7Shooting Video
The still photography capabilities of your Mavic Air 2 or Mavic Air 2S may be amazing, but their video features are even more remarkable. In video mode, your “Tripod in the Air” becomes a “SteadyCam in the Sky,” capable of capturing a variety of cool cinematic moves automatically, and dozens of other impressive video shots manually. It can shoot Full HD (high-definition) and 4K (ultra-high-definition) clips, plus 5.4K (with the Air 2S) and 2.7K resolutions at your choice of frame rates. Slow-motion and fast-motion video are also available. Advanced users will love the Mavic’s ability to use profiles to tailor color, saturation, sharpness, and some video-centric attributes using the color-grading tools of a video editor.
This chapter provides an introduction to video shooting, with the recreational drone pilot in mind. I’m going to show you how to practice a full range of useful manual maneuvers, and describe the automated QuickShot features and MasterShot (an Air 2S-only option). You’ll easily be able to capture compelling clips you can show as-is, or edit into complete mini-productions.
If you’re a serious videographer interested in incorporating drone video into your movies, you’ll want to check out the entire books dedicated to the techniques of video, and sample some of the YouTube tutorials. It’s not really possible to cover all the video capabilities of your drone, so my goal is to help video neophytes engage with what is one of the most interesting capabilities of the Mavic Air 2 and Air 2S aircraft.
Preparing to Shoot Video
Whether you’re looking to record informal clips of the family on vacation, the latest viral video for YouTube, or a set of scenes that will be painstakingly crafted into a cinematic masterpiece using editing software, your Mavic drone will perform admirably.
The first step is to switch the drone to video shooting mode within the DJI Fly app. Just follow these steps:
- 1.Access shooting mode. When connected to the aircraft using the DJI Fly app, tap the Shooting mode icon located at the right edge of the screen, just above the Shutter/Recording icon, as seen in Figure 7.1. The Air 2 version is shown at left in the figure and the Air 2S version at right. The screens are very similar, except that the Air 2 has an additional HDR Video icon and the Air 2S offers MasterShots in addition to QuickShots.

Figure 7.1 Select Video shooting with the Air 2 (left) and Air 2S (right).
- 2.Choose Video. Tap the video camera icon in the middle column and the available Video mode icons will appear in the left-most column.
- 3.Select Auto or Pro mode. Both Auto and Pro adjustment modes are available for video shooting. As I’ll explain shortly, you’ll have more options in Pro mode.
- 4.Choose video parameters. In Auto mode you can choose video resolution, frame rate, and add or subtract exposure compensation. In Pro mode, you can also select shutter speed, aperture, and ISO. I’ll describe these options in the following sections.
Resolution and Frames Per Second
Two of the parameters you’ll need to specify before shooting video are resolution and frames per second. You can access these settings by tapping on the RES&FPS label in the lower-right corner of the DJI Fly screen, as seen in Figure 7.2. Both are also available from the System Settings menu represented by three dots in the upper-right corner of the screen. (See Figure 7.3.)
Resolution is the dimension, in pixels, of each individual video frame, while the frames-per-second setting determines how many individual images (frames) are captured per elapsed second. I’m going to explain them and tell you why each individual value is important.

Figure 7.2 Select video resolution and frame rate.

Figure 7.3 Video resolution and frame rate can also be specified from the Camera tab of the System Settings screen.
Resolution
The kind of high-definition video drone pilots shoot always uses a consistent aspect ratio of 16:9. (Wide-screen motion pictures intended for theaters may use other proportions, such as 1.85:1.) Resolution is expressed in terms of the width times the height of the frame. Because the proportions are fixed, video resolution is sometimes expressed using only the height: 720p, 1080p, 3840p, and so forth. The “p” means that progressive scan was used (each line of pixels, top to bottom, are captured one after another), rather than using interlaced scan (odd-numbered lines captured first, then even-numbered lines). Common resolutions include:
- ■1280 × 720. Standard HD. This lowest-resolution HD format is on the way out, and neither the Mavic Air 2 nor Air 2S can capture video at this resolution, although the Air 2 transmits 720p video for display on your controller.
- ■1920 × 1080. Full HD. This is the minimum resolution used by most television screens and computer monitors, although a few 720p devices are still sold. It was the standard video resolution for a long time, but it is rapidly being replaced by higher-definition devices.
- ■2688 × 1512. 2 .7K. This resolution is useful for advanced users working with video-editing software. It enables you to crop a 1920 × 1080 region to improve the composition of a scene. Videographers sometimes like to “overshoot” and then decide in post-processing how to frame the image. Some believe that video captured at a higher resolution and then downsized looks better. Improvements from using 2K clips are likely to be minimal.
- ■3840 × 2160. 4K. This resolution used by the Mavic drones is on the way to becoming the new “minimum” standard, with more devices and streaming services supporting it. It’s sometimes called Ultra High Definition (UHD), although 8K video currently shares the UHD designation. Note that digital cinema defines 4K as 4096 × 2160—256 pixels wider than your Mavic’s 4K mode.
- ■5472 × 3078. 5.4K. You can capture 5.4K video with the Mavic Air 2S only. Its availability exists for the same logic as 2.7K resolution. You can crop 5.4K video down to 4K resolution, or, theoretically, end up with slightly better quality 4K using downsizing. The editor must know what they are doing and choose the appropriate encoder settings.
- ■7680 × 4320. 8K. Your Mavic cannot capture conventional video at this high-end resolution. While it’s making inroads in terms of devices able to handle it, right now 4K remains the mainstream video resolution of choice.
Frame Rates
Frame rates are the number of individual images captured per second. As I mentioned earlier, your Mavic drones do not use interlaced scanning, in which odd-numbered lines (lines 1, 3, 5, 7, and so forth) are captured with one pass, and then the even-numbered lines (2, 4, 6, 8, and so forth) are grabbed. Instead, video is captured using progressive or sequential scanning. This happens at a rate of 20, 60, or 120 frames per second, corresponding to the number of video fields captured. Two additional frame rates—24 and 48 fps—are available for shooting the so-called “cinematic” look, which I’ll explain shortly.
All these numbers apply to the NTSC television system used in North America, Central America, parts of South America, and in Japan, South Korea, and some other countries. Other places, including Europe, most of Asia, Oceania, and Africa, and parts of South America use PAL, where the nominal scanning figures are 25/50/100 rather than 30/60/120. I used the term nominal because the actual frame rates may technically be slightly different. You’ll sometimes see 23.976, 29.970, or 59.940 progressive scan frame rates. In practice, the nominal figures are good enough.
Your choice between 30/60/120 fps (NTSC) or 25/50/100 fps (PAL) and 24 or 48 fps is determined by what you plan to do with your video. The short explanation is that, for technical reasons I won’t go into here, shooting at 24 fps gives your movie more of the “cinematic” look that film would produce, excellent for showing fine detail. However, if your clip has moving subjects, or you pan the camera, 24 or 48 fps can produce a jerky effect called “judder.” The 30 and 60 fps (or 25 and 50 fps) options produce a home-video look that some feel is less desirable, but which is smoother and less jittery when displayed on an electronic monitor. I suggest you try each type and use the frame rate that best suits your tastes and video-editing software. Note: As I’ll explain later, the shutter speed you use can also contribute to a jerky look when the speed is too fast for a particular frame rate.
When video is played back at the same frame rate at which it was captured, the motion appears at normal speed. If the clip was captured at a higher speed (such as 120/100 fps), action seems to be moving in slow motion. Image-editing software can be used to seamlessly meld slo-mo video with normal video as a special effect. Interestingly, when you play back video at a speed that is faster than the speed at which it was captured, you get speeded up motion with a time-lapse look. That’s what your drone’s Hyperlapse setting does. Individual frames are captured at intervals greater than the 24/30 fps norm so that, when played back, the motion is speeded up and somewhat frantic in appearance.
Available Settings
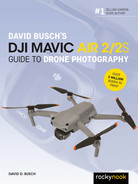
Given the previous list of common video resolutions, you’ll want to know that there are some significant differences in the video capabilities of the Mavic Air 2 and Air 2S. Both aircraft can capture 4K, 2.7K, and Full HD video at the common frame rates of 24, 25/30, 48, and 50/60 frames per second. If you want to go beyond 4K, the Air 2S can capture 5.4K video using the full width of the sensor.
The Air 2 has three additional modes: 4K, 2.7K, and FHD HDR (High Dynamic range) options, which provide the ability to capture detail in 8-bit video within an extended range of colors and tones. The Air 2S offers even better dynamic range options using 10-bit D-Log and 10-bit HLG capture. (More on those later, too.)
The older Air 2 boasts an 8K “hyperlapse,” feature, a time-lapse-like capture in which a feeling of motion is added by moving the camera slightly between frames. While 8K hyperlapse sounds cool, it has proved problematic and overly demanding on computer systems, so the Air 2S limits the feature to a more practical 4K resolution. In all cases, the same transfer rates are used for the available resolutions. The Air 2 transfers video to internal memory or a memory card at up to a 120 Mbps transfer speed; the Air 2S can handle slightly faster rates of up to 150 Mbps speeds. The resolutions and frame rates are displayed in Table 7.1, originally shown in Chapter 1.
 | NOTE APAS 4.0 is not available while using Intelligent Flight modes such as QuickShots and MasterShots, or when capturing video at high resolutions (5.4K 24/25/30 fps; 4K 48/50/60 fps; 2K 48/50/60 fps; or FHD at 120 fps). ActiveTrack, described later in this chapter, is not available in 5.4K mode. |
Video Settings
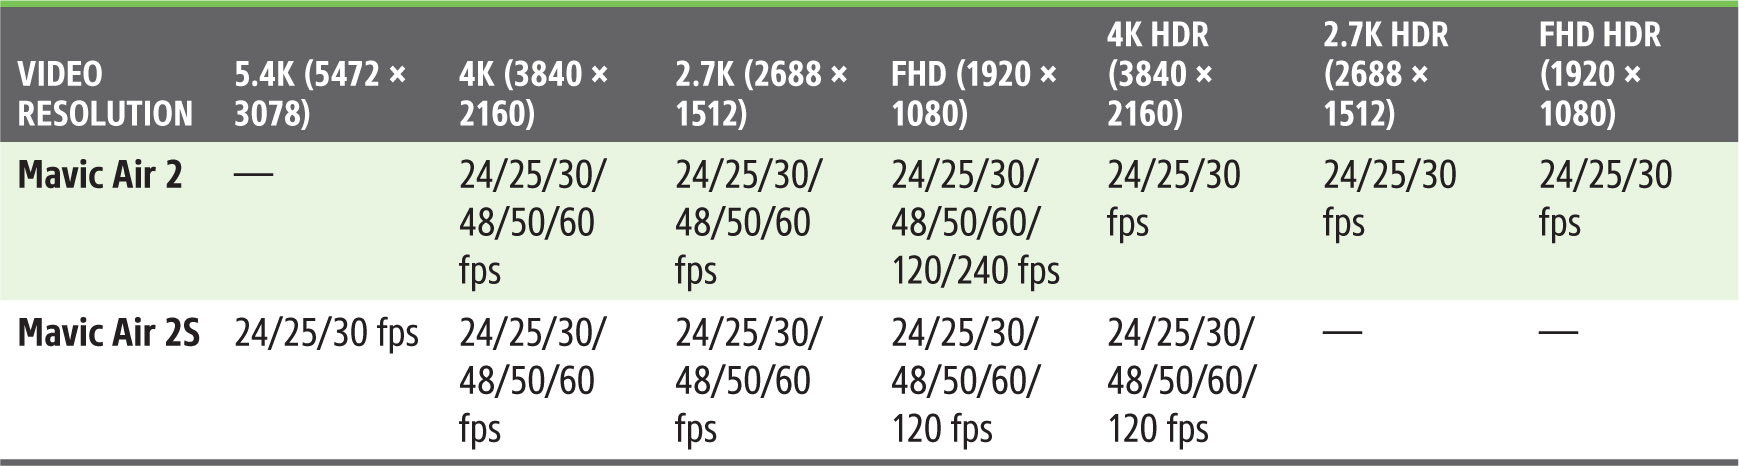
The key video settings of the Mavic Air 2 and Air 2S are similar, although presented in a different order within the System Settings menu. (See Figure 7.4.) I’ll explain each of them in the following sections. The basic settings include:
- ■Format: MP4, MOV. These are the container files that hold the video data, as I’ll describe shortly.
- ■Color: Normal, D-Log, HLG (Air 2: Normal, D-Cinelike). These are your color profiles, also described shortly.
- ■Coding Format: H.264, H.265. These are the codecs (coder/decoder) used.
Format
Both MP4 and MOV are multimedia file storage formats which serve as digital container files that hold compressed video data, audio tracks, still images, subtitles, and metadata needed to play back the video. You can select which format to use in the Systems Setting menu, or from the main screen, as shown in Figure 7.5. Both encode their contents using the MPEG-4 codec (coder/decoder). You can think of container files as a library shelf that may contain DVDs, audio CDs, photo albums, and a card catalog telling you where to find each and how to access them. The container is not the video itself, but, rather a place where the video and its components can be stored.
MP4 is an international standard and the most widely used video format and is compatible with a vast range of devices, software, and streaming platforms. It uses lossy compression to save space and can be smoothly translated to MOV as long as the same codec (such as H.264, described shortly) was used for both.
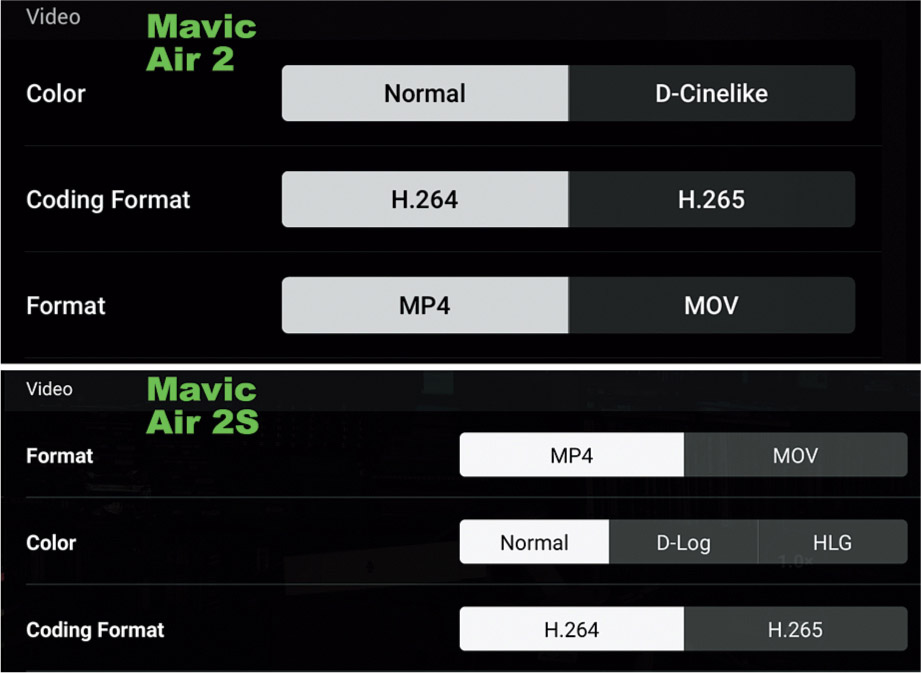
Figure 7.4 Format, Color, and Coding Format settings.

Figure 7.5 Choose MP4 or MOV formats.
MOV is a proprietary format developed by Apple for use with its QuickTime multimedia framework back in 1991. Although Apple ceased support for QuickTime more than five years ago, MOV lives on, because MOV files are less compressed than MP4 and sometimes higher in quality. They may be better for editing on Mac platforms, but most software can handle both MOV and MP4 and convert between them. YouTube and Vimeo video-hosting services accept both.
Color (Profiles)
By Color, in this case, DJI actually means something you can think of as video color profiles. Profiles are a way of adjusting the tonal values of a video as it is captured to produce a desired range of values and dynamic range. When processing the resulting footage in an image editor, a technique called color grading can be applied to produce the widest possible range of detail in shadows, highlights, and midtones. Color grading is a skill to be mastered in itself, but when used well, results in stunning video. DJI offers two different profiles with the Air 2—Normal and D-Cinelike—and three with the Air 2S: Normal, D-Log, and HLG, as shown in Figure 7.6.

Figure 7.6 Select a color profile here.
If you’ve been taking photos for a while, you’re probably familiar with all the fixes and tweaks you can do with your still images within image editors like Photoshop. It’s relatively easy to adjust color tones, contrast, sharpness, and other parameters prior to displaying or printing your photo.
Movies are a little trickier, because any given video typically consists of thousands of individual photos, captured at 24 frames per second (or faster), with the possibility that each and every frame within a particular sequence might need fixes or creative adjustments.
Fortunately, shooting video does not preclude doing post-processing during editing. Indeed, many videographers deliberately shoot relatively low-contrast video in order to capture the largest dynamic range possible, and then fine-tune the rendition later using their editing software. The profiles offered by the Mavic Air 2 and Mavic Air 2S allow you to adjust your camera so that the video you capture is somewhat pre-fine-tuned in order to reduce or eliminate the amount of post-processing you do later.
Needless to say, creating and using profiles is a highly technical aspect of video making, at least in terms of the amount of knowledge you need to have to correctly judge what changing one of the parameters will do to your video. I hope to get you started with a quick description of what those parameters do, so you’ll have a starting point when you start to explore them.
Thanks to our evolutionary heritage, humans don’t see differences in tones in a linear manner. An absolutely smooth progression of pixels from absolute black to pure white (with 0 representing black and 256 representing white) would not look like a continuous gradient to our eyes. We’d be unable to detect differences in shadows and highlights that have the same change in tonal values as midtones. So, everything from computer monitors to printers use a correction factor (gamma) to cancel out the differences in the way we see tones.
This correction takes the form of a curve, called a gamma curve. If you remember your geometry, the x and y axes on a graph are used to define the shape of a curve, and in the case of gamma curves, the values use logarithmic units (ack!) to define the slope. That’s where the term D-log comes from. The whole shebang is needed to reconcile the ability of sensors to capture, video systems to display, and printers to output a range of tones in a linear way with the actual tones we perceive non-linearly. Gamma correction and gamma compression are used to help make sure that what we get is what we see. While gamma correction between computer platforms (that is, between Macs and PCs) may be different, the actual gamma values defined by video standards like NTSC and PAL are fixed and well-known. Profiles allow you to configure your camera to capture video using a desired amount of gamma and color tone correction, and then make adjustments during color grading.
Video signals normally encompass brightness levels from 0 percent to 109 percent (you read that right: modern video cameras can record detail in highlights that are actually brighter than was possible when the video age began; the old scale was retained, reminiscent of Nigel Tufnel’s 11 setting on his amp). However, even the 109 percent provides too much of a limitation; cameras can capture detail in highlights that are even brighter than that. So, a log gamma curve like D -log is used to compress all that image detail to fit into the space allowed for conventional video signals. Post-processing in a video editor allows working with all that information and produces a finished video that contains the filmmaker’s selection of tonal values in a form that can be displayed comfortably. The full dynamic range can be used to produce the finished movie. You might find that useful when exposing for highlights while avoiding blowing out the sky, or for capturing detail in shadows without losing midtones and highlights. The next sections will help you understand your profile choices with the Air 2 and Air 2S.
Normal
As you might expect, Normal is the default, unaltered video profile, which produces great results with a generous range of tones, even when shooting video that encompasses a fairly bright sky and darker subject matter on the ground. It provides bright, saturated colors and excellent contrast under most conditions. It looks good and is ready to use or edit with no additional processing, unlike the optional color profiles, which produce very, very flat footage prior to grading.
The Normal color profile is frequently the best option for amateur drone pilots who want ready-to-use aerial footage. However, Normal videos may lack some of the fine detail contrast and dynamic range improvements found in professional video.
D-Cinelike (Air 2 Only)
D-Cinelike offers a flatter, more muted color profile for Air 2 users than Normal. However, it is able to capture a longer dynamic range than Normal, with improved contrast and detail. It prevents highlights from being too bright or washed out, and avoids inky shadows, which can be a particular problem late in the day when the sun is low in the sky. You’ll end up with fewer image areas that are completely white or black, with the brightest highlights becoming slightly darker and darkest shadow brightened a bit.
Straight out of the camera, your D-Cinelike video will have lower contrast and appear duller. However, the color grading process for D-Cinelike footage can be considered fairly simple, often requiring just a few changes to exposure and saturation to produce crisp footage.
D-log (Air 2S Only)
D-Log is a 10-bit log gamma curve that is used when the video will be processed after shooting and captures a much larger range of tones than standard gamma curves. It’s available only when using the H.265 coding format (explained shortly). A 10-bit video can capture up to 1.07 billion colors compared to only 16.7 million colors with the Normal 8-bit color depth. Indeed, the tones captured using D-log can’t be displayed in all their glory on a standard TV, monitor, or other device, which are generally adjusted for the broadcast television BT-709 standard.
Instead, the unprocessed video will look darker and lower in contrast because all those tonal values have been squeezed into the BT-709 (also called REC-709) range. Fortunately, when you select D-log, a new Color Display Assist option appears on the screen, as seen earlier in Figure 7.6. When activated, when you view your footage using the DJI Fly app on your controller’s screen, you’re provided with a partially corrected preview image that approximates what your video can look like after appropriate processing.
You’ll discover that D -log video may be your best choice if you’re willing to learn and use color grading. Like D-Cinelike video, your D-log footage will lack contrast and saturation and appear to be dull and flat straight out of the camera. However, D-log on the Air 2S can be considered an upgrade, because it is able to capture more highlight detail without rendering shadow areas too dark, and gives you access to a broader range of post-processing tools.
For example, the editing software you use may include a better selection of LUTs (Lookup Tables), used to enable correcting brightness, saturation, and hue as you work with the expanded dynamic range. LUTs are arrays of preselected values that map the colors contained in the original captured input to the desired colors of the final video. Each RGB value is assigned to a single combined value in the table. You can use the LUTs to perform color grading with software including Adobe Premier Pro CC, Apple Final Cut Pro X, and BlackMagic Design DaVinci Resolve 15, and transform washed-out footage into clips that are more saturated and contrasty, or, in other cases to produce a particular effect, such as “day for night.”
You’ll want to keep in mind that your Mavic’s digital zoom feature (discussed later in this chapter) is not available when using D-log (nor with HLG or 1080p at 120 fps) because those three modes are all very data-intensive.
HLG (Air 2S Only)
HLG stands for Hybrid-Log Gamma. Originally developed specifically for broadcasting and streaming, it produces vivid colors, along with excellent shadow and highlight detail. HLG might actually be a good choice to use the MOV format, which uses less compression and more shadow, highlight, and color information. Remember that MOV is more demanding on your computer and works best with systems that have a lot of RAM and a fast microprocessor.
HLG was conceived to overcome the limitations of HDR video. HDR is probably more familiar to you, and it came first. Note that HDR, when applied to video, is not the same thing as HDR for stills (which requires multiple exposures combined into one final image). HLG/HDR video is produced by extending the dynamic range of the original captured frames.
One problem with the original implementation of HDR video is that it could only be displayed on an HDR-capable television. So, two of the biggest gorillas in the broadcast industry, BBC and NHK, developed Hybrid-Log Gamma, which produces video that can show HDR content on non-HDR displays. Direct the same video to a 4K television with HLG/HDR support, and it will play back with the increased contrast, brighter highlights, and larger color gamut possible with high dynamic range video.
Where a Normal profile is ideal for fast, simple workflow, and D-log for professional video editing in post-production, HLG remains somewhere in between. As I mentioned earlier, the zoom feature is not available with HLG because your drone needs to concentrate all its processing power on capturing the HLG footage. Nor can you use the H.264 format at the highest resolution 5.4K setting.
Coding Format
Here you’ll select one of two widely used video compression standards, or codecs (coder/decoder), shown earlier in Figure 7.5. Your choices include:
- ■H.264. Also known as MPEG-4 Part 10 or Advanced Video Coding (MPEG-4 AVC), it compresses video so it requires only half the storage space or transmission bandwidth of MPEG-2, with the same video quality. Used with the Normal profile, it can be used to produce video quickly when you need fast turnaround. It is your best choice if you have a slow computer, don’t want to use color grading, and will be working with MP4 to get the highest degree of compatibility. However, if you’re shooting 5.4K or 4K, the file sizes will be larger and more demanding of your computer’s power.
- ■H.265. For the best quality, you’ll want to use H.265, also known as H.265/HEVC (High Efficiency Video Coding), even when using the Normal profile. It uses less compression, but can produce 10-bit files with a maximum amount of information, which comes in handy when doing color grading. However, you’ll need a fairly powerful computer to edit any footage you capture using this codec.
Exposure Considerations
I covered the elements of exposure in Chapter 5, and pretty much everything written there applies equally to shooting video. In general, you can apply the same exposure compensation/EV adjustments, white balance settings, histogram interpretation, and other parameters you use for still photography to capturing videos. In Auto mode, the drone will select shutter speed and ISO setting for you, but you can still compensate with EV adjustments. In Pro mode, you can select shutter speed, ISO, and EV adjustments yourself. I won’t repeat the other discussion of exposure in Chapter 5 here. However, two particular aspects of exposure control have special significance for videography. One of them is the need for consistent exposure while shooting. The other is the use of shutter speeds, and returning to that topic also calls for revisiting my earlier discussions on working with neutral-density filters.
Consistent Exposure
If most of your previous experience has been in shooting stills, you may not have given a lot of thought about why exposure consistency may have much more importance when capturing video. Every photographer wants to achieve well-exposed stills and video, and knows that exposure itself is an important tool in creating the look and mood of a finished image or video sequence. You may want a dark and gloomy look, or a bright high-key atmosphere. If your exposure is a bit off, it can often be corrected using an image editor, video editor, or during color grading of movie footage.
Where video shooting differs from stills is the need for exposure consistency and continuity during and between shots. If a scene or an intercut sequence is suddenly darker, lighter, or has different lighting, the difference can be as jolting as the appearance of a Starbuck cup on a dinner table in Westeros.
You’ll have lots of opportunities to put your experience to work. For example, you can also lock exposure to keep the same exposure settings as lighting changes or you reframe your scene from the air. Occasionally, you may find that you start having an exposure problem during recording; this might happen when pointing the lens toward a light-tone area that causes the camera to begin underexposing. Don’t let that happen. Before pointing the camera toward a backlit area, lock the exposure. This will prevent the exposure from changing as you point the lens toward the backlit part of the scene. This is preferable to waiting until an underexposure problem starts and then setting plus exposure compensation that suddenly makes the video brighter.
If you’re producing any sort of ambitious amateur or professional video, you’ll want lighting and exposure to remain consistent, when need be, from shot to shot. It’s up to you to decide whether to use your drone’s autoexposure and auto ISO modes, and tools like Zebra, or to make the necessary adjustments manually.
Once you realize that your video is not a still photograph, or even a series of still photographs, but, instead is the capture of a series of moments in time, you’ll put exposure consistency and continuity at the top of your list of priorities.
Appropriate Shutter Speed
Your Mavic drone has a fixed f/2.8 aperture, so, as I described in Chapter 5, you must control exposure using only shutter speed and ISO, supplemented by neutral-density filters when even the lowest ISO setting won’t let you choose the desired shutter speed. You have several options, which I introduced in Chapter 5:
- ■Auto ISO/Manual shutter speed. You select a shutter speed and the drone will choose an ISO sensitivity that will provide the correct exposure.
- ■Manual ISO/Auto shutter speed. You choose a fixed ISO sensitivity and allow the camera to adjust the shutter speed to arrive at an appropriate exposure.
- ■Exposure compensation. In either of the modes listed above, you can override the automatic setting by applying a plus/minus EV adjustment, as seen in Figure 7.7.
- ■Manual ISO/Manual shutter speed. You select both yourself.

Figure 7.7 You can use EV settings to adjust video exposure, too.
As I’ve mentioned in earlier chapters, the choice of a shutter speed for video is not as simple as you assume. You might think that setting your camera to a faster shutter speed will help give you sharper video frames. Actually, it will, but that’s frequently not a good thing. In most cases it’s best to leave the shutter speed at no more than double the frame rate (in other words no higher than 1/50th to 1/250th second) and allow the overall exposure to be adjusted by varying the ISO sensitivity or by using a neutral-density filter.
A “slow” 1/30th- or 1/60th-second shutter speed doesn’t mean your movies will have the same amount of blur that a typical still photograph will have using those shutter speeds. We don’t normally stare at a video frame for longer than 1/30th or 1/24th second, so while the shakiness of the camera can be disruptive (and usually corrected by the image-stabilization feature), if there is a bit of blur in our subjects from movement, we tend not to notice. Each frame flashes by in the blink of an eye, so to speak, so a shutter speed of 1/30th or 1/60th second works a lot better in video than it does when shooting stills.
Indeed, higher shutter speeds actually introduce problems of their own. If you shoot a video frame at 30 fps using a shutter speed of 1/250th second, the actual moment in time that’s captured represents only about 12 percent of the 1/30th second of elapsed time in that frame. Yet, when played back, that frame occupies the full 1/30th of a second, with 88 percent of that time filled by stretching the original image to fill it. The result is often a choppy/jumpy image, and one that may appear to be too sharp.
In addition, because we are accustomed to viewing Hollywood productions that use slower shutter speeds, we expect to see a bit of blur to smooth out the transitions as an object moves within the video frame. It’s thought that this effect is more social imprinting than scientific: we’ve all grown up accustomed to seeing the look of movies that, by convention, were shot using a shutter speed that’s half the reciprocal of the frame rate (that is, 1/48th second for a 24 fps movie). Movie cameras use a rotary shutter (achieving that 1/48th second exposure by using a 180-degree shutter “angle”), but the effect on our visual expectations is the same. For the most “film-like” appearance, use 24 fps and 1/60th second shutter speed.
Faster shutter speeds do have some specialized uses for motion analysis, especially where individual frames are studied. The rest of the time, 1/30th or 1/60th of a second will suffice. If the reason you needed a higher shutter speed was to obtain the correct exposure, use a slower ISO setting, or a neutral-density filter to cut down on the amount of light passing through the lens. A good rule of thumb is to use 1/60th second or slower when shooting at 24 fps; 1/60th second or slower at 30 fps; and 1/125th second or slower at 60 fps.
Working with ND Filters
I covered neutral-density filters in considerable detail in Chapter 5, so you should just need a reminder of how important they are when shooting video. The lowest ISO sensitivity setting available for your Mavic drone is ISO 100. With a typical daylight scene, shutter speeds will rarely be slower than 1/750th second at ISO 100. So, if you want the best cinematic effect, you’ll need at least a 4-stop ND filter to reduce a 1/750th-second shutter speed to the 1/50th-second range suitable for a 24 fps frame rate. The ND filter sets packaged with the Air 2 and Air 2S both include 4-stop filters, labeled ND16. (Remember that the density of these filters doubles for each stop reduction; four stops: 2 × 2 × 2 × 2 = 16.)
To give yourself a little wiggle room under bright conditions, you might want to use an ND filter with more density, such as an ND64 or ND128 (6 and 7 stops). Such filters can help retain a desired shutter speed even under brighter conditions at ISO 100; in dimmer light, they’ll continue to do the job. You’ll just need to boost the ISO sensitivity, say, to ISO 200 to 400 to produce the appropriate exposure with little quality loss due to the higher sensitivity setting.
In practice, you can probably skip using an ND filter entirely for fairly static video clips with limited movement of the drone and your subject matter. Lacking motion, any jerkiness caused by a fast shutter speed may not be noticeable. But once you start doing fly-bys or fly-overs of any type, you’ll want to have an ND filter in place to preserve the smooth cinematic look.
As I mentioned in Chapter 5, the Mavic Air 2 and Mavic Air 2S Fly More combos include sets of ND filters: ND16, ND64, and ND256 (4, 6, and 8 stops) for the Air 2, and ND4, ND8, ND16, and ND32 filters (2, 3, 4, and 5 stops) for the Air 2S. DJI sells an expanded set for the Air 2S with ND64, ND128, ND256, and ND512 filters (6, 7, 8, and 9 stops), and third-party vendors offer ND filters alone, in combinations, or in variable neutral-density filters that use a rotating ring to achieve up to 9-stop density. Some ND filters are sold that double as polarizers. Specialized split ND and graduated ND filters can help balance a bright sky with a darker foreground.
Using Digital Zoom
Neither the Mavic Air 2 nor Air 2S have an optical zoom lens to provide adjustments to the field of view. Their cameras have fixed focal length lenses with a wide-angle perspective equivalent to a full-frame camera’s 24mm (Air 2) or 22mm (Air 2S) lens, both with a fixed f/2.8 aperture.
Depth-of-field (the range of sharp focus) extends from 39 in/1m to infinity (Air 2) and 24 in/0.6m to infinity (Air 2S). You generally won’t be capturing images at a distance of one meter or less, so effectively, every still photo or video you capture should have an acceptable range of sharp focus.
Although your drone has a fixed focal length lens, the Mavic Air 2 does have a special 4K movie resolution called 4K Wide, which produces a 100-degree field of view, the equivalent of an 18mm lens on a full-frame camera. That’s considerably wider than the 84-degree field of view offered by the Air 2’s 24mm (equivalent) lens. That extra-wide perspective is available only when shooting 4K video, and never when capturing stills, which do have an even more versatile panorama feature. Even so, the 18mm wide angle can be useful when you need to shoot from a certain position and require a bit of extra coverage without backing up or changing altitude. In practice, what you’re most likely to need will be the ability to zoom in when necessary.
However, both the Mavic Air 2 and Air 2S can, in video mode only, simulate an optical zoom by enlarging a cropped area of the sensor to fill the frame. While this cropping reduces the resolution and image quality of the area captured, it does allow zooming in to produce an enlarged image from the same aerial position.
The reason why this feature is available only in video mode is that the ability to vary the camera’s field of view through zooming is most important in video shooting. Still photos can easily be cropped in an image editor to provide the desired perspective, and the Mavic’s panorama feature substitutes for having a wide-angle lens. But with video, what you see is generally what you get—unless you can create a zoom effect in some way.
The Mavic Air 2 originally shipped without a zoom feature; it was added with a firmware update on August 10, 2020. The Air 2S has had zoom capabilities since it was launched. With either aircraft, zooming is possible when using any movie resolution except 5.4K (Air 2S) and 4K Wide (Air 2) and either the Normal or D-Cinelike (Air 2) profiles. You can’t zoom when using D-log or HLG, or with the 120 fps frame rate.
When a circle with a zoom ratio (1X, 4X, etc.) appears to the upper left of the Record icon on the controller screen, you’ll know zooming is available. If it does not appear, as shown in Figure 7.8, left, then you’ve chosen a conflicting resolution, profile, or frame rate, and must adjust the errant parameter. There are three ways to zoom:
- ■Tap Zoom ratio icon. Tapping the icon repeatedly will cycle among the available zoom settings. The live display on your controller’s screen will zoom to reflect the new zoom setting. (Check out Figure 7.8 left again.) Only whole increments (e.g., 2X, 4X, etc.) are available in this mode.
Figure 7.8 Tap the Zoom ratio icon to zoom in whole increments (left), or use a sliding scale (right).
- ■Press and hold the Zoom ratio icon. As you press a finger on the icon, a zoom scale will appear, as seen in Figure 7.8, right. You can slide up and down to change the Zoom setting. The equivalent focal length appears next to the scale. You can choose any intermediate equivalent focal length between the whole increments as you slide.
- ■Use your controller’s “Zoom” Dial. With the DJI RC-N1, hold down the Fn button on the left side of the controller while rotating the Gimbal Dial. (The dial will tilt the gimbal if the Fn button is not held down.) If you’re using the DJI RC or DJI RC Pro, just rotate the Camera Control (Zoom) Dial on the right top of the controller; no button press is necessary. The location of these controls was shown in Chapter 3. You can select any of the intermediate focal lengths when using this method.
Table 7.2 shows the maximum zoom ratios available. Note that for zooming in 4K, the Air 2 must be set to the 4K Zoom resolution and not the 4K Wide resolution. Typical maximum zoom ratios for the Air 2S are shown in Figure 7.9.

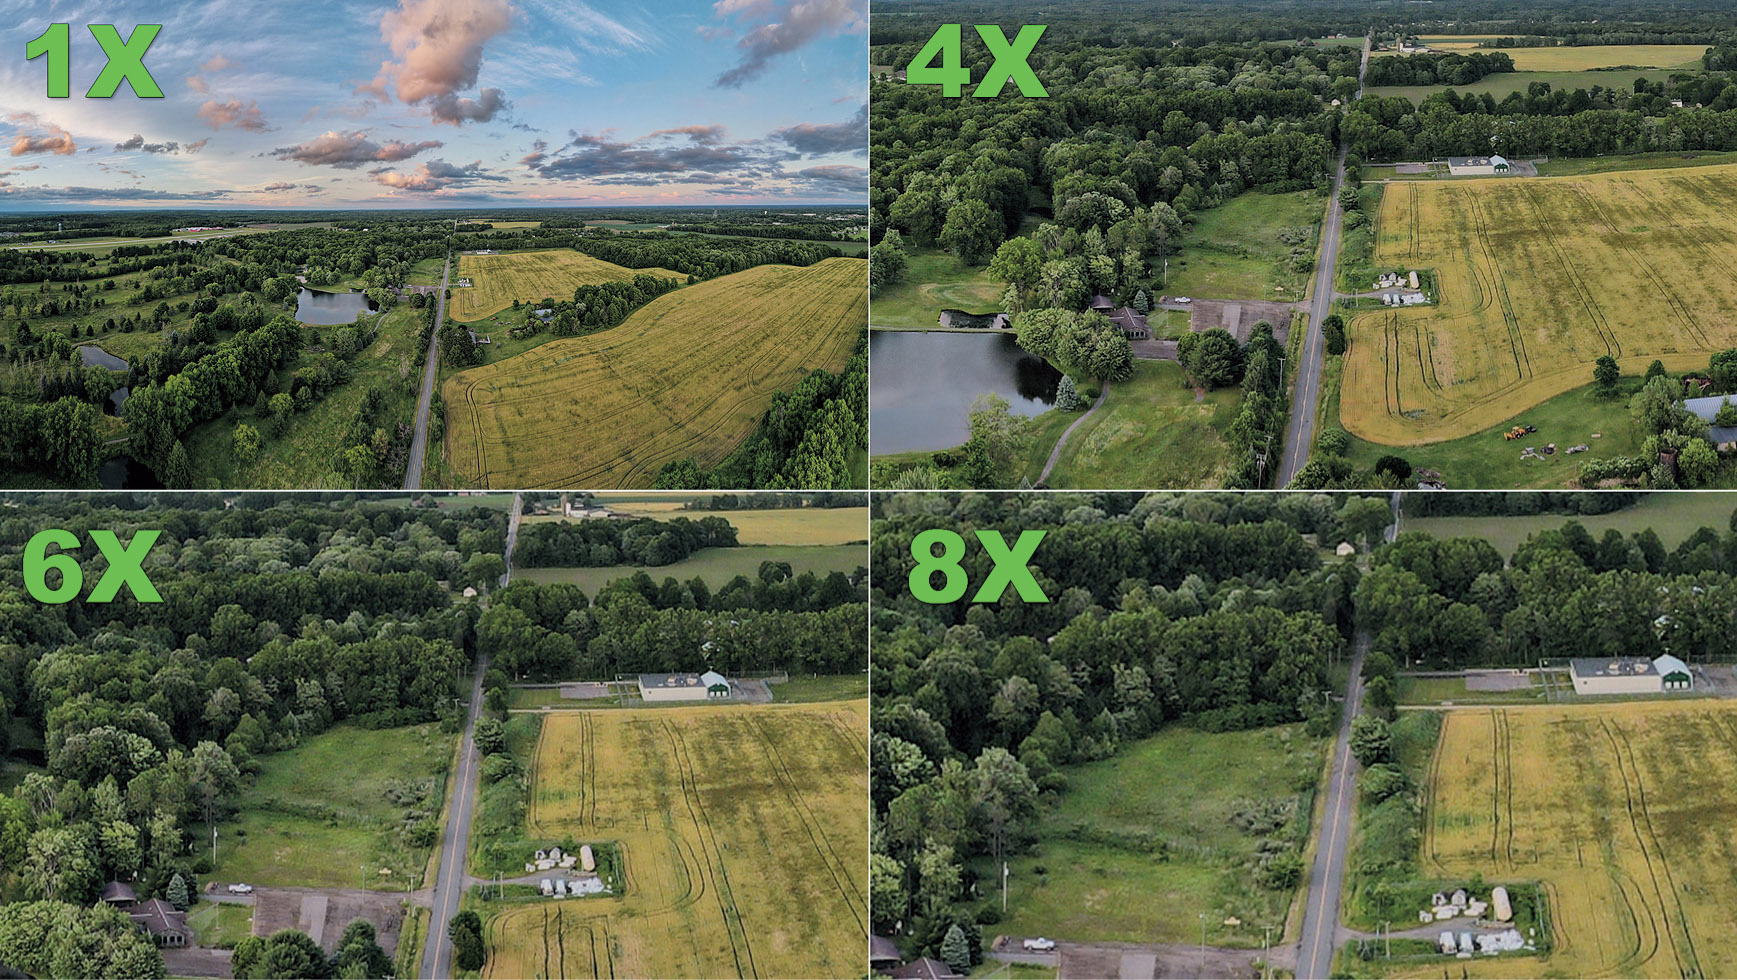
Figure 7.9 Typical Zoom factors.
Zoom Effects
Now that you know how to “zoom” with your drone, what do you do with it? In general, it’s a good idea to limit the zoom sequences you capture, especially while recording. It can be useful to be able to adjust the field of view and zoom in between shots to provide different perspectives, although having a scene suddenly appear larger can be disconcerting. You’ll probably want to reposition your aircraft between takes at different zoom settings.
But zooming during a sequence can be even more jarring and may be reminiscent of techniques used in ’70s-era kung-fu movies. You’ll want to plan any zoom carefully, and use your drone’s Zoom Dial to get the smoothest zoom possible.
Of course, there are exceptions to every rule, and sometimes it takes a genius—or two of them—to find the exception. Cinematographer Irmin Roberts came up with something called a dolly zoom that was most dramatically used by Alfred Hitchcock in his 1958 film Vertigo. (It’s sometimes called the Vertigo Effect for that reason.) To achieve this effect conventionally, the camera and its mount are attached to a smooth track. In its most common implementation the camera is moved forward or backward on its track, closer to or further away from the main subject. The field of view is changed simultaneously using zoom, so that the subject remains the same size.
If the camera moves closer while zooming out, the background seems to grow and become more dominant. If the camera moves away while zooming in, the foreground subject is emphasized as the background grows relatively smaller. The effect can be striking and is often used to convey reactions to dramatic events.
Although the dolly zoom is most effective when combined with selective focus to isolate the foreground subject, you can apply it to your drone videography in many ways. It does take some practice, but so does maneuvering your aircraft with agility. Note that this effect works best with the Air 2S and the largest possible zoom range (which means shooting at 1080p and 24 or 30 fps to achieve 8X magnification). Just follow these steps:
- 1.Select a dramatic foreground subject. A large, impressive building or statue against an interesting background would be ideal. Personally, I’d try this using the Cristo Redentor, atop Corcovado mountain in Rio de Janeiro, if it were legal, I could afford it, and had the necessary skills.
- 2.Choose N (Normal) mode. Although this is a cinematic effect, oddly enough, Cine/Tripod mode won’t work too well, because the drone’s movement is too slow for a dramatic change. Conversely, Sport mode is too fast.
- 3.Hover at an appropriate distance. You’ll want to fill as much of the frame as you can with your subject.
- 4.Begin recording. Tap the Record button and begin capturing video. You can trim any excess footage at the beginning using your video-editing software.
- 5.Prepare to zoom. Hold down the Fn button if using the RC-N1 controller, and position your left index finger on the Gimbal Dial. If you’re using the DJI RC or DJI RC Pro controller, position the index finger of your right hand on the Camera Control Dial.
- 6.Zoom smoothly while flying backward. This is the tricky part. You’ll want to zoom in while pressing the right stick backward to move the drone in that direction. You’ll want to try and match the drones’ backward movement with the zoom-in effect so the main subject remains the same size. It’s not easy to rotate the Zoom Dial while coordinating backward flight. Be prepared to practice and also capture several takes until you get it right.
Cruise Control
Cruise Control is a useful cinematic feature that allows you to set your drone on a desired course, and then lock that behavior so the aircraft continues smoothly at the same pace. You can still make adjustments to the drone’s direction, altitude, and gimbal position, if you like. Cruise Control works best in conditions that are not too windy; it won’t produce the desired results if gusts are strong enough to exceed the Mavic’s ability to compensate.
Cruise Control has previously been available only when using the Hyperlapse Free mode (one of your drone’s automated video modes discussed later in this chapter). More recently, however, DJI has been making it available in normal video modes, too, with some of its other drones. I expect by the time this book is published it will be an option for the Mavic Air 2S and, possibly, the Mavic Air 2, as well, through a firmware update.
The feature is simple enough to use. You need to assign Cruise Control to a custom button, as I’ll show you shortly. Then, when your drone is aloft, after you’ve made your desired flight adjustments, you can activate your Mavic’s autopilot feature by pressing that button. A Cruise Control In Use message appears at left on the controller screen, next to an X you can tap to disable Cruise Control. (See Figure 7.10.) When the feature is enabled, you can concentrate on other aspects of the flight.
To set up Cruise Control on your drone, just follow these steps:
- 1.Access System Settings. Tap the three dots in the upper-left corner of the main controller screen to open the Systems Settings menu. Navigate to the Control menu, as seen in Figure 7.11.
- 2.Customize button. Tap the Button Customization option in the Control menu.
- 3.Select button. Choose the button you want to use to invoke Cruise Control. Although I’ve highlighted the C3 button (available on the DJI RC Pro controller) in the figure, you can choose any other programmable button. You might actually want to use one of the buttons on the back of the controller and avoid a front button that you could press by accident while using the control sticks.
- 4.Choose function. In the figure I’ve specified Hyperlapse Cruise Control. When the expected firmware update adds the full Cruise Control feature, that choice will appear as well.

Figure 7.10 Activate Cruise Control by pressing the defined custom button.

Figure 7.11 Adding Cruise Control to a custom button.
Manual Maneuvers
Although your Mavic Air 2 and Mavic Air 2S have powerful automated flight modes, including QuickShots and MasterShots, as you develop as a videographer it’s a good idea to become proficient with the most common manual maneuvers first. The following sections will introduce you to the basic exercises you’ll need to master to form the foundation of your video skill set. For consistency, all these exercises begin with the drone located at the bottom of the figure used as an illustration.
Box: Simple and Nose Forward
This is a great maneuver to practice once you’ve mastered flying in straight lines forward, backward, and to either side. After you’ve reached the desired altitude, you can execute the box pattern using only the right control stick. Press it to the right to move to the first corner of the box, pause, then press forward to the second corner. Then press left to the upper-left corner. Pull the stick back toward you to move the aircraft back, and finish by moving to the right to your original position. (See Figure 7.12.)
Next, repeat the box pattern, rotating the drone so its nose is always moving in the direction of travel. The maneuver is done in much the same way as the simple box, except that at each corner you’ll need to press the left control stick to the left to rotate the drone 90 degrees. (See Figure 7.13.) Practice this until you are able to execute the pattern smoothly. It takes some getting used to, because when the drone is returning to you, its left/right directions are reversed from your own.
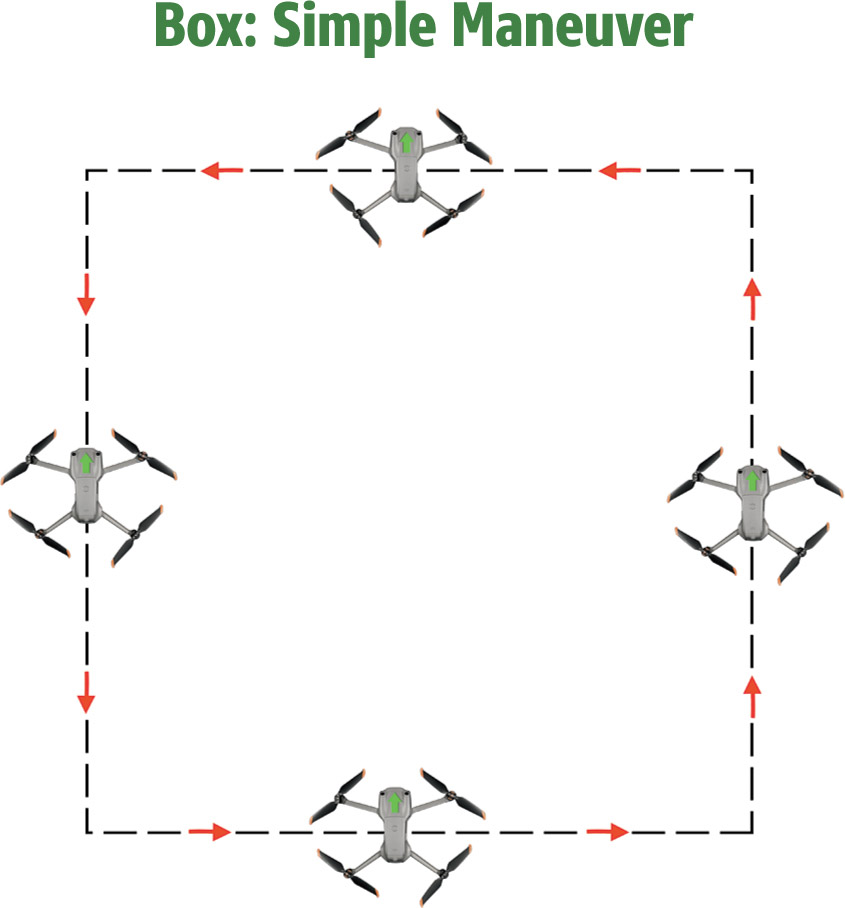
Figure 7.12

Figure 7.13
Circle: Simple and Nose Forward
Now you’re going to earn your wings! To execute a simple circle in the counterclockwise direction shown in Figure 7.14, you’ll need to use the right stick pressed evenly in a diagonal direction toward the right and forward so that the drone moves in an arc from the initial 6 o’clock position to the 3 o’clock position, then diagonally to the left and forward to reach 12 o’clock, before switching to press the right stick diagonally left/down and finishing with diagonally right/down to finish at your initial position. Practice doing large circles, then switch to smaller ones to refine your technique.
Keeping the nose of your drone facing in the direction of travel requires coordinating movement of the left stick left and right (to rotate; be sure to avoid any forward/backward motion, which changes the altitude) and the right diagonally stick forward/backward and left/right (to move around the circle in a counterclockwise direction). (See Figure 7.15.) Once you’ve mastered both types of circles, you can try the same maneuvers going clockwise. Take your time. Moving both control sticks simultaneously takes some practice.

Figure 7.14
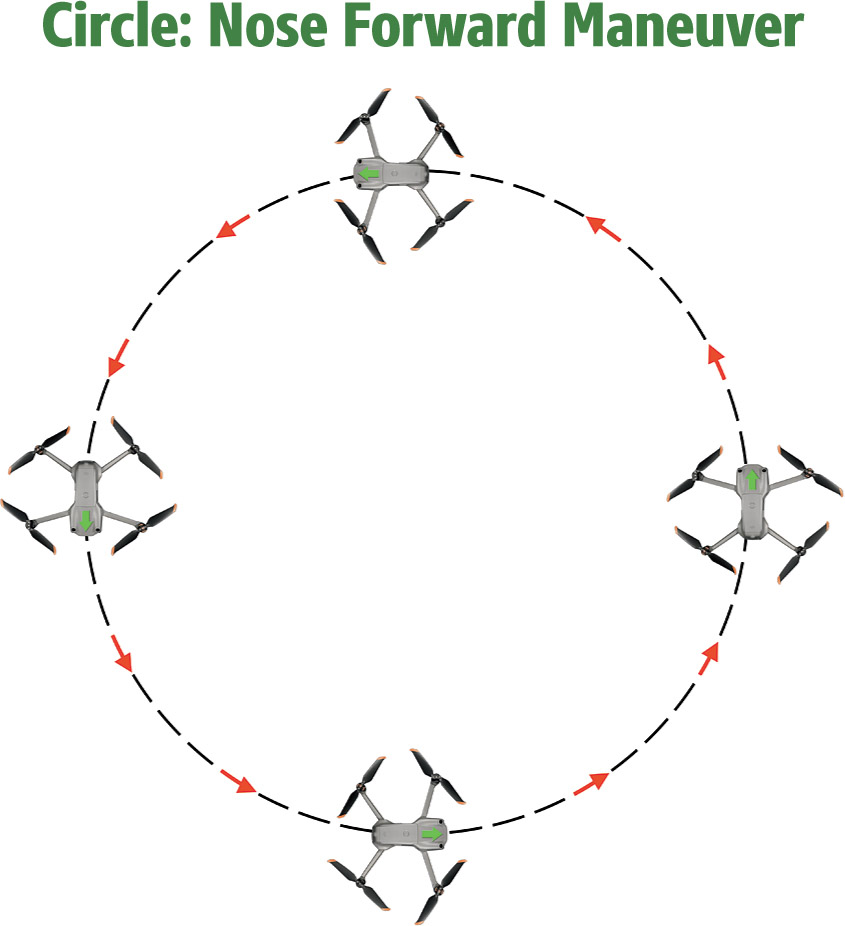
Figure 7.15
Figure 8: Simple and Nose Forward
There is method to all this madness! Once you’ve practiced your clockwise and counterclockwise circles, you’ll be ready to demonstrate your mastery by combining them to create a figure-8 pattern. The key is to fly in two s-shaped arcs. A simple figure 8 can be accomplished by flying the first right-hand half circle as you did for the circle pattern above, then, when halfway, reversing your movements to create a left-facing half circle over the top to finish off an “s.” Then, continue changing direction to create a reverse “s.” (See Figure 7.16.)
Once you’re comfortable doing a simple figure 8, you can work on mastering a more useful noseforward figure 8. Once you can perform this maneuver smoothly and repeatedly, you can consider yourself competent in basic drone patterns. (See Figure 7.17.)
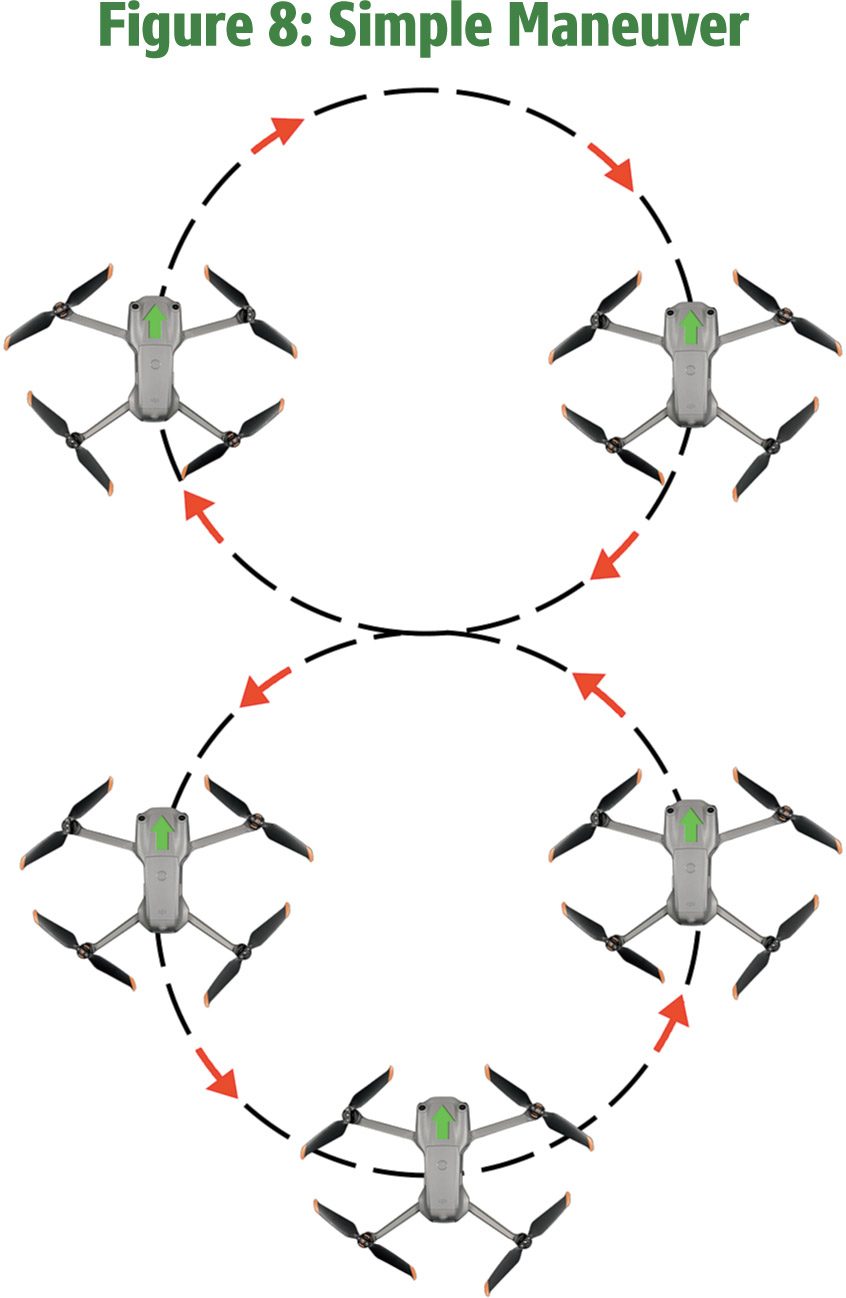
Figure 7.16

Figure 7.17
Orbit
Flying in an orbit pattern is much like completing a circle, except that the goal is to keep the nose of the Mavic facing toward the center, which will presumably be the subject of your video clip. The drone can perform this maneuver for you automatically, using the Orbit QuickShot, but it’s useful to be able to perform it manually, as you can then make some creative choices about the aircraft’s position during the flight.
The object is to move around the circle smoothly and consistently, while keeping the subject in the center of the frame. You’ll be working with the right stick to move the drone away from you and to first your right and then left (to reach the 12 o’clock position), and follow through bringing it back toward you while flying to the left and then to the right to return to the original position. The tricky part is pressing the left stick smoothly to the left to keep the drone rotating counterclockwise and facing the center. This is for a counterclockwise orbit; reverse the directions to fly the clockwise version. (See Figure 7.18.)
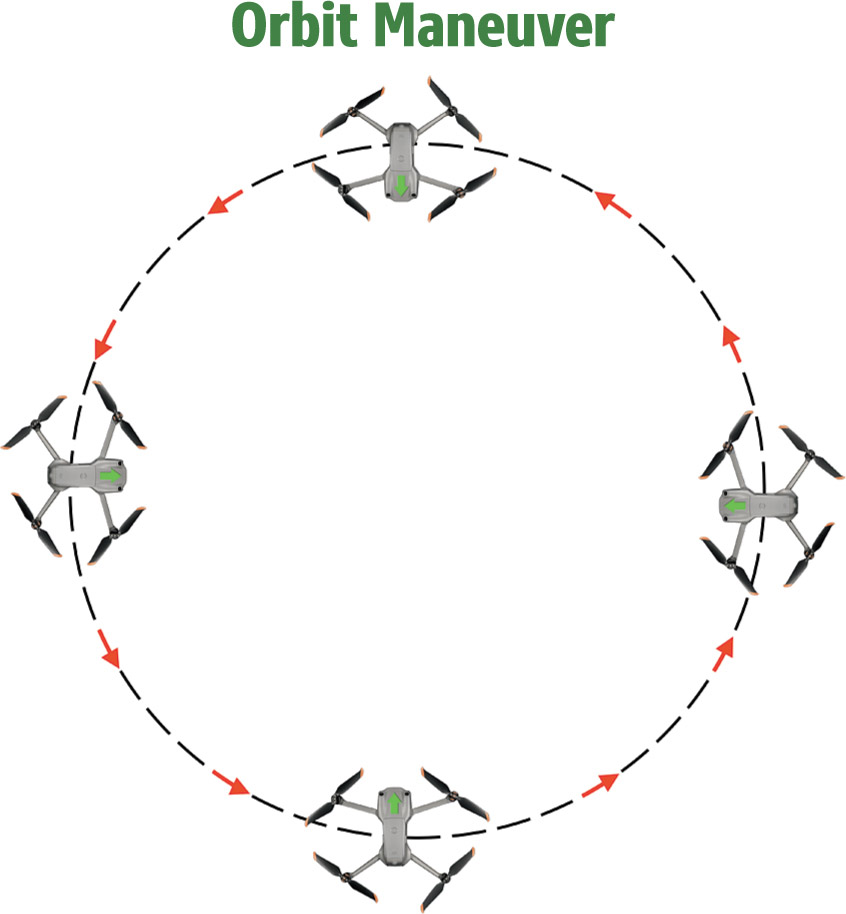
Figure 7.18
Other Useful Maneuvers
The manual maneuvers I’ve explained so far are just the beginning of the aerial movements and techniques you can use creatively to transform your videos into engaging and compelling clips and motion pictures. As I noted earlier, my goal is to introduce you to the basics so you’ll be interested in exploring the full range of videographic techniques that drones are capable of. This next section provides you with a checklist of cool techniques you can explore as your skill grows.
- ■Flyover. The use of flyovers taken from a birds-eye view have become a key movie establishing shot, supplementing the familiar skyline shots of cities like San Francisco, New York, Paris, and London. Given a familiar enough landmark—say the Pyramids of Egypt—a well-done flyover can replace the skyline (or monument-line) shot entirely. Recreational flyers may not be able to do flyovers of major metropolitan areas, but a birds-eye perspective can still be used to provide an interesting view in your video.
- ■Dolly. I described the dolly zoom earlier in this chapter, but other dolly shots can be a staple used in other ways. In Hollywood, the camera mount often resides on a special set of rails, such that the camera either slides in seamlessly toward or away from the subject, or maintains pace alongside it. You can imitate the in/out dolly move by maintaining a particular altitude with the drone on the same level as your subject, and flying toward or away from your subject at a constant speed. Moving the drone facing your subject in parallel with it provides a side-slide shot. You can achieve the same look with the Mavic’s automatic ActiveTrack (Parallel) Intelligent Flight mode, but you can learn to duplicate the move manually, too.
- ■Flythrough. With a flythrough, you’re moving the drone right through a scene, with objects passing by (such as trees, buildings, or, say, the interior of a covered bridge) during the maneuver. You can fly through as a forward motion with the camera facing ahead, or, looking backward as the aircraft flies in reverse. Since you’re actually flying through an area, you’ll need to take extra precautions to avoid collisions.
- ■Flyby. You can execute this maneuver by flying past a subject in a straight line, while pressing the left stick left or right so the drone rotates in sync with your subject. It’s as if you were moving past a subject while turning your head to keep the subject in the center of your view. It will take some practice to synchronize the rotation smoothly.
- ■Elevator. All you need to do is point the drone at the lower edge of a vertical subject (such as a tower), and then push the left stick forward smoothly to cause the aircraft to rise, revealing more and more of the subject’s upper structure. The reverse maneuver can also be used, with the Mavic reducing its altitude.
- ■Pan/Tilt. To capture a pan shot, all you have to do is press the left stick to the left or right so the drone rotates horizontally. You can use this to follow action as a subject moves from one edge of the movie frame to the opposite edge, or simply to show an impressive vista. The technique is similar to still photo panoramas, but you’re revealing the scene gradually as the camera rotates. A tilt is similar to a pan, but the change in perspective is caused by the tilting of the drone’s camera on its gimbal up and down. The range is more limited, as the gimbal can’t start its tilt upward (unless you enable that feature in the Control tab of the System Settings menu). You can use a tilt to gradually show the whole of a vertical structure, overcoming the tilt limitation by combining the movement of the Gimbal Dial with an elevator shot.
- ■Chase. You’ve watched commercials where the tough off-road vehicle climbs up a mountain, with the camera following it all the way to the top. Perhaps the commercial cuts to shots from the front of the vehicle, as it “chases” the camera. You can duplicate this type of shot manually, but I recommend learning how to use the FocusTrack mode’s ActiveTrack option in Trace mode (discussed soon) instead.
- ■Bank. This kind of shot abandons the gimbal’s horizontal stabilizing capabilities and lets the view tilt as the drone banks while making turns. This resembles the looks you get with racing drones that use first-person view. In fact, all you need to do to enable it is to go to the Control tab of the System Settings menu and change the gimbal’s behavior from the default Follow setting to FPV.
FocusTrack
FocusTrack is a versatile Intelligent Flight mode that allows you to keep your subject in the center of your shot while your drone flies autonomously or manually. It includes three variations, Spotlight 2.0, ActiveTrack 4.0, and Point of Interest 3.0. When using any of these, you or an observer will need to remain alert to spot safety hazards or obstacles as the side-vision sensors do not function in any of these modes. However, the other vision sensors will be active and do a good job of avoiding obstacles in other directions. The Air 2S has the advantage of its upward-facing sensors, because when the drone is moving forward, its nose will be tilted slightly downward, giving the forward and upward sensors each a slightly different view of what lies ahead. FocusTrack is disabled when recording at a high resolution such as 2.7K 48/50/60 fps, 1080p 48/50/60/120 fps, 4K 48/50/60 fps, and 5.4K 24/25/30 fps.

Figure 7.19 Subject Scanning can find target subjects for you.
You can enable any of the three tracking modes by taking off and hovering about six feet off the ground. Then, select a subject by drawing a box around it on the screen with your finger. If your subject is a human being, they can raise one hand above shoulder level and the drone will interpret this as a signal to lock on. The default FocusTrack mode is Spotlight, but you can switch to any of the other modes by tapping their icons that appear at the bottom of the screen. (See Figure 7.20.) Exit FocusTrack by pressing the Pause button on your controller.
Here are the FocusTrack modes:
- ■Spotlight 2.0. This mode is an excellent choice for subjects that don’t move, including people. You can fly the drone all around the subject at different angles and altitudes, and the subject will remain in the center of the frame. The water tower shown in Figure 7.20 is an example of the kind of subject you might choose.
- This mode is a mix of autonomous and manual flight. The Mavic will adjust the gimbal to keep the subject centered automatically, but you have control over the flight path. As with any manual flight, you can push the right stick forward or back to adjust the distance from the locked-in subject, or left/right to circle around it. Adjusting the left stick forward or back changes the altitude, and pressing the left stick left/right rotates the drone to adjust the frame. As you’re recording, if the drone loses the subject, it will exit Spotlight mode and hover, awaiting new instructions.
- ■ActiveTrack 4.0. This mode allows you to follow a moving subject around from two different angles, either behind or alongside. When you’ve drawn a box around your subject, a pair of options, Trace and Parallel, pop up. Tap the one you want, and then tap Go to begin tracking.
- The screen will look like the one shown in Figure 7.21. The drone can differentiate between people and vehicles, and an appropriate icon for each will appear below the box.
- In Trace mode: The aircraft follows the subject from a constant distance, as if it were chasing it. It will sense and avoid obstacles in front of it as it follows the subject. However, the maximum speed in Normal or Cine/Tripod mode is 27 mph, upped to 43 mph in Sport mode, so you’ll be unable to follow any subject faster than that.
- In Parallel mode: Move the drone to the side of your subject, and the Mavic will automatically track it from a constant angle and distance, while maintaining the same altitude—even if the subject moves upward or downward on its path. The aircraft will change altitude to avoid collisions with obstacles, as all vision sensors except for the side sensors are active.

Figure 7.20 Spotlight mode.
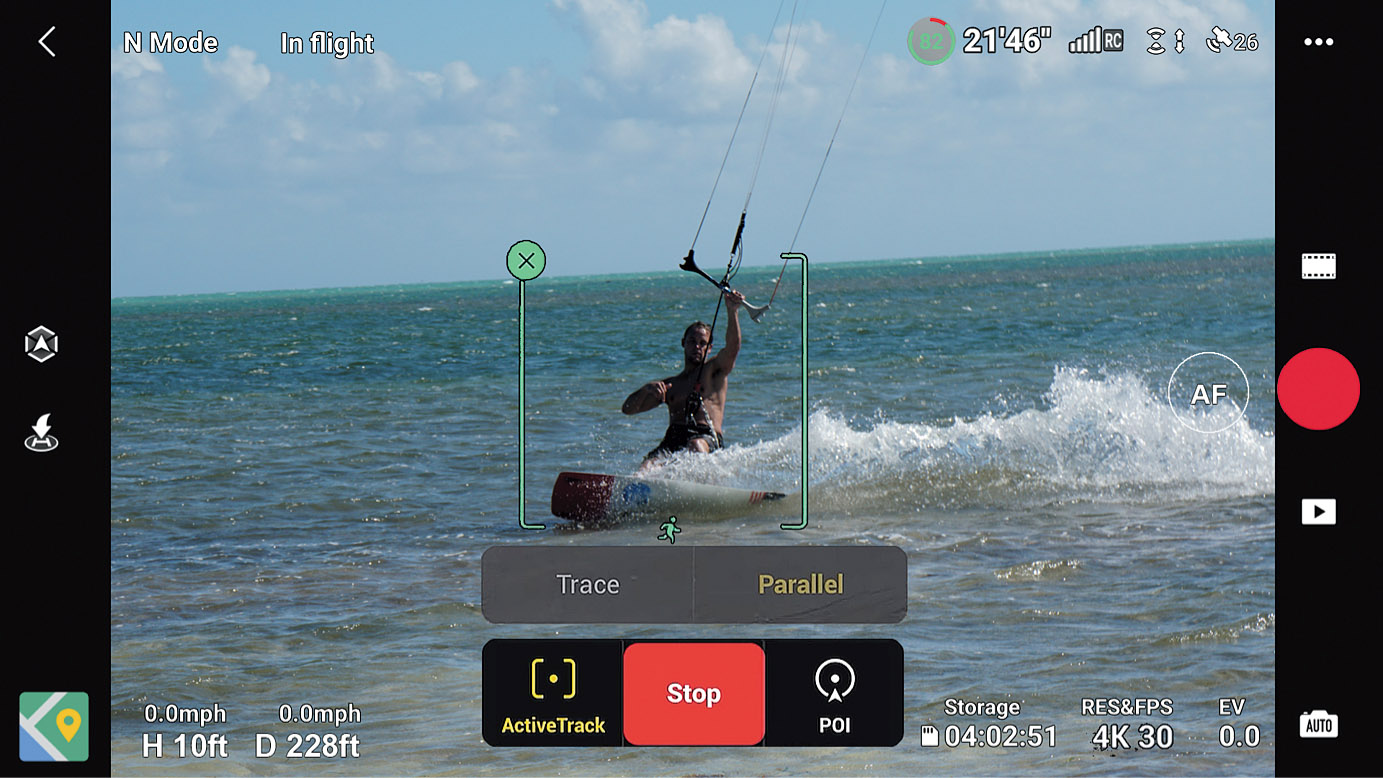
Figure 7.21 ActiveTrack.
- ■Point of Interest 3.0. In this mode, you draw a box around the subject, then choose the speed and direction of the drone’s travels as it orbits your subject by dragging the circle icon of the arrow that appears on the screen. As you drag it from right to left, the travel speed in a clockwise direction increases, until you reach the left end of the arc, where the direction reverses to counterclockwise. The altitude of the aircraft does not change from its initial height. (See Figure 7.22.) Once you’ve started recording, the drone moves slowly at first as it calculates the diameter of the circle that will be flown. It then speeds up to the velocity you specified. You can move the drone closer or further from the subject, and it will make any corrections needed to continue circling around your subject.
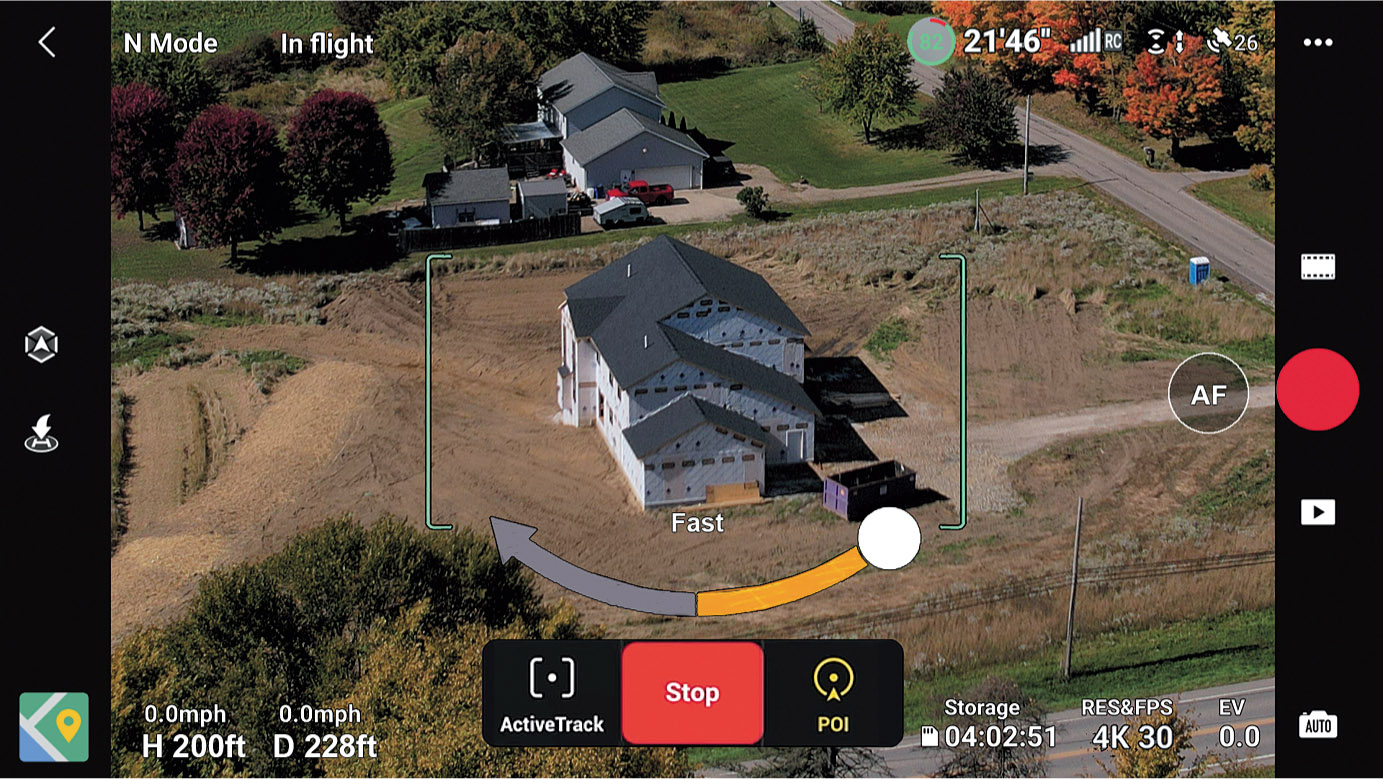
Figure 7.22 Point of Interest mode.
QuickShots
Many still photography instructors have their students learn how to shoot using manual exposure controls first, before branching out to learn semi-automatic exposure options like shutter-priority or aperture-priority. In a similar vein, I had you practice doing basic maneuvers manually before introducing your Mavic’s more automatic options like FocusTrack. Now that you’re capable of using a full range of video techniques with your controller specifying every move, you’re in a better position to appreciate the autonomous and semi-autonomous video modes available with the Mavic Air 2 and Mavic Air 2S.
QuickShots are shooting modes that guide the drone through various useful shots using its sensors and intelligence to handle nearly all the details required to capture a specific kind of clip. Your input may be limited to choosing the subject, specifying the starting point of the aircraft, its distance, or perhaps direction. Your options include Dronie, Rocket, Circle, Helix, Boomerang, and Asteroid. The drone captures a clip using the parameters for that type of shot and automatically creates a short video, which can be viewed, edited, provided with a soundtrack, and, if you like, shared to Facebook or other social media.
| NOTE It’s especially important to be aware of potential obstacles, such as powerlines, buildings, or tall trees, as well as the presence of any people you might fly over, when using QuickShots. Neither the Air 2 or Air 2S have side sensors, and can easily collide with obstacles when flying in the large circle maneuvers some QuickShot modes use. Make sure your flight distance and altitude are appropriate before flying. If you misjudge, you can exit a QuickShot mode or pause and hover the aircraft (use the Pause/Return to Home button). You should not use QuickShots when the GNSS signal is weak, or when close to buildings (which can interfere with GNSS). |
QuickShot Quick Start
As I described above, capturing a QuickShot is as easy as selecting a subject, a few parameters, and tapping Start. The full set of steps looks like this:
- 1.Launch. Take off and hover at least six feet above ground level.
- 2.Choose QuickShot mode. Scroll through the shooting modes, select QuickShots, and tap on the QuickShot mode you want to use.
- 3.Set parameters. Some modes will let you choose a distance, flight time, or flight direction.
- 4.Specify subject. You can draw a box around your subject, or, a human subject can wave or raise their arm so their elbow is above shoulder level. If the drone detects a likely subject on its own, you can tap the green circle with the plus symbol (as shown earlier in Figure 7.19) to accept it.
- 5.Move to start. After specifying your subject, you can manually move the drone to your selected starting point.
- 6.Begin. Tap the red Start/Record icon at the right side of the screen and the drone will begin shooting after a short countdown. A progress indicator circle will advance around the red icon, which now contains an X you can tap to cancel. (See Figure 7.23.)
- 7.Monitor progress. Watch carefully for obstacles as the drone captures your clip. If the aircraft detects an obstacle, it will halt and hover in place.
- 8.Cancel (optional). You can exit at any time by tapping the red circle X, or by pressing the controller’s Pause/RTH button.
- 9.Drone returns. After capturing the QuickShot, the drone will return to its initial position.
You have a wide selection of useful QuickShot modes to choose from, detailed in the sections that follow. While all of these are helpful, you should keep in mind that they’re intended to be a shortcut, and not really the primary source of clips for a professional-quality video. One mistake beginners make is to use them exclusively, which can make all their videos look the same.

Figure 7.23 You can monitor the progress of the QuickShot on-screen.
Dronie
This maneuver is often used to create a video selfie (or if more than one person is involved, an ussie). When you select Dronie, an animated reminder screen, like the one shown in Figure 7.24, appears. When you minimize the reminder, you can select your subject and a maximum distance, as seen in Figure 7.25. When Dronie is activated, the aircraft ascends slowly with the gimbal pitching slightly downward to follow the selected subject, which can remain motionless or move. The drop-down menu shown can be tapped to specify the maximum height for the sequence. Once recording of the Dronie is finished, the aircraft will fly back to its original position, slowly at first, then accelerating.
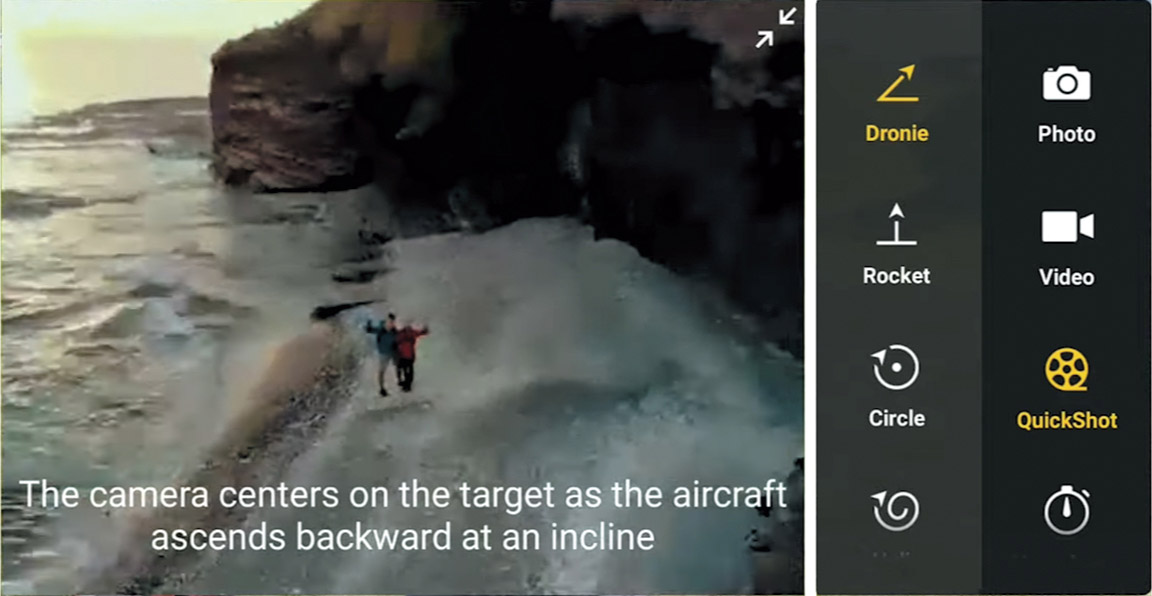
Figure 7.24 The app shows a preview of the Dronie effect.

Figure 7.25 You can lock in a subject and specify a maximum height.
Rocket
The Rocket maneuver is another quick shot that can be used for reveals. (See Figure 7.26 for the reminder screen.) You can position the drone in front of your subject, at a distance you select, and choose a maximum altitude for the sequence, as shown in Figure 7.27. The clip ends up as a shot directly over your subject, and, as such, should be used with human subjects only with permission and when allowed. The maneuver begins in front of the subject and the drone increases altitude, slowly at first, and then accelerating while moving forward and tilting the gimbal downward to end above your subject. As with the other QuickShots, once recording is completed, the drone will fly back to its original position.
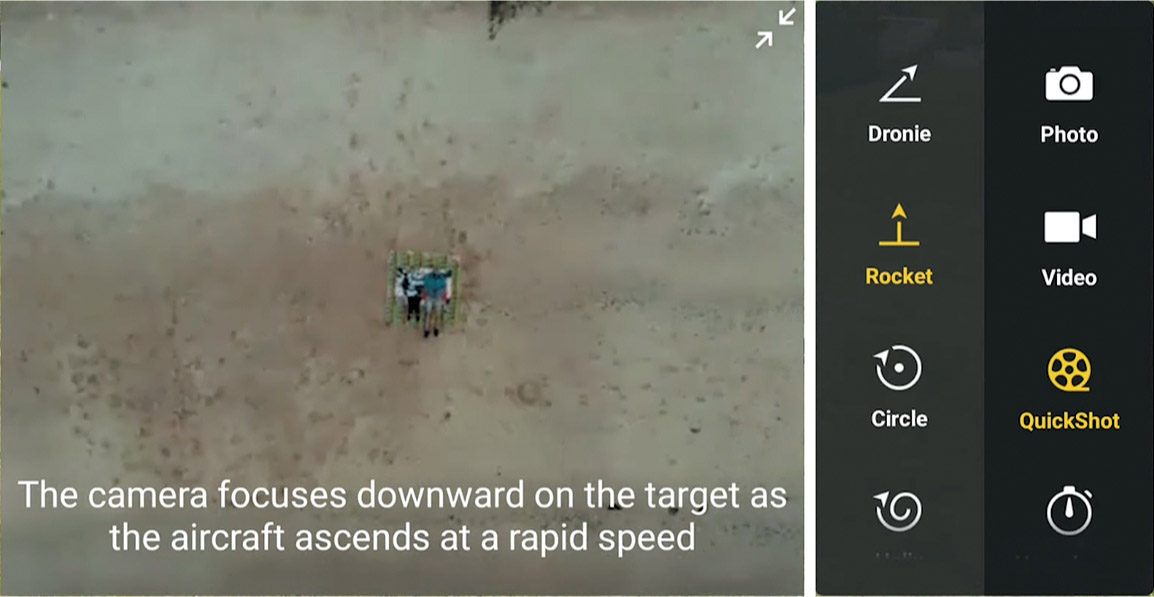
Figure 7.26 Select Rocket as your QuickShot.

Figure 7.27 Manually choose the starting position, and specify the maximum altitude.
Circle
The Circle maneuver (see Figure 7.28) is an automated version of the Orbit, with the drone circling around the subject you select. Move the drone to the height and distance you want and then choose the person, object, or structure to highlight using the same options available for the other QuickShots. Note that if your starting point is too far away for the drone to find a suitable subject automatically, you’ll definitely need to draw a box around it. Finally, select the direction of rotation (clockwise or counterclockwise) and tap Start to begin. (See Figure 7.29.)

Figure 7.28 You can monitor the progress of the QuickShot on-screen.

Figure 7.29 Choose clockwise or counterclockwise directions.
The Mavic will circle around your subject at a constant altitude and distance from your starting point, and, as the circle is completed, return to that position to finish. The greater initial distance you choose, the larger the circle will be, and the faster the drone will move in flying its circular route. That keeps the elapsed time reasonable, and also appropriate visually.
Helix
With the Helix maneuver (see Figure 7.30), the drone flies upward and backs away from your subject gradually, with the gimbal moving downward and rotating to keep the subject centered in the frame as the aircraft works its way through a spiraling course to finish at the maximum radius you specify. You can choose clockwise or counterclockwise directions. The drop-down radius slider operates like the distance and altitude controls of the previous QuickShot modes, so I won’t provide a screenshot of it. Because the Helix rises and curves dramatically, you should carefully assess the area for hazards before attempting this shot. (See Figure 7.31.)

Figure 7.30 Helix provides a spiraling path for the drone.

Figure 7.31 Make sure the surrounding area is clear before initiating the Helix maneuver.
Boomerang
Many drone users say this maneuver is their favorite. (See Figure 7.32.) The Mavic flies an oval path, ascending as it leaves its starting point. When it reaches a point behind the subject, the aircraft slows almost to a stop, then increases altitude while tilting the gimbal downward as it starts its return. Descending boomerang-like, the drone ends up in front of the subject at its starting altitude.
You choose the starting altitude and position, and it’s a good idea to make sure a space of at least 100 feet around the aircraft is clear of obstacles, and that there is room to ascend safely within that area. As with Circle and Helix, you can select either clockwise or counterclockwise movement.
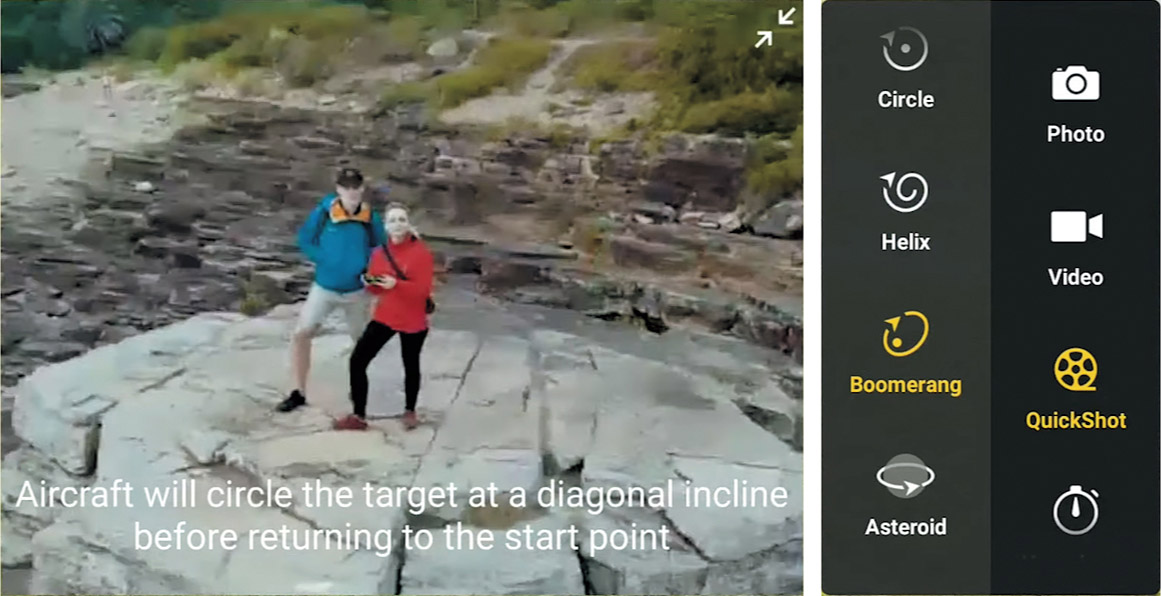
Figure 7.32 Boomerang causes the drone to fly out and behind you, then return to its starting position.
Asteroid
Asteroid is an odd duck. The drone flies backward and upward and takes enough still photos to create a 360-degree panorama, then flies back to the starting point you specify. A video is generated that starts with the panorama captured at the highest position, then displays the descent back to the initial location. This is another QuickShot that requires a lot of space. You should make sure there is at least 120 feet behind the start point with no obstacles, and 150 feet or more above it. (See Figure 7.33.)
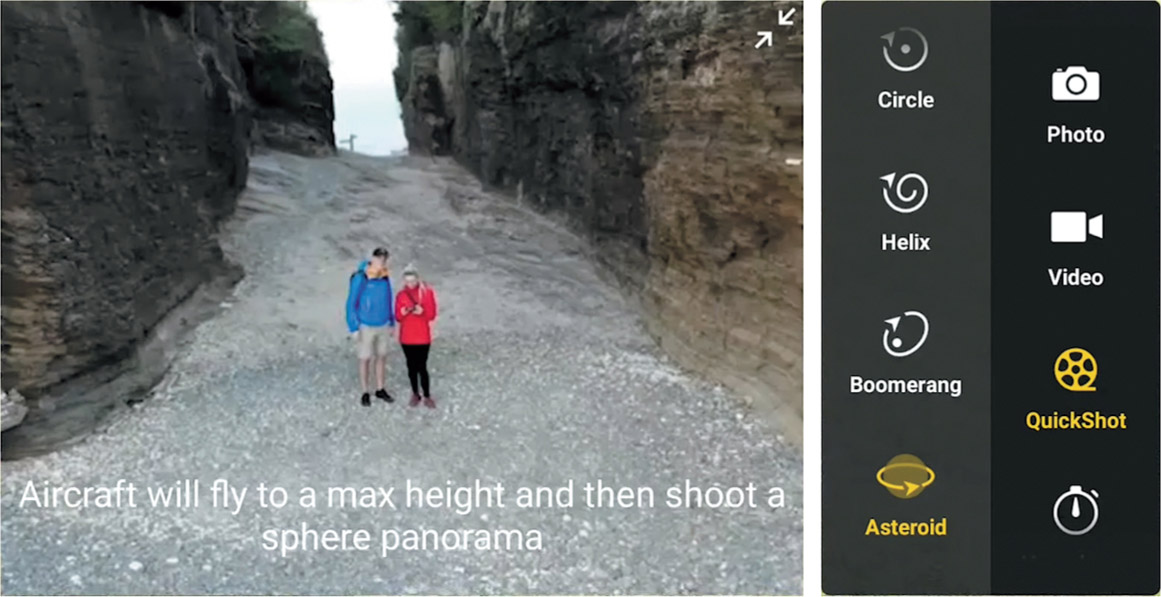
Figure 7.33 You can monitor the progress of the QuickShot on-screen.
Editing QuickShots and Other Videos
Beginners will like the fact that DJI gives you a basic editor for videos right within the DJI Fly app. You can choose to generate videos from a series of clips automatically, using a Template option. Or, as your skills improve, you can perform more advanced editing adjustments to produce a polished movie ready for sharing on social media without resorting to Final Cut Pro or DaVinci Resolve. This section will introduce you to your options available within the versatile DJI Fly app.
The DJI editor is hidden on the startup screen, accessible by tapping on the Album icon at lower left. (See Figure 7.34.) The content available on your drone (if connected) or your smart device will be displayed, as seen in Figure 7.35, with an option at the top of the screen of viewing All, Photos, Videos, or Favorites. You’ll see thumbnails of each video, along with its duration, and whether you’ve used D-log or HLG profiles. Only a low-resolution version of each clip is stored on your device; you’ll need to transfer or download the video to the device to work with the full-resolution clip.
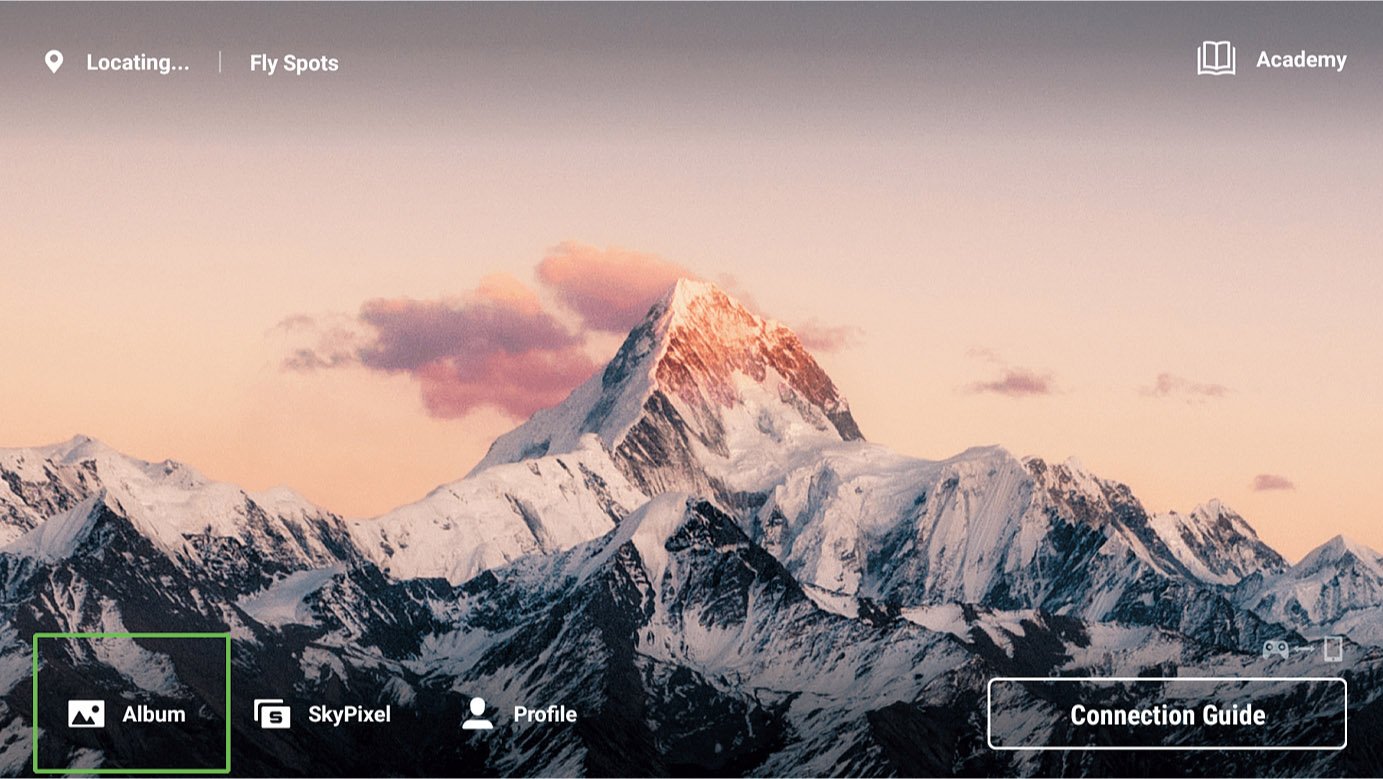
Figure 7.34 Tap on the Album icon to access the DJI Fly editor.
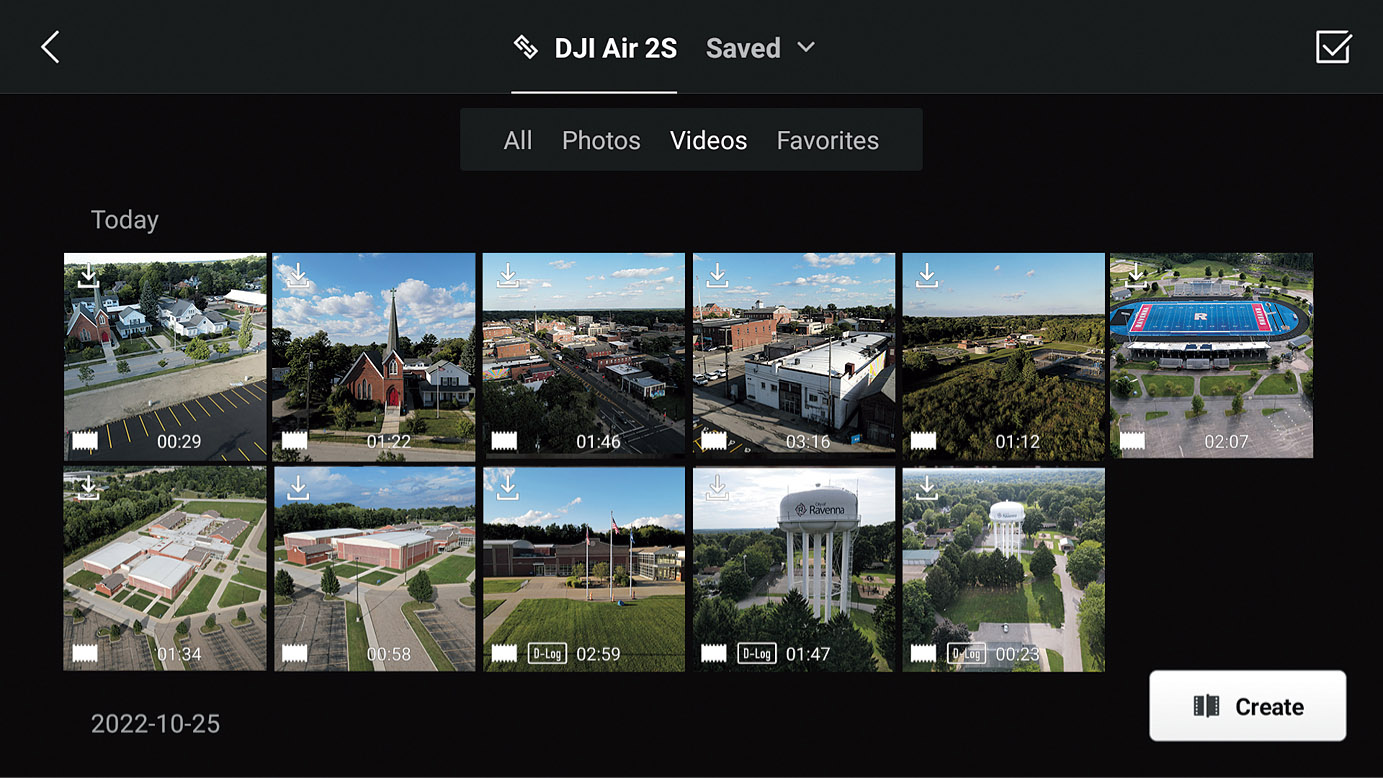
Figure 7.35 Download clips from your drone to your controller or device.
A downward-pointing arrow icon in the upper-left corner of each thumbnail will be shown if you need to download that clip to your controller or smart device. When you click the icon, you’ll be offered a choice of two download modes, as seen in Figure 7.36. Full download will copy the entire clip to your device, which can take a long time. If you choose Trimmed Download, you’ll be shown a screen like the one in Figure 7.37, which you can use to select only the portion of the clip that you want to transfer.
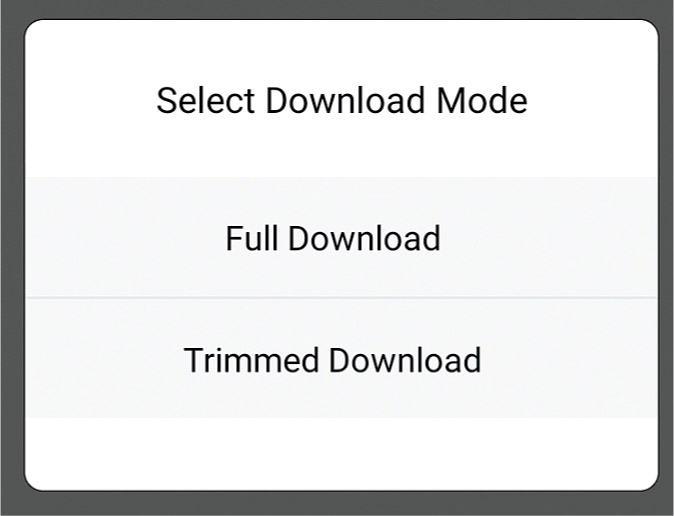
Figure 7.36 Choose to download the full clip, or trim to download only a portion.
Once all the sequences you want to use are available, click on Create in the Album screen. It’s located in the lower-right corner in Figure 7.35. You’ll then progress to the screen shown in Figure 7.38, where you can choose to work with Templates, or create your own video in Pro mode. The available templates are stacked in the right-hand column, with the template’s theme, number of shots required, and duration in seconds shown. Highlighting a template displays a sample of its theme. If you haven’t used a template before, you’ll be advised to download it. You can then tap Apply to proceed to the next step.

Figure 7.37 Choose which portion of a clip to download.
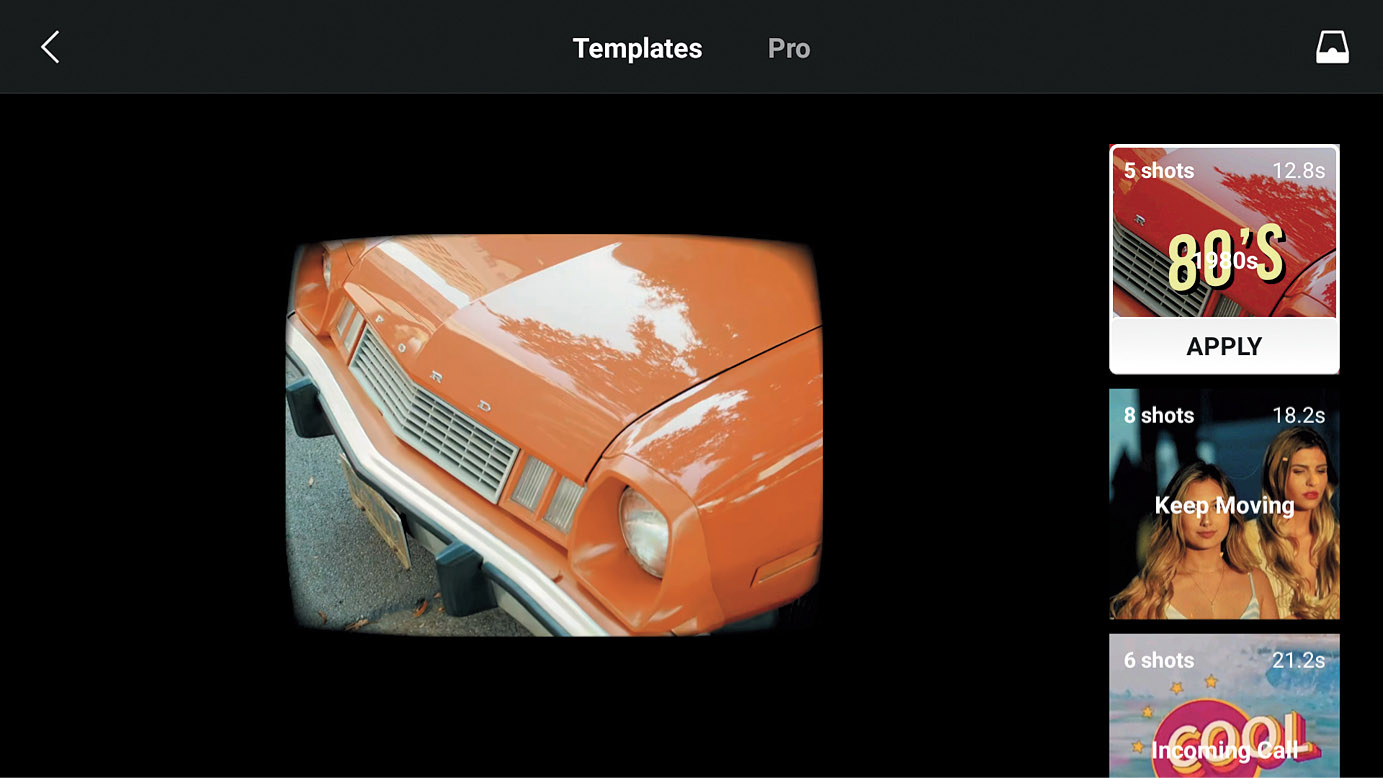
Figure 7.38 In Template mode, choose which canned video format to use.
You’ll need to select the number of shots specified for your selected template. (See Figure 7.39.) Click the Add panel in the upper-right corner to add the selected clips to the template. You’ll be whisked to the editing screen shown at left in Figure 7.40, and the app will provide a preview of the video in progress. Five thumbnails are displayed, showing the duration, in seconds, of each of the clips (in this example, 2.5, 2.4, 1.8, 2, and 3.8 seconds).
Underneath the thumbnail array you’ll find icons representing seven different tools you can use to edit the video. Tap one of the thumbnails to use the tools on that portion of the video. Each thumbnail sequence can be edited separately.

Figure 7.39 You’ll need to select the specified number of clips required for the template.
- ■Extract. The template has chosen a portion of each of the individual clips to use in the video. This utility lets you choose from different sections of that clip, presented as thumbnails you can sample and preview. A Speed slider lets you adjust how fast the extracted excerpt plays.
- ■Clip. Allows you to zoom in and out of the current clip, rotate it, or resize it to fit by using two fingers to pinch the screen. (See Figure 7.40, center.)
- ■Replace. Here you can swap out any of the clips for another one in your album.
- ■Sort. You can change the order of the clips.
- ■Filter. Add special effects, such as the ones shown in Figure 7.40, right.
- ■Tone. Change brightness, contrast, saturation, temperature (white balance), add a vignette effect, or sharpen. You can apply these changes to an individual clip or all the clips in the video.
- ■Volume. A slider appears letting you adjust the volume of the soundtrack for one clip, or all of them.
When you’ve finished your edits, tap the red Export label in the upper right of the screen (shown at left in Figure 7.40). The app will show you the progress as it generates your video (see Figure 7.41) and, when finished, presents you with the option to view the video or, selecting from an array at the bottom of the screen, post the video to Facebook, Instagram, WhatsApp, TikTok, or SnapChat. (You must have the appropriate social media app installed on your device to share the video.) (See Figure 7.42.) Click Done when finished.

Figure 7.40 The Template editing screen (left) offers tools like Clip (center) and Filter (right).
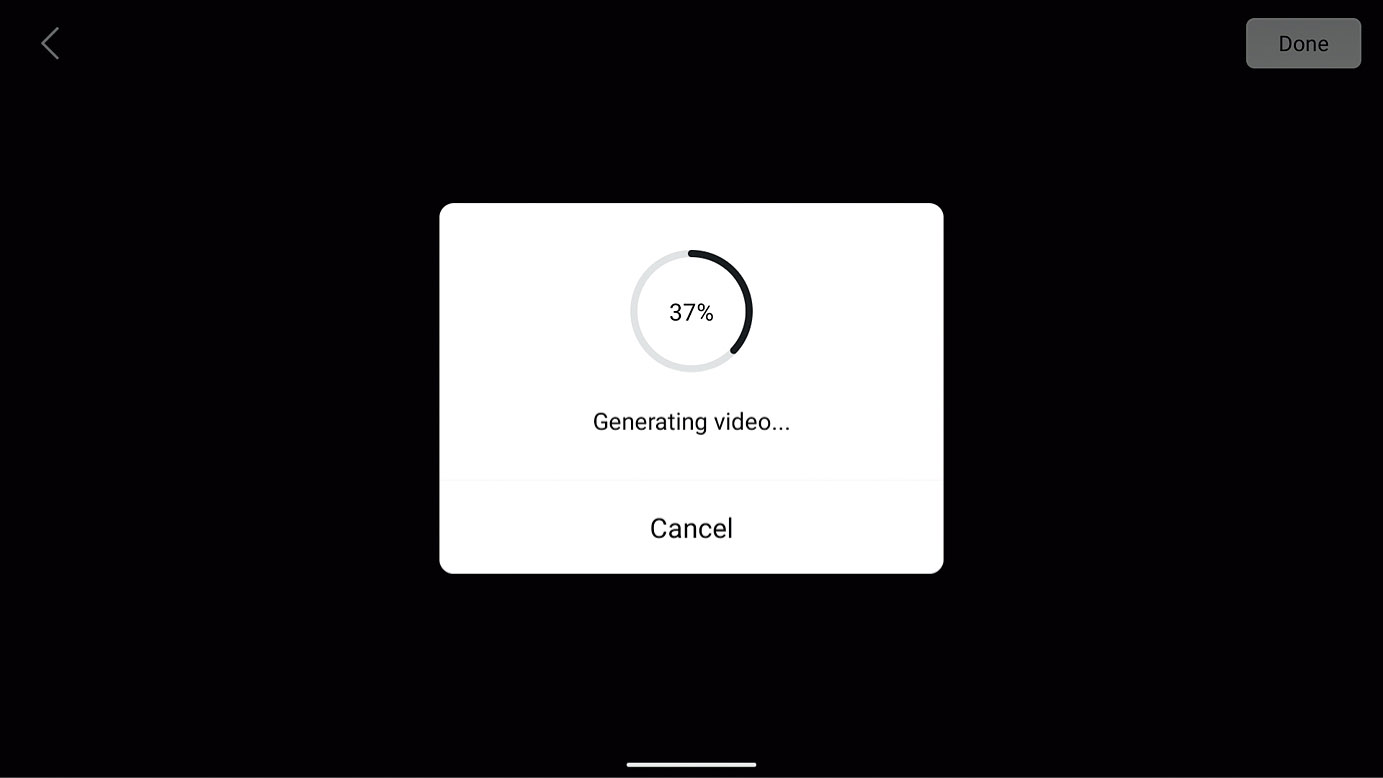
Figure 7.41 Generating the video.

Figure 7.42 Your video can be shared to Facebook, Instagram, WhatsApp, TikTok, or SnapChat.
Pro mode starts out similarly to Template mode, with you selecting which clips to include. Note that all your video clips do not need to be aerial footage from your drone. You can add other video with the same resolution captured from other sources. The editing screen in Pro mode has many more options than are available in Template mode, as shown in Figure 7.43. At the bottom resides a row with icons representing volume and playback speed controls and options to delete, copy, or reverse playback direction. Underneath are icons for editing and cutting frames from the clip, adding music tracks, filter effects, text subtitles, and stickers.
Some of your editing options are shown in Figures 7.44 and 7.45. Advanced video-editing procedures are beyond the scope of this book, but you can see that even a basic editor like the one supplied with the DJI Fly app has many options.
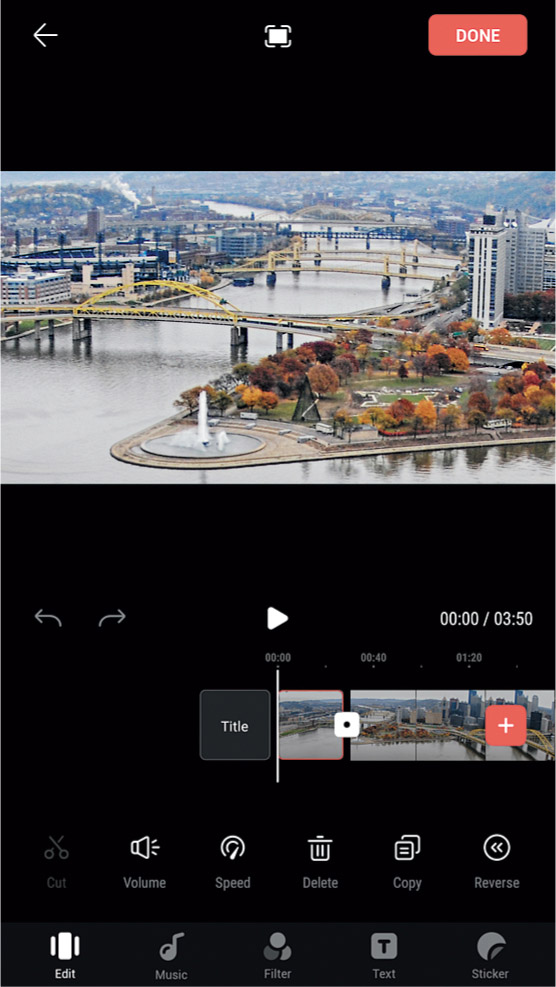
Figure 7.43 The Pro editing mode has more options.
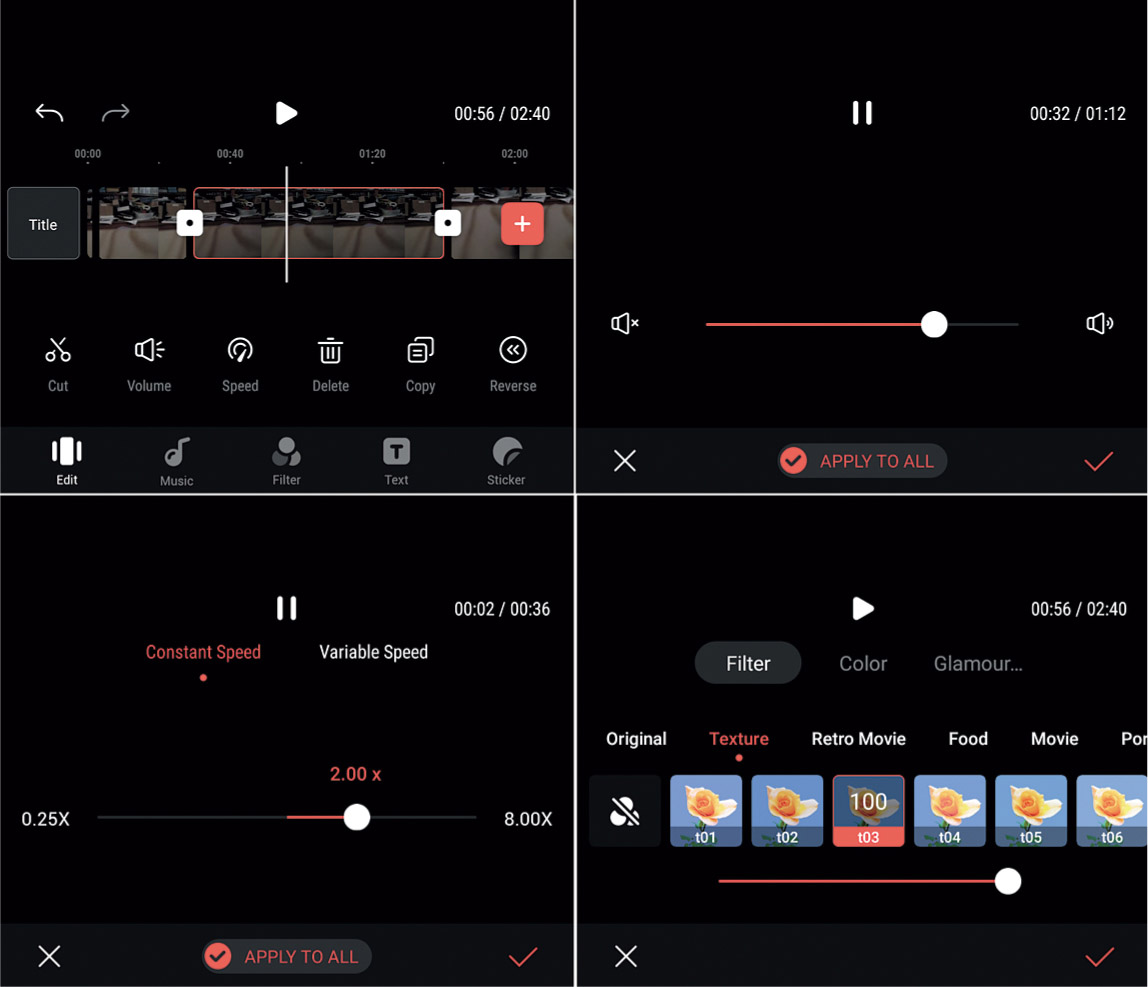
Figure 7.44 Editing (upper left), volume control (upper right), speed control (lower left), and three varieties of filters (lower right).

Figure 7.45 You can add text and subtitles to your videos using the DJI Fly app’s tools (upper left). A virtual keyboard is available with multiple options for inserting items into your video (upper right). You can select font, style, color, and text transparency (lower left). Subtitles can be placed in several different positions within the frame (lower right).
Hyperlapse
Your Mavic’s Hyperlapse feature is an automated time-lapse video mode that allows the drone to take a series of still images at a 16:9 aspect ratio and then combine them to produce a video that shows the motion over the elapsed time speeded up tremendously. Where time-lapse photography consists of a series of images captured with the camera remaining in one place, hyperlapse involves capturing that series from a moving camera. In both cases, many individual images are stitched together to produce a video that can be played back at a normal rate, but with the subject matter changing significantly between frames. Here are some considerations to take into account when creating hyperlapse movies.
- ■Shutter speed. Some blurring is desirable between frames to emphasize the feeling of motion, so you’ll want to use the lowest ISO setting and the densest neutral-density filter you have. In daylight, exposure times of 2 to 6 seconds are used most often, with the longer intervals advisable only if there is little or no wind. The drone needs to achieve a precise position for each shot and gusts only make that more difficult.
- ■Interval. The drone needs to be able to fly to its next position between shots, which may require longer intervals when greater distances are involved. A 2-second interval may not allow enough time for the Mavic to navigate to its next position.
- ■Weather. Daytime hyperlapse clips are most dramatic when there are moving clouds in the sky. Without clouds, the footage can appear a little bland. Just keep in mind that fast-moving clouds, while desirable from a visual point of view, may mean that stronger winds at the altitude at which you are flying.
- ■Speed. Your speed needs to match the length of your drone’s route so it can cover that distance during the flight.
- ■Duration. When you see the duration of your flight (it will be shown on the screen), you should check to make sure you have sufficient battery power to complete the mission. Hyperlapse videos lasting about five seconds when played back are often the most dramatic. You can edit several of these together to create a compelling video. But, with a 2-second interval between shots, a clip that plays back over 5 seconds will require 125 frames that will take 4 minutes, 10 seconds to capture at 30fps. It will take you time to set up and get into position. You wouldn’t want to commence such a sequence with, say, only 8 minutes of battery power left. Remember, you’ll need to have sufficient power to Return to Home when finished. If you miscalculate, the Low Battery Return to Home feature will kick in and abort your recording.
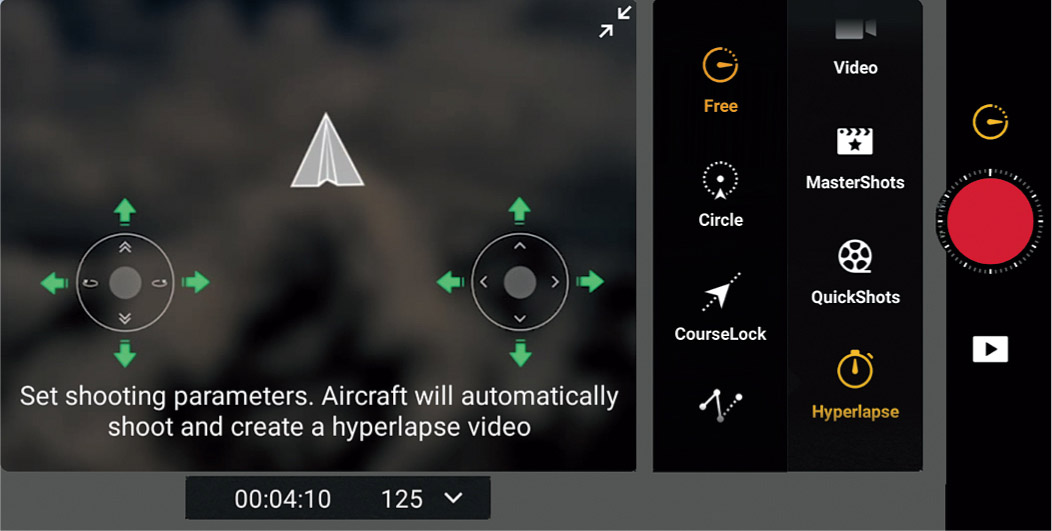
Figure 7.46 Selecting a Hyperlapse mode.
Your Mavic has four different Hyperlapse modes: Free, Circle, Course Lock, and Waypoint. You can select the mode using the screen shown in Figure 7.46.
- ■Free. You have full control over the aircraft’s movement and gimbal position. It’s the only Hyperlapse mode you can fiddle with before the drone takes off. That gives you plenty of time to make your settings without the motors running and seriously impacting your battery power/flight time. This is the only mode that lets you use Cruise Control, described earlier in this chapter, which is useful for stabilizing the aircraft and maintaining the same speed as you direct it manually.
- You can select the interval, duration of the video, and maximum speed, as shown in Figure 7.47. The number of frames that need to be captured using your parameters and the length of time needed to shoot the video is displayed (so you can make sure you have sufficient battery power). As with all the Hyperlapse modes, you commence shooting by pressing the shutter/record button to begin.

Figure 7.47 Choose parameters in Hyperlapse Free mode.
- ■Circle. In this mode, the aircraft flies a circular route automatically. You select a subject by drawing a box around it, and, as with Free mode, you select the interval, duration of the video, and maximum speed. Specify a clockwise or counterclockwise flight path, as shown in Figure 7.48. You’re shown the number of photos that will be taken and how long the shooting time will be. Once recording begins, adjust the gimbal, speed, and position of the drone with the controls.

Figure 7.48 You can choose clockwise or counterclockwise direction in Circle mode.
- ■Course Lock. With Course Lock, the aircraft will fly only in the direction the camera is pointed with a fixed orientation achieved by framing using the Gimbal Dial and rotation control (moving the left stick left/or right). It will fly in that straight line once you lock the direction, regardless of which way the drone is facing. (See Figure 7.49.) It’s useful when flying in narrow spaces, as the Mavic will not move from the path you’ve locked in. You can select a subject after drawing a box; if not, the drone will just fly in the direction of the camera.
- As with the other modes, you set the interval time, video duration, and max flight speed, and the screen shows the number of photos taken and length of shooting time. You can push the right control stick forward and back to control the horizontal flight speed, or side-to-side to move the Mavic to a different parallel forward path. (Rotating with the left stick is disabled once the maneuver has begun.)

Figure 7.49 Lock the drone to a straight-line path with Course Lock.
- ■Waypoints. The aircraft automatically captures the images using a flight path you designate comprised of two to five different way points. (See Figure 7.50.) You can specify the points individually and, if you like, reverse them so the drone flies the same route in the opposite direction. This mode is especially useful when you want to capture a series of hyperlapse videos over an extended period of time. It’s easy to capture a daylight hyperlapse of a scene, then return and generate one at twilight using the same route. You specify the waypoints and lens direction, interval time, video duration, and maximum speed.
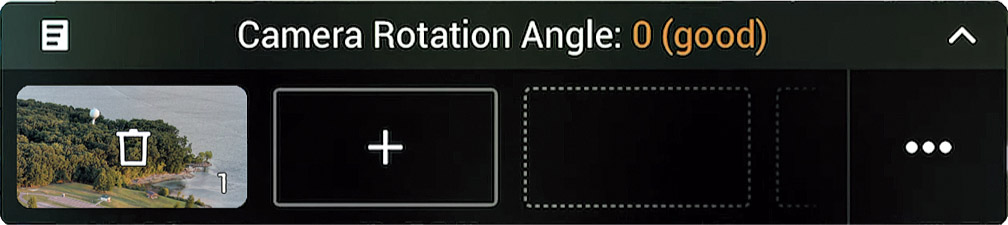
Figure 7.50 Choose up to five waypoints.
MasterShots (Air 2S Only)
MasterShots is a cool feature that lets you create a mini-movie with a variety of shots while letting your drone do all the work. All you need to do is select a subject and enter some parameters affecting the width, height, and duration of the video, and let your aircraft boogie through its routine. You’ll end up with a 2- to 3-minute cinematic video that you can edit yourself or convert into a finished video with a soundtrack using one of DJI Fly’s built-in templates. Here are some things to consider:
- ■Static subjects. MasterShots works best with subjects that do not move. When the drone switches from one shot mode to the next it can often “lose” its original target if it is moving. You can experiment with moving targets if you like, but don’t expect consistent results.
- ■Full HD. MasterShots is able to use the 8X zoom capabilities available in 1080p mode, so full-featured 4K MasterShots will have to come with some updates from DJI.
- ■Edit yourself. The basic MasterShot clip can be saved as-is without applying a template, and then you can extract that footage and edit or use it as you like. Even the most skilled videographer can’t capture five different professional-looking shots in a couple minutes.
- ■Don’t give yourself props. One problem with MasterShots is that the drone’s propellers sometimes appear in the sequences. But don’t worry, I have a solution.
No Prop Mode
Because MasterShots uses such a complex repertoire of maneuvers, by default, DJI enables obstacle avoidance during the process. That means that to dodge obstacles approaching from the side, the Mavic relies on its top and front vision sensors to look for hazards. So, rather than rotating the entire drone to capture some wide-angle views (potentially striking some unseen object in the process), it turns the gimbal left or right instead. Unfortunately, that means the propellers or even the front legs of the aircraft come into the view of the camera.
If you’re absolutely certain that your flight area will be clear and this secondary safety measure isn’t necessary, you can turn it off. When MasterShots is selected, a new Shooting Mode menu item appears in the System Settings Camera tab, as shown in Figure 7.51. This is separate from the Obstacle Avoidance entry in the Safety tab (with its Bypass, Brake, and Off options). You can disable Obstacle Avoidance and select Composition instead, in which case the drone will rotate left and right as required rather than moving the gimbal to its extreme limits where the props and legs come into view. After that, you’re on your own.

Figure 7.51 Turn off Obstacle Avoidance to nix unwanted propeller shots.
Using MasterShots
When you activate MasterShots and select your subject, a panel appears with choices for setting the width, length, and height of the flight path. Once you’ve entered those parameters, you’ll be shown the estimated flight time for your MasterShot-to-be. (See Figure 7.52.)
Once the automated flight has begun, you’ll see a series of progress messages on the controller screen, like those I’ve collected in Figure 7.53. (They appear one at a time in the same location, and not arrayed as in the figure.) After the MasterShot is done, the drone will return to its original location.
When finished, I recommend downloading your original footage, as indicated by the green box I placed in Figure 7.54. Then, if you like, you can scroll through the list of available templates and let the DJI Fly app do its thing with the MasterShot you’ve just captured. If you like the results, that’s fine, but since you have the original available, you can re-edit it or tweak it any way you like.

Figure 7.52 Define the width, length, and height of your MasterShot.

Figure 7.53 You’ll see progress messages as the flight is underway.

Figure 7.54 Save your MasterShot and/or use a template to compile a finished video.
Tips for Movie Making
I’m going to close out this introductory video chapter with just a couple of tips you can use to improve your movie-making as you move toward more polished video production. Each of these concepts will be familiar to experienced videographers, but photographers who have concentrated on still images may need to learn about these essential considerations.
Shooting Script
A shooting script is nothing more than a coordinated plan that covers both audio and video and provides order and structure for your video when you’re in planned, storytelling mode. A detailed script will cover what types of shots you’re going after, the audio soundtrack you’ll be laying over your footage, and any special effects you plan to use in post-production, transitions, and graphics. A good script needn’t constrain you: as the director you are free to make changes on the spot during actual capture of your aerial footage. But, before you change the route to your final destination, it’s good to know where you were headed, and how you originally planned to get there.
When putting together your shooting script, plan for lots and lots of different shots, even if you don’t think you’ll need them. Only amateurish videos consist of a bunch of long, tedious shots. You’ll want to vary the pace of your production by cutting among lots of different views, angles, and perspectives, so jot down your ideas for these variations when you put together your script.
If you’re shooting a documentary rather than telling a story that’s already been completely mapped out, the idea of using a shooting script needs to be applied more flexibly. Documentary filmmakers often have no shooting script at all. They go out, do their interviews, capture video of people, places, and events as they find them, and allow the structure of the story to take shape as they learn more about the subject of their documentary. In such cases, the movie is typically “created” during editing, as bits and pieces are assembled into the finished piece.
Storyboards
A storyboard is a series of panels providing visuals of what each scene should look like. While the ones produced by Hollywood are generally of very high quality, there’s nothing that says drawing skills are important for this step. Rudimentary drawings work just fine if that’s the best you can do. The storyboard just helps you visualize locations, placement of subject matter, and helps show how you want to frame or compose a shot.
Today’s audience is used to fast-paced, short-scene storytelling. In order to produce interesting video for such viewers, it’s important to view video storytelling as a kind of shorthand code for the more leisurely efforts print media offers. Audio and video should always be advancing the story. While it’s okay to let the camera linger from time to time, it should only be for a compelling reason and only briefly. It only takes a second or two for an establishing shot to impart the necessary information.
Provide variety too. If you put your shooting script together correctly, you’ll be changing camera angles and perspectives often and never leave a static scene on the screen for a long period of time. (You can record a static scene for a reasonably long period and then edit in other shots that cut away and back to the longer scene with other views.)
When editing, keep transitions basic! I can’t stress this one enough. Watch a television program or movie. The action “jumps” from one scene to the next. Fancy transitions that involve exotic “wipes,” dissolves, or cross fades take too long for the average viewer and make your video ponderous.
Composition
In movie shooting, several factors restrict your composition, and impose requirements you just don’t always have in still photography (although other rules of good composition do apply). Here are some of the key differences to keep in mind when composing movie frames:
- ■Horizontal compositions only. Movies are generally shot and shown in horizontal format only.
- ■Wasted space at the sides. For some shots, you may want to get close enough to your subject to fill up as much of the frame as possible. (Of course, you can fill that space with other interesting stuff, but that defeats your intent of concentrating on your main subject.)
- ■Seamless (or seamed) transitions. Unless you’re telling a picture story with a photo essay, still pictures often stand alone. But with movies, each of your compositions must relate to the shot that preceded it, and the one that follows. It can be jarring to jump from a long shot to a tight close-up unless the director—you—is very creative. Another common error is the “jump cut” in which successive shots vary only slightly in camera angle, making it appear that the main subject has “jumped” from one place to another. One rule of thumb is to vary the camera angle by at least 30 degrees between shots to make it appear to be seamless. Unless you prefer that your images flaunt convention and appear to be “seamy.”
- ■The time dimension. Unlike still photography, with motion pictures there’s a lot more emphasis on using a series of images to build on each other to tell a story. Static shots where the camera is mounted on a tripod and everything is shot from the same distance are a recipe for dull videos. Watch a television program sometime and notice how often camera shots change distances and directions. Viewers are used to this variety and have come to expect it. Professional video productions are often done with multiple cameras shooting from different angles and positions. But many professional productions are shot with just one camera, and with careful planning you can do just fine with your Mavic drone.