For some of us, shooting with the Z50 mirrorless camera is like working with an old friend. Someone who has used virtually any previous Nikon dSLR will find the Z50 mirrorless camera comfortably familiar in shape and placement of the controls. The only things missing are the mirror and quite a bit of weight and bulk. The Z50 has been right-sized to fit in your hand, with all the buttons, dials, and knobs needed for the most frequently adjusted functions arranged for easy access. Another 12 settings can be adjusted from the i menu, and you can substitute other options for any of the dozen default i menu settings to suit your own working habits. (I’ll show you how to personalize the i menu in Chapter 10.) With so many control choices available, you’ll find that the bulk of your shooting won’t be slowed down by a visit to the vast thicket of text options called Menu-land.
Of course, if you want to operate your Z50 efficiently, you’ll need to learn the location, function, and application of all these controls. However, what Nikon gives you in the user’s manual is akin to a world globe with an overall view and many cross-references to the pages that will tell you what you really need to know. In pages 1 through 4 in Nikon’s Reference manual you’ll find tiny black-and-white line drawings of the camera body with dozens of callouts. If you want to know what the touch screen “button” labeled with a magnifying glass does, the Nikon manual helpfully sends you off to explore pages 20, 49, 61, 145, and 162.
I’ll take a somewhat different approach in this book, particularly in this “roadmap” chapter. Rather than provide you with a satellite view, I’ll give you a street-level map that includes close-up, full-color photos of the camera from several angles, with a smaller number of labels clearly pointing to each individual feature. And, I don’t force you to flip back and forth among dozens of pages to find out what a component does. Each photo is accompanied by a brief description that summarizes the control’s functions, so you can begin using it right away. Only when a feature deserves a lengthy explanation do I direct you to a more detailed write-up later in the book.
Using Cross-References
“I wish I could learn everything I need to know about a feature in one place!”
Some readers find cross-references inconvenient. They’d like to open the book to one page and read everything there is to know about using, for example, bracketing capabilities. Unfortunately, it’s impossible to understand some features without having a background in what related features do. Explanations of how to bracket exposures aren’t useful for those who need to first understand all the available exposure options.
That’s why it’s not possible to explain everything there is to know about every button and control (or indeed, any feature of the Z50) with anything less than a mammoth 100-page chapter. But it is possible to tell you what you absolutely must know about each option to get started. So, if you’re wondering what that “Zoom in” icon on the right edge of the touch screen does, I’ll provide a concise explanation right up front rather than sending you off to five different pages scattered throughout the book. This book is not a scavenger hunt. But after I explain how to use that virtual button to zoom in when in shooting or playback modes, I will provide a cross-reference to longer explanations that clarify useful options to, say, cycle between full-frame and thumbnail displays.
So, my strategy is to provide you with introductions in the earlier chapters, covering simple features completely, and relegating some of the in-depth explanations to later parts of the book, using cross-references. For veteran enthusiasts, the introductions may be all they need; less-experienced photographers will be glad I didn’t make unwarranted assumptions about what they already know. Feedback from readers have told me that this kind of organization works best for the broadest possible audience working with a camera as sophisticated as the Nikon Z50. (Remember, you were a beginner once, too, and can always skip any sections you like if you feel you won’t benefit from a refresher.)
In all cases, however, by the time you finish this chapter, you’ll have a good understanding of every control and of the various roles each can have. I’ll provide a lot more information about items in the menus and submenus in Chapters 9, 10, and 11, but the following descriptions should certainly satisfy the button pusher and dial twirler in you.
You’ll also find this “roadmap” chapter a good guide to the rest of the book, as well. I’ll try to provide as much detail here about the use of the main controls as I can, but some topics (such as autofocus and exposure) are too complex to address in depth right away. So, I’ll point you to the relevant chapters that discuss things like setup options, exposure, use of electronic flash, and working with lenses with the occasional cross-reference.
Nikon Z50: Up Front
This is the side seen by your subjects as you snap away. For the photographer, though, the front is the surface your fingers curl around as you hold the camera, and there are really only a few buttons to press, all within easy reach of the fingers of your left and right hands. There are additional controls on the lens itself. You’ll need to look at several different views to see everything. Figure 3.1 shows the front of the camera with the lens removed. The components are as follows:
- Sub-command dial. This dial is used to change shooting settings. When settings are available in pairs (such as shutter speed/aperture), this dial will be used to make one type of setting, such as aperture, while the main command dial (on the back of the camera) will be used to make the other, such as shutter speed. Using the Custom Setting f4 menu adjustments, you can reverse the default rotational direction, swap the functions of the sub-command and main command dials, control how the command dials are used to set aperture and focus modes, tell the Z50 how to use the command dials to scroll through menus and images, and select options for using the sub-dial for advancing through frames during playback. All these adjustments are discussed in more detail in Chapter 12.
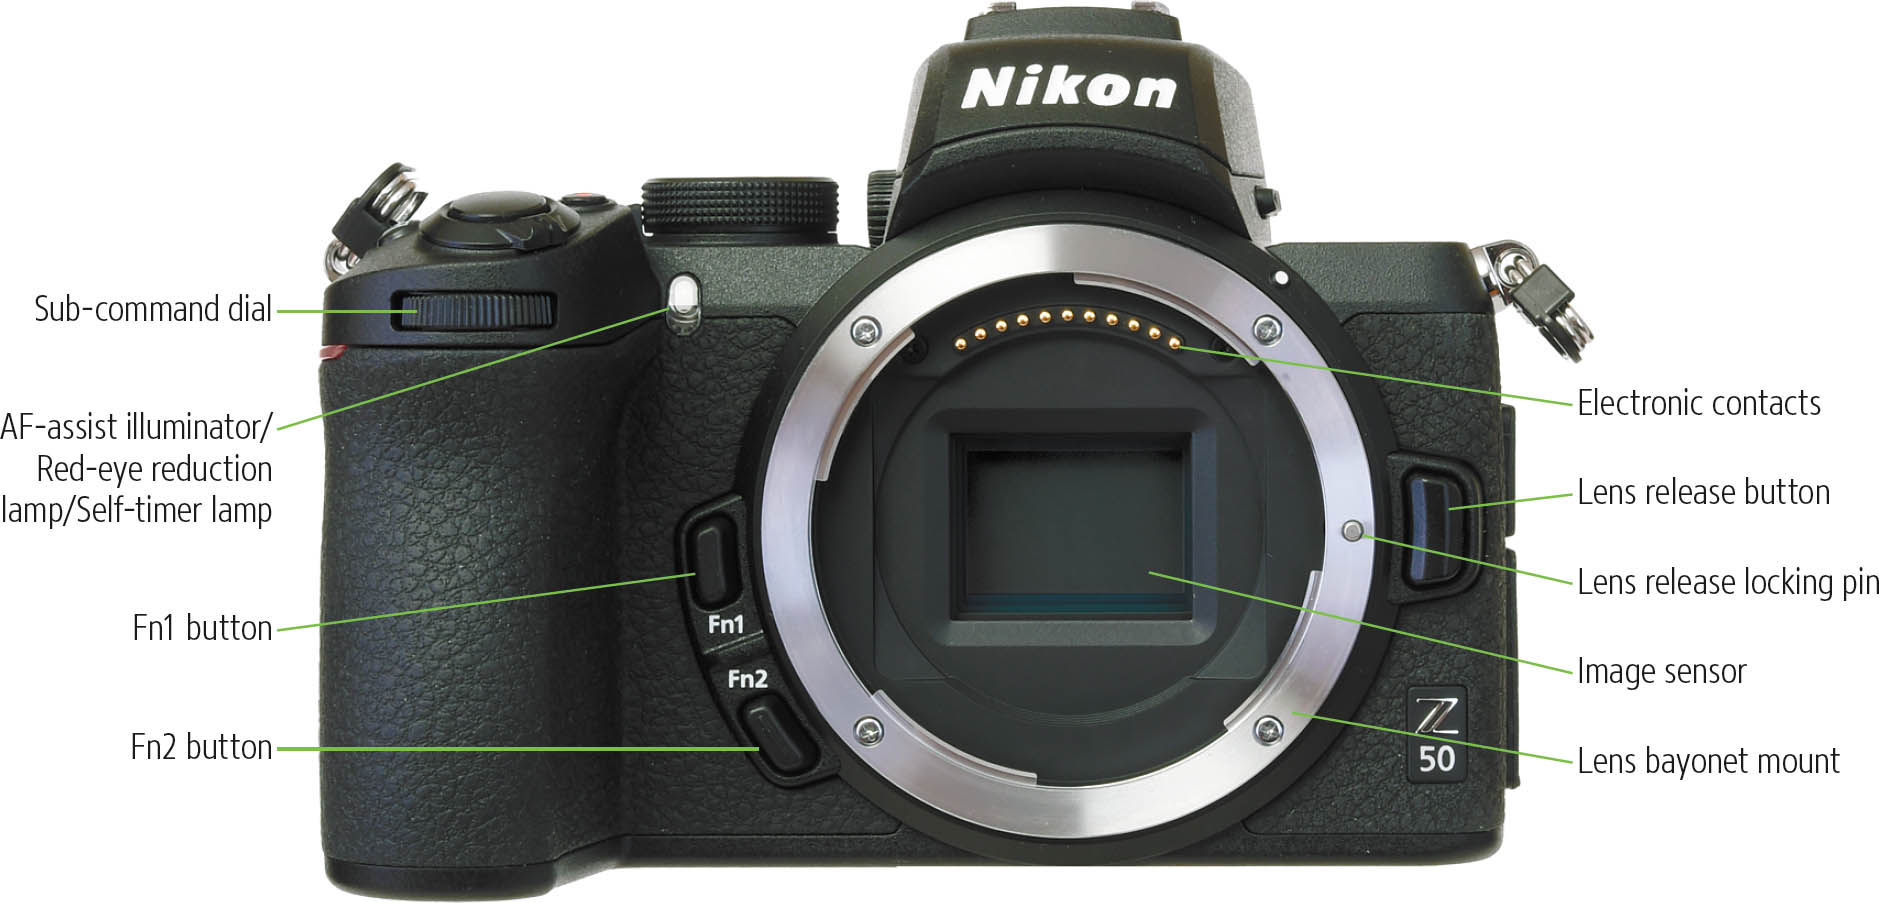
Figure 3.1
- Electronic contacts. These 11 contact points mate with matching points on the bayonet mount of the lens itself, and allow two-way communication between the camera and lens for functions like aperture size and autofocus information.
- Image sensor. The Z50’s 21 MP sensor is fully exposed when the lens is removed. You should be careful and never touch or press against it, to avoid damaging the protective surface of the sensor itself.
- Function 1 (Fn1) button. This conveniently located button has the White Balance function assigned by default. Just hold down the button and rotate the main command dial to select a white balance setting. When PRE (Preset) is selected, you can also rotate the sub-command dial to switch among custom white balance settings you create. However, using Custom Setting f2 and f3 (for Shooting and Movie modes, respectively), the Fn1 button can be programmed to perform any one of up to 30 different actions, ranging from selecting metering modes (Matrix, Center-weighted, Highlight-weighted, or Spot) to flash off. I’ll explain how to define a function in Chapter 12.
- Function 2 (Fn2) button. By default, this button adjusts Focus-area mode when you hold it and rotate the sub-command dial, and Focus mode when held while you spin the main command dial. This button can be redefined using the same functions offered for the Fn1 button, as discussed in Chapter 12.
- Lens bayonet mount. This precision bayonet mount mates with the matching mount on the back of each compatible lens. The Z-mount is held on the camera using four screws that provide a secure attachment to the body, but not too secure. Their mounting holes are shallow enough to allow the bayonet mount to pop off if you drop the camera on the lens (which avoids even worse damage to the camera body itself). But don’t worry, the mount is more than secure enough for everyday use, even with the heaviest lenses.
- Lens release button. Press this button to retract the locking pin on the lens mount so a lens can be rotated to remove it from the camera.
- Lens release locking pin. This pin slides inside a matching hole in the lens to keep it from rotating until the lens release button is pressed.
- AF-assist illuminator/Red-eye reduction lamp/Self-timer lamp. When using the self-timer, this lamp flashes to mark the countdown until the photo is taken.
Figure 3.2 shows a view of the left side of the Nikon Z50, as seen from the front. The main components you need to know about are as follows:
- Shutter release button. Angled on top of the hand grip is the shutter release button, which has multiple functions. Press this button down halfway to lock exposure and focus. Press it down all the way to actually take a photo or sequence of photos if you’ve set the release mode to any of the continuous shooting modes, or if you’ve defined the behavior of the self-timer to take 1 to 9 exposures when its delay has expired. (I’ll show you how to take multiple shots with the self-timer in Chapter 11.) Tapping the shutter button when the Z50’s exposure meters have turned themselves off reactivates them, and a tap can be used to remove the display of a menu or image from the rear color LCD monitor.
- On/Off switch. Rotating this switch to the detent turns the camera on.
- Hand grip. This provides a comfortable handhold, and also contains the Z50’s battery.
You’ll find more controls on the other side of the Z50, shown in Figure 3.3. In the illustration, you can see the rubber covers on the side that protect the camera’s USB, HDMI, and microphone ports. The main points of interest shown include:
- Lens mounting mark. Match the dot on the lens with this indicator when mounting your lens.
- Covers for connectors (microphone and USB/HDMI). These two covers protect the USB, HDMI, and microphone ports when not in use.
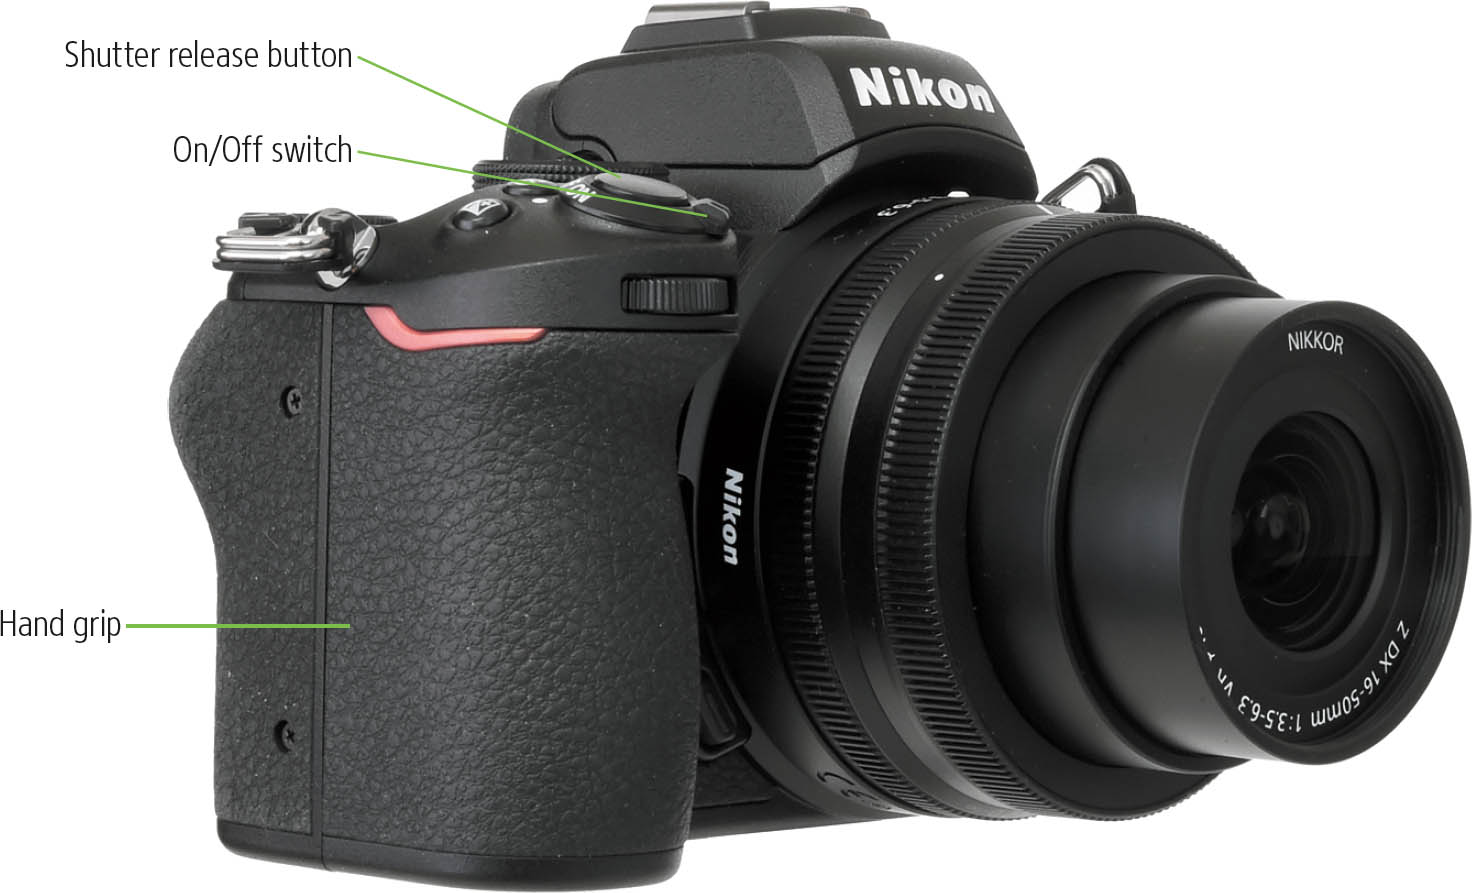
Figure 3.2
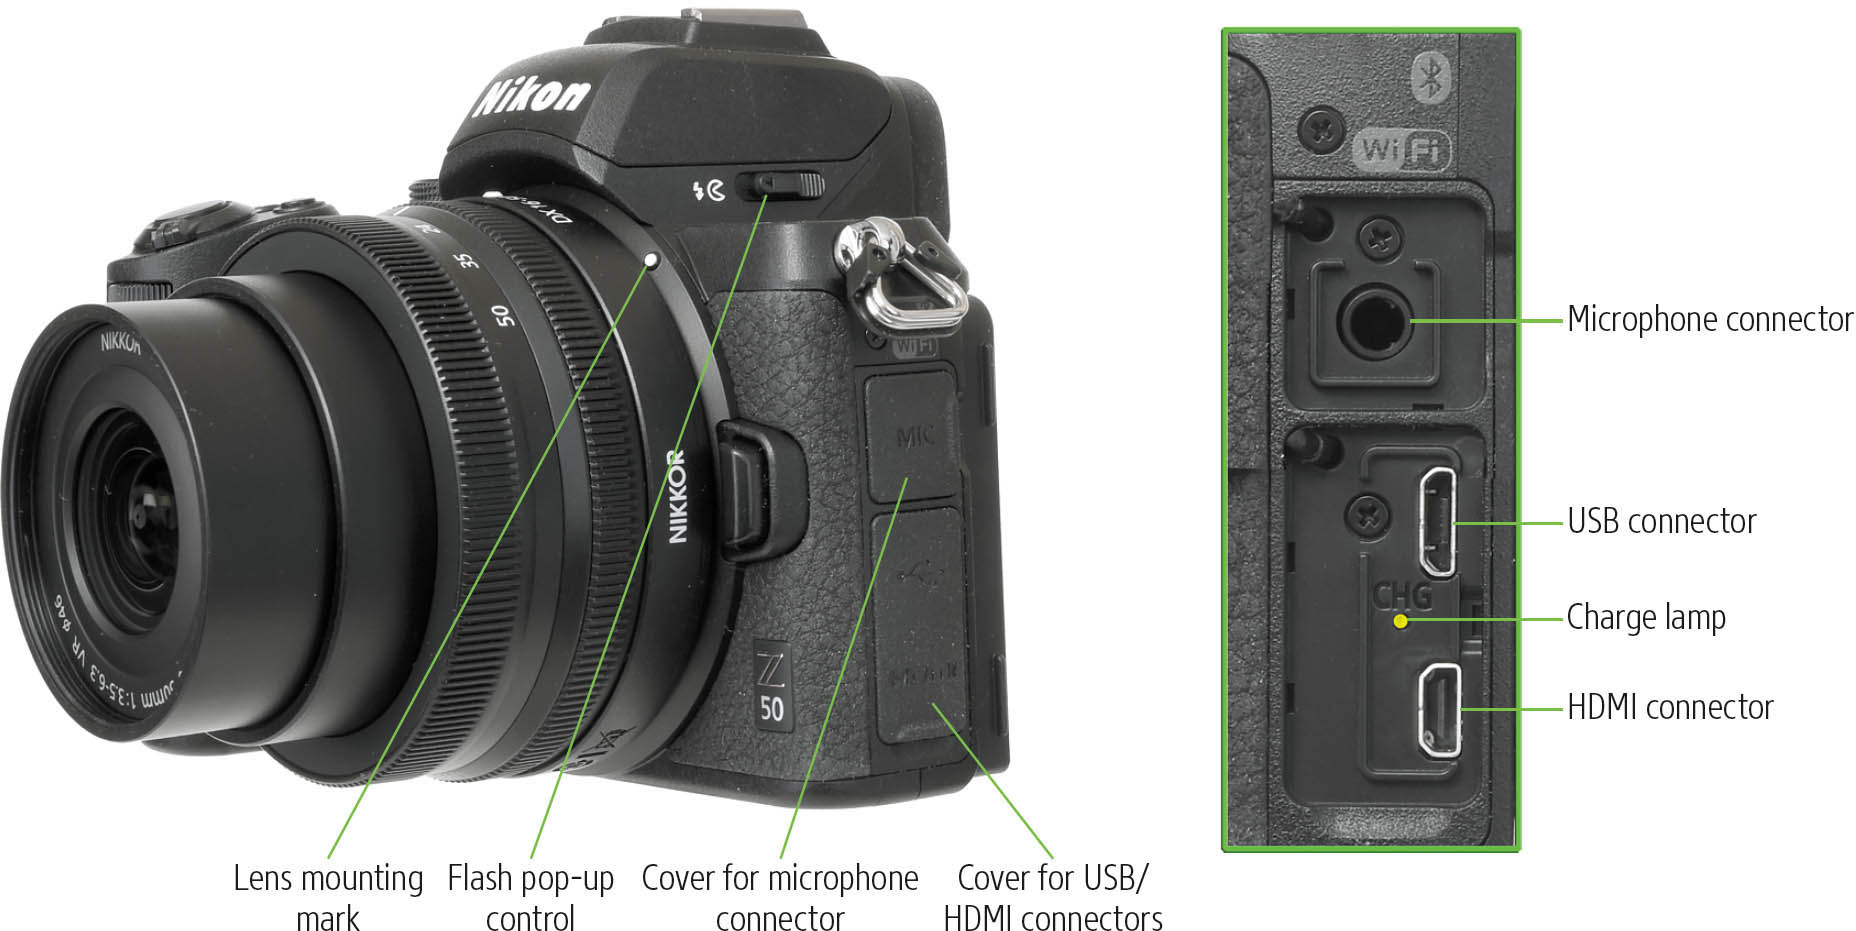
Figure 3.3
- Microphone connector. Although the Z50 has built-in microphones on top, if you want better quality (and want to shield your video clip soundtracks from noises emanating from the camera and/or your handling of it), you can plug in an accessory mic, such as the Nikon ME-1, here.
- USB connector. Plug in the USB cable furnished with your Nikon Z50 and connect the other end to a USB port in your computer to transfer photos, to upload Picture Control settings, or to upload/download other settings between your camera and computer. This USB connector is also used for charging the battery when connected to a power source.
- Charge lamp. This LED glows amber while charging the camera’s EN-EL25 battery when an external USB power adapter (not supplied with the Z50) and USB cable is plugged into the USB port. The lamp turns off when charging is complete. The charging adapter is disabled if the camera is turned on. You can continue to use the camera when the charging adapter is plugged in; however, the battery will not charge and the camera will not be powered by the adapter.
- HDMI connector. You need to buy an accessory HDMI mini-C cable to connect your Z50 to an HDTV, as one to fit this port is not provided with the camera. If you have a high-resolution television, it’s worth the expenditure to be able to view your camera’s output in all its glory.
- Flash pop-up control. Press toward the front of the camera to elevate the built-in flash.
The Nikon Z50’s Business End
The back panel of the Nikon Z50 bristles with a dozen different controls, buttons, and knobs. That might seem like a lot of controls to learn, but you’ll find, as I noted earlier, that it’s a lot easier to press a dedicated button and spin a dial than to jump to a menu every time you want to change a setting.
Top of Back Panel
You can see the controls clustered along the top edge of the back panel in Figure 3.4, left. The key buttons and components and their functions are as follows:
- Monitor mode button. Press this button to cycle among the four LCD monitor modes. You can disable unwanted modes in the Setup menu’s Limit Monitor Mode Selection entry.
- Automatic display switch. Alternates between viewfinder and monitor as your eye approaches the eye sensor or is moved away.
- Viewfinder only. Displays in the viewfinder only.
- Monitor only. Displays on the monitor only.
- Viewfinder eyepiece/Viewfinder window. You can frame your composition by peering into the 2,360,000-pixel (XGA) OLED electronic viewfinder, which shows 100 percent of your image frame at a generous 1.02x magnification. It’s surrounded by a soft rubber frame that seals out extraneous light when pressing your eye tightly up to the viewfinder, and it also protects your eyeglass lenses (if worn) from scratching. Your eye can be up to 19.5mm away from the viewfinder window (the “eyepoint”) and still view the entire focus screen area.
- Eye sensor. Detects when your eye (or anything else) approaches the viewfinder window (anything closer than about three inches in my tests).
- Diopter adjustment control. Pull this knob out, and then rotate it to adjust the diopter correction for your eyesight; then push it in to lock the setting. Adjustments are available from –3 to +3.
- AE-L/AF-L Protect Button. Press this button while taking photos to lock the exposure and focus. In Playback mode, press the button to Protect an image or video from accidental deletion (but not from removal when re-formatting a card).

Figure 3.4
- Main command dial. This is the main control dial of the Z50, used to set or adjust most functions, such as shutter speed, bracketing sequence, white balance, ISO, and so forth, either alone or when another button is depressed simultaneously. It is often used in conjunction with the subcommand dial on the front of the camera when pairs of settings can be made, such as image formats (main command dial: image format; sub-command dial: resolution); exposure (main: shutter speed; sub: aperture); flash (main: flash mode; sub: flash compensation); or white balance (main: WB preset; sub: fine-tune WB).
You can swap functions of the main and sub-command dials, reverse the rotation direction, choose whether the aperture ring on the lens or the sub-command dial will be used to set the f/stop, and activate the main command dials to navigate menus and images. You’ll learn about these Custom Settings menu options (Custom Setting f4 and f5) in Chapter 12.
- Tilting LCD monitor. The 3.2-inch LCD monitor has a 1,040,000-dot XGA TFT touch-sensitive screen with a 170-degree viewing angle that allows you to see the screen clearly even from the side or slightly above. It provides a 100 percent view of what the sensor sees. It swivels so you can position the camera down low (say, for macro shots of flowers) or up high for a periscope view.
The monitor can be tilted down and reversed to face the front of the camera; the image is reversed vertically, so it displays in the correct orientation. This feature is useful for taking selfies, to view yourself when vlogging, or for giving your subject a preview of the photo you are taking. (See Figure 3.4, right.) The latter mode is not especially practical, as both automatic and manual switching from viewfinder to monitor is disabled when the screen is in this position. In other words, you can’t preview your image through the viewfinder, and then back away to display the preview to your subject. See the section that follows this one for more tips on using the touch-sensitive monitor.
- Camera strap eyelet. It comes with a split-ring attached that can be used to fasten a neck strap to the Z50.
Taking Selfies
When the Self-Portrait Mode setting of the Setup menu is set to ON (as explained in Chapter 11), flipping the LCD monitor down to face forward automatically activates a special selfie mode. In this mode the Z50’s behavior changes in several ways:
- Many controls disabled. In self-portrait mode, the only controls that are enabled are the power switch, shutter release button, movie record button, photo/movie selector switch, mode dial, and flash pop-up control.
- Standby Timer >60 seconds. If you have set the Custom Settings C3 entry (Power Off: Standby Timer) to 10, 20, or 30 seconds, the Z50 will remain active for about 60 seconds if no operations are performed in Self-Portrait Mode. If the Standby Timer is set for 1, 5, 10, or 30 minutes or No Limit, those intervals will be used instead. A 1 minute or longer timer is recommended so you can take selfies at your leisure without rushing. You can read more about the Power Off settings in Chapter 10.
- Don’t use HDMI output. I discovered that if you have an external HDMI device, such as a monitor or recorder, plugged into the Z50, Self-Portrait Mode is not enabled. The LCD monitor image is displayed in the correct orientation, but the on-screen selfie controls are disabled.
To take a self-portrait, just follow these steps:
- 1. Select exposure mode with mode dial. Rotate the mode dial to select your preferred exposure mode, such as Program, Aperture-priority, Shutter-priority, or Manual exposure. You can also use the mode dial to make this adjustment when you’ve switched to Self-Portrait mode, but it’s easiest to do it beforehand.
- 2. Rotate the LCD monitor to face forward. As mentioned above, Self-Portrait Mode in the Setup menu must be On. The Z50 automatically rotates the screen image so the view is in the correct, upright orientation. This is true whether you hold the camera right side up, or upside down (in that case, with the LCD monitor above the camera).
Unfortunately, selfie mode doesn’t lend itself to mounting the camera on a tripod, as the tripod would obscure the LCD screen. It’s clearly intended to be used hand-held. Vloggers who don’t want to hand-hold the camera while recording podcasts will need to jury-rig another way to mount the camera to a tripod, such as the Smallrig Vlogging Mounting plate (about $30, www.smallrig.com). I use a three-inch long 1/2-inch thick rod with a male tripod fitting at one end and a female on the other end to lift the camera above the tripod head.
- 3. Adjust Exposure. You can adjust the ISO sensitivity, shutter speed (in S mode), aperture (in A mode), and all three Manual modes. Tap the shutter speed, aperture, or ISO icons at the bottom of the screen, as appropriate, to make your settings. (See Figure 3.5.) Other settings, such as metering mode or AF settings cannot be changed, and access to the menu system is disabled.
- 4. Set Self-timer. You’ll often want to use the self-timer when taking a self-portrait. The Z50 defaults to a 2-second delay. Tap the self-timer icon in the upper right of the touch screen (also shown in Figure 3.5) and you can choose a 10-second delay instead, and change from a single shot to up to 9 images captured after the delay expires. You can also disable the self-timer entirely.
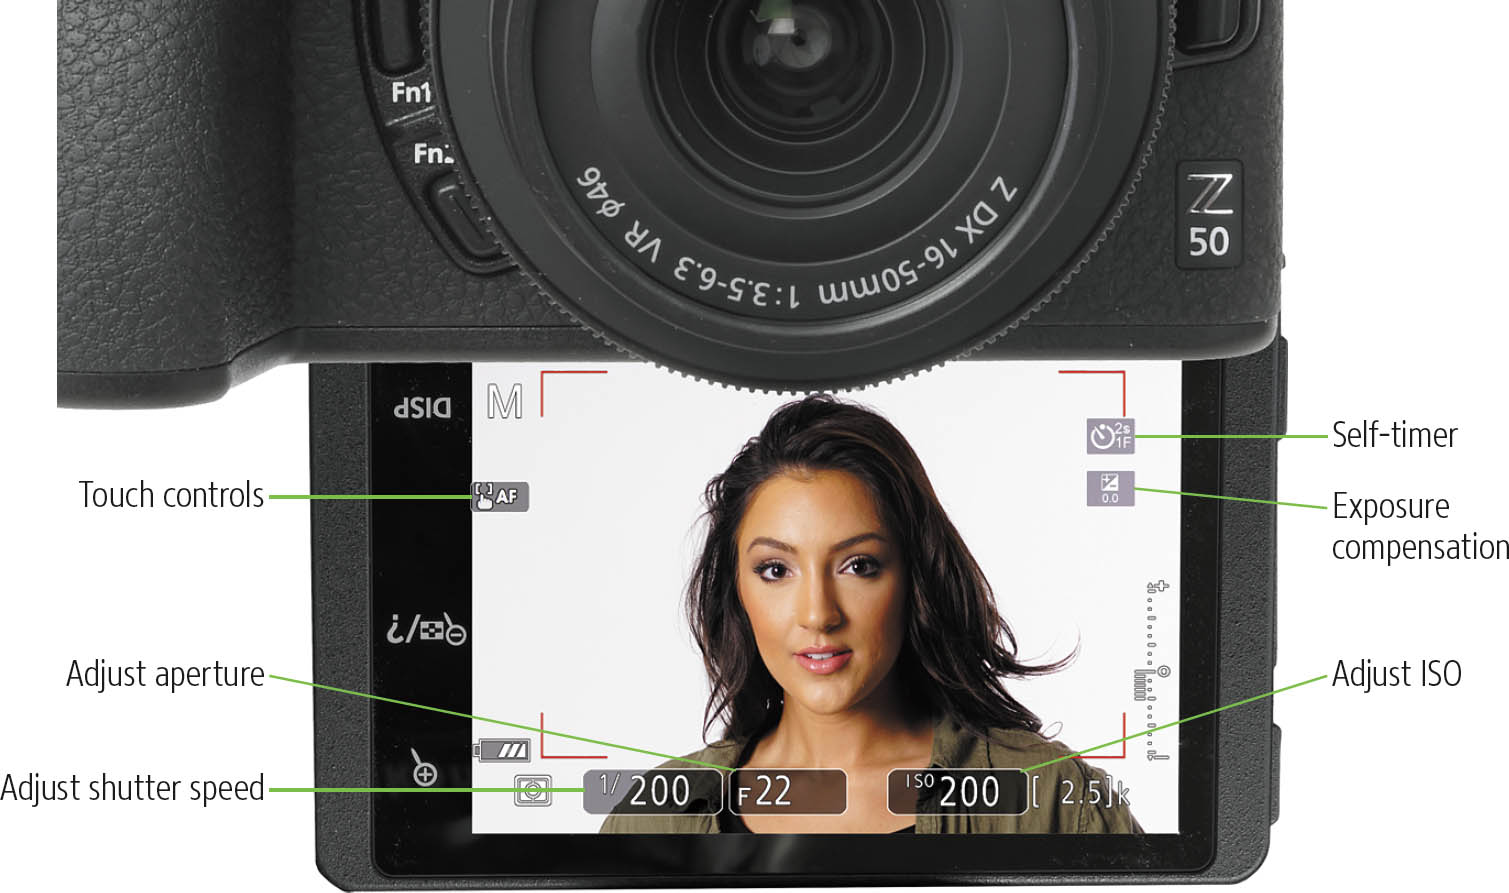
Figure 3.5 Shoot selfies or vlog with the LCD monitor facing forward.
- 5. Set exposure compensation. An exposure compensation icon is located in the figure directly below the self-timer icon in the upper right of the touch screen. Tap to add or subtract exposure.
- 6. Enable/disable touch focus/shutter. The touch controls icon at the upper left of the screen allows you to turn on touch focus (the Z50 focuses at the location you tap) or touch focus/shutter (the camera focuses at the point you tap and then takes a picture); or turn both capabilities off.
- 7. Take still photo/movie. With the Photo/Movie switch in the Photo position (if you don’t want to use the touch focus/shutter feature), press the shutter release halfway to focus and all the way down to take a still picture. With the switch in the Movie position, press the Movie button to start/stop video capture.
If you have paired the optional ML-L7 Bluetooth remote with your Z50, you can also take a picture or shoot movies by pressing the remote’s shutter button or movie button, respectively. But note, in the Playback menu you must set the Image Review entry to OFF. If you don’t, the Z50 will display the picture you just took immediately, and you will be unable to dismiss it. The Fn1 button on the ML-L7 remote’s default behavior is to enter/exit Playback mode, but it does not work in Self-Portrait mode. I’m hoping Nikon will correct this bug during the life of this book through a firmware update.
- 8. Exit Self-Portrait mode. Just return your LCD monitor to its closed and upright position and enjoy the rest of your flight.
Making Settings
I’ll describe the array of buttons on the back of the Z50 shortly. But while we’re learning what the touch screen can do, you’ll want to know that while you’re previewing an image on the LCD monitor you can make exposure changes and activate/deactivate the touch focus/touch shutter feature using the touch screen. The settings you can make from the touch screen are displayed with boxes highlighting them as shown in Figure 3.6. They include touch focus/touch shutter, shutter speed, aperture, ISO sensitivity, and i menu.

Figure 3.6 Settings accessible from the touch screen.
Other essential settings can be made using the cluster of physical and virtual buttons on the lower right of the back panel of the Z50 (see Figure 3.7):
In the control section of the touch screen:
- Zoom In button. This “virtual” button on the LCD monitor can be used in three different modes:
- Playback mode. Tap to zoom in on an image when in full-screen view, to increase the zoom ratio (up to 21X, depending on your Image Size setting), or to decrease the number of thumbnails when in index view (described shortly). Note: you can also zoom in and out in playback mode using “squeeze” and “stretch” gestures on the touch screen, similarly to the techniques used with smartphones. I’ll explain zooming and other playback options in the next section.
- Shooting mode. Tap to zoom in while focusing, and to increase the zoom ratio.
- Movie playback mode. Tap to increase the volume of the playback audio.
- Zoom Out/Index/Help button. This button has separate Playback and Shooting mode functions:
- Playback mode. Tap this button to change from full-screen view to 4, 9, or 72 thumbnails. Tap the Zoom In button to go the other way back to full screen and magnified views.
- Shooting mode. Tap to zoom out of a magnified image.
- Movie playback mode. Tap to increase the volume of the playback audio.
- DISP button. Shows or hides informational displays in the LCD monitor or viewfinder. Tap to cycle among the available displays in photo, movie, and playback modes.
On the back-right panel:
- Multi selector. This joypad-like disk can be shifted up, down, side to side, and diagonally for a total of eight directions. It can be used for several functions, including AF point selection, scrolling around a magnified image, trimming a photo, or setting white balance bias along the green/magenta and blue/yellow axes. Within menus, pressing the up/down arrows moves the on-screen cursor up or down; pressing toward the right selects the highlighted item and displays its options; pressing left cancels and returns to the previous menu.

Figure 3.7 Controls on the lower-right back panel.
- OK button. The OK button in the center of the multi selector can be pressed to activate several different default functions, depending on your current mode. Like many other controls, it can be redefined; in this case use Custom Setting f2. I’ll explain those options in Chapter 12.
- Shooting mode. Resets focus point to the center of the frame.
- Playback mode. Press to turn zoom on or off. Repeated presses toggle between those two modes only; zoom magnification does not change.
- Menu mode. Selects highlighted menu option (same as right arrow button).
- Playback button. Press this button to review images you’ve taken, using the controls and options I’ll explain in the next section. To remove the image display, press the Playback button again, or simply tap the shutter release button.
- Trash button. Press to erase the image shown on the LCD monitor. A display will pop up on the LCD monitor asking you to press the Trash button once more to delete the photo, or press the Playback button to cancel.
- i button. Pressing this button in photo or movie shooting modes summons the i menu, which I first showed you in Figure 2.1 in the previous chapter. A total of 12 adjustments can be accessed from the i menu, but you can replace any entry you don’t use much with another function of your choice, using Custom Setting f1: Customize i Menu, as described in Chapter 12.
In Playback mode, the i button has a different function. When reviewing a still image, press the i button and choose Rating, Select to Send/Deselect (Smart Device), Retouch, Choose Folder, Protect, or Unprotect All. When a movie clip is displayed during Playback mode, your choices are Rating, Volume Control, Trim Movie, Choose Folder, Protect, and Unprotect All. (See Figure 3.8.)
- Memory card access lamp. When lit or blinking, this lamp indicates that a memory card is being accessed.
- MENU button. Summons/exits the menu display. When you’re working with submenus, this button also serves to exit a submenu and return to the main menu.
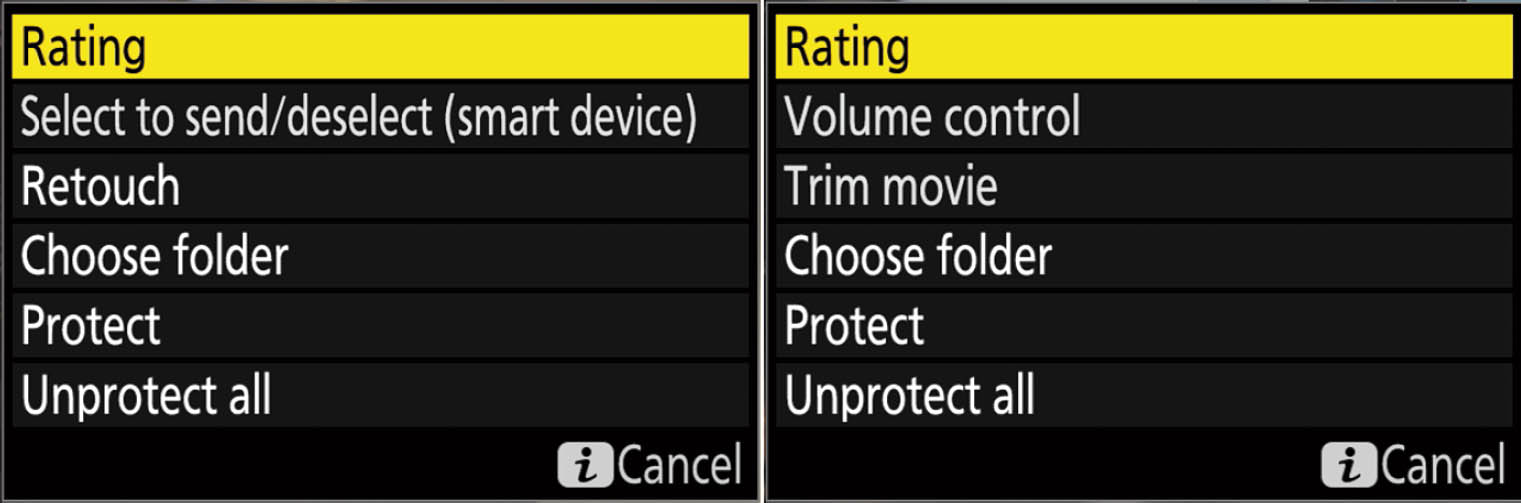
Figure 3.8 In Playback mode, the i button allows you to select a rating, send an image to a smart device, retouch a still image, choose a folder, or protect/unprotect an image from erasure. An additional option, Quick Crop, appears when the image is magnified. For video clips, your choices are Rating, Volume Control, Trim Movie, Choose Folder, Protect, and Unprotect All.
Playing Back Images
Reviewing images is a joy, whether you use the big 3.2-inch color LCD monitor or the viewfinder (which is especially handy for viewing images in bright light under which the monitor may tend to wash out).
Here are the basics involved in reviewing images on the Z50’s displays (or on a television/HDTV screen you have connected with a cable). You’ll find more details about some of these functions later in this chapter, or, for more complex capabilities, in the chapters that I point you to. This section just lists the must-know information.
- Start review. To begin review, press the Playback button located to the left of the trash button. The most recently viewed image will appear on the display.
- Playback folder. If you have more than one folder on your SD card, you can change which folder is used for playback by starting playback with the Playback button, and then pressing the i button and selecting Choose Folder. Press the right directional button and choose from a list of available folders. Press the right button again to activate that slot/folder.
You can also select the active folder using the Playback Folder option (choose NZ_50 folders, All, or Current Folder) in the Playback menu. You can create and activate a new folder using the Storage Folder entry in the Photo Shooting menu. See Chapter 9 for more information on both options.
- View thumbnail images. To change the view from a single image to four, nine, or 72 thumbnails, follow the instructions in the “Viewing Thumbnails” section that follows.
- Zoom in and out. To zoom in or out, press the Zoom In or Zoom Out buttons, following the instructions in the next section. (It also shows you how to move the zoomed area around using the multi selector keypad.)
- Move back and forth. To advance to the next image, press the right edge of the multi selector pad; to go back to a previous shot, press the left edge. When you reach the beginning/end of the photos in your folder, the display “wraps around” to the end/beginning of the available shots. Note: You can assign a special behavior to the sub-command dial such that rotating it skips ahead either 10 or 50 images, or advance by other parameters, such as rating. See the discussion of Custom Setting f4 (Customize Command Dials > Sub-dial Frame Advance) in Chapter 10 for more information.
- See different types of data. To change the type of information about the displayed image that is shown, press the up and down portions of the multi selector pad. You must first select which combination of seven informational screens appear, using the Playback Display Options entry in the Playback menu (described in Chapter 9).
- Remove images. To delete an image that’s currently on display, press the Trash button once, then press it again to confirm the deletion. To select and delete a group of images, use the Delete option in the Playback menu to specify particular photos to remove, as described in more detail in Chapter 9.
- Cancel playback. To cancel image review, press the Playback button again, or simply tap the shutter release button.
Zooming the Nikon Z50 Playback Display
The Nikon Z50 zooms in and out of preview images using the procedure that follows:
- 1. Zoom in. When an image is displayed (use the Playback button to start), press the Zoom In button to fill the screen with a slightly magnified version of the image. When viewing on the monitor, you can also press the multi selector center button, tap the touch screen twice, or touch two fingers to the LCD monitor and spread them apart to enlarge the image.
- 2. Continue zooming. A navigation window appears in the lower-right corner of the LCD monitor showing the entire image. Keep pressing to continue zooming in to the maximum of 21X enlargement (with a full resolution large image). (Medium and Small images can be enlarged up to 16X and 10X, respectively.) You can continue to use pinch and stretch gestures on the touch screen to zoom in and out.
- 3. Zoomed area indicated. A yellow box in the navigation window shows the zoomed area within the full image. (See Figure 3.9.) A bar under the window shows the current zoom ratio, and turns green at 1:1. The entire navigation window vanishes from the screen after a few seconds, leaving you with a full-screen view of the zoomed portion of the image.
- 4. Move zoomed area around. Use the multi selector buttons to move the zoomed area around within the image. The navigation window will reappear for reference when zooming or scrolling around within the display. You can also slide one finger around the touch screen to move the zoomed area.
- 5. Find faces. Up to 35 faces will be detected by the Z50, indicated by white borders in the navigation window. Rotate the sub-command dial or tap the on-screen guide (seen at the lower-right bottom edge in the figure) while the image is zoomed or tap the on-screen guide to move highlighting to the individual faces.
- 6. Quick Crop (optional). While the image is magnified during Playback, you can press the i button and choose Quick Crop. The Z50 will save a new file cropped to that image size. Your original image is untouched.
- 7. Review same area on another image. Use the main command dial or tap the left/right triangles at the bottom of the touch screen to move to the same zoomed area of the next/previous image. This allows you to compare a detail in a series of similar shots. I often use the capability to see if a spot in an image is a dust spot (it shows up in the same place in other images), or just an artifact found in a single image.
- 8. Zoom out. Use the Zoom Out button to zoom back out of the image.
- 9. Exit. To exit zoom in/zoom out display, keep pressing the Zoom Out button until the full-screen/full-image/information display appears again. Or, just tap the shutter release halfway or press the Playback button to exit playback entirely.

Figure 3.9 The Nikon Z50 incorporates a small thumbnail image with a yellow box showing the current zoom area.
Viewing Thumbnails
The Nikon Z50 provides other options for reviewing images in addition to zooming in and out. You can switch between single-image view and 4, 9, or 72 reduced-size thumbnail images on a single LCD monitor screen.
Pages of thumbnail images offer a quick way to scroll through a large number of pictures quickly to find the one you want to examine in more detail. The Z50 lets you switch quickly with a scroll bar displayed at the right side of the screen to show you the relative position of the displayed thumbnails within the full collection of images in the active folder on your memory card. Figure 3.10 offers a comparison between the three levels of thumbnail views. The Zoom In and Zoom Out/Thumbnail buttons are used, or you can use the pinch and spread gestures with two fingers on the touch screen to increase or decrease the number of thumbnail indexes shown.
- Add thumbnails. To increase the number of thumbnails on the screen, press the Zoom Out button or pinch the touch screen. The Z50 will switch from single image to 4 thumbnails to 9 thumbnails to 72 thumbnails. (The display doesn’t cycle back to single image again.)
- Reduce number of thumbnails. To decrease the number of thumbnails on the screen, press the Zoom In button or use the spread gesture on the touch screen to change from 72 to 9 to 4 thumbnails, or from 4 thumbnails to single-image display. Continuing once you’ve returned to single-image display starts the zoom process described in the previous section.
- Change folder. When viewing images, press the i button to produce the dialog box (shown earlier in Figure 3.7) that includes an option to choose the folder of the memory card that contains the images you want to view. When 72 thumbnails are displayed, you can also press the Zoom Out button to summon the folder selection screen.
- Switch between thumbnails and full image. When viewing thumbnails, you can quickly switch between thumbnail view and full-image display by pressing the OK button in the center of the multi selector, or by tapping the thumbnail image on the touch screen.
- Retouch an image/thumbnail. When an image or thumbnail is viewed, press the i button to access the options screen that includes a Retouch option for that image (described in Chapter 11).

Figure 3.10 Switch between 4 thumbnails (left), 9 thumbnails (center), or 72 thumbnails (right), by pressing the Zoom Out and Zoom In buttons or using pinch and spread gestures on the touch screen.
- Change highlighted thumbnail area. Use the multi selector to move the yellow highlight box around among the thumbnails, or, preferably, use the monitor and a single finger on the touch screen to scroll back and forth or to select a particular thumbnail. Note that touching a thumbnail moves the highlighting to that thumbnail, while tapping the thumbnail produces a full-screen view of the image.
- Protect and delete images. When viewing thumbnails or a single-page image, press the i button and choose Protect to preserve the highlighted image against accidental deletion (a key icon is overlaid over the thumbnail image; return to the i menu to remove protection).
- Exit image review. Tap the shutter release button or press the Playback button to exit image review. You don’t have to worry about missing a shot because you were reviewing images; a half-press of the shutter release automatically brings back the Z50’s exposure meters, the autofocus system, and, unless you’ve redefined your controls or are using manual focus, cancels image review.
Using the Photo Data Displays
When reviewing an image on the viewfinder or monitor displays, your Z50 can supplement the image itself with a variety of shooting data, ranging from basic information presented at the bottom of the display, to a series of text overlays that detail virtually every shooting option you’ve selected. However, this is a good place to provide an overview of the kind of information you can view when playing back your photos.
You can change the types of information displayed using the Playback Display Options entry in the Playback menu. There you will find checkboxes you can mark for both basic photo information (overexposed highlights and the focus point used when the image was captured) and detailed photo information (which includes an RGB histogram and various data screens). You must mark any unchecked box to enable that type of information display. I’ll show you how to activate these info options in Chapter 9, and provide more detailed reasons why you might want to see each type of data when you review your pictures. This section will simply show you the type of information available. Most of the data is self-explanatory, so the labels in the accompanying figures should tell you most of what you need to know. To change to any of these views while an image is on the screen in Playback mode, press the DISP button or up/down buttons.
- File information screen. The basic full-image review display is officially called the file information screen, and a typical screen is shown in Figure 3.11, upper left. Not all the available information is shown on this screen; for example, if you’ve applied a rating to the image (as explained in Chapter 9), one or more stars may appear in the lower-left corner. Protection status and other overlays (also detailed in Chapter 9) may appear. Press the multi selector down button to advance to the next information screen (or the up button to cycle in the other direction).
- Exposure data. Basic exposure information is shown, including exposure mode, shutter speed, aperture, exposure compensation, and ISO sensitivity. The overlays mentioned above may also be shown if available. (See Figure 3.11, upper right.)

Figure 3.11 Top row: File information screen; Exposure data. Bottom row: Highlights, RGB Histogram.
- Highlights. When highlights display is active (after being chosen in the Display Mode entry of the Playback menu, as described in Chapter 9), any overexposed areas will be indicated by a flashing black border. As I am unable to make the printed page flash, you’ll have to check out this effect for yourself. You can visualize what these “blinkies” look like in Figure 3.11, lower left, as they are most easily discerned as the black splotches in the sky.
- RGB histogram. Another optional screen is the RGB histogram, which you can see in Figure 3.11, lower right. I’m going to leave the discussion of histograms for Chapter 4.
- Shooting data 1–6. These are a series of screens that collectively provide everything else you might want to know about a picture you’ve taken. Note that each screen may not show all the information that can be displayed on that screen, and that all the screens may not appear. Only the data and screens that apply to your image will be shown. For example, the GPS screen appears only if a picture has GPS information obtained from a connection to your smart device is embedded in it; the Artist/Copyright screen is shown only if you have chosen to embed that information in your image file. (I’ll show you how to do that in Chapter 11.) The six screens are shown in Figures 3.12 and the top row of Figure 3.13.
- Overview data. This screen, shown at bottom left in Figure 3.13, provides a smaller image of your photo, but more information, including a luminance (brightness) histogram, metering mode used, lens focal length, exposure compensation, flash compensation, and lots of other data that’s self-explanatory.
- None (Image only). If you prefer a view uncluttered by overlays, this final display, shown at bottom right in Figure 3.13, should be your cup of tea.
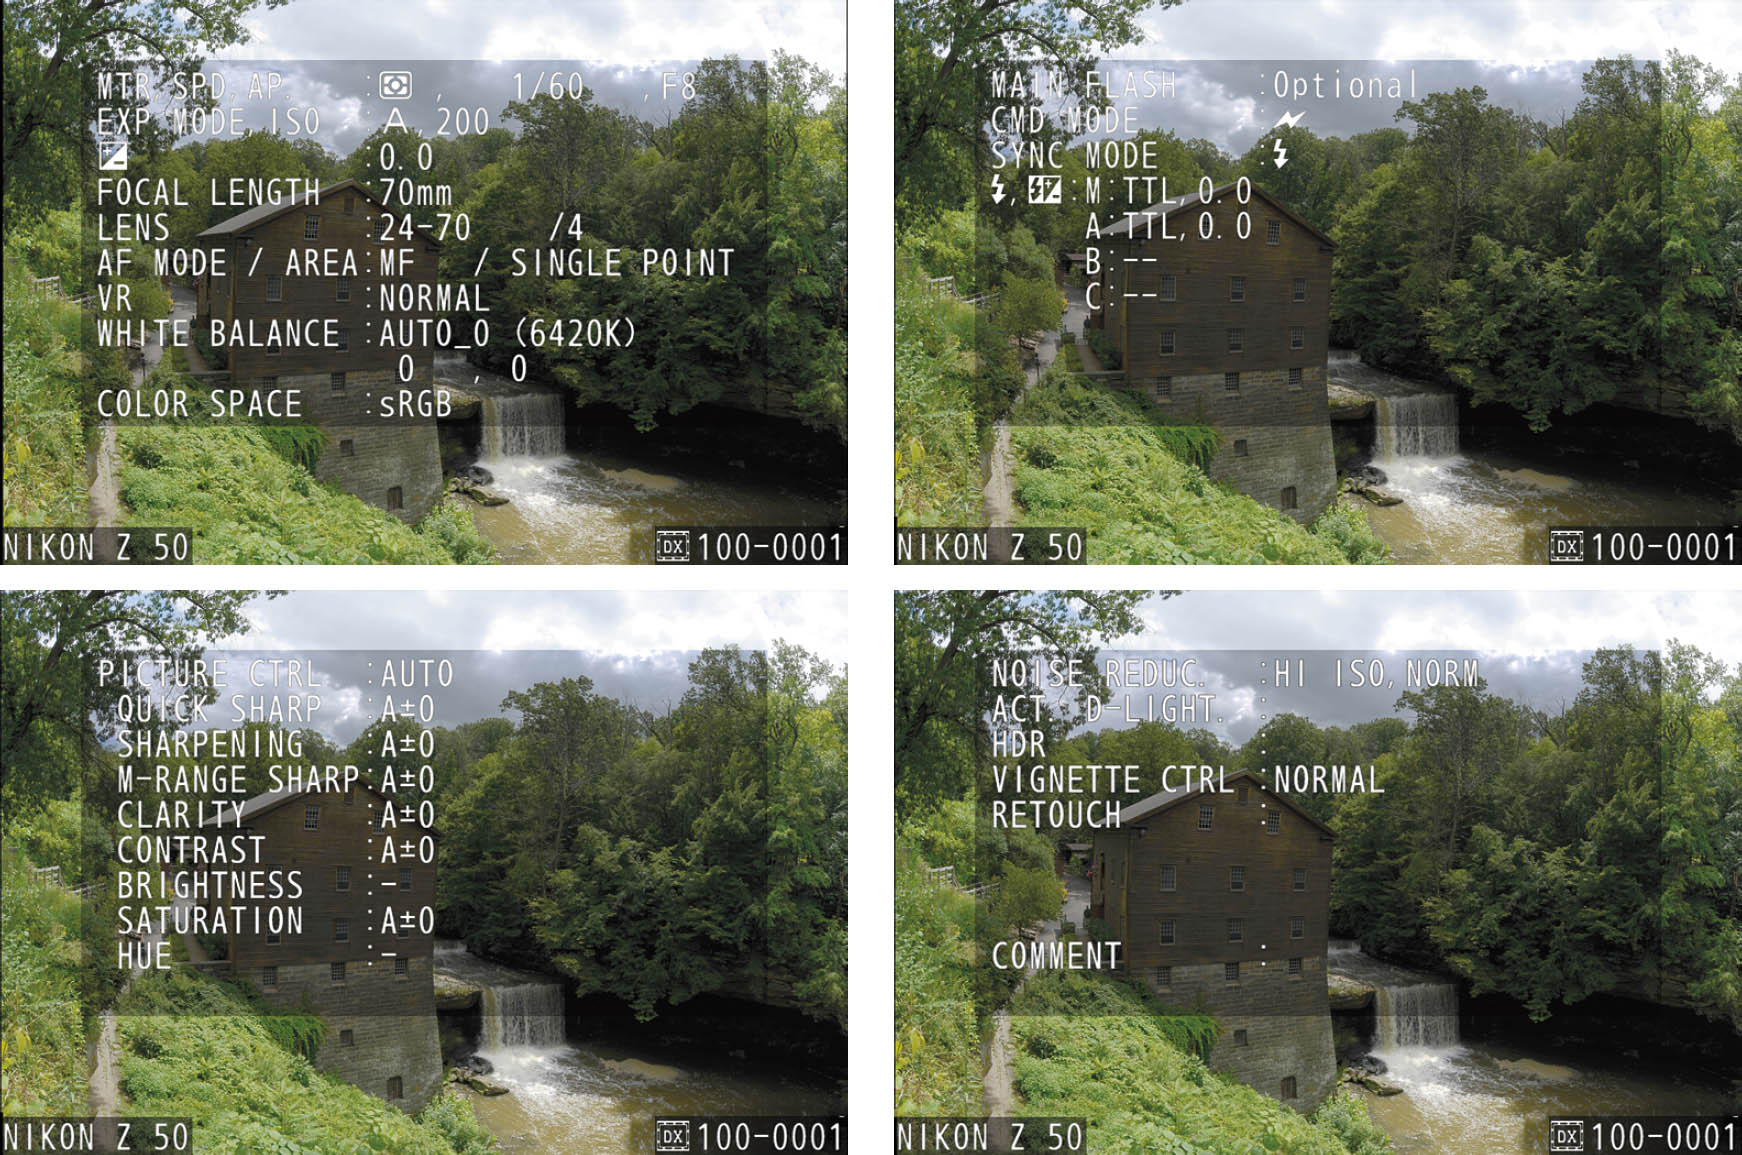
Figure 3.12 Top row: Exposure, lens, and autofocus/VR information (left); Flash exposure information (right). Bottom Row: Picture Control adjustments (left); Noise reduction, Active D-Lighting, Retouching, Comments, and other information (right).
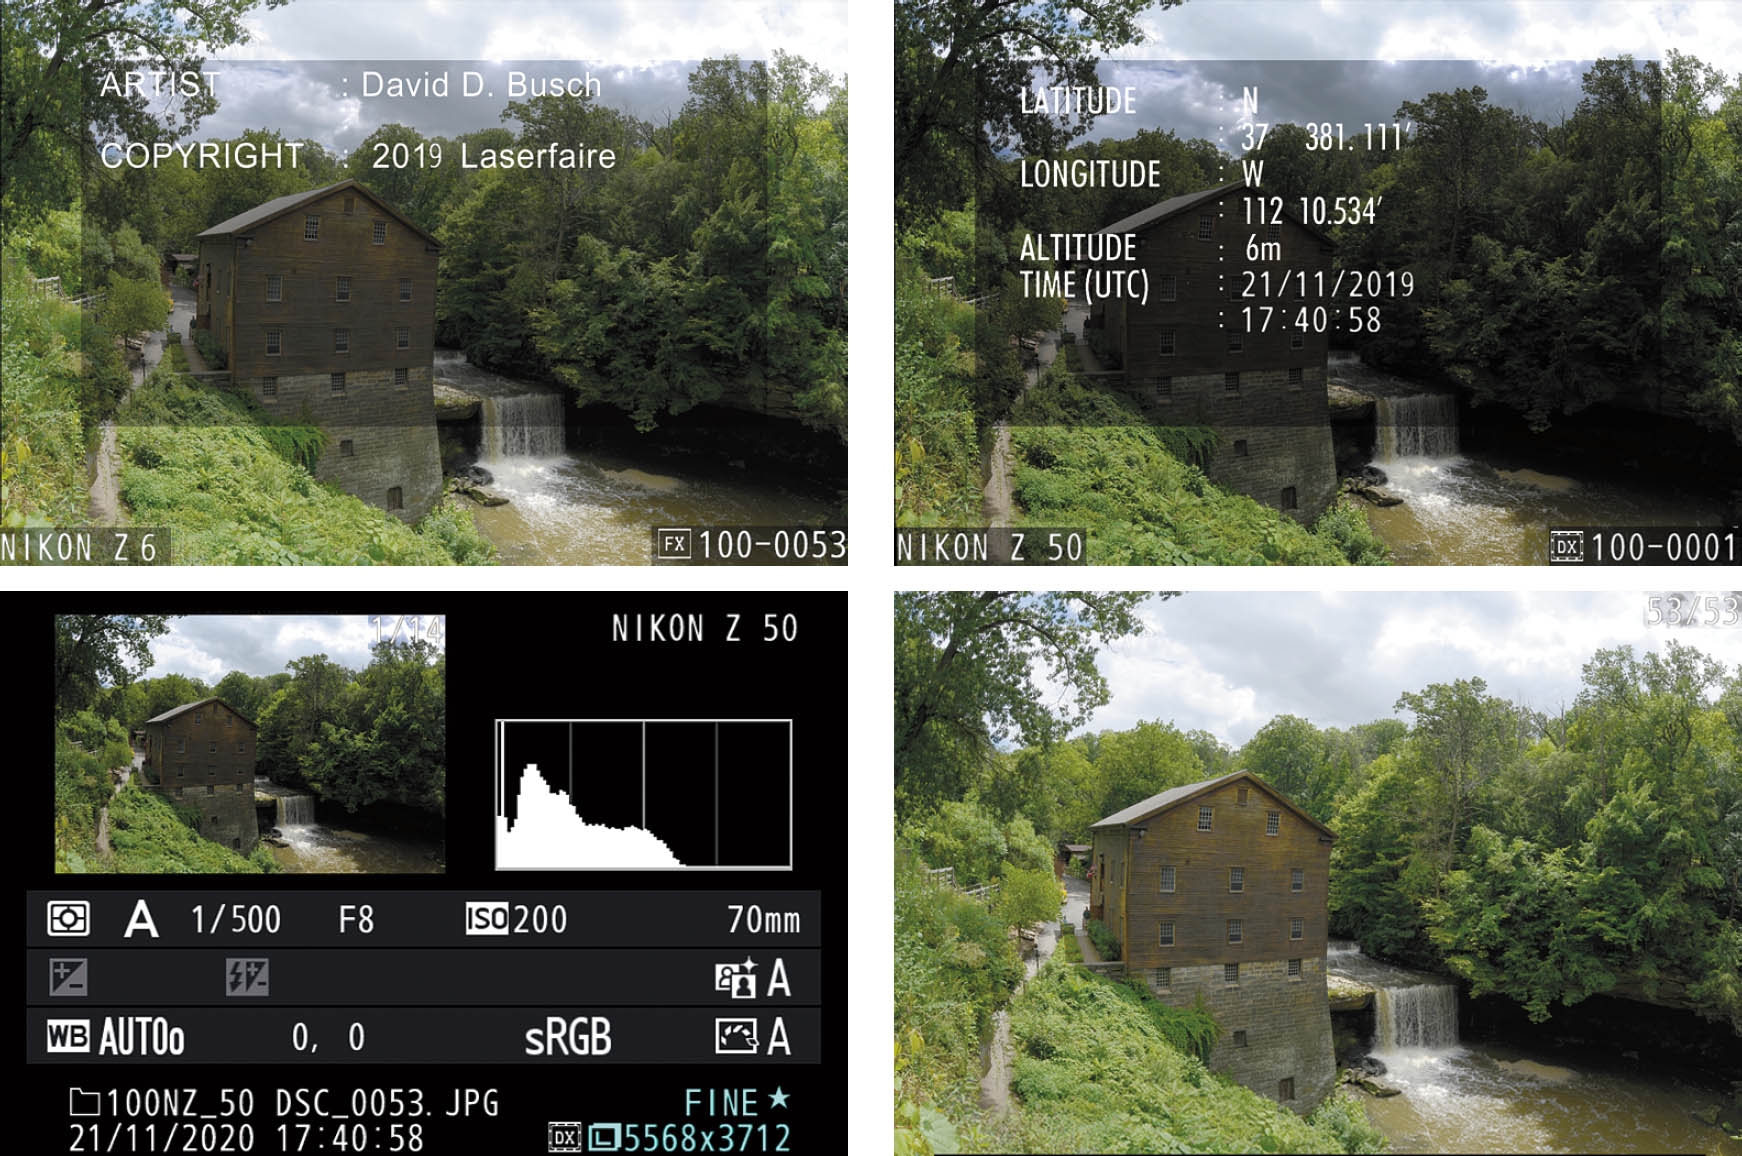
Figure 3.13 Top row: Artist, Copyright data (left); GPS data is displayed if the image was taken using a GPS device (right). Bottom row: Overview information (left); None (image only) displays (right).
The Viewfinder/Monitor Displays
Much of the important shooting status information is shown inside the electronic viewfinder and LCD monitor of the Nikon Z50. In shooting mode, you can press the DISP button to cycle through the available views. The shooting information display appears only on the monitor (in still photo mode), and can be shown in dark-on-light or light-on-dark color schemes. (See Figure 3.14.) Choose your scheme using the Information Display entry in the Setup menu, as explained in Chapter 11. One additional Information Display is available when an SB-300, SB-400, SB-500, or SB-5000 flash unit is attached and powered up. (See Figure 3.15.)
The other displays show information overlaid on the frame. As with the status control panel up on top, not all of this information will be shown at any one time. Figure 3.16 shows what you can expect to see on the LCD monitor. The viewfinder display is similar, but the icons are arrayed along the top and bottom instead of overlaid along the sides of the frame. The histogram is not displayed when Overlay Shooting is used in multiple exposure mode (see Chapter 9) or Custom Setting d7: Apply Settings to Live View is set to Off (see Chapter 10).
In addition to the features shown, a framing grid can be applied. This optional grid (it can be turned on and off in Custom Setting d8) can be useful when aligning horizontal or vertical shapes as you compose your image. The virtual horizon, shown in Figure 3.17, shows rotational and front/back tilt.
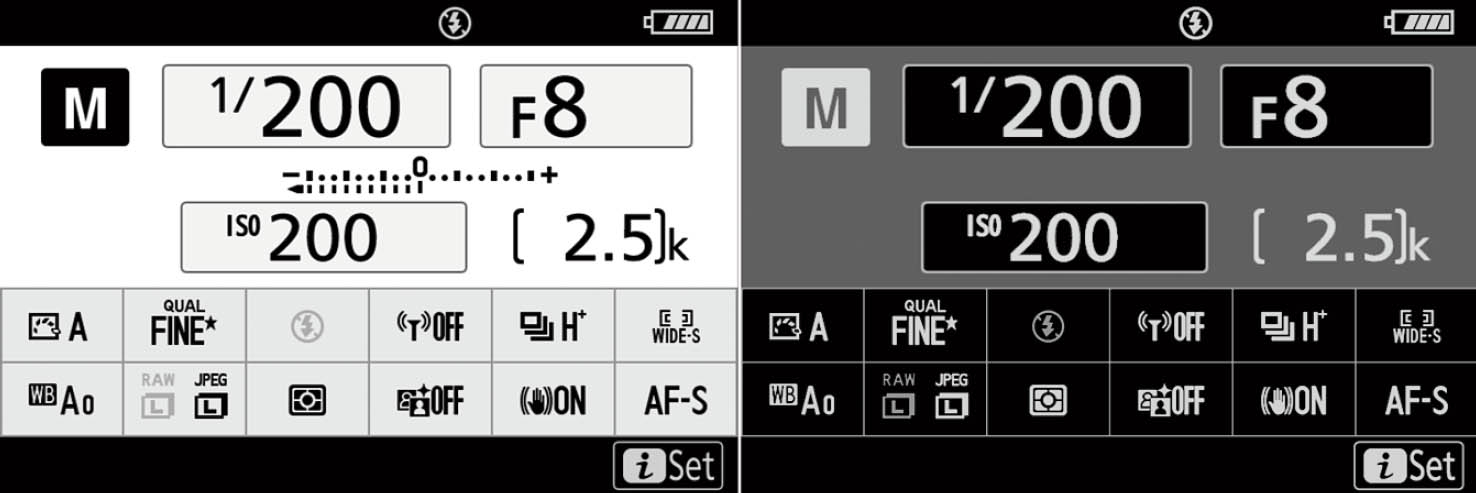
Figure 3.14 Photo information displays can be shown in light and dark color schemes.

Figure 3.15 Flash information appears when a compatible flash is mounted and powered up.
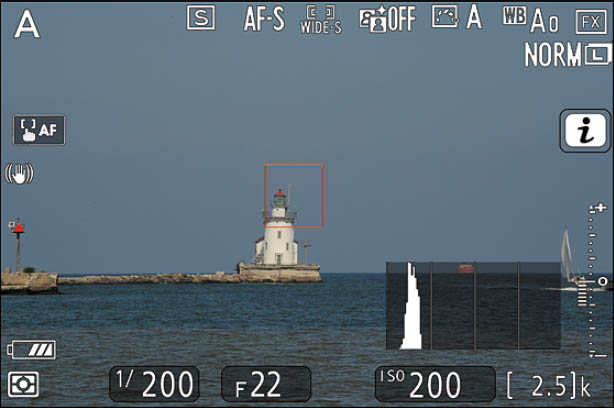
Figure 3.16 Overlaid information on the monitor screen.

Figure 3.17 The virtual horizon display is useful for correcting side-to-side and front/back tilt.
Going Topside
The top surface of the Nikon Z50 has its own set of frequently accessed controls. (See Figure 3.18.)
- Accessory shoe. Slide an electronic flash into this mount when you need a more powerful Speed-light. A dedicated flash unit, like the Nikon SB-5000, can use the multiple contact points shown to communicate exposure, zoom setting, white balance information, and other data between the flash and the camera. There’s more on using electronic flash in Chapters 9 and 10. You can also mount other accessories on this shoe, such as the Nikon ME-1 microphone.
- Stereo microphones. This pair captures sounds when shooting video.
- Power switch. Rotate this switch clockwise to turn on the Nikon Z50 (and virtually all other Nikon interchangeable-lens digital cameras).
- Shutter release button. Partially depress this button to activate the exposure meter (and the main and sub-command dials that adjust metering settings), lock in exposure, and focus (unless you’ve redefined the focus activation button, as outlined in Chapter 12). Press all the way to take the picture. Tapping the shutter release when the camera has turned off the autoexposure and autofocus mechanisms reactivates both. When a review image is displayed on the back-panel color monitor, tapping this button removes the image from the display and reactivates the autoexposure and autofocus mechanisms. You can also tap the button to exit image review and menus, readying the camera to take a picture.

Figure 3.18
- Exposure compensation button. Hold down this button and spin the main command dial to add or subtract exposure when using Program, Aperture-priority, or Shutter-priority modes. (In Manual mode, the exposure remains the same, but the “ideal” exposure shown in the electronic analog display [more on that in the next section] is modified to reflect the extra/reduced exposure you’re calling for.) The exposure compensation amount is shown on the monochrome status panel as plus or minus values.
- Focal plane mark. This indicator shows the plane of the sensor, for use in applications where exact measurement of the distance from the focal plane to the subject is necessary. (These are mostly scientific/close-up applications.)
- Movie button. Press to begin video capture; press a second time to stop.
- ISO button. Hold this button and rotate the main command dial until the ISO value you want is shown on the top control panel, in the viewfinder, and on the monitor.
- Speaker. Sounds from alerts, countdowns, and video playback emit from this monoaural speaker.
- Photo/Movie switch. Flip to toggle between still photo and video shooting modes.
Lens Components
As I write this, only two DX (APS-C) Nikkor lenses are available for the Z50, and they are more or less devoid of most of the controls found on the Nikon full-frame Z-mount lenses. Given that you may very well be supplementing your lens collection with full-frame lenses (and I’ll explain your options in Chapter 7), I’m going to describe the common lens components you’ll encounter. As Nikon F-mount lenses can also be used on your Z50 with the optional FTZ adapter, I’ll mention some features from those optics, as well. Not all Nikon lenses include all of the features shown in Figure 3.19. For example, G-series F-mount lenses (learn about different lens types in Chapter 7) do not have an aperture ring.
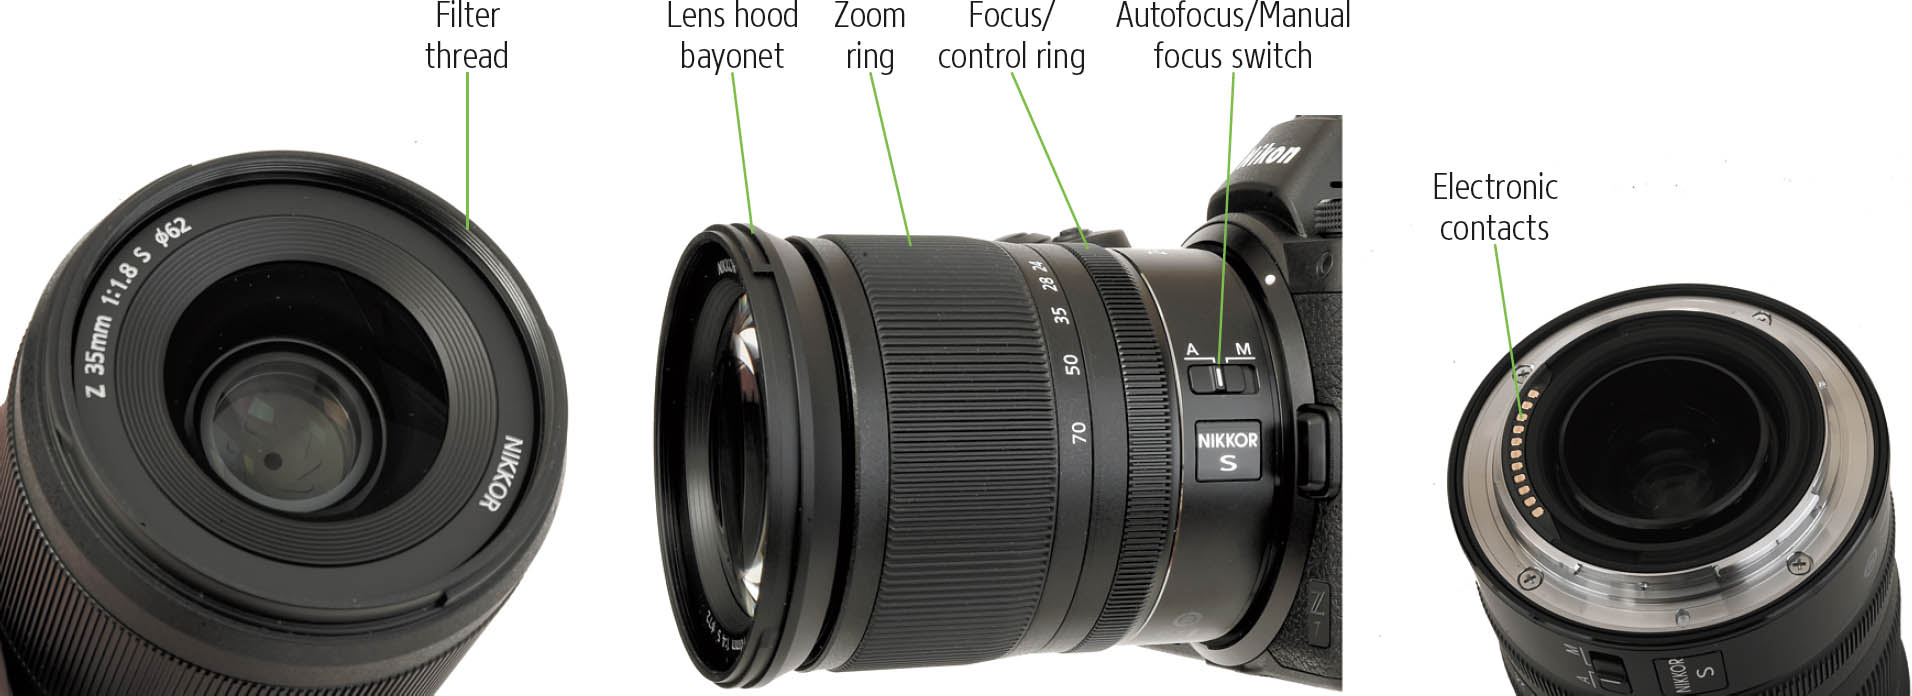
Figure 3.19
Components shown in the figure include:
- Filter thread. Most lenses have a thread on the front for attaching filters and other add-ons. Some, generally older F-mount lenses, also use this thread for attaching a lens hood (you screw on the filter first, and then attach the hood to the screw thread on the front of the filter). Some F-mount lenses, such as the AF-S Nikkor 14-24mm f/2.8G ED lens, have no front filter thread, either because their front elements are too curved to allow mounting a filter and/or because the front element is so large that huge filters would be prohibitively expensive. Some of these front-filter-hostile lenses allow using smaller filters that drop into a slot at the back of the lens.
- Lens hood bayonet. Lenses use this bayonet to mount the lens hood. Such lenses generally will have a lens hood alignment indicator, a dot on the edge showing how to align the lens hood with the bayonet mount.
- Focus/control ring. This is the ring you turn when you manually focus the lens, or fine-tune autofocus adjustment. It’s a narrow ring at the very front of the lens on some lenses, or a wider ring located somewhere else. The function of the focus/control ring (so far found on Z-mount full-frame lenses only) can be redefined, as I’ll explain in Chapter 9.
- Zoom ring. Turn this ring to change the zoom setting.
- Autofocus/Manual focus switch. Allows you to change from automatic focus to manual focus.
- Electronic contacts. These metal contacts pass information to matching contacts located in the camera body, allowing a firm electrical connection so that exposure, distance, and other information can be exchanged between the camera and lens.
Underneath Your Nikon Z50
There’s not a lot going on with the bottom panel of your Nikon Z50. You’ll find the battery/memory compartment access door and a tripod socket, which secures the camera to a tripod. The socket accepts other accessories, such as quick-release plates that allow rapid attaching and detaching the Z50 from a matching platform affixed to your tripod. The power outlet cover flips open to provide access to an AC adapter. Figure 3.20 shows the underside view of the camera.

Figure 3.20