Your Z50 has more special features than a Blu-Ray box set. In designing its all-new Z-series camera platform, Nikon drew on its expertise in providing leading-edge capabilities in the digital single-lens reflex realm, and leveraged the advanced features possible with mirrorless technology. As a result, your Z50 has the kind of totally silent shooting that’s not possible with conventional dSLRs and their clunky mechanical mirrors. Other capabilities built into your Z50 are more common, but have some special applications in a mirrorless model like the Z50. So, I’ve saved some of my favorite advanced techniques that the Z50 excels at for this chapter, which devotes a little extra space to some special features of the camera. This chapter covers GPS techniques and special exposure options, including time-lapse photography and very long and very short exposures. You’ll even find an introduction to using SnapBridge and focus stacking.
Continuous Shooting
Even a seasoned action photographer can miss the decisive instant during a football play when a crucial block is made, or a baseball superstar’s bat shatters and pieces of cork fly out. Continuous shooting simplifies taking a series of pictures, either to ensure that one has more or less the exact moment you want to capture or to capture a sequence that is interesting as a collection of successive images, as seen in Figure 6.1. Your Nikon Z50 can capture up to 11 fps using Continuous H (Extended) mode for JPEG or 12-bit NEF (RAW) images.
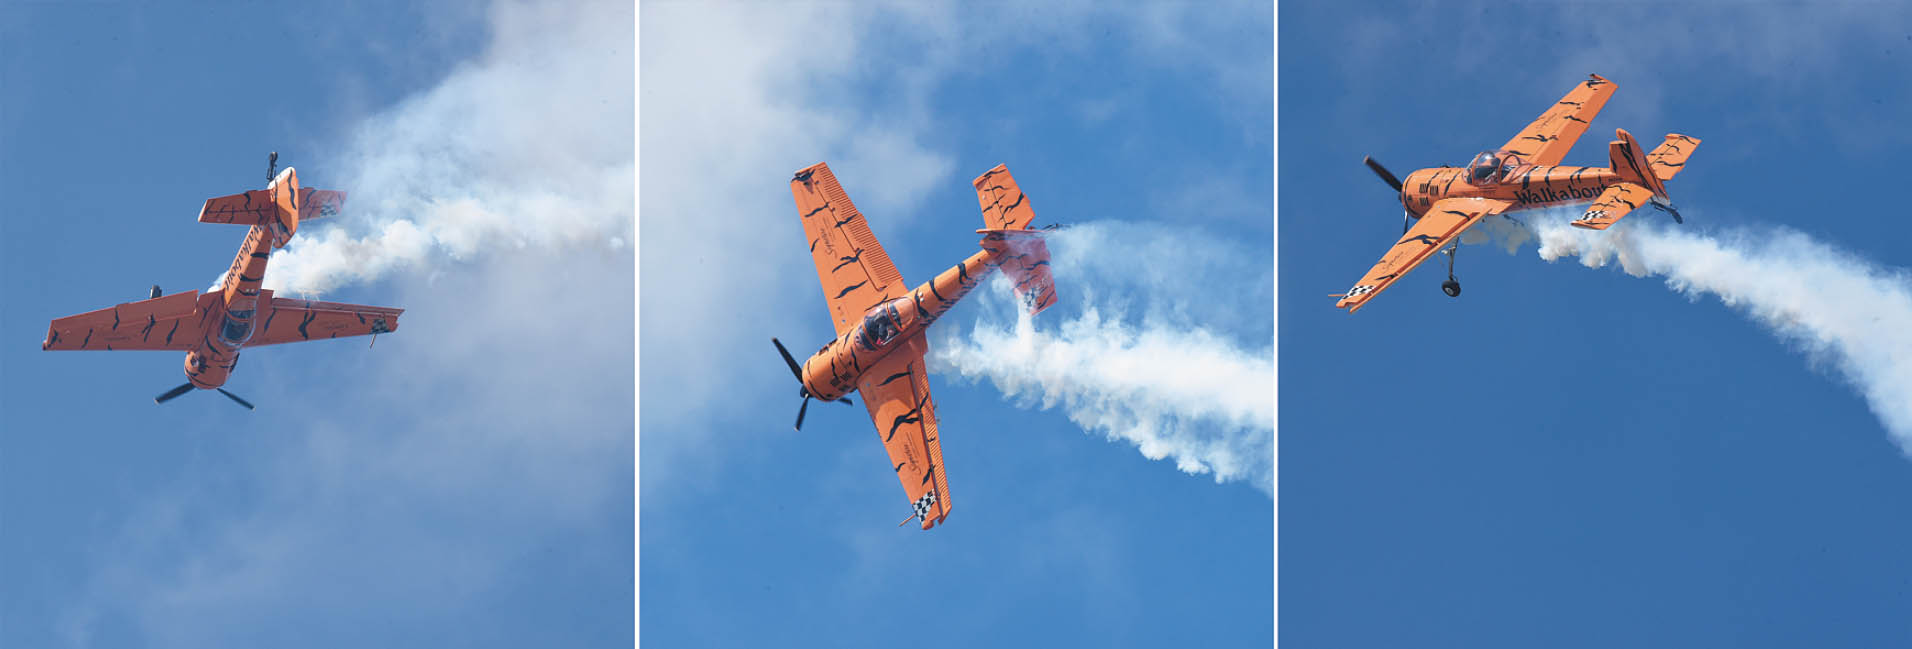
Figure 6.1 Continuous shooting allows you to capture an entire sequence of exciting moments as they unfold.
I use continuous shooting a lot—and not just for sports. The upside is that I may be able to capture an image or a sequence that I could never grab in single-shot mode. The downside is that I end up with many shots to wade through to find the “keepers.” I know that sounds like I am using my Nikon like a machine gun, and hoping that I capture a worthwhile moment through sheer luck, but that’s not really the case. Here are some types of scenes where the rapid-fire capabilities of the Z50 pay big dividends.
- Action. Of course. If you’re shooting a fast-moving sport, continuous shooting is your only option. But it’s important to remember that lightning-quick bursts don’t replace good timing. A 90 mph fastball moves about 12 feet between frames when you’re shooting at the Z50’s maximum frame rate of 11 fps. A ball making contact with a bat is still likely to escape capture. Continuous shooting may provide its best advantages in capturing sequences, so that each shot tells part of the story.
- Bracketing. I almost always set my camera to continuous shooting when bracketing. My goal is not to capture a bunch of different moments, each slightly different from the last, but, rather, to grab virtually the same moment, at different exposures. I can then choose which of the nearly identical shots has the exposure I prefer, or can assemble some of them into a high dynamic range. The high burst rate of the Z50 makes bracketing and hand-held HDR (high dynamic range) photography entirely practical. Software that combines such images does an excellent job of aligning images that are framed slightly differently when creating the final HDR version.
- Ersatz vibration reduction. I shoot three or four concerts a month, always hand-held, and always with VR turned on. I usually add a little simulated vibration reduction by shooting in continuous mode. While I have a fairly steady hand, I find that the middle exposures of a sequence are often noticeably sharper than those at the beginning, because my motions have “settled down” after initially depressing the shutter release button. My only caution for using this tool is to limit your shots during quiet passages, and avoid continuous shooting during acoustic concerts, if you are not using the electronic shutter. The rat-a-tat-tat of a Nikon Z50’s mechanical shutter will earn you no friends. Activating the electronic shutter from the Photo Shooting menu is a better idea in such venues.
- Variations on a theme. Some subjects benefit from sequences more than others, because some aspect changes between shots. Cavorting children, emoting concert performers (as described above), fashion models, or participants at weddings or other events all can look quite different within the span of a few seconds.
To use the Z50’s continuous shooting modes use the i menu and navigate to Release Mode to select Continuous (L), Continuous (H), or Continuous (H) Extended. When you partially depress the shutter button, the viewfinder will display at the right side a number representing the maximum number of shots you can take at the current quality settings—the Shots Remaining indicator will show [r35] or some other value. That number will decrease as you take photos and they are stored in the Z50’s buffer before being dumped onto the memory card. As the card catches up, the number will increase again.
Nikon provides estimates for the number of shots you can take consecutively with Image Area set to DX (24 × 16). You should be able to shoot 35 (12-bit RAW), 30 (14-bit RAW), or 71 JPEG Fine (Large Image Size) photos before the buffer fills. At all other JPEG image size settings (Large Medium, Large Small, and Normal/Basic in Large, Medium, or Small sizes), the buffer capacity is 100. I’ll explain more about RAW, JPEG, and TIFF formats in Chapter 11.
If you use slower SD cards or shoot RAW + JPEG, expect some performance penalties. Slow shutter speeds obviously reduce frame rates; you can’t fire off 5 frames per second with a 1/4-second shutter speed, for example. The built-in flash or an optional flash cannot be used in High-Speed Continuous (Extended) mode. Here are some guidelines for choosing frame rates:
- 11 fps. In High-Speed Continuous (Extended) you can capture JPEGs at up to 12 fps or 14-bit NEF (RAW) at 9 fps. Use these for sports and other subjects where you want to optimize your chances of capturing the decisive moment. Perhaps you’re shooting some active kids and want to grab their most appealing expressions. This fast frame rate can improve the odds. However, there is no guarantee that even at 12 fps the crucial instant won’t occur between frames. For example, when shooting major league baseball games, if I want to photograph a batter, I keep both eyes open, and keep one of them on the pitcher. Then, I start taking my sequence just as the pitcher releases the ball. My goal is to capture the batter making contact with the ball. But even at 12 fps, I find that a hitter connects between frames (remember that 90 mph fastball jumps 11 feet between shots). I usually must take pictures of a couple dozen at-bats to get a shot of bat and ball connecting, either for a base hit or a foul ball.
The very fastest continuous speeds come with some tradeoffs. The Z50 does not recalculate exposure between shots; it is fixed at the exposure calculated for the first image in the sequence. Flicker reduction is not used in this continuous mode, so the display is not updated in real time, and you may notice some lagging. You can set Custom Setting d10: View All in Continuous Mode to Off, and the display will blank during a sequence, giving you the fastest speed, but no feedback. I always leave d10 set to On.
- 4–5 fps. High-Speed Continuous has a top rate of 5 fps, but you can choose any setting between 1 and 4 fps for Low-Speed Continuous. When selecting Continuous L, press the down button to produce a display with 1, 2, 3, and 4 fps options. The left/right buttons can be pressed to select one of those speeds. A slightly slower rate can be useful for activities that aren’t quite so fast moving. But, there’s another benefit. If your frame rate is likely to be slowed by one of the factors I mentioned earlier, using a moderately slower frame rate can provide you with a constant shooting speed without the buffer filling.
- 1.0–3.0 fps. You can set Low-Speed Continuous to use even slower frame rates, too. Use these rates when you just want to be able to take pictures quickly and aren’t interested in filling up your memory card with mostly duplicated images. At 1 fps you can hold down the shutter release and fire away, or ease up when you want to pause. At higher frame rates, by the time you’ve decided to stop shooting, you may have taken an extra three or four shots that you really don’t want. Slow frame rates are good for bracketing, too. You’ll find that slower frame rates also come in handy for subjects that are moving around in interesting ways (photographic models come to mind) but don’t change their looks or poses quickly enough to merit a 5 fps burst.
- Movie stills. As I’ll note in Chapter 14, you can take up to 40 still photos in JPEG Fine format using the dimensions of the movie frame (e.g., 1920 × 1080 pixels) while capturing video. While you can take stills while shooting movies, only one image can be captured at a time, even if you’ve set the release mode to Continuous. However, when the Z50 is set to movie mode, you can shoot a sequence of continuous stills when in standby mode and not actually capturing video. I’ll provide complete instructions in Chapter 14.
A Tiny Slice of Time
Exposures that seem impossibly brief can reveal a world we didn’t know existed. Electronic flash freezes action by virtue of its extremely short duration—as brief as 1/50000th second or less. The Z50’s electronic flash unit can give you these ultra-quick glimpses of moving subjects. You can read more about using electronic flash to stop action in Chapter 9.
Of course, the Z50 is fully capable of immobilizing all but the fastest movement using only its shutter speeds, which range all the way up to 1/4000th second. Indeed, you’ll rarely have need for such a brief shutter speed in ordinary shooting. (For the record, I don’t believe I’ve ever used a shutter speed of 1/4000th second, except when testing a camera’s ISO 25800 or higher setting outdoors in broad daylight.) But at more reasonable sensitivity settings, say, to use an aperture of f/1.8 at ISO 200 outdoors in bright sunlight, a shutter speed of 1/4000th second would more than do the job. You’d need a faster shutter speed only if you moved the ISO setting to a higher sensitivity (but why would you do that, outside of testing situations like mine?). Under less than full sunlight, even 1/2000th second is probably more than fast enough for any conditions you’re likely to encounter.
Indeed, most sports action can be frozen at even slower speeds, as you can see in the image of the soccer player in Figure 6.2; I caught the two soccer players at the peak of the action, so 1/800th second was easily fast enough to freeze them in mid-stride. At ISO 100, I used f/5.6 on my 70-200mm f/2.8 lens to allow the distracting background to blur.
Of course, in many sports a slower shutter speed is actually preferable—for example, to allow the wheels of a racing automobile or motorcycle, or the rotors on a helicopter to blur realistically, as shown in Figure 6.3. At top, a 1/1000th second shutter speed effectively stopped the rotors of the helicopter, making it look like a crash was impending. At bottom, I used a slower 1/200th second shutter speed to allow enough blur to make this a true action picture.
But if you want to do some exotic action-freezing photography without resorting to electronic flash, the Z50’s top shutter speed is at your disposal. Here are two things to think about when exploring this type of high-speed photography:
- You’ll need a lot of light. Very high shutter speeds cut extremely fine slices of time and sharply reduce the amount of illumination that reaches your sensor. To use 1/4000th second at an aperture of f/6.3, you’d need an ISO setting of 1600—even in full daylight. To use an f/stop smaller than f/6.3 or an ISO setting lower than 1600, you’d need more light than full daylight provides. (That’s why electronic flash units work so well for high-speed photography when used as the sole illumination; they provide both the effect of a brief shutter speed and the high levels of illumination needed.)
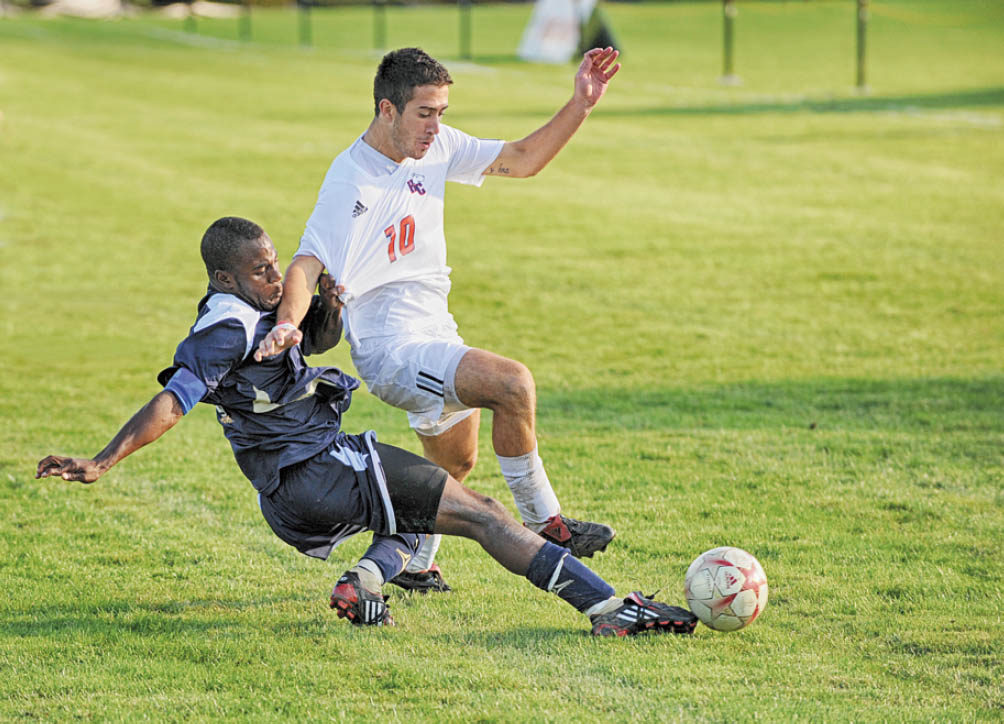
Figure 6.2 A shutter speed of 1/800th second was fast enough to stop this action.

Figure 6.3 A little blur can be a good thing, as these shots of a helicopter at 1/1000th second (top) and 1/200th second (bottom) show.
- High shutter speeds with electronic flash. You might be tempted to use an electronic flash with a high shutter speed. Perhaps you want to stop some action in daylight with a brief shutter speed and use electronic flash only as supplemental illumination to fill in the shadows. Unfortunately, under ordinary conditions you can’t use flash in subdued illumination with your Z50 at any shutter speed faster than 1/200th second. That’s the fastest speed at which the camera’s focal plane shutter is fully open. Shorter shutter speeds are achieved by releasing the rear curtain before the front curtain has reached the end of the frame, so the sensor is exposed by a moving slit (described in more detail in Chapter 9). The flash will expose only the small portion of the sensor exposed by the slit throughout its duration. (Check out “High-Speed Sync” in Chapter 9 if you want to see how you can use shutter speeds shorter than 1/200th, albeit at much-reduced effective flash power levels.)
Working with Short Exposures
You can have a lot of fun exploring the kinds of pictures you can take using very brief exposure times, whether you decide to take advantage of the action-stopping capabilities of your built-in or external electronic flash or work with the Nikon Z50’s faster shutter speeds. Here are a few ideas to get you started:
- Take revealing images. Fast shutter speeds can help you reveal the real subject behind the façade, by freezing constant motion to capture an enlightening moment in time. Legendary fashion/portrait photographer Philippe Halsman used leaping photos of famous people, such as the Duke and Duchess of Windsor, Richard Nixon, and Salvador Dali to illuminate their real selves. Halsman said, “When you ask a person to jump, his attention is mostly directed toward the act of jumping and the mask falls so that the real person appears.” Try some high-speed portraits of people you know in motion to see how they appear when concentrating on something other than the portrait. Figure 6.4 provides an example.
- Create unreal images. High-speed photography can also produce photographs that show your subjects in ways that are quite unreal. A motocross cyclist leaping over a ramp, but with all motion stopped so that the rider and machine look as if they were frozen in mid-air, make for an unusual picture. When we’re accustomed to seeing subjects in motion, seeing them stopped in time can verge on the surreal.
- Capture unseen perspectives. Some things are never seen in real life, except when viewed in a stop-action photograph. MIT electronics professor Harold Edgerton’s famous 1962 photo of a bullet passing through an apple was only a starting point. Freeze a hummingbird in flight for a view of wings that never seem to stop. Or, capture the splashes as liquid falls into a bowl, as shown in Figure 6.5. No electronic flash was required for this image. Instead, two high-intensity lamps with green gels at left and right and an ISO setting of 1600 allowed the camera to capture this image at 1/2000th second.
- Vanquish camera shake and gain new angles. Here’s an idea that’s so obvious it isn’t always explored to its fullest extent. A high enough shutter speed can free you from the tyranny of a tripod, and the somewhat limited anti-shake capabilities of image stabilization, making it easier to capture new angles, or to shoot quickly while moving around, especially with longer lenses. I tend to use a monopod or tripod frequently, and I end up missing some shots because of a reluctance to adjust my camera support to get a higher, lower, or different angle. If you have enough light and can use an f/stop wide enough to permit a high shutter speed, you’ll find a new freedom to choose your shots.
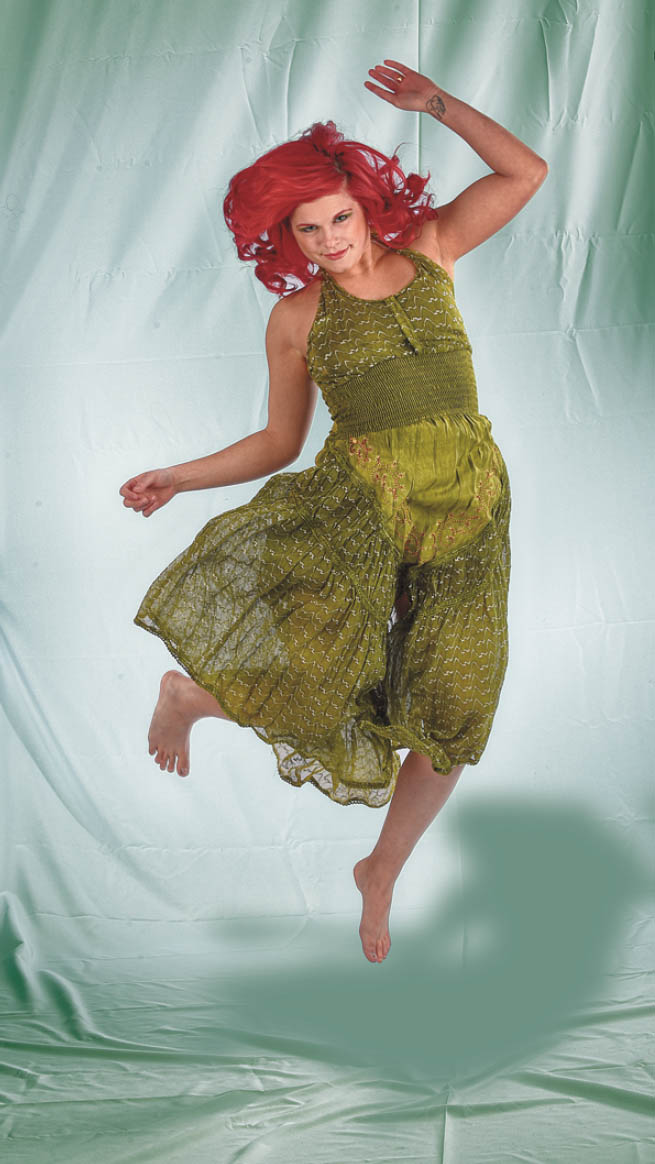
Figure 6.4 Shoot your subjects leaping and see what they look like when they’re not preoccupied with posing.

Figure 6.5 A large amount of artificial illumination and an ISO 1600 sensitivity setting allowed capturing this shot at 1/2000th second without use of an electronic flash.
Long Exposures
Longer exposures are a doorway into another world, showing us how even familiar scenes can look much different when photographed over periods measured in seconds. At night, long exposures produce streaks of light from moving, illuminated subjects like automobiles or amusement park rides. Extra-long exposures of seemingly pitch-dark subjects can reveal interesting views using light levels barely bright enough to see by. At any time of day, including daytime (in which case you’ll often need the help of neutral-density filters to make the long exposure practical), long exposures can cause moving objects to vanish entirely, because they don’t remain stationary long enough to register in a photograph.
Three Ways to Take Long Exposures
There are actually three common types of lengthy exposures: timed exposures, bulb exposures, and time exposures. The Z50 offers all three. Because of the length of the exposure, all of the following techniques should be used with a tripod to hold the camera steady.
- Timed exposures. These are long exposures from 1 second to 30 seconds, measured by the camera itself. To take a picture in this range, simply use Manual or S modes and use the main command dial to set the shutter speed to the length of time you want, choosing from preset speeds of 1.0, 1.5, 2.0, 3.0, 4.0, 6.0, 8.0, 10.0, 15.0, 20.0, or 30.0 seconds (if you’ve specified 1/2-stop increments for exposure adjustments), or 1.0, 1.3, 1.6, 2.0, 2.5, 3.2, 4.0, 5.0, 6.0, 8.0, 10.0, 13.0, 15.0, 20.0, 25.0, and 30.0 seconds (if you’re using 1/3-stop increments). The advantage of timed exposures is that the camera does all the calculating for you. There’s no need for a stopwatch. If you review your image on the monitor and decide to try again with the exposure doubled or halved, you can dial in the correct exposure with precision. The disadvantage of timed exposures is that you can’t take a photo for longer than 30 seconds.
- Bulb exposures. This type of exposure is so-called because in the olden days the photographer squeezed and held an air bulb attached to a tube that provided the force necessary to keep the shutter open. Traditionally, a bulb exposure is one that lasts as long as the shutter release button is pressed; when you release the button, the exposure ends. To make a bulb exposure with the Z50, set the camera on Manual mode and use the main command dial to select the first shutter speed immediately after 30 seconds—Bulb. Then, press the shutter or the button on a remote control to start the exposure, hold it down, and then release it to close the shutter.
- Time exposures. On the Z50, this type of exposure is similar to Bulb, except you don’t have to hold the shutter release down. Simply press the shutter release or your remote button to start the exposure, and press a second time to stop the exposure. The setting is located just beyond Bulb when rotating the main command dial in Manual exposure mode, and is labeled Time. I use this instead of Bulb most of the time. You can start the exposure, go off for a few minutes, and come back to close the shutter (assuming your camera is still there). A typical time exposure I took of the Rock & Roll Hall of Fame in Cleveland, is shown in Figure 6.6, left.
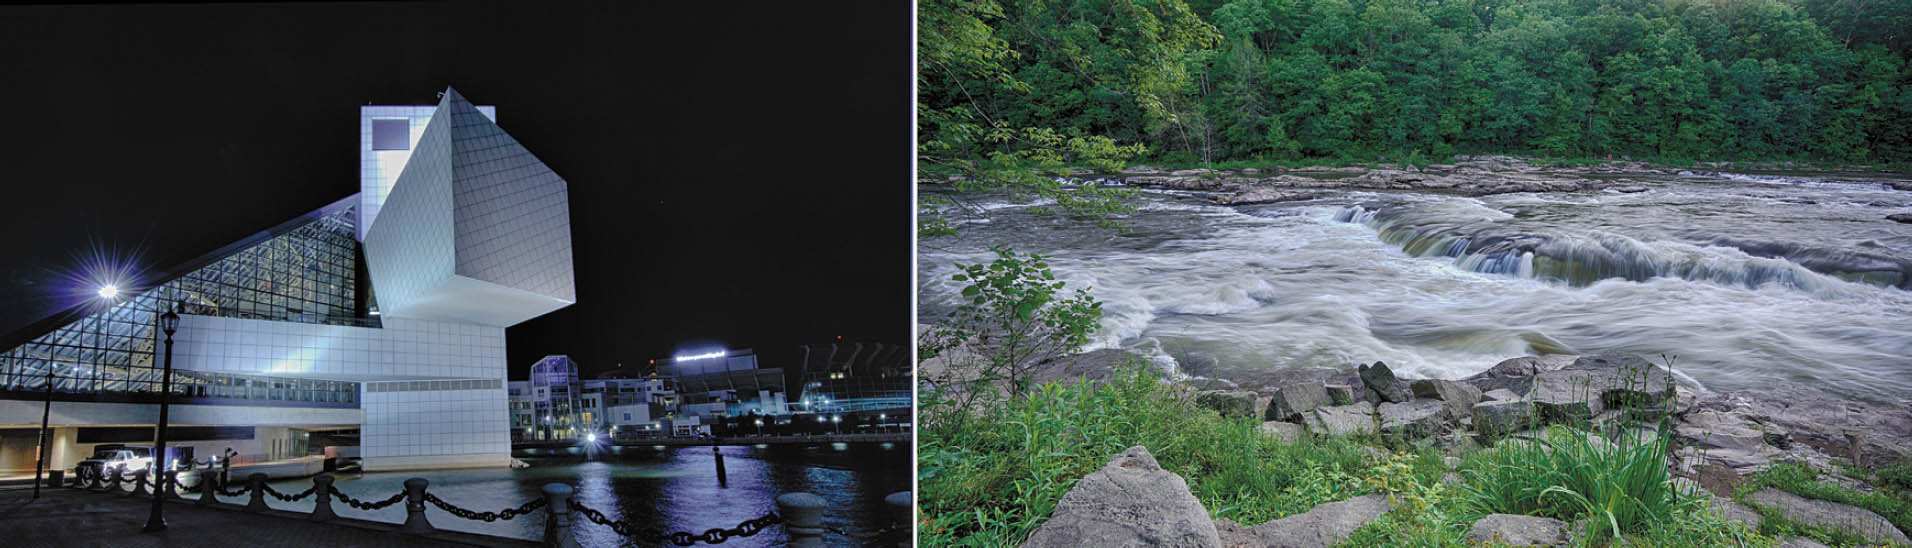
Figure 6.6 The Z50’s time exposure setting can give you long time exposures, such as this 60-second shot of the Rock & Roll Hall of Fame (left) or this cascade in the Youghiogheny River in Pennsylvania (right).
![]()
NOTE If you choose Bulb or Time in Manual mode and then switch to Shutter-priority mode, the Bulb or Time setting will “stick,” but the Z50 will not take a picture in either mode. Instead, an indicator on the display will flash, warning you to change to a usable setting. Nikon’s reasoning is that you might not realize that Bulb or Time are no longer available, and wouldn’t want the camera to choose some other setting on your behalf.
Working with Long Exposures
Because the Z50 produces such good images at longer exposures, and there are so many creative things you can do with long exposure techniques, you’ll want to do some experimenting. Get yourself a tripod or another firm support and take some test shots with long exposure noise reduction both enabled and disabled (to see whether you prefer low noise or high detail) and get started. Here are some things to try:
- Show total darkness in new ways. Even on the darkest, moonless nights, there is enough starlight or glow from distant illumination sources to see by, and, if you use a long exposure, there is enough light to take a picture.
- Blur waterfalls, etc. You’ll find that waterfalls and other sources of moving liquid produce a special type of long-exposure blur, because the water merges into a fantasy-like veil that looks different at varying exposure times, and with different waterfalls. Cascades with turbulent flow produce a rougher look at a given longer exposure than falls that flow smoothly, as you can see in Figure 6.6, right. Although blurred waterfalls have become almost a cliché, there are still plenty of variations for a creative photographer to explore.
- Make people invisible. One very cool thing about long exposures is that objects that move rapidly enough won’t register at all in a photograph, while the subjects that remain stationary are portrayed in the normal way. That makes it easy to produce people-free landscape photos and architectural photos at night or, even, in full daylight if you use a neutral-density filter (or two) (or three) to allow an exposure of at least a few seconds. At ISO 100, f/22, and a pair of 8X (three-stop) neutral-density filters, you can use exposures of nearly two seconds; overcast days and/or even more neutral-density filtration would work even better if daylight people-vanishing is your goal. They’ll have to be walking very briskly and across the field of view (rather than directly toward the camera) for this to work. At night, it’s much easier to achieve this effect with the 20- to 30-second exposures that are possible, as you can see in Figure 6.7. At left, with an exposure of several seconds, the crowded street in Segovia, Spain, is fully populated. At right, with a 20-second exposure, the folks moving slowly (at left) show up as blurs; those standing still (at right) are portrayed normally; and the fast-moving walkers in the foreground are barely perceptible blurs.
- Create streaks. If you aren’t shooting for total invisibility, long exposures with the camera on a tripod can produce some interesting streaky effects. Even a single 8X ND filter will let you shoot at f/22 and 1/6th second in daylight. Indoors, you shouldn’t have a problem using long shutter speeds to get shots like the one shown in Figure 6.8.
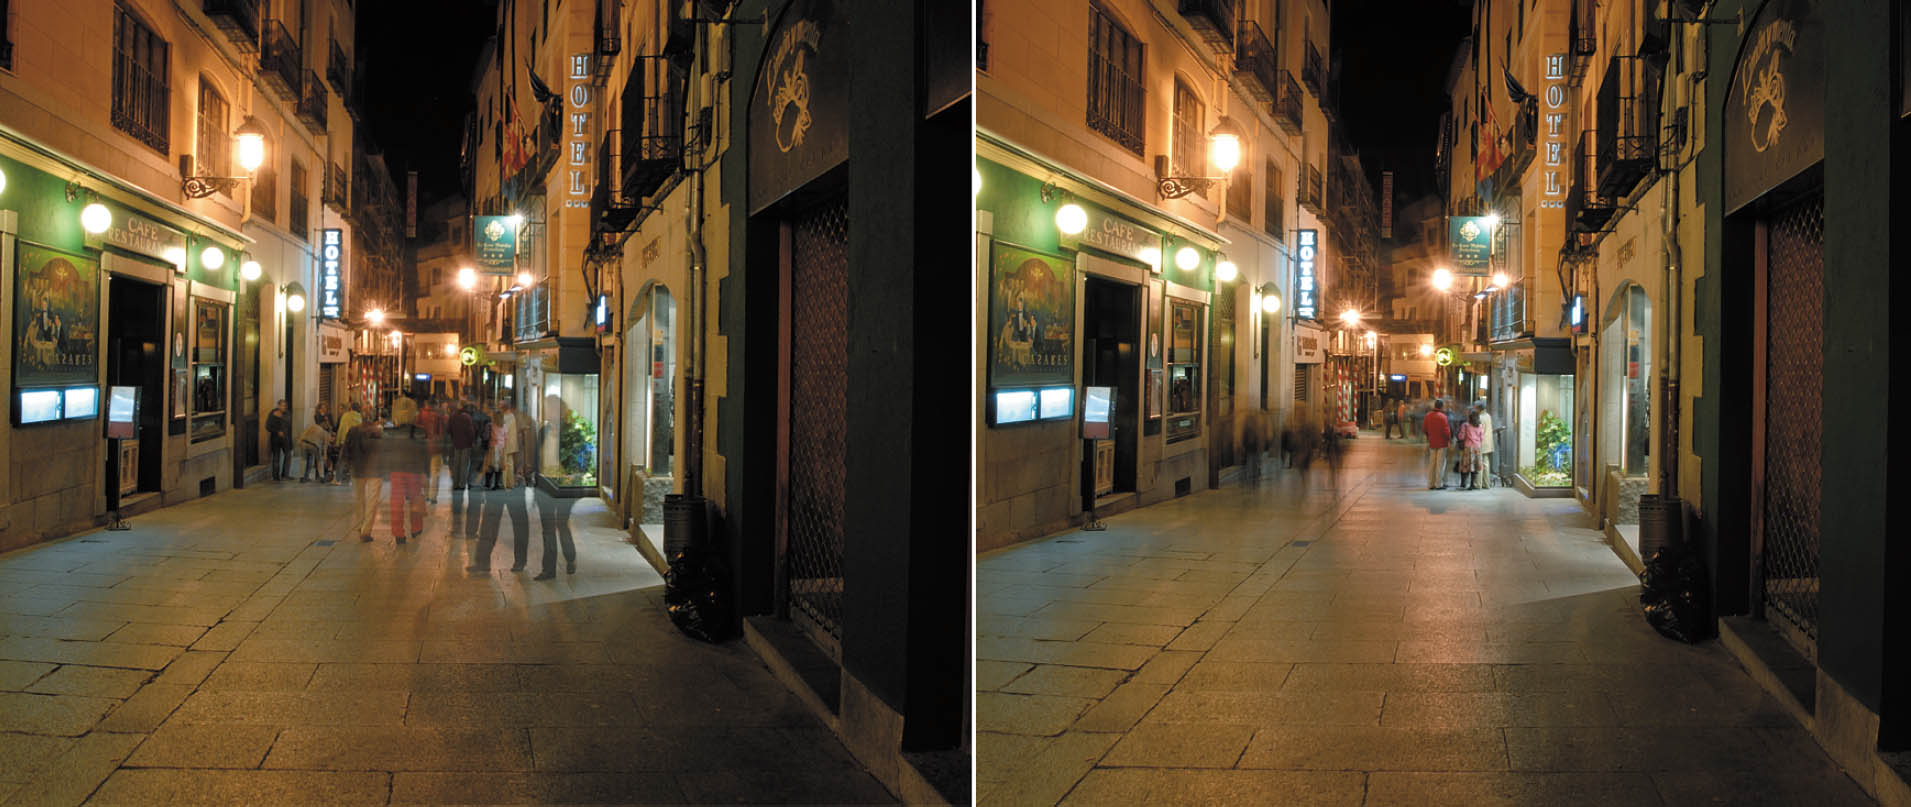
Figure 6.7 This European alleyway is thronged with people (left), but with the camera on a tripod, a 20-second exposure rendered most of the passersby almost invisible.
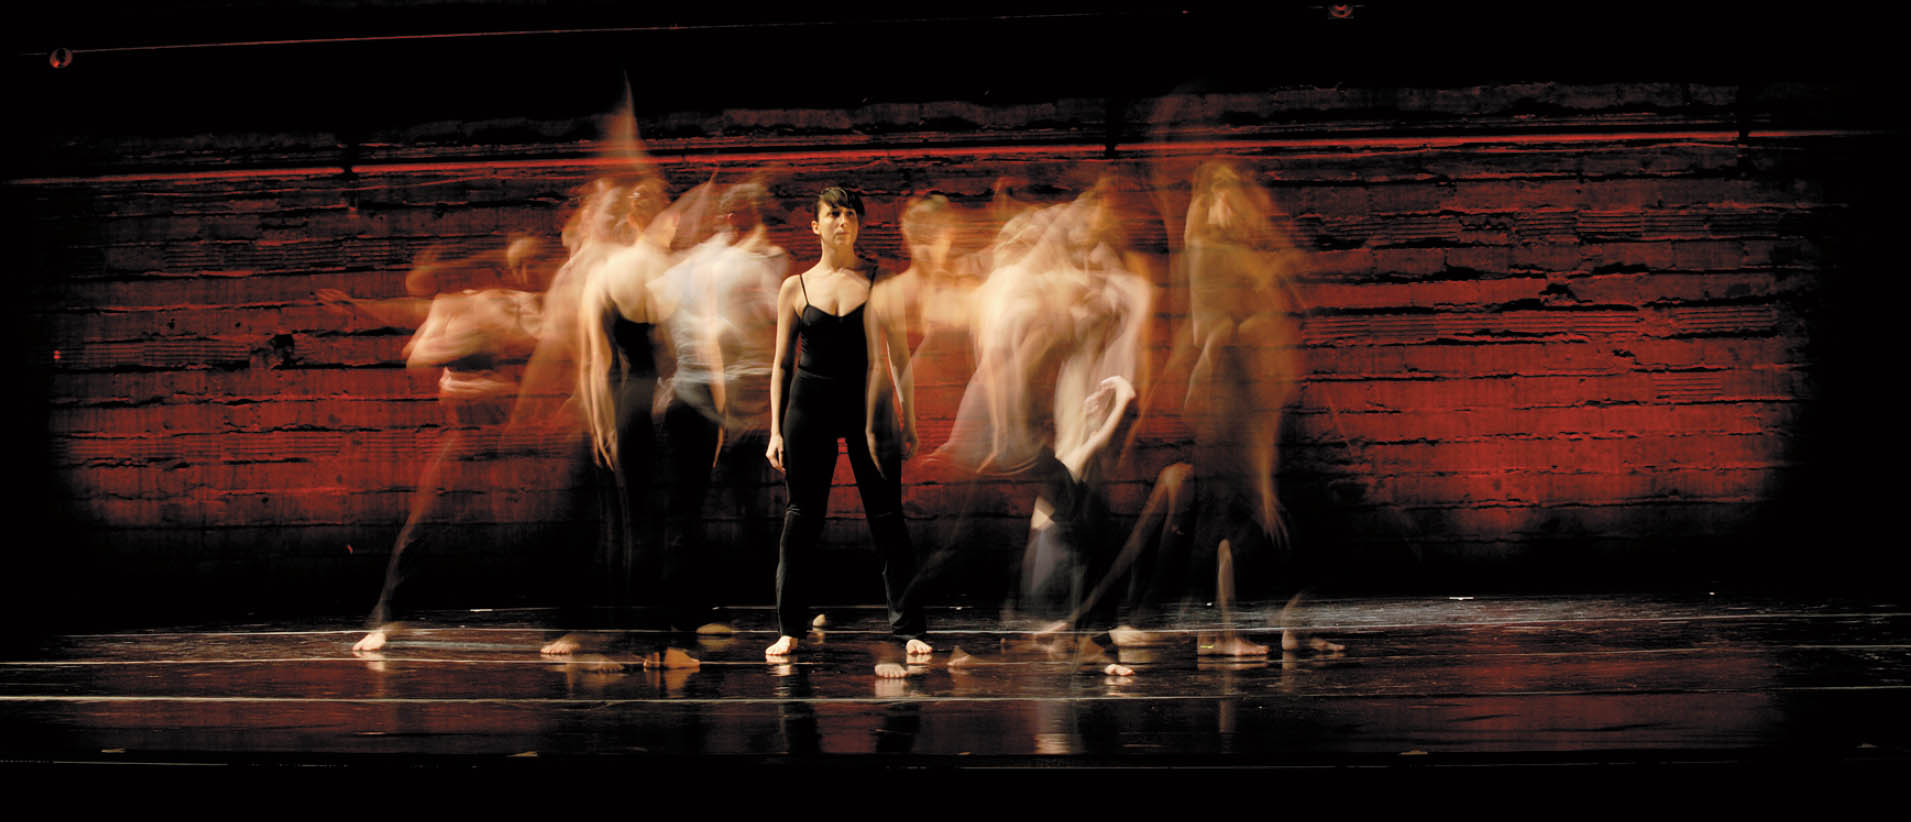
Figure 6.8 Long exposures can turn dancers into a swirling image.
- Produce light trails. At night, car headlights and taillights and other moving sources of illumination can generate interesting light trails, as shown in the image of the carnival ride in Figure 6.9. Your camera doesn’t even need to be mounted on a tripod; hand-holding the Z50 for longer exposures adds movement and patterns to your streaky trails. If you’re shooting fireworks with a tripod, a longer exposure may allow you to combine several bursts into one picture.
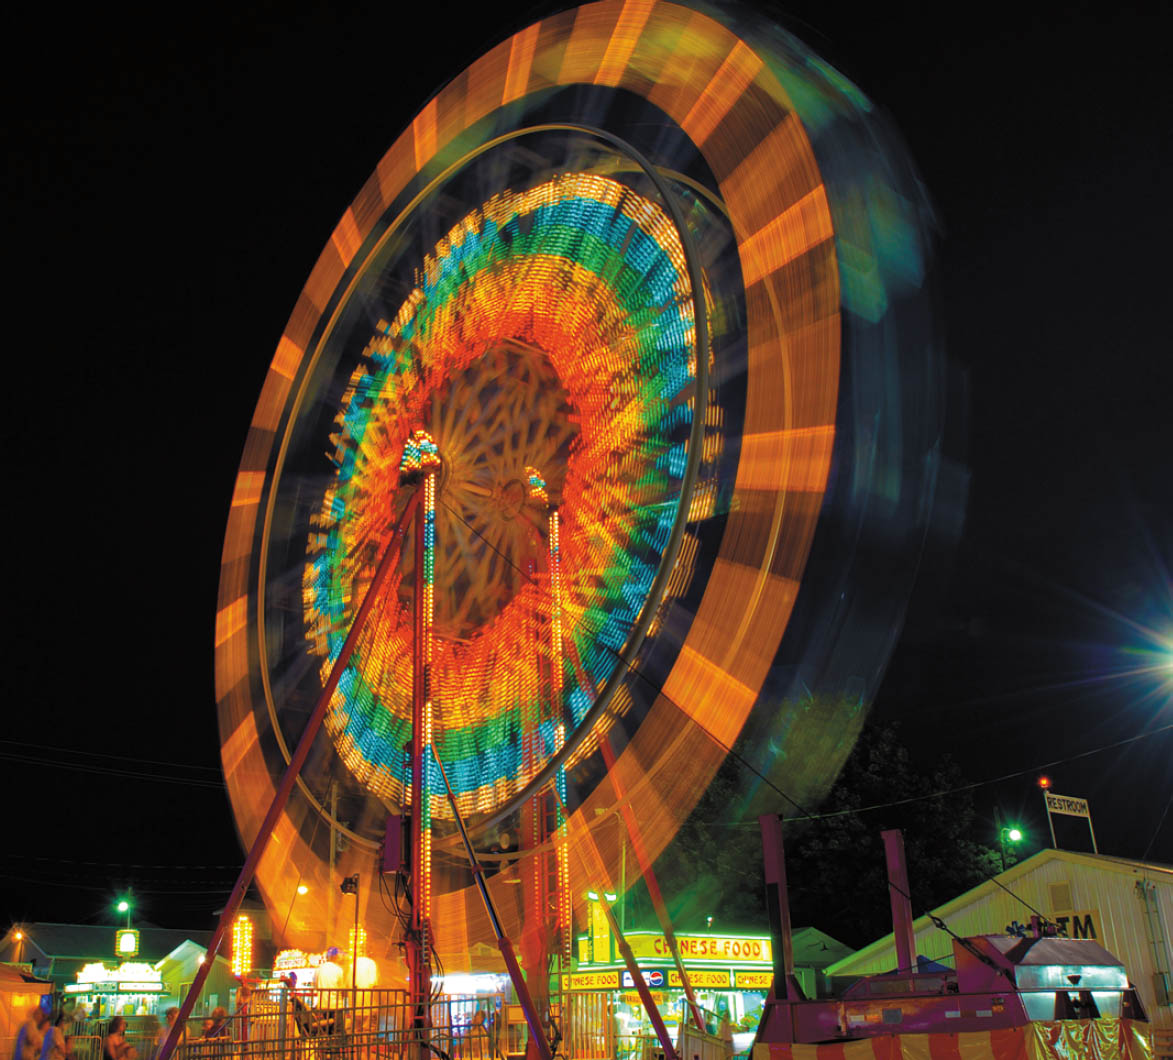
Figure 6.9 The carnival ride’s motion produces interesting light trails.
Delayed Exposures
Sometimes it’s desirable to have a delay of some sort before a picture is actually taken. Perhaps you’d like to get in the picture yourself, and would appreciate it if the camera waited 10 seconds after you press the shutter release to actually take the picture. Maybe you want to give a tripod-mounted camera time to settle down and damp any residual vibration after the release is pressed to improve sharpness for an exposure with a relatively slow shutter speed. It’s possible you want to explore the world of time-lapse photography. The next sections present your delayed exposure options.
Self-Timer
The Z50 has a built-in self-timer with a user-selectable delay. Activate the timer by accessing the Release Mode setting of the i menu, and then rotating the main command dial to the self-timer icon. Press the shutter release button halfway to lock in focus on your subjects (if you’re taking a group shot of yourself and several others, focus on an object at a similar distance and use focus lock). When you’re ready to take the photo, continue pressing the shutter release the rest of the way. The lamp on the front of the camera will blink slowly for eight seconds (when using the 10-second timer) and the beeper will chirp (if you haven’t disabled it in the Custom Settings menu, as described in Chapter 10). During the final two seconds, the beeper sounds more rapidly and the lamp remains on until the picture is taken. It’s a good idea to close the viewfinder eyepiece shutter if you’re not using live view or shooting in Manual exposure mode, to prevent light from the viewing window getting inside the camera and affecting the automatic exposure.
You can customize the settings of the self-timer. Your adjustments are “sticky” and remain in effect until you change them. Your options include:
- Self-timer delay. Choose 2, 5, 10, or 20 seconds, using Custom Setting c2. If I have the camera mounted on a tripod or other support and am too lazy to dig around for my wired remote, I can set a two-second delay that is sufficient to let the camera stop vibrating after I’ve pressed the shutter release. A longer delay time of 20 seconds is useful if you want to get into the picture and are not sure you can make it in 10 seconds.
- Number of shots. After the timer finishes counting down, the Z50 can take from 1 to 9 different shots. This is a godsend when shooting photos of groups, especially if you want to appear in the photo itself. You’ll always want to shoot several pictures to ensure that everyone’s eyes are open and there are smiling expressions on each face. Instead of racing back and forth between the camera to trigger the self-timer multiple times, you can select the number of shots taken after a single countdown. For small groups, I always take at least as many shots as there are people in the group—plus one. That gives everybody a chance to close their eyes.
Interval/Time-Lapse Photography
The Z50 is capable of both interval photography (for still pictures) and time-lapse video, both available from the Photo Shooting menu. The commands for both are described in Chapter 9. Who hasn’t marveled at a time-lapse photograph of a flower opening, a series of shots of the moon marching across the sky, or one of those extreme time-lapse picture sets showing something that takes a very, very long time, such as a building under construction.
You probably won’t be shooting such construction shots, unless you have a spare Z50 you don’t need for a few months (or are willing to go through the rigmarole of figuring out how to set up your camera in precisely the same position using the same lens settings to shoot a series of pictures at intervals). However, other kinds of interval and time-lapse photography are entirely within reach. If you’re willing to tether the camera to a computer (a laptop will do) using the USB cable, you can take time-lapse photos using the optional extra-cost Nikon Camera Control Pro.
For Figure 6.10, I set up my camera on a tripod and pointed it at the North Star, hoping to use Interval Timing Shooting to capture some star trails. I left the camera running for a full hour, shooting a 30-second exposure every 32 seconds. I combined the resulting pictures in Photoshop to produce the photo of the stars—with the sky’s canopy crossed by the lights from airplanes at intervals. I’ve also used interval shooting for images of sunsets. Typically, I aim the camera at the horizon and set it to shoot a three-shot bracket with a 3.0-stop increment. Then, I set the interval time to take a bracket burst every 10 seconds. Over a 10-minute span, I’ll end up with 180 images I can assemble in a variety of ways to create an interesting HDR photograph.

Figure 6.10 This time-lapse series captured the apparent motion of the stars as Earth rotated for a one-hour period.
Here are the essential tips for effective time-lapse and interval photography:
- Conserve power. If you’re shooting a long sequence of stills, to minimize power drain, set Image Review to Off in the Playback menu, and enable Silent Photography in the Interval Timer Shooting entry.
- Make sure you have enough storage space. Unless your memory card has enough capacity to hold all the images you’ll be taking, you might want to change to a higher compression rate or reduced resolution to maximize the image count.
- Make a movie. While stills shot at intervals are interesting, you can increase your fun factor by producing a time-lapse movie instead. You can also combine your interval shots into a motion picture using your favorite desktop movie-making software.
- Protect your camera. If your camera will be set up, make sure it’s protected from weather, earthquakes, animals, young children, innocent bystanders, and theft.
- Vary intervals. Experiment with different time intervals. You don’t want to take pictures too often or less often than necessary to capture the changes you hope to image.
Nikon Z50’s built-in time-lapse photography feature allows you to take pictures for up to 999 intervals in bursts of as many as nine shots, with a delay of up to 23 hours and 59 minutes between shots/bursts, and an initial start-up time of as long as 23 hours and 59 minutes from the time you activate the feature. That means that if you want to photograph a rosebud opening and would like to photograph the flower once every two minutes over the next 16 hours, you can do that easily. If you like, you can delay the first photo taken by a couple hours so you don’t have to stand there by the Z50 waiting for the right moment. Or, you might want to photograph a particular scene every hour for 24 hours to capture, say, a landscape from sunrise to sunset to the following day’s sunrise again.
Movies Two Ways
Your Z50 allows you to capture time-lapse movies, rather than just a series of still pictures, in two ways. One is highly automated, while the other requires a little work on your part. I’ll explain the differences between the two, and then show you how to use either of them.
- Your camera does all the work. If you use the Z50’s Time-Lapse Movie option, which I’ll describe shortly, the camera will take all the pictures using the interval and other parameters that you specify, and then combine them to produce a movie. You can watch the video as-is, or use a video-editing program to combine it with other clips. The Time-Lapse movie entry is located in the Photo Shooting menu, and is grayed out if the photo/movie selector switch is not set to the Movie position. I describe its parameters in Chapter 9, but the process basically works much like Interval Photography, which I will detail in the following sections.
- Do-it-yourself. You gain more flexibility and some options if you capture the individual frames using the Z50’s Interval Timer, and then combine them in a video editor to produce a video. That allows you to have individual frames as stills—and at a higher resolution, too (up to the full 24 megapixels the Z50 offers)—as well as video (which is described in Chapter 9).
Using Interval Photography
This next section will tell you everything you need to know to capture images using the Z50’s built-in intervalometer—whether you intend to use the resulting still photos as such, or plan to combine them into a home-brewed time-lapse movie. To set up interval timer shooting, just follow these steps.
Before you start:
- 1. Check your time. The Z50 uses its internal clock to activate, so make sure the time has been set accurately in the Setup menu before you begin.
- 2. Ignore release mode. You don’t need to set the camera for continuous shooting. The Z50 will take the specified number of shots at each interval regardless of release mode setting.
- 3. Set up optional bracketing. However, if you’d like to bracket exposures during interval shooting, set up bracketing prior to beginning. (You learned how to bracket in Chapter 4.) The Z50 will expose the requested number of bracketed images regardless of the number of shots per interval requested. Exposure, flash, ADL, and white balance bracketing can all be used.
- 4. Position camera. Mount the camera on a tripod or other secure support. Adjust the Optical VR setting in the Photo Shooting menu to Off.
- 5. Fully charge the battery. Although the camera more or less goes to sleep between intervals, some power is drawn, and long sequences with bursts of shots can drain power even when you’re not using the interval timer feature.
- 6. Make sure the camera is protected from the elements, accidents, and theft.
When you’re ready to go, set up the Z50 for interval shooting:
- 1. Access feature. Choose Interval Timer Shooting from the Photo Shooting menu. (See Figure 6.11, left.)
- 2. Specify a starting time. Highlight Choose Start Day/Time, and press the right directional button. A screen appears allowing you to choose either Now (to begin interval shooting immediately) or Choose Day/Time. To set a start time in the future, highlight Choose Day/Time, and press the right directional button. A screen appears that allows entering a Start Date, H (Hour), and M (Minute). You can set the current date, or up to seven days in the future. Hours are available in 24-hour format. Press OK when you’ve specified the start time. You’ll be returned to the main screen shown in Figure 6.11, left.
- 3. Set the interval between exposures. Scroll down to the Interval entry and press the right directional button. In the screen that appears, you can use the left/right buttons to move among hours, minutes, and seconds, and use the up/down buttons to choose an interval from 1 second to 24 hours. Press the OK button when finished to move back to the main screen. If your interval is longer than your flash’s recycling time, you can use flash to capture your interval sequence.
- 4. Select the spacing and number of shots. Highlight Intervals × Shots/Interval and press the right directional button. Use the left/right buttons to highlight the number of intervals (that is, how many times you want the camera activated) and the number of shots taken after each interval has elapsed (as many as nine images taken at each activation). The total number of shots to be exposed overall will be shown at far right once you’ve entered those two parameters. You can highlight each number column separately, so that to enter, say, 250 intervals, you can set the 100s, 10s, and 1s columns individually (rather than press the up button 250 times!). You can select up to 9,999 intervals, and 9 shots per interval for a maximum of 89,991 exposures with one interval shooting cycle. Press OK to return to the main screen. Tip: Your memory card won’t hold 89,991 exposures at full resolution!
![]()
TIP The interval cannot be shorter than the shutter speed; for example, you cannot set one second as the interval if the images will be taken at two seconds or longer.
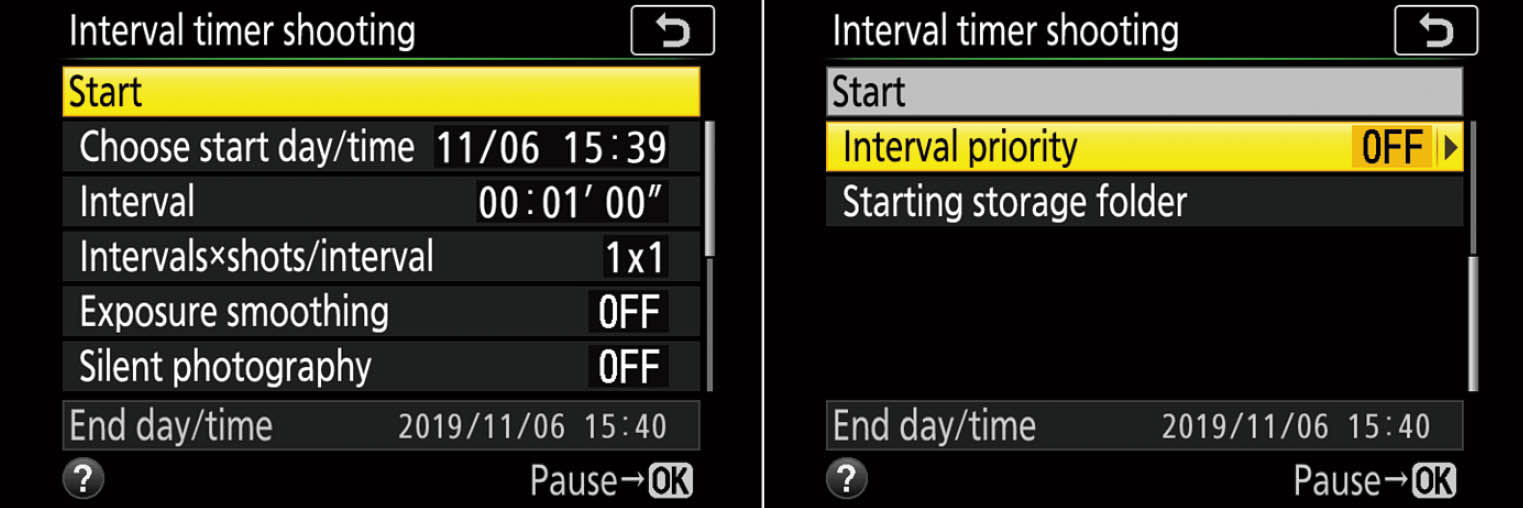
Figure 6.11 Interval timer shooting options.
- 5. Specify Exposure Smoothing. You can turn this feature on or off. When activated, the Z50 will adjust the exposure of each shot to match that of the previous shot in P, S, or A mode. So, if you want the shutter speed to remain the same for each image (and don’t care if the aperture is adjusted), use Shutter-priority mode. If you’d rather lock in your selected aperture (say, to keep the same depth-of-field), use Aperture-priority mode. Smoothing can also be used in Manual mode, but, of course, the Z50 won’t vary either the shutter speed or aperture. You must have set ISO Sensitivity to Auto, to allow the camera to conform exposures by adjusting the ISO instead. Press OK to confirm.
- 6. Activate Silent Shooting (if desired). You can choose On or Off for this parameter. When Silent Shooting is activated, the shutter will be silenced. This option comes in handy when you don’t want your interval photography to disturb those who might be present, or you don’t want them to know that you’re shooting entirely. Silent shooting disables flash photography, long exposure noise reduction, flicker reduction, and ISO sensitivities of Hi 1 and Hi2.
- 7. Set Interval Priority. Scroll down the screen to reveal additional choices shown in Figure 6.11, right. Interval Priority can be set to On or Off. This parameter handles situations in which the shutter speed automatically selected in Program or Aperture-priority ends up being longer than the interval between shots. Perhaps you’re shooting outdoors and daylight has waned into night and a shutter speed of, say, 2 seconds is required even though your selected interval is 1 second.
- Interval Priority On: The Z50 takes the picture at the specified interval anyway, even though the image may be taken at a shorter shutter speed and, therefore underexposed. You can avoid the underexposure by activating Auto ISO Sensitivity, and selecting a minimum shutter speed that is shorter than the interval time. In that case, the Z50 will increase the ISO setting (if necessary) to produce the correct exposure using the automatically selected shutter speed.
![]()
NOTE You can use manual focus to prefocus before starting your interval capture sequence. If you’d prefer to have the camera focus automatically, select AF-C and make sure Custom Setting a1: AF-C Priority Selection is set to Release priority.
- Interval Priority Off: The chosen interval is lengthened to allow a correct exposure.
- 8. Starting Storage Folder. Highlight New Folder and press the right button to tell the Z50 to create a new folder for each time-lapse sequence. This allows you to easily keep your sequences separate in their own folders. If you’ve chosen New Folder, you can also activate Reset File Numbering, which resets the numbering of each sequence to 0001 when a new folder is created. It’s handy to have each sequence numbered separately.
- 9. Activate shooting. When all the parameters have been entered, scroll to the Start option at the top of the menu and press OK. If you’ve selected Now under Start Options, then interval shooting will begin immediately. If you chose a specific date/time instead, the appropriate delay will elapse before recording begins. Leave your camera turned on. Once you activate interval shooting, immediately before the next shooting interval begins, the shutter speed display shows the number of intervals remaining and the aperture display shows the number of shots remaining in the current interval. Between intervals, you can view that information by pressing the shutter release button halfway; when you release the button, the data appears until the standby timer expires.
PAUSE OR CANCEL INTERVAL SHOOTING
While interval shooting is underway, you can review the images already taken using the Playback button. The monitor will clear automatically about four seconds before the next interval begins. Press the OK button between intervals (but not when images are still being recorded to the memory card) or choose the Interval Timer Shooting menu entry, and select Pause. Interval shooting can also be paused by turning the camera on or off. To resume the Interval Timer Shooting menu again, press the multi selector left button, and choose Restart. You may also select Off to stop the shooting entirely.
Time-Lapse Movies
If you’ve mastered Interval Photography, shooting Time-Lapse movies to allow the Z50 to capture the individual frames and assemble them into a movie for you is a snap! There are some additional considerations when shooting time-lapse movies.
- Time-lapse movie access. You’ll find the Time-Lapse Movie entry in the Photo Shooting menu, not the Movie Shooting menu. That’s because time-lapse movies are simply a series of still photos shot consecutively.
- Use Still Photo mode. Make sure the Photo/Movie switch is in the Photo position. While you can access the Time-Lapse Movie entry while in Movie mode, you can’t start capturing a movie until you switch back to still photo mode.
- Incompatible features. If the entry is grayed out, remember that you cannot access the Time-Lapse Movie entry if Bracketing is enabled. Other features that conflict with Time-Lapse movie capture include Bulb and Time exposures, the self-timer, multiple exposures, and HDR photography. Active D-Lighting cannot be used, but is disabled for you automatically.
- Cropped format. Remember that even though time-lapse movies are a series of stills captured in sequence, they will be stored using the 16:9 movie crop ratio, not the full APS-C frame.
- Color balance. Because the frames in a time-lapse movie are viewed one after another (like any movie), variations in color balance can be objectionable. Choose a fixed white balance in the Movie Shooting menu, not Auto or Natural Light Auto (which can change balance between shots).
The settings screen is similar to the one for interval shooting, with some additional options. The key entries include:
- Start. Unlike the similar Interval Timer found in the Photo Shooting menu, Time-Lapse Photography has no Start Options. Make your other settings, select Start, and time-lapse photography will begin automatically about three seconds later. Be sure to double-check your settings before triggering the camera.
- Interval. Select an interval between frames; use a longer value for slow-moving action, such as a flower bud unfolding. You might want to experiment and choose a time between shots of one minute or longer. Some blooms mature faster than others. Use a shorter value for movies, say, depicting humans moving around at a comical pace for a Charlie Chaplin–like effect. This parameter can be set from 1 second to 10 minutes.
- Shooting time. You can specify time-lapse movie duration. The longest movie you can create is a total of 7 hours, 59 minutes. That should be plenty for most applications. Andy Warhol’s 1963 flick Sleep was only 5 hours, 20 minutes long!
- Exposure smoothing. You can turn exposure smoothing on or off. When activated, the camera adjusts the exposure of each frame to match that of the previous frame in P, S, or A mode. That avoids sudden changes in exposure modes other than Manual exposure (which, of course, will remain at your manual settings throughout). Smoothing can also be used in Manual mode, but, of course, the Z50 won’t vary either the shutter speed or aperture. You must have set ISO Sensitivity to Auto to allow the Z50 to compensate appropriately for changes in brightness. Press OK to confirm.
- Silent photography. Silences the shutter sound for unobtrusive or stealth video capture. As with interval shooting, flash photography, long exposure noise reduction, flicker reduction, and Hi 1 and Hi 2 ISO settings are unavailable.
- Frame size/frame rate. Here you can select the frame size and frames per second setting for your time-lapse movie. You can choose from 4K, 3840 × 2160 30/15/24p and Full HD, 1920 × 1060 60/50/30p (in both High Quality and Normal modes, also explained in Chapter 12) formats.
- Interval priority. This setting is similar to its intervalometer counterpart, as explained previously. It takes care of situations in which the shutter speed automatically selected in Program or Aperture-priority ends up being longer than the interval between shots. When enabled, the Z50 captures the movie frame at the specified interval, even though the image may be taken at a shorter shutter speed and underexposed.
To compensate, activate Auto ISO Sensitivity, and select a minimum shutter speed that is shorter than the interval time. The Z50 will boost ISO to allow exposure at the correct interval. When disabled, the camera increases the interval you specified to allow correct exposure. However, with some subjects, the increased time may be visible in the finished movie as a jump or delay.
Multiple Exposures
Some of my very first images captured when I was a budding photographer at age 11 were double exposures. Some were unintentional, as my box camera, using 620-size film, could take several pictures on one frame if you forgot to wind it between shots. But my initial foray into special effects as a pre-teen were shots of my brother throwing a baseball to himself, serving as both pitcher and batter thanks to a multiple exposure.
The Z50’s multiple exposure feature is remarkably flexible. It allows you to combine two to ten exposures into one image without the need for an image editor like Photoshop, and it can be an entertaining way to return to those thrilling days of yesteryear, when complex photos were created in the camera itself. In truth, prior to the digital age, multiple exposures were a cool, groovy, far-out, hep/hip, phat, sick, fabulous way of producing composite images. Today, it’s more common to take the lazy way out, snap two or more pictures, and then assemble them in an image editor like Photoshop, or use the Z50’s Image Overlay feature in the Retouch menu.
However, if you’re willing to spend the time planning a multiple exposure (or are open to some happy accidents), there is a lot to recommend the multiple exposure capability that Nikon has bestowed on the Z50. For one thing, the camera is able to combine two to ten images using the RAW data from the sensor, producing photos that are blended together more smoothly than is likely for anyone who’s not a Photoshop guru. To take your own multiple exposures, just follow these steps (although it’s probably a good idea to do a little planning and maybe even some sketching on paper first, if that’s possible):
To create multiple exposures, just follow these steps:
- 1. Activate the feature. Choose Multiple Exposure from the Photo Shooting menu.
- 2. Choose Multiple Exposure mode. Select Multiple Exposure mode. A submenu appears with three choices:
- On (series). The Multiple Exposure feature remains active even after you’ve taken a complete set of exposures for the number of shots you specified. Use this if you want to shoot several multiple exposures in a row. Remember to turn it off when you’re done.
- On (single photo). Once you’ve taken a single set of multiple exposures, the feature turns itself off.
- Off. Use this option to cancel multiple exposures.
- 3. Choose exposures per frame. Select Number of Shots, choose a value from 2 to 10 with the multi selector up/down buttons, and press OK.
- 4. Specify ratio of exposure between frames. Choose Overlay Mode and select Add, Average, Lighten, or Darken.
- Add. Each new exposure is added to the previous shots, with each individual image fully exposed and overlaid on the others in the frame. Use when photographing a subject that is moving against a dark background, to track movement. (See Figure 6.12, left.)
- Average. The overall exposure is divided by the number of shots in the series, and each image is allocated that fraction of the overall exposure. Use this when shooting subjects with a great deal of overlap. (See Figure 6.12, right.)
- Lighten. The camera compares pixels in the same position in each exposure, and uses only the brightest. This effect is similar to the Lighten blending mode in Photoshop, Lightroom, and other image-editing software. Use this to allow the lightest tones of each shot in the series to show through, such as multiple bursts in a fireworks show. The sky will remain dark, but the pyrotechnics will be captured perfectly. You may have to experiment with this setting until you become familiar with what it does to your images.
- Darken. Similar to the Lighten blending mode, only just the darkest pixel is saved. You’d use this in situations that are the opposite of those typical of the Add selection. That is, if the background is light, and a darker subject is moving across that background, Darken would provide separate images.
- 5. Keep all exposures? Ordinarily, the Z50 combines all the shots into a single exposure. However, you can ask the camera to save all the individual images in the series by choosing On in the Keep All Exposures entry.
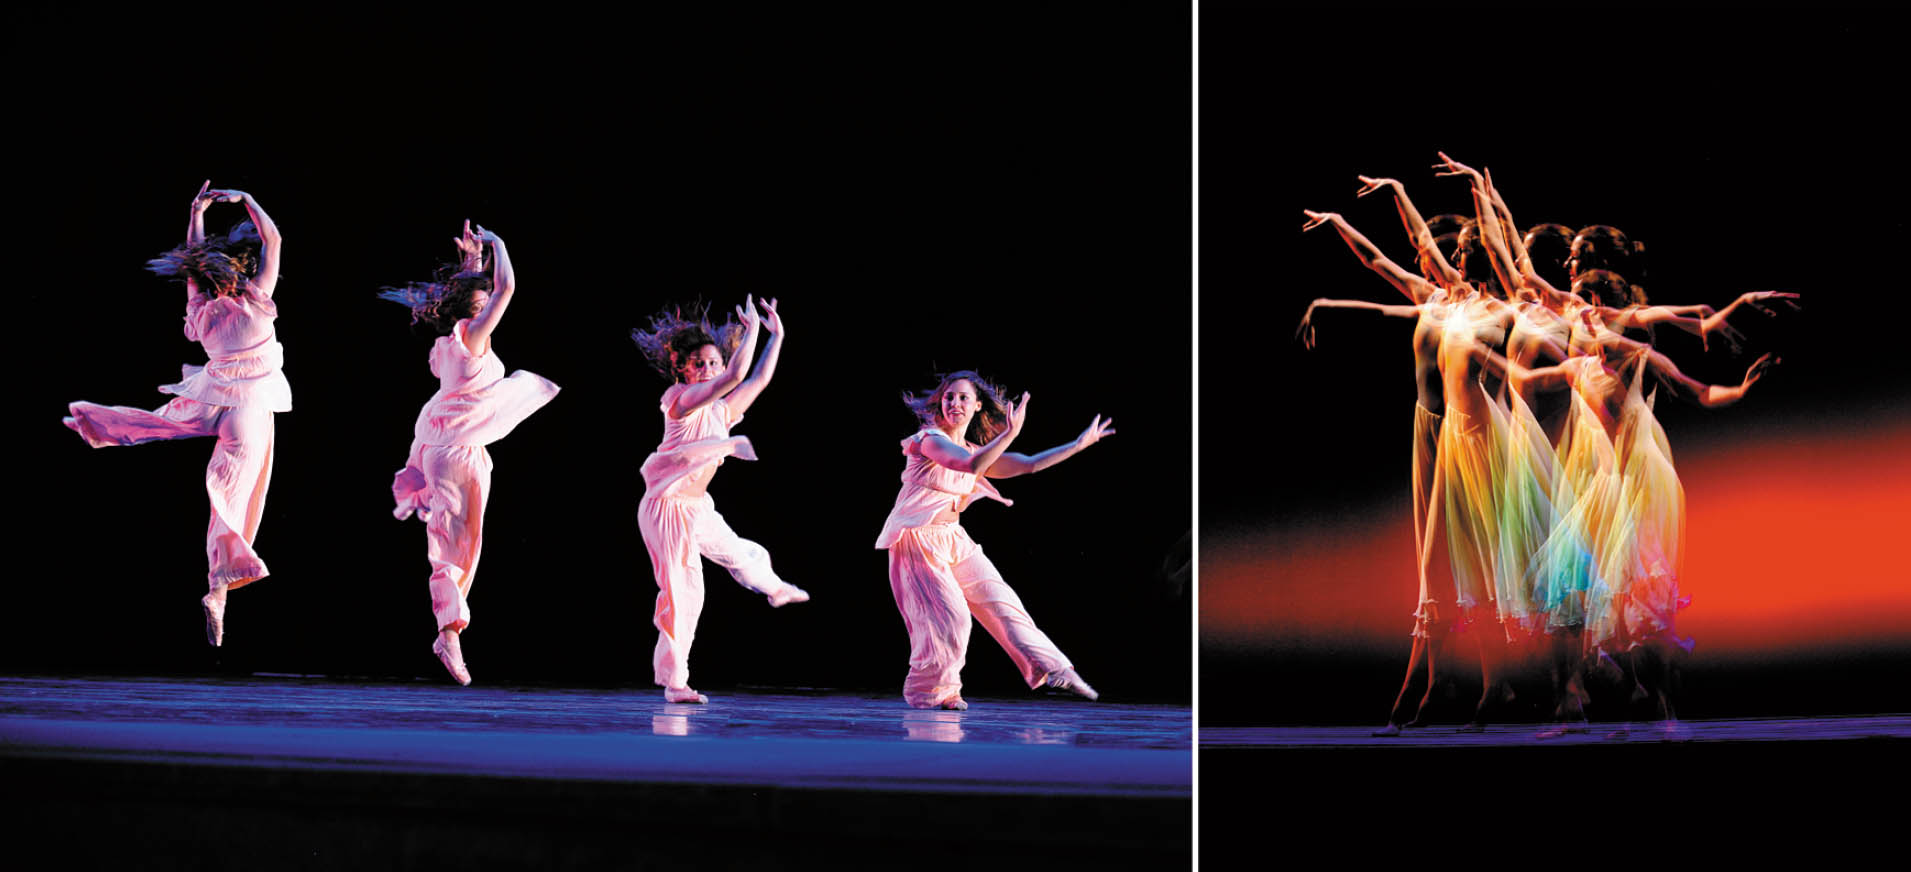
Figure 6.12 Multiple Exposures using Add (left) and Average (right) overlay modes.
- 6. Overlay Shooting. This is a separate entry from Overlay Mode, described above. When set to On, the camera will superimpose each view you take on the display.
- 7. Choose First Exposure (NEF). This is a neat feature that allows you to, say, add a background of your choice to your multiple exposure. I’ll provide instructions in the Overlay Shooting section that follows.
- 8. Shoot your multiple exposure set. Take the photo by pressing the shutter release button multiple times until all the exposures in the series have been taken. (In continuous shooting mode, the entire series will be shot in a single burst.) The blinking multiple exposure icon vanishes when the series is finished. Reminder: You’ll need to deactivate the Multiple Exposure feature once you’ve finished taking a set in On (series) mode, as the setting remains even after the camera has been powered off.
Keep in mind if you wait longer than 30 seconds between any two photos in the series, the sequence will terminate and combine the images taken so far. If you want a longer elapsed time between exposures, go to the Playback menu and make sure On has been specified for Image Review, and then extend the Standby Timer using Custom Setting c3: Power Off Delay to an appropriate maximum interval. The camera will grant you an additional 30 seconds beyond that. The Multiple Exposure feature will then use the monitor-off delay as its maximum interval between shots.
Overlay Shooting
The Overlay Shooting option is a very handy feature. I use it often when I am shooting ballet dancers in action against a dark background. I set the Z50 to Single shooting rather than continuous when capturing the multiple exposure sequence. I can often move the camera to adjust the position of a dancers in the frame while pressing the shutter release rapidly to capture a sequence like the one shown earlier at left in Figure 6.12. As noted, you just need to select the Overlay Mode that will combine the images appropriately.
The Choose First Exposure option adds a new wrinkle: the ability to incorporate the background image of your choice. Here are the steps I used to create Figure 6.13.
- 1. Take background photo. You can capture a background photo in RAW (NEF) format any time. It must reside on the memory card you’ll use to grab your multiple exposures. For Figure 6.13, I took along a card I’d previously used to photograph a sunset to a ballet rehearsal.
- 2. Set up multiple exposure. Enter the basic parameters for your multiple exposure, including Mode and Exposures Per Frame. I used On (Series) and 3 Exposures Per frame. (The NEF background photo counts as the first exposure.)
- 3. Select Overlay Mode. Since my dancer was going to be photographed against a black background, and my new background was also dark, I chose Lighten so the pixels of the dancer would show through.
- 4. Overlay Shooting. I set this parameter to On. I was planning on taking two separate shots of the dancer and wanted to have the first image overlaid on the viewfinder so I could frame the second shot easily.
- 5. Choose First Exposure (NEF). When I selected this parameter, the Z50 displayed the selection screen, where only NEF files could be selected. I chose the sunset photo.
- 6. Take Photo. I took the “second” photo at left in Figure 6.13 (remember, the NEF background counts as the first in the sequence) by pressing the shutter release down all the way, then moved the camera slightly to the left to frame the next image, which I then captured at the right side of the photo. While you can accomplish the same look in an image editor, doing it in camera can be more fun.

Figure 6.13 Overlay Shooting allows you to combine several images with a background image you’ve already captured.
Connecting Your Z50
The Z50 is capable of connecting to a variety of external devices, ranging from HDMI-compatible monitors and video recorders, to your computer, smartphone, or tablet. These links allow you to share photos, operate your camera remotely, or redirect your camera’s output. The last sections of this chapter will help you make the most common connections. Your options include:
- Video output. Your camera has an HDMI audiovisual terminal that can direct the Z50’s display and sound to an external device, such as a computer monitor, high-definition television, or video recorder. It’s usually as simple as plugging an HDMI Type D cable into the terminal on the camera, and the other end into the HDMI connection on the external device. The camera’s Auto setting (found in the Setup menu and explained in Chapter 11) will usually set the correct output for you; if not, you can specify the particular setting required.
- Connect to printers. You can select specific JPEG images on the camera (using the Playback menu, as described in Chapter 9), and then link the Z50 to a PictBridge-compatible printer using the USB cable that comes with the Z50. (Connect the two directly; using a USB hub can be problematic.) When the camera and printer are powered up, the PictBridge playback menu will appear.
It’s easy to print single pictures, multiple photos, or even index prints (what we used to call “contact sheets”) with thumbnails of the first 256 images on the card.
- Direct computer connection. You can connect the Z50 to your computer using the included USB cable, and connect using the free ViewNXi software available from the Nikon download center web site for your country. Then, copy pictures using the program’s Nikon Transfer 2 module to your computer for viewing, editing, and organizing. In many cases, a card reader is faster for transfer (and uses less of the camera’s power), but it’s handy to be able to copy photos when nothing is available but a USB cable.
- Wireless connection to a computer. Techie types and professional photographers may be willing to wend through the complex setup required to connect a computer to the Z50 over a network. Most of us, however, find wireless access to the camera with our smart devices most convenient and practical.
- Wireless connection to a smart device. The ability to use our Internet-friendly smartphones and tablet to communicate with the Z50 is the most widely used and practical way to operate the camera remotely and link to the outside world. That’s the mode I’ll be emphasizing in this chapter.
Introduction to Wi-Fi/Computer Connections
Your Z50 has the ability to connect to a computer wirelessly using two different methods:
- Access-Point mode. The Z50 has a built-in wireless access point. If you have a home network, you may have Wi-Fi “extenders” located some distance from your router that allow connecting outside the router’s range. The Z50’s built-in access point can serve in that function so that your computer can connect to it (and the camera) wirelessly in a special mini-LAN (local area network). Note that in Access–Point mode, your computer is connecting to the camera instead of your home network, so the computer will not be able to access the Internet while linked to the Z50. Logically, that makes this mode best for use outdoors or in other places where a wireless network is not available.
- Infrastructure mode. In this mode, the Z50 connects to your computer over an existing network that they are both linked to, such as your home network with a wireless router. Because the connection is a conventional network, your computer can access the camera, the Internet, and other devices on the local area network (including printers) at the same time.
Unfortunately, these more advanced Wi-Fi/computer options are beyond the scope of this book, even if there were room for a 60-page chapter that deals with computer technology rather than photography. (You can download Nikon’s own 60-page Network Connection Guide from their web page, however.) But unless you have LAN or IT experience, all the options available for Wi-Fi connections probably will have your eyes glazing over.
You’ll need to create a network profile, access the camera’s SSID and network security encryption key, download and install Nikon’s Wireless Transmitter Utility, supply an authentication code (for Access-Point mode), or, alternatively use either Push-button WPS or Pin-entry WPS, obtain or select an IP address, and make a few other settings (in Infrastructure mode).
While Nikon provides basic instruction for these modes in the Z50 manual, I recommend those who don’t have (or want to develop) that LAN/IT experience stick to SnapBridge, which is finally evolving into a useful tool. Oddly enough, SnapBridge is capable of using your camera’s built-in access point, too (for uploading movies), and makes the camera/smart device connection much easier than conventional LAN access.
Using SnapBridge
Nikon has elected to blaze a trail of its own in implementing wireless connectivity on the Z50, using a system it calls SnapBridge. It features both Bluetooth LE (Low Energy) and Wi-Fi connections. You can connect to your computer over Wi-Fi, or to your smart device running the SnapBridge app using either Wi-Fi or Bluetooth. Bluetooth can safely be left active at all times, because it provides little drain on the Z50’s battery when not being actively used. That makes connecting camera and smart device much quicker. A Wi-Fi connection, using the Z50’s built-in Wi-Fi access point, is the required choice for movies and a good idea for transferring large numbers of images in one session.
Here’s some of what you can do with SnapBridge:
- Auto uploads. You can use SnapBridge to automatically upload JPEG images (but not RAW files) from your camera to your smart device.
- Upload selected photos. During image review (Playback mode), you can press the i button and choose Select to Send to Smart Device/Deselect to choose specific images to transfer to your smart device. You can also use the Select to Send to Smart Device entry in the Playback menu. Up to 1,000 photos can be marked for upload in one session.
- Resize images. Obviously, uploading full-resolution images to your smart device would be slow and use a lot of storage space on your device. SnapBridge defaults to low-resolution 2-megapixel images (which should be fine for smart device display or sharing on social media), and the app lets you specify a different upload size.
- Add credits. The app also lets you choose to embed comments and copyright information entered in the Setup menu (as described in Chapter 9) or entered using the SnapBridge app itself.
- Multiple devices. If you own multiple phones and tablets, you can pair the camera with as many as five different devices. However, the Z50 can connect to only one at a time. You can manually switch between devices using the connection options described shortly.
- Remote control. You can trigger the shutter using your smart device (as long as the camera is on), giving you wireless remote control without the need of purchasing an accessory.
- Imprint photos. You can overlay comments or the time the photo was taken.
As I noted earlier, the Z50’s SnapBridge app supports camera-to-smart-device communications. Your first step in using SnapBridge is to download and install the SnapBridge app onto your smart device from the Google Play store or the Apple iTunes store. There are several ways to connect your Z50 to your device, either using the Setup menu’s Connect to Smart Device entry or by loading the SnapBridge app and using its Connect feature.
Make sure both Bluetooth is enabled on your smart device, and the Airplane mode in the Z50’s Setup menu is set to Off. Then follow these steps to link your camera and device using the camera’s Setup menu. Your screens may vary depending on whether you are using an Android or iOS device, and whether Nikon has issued one of its frequent updates to SnapBridge since this book went to press. Updates have been frequent, because Apple’s iOS 13 “broke” SnapBridge and some other wireless applications, causing Nikon, Apple, and other visitors to respond with several rounds of bug fixes and patches. Version 2.6.1 was current as I wrote this book. Depending on your device, you may need to use its Settings menu to connect to the camera, which will appear as a connection option in the device’s Bluetooth and Wi-Fi entries.
- 1. Open the SnapBridge app. Access the app on your device. The first time it launches it will ask you to connect to a camera by tapping the icon circled in green at far left in Figure 6.14. Select Mirrorless Camera in the next screen (Figure 6.14, center left), and then Pairing (Bluetooth) in the Connection Type screen seen center right in the figure.
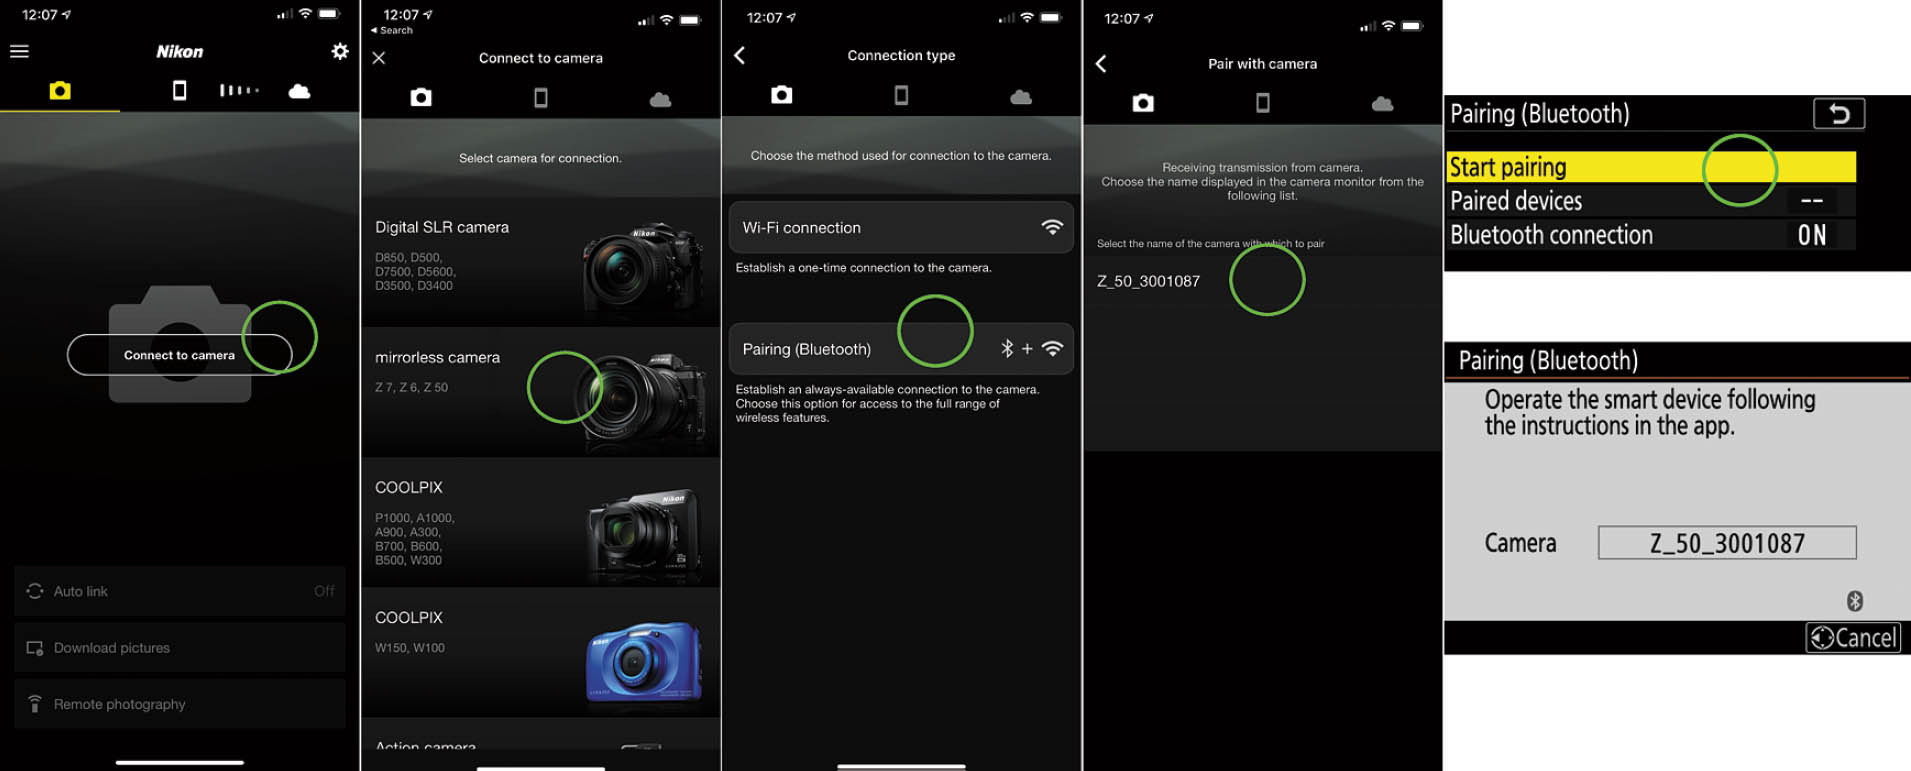
Figure 6.14 Connecting to a smart device with SnapBridge.
- 2. Read the instructions. Help screens will appear telling you what to do next using the Z50’s Connect to Smart Device menu entry. Follow the directions, and tap Understood when you’ve followed them. The app will search for available connections, as seen in the Pair With Camera screen shown fourth from the left in Figure 6.14.
- 3. Navigate to Connect to Smart Device in the Z50’s Setup menu. As with all menu entries, and those that follow in this list, proceed by pressing the right directional arrow or pressing OK. Choose Pairing (Bluetooth) and when the screen shown in Figure 6.14, upper right, appears, choose Start Pairing.
- 4. Begin connection. Return to the Connect to Smart Device screen on the Z50, choose Start, and press the right button. Initially, you should see a screen like the one at lower right in Figure 6.14. Follow the directions on the screens that appear The connection screen will look something like the screen at far left in Figure 6.15, depending on your smart device.
- 5. Confirm connection. The name of your camera on the smart device will be the same displayed on the Z50’s display.
- 6. Select an Accessory. This screen (see Figure 6.15, top center) appears next on your smart device. Tap your camera’s name.
- 7. Connect Bluetooth. The Bluetooth Pairing Request message appears on the device (see Figure 6.15, middle center), along with an authorization code. The same code will appear on the Z50’s LCD monitor. If they match, press/tap OK on the camera and tap Pair on the device screen.
- 8. Pairing success. When pairing is completed successfully, the screen shown at bottom center in Figure 6.15 will appear on the Z50. Press OK, and, depending on your release of SnapBridge, two more screens may be shown asking for permission for the smart device to share location data with the camera and to synchronize the camera with the smart device’s information. Select Yes and press the right directional button or the OK button to confirm each. A “Done” message appears and you’ll return to the Setup menu.

Figure 6.15 The Z50’s connection screens lead you through linking your camera and smart device.
- 9. Choose autosend (Optional). If you want your images to be transferred automatically, choose Send to Smart Device (Auto), and in the screen that appears, select and confirm On.
- 10. Activate Bluetooth. Next, return to the Connect to Smart Device entry in the Setup menu of the Z50, and find the Send While Off entry. (See Figure 6.16.) Enable it if you’d like to allow the camera to maintain a Bluetooth connection with your device and continue to upload images even when the Z50 is powered down. Note: This setting will consume even more power if you have many images to upload. Your images will be stored in the Snapshot Gallery in the app.
- 11. Use both Wi-Fi and Bluetooth. If you have an iOS device, you can connect using both Wi-Fi and Bluetooth. Pair your Z50 with the camera using the Settings menu of your smart device, but Wi-Fi is faster and used for transferring movies or large numbers of files. You can connect your smart device to the camera using Wi-Fi through your device’s Settings menu, too. I’ll explain the Wi-Fi option shortly.
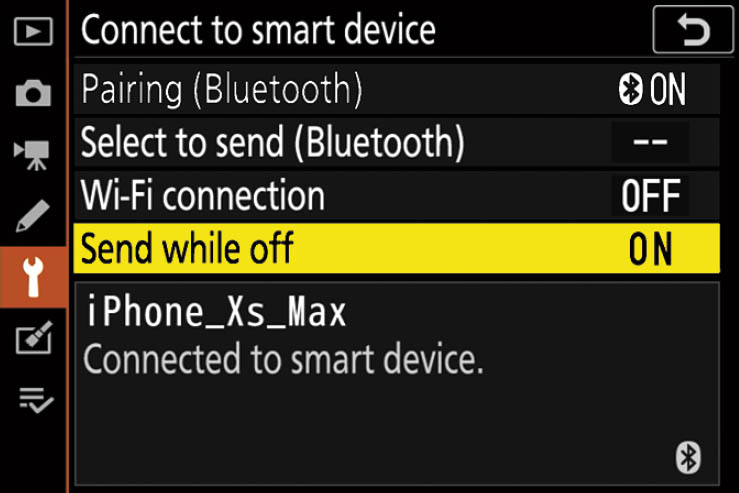
Figure 6.16 Connect to Smart Device options.
Using the SnapBridge App
The app itself has a fairly simple interface, shown in Figure 6.17 (left). You can also download images (see Figure 6.17, center). When you first access the SnapBridge app, you’ll be invited to register for Nikon Image Space cloud storage and receive a Nikon ID (see Figure 6.17, right). You can access Image Space by tapping the cloud icon at top right in the main screen.
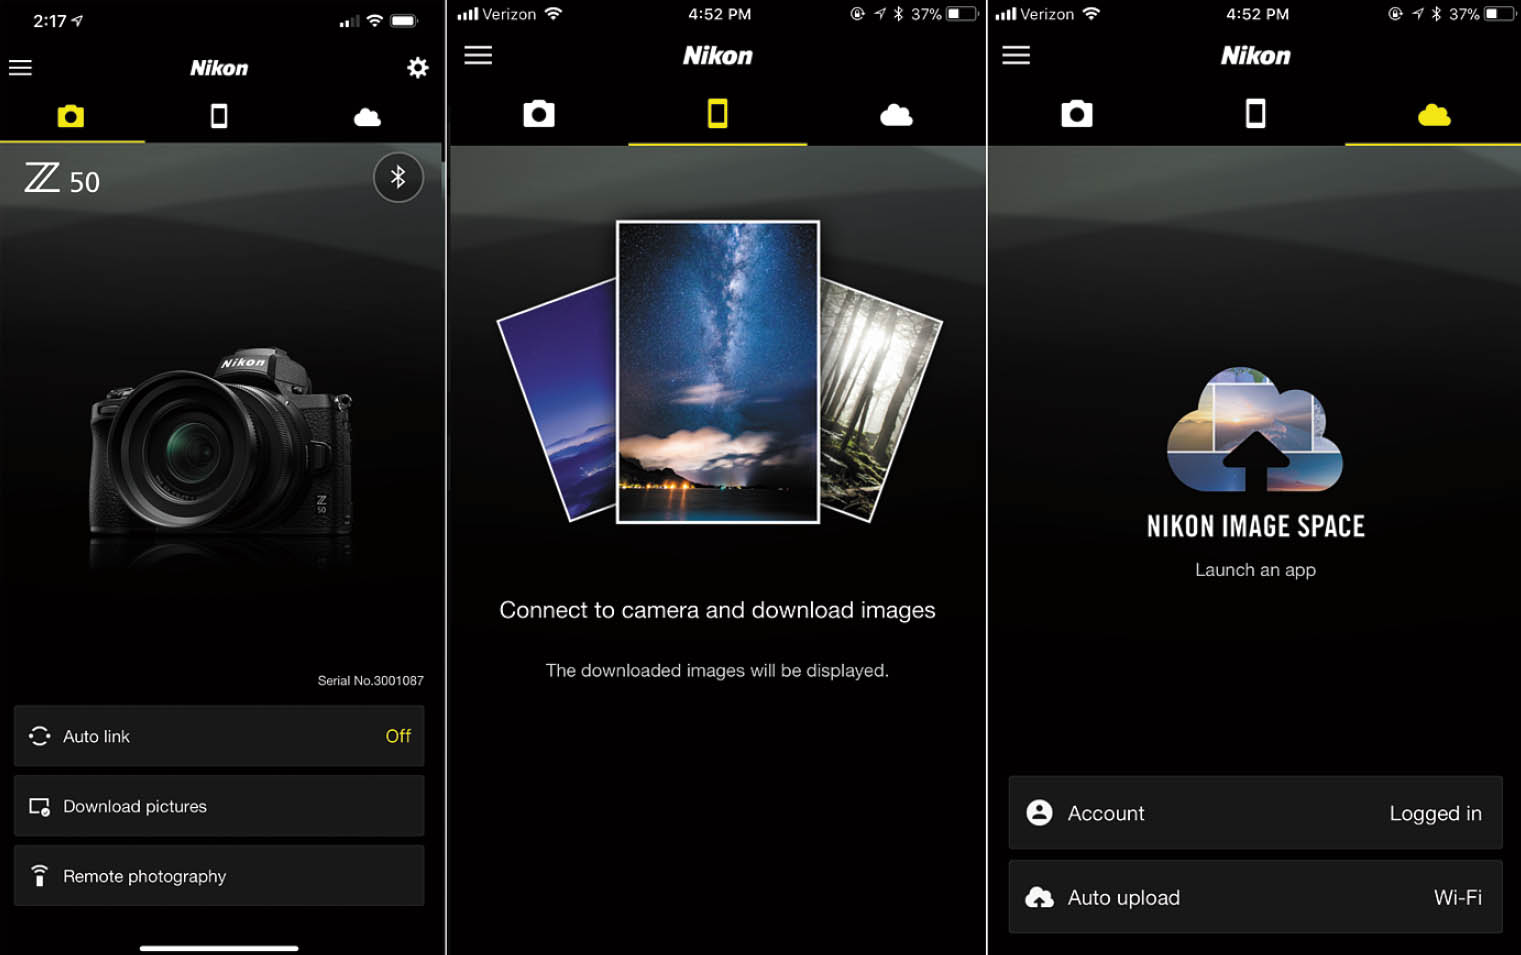
Figure 6.17 The SnapBridge App has a simple interface (left); can download images from your camera (center); and upload to the cloud-based Nikon Image Space (right).
Tap the Camera icon in the main SnapBridge screen to access these three options: Autolink, Download Pictures, and Remote Photography:
- Autolink. Offers these options, shown at left in Figure 6.18:
- Auto download. You can select to automatically download compact, 2 MP images, or original-size images, or disable auto download from your camera to your device entirely. Images can be auto uploaded from the device to Nikon Image Space so they will be immediately available over the Internet. I generally leave auto download turned off most of the time so I can select images for transfer at a later time, but activate it when I am shooting “tethered” and want to have, say, 2 MP images quickly transferred to the smart device for review.
- Synchronize Clock. You can synchronize your camera’s internal clock from the information supplied by your smart device (which generally will have access to GPS and precise time information).
- Synchronize Location Data. You can elect to include the location from which your uploads are made (using your device’s GPS features), or disable sharing that information for privacy reasons.
- Power Saving Mode. Activate to tell your device to suspend links if it is out of range of the camera, or the camera is idle. The connection will be re-established the next time SnapBridge launches.
- Download Pictures. You can mark images using the Select to Send to Smart Device entry in the Playback 2 menu, and then download them from here. You’d want to do this whenever you’ve disabled automatic downloads. You can also select images from your phone or tablet, as shown in Figure 6.18, right. Just tap Select and then tap the pictures you want to select or deselect.
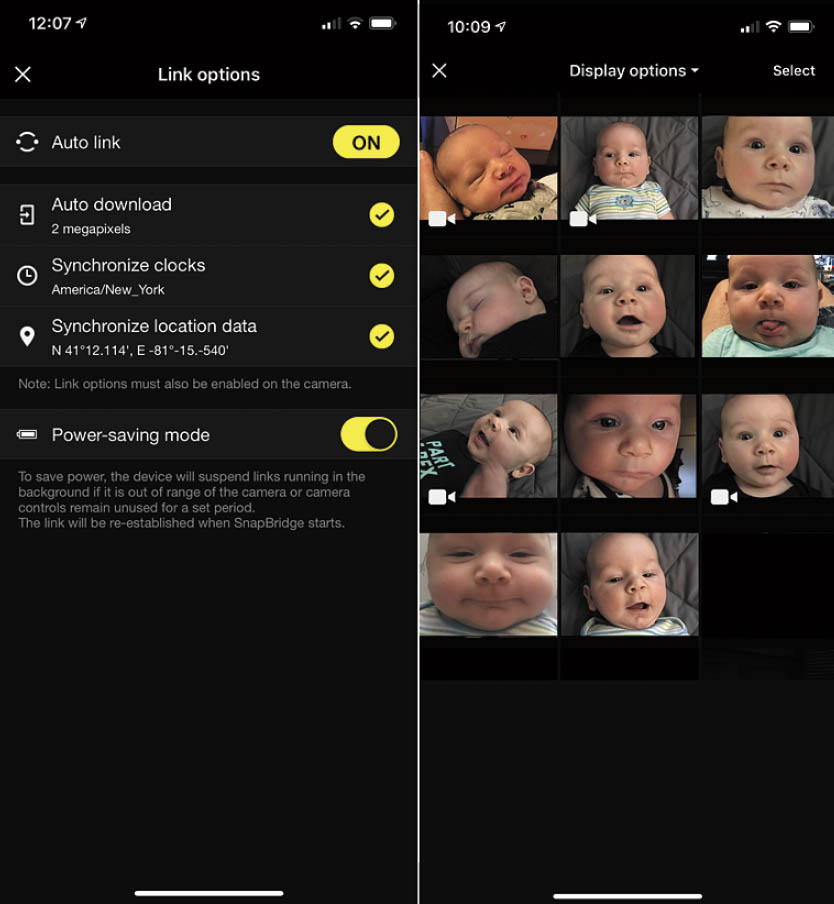
Figure 6.18 Link options (left), Download photos (right).
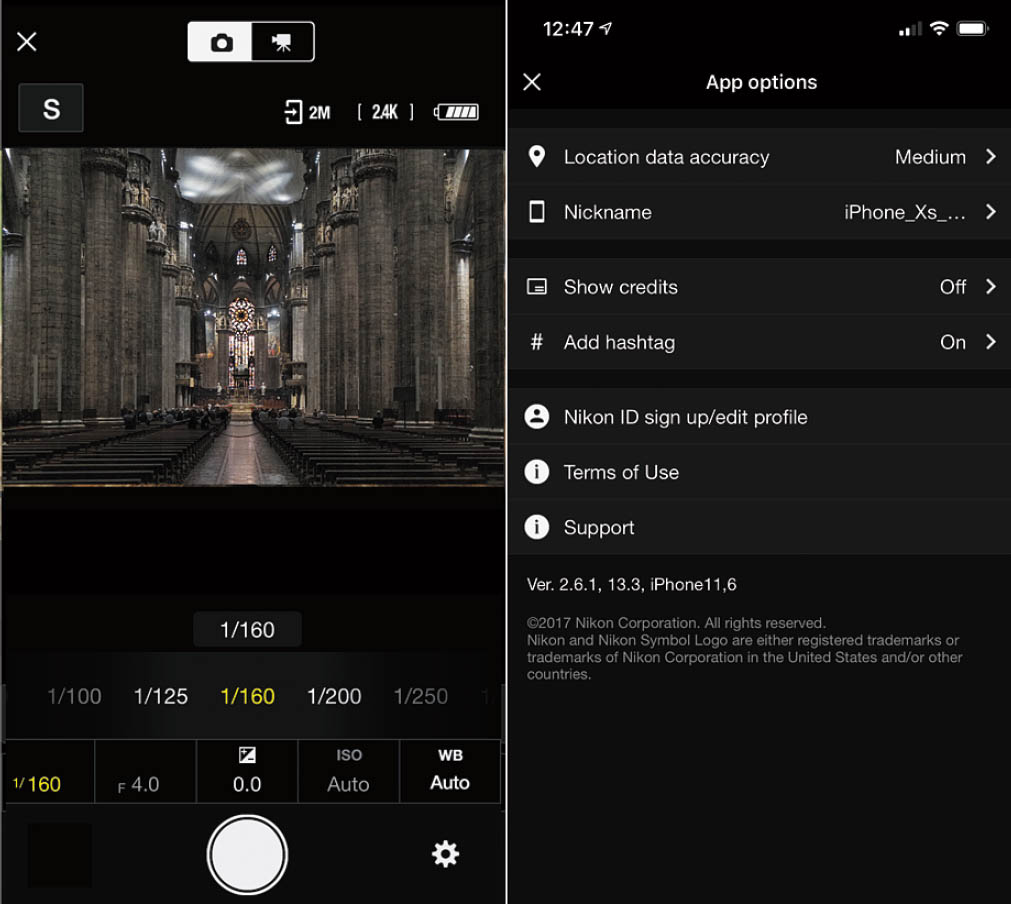
Figure 6.19 Remote photography (left), App Options (right).
- Remote Photography. This allows you to view your camera’s live display on your device screen and take photos using your phone or tablet. You’ll need to switch to a Wi-Fi connection to shoot remotely (don’t worry, the Z50 has its own built-in Wi-Fi access point). If you are using an iOS device, just follow the instructions in the section that follows this one; your Android device will lead you through the steps automatically. (See Figure 6.19, left.)
When you tap the Menu icon (represented by three lines in the upper-left corner of the main screen) you’ll find three entries: Notices (news and messages from Nikon), Help (an online Help guide), and App Options, seen at right in Figure 6.19. Those options include:
- Location Data Accuracy. You can choose the level of detail for GPS information imported from your smart device.
- Nickname. Choose the name for your smart device.
- Show credits. You can enable adding credit information to each photo when it’s downloaded.
- Add hashtag. Define a hashtag to be appended to your uploaded photos on social media.
- Nikon ID signup/edit profile. Use this to sign up for a free Nikon Image Space account, or to change your account settings.
- Terms of Use. A message center with notifications from Nikon.
- Support. Provides a five-screen tutorial that, in general, tells you things you already know if you’ve gotten this far.
- Info/Settings. Displays connected cameras, allows making some of the settings already mentioned, such as auto download, upload location, or synchronize clock, and offers a modicum of SnapBridge Help that goes through each of the functions in quite a bit more detail than the “tutorial.”
Wi-Fi
Low-energy Bluetooth is the best (and default) connection for most applications, because it doesn’t drain the battery of your smart device or camera as quickly. However, Wi-Fi is sometimes required for remote photography and transferring movies, both of which can be done more efficiently over a Wi-Fi connection. If you’re using an Apple iPad or iPhone, the Z50 will prompt you to set up a Wi-Fi link when needed. Note that this connection is a camera/smart device Wi-Fi link, and not the complicated camera/computer Wi-Fi connection I used to terrify you in the previous section. SnapBridge makes the setup much easier.
The chief disadvantage of this Wi-Fi mode is that you can’t control image transfer from the camera itself. Wi-Fi access uses the Nikon app’s browsing capability to download thumbnails of the images on the Z50’s memory cards, and then pull them (JPEG’s only, not NEF/RAW) from the camera onto the smart device.
When Wi-Fi is required, a screen like the one shown in Figure 6.20 (left) appears. The screens will vary, depending on your Android or iOS device, and Nikon’s latest version of SnapBridge. Tap Yes, and the screen seen at right is displayed. Note the camera’s network SSID and the password (if needed: see Figure 6.21). Then tap Go and you’ll be whisked to the device’s Settings > SnapBridge section, which has the following options:
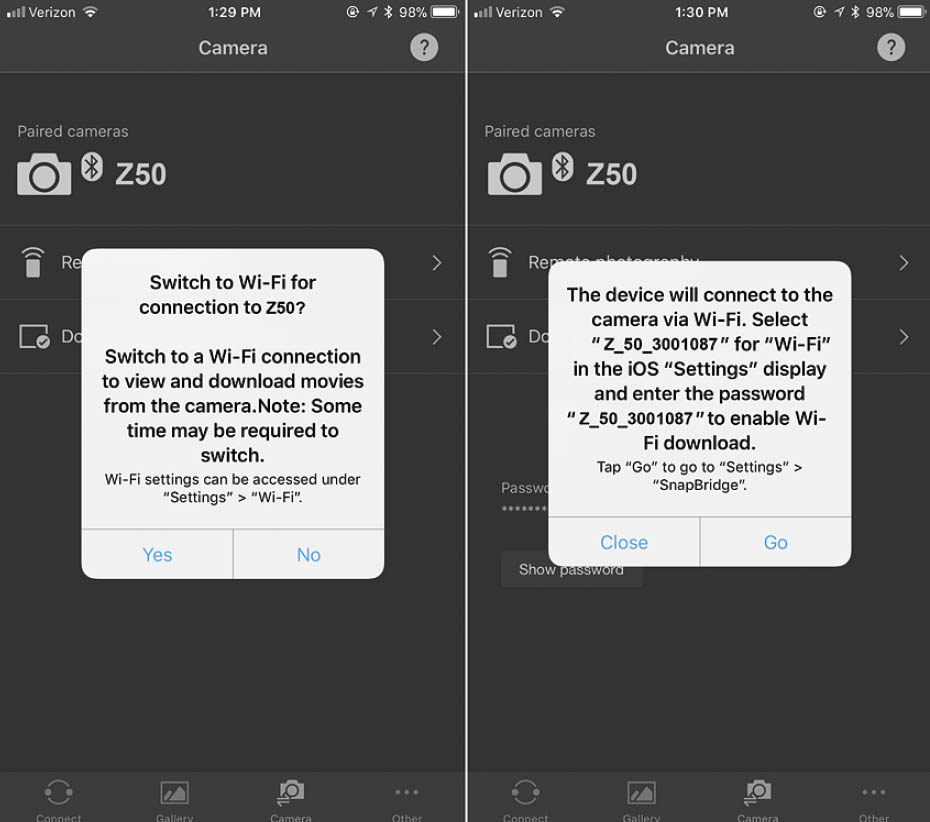
Figure 6.20 Switching to Wi-Fi.
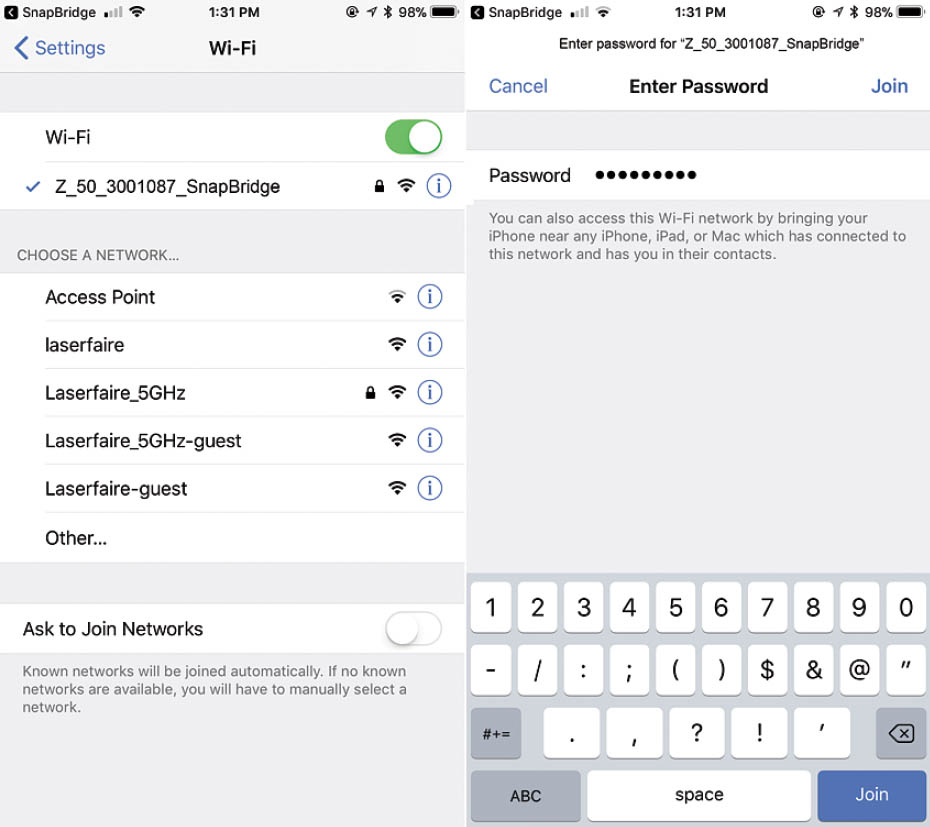
Figure 6.21 Connect to Wi-Fi on your smart device.
- Location. Allows the device to share your location with the Z50, so GPS data can be imbedded in the images you shoot. Choose Never, While Using the App, or Always. I prefer Always. I keep my phone charged and don’t worry about the slight drain on the battery when the SnapBridge app is not active.
- Photos. You must give SnapBridge permission to read photos from your camera during image transfer, and to write information to the image file.
- Siri and Siri Suggestions. Allows information from SnapBridge to be included in Siri Lookup, Search, and Keyboard features, so Siri can intelligently offer suggestions based on how you use SnapBridge.
- Notifications. You can allow or disable all notifications about SnapBridge on your device, or individually choose to use sounds, or display Badge app icons, or show on the Lock Screen, in History, or as Banners. Banners can be persistent—requiring an action on your part before they are dismissed, or temporary, so that they disappear automatically after a short time.
- Cellular Data. You can let SnapBridge use cellular data if you’re not on a limited plan. My carrier gives me 12GB a month, which I never use up entirely, and carries over any unused data to the following month. I generally have in excess of 20GB available, so I leave this setting On.