Today, modern digital cameras like the Z50 can identify potential subject matter, lock in on human faces, if present, and automatically focus faster than the blink of an eye. Usually. Of course, sometimes a camera’s AF will zero in on the wrong subject, become confused by background pattern, or be totally unable to follow a fast-moving target like a bird in flight. While autofocus has come a long way in the last 30-plus years, it’s still a work-in-progress that relies heavily on input from the photographer. Your Nikon Z50 can calculate and set focus for you quickly and with a high degree of accuracy, but you still need to make a few settings that provide guidance on three Ws of autofocus: what, where, and when. Your decisions in how you apply those choices supplies the fourth W: why. This chapter will provide you with everything you need to put all four to work.
How Focus Works
Simply put, focus is the process of adjusting the camera so that parts of our subject that we want to be sharp and clear are, in fact, sharp and clear. We allow the camera to focus for us, automatically, or we can rotate the lens’s focus ring manually to achieve the desired focus. Manual focusing is especially problematic because our eyes and brains have poor memory for correct focus. That’s why your eye doctor conducting a refraction test must shift back and forth between pairs of lenses and ask, “Does that look sharper—or was it sharper before?” in determining your correct prescription. Too often, the slight differences are such that the lens pairs must be swapped multiple times.
Similarly, manual focusing involves jogging the focus ring back and forth as you go from almost in focus, to sharp focus, to almost focused again. The little clockwise and counterclockwise arcs decrease in size until you’ve zeroed in on the point of correct focus. What you’re looking for is the image with the most contrast between the edges of elements in the image.
The Nikon Z50’s autofocus mechanism, like all such systems found in modern cameras, also evaluates these increases and decreases in sharpness, but it is able to remember the progression perfectly, so that autofocus can lock in much more quickly and, with an image that has sufficient contrast, more precisely. Unfortunately, while the camera’s focus system finds it easy to measure degrees of apparent focus at each of the focus points in the viewfinder, it doesn’t really know with any certainty which object should be in sharpest focus. Is it the closest object? The subject in the center? Something lurking behind the closest subject? A person standing over at the side of the picture? Using autofocus effectively involves telling the Z50 exactly what it should be focusing on.
Learning to use the Z50’s modern autofocus system is easy, but you do need to fully understand how the system works to get the most benefit from it. Once you’re comfortable with autofocus, you’ll know when it’s appropriate to use the manual focus option, too.
As the camera collects focus information from the sensors, it then evaluates it to determine whether the desired sharp focus has been achieved. The calculations may include whether the subject is moving, and whether the camera needs to “predict” where the subject will be when the shutter release button is fully depressed and the picture is taken.
The Z50 has a hybrid autofocus system, using two technologies called contrast detection autofocus (CDAF) and phase detection autofocus (PDAF). I’m going to provide a quick overview of contrast detection first, and then devote much of the rest of this chapter to optimizing your camera’s use of its phase detection features.
Contrast Detection
This is a slower, but potentially more accurate mode, best suited for static subjects, and was originally the only kind of autofocus available for mirrorless cameras and for dSLRs when shooting in their live view and movie modes. The recent innovation of adding phase detection abilities to the sensor itself (as I’ll describe shortly) made contrast detection a fine-tuning option for hybrid autofocus systems that combined CDAF and PDAF.
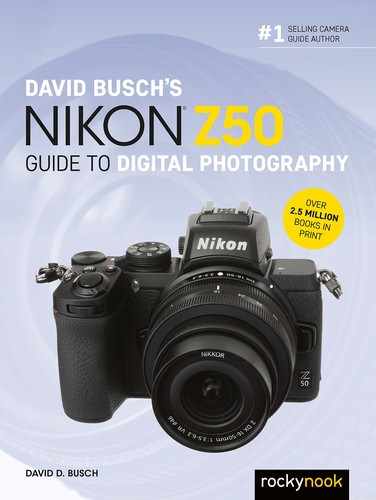
Contrast detection is very easy to understand, and is illustrated by Figure 5.1, a close-up of some weathered wood. At top in the figure, the transitions between the edges found in the image are soft and blurred because of the low contrast between them. Whether the edges are horizontal, vertical, or diagonal doesn’t matter in the least; the focus system looks only for contrast between edges, and those edges can run in any direction at all.
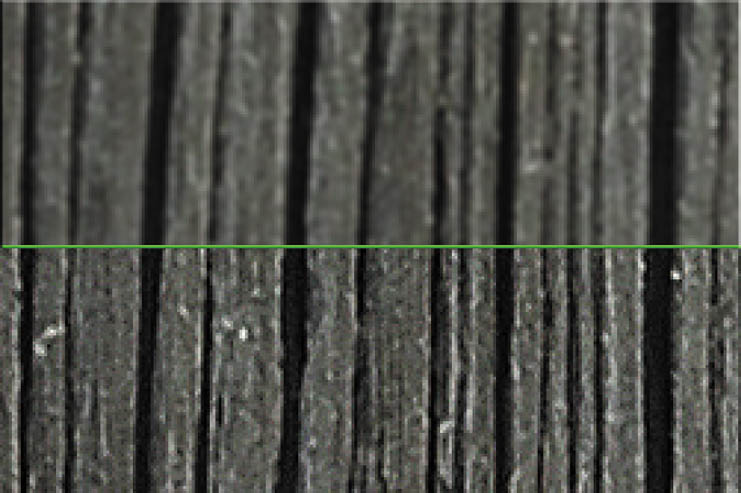
Figure 5.1 Focus in contrast detection mode evaluates the increase in contrast in the edges of subjects, starting with a blurry image (top) and producing a sharp, contrasty image (bottom).
At the bottom of Figure 5.1, the image has been brought into sharp focus, and the edges have much more contrast; the transitions are sharp and clear. Although this example is a bit exaggerated so you can see the results on the printed page, it’s easy to understand that when maximum contrast in a subject is achieved, it can be deemed to be in sharp focus. Although achieving focus with contrast detection is generally quite a bit slower, it can be used to fine-tune focus on a subject that has already been brought into general focus using phase detection (described next). There are several advantages—and disadvantages—to contrast detection:
- Works with more image types. Any subject that has edges will work with CDAF, which doesn’t “care” whether lines within the frame are straight or curved, horizontal, vertical, or diagonal.
- Focus on any point. With contrast detection, any portion of the image can be used to focus: you don’t need dedicated AF sensors embedded in the sensor. Focus is achieved with the actual sensor image, so focus point selection is simply a matter of choosing which part of the sensor image to use. It’s easy to move the focus frame around to virtually any location.
- Potentially more accurate. Contrast detection is clear-cut. The camera can clearly see when the highest contrast has been achieved, as long as there is sufficient light to allow the camera to examine the image produced by the sensor. However, some “hunting” may be necessary. As the camera seeks the ideal plane of focus, it may overshoot and have to back up a little, then re-correct if the new focus plane is not optimal. However, once CDAF settles on the ideal focus plane, the results are generally very accurate. Contrast detection is an excellent way of fine-tuning focus that has previously been achieved through PDAF.
Phase Detection
Phase detection is easily much more rapid than contrast detection. The challenge is to make its operation as accurate as possible. Digital SLRs, like the Z50’s sibling the Nikon D850, have always used PDAF. Such dSLR systems include an array of tiny autofocus sensors, located in the “floor” of the mirror box, with a small portion of the illumination directed downward to the autofocus sensor array.
In the Z50, that separate AF sensor is replaced by 209 phase detect autofocus points embedded in the camera’s imaging sensor. These points are located in the center of the boxes shown in Figure 5.2. The boxes represent the positions you can individually select as your AF area in Single-point AF area mode—not the size of the PDAF pixels themselves, which are much smaller.

Figure 5.2 The boxes represent the 209 selectable AF areas when using Single-point autofocus.
The phase detection pixels in the Z50’s sensor split incoming photons arriving from opposite sides of the lens into two parts, forming a pair of images, exactly like the rangefinders used for surveying and in rangefinder-focusing cameras like the venerable Leica M series. The dual images are separated when out of focus, and then gradually brought together to achieve sharp focus, as shown from top to bottom in Figure 5.3.
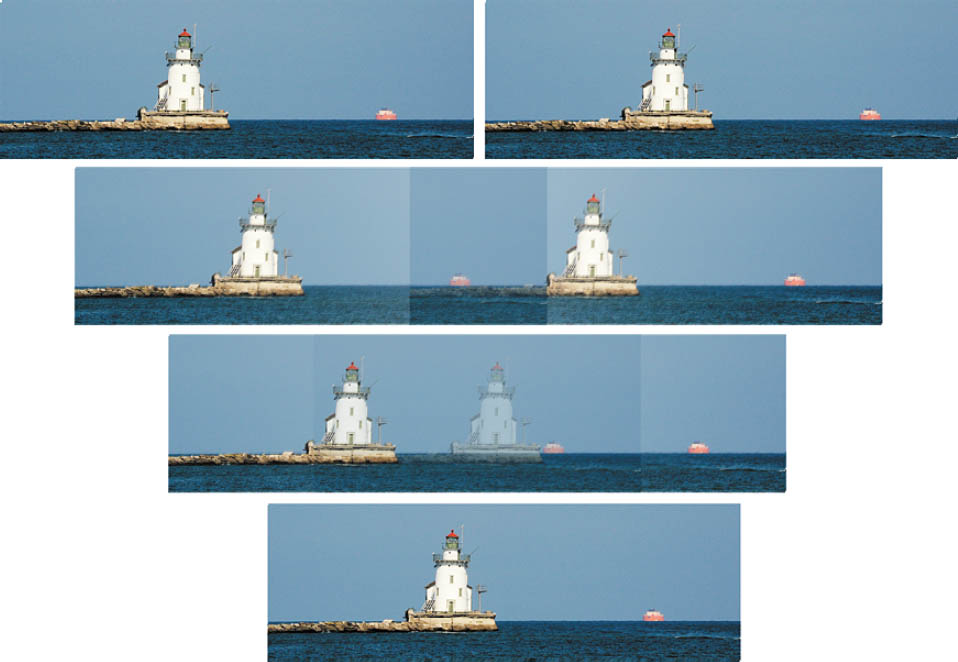
Figure 5.3 In phase detection, parts of an image are split in two and compared (top). When the image is in focus, the two halves of the image align, as with a rangefinder (bottom).
This process tells the camera when the image pair are “in phase” and aligned. The rangefinder approach of phase detection tells the Z50 exactly how out of focus the image is, and in which direction (focus is too near, or too far) thanks to the amount and direction of the displacement of the split image. The camera can quickly and precisely snap the image into sharp focus and match the lines. If necessary, the Z50’s contrast-detect feature can follow up to perfect the plane of focus. This hybrid AF process is available in all cases (except in Pinpoint AF Area mode, which I’ll explain shortly).
The PDAF sensors in the Z50 are all line sensors, which means they work best with features that transect the sensor either perpendicularly or at an angle, as visualized in Figure 5.4, left. It’s easy to detect when the two halves of the vertical lines of the weathered wood are aligned. (See Figure 5.4, center.) However, when the same sensor is asked to measure focus for, say, horizontal lines that don’t split up quite so conveniently, or, in the worst case, subjects such as the sky (which may have neither vertical nor horizontal lines), focus can slow down drastically. One such scenario is pictured in Figure 5.4, right. Fortunately, as I mentioned earlier, the Z50’s contrast detection AF will come to the rescue and take over where phase-detect AF is stymied.
Figure 5.4 When an image is out of focus, the split lines don’t align precisely (left). Using phase detection, the Z50 is able to align the features of the image and achieve sharp focus quickly (center). Horizontal lines aren’t ideal for horizontally oriented sensors and require vertical contrast detection to achieve final focus (right).
As with any rangefinder-like function, phase detection accuracy is better when the “base length” between the two images is larger. (Think back to your high school trigonometry; you could calculate a distance more accurately when the separation between the two points where the angles were measured was greater.) For that reason, phase detection autofocus is more accurate with larger (wider) lens openings—especially those with maximum f/stops of f/2.8 or better—than with smaller lens openings, and may not work at all when the f/stop is smaller than f/8. As I noted, the Z50 is able to perform these comparisons very quickly.
Depth-of-field
But there are other factors in play, as well. You know that increased depth-of-field, a by-product of shorter focal lengths and/or smaller f/stops, brings more of your subject into focus, at the same time making it more difficult to focus on a subject with, say, a 24mm zoom setting than a 200mm zoom setting. By the same token, a lens with a maximum aperture of f/1.8, such as the Z-mount 50mm f/1.8 and 35mm f/1.8 optics, will be easier to autofocus (or manually focus) than one of the same focal length with an f/4 maximum aperture, such as the 24-70mm kit zoom, because the f/4 lens has more depth-of-field and a dimmer view at a particular focal length.
Of course, many subjects move around in the frame, so that even if the Z50 is sharply focused on your main subject, it may change position and require refocusing. An intervening subject may pop into the frame and pass between you and the subject you meant to photograph. You (or the Z50) have to decide whether to lock focus on this new subject, or remain focused on the original subject. Finally, there are some kinds of subjects that are difficult to bring into sharp focus because they lack enough contrast to allow the Z50’s AF system (or our eyes) to lock in. Blank walls, a clear blue sky, birds-in-flight, or other subject matter may make focusing difficult.
Technically, there is just one plane within your picture area, parallel to the back of the camera (or sensor, in the case of a digital camera), that is in sharp focus. That’s the plane in which the points of the image are rendered as precise points. At every other plane in front of or behind the focus plane, the points show up as discs that range from slightly blurry to extremely blurry. In practice, the discs in many of these planes will still be so small that we see them as points, and that’s where we get depth-of-field. Depth-of-field is just the range of planes that include discs that we perceive as points rather than blurred splotches. The size of this range increases as the aperture is reduced in size and is allocated roughly one-third in front of the plane of sharpest focus, and two-thirds behind it. The range of sharp focus is always greater behind your subject than in front of it. (See Figure 5.5.)

Figure 5.5 The range of sharp focus is greater behind your subject than in front of it.
Using Autofocus with the Nikon Z50
Autofocus can sometimes be frustrating for the new digital photographer, especially those coming from the point-and-shoot world. That’s because correct focus plays a greater role among your creative options with a digital camera, even when photographing the same subjects. Most point-and-shoot digital cameras and smartphones have sensors that are much tinier than the sensor in the Z50. Those smaller sensors require shorter focal length lenses and zoom settings, which have, effectively, more depth-of-field.
The bottom line is that with the average point-and-shoot camera or smartphone, everything is in focus from about one foot to infinity and at virtually every f/stop. Unless you’re shooting close-up photos a few inches from the camera, the depth-of-field is prodigious, and autofocus is almost a non-factor. The Z50, on the other hand, is a full-frame camera that uses longer focal length lenses to achieve the same field of view with its larger sensor, so there is less depth-of-field. That’s a good thing, creatively, because you have the choice to use selective focus to isolate subjects. But it does make the correct use of autofocus more critical.
To maintain the most creative control, you have to choose three attributes:
- How much is in focus. Generally, by choosing the f/stop used, you’ll determine the range of sharpness/amount of depth-of-field. The more extensive the DOF, the “easier” it is for the autofocus system’s locked-in focus point to be appropriate (even though, strictly speaking, there is only one actual plane of sharp focus). With less depth-of-field, the accuracy of the focus point becomes more critical, because even a small error will result in an out-of-focus shot.
- What subject is in focus. The portion of your subject that is zeroed in for autofocus is determined by the autofocus zone that is active, and which is chosen either by you or by the Nikon Z50 (as described next). For example, when shooting portraits, it’s actually okay for part of the subject—or even part of the subject’s face—to be slightly out of focus as long as the eyes (or even just the nearest eye) appear sharp.
- When focus is applied. For static shots of objects that aren’t moving, when focus is applied doesn’t matter much. But when you’re shooting sports, or birds in flight, or children, the subject may move within the viewfinder as you’re framing the image. Whether that movement is across the frame or headed right toward you, timing the instant when autofocus is applied can be important.
Autofocus vs. Manual Focus
Manual focus requires judgment and fast reflexes (if your subject is moving). On the one hand, autofocus does save time and allows us to capture subjects (particularly fast-moving sports) that are difficult to image sharply using manual focusing (unless you have training and know certain techniques). On the other hand, learning to apply the Nikon Z50’s autofocus system most effectively also requires a bit of study and some practice. Then, once you’re comfortable with autofocus, you’ll know when it’s appropriate to use the manual focus option, too. Your Z50 includes some useful features that help you focus manually—including magnification and focus peaking, a way of highlighting out-of-focus areas that may need correction just as “blinkies” show you what parts of the image are overexposed. I’ll show you how to use these manual focus aids later in this chapter.
The important thing to remember is that focus isn’t absolute. For example, some things that look in sharp focus at a given viewing size and distance might not be in focus at a larger size and/or closer distance. In addition, the goal of optimum focus isn’t always to make things look sharp. Not all of an image will be or should be sharp. Controlling exactly what is sharp and what is not is part of your creative palette. Use of depth-of-field characteristics to throw part of an image out of focus while other parts are sharply focused is one of the most valuable tools available to a photographer. But selective focus works only when the desired areas of an image are in focus properly. For the digital photographer, correct focus can be one of the trickiest parts of the technical and creative process.
Bringing the Z50’s AF System into Focus
I’ve explained individual bits and pieces of the Nikon Z50’s autofocus system earlier in this book, particularly in the “roadmap” sections that showed you where all the controls were located, and the “setup” chapters that first introduced the key autofocus options. Now it’s time to round out the coverage as we tie everything together. There are three aspects of autofocus that you need to understand to use this essential feature productively. They apply—in slightly different ways—to both autofocus when using the optical viewfinder, and in Photo/Movie shooting modes. For now, we’re going to concentrate on the system’s most important features:
- Autofocus mode and priority. This governs when during the framing and shooting process autofocus is achieved. Should the camera focus once when activated, or continue to monitor your subject and refocus should the subject move? Is it okay to take a picture even if sharp focus isn’t yet achieved, or should the camera lock out the shutter release until the image is sharp?
- Autofocus point selection. This aspect controls how the Z50 selects which areas of the frame are used to evaluate focus. Point selection allows the camera (or you) to specify a subject and lock focus in on that subject.
- Autofocus activation. When should the autofocus process begin, and when should it be locked? This aspect is related to the autofocus mode, but uses controls that you can specify to activate and/or lock the autofocus process.
The speed with which the camera is able to evaluate focus and then move the lens elements into the proper position to achieve the sharpest focus determines how fast the autofocus mechanism is. Although your Z50 will almost always focus more quickly than a human, there are types of shooting situations where that’s not fast enough. For example, if you’re having problems shooting sports because the Z50’s autofocus system manically follows each moving subject, a better choice might be to switch autofocus modes or shift into manual and prefocus on a spot where you anticipate the action will be, such as a goal line or soccer net. At night football games, for example, when I am shooting with a telephoto lens almost wide open, I often focus manually on one of the referees who happens to be standing where I expect the action to be taking place (say, a halfback run or a pass reception).
Focus Mode and Priority
Focus Modes (labeled AF-S, AF-C, AF-A, and Manual in your camera’s settings) are another key to focusing success. (Your Z50 also has an additional focus mode, AF-F—full-time autofocus in Movie mode, as explained in Chapter 12.) To save battery power, when shooting stills, your Z50 doesn’t start to focus the lens until you partially depress the shutter release or press an AF-ON button you’ve defined using Custom Controls, as explained in Chapter 10. But, autofocus isn’t some mindless beast out there snapping your pictures in and out of focus with no feedback from you after you press that button. There are several settings you can modify that return at least a modicum of control to you. Your first decision should be whether you set the Z50 to AF-S, AF-C, AF-A, or manual focus.
You can easily specify any of the three automatic modes plus manual: just press Fn2 and rotate the main command dial (unless you’ve redefined the button for some other behavior). Or press the i button and access Focus Mode, located by default at the far right in the bottom row of the i menu. If you have a lot of time on your hands, use the Focus Mode entry in the Photo or Movie Shooting menus. The AF mode appears at the top of the viewfinder or on the monitor screen as you make the adjustments.
Autofocus Mode
This choice determines when your Z50 starts to autofocus, and what it does when focus is achieved. In still photo mode, automatic focus is not something that happens all the time when your camera is turned on. As I mentioned, to save battery power, your Z50 generally doesn’t start to focus the lens until you partially depress the shutter release or a defined custom AF-ON button.
Single-Servo Autofocus (AF-S)
In this mode, also called Single Autofocus or AF-S, focus is set once and remains at that setting until the button is fully depressed, taking the picture, or until you release the shutter button without taking a shot. For non-action photography, this setting is usually your best choice, as it minimizes out-of-focus pictures (at the expense of spontaneity). The drawback here is that you might not be able to take a picture at all while the camera is seeking focus; you’re locked out until the autofocus mechanism is happy with the current setting. AF-S is available in both still photo and movie shooting modes.
When sharp focus is achieved, the selected focus point will turn green. By keeping the shutter button depressed halfway, you’ll find you can reframe the image while retaining the focus (and exposure) that’s been set. You can also use your AE-L/AF-L button. If the camera is unable to focus, the focus point will flash red. Because of the small delay while the camera zeroes in on correct focus, you might experience slightly more shutter lag. This mode uses less battery power.
You can select any of the 209 focus areas in this AF mode when your Autofocus Area setting (described shortly) is set to Single-point AF. AF-S is the mode to use if you want to place the focus point within your frame with even more accuracy. And, AF-S is the autofocus mode in which you can specify Pinpoint-area AF as your focus area, and place a tiny focus point virtually anywhere in the frame encompassed by the boxes in Figure 5.2.
LOW-LIGHT AF
All digital cameras find autofocusing in low-light environments a challenge. The Z50’s abundant PDAF pixels slightly reduce the area of the sensor available to capture photons, and some report the bands or stripes that can appear in darker areas of an image. You may be able to improve autofocus performance for subjects that are within the range of about three feet to nearly 10 feet (1 to 3 meters) with the built-in AF-assist illuminator lamp on the front of the camera, which is activated by default but may be disabled using Custom Setting a8. You can also activate Custom Setting a7: Low-Light AF, which works in any still photo shooting mode other than Auto. Autofocus may take longer in Low-Light mode, so a warning appears on the display. Both settings operate only when using the AF-S focus mode.
Continuous-Servo Autofocus (AF-C)
This mode, also known as AF-C, is the mode to use for sports and other types of photography with fast-moving subjects. In this mode, once the shutter release is partially depressed, the camera sets the focus but continues to monitor the subject, so that if it moves or you move, the lens will be refocused to suit. Focus and exposure aren’t really locked until you press the shutter release down all the way to take the picture. You’ll find that AF-C produces the least amount of shutter lag of any autofocus mode when set to release-priority: press the button and the camera fires, even if sharp focus has not quite been achieved. It also uses the most battery power, because the autofocus system operates as long as the shutter release button is partially depressed. AF-C is also available in both still photo and movie shooting modes.
Continuous-servo autofocus uses a technology called predictive tracking AF, which allows the Z50 to calculate the correct focus if the subject is moving toward or away from the camera at a constant rate. It uses either the automatically selected AF point (in Auto-area AF mode) or the point you select manually to set focus. As described in Chapter 10, you can set AF-C mode to use release-priority (the default) or focus-priority using Custom Setting a1. You can temporarily lock the focus point by partially depressing the shutter release, or pressing the AE-L/AF-L button.
Automatic Autofocus (AF-A)(Still Photo Mode Only)
This mode, also known as AF-A, is available only in Photo mode. The Z50 starts out in AF-S mode, but will switch to AF-C mode if your subject starts to move. It’s useful for unpredictable subjects, say, a pet canine that appears to be in repose, but which may perk up and dash off when it’s spotted a squirrel.
Full-time Autofocus (AF-F)(Movie Mode Only)
This mode, also known as AF-F, is available only in Movie mode. You don’t need to activate focus with a button: the camera adjusts focus continually as your subject moves. Focus locks only when the shutter release is pressed halfway. Obviously, this mode uses the most juice.
Manual Focus
Set manual focus by sliding the switch on the lens to the M position (if the lens has one) or by using the Fn2 button, i menu, or Photo/Movie Shooting menu options. There are some advantages and disadvantages to this approach. While your batteries will last longer in manual focus mode, it will take you longer to focus the camera for each photo, a process that can be difficult. Modern digital cameras depend so much on autofocus that the viewfinders are no longer designed for optimum manual focus. Pick up any film camera and you’ll see a bigger, brighter viewfinder with a focusing screen that’s a joy to focus on manually. I’ll tell you more about manual focus later in this chapter.
Choosing an Autofocus Area Mode
If your Z50 isn’t focusing on the correct subject, autofocus speed and activation are pretty much wasted effort. As you’ve learned, the Z50 has up to 209 different points on the screen that can be individually selected to determine the active focus zone. You can choose which of those points is used by selecting an AF-area mode. As with AF mode, you can select the AF-area mode from the i menu, Photo/Movie Shooting menus, or by holding down the Fn2 button and rotating the sub-command dial. The Z50 has six different focus point selection modes. I’m going to describe each of the modes, and explain how to use them.
Pinpoint AF
This mode is available only in Single AF (AF-S) focus mode. As I mentioned earlier, Pinpoint AF is the only AF-area mode in which contrast-detect autofocus (CDAF) is used exclusively. The 209 phase-detect pixels are ignored, and the Z50 evaluates a tiny area of the sensor frame to determine correct focus. As you might expect, this mode is slower than other AF-area modes, especially Single-point AF (described next), but highly accurate.
In Pinpoint AF mode, you always select the focus point manually, using the multi selector directional controls (which, helpfully, will respond to your thumb presses not only in the left/right and up/down directions, but diagonally, as well). Return the focus point to the center at any time by pressing the OK button.
The focus point is represented by the tiny box shown in Figure 5.6. You have an extraordinary amount of freedom in placing the focus area, which is half the size of that used for Single-Point AF. Because Pinpoint AF uses contrast detection within the selected area, it’s not limited by the position of the fixed PDAF pixels represented by the larger boxes.
Obviously, selecting an AF point so precisely can be time-consuming, so Pinpoint AF is best suited for subjects that don’t move. It’s especially good for macro work and any photography undertaken with the camera mounted on a tripod.
Single-Point AF
As with the other user-selectable area modes, you can select the focus point manually, using the multi selector. The Z50 evaluates focus based solely on the point you select, making this another good choice for subjects that don’t move much. You can choose Custom Setting a3: Focus Points Used, to select whether the focus point resides within the 209-area array by choosing ALL (see Figure 5.7) or a more widely spaced distribution (Every Other Point) which activates only one-quarter of the focus areas (see Figure 5.8). The alternate point mode allows much faster positioning of your focus zone. I use Every Other Point a lot for sports, because I plan on filling as much of the frame as possible with players, and can usually estimate where they will appear in the frame. (That’s usually off center, closer to the edge where I expect them to enter the frame.) Single-Point AF is excellent for achieving focus on a subject that might otherwise blend in with its background.
![]()
TIP The Every Other Point setting does not affect the number of focus points used with Wide Area AF (Small or Large), which I’ll describe shortly.
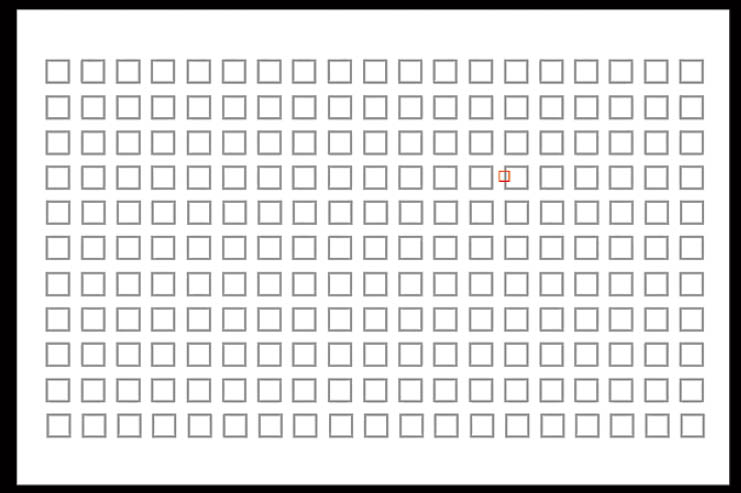
Figure 5.6 The Pinpoint AF selection box can be moved in tiny increments virtually anywhere within the area represented by the 209 AF point boxes.
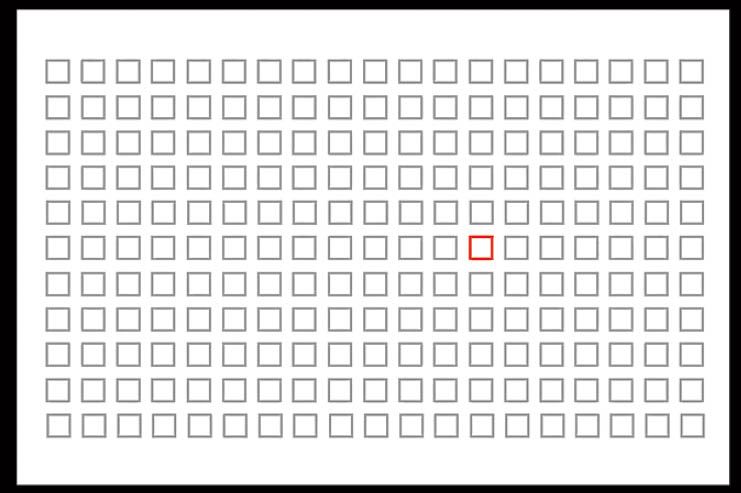
Figure 5.7 By default, Single-Point AF allows you to choose from all 209 focus zones.
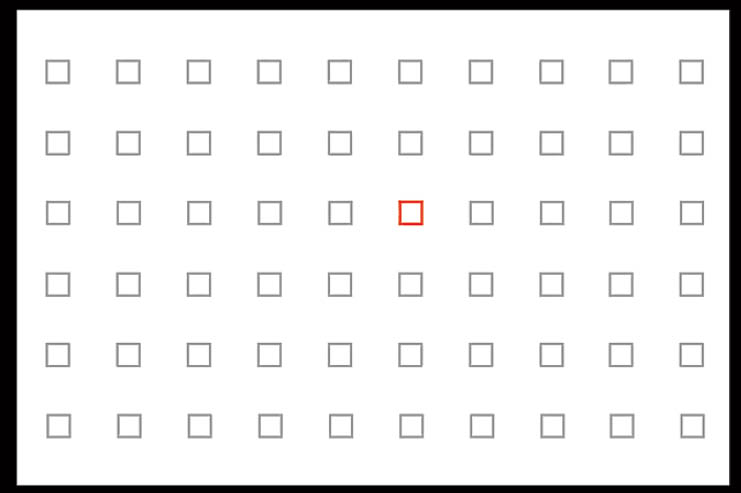
Figure 5.8 The number of focus points is reduced by three-quarters when you specify Every Other Point with Custom Setting a3.
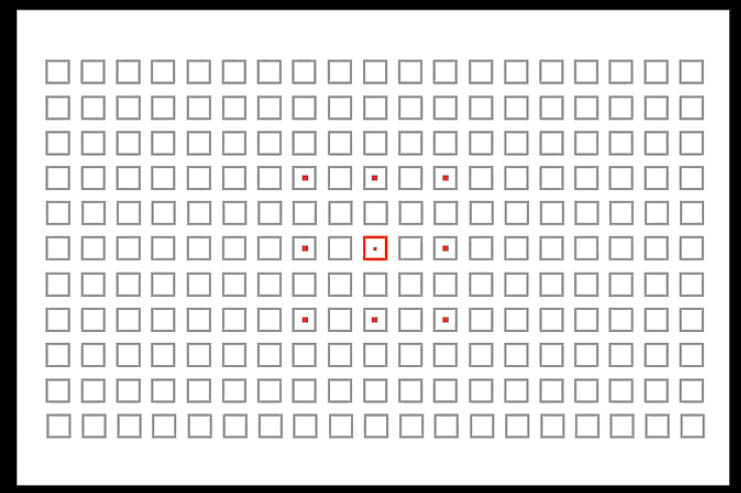
Figure 5.9 You can select a primary focus point with Dynamic-area AF, but adjacent points will also be used if your subject moves outside the primary area.
Dynamic-Area AF
In this mode, available only when AF-C is active (or the camera has switched to AF-C in AF-A mode), you still select the primary focus point yourself from among the 209 available using the multi selector. The camera will focus on that point, but if the subject departs from the selected area, the Z50 uses information from the surrounding areas. The red-highlighted points in the middle of Figure 5.9 show the active focus points when the dynamic area is centered in the frame. You can move the grouping to any of the other points, but when the grouping reaches the top border or corners (as shown in the corners of the figure), some of the potential points are outside the array.
DOT’S THE POINT
In all Focus Area Modes except Auto-area AF (discussed shortly), a dot appears within the focus point when it is located in the center of the frame, as you can see in Figure 5.9.
Dynamic-area AF is a more sophisticated version of Single-Point AF. You can select the initial focus point, and then trust the Z50’s smarts to continue focusing on a moving subject. That frees you to concentrate on framing your composition rather than worrying about whether your subject remains in focus.

Figure 5.10 Focus on slow-moving subjects with Dynamic-area AF (left). More erratic subjects (right) can work, too, but may require using the Z50’s tracking feature.
This setting is excellent for slow-moving subjects, as seen in Figure 5.10, left, but flexible enough to follow subjects that move erratically from side to side (say, a child at play or a basketball player moving around the court on defense), because the camera can use the distance information to differentiate the original subject from objects that are closer or farther away, especially human subjects (see Figure 5.10, right). However, many photographers also use this setting for birds in flight. Very rapid motion may call for the Z50’s tracking feature, described shortly.
![]()
TIP In Pinpoint AF, Single-point AF, or Dynamic-area AF, if you want to lock the focus point you’ve selected for a series of shots, you can temporarily lock the focus point by partially depressing and holding the shutter release, or pressing and holding the AE-L/AF-L button. Press the multi selector center button to move the single focus point back to the center of the frame quickly.
Wide-Area AF (Small and Large)
Uses the focus points within zones you can move around the display. You can choose the smaller of the wide-area zones (shown in Figure 5.11, or even larger zones, seen in Figure 5.12). I don’t use these much, especially Wide-area (L), because they each encompass so much of the frame that they’re best suited for large subjects that will reside in a predictable area, and those are often handled quite efficiently with Single-point AF.

Figure 5.11 Wide-area AF zones can be moved around the frame. Examples shown are the Small area version.
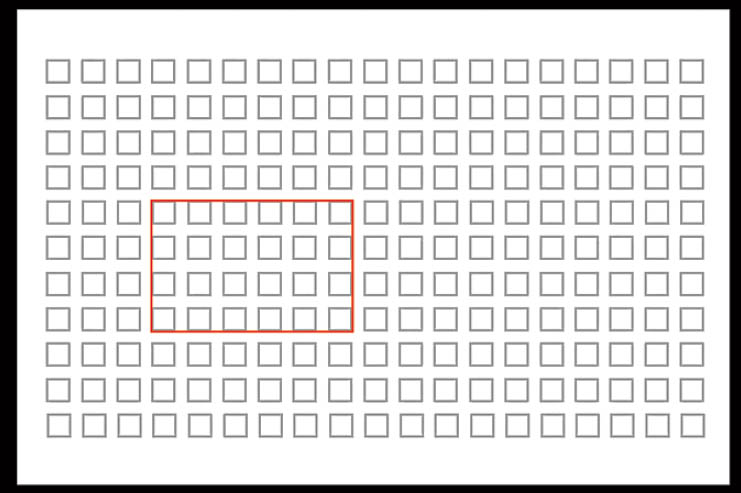
Figure 5.12 The Wide-area AF Large zones occupy a larger area of the frame, and cannot be located as close to the edges as their Small counterparts.
Automatic-Area AF
In this mode, autofocus point selection is out of your hands; the Z50 performs the task for you using its own intelligence. Red brackets will be displayed to show the area the camera will use to establish focus (see Figure 5.13). The camera can even work with the distance information supplied by the lens and its face detection technology to distinguish humans from their background, so a person standing at the side of the frame will be detected and used to evaluate focus, while the camera ignores the background area in the frame.

Figure 5.13 The red brackets show the area covered in Automatic-area AF.
In AF-S mode, the active focus points are highlighted with an array of green boxes that illuminate as you hold the shutter release down halfway. In AF-C mode, a dancing array of red boxes appears around the focused area, highlighted in that color to indicate that the current focus point is only tentative and won’t be locked in until you press the shutter release down all the way. Birds in flight—one of the most difficult of all autofocus targets—can often be grabbed using Automatic-area AF.
This mode’s face-detection and tracking features merit a more detailed discussion of their own, which I’ll provide in the next section.
Face Detection and Subject Tracking
The Auto-area AF feature has two great features that allow you to identify human targets and track any kind of moving subjects (birds-in-flight, people-in-flight, and others). Face detection allows the camera to locate potential portrait subjects when the visage of a human being appears in the frame. Subject tracking with lock-on directs the Z50 to follow the movement of a subject you specify and continue to focus on it as it roams around the frame. Just keep in mind that you must be using Auto-area AF to access either of these features.
Face Detection
Use this mode for portraits and people pictures. The camera automatically detects faces, or both eyes and faces (your choice), and focuses on subjects facing the camera, as when you’re shooting a portrait. Within this mode, the Z50 really does assign finding faces and autofocusing on them its number-one priority.
To use this feature, you must first enable Custom Setting a2: Auto-Area AF Face/Eye Detection. You can choose from Face and Eye Detection On, Face Detection On (the camera will not seek out eyes), and Off. (Eye detection is not available in Movie mode.)
Once enabled, you can’t directly select the focus zone yourself. Instead:
- Face or eye detected. A yellow border will be displayed on the LCD around a face or eye that is detected. You don’t need to press the shutter release to activate this behavior—in this mode, the camera starts looking for faces immediately. Up to five faces may be detected, with the yellow border aligned with the selected face (usually, the face that is closest to the camera). If eye detection is activated, the yellow border appears around the eye.
- Multiple faces/eyes. If more than one face or eye is found, a triangle will appear at the side of the yellow box (see Figure 5.14). Use the multi selector buttons to switch to a different face, or if the box surrounds an eye, to switch to the other eye. If touch operation is enabled, you can touch a face with your finger and the Z50 will focus on that face and take a picture immediately.
- Otherwise, if you’re using AF-S mode (or AF-A is in AF-S mode), when you press down the shutter release halfway, the box around the selected face turns green, but the triangle allowing you to change faces remains. In AF-C mode, the border remains yellow, indicating that the camera can continue to refocus if required. If the camera is unable to focus at all, the selection triangle disappears, but the border remains. Focus may also be lost if the subject turns away from the camera and is no longer detectable by Face-priority.
- If your subject looks away. The Z50 “remembers” a detected face, so if your subject temporarily looks away, the camera will move the focus point to track their motion.
- During Playback. When reviewing your photo, press the OK/center button to zoom in on the face or eye used for focus.
- Ooops. Face and eye detection can be confused if a face is lit too brightly, or is too dim; if your subject is wearing glasses or has bangs; or moves excessively while you compose your shot. Faces that fill the frame or are very small may be harder for the Z50 to identify, as well.

Figure 5.14 You can move the focus point from the selected face to another face in the frame.
Subject Tracking
The useful Subject-tracking autofocus feature of Auto-area AF is one of those capabilities that can be confusing at first, but once you get the hang of it, it’s remarkably easy to use. In fact, it’s always available any time you’re using Auto-area AF.
Here’s the quick introduction you need to Subject Tracking.
- Ready, aim . . . To select a subject for tracking, press the OK button at any time. A white border with directional arrows at its edges appears in the center of the frame. (Nikon calls this a “reticle” after the markings in a gunsight or other device.) You can move the border around with the multi selector. Use that border to “aim” the camera until the subject you want to focus on and track is located within the border. (See Figure 5.15.) Because you can select at any time, if, say, you’re shooting sports, you can wait until just before some action is going to begin, and then choose your subject.
- Select your subject. When you’re ready, press the OK button to activate tracking. The box will change from white to yellow. Press the center button again to de-select and re-select a different subject.
- Touch options. Note that if the touch screen is active, you have several options. Once you’ve enabled Touch Controls in the Setup menu, you can cycle among Touch AF (Off), Touch AF, and Touch Shutter/AF by tapping the touch icon at the left side of the monitor.
- Touch AF (only) is on. You don’t need to press the OK button. Start tracking by tapping your subject on the monitor. You’ll bypass the white box completely. The yellow box will appear at the place you tap. If you’ve already activated tracking (with the touch screen or OK button), touching the monitor will move the yellow tracking box to the new subject.
- Touch shutter/AF is on. Tap the screen, and the Z50 will immediately focus on that point and take a picture, but will continue tracking at that point. This is a great feature. For example, if you unexpectedly see some action taking place, tap the touch screen to take a photo right away, and then continue to shoot (if you like) with the camera tracking the subject you just shot.
- Reframe as desired. Once the focus frame has turned yellow, it seemingly takes on a life of its own, and will “follow” your subject around on the LCD as you reframe your image. (In other words, the subject being tracked doesn’t have to be in the center of the frame for the actual photo.) Best of all, if your subject moves, the Z50 will follow it as required.
- Tracking continues. The only glitches that may pop up might occur if your subject is small and difficult to track, or is too close in tonal value to its background, or if the subject approaches the camera or recedes sufficiently to change its relative size on the LCD significantly. The Z50 may also be unable to track subjects that leave the frame, are moving too fast, are too large/small, or too bright/dark.
- . . . Focus. If you’re not using the touch options, when you’ve activated tracking on your subject, press the shutter button halfway to activate the Z50’s autofocus feature. The focus frame will turn red and the camera will emit a beep (unless you’ve disabled the beep within the Setup menu) when locked in.
- Or exit. To cancel focus tracking, press the Zoom Out/Index button.
- Take your picture. Press the shutter release down all the way.

Figure 5.15 Press OK to produce a frame you can use to select an object to track.
Manual Focus
As I’ve noted several times, some subjects lend themselves to manual focus, especially close-up or macro photography, in which AF can be a creative hindrance. If you’re photographing a flower, why let the camera decide which leaf or petal should be sharpest—particularly if you are using a relatively large aperture and selective focus as an effect? A mirrorless camera’s live view is especially useful when focusing manually, because you have extra tools at your disposal to focus precisely and quickly.
Here are the basic steps for quick and convenient setting of focus manually with the Z50:
- Activate manual focus. Switch to manual focus by sliding the switch on the lens to the M position (if one is available with that lens), or by selecting Manual focus using the i menu, or by holding the Fn2 button and rotating the main command dial.
- Aim at your subject and turn the control/focusing ring on the lens. Turn the focusing ring until your subject appears to be in the sharpest possible focus. Note that while you can redefine the function of the focus ring (or of the control ring found on some lenses), as described in Chapter 10, in Manual focus mode it can only be used to adjust focus.
- If you have difficulty focusing. If you are unable to focus precisely, you have four options: zooming, magnification, focus peaking, and electronic rangefinder. The first two give you a larger image to focus, but have their own advantages and disadvantages.
- Zooming in optically. If you are using a zoom lens (rather than a fixed focal length prime lens), you can zoom in on your subject using the longest available focal setting. Even if you plan to take a wide-angle photo, the reduced depth-of-field at a telephoto setting can make it easier to see the exact effect of slight changes in focus while zoomed in. With most lenses, when you zoom back out to take the picture, the center of interest will still be in sharp focus. However, some lenses (generally less expensive optics) can change focus as they zoom. The most blatant of these are called varifocal lenses. Sticklers refer to lenses that don’t change focus as they zoom as “true” zoom or parfocal lenses. However, even a true zoom can change focus slightly when zooming.
- Magnification. To magnify a portion of the image and enhance your ability to focus, press the Zoom In button in the control area of the touch screen. As you press the button repeatedly, to enlarge the view to three different levels of magnification, a navigation window, seen at lower right in Figure 5.16, displays a yellow box at the approximate location within the overall frame of the magnified view. You can relocate the zoomed area using the multi selector. Press the center button at any time to restore the zoom window to the center of the frame.
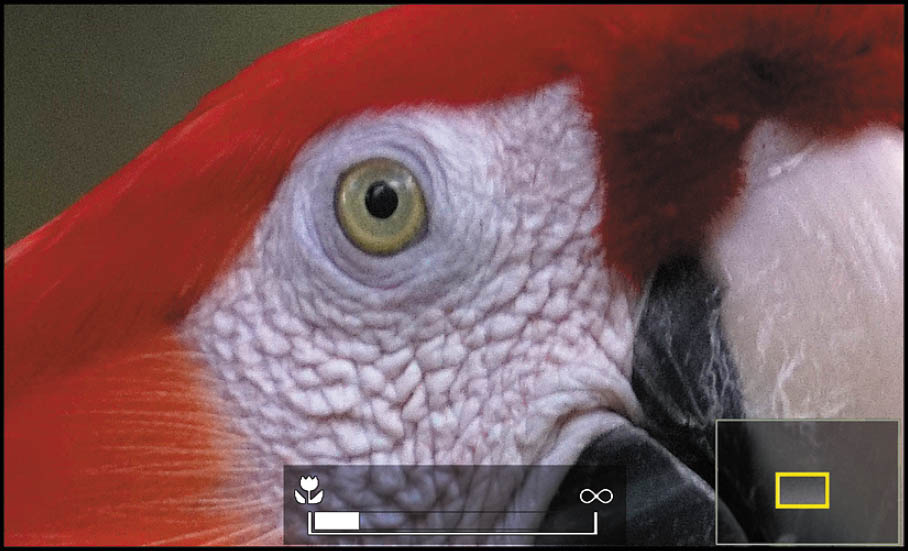
Figure 5.16 You can magnify the image to make manual focusing easier.

Figure 5.17 With Peaking Highlights activated, in-focus areas are highlighted in color.
- Focus Peaking. Activate focus peaking using the instructions for Custom Setting d9: Peaking Highlights in Chapter 10. Focus peaking provides a colored overlay around edges within your image that are sharply focused. As the color fades or becomes stronger, it is easier to determine when your subject is precisely focused. Choose Peak 1 (low sensitivity), Peak 2 (standard sensitivity), or Peak 3 (high sensitivity), depending on the contrast of your subject, as seen in Figure 5.17. The flowers shown tended to blend in with the foliage in the background, so I selected high sensitivity. The default peaking highlight color of red was fine in this case, but you can use Custom Setting d9 to change it to yellow, blue, or white. The alternate hue may be needed to provide a strong contrast between the peaking highlights and the color of your subject. Yellow might be the best choice to focus on, say, a red rose. Access the Peaking Color item of the Setup menu to adjust the color. To make the overlay even more visible, select 3 (High sensitivity) in the Peaking Level item; you can also turn peaking Off with this item, if desired.
- Use the electronic rangefinder. Position the focus point over the subject and rotate the focus ring until sharp focus is achieved using the electronic rangefinder feature. The focus point will change to green and the in-focus indicator at lower left in the display will change according to the symbols shown in Figure 5.18.
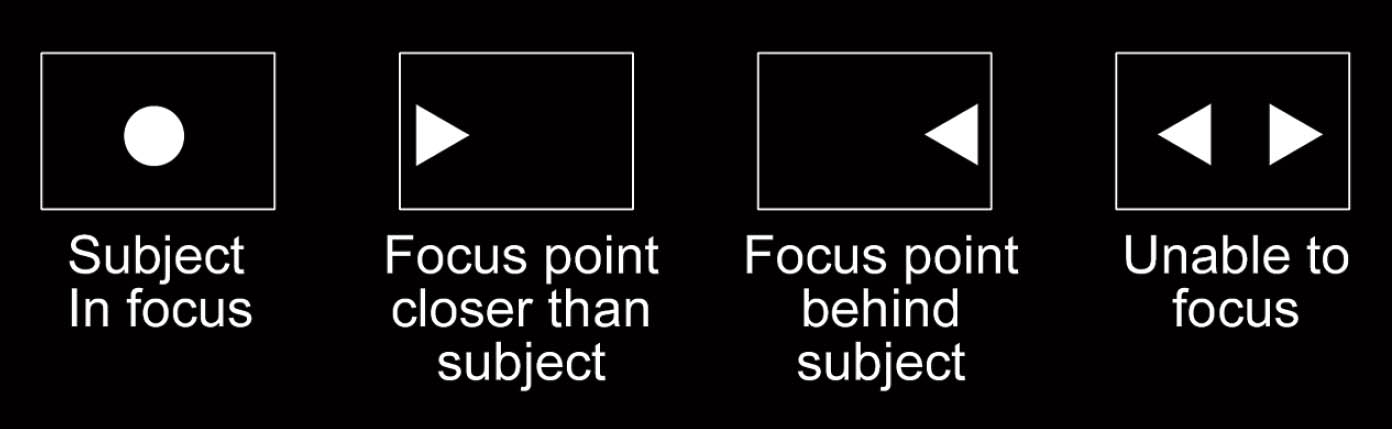
Figure 5.18 The electronic rangefinder in the lower-left corner of the display shows manual focus status.
- Preview depth-of-field. Focusing is always done with the lens set to its largest f/stop (except in Manual exposure mode when On (the default) is specified for Custom Setting d7: Apply Settings to Live View). The maximum aperture provides the least depth-of-field, so focus snaps in and out more precisely. When the picture is captured, the Z50 closes down the iris to the “taking aperture,” which is old-school terminology for the aperture used to take the picture (natch). If that f/stop is smaller than the maximum aperture, the depth-of-field in your finished image will be larger—but unknown to you without a preview. For critical applications, especially when you’re using selective focus, you’ll want to see the actual DOF on the live view screen.
The Z50 doesn’t have a Pv (Preview) button by default, but you can define one for, say, Fn1 or Fn2 in Custom Setting f2: Custom Control (Shooting). Then, when you press the defined Pv button, the lens will stop down to the aperture selected by you (in Manual mode) or by the camera (in Aperture-priority mode). (This doesn’t work in Program or Shutter-priority mode, because the aperture isn’t determined in either mode until you lock exposure or take a photo.) To open the aperture to maximum again, release the button.
Back Button Focus
Once you’ve been using your camera for awhile, you’ll invariably encounter the terms back focus and back button focus, and wonder if they are good things or bad things. Actually, they are two different things, and are often confused with each other. Back focus is a bad thing, and occurs when a particular lens consistently autofocuses on a plane that’s behind your desired subject. This malady may be found in some of your lenses, or all your optics may be free of the defect. The good news is that if the problem lies in a particular lens (rather than a camera misadjustment that applies to all your lenses), it can be fixed. I’ll show you how to do that at the end of this chapter.
Back button focus, on the other hand, is a tool you can use to separate two functions that are commonly locked together—exposure and autofocus—so that you can lock in exposure while allowing focus to be attained at a later point, or vice versa. It’s a good thing, although using back button focus effectively may require you to unlearn some habits and acquire new ways of coordinating the action of your fingers.
As you have learned, the default behavior of your Nikon Z50 is to set both exposure and focus (when AF is active) when you press the shutter release down halfway. When using AF-S mode, that’s that: both exposure and focus are locked and will not change until you release the shutter button, or press it all the way down to take a picture and then release it for the next shot. In AF-C mode, exposure is locked and focus set when you press the shutter release halfway, but the Z50 will continue to refocus if your subject moves for as long as you hold down the shutter button halfway. Focus isn’t locked until you press the button down all the way to take the picture.
What back button focus does is decouple or separate the two actions. You can retain the exposure lock feature when the shutter is pressed halfway, but assign autofocus start and/or autofocus lock to a different button. So, in practice, you can press the shutter button halfway, locking exposure, and reframe the image if you like (perhaps you’re photographing a backlit subject and want to lock in exposure on the foreground, and then reframe to include a very bright background as well).
But, in this same scenario, you don’t want autofocus locked at the same time. Indeed, you may not want to start AF until you’re good and ready, say, at a sports venue as you wait for a ballplayer to streak into view in your viewfinder, or when you’re photographing a garden and expect a butterfly to alight somewhere nearby. With back button focus, you can lock exposure on the spot where you expect the athlete or insect to be, and activate AF at the moment your subject appears. The Z50 gives you a great deal of flexibility, both in the choice of which button to use for AF, and the behavior of that button. That’s where the learning of new habits and mind-finger coordination comes in. You need to learn which back button focus techniques work for you, and when to use them.
Back button focus lets you avoid the need to switch from AF-S to AF-C when your subject begins moving unexpectedly. You retain complete control. It’s great for sports photography when you want to activate autofocus precisely based on the action in front of you. It also works for static shots. You can press and release your designated focus button, and then take a series of shots using the same focus point. Focus will not change until you once again press your defined back button. (See Figure 5.19.)

Figure 5.19 Lock your exposure for the garden by pressing the shutter release halfway; then activate autofocus when the butterfly decides where to land.
Want to focus on a spot without moving the focus point within your frame? Use back button focus to zero in focus with the current focus area—no need to move it—then reframe. Focus will not change. Don’t want to miss an important shot at a wedding on a photojournalism assignment? If you’re set to focus-priority your camera may delay taking a picture until the focus is optimum; in release-priority there may still be a slight delay. With back button focus you can focus first, and wait until the decisive moment to press the shutter release and take your picture. The Z50 will respond immediately and not bother with focusing at all. Back button focus can also save battery power. Constantly refocusing in AF-C mode can consume a lot of power.
Activating Back Button Focus
Here’s how to set up back button focus on your Z50. Just follow these steps:
- Assign exposure lock to the shutter button. Make sure Custom Setting c1: Shutter-Release Button AE-L is set to On (Half-Press). In that mode, depressing the shutter button halfway always locks the exposure at the setting the camera has selected. (In Manual exposure mode, of course, exposure does not change until you adjust it yourself.)
- Assign AF activation to AF-ON function only. You’ll find the key control for enabling back button focus in Custom Setting a4: AF Activation. There, the options are Shutter/AF-ON or AF-ON only. With the former option, pressing the shutter release halfway or the defined AF-ON control will enable both autoexposure and autofocus. Select AF-ON only to decouple the two functions, so that AF activation starts only when you press your designated AF-ON button. Note that choosing AF-ON Only means that any button you assign the AF-ON behavior to can be pressed.
- Assign AF-ON function. The Z50 does not have an AF-ON button, so you must define one. Use Custom Setting f2: Custom Controls (Shooting) (described in more detail in Chapter 10) and assign the AF-ON function to the AE-L/AF-L button, or the control of your choice. Most prefer to use the AE-L/AF-L button. But you can assign AF-ON to a different button if you like. In all cases, if you’ve followed these steps, the defined button is used to initiate autofocus. The shutter release button cannot be used to initiate autofocus.
Fine-Tuning the Focus of Your Lenses
Theoretically, at least, there should be no need at all to fine-tune the focus of autofocus lenses, native Z-mount lenses in particular. With a traditional dSLR, the autofocus mechanism is a separate component located in the floor of the mirror box. That module can be slightly misaligned in relationship to the lens and the dSLR’s optical manual focusing screen. AF fine-tune can correct for that error. The Z50, in contrast, calculates autofocus using the actual sensor image using its CDAF and PDAF features, and so should “see” any misalignment and correct for it automatically.
However, Nikon, in its wisdom, has included an AF fine-tune feature in the Z50. You can use it with both native Z-mount lenses as well as F-mount lenses attached using the FTZ adapter. In this section, I’ll show you how to calibrate your lenses using the Z50’s AF Fine-tune feature.
Why is the focus “off” for some lenses in the first place? There are lots of factors, including the age of the lens (an older lens may focus slightly differently), temperature effects on certain types of glass, humidity, and tolerances built into a lens’s design that all add up to a slight misadjustment, even though the components themselves are, strictly speaking, within specs. A very slight variation in your lens’s mount can cause focus to vary slightly. With any luck (if you can call it that) a lens that doesn’t focus exactly right will at least be consistent. If a lens always focuses a bit behind the subject, the symptom is back focus. If it focuses in front of the subject, it’s called front focus.
If it’s the lens that’s at fault, or if your camera consistently mis-focuses, you’re almost always better off sending your lens or Z50 to Nikon to have them make it right. But that’s not always possible or advised. Perhaps you need your lens recalibrated right now, or you purchased a gray market lens that Nikon isn’t willing to fix. You may have a problem only with one or two lenses, while the rest focus with more accuracy. If you want to do the fine-tuning yourself, the first thing to do is determine whether your lens has a back focus or front focus problem.
For a quick-and-dirty diagnosis (not a calibration; you’ll use a different target for that), lay down a piece of graph paper on a flat surface, and place an object on the line at the middle, which will represent the point of focus (we hope). Then, shoot the target at an angle using your lens’s widest aperture and the autofocus mode you want to test. Mount the camera on a tripod so you can get accurate, repeatable results.
If your camera/lens combination doesn’t suffer from front or back focus, the point of sharpest focus will be the center line of the chart, as you can see at top in Figure 5.20. If you do have a problem, one of the other lines will be sharply focused instead. Should you discover that your lens consistently front or back focuses, it needs to be recalibrated. Unfortunately, it’s only possible to calibrate a lens for a single focusing distance. So, if you use a particular lens (such as a macro lens) for close focusing, calibrate for that. If you use a lens primarily for middle distances, calibrate for that. Close-to-middle distances are most likely to cause focus problems, anyway, because as you get closer to infinity, small changes in focus are less likely to have an effect.
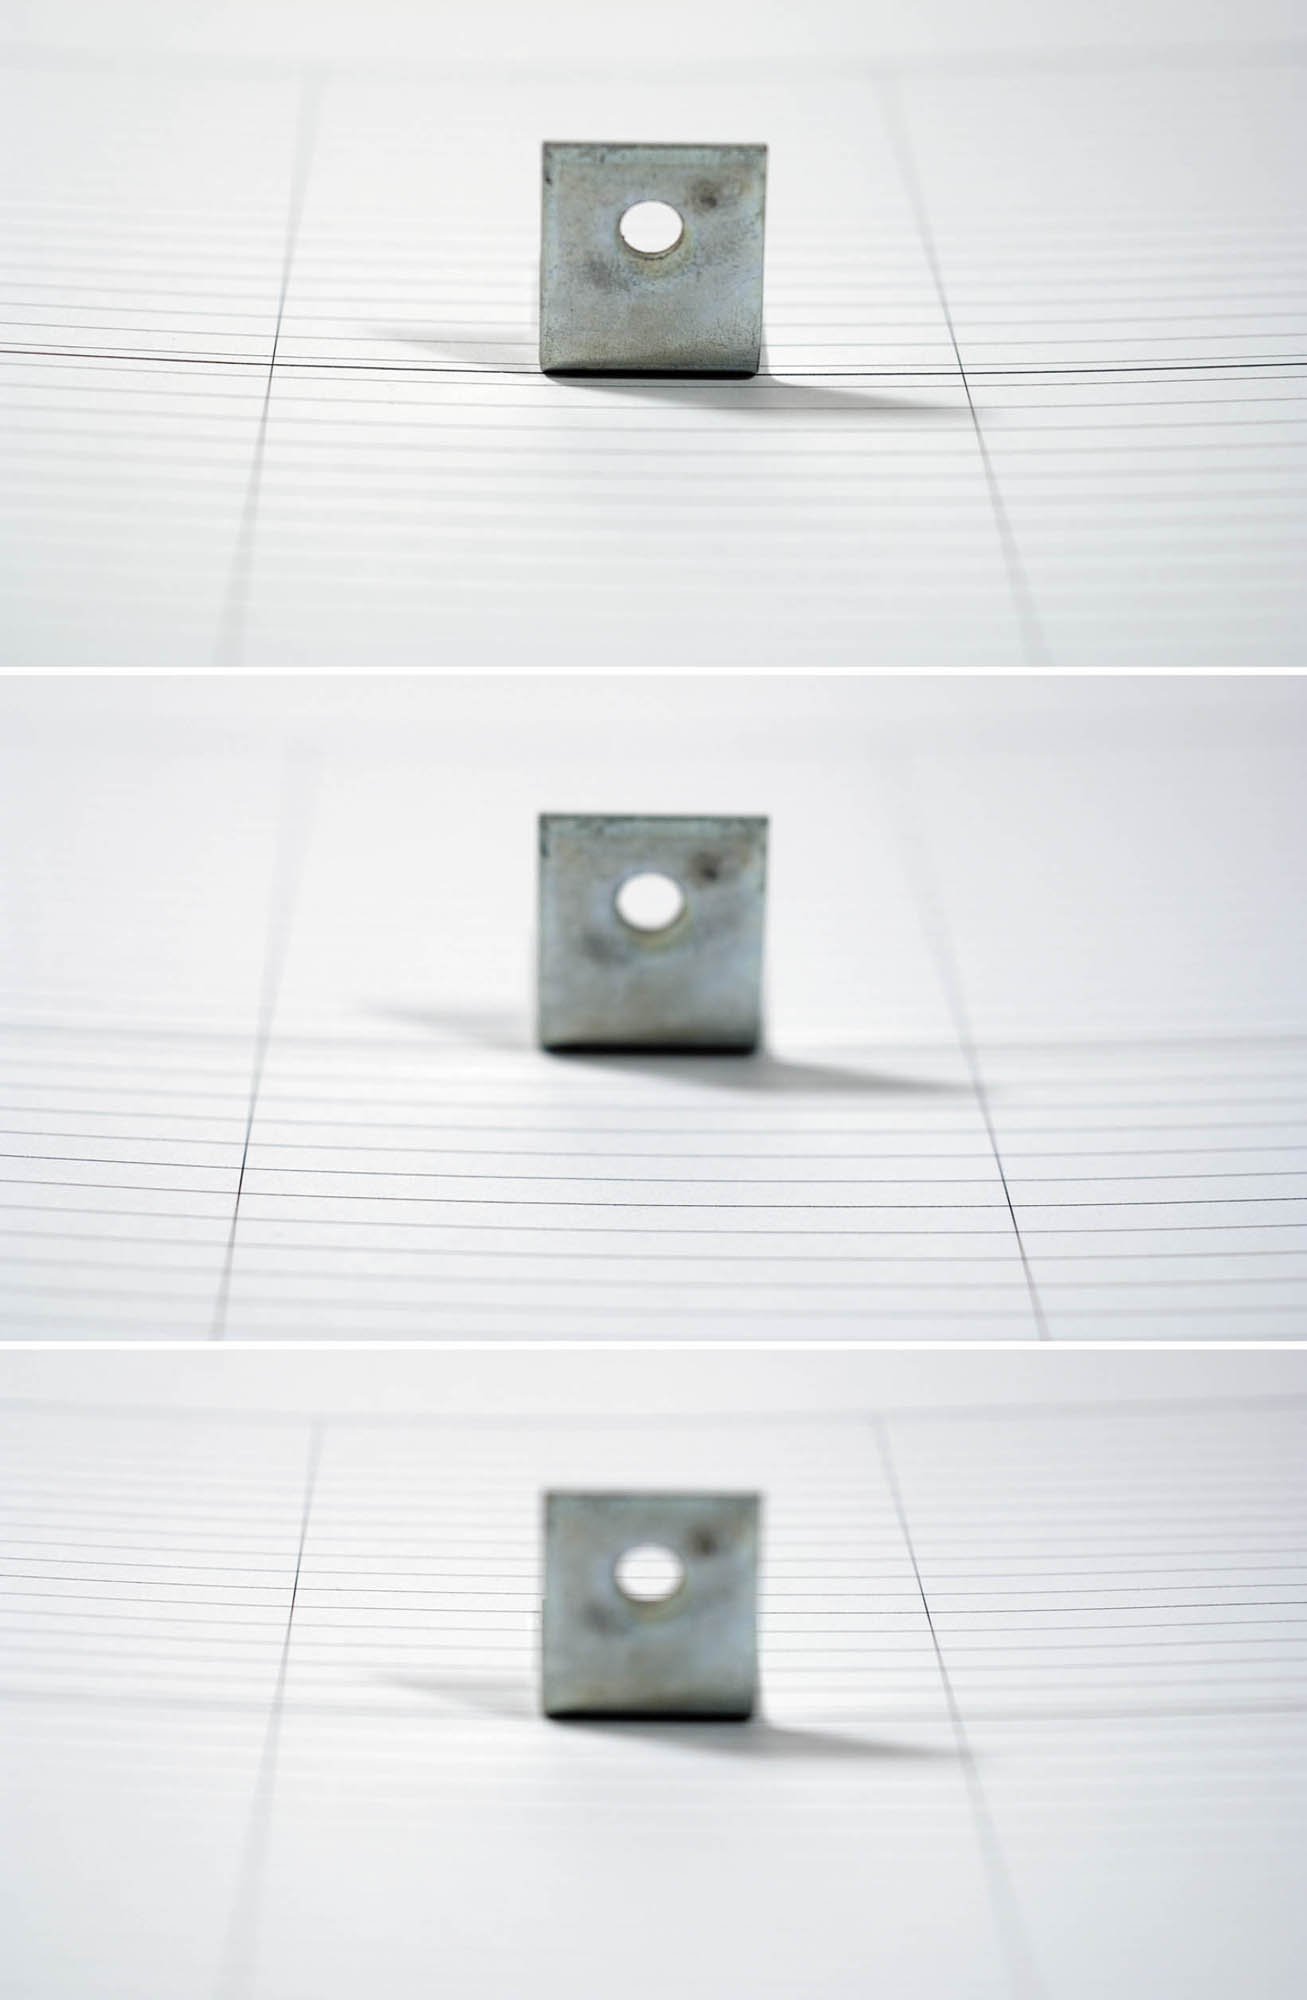
Figure 5.20 Correct focus (top), front focus (middle), and back focus (bottom).
Lens Tune-up Options
There are products available, such as Reikan FoCal ($135) a tool for both PCs and Macs that comes with software and a focusing target. Also available is the LensAlign MkII Focus Calibration system ($85). You can fine-tune your camera’s focus manually using the instructions that follow.
To manually adjust your camera/lens AF setting, just follow these steps. The key tool you can use to fine-tune your lens is the AF Fine-Tune entry in the Setup menu, shown in Figure 5.21. You’ll find the process easier to understand if you first run through this quick overview of the menu options:
- AF fine-tune (On/Off). This option enables/disables autofocus fine-tuning for all the lenses you’ve defined using the menu entry. If you discover you don’t care for the calibrations you make in certain situations (say, it works better for the lens you have mounted at middle distances, but is less successful at correcting close-up focus errors), you can deactivate the feature as you require. You should set this to On when you’re doing the actual fine-tuning.
- Saved value. This setting lets you tune the autofocus calibration for the current Z-mount and CPU-chipped F-mount lenses (virtually all Nikon-brand autofocus lenses) mounted on the Z50. When you first fine-tune a lens, the saved value will be 0 (zero). You can press the multi selector up/down buttons to choose a value between +20 and –20. Positive numbers move the focal point farther from the camera, and would be used if your lens consistently suffers from front focus problems. Negative numbers move the focal point closer to the camera, and would be used if your lens is plagued with consistent back focus. The value is relative, and doesn’t correlate to any particular distance or percentage.
- Default. This entry often confuses. It is a value that is applied to every lens mounted on the camera that doesn’t already have a customized saved value associated with it. That is, if your Z50 has consistent front or back focus problems with all lenses, you can enter a value here, and the camera will apply the correction to each CPU lens you use. This default setting can be overridden by saved values you’ve stored for particular lenses. So, you can change the default focal plane for all lenses, and still further fine-tune specific lenses that need more autofocus correction. My recommendation is that if your camera and lenses are so out of whack that you need global correction and individual fine-tuning, you really ought to consider shipping the whole kit off to Nikon for proper calibration.
- List saved values. This screen shows you the saved fine-tuning values for all lenses. If the currently mounted lens has a stored value, it will be marked with a solid black box icon. You can delete lenses from this list by highlighting them and pressing the Trash button. You can also change the number (a two-digit number from 00 to 99) used to identify a particular lens.

Figure 5.21 The AF Fine-Tune menu.
Evaluating Current Focus
The first step is to capture a baseline image that represents how the lens you want to fine-tune autofocuses at a particular distance. You’ll often see advice for photographing a test chart with millimeter markings from an angle, and the suggestion that you autofocus on a particular point on the chart. Supposedly, the markings that actually are in focus will help you recalibrate your lens. The problem with this approach is that the information you get from photographing a test chart at an angle doesn’t actually tell you what to do to make a precise correction. So, your lens back focuses three millimeters behind the target area on the chart. So what? Does that mean you change the saved value by –3 clicks? Or –15 clicks? Angled targets are a “shortcut” that don’t save you time.
Instead, you’ll want to photograph a target that represents what you’re actually trying to achieve: a plane of focus locked in by your lens that represents the actual plane of focus of your subject. For that, you’ll need a flat target, mounted precisely perpendicular to the sensor plane of the camera. Then, you can take a photo, see if the plane of focus is correct, and if not, dial in a bit of fine-tuning in the AF Fine-Tuning menu, and shoot again. Lather, rinse, and repeat until the target is sharply focused.
You can use the focus target shown in Figure 5.22, or you can use a chart of your own, as long as it has contrasty areas that will be easily seen by the autofocus system, and without very small details that are likely to confuse the autofocus. Download your own copy of my chart from www.nikonguides.com/FocusChart.pdf (the URL is case-sensitive). Then print out a copy on the largest paper your printer can handle. (I don’t recommend just displaying the file on your monitor and focusing on that; it’s unlikely you’ll have the monitor screen lined up perfectly perpendicular to the camera sensor.) Then, follow these steps:
- 1. Position the camera. Place your Nikon Z50 on a sturdy tripod with a remote release attached, positioned at roughly eye-level at a distance from a wall that represents the distance you want to test for. Keep in mind that autofocus problems can be different at varying distances and lens focal lengths, and that you can enter only one correction value for a particular lens. So, choose a distance (close-up or mid range) and zoom setting with your shooting habits in mind.
- 2. Set the autofocus mode. Choose the autofocus mode (AF-C or AF-S) you want to test.
- 3. Level the camera (in an ideal world). If the wall happens to be perfectly perpendicular, you can use a bubble level, plumb bob, or other device of your choice to ensure that the camera is level to match. Many tripods and tripod heads have bubble levels built in. Avoid using the center column, if you can. When the camera is properly oriented, lock the legs and tripod head tightly.
- 4. Level the camera (in the real world). If your wall is not perfectly perpendicular, use this old trick. Tape a mirror to the wall, and then adjust the camera on the tripod so that when you look through the viewfinder at the mirror, you see directly into the reflection of the lens. Then, lock the tripod and remove the mirror.
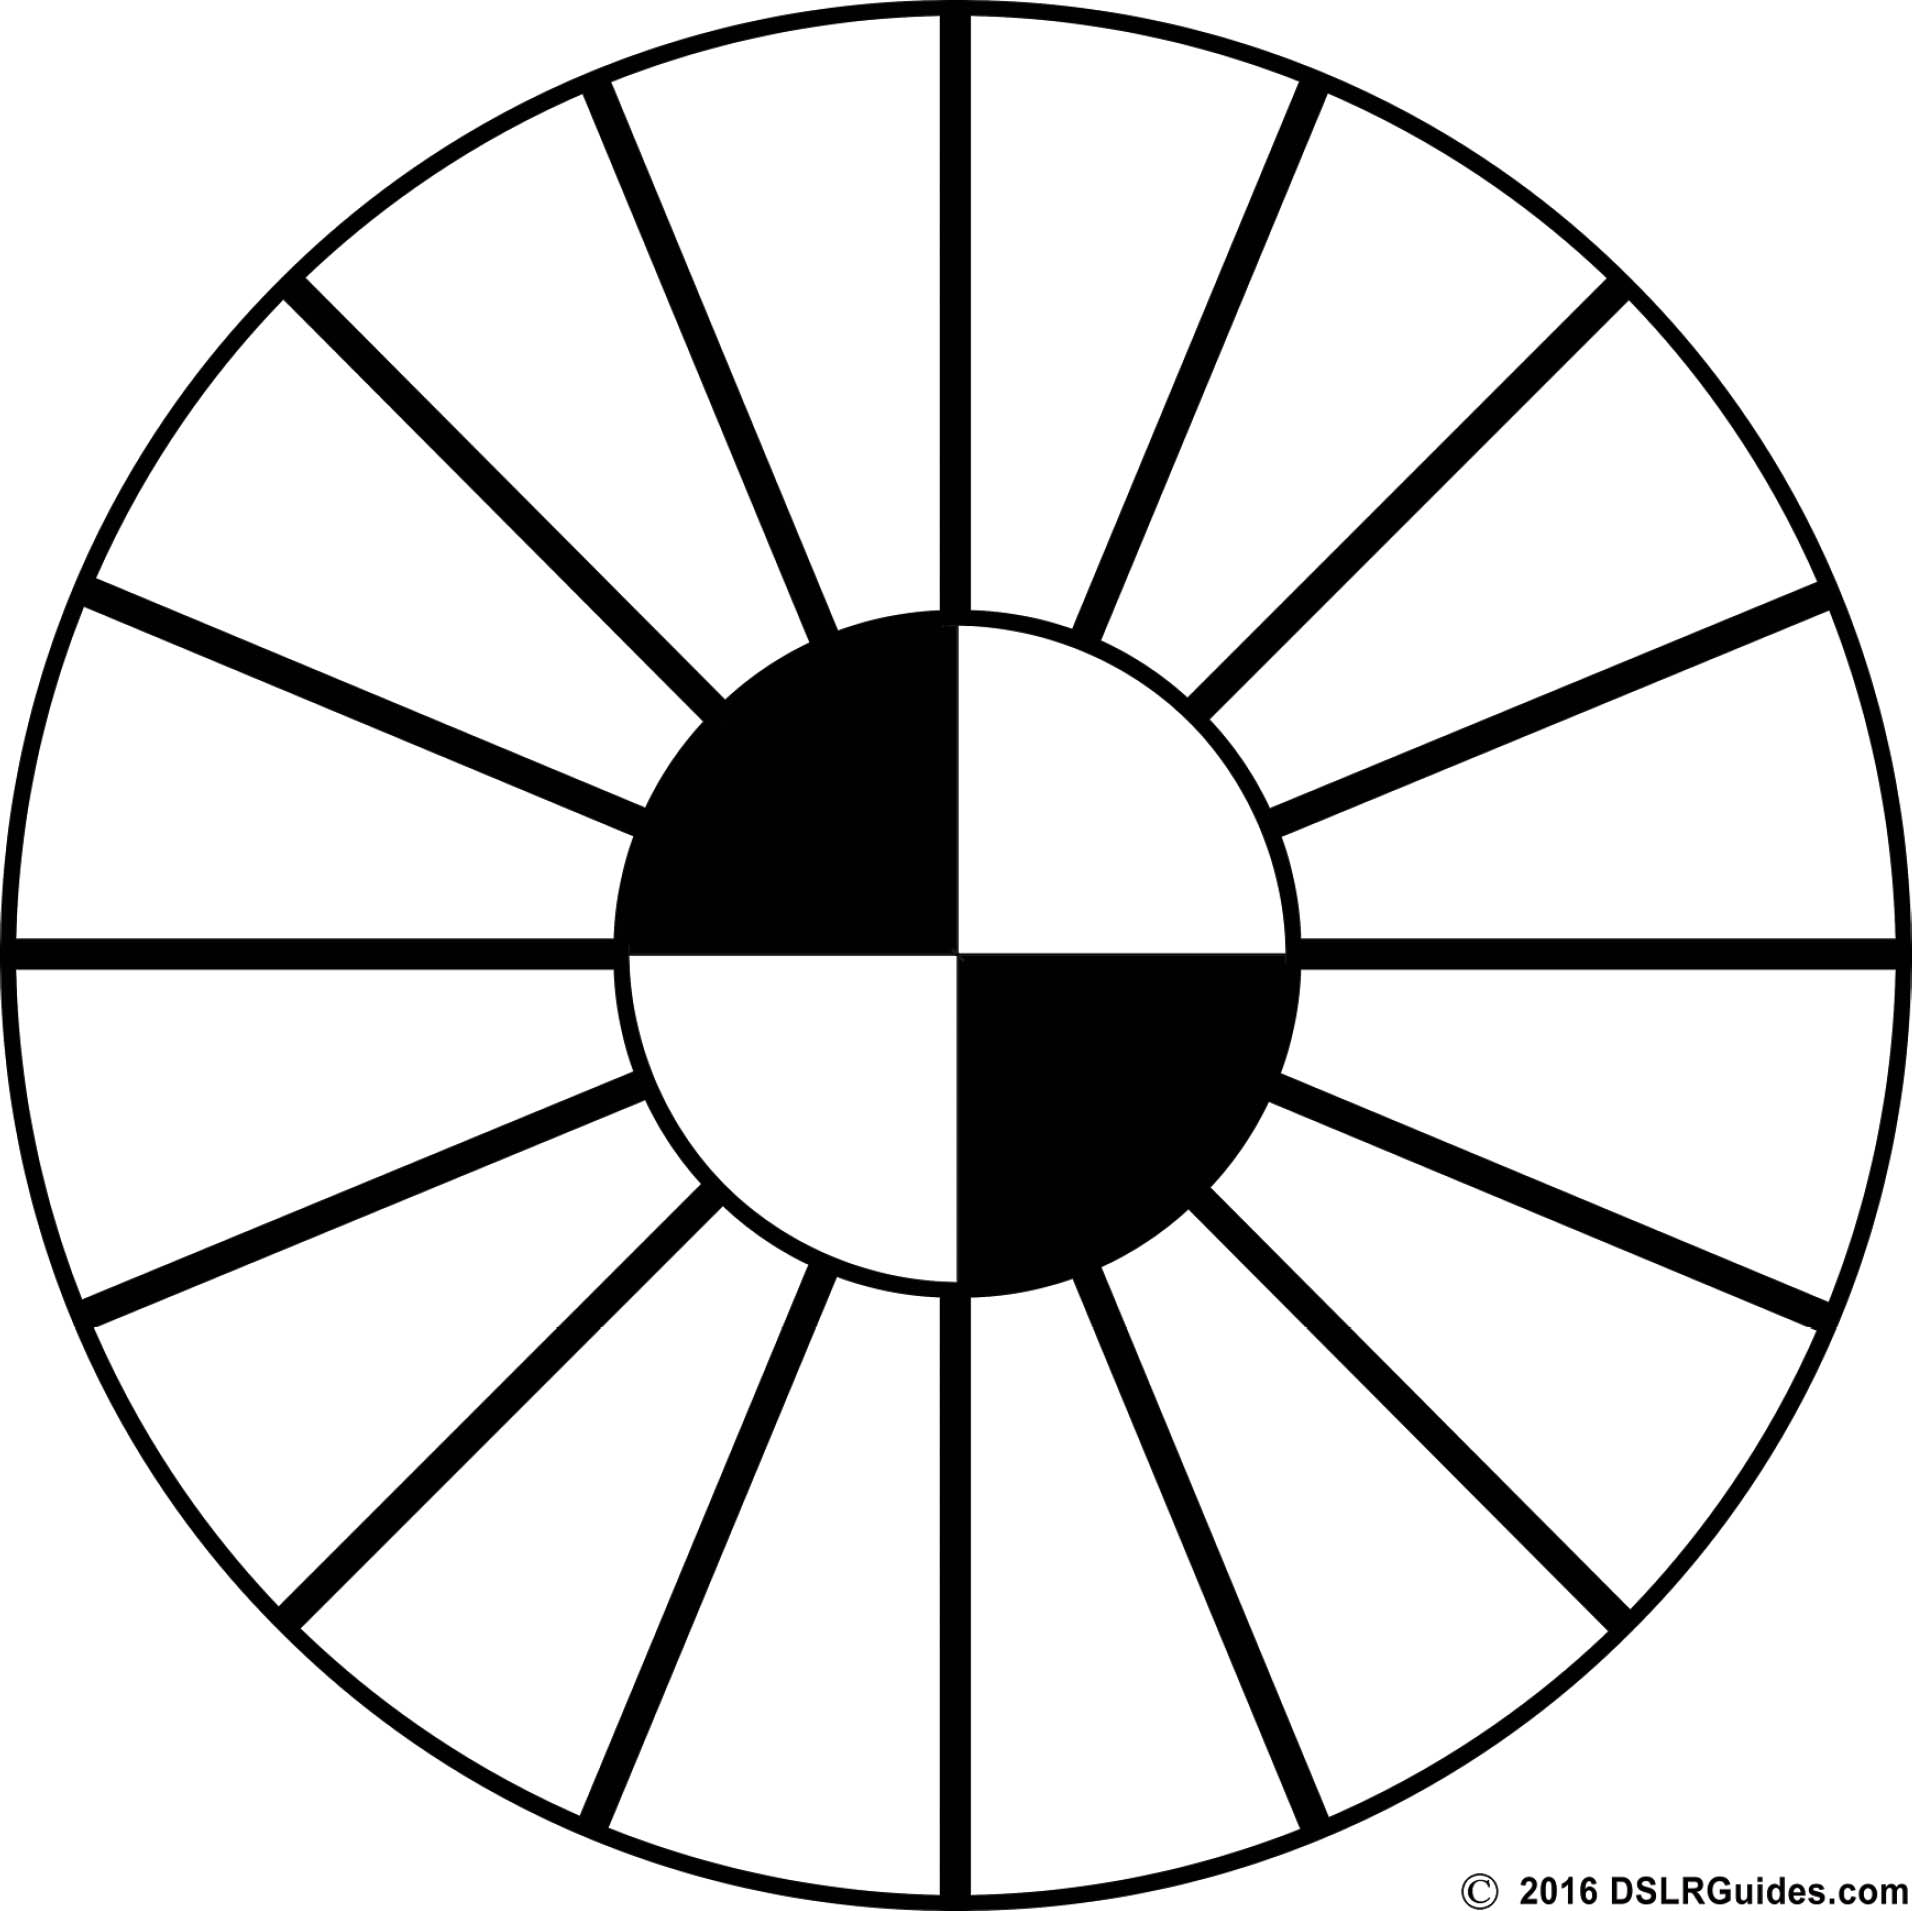
Figure 5.22 Use this focus test chart, or create one of your own.
- 5. Mount the test chart. Tape the test chart on the wall so it is centered in your camera’s viewfinder. You should place the chart roughly 30X to 40X the focal length of the lens setting you’ll be testing. For example, for a 100mm lens, place the chart 3,000mm from the camera (roughly 9.8 feet).
- 6. Photograph the test chart using AF. Allow the camera to autofocus, and take a test photo, using the remote release to avoid shaking or moving the camera.
- 7. Make an adjustment and rephotograph. Make a fine-tuning adjustment and photograph the target again. Follow the instructions in the next section. I’ve separated the fine-tuning adjustments from these steps because some people may want to just tweak the focus at a later time without going through all these evaluation steps. Follow steps 1 to 8 in the section that follows this one to make evaluation images at a range of corrections, say, –5 through +5.
- 8. Evaluate the image. If you have the camera connected to your computer with a USB cable and Camera Control Pro or other linkup software such as Nikon Transfer, or through a Wi-Fi connection, so much the better. You can view the image after it’s transferred to your computer. Otherwise, carefully open the camera card door and slip the memory card out and copy the images to your computer.
- 9. Evaluate focus. Which image is sharpest? That’s the setting you need to use for this lens. If your initial range doesn’t provide the correction you need, repeat the steps between –20 and +20 until you find the best fine-tuning.
Changing the Fine-Tuning Setting
Adjust the fine-tuning for the lens you have mounted on the camera by following these steps:
- 1. Mount lens. If you haven’t been running the test described previously, mount the Z-mount or F-mount CPU-equipped lens (with FTZ adapter) you want to fine-tune on the Nikon Z50. The camera will automatically recognize the lens you are using during the “calibration” process and display its name on the screen.
- 2. Activate fine-tuning. If you haven’t already done so, choose AF Fine-Tune (On/Off) and turn it ON.
- 3. Select Saved Value. A screen similar to the one shown in Figure 5.23 will appear.
- 4. Adjust focus. Press the multi selector up/down buttons to tell the Z50 to adjust the autofocus from +20 (move the focal point away from the camera to fix front-focus problems) to –20 values (move the focal point toward the camera to fix back focus).
- 5. Confirm adjustment. Press OK when the value you want is entered. You may have to run the test described above several times and use some trial and error to determine the correct adjustment.
- 6. View saved values. Choose List Saved Values to see the names of the lenses you’ve fine tuned. (See Figure 5.24.) With the lens you want to assign a number to highlighted, press the right directional button to produce the screen shown in Figure 5.25.
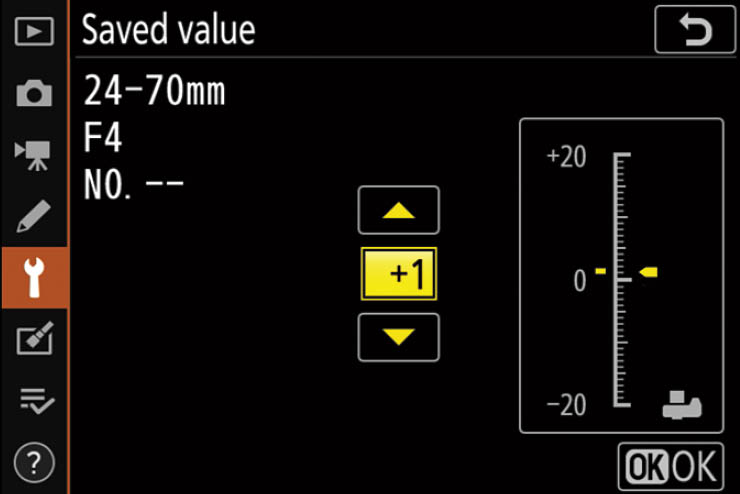
Figure 5.23 Change a saved value for a particular lens.
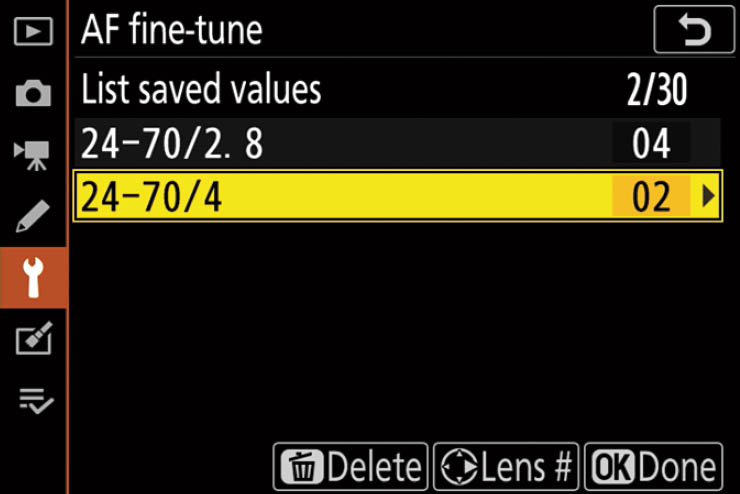
Figure 5.24 List the saved values you’ve stored.
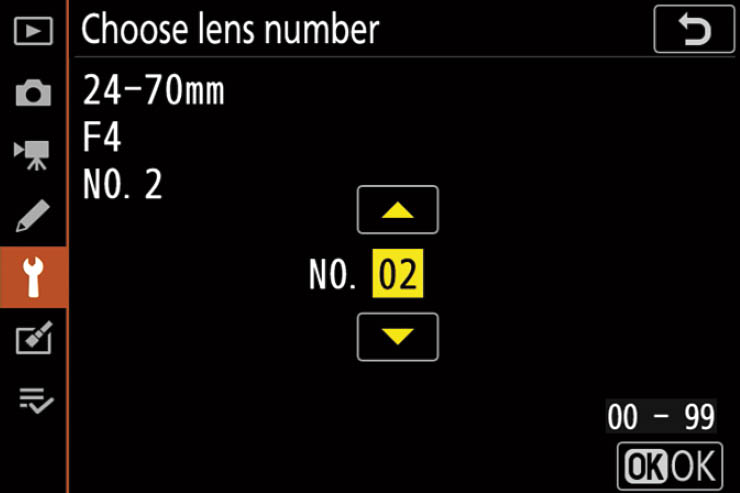
Figure 5.25 Assign a lens number, if necessary, to differentiate a particular lens from other lenses of the same type you may use.
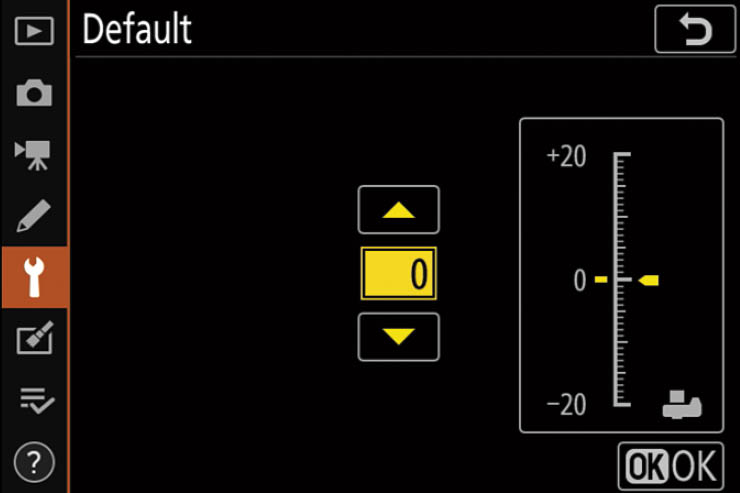
Figure 5.26 Choose a default value to be applied to all lenses not already fine-tuned.
- 7. Assign a number. Choose a lens identifier from 00 to 99 to the lens you’ve just calibrated. This identifier can be used to differentiate a particular lens from other lenses of the same type, if you own, say, some duplicate lenses. That’s not as far-fetched as you might think. Some organizations, such as newspapers, allow their photographers to use favorite lenses exclusively, but may need to share other specialized optics among several photographers. If you don’t know which of the pooled AF-S Nikkor 600mm f/4G ED VR lenses you’ll be using on any particular day, you can calibrate your camera separately for each of them.
- 8. Exit. Press MENU to exit.
Setting the Default Value
If you want to set a default value for lenses that aren’t in your Saved Values list (say, because your camera always back or front focuses slightly), choose the Default setting from the AF Fine-Tune menu, and adjust as shown in Figure 5.26.