
The Sony a7C can be incredibly easy to use, right out of the box, especially if you already have some experience with digital photography. As ridiculous as it may seem, this advanced camera can be used in point-and-shoot mode simply by rotating the large mode dial on the top-right panel to select the Program (P) label or green Intelligent Auto icon. (See Figure 1.1.) If you’ve charged the battery, mounted a lens, and inserted a formatted memory card into the camera, flip the power switch to On. (It’s concentric with the shutter release button on top of the camera.) I’ll provide tips on performing these tasks later in this chapter if you need help. Otherwise, you’re ready to start taking your first pictures.

Figure 1.1 Select Program or Auto and take a picture.
As you peer through the viewfinder or examine the monitor (the rear LCD screen), the scene your camera will capture is shown, with the current shooting mode displayed in the upper-left corner of the frame. Compose your image and press the shutter release button when you’re ready to take your first shot. That’s all there is to it. The a7C is smart enough to produce a pretty good shot without much input from you. In this book, I’m going to help you go beyond pretty good to consistently great.
Although you can begin shooting as soon as you unbox your new camera, it’s not a bad idea, once you’ve taken a few orientation pictures with your camera, to go back and review the basic operations of the a7C from the beginning—if only to see if you’ve missed something. This chapter is my opportunity to introduce new owners to the a7C and review the setup procedures for those among you who are already veteran users, and to help ease the more timid (even those few who have never before worked with an interchangeable-lens camera) into the basic pre-flight checklist that needs to be completed before you really spread your wings and take off. For the uninitiated, as easy as it is to use initially, your Sony a7C does have some dials, buttons, and menu items that might not make sense at first but will surely become second nature after you’ve had a chance to review the instructions in this book.
But don’t fret about wading through a manual to find out what you must know to take those first few tentative snaps. I’m going to help you hit the ground running with this chapter (or keep on running if you’ve already jumped right in). If you haven’t had the opportunity to use your a7C yet, I’ll help you set up your camera and begin shooting in minutes. You won’t find a lot of operational detail in this chapter. Indeed, I’m going to tell you just what you absolutely must understand, accompanied by some interesting tidbits that will help you become acclimated. I’ll go into more depth and even repeat some of what I explain here in later chapters, so you don’t have to memorize everything you see. Just relax, follow a few easy steps, and then go out and begin taking your best shots—ever.
DIFFERENT STROKES . . .
One of the challenges of writing a guidebook like this is satisfying the needs of both veteran E-mount users as well as newcomers to Sony cameras (which now includes the hordes who jumped to the Sony mirrorless world from other camera platforms). Believe it or not, while the a7C attracts both photo enthusiasts and professional photographers looking for an ultra-compact full-frame camera, a surprising number of less experienced shooters have found the a7C appealing, too.
So, whether you’re an advanced shooter looking to improve your comfort level with the features of this well-designed (yet complex) camera or are looking forward to starting from a more modest level of photographic expertise, I hope you’ll find the advice I’m about to offer in this chapter—and beyond—useful.
Your Out-of-Box Experience
Your Sony a7C (also known as the ILCE-7C) comes in an attractive box filled with stuff, including a multi-purpose USB charging cable, AC adapter, basic instructions, some pamphlets, and a few other items. The most important components are the camera and lens, battery, charger, and, if you’re the nervous type, the neck strap. You’ll also need a Secure Digital card, as one is not included.
The first thing to do is to carefully unpack the camera and double-check the contents with the checklist on one side of the box. While this level of setup detail may seem as superfluous as the instructions on a bottle of shampoo, checking the contents first is always a good idea. It’s better to know now that something is missing so you can seek redress immediately.
LENS NOMENCLATURE
In the discussion of lenses in the section that follows, you’re going to find me describing certain E-mount lenses using their full, formal product names, which can be rather unwieldy. However, for the most part in this book, I’ll use shorter, more compact nomenclature when there is little chance of confusion. For example, Sony offers several full-frame prime lenses in the 50-55mm focal length range. So, to be clear, I may need to refer to the Sony FE 50mm f/1.8, Sony Planar T* FE 50mm f/1.4 ZA, Sony Sonnar T* FE 55mm f/1.8 ZA, or Sony FE 50mm f/2.8 macro lens, as appropriate. Most of the time, a shorter version of the lens’ name will do.
So, check the box at your earliest convenience, and make sure you have (at least) the following:
- Sony a7C body. This is hard to miss. The camera (in all-black or black and silver finishes) is the main reason you laid out the big bucks, and it is tucked away inside a nifty protective envelope you should save for re-use in case the camera needs to be sent in for repair. It almost goes without saying that you should check out the camera immediately, making sure the color LCD on the back isn’t scratched or cracked, the battery compartment, memory card door, and connection port doors open properly; and, when a charged battery is inserted, and lens mounted, the camera powers up and reports for duty. Out-of-the-box defects in these areas are rare, but they can happen. It’s probably more common that your dealer played with the camera or, perhaps, it was a customer return. That’s why it’s best to buy your camera from a retailer you trust to supply a factory-fresh camera.
- Lens. Depending on where you live, the Sony a7C may be available in several different configurations, often the body alone, or packaged as a kit with the compact (and collapsible) FE 28-60mm f/4-5.6 zoom lens. At introduction, the camera was also offered by many retailers with a variety of other optics.
My recommendation: If you purchased your a7C because you were looking for a compact camera, the 28-60mm kit lens is a good choice. It measures only 2.6 × 1.8 inches when retracted, weighs less than six ounces, and provides excellent image quality. Its f/5.6 maximum aperture at 60mm is a tad slow for shooting in low light, and while it covers many of the most-used focal lengths, it doesn’t encompass ultra-wide angle or short telephoto perspectives. If you’re looking for more versatility, you might want one of three Sony full-frame 24/28-70mm zoom lenses or the FE 24-105mm f/4 zoom. You probably do not need both lenses because the 24-105mm lens completely overlaps the range of the three 24/28-70mm optics. You might make an exception for the 24-70mm f/2.8 G-Master if you do a lot of shooting in the shorter focal length neighborhood and want a super-sharp lens with a fast f/2.8 maximum aperture.
You probably won’t be satisfied with the low-cost 28-70mm f/3.5-5.6 OSS lens, as it’s not the sharpest lens in the drawer. The Zeiss 24-70mm version is a bit better, and its constant maximum aperture gives you f/4 (rather than f/5.6) at the 70mm setting. The f/2.8 G-Master is the best of all, and my guess is that, despite its greater bulk, will be popular among those investing in the a7C.
Owning any lens in this particular zoom range is a matter of personal style and preference. Many shooters tend to “see” images as “wide-angle/perspective distortion/maximum depth-of-field” shots or, conversely, as “longer lens/selective focus” photos. If you are in either camp, eschewing all these lenses and putting the money toward a different lens is a good option. I use my Sony Vario-Tessar T* FE 16-35mm f/4 ZA OSS lens quite often and have been relying on the 24-105mm zoom more frequently as a “walk-around” lens.
- Info-Lithium NP-FZ100 battery. This is the power source for your Sony camera. Charge yours as soon as possible (as described next).
My recommendation: Although the a7C’s 2280 mAh battery is more than twice as powerful as the one furnished with Sony’s original mirrorless models, it’s smart, nay, essential to have more than one battery pack. Although relatively small in size, this camera gulps power, and, even with the generous standards Sony cites in its literature, each is likely to last for no more than 640 to 740 still shots or roughly 140 minutes of non-stop video capture. (The figures given vary depending on whether you are using the electronic viewfinder or LCD monitor screen to frame your image, plus other factors.) Buy more and stick to Sony-brand products—even though third-party batteries eventually are available. Off-brand packs have been known to fail quickly, sometimes in potentially destructive ways.
- Sony AC-UUD12 AC adapter. Sony includes this small 5V 1.5-amp AC adapter for charging the a7C’s battery while it is in the camera, using the included Type-C USB cable, but I think you’ll probably prefer one of the better options available. (See Figure 1.2, left.)
My recommendation: Charging the battery while it’s in the camera means your a7C is tied to external power while you’re recharging. I prefer the option of slipping a new battery into my camera and having the depleted battery recharge while I continue to shoot. You can buy an optional Sony BC-QZ1 external charger. This handy device (see Figure 1.2, right) allows you to recharge one battery while another is ensconced in your camera as you continue shooting.

Figure 1.2 The included AC-UUD12 adapter allows charging the battery in the camera (left). The Sony BC-QZ1 charger (right) rejuvenates your battery outside the camera, so you can keep shooting with a spare.
I strongly prefer the faster external charger to the alternative cable-charging method, accomplished by plugging a USB cable into a computer or USB charger. However, an even better choice than the BC-QZ1 is the $400 NPA-MQZ1K Multi-Battery Adapter Kit, described shortly.
While the supplied AC-UUD12 adapter is compact, you probably already own multiple smart adapters for your phones, tablets, or other devices that supply 5V 2.4A juice. A Type-C USB cable can charge your camera when plugged into your computer or laptop, a USB port in your vehicle, or one of the many pocketable power packs.
- UCB-30 Micro Type-C cable. Use this 3.3-foot USB cable to link your Sony to a computer when you need to transfer pictures but don’t have an optional card reader accessory handy. While the camera is connected with the cable, the battery inside the body will also be charging. As I already mentioned, the USB cable can also be connected to an AC adapter (the Sony AC-UUD12 adapter, or virtually any other 5V/2A smart device power cube) if you want to charge the battery using household power.
My recommendation: I like the sturdy USB cable furnished with the camera, but you can use virtually any Type-C cable should you need a replacement or a spare.
- Shoulder strap. Sony provides a suitable neck or shoulder strap, with the Sony logo subtly worked into the design.
My recommendation: While I am justifiably proud of owning a fine Sony camera, I never attach the factory strap to my camera, and instead opt for a more serviceable strap from UPstrap (www.journeycamera.com). If you carry your camera over one shoulder, as many do, I particularly recommend UPstrap (shown in Figure 1.3). It has a patented non-slip pad that offers reassuring traction and eliminates the contortions we sometimes go through to keep the camera from slipping off. I know several photographers who refuse to use anything else. If you do purchase an UPstrap, be sure to tell photographer-inventor Al Stegmeyer that I sent you hence. There are several different strap models, and Al will help you choose which one is best for you.
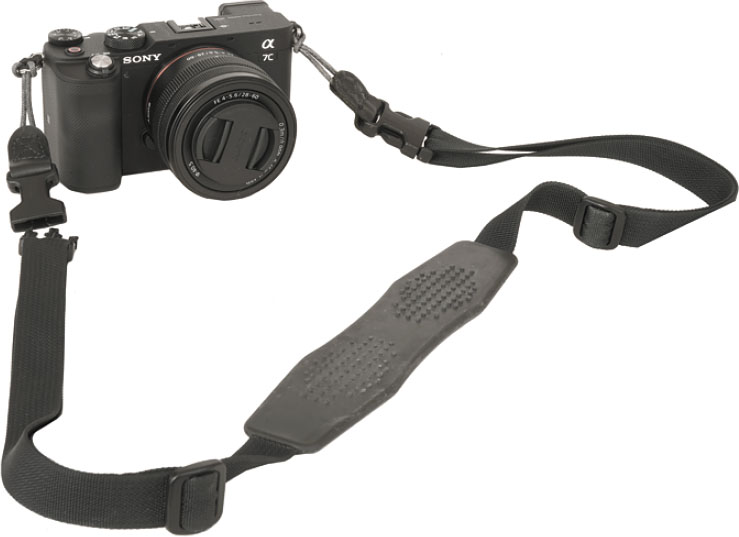
Figure 1.3 Third-party neck straps, like this UPstrap model, are often preferable to the Sony-supplied strap.
- Multi Interface Shoe cap. This plastic piece slides into the camera’s multi interface shoe on top of the camera (what we used to call a “hot shoe”) and protects the contacts from dirt, moisture, and damage when you don’t have an electronic flash, microphone, or other accessory attached.
My recommendation: If you are very careful about how you insert an external flash or microphone into the multi interface shoe, and avoid drenching moisture, you can remove this piece and leave it off for the rest of your life. I have lost shots while fumbling with protective covers and manage to lose the shoe cap with alarming frequency. If you misplace yours, USA shooters can get a replacement from www.laserfairepress.com for a few bucks.
- Application software. Sony no longer includes a software CD in the package. The first time you power up the camera, it will display the current URL for your country where you can download imaging software for the a7C. Be sure to get the new, free Imaging Edge Desktop software. It’s a great RAW processor and editor and has a Remote application for tethered shooting (with your a7C connected to a laptop or other computer).
- Printed Startup Guide/Reference Guide. Sony no longer includes any sort of manual with the camera. Instead, you get a single-sheet Startup Guide (12 × 11 inches when unfolded) and a single-sheet “Reference Guide” (8 × 11.5 inches when unfolded), which provides safety information in English, French, and Spanish, but nothing about the camera itself. A 661-page Help Guide to the camera’s operation can be accessed online in HTML format or downloaded as a more useful PDF file from Sony’s esupport.sony.com website. The box will also contain warranty and registration information, and assorted pamphlets listing available accessories. If you purchased the camera with the 28-60mm kit lens, you’ll receive a pamphlet on that, as well.
My recommendation: You’ve already availed yourself of your best option by purchasing this book. Rocky Nook also bundles the book with a handy ebook version you can store on your phone or tablet for only $10 more.
- Body cap. This accessory will probably already be attached to the camera body if you purchase your a7C without a lens.
My recommendation: Purchase an extra body cap. With mirrorless cameras like the a7C series, it is especially important not to leave the sensor unprotected. If you lose your body cap, mount a lens as a “body cap” until you purchase spares. A body cap is essential when packing your camera for compact travel. Since gray or black caps are easy to lose in the depths of a camera bag, I prefer to use body and rear lens caps in brilliant Sony orange. (See Figure 1.4.) I’ve imported a bunch of these for my personal use but have a limited number of extras available to Sony owners in the USA. You’ll find cheap body and rear lens caps in traditional colors and Sony orange at www.laserfairepress.com, too. (Nobody gets rich selling these items for a few dollars, but these are provided as a service because Boca Photo, a key previous source for them, has gone out of business.)

Figure 1.4 Lens and body caps protect your camera and optics.
Initial Setup
The initial setup of your Sony is fast and easy. You just need to charge the battery, attach a lens (if that hasn’t already been done), adjust the diopter setting, and insert a memory card. I’ll address each of these steps separately, but if you already feel you can manage these setup tasks without further instructions, feel free to skip this section entirely. You should probably at least skim its contents, however, because I’m going to list a few options that you might not be aware of.
Battery Included
Your Sony a7C is a sophisticated hunk of machinery and electronics, but it needs a charged battery to function, so rejuvenating the NP-FZ100 lithium-ion battery pack should be your first step. A fully charged power source should theoretically be good for 640 shots (when using the power-hungry viewfinder) or 740 shots (when working with the more juice-frugal LCD monitor screen). Expect 105 minutes (or more) of typical video capture, which includes standby time, zooming, and turning the camera on or off from time to time. When shooting continuously, you may be able to stretch a single battery for as much as 140 minutes of continual video capture. Theoretically. I frequently (always) deplete my batteries more quickly than that. Sony’s estimates are based on standard tests defined by the Camera & Imaging Products Association (CIPA). If you often use the camera’s Wi-Fi feature (discussed later), you can expect to take even fewer shots before it’s time for a recharge. This is an Info-Lithium battery, so the camera can display the approximate power remaining with a graphic indicator.
Remember that all rechargeable batteries undergo some degree of self-discharge just sitting idle in the camera or in the original packaging. Lithium-ion power packs of this type typically lose a small amount of their charge every day, even when the camera isn’t turned on. Li-ion cells lose their power through a chemical reaction that continues when the camera is switched off. So, it’s very likely that the battery purchased with your camera, even if charged at the factory, has begun to poop out after the long sea voyage on a banana boat (or, more likely, a trip by jet plane followed by a sojourn in a warehouse), so you’ll want to revive it before going out for some serious shooting.
My recommendation: At roughly $400, the NPA-MQZ1K Multi Battery Adapter Kit sounds pricey (it is!). However, it comes with two NP-FZ100 batteries (normally about $80 each), which means that, effectively, you’re paying “only” $240 for the charger itself. The charger is extremely versatile: it can charge up to four NP-FZ100 batteries simultaneously but can be converted to a compact two-battery charger for use while traveling. (See Figure 1.5.)

Figure 1.5 The NPA-MQZ1K Multi Battery Adapter Kit lets you charge up to four batteries at once, or power your a7C using AC current.
Even better, the charger can serve as a power pack when outfitted with fully charged batteries. A dummy battery plugs into the battery compartment of the a7C (or, with a supplied adapter, into any E-mount camera that uses the puny NP-FW50 batteries). Two USB ports allow rejuvenating other devices that use USB cable charging (including your smartphone!). It has six standard 1/4"-20 mounting sockets so it can be mounted to support systems (like the cages videographers use to attach external viewfinders and other accessories).
I own eight NP-FZ100 batteries (so far). You won’t need that many, but in addition to my a7C, I also own other cameras that use the same battery, including the a7R IV, a6600, and a9 II. I keep a fresh battery in the camera at all times. Nevertheless, I always check battery status before I go out to shoot, as some juice may have been siphoned off while the camera sat idle. I go to the Network 1 menu and turn Airplane Mode on (as described in Chapter 5) when I don’t need Wi-Fi features.
THIRD-PARTY BATTERIES
I don’t recommend using third-party batteries, even though they may cost one-third the price of Sony’s own batteries. It makes little sense to risk damaging a $2,000 camera body just to save a few dollars on such a crucial component. I purchased several well-known NP-FZ100 clones when they were first introduced; they didn’t work, and within a week the company had stopped selling them. All existing batteries were recalled or replaced.
Your a7C will display a compatibility warning message when many of these batteries are inserted. While the latest generation knock-offs seem to work better, many have reduced capacity, and there’s no guarantee that the third parties selling them will be able to issue timely recalls if needed. While some owners have had no problems, and swear by their Wasabi, Watson, Neewer, or DTSE batteries, I don’t think it’s worth the risk.
Charging the Battery
While the optional Sony BC-QZ1 external charger or NPA-MQZ1K multi-battery adapter should be your first choices, you have multiple other options, including charging the battery while it’s still in the camera (best done when the camera is idle and not needed for shooting). As noted earlier, you probably already own a suitable AC adapter/charger, in the form of any charging device you use for your smartphone, tablet, Kindle, or other electronic product. Their typical 5V/2A output will work fine. I also use a 22,000 mAh lithium-ion power “brick,” which also can recharge my phone, my tablet, and, in a pinch (using an included cable) jump start a car. The brick comes with its own 12V DC charger, so I can keep it topped up using my vehicle’s accessory outlet (what we used to call a “cigarette lighter” socket). I also have a more compact 5,000 mAh pack, about the size of a roll of quarters, that I keep in my camera bag.
Charging in the Camera
When you’re ready to charge the battery internally, turn the camera Off. Then, plug one end of the USB cable (with the smaller connector) into the USB Type-C port shown in Figure 1.6. Plug the other end of the cable (with the familiar USB Type-A connector) into a computer’s USB port, AC adapter, or battery-powered recharging device. Whether you charge from a computer’s USB port or household power, a Charge light next to the camera’s USB/charging ports glows orange, without flashing. It continues to glow until the battery completes the charge and the lamp turns off. In truth, the full charge is complete about one hour after the charging lamp turns off, so if your battery was really dead, don’t stop charging until the additional time has elapsed. Be sure to plan for charging time before your shooting sessions because it takes several hours in a warm environment to fully restore a completely depleted battery.
Fast flashing that can’t be stopped by re-inserting the battery indicates a problem with the battery. Slow flashing (about 1.5 seconds between flashes) means the ambient temperature is too high or low for charging to take place.
POWERING THE CAMERA EXTERNALLY
While the a7C’s battery will charge when connected to an external power source when the camera is turned off, you can also turn on the camera and use the external source to power it, say, for long exposures or interval photography. Just turn the camera On while connected, and you’ll see a note that says USB Mode on the LCD screen; this confirms that the connection has been made. An indicator at lower right shows the Playback button’s icon.
Press Playback, and a screen appears giving you the option to disconnect the USB data connection, and switch to USB power supply instead. You can then use the camera while connected to the external power supply. A “plug” icon appears next to the battery status indicator on the display, indicating the camera is being powered externally.
Charging Externally
Charging the battery with the supplied BC-QZ1 external charger is even easier; just slide the battery in, connect to AC power, and the charger’s yellow status light will begin to glow, accompanied by three green LEDs that illuminate progressively as charging proceeds, to let you know when the battery is fully charged. The yellow LED will extinguish when the cycle is over. Similar indicators appear for each mounted battery when using the NPA-MQZ1K multi-charger.
If the charging lamp flashes after you insert an externally charged battery into the camera, that indicates an error condition. Remove it and re-insert it. To insert/remove it, slide the latch on the bottom of the camera, open the battery door, and press a blue lever in the battery compartment that prevents the pack from slipping out when the door is opened; then, ease the battery out. To insert it, do so with the contact openings facing into the compartment (see Figure 1.7).
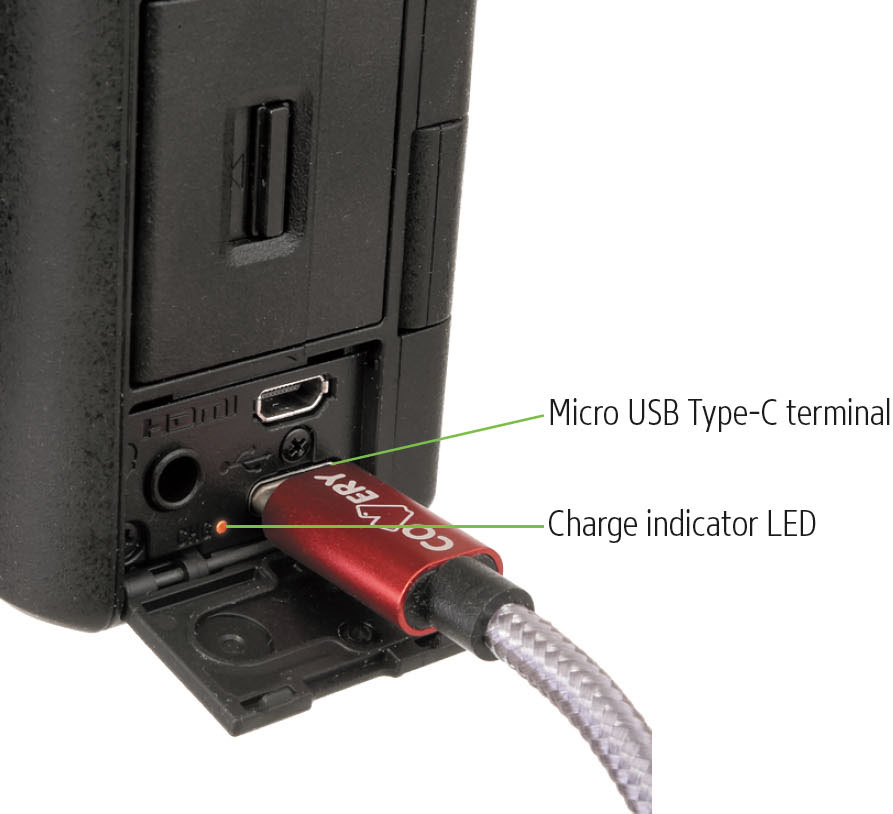
Figure 1.6 Charging through the Type-C USB terminal (as shown), takes several hours to provide a normal charge to a battery pack that was completely depleted, but can be performed through a USB connection to your computer, or with an appropriate power brick or AC adapter.
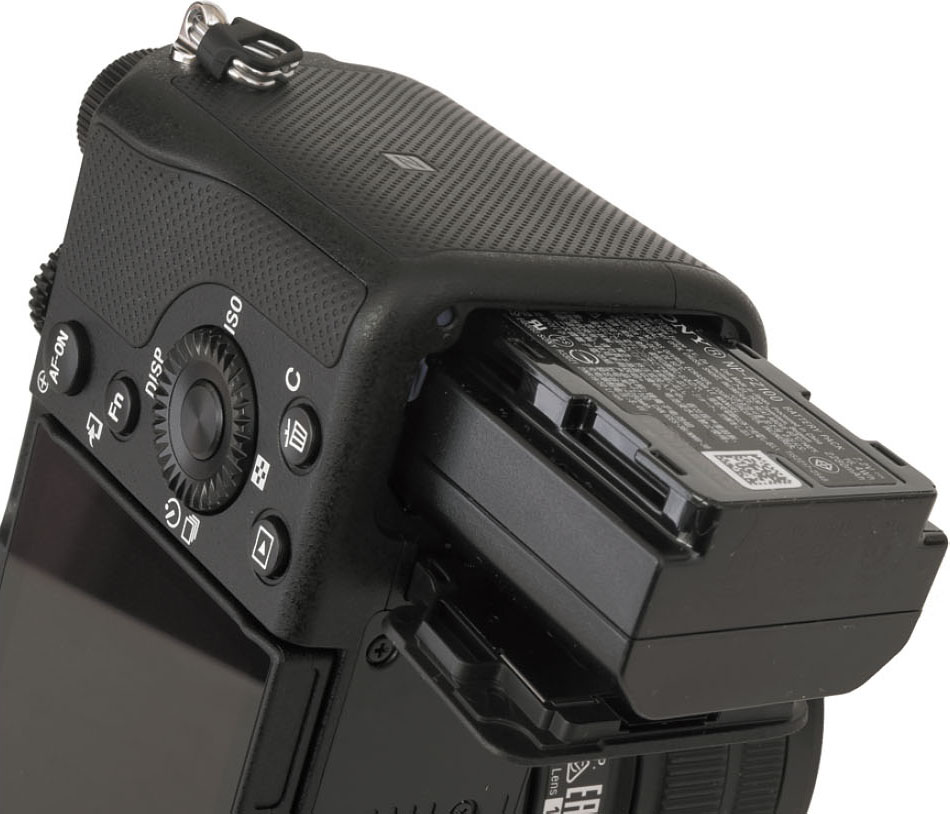
Figure 1.7 Install the charged battery in the camera; it only fits one way.
Final Steps
Your Sony a7C is almost ready to fire up and shoot. You’ll need to select and mount a lens (if not previously done) and insert a memory card. Each of these steps is easy, and if you’ve used any similar camera in the past, such as a Sony or other model, you already know exactly what to do. I’m going to provide a little extra detail for those of you who are new to the Sony or interchangeable-lens camera worlds.
Mounting the Lens
My recommended lens mounting procedure emphasizes protecting your equipment from accidental damage and minimizing the intrusion of dust. Select the lens you want to use and loosen (but do not remove) the rear lens cap. I generally place the lens I am planning to mount vertically in a slot in my camera bag, where it’s protected from mishaps but ready to pick up quickly. By loosening the rear lens cap, you’ll be able to lift it off the back of the lens at the last instant, so the rear element of the lens is covered until then.
After that, remove the body cap that protects the camera’s exposed sensor by rotating the cap toward the shutter release button. You should always mount the body cap when there is no lens on the camera because it helps keep dust out of the interior of the camera. Unlike traditional dSLRs, these cameras have no mirror or closed shutter to protect the sensor.
Once the body cap has been removed, remove the rear lens cap from the lens, set the cap aside, and then mount the lens on the camera by matching the raised white alignment indicator on the lens barrel with the white dot on the camera’s lens mount (see Figure 1.8). Rotate the lens away from the shutter release side of the camera until it seats securely and clicks into place. (Don’t press the lens release button during mounting.) Some lenses ship with a hood. If that accessory is included, and if it’s bayoneted on the lens in the reversed position (which makes the lens/hood combination more compact for transport), twist it off and remount with the rim facing outward (see Figure 1.9). A lens hood protects the front of the lens from accidental bumps, and reduces flare caused by extraneous light arriving at the front element of the lens from outside the picture area.

Figure 1.8 Match the raised white dot on the lens with the white dot on the camera mount to properly align the lens with the bayonet mount.

Figure 1.9 A hood protects the lens from extraneous light and from accidental bumps, but not all lenses include this accessory.
Turn on the Power
Locate the On/Off switch that is wrapped around the shutter release button and rotate it to the On position. The LCD display will be illuminated. If you bring the viewfinder up to your eye, a sensor will detect that action and switch the display to the built-in electronic viewfinder instead. (You can disable this automatic switching in the FINDER/MONITOR setting within the Camera Settings II-07: Display/Auto Review 1 menu, as I’ll describe in Chapter 4. After one minute of idling (the default), the a7C goes into standby mode to save battery power. Just tap the shutter release button to bring it back to life. (You can select a longer time using the Power Save Start Time option in the Setup 2 menu, as I discuss in Chapter 5.)
When the camera first powers up, you may be asked to set the date and time. The procedure is self-explanatory (although I’ll explain it in detail in Chapter 5). You can use the left/right directional buttons to navigate among the date, year, time, date format, and daylight savings time indicator, and use the up/down buttons to enter the correct settings. When finished, press the control wheel center button to confirm the settings and return to the menu system. Veteran users will know how to do this; if you’re totally new to the E-mount system, I’ll explain the control dials, wheels, and buttons in detail in Chapter 2.
Once the Sony a7C is satisfied that it knows what time it is, you will be viewing a live view of the scene in front of the lens—on the LCD screen or in the viewfinder when that is held up to your eye—whenever you turn the camera on. The view is superimposed with many items of data over the display; these provide a quick method for checking many current camera settings, including current shutter speed and aperture (f/stop), shooting mode, ISO sensitivity, and other parameters.
Adjusting the Diopter Setting
The a7C is equipped with a built-in electronic viewfinder or EVF, a small, high-resolution (2,359,296 pixels) OLED (organic light-emitting diode) screen that can be used instead of the LCD screen for framing your photos or movies. A sensor detects your eye at the viewfinder and shuts off power to the LCD when you are using the EVF. Usually, when you’re learning to use the camera’s many features, you’ll rely on the LCD screen’s display, but when you’re actually taking photos, you’ll sometimes want to use the EVF instead. You can also use it to review your photos or video clips and navigate menu selections.
If you wear glasses and want to use the EVF without them, or if you find the viewfinder needs a bit of correction, rotate the diopter adjustment dial located to the right of the viewfinder window (and shown in Figure 1.10). Adjust the dial while looking through the viewfinder until the image appears sharpest.

Figure 1.10 Diopter adjustment dial.
Inserting a Memory Card
You can’t take actual photos without a memory card inserted in your Sony camera, although if you have the Release without Card entry in the Camera Settings II-05: Shutter/SteadyShot menu set to Enable, you can pretend to shoot. In that case, if you don’t have a card installed, the camera will sound as if it’s taking a photo (when using the mechanical shutter, of course), and it will display that “photo.” However, the image is only in temporary memory and not actually stored; you’ll get a reminder about that with a flashing orange NO CARD warning at the upper left of the LCD. If you go back later and try to view that image, it will not be there. So, be sure you have inserted a compatible card with adequate capacity before you start shooting stills or videos.
Given the fast continuous shooting speeds available with the a7C, you’ll want to consider the speediest cards available, which, as I write this, are the Sony SF-G Series UHS-II U3 Class 10 SDXC memory cards, available in 128GB, 64GB, and 32GB capacities. They have a maximum 299 MB/second write speed (essential in order to transfer images from the a7C’s built-in memory buffer to the card quickly). Poky write speeds can be infuriating when a “Processing” warning appears on your screen and you’re unable to continue shooting or reviewing the images you’ve already taken until the buffer has emptied.
The Sony SF-G Series cards have a maximum read speed of 300MB/second, too. The latter spec is useful when it comes time to transfer your images from the memory card to your computer. Vendors typically tout their cards’ read speed and downplay the write speed, which can be typically half as fast. With Sony’s SF-G series, the card is wicked fast in both directions. (I suspect the 299/300 MB difference between write and read speeds is a marketing ploy to make sure consumers realize that both speeds are being shown.)
The memory card slot is located beneath a door on the left side of the camera. Slide the door open, revealing the slot (see Figure 1.11). You should remove the memory card only when the camera is switched off. Insert an SD card with the label facing toward the front of the camera (as shown in Figure 1.11). In either case, the metal contacts go into the slot first; the card simply will not fit into the slot if it is incorrectly oriented.

Figure 1.11 The memory card is inserted in the slot on the side of the camera.
Close the door, and your pre-flight checklist is done! (I’m going to assume you’ll remember to remove the lens cap when you’re ready to take a picture!) When you want to remove the memory card later, just press down on the card edge that protrudes from the slot, and the card will pop right out.
My recommendation: Given the fast continuous shooting speeds available with the a7C, you’ll want to consider a speedy memory card of the UHS-I (Ultra High Speed I) type, with a Speed Class of 3 (the card will have a symbol showing the number 3 within an uppercase U). Such a card will have a minimum sequential write speed (that is, storing your image or video on the card) of 30MB/second, which is fast enough for the camera’s 10 fps still shooting and 4K video capture capabilities. The actual maximum sequential write speed of the card is likely to be somewhat higher. SD cards also have a maximum read speed, too, which is useful when it comes time to transfer your images from the memory card to your computer. As I mentioned, vendors typically tout their cards’ read speed and downplay the write speed, which can be typically half as fast. SanDisk, for example, doesn’t supply the write speed at all in its specification. While a card with a 98MB/second to 150MB/second read speed should be fast enough for your a7C, the camera can use even faster UHS-II cards.
In addition, size matters when you’re using a camera with a 24MP sensor. If you’re buying new, rather than re-using old cards, if your budget is limited, purchase at least two fast 32GB cards (so you’ll always have a backup). If your pockets are a little deeper, 64GB and 128GB memory cards can be more attractive, especially when you’re on vacation and shooting a lot each day.
HOW MANY SHOTS?
The Sony a7C provides a fairly accurate estimate of the number of shots that your memory card will hold. This number is visible near the top-left corner of the display (next to the memory card icon) in standard live view. It is only an estimate, because the actual number will vary, depending on the capacity of your memory card, the content of the image itself, and the aspect ratio (proportions) of the image. (The a7C can use traditional 3:2 proportions, 1:1 [square format], and 16:9 [HDTV] aspect ratios.) Some photos may contain large areas that can be more efficiently squeezed down to a smaller size. If you change the file format (from JPEG to RAW or from a large JPEG to a small JPEG, for example), the number will change. The Display Media Info setting in the Setup 6 menu will show you how many images you can capture at your current settings, and how much movie-shooting time you can squeeze out of your memory card.
Table 1.1 shows the typical number of shots you can expect using a medium-sized 32GB memory card. Take those numbers and double them if using a 64GB card. The numbers shown may differ from what you read in the camera’s manual. I obtained them by formatting my own 32GB card and writing down the number of shots available at each setting. Although the a7C can shoot more than 10,000 images with a high-capacity card, the maximum number of recordable images displayed on the LCD or viewfinder will never exceed 9,999.
TABLE 1.1 Typical Shots with a 32GB Memory Card

There are three ways to create a blank memory card for your Sony a7C, and two of them are at least partially wrong. Here are your options, both correct and incorrect:
- Transfer (move) files to your computer. You’ll sometimes decide to transfer (rather than copy) all the image files to your computer from the memory card (either using a direct cable transfer or with a card reader and appropriate software, as described later in this chapter). When you do so, the image files on the card can be erased leaving the card blank. Theoretically. This method does not remove files that you’ve labeled as Protected (by choosing Protect from the Playback menu during review), nor does it identify and lock out parts of your card that have become corrupted or unusable since the last time you formatted the card. Therefore, I recommend always formatting the card, rather than simply moving the image files. The only exception is when you want to leave the protected/unerased images on the card for a while longer, say, to share with friends, family, and colleagues.
- (Don’t) Format in your computer. With the memory card inserted in a card reader or card slot in your computer, you can use Windows or Mac OS to reformat the memory card. Don’t even think of doing this! The operating system won’t necessarily arrange the structure of the card the way the camera likes to see it (in computer terms, an incorrect file system may be installed). In particular, cards larger than 32GB must be initialized using the exFAT format, and while your computer may offer exFAT as an option, it may default to a different scheme. The only way to ensure that the card has been properly formatted for your camera is to perform the format in the camera itself. The only exception to this rule is when you have a seriously corrupted memory card that your camera refuses to format. Sometimes it is possible to revive such a corrupted card by allowing the operating system to reformat it first, then trying again in the camera to restore the proper exFAT system.
- Setup menu format. Use the recommended method to format a memory card in the camera, as described next.
To format a memory card, just follow these steps. I’m going to suggest some basic navigation controls for those who are new to E-mount cameras. However, Sony gives you multiple ways to move around with its screens, and I’ll show you how to do that in Chapter 2, where I’ll also explain how to use the touch screen to specify a focus area. (Veteran users can use the method of their choice.) For now, we’ll just use the control dial and control wheel to navigate.
- 1.Press MENU. When you press the MENU button, a menu screen will appear on the LCD monitor or electronic viewfinder. If you’ve previously selected a menu entry, the a7C will remember that and return to that menu screen with the most recently used item highlighted with an orange bar, as seen in Figure 1.12. However, in most cases the most recent menu may not be the one you want to use to format a memory card.
To quickly move from one main menu tab to the next, first rotate the control wheel to move the highlight upward until only the tab at top is highlighted—if necessary. You can then rotate the control dial to jump among the available tabs. (I’ll explain these controls in more detail in Chapter 3.)

Figure 1.12 The Setup 5 menu.
- 2.Navigate to the Setup tab. Rotate the control dial until the Setup tab (a yellow toolbox icon) is highlighted. Then rotate the control wheel dial to move the orange highlighting down into the Setup menus.
- 3.Navigate to the Setup 5 menu. Use the control dial to jump among the Setup tabs’ menus until you arrive at the Setup 5 screen shown in the figure. Highlight Format, if necessary, and press the center of the control wheel to access the menu entry. (The relevant controls are shown in Figure 1.13.)
- 4.Format. A display will appear asking if you want to delete all data. If you’re sure you want to do so, press up/down to choose OK, and press the center button to confirm your choice. This will begin the formatting process.
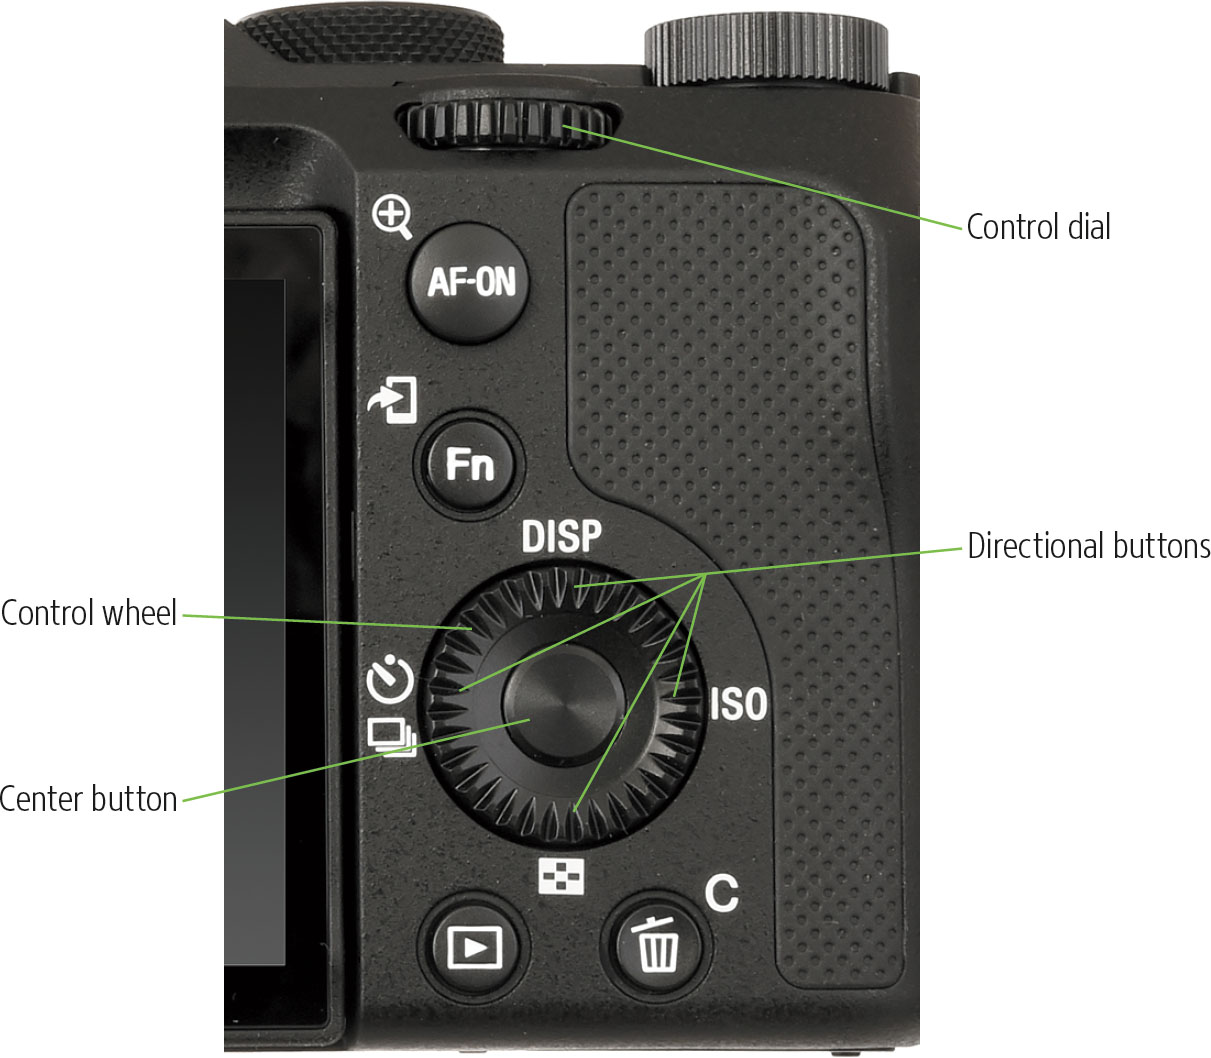
Figure 1.13 Navigation controls.
CONTROL WHEEL/CONTROL DIAL
Remember: When navigating menus, the control wheel moves highlighting up and down within a particular menu tab’s entries. The control dial moves highlighting from one menu page within a main menu tab to the next, or, when no entry is highlighted, from one main menu tab to the next one. The directional buttons can be used for left/right and up/down movement, too.
Selecting a Shooting Mode
When it comes time to select the shooting mode and other settings on the a7C camera, you may start to fully experience the “feel” of the user interface. Thanks to the mode dial shown earlier in Figure 1.1, it’s simple and quick to set a shooting mode. Just rotate it to the position you want, such as P (Program Auto).
Hidden Scenes
Intelligent Auto is a fully automatic shooting mode. In that mode, the camera makes most of the decisions for you (except when to press the shutter). The a7C does not have a Scene position on the mode dial but does resort to these Scene-style settings when you use Intelligent Auto. Although you can’t specify most settings on your own in Intelligent Auto mode, the a7C will evaluate your scene and switch to Portrait, Infant, Night Portrait, Night Scene, Backlight Portrait, Backlight, Landscape, Macro, Spotlight, Low Light, and Night Scene (Tripod) modes. (If you’ve disabled Face Detection, as described in Chapter 3, Portrait, Infant, Night Portrait, and Backlight Portrait scene modes are not available.) Scene detection may be incorrect if you’re using the a7C’s digital zoom feature, discussed in Chapter 4.
The available scene modes the camera may choose from are as follows:
- Portrait. With the Portrait setting, the camera uses settings to blur the background and sharpen the view of the subject, while using soft skin tones. External flash will fire in low light if you have attached it and powered it up.
- Infant. Optimizes settings for photographing small children, using bright, vivid colors.
- Night Portrait. Choose this mode when you want to illuminate a subject in the foreground with flash, but still allow the background to be exposed properly by the available light. Be prepared to use a tripod or to rely on the SteadyShot feature to reduce the effects of camera shake. If there is no foreground subject that needs to be illuminated by the flash, you may do better by using the Night Scene mode, discussed next. Remember that you must attach and power up the external flash before taking a shot if you want the flash to fire.
- Night Scene. This mode uses slower shutter speeds to provide a useful exposure, but without using flash. You should use a tripod to avoid the effects of camera shake that can be problematic with a slow shutter speed.
- Backlight Portrait. This is like the Portrait setting but compensates exposure for lighting coming from the rear.
- Backlight. Provides exposure compensation for backlight for subjects that are not portraits.
- Landscape. Select this scene mode when you want a maximum range of sharpness (instead of a blurred background) as well as vivid colors of distant scenes. External flash will never fire in this mode.
- Macro. This mode is helpful when you are shooting close-up pictures of a subject such as a flower, insect, or other small object. External flash will fire in low light if you have popped it into the up position, but the flash may be too bright for a subject that’s very close to the camera.
- Spotlight. This setting compensates for subjects that are illuminated by a small, direct light source, as in stage performances and concerts.
- Low Light. This special mode is designed for use in low light. The camera will set a high ISO (sensitivity) level to enable it to use a fast shutter speed to minimize the risk of blurring caused by camera shake.
- Night Scene (Tripod). This mode also uses slower shutter speeds, including those long enough to make use of a tripod mandatory.
Other Modes
The mode dial also includes a Movie position; three semi-automatic modes, (Program, Aperture Priority, and Shutter Priority), which allow you to provide more input over the exposure and settings the camera uses; and a fully Manual mode. I’ll provide tips on using these in Chapter 7. The other positions include S&Q (for slow-motion and quick-motion shooting) and three Memory Recall settings “slots” to register frequently used settings. I’ll explain how to use the Memory settings in Chapter 3.
The mode dial options include:
- P (Program auto). This mode allows the a7C to make the basic exposure settings, but you can still override the camera’s settings to fine-tune your image.
- A (Aperture Priority). Choose this mode when you want to use a particular lens opening (called an aperture or f/stop), especially to control how much of your image is in focus. The camera will set the appropriate shutter speed after you have set your desired aperture using the control wheel that’s around the mode selector dial.
- S (Shutter Priority). This mode is useful when you want to use a particular shutter speed to stop action or produce creative blur effects. You dial in your chosen shutter speed with the control wheel, and the camera will set the appropriate aperture (f/stop) for you.
- M (Manual). Select this mode when you want full control over the shutter speed and the aperture (lens opening), either for creative effects or because you are using a studio flash or another flash unit not compatible with the camera’s automatic flash metering. You also need to use this mode if you want to use the Bulb setting for a long exposure, as explained in Chapter 6. You select both the aperture (with the front dial) and the shutter speed aperture (with the control wheel on the camera back). There’s more about this mode, and the others, in Chapter 6.
- Movie. Allows shooting movie clips. You can capture video in other exposure modes, just by pressing the red Movie button located to the right of the mode dial, highlighted with a red ring. While you can shoot movies with the camera set to PASM modes, this dial position gives you more options over your movie settings.
- 1/2/3 (Memory Recall). These three positions on the mode dial, simply marked 1, 2, or 3, aren’t actually exposure modes. Instead, they correspond to different groups of settings that you’ve previously stored in an internal memory storage “slot” (register) numbered 1, 2, and 3. You can use the memory registers to set up the a7C for specific types of shooting scenes, and then retrieve those settings from the mode dial.
- S&Q. You can capture slow-motion and quick-motion video clips by moving the mode dial to this position and pressing the red Movie button. In the Camera Settings II-01 (Movie 1) menu’s S&Q Settings entry, you can select Record Setting (60p, 30p, 24p) and frame rates in the S&Q Settings entry. If the a7C’s 10-frames-per-second continuous shooting isn’t fast enough for you, you can shoot video at up to 120 fps, which slows down motion by a 5X factor. Quick-motion rates of up to 60X normal speed can also be selected. I’ll show you how to use these in Chapter 4.
Choosing a Metering Mode
You might want to select a particular exposure metering mode for your first shots, although the default high-tech Multi (short for multi-zone or multi-segment) metering is probably the best choice while getting to know your camera. If you want to select a different metering pattern, you must not be using Intelligent Auto; in that mode, the camera uses Multi metering and that cannot be changed. To change the metering mode, press the MENU button (located just above the LCD monitor) and navigate to the Camera Settings I menu (the tab in the upper-left corner in Figure 1.12), and thence to the Camera Settings I-08 menu to the Metering Mode entry. Press the center button, then scroll up/down with the directional buttons (see Figure 1.13) to reach Multi, Center (for center weighted), Spot, Entire Screen Averaging, and Highlight metering selections. Press the center button to confirm your choice and return the camera to shooting mode. The metering options are as follows:
- Multi metering. In this standard metering mode, the camera attempts to intelligently classify your image and choose the best exposure based on readings from 1,200 different zones or segments of the scene. You can read about this so-called “evaluative” metering concept, as well as the other two options, in Chapter 7.
- Center metering. The camera meters the entire scene but gives the most emphasis (or weighting) to the central area of the frame.
- Spot metering. The camera considers only the brightness in a very small central spot, so the exposure is calculated only based on that area. You can set the size of the metering circle to Standard or Large, and either link the spot to a focusing point or fix it to the center position, as I’ll explain in Chapter 7.
- Entire Screen Averaging. This mode sets exposure based on the mean value (in the arithmetic, rather than vengeful sense) of all the tones in the frame, which means the exposure will remain constant even if your subject moves around within the frame.
- Highlight metering. Emphasizes preserving tones in the highlights of an image to avoid overexposure, possibly at the expense of shadow detail. I’ll show you how to balance exposures for lighter and darker images in Chapter 7.
OPTION OPTIONS
You’ll soon find that your a7C gives you multiple ways to make adjustments. In this Quick Start chapter, I may show you just one way of selecting options. For example, you can select a metering mode using the Camera Settings I-08 menu, as described, or you can press the Fn button on the right side of the back of the camera and specify the metering method from the 12-item Function menu that pops up. (See Figure 1.14, left.) Alternatively, when the “Quick Navi” screen is shown on the LCD monitor, you can press the Fn button to change the metering mode as well as most of the other shooting settings. (See Figure 1.14, right.) I’ll show you how to use the other optional methods in Chapter 2.

Figure 1.14 Function menu (left); Quick Navi screen (right).
Choosing a Focus Mode
The focus mode can be selected using the Camera Settings I-04 menu entry, the Fn menu’s Focus Mode (located second from the right in the top row of the Fn menu), or the Quick Navi screen. Focus mode is easy to understand; it determines when focus is established. The choices that are available when using P, A, S, or M mode are as follows:
- Single-shot AF (AF-S). This mode, sometimes called single autofocus, sets focus after you touch the shutter release button and the camera beeps to confirm focus (unless you’ve turned the beeps off). The active focus point(s) are shown in green on the screen and a green dot appears in the bottom-left corner of the display. The focus will remain locked as long as you maintain contact with the shutter release button, or until you take the picture. If the autofocus system is unable to achieve sharp focus (because the subject is too close to the camera, for example), the focus confirmation circle will blink. This mode is best when your subject is relatively motionless as when you’re taking a portrait or landscape photo.
- Continuous AF (AF-C). This mode, sometimes called continuous servo or continuous tracking focus by photographers, sets focus when you partially depress the shutter button but continues to monitor the frame and refocuses if the distance between the camera and the subject changes. (This allows it to continuously focus on a person walking toward you, for example.) No beep sound is provided. A green dot surrounded by two brackets (curved lines) appears to indicate that the camera is not having a problem achieving and maintaining focus. The brackets disappear when focus is achieved, leaving only the green dot. If the camera should fail to acquire focus, the green dot disappears, and the brackets remain. Continuous AF is a useful mode for photographing moving subjects.
- Automatic AF (AF-A). When using AF-A the a7C will switch between AF-S and AF-C to account for a subject that is moving intermittently. When shooting continuously, even if AF-A is set the camera will automatically shift into AF-C mode after the first exposure in the series.
- DMF (Direct Manual Focus). Allows you to manually adjust focus after autofocus has been confirmed, using the focus ring on the lens.
- Manual Focus. Focus by rotating the focus ring on the lens. The a7C offers magnification and Focus Peaking as aids to manual focus. I’ll describe their use in Chapter 8.
Selecting a Focus Area
The Sony a7C is equipped with an advanced hybrid autofocus system using both phase detection and contrast detection. I’ll explain what those are and how they work in detail in Chapter 8. In Intelligent Auto mode, the focus area that will set focus is selected automatically by the camera; in other words, the AF system decides which part of the scene will be in sharpest focus. In the semiautomatic P, A, and S mode, and in the manual M exposure modes, you can allow the camera to select the focus point automatically, or you can specify which focus point should be used with the Focus Area feature.
Set the camera to one of the four modes mentioned above and select Focus Area from the Camera Settings I-04 (AF1) menu. Focus Area can also be selected using the Function and Quick Navi menus. By default, it will be set to Wide (multi-point autofocus). Scroll up/down until you reach the option you want to use (see Figure 1.15) and press the center button to confirm your selection. (The button is located in the middle of the control wheel that resides to the immediate right of the LCD screen.) There are six autofocus area options, described in Chapter 8. Here’s a brief overview of the options.
- Wide. The a7C automatically chooses the appropriate focus area or areas; often several subjects will be the same distance from the camera as the primary subject. The active AF area or areas are then displayed in green on the LCD monitor or in the viewfinder, depending on which display you’re using.
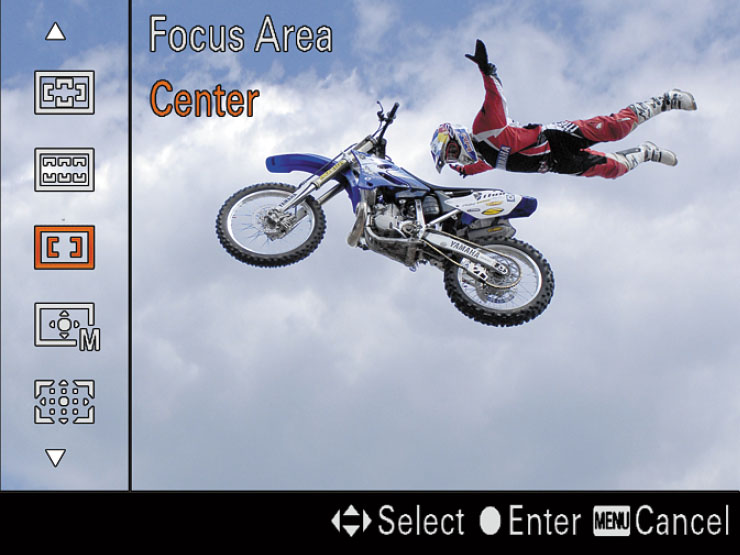
Figure 1.15 Choose Focus Area from this scrolling list.
- Zone. In this mode, a frame that encompasses nine focus areas appears on the LCD while you’re shooting. You can move this grid around the frame with the directional buttons shown in Figure 1.13, and the camera will select which of the focus areas to use to focus within the zone you specify.
- Center. The camera always uses the focus area in the center of the frame, so it will focus on the subject that’s closest to the center in your composition.
- Flexible Spot. After you select this option from Focus Area, you can use the joystick or left/right directional buttons to specify Small, Medium, or Large focus areas. Then, while viewing your subject, you can move the focus frame (rectangle) around the screen to your desired location, using the directional buttons. Adjust the focus frame so it covers the most important subject in the scene; I’ll discuss this topic in more detail in Chapter 8, where I’ll cover many aspects of autofocus (as well as manual focus), including some not covered in this Quick Start chapter.
- Expand Flexible Spot. Like standard Flexible Spot, in this mode, if the camera is unable to lock in focus using the selected focus point, it will also use the eight adjacent points to try to achieve focus.
- Tracking. In this mode, the camera locks focus onto the subject area that is under the selected focus spot when the shutter button is depressed halfway. Then, if the subject moves (or you change the framing in the camera), the camera will continue to refocus on that subject. You can select this mode only when the focus mode is set to Continuous AF (AF-C). You can activate it for any of the five focus area options described above. That is, once you’ve highlighted Lock-On AF on the selection screen, you can then press the left-right directional button and choose Wide, Zone, Center, Flexible Spot, or Expand Flexible Spot.
SWITCHING AF AREAS/POINTS
You can set separate AF points and AF areas for horizontal and two different vertical orientations (horizontal upside-down is not supported) using the Camera Settings I-04: AF1 menu, and I’ll show you how to use the Switch Vertical/Horizontal AF Area option in Chapter 8.
Other Settings
There are a few other settings you can make if you’re feeling ambitious, but don’t feel bad if you postpone using these features until you’ve racked up a little more experience with your Sony a7C. By default, these camera features will be at Auto, so the camera will make a suitable setting.
Adjusting White Balance and ISO
If you like, you can custom-tailor your white balance (overall color balance) and the ISO level (sensitivity) as long as you’re not using Intelligent Auto. To start out, it’s best to leave the white balance (WB) at Auto, and to set the ISO to ISO 200 for daylight photos or to ISO 400 for pictures on a dark, overcast day or indoors when you’ll be shooting with an external flash. You can adjust white balance with the White Balance entry in the Camera Settings I-11: Color/WB/Img. Processing 1 menu; the ISO can be set either from the Camera Settings I-08: Exposure 1 menu, after pressing the ISO section of the control wheel (the right directional button), or from the Function and Quick Navi menus. (So many optional options!)
After accessing either feature, navigate (scroll) to make the desired setting with the directional buttons, or by rotating the control wheel. The control wheel and several of the most important buttons are shown in Figure 1.16.

Figure 1.16 The control wheel and some key buttons.
Using the Self-Timer
If you want to have time to get into the photo before the tripod-mounted camera takes the actual shot, the self-timer is what you need. You can select the self-timer using the Drive Mode button (the left directional button on the control wheel). Hold the Drive Mode button and rotate the control wheel to highlight either Self-Timer choice (described next). The dial also includes Single Shot, High-, Medium-, and Low-speed continuous, and various Bracketing options.
When the Drive Mode screen is visible, scroll up/down through the various options until you reach either the Self-timer (Single) or Self-timer CS (continuous) options. When the former is highlighted, press the directional buttons or joystick to choose 2-, 5-, or 10-second durations. With the Self-timer CS choice, you can also specify either 3 or 5 images to be taken after the timer elapses. Press the center button to confirm your choice and a self-timer icon will appear on the LCD monitor. Press the shutter release to lock focus and exposure and to start the timer. The self-timer lamp will blink, and the beeper will sound (unless you’ve silenced it in the menu) until the final two seconds when the lamp remains lit.
The multiple image option is handy if you are taking family group pictures with a few known inveterate blinkers to be pictured. Note that the self-timer setting is “sticky” and will still be in effect for multiple shots, even if you turn the camera off and power up again. When you’re done using the self-timer, reset the camera to one of the other drive mode options.
Quick Start to Movie Making
I’m going to talk in more detail about your movie-making options with the a7C in Chapters 10 and 11. For now, though, I’ll give you enough information to get started, in case a cinematic subject wanders into your field of view before you get to that chapter. The overrides you have set for certain aspects while shooting still photos will apply to the video clip that you’ll record; these include exposure compensation, White Balance, any Creative Style, Metering Mode, Face Detection, D-Range Optimizer, and Lens Compensation. You’ll even retain your aperture setting if the camera is in A mode or the shutter speed if it’s in S mode. You also get access to the settings for the movie file formats (XAVC S HD and XAVC S 4K modes we’ll explore later in this book) and the resolution in the Record Setting item of the Camera Settings II section of the menu.
After you start recording, you can change the aperture or the shutter speed; either step will make your movie brighter or darker as you’ll notice while viewing on the EVF or LCD while making the adjustments. However, you can also set plus or minus exposure compensation for that purpose while filming. The a7C provides an effective Continuous Autofocus in Movie mode and sound is recorded in stereo with the built-in mics located on the viewfinder housing on top of the camera.
Let’s save the discussion of those aspects for Chapters 10 and 11. For the moment, let’s just make a basic movie. With the camera turned on, aim at your subject and locate the red Movie record button located southeast of the shutter button. You don’t have to switch to Movie mode using the mode dial; the Movie mode position simply gives you access to more movie-shooting controls, including the ability to adjust shutter speed and aperture.
Compose as you wish and press that button once to start the recording, and again to stop it; don’t hold the button down. You can record for up to about 29 minutes consecutively if you have sufficient storage space on your memory card and charge in your battery. The camera will adjust the focus and exposure automatically, and you can zoom while recording, if you have a zoom lens attached to the camera.
After you finish recording a video clip, you can view it by pressing the Playback button at the lower right of the LCD screen, then pressing the Center button to start the movie displayed. While a movie is being played back, press the down button to access an operation panel with playback controls. (See Figure 1.17.) Highlight the control you want to use with the directional buttons. I’ll explain the use of these buttons in more detail in Chapter 10. From left to right at the bottom of the figure, they are: Previous Movie File, Fast-Rewind, Pause/Resume, Fast-Forward, Next Movie File, Photo Capture, Sound Volume Adjustment, and Close Operation Panel.

Figure 1.17 Movie playback options.
Reviewing the Images You’ve Taken
The Sony a7C has a broad range of playback and image review options. I’ll cover them in more detail in Chapter 2. Initially, you’ll want to learn just the basics for viewing still photos, so I’ll assume you have taken only such images. Note that, as always, you have several options—the left/right edges of the control wheel, the joystick, and rear control dial can all be used to view the previous or next image. I’ll stick to just one method in the list that follows. After shooting some video or JPEG and/or RAW photos, here’s how to view them, using the controls shown in Figure 1.18:
- Playback. Press the Playback button to display the most recently taken image. (It’s the small button with a > symbol located to the lower right of the LCD monitor screen.) If you have shot both still photos as well as movie clips (which have “sprocket holes” flanking their icons), the a7C will show both in playback mode. Just press the control wheel’s center button to play the movie.
- View a previous image. Rotate the control wheel to the left.
- View the next image. Rotate the control wheel to the right.
- Change information displayed. While viewing a photo, press the DISP button (top directional button) repeatedly to cycle among the available displays: views that have no recording data, full recording data (f/stop, shutter speed, image quality/size, etc.), and a thumbnail image with histogram display. (I’ll explain all these in Chapter 2.)
- Delete current image. Press the lower-right button, marked with a C (Custom) label and trash can icon, to delete the currently displayed image.
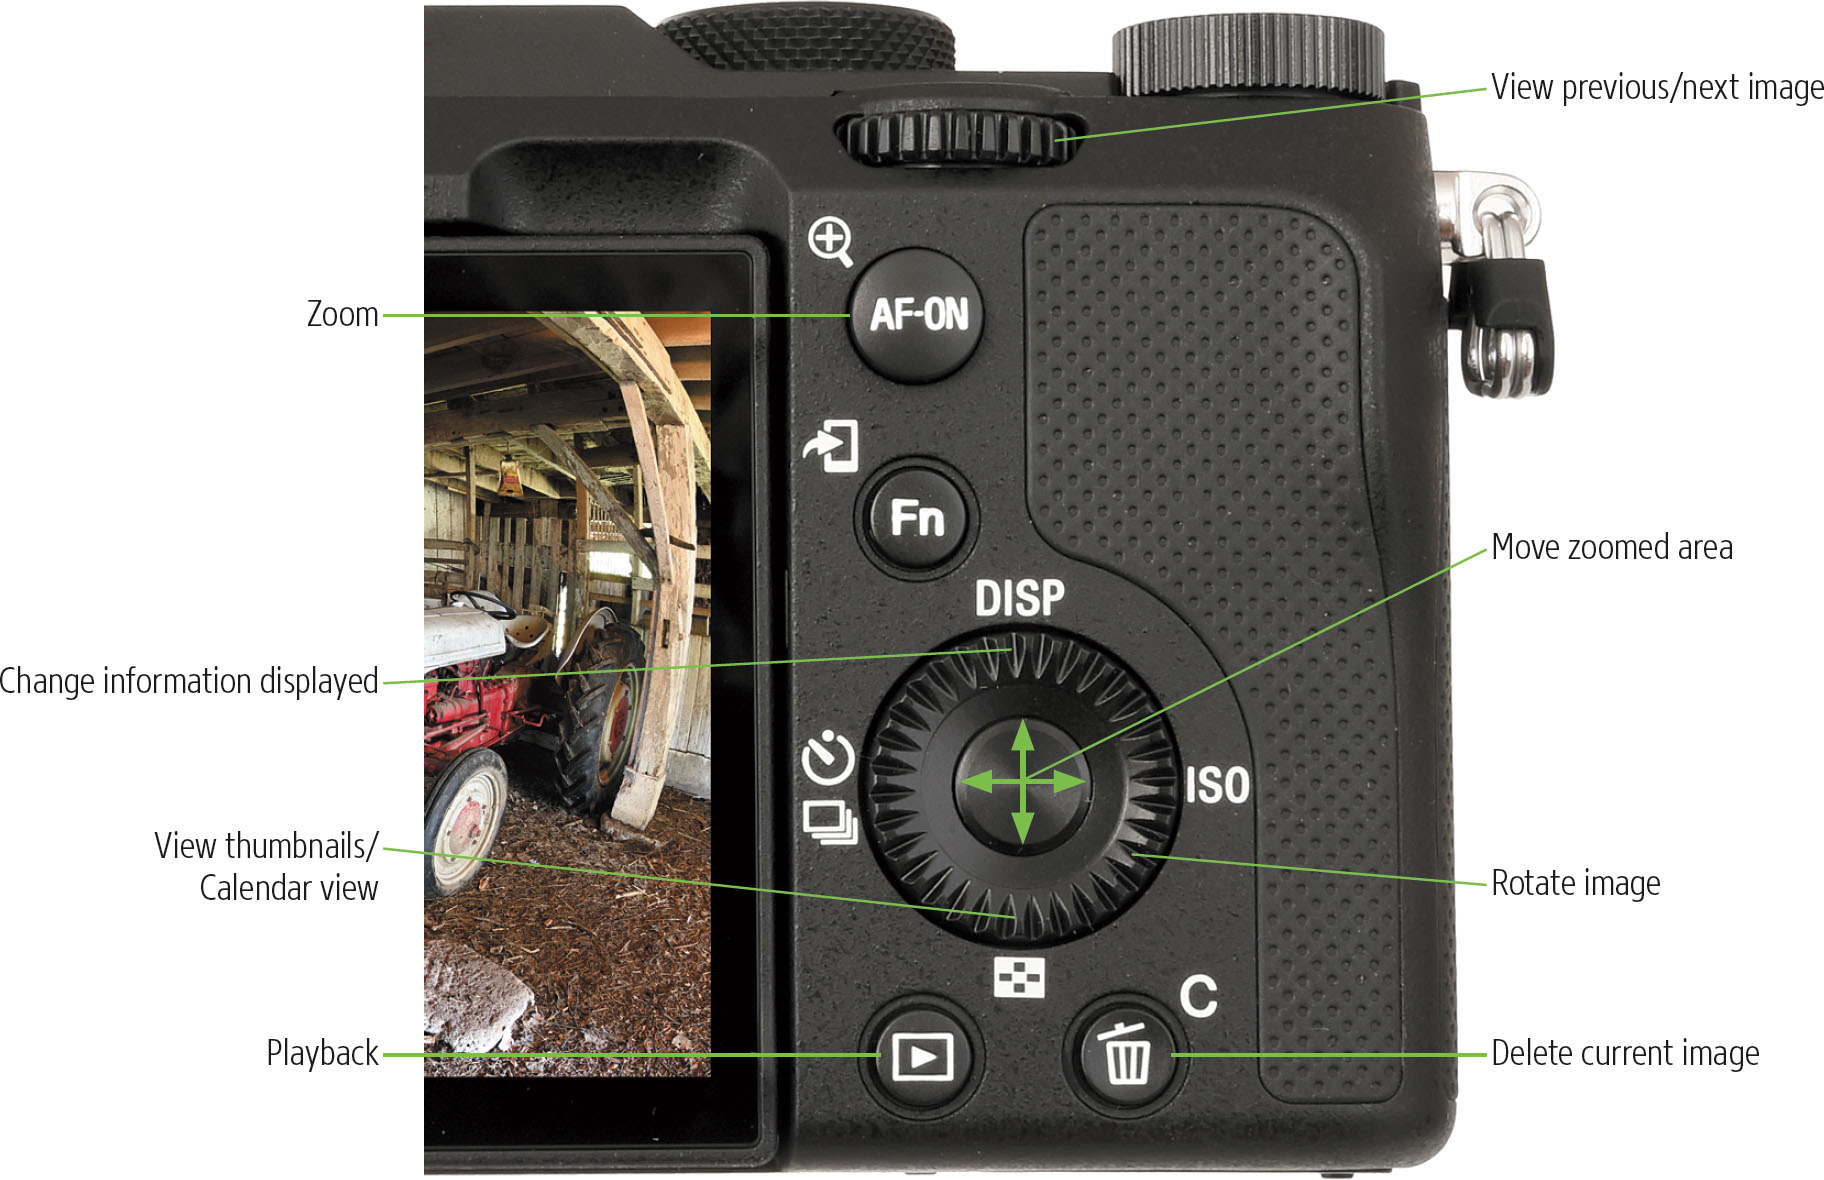
Figure 1.18 Review your images using the pertinent camera controls.
- Rotate image. While the image is displayed, press the MENU button and from the Playback 1 menu, select Rotate, followed by pressing the center button, to rotate the image on the screen 90 degrees. Successive presses of the center button rotate the image 90 degrees each time. (You won’t likely need this feature unless you have disabled automatic rotation, which causes the camera to display your vertically oriented pictures already rotated. I’ll explain how to activate/deactivate automatic rotation in Chapter 5.)
- Zoom. Press the AF-ON/Zoom button located to the right of the viewfinder window to zoom into the image. Rotating the control wheel on the back of the camera allows you to zoom in and out. You can also scroll around inside the image using the directional buttons. To exit this screen and return to normal view, press the MENU button.
- View thumbnails/Calendar view. While in Playback mode, press the Index/Down button to display an index screen showing either 9 or 25 thumbnail images (select the number using the Image Index option in the Playback 3 menu). Keep scrolling downward to view the thumbnails of the next images (assuming you have shot lots of photos). Scroll to the thumbnail of the photo you want to view and press the center button; the photo will then fill the screen. In default Date View mode, the a7C arranges index images by date shot, and includes a calendar view you can use to look for pictures taken on a specific date. (See Figure 1.19.) (When the left bar of the playback screen is highlighted, press the center button to toggle between Calendar and Date View modes.) You can also choose to play back images using Folder View or display only specific video file formats. I’ll explain those options in more detail in Chapter 6.

Figure 1.19 Viewing thumbnails (left) and calendar view (right).
Capturing bursts of shots in continuous shooting modes produces a lot of separate images—up to 10 frames per second. Sony lets you speed up picture review by optionally “nesting” each burst sequence into a single “stack,” which is represented by a single image overlaid on a “pile” icon. If you decide you do want to look at each image in the burst, press the center button to drill down into the stack, then press the left/right controls to view the images. Press the center button again to return to normal view. Enable the Display as Group in the Playback 3 menu to activate the stacking feature.
Transferring Files to Your Computer
The final step in your picture-taking session will be to transfer the photos and/or movies you’ve taken to your computer for printing, further review, or editing. (You can also take your memory card to a retailer for printing if you don’t want to go the do-it-yourself route.) Your a7C allows you to print directly to PictBridge-compatible printers, without downloading the photos to a computer and to create print orders right in the camera. It also offers an option for selecting which images to transfer to your computer.
For now, you’ll probably want to transfer your images by either using the USB cable from the camera to the computer or by removing the memory card from the a7C and transferring the images with a card reader. The latter option is ordinarily the best because it’s usually much faster and doesn’t deplete the camera’s battery. However, you might need to use a cable transfer when you have the cable and a computer but no card reader. (You might be using the computer at a friend’s home or the one at an Internet café, for example.)
Here’s how to transfer images from a memory card to the computer using a card reader:
- 1.Turn off the camera.
- 2.Slide open the memory card compartment door and press on the card to pop it up, so it can be removed from the slot.
- 3.Insert the memory card into a memory card reader accessory that is plugged into your computer. Your installed software detects the files on the card and offers to transfer them. The card can also appear as a mass storage device on your desktop; in that case, you can open that and then drag and drop the files to your computer.
To transfer images from the camera to a Mac or PC computer using the USB cable:
- 1.Turn off the camera.
- 2.Open the lower port door on the left side of the camera and plug the USB cable furnished with the camera into the USB port inside that door. (See Figure 1.6, shown earlier in this chapter.)
- 3.Connect the other end of the USB cable to a USB port on your computer.
- 4.Turn on the camera. From this point on, the method is the same as in entry 3 in the card reader list above.
Wireless File Transfer
Your a7C is also equipped with built-in Wi-Fi which provides many options, including a method for wireless transfer of image files to a Mac or Windows computer when connected to a wireless network. This is a multi-faceted topic, so I won’t begin to discuss it here; instead, you’ll find full coverage in Chapter 5.