
As I’ve noted several times in this book, the a7C boasts professional-level video features not found in most consumer- or even some pro-oriented digital still cameras. Many of those looking for an advanced Sony camera for video may prefer a dedicated camcorder, like the Sony PXW-FS5M2 4K XDCAM Super 35mm Compact camcorder (about $4,750), which uses E-mount lenses, or the 4K-capable Sony AX1 Professional Handycam ($4,500), which has a fixed 20X zoom lens. Even so, the a7C is no slacker when it comes to capturing clips that can be assembled into polished video productions.
This chapter will introduce you to some of the most important concepts you’ll need to learn as you continue your educational journey toward professional cinematography. Some of this will seem a little technical to those who are just learning about video, so if you’re not going to be venturing into serious movie making soon, you might want to skim through this chapter simply to gain some background. As I mentioned when I talked about the a7C’s backside illuminated sensor, I don’t normally venture this deeply into tech territory in my books, but the a7C isn’t an ordinary camera!
More on Sensors and Crop Factors
In Chapter 10, under the “Lens Craft” section, I described some of the reasons why the relatively larger sensor size of an APS-C still camera like the a7C provides video shooters with some selective focus advantages when compared to the much smaller sensor found on many professional video cameras in the past. I’ll be explaining the concept of crop factor in detail in Chapter 12. Both aspects are important in the video world, but with a few variations caused by the differences in how video is captured and used.
Sensor Size and Crop Factors
Sensor size is important because smaller sensors use lenses with shorter focal lengths to fill their frames, and the shorter the focal length, the larger the depth-of-field. That’s why point-and-shoot cameras (or smartphones), with their minuscule sensors, can produce acceptably sharp images for subjects located a few inches from the lens out to infinity. Conversely, because a normal lens on an APS-C camera is in the 38mm range, and on a full-frame camera is roughly 55mm, a full-frame camera like the a7C has even less depth-of-field for the same field of view than the a7C.
However, the a7C does provide selective focus options that are definite creative pluses for videographers. We’ve all seen shots in which focus initially emphasizes some foreground object that’s sharply rendered, and then the camera operator pulls focus out to a more distant subject, which suddenly appears in great detail. Larger sensors make such techniques easier, which is why current video cameras are often segregated into small sensor and large sensor categories. The Sony PXW camcorder I mentioned earlier has a large APS-C sensor while the Sony AX1 Professional Handycam has a smaller 1/2.3-inch sensor. (Video cameras dating back to the dawn of television have used the diameter of the video tube as a measurement.)
Figure 11.1 shows the relative size of the 4K and/or full HD capture area of some typical sensor sizes, starting with the a7C’s full-frame sensors at upper left, the “small” sensor of typical pro cameras and the 1/2/3-inch sensor of Sony’s least expensive pro camera at right, and a typical APS-C sensor and the RED Raven “large” sensor shown at the bottom. The cropping effect becomes more apparent when you’re looking for a wide-angle perspective.

Figure 11.1 Relative video capture areas for example sensor sizes.
TIP The a7C uses the full width of the sensor to record full HD video and 4K video at 24 fps but uses a slight 1.2X crop (not reflected in the figure) when capturing at 30 fps. You’ll get the most detail using 4K/24p, at the cost of slightly more rolling shutter effect. Switch to 4K/30p, and rolling shutter is less of a problem, but your field of view will be reduced by the 1.2X crop factor.
The crop factor is important because with any given lens, the field of view will vary depending on how much of that lens’s coverage area is used to capture video. (If you’re completely unfamiliar with crop factors, skip ahead to Chapter 12 and read about them.) Still photos can be shot in both vertical or horizontal orientations, and most often using the 3:2 aspect ratio used outside the Micro Four Thirds (4:3) world. So, the crop factor for stills is calculated by comparing the diagonal measurement of the frame with the diagonal of the traditional 35mm frame.
For video, clips are normally captured with the camera in a horizontal orientation (at least, outside the realm of the smartphone), and the proportions or aspect ratio of the video frame can vary, with 16:9 being the standard for standard HD, full HD, and 4K (Ultra HD) video (and beyond).
The 16:9 proportions work out to roughly 1.78:1, which is close enough to the 1.85:1 widescreen cinema aspect ratio that it’s easy to show movies captured in either aspect ratio on displays compatible with either. Given the 16:9 standard, it’s common to represent the resolution of a video image by its horizontal measurement and scanning method: that is, 720p, 1080p, and 4K (actually 3,840 pixels with your Sony a7C camera; 4,096 pixels with some other 4K devices) for progressive scan (p) video.
Other Important Parameters
But wait, as they say, there’s more! The last sections of this chapter will explain some of the other technical details of shooting video, providing enough detail, I hope, to get you reading more complex tomes that cover this information in depth.
Frame Guides
Frame guides are a useful way of visualizing the area that will be captured within a larger visible display. In ancient times, interchangeable-lens rangefinder film cameras that used an optical viewfinder would have bright frame outlines appear, often automatically when a particular lens was mounted on the camera, and sometimes through the use of an attachment that fit over the built-in viewfinder. In the digital age, frame guides have been popular with digital cameras that use an optical viewfinder, providing a masked off display to preview the actual image area that will be captured in crop or video modes. Cameras with electronic displays, like the a7C, don’t necessarily need frame guides, because the capture area can be enlarged and masked off electronically to show only the actual image area.
Even so, frame guides are a popular tool for videographers, because they allow viewing the area outside the actual frame that will be captured (the “look-around area”) so you can monitor moving subjects before they enter the frame. In professional productions, it’s useful to look at the region outside the captured frame to detect when boom microphones, careless crew members, or other objects threaten to intrude on the frame.
The a7C cameras offer a variety of frame guides that can be turned on or off in the Camera Settings II menu, including grid lines, aspect ratios, frame center markings, and “safety” areas. These markers appear only on the EVF or LCD monitor, and not in the captured video itself (see Figure 11.2 for example placement).
- Marker Display. This Camera Settings II-03 (Movie 3) menu entry works in conjunction with the Marker Settings option (described next), and simply turns settings on or off.
- Marker Settings. This menu entry allows you to specify Center, Aspect Ratio, Safety Zone, or Guideframe. Each can be specified individually and turned on or off independently, so you can display any, all, or none.
- Center. This crosshair can be used to determine whether your subject is placed in the exact center of the screen.
- Aspect Ratio. Use these guides to frame your image so the important subject matter is contained within a desired aspect ratio, or to frame the image for later cropping to that aspect ratio. You can select from 4:3, 13:9, 14:9, 15:9, 1.66:1, 1.85:1, or 2.35:1. These conform to various movie formats in common use. (Star Wars, for example, was filmed in CinemaScope, with a 2.35:1 aspect ratio.)
- Safety Zone. It’s common to shoot movies knowing in advance that they will be cropped down eventually for display in a slightly different format. The director simply makes sure that the important parts of the frame are included in the “safety zone” that will never be cropped out. For example, you wouldn’t want to put two characters who are talking to each other at opposite ends of the entire frame but would instead locate them in the safety zone so both would be visible. Your camera’s safety zone display can be set for 80 percent or 90 percent of the frame to represent the area that will always be shown when the movie is viewed on a standard HDTV.
- Guideframe. This grid is used to help you determine whether horizontal and vertical lines are skewed and can also be used as a Rule of Thirds guide for composition.
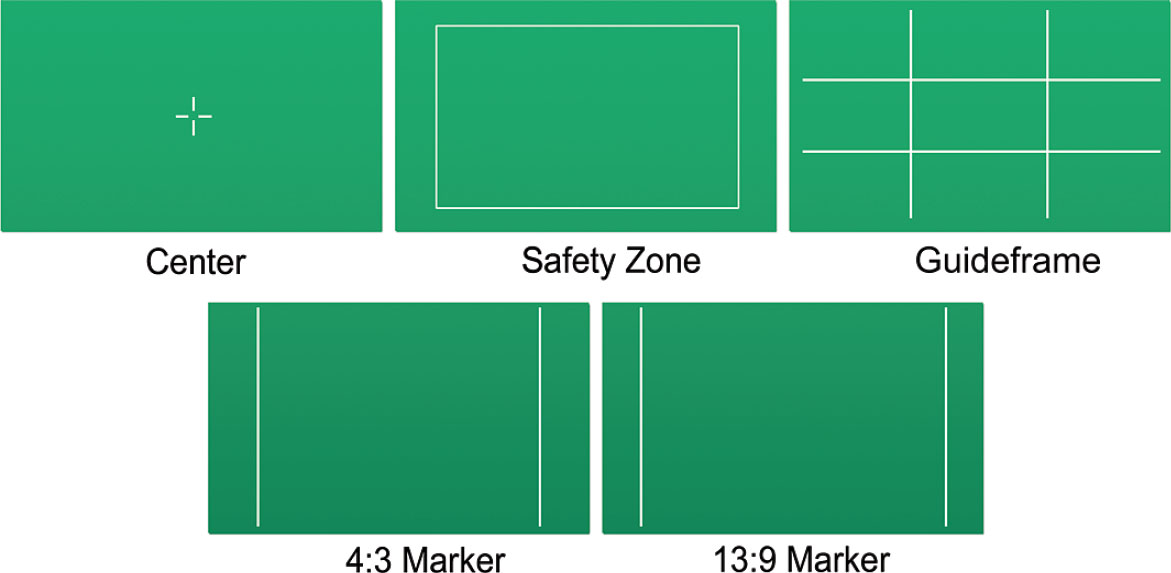
Figure 11.2 Video guide markers.
Time Codes and User Bits
The Time Code (TC) and User Bit (UB) settings are information that can be embedded and used to sync clips and sound when editing movies. Advanced video shooters find SMPTE (Society of Motion Picture and Television Engineers)-compatible time codes embedded in the video files to be an invaluable reference during editing. To oversimplify a bit, the time system provides precise hour:minute:second:frame markers that allow identifying and synchronizing frames and audio. The time code system includes a provision for “dropping” frames to ensure that the fractional frame rate of captured video (remember that a 24 fps setting actually yields 23.976 frames per second while 30 fps capture gives you 29.97 actual “frames” per second) can be matched up with actual time spans.
Using time codes and user bits is a college-level film school class on its own, but I’m going to provide a quick overview to get you started. If you’re at the stage where you’re using time codes, you don’t need this primer, anyway. However, the a7C’s TC/UB Settings entry, which Sony has hidden away in the Setup 3 menu, is grayed out if the mode dial is not set to Movie mode. Your choices include the following options:
- TC Preset. Sets the time code. If you’ll be shooting 60i/50i, you can choose time codes from 00:00:00:00 (hours, minutes, seconds, frame) to 23:59:59:29 or 23:59:59:24, respectively. With 24p, you can set multiples of four from 0 to 23 frames. If you own the RMT-VP1K remote commander, the time code can be reset to zero using a button on the controller.
- UB Preset. Sets the user bit, which is a marker you can insert in your video, say to designate a scene or take. There are four digits in each user bit (for example, 01:02:03:04), and the digits are each hexadecimal in nature, so you could create a code like C0 FF EE if you were feeling facetious.
- TC Format. Sets the recording method for the time code. You can choose from DF (drop frame) or NDF (non–drop frame) formats. Drop frames are a way of compensating for the discrepancy between the nominal number of frames per second and the actual number (for example, 30 fps yields 29.97 actual frames per second, and 60 fps gives you 59.95 frames per second). In drop-frame format, the camera will skip some time code numbers at intervals to eliminate the discrepancy. The first two frame numbers are removed every minute except for every tenth minute (think of it as a leap year). You may notice a difference of several seconds per hour when using the non–drop frame option.
- TC Run. Sets the count-up format for the time code. You can choose Rec Run, in which the time code counts up only when you are actually capturing video, or Free Run (also known as Time of Day), which allows the time code to run up even between shooting clips. The latter is useful when you want to synchronize clips between multiple cameras that are shooting the same event. When using Free Run, even if the cameras record at different times, you’ll be able to match the video that was captured at the exact same moment during editing.
- TC Make. Sets the recording format for the time code on the recording medium. Choose Preset to record a new time code or Regenerate to read the previous time code setting and record the new time code consecutively. When Regenerate is selected, the time code advances no matter what TC Run setting has been selected.
- UB Time Rec. Sets whether to record the time as a user bit.
Picture Profiles
If you’ve been taking photos for a while, you’re probably familiar with all the fixes and tweaks you can do with your still images within image editors like Photoshop. It’s relatively easy to adjust color tones, contrast, sharpness, and other parameters prior to displaying or printing your photo. Movies are a little trickier, because any given video typically consists of thousands of individual photos, captured at 24 frames per second (or faster), with the possibility that each and every frame within a particular sequence might need fixes or creative adjustments.
Shooting video does not preclude doing post-processing during editing. Indeed, many videographers deliberately shoot relatively low-contrast video in order to capture the largest dynamic range possible, and then fine-tune the rendition later using their editing software. Picture Profiles let you do that—and also allow you to adjust your camera so that the video you capture is pre-fine-tuned in order to reduce or eliminate the amount of post-processing you do later.
The a7C camera is furnished with ten “canned” picture profiles, which you can think of as Creative Styles for movies. The parameters included in these profiles can be further adjusted by you to better suit the “look” you are striving for in your videos. You can connect your camera to a TV or monitor using the HDMI Out connector and an HDMI cable, view the image produced by the camera on the larger screen, and then make adjustments to the picture profile. I described the process in how-to form briefly in Chapter 3.
Needless to say, creating and using Picture Profiles is a highly technical aspect of video making, at least in terms of the amount of knowledge you need to have to correctly judge what changing one of the parameters will do to your video. I hope to get you started with a quick description of what those parameters do, so you’ll have a starting point when you start to explore them.
Gamma, Gamma Ding Dong
The ten Picture Profile presets in the Camera Settings I-11 (Color/WB/Image Processing 1) menu already have their own default values, each adjusted for a particular type of shooting, using various gamma and color tone settings. Thanks to our evolutionary heritage, humans don’t see differences in tones in a linear manner. An absolutely smooth progression of pixels from absolute black to pure white (with 0 representing black and 256 representing white) would not look like a continuous gradient to our eyes. We’d be unable to detect differences in shadows and highlights that have the same change in tonal values as midtones. So, everything from computer monitors to printers use a correction factor (gamma) to cancel out the differences in the way we see tones.
This correction takes the form of a curve, called a gamma curve. If you remember your geometry, the x and y axes on a graph are used to define the shape of a curve, and in the case of gamma curves, the values use logarithmic units (ack!) to define the slope. That’s where the terms S-Log2, S-Log3, HLG and other mind-numbing jargon comes from. The whole shebang is needed to reconcile the ability of sensors to capture, video systems to display, and printers to output a range of tones in a linear way with the actual tones we perceive non-linearly. Gamma correction and gamma compression are used to help make sure that what we get is what we see. While gamma correction between computer platforms (that is, between Macs and PCs) may be different, the actual gamma values defined by video standards like NTSC and PAL are fixed and well-known. Picture Profiles allow you to configure your camera to capture video using a desired amount of gamma and color tone correction.
S-Log2/S-Log3/HLG
S-Log2 is a log gamma curve that is used when the video will be processed after shooting and captures a much larger range of tones (as many as 14 stops!) than standard gamma curves. Indeed, the tones captured using S-Log2 can’t be displayed in all their glory on a standard TV or monitor, which are generally adjusted for the broadcast television BT-709 standard. Instead, the unprocessed video will look darker and lower in contrast because all those tonal values have been squeezed into the BT-709 (also called REC-709) range.
Video signals normally encompass brightness levels from 0 percent to 109 percent (you read that right: modern video cameras can record detail in highlights that are actually brighter than was possible when the video age began; the old scale was retained, reminiscent of Nigel Tufnel’s 11 setting on his amp). However, even the 109 percent provides too much of a limitation; cameras can capture detail in highlights that are even brighter than that. So, a log gamma curve (in this case one called S-Log2) is used to compress all that image detail to fit into the space allowed for conventional video signals. Post-processing in a video editor allows working with all that information and produces a finished video that contains the filmmaker’s selection of tonal values in a form that can be displayed comfortably. The full dynamic range can be used to produce the finished movie. You might find that useful when exposing for highlights while avoiding blowing out the sky, or for capturing detail in shadows without losing mid tones and highlights.
The Picture Profile 7 (PP7) is already set up for S-Log2 and should be your choice if you want to work with that curve. I’ve oversimplified things a bit, because there are many other great things you can do with S-Log2, such as overexposing or “pushing” your video to reduce noise (but at the risk of losing some detail in brighter skin tones), and then output (called “grading”) to produce an optimized final image. Picture Profiles 8 and 9 (PP8 and PP9) are set up for S-Log3, which is a gamma curve optimized to look more like what you would have gotten if you shot film. Both also assume your video will be processed for your final production. HLG/HLG1-HLG3 gamma curves are provided for various high-dynamic range formats.
I know this chapter doesn’t tell you everything you need to know to take the next step in movie making with your a7C camera, but my intent was to introduce you to enough of your Sony’s capabilities to spur additional exploration of this exciting creative arena.
Movies captured using gamma profiles appear to be very low in contrast until processed using software on your computer. Because Picture Profiles extend the dynamic range of recorded video, the clips normally appear very low in contrast during review in the camera. The Gamma Display Assist entry in the Setup 1 menu allows you to adjust playback when viewing images captured using Picture Profiles, so that the appearance on the a7C’s EVF and LCD appears more natural, which is useful if you use live view to evaluate your captures. The display is not changed if you’re viewing through a device plugged into the HDMI port, and you’ll still need to process the video in your video-editing software. You can turn Gamma Display Assist off, allow the camera to select an appropriate adjustment automatically, or manually set the assist feature to use the gamma you are using. Your choices include S-Log2 and S-Log3, and four HLG (Hybrid Log Gamma) settings, which are used for delivery of video to high dynamic range TVs that are currently the rage. (More on HLG later in this chapter.) These are a bit esoteric for the average a7C user who isn’t heavily into professional-quality video capture.
More on 4K Video
It’s probably a great time for you to start working with 4K video, especially since 8K video is already on the way. In practice, shooting 4K is not much different than shooting full HD or standard HD. The only changes you might make involve your realization that as long as you are capturing higher-quality video, you might as well upgrade your technique (and, perhaps, your auxiliary equipment).
While 4K video still seems new and exotic, given the usual pace of technology, it’s very likely that your next HDTV will have 4K (or even 8K) capabilities (if your current set does not), and cable/satellite/streaming systems as well as Blu-Ray discs will all make the leap sooner than any of us expect.
Shooting in 4K is still in its infancy: few of us own 4K high-definition televisions that allow playing back 4K content at its full resolution. However, the number of 4K-capable TVs is growing all the time, and there are some definite benefits to shooting ultra-high resolution now, even before the ability to take advantage of the format is widespread. Simply speaking, if you shoot 4K and then convert it to conventional full HD, your video will generally be much higher in quality than if you originated in 1920 × 1080 resolution. All you need is editing software like Adobe Premiere Pro, Final Cut Pro, or Corel Video Studio that can work with and edit your 4K clips.
The key thing to know is that your a7C can record 4K video internally, export 4K video to an external recorder, or to both simultaneously. If you want to record only to the memory card, you don’t need to do anything special other than select XAVCS 4K under the File Format entry and your desired frame/bit rate under Record Setting (both in the Camera Settings II-1 (Movie 1) menu).
If you prefer to output your 4K video to the HDMI port (say, to a video recorder), or HDMI port and the memory card, you need to visit the 4K Output Selection entry in the Setup 3 menu. Set the mode dial to Movie and attach your camera to the external device using a micro HDMI cable to make the setting available. Since the length of your recording time is essentially limited only by the a7C’s ability to dissipate heat and avoid shutdown from high sensor temperatures (potentially a problem when shooting 4K video), the extra storage of an external monitor can come in handy.
As I mentioned in Chapter 10, you will probably want to use an external microphone, either plugged into the a7C’s microphone jack or connected through the multi interface shoe on top of the camera. As I noted, a move to professional microphones using the XLR interface might also seem prudent.

TIP If you read my Chapter 4 advice on redefining the available options in the Function menu, consider using Function Menu Set in the Camera Settings II-09 (Custom Operation 1) menu if you intend to shoot a lot of video. You can define separate Function menus for still photography and movie shooting. Among those you might consider substituting are Zebra settings, Audio levels, and Color balance/temperature settings (remember it’s more difficult to adjust color in video than in individual still photos). Or, you might want to add Picture Profiles, Wind Noise Reduction, or the Movie setting (which allows you to switch among P, A, S, or M movie exposure modes). Marker Display or TC/UB settings are other entries you might want to add to your Function menu.
Using an External Recorder
If you’re truly becoming an advanced videographer, you’ll probably be working with the a7C’s ability to output “clean” non-compressed HDMI video to an external monitor or video recorder, including the Atomos Shogun lineup, which includes versions that are quite affordable, at least in terms of professional video gear. You can choose models both with and without an external LCD monitor, and capture to solid-state drives (SSD), a laptop’s internal or connected hard drive, or to CFast memory cards (the latter chiefly as a nod to those still using the “fast” version of Compact Flash cards). Such equipment allows very high transfer rates and is certainly your best choice if you’re shooting 4K video.
Probably the best of the lot for a7C owners is the Atomos Ninja V, an extremely portable unit with a 5.2-inch screen and a $600 price tag that’s currently the lowest for this type of device. Its size is a definite plus—if you’re shooting video with a smaller, lightweight camera, you’re going to need an equally compact recorder/monitor, such as the roughly 13-ounce Ninja V. Add a battery, HDMI cable, and a 2.5-inch solid-state drive, and you’re ready to go.
The Ninja V has HDMI input and output jacks on its left edge, which you can see in Figure 11.3. The latter allows you to daisy-chain an even larger monitor or other device. A power button, headphone jack, microphone/audio input, and remote jack reside on the other edge. The touch screen enables you to view your video and access the monitor/recorder’s menus and controls, which is convenient (except outdoors in cold weather when you’re wearing gloves and might wish you had a few buttons to press instead). The only other “defect” of the unit is the noise produced by its fan; even when you’re using an external microphone with your a7C, the fan noise may be picked up in a quiet room.
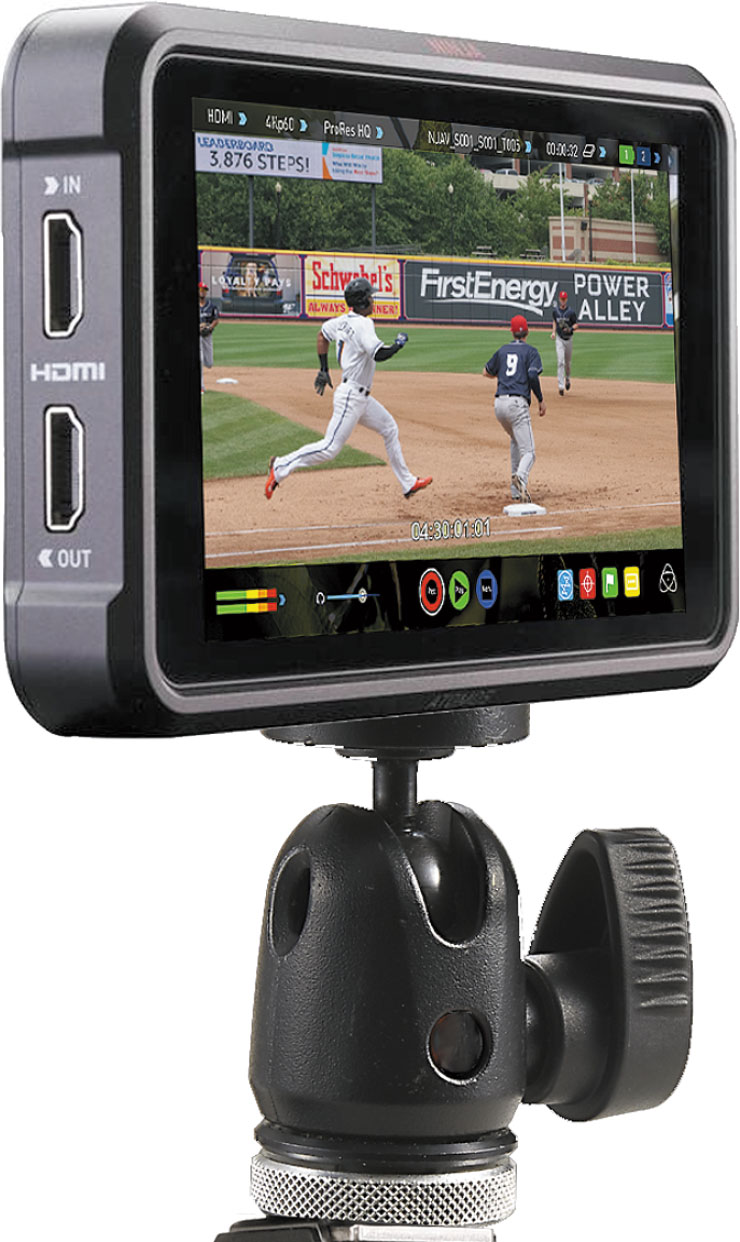
Figure 11.3 The Atomos Ninja V monitor/recorder.
Why use an external monitor/recorder like the Ninja V, when your a7C has its own nifty monitor and can store quite a lot of video on UHS-II-compliant memory cards? From a monitor standpoint, an external unit’s screen is larger, easier to see, and offers more flexibility in positioning. The a7C’s screen tilts up or down; mounted on a ballhead like the one in the figure, you can adjust an external screen to any angle, including reversing it to point in the same direction as the lens, so vloggers can monitor themselves as they record or stream their video blog.
But the best value may come from the recording capabilities of such a device. Internal video is saved to your memory card in the standard H.264/MPEG-4 Part 10 format, which compresses that stream of images as much as 50X. That video has only 8 bits of information: good, but somewhat limited in the dynamic range that can be included. Depending on your scene, you may lose some detail in the highlights or shadows.
Fortunately, the a7C can also direct its video output through the HDMI port in “clean” uncompressed 4:2:2 8-bit UHD (ultra-high-definition) resolution. That’s correct. Sony still doesn’t offer external 10-bit output, which is unfortunate: 8-bit output gives you 16.8 million possible colors; 10-bit output is capable of more than 108 billion hues. Nor is 60p 4K video available. However, for most of us who aren’t professional videographers, the a7C’s output should be sufficient, especially since the available Picture Profiles include four HLG (hybrid log gamma) curves suitable for HDR (high dynamic range) recording.
TECH ALERT
Unless you’re venturing into professional videography, you probably aren’t obsessed with all those numbers in the previous paragraph. However, if you’re terminally curious, the important things to keep in mind are:
- Transfer bit rate. This is the speed the a7C outputs its video to your memory card or external recorder. High transfer rates (such as 100 megabits per second) require fast memory cards; an external recorder should be able to suck up video as quickly as your camera can deliver it.
- Encoding. Although the “clean” video output to the HDMI port is not compressed, it is encoded using a procedure called chroma subsampling, which does reduce the amount of information that needs to be transferred. Chroma subsampling takes advantage of the fact that human beings don’t detect changes in color (chroma) as easily as they do for brightness (luma). The designation 4:2:2 simply indicates that the full amount of brightness information is passed along (“4”) while the two chroma values are sampled at half that rate (“2:2”). Subsampling in this way reduces the bandwidth of the otherwise uncompressed video signal by as much as one-third with no visual difference.
The HDMI port on the a7C accepts an HDMI mini-D cable. I prefer to purchase value-priced third-party cables, which I buy in convenient lengths of 3 feet, 6 feet, 10 feet, or longer. The cable can be connected to the monitor, recorder, or other device of your choice. (Some of the screen shots in this book were output to a Blackmagic Intensity shuttle that allowed capturing stills of the a7C’s menus, live view, and video.)
When it comes to saving your 4K video files, you have three destination combinations:
- Capture to memory card (only). You can output your 4K video to a memory card in your a7C, but it really should be a fast UHS-I card. Because 4K video files can be so massive, you’ll want a 64GB to 128GB (or larger, when they become affordable) card to store your movies. This option is the least expensive, but it comes at a cost. The camera compresses your 4K video, using a maximum 100MB/second transfer rate, so a bit of quality is lost. If you’re planning on editing the video and ending up with 1080p HD clips, you probably won’t notice the difference, especially since your 4K-to-HD conversion will usually have more detail than a straight 1080p movie.
- Capture to an external recorder (only). If you’re really serious about video, you’ll want to consider using an external recorder, linked through the a7C’s HDMI port. The video is not compressed, and you can take advantage of the fastest transfer rates to optimize quality.
- Capture to both. If you’re equipped with a very fast memory card and external recorder, you can opt to save your video to both destinations.
And, as I noted in Chapter 6, the 4K Output Selection entry in the Setup 3 menu allows you to specify exactly where and how your 4K video is captured when using an external recorder. To recap, you have four choices:
- Memory Card+HDMI. A 4K movie in 30p is saved on the camera’s internal SDXC memory card and output to the external recorder. This option gives you two copies, including one you can review right in the camera, and a second on your external recorder.
- HDMI Only (30p). A 4K movie in 30p is output only to the external device, and not recorded on your memory card. HDMI Info. Display is disabled.
- HDMI Only (24p). A 4K movie in 24p is output only to the external device. HDMI Info. Display is disabled.
- HDMI Only (25p). If the NTSC/PAL Selector described earlier is set to PAL, you can use this option to shoot a 4K movie in 25p, and output only to the external device. HDMI Info. Display is disabled.