
A huge number of lenses are now available in Sony FE-compatible mounts, a dramatic increase in number and variety since the company introduced its first full-frame E-mount camera in October 2013. Indeed, a host of third-party lens manufacturers, including Zeiss, Sigma, and Tamron have joined the fray, so that today your a7C boasts the largest range of compatible lenses of any competing lineup. The number of versatile, high-quality FE-mount lenses is growing rapidly.
If you’re willing to use an adapter, there are more than 100 different full-frame lenses in Sony/Minolta A-mount, Nikon F-mount, or Canon EF-mount—often available at bargain prices—that can be used on your a7C, again, with autofocus and autoexposure. And the number of lenses that can be used with manual focus and Aperture Priority autoexposure using adapters for Nikon, Yashica, Contex, Contarex, Alpha, and other types of lenses is mind-boggling. Indeed, Pulitzer Prize–winning photographer (and Sony guru) Brian Smith has called the Sony a7 product line the “universal mount” cameras.
This chapter will help you wend your way through the confusing world of lenses for the a7C. Before we get into the actual lenses themselves, it may be useful to explore some aspects that affect how you choose and use optics.
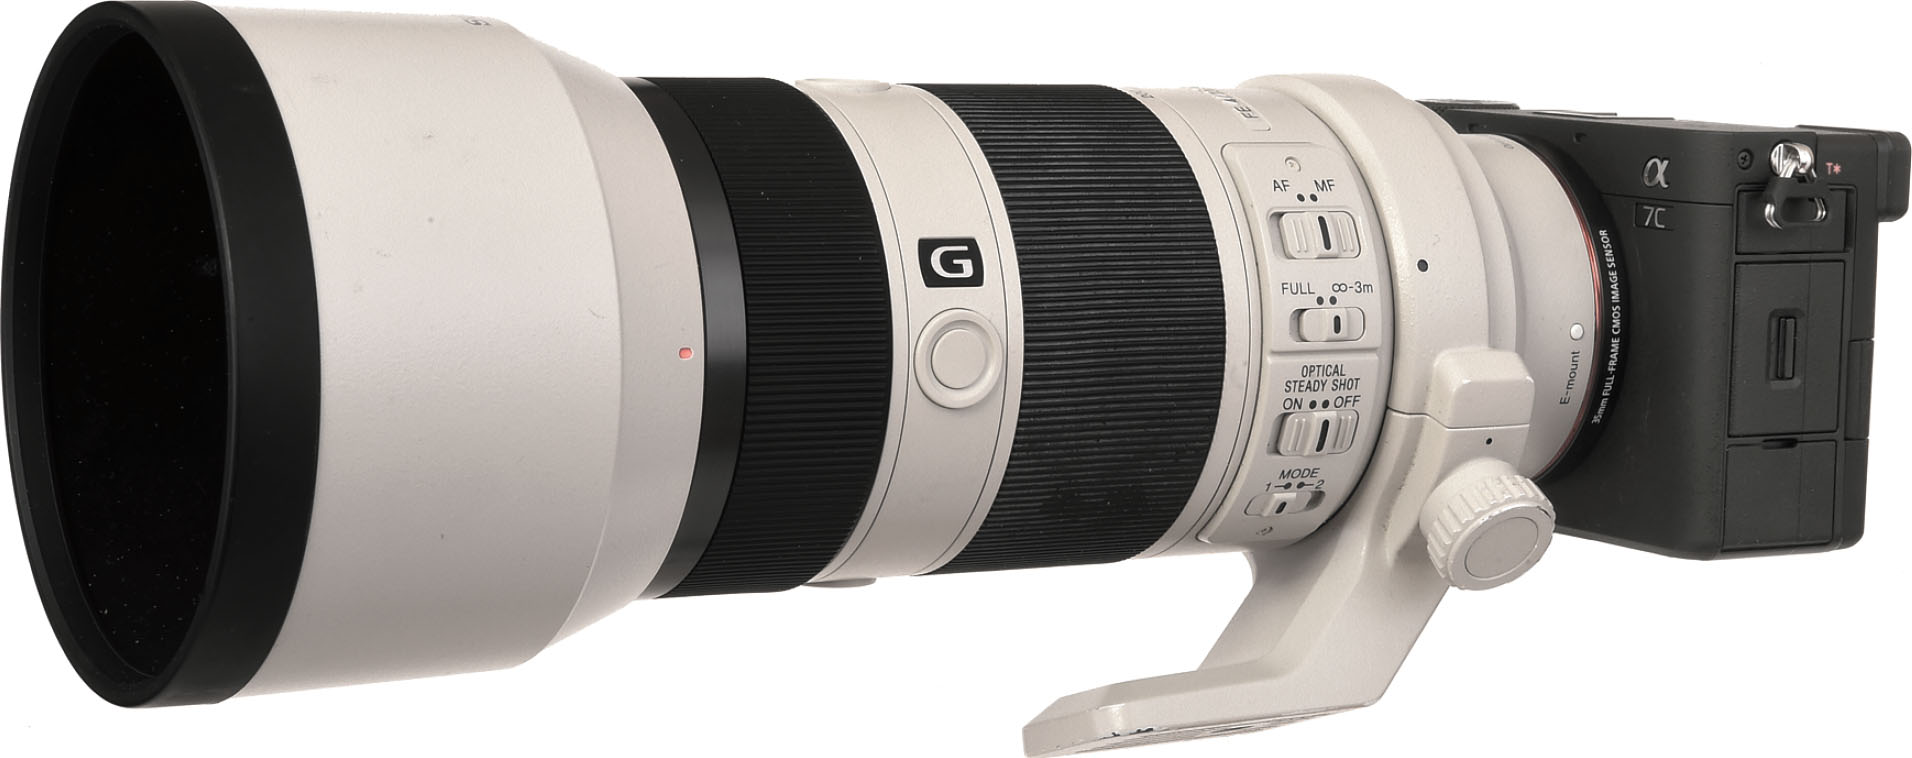
Figure 12.1 A full range of FE-mount lenses, including this Sony FE 70-200mm F4 G OSS, work well on the a7C.
Don’t Forget the Crop Factor
If the a7C is your introduction to full-frame photography, you may be wondering about the term crop factor, or, perhaps, alternate nomenclature such as lens multiplier or focal length multiplication factor. They’re used to describe the same phenomenon: the fact that cameras that do not have a full-frame sensor provide a field of view (or scene coverage) that’s smaller than what you get with a camera employing the larger sensor. The a7C (as well as numerous other cameras of several brands) uses a sensor that’s approximately 24mm × 36mm (roughly 1.0 × 1.5 inches) in size. Many other digital cameras, however, use a smaller so-called APS-C sensor that measures roughly 16mm × 24mm. In comparison, the APS-C sensor’s field of view is cropped. While some interchangeable-lens cameras (ILC) from other vendors, including Olympus and Panasonic, may use even smaller sensors (with even greater cropping effect), the Sony ILC product line consists entirely of full-frame and APS-C models if you count both A-mount and E-mount variations.
In practical terms, let’s assume you’re using a 200mm lens on a full-frame Sony a7C; you get a field of view (measured diagonally) of a little more than 12 degrees. But if you use a 200mm focal length lens on an APS-C camera, like the Sony a6600, the field of view is roughly 8 degrees because the smaller sensor records only a part of the image that the lens projects. Knowledgeable photographers often discuss this effect as the crop factor and you’ll often find a reference in lens reviews to a focal length equivalent, such as 1.5X. In other words, a 200mm lens used on an APS-C camera (or the a7C when in APS-C/Super 35mm mode) is equivalent to a 300mm focal length on a full-frame camera. The most accurate expression to describe this concept might be something like field-of-view equivalency factor.
Figure 12.2 quite clearly shows the phenomenon at work. The outer rectangle, marked 1X, shows the field of view you might expect with a 200mm lens mounted on a full-frame digital model like the a7C. The rectangle marked 1.5X shows the field of view you’d get with that 200mm lens installed on a camera using the APS-C format (or an a7C in APS-C/Super 35 mode). It’s easy to see from the illustration that the 1X rendition provides a wider, more expansive view, while the other view is, in comparison, cropped.
In any event, I strongly prefer crop factor to focal length multiplier, because nothing is being multiplied (as I said above). A 200mm lens doesn’t “become” a 300mm lens; the depth-of-field and lens aperture remain the same. (I’ll explain more about these later in this chapter.) Only the field of view is cropped. Of course, the term crop factor has a drawback: it implies that a 24mm × 36mm frame is “full” and anything else is “less than full.”
I get e-mails all the time from medium-format photographers who own cameras like the Hasselblad H6D-50c, which has a 43.8mm × 32.9mm sensor that’s 67 percent larger than “full frame.” By their logical reckoning, the 24mm × 36mm sensors found in full-frame cameras like the Sony a7C are “cropped.” Take a look at the outer, darkened area within the red rectangle in Figure 12.2. That represents the whopping 104-degree field of view you’d get with a Hasselblad HCD 24mm f/4.8 ($6,295; body an extra $14,495 if you’re compiling a holiday gift list).
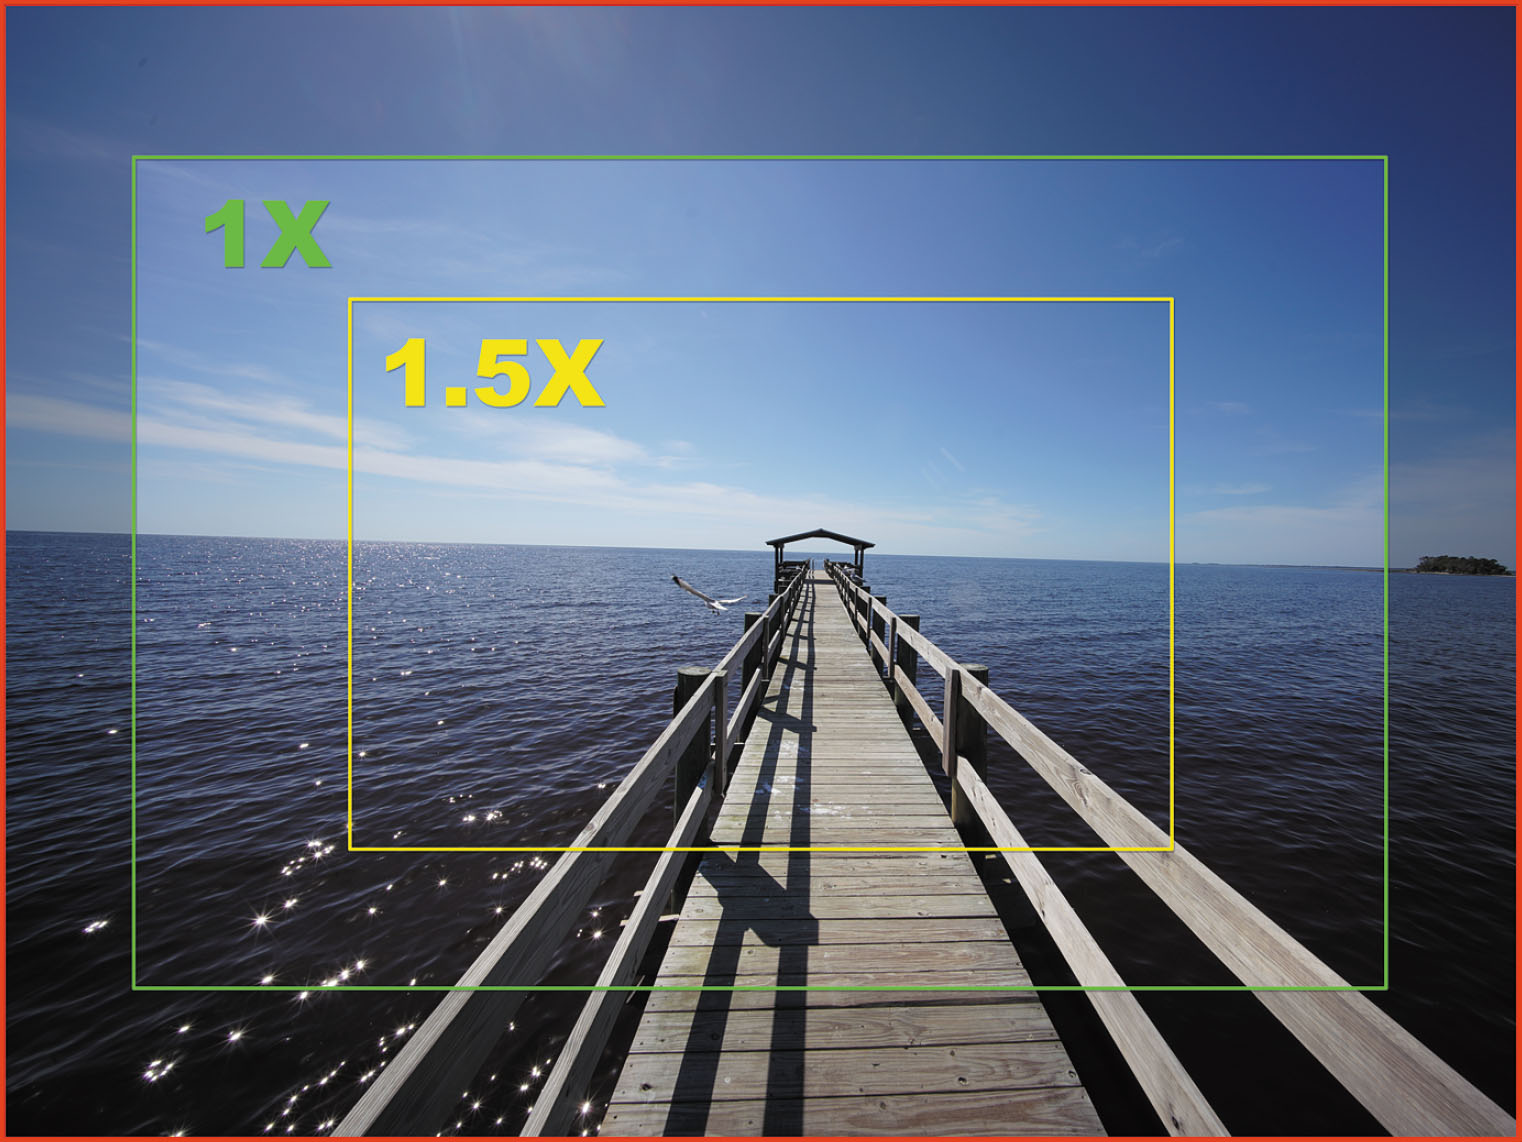
Figure 12.2 This image illustrates the field of view provided by a full-frame camera like the Sony a7C (1X) with a 200mm lens, as well as the field of view you’d get when using a camera with the smaller sensor (1.5X crop) like the Sony a6600.
The Crop Factor and the a7C
So, what should the crop factor mean to you? Here’s a checklist of things you should consider:
- Reduced resolution. This is the biggie. In crop mode, your images will have greatly reduced resolution, producing 10MP shots with the a7C. That’s generally sufficient only for certain applications, such as real estate photography, or images that will only be posted on web pages or emailed.
Crop mode actually works better with cameras like the a7R IV: its 60MP of resolution is reduced to a still-respectable 26 megapixels when cropped. So, the “extra telephoto reach” effect on your longer lenses has little application for a7C users—unless you have one of those applications where 10MP images are good enough. Although APS-C/Super 35 mode “transforms” your 70-200mm zoom into a fast 105-300mm lens, the resolution penalty will usually be too much.
- Shoot now, crop later? Indeed, many point out that you can always shoot everything in full-frame mode and crop your images, perhaps with greater flexibility, in an image editor. While that’s true, it’s not always the best route. In crop mode, the a7C enlarges the cropped image to fill the EVF and LCD monitor, and it’s more intuitive to frame and compose your images already cropped. Sports photographers and photojournalists who fire off 1,000 shots at an event won’t be eager to go through their digital files and manually crop images. If 10 megapixels are sufficient, it’s easier to crop as you shoot.
- Lens compatibility. If you’re upgrading from an earlier APS-C format Sony E-mount camera, any lenses you have designed specifically for cropped sensor cameras may not cover the entire 24mm × 36mm full frame of the a7C (although some zoom lenses may have a large enough image circle at some focal lengths). With most APS-C lenses you will experience vignetting (darkening) in the corners and reduced sharpness along the edges of the image. For full-frame photography, these lenses will usually be less than satisfactory.
- Enabling crop mode. As described in Chapter 4, you’ll find the APS-C/Super 35mm crop mode in the Camera Settings I-01 (Quality/Image Size 1) menu. It has three settings:
- On. The a7C always shoots in cropped mode, regardless of which lens is mounted on the camera. Both full-frame and APS-C lenses will produce images with a cropped field of view. You might use this setting to give your lenses some extra “reach” for sports or wildlife photography at the lower 10MP resolution.
- Auto. If the camera detects that an APS-C lens is mounted, it will switch to crop mode. Not all lenses, particularly third-party optics, will be automatically detected, so you may have to use the On setting instead to manually select crop mode.
- Off. The camera never switches to crop mode. Even APS-C lenses will be used in full-frame mode. If you have a lens that almost covers the full frame at certain zoom settings, you can use this option and crop out the offending dark corners in your image editor.
SteadyShot and You
Even the highest resolution lenses and sensors can do nothing to correct image sharpness lost due to movement. And while higher shutter speeds can counter most subject movement, when it’s the camera that’s causing blur due to vibration, other approaches have to be taken. Your a7C has improved technology that can help avoid blur caused by shutter movement and bounce, but when the entire camera and lens are vibrating, that’s where image stabilization (IS) comes into play.
Image stabilization/vibration reduction can take many forms, and Sony has expertise in all of them. Electronic IS is used in video cameras and involves shifting pixels around from frame to frame so that pixels that are not moving remain in the same position, and portions of the image that are moving don’t stray from their proper path. Optical image stabilization, which Sony calls Optical SteadyShot (OSS), is built into many FE-mount lenses and involves lens elements that shift in response to camera movement, as detected by motion sensors included in the optics. Then, in late 2014, Sony introduced a new (at least for its mirrorless lineup) wrinkle: in-body, anti-shake technology called SteadyShot Inside (SSI), which adjusts the position of the sensor carriage itself along five different axes to counteract movement. If you’re using an OSS lens with your a7C camera, you actually have access to two different, complementary image stabilization systems.
The results can be spectacular. Sony claims a 5-stop improvement from its latest in-body SteadyShot technology. That is, a photograph taken at 1/30th second should have the same sharpness (at least in terms of resistance to camera shake) as one shot at 1/1000th second. I’ve found this to be true. Figure 12.3 shows two shots of pelicans taken a few minutes apart with a 100-400mm Minolta A-mount zoom lens (using the Sony EA-LA5 adapter) at 400mm and 1/125th second hand-held. This older lens has no image stabilization built-in, so the shot at top was taken using only the camera’s in-body IS. For the bottom photo, SteadyShot was turned off.
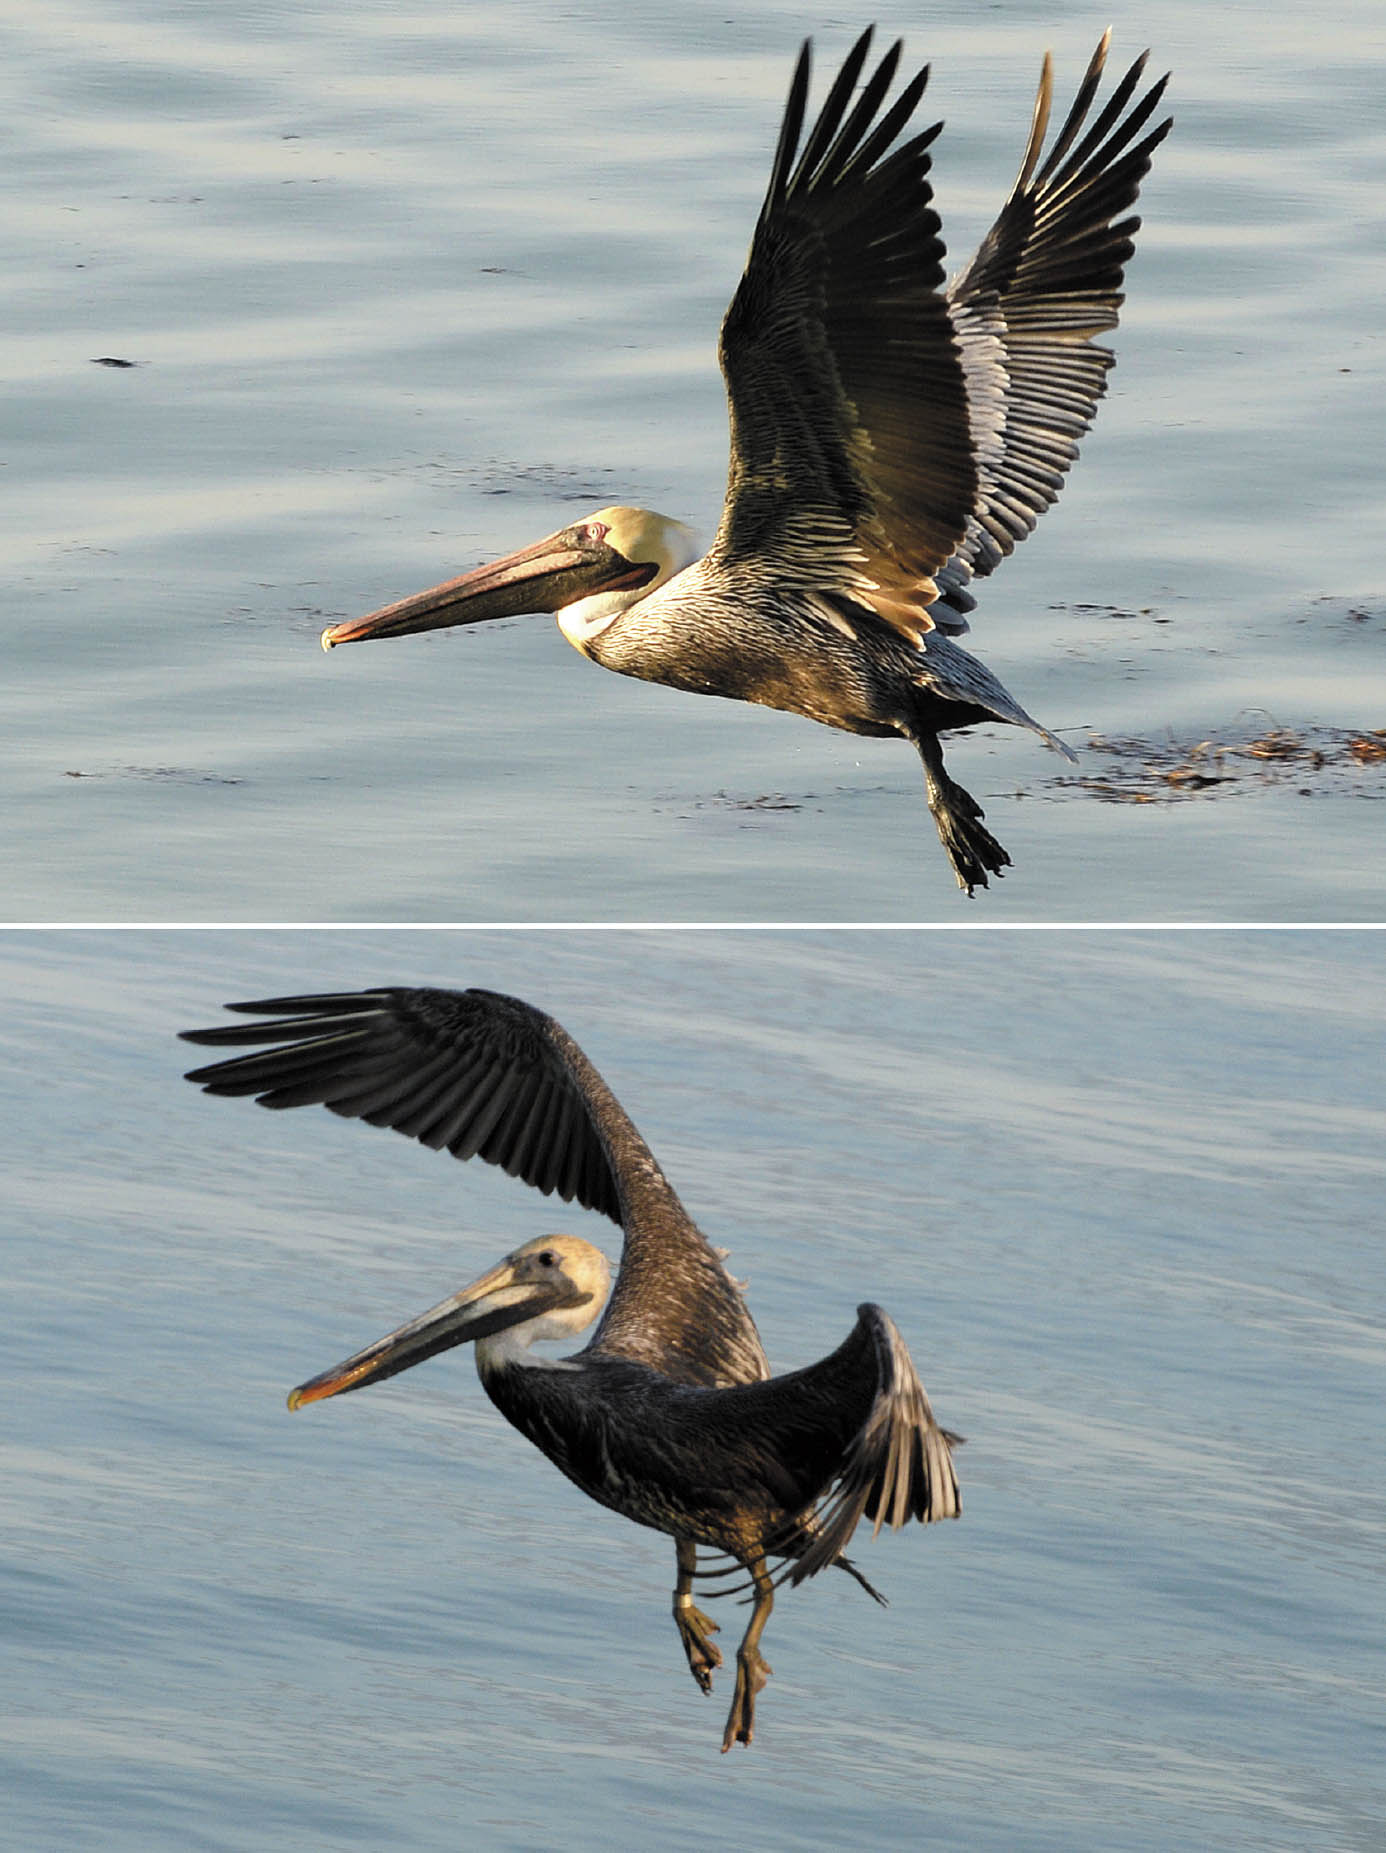
Figure 12.3 When hand-holding a lens at 400mm (top) and panning slightly to follow the pelican’s movement, I was able to get a blur-free photo at 1/125th second. With SteadyShot deactivated, camera movement produced noticeable blurring (bottom).
No amount of SteadyShot can eliminate blur from moving subjects, but you should find yourself less tied to a tripod when using longer lenses, or when working with wide-angle lenses under dim lighting conditions than in the past. If you’re taking photos in venues where flash or tripods are forbidden, you’ll find the a7C’s image stabilization tandem invaluable. Because lens-based and in-body image stabilization work together, it’s appropriate to discuss their use in this lens-oriented chapter.
How It Works
As I mentioned, stabilization uses gyroscope-like motion sensors to detect camera motion, which can occur along one of five different axes, as in Figure 12.4, Shifts in the x and y directions are likely to occur when shooting macro images hand-held but can take place any time. Roll happens when you rotate the camera along the axis passing through the center of the front of the lens, say, to align the horizon while shooting a landscape. There may be a tendency to continue to “correct” for the horizon as you shoot, producing vibration along the roll axis. Roll is especially noticeable in video clips because it’s easy to see straight lines changing their orientation during a shot.
Pitch movements happen when the camera shake is such that the lens moves up or down, often because the lens itself is a front-heavy telephoto lens. The magnification of the tele only serves to exaggerate the changes in pitch. Telephotos are also a major contributor to yaw vibrations, in which the camera pivots slightly as if you were shooting a panorama—even when you’re not. All five of these types of movement can be countered through image stabilization.

Figure 12.4 The five axes of in-body SteadyShot stabilization.
OSS does best in nullifying changes in pitch and yaw. SSI in the body can correct for all five types of movement. If both OSS and SSI are active at the same time, the a7C uses the two in tandem, allowing the lens to correct for pitch and yaw, while the in-body IS compensates for x, y, and roll movements. That makes a lot of sense, because in correcting for x, y, and roll, the camera is able to keep the sensor in the exact same plane to preserve precise focus and simply move the sensor carriage up, down, or slightly rotated to nullify the movement. If your lens does not have OSS, the SSI technology handles all the image stabilization tasks, in effect bringing IS to every lens you mount on the camera. That includes all E-mount lenses, as well as A-mount lenses attached with an EA-LA-series adapter (more on those later), and even “foreign” lenses like Canon EF optics using an appropriate adapter.
However, not all non-stabilized lenses benefit in identical ways from Sony’s stabilization technology. For best results, the SSI system needs to know both focal length and focus distance to provide optimum stabilization. That’s an advantage of OSS: stabilization built into the lens always knows exactly what focal length setting and focus distance is being used. For SSI, the same information has to be supplied to the smarts inside the camera body, using the SteadyShot Settings entry on the Camera Settings II-05 (Shutter/SteadyShot) menu.
The lens may be one that can communicate this information to the camera. Focal length and distance data are also used with Sony’s advanced distance integration (ADI) technology for flash exposure, as described in Chapter 13. Focal length information is needed to correct for pitch and yaw, while x and y compensation need to know the focal distance. (Roll correction needs neither type of data and can do its thing just from what SteadyShot sees happening on the sensor.)
However, when all the data is available, the full array of the a7C’s IS capabilities can be used to correct on all five axes. If the lens cannot communicate this information, the focal length can still be specified using the SteadyShot Settings entry in the Camera Settings II-05 (Shutter/SteadyShot) menu, as described in Chapter 3. Simply change the SteadyShot Adjustment option to Manual, then use the SteadyShot Focal Length sub-entry to specify the focal length of the lens or the zoom position you’re going to use from the range 8mm to 1000mm.
Unless you’re working with a non-zoom lens, going this route can be clumsy, but at least it works. When I am shooting sports with my 100-400mm Minolta lens, I set the focal length to 400mm, and get appropriate IS the majority of the time. Manually entering the focal length doesn’t provide the second half of the required data—the focus distance. But with only the focal length data to work with, the IS can calculate the amount of compensation to provide to correct for pitch and yaw, and it doesn’t need that data to fix roll. When using your non-compatible and foreign lenses, and lenses from third-party vendors like Rokinon/Samyang, you must forgo corrections along the x and y axes, but that deficit can be lived with, I’ve found.
One interesting variation comes when using an autofocus-compatible Canon adapter (from Meta-bones, Yongnuo, or other vendors) or Commlite/Fotodiox Nikon adapter with lenses that do have built-in image stabilization. Sony recommends turning off the lens’s image stabilization/vibration reduction using the switch on the lens, because, even with an autofocus/autoexposure-compatible adapter, the foreign lens has no way of working harmoniously with the in-body stabilization (and vice versa). The result would be having both the lens and the a7C trying to correct for pitch and yaw simultaneously, and possibly overcompensating.
Here’s a quick summary of some things you should keep in mind:
- Compatible lenses. All FE lenses and most Sony E-mount lenses should be compatible, and you can leave SteadyShot turned on. The a7C will identify the lens and choose how to apply the in-lens and in-body stabilization. For best results, turn off SteadyShot when the camera is mounted on a tripod.
- SteadyShot doesn’t stop action. Unfortunately, no stabilization is a panacea to replace the action-stopping capabilities of a faster shutter speed. If you need to use 1/1000th second to freeze a high jumper in mid-air, neither type of image stabilization achieves the desired effect at a longer shutter speed.
- Stabilization might slow you down. The process of adjusting the lens and/or sensor to counter camera shake takes time, just as autofocus does, so you might find that SteadyShot adds to the lag between when you press the shutter and when the picture is actually taken. In a situation where you want to capture a fleeting instant that can happen suddenly, image stabilization might not be your best choice.
- Give SteadyShot a helping hand. When you simply do not want to carry a tripod all day and you’ll be relying on the OSS system, brace the camera or your elbows on something solid, like the roof of a car or a piece of furniture. Remember that an inexpensive monopod can be quite compact when not extended; many camera bags include straps that allow you to attach this accessory. Use a monopod for extra camera-shake compensation. Brace the accessory against a rock, a bridge abutment, or a fence and you might be able to get blur-free photos at surprisingly long shutter speeds. When you’re heading out into the field to photograph wild animals or flowers and want to use longer exposures and think a tripod isn’t practical, at least consider packing a monopod.
Choosing a Lens
Since the launching of the original a7R and a7, Sony has been introducing new full-frame FE lenses for the system at an admirable pace, including the Sony FE 24-105mm f/4 G OSS lens offered as a kit lens for the a7C. So, while I’m going to provide a quick listing of some of the lenses currently available for the a7C series, it will necessarily be somewhat incomplete. After all, I expect additional lenses to be introduced as this book goes into production and, with luck, during the life of the book itself.
I’m going to cover only full-frame lenses in this chapter. If you read through my explanation of the crop factor, you know that APS-C lenses can also be used with the a7C, which still gives you a 10MP image in crop mode. But, as I noted, there are pros and cons to that approach, and even though the number of APS-C lenses available is vast, I’m not going to list those dubious options here.
In addition, most of my books rarely discuss third-party offerings, whether it’s lenses, flash units, or accessories. There are so many of them, and the product churn can quickly make any recommendation obsolete during the life of this book. And, besides, for the most part the original vendor, such as Sony, provides the superior product. The situation is slightly different in the case of Sony’s full-frame mirrorless cameras. In addition to Sony’s own product line, produced internally from the company’s own designs or with the cooperation of Zeiss, there are some excellent third-party optics you really should consider. I expect many new lenses to be introduced by third parties, so for the very latest information I urge you to consult online forums, such as DPReview, as they have constant updates that printed and ebook publications can’t match.
Some of the best lenses are from Zeiss and some are from third parties looking to fill the vacuum caused by the initial dearth of full-fledged FE lenses, and more recently encouraged by the popularity of Sony’s full-frame lineup. Samyang, Lensbaby, Venus Optics Laowa, Mitagon, Handevision, and others have all jumped into the Sony arena. Even more possibilities derive from the a7C’s capability of using “foreign” lenses with tolerable—or better—autofocus and autoexposure features. As I noted in the introduction to this chapter, you can use a zillion A-mount lenses with the EA-LA-series adapters, Canon EF lenses, and Nikon F-mount optics with an appropriate auto adapter from Metabones, Commlite, Yongnuo, or other vendors, and adapters for virtually every other possible lens mount if you’re willing to forgo autofocus and some other features.
I’ll break down my overviews by vendor and provide you with my own recommendations where appropriate.
Sony FE Lenses
If the compact form factor and light weight of the a7C were significant factors in choosing to buy this camera, you probably did as I did, and ordered yours in a kit with the remarkable Sony FE 28-60mm f/4-5.6 kit lens, as it added only about $300 to the cost of the body alone. That saves you about $200 from the $500 price it commands when purchased separately.
As a walk-around lens, it covers a useful range of focal lengths, and most find that its compact size makes up for the relatively slow f/4-5.6 variable maximum aperture. Measuring a tiny 2.6 × 1.8 inches when retracted, a simple twist extends it for use when the camera powers up (you’ll receive a warning on the display if you forget). (See Figure 12.5.) This lens weighs less than 6 ounces and uses inexpensive 40.5mm filters. It focuses down to about 1 foot, so, while it’s not technically a macro lens, you can take some decent close-up photos with it. I tend to use it as a casual walk-around lens when I don’t have my 24-105mm f/4 zoom mounted.
The other Sony-designated E-mount FE lenses available should meet the needs of most photographers, and you’ll also find several premium-grade (and expensive) products with the Carl Zeiss ZA designation. The Carl Zeiss models all boast rugged metal construction for great durability, the very effective T* multi-layer anti-reflective coating for flare control, and one or more large high-tech optical elements for effective correction of optical aberrations. I’m going to list my favorite E-mount options for a7C owners who want the most versatility and/or best image quality.

Figure 12.5 Even extended, the Sony FE 28-60mm f/4-5.6 lens is very compact.
The Affordable Trinity
First up, a trinity of (reasonably) affordable must-have lenses. These three lenses all have built-in optical image stabilization that can work in tandem with the a7C’s in-body SteadyShot. All have a constant f/4 maximum aperture that doesn’t change as you zoom and are reasonably affordable (as far as premium optics go) at $1,200–$1,400 each. (See Figure 12.6.)
- Sony FE 16-35mm f/4 ZA OSS lens. This is the lens you need for your architectural, landscape, and indoor photography in tight quarters. It covers an almost perfect range of focal lengths, from an ultra-wide 16mm to the street/urban photographer’s favorite 35mm field of view. Some might prefer Sony’s 12-24mm zoom instead (which wouldn’t overlap with the 24-70mm lens described next), but I find the extra 11mm useful. I don’t have to swap lenses when I need to zoom in a little tighter. One wonderful thing about this optic is that it has curved aperture blades, producing smooth circular defocused highlights for great bokeh. At around $1,350, you can afford this lens, and if you shoot a lot of wide-angle images, you can’t afford not to have it.
- Sony Vario-Tessar T* FE 24-70mm f/4 ZA OSS lens. This lens includes my personal least-used focal length range. I tend to see my subjects either with a wide-angle view, often with an apparent perspective distortion aspect, or with a telephoto/selective focus approach. Another Zeiss-branded product, it has excellent balance with the a7C, making it useful as a walk-around lens for travel photography, full-length and three-quarters portraits, and indoor sports like basketball and volleyball. Unfortunately, it won’t be the sharpest optical knife in your toolkit, despite the Zeiss label. I find it perfectly acceptable when stopped down two or three stops from maximum aperture, but for $900, I expected more. You might explore the sub-$400 Sony FE 28-70mm f/3.5-5.6 OSS kit lens. It’s abominably slow (f/5.6) at the 70mm zoom position, but you might find that saving $500 while filling out your trinity alleviates the pain.
- Sony FE 70-200mm f/4 G OSS lens. Compared to 70-200mm f/4 lenses designed for other full-frame cameras, this $1,500, 3-pound, 10.4 × 5.4 × 5.3–inch lens is almost petite, but it’s quite a beast mounted on the tiny a7C. It’s well balanced and these cameras do have the new beefed-up mounting bayonet, but you really should consider using the swiveling tripod collar, either when mounting on a tripod/monopod or as a support when hand-holding. It’s a Sony premium G lens (the G stands for “Gold”) and its optical performance won’t disappoint.

Figure 12.6 Sony’s three key FE lenses, left to right: 16-35mm f/4, 24-70mm f/4, and 70-200mm f/4.
Elite Threesomes
In response to professionals and others who prefer fast, super-sharp lenses with a larger maximum aperture, Sony has begun introducing what it calls its G-Master (GM) lineup; three of them span the same focal length range as the “affordable trinity.” Other G-Master lenses are available now, such as the Sony FE 85mm f/1.4 GM and Sony FE 100mm f/2.8 SFT GM OSS, offering additional focal lengths.
Sony’s top-of-the-line trio include:
- Sony FE 16-35mm f/2.8 GM. Like all G-Masters, this lens is dust- and moisture-resistant, has extra-low dispersion elements, and a price to match its high quality: in this case about $2,200. It focuses as close as 11 inches and uses 82mm filters, which is good news for landscape photographers who need to use polarizers or gradient neutral-density filters. The downside? It’s a larger lens than its f/4 cousin, and at 1.5 pounds is almost six ounces heavier.
- Sony FE 24-70mm f/2.8 GM. Priced at $2,200, this lens is massive compared to its f/4 sibling, and at almost 32 ounces weighing more than twice as much. It focuses down to 1.25 feet, uses 82mm filters, and is a superb lens with this focal length range.
- Sony FE 70-200mm f/2.8 GM. The costliest lens in the elite trinity, this one is priced at $2,600—but your cost for filters will be reduced if you already own the popular 77mm size this lens takes. It has 11 rounded aperture blades for great bokeh (the blur of the out-of-focus areas), weighs a hefty 3.26 pounds, and focuses down to about three feet for intimate telephoto close-ups.
Some Alternate Choices
Whether you’re assembling an “affordable: basic trio,” or looking to build a premium lineup, Sony has some alternates for the lenses described above that might better fit your needs. Here are some substitutions I recommend:
- Sony FE 12-24mm f/4 G. If you need a wider perspective or prefer to have no overlap with the 24-70mm lens in your arsenal, this lens makes an excellent alternative for the 16-35mm f/4 lens I listed earlier. At around $1,800, though, its “affordability” may come into question, and it’s a larger lens. But those doing a lot of architectural photography will appreciate its more expansive view. Its chief disadvantage is that it can’t accept filters. It might be the most versatile walk-around lens for landscape, architectural, and, maybe, street photographers who love (or need) the wide-angle look. Roughly the same size as the 24-105mm lens, it weighs 20 ounces, but lacks image stabilization (which is less important with wide-angle lenses with most shutter speeds). I’d use this lens if the combination of the Sony 16-35mm zoom and Voigtlander 10mm f/5.6 manual focus lens didn’t give me all the wide-angle flexibility I need.
- Sony FE 12-24mm f/2.8 GM. The image quality alone puts this $3,000 lens in the “elite” category, but even though Sony touts it as “surprisingly small and lightweight,” this fast 12-24mm lens’s 30-ounce heft is 1.7X that of the a7C’s body alone. If you rely on certain filters, this lens has a rear-filter holder that accepts inexpensive sheet filters, which may serve certain needs.
- Sony FE 70-300 f/4.5-5.6 G OSS. Cash-strapped enthusiasts who need some extra reach for outdoor sports or wildlife photography may want to substitute this $1,300 lens for the recommended 70-200mm f/4 optic. Its variable maximum apertures are fine when light is plentiful, but not optimum for night photography. It does have Optical SteadyShot, so you may be able to counter the limited f/stop range with slower shutter speeds if your subjects aren’t moving rapidly.
- Sony FE 24-240mm f/3.5-6.3 OSS. On first glance, a 10X zoom lens stretching from a true wide-angle 24mm field of view to the edge of super telephoto range at 240mm sounds very tempting. With a second look, this optic’s $1,050 price adds to the appeal. The reality check comes only when you realize that mating this hefty (1.72 pound), somewhat slow lens (f/6.3 at maximum zoom) to the compact a7C counters the best reason for toting around a tiny full-frame mirrorless camera.
Given its modest price tag, you can expect this lens will be a jack-of-all-trades and master of none. I’ve never been a fan of do-everything zoom lenses, as they tend to lose resolution at one end (or both ends) of their focal length range, but those looking to reduce their traveling photo kit to a compact body (like the a7C’s) and a single lens will want to consider this option. It’s actually not as bulky as you might think (it’s lighter than the 12-24mm f/2.8 G Master), measures 3.25 × 4.75 inches, and takes affordable 72mm filters.
If you truly want to walk around with only a single lens and can justify the bulk, this optic does fill the bill. It would also be an efficient choice for photography that might call for extreme wide-angle views and telephoto reach in rapid succession. I tend to prefer Sony’s 24-105mm f/4 G lens (described soon) as my walk-around optic, but this lens’s extra reach can come in handy if your travels involve wildlife.
Next up are some of my choices among the other Sony FE lenses. They include walk-around lenses, some fast primes for photojournalism and other available-light applications, and even a stellar macro. First, additional lenses in the superb G-Master lineup:
- Sony FE 24mm f/1.4 GM. This is a prime lens (so to speak) for a wide variety of applications. Architectural photographers will love the $1,400 optic for hand-held interior photography under low-light conditions. Street shooters and photojournalists will find it a relatively affordable option for capturing intimate moments day or night. Landscape photographers will prize its high resolution and useful wide-angle perspective. It’s a compact walk-around lens for general-purpose photography, too.
- Sony FE 100mm f/2.8 STF GM OSS. What do you get for $1,500? This G-Master is one of two near-ideal portrait/short telephoto lenses that Sony offers. The f/2.8 maximum aperture makes it easy to defocus the backgrounds, and the STF (Smooth Trans Focus) technology uses something called an apodization filter to produce achingly smooth bokeh with nice, round out-of-focus highlights. (“Apodization” is technical mumbo-jumbo that Sony applies to its use of a radially graduated neutral-density filter that, clear in the center and darker at its edges, in effect, counters the fade-out of those blurry round disks we call “bokeh,” for a more pleasing effect.) Reduced flare for greater contrast, fast autofocus, OSS, and focus as close as 1.9 feet (you can switch focus ranges from 2.8 feet to infinity or to a useful macro-only range of 1.9–3.3 feet) make this a formidable lens for portraiture and other subjects.
- Sony FE 85mm f/1.4 GM. This is Sony’s other awesome G-Master portrait lens, priced at $1,800. It’s good for head-and-shoulders work, too, and a focal length shorter than the 100mm f/2.8 makes it easier to shoot full-length, couples, and group portraits. It has wonderful bokeh, weighs about 29 ounces, and can focus as close as 20 inches. I like this lens’s large maximum aperture for concert and performance photography, other subjects under low light, and subjects I want to isolate with selective focus. Videographers will like the ability to de-click the actual physical lens aperture ring (most lenses these days do not have one at all) so exposure can be changed smoothly while a sequence is captured.
- Sony 135mm f/1.8 GM. This fast $2,100 lens is perfect for sports, portraits, and any subjects that can benefit from selective focus and world-class creamy bokeh (for smooth out-of-focus backgrounds).
- Sony FE 100-400mm f/4.5-5.6 GM OSS. Yet another very welcome G-Master lens, this one covers an ideal focal length range for sports and wildlife photographers, especially since it has OSS and superb weather-sealing. The price, at $2,500, is not even exorbitant considering its likely market and what you get. (Prime and zoom lenses in the 400mm and longer range can easily top $5,000 to $10,000.) It’s a little over three pounds in weight, but that’s normal in the long-tele-zoom territory.
- Sony FE 400mm f/2.8 GM OSS. This stupendous lens was first used at the Winter Olympics in February 2018. Ordinary humans almost certainly will need at least $12,000 to buy one. It’s one of several Sony telephoto lenses with a Preset switch that allows specifying a focus plane (say, home plate in a baseball game) and refocusing on that point instantly at the press of a button.
- Sony FE 600mm f/4 GM OSS. A super telephoto (in many senses of the word), this G-Master has a large maximum aperture that’s especially suited for field sports photography. The f/4 aperture can be used wide open at night to allow action shooters to use a motion-freezing high shutter speed, with the added benefit of shallow depth-of-field to throw distracting elements (spectators, or players not involved in the current action) out of focus. This 6.7-pound dream lens has a super price, too: expect to pay $13,000 to add this one to your gear cupboard. Optional 1.4X and 2.0X teleconverters are available. The 2.0X model transforms this optic into a 1200mm f/8 monster (or 1800mm f/8 in crop mode).
Sony has a growing lineup of G-series (“Gold”) and standard lenses that will fit the needs of just about any shooting situation, and includes my own favorite walk-around lens, the Sony FE 24-105mm f/4 G OSS that leads off the list that follows:
Zoom Lenses:
- Sony FE 24-105mm f/4 G OSS. This is the do-everything lens for me. I used to rely on the Sony FE Vario-Tessar T* 16-70mm f/4 ZA OSS, and still use it extensively indoors and for architecture, but for everyday photography I’m willing to give up a little of the wide-angle end of the zoom scale to get the extra reach and selective focus prowess at the long end of this 24-105mm optic’s range. It focuses down to 16 inches, uses my full arsenal of 77mm filters, and has Optical Steady-Shot. While not petite, I find its 4.5-inch length and 24-ounce weight not burdensome to carry around. As a G lens it has great image quality. It was in short supply and back-ordered for months after the a7C was introduced, but if you can find one, at $1,400 it’s a bargain. (See Figure 12.7.)
Figure 12.7 The Sony FE 24-105mm lens is an excellent walk-around lens option.
- Sony FE 28-135mm f/4 G PZ OSS lens. The specs alone might lead you to believe this is a faster, heavier (5 pounds) walk-around lens with a more restricted zoom range. You’d be wrong. This $2,500 monster is especially designed for pro-level 4K video productions, and if heavy-duty movie making isn’t on your agenda, you probably don’t want or need this lens. Video shooters, though, will delight in its near-silent precision variable 8-speed power zoom, and responsive manual control rings for zoom (with direction reversal for smooth zooms), focus pulling, and aperture.
- Sony FE 28-70mm f/3.5-5.6 OSS. This lens is often bundled with Sony full-frame mirrorless cameras as a kit lens, and available separately for less than $400. As I noted above, it’s slow (f/3.5) at the 28mm zoom position, and even slower (f/5.6) when zoomed to 70mm. If you favor telephoto lenses or extreme wide angles (as I do), you may find yourself not using the 28-70mm focal length range very often, in which case this lens might make an acceptable fill-in for occasional use. It’s sharp enough stopped down to f/8 to f/11, but really not up to the demands of the a7C’s 24MP sensor.
- Sony FE 200-600mm f/5.6-6.3 G OSS lens. Most sports and wildlife photographers will find this hefty zoom lens more affordable, at roughly $2,000. Its maximum aperture varies from f/5.6 to f/6.3 as you zoom to the longest telephoto position, but if you need a 600mm focal length, setting your ISO a stop or two higher can save you $11,000. In APS-C/Super 35 mode, this lens becomes a 300-900mm ultra-tele with 26MP files. It is compatible with Sony’s 1.4X and 2.0X teleconverters, too.
Wide-Angle Primes:
- Sony FE 20mm f/1.8G lens. Architectural, travel, and street photographers will love this fast ultra-wide-angle lens, especially since it is affordable for most at $900.
- Sony FE 28mm f/2.0 lens. Here’s a lens that comes with its own bag of tricks. It’s a compact prime lens with a fast f/2.0 aperture, so you can shoot in low light and even gain a modicum of selective focus with its (relatively) shallow depth-of-field wide open. Despite its $450 price, it boasts an advanced optical design with ED (extra-low dispersion) glass elements that improve contrast and reduce troublesome chromatic and spherical aberrations. (You’ll find descriptions of lens aberrations later in this chapter.) If that’s not enough, you can attach either of two adapter optics to the front. There is a wide-angle version ($250), which converts it to a 21mm f/2.8 wide angle that focuses down to eight inches, and a 16mm fisheye attachment ($300) that I personally find more interesting and fun. But then, I own eight different fisheye lenses, so I’m susceptible.
- Sony Sonnar T* FE 35mm f/2.8 ZA lens. This tiny lens is a perfect match for the compact a7C. At a mere eight ounces and measuring 2.42 × 1.44 inches, it makes a great walk-around lens for stealthy photographers. The image quality is great, but you’d expect that from a Zeiss lens that, at $750, is not bargain-basement cheap.
- Sony FE 35mm f/1.8 lens. If you need a little more speed, this compact and lightweight wide-angle prime lens has a fast f/1.8 maximum aperture. The $750 optic is especially suitable for street photography and architecture, and it is slightly cheaper than the 35mm Sonnar.
- Sony Distagon T* FE 35mm f/1.4 ZA lens. This Zeiss lens is a photojournalist’s dream, with a wide-angle focal length that lets you get up close and personal with your subject, and a fast f/1.4 aperture suitable for low light and selective focus. The Zeiss T* (T-star) coating suppresses contrast loss from internal reflections among the lens elements. It’s great for video, too, as the aperture ring can be de-clicked with a switch. The only drawback is the price: $1,600, which is a lot to pay for a lens that doesn’t give you a range of different focal lengths to work with. However, the shooters this lens is designed for will confirm that it’s worth it.
Normal to Short Tele Primes:
- Sony FE 55mm f/1.8 ZA lens. So, why get excited about a “normal” lens with an f/1.8 maximum aperture and a $1,000 price tag? After all, both Nikon and Canon offer full-frame 50mm f/1.8 prime lenses for $200 or less. In this case, your ten Benjamins buys you one of the sharpest lenses ever made, with exquisite resolution at every f/stop—including wide open. Given that perspective, this lens is actually a bargain. You’ll love using it for head-and-shoulders or 3/4-length portraits using selective focus at f/1.8. It’s said to rival super-costly lenses, like the 55mm f/1.4 Zeiss Otus, which has a $4,000 price tag. You owe it to yourself to get this lens.
- Sony FE Planar T* 50mm f/1.4 ZA lens. Faster, sharper, more expensive (at $1,500), and sporting a flare/ghost-reducing T* (T-star) coating, this mid-range (“normal”) lens has the Zeiss quality you expect, a solid build, and creamy bokeh from its 11-blade circular aperture.
- Sony 85mm f/1.8 lens. At $550, this is an affordable, fast, mid-telephoto prime lens that’s lightweight and portable.
Macro Lenses:
- Sony FE 90mm f/2.8 Macro G OSS lens. While Sony will continue to make additional macro lenses available for the a7C, this affordable (in the Sony FE realm, anything in the $1,000 range is considered affordable) $1,100 lens is an excellent choice. Its 90mm focal length gives you a decent amount of distance between the camera and your close-up subject, even at its minimum focusing distance of 11 inches. With internal focusing such that only the internal elements move, the lens doesn’t get longer as you focus, avoiding a common problem. You can add a set of auto extension tubes to get even closer. I use Fotodiox Pro 10mm and 16mm tubes. Those tubes are primarily plastic and not especially rugged but are serviceable for light-duty use.
- Sony FE 50mm f/2.8 Macro lens. This is a compact, lightweight standard macro lens with 1:1 (life-size) magnification, focusing as close as 6.3 inches. Priced at $550, it makes a fine, affordable standard macro lens for shooting flowers, bugs, or your coin/stamp collection. If you need to maintain some distance from your subject (say, a skittish creature, or one that requires careful lighting), you would probably prefer the 90mm macro above. But a 50mm is perfect for extreme close-up photography, particularly when mated to a set of extension tubes.
A-Mount Lenses
If you’re coming to the Sony mirrorless world from the SLT/A-mount arena, you may already own some Sony or Minolta lenses that can work very well with your a7C. And even if you don’t have any A-mount lenses now, you may want to investigate purchasing some. In some cases, they are as good as—or better—than the current roster of FE lenses.
However, a viable option for everyone is to buy gently used A-mount lenses from reliable sources, such as KEH Camera (www.keh.com). I’ve purchased more than a dozen lenses from them over the last few years, including the ever-popular “beercan,” the Minolta AF Zoom 70-210mm f/4, an ancient optic prized for its tank-like solid build, commendable sharpness, constant maximum aperture, and smooth bokeh. Of course, my favorite is my Minolta AF 100-400mm f/4.5-6.7 APO Tele-Zoom lens. (See Figure 12.8.) It’s not my sharpest lens, but I would never have been able to afford a 400mm autofocus lens otherwise.
I’m not sure where KEH gets 30-year-old lenses that are like new, but their selection is huge, and the prices are a fraction of what you’d pay for new A-mount optics. Keep in mind that when Sony took over Konica Minolta’s camera/lens technology, it simply rebranded quite a few of the most popular lenses, so you may find a 50mm f/1.4 Minolta lens that’s identical to the Sony 50mm f/1.4 lens at a much lower price.
The only drawback to the most affordably priced A-mount lenses is that they probably use Minolta’s original screw-drive autofocus technology. To use them on your a7C, you’ll need the Sony LA-EA4 adapter, which has its own SLT (single-lens translucent) phase-detect autofocus system, similar to that used in the Sony a99. By the time this book is published, I expect Sony will have released a firmware upgrade that allows the LA-EA5 adapter, which has its own built-in motor, to be used for a broad range of A-mount lenses as well.
As I write this, the LA-EA5 adapter works only with A-mount lenses built-in autofocus motors of the SSM or SAM variety. These lenses also work with the Sony LA-EA3 adapter and let you use the a7C’s own hybrid phase detect/contrast detect AF system, which is typically both faster and more accurate. (Such lenses are easy to spot: they incorporate the SSM, SSM II, SAM, or SAM II designations in their official names.) SSM stands for SuperSonic motor, which uses a ring-type ultrasonic driver that is fast and virtually silent and is found on upper-end lenses. SAM stands for Smooth Autofocus Motor, an alternate system built into some lower-end Sony optics introduced since 2009.

Figure 12.8 Minolta 100-400mm lens.
The LA-EA5 adapter has its own motor and can potentially provide autofocus for a much broader range of A-mount lenses. However, as I write this, the built-in motor is compatible only with the Sony a6600 and a7R IV cameras. With the a7C, it requires SSM/SAM lenses. As I mentioned, I expect that a firmware upgrade will be available by the time this book hits the shelves to bring full AF capabilities to the a7C, too.
Meanwhile, singling out a few choice A-mount lenses from the vast and varied selection available is difficult, especially since some of the older lenses are unique—like my 500mm f/8 Reflex super telephoto lens (available used with either Minolta and Sony badges, the world’s first [and only] auto-focus mirror [catadioptric] lens). (See Figure 12.9.) It has a single, fixed f/8 aperture and that weird “doughnut” bokeh typical of mirror lenses, but it’s the most compact long telephoto lens I own, even when attached using an adapter. Just keep these provisos in mind:
- Both full-frame and APS-C. The older Minolta lenses you’ll find were all designed for full-frame film cameras, but Sony introduced both full-frame and APS-C lenses for A-mount. You can usually identify Sony APS-C A-mount lenses by the designation DT in the lens name; if DT is not included, it is a full-frame lens. Third-party lens manufacturers such as Tokina, Sigma, Vivitar, and Tamron also offer a mixture of both types. Research A-mount lenses before you buy.
- Motor/No Motor. It’s easy to discern Sony A-mount lenses with internal motors, as the specification is included in their name. However, specs of the offerings of third-party vendors are not always obvious. Somewhere in their catalog descriptions they will usually specify whether a particular lens includes an internal motor, and they’ll also reveal whether a lens is intended for full-frame or APS-C models. If you have the new Sony LA-EA5 adapter, you can use both motor and no motor types once the firmware upgrade arrives, as I’ll explain next.

Figure 12.9 The Sony/Minolta 500mm f/8 mirror lens.
Using the LA-EA Series Adapters
Sony has designed five A-mount to E-mount adapters, which allow using the Sony/Minolta A-mount lenses described above on an E-mount camera such as the a7C. Why five different adapters? The first four (LA-EA1 through LA-EA4) allow connecting an A-mount lens to an NEX/Alpha-series camera, but the two odd-numbered adapters use only contrast detect autofocus with lenses that have built-in AF motors and are compatible with them. The two even-numbered adapters have built-in SLT-like phase detection AF systems for fast focusing with lenses that use the original screw-drive AF system. The LA-EA1 and LA-EA2 (now discontinued) were designed for APS-C cameras, while the LA-EA3 and LA-EA4 were intended for full-frame models like the a7C.
The fifth adapter, the LA-EA5, introduced in 2020, eventually replaces all of them. It has its own motor that allows nearly all lenses with built-in motors and motorless optics to access the full range of the autofocus features. Compatibility includes full support for Real-Time Eye AF tracking (human and animal) at up to 10 fps (with the a7C). Not all Sony, Minolta, or Konica Minolta lenses are compatible (Sony has a web page providing an up-to-date listing), and if you have third-party A-mount lenses, you’ll have to check with the vendor. Table 12.1 should clear things up a bit.
If you already own one of them, the LA-EA3 adapter or LA-EA4 adapter are both satisfactory, depending on the type of autofocus used in your A-mount lenses. I originally purchased both because I have a mixture of SSM, SAM, and screw-drive lenses. The LA-EA2 and LA-EA4 are clever because both involve, basically, building a version of Sony’s Translucent Mirror Technology, found in the SLT cameras, into an adapter, as you can see in the exploded diagram shown in Figure 12.10. (In actual use, the lens must be physically mounted to the adapter, and the lens does not explode.)
TABLE 12.1 LA-EA Series Adapters
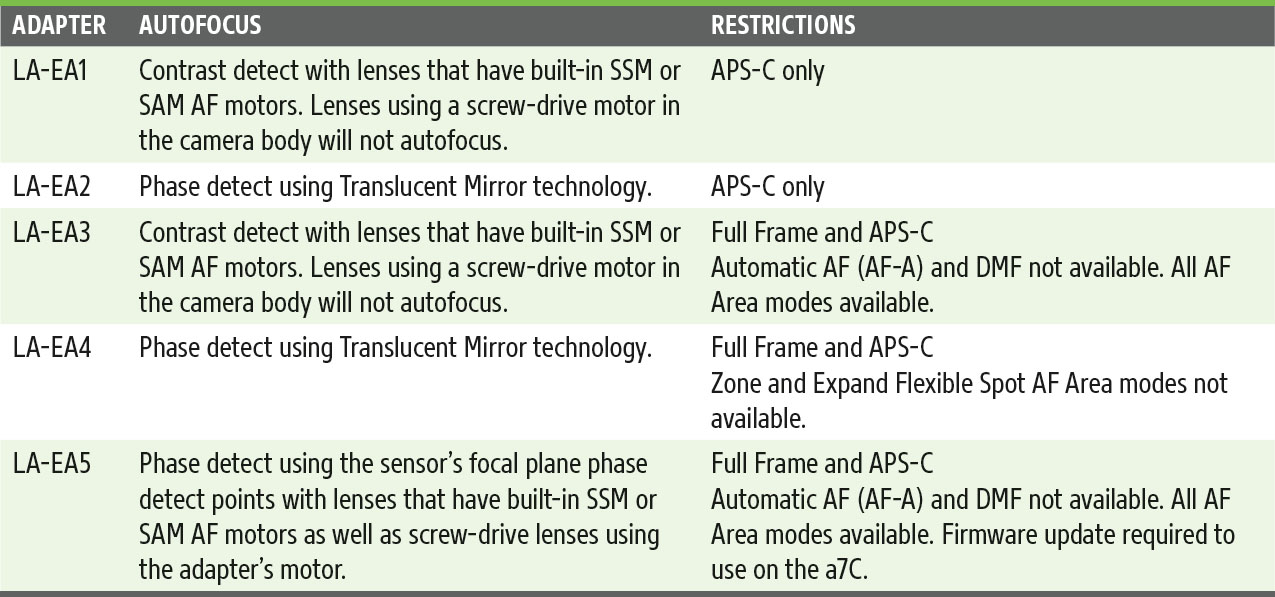

Figure 12.10 The Sony LA-EA4 adapter with translucent mirror autofocus technology.
Zeiss Loxia Lenses
While the Zeiss FE lenses produced and sold by Sony all feature autofocus, Zeiss also independently sells its own optics, including the Loxia lineup designed specifically for Sony full-frame E-mount cameras.
Zeiss lenses are all premium optics, and, as I write this, the super-premium Zeiss Otus lineup (priced at $4,000 and up) is not available in Sony E-mount. Nor can you buy the new Milvus full-frame lenses to fit your a7C, and, just in case you’re wondering, the Zeiss Touit lenses in E-mount are designed for APS-C sensors only.
However, these Loxia lenses are among the best we can get. So far, the five available are all manual focus. Not including autofocus helps keep the price down on these otherwise premium-quality, super-sharp lenses. Keep in mind that your a7C has a wealth of manual-focus-friendly features, including focus peaking and focus magnification, all described elsewhere in this book.
- Zeiss Loxia 85mm f/2.4 T* lens. Its maker describes this $1,400 lens as portable, inconspicuous, and powerful and urges you to use it for portrait, street, and landscape photography. It is remarkably sharp from edge to edge. Like all the Loxia lenses, the manual aperture ring can be de-clicked, using a supplied tool, for use when constantly varying apertures are desired when shooting video.
- Zeiss Loxia 50mm f/2 Planar T* lens. If you’ve been involved with photography for any length of time, you’ll recognize the Zeiss Planar name, first applied to a symmetrical lens design as far back as 1896. This fast manual focus lens does a good job of correcting for chromatic aberration and distortion and is one of the best lenses you can buy for roughly $950.
- Zeiss Loxia 35mm f/2 Biogon T* lens. Another name out of the past, Biogon lenses have historically been some of the best wide-angle optics you can buy, and this fast 35mm f/2 lens has been optimized for use with digital cameras (that is, illumination emerges from the back of the lens at a less steep angle, as explained in Chapter 2). Your $1,300 buys you a well-corrected lens suitable for street photography, architecture, landscapes, and other subjects.
- Zeiss Loxia 21mm f/2.8 T* lens. This final lens in the trio was the last introduced, in December 2015 for $1,500. It’s an extra-compact lens using the famed Distagon design, which overcomes some of the drawbacks of many wide angles to provide consistent sharpness from edge to edge, with little light falloff and excellent correction for chromatic aberrations.
- Zeiss Loxia 25mm f/2.4 T* lens. Another weather-sealed, de-clickable lens, it has two low-dispersion and one aspherical element for excellent image quality and is priced at $1,300.
Zeiss Batis Lenses
Here we have reasonably priced autofocus lenses from Zeiss, which help fill out holes in Sony’s full-frame E-mount lineup. If you’re looking for a futuristic touch, they each feature an illuminated OLED (organic LED) display that dynamically shows focus distance and depth-of-field. In the good old days, prime (non-zoom) lenses had etched or painted color-coded depth-of-field markers on the lens barrel, but those largely disappeared when zoom lenses became dominant. Now depth-of-field can be displayed on your lens in a more useful form. As I write this, the four available Batis lenses are as follows:
- Zeiss Batis 135mm f/2.8 lens. For $1,700 you get a Zeiss Sonar-design lens with OSS, fast autofocus, and impressive image quality. Some may think this lens verges on being too long for head-and-shoulders portraits, but it’s a versatile lens for many types of sports, especially since it has great anti-flare and ghosting properties that are useful when shooting into sunlight.
- Zeiss Batis 85mm f/1.8 lens. This is a $1,200 medium-telephoto autofocus lens that’s ideal for portraits, and a primo choice for low-light photography and selective focus. It’s the first Zeiss lens that has optical image stabilization (the equivalent of Sony’s trademarked OSS), giving you hybrid IS when used with the a7C’s in-body SteadyShot Inside.
- Zeiss Batis 25mm f/2.0 lens. There’s a bit of overlap in potential use between this autofocus lens and Sony’s own 28mm f/2.0 optic. This one is more expensive at less than $1,300, sharper, and isn’t compatible with Sony’s wide-angle/fisheye adapters.
- Zeiss Batis 18mm f/2.8 lens. Featuring the famed Zeiss Distagon wide-angle design, this $1,500 optic focuses down to about 10 inches, which is useful if you like wide-angle (apparent) perspective distortion effects. (It’s apparent rather than real, because the distortion is due to the placement of the subject matter within the field of view, not any defect in the lens itself.) At 12 ounces, it’s not heavy and makes a good walk-around lens for those who want a prime lens with a wide field of view.
Other Third-Party Lenses
Because the a7C has relatively short back-focus distances (the gap between the lens mount bayonet and sensor), it’s fairly easy for third parties to adapt their existing full-frame lenses to fit your camera. There are some interesting lenses available. Among them:
- Voigtlander. Probably the oldest name in camera gear, dating back to its founding in Vienna in 1756 (well before the invention of photography itself), this company produces more than a dozen interesting lenses for Sony cameras, including 10mm and 12mm f/5.6 Heliar and a 15mm f/4.5 Heliar. I own the 10mm lens, and it is one of my all-time favorites. On a full-frame camera like the a7C, it’s one of the widest rectilinear (non-fisheye) prime lenses available, with a breathtaking 130-degree field of view. (See Figure 12.11.)
The company has an impressive array of super-sharp manual-focus full-frame macro lenses for Sony cameras, including an APO-Lanthar 50mm F2 macro that includes electronic contacts that can report EXIF and distance information to the camera for smooth integration with the a7C’s in-body image stabilization system and Focus Magnifier. Voigtlander’s APO-Lanthar macro lineup also includes 65mm f/2 and 110mm f/2.5 models.
- Mitakon/Zhongyi. This company makes an ultra-fast 85mm f/1.2 manual focus lens ($630), and a hyperfast 50mm f/0.95 lens ($850) in Sony E-mount, with the latter having the distinction of being the world’s fastest full-frame E-mount lens. The company also offers a 20mm f/2 super-macro at a bargain $240 that focuses down to less than one inch! I own this lens and its main drawback is that it focuses only at 1.8 inches. There is no focus ring—the lens works best on a focusing rail that allows you to move the entire camera/lens rig back and forth to achieve focus. (See Figure 12.12.)
- Samyang/Rokinon. This company’s manual focus 12mm f/2.8 fisheye resides in my fisheye collection, and I often alternate its use with my 15mm f/2.8 Sigma fisheye. I use them in manual focus mode with adapters, but Samyang/Rokinon also sells lenses in E-mount (sometimes under the Bower brand name). They include a 24mm f/1.4, 35mm f/1.4, 50mm f/1.4, 85mm f/1.4, 135mm f/2, and a 100mm f/2.8 macro lens that produce 1:1 (life-size) magnification at a minimum focusing distance of 12 inches. They are starting to issue autofocus lenses in Sony FE mount, including an affordable FE 35mm f/2.8 for a mere $400 and a 14mm f/2.8 for $800.
Figure 12.11 Voigtlander’s 10mm f/5.6 lens is a rectilinear super-wide-angle lens.
Figure 12.12 The Mitakon Zhongyi 20mm f/2 super-macro lens has a 4X–4.5X magnification range.
- Tamron. Tamron, which is partially owned by Sony, has made a move into Sony E-mount autofocus territory, with a total of eight lenses as I write this. Their first FE offering was the Tamron 28-75mm f/2.8 Di III RXD, which is lighter and smaller than Sony’s own 24-70mm f/2.8 G-Master. They also offer three telephoto zooms, including a 70-180mm f/2.8, 70-300mm f/4.5-6.3, and 28-200mm f/2.8-5.6. In the wide-angle realm, Sigma has a 17-28mm f/2.8 zoom, plus 20mm and 24mm f/2.8 prime lenses.
- Sigma. Sigma is also increasingly venturing into FE territory, with a lineup of fast prime lenses having f/1.4 maximum apertures in 20mm, 24mm, 28mm, 35mm, 40mm, and 105mm focal lengths. In addition to a 70mm f/2.8 macro lens, Sigma sells 14mm f/1.8 and 135mm f/1.8 prime lenses.
- Venus Optics Laowa. This company makes a variety of full-frame lenses for Sony E-mount cameras, including the novel Laowa 10-18mm f/4.5-5.6 FE zoom and the weirdest macro lens ever made: the Laowa 24mm f/14 2X Macro Probe, an expensive ($1,500) optic for super-close, bugs’-eye views with a waterproof probe that includes a built-in LED ring light. The company also offers a compact 25mm f/2.8 ultra-macro with 2.5X to 5X life-size magnification and focusing down to less than two inches. Other full-frame lenses from Laowa that may be of interest to discerning a7C owners include a 15mm f/2 “Zero D” (zero distortion) lens with a 110-degree angle of view and remarkable image quality. It’s not a fisheye—it’s a rectilinear lens with two aspherical elements and three extra-low dispersion (ED) elements for impressive optical quality. It focuses down to seven inches, making some interesting, distorted perspective shots possible.
Other Lens Options
Because of the popularity of the camera line, third-party vendors have rushed to produce lenses for these models. As I mentioned earlier, because the a7-series’ “flange-to-sensor” distance is relatively short, there’s room to use various types of adapters between camera and lens and still allow focusing all the way to infinity. There are already a huge number of adapters that allow mounting just about any lens you can think of on the a7C cameras, if you’re willing to accept manual focus and, usually, a ring on the adapter that’s used to stop down the “adopted” lens to the aperture used to take the photo. You can find these from Novoflex (www.novoflex.com), Metabones (www.metabones.com), Fotodiox (www.fotodioxpro.com), Rainbow Imaging (www.rainbowimaging.biz), Cowboy Studio (www.cowboystudio.com), and others.
Some adapters of certain types and brands sell for as little as $20 to $30. With many of them you should not expect autofocus even if you’re using an AF lens from some other system; as well, many of the cameras’ high-tech features do not operate. However, you can usually retain automatic exposure by setting the a7C to Aperture Priority, stopping down to the f/stop you prefer, and firing away.
The ultra-high-grade Novoflex and Metabones adapters for using lenses of other brands sell for much higher prices. Some adapters maintain autofocus with a lens of an entirely different brand. The Metabones Canon EF-to-Sony Smart Adapter (Fifth Generation) and their similar Speed Booster (Fifth Generation) model ($400 and $650, respectively) maintain autofocus, autoexposure, and the Canon lens’s image stabilizer feature when used with a camera. The “Speed Booster” part of the name comes from the adapter’s ability to magically add one f/stop to the maximum aperture of the lens (thanks to the adapter’s internal optics), transforming an f/4 lens into an f/2.8 speed demon.
The Metabones Smart Adapter has been especially popular, thanks to the ability to use AF-C with Canon’s EF or EF-S lenses and your camera’s hybrid phase detection/contrast detection autofocus system. Reports are that autofocus with these lenses is equal to or superior to that of the same lenses when mounted on their native Canon camera bodies. The Canon lenses’ in-lens IS also works, but you may want to disable it and rely solely on the a7C’s own SteadyShot capabilities. The Metabones Smart Adapter is well made, with brass components, but if you are switching over from a Canon system, the ability to use your existing lenses is priceless.
Commlite, Fotodiox, and other vendors offer adapters that preserve full autofocus/autoexposure/image stabilization features for Nikon AF-S lenses. (See Figure 12.13.) The AF-S lenses have their own built-in autofocus motors.
I love to experiment with other third-party lenses. I imported an ancient (Soviet-era) 58mm f/2 Helios 44-2 from a seller in the Ukraine for $35, so I could take advantage of this cult lens’s proverbial “swirly” bokeh, which provides a wild special effect. You can find them on Amazon for $50 to $80.

Figure 12.13 A Nikon 105mm f/1.4 lens is shown mounted using a Fotodiox Fusion adapter.
Fine-Tuning the Focus of Your A-Mount Lenses
In Chapter 3, I introduced you to the a7C’s AF Micro Adjustment feature in the Camera Settings I-07 (AF 4) menu, which can be manipulated only when you’re using a Sony, Minolta, or Konica-Minolta Maxxum/Dynax A-mount lens with the EA-LA2 or EA-LA4 adapters. (But you won’t be using the APS-C-format EA-LA2 on the a7C.) It is not available when using the LA-EA1 or LA-EA3 adapters. (The micro adjustment may work with an A-mount lens of another brand, but Sony warns that the results may be inaccurate.)
This feature is available only for lenses attached with the LA-EA4 adapter because the adjustment actually calibrates the SLT (semi-transparent mirror) of the adapter. No such calibration is needed when using native E-mount lenses on the a7C, or when using the LA-EA5 adapter, because AF is calculated using PDAF pixels on the sensor itself, which cannot go out of alignment. Millions of A-mount lenses have been sold over the years, and the EA-LA4 adapter is not terribly expensive, so I will assume that many readers who own one will eventually want to consider the fine-tuning feature.
If you do not currently have such lenses or the EA-LA4 adapter, you cannot use AF Micro Adjustment (you can turn the feature on or off, but you cannot enter any adjustment factor). But if you do own the relevant equipment, you might find that a particular lens is not focusing properly. If the lens happens to focus a bit ahead or a bit behind the desired area (like the eyes in a portrait), and if it does that consistently, you can use the adjustment feature.
Why is the focus “off” for some lenses in the first place? There are lots of factors, including the age of the lens (an older lens may focus slightly differently), temperature effects on certain types of glass, humidity, and tolerances built into a lens’s design that all add up to a slight misadjustment, even though the components themselves are, strictly speaking, within specs. A very slight variation in your lens’s mount or that of the EA-LA4 adapter can cause focus to vary slightly. With any luck (if you can call it that) a lens that doesn’t focus exactly right will at least be consistent. If a lens always focuses a bit behind the subject, the symptom is back focus. If it focuses in front of the subject, it’s called front focus.
For a quick-and-dirty diagnosis (not a calibration; you’ll use a different target for that), lay down a piece of graph paper on a flat surface, and place an object on the line at the middle, which will represent the point of focus (we hope). Then, shoot the target at an angle using your lens’s widest aperture (smallest available f/number) and the autofocus mode you want to test. Mount the camera on a tripod so you can get accurate, repeatable results.
If your camera/lens combination doesn’t suffer from front or back focus, the point of sharpest focus will be the center line of the chart, as you can see in Figure 12.14. If you do have a problem, one of the other lines will be sharply focused instead. Should you discover that your lens consistently front focuses or back focuses, it needs to be recalibrated. Unfortunately, it’s only possible to calibrate a lens for a single focusing distance. So, if you use a particular lens (such as a macro lens) for close-focusing, calibrate for that. If you use a lens primarily for middle distances, calibrate for that. Close-to-middle distances are most likely to cause focus problems, anyway, because as you get closer to infinity, small changes in focus are less likely to have an effect.
Lens Tune-Up
The AF Micro Adj setting in the Camera Settings I-07 (AF 4) menu is the key tool you can use to fine-tune your A-mount lens used with the LA-EA4 adapter. Of course, this assumes you are using an A-mount lens and the adapter. You’ll find the process easier to understand if you first run through this quick overview of the menu options:
- AF Adjustment Setting. Set: This option enables AF fine-tuning for all the lenses you’ve registered using this menu entry. If you discover you don’t care for the calibrations you make in certain situations (say, it works better for the lens you have mounted at middle distances but is less successful at correcting close-up focus errors), you can deactivate the feature as you require. You should set this to On when you’re doing the actual fine-tuning. Adjustment values range from –20 to +20. Off: Disables autofocus micro adjustment.
- Amount. You can specify values of plus or minus 20 for each of the lenses you’ve registered. When you mount a registered lens, the degree of adjustment is shown here. If the lens has not been registered, then +/-0 is shown. If “-” is displayed, you’ve already registered the maximum number of lenses—up to 30 different lenses can be registered with each camera.
- Clear. Erases all user-entered adjustment values for the lenses you’ve registered. When you select the entry, a message will appear. Select OK and then press the center button of the control wheel to confirm.
Evaluate Current Focus
The first step is to capture a baseline image that represents how the lens you want to fine-tune autofocuses at a particular distance. You’ll often see advice for photographing a test chart with millimeter markings from an angle, and the suggestion that you autofocus on a particular point on the chart. Supposedly, the markings that actually are in focus will help you recalibrate your lens. The problem with this approach is that the information you get from photographing a test chart at an angle doesn’t actually tell you what to do to make a precise correction. So, your lens back focuses three millimeters behind the target area on the chart. So what? Does that mean you change the Saved Value by –3 clicks? Or –15 clicks? Angled targets are a “shortcut” that don’t save you time.
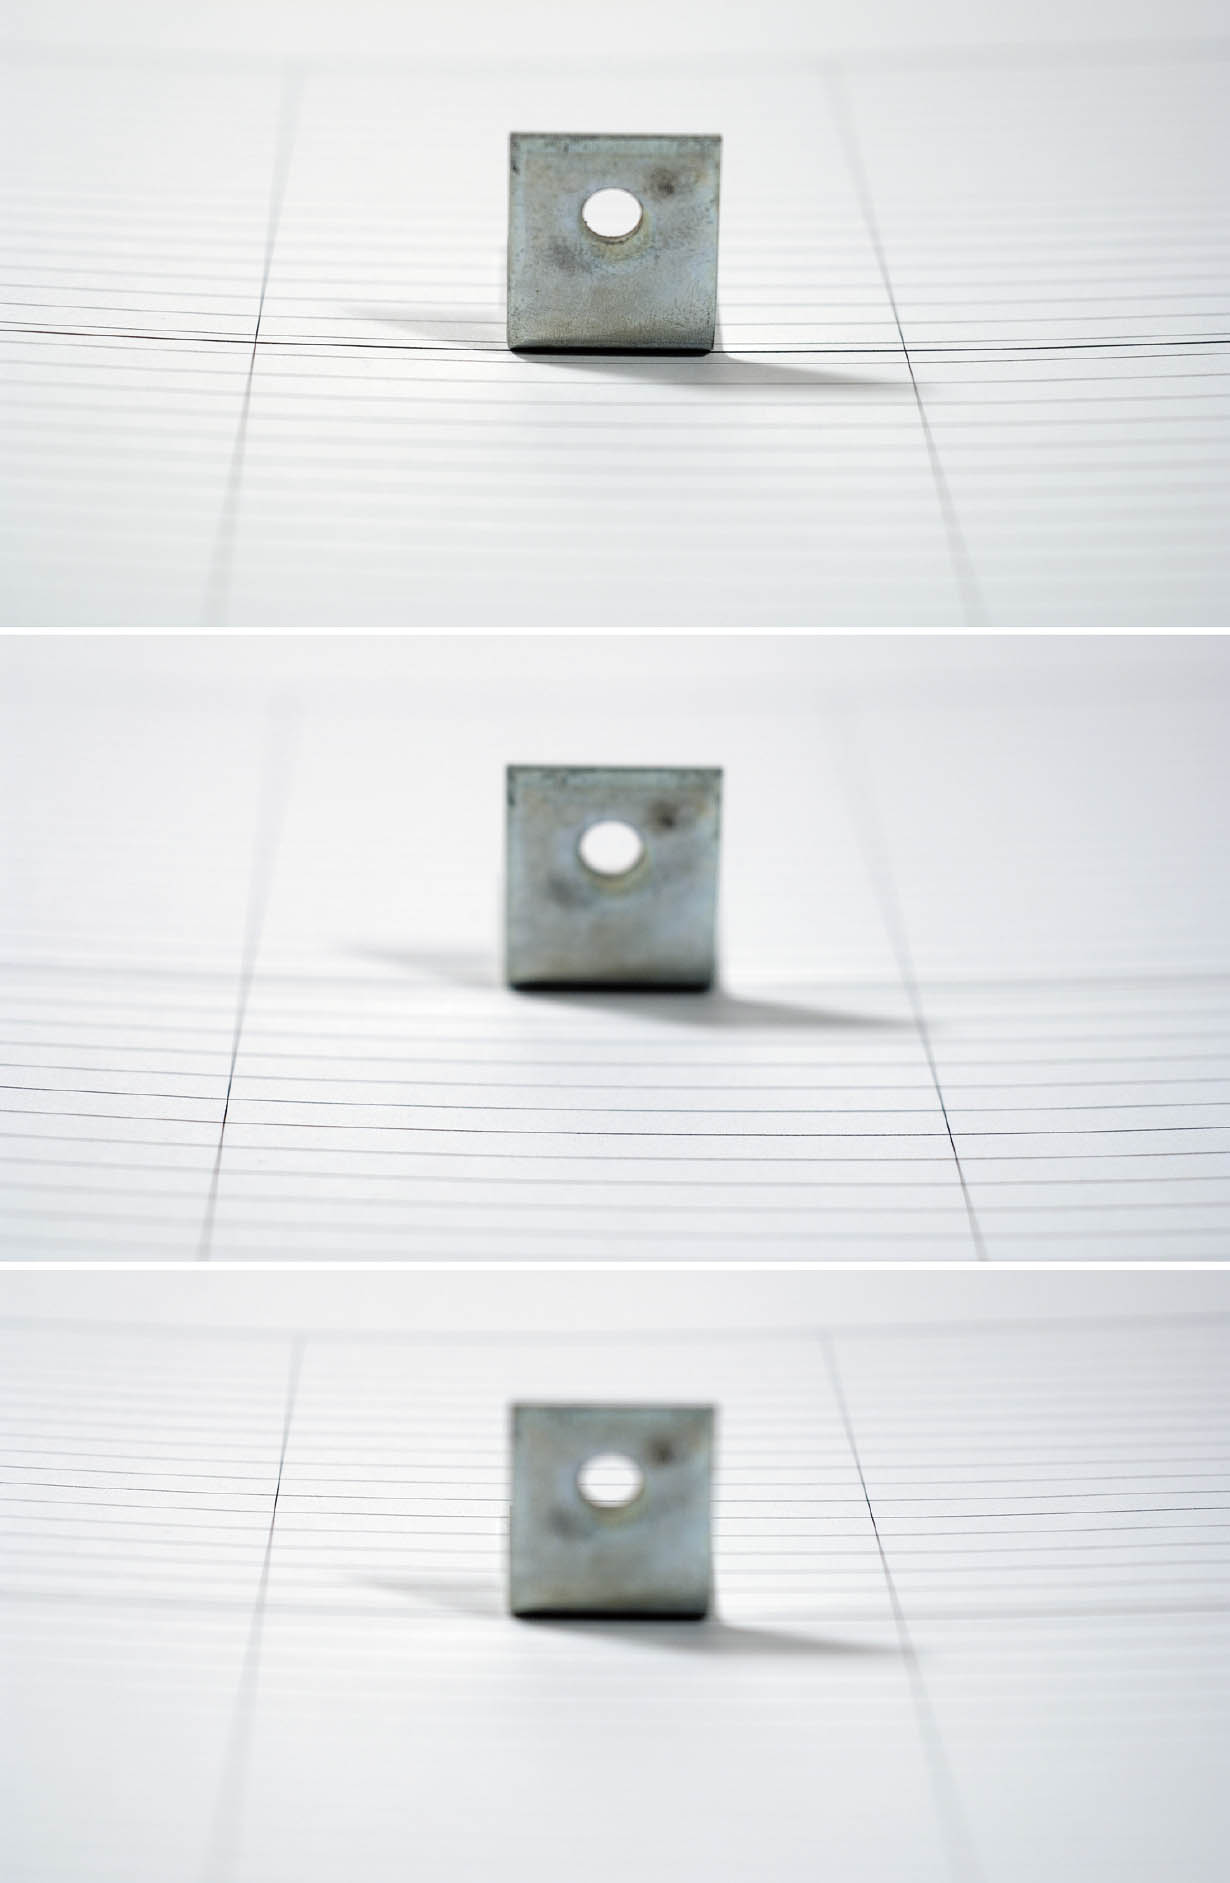
Figure 12.14 Correct focus (top), front focus (middle), and back focus (bottom).
Instead, you’ll want to photograph a target that represents what you’re actually trying to achieve: a plane of focus locked in by your lens that represents the actual plane of focus of your subject. For that, you’ll need a flat target, mounted precisely perpendicular to the sensor plane of the camera. Then, you can take a photo, see if the plane of focus is correct, and if not, dial in a bit of fine-tuning in the AF Fine Tuning menu, and shoot again. Lather, rinse, and repeat until the target is sharply focused.
You can use the focus target shown in Figure 12.15, or you can use a chart of your own, as long as it has contrasty areas that will be easily seen by the autofocus system, and without very small details that are likely to confuse the autofocus. Download your own copy of my chart from www.dslrguides.com/FocusChart.pdf. (The URL is case sensitive.) Then print out a copy on the largest paper your printer can handle. (I don’t recommend just displaying the file on your monitor and focusing on that; it’s unlikely you’ll have the monitor screen lined up perfectly perpendicular to the camera sensor.) Then, follow these steps:
- 1.Position the camera. Place your camera on a sturdy tripod with a remote release attached, positioned at roughly eye-level at a distance from a wall that represents the distance you want to test for. Keep in mind that autofocus problems can be different at varying distances and lens focal lengths, and that you can enter only one correction value for a particular lens. So, choose a distance (close-up or mid-range) and zoom setting with your shooting habits in mind.
- 2.Set the autofocus mode. Choose the autofocus mode you want to test.
- 3.Level the camera (in an ideal world). If the wall happens to be perfectly perpendicular, you can use a bubble level, plumb bob, or other device of your choice to ensure that the camera is level to match. Many tripods and tripod heads have bubble levels built in. Avoid using the center column, if you can. When the camera is properly oriented, lock the legs and tripod head tightly.
- 4.Level the camera (in the real world). If your wall is not perfectly perpendicular, use this old trick. Tape a mirror to the wall, and then adjust the camera on the tripod so that when you look through the viewfinder at the mirror, you see directly into the reflection of the lens. Then, lock the tripod and remove the mirror.
- 5.Mount the test chart. Tape the test chart on the wall so it is centered in your camera’s viewfinder.
- 6.Photograph the test chart using AF. Allow the camera to autofocus and take a test photo using the remote release to avoid shaking or moving the camera.
- 7.Make an adjustment and re-photograph. Navigate to the Custom Settings menu and choose AF Micro Adj. Make sure the feature has been turned on, then highlight Amount and make a fine-tuning adjustment, plus or minus, and photograph the target again.
- 8.Lather, rinse, repeat. Repeat steps 6 and 7 several times to create several different adjustments to check.
- 9.Evaluate the image(s). If you have the camera connected to your computer with a USB cable or through a Wi-Fi connection, so much the better. You can view the image(s) after transfer to your computer. Otherwise, carefully open the camera card door and slip the memory card out and copy the images to your computer.
Figure 12.15 Use this focus test chart or create one of your own.
- 10.Evaluate focus. Which image is sharpest? That’s the setting you need to use for this lens. If your initial range doesn’t provide the correction you need, repeat the steps between –20 and +20 until you find the best fine-tuning. Once you’ve made an adjustment, the –7 will automatically apply the AF fine-tuning each time that lens is mounted on the camera, as long as the function is turned on.
MAXED OUT
If you’ve reached the maximum number of lenses (which is unlikely—who owns 30 lenses?), mount a lens you no longer want to compensate for, and reset its adjustment value to +/-0. Or you can reset the values of all your lenses using the Clear function and start over.
What Lenses Can Do for You
A sane approach to expanding your lens collection is to consider what each of your options can do for you and then choose the type of lens that will really boost your creative opportunities. Here’s a guide to the sort of capabilities you can gain by adding a lens (using an adapter, if necessary) to your repertoire.
- Wider perspective. A 24-70mm or 28-70mm lens can serve you well for moderate wide-angle to medium telephoto shots. Now you find your back is up against a wall and you can’t take a step backward to take in more subject matter. Perhaps you’re standing on the boulevard adjacent to the impressive domed walls of the Mirogoj Cemetery in Zagreb, Croatia, and you want to show the expanse of the walls, as I did for the photo at top in Figure 12.16, made with the Sony/Zeiss 16-35mm f/4 zoom lens. Or, you might find yourself just behind the baseline at a high school basketball game and want an interesting shot with a little perspective distortion tossed in the mix. If you often want to make images with a super-wide field of view, a wider lens is in your future.
- Bring objects closer. A long focal length brings distant subjects closer to you, allows you to produce images with very shallow depth-of-field, and avoids the perspective distortion that wide-angle lenses provide. If you find the traffic on the street intrusive, as I did in Zagreb, you can zoom in to eliminate the distraction, as in Figure 12.16, center. A lens like the Sony/Zeiss 24-70mm f/4 can be your best friend. For even more magnification you might want to use a longer telephoto, like the 100-400mm lens I used to zoom in on one of the domes, as I did for Figure 12.16, bottom.
- Bring your camera closer. Sony has two excellent macro lenses with f/2.8 maximum apertures, in 50mm and 90mm focal lengths. The Sony 90mm f/2.8 macro lens is preferable to the shorter macro lens in nature photography because you do not need to move extremely close to a skittish subject for high magnification. And you can get a frame-filling photo of a tiny blossom without trampling all the other plants in its vicinity.
- Look sharp. Many lenses, particularly the higher-priced Sony and Zeiss optics, are prized for their sharpness and overall image quality. Your run-of-the-mill lens is likely to be plenty sharp for most applications at the optimum aperture (usually f/8 or f/11), but the very best optics, such as the Zeiss 55mm f/1.8, are definitely superior. You can expect to get excellent sharpness in much of the image area at the maximum aperture, high sharpness even in the corners by one stop down, more consistent sharpness at various focal lengths with a zoom, and better correction for various types of distortions (discussed shortly).

Figure 12.16 A 16mm view shows a broad expanse of wall outside the Mirogoj Cemetery in Zagreb, Croatia (top). A view at roughly the same distance at 100mm (center). A long telephoto lens at 400mm captured this image (bottom).
- More speed. Your basic lens might have the perfect focal length and sharpness for sports photography, but the maximum aperture may be small at telephoto focal lengths, such as f/5.6 or f/6.3 at the far end. That won’t cut it for night baseball or football games, since you’ll need to use an extremely high ISO (where image quality suffers) to be able to shoot at a fast shutter speed to freeze the action. Even outdoor sports shooting on overcast days can call for a high ISO if you’re using a slow zoom lens (with small maximum apertures).
That makes the FE-mount lenses with a very wide aperture (small f/number) such as the 85mm f/1.4 optic a prime choice (so to speak) for low-light photography when you can get close to the action; that’s often possible at an amateur basketball or volleyball game.
Categories of Lenses
Lenses can be categorized by their intended purpose—general photography, macro photography, and so forth—or by their focal length. The range of available focal lengths is usually divided into three main groups: wide-angle, normal, and telephoto. Prime lenses fall neatly into one of these classifications. Zooms can overlap designations, with a significant number falling into the catchall wide-to-telephoto zoom range. This section provides more information about focal length ranges, and how they are used.
Any lens with a focal length of 10mm to 20mm is said to be an ultra-wide-angle lens; from about 20mm to 40mm is said to be a wide-angle lens. Normal lenses have a focal length roughly equivalent to the diagonal of the film or sensor, in millimeters, and so fall into the range of about 45mm to 60mm on a full-frame camera like your a7C model. Telephoto lenses usually fall into the 75mm and longer focal lengths, while those with a focal length much beyond 300mm are referred to as super telephotos.
Using Wide-Angle Lenses
To use wide-angle prime lenses and wide zooms, you need to understand how they affect your photography. Here’s a quick summary of the things you need to know.
- More depth-of-field (apparently). Practically speaking, wide-angle lenses seem to produce more extensive depth-of-field at a particular subject distance and aperture. However, the range of acceptable sharpness actually depends on magnification: the size of the subject in the frame. With a wide-angle lens, you usually include a full scene in an image; any single subject is not magnified very much, so the depth-of-field will be quite extensive. When using a telephoto lens however, you tend to fill the frame with a single subject (using high magnification), so the background is more likely to be blurred. (I’ll discuss this in more detail in the sidebar below.)
You’ll find a wide-angle lens helpful when you want to maximize the range of acceptable sharpness in a landscape, for example. On the other hand, it’s very difficult to isolate your subject (against a blurred background) using selective focus unless you move extremely close. Telephoto lenses are better for this purpose, and as a bonus, they also include fewer extraneous elements of the scene because of their narrower field of view.
- Stepping back. Wide-angle lenses have the effect of making it seem that you are standing farther from your subject than you really are. They’re helpful when you don’t want to back up—or can’t because of impediments—to include an entire group of people in your photo, for example.
- Wider field of view. While making your subject seem farther away, as implied above, a wide-angle lens also provides a more expansive field of view, including more of the scene in your photos.
- More foreground. As background objects appear further back than they do to the naked eye, more of the foreground is brought into view by a wide-angle lens. That gives you extra emphasis on the area that’s closest to the camera. Photograph your home with a 50mm focal length, for example, and the front yard probably looks fairly conventional in your photo. Switch to a wider lens, such as the 12mm setting of the 12-24mm f/4 zoom, and you’ll discover that your lawn now makes up much more of the photo. So, wide-angle lenses are great when you want to emphasize that lake in the foreground, but problematic when your intended subject is located farther in the distance.
- Super-sized subjects. The tendency of a wide-angle lens to emphasize objects in the foreground while de-emphasizing objects in the background can lead to a kind of size distortion that may be more objectionable for some types of subjects than others. Shoot a bed of flowers up close with a 16mm or shorter focal length, and you might like the distorted effect of the nearby blossoms looming in the photo. Take a shot of a family member with the same lens from the same distance, and you’re likely to get some complaints about that gigantic nose in the foreground.
- Perspective distortion. This type of distortion occurs when you tilt the camera, so the plane of the sensor is no longer perpendicular to the vertical plane of your subject. As a result, some parts of the subject are now closer to the sensor than they were before, while other parts are farther away. This is what makes buildings, flagpoles, or NBA players appear to be leaning over backward (like the building shown in Figure 12.17). While this kind of apparent distortion is actually caused by tilting the camera/lens upward (not by a defect in the lens), it can happen with any lens, but it’s most apparent when a wide angle is used.
- Steady cam. You’ll find that it is easier to get photos without blur from camera shake when you hand-hold a wide-angle lens at slower shutter speeds than it is with a telephoto lens. And, thanks to SteadyShot stabilization, you can take sharp photos at surprisingly long shutter speeds at a long focal length without using a tripod. That’s because the reduced magnification of the wide-angle lens or wide-zoom setting doesn’t emphasize camera shake like a telephoto lens does.
- Interesting angles. Many of the factors already listed combine to produce more interesting angles when shooting with wide-angle lenses. Raising or lowering a telephoto lens a few feet probably will have little effect on the appearance of a distant subject that fills the frame. The same change in elevation can produce a dramatic effect if you’re using a short focal length and are close to your subject.

Figure 12.17 Tilting the camera produces this “falling-back” look in architectural photos.
The depth-of-field advantage of wide-angle lenses disappears when you enlarge your picture. Believe it or not, a wide-angle image enlarged and cropped to provide the same subject size as a telephoto shot will have the same depth-of-field. Try it: take a wide-angle photo of a friend from a fair distance. Then, use a longer (telephoto) zoom setting from the same shooting position to take the same picture; naturally, your friend will appear to be larger in the second because of the greater telephoto magnification.
Download the two photos to your computer. While viewing the wide-angle shot, magnify it with the zoom or magnify tool so your friend is as large as in the telephoto image. You’ll find that the wide-angle photo will have the same depth-of-field as the telephoto image; for example, the background will be equally blurred.
Avoiding Potential Wide-Angle Problems
Wide-angle lenses have a few quirks that you’ll want to keep in mind when shooting so you can avoid falling into some common traps. Here’s a checklist of tips for avoiding common problems:
- Symptom: converging lines. Unless you want to use wildly diverging lines as a creative effect, it’s a good idea to keep horizontal and vertical lines in landscapes, architecture, and other subjects carefully aligned with the sides, top, and bottom of the frame. To prevent undesired perspective distortion, you must take care not to tilt the camera. If your subject is very tall, like a building, you may need to shoot from an elevated position (like a high level in a parking garage) so you won’t need to tilt the lens upward. And if your subject is short, like a small child, get down to a lower level so you can get the shot without tilting the lens downward.
- Symptom: color fringes around objects. Lenses often produce photos that are plagued with fringes of color around backlit objects, produced by chromatic aberration. This common lens flaw comes in two forms: longitudinal/axial, in which all the colors of light don’t focus in the same plane, and lateral/transverse, in which the colors are shifted to one side. Axial chromatic aberration can be reduced by stopping down the lens (to f/8 or f/11, for example), but transverse chromatic aberration cannot.
Better-quality lenses reduce both types of imaging defect; it’s common for reviews to point out these failings, so you can choose the best performing lenses that your budget allows. The Lens Compensation feature in the Camera Settings I-02 (Quality/Image Size 2) menu can help reduce this problem. Leave it set for Auto to get the chromatic aberration reduction processing that the camera can provide.
- Symptom: lines that bow outward. Some wide-angle lenses cause straight lines to bow outward, an effect called barrel distortion; you’ll see the strongest effect at the edges. Most fisheye (or curvilinear) lenses produce this effect as a feature of the lens; it’s much more obvious than with any other type of lens. (See Figure 12.18.) The mild barrel distortion you get with a conventional lens is rarely obvious except in some types of architectural photography. If you find it objectionable, you’ll need to use a well-corrected lens.
Manufacturers like Sony do their best to minimize or eliminate it (producing a rectilinear lens), often using aspherical lens elements (which are not cross-sections of a sphere). You can also minimize barrel distortion simply by framing your photo with some extra space all around, so the edges where the bowing outward is most obvious can be cropped out of the picture. The Lens Correction feature can help reduce this problem, too. Leave it set to Auto to allow the processor to minimize the slight barrel distortion that can occur with the more affordable lenses.

Figure 12.18 Many wide-angle lenses cause lines to bow outward toward the edges of the image. That’s often not noticeable unless you use a fisheye lens; the effect is considered to be interesting and desirable.
- Symptom: light and dark areas when using a polarizing filter. You should be aware that polarizers work best when the camera is pointed 90 degrees away from the sun and have the least effect when the camera is oriented 180 degrees from the sun. This is only half the story, however. With lenses like the 12-24mm or 16-35mm zooms, the range is extensive enough to cause problems.
Think about it: if you use the widest setting of such a zoom and point it at a part of a scene that’s at the proper 90-degree angle from the sun, the areas of the scene that are at the edges of the frame will be oriented at much wider angles from the sun. Only the center of the image area will be at exactly 90 degrees. When the filter is used to darken a blue sky, the sky will be very dark near the center of your photo. Naturally, the polarizing effect will be much milder at the edges so the sky in those areas will be much lighter in tone (less polarized). The solution is to avoid using a polarizing filter in situations where you’ll be including the sky with lenses that have an actual focal length of less than about 28mm.
Using Telephoto and Tele-Zoom Lenses
Telephoto lenses also can have a dramatic effect on your photography. Here are the most important things you need to know. In the next section, I’ll concentrate on telephoto considerations that can be problematic—and how to avoid those problems.
- Selective focus. Long lenses have reduced depth-of-field, a shallow range of acceptably sharp focus, especially at wide apertures (small f/numbers); this is useful for selective focus to isolate your subject. You can set the widest aperture to create shallow depth-of-field or close it down (to a small f/number) to allow more of the scene to appear to be in acceptably sharp focus. The flip side of the coin is that even at f/16, a 300mm and longer lens will not provide much depth-of-field, especially when the subject is large in the frame (magnified). Like fire, the depth-of-field aspects of a telephoto lens can be friend or foe.
- Getting closer. Telephoto lenses allow you to fill the frame with wildlife, sports action, and candid subjects. No one wants to get a reputation as a surreptitious or “sneaky” photographer (except for paparazzi), but when applied to candids in an open and honest way, a long lens can help you capture memorable moments while retaining enough distance to stay out of the way of events as they transpire.
- Reduced foreground/increased compression. Telephoto lenses have the opposite effect of wide angles: they reduce the importance of things in the foreground by squeezing everything together. This so-called compressed perspective makes objects in the scene appear to be closer than they are to the naked eye. You can use this effect as a creative tool. You’ve seen the effect hundreds of times in movies and on television, where the protagonist is shown running in and out of traffic that appears to be much closer to the hero (or heroine) than it really is.
- Accentuates camera shakiness. Telephoto focal lengths hit you with a double whammy in terms of camera/photographer shake. The lenses themselves are bulkier, more difficult to hold steady, and may even produce a barely perceptible seesaw rocking effect when you support them with one hand halfway down the lens barrel. As they magnify the subject, they amplify the effect of any camera shake. It’s no wonder that image stabilization like Optical SteadyShot (OSS) is especially popular among those using longer lenses, and why Sony includes this feature in the 18-200mm zooms (and many of the long A-mount lenses).
- Interesting angles require creativity. Telephoto lenses require more imagination in selecting interesting angles, because the “angle” you do get on your subjects is so narrow. Moving from side to side or a bit higher or lower can make a dramatic difference in a wide-angle shot but raising or lowering a telephoto lens a few feet probably will have little effect on the appearance of the distant subjects you’re shooting.
Avoiding Telephoto Lens Problems
Many of the “problems” that telephoto lenses pose are really just challenges and not that difficult to overcome. Here is a list of the seven most common picture maladies and suggested solutions.
- Symptom: flat faces in portraits. Head-and-shoulders portraits of humans tend to be more flattering when a focal length of 50mm to 85mm is used with a full-frame camera. Longer focal lengths compress the distance between features like the nose and ears, making the face look wider and flat. (Conversely, a wide-angle lens will make the nose look huge and ears tiny if you move close enough for a head-and-shoulders portrait.) So, avoid using a focal length much longer than about 60mm with your a7C unless you’re forced to shoot from a greater distance. (Use a wide-angle lens only when shooting three-quarters/full-length portraits, or group shots.)
- Symptom: blur due to camera shake. Because a long focal length amplifies the effects of camera shake, make sure the SteadyShot stabilization is not turned off (with a menu item). Then, if possible, use a faster shutter speed; that may mean that you’ll need to set a higher ISO to be able to do so. Of course, a firm support like a solid tripod is the most effective tool for eliminating camera shake, especially if you trip the shutter with a remote commander accessory or the self-timer to avoid the risk of jarring the camera. Of course, only the fast shutter speed option will be useful to prevent blur caused by subject motion; SteadyShot or a tripod won’t help you freeze a race car in mid-lap.
- Symptom: color fringes. Chromatic aberration is the most pernicious optical problem found in tele-photo lenses. There are others, including spherical aberration, astigmatism, coma, curvature of field, and similarly scary-sounding phenomena. The best solution for any of these is to use a better lens that offers the proper degree of correction for aberrations or stop down the lens (to f/8 or f/11) to minimize the problem. But that’s not always possible. Your second-best choice may be to correct the fringing using the a7C’s Lens Compensation feature, or by using your favorite RAW conversion tool or image editor. Photoshop’s Lens Correction filter offers sliders that minimize both red/cyan and blue/yellow fringing. A feature such as this (also available with some other software) can be useful in situations where the a7C’s Lens Compensation feature doesn’t fully correct for chromatic aberration.
- Symptom: lines that curve inward. Pincushion distortion is common in photos taken with many tele-photo lenses; lines, especially those near the edges of the frame, bow inward like the pincushion your grandma might have used. You can take photos of a brick wall at various focal lengths with your zoom lens to find out where the pincushion distortion is the most obvious; that will probably be at or near the longest focal length. Like chromatic aberration, it can be partially corrected using tools like Photoshop’s Lens Correction filter (or a similar utility in some other software).
- Symptom: low contrast from haze or fog. When you’re photographing distant objects, a long lens shoots through a lot more atmosphere, which generally is muddied up with extra haze and fog. The dust or moisture droplets in the atmosphere can reduce contrast and mute colors. Some feel that a skylight or UV filter can help, but this practice is mostly a holdover from the film days. Digital sensors are not sensitive enough to UV light for a UV filter to have much effect. A polarizer might help a bit, but only in certain circumstances. I don’t consider this to be a huge problem because it’s easy to boost contrast and color saturation in Picture Styles (a menu item) or later in image-editing software.
- Symptom: low contrast from flare. Lenses are often furnished with lens hoods for a good reason: to minimize the amount of stray light that will strike the front element causing flare or a ghost image of the diaphragm containing the aperture. A hood is effective when the light is at your side, but it has no value when you’re shooting toward the sun. On the other hand, you’ll often be shooting with the light striking the lens from an angle. In this situation, the lens hood is only partially effective, so minimize flare by using your hand or cap to cast a shadow over the front element of the lens. (Just be careful not to let your hand or cap intrude into the image area.)
- Symptom: dark flash photos. Edge-to-edge flash coverage isn’t as problematic with telephoto lenses as it is with wide angles. (The built-in flash simply cannot provide light that covers the entire field of view that’s recorded by a lens shorter than 16mm.) The shooting distance is the problem with longer lenses. A 210mm focal length might allow you to make a distant subject appear close to the camera, but the flash isn’t fooled. You’ll need extra power for distant flash shots, making a large accessory flash unit a valuable accessory.
If you do not have a powerful flash unit and cannot get closer to the subject (like Lady Gaga strutting her stuff on a dark stage), try setting the camera’s ISO level to 3200. This increases the sensitivity of the sensor so less light is required to make a bright photo; of course, the photo is likely to be grainy because of digital noise. If that does not solve the problem, you will need to set an even higher ISO, but then you’ll get even more obvious digital noise in your photo.