
The autofocus system found in the Sony a7C is one of its most innovative features. The camera has the ability to lock in on subjects, track their motion, switch to face detection/tracking, then progress to even more precise eye detection—and then backtrack to the other methods as movement continues through the frame. That’s particularly impressive because, when mirrorless digital cameras were originally introduced, they didn’t excel at autofocus.
The mirrors found in traditional SLRs had two distinct advantages: they allowed previewing an image through an optical viewfinder and made it possible to direct some of the incoming illumination to a separate electronic autofocus system. At the moment of exposure, focus was locked, and the mirror flipped up out of the way, allowing the light to pass through the camera body to the film or digital sensor. Autofocus was fast and reasonably accurate.
Of course, the mirror system had its own set of drawbacks. Moving mirrors are noisy and bulky and increase the distance between the lens mounting flange and the film or sensor, resulting in larger cameras. Mirror-based viewing systems also mean that autofocus can’t take place during exposure, which is particularly problematic when capturing video. Those mirrors were, at best, a kluge introduced to allow previewing an image through the same lens used to take the picture; early cameras had no mirrors, nor did the first 35mm cameras (dating from the first Leica prototypes of 1913). Compact models with mirrors for previewing images didn’t start to make in-roads until just before World War II, and mirrorless cameras from Leica and others were prized for their light weight, smaller size, and quietness for another 30 to 35 years.
We eventually became so accustomed to the limitations of single-lens reflex models with mirrors that the first digital mirrorless cameras seemed very limited, especially when it came to autofocus. The initial generations of mirrorless cameras from Sony and other vendors had to use a slower AF method, based solely on what the imaging sensor sees. But that was then, and this is now. Sony has combined the slow, but inherently very accurate method of autofocus, called contrast detection, with a much speedier phase detection system to produce a single “4D” (Sony’s terminology) hybrid AF system that combines speed with accuracy and exceptional tracking capabilities.
However, there is still one logistical problem to overcome: the camera doesn’t really know, for certain, what subject you want to be in sharp focus. It may select an object and lock in focus with lightning speed. (Sony claims 0.02-second response in some cases.) However, the focus plane isn’t guaranteed to be your intended center of interest in your photograph. Or, the camera may lock focus too soon, or too late. This chapter will help you understand the options available with your Sony a7C so you can help the camera understand what you want to focus on, when, and maybe even why.
Getting into Focus
Learning to use the a7C’s autofocus system is easy, but you do need to fully understand how the system works to get the most benefit from it. Once you’re comfortable with autofocus, you’ll know when it’s appropriate to use the manual focus option, too. The important thing to remember is that focus isn’t absolute. For example, some things that appear to be in sharp focus at a given viewing size and distance might not be in focus at a larger size and/or closer distance. That family portrait hanging over the mantle may look fine when you’re seated on the sofa, but it appears less sharp when examined from two feet away.
In addition, the goal of optimum focus isn’t always to make things look sharp. For some types of subjects, not all of an image needs to be sharp. Controlling exactly what is sharp and what is not is part of your creative palette. Use of depth-of-field characteristics to throw part of an image out of focus while other parts are sharply focused is one of the most valuable tools available to a photographer. But selective focus works only when the desired areas of an image are in focus properly. For the digital camera photographer, correct focus can be one of the trickiest parts of the technical and creative process.
As I said in the introduction to this chapter, there are two major focusing methods used by modern digital cameras: phase detection, used by all digital cameras with mirrors, including the fixed-mirror Sony models like the a77 II, and contrast detection, which was the primary focusing method employed by all mirrorless models until fairly recently.
Contrast Detection
Contrast detection relies on examining the image formed on the sensor, and how it works is illustrated, if over-simplified, in Figure 8.1. At top in the figure, the transitions between the edges of the vertical wood grain grooves are soft and blurred because of the low contrast between them. The traditional contrast detection autofocus system looks only for contrast between edges, and those edges can run in any direction. At the bottom of the figure, the image has been brought into sharp focus, and the edges have much more contrast; the transitions are sharp and clear. Although this example is a bit exaggerated so you can see the results on the printed page, it’s easy to understand that when maximum contrast in a subject is achieved using contrast detection, it can be deemed to be in sharp focus.

Figure 8.1 Using the contrast detection method of autofocus, a camera can evaluate the increase in contrast in the edges of subjects, starting with a blurry image (top) and producing a sharp, contrasty image (bottom).
Contrast detection works best with static subjects because it is inherently slower and not well-suited for tracking moving objects. Contrast detection works less well in dim light because its accuracy depends on its ability to detect variations in brightness and contrast. You’ll find that contrast detection works better with faster lenses, too, because larger lens openings admit more light that can be used by the sensor to measure contrast. Despite its limitations, you’ll find that contrast detection is more accurate than phase detection, so Sony’s hybrid system uses it to fine-tune focus after phase detection has achieved approximate focus (more quickly).
Phase Detection
In the a7C, phase detection is built into pixels embedded in the sensor and combines with contrast detection to give us, potentially, the best of both worlds. Phase detection is also used in a different way when you use A-mount (rather than E-mount) lenses attached to the optional LA-EA2 or LA-EA4 A-mount lens adapters. Both adapters have their own built-in phase detection autofocus systems that bypass and replace the hybrid AF technology built into your camera. It’s basically the same technology used in Sony’s A-mount SLT (single-lens translucent) models, which have a fixed semi-transparent mirror.
With phase detection, each autofocus sampling area is divided into two halves. The two halves are compared, much like (actually, exactly like) a two-window rangefinder used in surveying, weaponry, and non-SLR cameras such as the venerable Leica M film models. The contrast between the two images changes as focus is moved in or out, until sharp focus is achieved when the images are “in phase,” or lined up. Figure 8.2 can help you visualize how this works.
Figure 8.3 is another way of visualizing phase detection. (This is a greatly simplified view just for illustration purposes.) In Figure 8.3 (top left), a typical horizontally oriented focus sensor is looking at a series of parallel vertical lines in a weathered piece of wood. The lines are broken into two halves by the sensor’s rangefinder prism, and you can see that they don’t line up exactly; the image is slightly out of focus. The rangefinder approach of phase detection tells the camera exactly how much out of focus the image is, and in which direction (focus is too near, or too far), thanks to the amount and direction of the displacement of the split image.
The camera can snap the image into sharp focus and line up the vertical lines, as shown in Figure 8.3, top right, in much the same way that rangefinder cameras align two parts of an image to achieve sharp focus. Even better, because it knows the amount of focus travel needed, the camera is able to adjust the speed of the lens’s AF motor to move the lens elements slowly or quickly, depending on how much focus adjustment is needed.
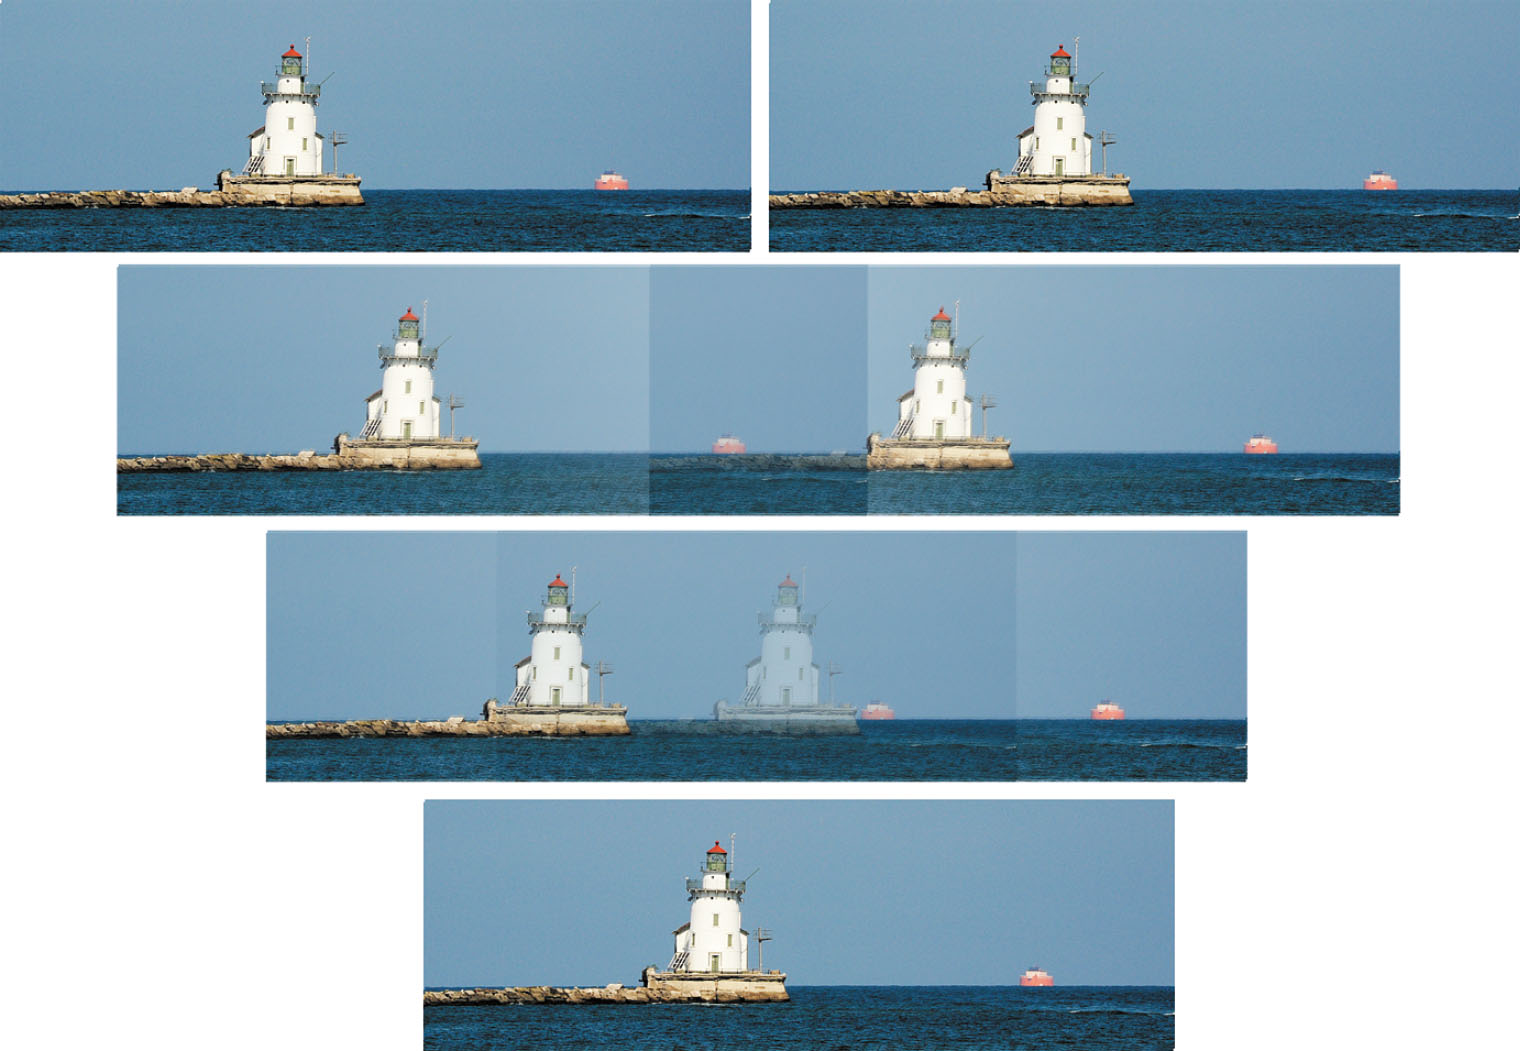
Figure 8.2 Phase detection “lines up” portions of your image using rangefinder-like comparison to achieve focus.
HORIZONTAL PROBLEMS
You should know that each of these sensors consist of a tiny horizontal array of pixels (represented by the red and green rectangles in Figure 8.3) and do the best job of detecting vertical lines that intersect them at a 90-degree angle. These vertical-sensitive sensors also do a fairly good job lining up diagonally oriented features. But they are less effective when faced with horizontal features, such as the rotated example shown at bottom left in Figure 8.3. The solution would be to include some vertically oriented, horizontal-line-sensitive sensors (as in Figure 8.3, bottom right), but Sony didn’t need to do this, as the a7C’s complementary contrast detection fine-tuning system handles horizontal features well. However, with very difficult subjects, if you find yourself photographing something with predominantly horizontal lines, you can improve your results by rotating the camera to better align the a7C’s PDAF sensors with your subject.
The phase detection sensors are all line sensors, which means they work best with features that transect the sensor either perpendicularly or at an angle, as visualized in Figure 8.3, top left and right. It’s easy to detect when the two halves of the vertical lines of the weathered wood—actually a 19th century outhouse—are aligned. However, when the same sensor is asked to measure focus for, say, horizontal lines that don’t split up quite so conveniently, or, in the worst case, subjects such as the sky (which may have neither vertical nor horizontal lines), focus can slow down drastically, or even become impossible. One such scenario is pictured in Figure 8.3, bottom left. A possible solution is to incorporate vertically oriented AF sensors, which can easily focus horizontal subject matter (Figure 8.3, bottom right) or sensors that are sensitive in both horizontal and vertical orientations. Such sensors are called “cross-type” sensors.
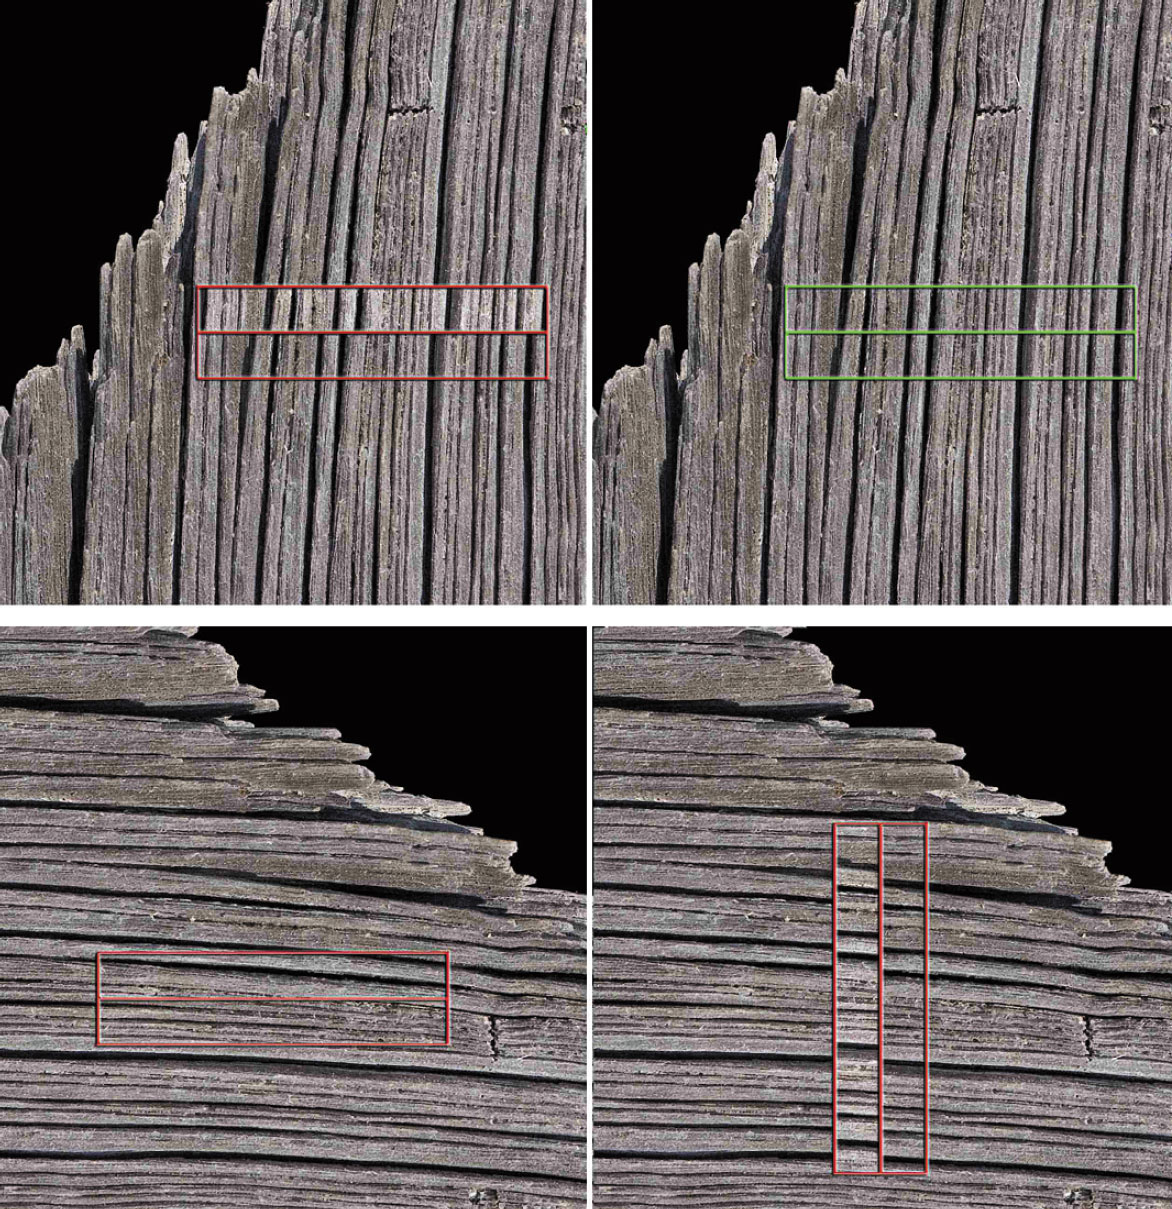
Figure 8.3 When an image is out of focus, the split lines don’t align precisely (top left). Using phase detection, the camera is able to align the features of the image and achieve sharp focus quickly (top right). Horizontal lines aren’t ideal for horizontally oriented sensors (bottom left) and require vertically oriented AF sensors (bottom right).
However, none of Sony’s mirrorless models have cross sensors, as such phase detect pixels are difficult (expensive, actually) to embed in today’s image sensors. Canon uses a different approach. Once the focus plane has been achieved using the line sensors of the phase-detect system, the camera is able to use contrast detection to fine-tune focus, if necessary. The combination provides the speed of phase detection with the accuracy of contrast detection.
As with any rangefinder-like function, accuracy is better when the “base length” between the two images is larger, so the two split images have greater separation. (Think back to your high school trigonometry; you could calculate a distance more accurately when the separation between the two points where the angles were measured was greater.) For that reason, phase detection autofocus is more accurate with larger (wider) lens openings than with smaller lens openings, and, with the Sony a7C, may not work at all when the f/stop is smaller than f/8 (Sony says f/9 or smaller). Obviously, the “opposite” edges of the lens opening are farther apart with a lens having an f/2.8 maximum aperture than with one that has a smaller, f/5.6 maximum f/stop, and the base line is much longer. The camera is able to perform these comparisons and then move the lens elements directly to the point of correct focus very quickly, in milliseconds.
Because of the speed advantages of phase detection, makers of mirrorless cameras have been adding on-chip phase detection points to their sensors. Sony, because it designs and makes its own sensors, has been able to do a stellar job with this. The a7C has a whopping 693 phase detection pixels embedded in its sensor.
Comparing the Two Hybrid Components
The Sony a7C autofocus system uses both phase detection autofocus (PDAF) and contrast detection autofocus (CDAF) to provide a combination of fast and accurate AF, together covering virtually all of the frame. Figure 8.4 shows the layout of the autofocus points and zones used. The CDAF and PDAF areas are overlaid on top of each other and can be used in tandem, but the figure shows them separately for easy reference.
- Phase detection points. The 693 phase detection points of the a7C, represented by the green boxes at left in the figure, are spread over a wide area. In Super 35/APS-C mode, as few as 221 PDAF points may be in play.
- Contrast detection zones. The blue boxes at right in Figure 8.4 represent the 425 areas of the sensor used by the a7C when deploying contrast detection in full-frame mode. Notice that a large area of the frame is covered by the contrast-sensitive areas of the sensor. When using Super 35/APS-C mode contrast detection provides coverage of the entire cropped frame.

Figure 8.4 Autofocus zones for fast phase detection (left) and precise contrast detection (right).
The hybrid autofocus system uses both types of AF. The process begins by rapidly focusing using PDAF (see Figure 8.5, left), because the rangefinder approach always tells the camera whether to move focus closer or farther, and by approximately how much. No hunting is required, which is often the case with phase detection, which needs to tweak the focus point until it settles on the sharpest position.
NOTE COMPATIBLE LENSES
Not all lenses are compatible with the phase detection component. Older lenses, and lenses that need to be updated using firmware, don’t support phase detection, which in turn blocks use of the Automatic AF, AF Track Duration, and AF Drive Speed features explained in Chapter 3. A-Mount lenses used with the LA-EA2 or LA-EA4 adapters do not support focal plane phase detection, although most can be used with their own phase detection built into the adapter itself.
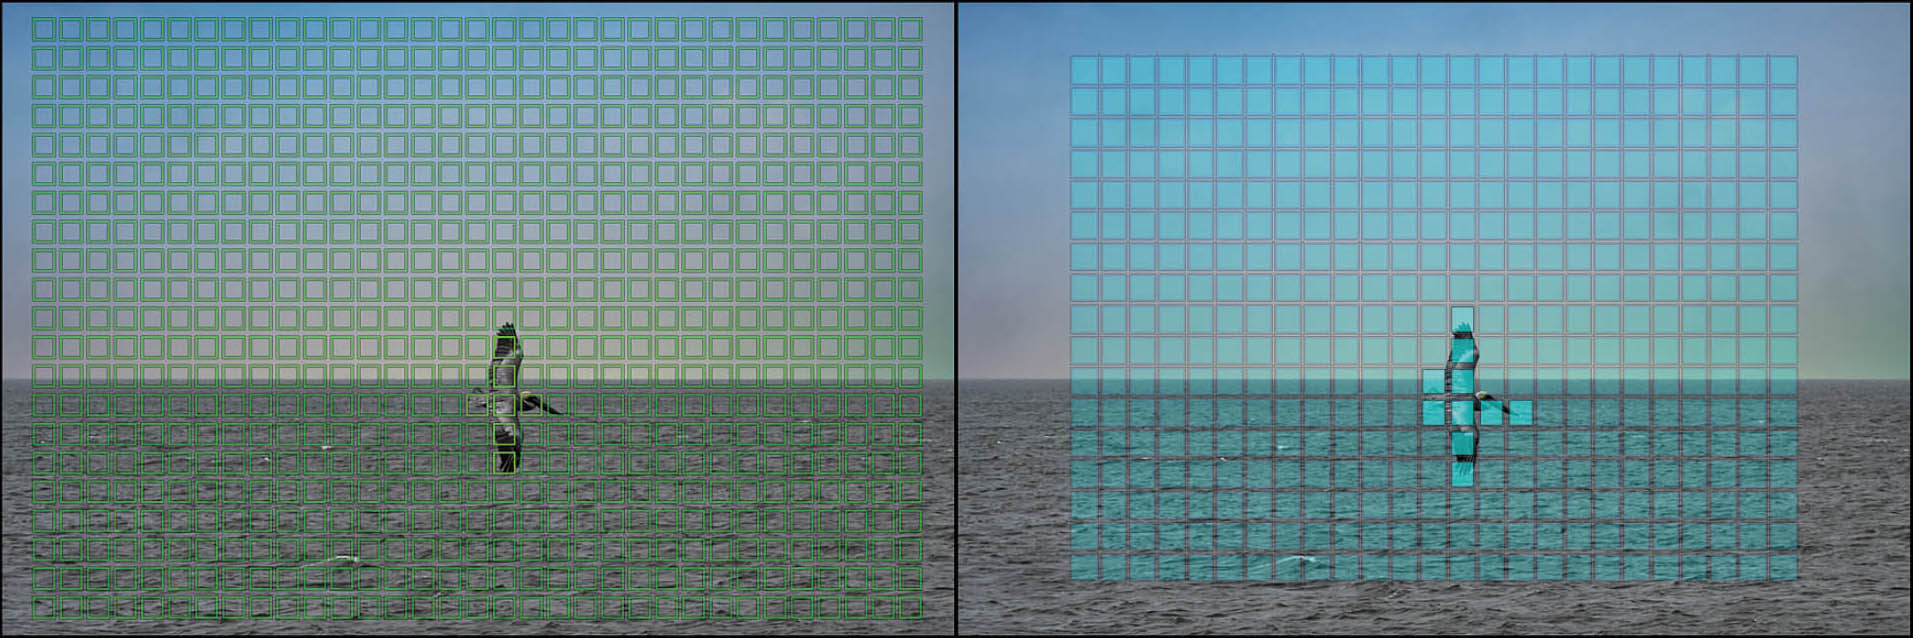
Figure 8.5 Phase detection zones (left) and contrast detection zones (right).
Once the PDAF has done its stuff, contrast detection kicks in, using its finicky but more accurate focusing capabilities to fine-tune focus. (See Figure 8.5, right.) So, you end up with speedy initial focus (PDAF) and slightly slower final adjustments (CDAF), providing a perfect hybrid compromise. That’s why Sony didn’t switch to phase detection completely. Here’s a quick rundown of the advantages of a hybrid system:
- Contrast detection works with more image types. Contrast detection doesn’t require subject matter to have lines that are at angles to the PDAF points to work optimally, as phase detection does. Any subject that has edges running in any direction can be used to achieve sharp focus.
- Contrast detection can focus on larger areas of the scene. Whereas phase detection focus can be achieved only at the points that fall on one of the special autofocus sensor pixels (which are smaller than the green boxes shown in the figures), with contrast detection much larger portions of the image can be used as focus zones. Focus is achieved with the actual sensor image, so focus point selection is simply a matter of choosing which part of the sensor image to use.
- Contrast detection can be more accurate with some types of scenes. Phase detection can fall prey to the vagaries of uncooperative subject matter: if suitable lines aren’t available, the system may achieve less than optimal focus. In addition, accuracy decreases as the maximum aperture baseline used for calculations becomes smaller. A lens with a maximum aperture of f/5.6 will focus with less accuracy than one with an f/1.8 maximum aperture. Contrast detection focus is more clear-cut. In most cases, the camera is able to determine clearly when sharp focus has been achieved.
- Phase detection “knows” which direction to focus. The split image seen by phase detection sensors reveal instantly whether focus is too close or too far. As I mentioned earlier, there is no need to “hunt” for the focus point, as the AF system can immediately adjust in the proper direction. That boosts focus speed considerably.
- Phase detection “knows” how far out of focus a subject is. The separation between the two halves of the image let the AF system know whether the subject is grossly out of focus, or whether only a slight adjustment is needed. That means faster autofocus, too.
- Phase detection isn’t as dependent on scene brightness. As long as the split images are illuminated well enough for the AF system to make an evaluation, greater or lesser amounts of light don’t have as much of an effect on speed and accuracy. Remember, the reason phase detection systems operate less well at smaller f/stops is because the baseline diameter of the aperture is smaller.
- Sony’s 4D high-density tracking can follow moving subjects. The a7C’s phase detection system can achieve focus quickly (even when shooting continuously at 10 frames per second), whether your subject is moving horizontally or vertically (what Sony calls area), toward you, or away from you (depth in Sony-speak). To those three dimensions, the system adds the fourth dimension of time (which the company labels as steadfast), so focus can be maintained as it changes position. The 4D AF also deploys high-density tracking to zero in on moving subjects, using focus areas that are smaller than the 693 phase detection sensor areas shown in Figure 8.5.
Focus Modes and Options
Now that you understand the fundamental principles of how the a7C achieves focus, let’s discuss the practical application of these principles to your everyday picture-taking activities by setting the various modes and options available for the autofocus system. We’ll also discuss the use of manual focus, and when that method might be preferable to autofocus.
As you’ve come to appreciate by now, the a7C offers many options for your photography. Focus is no exception. Of course, as with other aspects of this camera, you can set the shooting mode to either Auto option and the camera will do just fine in most situations, using its default settings for autofocus. But, if you want more creative control, the choices are there for you to make.
FOCUS MODES/FOCUS AREA MODES
Your camera has a lot of modes! To keep the various focus options straight, remember that focus modes determine when the camera focuses: either once or continuously using autofocus, or manually. Focus area modes determine where in the frame the a7C collects the information used to achieve autofocus.
So, no matter what shooting mode you’re using, your first choice is whether to use autofocus or manual focus. Yes, there’s also a Direct Manual Focus (DMF) option, discussed in Chapter 3, but that still provides autofocus, with the option of fine-tuning focus manually before taking the shot. Manual focus presents you with great flexibility along with the challenge of keeping the image in focus under what may be difficult conditions, such as rapid motion of the subject, darkness of the scene, and the like. Later in this chapter, I’ll cover manual focus as well as DMF. For now, I’ll assume you’re going to rely on the camera’s conventional AF mode.
The Sony a7C has three basic AF modes: AF-S (Single-shot autofocus) and AF-C (Continuous autofocus), as well as Automatic AF (AF-A), which switches between the two other modes as required. Once you have decided on which of these to use, you also need to tell the camera how to select the area used to measure AF. In other words, after you tell the camera how to autofocus, you also have to tell it where to direct its focusing attention. I’ll explain both AF modes and AF area modes in more detail.
When you select manual focus (MF) in the Focus Mode entry in the Camera Settings I-04 menu, using the Function menu, Quick Navi screen, or by switching using a defined button, the a7C lets you set the focus yourself by turning the focus ring on the lens. There are some advantages and disadvantages to this approach. While your batteries will last slightly longer in manual focus mode, it will take you longer to focus the camera for each photo. And unlike older 35mm film SLRs, digital cameras’ electronic viewfinders and LCDs are not designed for optimum manual focus. Pick up any advanced film camera and you’ll see a big, bright viewfinder with a focusing screen that’s a joy to focus on manually. So, although manual focus is still an option for you to consider in certain circumstances, it’s not as easy to use as it once was. I recommend trying the various AF options first and switching to manual focus only if AF is not working for you. And then be sure to take advantage of the focus peaking feature and the automatic frame enlargement (MF Assist), which can make it easier to determine when the focus is precisely on the most important subject element. And remember, if you use the DMF mode, you can fine-tune the focus after the AF system has finished its work.
Focus Pocus
Back in the pre-AF days, manual focusing was problematic because our eyes and brains have poor memory for correct focus, which is why your eye doctor must shift back and forth between sets of lenses and ask, “Does that look sharper or was it sharper before?” in determining your correct prescription. Similarly, manual focusing involves jogging the focus ring back and forth as you go from almost in focus, to sharp focus, to almost focused again. The little clockwise and counterclockwise arcs decrease in size until you’ve zeroed in on the point of correct focus. What you’re looking for is the image with the most contrast between the edges of elements in the image.
The Sony a7C can assess sharpness quickly, and it’s also able to remember the progression perfectly, making the entire process fast and precise. Unfortunately, even this high-tech system doesn’t really know with any certainty which object should be in sharpest focus. Is it the closest object? The subject in the center of the frame? Something lurking behind the closest subject? A person standing over at the side of the picture? Many of the techniques for using autofocus effectively involve telling the camera exactly what it should be focusing on.
Adding Circles of Confusion
But there are other factors in play, as well. You know that increased depth-of-field brings more of your subject into focus. But more depth-of-field also makes autofocusing (or manual focusing) more difficult because the contrast is lower between objects at different distances. So, autofocus with a 300mm lens (or zoom setting) may be easier than at a 16mm focal length (or zoom setting) because the longer lens has less apparent depth-of-field. By the same token, a lens with a maximum aperture of f/1.8 will be easier to autofocus (or manually focus) than one of the same focal length with an f/4 maximum aperture, because the f/4 lens has more depth-of-field and a dimmer view. It’s also important to note that lenses with a maximum aperture smaller than f/5.6 would give your Sony Alpha’s autofocus system fits, because the smaller opening (aperture) would allow less light to enter or to reach the autofocus sensor.
To make things even more complicated, many subjects aren’t polite enough to remain still. They move around in the frame, so that even if the camera’s lens is sharply focused on your main subject, the subject may change position and require refocusing. An intervening subject may pop into the frame and pass between you and the subject you meant to photograph. You (or the camera) have to decide whether to focus on this new subject, or to remain focused on the original subject. Finally, there are some kinds of subjects that are difficult to bring into sharp focus because they lack enough contrast to allow the camera’s AF system (or our eyes) to lock in. Blank walls, a clear blue sky, or other low-contrast subject matter may make focusing difficult even with the hybrid AF system.
If you find all these focus factors confusing, you’re on the right track. Focus is, in fact, measured using something called a circle of confusion. An ideal image consists of zillions of tiny little points, which, like all points, theoretically have no height or width. There is perfect contrast between the point and its surroundings. You can think of each point as a pinpoint of light in a darkened room. When a given point is out of focus, its edges decrease in contrast and it changes from a perfect point to a tiny disc with blurry edges (remember, blur is the lack of contrast between boundaries in an image). (See Figure 8.6.)

Figure 8.6 When a pinpoint of light (left) goes out of focus, its blurry edges form a circle of confusion (center and right).
If this blurry disc—the circle of confusion—is small enough, our eyes still perceive it as a point. It’s only when the disc grows large enough that we can see it as a blur rather than as a sharp point that a given point is viewed as being out of focus. You can see, then, that enlarging an image, either by displaying it larger on your computer monitor or by making a large print, also magnifies the size of each circle of confusion. Moving closer to the image does the same thing. So, parts of an image that may look perfectly sharp in a 5 × 7–inch print viewed at arm’s length, might appear blurry when blown up to 11 × 14 inches and examined at the same distance. Take a few steps back, however, and the image may look sharp again.
To a lesser extent, the viewer also affects the apparent size of these circles of confusion. Some people see details better at a given distance and may perceive smaller circles of confusion than someone standing next to them. For the most part, however, such differences are small. Truly blurry images will look blurry to just about everyone under the same conditions.
Technically, there is just one plane within your picture area, parallel to the back of the camera (actually the sensor) that is in sharp focus. That’s the plane in which the points of the image are rendered as precise points. At every other plane in front of or behind the focus plane, the points show up as discs that range from slightly blurry to extremely blurry. In practice, the discs in many of these planes will still be so small that we see them as points, and that’s where we get depth-of-field: the range of planes that includes discs that we perceive as points rather than blurred splotches. The size of this range increases as the aperture is reduced in size and is allocated roughly one-third in front of the plane of sharpest focus, and two-thirds behind it. (See Figure 8.7.)

Figure 8.7 The sharpest plane of focus is one-third in front of the plane of sharpest focus, and two-thirds behind it.
Your Focus Mode Options
Manual focus can come in handy, as I’ll explain later in this chapter, but autofocus is likely to be your choice in the great majority of shooting situations. Choosing the right AF mode and the way in which focus points are selected is your key to success. Using the wrong mode for a particular type of photography can lead to a series of pictures that are all sharply focused—on the wrong subject.
But autofocus isn’t some mindless beast out there snapping your pictures in and out of focus with no feedback from you. There are several settings you can modify to regain a fair amount of control. Your first decision should be which of the autofocus modes to select: Single-shot (AF-S), Continuous AF (AF-C), or Automatic AF (AF-A). DMF first uses autofocus, and then allows you to fine-tune focus manually. Press the MENU button, go to the Camera Settings I-04 menu, and navigate to the line for Focus Mode. Press the center button, then highlight your autofocus mode choice from the submenu, and press the center button again. You can also set autofocus mode using the Quick Navi screen or by pressing the Fn button and using the Function menu.
FOCUS INDICATOR
At the lower-left corner of your screen, you’ll find a green focus confirmation indicator that’s active while focusing is underway. It consists of a round green disk which may have rounded brackets at either side. If the disk glows steadily, the image is in focus. Only the disk appears when using AF-S; in AF-C mode, the disk is surrounded by the brackets and indicates that the focus plane may change if the subject moves. If the brackets are flashing and no disk appears, focusing is in progress; if the disk is flashing, focusing has failed. (See Figure 8.8.)
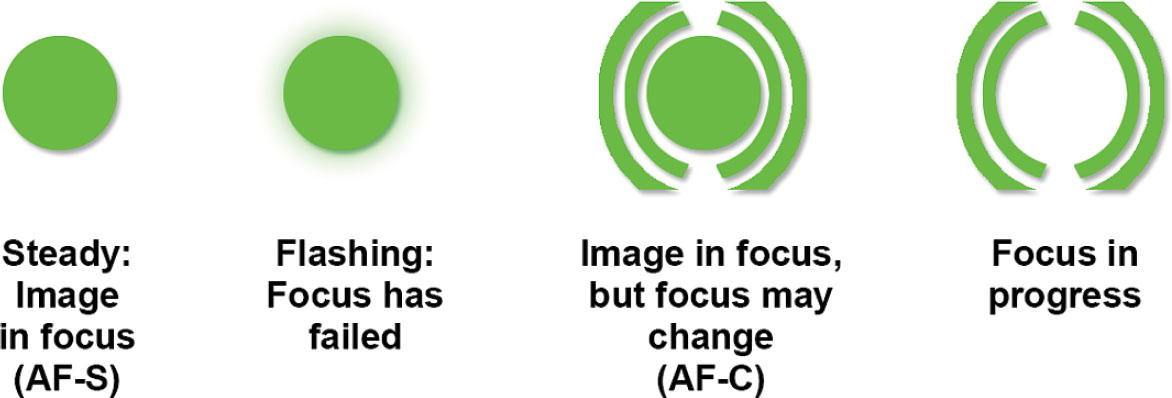
Figure 8.8 The focus indicator icon shows focus status.
In the next sections, I’m going to describe all five focus modes, so you’ll understand exactly what types of subjects each is intended for. However, as you’ll learn, the a7C’s AF system is so sophisticated that you can generally set up your camera as I’ll explain later in this chapter in a section called “Magic Autofocus—Set and Forget,” and then forget about twiddling with autofocus thereafter. I’ll list a few settings you can make that will let the a7C easily nail autofocus under most conditions more than 90 percent of the time.
Single-Shot AF (AF-S) Mode
With Single-Shot AF (AF-S), the camera will lock in focus when you press the shutter release (or defined AF start button) and will not adjust focus if your subject moves or you change the distance between you and your subject, as long as you hold down the button.
In AF-S mode, focus is locked. By keeping the button depressed halfway, you’ll find you can reframe the image by moving the camera to aim at another angle; the focus (and exposure) will not change. Maintain pressure on the shutter release button and focus remains locked even if you recompose, or if the subject begins running toward the camera, for example.

TIP In this chapter, I’m assuming that you’re using P, A, S, or M mode where you have full control over the camera features. This is important because the camera will use only AF-S in Intelligent Auto mode. And it will set Continuous AF (AF-C) only in Movie mode, regardless of what focus mode you’ve selected for still images.
When sharp focus is achieved in AF-S mode, the solid-green focus indicator appears in the lower-left corner of the screen and you’ll hear a little beep. One or more green focus confirmation frames will also appear to indicate the area(s) of the scene that will be in sharpest focus.
For non-action photography, AF-S is usually your best choice, as it minimizes out-of-focus pictures (at the expense of spontaneity). Because of the small delay while the camera zeroes in on correct focus, you might experience slightly more shutter lag. This mode uses less battery power than Continuous AF.
If you have set the a7C for Pre-AF in the Camera Settings I-05 (AF 2) menu, you may notice something that seems strange: the camera’s autofocus mechanism will begin seeking focus even before you touch the shutter release button. In this mode, no matter which AF method is selected, the camera will continually alter its focus as it is aimed at various subjects, until you press the shutter release button halfway. At that point, the camera locks focus, in Single-shot AF mode.
When using AF-S or AF-C (described later in this chapter), you can specify focus priority, from AF (wait until the subject is in sharp focus), Release (take the picture now even if not in perfect focus), and Balanced Emphasis (compromise!).
Continuous AF (AF-C) Mode
When Continuous AF is active, focus is constantly readjusted as your subject (or you) move. The difference between Single-shot AF and Continuous AF comes at the point the shutter release button (or defined focus start button) is pressed halfway. (See the discussion of back-button focus later in this chapter.)
Switch to this mode when photographing sports, young kids at play, and other fast-moving subjects. In this mode, the camera can lock focus on a subject if it is not moving toward the camera or away from your shooting position; when it does, you’ll see a green circle surrounded by brackets. (There will be no beep.) But if the camera-to-subject distance begins changing, the camera instantly begins to adjust focus to keep it in sharp focus, making this the more suitable AF mode with moving subjects.
Automatic AF (AF-A) Mode
The camera begins using AF-S, and switches to AF-C if the subject begins moving. Use this mode when you’re not certain that your subject will begin moving, and you’d like to take advantage of AF-S, as described earlier, until the subject does move. You might use AF-A to photograph a sleeping pet, which, if awakened by the activity, might respond with sudden movement.
Direct Manual Focus (DMF) Mode
The camera focuses using AF-S mode, then uncouples the focus motor so you can fine-tune focus (if necessary) manually. For best results, use this mode with focus peaking enabled to provide you with visual feedback as you adjust.
Manual Focus
No autofocus at all. You’re on your own in deciding when the image is in sharp focus but provided with extra tools, such as the focus indicator in the lower-left corner of the screen (shown earlier in Figure 8.8), focus peaking, and the a7C’s focus magnification features.
Focus or Release Priority?
The current focus plane is fixed and cannot be changed at a certain point in the picture-taking process. With AF-S mode, that point is when you press the shutter release halfway. As long as you keep your finger on the button, the camera will not refocus until you press down all the way or take your finger off the release. In AF-C mode, the camera will focus, but will continue to refocus as long as the shutter release is held down halfway. Focus is not locked until you press down all the way to take a picture.
In either mode, when you simply press the shutter release down all the way, focus activation, locking, and picture taking take place one after the other—but still happen in the order I just described. That’s where focus/release priority come into play. When the shutter release is pressed down all the way in a continuous motion, do you want the camera to wait until sharp focus is achieved—even if that means missing the exact instant you wanted to capture? Or do you want to have the a7C go ahead and take the picture anyway, even if there is a possibility that the image isn’t perfectly focused? I explained the priority options in Chapter 3, but here’s a recap to using the Priority Set in AF-S/AF-C entries in the Camera Settings I-05 (AF 2) menu:
- AF Priority. The shutter is not activated until sharp focus is achieved. You can choose the AF Priority option for both AF-S and AF-C modes individually. Use AF Priority for subjects that are not moving rapidly. The a7C’s AF system is fast enough that the slight delay should be negligible. However, if you’re using an A-mount lens that does not have a built-in AF motor with the LA-EA adapter, you can experience a significant delay. Sports shooters and others who depend on capturing the decisive moment and can countenance no delay at all generally use Release Priority, discussed next.
- Release Priority. When this option is selected, the shutter is activated when the release button is pushed down all the way in both AF-S and AF-C modes, even if sharp focus has not yet been achieved. I prefer this option for AF-C mode, as Continuous Focus focuses and refocuses constantly when autofocus is active, and even though an image may not quite be in sharpest focus, at least I am able to get my shot. Using Release Priority does not mean that your image won’t be sharply focused; it just means that the a7C hasn’t yet confirmed that focus is achieved. Keep in mind that the a7C’s AF system is very speedy, so your picture is likely to be in sharp focus even if the camera hasn’t had quite enough time to confirm that focus is locked in. If you’ve been poised with the shutter release pressed halfway, the camera probably has been tracking the focus of your image.
- Balanced Emphasis. In this mode, the shutter is released when the button is pressed, with a slight pause if autofocus has not yet been achieved. It can be selected for both AF-S and AF-C modes and is probably your best choice if you want a good compromise between speed of activation and sharpest focus. However, you would not want to use this setting if the highest possible continuous shooting rates are important to you.
Autofocus Magnified
A very cool way to improve your AF accuracy is to use autofocus in conjunction with the Focus Magnifier that you probably work with most often when manually focusing. Just follow these steps:
- 1.Turn on AF in Focus Magnifier in the Camera Settings I-13 (Focus Assist) menu (as described in Chapter 3).
- 2.Define a custom key, as the activating button for Focus Magnifier. (Or access the feature directly from the Camera Settings I-13 (Focus Assist) menu.)
- 3.Activate Focus Magnifier. An orange box will appear on the screen. (See Figure 8.9, left.) Use the directional buttons to position the orange box over the area you want to bring into focus.
- 4.Press the center button. The Focus Magnifier will enlarge the image contained within the orange box by a factor of 5.9X. (See Figure 8.9, right.) Press the center button a second time to enlarge 11X, if needed.
- 5.Activate AF. Press the shutter release halfway to activate autofocus (or use another key you may have defined to perform that function, say, if you’re using back-button focus as described later in this chapter).
- 6.AF focus commences. The a7C will use the current AF settings to focus on the area you’ve selected with the orange box.

Figure 8.9 Activate focus magnifier (left) and focus on zoomed-in area (right).
Choosing the AF Area
So far, you have allowed the camera to choose which part of the scene will be in the sharpest focus using its focus detection points called AF areas by Sony. However, you can also specify a single focus detection point that will be active. Use the Function menu, or press the MENU button, navigate to the Focus Area item in the Camera Settings I-05 (Focus Assist) menu, press the center button, and select one of the options. Press the center button again to confirm. Here is how the AF Area options work:
- Wide. The camera chooses the appropriate focus area(s) in order to set focus on a certain subject in the scene. There are no focus indicators visible on the screen until you press the shutter release button halfway. At that point, in AF-S mode the camera displays one or more green focus indicators to show what area(s) of the image it has used to set focus on. In AF-C mode, the indicators will continue to flicker around the frame while the camera refocuses as necessary. If Face Detection is active, the AF system will prioritize faces when making its decision as to where it should set focus. You’ll see multiple focus indicators when several parts of the scene are at the same distance from the camera. When most of the elements of a scene are at roughly the same distance, the camera displays a single, large green focus bracket around the entire edge of the screen.
Even if you set one of the other options, Wide is automatically selected in Intelligent Auto mode. Use this mode to give the camera complete control over where to focus. You can set Display Continuous AF Area in the Camera Settings I-06 menu (AF 3) if you want to see the focus area displayed as you use AF-C. Indeed, if you’re working with AF-C, you’ll see the high-density points “dance” as the a7C continually refocuses as your subject or camera moves.
VANISHING BRACKETS
When the Focus Area mode is Wide, Zone, or DMF, the a7C may show the currently active focus area(s) using one of three types of displays. The focus area may appear as one or several large brackets (seen in the version at upper left in Figure 8.10), or the high-density focus points (shown at lower center). If all areas of the screen are considered, a green frame appears around the potential focus area (see Figure 8.10, upper right).
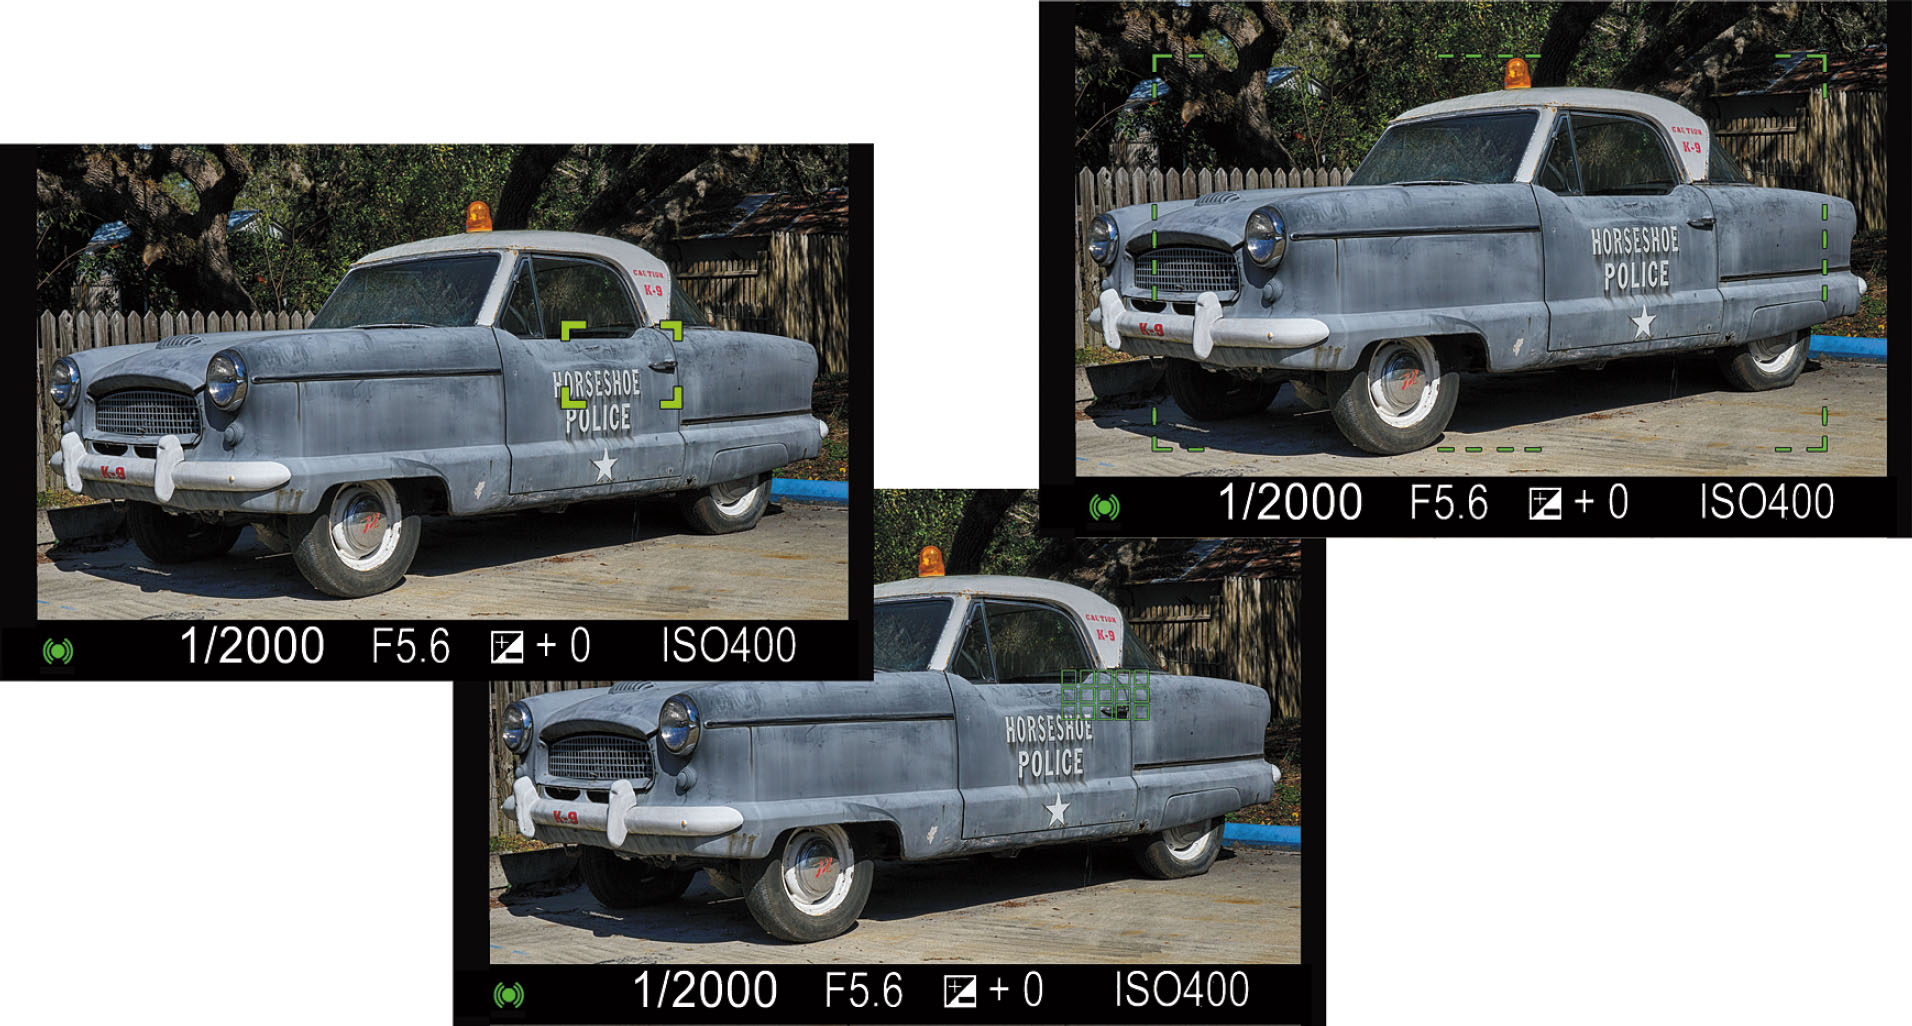
Figure 8.10 With Wide AF Area, the camera either displays a large green bracket indicating that most of the scene is at the same distance to the camera (left) or it displays one or more smaller brackets to indicate the specific area(s) of the scene that will be in sharpest focus (lower center). If the camera decides that all areas of the frame should be considered, a bracket around the entire focusing area is shown (upper right).
- Zone. There are nine different focus zones available—three at the top left, center, and top right of the frame, three in the equivalent positions at the bottom, and three in the middle. Each of those zones is populated by a 9 × 9 array of focus points, initially displayed in white, as shown in Figure 8.11.
You can move the focus array to one of the nine overlapping areas using the directional buttons while those brackets are displayed. To lock the brackets in their current position, press the center button (or other defined Focus Standard button). Press the center button again to resume moving the frames. You can also move the focusing frame quickly with the touch screen and return the zone to the center of the screen by pressing the Trash button.
Press the AF-ON button or press the shutter release halfway to initiate focus. The display changes to one of the three modes described in the Vanishing Brackets sidebar above, and the camera chooses which sections within the zone to use to calculate sharp focus. The active focus points will be highlighted in green. Use this mode when you know your subject is going to reside in a largish area of the frame and want to allow the a7C to select the exact focus point within your designated zone.
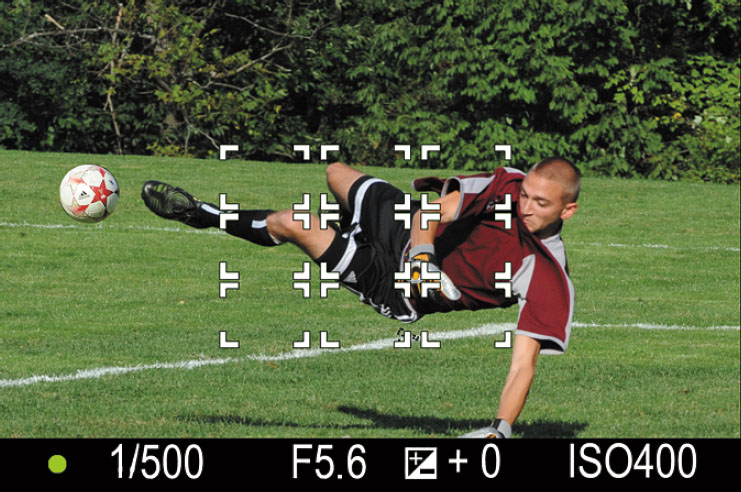
Figure 8.11 In Zone mode, brackets represent a focus zone, and you can move the zone to nine different locations on the screen. The camera selects one or more focus points within that array.
- Center. Activate this AF area and the camera will use only a single focus detection point in the center of the frame to set focus. Initially, a pair of focus brackets appears on the screen. Touch the shutter release button and the camera sets and locks focus on the subject in the center of the image area; the brackets then turn green to confirm the area that will be in the sharpest focus in your image. (See Figure 8.12.) Choose this option if you want the camera to always focus on the subject in the center of the frame. Center the primary subject (like a friend’s face in a wide-angle landscape composition), allow the camera to focus on it, maintain slight pressure on the shutter release button to keep focus locked, and re-frame the scene for a more effective, off-center, composition. Take the photo at any time and your friend (who is now off-center) will be in the sharpest focus.

Figure 8.12 In the Center AF Area mode, the camera displays the focus brackets in the center of the screen; the brackets turn green after focus has been set.
- Flexible Spot. This mode enables you to move the camera’s focus detection point (focus area) around the scene to any one of multiple locations, using the directional buttons. When opting for Flexible Spot, you can use the left/right buttons to choose Small, Medium, or Large spots, which changes the size of the focus brackets in the frame. This mode can be useful when the camera is mounted on a tripod and you’ll be taking photos of the same scene for a long time, while the light is changing, for example. Move the focus area to cover the most important subject, and it will always focus on that point when you later take a photo.
Use the directional controls to move the brackets around the screen, which allows great versatility in the placement of the active focus detection point. (See Figure 8.13.) Lock in the position by pressing the center button (and unlock by pressing it again). Adjust the brackets until they cover the most important subject area and touch the shutter release button. The brackets will turn green when focus is achieved (or magenta if unable to focus).
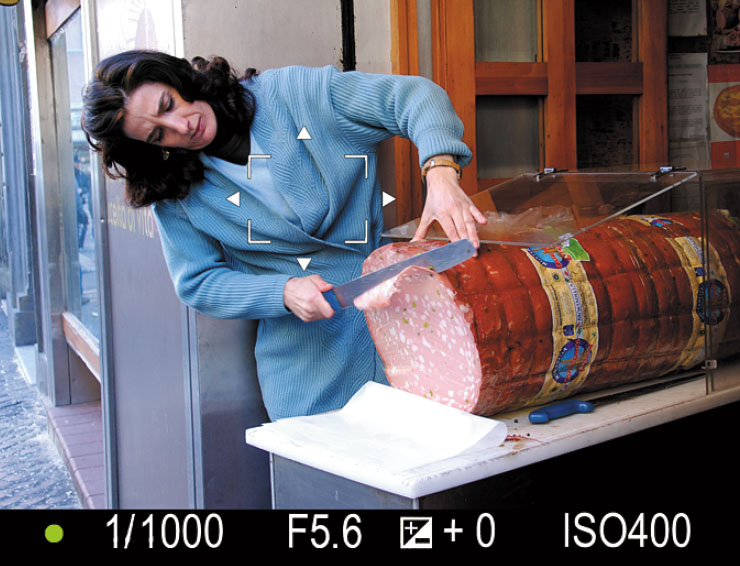
Figure 8.13 When the Flexible Spot AF Area mode is initially selected, the active focus detection point is delineated with indicators that turn green when focus is confirmed and locked. Use the directional controls or touch screen to specify location of the spot.
- Expand Flexible Spot. This mode is similar to Flexible Spot. If the camera is unable to lock in focus using the selected focus point, it will also use the eight adjacent points to try to achieve focus.
- Tracking AF. In this mode, the camera locks focus onto the subject area that is under the selected focus spot when the shutter button is depressed halfway. Then, if the subject moves (or you change the framing in the camera), the camera will continue to refocus on that subject. You can select this mode only when the focus mode is set to Continuous AF (AF-C).
This option is especially powerful, because you can activate it for any of the focus area options described above. That is, once you’ve highlighted Tracking on the Focus Area selection screen, you can then press the left-right directional button and choose Wide, Zone, Center, Flexible Spot, or Expand Flexible Spot. The camera will lock on a subject, using one of those area modes to follow it. (See Figure 8.14 and the explanation which follows in the next section.)
You cannot use this option if the mode dial is set to Movies or S&Q quick-/slow-motion video shooting movies. I’ll describe Tracking AF, along with eye/face recognition in more detail in the section that follows this one.
MOVING THE FOCUS FRAME
Reminder: You can move the focus frame/point in either of two ways: use the directional controls when working with an AF mode that allows you to specify the focus area, or, if Touch Operations and Touch Focus are enabled, by tapping the touch screen to indicate the focus point and/or dragging the focus point on the screen to the desired location. In manual focus mode, the same controls move the magnified focus area.
Just as you’re limited in the use of the AF mode in certain operating modes, there’s a limitation with AF Area as well. For example, Flexible Spot is not available for selection in Intelligent Auto mode; the camera will always use Multi as the AF Area mode.
TEMPORARY TRACKING
If you find you don’t need tracking (say, you’re shooting landscapes or other non-active subjects) but would like to be able to turn it on quickly, just define a custom key to temporarily activate the feature. Assign the Tracking On or Tracking On+AF On behavior to the key, under Custom Key (Shooting) in the Camera Settings II-09 (Custom Operation 1) page, as described in Chapter 4. Thereafter, if you’ve set, for example, the Focus Area to Wide or Flexible Spot Small, when you press the defined key the camera will switch to Tracking: Wide or Tracking: Flexible Spot Small while the button is held down.
Tracking and Focusing on Subjects, Faces, and Eyes
The a7C’s tracking capabilities are awesome enough on their own. The camera’s upgraded face and eye detection augments the plain vanilla tracking capabilities enough that it can be considered one of the most significant improvements this camera boasts.
Tracking AF is not limited to following and focusing on faces or eyes, of course; it can track any moving subject. In general, you can turn it on and forget it. Conventional tracking does, however, only work in still photography mode; you can’t use it when shooting movies. When the mode dial is set to the Movie position, the Tracking focus area mode is grayed out.
However, that doesn’t mean tracking is totally unavailable in Movie mode; you can still use the touch screen to specify a subject to be tracked. Navigate to the Camera Settings II-10 (Custom Operation 2) menu page and set Function of Touch Operation to Touch Tracking. Then, you can simply tap a subject on the LCD screen and the a7C will track it. However, if you want to use Touch Focus or Touch Shutter in stills mode, you’ll want to return to the Function of Touch Operation entry and revert to one of the other settings when you’re finished shooting video.
One thing to keep in mind is that it’s sometimes difficult to track subjects other than humans; if your chosen subject happens to be near a face (say, an active pet, when you have the Animal subject option turned off), the a7C’s AF system will sometimes jump to the face/eyes, and begin tracking it, instead. The desired subject needn’t be physically near the face; proximity in two-dimensions is sufficient to fool the AF system. Perhaps you want to photograph a close-up of a bride’s hand wearing her new wedding ring, with the groom smiling in the background. If the groom’s face is “close” enough to the ring in the frame, instead of a sharp photo of the bridge’s hand and a smiling groom (who you wanted to be out of focus for creative effect), you end up with a sharp husband and blurry wedding ring.
Tracking may not work if the subject is moving too quickly, is too small or too large to be isolated effectively, has only reduced contrast against its background, or if the ambient light is too dark or changes dramatically while you’re tracking. I’m going to show you how to use the basic tracking feature first, then go into detail about the new face/eye detection features.
TRACKING MADE EASY
The easiest way to deploy the most simple form of tracking is to make sure the AF-ON button’s behavior is set to Tracking On + AF-ON. That’s the default setting, but if the button has been redefined, you can change it back using Custom Keys (Stills) in the Camera Settings II-09 (Custom Operation 1) menu. Thereafter, you don’t need to select Tracking as your Focus Area mode and you don’t need to be using Continuous AF (AF-C). When you press the AF-ON button, the a7C will initiate autofocus, switch to AF-C, and activate tracking to follow the subject under the focus frame as long as you hold down the AF-ON button. Simply release the button to return to your original settings.
However, to use the full range of options available with Tracking AF, you can follow these steps:
- 1.Choose AF-C. Tracking works only when you are using continuous autofocus because, well, it refocuses continually.
- 2.Activate Tracking AF. Use the Function menu and choose Focus Area. Scroll down to the bottom of the list of modes and highlight Tracking AF.
- 3.Choose Focus Area Mode. Using Tracking AF does not mean you lose access to the four AF area modes. With Tracking AF highlighted, use the left/right directional controls to select Wide, Zone, Center, Flexible Spot, or Expand Flexible Spot. That will give you both Tracking AF and the area mode you prefer. If you switch from AF-C to AF-S, you lose the lock-on capabilities, and the camera just reverts to whatever focus area mode you select here.
- 4.Select subject to track. Your subject will be within the selected autofocus area.
- Tracking: Wide. The camera selects the focus area and subject to track.
- Tracking: Center. Frame the scene so the subject you want to track is under the center focus point.
- Tracking: Flexible Spot. You can use the directional controls to position the Small, Medium, or Large Flexible Spot over the subject.
- Tracking: Expand Flexible Spot. You can use the directional controls or touch screen to position the Small, Medium, or Large Flexible Spot over the subject. (See Figure 8.14, left.)
- 5.Start tracking. When you activate focus by pressing the shutter release halfway, the camera will use your selected focus area option to lock in focus, as always. However, now, once focus has been locked, the camera will track your subject as it roams around the screen. You’ll see the green focus area box moving as your subject moves (or you reframe the image with the camera). (See Figure 8.14, right.) If a face is detected, a tracking rectangle around the face will be shown. (You’ll learn more about face detection in an upcoming section.)

Figure 8.14 Left: Place the focus point on the object the camera should track and press the shutter release to activate tracking. Right: When Tracking is active, the camera maintains focus on your preferred target, tracking it as it moves around the scene.
Face Detection and Eye AF Overview
As hinted already, the a7C has a couple more tricks up its sleeve for setting the AF area. The camera can detect faces and eyes, lets you select which eye to track, and can differentiate between humans and animals—and it can do all that at high speed! You can turn Face Priority on or off and activate visible frames around the faces the a7C detects. This enables the camera to attempt to identify any human faces in the scene. If it finds one or more faces, the camera will surround each one (up to eight in all) with the highest priority face outlined in white, and the others in either gray (if an unregistered face) or purple (if you have previously registered that face). In AF-S mode, an additional frame will be placed on the eyes of your subject, if detected. Press the shutter release halfway and the camera focuses on the highest priority face.
You can also specify Face Priority in Multi Metering in the Camera Settings I-08 (Exposure 1) menu, and the a7C will not only try to focus on faces, it will base its exposure on them as well. In Chapter 3, I explained how to register and prioritize faces using entries in the Camera Settings I-14 (Shooting Assist) menu. Face Detection is available only when you’re using AF and when the Focus Area is set to Wide and the Metering mode is set to Multi, the defaults. So, if the Face Detection Settings option is grayed out on the Camera Settings I menu, check those other settings to make sure they are in effect. Face Detection in the a7C works well enough that you can leave it on all the time. It’s also an ideal choice if you need to hand the camera to someone to photograph you and your family or friends at an outing in the park. However, it really comes in useful when you couple it with Eye AF.
Face/Eye Detection is disabled when using digital zoom features, the focus magnifier, and the Posterization Picture Effect. It’s also unavailable when shooting movies with the 120p/100p Record Setting, S&Q slow-motion movies at 120/100 frames per second, or when capturing 4K movies at 30/25p 100M, 30/25p 60M, or when you output 4K movies to both your camera’s internal memory card and HDMI port.
Making Your Face/Eye Detection Settings
The key Face/Eye Detection settings are found in several different menus. This section will help you find and adjust all of them. I’ll show you how to tell the a7C to base its AF decisions on faces, give certain faces a higher priority, and explain how to switch back and forth between detecting human eyes and those of animals.

Figure 8.15 Face/Eye Autofocus settings.
Your first stop should be the Face/Eye AF Settings menu entry in Camera Settings I-05 (AF 2), shown in Figure 8.15.
The sub-screen has five entries:
- Face/Eye Priority in AF. The entry has two choices: On or Off. When set to Off, the camera gives no special priority to faces detected within the frame. Perhaps you’re shooting landscapes or other scenes and don’t want the camera to fixate on any faces it detects.
Alternatively, choose On and the a7C will give a higher priority to detected faces. Up to eight faces, if present, may be detected. When autofocus is activated, the camera will attempt to focus on the eyes, if they are located within the active focus area. Note that when using Superior Auto, Face/Eye Priority is locked at On.
The Eye AF portion of Face/Eye Priority AF may not function as expected with subjects which are rapidly moving, have long bangs, closed eyes, or are wearing sunglasses. Shady conditions, backlight, and low-light situations can also hinder eye detection. Keep in mind that if the a7C is unable to focus on human eyes in the frame for some reason, it will fall back to focusing on the human’s face instead. (This is useful with humans who have their eyes closed, are wearing some kinds of glasses, or who have hair that obscures their eyes. You can generally count on having to manually focus Saul “Slash” Hudson.)
As I noted in Chapter 3, you should keep in mind that activating Face/Eye Priority in Autofocus with this entry means that your a7C will give priority to detecting faces and eyes but doesn’t guarantee that it will automatically focus on them! In practice, what happens is that the camera will prioritize focus on faces/eyes found—but only if that particular face or eye resides within the Focus Area you are using. In other words, if you’re using the center focus area and your human subject happens to reside outside the center area, the camera will helpfully detect a face/eye and display a frame around it, but will focus only on whatever is actually within the focus area.
It’s easy to overlook this discrepancy, especially if the subject you want to focus on is located near to, but in front of or behind, a human. Further, most of our “people” shots have the person in the center of the frame, and, with some focus modes (such as Wide), the focus area is so large that your human may actually be in an appropriate location, anyway. However, you should be aware of this distinction.
As you’ll learn shortly, the “bug” is actually a feature. As I point out in the “Magic Autofocus—Set and Forget” section coming up, separating the face/eye detection from face/eye implementation comes in useful. If you need to work around it, however, use Eye AF, which zeroes in and focuses on detected eyes, regardless of your selected focus area. I assign Eye AF to a Custom Key for that purpose.
- Subject Detection. When set to Human, the camera looks for human faces and eyes. If you choose Animal instead, it looks for animal eyes only; as, to date, the faces of other types of living creatures vary too much for existing technology to detect with any reliability. It’s generally safe to leave this setting at Human, unless you happen to be at a zoo, photographing the Westminster Kennel Club show, or engaged in other animal-intensive activities. (Animal eye detection works great, by the way.)
- Right/Left Eye Select. Chooses whether to detect the left or right eye of the human subject (the option is not available when Animal is selected for Subject Detection). Note that this feature uses the subject’s eye, which may be on the opposite side from your perspective (that is, your subject’s right eye is on the left side of your frame). In general, it usually doesn’t matter which eye the camera scrutinizes. If you don’t care (which will usually be the case), select Auto instead of Right or Left, and the a7C will do a good job of finding the closest eye for you.
One really cool thing to do (because you can!) is to assign Switch Right/Left Eye to a Custom Key in the Camera Settings II-09 (Custom Operation 1) menu, just to have the power to alternate eyes on the fly if you feel the need.
- Face Detection Frame Display. When activated, the camera automatically shows a small white square around a human eye it is focusing on, and that frame will turn green when the subject is in focus. (See Figure 8.16, left.) But you can also enable a frame around entire faces with this option. (If you want the frames to display, but disappear after a time, use AF Area Auto Clear, described later in this chapter.)
Although the eye-focus box is helpful, I find the additional box around the face very useful and leave it on at all times, so I know exactly what face(s) has been detected. When enabled, a gray selection box appears around detected faces. The box around the face used for autofocus turns white. If there are several faces in the frame and you’ve registered and prioritized some or all of them, the boxes around the other faces turn reddish-purple. (I’ll show you how to register faces later in this chapter.) (See Figure 8.16, right.) If you find the boxes distracting, you can turn them off, and face detection, if enabled, as described earlier, will still be active.
- Animal Eye Display. Again, animal faces are never detected, but you can choose to have the camera place a white frame around their eyes when they are found. The frame appears as soon as the eye is detected; it turns green when you press the shutter release halfway to start autofocus. If you’ve set the display to off, no white frame is shown, but the green frame will appear when you initiate focus. The frames appear only when Animal is selected for Subject Detection. You might find the display reassuring if you’re wondering whether the camera knows you have an animal in your sights, but I find the a7C does a good enough job that I generally leave this turned off.

Figure 8.16 Eye detection (left); multiple faces detected (right).
Other Important Face/Eye Settings
There are several other settings you need to keep in mind when using Face/Eye Detection. They were fully explained in Chapter 3, and I won’t repeat that information here. But this recap should remind you:
- Face Priority in Multi Metering. Since the a7C does such a good job in finding faces, you might as well leverage that capability to improve your exposure metering, too, when you’re photographing people. This entry in the Camera Setting I-08 (Exposure 1) menu tells the a7C to adjust its Multi metering to prioritize exposure for any faces in the scene. It works especially well for street photography and some kinds of performances.
- Face Registration. This entry in the Camera Settings I-14 (Shooting Assist) menu allows you to prioritize faces of friends, associates, family members, and anyone you suspect is stalking you. You can enter faces (say, a new friend), delete registered faces (say, your stalker is arrested), and change the order of their priority (your brother-in-law never paid back that money he owed you).
- Registered Faces Priority. This lets you enable or disable priority assigned to registered faces.
- Eye AF. The Custom Key definition entry in the Camera Settings II-09 (Custom Operation 1) menu can be your best friend when you want to customize the way your a7C uses features like Eye AF. Assign the Eye AF function to a key, and the a7C will detect and focus on the eye exclusively as long as you are holding down the custom key. As I noted earlier, the camera will search for human eyes within the entire frame, regardless of the Focus Area you’ve selected. Press the shutter release down all the way while holding the key to take the picture. It also allows you to use one Focus Area setting, and instantly bypass that selection by activating Eye AF. I also noted that you can assign a key to Right/Left Eye select, bypassing the Auto setting for that feature if your subject tends to not face you consistently.
Magic Autofocus—Set and Forget
I gave this chapter the title “Mastering Autofocus Options” for a reason. Your Sony a7C has an incredible number of autofocus adjustments—many of them new to Sony mirrorless cameras introduced in 2019 and later (or provided as a firmware update to earlier models like the a7R III and a9). My goal, to this point, has been to help you learn about all those options so you’ll understand exactly what you can do to fine-tune the a7C’s incredible AF features under a variety of situations.
The good news is that your camera’s AF system is so robust you may not need to implement many features for about 90 percent of your shooting. This section will explain some basic adjustments you can set, and then forget, for most of your shooting. The a7C can do an excellent job of achieving focus under most conditions; my camera stumbles only under very low-light environments, insanely active sports, or with challenging subjects like birds in flight. Not that it can’t perform well in those situations, but you can still benefit from the AF options described earlier in this chapter.
Here’s the secret of “magic” autofocus, which I think you’ll find will work very well nearly all of the time, thanks to the a7C’s generous array of phase detection AF points embedded in the sensor, 693 contrast detection zones, and the pure power of its Bionz X microprocessor.
- Set your AF mode to AF-C. Leave it there. Advanced users don’t need the “automatic” AF-A mode, which is inconsistent. You might need AF-S if you want to lock focus on a particular subject. I’m going to show you how you can leave the camera set on AF-C and temporarily switch from AF-C to AF-S when you hold down a Custom Key.
- Set AF Area mode to Tracking: Flexible Spot M. Thereafter, you can move the box representing the focus spot around the screen with the directional controls. Half-press the shutter release button and the a7C will begin tracking whatever is under the spot location as long as you continue to hold the shutter button.
Here’s the cool part: If there is a human in the area you decide to track, the a7C will add Face/Eye detection to improve its AF performance. If the area you track does not have a human, the camera will track that object instead. It will continue to detect faces and eyes but won’t automatically focus on them. This is the “feature” I noted in the “A Useful Bug” sidebar earlier. Most other camera brands with face detection don’t give you this flexibility. It makes it possible to track objects that are not human without disabling face detection—as long as the human face isn’t too close to the tracked subject.
- Activate Face/Eye Priority in AF. I showed you how to do this in the previous section.
- Set Subject Detection to Human and Right/Left Eye Detect to Auto. Change these only if you have a reason to switch to Animal or specific eye detection.
- Enable Face Detection Frame Display. You’ll appreciate the extra feedback and reassurance.
- Begin to enjoy amazingly accurate AF. You may find you rarely have to make most of the adjustments described earlier in this chapter—although you’ll be able to once you’ve learned how and when to use each of them.
- If you need to lock focus switch to manual focus, or temporarily switch to AF-S using the technique described next.
Your AF-C to AF-S Switch
Sony doesn’t offer a Custom Key definition to toggle between AF-C and AF-S, but you can do the next best thing—define a button so that the camera switches to AF-S while you hold down the button and then switches back to AF-C once you release it.
The procedure is fairly simple. Just follow these steps:
- 1.Access Register Custom Shoot Set. Navigate to this entry, located on the Camera Settings I-03 (Shoot Mode/Drive 1) page, and originally described in Chapter 3.
- 2.Select a Custom Shoot Set to register. I selected Recall Custom Hold 1. Press the center button to enter the setup screen.
- 3.Unmark all but two settings. A wide variety of camera settings can be registered, but for this application we don’t want to mess with most of your camera’s settings. We only want to change the Focus Mode and Focus Area settings, and only while the defined Custom Key is pressed. Scroll through the list and unmark all of them except for Focus Mode and Focus Area. (See Figure 8.17.)
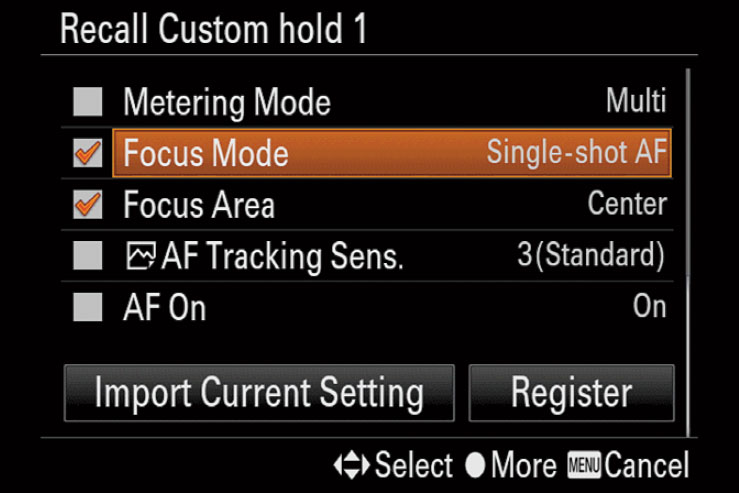
Figure 8.17 Recall Custom 1 screen.
- 4.Specify each of the two. Highlight Focus Mode and select Single-Shot AF from the screen that appears. Then Highlight Focus Area and choose Center.
- 5.Select Register. Scroll down to the bottom of the settings list and highlight Register. Press the center button to confirm your settings, and MENU to exit.
- 6.Navigate to the Camera Settings II-09 (Exposure 2) menu and choose Custom Key (Stills).
- 7.Define the button you want to use to switch temporarily to AF-S. I chose the Multi-Selector Center Button, which is on the second page of the Custom Key button options.
- 8.When your button is highlighted press the center button, and in the screen that appears navigate to the Recall Custom Hold 1 option.
- 9.Press enter to confirm. Then press MENU to exit.
That’s all there is to it. Henceforth, AF-C, Tracking, and Face/Eye Detection will by default be active and provide amazing AF performance under most circumstances. If you want to switch to AF-S to lock in focus on a specific subject, just press your defined Custom Key and hold it down. Then, press the shutter release halfway. The a7C will use Single-Shot (AF-S) to focus and the Focus Area will be set to the center of the screen. The camera will lock focus as long as you keep the Custom Key and shutter release depressed. To return to AF-C and your other previous AF settings, just release the Custom Key.
Using Manual Focus
Manual focus is not as straightforward as with an older manual focus 35mm SLR equipped with a focusing screen optimized for this purpose and a readily visible focusing aid. But Sony’s designers have done a good job of letting you exercise your initiative in the focusing realm, with features that make it easy to determine whether you have achieved precise focus. It’s worth becoming familiar with the techniques for those occasions when it makes sense to take control in this area.
Here are the basic steps for quick and convenient setting of focus:
- Select Manual Focus. After you do so (in the Focus Mode entry in the Camera Settings I-04 (AF 1) menu), the letters MF will appear in the LCD display when you’re viewing the default display that includes a lot of data. (You can change display modes by pressing the DISP button.)
- Aim at your subject and turn the focusing ring on the lens. As soon as you start turning the focusing ring, the image on the LCD is enlarged (magnified) to help you assess whether the center of interest of your composition is in focus. (That is, unless you turned off this feature, called MF Assist, through the Camera Settings I-13 (Focus Assist) menu.) Use the up/down/left/right directional controls to move around the magnified image area until you’re viewing the most important subject element, such as a person’s eyes. Turn the focusing ring until that appears to be in the sharpest possible focus.
The enlargement lasts two seconds before the display returns to normal; you can increase that with the MF Assist Time menu item. In situations where you want to use manual focus without enlargement of the preview image, you can turn this feature off in the Camera Settings I-13 (Focus Assist) menu, using the MF Assist item.
- If you have difficulty focusing, zoom in if possible and focus at the longest available focal length. If you’re using a zoom lens, you may find it easier to see the exact effect of slight changes in focus while zoomed in. Even if you plan to take a wide-angle photo, zoom to telephoto and rotate the ring to set precise focus on the most important subject element. When you zoom back out to take the picture, the center of interest will still be in sharp focus.
- Use Peaking of a suitable color. On by default in Shooting mode, focus peaking provides a colored overlay around edges that are sharply focused; this makes it easier to determine when your subject is precisely focused. The overlay is white, but you can change that to another color when necessary. The alternate hue may be needed to provide a strong contrast between the peaking highlights and the color of your subject. Access the Peaking Setting entry in the Camera Settings I-13 (Focus Assist) menu to adjust the color. To make the overlay even more visible, select High in the Peaking Level item; you can also turn peaking Off with this item, if desired.
- Consider using the DMF option. Another option is DMF, or Direct Manual Focus. Activate it and the camera will autofocus with Single-shot AF and lock focus when you press the shutter release button halfway. As soon as focus is confirmed, you can turn the focusing ring to make fine-tuning adjustments, as long as you maintain slight pressure on the shutter release button. The MF Assist magnification will be activated immediately.
This method gives you the benefit of autofocus but gives you the chance to change the exact point of focus, to a person’s eyes instead of the tip of the nose, for example. This option is useful in particularly critical focusing situations, when the precise focus is essential, as in extremely close focusing on a three-dimensional subject. Because depth-of-field is very shallow in such work, you’ll definitely want to focus on the most important subject element, such as the pistil or stamen inside a large blossom. This will ensure that it will be the sharpest part of the image.
Back-Button Focus
Once you’ve been using your camera for a while, you’ll invariably encounter the terms back focus and back-button focus and wonder if they are good things or bad things. Actually, they are two different things, and are often confused with each other. Back focus is a bad thing and occurs when a particular lens consistently autofocuses on a plane that’s behind your desired subject. Fortunately, that’s a malady only cameras with outboard AF sensors have, so you won’t experience back or front focus unless you’re using an EA-LA2 or EA-LA4 A-mount adapter.
Back-button focus, on the other hand, is a tool you can use to separate two functions that are commonly locked together—exposure and autofocus—so that you can lock in exposure while allowing focus to be attained at a later point, or vice versa. It’s a good thing, although using back-button focus effectively may require you to unlearn some habits and acquire new ways of coordinating the action of your fingers.
As you have learned, the default behavior of your camera is to set both exposure and focus (when AF is active) when you press the shutter release down halfway. When using AF-S mode, that’s that: both exposure and focus are locked and will not change until you release the shutter button or press it all the way down to take a picture and then release it for the next shot. In AF-C mode, exposure is locked, and focus is set when you press the shutter release halfway, but the a7C will continue to refocus if your subject moves for as long as you hold down the shutter button halfway. Focus isn’t locked until you press the button down all the way to take the picture. In AF-A mode, the camera will start out in AF-S mode but switch to AF-C if your subject begins moving.
What back-button focus does is decouple or separate the two actions. You can retain the exposure lock feature when the shutter is pressed halfway but assign autofocus start and/or autofocus lock to a different button. So, in practice, you can press the shutter button halfway, locking exposure, and reframe the image if you like (perhaps you’re photographing a backlit subject and want to lock in exposure on the foreground, and then reframe to include a very bright background as well).
But, in this same scenario, you don’t want autofocus locked at the same time. Indeed, you may not want to start AF until you’re good and ready, say, at a sports venue as you wait for a ballplayer to streak into view in your viewfinder. With back-button focus, you can lock exposure on the spot where you expect the athlete to be and activate AF at the moment your subject appears. The a7C gives you a great deal of flexibility, both in the choice of which button to use for AF, and the behavior of that button. You can start autofocus, lock autofocus at a button press, or lock it while holding the button. That’s where the learning of new habits and mind-finger coordination comes in. You need to learn which back-button focus techniques work for you, and when to use them.
Back-button focus lets you avoid the need to switch from AF-S to AF-C when your subject begins moving unexpectedly. Nor do you need to use AF-A and hope the camera switches when appropriate. You retain complete control. It’s great for sports photography when you want to activate autofocus precisely based on the action in front of you. If the AF-ON button is set for Tracking On + AF ON, the a7C will not only achieve focus, it will track the movement of your subject until you take the picture by pressing the shutter release down all the way.
DISABLE TRACKING
Back-button focus also works for static shots. You can press and release your designated focus button, and then take a series of shots using the same focus point. Focus will not change until you once again press your defined back button. If the AF-ON button is set for Tracking On + AF ON, you’ll need to disable tracking, however, to maintain a fixed focus point. Use the Custom Settings (Stills) entry to change the AF ON button’s behavior to AF On. That change will allow you to focus on a spot that doesn’t reside under one of the a7C’s focus areas. You can then use back-button focus to zero in focus on that location, then reframe. Focus will not change. Don’t want to miss an important shot at a wedding or a photojournalism assignment? If you’re set to focus priority, your camera may delay taking a picture until the focus is optimum; in release priority there may still be a slight delay. With back-button focus you can focus first and wait until the decisive moment to press the shutter release and take your picture. The a7C will respond immediately and not bother with focusing at all.
Activating Back-Button Focus
To enable back-button focus, just follow these steps:
- 1.Select an AF-ON button. The a7C’s built-in AF-ON button performs this function by default (and, by default, initiates tracking as well as autofocus), but if you don’t care for its location next to the viewfinder, you can redefine another key to have the AF-ON behavior. In the Camera Settings II-09 (Custom Operation 1) menu, select Custom Key Settings (Stills) and define the button of your choice.
- 2.Turn off shutter button AF activation. In the Camera Settings I-05 (AF 2) menu, set AF/w Shutter to Off. When you want to disable back-button focus (temporarily or permanently), change it back to On.
- 3.Enable or disable tracking. Make sure your AF-ON button is set for either Tracking On + AF On or simply AF On, depending on whether you want the camera to track your subject once you’ve initiated back-button focus.
That’s all there is to it. Henceforth, pressing the shutter release will not activate autofocus. Autoexposure metering will still be initiated by pressing the shutter button halfway, as long as the AEL/w Shutter is set to Auto or On (and not Off) and pressing it all the way takes a picture.
Useful Menu Items for AF
I discussed how to set all the autofocus options, which are scattered among the Camera Settings I and Camera Settings II menus, plus how to define Custom Keys to activate certain features in Chapters 3 and 4. If you need a recap, here is a list of the a7C autofocus features that you should keep in mind. I’ll recap the most important aspects here, as a quick guide to help you locate the longer discussions. Table 8.1 provides some guidelines for particular types of subjects if you don’t want to rely on my “Magic AF” recommendation. Remember that some of these are also available in the Function menu.
- Pre-AF (Stills). The camera automatically adjusts focus before you press the shutter release or AF-ON button. This setting can be found in the Camera Settings I-05 (AF 2) menu page.
- AF Illuminator (Stills). This Camera Settings I-05 (AF 2) menu item is set at Auto by default, indicating that the illuminator on the front of the camera will provide a burst of light in a dark location when using in AF-S mode. That provides a bright target for the autofocus system. Turn this feature off when you feel the red burst might be intrusive.
- Face Registration. Mentioned briefly earlier in this chapter, this Camera Settings I-14 (Shooting Assist) menu item is quite versatile and was described in Chapter 3. You can register up to eight faces that should get priority in terms of autofocus and then specify the order of priority from the most important faces to the least important.
To register a face, point the camera at the person’s face, make sure it’s within the large square on the screen, and press the shutter release button. Do so for several faces. When you’re taking a photo of a scene that contains more than one registered face, the camera will prioritize faces based on which were the first to be registered in the process you used.
Take advantage of the Order Exchanging option of this menu item so the faces you consider the most important are prioritized. When you access it, the camera displays the registered faces with a number on each; the lower the number the higher the priority. You can now change the priority in which the faces will be recognized, from 1 (say your youngest child) to 8 (perhaps your cousin twice removed). You can also use the Delete or the Delete All options to delete one or more faces from the registry, such as your ex and former in-laws.
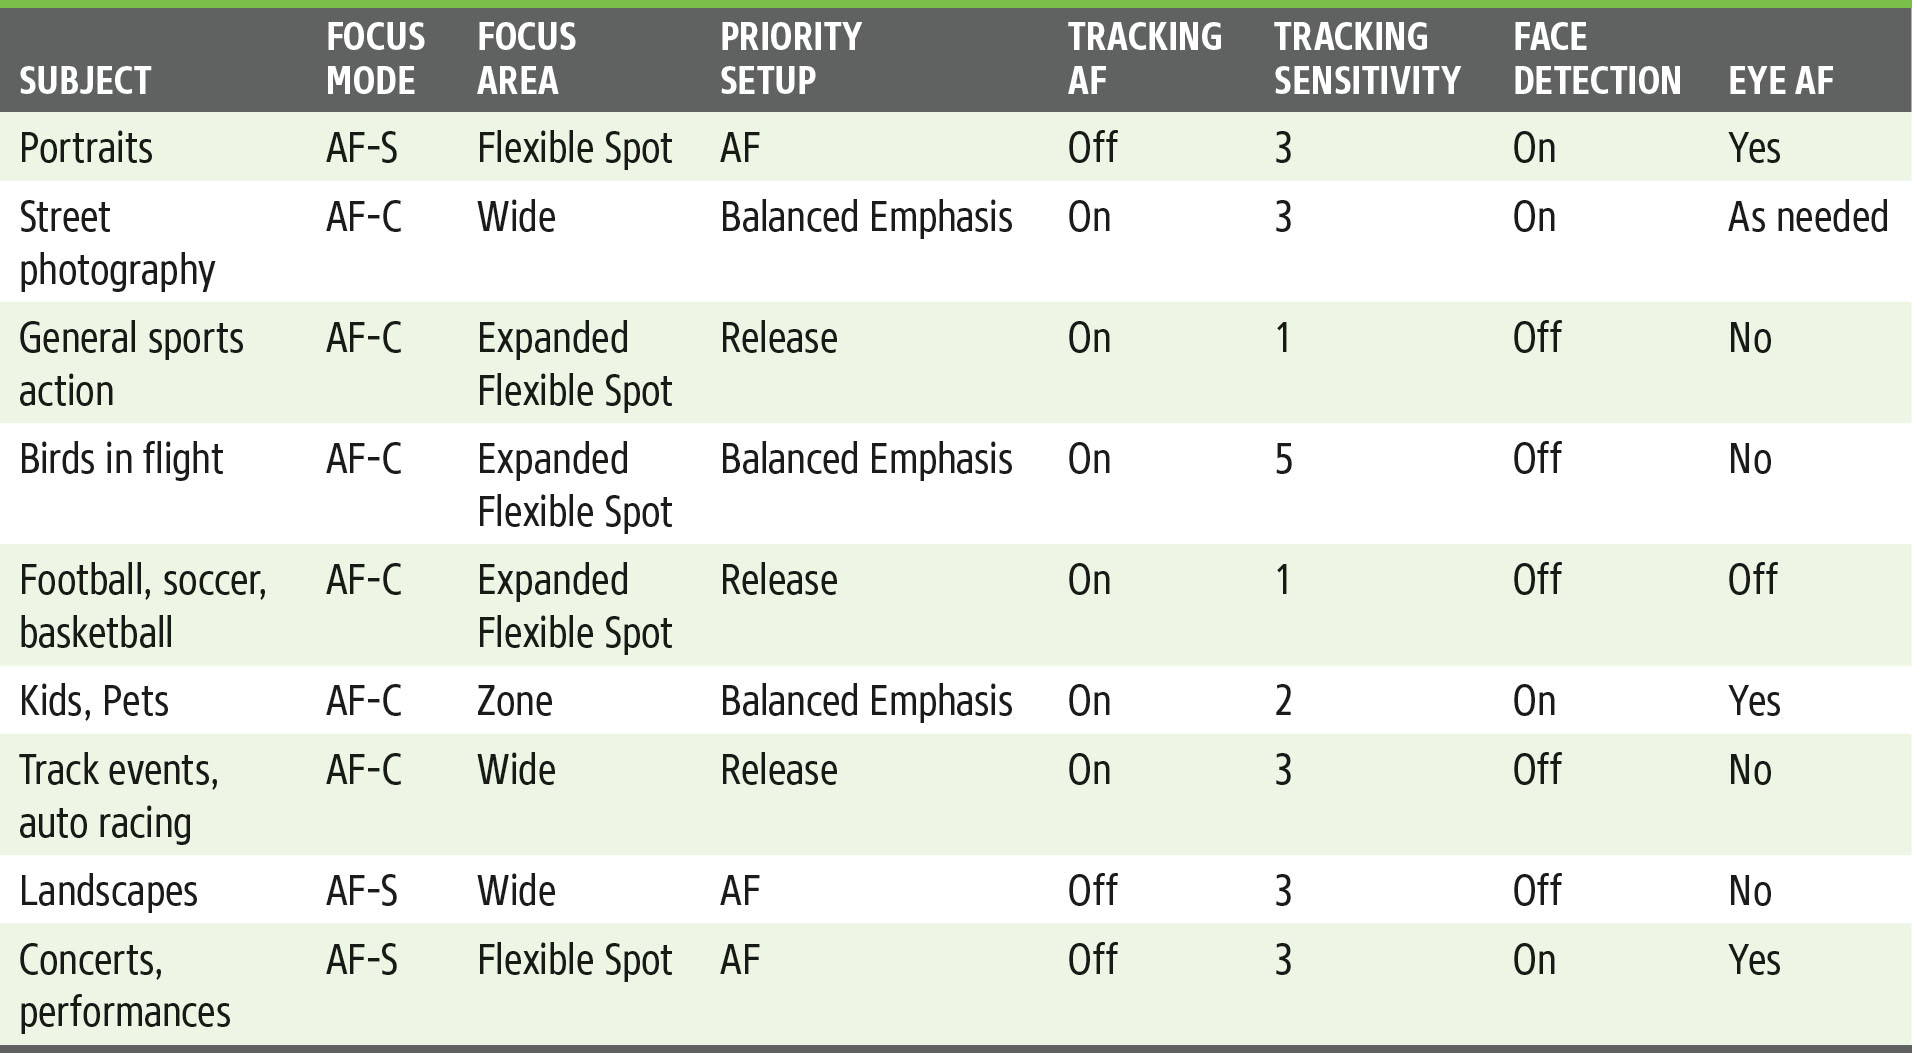
- Face/Eye AF Settings (Camera Settings I-05). Allows turning Face/Eye Detection priority on/off, specifying Human or Animal subjects, selecting right or left eyes, turning face frames on/off, and displaying a frame around animal eyes.
- Focus Mode (Camera Settings I-04). Choose focus modes from AF-S, AF-C, AF-A, DMF, and MF.
- Priority Set AF-S/AF-C (Camera Settings I-04). Select whether focus is release priority (take picture immediately, even if sharp focus not achieved) or focus priority (don’t take picture until sharp focus is locked in). You can also choose balanced emphasis as a compromise between the two. Separate entries for AF-S and AF-C.
- Focus Area (Camera Settings I-04). Select the number and location of autofocus points used, from Wide, Zone, Center, Flexible Spot, and Expanded Flexible Spot.
- Focus Area Limit (Camera Settings I-04). Choose which focus area modes are available.
- Switch Vertical/Horizontal AF Area (Camera Settings 1-04). Specify different AF areas for horizontal and two vertical camera orientations.
- AF with Shutter (Camera Settings I-05). Choose On to start AF when the shutter is pressed halfway, or Off to decouple AF start from shutter release.
- Eye-Start AF (Stills) (Camera Settings I-06). When using a compatible A-mount lens and adapter, autofocus is initiated when you put your eye up to the viewfinder.
- AF Area Registration (Stills) (Camera Settings I-06). Allows setting a preassigned AF area location to a custom key.
- Delete Registered AF Area (Camera Settings I-06). Removes a pre-defined registered AF area that you no longer want to use.
- AF Area Auto Clear (Camera Settings I-06). Determines whether the autofocus area is displayed all the time, or only briefly before disappearing.
- Display Continuous AF Area (Camera Settings I-06). Enables/disables display of AF areas during continuous autofocus.
- Circulation of Focus Point (Camera Settings I-07). Enables/disables wrap-around of focus point/frame as you move them toward the edges of the frame.
- AF Micro Adjustment (Camera Settings I-07). Fine-tune autofocus for specific A-mount lenses when used with EA-LA2 or EA-LA4 adapters.
- AF Frame Movement Amount (Camera Settings I-07). Set Standard or Large movement increments when adjusting the autofocus frame position.
- AF Transmission Speed (Movies) (Camera Settings II-02). Choose between slow and accurate AF, or fast and slightly less accurate in video mode.
- AF Subject Shift Sensitivity (Movie) (Camera Settings II-02). Adjust how long the a7C waits to refocus on intervening objects when shooting movies.
- Focus Magnifier (Camera Settings I-13). Enlarges image during manual focus.
- MF Assist (Camera Settings I-13). Turns manual focus magnifier on or off.
- Focus Magnifier Time (Camera Settings I-13). Length of time focus magnifier remains active.
- Peaking Setting (Camera Settings I-13). Turn peaking on or off, set the level (strength) of the effect, and the color of the outline.