
Chapter 4. JavaScript Fundamentals for Deep Learning
JavaScript has come a long way in the past five years. Today, it is the only language that enables cross-platform training and inference of deep neural networks, while supporting all kinds of GPUs, even on mobile devices. In these chapters we cover the fundamental building blocks in JavaScript that power today’s deep learning frameworks running in the browser and Node.js.
Note: All of the source code used in this book can be found here: https://github.com/backstopmedia/deep-learning-browser. And, you can access the demo of our Rock Paper Scissors game here: https://reiinakano.github.io/tfjs-rock-paper-scissors/. Also, you can access the demo of our text generation model here: https://reiinakano.github.io/tfjs-lstm-text-generation/.
In the first section, we take a look at a few data types in JavaScript that make deep learning in the browser efficient: the TypedArrays. These primitives, as well as interfaces for encoding and decoding of binary data into these primitives such as ArrayBuffer and DataView, are fundamental for the performance of loading model parameters, computing convolutions, and pushing data to the GPU memory.
In this chapter we explore a key feature of JavaScript, namely its concurrency model. We will take a look at the event loop, asynchronous functions such as Promises, the async/await syntax, as well as multi-threading capabilities in the browser.
You will also learn about the APIs for loading resources on the CPU or GPU. You will see the fetch API, which can be used to load resources asynchronously to the browser. On top it provides access to the binary data of the HTTP response. We will also cover how to encode labels in JavaScript.
The last section outlines the graphic APIs of modern browsers. Hardware accelerated 2D rendering and processing is provided using the Canvas API, whereas hardware accelerated 3D processing is provided via the WebGL API.
TypedArrays in JavaScript
The matrix and the vector are the most basic data structures in deep learning. As covered in the previous chapter, feed-forwarding and computing gradients of each weight can be done as matrix multiplication. Having efficient data structures for the matrix and vector is key to making deep learning practical. The array in C/C++ is an efficient data structure to store the collection. It’s allocated in native memory space and provides a way to access data in a fast manner. The array can be used to even express the matrix or vector. On the other hand, in the Python world, these linear algebraic data structures are represented as NDArray. NDArray is an abstract data structure that expresses arbitrary dimensional data. NDArray provides a flexible interface while hiding the actual implementation under the hood.
TypedArray is intermediate between a raw array and NDArray, which enables you to access the data in a type-safe manner without an overhead of data copy. TypedArray defines a view of the collection of underlying ArrayBuffer. There is no concrete class named TypedArray, but it is a general term to specify which type the array can store. Specifically, there are nine types of TypedArray in the modern browser.
- Int8Array
- Uint8Array
- Uint8ClampedArray
- Int16Array
- Uint16Array
- Int32Array
- Uint32Array
- Float32Array
- Float64Array
U in the prefix represents an unsigned value. For example, Uint8Array allows you to read or write unsigned 8 bytes integer in each element in the array. Uint8Array can keep 0-255 value. If you put a value greater than 256, overflowed bits will be truncated. For example:
// Create a 4 byte fixed length Uint8Arrayvararr=newUint8Array(4);arr[0]=256;console.log(arr);// -> Uint8Array [ 0, 0, 0, 0 ]
Uint8ClampedArray puts limits on the value instead of truncating the value. If you write 256 to Uint8ClampedArray, it will be bounded up to 255. The value less than 0 will be limited by 0 as well.
vararr=newUint8ClampedArray(4);arr[0]=256;arr[1]=-128;console.log(arr);// -> Uint8ClampedArray [ 255, 0, 0, 0 ]
As shown this far, TypedArray can be used as a normal array, which enables you to read or write a value through the [] operator. TypedArray just provides a proper way to access each element in the array. In fact, actual data is stored in the ArrayBuffer.
ArrayBuffer
TypedArray is a view that specifies how to access the underlying ArrayBuffer. ArrayBuffer is a data structure that actually stores data. Since ArrayBuffer is only a binary buffer on memory, it does not provide any way to read or write data. All operations are able to be done through TypedArray or DataView that is explained later. TypedArray knows what kind of data type is expected by a programmer. Therefore, TypedArray can calculate the aligned slice of each element from the internal ArrayBuffer.
varbuf=newArrayBuffer(4);vararr=newUint8Array(buf);
You can access an ArrayBuffer through different TypedArray views, because ArrayBuffer is only a sequence of binary data, which does not have any accessor type information. The task of how to interpret the binary data is delegated to TypedArray, even it is possible to use different types of TypedArray on an ArrayBuffer.
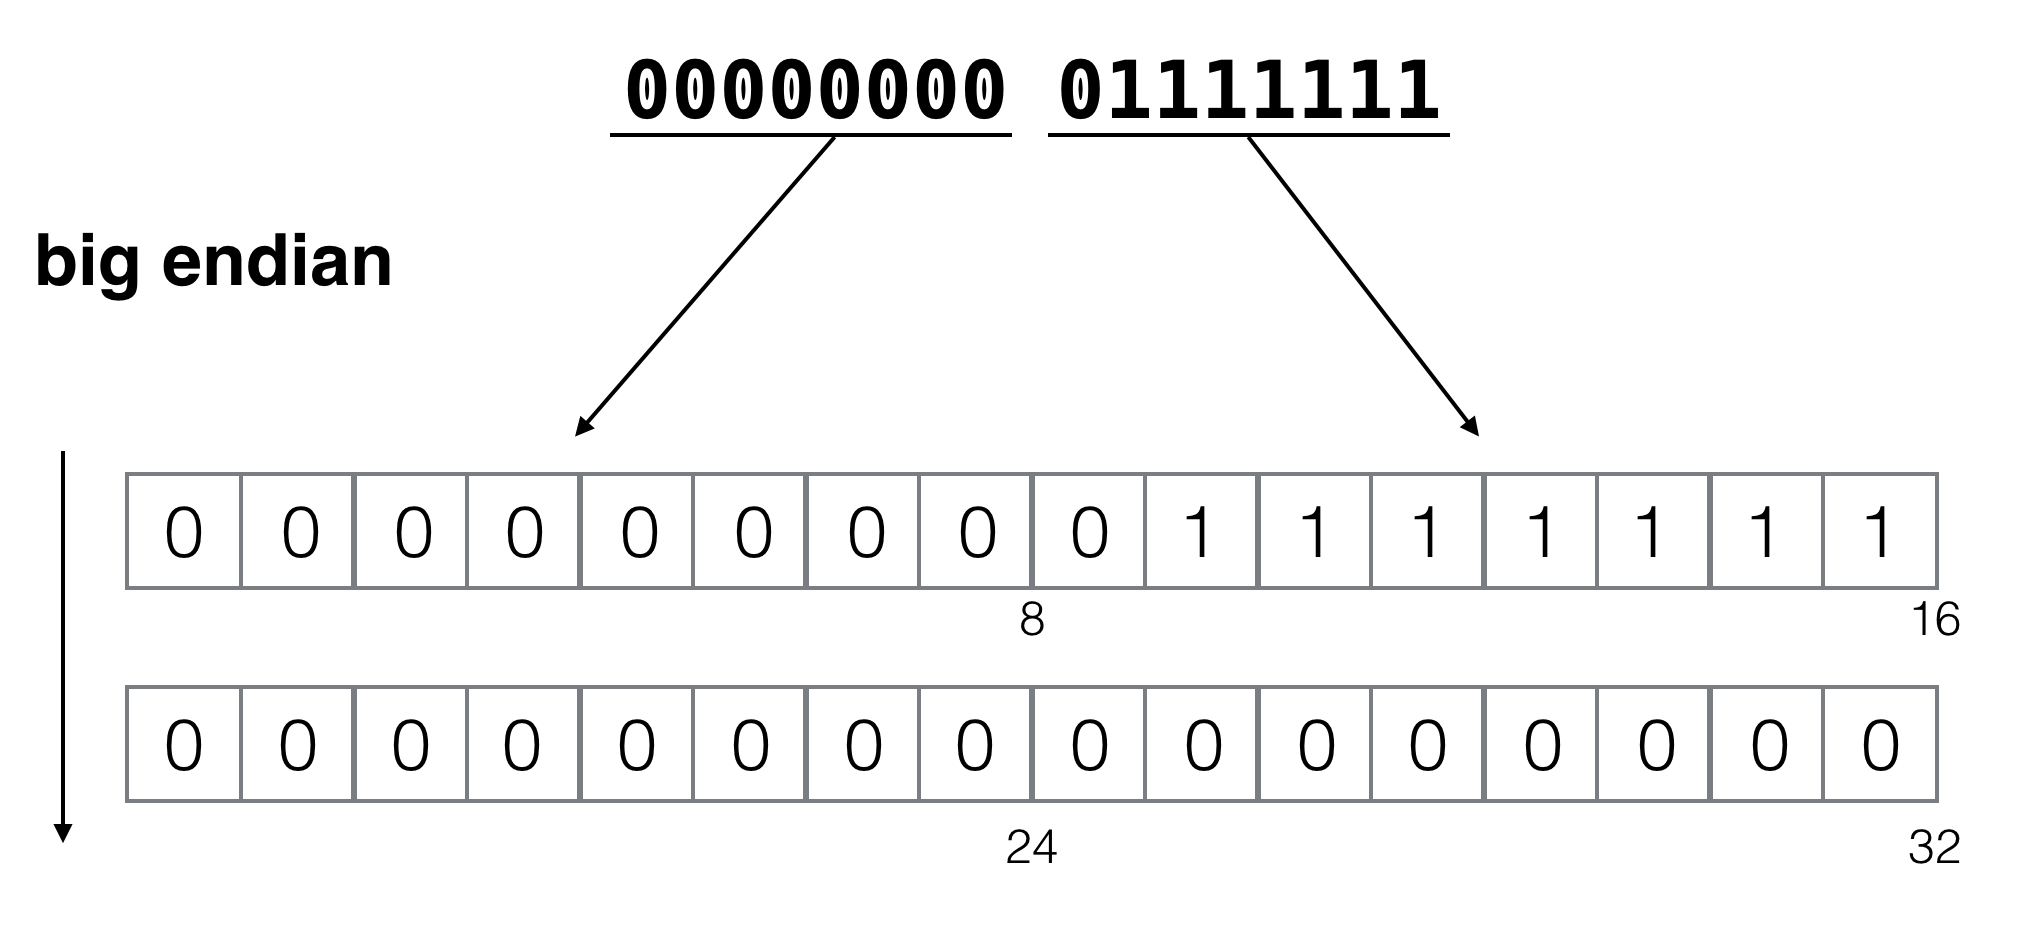
varbuf=newArrayBuffer(4);varuint8=newUint8Array(buf);varint16=newInt16Array(buf);uint8[0]=1;uint8[1]=1;console.log(uint8);// -> Uint8Array [ 1, 1, 0, 0 ]console.log(int16);// -> Int16Array [ 257, 0 ]

This figure shows what internal bits of ArrayBuffer look like. You can see how different types of TypedArray (Uint8Array and Int16Array) provide different data, even if the underlying data is the same.
Make sure that a change is reflected in both TypedArrays, because they share an underlying ArrayBuffer. Data stored in ArrayBuffer won’t only be copied by creating a new TypedArray on the existing ArrayBuffer. TypedArray and ArrayBuffer provide an efficient way to access memory data by avoiding redundant data copy. By eliminating the overhead, it achieves fast data access even in a non-native environment like a web browser.
DataView
DataView is another way to read and write data from ArrayBuffer. What you can do with TypedArray can also be done with DataView. DataView provides a more low-level interface on ArrayBuffer, and DataView does not manage the type of stored data. You need to recognize what kind of data is stored every time you access it.
varbuf=newArrayBuffer(4);vard=newDataView(buf);// Set 10 as unsinged 8 bit integer as the first elementd.setInt8(0,10);// Get the first elementconsole.log(d.getInt8(0));// -> 10
A multi-byte number is stored differently, depending on the machine architecture. Without knowing the endianness of the machine architecture, you will later see an unexpected binary layout. DataView provides a way to explicitly specify endianness.
varbuf=newArrayBuffer(4);newDataView(buf).setInt16(0,127,true);// Store as little endianconsole.log(newUint8Array(buf));// -> Uint8Array [ 127, 0, 0, 0 ]newDataView(buf).setInt16(0,127,false);// Store as big endianconsole.log(newUint8Array(buf));// -> Uint8Array [ 0, 127, 0, 0 ]
In the case of little endian, a 2byte integer is stored as lower bits in the first position. On the other hand, big-endian is a way to store the integer as lower bits behind the position. If you do not specify the endianness explicitly, DataView stores data as default in a big-endian manner.
Little and Big Endian are the primitive building blocks for keeping data for training datasets, the intermediate results, and the final output. The data can be manipulated by GPU with WebGL, as well as CPU, as you have seen. In the next chapter, we introduce how to load data through the ArrayBuffer into memory or into the GPU buffer.
Concurrency in JavaScript
Generally speaking, JavaScript in the browser runs with a single thread. If the main thread needs to wait for some heavy computation or network IO (such as a web request), a programmer usually sets a callback function that is called after the computation is finished. Although the function still runs on a single thread, it does not block the main thread. In the world of the web browser, blocking the main thread also blocks the user interface of the browser, which indicates that rendering HTML, the response of a mouse click, will slow down the scrolling of the page. This makes the user experience of your application worse. Writing code that does not block the main thread is important in order to keep your web application quickly working. JavaScript, as well as TypeScript, provides useful APIs to asynchronously run your code.
The JavaScript event loop
A JavaScript implementation has a concept called the “event loop.” Although this programming model achieves efficient concurrency in general, it may look different to those who program in Java or C. So, let’s go over the event loop to explain concurrency in JavaScript.
There are three basic components in the JavaScript runtime: Stack, Heap, and Queue. A function call in JavaScript forms a stack. It manages local variables and stack frames allocated in advance. The heap is a region where arbitrary objects are allocated dynamically. Since a JavaScript implementation has a garbage collector, unused objects in the heap region are discarded properly. A queue is a JavaScript-specific mechanism to process something concurrently. It manages messages to be processed in the JavaScript runtime. Each message is associated with a callback function that gets called when the message is processed.
At some point in the event loop, the JavaScript runtime processes the oldest message in the queue. Therefore the callback function is called asynchronously from the viewpoint of the caller side. The event loop is a mechanism to decide when to process messages in the queue. As the name suggests, the event loop checks the message queue periodically and processes the oldest one with the appropriate timing.
while(queue.waitForMessage()){queue.processNextMessage();}
The event loop enables you to write an interactive program that efficiently communicates with a user, such as a mouse click or a scroll. Each message is processed completely. It indicates that the browser cannot process any user interactions while processing heavy message processing. Therefore, it is recommended to use WebWorker in such use cases so as not to block user interactions. This will be explained in more depth later in this chapter.
You may be familiar with the setTimeout function. This is actually an API to add a message to a runtime queue. setTimeout takes two arguments. One is a callback function and the other is a time value that represents the minimum delay after which the message is processed.
setTimeout(()=>{console.log("This is called 2 seconds later");},2000);
If another message is processed say two seconds later, the event loop cannot call the callback function, and may be further delayed. This is why the second argument is the minimum delay to process the message.
The event loop is mainly designed to handle IO and user interaction efficiently. Basically, it never blocks the main thread while processing XMLHttpRequest. Asynchronous features that are provided as Promise and async are handled by the event loop. They will be described in the next section.
Creating an asynchronous function with Promise
Promise is a structure that wraps a result to be calculated asynchronously. You can usually write asynchronous functions by using a callback function.
functionasyncFunc1(cb){cb("Hello, Callback");}asyncFunc1((v)=>{console.log(v)})// -> "Hello, Callback"
The code can be hard to read if multiple callbacks need to be nested.
functionasyncFunc1(name,cb){cb(name);}// Callback hell!asyncFunc1('Callback1',(v1)=>{asyncFunc1(`${v1}and Callback2`,(v2)=>{asyncFunc1(`${v2}and Callback3`,(v3)=>{console.log(v3);})})})// -> Callback1 and Callback2 and Callback3
By using Promise you can rewrite the code.
functionpromiseFunc(name){returnnewPromise((resolve,reject)=>{resolve(`${name}`);});}promiseFunc('Promise1').then(v1=>{returnpromiseFunc(`Promise2 and${v1}`);}).then(v2=>{returnpromiseFunc(`Promise3 and${v2}`);}).then(v3=>{console.log(v3);})// -> Promise1 and Promise2 and Promise3
Although the code won’t be a deeper proportion to the number of functions, we still need to write some redundant code like the creation of a Promise object. That makes the code look quite different from the code written in a synchronous way. Async/await is a new way to write asynchronous code that is built on top of Promise.
Using the new async/await syntax
You can use the async keyword to define an asynchronous function and use await to call the asynchronous function. Just prepending the async keyword to the definition of the function automatically wraps the result with a Promise object. In short, the async keyword manages the Promise creation on behalf of the programmer.
// Returns the Promise object by resolving// the result with the name objectasyncfunctionasyncFunc(name){returnname;}asyncFunc('Async1').then(v1=>{returnasyncFunc(`Async2 and${v1}`);}).then(v2=>{returnasyncFunc(`Async3 and${v2}`);}).then(ret=>{console.log(ret);})
You can omit the creation of the Promise object explicitly, but you still need to use a method chain with then. It tends to make the code longer and harder to track the logic. You can specify the function to wait for the return of async function by using the await keyword. You can extract the result directly from the async function.
asyncfunctionasyncFunc(name){returnname;}asyncfunctionasyncCall(){try{letname1=awaitasyncFunc('Async1');letname2=awaitasyncFunc('Async2');// let error = await throwError();letname3=awaitasyncFunc('Async3');letmsg=`${name1}and${name2}and${name3}`;returnmsg;}catch(err){throwerr;}}asyncCall().then(msg=>{console.log(msg);// -> Async1 and Async2 and Async3});
The code becomes cleaner and more concise. The flow of logic looks similar to the synchronous logic. But there is one pitfall for using await. You can only use await in an async function. The following code is invalid.
// we cannot use await keyword in non async function.functionnormalFunc(){letret=awaitasyncFunc('Invalid');}
The merit of using async/await syntax is not only making the code simple, but also to make the error handling easier. You just need to throw an exception or error object when you want to stop the process and propagate the error message.
asyncfunctionthrowError(){thrownewError('Error is happening');}asyncfunctionasyncCall(){letname1=awaitasyncFunc('Async1');letname2=awaitasyncFunc('Async2');leterror=awaitthrowError();letname3=awaitasyncFunc('Async3');letmsg=`${name1}and${name2}and${name3}`;returnmsg;}asyncCall().then(msg=>{// If no error is propagated, message is normally printed.console.log(msg);}).catch((err)=>{// Error can be catched by catch method of Promise object.console.log(`Error is catched:${err.message}`);});
Multiple calls of the asynchronous method will be stopped immediately and an exception thrown to the caller. It is a major advantage to use the async/await in heavy calculation on a browser. Actually, deep learning frameworks like deeplearn.js frequently use the feature, especially data loading.
Multi-threading using WebWorkers
The async/await feature is not implemented on top of threads. Rather, it is used by the hook in the event loop of the JavaScript runtime. So, theoretically, it still does not run in parallel. It just provides an abstraction for non-blocking API.
WebWorkers is an API to run specific tasks concurrently in a separate thread. WebWorkers run in another global context when the main thread (window) is running. The current global context within WebWorkers will throw an error, so data is sent via postMessage API instead. You can pass any type of object to this API. At the receiver, it is necessary to implement an onmessage function to accept the message from the worker or client. Let’s show an example of how to use WebWorkers.
<html><head><scripttype="text/javascript">letw=newWorker('worker.js');w.postMessage("From Client");w.onmessage=(e)=>console.log(e.data);</script></head></html>
This is the client side code that just receives the message from WebWorker and prints it on the console. The script running on WebWorker should be written as the name, which is “worker.js” in this case.
leti=0;setInterval(()=>{postMessage(`This is worker. I'm sending a message${i++}times`);},1000);onmessage=(msg)=>{console.log(`Received Message from client:${msg.data}`);}
You will see the printed message on the console.
Received Message from client: From Client worker.html:7 This is worker. I'm sending a message 0 timesworker.html:7 This is worker. I'm sending a message1timesworker.html:7 This is worker. I'm sending a message 2 timesworker.html:7 This is worker. I'm sending a message3times...
Although the task here is just returning a text message, you can delegate a heavy task such as downloading data from a remote source to a worker. As you may know, XMLHttpRequest is available in the WebWorker. So as far as the data source exists on the same origin, WebWorker can asynchronously load the data. The task is run in a separate thread from the main thread. It does not block the user experience at all.
There are three types of the scopes a namespace WebWorker can make use of: DedicatedWorkerGlobalScope, SharedWorkerGlocalScope, and ServiceWorkerGlobalScope. The previous example demonstrates the usage of DedicatedWorkerGlobalScope, in which a worker was only used by a single script. WebWorker, as mentioned before, is not able to access global context of the browser main thread. It indicates that a worker cannot directly manipulate DOM objects. WebWorker runs with another context called WorkerGlobalScope that can be referred by a self keyword within WebWorker. WorkerGlobalScope is specialized by three scopes previously introduced. You can only access the global object referable via WorkerGlobalScope, such as console and navigation. That is why you can print a message by console.log in the example. You need to choose a specific WebWorker type that fits your purpose.
A processing loop for deep learning applications
Web applications need to return specific results continuously from the deep learning model, which is often the case of an interactive web application. The deep learning model predicts something with a given input one after another. For example, let’s assume we have an object tracking application using a web camera on a browser. A web camera provides input images continuously to our deep learning model. The web application also needs to render the detected frame returned by the deep learning model one-by-one. Therefore, an application keeps running prediction and rendering.
requestAnimationFrame is a method to ask the browser to call a specific function to render a frame. You can pass a callback function to this method. The web browser calls the callback function approximately 60 times per second. But in general, it matches the number of the refresh rate of the display.
Using requestAnimationFrame is efficient compared to the while loop calling the callback function, because most web browsers pause and refresh when running in a background tab or hidden <iframe> to improve performance and battery life. It is highly recommended to use requestAnimationFrame in a deep learning application in a web browser or a graphics rendering application.
asyncfunctionstep(timestamp){// perform your processing herewindow.requestAnimationFrame(step);}window.requestAnimationFrame(step);
Loading resources on CPU/GPU
As you have seen so far, data is represented by TypedArray and ArrayBuffer in the browser world. The situation on a CPU is simple. ArrayBuffer is allocated in the memory space used by the browser process. It is mainly managed by browser process and JavaScript runtime. You don’t need to take care of memory management in this case.
On the other hand, you need to carefully manage data on a GPU buffer, otherwise it will cause huge performance degradation. GPU has its own memory to store the data to be computed. Since GPU code cannot access the data in the main memory, you need to manually copy the data to the GPU buffer space before the calculation on GPU is starting. The next figure shows the ordinal architecture of the GPU connection. PCI Express is a general bus to connect CPU and GPU. CPU sends commands and data through this bus to GPU. WebGL provides specific APIs to make data loading between CPU and GPU easier. Since there is a limitation in terms of the bandwidth of the bus, it is necessary to efficiently copy the data. This detail will be introduced in later chapters.
Fetch API
As introduced in the previous chapter, data can be any kind of format such as JSON, CSV, or binary format. It is important to load these kinds of resources efficiently into a CPU. Web browsers already provide a simple way to load an arbitrary resource. This is called the Fetch API. The Fetch API is an abstraction to load the resource from the web or a local machine. It is similar to XMLHttpRequest, but Fetch API is simpler and more flexible in terms of accessing the response of the HTTP request and returns a Promise. You can call the fetch function that is provided in the global context.
fetch("data.csv")
The Fetch API returns a Promise object that can be resolved as a Response object. A Response object has several methods to get a value in various kinds of formats. For example, you can use the text method to retrieve the data as only text format.
fetch("data.csv").then(response=>response.text()).then(text=>console.log(text)).catch(err=>console.log(err));
In addition to this method, the Response class also provides arrayBuffer(), blob(), and json() so you can read the data in the format used in machine learning. One thing to take care of is error handling. The Fetch API does not always throw exceptions, such as a 404 status code. In such cases, you need to check the status of the Response object. It is provided as an ok property of the Response object.
fetch("data.csv").then(response=>{if(response.ok){returnresponse.text();}else{thrownewError();}}).then(text=>console.log(text));
Response.ok is true when the status code is between 200 and 299. Check the property first to make sure the resource is properly found.
By specifying the second argument of the Fetch API, you can customize the request in a fine-grained manner.
fetch("data.csv",{method:'GET',mode:'same-origin'})
The Fetch API provides a general way to access specific resources that can be used seamlessly with the Promise and async APIs introduced previously. Since the Fetch API is powerful, it is reasonable to use the API to load large resources or data used for the deep learning model into the web browser.
Now let’s introduce a way to associate labels and datasets with ArrayBuffer. As explained in the previous chapter, the deep learning model requires label data as a target variable to be predicted. The dataset is illustrated as a fixed-length vector that represents the feature of a data point. A deep learning model is trained to predict the correct label with a given vector feature. A data point can have various kinds of features, such as a string, a floating-point number, an integer, a date time, and so on. But the deep learning model is able to process only a numeric feature data point. ArrayBuffer is also able to keep only numeric data such as integer, floating-point number, or boolean (a boolean value can be represented as a binary number, 0 or 1). Other types must be converted into one of these types.
Label encoding
Label encoding is a way to map label value to a corresponding numeric value. It usually encodes a label value between 0 to the number of classes.
// This original label value will be...varlabels=['Cat','Dog','Monkey','Cat'];// changed into...varencoded=[0,1,2,0];
You can use this encoded value as both a training dataset and the target value. This is a common way to get a numerical value from a categorical value, which you can see in a popular machine learning framework like scikit-learn or LabelEncoder. As you may have noticed, there is a problem with this method. This mapping assumes a kind of order in the categorical values. ‘Monkey’ is two times as big as ‘Cat’ in this case. This kind of assumption is true only when we use a comparable category like size or length (e.g., S, M, L, XL of the sizes of clothes). It is meaningless to provide the category value 1.5, because there is no meaning between ‘Dog’ and ‘Monkey.’ In these cases, the following method is a common way.
One-hot Encoding
One hot encoding encodes categorical features into a numerical vector by using one-of-k encoding. One-of-k encoding creates a binary vector that each bit represents a category. For example, a three length vector is necessary to express a List.x category.
// This original label value will be...varlabels=['Cat','Dog','Monkey','Cat'];// changed into...varencoded=[[1,0,0],[0,1,0],[0,0,1],[1,0,0]];
This type of encoding does not assume any order between labels. Each encoded value can be regarded as a distinct value. One shortcoming of this encoding is that it tends to be pretty sparse. Only one bit of the vector is 1 even if there are thousands of labels. Using the data structure that is specific for sparse vector may be better.
You can store data efficiently in ArrayBuffer after all values become the numeric type, as described in the previous sections. Float32Array is usually used in the deep learning model. Float64Array can keep data more precisely, but it requires a larger memory space. Using Float32Array is sufficient in most cases.
vardata=newFloat32Array([0.1,0.3,-0.2]);
ArrayBuffer needs to be copied to the GPU buffer if you want to accelerate the calculation by the high parallelism. The data will be uploaded as texture to be used by the fragment shader. This detail will be explained in the following chapters.
Summary
In this chapter, we introduced the basic building blocks for running deep learning in the browser. It includes advanced data structures and APIs implemented in modern browsers, as well as basic JavaScript functions. TypedArray and ArrayBuffer provide a way to access the loaded data into the browser. It is important to understand how these underlying data structures behave. And also modern web browsers provide various kinds of APIs that make multi-threading programming possible. WebWorker enables you to run a specific heavy workload without blocking the main foreground thread. That API can be used for pre-processing or model training that usually requires a computation resource. The Fetch API is a general API to load resources in an efficient manner. Using the API will make your code consistent and readable. Familiarity of these basics allow you to make your model efficient and competitive in terms of performance and readability of the codebase.
In the next chapter we will look into WebGL, an API that provides the browser access to the shader pipeline of the GPU. We will learn about how to map deep learning operations in GPU shader programs. We will also show how to implement a neural network with WebGL.