© Chet Hosmer 2018
Chet HosmerDefending IoT Infrastructures with the Raspberry Pihttps://doi.org/10.1007/978-1-4842-3700-7_3

3. Raspberry Pi Configuration and PacketRecorder.py Enhancements

Chet Hosmer1 
(1)
Longs, South Carolina, USA
 
When examining a platform for deploying a sensor, there are several key considerations. These considerations typically fall into four broad categories.
  1. 1.

    We must consider the placement of the sensor and the connection to the network that we which wish to sense, such as wired direct connection, traditional 802.11 WIFI, Bluetooth, or other lightweight protocols.

     
  2. 2.

    We must examine the visibility that can be obtained from the selected network connection and/or the physical location of the sensor. In other words, what network traffic will be visible from a specific vantage point?

     
  3. 3.

    Will multiple sensors be required to derive a complete picture of the network that we wish to monitor?

     
  4. 4.

    Certainly, the cost and long-term viability of the platform we intend to deploy need to be considered.


Since this book is focused on using the Raspberry Pi as the sensor, we also need to consider the advantages and limitations of the Pi. We have chosen this platform and the Python programming language based on cost, simplicity, and versatility. Certainly, depending upon the amount of network traffic, along with the speed of the networks that will be monitored, the Pi might not have the performance required. However, since all of the software is written in Python, as more powerful Raspberry Pi or other Linux platforms (small and lightweight or large and high performance) become available, the solution can be scaled to meet the needs.

Basic Configuration (as of This Writing)

We will be using a Raspberry Pi 3 Model B version 1.2 as described back in Chapter 1 and pictured in Figure 1-6 for the examples in the book. We do this to provide a bit more detail on the configuration and to introduce you to the Raspberry Pi and the Raspbian OS commands, which allow us to do a bit of probing.

Note

All the commands executed from the Pi were done from the /home/pi directory. In the default state the default user is pi.

The following line is what the default prompt should look like. Depending on the installation and configuration of your Pi, this might vary slightly.

pi@raspberrypi:~ $

Note

The ~ (tilde) character is shorthand for the /home/pi directory. Thus, commands are entered directly after the $, allowing you to get some basic but valuable information about your Pi.

Get Information About the Pi CPU

The command retrieves the basic information regarding the Raspberry Pi CPU.

pi@raspberrypi:~ $ cat /proc/cpuinfo

Note the Pi 3 Model B has four cores. This will become important in later chapters when we utilize the Python multiprocessing library to enhance performance.

processor    : 0
model name   : ARMv7 Processor rev 4 (v7l)
BogoMIPS     : 38.40
Features     : half thumb fastmult vfp edsp neon vfpv3 tls vfpv4 idiva idivt vfpd32 lpae evtstrm crc32
CPU implementer : 0x41
CPU architecture: 7
CPU variant  : 0x0
CPU part     : 0xd03
CPU revision : 4
processor    : 1
model name   : ARMv7 Processor rev 4 (v7l)
BogoMIPS     : 38.40
Features     : half thumb fastmult vfp edsp neon vfpv3 tls vfpv4 idiva idivt vfpd32 lpae evtstrm crc32
CPU implementer : 0x41
CPU architecture: 7
CPU variant  : 0x0
CPU part     : 0xd03
CPU revision : 4
processor    : 2
model name   : ARMv7 Processor rev 4 (v7l)
BogoMIPS     : 38.40
Features     : half thumb fastmult vfp edsp neon vfpv3 tls vfpv4 idiva idivt vfpd32 lpae evtstrm crc32
CPU implementer : 0x41
CPU architecture: 7
CPU variant  : 0x0
CPU part     : 0xd03
CPU revision : 4
processor    : 3
model name   : ARMv7 Processor rev 4 (v7l)
BogoMIPS     : 38.40
Features     : half thumb fastmult vfp edsp neon vfpv3 tls vfpv4 idiva idivt vfpd32 lpae evtstrm crc32
CPU implementer : 0x41
CPU architecture: 7
CPU variant  : 0x0
CPU part     : 0xd03
CPU revision : 4

Get Information Regarding Pi Memory

Another crucial factor regarding the capabilities of the Raspberry Pi is the amount of RAM memory onboard, and more importantly the memory available for use by our application. You can obtain this information using the following command.

pi@raspberrypi:~ $ get_mem arm

Notice, unlike the static information regarding the CPU, this is a live report regarding memory usage. As you can see we have a little over 700 MB of fee memory available along with just under 100 MB of free swap memory.

Hardware     : BCM2709
Revision     : a02082
Serial       : 0000000093c183ae
MemTotal:         947732 kB
MemFree:          700856 kB
MemAvailable:     796304 kB
Buffers:           20404 kB
Cached:           126088 kB
SwapCached:            0 kB
Active:           129024 kB
Inactive:          84444 kB
Active(anon):      67364 kB
Inactive(anon):    13852 kB
Active(file):      61660 kB
Inactive(file):    70592 kB
Unevictable:           0 kB
Mlocked:               0 kB
SwapTotal:        102396 kB
SwapFree:         102396 kB
Dirty:                92 kB
Writeback:             0 kB
AnonPages:         66816 kB
Mapped:            63560 kB
Shmem:             14240 kB
Slab:              16964 kB
SReclaimable:       8312 kB
SUnreclaim:         8652 kB
KernelStack:        1576 kB
PageTables:         2316 kB
NFS_Unstable:          0 kB
Bounce:                0 kB
WritebackTmp:          0 kB
CommitLimit:      576260 kB
Committed_AS:     721200 kB
VmallocTotal:    1114112 kB
VmallocUsed:           0 kB
VmallocChunk:          0 kB
CmaTotal:           8192 kB
CmaFree:            3724 kB

Get Information Regarding the Current Free Memory Only

Digging a bit deeper, this command provides a more targeted result providing us data regarding free memory and the used and free swap space.

pi@raspberrypi:~ $ free -o -h
           total     used    free   shared    buffers     cached
Mem:        925M     241M    683M      13M        20M       123M
Swap:        99M       0B     99M

Get Information Regarding Pi Filesystem

Obtaining information regarding the current active Pi filesystem will help to define the onboard storage we have available.

pi@raspberrypi:~ $ df

This command provides the information on how the Pi is configured and most importantly how much free space we have available. Performing simple arithmetic (1024 × 8792304; the available blocks × 1K), we see that we have a little over 9 GB available. This make sense as I’m using a 16GB SD Card on this Pi. If you need more space, then you can choose a larger SD Card for your application. Note, the official maximum size is 32GB.

Filesystem     1K-blocks    Used Available Use% Mounted on
/dev/root       13606320 4099804   8792304  32% /
devtmpfs          469532       0    469532   0% /dev
tmpfs             473864       0    473864   0% /dev/shm
tmpfs             473864    6460    467404   2% /run
tmpfs               5120       4      5116   1% /run/lock
tmpfs             473864       0    473864   0% /sys/fs/cgroup
/dev/mmcblk0p6     66528   20762     45767  32% /boot
tmpfs              94776       0     94776   0% /run/user/1000
/dev/mmcblk0p5     30701     456     27952   2% /media/pi/SETTINGS

Get Information Regarding USB Devices and Interfaces

We can of course add more storage to the Pi using the available USB expansion slots as well.

I ran this command twice for you. The first is with no external USB devices inserted, and the second is with one added.

pi@raspberrypi:~ $ lsusb
Bus 001 Device 004: ID 045e:0745 Microsoft Corp. Nano Transceiver v1.0 for Bluetooth
Bus 001 Device 003: ID 0424:ec00 Standard Microsystems Corp. SMSC9512/9514 Fast Ethernet Adapter
Bus 001 Device 002: ID 0424:9514 Standard Microsystems Corp.
Bus 001 Device 001: ID 1d6b:0002 Linux Foundation 2.0 root hub

Now, to execute the same command after inserting the external USB SanDisk Cruzer:

pi@raspberrypi:~ $ lsusb
Bus 001 Device 004: ID 045e:0745 Microsoft Corp. Nano Transceiver v1.0 for Bluetooth
Bus 001 Device 005: ID 0781:5406 SanDisk Corp. Cruzer Micro U3
Bus 001 Device 003: ID 0424:ec00 Standard Microsystems Corp. SMSC9512/9514 Fast Ethernet Adapter
Bus 001 Device 002: ID 0424:9514 Standard Microsystems Corp.
Bus 001 Device 001: ID 1d6b:0002 Linux Foundation 2.0 root hub

Get Information About the Version of Linux

This command provides us information about the core version of Linux we are using, but also provides information regarding the current c++ compiler and crosstool that are installed. It is important to keep your Pi updated, including the operating system and development platform.

pi@raspberrypi:~ $ cat /proc/version
Linux version 4.4.50-v7+ (dc4@dc4-XPS13-9333)
(gcc version 4.9.3 (crosstool-NG crosstool-ng-1.22.0-88-g8460611) )
#970 SMP Mon Feb 20 19:18:29 GMT 2017

Upgrading Your Pi

Like other more traditional computing platforms, keeping your Pi up to date is an important process. This will ensure that you are running the latest version of software and that security updates are current. In addition, I also update the pip environment for the same reasons (pip is the tool that we use for installing and managing Python packages, such as those found in the Python Package Index.) Here are examples for both:

pi@raspberrypi:~ $ sudo apt-get update

This will download and install updates to any packages that have updates available (based on the information obtained from the apt-get update command).

Get:1 http://mirrordirector.raspbian.org jessie InRelease [14.9 kB]
Get:2 http://archive.raspberrypi.org jessie InRelease [22.9 kB]
Get:3 http://mirrordirector.raspbian.org jessie/main armhf Packages [9,536 kB]
Get:4 http://archive.raspberrypi.org jessie/main armhf Packages [170 kB]
Get:5 http://archive.raspberrypi.org jessie/ui armhf Packages [58.9 kB]
Get:6 http://mirrordirector.raspbian.org jessie/contrib armhf Packages [43.3 kB]

---- Truncated for brevity ----

pi@raspberrypi:~ $ sudo apt-get dist-upgrade

Using the dist-upgrade will update Pi kernel and firmware.

Finally, as mentioned in the preceding, we need to keep the Python package installer up to date as well, in order to update any third-party Python packages we may use.

pi@raspberrypi:~ $ sudo pip install --upgrade pip

Important

One final note after executing these updates! You need to reboot the Pi. The command to do that is

pi@raspberrypi:~ $ sudo reboot

Advancing PacketRecorder.py

Now that we have the Pi configuration in hand, we can begin to advance the baseline of the PacketRecorder.py script we created in Chapter 2. To obtain more interesting information from the packets we see, we need to perform some secondary processing and advanced dictionary of observations. This will allow us to detect and observe packets of interest. Therefore, we are going to make the following enhancements to PacketRecorder.py.
  1. 1.

    Convert port numbers to common port names including known malicious ports

     
  2. 2.

    Convert MAC addresses to known manufacturers including known suspicious MAC addresses

     
  3. 3.

    Look up country code based on IP addresses

     
  4. 4.

    Record the average packet size for each unique connection

     
  5. 5.

    Update the interface to the PacketRecorder by using the built-in argparse library. This will allow us to create a command-line interface to the PacketRecorder and supply our desired options.


You can always find the latest command-line execution and parameters by typing the following:

pi@raspberrypi:~/Desktop/RP-10-12-2017 $ sudo python pr.py -h

Notice that I moved to the current working directory containing the PacketRecorder.py source code along with the needed additional support files. The installation of the full project is available from the source code for this book. Go to www.apress.com/9781484236994 and click the Source Code button.

pi@raspberrypi:~/Desktop/RP-10-12-2017 $ sudo python pr.py -h
Python Packet Recorder v.85 - Raspberry Pi
Python Forensics, Inc.  October 2017
Copyright Python Forensics - All Rights Reserved
usage: Raspberry Pi Packet Recorder V.85 . October 2017 [-h] -m DURATION
                                                        [-E] [-C]
optional arguments:
  -h, --help            show this help message and exit
  -m DURATION, --duration DURATION
                        specify duration of the recording in minutes
  -E, --ephemeral       if specified ephemeral ports are considered unique
  -C, --countryReport   if specified a special country report is generated

Step 1: Creating the Lookups

During the examination of observed packets, it is important not to overwhelm that process with significant code, databases, and so on. Remember, the purpose of the PacketRecorder.py application is to create a baseline of a “normal operating” network. This will in fact generate a detailed network device-level asset map for the environment that we are monitoring. This map should be compared to other available device maps (such as those generated by NMAP, administration documentation, etc.).

Thus, our approach is to preprocess lists of known good/bad ports, country codes, and manufacturer indices, and create a fast lookup of those values that can be easily added to the observations dictionary. We can of course generate anomalies identified during the baselining process as well.

Each of the lookups is processed in a comparable manner that starts with the conversion of online data into dictionary objects. We perform this operation as a preprocessing step. Depending upon the complexity of the online data source, the parsing and preparation of these dictionaries can be either simple or quite complex. However, we only perform this preprocessing operation periodically to keep our dictionary lookups up to date.

Once the preprocessing step is complete, we convert the resulting dictionary objects into serialized data (Python pickle files) that are loaded on to the Pi. In this manner the Pi does not require access to the Internet during baselining or operational sensing phases.

To perform this effectively, we extract information from reliable sources:
  1. 1.

    Manufacturer IEEE (Institute of Electrical and Electronics Engineers) OUI lists: http://standards-oui.ieee.org/oui.txt

     
  2. 2.
     
  3. 3.

    Maxmind’s Country Location Database http://dev.maxmind.com/geoip/legacy/geolite/


Ports Dictionary Creating Example

The following script demonstrates the processing of the IANA text ports list and conversion into a Python dictionary. Once the dictionary is created, the serialization of the dictionary is recorded in the file “ports.pickle”.

'' Port Dictionary Creation Process '''
'''
Copyright (c) 2017 Python-Forensics and Chet Hosmer, [email protected]
Permission is hereby granted, free of charge, to any person obtaining a copy of this software and associated documentation files (the "Software"), to deal in the Software without restriction, including without limitation the rights to use, copy, modify, merge, publish, distribute, sublicense, and/or sell copies of the Software, and to permit persons to whom the Software is furnished to do so, subject to the following conditions:
The above copyright notice and this permission notice shall be included in all copies or substantial portions of the Software.
'''
''' excerpt from the online ports list
TCP  0  Reserved
TCP  1  Port Service Multiplexer
TCP  2  Management Utility
TCP  3  Compression Process
TCP  4  Unassigned
TCP  5  Remote Job Entry
'''
import pickle
# Create an Empty Dictionary
portDictionary = {}
records = 0
print "PortList Dictionary Creation Script"
print "Python Forensics, Inc. ver 1.1 2017"
print "Processing PortList.txt"
# Open the PortList Text File
with open("PortList.txt", 'r') as theFile:
    # Process EachLine
    for eachLine in theFile:
        # Create a list of each component of the line
        # Split the line into parts
        lineList = eachLine.split()
        # We need at least three elements to be valid
        # PortType PortNumber  Description
        # The descriptions may be broken up into multiple parts of course
        if len(lineList) >= 3:
            # Make the key in the key/value pair
            key = (lineList[1], lineList[0])
            # Determine how many parts we have after type and port
            # We will use this list as the value in the key/value pair
            value = " ".join(lineList[2:])
            # Now create a dictionary entry
            # key = Port,Type
            # Value = Description
            portDictionary[key] = value
            records += 1
        else:
            # if the line does not have the correct number
            # of values skip this line and continue processing
            # the next line
            continue
    # All lines have been processed
    print "Lookup Records Create: ", records
''' Finally we serialize the portDictionary
    for use by PacketRecorder and PacketDetection
    scripts, by creating the file ports.pickle
'''
with open('portTest.pickle', 'wb') as pickleFile:
    pickle.dump(portDictionary, pickleFile)

Execution of the Script

To demonstrate the execution of the script, I have copied the source code and PortList.txt file to my local windows system.

Note

The creation of the lookups does not need to be done on the Raspberry Pi; this process can be created on Windows, Linux, or Mac.

When you download the Raspberry Pi installation files from GIT-HUB it will include the required pickle files. Therefore, you will not need to perform this operation. The sample is provided here to explain how the dictionaries are serialized into pickle files (see Listing 3-1).

c:ports>dir
 Volume in drive C is OS
 Volume Serial Number is ECD2-7A54
 Directory of c:ports
10/13/2017  11:22 AM    <DIR>          .
10/13/2017  11:22 AM    <DIR>          ..
10/13/2017  11:17 AM             2,696 CreatePortPickle.py
05/23/2017  08:15 AM           174,165 PortList.txt
               2 File(s)        176,861 bytes
               2 Dir(s)  496,912,228,352 bytes free
Listing 3-1

Directory for Execution of the CreatePortPickle.py script

At this point the script is executed and listing of the resulting directory, which includes the portTest.pickle file.

c:ports>python CreatePortPickle.py
PortList Dictionary Creation Script
Python Forensics, Inc. ver 1.1 2017
Processing PortList.txt
Lookup Records Created:  6367
c:ports>dir
 Volume in drive C is OS
 Volume Serial Number is ECD2-7A54
 Directory of c:ports
10/13/2017  11:27 AM    <DIR>          .
10/13/2017  11:27 AM    <DIR>          ..
10/13/2017  11:17 AM             2,696 CreatePortPickle.py
05/23/2017  08:15 AM           174,165 PortList.txt
10/13/2017  11:27 AM           398,507 portTest.pickle
               3 File(s)        575,368 bytes
               2 Dir(s)  496,910,360,576 bytes free

You might notice that the .pickle file is larger than the original PortList.txt file. This is normal, as the keys and internal structure of the dictionary may be larger. However, the efficiency gained through their use in the actual packetRecorder.py script is significant.

Utilizing the Pickle Files in PacketRecorder.py

Integrating the pickle files for is accomplished by creating a class for each lookup type. The initialization (or constructor of the class) loads the associated .pickle file into a dictionary associated with the object. Then a lookup method is included that allows fast lookup of the desired conversion.
  • Ethernet Packet Type

  • MAC Address to Manufacturer Lookup

  • Transport Protocol Lookup

  • Port Name Lookup

  • Country IP Address Lookup

The following code snippets provide the code for each of the lookup-related classes.

class ETH:
    def __init__(self):
        ''' FrameTypes Supported'''
        self.ethTypes = {}
        with open("ethTypes.pickle2",'rb') as fp:
            self.ethTypes = pickle.load(fp)        
    def lookup(self, ethType):
        ''' Returns the FrameType associated with the lookup or not=supported'''
        try:
            result = self.ethTypes[ethType]
        except:
            result = "not-supported"
        return result.strip()
# MAC Address Lookup Class
class MAC:
    def __init__(self):
        ''' constructor'''
        # Open the MAC Address OUI Dictionary
        try:
            with open('oui.pickle', 'rb') as pickleFile:
                self.macDict = pickle.load(pickleFile)
        except Exception as err:
            print str(err)
    def lookup(self, macAddress):
        try:
            result = self.macDict[macAddress]
            if len(result) >= 2:
                result = ": ".join(result[0:2])
            else:
                result = result[0]
            return result
        except:
            return "unknown"
# Transport Lookup Class
class TRANSPORT:
    def __init__(self):
        # Open the Transport protocol Dictionary
        with open('protocol.pickle', 'rb') as pickleFile:
            self.proDict = pickle.load(pickleFile)
    def lookup(self, protocol):
        try:
            result = self.proDict[protocol]
            return result
        except:
            return ["unknown", "unknown", "unknown"]
#PORTS Lookup Class
class PORTS:
    def __init__(self):
        # Open the Transport protocol Dictionary
        with open('ports.pickle', 'rb') as pickleFile:
            self.portsDict = pickle.load(pickleFile)
    def lookup(self, port, portType):
        try:
            lookupValue = (str(port).strip(),portType)
            result = self.portsDict[lookupValue]
            return result
        except:        
            return "unknown"
#
# Country Lookup
#
class COUNTRY:
    def __init__(self):
        # download from http://dev.maxmind.com/geoip/legacy/geolite/
        self.giv4 = pygeoip.GeoIP('geoIPv4.dat')
        self.giv6 = pygeoip.GeoIP('geoIPv6.dat')
    def lookup(self, ipAddr, kind):
        try:
            if kind == 'IPv4':
                return self.giv4.country_name_by_addr(ipAddr)
            elif kind == 'IPv6':
                return self.giv6.country_name_by_addr(ipAddr)
            else:
                return ''
        except:
            return ''

Instantiating and Accessing the Lookup Methods

The next step is to instantiate each of the classes into locally useable objects and then use the associated lookup functions when processing the observed packet.

Note

We perform this instantiation as part of the packetProcessor Class constructor, so the lookup methods are available during packet processing.

Code Snippet to Instantiate the Classes into Objects
class PacketProcessor:
    """
    Packet Processor Class Methods
    __init__ Constructor
    PacketProcessor(self, packet) : processes a single packet
    PrintMap(self) : prints out the content of the map
    """
    def __init__(self):
        """Constructor"""
        '''
        Create Lookup Objects
        These Object provide lookups for:
        Ethernet Frame Types
        MAC Addresses
        Transport Protocol Types
        TCP/UDP Port Names
        Country
        '''
        self.traOBJ  = TRANSPORT()
        self.ethOBJ  = ETH()    
        self.portOBJ = PORTS()
        self.ouiOBJ  = MAC()
        self.cc      = COUNTRY()

Using the Lookups During Packet Processing

Now that the objects self.traOBJ, self.ethOB, self.portOBJ, self.ouiOBJ, and self.cc have been created, we can put them to use during normal packet processing. I have chosen to depict a couple of these here to give an example of how they are utilized.

Sample IPv4 Processing Conversion (Excerpt)

This excerpt depicts the conversion of the source and destination IP addresses into country location and converts the protocol number of the IPv4 packet into the associated country name.

 # covert the source and destination address to typical dotted notation strings
            self.packetSize = packetLength
            self.srcIP = socket.inet_ntoa(sourceIP);
            self.dstIP = socket.inet_ntoa(destIP);
            self.srcCC = self.cc.lookup(self.srcIP, 'IPv4')
            self.dstCC = self.cc.lookup(self.dstIP, 'IPv4')
            translate = self.traOBJ.lookup(str(protocol))
            transProtocol = translate[0]           
Convert the Port Numbers into Port Names (Excerpt)
# unpack the TCP Header to obtain the
# source and destination port
            tcpHeaderBuffer = struct.unpack('!HHLLBBHHH' , stripTCPHeader)
            self.srcPort = tcpHeaderBuffer[0]
            self.dstPort = tcpHeaderBuffer[1]
            self.srcPortName = self.portOBJ.lookup(self.srcPort, 'TCP')
            self.dstPortName = self.portOBJ.lookup(self.dstPort, 'TCP')

Executing the Updated PacketRecorder.py

In each chapter, as we advance and integrate new capabilities into PacketRecorder.py baselining capability, and into the ultimate sensor, I will be providing sample output from the latest version.

Note

that the name of the PacketRecorder.py was changed to pr.py for simplicity.

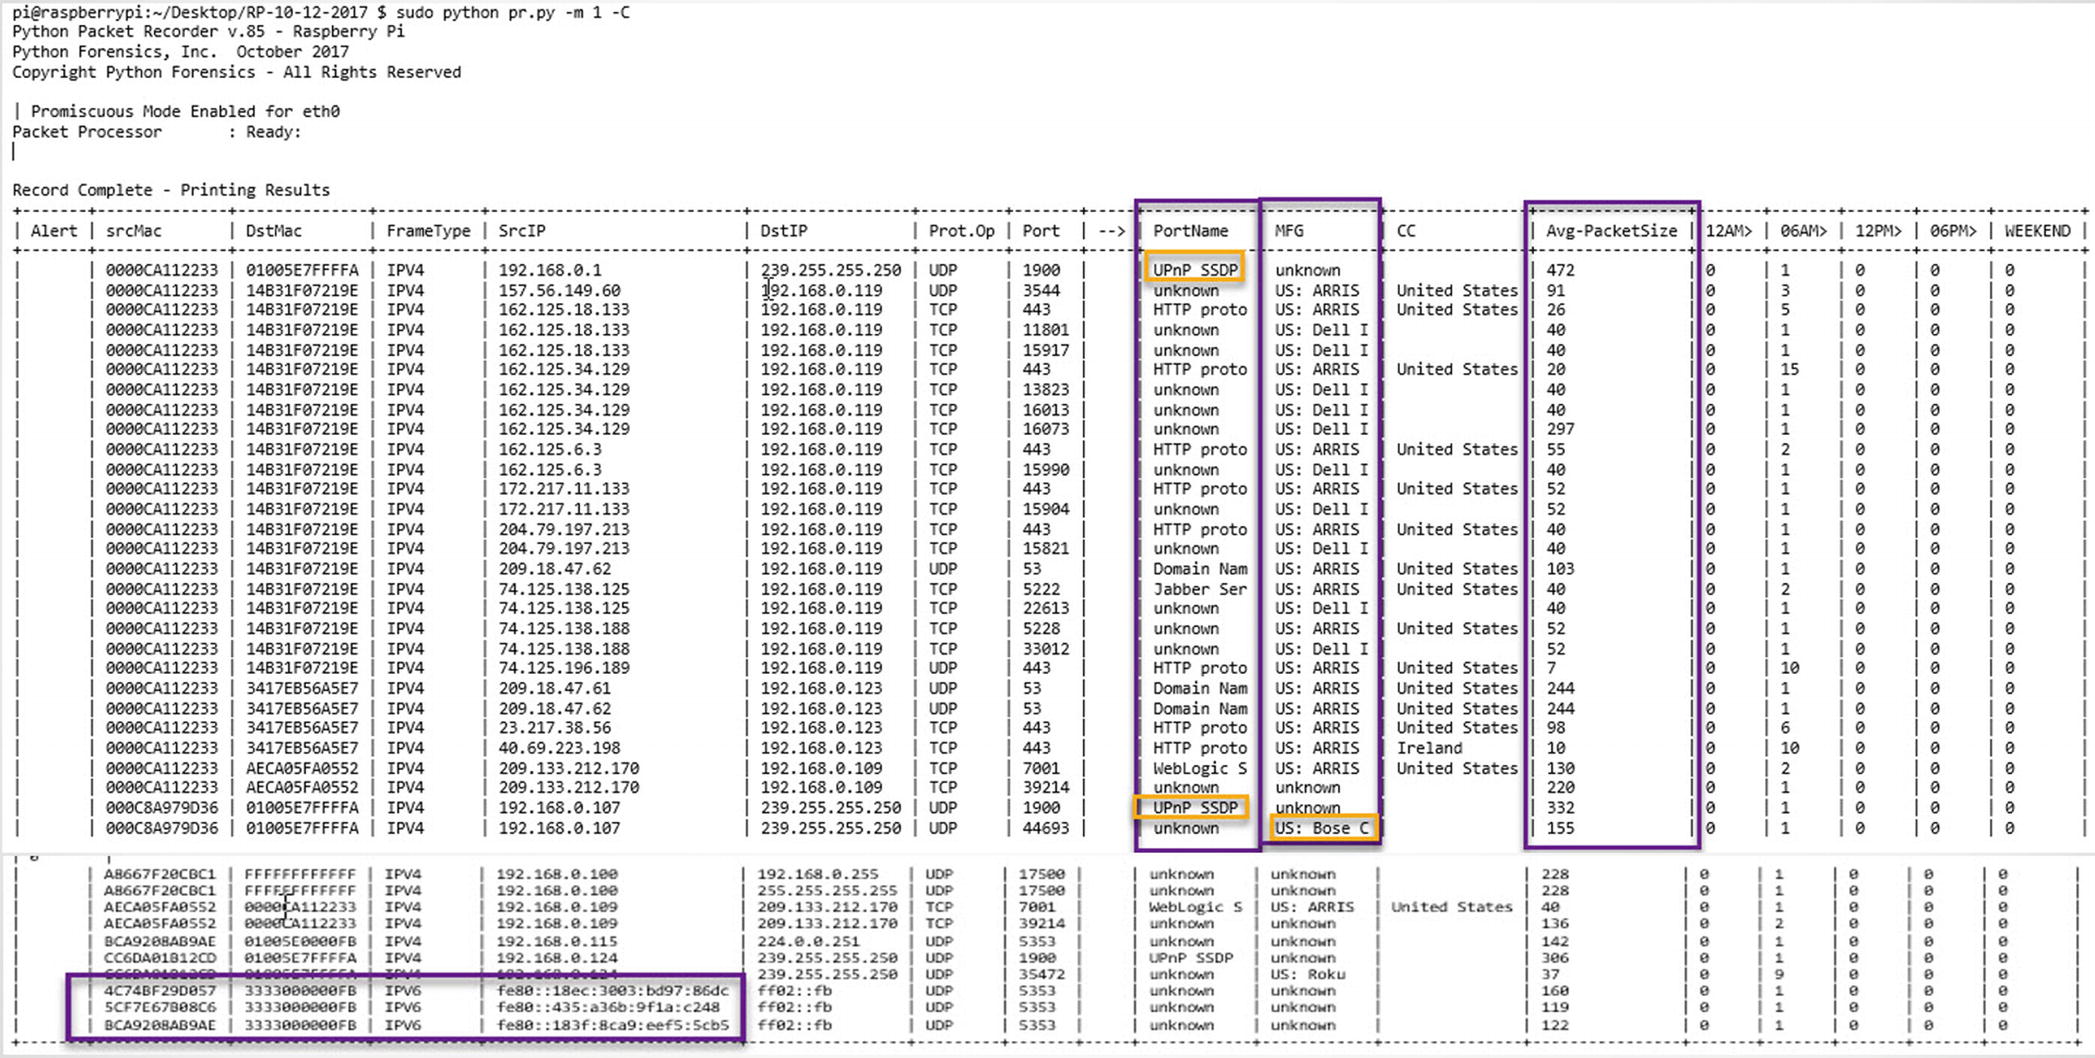
pi@raspberrypi:~/Desktop/RP-10-12-2017 $ sudo python pr.py -m 1 -C

The command line requests that pr.py execute for 1 minute using the -m option. The -C option requests that a separate country report be generated.

Script Execution

In this run you can see new columns in the report that include
  1. 1.

    Port Name

     
  2. 2.

    Manufacturer

     
  3. 3.

    Average Packet Size

     
In addition, near the bottom you can see that IPv6 packet captures are now included (Figure 3-1).
../images/448940_1_En_3_Chapter/448940_1_En_3_Fig1_HTML.jpg
Figure 3-1

Packer recorder

Foreign Country Hits (Outside the United States)

An additional report is also generated that extracts any foreign countries that were detected based on the IP address translation (Figure 3-2).
../images/448940_1_En_3_Chapter/448940_1_En_3_Fig2_HTML.jpg
Figure 3-2

Foreign country report

Summary

This chapter provided an examination of the Raspberry Pi using several special Raspbian Pi command-line tools. We also considered both the advantages and some potential limitations of the Pi based on available memory and filesystem space.

We added some finishing touches to the baselining script PacketRecorder.py, including the following:
  • Ethernet packet type

  • MAC address to manufacturer lookup

  • Transport protocol lookup

  • Port name lookup

  • Country IP address lookup

  • Recording of IPv6 packets

  • Recording of ARP packets

  • Recording of average packet size observed for each unique connection

  • Finally, a command-line execution that directs the execution of the script

We also added a second report option for generating a report relating to country IP addresses outside the United States. In the next version, we will add an allowed/blacklisted country list to generate even more data regarding the external connections made.

In Chapter 4, we will develop the sensor script, which will utilize a prerecorded baseline (generated by PacketRecorder) and report on anomalies between the baseline and the live environment. We will also generate a specific report that isolates IoT-based protocol observations versus other network traffic.

..................Content has been hidden....................

You can't read the all page of ebook, please click here login for view all page.
Reset
3.144.95.22