© Chet Hosmer 2018
Chet HosmerDefending IoT Infrastructures with the Raspberry Pihttps://doi.org/10.1007/978-1-4842-3700-7_2

2. Classifying and Modeling IoT Behavior

Chet Hosmer1 
(1)
Longs, South Carolina, USA
 
In Chapter 1 we took a high-level look at the differences between IoT environments and traditional computing environments. In addition, we examined some of the unique risks and vulnerabilities associated with IoT environments along with the unique discovery and communication protocols that are in use. These characteristics led me to focus on passive mapping and monitoring of IoT behavior. The rationale for this decision includes the following:
  • Many unique devices exist.

  • These devices can be temporal, meaning that they may appear and disappear from networks.

  • They can operate on different wireless and wired networks.

  • They can communicate directly with each other, in many cases without supervision or use of an intermediary such as a switch or wireless access point.

  • New devices can be added by simply applying power to them as with zero configuration devices.

  • They can utilize one of several dynamic discover protocols.

  • Finally, if devices are compromised they may impact other local devices, leak information, or disrupt activities of other devices and networks.

Thus, the remainder of this book will focus on the collection, mapping, monitoring, and ultimately the detection of rogue devices or abnormal behavior of IoT devices. To accomplish this, we must ask a few critical questions.
  1. 1.

    What passive observations data should we collect?

     
  2. 2.

    How should we categorize collected observations as meaningful, redundant, or plain noise?

     
  3. 3.

    How might we organize and store the observations?

     
  4. 4.
    What do we plan to do with the collected observations?
    1. a.

      How will we define “normal” versus “abnormal” behavior?

       
    2. b.

      Can the collected observations be used to train machine learning elements?

       
    3. c.

      Can the observations be a viable source of forensic evidence?


  5. 5.

    What networks should we passively monitor?

     
  6. 6.

    What observations will be recorded based on this passive monitoring?

     
  7. 7.

    Are we really going to use a Raspberry Pi to do this?


Clearly, we are not going to address these all of these questions at the same time. Rather, let’s develop a model for the basics and then we can build upon that model in a spiral fashion.

We will do this by starting with what we already know well, Ethernet-based IP wired networks. To monitor and collect data we can use a variety of off-the-shelf tools or we can roll our own. Because we are planning to deploy this technology on a Raspberry Pi, using Python (I know, sounds crazy, right?), we need to keep this as simple and as close to the metal as possible. Thus, for this first experiment, I will be only using the Python standard socket library to perform this collection, and I will be using the built-in Python dictionary type to store, categorize, and at the same time, reduce the observations.

What Should We Collect?

Let’s take a very simplistic view of a traditional wired network. Devices would be attached to a physical switch, with a SPAN or monitoring port. A packet capture device would be connected to the monitoring port and record all observed packets in and out of the switch (see Figure 2-1).
../images/448940_1_En_2_Chapter/448940_1_En_2_Fig1_HTML.jpg
Figure 2-1

Simplified LAN diagram

Starting with the basics, we will examine the packets that could be monitored using this approach. To break this down, for the first example we plan to collect, record, and observe the following:
  1. 1.

    Ethernet Packets

     
  2. 2.

    ARP (Address Resolution Protocol) Packets

     
  3. 3.

    IP Packets

     
  4. 4.

    TCP Packets

     
  5. 5.

    UDP Packets

     
  6. 6.

    ICMP (Internet Control Message Protocol) Packets


Ethernet Packet Format

Examining the Ethernet header (see Figure 2-2), we narrow in on the destination and source media access control address, (commonly referred to as MAC address), along with the type/length field. These provide important mapping information, protocol data, and also the ability to look up the manufacturer associated with the source and destination of the packet.
../images/448940_1_En_2_Chapter/448940_1_En_2_Fig2_HTML.jpg
Figure 2-2

Ethernet packet overview

Note

Network device MAC addresses can be modified in many cases. Thus, it is possible to modify such devices to report an inaccurate or spoofed organizationally unique identifier (OUI).

Breaking down the first octet (byte), we see that bit 0 and bit 1 have special meaning (see Figure 2-3).
  1. 1.

    Bit 0 defines whether the packet is set to all nodes individually (unicast) or if only one packet is sent (multicast) and individual NICs can decide to accept or reject the packet.

     
  2. 2.

    Bit 1 defines whether the MAC address is defined globally through OUI registration or whether the MAC address set by the manufacturer is overridden by the local administrator.

     
../images/448940_1_En_2_Chapter/448940_1_En_2_Fig3_HTML.jpg
Figure 2-3

OUI breakdown

Our objective in extracting the MAC address is to map the packet to a specific device. If the MAC address is not locally defined, then extract information about the device defined by the manufacturer.

ARP

The ARP is used to dynamically discover the mapping of devices operating on a network. This maps the MAC address (layer 2) with the IP address (layer 3).

For example, Device A needs to communicate with Device B, but requires the MAC address to do so as Device A’s ARP table is incomplete (see Figure 2-4). Device B responds to the request allowing device A to map the layer 2 MAC address with the layer 3 IP address to allow Device A to properly address Device B at the Ethernet and IP layers.
../images/448940_1_En_2_Chapter/448940_1_En_2_Fig4_HTML.jpg
Figure 2-4

Simplified ARP request/replay process

Mapping ARP behavior (request, replies, frequency, and time frame) can identify devices that are behaving normally, or devices that could be rogue, are new to the network, or are operating erratically or maliciously. Mapping such behaviors under “normal conditions” will help to identify aberrant conditions.

ARP Tables

In Ethernet, LAN, a table, also referred to as the ARP cache, is used to maintain a correlation between each MAC address and its corresponding IP address.

IP Packets

Moving to IP packets and their contents, IP packets provide additional details that can be used to map and analyze the behavior on traditional networks. Figure 2-5 depicts a typical IP packet with fields that are highlighted to define key components that will be used during mapping and analysis. Mapping the “normal” connections (source and destination IP addresses) along with the protocols utilized, day of week and time of day, will be vital in establishing a baseline of operations.
../images/448940_1_En_2_Chapter/448940_1_En_2_Fig5_HTML.jpg
Figure 2-5

IP packets

Next, we will examine the specific data contained in the associated data (for example TCP, UDP, and ICMP) contents delivered using IP packets.

TCP Packets

Extracting specific source and destination ports from TCP packets, as shown in Figure 2-6, again provides a model for determining “normal” behavior on the network. TCP packets provide reliable link capabilities by using sequence and acknowledgement numbers to ensure orderly delivery and acknowledgment of packets. If packets are lost or delayed, the protocol will retry and request retransmission. At this point we will be ignoring the payload of the packet and just focus on the source and destination ports, as they contain the most meaningful information that can be reasonably and quickly acquired. Port values range from 1 to 65535 and are generally defined here:
  1. 1.

    Ports 1–1023 are considered well-known ports.

     
  2. 2.

    Ports 1024–49151 are considered “registered ports” that are assigned by the Internet Assigned Numbers Authority (IANA).

     
  3. 3.

    Ports 49152–65535 are considered dynamic, private, or more commonly ephemeral (i.e., lasting for a brief time or transient). For example, ports in this range are commonly used by clients making a connection to a server. It should be noted that some of the ports in this range have been mapped to known malware usage.

     
../images/448940_1_En_2_Chapter/448940_1_En_2_Fig6_HTML.jpg
Figure 2-6

TCP packet details

UDP Packet

UDP packets, unlike TCP packets, ensure orderly packet sequencing. UDP packets are connectionless and less reliable (see Figure 2-7). The protocol is used for streaming data where packets that are lost or are out of sequence will not impact the communication. Again, we are interested here in mapping the normal behavior by capturing the source and destination port numbers as discussed in the TCP section.
../images/448940_1_En_2_Chapter/448940_1_En_2_Fig7_HTML.jpg
Figure 2-7

UDP packet details

ICMP Packet

ICMP defines a protocol that provides troubleshooting, control, and error message services. ICMP is most frequently used to diagnose and test connections on an IP network. The only information we will be concerned with is the fact that an ICMP packet was sent over the network from a source IP address to a destination IP address (see Figure 2-8). Note that there is not a port number associated with ICMP.
../images/448940_1_En_2_Chapter/448940_1_En_2_Fig8_HTML.jpg
Figure 2-8

ICMP packet details

Passively Monitoring IoT Behavior

Compared to active probing, passive monitoring provides greater insight into the activities of the network being monitored. The difference can be likened to a movie versus a still photograph. Using tools like NMAP to identify devices operating on your network provides an instantaneous view of those devices that properly respond. In many cases IoT devices are transient and thus could and will be missed by active or probing-based methods. Mapping the behavior of these devices over an extended period of time is critical to understanding the potential threats that they pose, along with connections to other devices.

Modeling Normal Behavior

Now that we have defined several key elements from the Ethernet layer, IP layer, and transport layers, let’s take inventory of the key elements that we could observe and determine how we can store and categorize these observed values.

Ethernet Layer

Source MAC address
Destination MAC address
Frame Type (IPv4, IPv6, ARP)

IP Layer

Source IP
Destination IP
Protocol

Transport Layer

Source Port
Destination Port

Because it is likely that we will encounter many packets with the same MAC, source IP, destination IP, protocol, and nonephemeral port values, we need to reduce the data that we store regarding these observations. We will also be choosing a data type that is built in. We could choose a Python list or set, but both have limitations that make them not the best choice. However, the built-in dictionary data type in Python provides the ideal solution for storing these observations.

Python dictionaries, much like traditional Webster-style dictionaries, have a key and a value, which is typically referred to as a key/value pair. In Python both the key and the value can be complex, the only rule being that the key must be a hashable type such as an integer, long, string, or tuple. The value part of the key/value pair can be a list or other nonhashable data type.

The question is how would we structure the key to help us reduce the observations that we need to store and begin to build and hold a model of normal behavior. To simplify the question: what combination of fields from the collected observations would be considered unique?

I’m going to use the following tuple as the key:

(SRC-MAC, DST-MAC, SRC-IP, DST-IP, Protocol, Port)

Notice I didn’t include SRC and DST port. The reason is that when a client makes a connection to a server, the port that is chosen is dynamic and normally comes from the ephemeral set of ports. Thus, the port that will be included in the key will be the nonephemeral port. If both ports are nonephemeral then two entries will be made in the dictionary, one using the SRC port and one using the DST port. If both ports are ephemeral, again both entries will be made.

So that takes care of the key. Now the question is what does the value portion of the key/value pair contain?

For this we are interested in keeping track of the number of occurrences of each unique combination. Furthermore, we would like to keep track of when and how often that combination occurred. Therefore, I will use a list to keep track of the number of occurrences of each unique key. Note, keeping track of the number of occurrences can be very fine-grained (down to the hour, day, day of week, etc.). To keep this simple, and use this data later for machine learning, I have decided to break the occurrences count down in the following way.

Early Morning:      12:00 AM–5:59 AM
Morning:            6:00 AM–11:59 AM
Afternoon:          12:00 PM–5:59 PM
Evening:            6:00 PM–11:59 PM
Weekend:            12:00 AM Saturday–11:59 PM Sunday

Therefore, the value list will be initialized with just five occurrence count values:

[0,0,0,0,0]

Each time a new observation is made with the same key, the number associated with that time will be incremented by one in the value argument associated with that key.

How Can This Be Accomplished on a Raspberry Pi with Python?

I promise to only say this once: It’s as easy as Pie.

Part I: Passively Capture Packets in Python on a Raspberry Pi

  1. 1.

    As depicted in Figure 2-1 we need to attach the Pi to a monitoring or SPAN port of an Ethernet switch along with the WIFI 802.11 air waves.

     
  2. 2.

    Next, we need to place the Pi Ethernet Port into promiscuous mode.

     
  3. 3.

    Finally, we need to capture packets using the Python standard socket library.

     
Examine a Simple Code Snippet to Perform These Operations
The code snippet written in Python performs three basic operations (see Listing 2-1).
  1. 1.

    The code places the standard Ethernet port of the Pi into promiscuous mode. This allows us to view any traffic flowing over the network even if it is not destined or originating from the Pi itself.

     
  2. 2.

    The code opens a socket associated with the Ethernet port to listen to traffic passing over the network.

     
  3. 3.

    The code captures a single packet and displays the results in hexadecimal.

     
'''
Capture a single packet in promiscuous mode
Note: you must run this script as super user
i.e. sudo python sniff.py
'''
import os               # Python operating system standard library
import socket           # Python low level socket standard library
import sys             # Python system standard library
from binascii import hexlify  # Python binary ascii conversions standard library
# configure Raspberry Pi eth0 in promiscuous mode
# using a system command
try:
    ret =  os.system("ifconfig eth0 promisc")
except Exception as err:
    print "System Command Failed: ", str(err)
    sys.exit(0)
if ret == 0:
    # If the command was successful
    print 'Promiscuous Mode Set Correctly'                
    # create a new socket using the python socket module
    # PF_PACKET     : Specifies Protocol Family Packet Level
    # SOCK_RAW      : Specifies A raw protocol at the network layer
    # htons(0x0800) : Specifies all headers and packets
    #               : Ethernet and IP, including TCP/UDP etc
    try:
           # attempt to open the socket for capturing raw packets
          rawSocket=socket.socket(socket.PF_PACKET,socket.SOCK_RAW,
              socket.htons(0x0800))
    except Exception as err:
        # catch any exceptions and report the error
        print "Socket Error", str(err)
        sys.exit(0)
    # If socket is established and we have established promiscuous mode
    print "Network      : Promiscuous Mode"
    print "Sniffer      : Ready: "
    # attempt to receive a packet
    # Note: this function call is synchronous, thus it will wait)
    try:
        recvPacket=rawSocket.recv(65535)
        print "Packet Received:"
        print hexlify(recvPacket)
        print " End"
    except Exception as err:
        # Catch any exceptions and report the error
        print "Receive Socket Error: ", str(err)
        sys.exit(0)
else:
    print "System Command Failed to set promiscuous mode"
Listing 2-1

sniff.py Capture One Packet with Python

Sample Execution of the Script

When executing this script we need to have privilege. In other words, we need to be operating as superuser (sudo) in order to place the network interface card (NIC) into promiscuous mode. Next, since the script is written in Python we need to invoke the Python interpreter (python). Finally, we need to identify the script (sniff.py) we are executing. The script then performs as expected, setting the NIC into promiscuous mode, capturing a single packet and displaying the packet details in hex (see Listing 2-2).

pi@raspberrypi:~/Desktop $ sudo python sniff.py
Promiscuous Mode Set Correctly
Network      : Promiscuous Mode
Sniffer      : Ready:
Packet Received:
0000ca11223314b31f07219e0800450000282731400080064d8bc0a8006da27d2281e70c01bba0c0a5de4e0b8d0b501101001e420000000000000000
End
Listing 2-2

Sample Hex Dump of a Received Packet

Part II: Identify and Extract the Key Packet Components

The next step in the process is to capture and then parse the packet contents. This includes extracting the Ethernet, IP, ARP, TCP, ICMP, IGMP, and UDP components in our first example.

You may notice a new entry in the list IGMP. The IGMP protocol is used to establish multicast group memberships. Multicast protocols are commonly used by IoT devices in order to discover nearby devices along with the services that they offer.

To handle this, I have created a new Python script called “PacketRecorder.py” which continually captures packets, extracts the key information, and records the occurrences of each unique combination in a Python dictionary.

Let’s take a deeper look at some of the key components of the script (see Listing 2-3). At the end of the chapter I will provide the complete source code for the script.

Overview and Copyright
'''
PacketRecorder.py
version .50
July 2017
Author: C. Hosmer, Python Forensics
Requirements:
Python 2.7.9 or greater
Raspbian or Ubuntu Linux
Copyright (c) 2017 Python Forensics and Chet Hosmer
Permission is hereby granted, free of charge, to any person obtaining a copy of this software and associated documentation files (the "Software"), to deal in the Software without restriction,including without limitation the rights to use, copy, modify, merge, publish, distribute, sublicense, and/or sell copies of the Software, and to permit persons to whom the Software is furnished to do so, subject to the following conditions:
The above copyright notice and this permission notice shall be included in all copies or substantial portions of the Software.
'''
Listing 2-3

PacketRecorder.py Script Overview

Required Python Standard and Third-Party Libraries

For this script, I will be using almost exclusively standard Python libraries to perform the operations. I have imported one third-party library, PrettyTable, to provide tabular results of the recording (see Listing 2-4).

''' Import Python Standard Library Modules '''
import datetime
import calendar
import pickle
import struct
import os             
import socket           
import sys      
import signal
from binascii import hexlify      
# 3rd Party Libraries
from prettytable import PrettyTable
Listing 2-4

Required Libraries

The Script Main Loop

Taking a top-down look at the script, let’s first examine the main script entry point in Listing 2-5. Note that this script is completely contained in a single file (not including the importing of the standard and third-party libraries).

The script performs the following operations:
  1. 1.

    Creates a PacketProcessor object that will be used to extract and record key information from each packet.

     
  2. 2.

    Configures Ethernet port 0 on the Raspberry Pi in promiscuous mode.

     
  3. 3.

    Creates a raw socket using this promiscuous port.

     
  4. 4.

    Sets a signal timer to capture packets for 1 hour (3600 seconds).

     
  5. 5.

    Creates a loop to receive packets.

     
  6. 6.

    Each received packet is then passed to the PacketExtractor method of the PacketProcessing object.

     
  7. 7.

    Finally, once the timer expires the PrintMap method of the PacketProcessing object is called to print out the results.

     
# Main Script Starts Here
#===================================
if __name__ == '__main__':
    "Python Packet Recorder v.50"
    "Python Forensics, Inc.  July 2017 "
    # create a packet processing object
    packetObj = PacketProcessor()
    # Python Packet Capture
    # configure the eth0 in promiscuous mode
    try:
        ret =  os.system("ifconfig eth0 promisc")
    except Exception as err:
        print "System Command Failed: ", str(err)
        sys.exit(0)
    if ret == 0:
        print 'Promiscuous Mode Enabled for eth0'                
        # create a new socket using the python socket module
        # PF_PACKET     : Specifies Protocol Family Packet Level
        # SOCK_RAW      : Specifies A raw protocol at the network layer
        # htons(0x0800) : Specifies all headers and packets
        #               : Ethernet and IP, including TCP/UDP etc
        # attempt to open the socket for capturing raw packets
        try:
            rawSocket=socket.socket(socket.PF_PACKET,socket.SOCK_RAW,
                      socket.htons(0x0800))
        except Exception as err:
            print "Socket Error", str(err)
            sys.exit(0)
        print "Packet Processor       : Ready: "
        # Set signal to 1 hour
        signal.signal(signal.SIGALRM, handler)
        signal.alarm(3600)
        try:
            while True:
                # attempt to receive (synchronous call)
                try:
                    recvPacket=rawSocket.recv(65535)
                    packetObj.PacketExtractor(recvPacket)
                except Exception as err:
                    packetObj.printMap()
                    print "Receive Socket Error: ", str(err)
                    sys.exit(0)
        except myTimeout:
            packetObj.printMap()
            packetObj.SaveOb("observations.pickle")
            print " End Packet Processor"
            sys.exit(0)
    else:
        print "System Command Failed to set promiscuous mode"
Listing 2-5

PacketRecorder Main Loop

PacketProcessor Class
The PacketProcessor class contains four basic methods (see Listing 2-6):
  1. 1.

    __Init__ or the constructor: This function is called when an object is instantiated from the class. It creates two lookup objects for converting Ethernet frame types and transport protocol numbers to readable values. It also creates an empty dictionary to hold the key/value pairs observed.

     
  2. 2.

    PacketExtractor: This function processes the observed packet data. It extracts key information from the Ethernet frame, IP header, and transport protocols. Once the required information is collected, the key will be equal to SRC-MAC, DST-MAC, SRC-IP, DST-IP, protocol, and port, and the value will be equal to the observed occurrence times. A dictionary entry is created or updated based on the observed data from the packet.

     
  3. 3.

    PrintMap: This function iterates through each of the entries in the dictionary of recorded observations and prints them in a table format (see Figure 2-9).

     
  4. 4.

    SaveObservations: This function uses the Python pickle library to save the dictionary as a pickle file. We will be recalling this dictionary in later chapters to perform additional operations and analysis and to use as a key input to the machine learning process.

     
class PacketProcessor:
    """
    Packet Processor Class Methods
    __init__ Constructor
    PacketProcessor(self, packet) : processes a single packet
    PrintMap(self) : prints out the content of the map
    """
    def __init__(self):
        """Constructor"""
        '''
        Create Lookup Objects
        These Object provide lookups for:
        Ethernet Frame Types
        Transport Protocol Types
        '''
        self.traOBJ  = TRANSPORT()
        self.ethOBJ  = ETH()        
        # Packet Dictionary
        self.d = {}
    def PacketExtractor(self, packet):
        ''' Extract Packet Data input: string packet, dictionary d
            result is to update dictionary d
        '''
        ETH_LEN  = 14      # ETHERNET HDR LENGTH
        IP_LEN   = 20      # IP HEADER    LENGTH
        UDP_LEN  = 8       # UDP HEADER   LENGTH
        ''' Elements of the key '''
        self.srcMac = ''
        self.dstMac = ''
        self.srcIP  = ''
        self.dstIP  = ''
        self.proto  = ''
        self.port   = ''
        EthernetHeader=packet[0:ETH_LEN]
        ethFields =struct.unpack("!6s6sH",EthernetHeader)
        self.dstMac = hexlify(ethFields[0])
        self.srcMac = hexlify(ethFields[1])
        self.fType  = ethFields[2]
        frameType = self.ethOBJ.lookup(self.fType)
        if frameType == "IPv4":
            # Process as IPv4 Packet
            ipHeader = packet[ETH_LEN:ETH_LEN+IP_LEN]
            # unpack the ip header fields
            ipHeaderTuple = struct.unpack('!BBHHHBBH4s4s' , ipHeader)
            # extract the key ip header fields of interest
                                                   # Field Contents
            verLen       = ipHeaderTuple[0]        # Field 0: Ver and Length
            protocol     = ipHeaderTuple[6]        # Field 6: Protocol Number
            sourceIP     = ipHeaderTuple[8]        # Field 8: Source IP
            destIP       = ipHeaderTuple[9]        # Field 9: Destination IP
            # Calculate / Convert extracted values
            version      = verLen >> 4     # Upper Nibble is the version Number
            length       = verLen & 0x0F   # Lower Nibble represents the size
            ipHdrLength  = length * 4      # Calculate the header in bytes
            # convert the src/dst IP address to typical dotted notation strings
            self.srcIP = socket.inet_ntoa(sourceIP);
            self.dstIP = socket.inet_ntoa(destIP);
            translate = self.traOBJ.lookup(str(protocol))
            transProtocol = translate[0]
            if transProtocol == 'TCP':
                self.proto = "TCP"
                stripTCPHeader =
                        packet[ETH_LEN+ipHdrLength:ipHdrLength+ETH_LEN+IP_LEN]
                # unpack the TCP Header to obtain the
                # source and destination port
                tcpHeaderBuffer = struct.unpack('!HHLLBBHHH', stripTCPHeader)
                self.srcPort = tcpHeaderBuffer[0]
                self.dstPort = tcpHeaderBuffer[1]
            elif transProtocol == 'UDP':
                self.proto = "UDP"
                
                stripUDPHeader =
                     packet[ETH_LEN+ipHdrLength:ETH_LEN+ipHdrLength+UDP_LEN]
                # unpack the UDP packet and obtain the
                # source and destination port
                udpHeaderBuffer = struct.unpack('!HHHH', stripUDPHeader)
                self.srcPort = udpHeaderBuffer[0]
                self.dstPort = udpHeaderBuffer[1]
            elif transProtocol == 'ICMP':
                self.proto = "ICMP"
                self.srcPort = ""
                self.dstPort = ""
            elif transProtocol == 'IGMP':
                self.proto = "IGMP"
                self.srcPort = ""
                self.dstPort = ""                
            else:
                self.proto = transProtocol
                self.srcPort = ""
                self.dstPort = ""
        elif frameType == 'ARP':
            self.proto = "ARP"
            self.srcPort = ""
            self.dstPort = ""
        else:
            self.proto = frameType
            self.srcPort = ""
            self.dstPort = ""
        valueNdx = getOccurrenceValue()        
        # get the most unique port to use
        portA, portB = getUniquePort(self.srcPort, self.dstPort)
        # create the key for this packet
        key = (self.srcMac, self.dstMac, self.srcIP, self.dstIP,
               self.proto, portA)
        try:
            value = self.d[key]
            # Increment the appropriate occurrence value
            value[valueNdx] = value[valueNdx] + 1
            self.d[key] = value
        except:
            # New Key initialize the value
            value = [0,0,0,0,0]
            value[valueNdx] = value[valueNdx] + 1    
            self.d[key] = value
        if portB != None:
            # create a 2nd key for this packet
            key = (self.srcMac, self.dstMac, self.srcIP,
                   self.dstIP, self.proto, portB)
            try:
                value = seld.d[key]
                # Increment the appropriate occurrence value
                value[valueNdx] = value[valueNdx] + 1
                self.d[key] = value
            except:
                # New Key initialize the value
                value = [0,0,0,0,0]
                value[valueNdx] = value[valueNdx] + 1    
                self.d[key] = value
    def printMap(self):
        ''' Print the contents of the packet map'''
        ''' Table Heading'''
        t = PrettyTable(['srcMac', 'DstMac', 'SrcIP', 'DstIP', 'Protocol',
                        'Port', '-->', "12AM>", "06AM>",
                        "12PM>", "06PM>", "SAT-SUN"])
        for eachKey in self.d:
            value = self.d[eachKey]
            t.add_row([eachKey[0], eachKey[1], eachKey[2], eachKey[3],
                       eachKey[4], eachKey[5],"   ", str(value[0]),
                      str(value[1]), str(value[2]), str(value[3]),
                      str(value[4])])
        t.align = "l"
        print t.get_string(sortby="SrcIP")
    def SaveOb(self, fileName):
        ''' Save the current observation dictionary to a file '''
        with open(fileName, 'wb') as fp:
            pickle.dump(self.d, fp)   
pi@raspberrypi:~/Desktop $ sudo python packetrecorder.py
Python Packet Recorder v.50
Python Forensics, Inc.  July 2017
Listing 2-6

PacketProcessor Class

../images/448940_1_En_2_Chapter/448940_1_En_2_Fig9_HTML.jpg
Figure 2-9

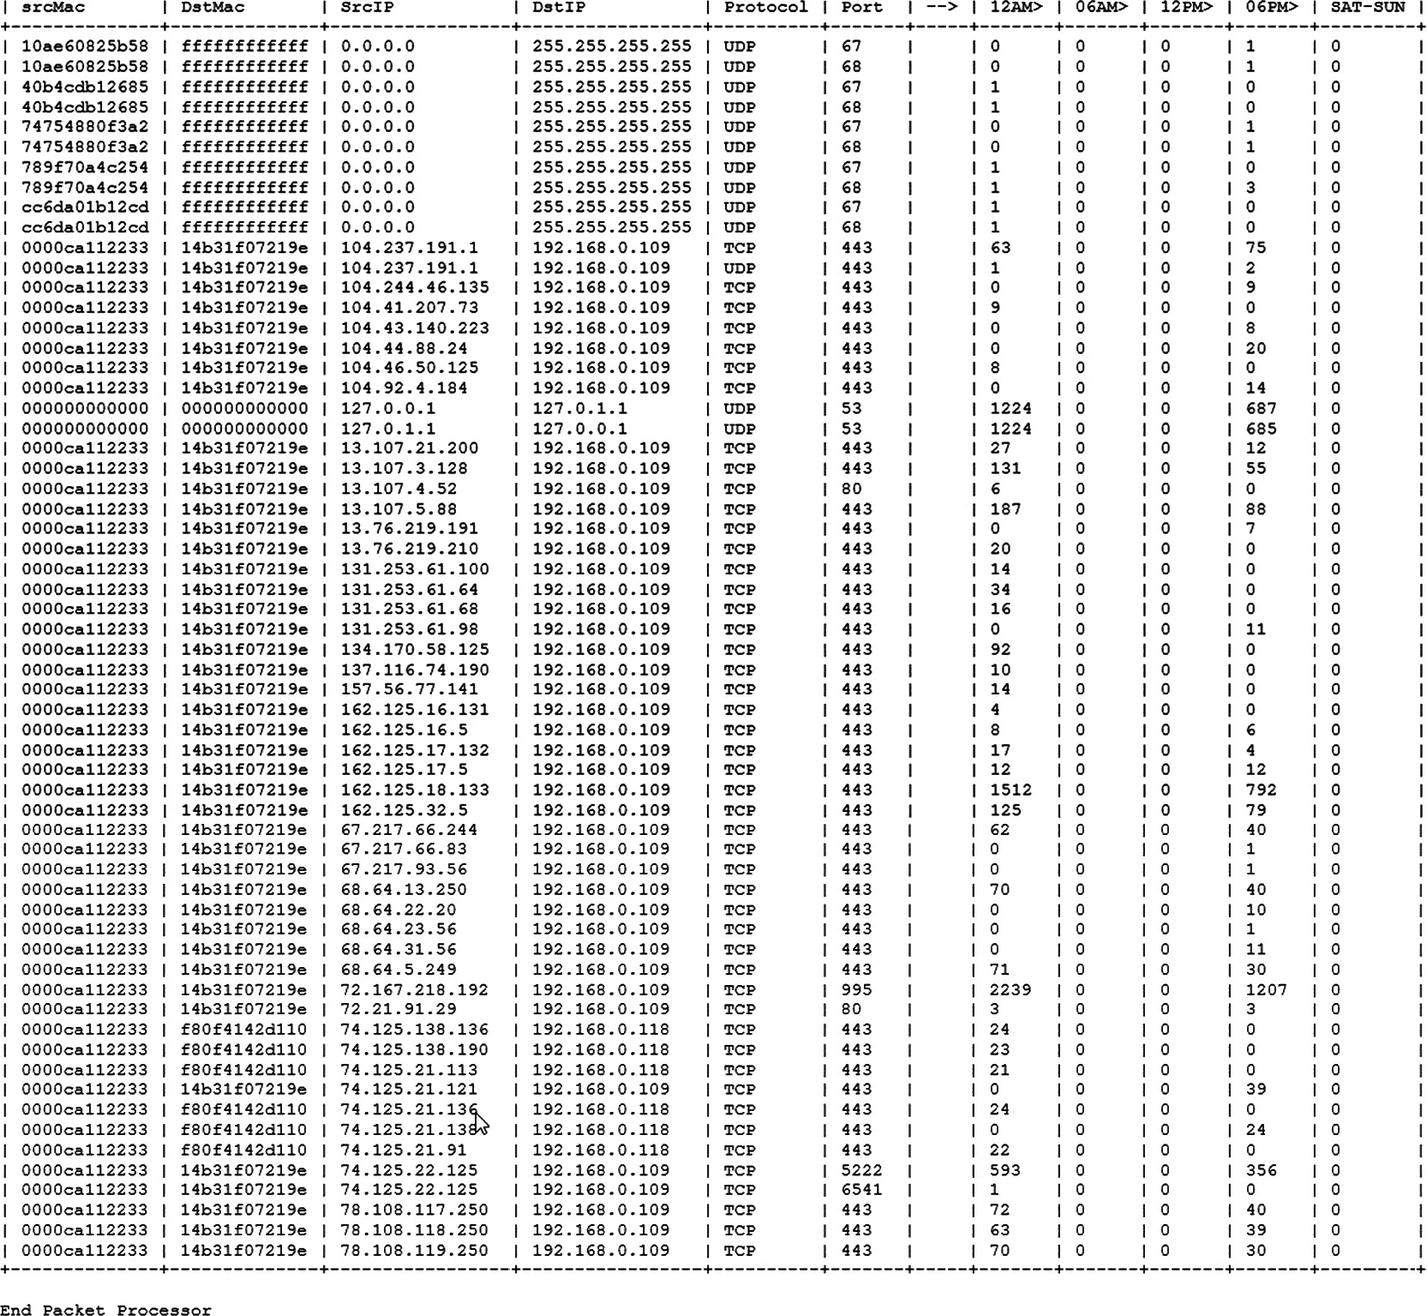
Sample output from the PacketRecorder.py script

Summary

This chapter provides a deep look at the collection, reduction, and mapping of network traffic. The basic methods of capturing and recording observations will be used in future chapters to create a baseline of “normal” operations within an IoT environment. These observations will be used to monitor and detect aberrant behavior and to train machine learning methods.

..................Content has been hidden....................

You can't read the all page of ebook, please click here login for view all page.
Reset
3.139.90.172