
Chapter 7. Object Composition
- Console applications
- ASP.NET MVC
- Windows Communication Foundation
- Windows Presentation Foundation
- ASP.NET (Web Forms)
- PowerShell
Cooking a gourmet meal with several courses is a challenging undertaking, particularly if you wish to partake in the consumption. You can’t very well eat and cook at the same time, yet many dishes require last-minute cooking to turn out well.
Professional cooks know how to resolve many of these challenges. Amidst many tricks of the trade, they use the general principle of mise en place, which can be loosely translated to everything in place: everything that can possibly be prepared well in advance is prepared in advance. Vegetables are cleaned and chopped, meats cut, stocks cooked, ovens preheated, tools laid out, and so on.
The components of the meal are prepared as much as possible. If ice cream is part of the dessert, it can be made the day before. If the first course contains mussels, they can be cleaned hours before. Even such a fragile component as sauce béarnaise can be prepared up to an hour before. When the guests are ready to eat, only the final preparations are necessary: reheat the sauce while frying the meat, and so on. In many cases, this final composition of the meal need not take more than 5 to 10 minutes. Figure 7.1 illustrates the process.
Figure 7.1. Mise en place involves preparing all components of the meal well in advance so that the final composition of the meal can be done as quickly and effortlessly as possible.
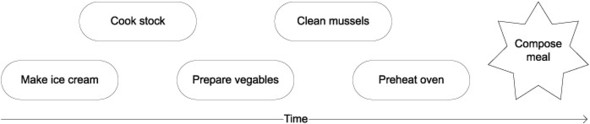
The principle of mise en place is similar to developing a loosely coupled application with DI. We can write all the required components well in advance and only compose them when we absolutely must.
Note
In section 3.3.1, I compared the COMPOSITION ROOT to the concept of the Last Responsible Moment from Lean Software Development.[1] Comparing the COMPOSITION ROOT to mise en place is a similar analogy, although it highlights a slightly different aspect: composition.
1 See, for example, Mary Poppendieck and Tom Poppendieck, Implementing Lean Software Development: From Concept to Cash (New York: Addison-Wesley, 2007).
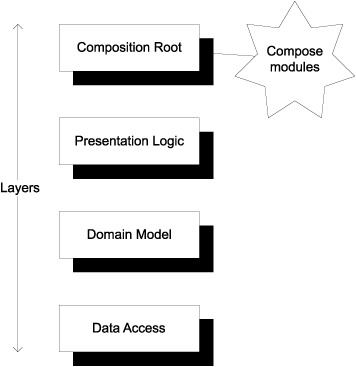
As with all analogies, we can only take them so far. The difference is that in cooking, preparation and composition are separated over time, whereas in application development, this separation occurs across modules and layers. Figure 7.2 shows how we compose the components in the COMPOSITION ROOT (often the UI layer).
Figure 7.2. The COMPOSITION ROOT composes all the independent modules of the application. In contrast to mise en place, this doesn’t happen as late as possible, but happens in a place where the integration of the different modules is required.
At runtime, the first thing that happens is this OBJECT COMPOSITION. As soon as the object graph is wired up, OBJECT COMPOSITION is finished, and the constituent components take over.
Although OBJECT COMPOSITION is the foundation of DI, it’s one of the easiest parts to understand. You already know how to do it, because you compose objects all the time when you create objects that contain other objects. In section 3.3, we covered the basics of when and how to compose applications. As a consequence, I don’t intend to use the next 40 pages telling you how to compose objects.
Instead, I want to help you address some of the difficulties that may arise as you compose objects. Those difficulties stem not from OBJECT COMPOSITION itself, but rather from the application frameworks in which you wish to compose your objects. These issues tend to be specific to each framework, and so do the resolutions. In my experience, these challenges pose some of the greatest obstacles to successfully applying DI, so I’ll focus on them. Doing so will make the chapter less theoretical and more practical than the previous chapters.
Tip
If you only want to read about applying DI in your framework of choice, you can skip ahead to that section. Each section is intended to stand alone.
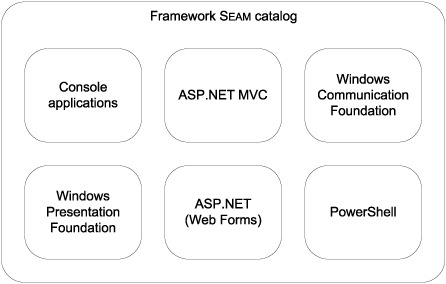
It’s easy to compose an application’s entire dependency hierarchy when we have full control over the application’s lifetime (as we do with command-line applications). However, most frameworks (ASP.NET, WCF, and so on) in .NET involve INVERSION OF CONTROL that can sometimes make it difficult to apply DI. Understanding each framework’s SEAMS is the key to applying DI for that particular framework. As figure 7.3 illustrates, in this chapter we’ll examine how to implement COMPOSITION ROOTS in some common Base Class Library (BCL) frameworks.
Figure 7.3. The structure of this chapter takes the form of a catalog of various BCL frameworks and the SEAMS they may have for enabling DI. Each section is written so that it can be read independently of the other sections.
Note
Due to space constraints, I won’t cover Windows Forms applications. However, when it comes to OBJECT COMPOSITION, they’re similar to WPF applications.
Each section deals with one of these frameworks and can be read more or less independently. I’ll begin each section with a general introduction to applying DI in that particular framework, followed by an extensive example that builds on the common Commerce example that runs through most of this book.
We’ll start with the easiest framework in which to apply DI and gradually work through more complex frameworks. When we reach ASP.NET, we need to cross an abyss beyond which we can only apply DI by compromising on at least some of our principles. There is no denying that frameworks such as ASP.NET and PowerShell are downright hostile environments in which to apply DI, so we must do the best we can. However, until we reach that point, there is no need to compromise.
A console application is probably the easiest type of application in which to apply DI.
7.1. Composing console applications
A console application is hands down the easiest type of application to compose. Contrary to most other BCL application frameworks, a console application involves virtually no INVERSION OF CONTROL. When execution hits the application’s entry point (usually the Main method), we’re on our own. There are no special events to subscribe to, no interfaces to implement, and precious few services we can use.
The Main method is a suitable COMPOSITION ROOT. The first thing we should do in the Main method is to compose the application’s modules and let them take over. There’s nothing to it, but let’s look at an example.
7.1.1. Example: updating currencies
In chapter 4, we looked at how to provide a currency conversion feature for the sample Commerce application. Section 4.3.4 introduced the Currency class, which provides exchange rates from one currency to other currencies. Because Currency is an abstract class, we could have created many different implementations, but in the example we used a database. The purpose of the example code in chapter 4 was to demonstrate how to retrieve and implement currency conversion, so we never looked at how to update exchange rates in the database.
To continue the example, let’s examine how to write a simple console application that allows an administrator or super-user to update the exchange rates without having to interact directly with the database.
The UpdateCurrency program
Because the purpose of this program is to update the exchange rates in the database, it’s called UpdateCurrency.exe. It will take three command-line arguments:
- The destination currency code
- The source currency code
- The exchange rate
It may sound strange to list the destination before the source, but this way should be most familiar to most people. It tells you how much of the source currency you’ll need in order to buy one unit of the destination currency; for example, the exchange rate for USD to EUR is expressed as 1 EUR costing 1.44 USD.[2]
2 January 10, 2010, that is.
At the command line, it looks like this:
PS Ploeh:> .UpdateCurrency.exe EUR USD "1,44"
Updated: 1 EUR in USD = 1,44.
Executing the program updates the database and writes the updated values back to the console.
Composition Root
UpdateCurrency uses the default entry point for a console program: the Main method in the Program class. This is the COMPOSITION ROOT for the application, as shown in the following listing.
Listing 7.1. Console application COMPOSITION ROOT
public static void Main(string[] args)
{
    var container = new CurrencyContainer();
    container.ResolveCurrencyParser()
        .Parse(args)
        .Execute();
}
The Main method’s only responsibility is to compose all relevant modules and let the composed object graph take care of the functionality. In this example, a custom container encapsulates how modules are composed. Because it performs exactly the same function as a DI CONTAINER, I chose to call it a container, although it’s a custom container with hard-wired DEPENDENCIES. We’ll return to it shortly to examine how it’s implemented.
With the container in place, you can now ask it to resolve a CurrencyParser that parses the incoming arguments and eventually executes the corresponding command.
Tip
The COMPOSITION ROOT should do only two things: set up the container and resolve the type that implements the desired functionality. As soon as it has done that, it should get out of the way and leave the rest to the resolved instance.
Tip
Use a proper DI CONTAINER instead of a home-grown custom container for your production applications.
This example uses a custom container explicitly created for this application, but it’s straightforward to replace it with a proper DI CONTAINER such as those covered in part 4.
Container
The CurrencyContainer class is a custom container created for the express purpose of wiring up all DEPENDENCIES for the UpdateCurrency program. The following listing shows the implementation.
Listing 7.2. Custom CurrencyContainer
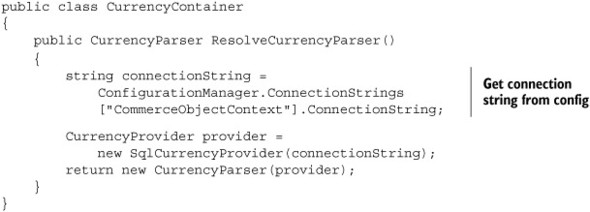
In this example, the dependency graph is rather shallow. The CurrencyParser class requires an instance of the abstract CurrencyProvider class, and in the CurrencyContainer you decide that the implementation should be the SqlCurrencyProvider that provides the desired communication with the database.
The CurrencyParser class uses CONSTRUCTOR INJECTION, so you pass it the SqlCurrencyProvider instance that was just created before returning it from the method.
In case you were wondering, here is the constructor signature of CurrencyParser:
public CurrencyParser(CurrencyProvider currencyProvider)
Recall that CurrencyProvider is an abstract class that is implemented by SqlCurrencyProvider. Although CurrencyContainer contains a hard-coded mapping from CurrencyProvider to SqlCurrencyProvider, the rest of the code is loosely coupled because it consumes only the ABSTRACTION.
This example may seem simple, but it composes types from three different application layers. Let’s briefly examine how these layers interact in this particular example.
Layering
The COMPOSITION ROOT is the place where components from all layers are wired together. The entry point and the COMPOSITION ROOT constitute the only code of the executable. All implementation is delegated to lower layers, as figure 7.4 illustrates.
Figure 7.4. Component composition of the UpdateCurrency application. CurrencyParser parses the command-line arguments and returns an appropriate ICommand. If the arguments were intelligible, it returns a CurrencyUpdateCommand that uses a Currency instance to update the exchange rate. The vertical line to the right shows the corresponding application layer. Each layer is implemented in a separate assembly.

The diagram in figure 7.4 may look complicated, but it represents almost the entire code base of the application. Most of the application logic consists of parsing the input arguments and choosing the correct command based on the input. All this takes place in the Application Services layer, which only talks directly with the Domain Model via the abstract CurrencyProvider and Currency classes.
CurrencyProvider is injected into the CurrencyParser by the container and is subsequently used as an Abstract Factory[3] to create a Currency instance used by CurrencyUpdateCommand.
3 Erich Gamma et al., Design Patterns: Elements of Reusable Object-Oriented Software (New York: Addison-Wesley, 1994), 87.
The Data Access layer supplies the SQL Server–based implementations of the Domain Classes. Although none of the other application classes talk directly to these classes, the CurrencyContainer maps the ABSTRACTIONS to the concrete classes.
Using DI with a console application is easy because there’s virtually no external INVERSION OF CONTROL involved. The .NET Framework simply spins up the process and hands the control to the Main method.
In most other BCL frameworks, there is a higher degree of INVERSION OF CONTROL, which means we need to be able to identify the correct extensibility points to wire up the desired object graph. One such framework is ASP.NET MVC.
7.2. Composing ASP.NET MVC applications
ASP.NET MVC was built with the express intent to be DI-friendly, and it is. It doesn’t enforce the use of DI, but it easily allows DI without making any assumption about the kind of DI we’ll apply. We can use POOR MAN’S DI or whichever DI CONTAINER we like.
7.2.1. ASP.NET MVC extensibility
As is always the case with DI, the key to applying it is finding the correct extensibility point. In ASP.NET MVC, this is an interface called IControllerFactory. Figure 7.5 illustrates how it fits into the framework.
Figure 7.5. When the ASP.NET MVC runtime receives a request, it asks its Controller Factory to create a Controller for the requested URL. The Controller Factory determines the correct type of Controller to use for the given request and creates and returns a new instance of that type. ASP.NET MVC then invokes the appropriate action method on the Controller instance. When it’s finished, ASP.NET MVC gives the Controller Factory a chance to dispose of resources by calling ReleaseController.

Controllers are a central concept in ASP.NET MVC. They handle requests and determine how to respond. If we need to query a database, validate and save incoming data, invoke domain logic, and so on, we initiate such actions from a Controller.
A Controller shouldn’t do such things itself, but rather delegate the work to appropriate DEPENDENCIES. This is where DI comes in. We want to be able to supply DEPENDENCIES to a given Controller class, ideally by CONSTRUCTOR INJECTION. This is possible with a custom IControllerFactory.
When ASP.NET MVC 3 was released in 2011, one of the new features was marketed as “DI support.” It turns out that this support revolves around a new interface called IDependencyResolver. This interface and the way it’s being used in the ASP.NET MVC framework are problematic.
On a conceptual level, the intended use of IDependencyResolver is as a SERVICE LOCATOR, and that is how the framework uses it.
On a more concrete level, the interface has limited usefulness because it lacks a Release method. In other words, we can’t properly manage the lifetime of object graphs using this interface. With some DI CONTAINERS, this guarantees resource leaks.[4]
4 Mike Hadlow, “The MVC 3.0 IDependencyResolver interface is broken. Don’t use it with Windsor,” 2011, http://mikehadlow.blogspot.com/2011/02/mvc-30-idependencyresolver-interface-is.html
In its current incarnation, I find it safer and more correct to ignore IDependencyResolver. The irony of the situation is that true DI has been supported by ASP.NET MVC since the first version through the IControllerFactory interface.
Creating a custom Controller Factory
ASP.NET MVC comes with a DefaultControllerFactory that requires Controller classes to have a default constructor. That’s a sensible default behavior that doesn’t force us to use DI if we don’t want to. However, default constructors and CONSTRUCTOR INJECTION are mutually exclusive, so we need to modify this behavior by implementing a custom Controller Factory.
Doing so isn’t particularly difficult. It requires you to implement the IControllerFactory interface:
public interface IControllerFactory
{
    IController CreateController(RequestContext requestContext,
        string controllerName);

    SessionStateBehavior GetControllerSessionBehavior(
        RequestContext requestContext, string controllerName);

    void ReleaseController(IController controller);
}
The CreateController method provides a RequestContext that contains such information as the HttpContext, whereas controllerName indicates which Controller is requested.
You may choose to ignore the RequestContext and only use the controllerName to determine which Controller to return. No matter what you do, this is the method where you get the chance to wire up all required DEPENDENCIES and supply them to the Controller before returning the instance. You’ll see an example in section 7.2.2.
If you created any resources that need to be explicitly disposed of, you can do that when the ReleaseController method is called.
Tip
DefaultControllerFactory implements IControllerFactory and has several virtual methods. Instead of implementing IControllerFactory from scratch, it’s often easier to derive from DefaultControllerFactory.
Although implementing a custom Controller Factory is the hard part, it won’t be used unless we tell ASP.NET MVC about it.
Registering a custom Controller Factory
Custom Controller Factories are registered as part of the application startup sequence—usually in Global.asax. They’re registered by calling ControllerBuilder.Current.SetControllerFactory. Here’s a snippet from the sample Commerce application:
var controllerFactory = new CommerceControllerFactory();

ControllerBuilder.Current.SetControllerFactory(controllerFactory);
This example creates and assigns a new instance of the custom CommerceControllerFactory. ASP.NET MVC will now use the controllerFactory instance as its Controller Factory for this application.
If this code looks vaguely familiar, it’s because you saw something similar in section 3.3. Back then, I promised to show you how to implement a custom Controller Factory in chapter 7, and what do you know? This is chapter 7.
7.2.2. Example: implementing CommerceControllerFactory
The Commerce sample application needs a custom Controller Factory to wire up Controllers with the required DEPENDENCIES. Although the entire dependency graph for all Controllers is considerably deeper, from the perspective of the Controllers themselves, the union of all immediate DEPENDENCIES is as small as three items, as shown in figure 7.6.
Figure 7.6. Dependency graph for the three Controllers in the sample Commerce application. The concrete implementations of each of these DEPENDENCIES have other DEPENDENCIES but these aren’t shown. BasketController and HomeController share a DEPENDENCY on CurrencyProvider. AccountController is inherited unchanged from the default ASP.NET MVC template; because it uses BASTARD INJECTION, it has no unresolved DEPENDENCIES.

Although you could implement IControllerFactory directly, it’s easier to derive from DefaultControllerFactory and override its GetControllerInstance method. This means the DefaultControllerFactory takes care of mapping a Controller name to a Controller type, and all you have to do is return instances of the requested types.
Listing 7.3. Creating Controllers
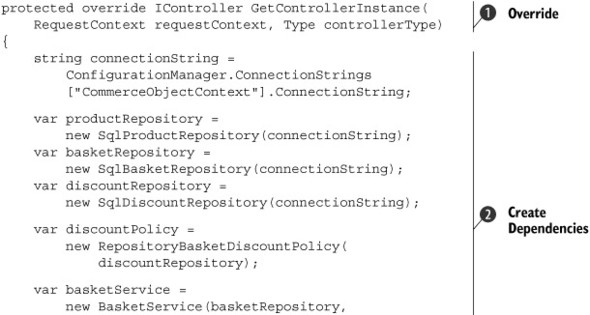

This method overrides DefaultControllerFactory.GetControllerInstance ![]() to create instances of the requested Controller types. If the requested type is either BasketController or HomeController, you explicitly wire it up with the required DEPENDENCIES
to create instances of the requested Controller types. If the requested type is either BasketController or HomeController, you explicitly wire it up with the required DEPENDENCIES ![]() and return them
and return them ![]() . Both types use CONSTRUCTOR INJECTION, so you supply the DEPENDENCIES through their constructors.
. Both types use CONSTRUCTOR INJECTION, so you supply the DEPENDENCIES through their constructors.
To keep the code simple, I chose to wire up all the DEPENDENCIES ![]() before checking the controllerType. Obviously, this means some of the created DEPENDENCIES won’t be used, so it’s not a particularly efficient implementation. You can refactor listing 7.3 into a more appropriate (but slightly more complex) form.
before checking the controllerType. Obviously, this means some of the created DEPENDENCIES won’t be used, so it’s not a particularly efficient implementation. You can refactor listing 7.3 into a more appropriate (but slightly more complex) form.
For those types not explicitly handled, you default to the base behavior ![]() , which is to create the requested Controller using its default constructor. Notice that you aren’t explicitly handling AccountController, so you let the base behavior deal with it instead. AccountController is a carryover from the ASP.NET MVC project template and uses BASTARD INJECTION, which gives it a default constructor.
, which is to create the requested Controller using its default constructor. Notice that you aren’t explicitly handling AccountController, so you let the base behavior deal with it instead. AccountController is a carryover from the ASP.NET MVC project template and uses BASTARD INJECTION, which gives it a default constructor.
Note
I consider BASTARD INJECTION to be an anti-pattern, but I left AccountController in that state because I had plenty of other proper DI examples to showcase. I did it because this is, after all, sample code, but I would never leave it like that in production code.
When a CommerceControllerFactory instance is registered in Global.asax, it will correctly create all requested Controllers with the required DEPENDENCIES.
Tip
Consider not writing a custom Controller Factory yourself. Instead, use a general-purpose Controller Factory that works together with your DI CONTAINER of choice. Look at the MVC Contrib[5] project for inspiration, or use one of the reusable implementations available there. Some DI CONTAINERS also have “official” ASP.NET MVC integration.
The nice thing about ASP.NET MVC is that it was designed with DI in mind, so we only need to know and use a single extensibility point to enable DI for an application. In other frameworks, enabling DI can be a more complex task. Windows Communication Foundation (WCF), although extensible, is one example.
7.3. Composing WCF applications
WCF is one of the most extensible parts of the BCL. Although it’s fairly easy to get started writing WCF services, the myriad of extensibility points can make it difficult to find exactly the one you need. This is also the case when it comes to DI.
Note
A joke claims that WCF is an acronym for Windows Complication Foundation. There’s a certain degree of truth in that claim.
You could easily be led to believe that WCF doesn’t support CONSTRUCTOR INJECTION. If you implement a WCF service with CONSTRUCTOR INJECTION and no default constructor, the WCF service host will at runtime throw a ServiceActivationException with a message similar to this:
The service type provided could not be loaded as a service because it does not have a default (parameterless) constructor. To fix the problem, add a default constructor to the type, or pass an instance of the type to the host.
This message strongly indicates that a default constructor is required. The only way out seems to be to pass an already-created instance to the WCF host, but doing so raises several issues:
- How can we do this if we host the service in Internet Information Services (IIS)?
- This requires the service to run in the Single InstanceContextMode, which is undesirable for a number of other reasons.
The good news is that the exception message is misleading. There are other ways to enable CONSTRUCTOR INJECTION with WCF.
7.3.1. WCF extensibility
WCF has lots of extensibility points, but when it comes to DI we only need to know about the IInstanceProvider interface and contract behaviors. A contract behavior is a SEAM in WCF that allows us to modify how a given contract (that is, a service) behaves.
IInstanceProvider is an interface that defines how service instances are created (and released). Here is the interface definition in all its glory:
public interface IInstanceProvider
{
    object GetInstance(InstanceContext instanceContext);
    object GetInstance(InstanceContext instanceContext, Message message);
    void ReleaseInstance(InstanceContext instanceContext, object instance);
}
The two GetInstance overloads are responsible for creating an appropriate service instance, and ReleaseInstance provides a hook for cleaning up if necessary.
The default implementation looks for a default constructor on the service type, but we can replace it with one that uses DI. Figure 7.7 illustrates the overall flow when a hosted service receives a message.
Figure 7.7. When a message (request) arrives for a service operation, WCF determines which CLR type implements the service. It asks a
ServiceHostFactory to create an appropriate ServiceHost that can host the requested service. The ServiceHost does its part by applying behaviors and creating the requested instance.
When we host a WCF service in IIS, a ServiceHostFactory is mandatory, although the default implementation will be used if we don’t explicitly define an alternative. If we host the
service manually, a ServiceHostFactory may still be useful, but it isn’t required because we can create the appropriate ServiceHost directly in code.

When the ServiceHost applies behaviors, it picks them up from at least three different places before aggregating them:
- Attributes
- .config file
- In-memory objects
Although we can define behaviors in attributes, it’s not a particularly attractive strategy to use when it comes to DI because that means we’re compiling into the code a particular creation strategy with particular DEPENDENCIES. The net result is almost the same as if we had hard-coded the DEPENDENCIES directly in the service, just in a much more convoluted way.
A configuration file may sound like the ultimate in flexibility, but it isn’t because it doesn’t allow us to imperatively configure DEPENDENCIES if we want to do that.
In-memory objects provide the best flexibility because we can choose to create the DEPENDENCIES directly in code or based on configuration settings. If we use a DI CONTAINER, we get both options for free. This means we should create a custom ServiceHostFactory that creates instances of a custom ServiceHost that again can wire up the desired service with all its DEPENDENCIES.
We can create a set of general-purpose classes that do this based on a DI CONTAINER of choice or use one of the already-implemented reusable container-based ServiceHostFactorys. We can also create a specialized ServiceHostFactory for a particular service. Because this provides the best illustration of the process, the following example uses a specialized factory.
7.3.2. Example: wiring up a product-management service
As an example, imagine you’ve been asked to extend the Commerce sample application with a WCF-based service that exposes operations that allow other applications to manage product data. This lets you hook up a rich client (you’ll do that in a subsequent section) or a batch job to manage product data.
Introducing the product-management service
To keep the example simple, let’s assume that you wish to expose simple Create, Read, Update, and Delete (CRUD) operations. Figure 7.8 shows a diagram of the service and associated Data Contracts.
Figure 7.8. IProductManagementService is a WCF service that defines simple CRUD operations on products. It uses the associated ProductContract and MoneyContract to expose these operations. Although not shown in this diagram, all three types are decorated with the usual WCF attributes: ServiceContract, OperationContract, DataContract, and DataMember.

Because you already have an existing Domain Model, you wish to implement this service by extending the Domain Model and expose its operations through this WCF contract. The exact details aren’t important; suffice it to say that you expand the abstract ProductRepository class, which you saw in previous chapters.
Tip
Although I won’t walk you through all the domain code here, you can review the details in the code download for the book.
The Domain Model represents a product as the ENTITY Product, and the service contract exposes its operations in terms of the DATA TRANSFER OBJECT (DTO) ProductContract. To map between these two different types, you also introduce an interface called IContractMapper.
The bottom line is that you end up with a service implementation with two DEPENDENCIES; and because both are mandatory, you wish to use CONSTRUCTOR INJECTION. Here is the service’s constructor signature:
public ProductManagementService(ProductRepository repository,
    IContractMapper mapper)
So far, we’ve been happily ignoring the elephant in the room: how do we get WCF to correctly wire up an instance of ProductManagementService?
Wiring Up ProductManagementService in WCF
As illustrated in figure 7.7, the COMPOSITION ROOT in WCF is the triplet of ServiceHostFactory, ServiceHost, and IInstanceProvider. To wire up a service with CONSTRUCTOR INJECTION, we must supply custom implementations of all three.
Tip
You can write completely reusable implementations that wrap your favorite DI CONTAINER in those three types and use them to implement IInstanceProvider. Many people have already done that, so you can probably find a readymade set for your chosen DI CONTAINER.
Note
This example implements a hard-wired container using POOR MAN’S DI. I chose to encapsulate the hard-coded DEPENDENCIES in a custom container class to give you a good idea of how to create a reusable solution based on a particular DI CONTAINER.
The previous paragraph threw some more jargon at you, so let’s briefly review what is meant by ENTITY and DTO.
An ENTITY is a term from Domain-Driven Design[6] that covers a Domain Object that has a long-term identity unrelated to a particular object instance. This may sound abstract and theoretical, but it means that an ENTITY represents an object that lives beyond arbitrary bits in memory. Any .NET object instance has an in-memory address (identity), but an ENTITY has an identity that lives across process lifetimes. We often use databases and primary keys to identify ENTITIES and ensure that we can persist and read them even if the host computer reboots.
6 Eric Evans, Domain-Driven Design: Tackling Complexity in the Heart of Software (New York: Addison-Wesley, 2004), 89.
The Domain Object Product is an ENTITY because the concept of a product has a much longer lifetime than a single process, and we use a product ID to identify it in the ProductRepository.
A Data Transfer Object[7] (DTO), on the other hand, exists only for the purpose of being transferred from one application tier to another. Whereas an ENTITY may encapsulate a lot of behavior, a DTO is a structure of data without behavior.
7 Martin Fowler et al., Patterns of Enterprise Application Architecture (New York: Addison-Wesley, 2003), 401.
When exposing a Domain Model to external systems, we often do so with services and DTOs because we can never be sure the other system can share our type system (it may not even use .NET). In such situations, we always need to map between the ENTITIES and the DTOs.
Let’s start with the custom ServiceHostFactory, which is the true entry point to a WCF service. The following listing shows the implementation.
Listing 7.4. Custom ServiceHostFactory
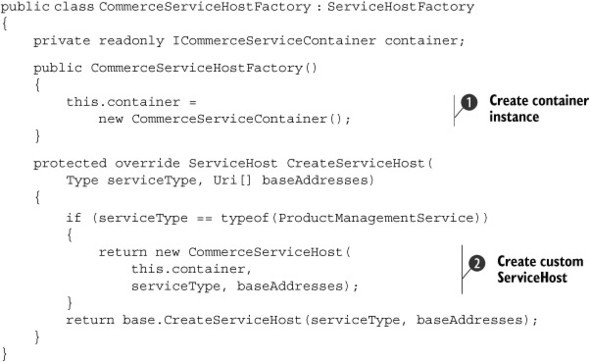
The custom CommerceServiceHostFactory derives from ServiceHostFactory with the single purpose of wiring up ProductManagementService instances. It uses a custom CommerceServiceContainer to do the actual work, so it creates an instance of the container in its constructor ![]() . You can easily expand this example to use a true DI CONTAINER by creating and configuring an instance of that container instead.
. You can easily expand this example to use a true DI CONTAINER by creating and configuring an instance of that container instead.
When asked to create a ServiceHost, it returns a new CommerceServiceHost with the configured container ![]() if the requested service type is appropriate. The CommerceServiceHost is responsible for assigning appropriate behaviors to all the service types it hosts. In this case, you only want to add
a single behavior that assigns the desired IInstanceProvider to the services. You can accomplish all this work in the constructor shown next, and the base class takes care of the rest.
if the requested service type is appropriate. The CommerceServiceHost is responsible for assigning appropriate behaviors to all the service types it hosts. In this case, you only want to add
a single behavior that assigns the desired IInstanceProvider to the services. You can accomplish all this work in the constructor shown next, and the base class takes care of the rest.
Listing 7.5. Custom ServiceHost

The CommerceServiceHost class derives from ServiceHost, which is a concrete class that does all the heavy lifting. In most cases, you’ll host only a single service type (in this case, ProductManagementService), but you’re allowed to host multiple services; this means you must add the IInstanceProvider to them all. The ImplementedCon-tracts property is a dictionary, so you must loop over its Values to target them all.
For each service type, you initialize a new instance of the custom CommerceInstanceProvider class with the container ![]() . Because it doubles as a behavior, you can add it to the service’s Behaviors
. Because it doubles as a behavior, you can add it to the service’s Behaviors ![]() .
.
The last part of the custom WCF triplet is CommerceInstanceProvider, which doubles as both IInstanceProvider and IContractBehavior. It’s a simple implementation, but because it implements two different interfaces with complex signatures, it can look a bit daunting if you see it in one go. Instead, I’ll show the code a little at a time; figure 7.9 provides an overview.
Figure 7.9. CommerceInstanceProvider implements both IInstanceProvider and IContractBehavior, so you’re required to implement seven methods. You can leave three empty, and the other four are one-liners.

Listing 7.6 shows the class declaration and the constructor. Nothing much goes on here apart from the use of CONSTRUCTOR INJECTION to inject the container. Normally, we use CONSTRUCTOR INJECTION to announce to a DI CONTAINER that a class requires some DEPENDENCIES, but here it’s backward because you inject the container itself. This is normally a big code smell because it usually indicates intent to use the SERVICE LOCATOR anti-pattern, but it’s necessary here because you’re implementing the COMPOSITION ROOT.
Listing 7.6. CommerceInstanceProvider class declaration and constructor
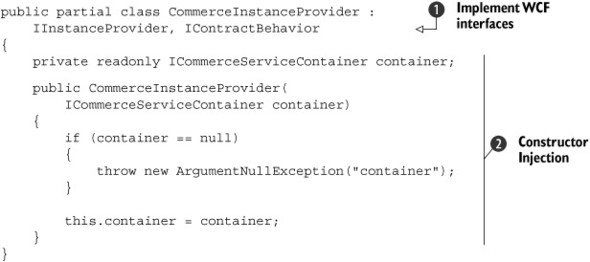
CommerceInstanceProvider implements both IInstanceProvider and IContractBehavior ![]() . You supply the container through standard CONSTRUCTOR INJECTION
. You supply the container through standard CONSTRUCTOR INJECTION ![]() . In this sample, you use the custom CommerceServiceContainer, but replacing it with a general-purpose DI CONTAINER is a trivial exercise.
. In this sample, you use the custom CommerceServiceContainer, but replacing it with a general-purpose DI CONTAINER is a trivial exercise.
The IInstanceProvider implementation in the next listing is used by the WCF runtime to create instances of the ProductManagementService class.
Listing 7.7. IInstanceProvider implementation

The WCF runtime invokes one of the GetInstance methods to get an instance of the requested service type, so you ask the container to wire up the ProductManagementService ![]() with all its required DEPENDENCIES.
with all its required DEPENDENCIES.
When the service operation has completed, the WCF runtime asks you to release the instance, and again you delegate this work
to the container ![]() .
.
The other part of CommerceInstanceProvider is the IContractBehavior implementation. The only reason you implement this interface is to allow you to add it to the list of behaviors as shown in listing 7.5. All the methods on the IContractBehavior interface return void, so you can leave most of them empty because you don’t need to implement them.
The following listing shows the implementation of the only method you care about.
Listing 7.8. Core implementation of IContractBehavior
public void ApplyDispatchBehavior(
    ContractDescription contractDescription, ServiceEndpoint endpoint,
    DispatchRuntime dispatchRuntime)
{
    dispatchRuntime.InstanceProvider = this;
}
You only need to do one exceedingly simple thing in this method. The WCF runtime calls this method and passes an instance of DispatchRuntime, which lets you tell it that it should be using this particular IInstanceProvider implementation—recall that CommerceInstanceProvider also implements IInstanceProvider. The WCF runtime now knows which IInstanceProvider to use, and it can subsequently invoke the GetInstance method shown in listing 7.7.
This seems like a lot of code to implement to enable DI for WCF, and I haven’t even shown you the implementation of CommerceServiceContainer.
Tip
Remember that you can easily write reusable versions of these three classes that wrap your favorite DI CONTAINER, and package that implementation into a library. Many developers have done that, so you can probably find a suitable readymade library on the internet.
The container is the last piece of the WCF DI puzzle.
Implementing the specialized container
CommerceServiceContainer is a specialized container with the single purpose of wiring up the ProductManagementService class. Recall that this class requires instances of ProductRepository and IContractMapper as DEPENDENCIES.
With the entire WCF infrastructure out of the way, the container is free to concentrate on wiring up the dependency graph.
Note
In addition to adhering nicely to the SINGLE RESPONSIBILITY PRINCIPLE, this separation of concerns shows that you can replace this specialized container with a general-purpose DI CONTAINER, because there’s no WCF-specific code present.
The ResolveProductManagementService method wires up the instance with POOR MAN’S DI, as shown next.
Listing 7.9. Resolving ProductManagementService

In a sense, when it comes to resolving a dependency graph, it often pays to work your way backward. You know you need to return
an instance of ProductManagementService with ProductRepository and IContractMapper instances. The IContractMapper instance is easy to create ![]() , but the ProductRepository requires a bit more work.
, but the ProductRepository requires a bit more work.
You wish to use SqlProductRepository ![]() , but to do that you need a connection string that you can read from the web.config file.
, but to do that you need a connection string that you can read from the web.config file.
If you wish to host the service in your own application, you can now do that by creating a new instance of the CommerceServiceHostFactory class and invoking its CreateServiceHost method with the correct parameters. It will return a CommerceServiceHost instance that you can open, and it will figure out the rest for you and host the ProductManagementService.
However, if you wish to host the service in IIS, you must take one more step.
Hosting ProductManagementService in IIS
In IIS, we don’t manually create new instances of CommerceServiceHostFactory. Instead, we must tell IIS to do so on our behalf. This can be done in an .svc file by supplying the Factory attribute:
<%@ ServiceHost
    Factory = "Ploeh.Samples.CommerceService.CommerceServiceHostFactory,
    Ploeh.Samples.CommerceService"
    Service = "Ploeh.Samples.CommerceService.ProductManagementService"
%>
Ploeh.Samples.CommerceService"
Service = "Ploeh.Samples.CommerceService.ProductManagementService"
%>
This .svc file instructs IIS to use the CommerceServiceHostFactory every time it needs to create an instance of the ProductManagementService class. It’s a requirement that the ServiceHostFactory in question has a default constructor, but this is also the case in this example.
Enabling DI in WCF is harder than it should be, but at least it’s possible, and the end result is entirely satisfactory. We can use whichever DI CONTAINER we like, and we end up having a proper COMPOSITION ROOT.
Some frameworks don’t give us the appropriate SEAMS to allow us that luxury. However, before we look at one such notorious framework, let’s relax and look at a much simpler framework.
7.4. Composing WPF applications
If you thought that composing a WCF service was difficult (I do), you’ll appreciate that composing a Windows Presentation Foundation (WPF) application is almost as easy as composing a console application.
A WPF application’s entry point is fairly obvious and uncomplicated, and although it doesn’t provide SEAMS explicitly targeted at enabling DI, we can easily compose an application in any way we prefer.
7.4.1. WPF Composition
A WPF application’s entry point is defined in its App class. As with most other classes in WPF, this class is split into two files: App.xaml and App.xaml.cs. We can define what happens at application startup in both files, depending on our need.
When you create a new WPF project in Visual Studio, the App.xaml file defines a StartupUri attribute that defines which window is shown when the application starts—in this case, Window1:
<Application x:Class="MyWpfApplication.App"
    xmlns="http://schemas.microsoft.com/winfx/2006/xaml/presentation"
    xmlns:x="http://schemas.microsoft.com/winfx/2006/xaml"
    StartupUri="Window1.xaml">
</Application>
The implication of this declarative style is that the Window1 object is created and shown without any sort of additional context. When you want to supply DEPENDENCIES to the window, a more explicit approach can be more appropriate. You can remove the StartupUri attribute and wire up the window by overriding the OnStartup method. This allows you to fully wire up the first window before it’s shown, but you pay one tax: you must remember to explicitly invoke the window’s Show method.
The OnStartup method thus becomes the application’s COMPOSITION ROOT. You can use a DI CONTAINER or POOR MAN’S DI to compose the window. The next example uses POOR MAN’S DI to illustrate that you don’t have to rely on features of any particular DI CONTAINER.
7.4.2. Example: wiring up a product-management rich client
The previous example developed a web service we can use to manage the product catalog for the sample Commerce application. In this example, you’ll create a WPF application that uses this web service to manage products. Figure 7.10 shows a screen shot of the application.
Figure 7.10. The Product Management application’s main window is a list of products. You can add new products, edit existing products, or delete them. When adding or editing products, a modal edit dialog is used. All operations are implemented by invoking appropriate operations on the product-management web service from section 7.3.2.

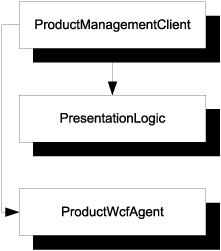
The entire application is implemented using the Model View ViewModel (MVVM) approach and contains the three layers shown in figure 7.11. As usual, we keep the part with the most logic isolated from the other modules—in this case, PresentationLogic. ProductManagementClient is a HUMBLE EXECUTABLE that does little apart from defining the UI and delegating implementation to the other modules.
Figure 7.11. The application consists of three distinct assemblies. The ProductManagementClient assembly is the executable and contains the UI implemented in XAML with no code-behind. The PresentationLogic library contains the ViewModels and supporting classes, and the ProductWcfAgent library contains an Adapter between the custom IProductManagementAgent ABSTRACTION and the concrete WCF proxy that is used to communicate with the product-management web service. The dependency arrows imply that ProductManagementClient acts as the COMPOSITION ROOT, because it wires together the other modules.
With MVVM, we assign a ViewModel to the main window’s DataContext property, and data binding and the data-templating engine take care of presenting the data correctly as we spin up new ViewModels or change the data in the existing ViewModels.
Model View ViewModel (MVVM)[8] is a design pattern for which WPF is particularly well suited. It divides UI code into three distinct responsibilities.
8 Read more about MVVM in Josh Smith, “Patterns: WPF Apps With The Model-View-ViewModel Design Pattern,” 2009, http://msdn.microsoft.com/en-us/magazine/dd419663.aspx
The Model is the underlying model for the application. This is often, but not always, the Domain Model. It often consists of Plain Old CLR Objects (POCOs). In the present example, the Domain Model is implemented in the web service, so you don’t have a proper Domain Model in this tier. However, the application operates with an ABSTRACTION on top of the web service proxy, and this is your Model. Notice that the Model is usually expressed in a UI-neutral way. It doesn’t assume that it will be exposed directly by a UI, so it doesn’t expose any WPF-specific functionality.
The View is the UI we look at. In WPF, we can declaratively express the View in XAML and use data binding and data templating to present the data. It’s possible to express the Views without the use of code-behind.
The ViewModel is the bridge between the View and the Model. Each ViewModel is a class that translates and exposes the Model in a technology-specific way. In WPF, this means it may expose lists as ObservableCollections, and so on.
Injecting Dependencies into the main ViewModel
MainWindow contains only XAML markup and no custom code-behind. Instead, it uses data binding to display data and handle user commands. To enable this, we must assign a MainWindowViewModel to its DataContext property.
MainWindowViewModel exposes data such as the list of products as well as commands to create, update, or delete a product. Enabling this functionality depends on a service that provides access to the product catalog: the IProductManagementAgent ABSTRACTION.
Apart from IProductManagementAgent, MainWindowViewModel also needs a service it can use to control its windowing environment, such as showing modal dialog boxes. This other DEPENDENCY is called IWindow.
MainWindowViewModel uses CONSTRUCTOR INJECTION with this constructor signature:
public MainWindowViewModel(IProductManagementAgent agent, IWindow window)
To wire up the application, we must create MainWindowViewModel and assign it to the DataContext property of a MainWindow instance.
Wiring up MainWindow and MainWindowViewModel
This example contains the extra spice that to implement IWindow correctly, you need a reference to the real WPF window (MainWindow); but the ViewModel requires an IWindow, and the MainWindow’s DataContext should be the ViewModel. In other words, you have a circular DEPENDENCY.
In chapter 6, we dealt with circular DEPENDENCIES and walked through the relevant part of this particular example, so I won’t repeat it here. Suffice it to say that you introduce a MainWindowViewModelFactory responsible for creating instances of MainWindowViewModel.
You use this factory from within an implementation of IWindow called MainWindowAdapter to create the MainWindowViewModel and assign it to the MainWindow’s DataContext property:
var vm = this.vmFactory.Create(this);
this.WpfWindow.DataContext = vm;
The vmFactory member variable is an instance of IMainWindowViewModelFactory, and you pass its Create method an instance of the containing class, which implements IWindow. The resulting ViewModel instance is then assigned to the DataContext of WpfWindow, which is an instance of MainWindow.
Note
I am glossing over the details on purpose because we covered them in chapter 6. Go back and reread the section on circular DEPENDENCIES if you need a refresher about what’s going on.
Tip
WPF data binding requires us to assign the DEPENDENCY (the ViewModel) to the DataContext property. This is, in my opinion, misuse of PROPERTY INJECTION because it signals that the DEPENDENCY is optional, which it isn’t. However, WPF 4 introduces something called a XamlSchemaContext, which can be used as a SEAM that gives us greater flexibility when it comes to instantiating Views based on markup.[9]
9 For more information, see Simon Ferquel, “[Xaml] IoC-enabled Xaml parser,” 2010, www.simonferquel.net/blog/archive/2010/02/19/xaml-ioc-enabled-xaml-parser.aspx
Figure 7.12 shows the complete dependency graph for the application.
Figure 7.12. Dependency graph for MainWindowAdapter, which ends up being the root object in the application. It uses a MainWindowViewModelFactory to create the appropriate ViewModel and assign it to the MainWindow. To create MainWindowViewModel, the factory needs a WcfProductManagementAgent to pass to the ViewModel. This agent is an Adapter between IProductManagementAgent and the WCF proxy. It requires a ProductChannelFactory to create instances of the WCF proxy, as well as an IClientContractMapper that can translate between ViewModels and WCF Data Contracts.

Now that you’ve identified all the building blocks of the application, you can compose it. To keep the POOR MAN’S DI code symmetrical with the use of a DI CONTAINER, I have implemented this as a Resolve method on a specialized container class. The following listing shows the implementation.
Listing 7.10. Composing the main window
public IWindow ResolveWindow()
{
    IProductChannelFactory channelFactory =
        new ProductChannelFactory();
    IClientContractMapper mapper =
        new ClientContractMapper();
    IProductManagementAgent agent =
        new WcfProductManagementAgent(
            channelFactory, mapper);

    IMainWindowViewModelFactory vmFactory =
        new MainWindowViewModelFactory(agent);

    Window mainWindow = new MainWindow();
    IWindow w =
        new MainWindowAdapter(mainWindow, vmFactory);
    return w;
}
Ultimately, you return an IWindow instance implemented by MainWindowAdapter, and you need a WPF Window and an IMainWindowViewModelFactory for that. The first window you want to show to users should be a MainWindow, so this is what you pass to MainWindowAdapter.
MainWindowViewModelFactory uses CONSTRUCTOR INJECTION to request an IProductManagementAgent, so you must compose a WcfProductManagementAgent with its two DEPENDENCIES.
The final MainWindowAdapter returned from the method wraps the MainWindow, so when we invoke the Show method, it delegates to the MainWindow’s Show method. That is exactly what you’ll do from the COMPOSITION ROOT.
Implementing the Composition Root
Now that you know how to wire up the application, you only need to do so in the correct place. As described in the previous section, you first need to open App.xaml and remove the StartupUri attribute because you wish to explicitly compose the startup Window yourself.
After you’ve done that, you only need to override the OnStartup method in App.xaml.cs and invoke the container.
Listing 7.11. Implementing a WPF COMPOSITION ROOT
protected override void OnStartup(StartupEventArgs e)
{
    base.OnStartup(e);

    var container =
        new ProductManagementClientContainer();
    container.ResolveWindow().Show();
}
In this example, you use the specialized ProductManagementClientContainer, but you could just as well use a general-purpose DI CONTAINER like Unity or StructureMap. You ask the container to resolve an IWindow instance and subsequently invoke its Show method. The returned IWindow instance is a MainWindowAdapter; when you invoke its Show method, it invokes the Show method on the encapsulated MainWindow, which causes the desired window to be shown to the user.
WPF offers a simple place for a COMPOSITION ROOT. All you need to do is to remove StartupUri from App.xaml, override OnStartup in App.xaml.cs, and compose the application here.
So far, you’ve seen examples where the frameworks provide a SEAM that allows us to take over the lifetime of key object instances (web pages, service instances, windows, and so on). In many cases, doing so is fairly easy; but even when it gets as difficult as in WCF, we can still prevail and implement pure DI without compromising our principles.
Some frameworks, however, don’t give us that luxury.
7.5. Composing ASP.NET applications
Some frameworks insist on creating and managing the lifetime of the classes we write. The most popular framework is ASP.NET (Web Forms, as opposed to MVC).
Note
Some other frameworks sharing this trait are the Microsoft Management Console (MMC) managed SDK, and such recent inventions as PowerShell.
The most obvious symptom of such frameworks is that to fit in, our classes must have a default constructor. In ASP.NET, for example, any Page class we implement must have a parameterless constructor. We can’t use CONSTRUCTOR INJECTION with these frameworks, so let’s examine our options.
7.5.1. ASP.NET composition
CONSTRUCTOR INJECTION would be preferable because it would ensure that our Page classes would be properly initialized with their DEPENDENCIES. Because that isn’t possible, we must choose from these alternatives:
- Move and duplicate our COMPOSITION ROOTS within each Page class.
- Use a SERVICE LOCATOR to resolve all DEPENDENCIES from within each Page class.
However, remember that SERVICE LOCATOR is an anti-pattern, so that option isn’t desirable. A better alternative is to compromise on the location of our COMPOSITION ROOT.
Ideally, we would prefer the scenario in figure 7.13 where we have only one COMPOSITION ROOT per application, but that isn’t possible in ASP.NET because we can’t compose Page instances from the outside. In other words, the Web Forms framework forces us to compose the application from within each Page.
Figure 7.13. In a perfect world, we would like to be able to compose Page objects from an application’s COMPOSITION ROOT. When a request arrives, we should be able to use the defined configuration of DEPENDENCIES to compose an appropriate Page object. However, this isn’t possible because ASP.NET manages the lifetime of Page objects on our behalf.

Note
So far, I have only talked about Page objects, but ASP.NET requires a default constructor for lots of objects if we want to use the framework. Another example is Object Data Sources. The discussion in this section applies equally well to all other types that must have a default constructor.
To address this issue, we must compromise on our ideals, but I find it much safer to compromise on the location of COMPOSITION ROOTS than to allow a SERVICE LOCATOR to enter the picture.
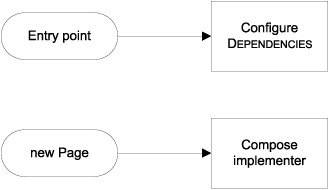
In essence, we turn each Page into a COMPOSITION ROOT as shown in figure 7.14. The SINGLE RESPONSIBILITY PRINCIPLE reminds us that each class should have only a single responsibility; now that we use the Page to compose all required DEPENDENCIES, we should delegate the responsibility of implementation to an implementer. This effectively turns the Page into a HUMBLE OBJECT, exposing other members such as click-event handlers solely for the purpose of delegating to the Page’s resolved implementer.
Figure 7.14. In ASP.NET, we can use the application entry point (global.asax) to configure the DEPENDENCIES, but we then have to wait until the framework creates a new Page object before we can continue with the composition. From within each Page, we can use the configured DEPENDENCIES to compose an implementer that implements all the behavior of the Page class.
The distinction between moving the COMPOSITION ROOT into each class and using a SERVICE LOCATOR is subtle. The difference is that with a SERVICE LOCATOR we resolve each of the Page class’s DEPENDENCIES individually and use them directly from within the Page class. As always with SERVICE LOCATOR, this tends to blur the focus of the class. In addition, it becomes tempting to keep the container and use it to resolve other DEPENDENCIES as necessary.
To counter this tendency, it’s important to only use our container to resolve the implementer and then forget about it. This allows us to follow appropriate DI patterns (such as CONSTRUCTOR INJECTION) for the rest of the application’s code.
Although this is theoretical, you’ll be relieved to hear that it’s easy to implement. This is best illustrated with an example.
7.5.2. Example: wiring up a CampaignPresenter
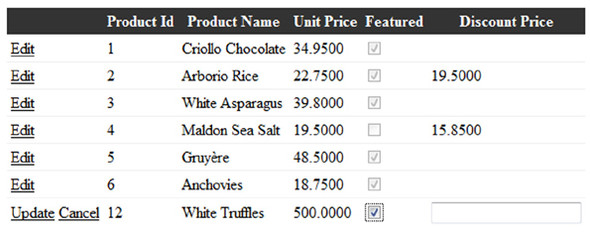
The Commerce sample application you know and love supports product discounts and featured products, but so far you haven’t provided business users with an application to manage these aspects. In this example, we’ll examine how to compose the ASP.NET application (shown in figure 7.15) that allows a business user to update campaign data for a product.
Figure 7.15. The CampaignManagement application allows a business user to edit campaign data (Featured and Discount Price) for a product. It’s an ASP.NET application built with the GridView control bound to an ObjectDataSource control.
To keep things simple, this application consists of a single GridView control bound to an ObjectDataSource. The data source is an application-specific class that delegates its behavior to the Domain Model and through that ultimately to the dataaccess library that stores the data in a SQL Server database.
You can still use global.asax to configure DEPENDENCIES, but you must defer composing the application until the Page and its ObjectDataSource have been created. Configuring the DEPENDENCIES is similar to previous examples.
Configuring Dependencies in ASP.NET
The application entry point in ASP.NET is the global.asax file, and although you can’t compose anything at this point, you can create your mise en place, making everything ready for when the application starts:
protected void Application_Start(object sender, EventArgs e)
{
    this.Application["container"] =
        new CampaignContainer();
}
The only thing you do here is to create your container and save it in the Application Context so you can use it when you need it. This allows you to share the container across separate web requests, which is beneficial if you need to keep some DEPENDENCIES for the duration of the process’s lifetime (we’ll talk more about lifetimes in chapter 8).
Note
As with all the other examples in this chapter, I use POOR MAN’S DI to demonstrate the core principles involved. CampaignContainer is a custom class created explicitly for this example, but you can easily replace it with the DI CONTAINER of your choice.
Many different Page and data source objects can share the same container by accessing the Application Context. However, this approach poses a danger of being misused as a SERVICE LOCATOR, because any class can potentially access the Application Context. Thus, it’s important to delegate the implementation to classes that can’t access the Application Context. In practice, this means delegating to classes implemented in other separate libraries that don’t reference ASP.NET.
Note
We can also get by with a bit of discipline, constraining ourselves from accessing the Application Context unless we’re implementing a COMPOSITION ROOT. This can work well when all developers are experienced in writing loosely coupled code; but if we suspect that some team members may not fully understand the issues involved, we can better protect the code by using separate libraries. Section 6.5 described how to do that.
In the current example, you’ll delegate all implementation to a separate presentation logic library to ensure that no classes directly access the Application Context. You don’t allow the library to reference any of the ASP.NET assemblies (such as System.Web).
Figure 7.16 shows a partial view of the application architecture. The salient point is that you use classes in the root of the application (the Default Page and CampaignDataSource) as COMPOSITION ROOTS that resolve classes from the Presentation Logic layer together with their DEPENDENCIES.
Figure 7.16. The root of the CampaignManagement application is the only part of the application that references ASP.NET. The CampaignDataSource class has a default constructor but acts as a COMPOSITION ROOT and HUMBLE OBJECT that delegates all method calls to a CampaignPresenter. As usual, the arrows denote references, and the root application references all other modules because it wires them together. Both the Presentation Logic and Data Access modules reference the Domain Model library. Not all involved classes are shown.

Armed with the knowledge of the application’s dependency graph, you can now implement a COMPOSITION ROOT for the screen shown in figure 7.15.
Composing an ObjectDataSource
The Default Page shown in figure 7.15 consists of a GridView control and an associated ObjectDataSource control. As is the case with Page classes, a class used for ObjectDataSource must also have a default constructor. To meet that goal, you explicitly create the class shown in the following listing.
Listing 7.12. Composing a Presenter as data source

The CampaignDataSource class has a default constructor because this is required by ASP.NET. True to the spirit of Fail Fast, it immediately attempts to extract the container from the Application Context and resolve a CampaignPresenter instance ![]() that will serve as the real implementation.
that will serve as the real implementation.
All members of the CampaignDataSource class delegate the call to the resolved presenter ![]() , thus acting as a HUMBLE OBJECT.
, thus acting as a HUMBLE OBJECT.
Note
For design pattern enthusiasts, the CampaignDataSource class looks a lot like either a Decorator or an Adapter.[10] It implements no strongly typed interface but wraps a proper implementation in a class that conforms to the requirements put forth by ASP.NET.
10 Gamma, Design Patterns, 139.
You may wonder what we gain from this extra layer of indirection. If you’re used to TDD, it should be straightforward: HttpContext.Current isn’t available during unit testing, so you can’t unit-test CampaignDataSource. This is an important reason why you must keep it a HUMBLE OBJECT.
Although this construct is awkward at best, it allows you to follow proper DI patterns from the CampaignPresenter class and further down through the application’s layers.
Composing the Presenter
I won’t walk you through the nitty-gritty details of CampaignPresenter, but it’s worth looking at its constructor signature because it uses CONSTRUCTOR INJECTION:
public CampaignPresenter(CampaignRepository repository,
    IPresentationMapper mapper)
Its DEPENDENCIES are the abstract CampaignRepository class and the IPresentationMapper interface. Exactly what these ABSTRACTIONS do is less important than how you compose them. This is the job of the CampaignContainer in the next listing. You may recall that you configured it in global.asax and registered it in the Application Context.
Listing 7.13. Resolving CampaignPresenter

The ResolvePresenter method’s responsibility is to compose a CampaignPresenter instance. From the constructor, you know it needs a CampaignRepository, so you map that to a SqlCampaignRepository instance ![]() . The other DEPENDENCY is IPresentationMapper, and you map that to the concrete PresentationMapper class
. The other DEPENDENCY is IPresentationMapper, and you map that to the concrete PresentationMapper class ![]() .
.
Armed with all required DEPENDENCIES, you can subsequently ![]() return a new CampaignPresenter instance.
return a new CampaignPresenter instance.
Using DI with ASP.NET isn’t impossible, but it’s more work than we would like. The main drawback with using each Page and object data source as a combined COMPOSITION ROOT and HUMBLE OBJECT is that it requires us to duplicate a lot of class members.
Did you notice how every member of CampaignDataSource delegates its implementation to a similarly named method on CampaignPresenter? You have to repeat this coding idiom throughout an entire ASP.NET application. For every button-click handler, you need to define and maintain an associated method on a Presenter class, and so on.
As we discussed in chapter 3, I liken the concept of a COMPOSITION ROOT to Lean Software Development’s idea of the Last Responsible Moment. With frameworks such as ASP.NET MVC and WCF, we can defer the composition of the application all the way to the application’s entry point, but this isn’t the case with ASP.NET. No matter how hard we try, we can only defer decisions about OBJECT COMPOSITION until we meet a requirement for a default constructor.
That, then, becomes the “highest possible place” in which we can compose objects. Although we feel that we’re compromising, we still follow the overall spirit of COMPOSITION ROOT. We compose object hierarchies as close to the architectural top as possible and enable correct DI patterns from there on down.
ASP.NET still allows us a small luxury: we can share one container instance through the Application Context. Some frameworks don’t even grant us that.
7.6. Composing PowerShell cmdlets
Some frameworks offer absolutely no SEAMS that allow us to manage the lifetime of the core elements of the framework. Windows PowerShell is such a framework.
Note
Read on even if you have no particular interest in PowerShell. I mainly chose it as an example of the ultimate DI challenge. I could also have chosen the Managed MMC SDK, but it’s unpleasant in so many other ways that I found PowerShell preferable as an example.
An important element in PowerShell is a cmdlet. (I suppose it’s pronounced command-let, but I have only seen it spelled cmdlet.) You can think of a cmdlet as an advanced command-line utility.
A cmdlet is a class that derives from Cmdlet,[11] and it must have a default constructor. As with ASP.NET, that requirement effectively bars any use of CONSTRUCTOR INJECTION. The solution is similar: we move the COMPOSITION ROOT into the constructor of each cmdlet. The only difference is that there is no built-in Application Context so we must instead resort to the lowest common denominator: a static class.
11System.Management.Automation.Cmdlet to be exact, although it can also derive from System.Management.Automation.PSCmdlet.
Note
I consider any use of the static keyword a code smell, but in contrast with anti-patterns, code smells only indicate a potential design flaw. In some special cases, the smelly idiom is warranted, and this is such a case.
You may wonder how this is different from the SERVICE LOCATOR anti-pattern. Just as with ASP.NET, the main difference is not in the structure of the code, but in the usage pattern. Instead of trying to use a static SERVICE LOCATOR as a virtual new keyword, we use it only once per cmdlet. To further protect ourselves from misuse, we can make the COMPOSER internal and use it only to resolve types from different assemblies, as shown in figure 7.17.
Figure 7.17. When there is no way around a static container, we can make it internal and place it in the application’s root assembly. All Resolve methods return classes defined in other assemblies. Thus as soon as the container has resolved the implementer, no classes in the resolved dependency hierarchy have access to the static container because they’re all outside the application’s root assembly and the container is internal.

The result of resolving the dependency graph is a class defined in a different assembly, and that class can’t access the static container because it’s internal to the application’s root assembly. The cmdlet implementer needs to use proper DI patterns such as CONSTRUCTOR INJECTION to consume any DEPENDENCIES, and we’ve effectively shielded ourselves from the dangers of SERVICE LOCATOR.
Let’s look at an example that illustrates this principle.
7.6.1. Example: composing basket-management cmdlets
This example returns to the commerce sample application. Like all other commerce applications, this one has shopping basket functionality. It’s common for users to put items in their shopping basket but then leave the site, never to return.
Although storage is cheap these days, project stakeholders have requested that you provide them with a flexible ability to clean up orphaned baskets based on different criteria. They want to be able to select orphaned baskets based on when they were last updated. If the basket represents a significant amount, it shouldn’t be deleted (or perhaps it should be given a longer grace period), but the total should be calculated according to all current business rules.
It sounds like a scripting API would be a good fit, because an administrator would be able to define and schedule simple cleanup scripts. PowerShell is appropriate here because of its advanced filtering and piping functionality.
You can implement the desired API with two cmdlets: one to retrieve all baskets and one to delete a basket for a given user. The following listing is an example of how this might look in an interactive session.
Listing 7.14. Deleting baskets more than a month old

Before you begin deleting baskets, you want to review the current baskets in the system. You can use the custom cmdlet Get-Basket to list all baskets. Notice that each basket has three properties that tell you when the basket was last updated, who the owner is, and the total value (including discounts) of the basket.
The current date when this particular session was performed was March 22, 2010. Notice that the second basket ![]() is more than 30 days old. You can now calculate the cutoff date
is more than 30 days old. You can now calculate the cutoff date ![]() from the current date and use it in a filter expression
from the current date and use it in a filter expression ![]() . You can delete all old baskets by piping the result of Get-Basket to the filter and then piping the result of the filtered baskets to the Remove-Basket cmdlet. If you wanted to also filter on the Total property, you could do so as well.
. You can delete all old baskets by piping the result of Get-Basket to the filter and then piping the result of the filtered baskets to the Remove-Basket cmdlet. If you wanted to also filter on the Total property, you could do so as well.
Finally, you list all baskets to verify that the old basket was deleted.
Note
Don’t worry if you don’t understand all the details of the filter expression. This book isn’t about PowerShell, so I won’t linger on this subject.
To facilitate this scripting API, you need to implement two custom cmdlets. Because one of the requirements is that the Total must take into account all relevant business rules, you need to compose the cmdlets with your Domain Model.
Composing GetBasketCmdlet
Let’s examine how the Get-Basket cmdlet is implemented. Remove-Basket is implemented in a similar manner, so I won’t cover it.
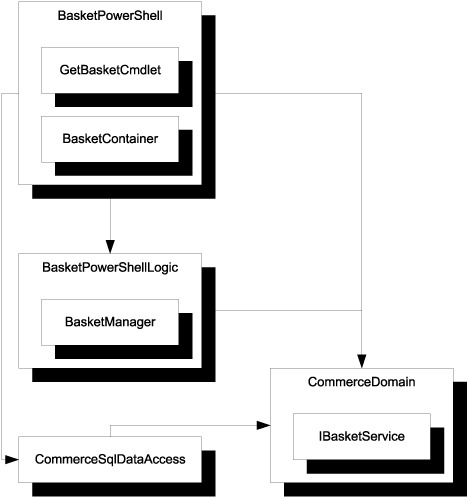
To escape the lure of the static container, you’ll implement the entire bridge between the PowerShell cmdlet and the Domain Model in a separate library called BasketPowerShellLogic. Figure 7.18 shows how the application is composed across libraries.
Figure 7.18. The BasketPowerShell library only contains the infrastructure necessary to make PowerShell happy—it’s a HUMBLE OBJECT. As soon as the static BasketContainer has resolved a BasketManager, all further implementation happens in different assemblies. The BasketManager class has no access to the internal BasketContainer but consumes an IBasketService from the Domain Model. As usual, arrows denote references. Not all involved classes are shown.
Note
If you think figure 7.18 looks a lot like figure 7.16, you’re beginning to see a pattern.
Note
You may remember IBasketService from chapter 2, section 2.3.2.
The GetBasketCmdlet class must have a default constructor to satisfy PowerShell, so you use it as a COMPOSITION ROOT and leave it as a HUMBLE OBJECT. The next listing demonstrates just how humble it is.
Listing 7.15. Implementing GetBasketCmdlet

In the required default constructor, you use the static container to resolve the BasketManager ![]() that serves as the implementation
that serves as the implementation ![]() . BasketManager uses CONSTRUCTOR INJECTION to request an IBasketService instance. By now, you should be familiar with this pattern and the implementation of BasketContainer shown in the following listing.
. BasketManager uses CONSTRUCTOR INJECTION to request an IBasketService instance. By now, you should be familiar with this pattern and the implementation of BasketContainer shown in the following listing.
Listing 7.16. Resolving BasketManager

The method, as well as the entire class, is internal ![]() , which makes it possible to invoke it from the GetBasketCmdlet as shown in listing 7.15 but impossible to inadvertently use from BasketManager or its DEPENDENCIES.
, which makes it possible to invoke it from the GetBasketCmdlet as shown in listing 7.15 but impossible to inadvertently use from BasketManager or its DEPENDENCIES.
The implementation of the method should now look familiar to you. Again I find it most straightforward to work backward from
the result. The BasketManager class requires an IBasketService instance ![]() , and you use the BasketService class (not that you currently have any other implementation to choose from).
, and you use the BasketService class (not that you currently have any other implementation to choose from).
BasketService requires a BasketRepository and a BasketDiscountPolicy. For the latter, you use RepositoryBasketDiscountPolicy. This class requires another repository ABSTRACTION, and for both repositories, you use the SQL Server–based implementations.
The BasketManager implementation is basic, so I won’t show it. All it does is express the requested operation in terms of the Domain Model.
The Remove-Basket cmdlet follows exactly the same pattern: it uses the static but internal BasketContainer to resolve a BasketManager instance and then delegates the implementation to the resolved instance. Both cmdlets act as a combination of COMPOSITION ROOT and HUMBLE OBJECT.
The BasketManager class is implemented in a different assembly. As soon as the code leaves the cmdlets, there is no risk that any of the underlying implementation will use the static container as a SERVICE LOCATOR because it’s internal to the assembly containing the cmdlets.
Note
Obviously, the underlying code will never do anything by accident, but the developer writing the code might. We shield the static container from the rest of the code to protect ourselves from making mistakes.
A framework like PowerShell represents the ultimate in DI-unfriendliness. Using the simple technique of making each framework element a COMPOSITION ROOT and a HUMBLE OBJECT gives you an easy way to deal with the issue.
7.7. Summary
OBJECT COMPOSITION is one of three important dimensions of DI (the others being LIFETIME MANAGEMENT and INTERCEPTION). In this chapter, I have shown you how to compose applications from loosely coupled modules in a variety of different environments.
Some frameworks make it easy. When we’re writing console applications and Windows clients (WPF or Windows Forms), we’re more or less in direct control of what is happening at the application’s entry point. This provides us with a distinct and easily implemented COMPOSITION ROOT at the entry point.
Other frameworks, such as ASP.NET MVC and WCF, make us work a little harder, but they still provide SEAMS we can use to define how the application should be composed. ASP.NET MVC was designed with DI in mind, so composing an application is as easy as implementing a custom IControllerFactory and registering it with the framework. In WCF, the SEAM almost appears to be there accidentally; but although it’s more roundabout than implementing a single interface, we can still achieve all the DI goodness we could wish for.
Other frameworks are decidedly DI-unfriendly and require us to use default constructors to fit in. ASP.NET (Web Forms) is the most notorious of these, but other examples include PowerShell and the Managed MMC SDK. These frameworks manage the lifetimes of the classes we provide, so the only option is to treat each class as a separate COMPOSITION ROOT. This is more work, so I personally prefer to use DI-friendly frameworks whenever I have the choice.
Without OBJECT COMPOSITION, there is no DI, but you may not yet have fully realized the implications for OBJECT LIFETIME when we move creation of objects out of the consuming classes. You may find it self-evident that the external caller (often a DI CONTAINER) creates new instances of DEPENDENCIES—but when are injected instances deallocated? And what if the external caller decides not to create new instances all the time, but rather hands you an existing instance? These are topics for the next chapter.