
Chapter 11. StructureMap
- Introducing StructureMap
- Managing lifetime
- Working with multiple components
- Configuring difficult APIs
In the previous chapter, we looked at the Castle Windsor DI CONTAINER to see how the principles and patterns described in parts 1–3 can be applied. In this chapter, we’ll do exactly the same with another DI CONTAINER: StructureMap.
StructureMap is the oldest DI CONTAINER for .NET—it has been around longer than the others. Despite its age, it’s still being actively developed and has many modern features, so we should view its age mostly as a testament to its maturity. It’s also one of the most commonly used DI CONTAINERS.[1]
1 Once more I need to stress that there are no scientifically sound statistics about DI CONTAINER usage, so all such claims are based on ad hoc internet polls, and so on. Take it for what it is.
In this chapter, we’ll examine how StructureMap can be used to apply the principles and patterns laid forth in parts 1–3. Figure 11.1 shows the structure of the chapter.
Figure 11.1. This chapter is divided into four sections. The first section introduces the StructureMap API and should be considered a prerequisite for the next three sections. Each of these can be read independently of each other, although the fourth section uses some methods that are introduced in the third section. These methods have relatively self-explanatory names, so you may be able to read the fourth section without reading the third, but on the other hand you may also find that you need to refer back to that section occasionally.

The first section provides an overall introduction to StructureMap and demonstrates how to configure and resolve components. The next three sections each deal with usage patterns that require a bit of extra attention; you can read them all in order, or you can skip some and read only the ones that interest you.
This chapter should enable you to get started, as well as deal with the most common issues that may come up as you use StructureMap on a day-to-day basis. It isn’t a complete treatment of StructureMap—that would take several more chapters, or perhaps a whole book in itself.
You can read the chapter in isolation from the rest of part 4 specifically to learn about StructureMap, or you can read it together with the other chapters in part 4 to compare DI CONTAINERS. The focus of this chapter is to show how StructureMap relates to and implements the patterns and principles described in parts 1–3.
11.1. Introducing StructureMap
In this section, you’ll learn where to get StructureMap, what you get, and how you start using it. We’ll also look at common configuration options, as well as how to package configuration settings into reusable components. Table 11.1 provides fundamental information that you’re likely to need to get started.
Table 11.1. StructureMap at a glance
|
Question |
Answer |
|---|---|
| Where do I get it? | Go to http://structuremap.github.com/structuremap/index.html, and click the Download the Latest Release link. From Visual Studio 2010 you can also get it via NuGet. The package name is structuremap. |
| What’s in the download? | You can download a .zip file with precompiled binaries. You can also get the source code and compile it yourself. The binaries are .dll files that you can place wherever you like and reference from your own code. |
| Which platforms are supported? | .NET 3.5 SP1, .NET 4. |
| How much does it cost? | Nothing. It’s open source software. |
| Where can I get help? | There’s no guaranteed support, but you’re likely to get help in the official forum at http://groups.google.com/group/structuremap-users. |
| On which version is the chapter based? | 2.6.1. |
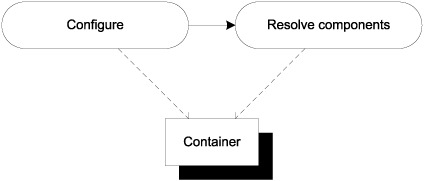
As is also the case with Castle Windsor, using StructureMap follows a simple rhythm, illustrated by figure 11.2.
Figure 11.2. The overall usage pattern of StructureMap is simple: First we configure the container, and then we resolve components from it. In the vast majority of cases, we create an instance of the Container class and completely configure it before we start resolving components from it. We resolve components from the same instance that we configure.
Earlier versions of StructureMap used a static ObjectFactory class as a single, application-wide container. It was used like this:
SauceBéarnaise sauce =
    ObjectFactory.GetInstance<SauceBéarnaise>();
Among several problems with using a static factory is that it encourages us to misuse it as a SERVICE LOCATOR; use of the ObjectFactory class is now discouraged in favor of container instances. There are still many examples on the StructureMap site (and elsewhere) that use ObjectFactory code samples to demonstrate various StructureMap features, but we should consider these as rudiments of an earlier age.
In the rest of this chapter, we’ll ignore that ObjectFactory exists and focus exclusively on container instances.
Warning
The StructureMap API has changed a lot recently. It’s often the case that we find a code example on the internet that uses a method or class that isn’t available in the current version; most likely, it was renamed or otherwise refactored. Although all code examples compiled and worked when this chapter was written, some parts of the API might have changed between then and when you’re reading this.
When you’re done with this section, you should have a good feeling for the overall usage pattern of StructureMap, and you should be able to start using it in well-behaved scenarios where all components follow proper DI patterns such as CONSTRUCTOR INJECTION. Let’s start with the simplest scenario and see how we can resolve objects using a StructureMap container.
11.1.1. Resolving objects
The core service of any DI CONTAINER is to resolve components. In this section, we’ll look at the API that enables us to resolve components with StructureMap.
If you remember the discussion about resolving components with Castle Windsor, you may recall that Windsor requires you to register all relevant components before you can resolve them. This isn’t the case with StructureMap; if you request a concrete type with a default constructor, no configuration is necessary. The simplest possible use of StructureMap is this:
var container = new Container();
SauceBéarnaise sauce = container.GetInstance<SauceBéarnaise>();
Given an instance of StructureMap.Container, you can use the generic GetInstance method to get an instance of the concrete SauceBéarnaise class. Because this class has a default constructor, StructureMap automatically figures out how to create an instance of it. No explicit configuration of the container is necessary.
Note
The GetInstance<T> method is equivalent to Windsor’s Resolve<T> method.
Because StructureMap supports AUTO-WIRING, even in the absence of a default constructor, it will be able to create instances without configuration as long as the involved constructor parameters are all concrete types and the entire tree of parameters have leaf types with default constructors.
As an example, consider this Mayonnaise constructor:
public Mayonnaise(EggYolk eggYolk, OliveOil oil)
Whereas the mayonnaise recipe is a bit simplified, both EggYolk and OliveOil are concrete classes with default constructors. Although Mayonnaise itself has no default constructor, StructureMap can still create it without any configuration:
var container = new Container();
var mayo = container.GetInstance<Mayonnaise>();
This works because StructureMap is able to figure out how to create all required constructor parameters. However, as soon as we introduce loose coupling, we must configure StructureMap by mapping ABSTRACTIONS to concrete types.
Mapping Abstractions to concrete types
Whereas StructureMap’s ability to AUTO-WIRE concrete types certainly can come in handy from time to time, loose coupling normally requires you to map ABSTRACTIONS to concrete types. Creating instances based on such maps is the core service offered by any DI CONTAINER, but you must still define the map.
In this example, you map the IIngredient interface to the concrete Sauce-Béarnaise class, which allows you to successfully resolve IIngredient:
var container = new Container();
container.Configure(r => r
    .For<IIngredient>()
    .Use<SauceBéarnaise>());
IIngredient ingredient = container.GetInstance<IIngredient>();
The Configure method provides the opportunity to configure a ConfigurationExpression using a code block (see the following sidebar “Nested Closures” for an explanation). The configuration statement reads almost like a sentence (or like instructions from a cookbook): for IIngredient use SauceBéarnaise. The For method enables you to define the ABSTRACTION while the Use method lets you define the concrete type that implements the ABSTRACTION.
The strongly typed API provided by the ConfigurationExpression class helps prevent configuration mistakes because the Use method has a generic constraint that enforces that the type specified in the type argument must derive from the abstraction type argument specified in the For method. The previous example code compiles because SauceBéarnaise implements IIngredient.
In many cases, the strongly typed API is all we need, and, because it provides desirable compile-time checking, we should use it whenever we can. Still, there are situations where we need a more weakly typed way to resolve services. This is also possible.
Resolving weakly typed services
Sometimes we can’t use a generic API because we don’t know the appropriate type at design time. All we have is a Type instance, but we’d still like to get an instance of that type. You saw an example of that in section 7.2, where we discussed ASP.NET MVC’s DefaultControllerFactory class. The relevant method is this one:
protected internal virtual IController GetControllerInstance(
    RequestContext requestContext, Type controllerType);
Because you only have a Type instance, you can’t use generics, but must resort to a weakly typed API. Fortunately, StructureMap offers a weakly typed overload of the GetInstance method, which allows you to implement the GetControllerInstance method, like this:
return (IController)this.container.GetInstance(controllerType);
The weakly typed overload of GetInstance enables you to pass the controllerType argument directly to StructureMap, but also requires you to explicitly cast the return value to IController.
No matter which overload of GetInstance you use, StructureMap guarantees that it will return an instance of the requested type or throw an exception if there are DEPENDENCIES that can’t be satisfied. When all required DEPENDENCIES have been properly configured, StructureMap can AUTO-WIRE the requested type.
In the previous example, this.container is an instance of StructureMap.IContainer. To be able to resolve the requested type, all loosely coupled DEPENDENCIES must previously have been configured. There are many ways to configure StructureMap; the next section reviews the most common ones.
11.1.2. Configuring the container
As we discussed in section 3.2, there are several conceptually different ways to configure a DI CONTAINER. Figure 11.3 reviews the options.
Figure 11.3. Conceptually different configuration options. CODE AS CONFIGURATION is strongly typed and tends to be explicit. XML, on the other hand, is late bound, but still explicit. AUTO-REGISTRATION instead relies on conventions that can be both strongly typed and more loosely defined.

Like other DI CONTAINERS with a long history, StructureMap started out with XML as the main configuration source. However, many teams soon learned that defining type registrations in XML is extraordinarily brittle, so today we prefer strongly typed configuration. This can be done with CODE AS CONFIGURATION, but is often more effectively done with more convention-based AUTO-REGISTRATION.
StructureMap supports all three approaches and even allows us to mix them all within the same container; in this regard, it gives us all we could ask for. In this section, you’ll see how you can use each of these three types of configuration sources.
Code as Configuration
In section 11.1.1, you already saw a brief glimpse of StructureMap’s strongly typed configuration API. Here we’ll examine it in greater detail.
There are several entry points into the configuration API. You’ve seen it invoked through explicit use of the Configure method:
var container = new Container();
container.Configure(r => r
    .For<IIngredient>()
    .Use<SauceBéarnaise>());
Another alternative is to specify the exact same code block directly when creating the Container instance:
var container = new Container(r => r
    .For<IIngredient>()
    .Use<SauceBéarnaise>());
The result is exactly the same; however, in this chapter, I’ll follow a consistent convention and prefer the Configure method over the constructor.
StructureMap makes extensive use of the Nested Closure pattern,[2] where configuration is defined by code blocks (popularly known as lambda expressions). As an example, this is the Configure method’s signature:
2 For a good introduction to Nested Closures, see Jeremy Miller, “Patterns in Practice: Internal Domain Specific Languages,” MSDN Magazine (January 2010). Also available online at http://msdn.microsoft.com/en-us/magazine/ee291514.aspx This article is written by one of the main authors of StructureMap and uses examples from the StructureMap API to illustrate the thinking behind the API design.
public void Configure(Action<ConfigurationExpression> configure);
The configure parameter is a delegate that takes a ConfigurationExpression as input. In the code examples in this chapter, this parameter is usually denoted by r, and I normally supply the delegate as a code block expressed using the r parameter.
As a side note: looking through the code samples on the StructureMap site and Jeremy Miller’s blog, sometimes the parameter name used in the code block is x, and sometimes it is registry. Because there’s no consistent precedent, I have chosen r (for registry) as the convention in this chapter; although r isn’t a particularly self-explanatory variable name, the tiny scope of the code blocks in question makes it more appropriate than a longer, less succinct name.[3]
3 Robert C. Martin, Clean Code: A Handbook of Agile Software Craftsmanship (Upper Saddle River, NJ: Prentice Hall, 2008), 312 (N5).
The ConfigurationExpression class contains many methods we can use to configure StructureMap; one of them is the For method we’ve already seen. As you’ll see later in this section, another is the Scan method with this signature:
public void Scan(Action<IAssemblyScanner> action);
Notice that the Scan method itself takes a delegate as input. When you supply a code block for the Scan method, you have a code block within a code block—hence the name Nested Closure.
Unlike Castle Windsor, mapping IIngredient to SauceBéarnaise in the same way as previously shown doesn’t preclude you from resolving SauceBéarnaise itself. That is, both sauce and ingredient will be appropriately resolved here:
container.Configure(r =>
    r.For<IIngredient>().Use<SauceBéarnaise>());
var sauce = container.GetInstance<SauceBéarnaise>();
var ingredient = container.GetInstance<IIngredient>();
If you recall the discussion in section 10.1.2, mapping IIngredient to Sauce-Béarnaise with Castle Windsor causes the concrete class (SauceBéarnaise) to “disappear,” and you have to use Type Forwarding to be able to resolve both. Such extra steps aren’t necessary with StructureMap, where you can resolve both IIngredient and SauceBéarnaise. In both cases, the returned objects are Sauce-Béarnaise instances.
In real applications, we always have more than one ABSTRACTION to map, so we must configure multiple mappings. We can do so in a single call to the Configure method, or using multiple successive calls. These two examples are equivalent:
container.Configure(r =>
{
    r.For<IIngredient>()
        .Use<SauceBéarnaise>();
    r.For<ICourse>()
        .Use<Course>();
});
|
container.Configure(r => r
    .For<IIngredient>()
    .Use<SauceBéarnaise>());
container.Configure(r => r
    .For<ICourse>()
    .Use<Course>());
|
Although the example to the right uses two successive calls to configure, the example to the left passes a code block with more statements to a single Configure method call. Both code examples end up registering correct mappings for both ICourse and IIngredient interfaces. However, configuring the same ABSTRACTION multiple times has some interesting results:
container.Configure(r =>
    r.For<IIngredient>().Use<SauceBéarnaise>());
container.Configure(r =>
    r.For<IIngredient>().Use<Steak>());
In this example, you register IIngredient twice. If you resolve IIngredient you get an instance of Steak. The last configuration wins, but previous configurations aren’t forgotten. StructureMap handles multiple configurations for the same ABSTRACTION well, but we’ll return to this topic in section 11.3.1.
There are more advanced options available for configuring StructureMap, but we can configure an entire application with the methods shown here. To save ourselves from too much explicit maintenance of container configuration, we could instead consider a more convention-based approach, using AUTO-REGISTRATION.
Auto-registration
In many cases, registrations will be similar. Such registrations are tedious to maintain and explicitly registering each and every component may not be the most productive approach.
Consider a library that contains a lot of IIngredient implementations. We can configure each class individually, but it will result in numerous similar-looking calls to the Configure method. What’s worse, every time we add a new IIngredient implementation, we must also explicitly configure it in the container if we want it to be available. It would be more productive to state that all implementations of IIngredient found in a given assembly should be registered.
This is possible with the Scan method, which is another example of StructureMap’s extensive use of delegates. The Scan method is available on the ConfigurationExpression class, which is already accessed via a code block. This is where we see the Nested Closure pattern in effect. This example configures all IIngredient implementations in a single swoop:
container.Configure(r =>
    r.Scan(s =>
    {
        s.AssemblyContainingType<Steak>();
        s.AddAllTypesOf<IIngredient>();
    }));
The Scan method is nested within the Configure code block. The s variable represents an IAssemblyScanner instance, which we can use to define how an assembly should be scanned and types configured.
The IAssemblyScanner instance provides several methods we can use to define which assemblies to scan and how to configure types from those assemblies. We can use the generic AssemblyContainingType method to identify an assembly from a representative type, but there are several other methods that enable us to provide an Assembly instance or even add all assemblies from a given file path.
A different set of methods gives us the ability to define which types to add and how to map them. The AddAllTypesOf method provides an easy shortcut to add all types that implement a given interface, but there are several other methods that enable us to accurately control how types are configured.
The previous example unconditionally configures all implementations of the IIngredient interface, but we can provide filters that enable us to select only a subset. Here’s a convention-based scan where you add only classes whose name starts with Sauce:
container.Configure(r =>
    r.Scan(s =>
    {
        s.AssemblyContainingType<Steak>();
        s.AddAllTypesOf<IIngredient>();
        s.Include(t => t.Name.StartsWith("Sauce"));
    }));
The only difference from the previous example is the addition of the Include method call, which introduces a third level of Nested Closure. The Include method takes a predicate that’s used to determine whether a given Type should be included or not. In this case, the answer is true whenever the Type’s Name starts with Sauce.
If we want full control over convention-based configuration, we can define a custom convention by implementing the IRegistrationConvention interface. The following listing shows the Sauce convention implemented as a custom convention.
Listing 11.1. Implementing a custom convention
public class SauceConvention : IRegistrationConvention
{
    public void Process(Type type, Registry registry)
    {
        var interfaceType = typeof(IIngredient);
        if (!interfaceType.IsAssignableFrom(type))
        {
            return;
        }
        if (!type.Name.StartsWith("Sauce"))
        {
            return;
        }

        registry.For(interfaceType).Use(type);
    }
}
The SauceConvention class implements IRegistrationConvention, which defines a single member. The Process method will be invoked by StructureMap for each type in the assembly defined in the Scan method, so you must explicitly provide a set of Guard Clauses that filters out all those types you don’t care about.
The Guard Clauses guarantee that any type that makes it past them is an IIngredient whose name starts with Sauce, so you can now register it with the registry. Notice, by the way, that the Registry is provided through METHOD INJECTION, which makes a lot of sense because IRegistrationConvention defines an add-in for StructureMap.
You can use the SauceConvention class in the Scan method like this:
container.Configure(r =>
    r.Scan(s =>
    {
        s.AssemblyContainingType<Steak>();
        s.Convention<SauceConvention>();
    }));
Notice that you still define the assembly outside of the convention. This lets you vary the source of the types to process independently of the convention itself. The SauceConvention is specified using the Convention method. This method requires that the IRegistrationConvention specified as the type argument has a default constructor, but there’s also a With method that takes an IRegistrationConvention instance that you can manually create any way you want.
Because you can use the Scan method to scan all assemblies in a specified folder, you can use it to implement add-in functionality where add-ins can be added without recompiling a core application. This is one way to implement late binding; another is to use the XML-based configuration API.
XML configuration
When we need to be able to change a configuration without recompiling the application, XML configuration is a good option.
Tip
Use XML configuration only for those types you need to change without recompiling the application. Use AUTO-REGISTRATION or CODE AS CONFIGURATION for the rest.
We can use specialized XML files to configure StructureMap, or we can embed the configuration in the standard application configuration file. However, surprisingly, the last option isn’t directly supported, so let’s first look at how to use a specialized XML file.
Configuration can be defined in XML and read using the AddConfigurationFromXmlFile method:
container.Configure(r =>
    r.AddConfigurationFromXmlFile(configName));
In this example, configName is a string which contains the name of the appropriate XML file. If you wish to use the standard application configuration file, you need to use the AppDomain API to figure out the path for the current configuration file:
var configName =
    AppDomain.CurrentDomain.SetupInformation.ConfigurationFile;
Note
Although the static ObjectFactory class directly supports reading configuration from App.config, this isn’t supported for Container instances. Using the AppDomain API to get the file name is the recommended workaround.[4]
4 This was confirmed in a Twitter conversation between Jeremy Miller and me: http://twitter.com/jeremydmiller/statuses/18134210141
In addition to pointing StructureMap to a file, you can supply XML configuration as an XmlNode:
container.Configure(r =>
    r.AddConfigurationFromNode(xmlNode));
This enables you to pull XML configuration from arbitrary places besides files, such as databases or embedded resources.
No matter the source of the XML, the schema remains the same. Here’s a simple configuration that maps IIngredient to Steak:
<StructureMap MementoStyle="Attribute">
  <DefaultInstance PluginType="Ploeh.Samples.MenuModel.IIngredient,
                   Ploeh.Samples.MenuModel"
                   PluggedType="Ploeh.Samples.MenuModel.Steak,
                   Ploeh.Samples.MenuModel" />
</StructureMap>
Ploeh.Samples.MenuModel"
PluggedType="Ploeh.Samples.MenuModel.Steak,
Ploeh.Samples.MenuModel" />
</StructureMap>
Notice that you must supply the assembly qualified type name for both the ABSTRACTION and the implementation—StructureMap calls these Plugins and Plugged types.
If you want to embed this XML in the application’s configuration file, you must also register the StructureMap element as a configuration section:
<configSections>
  <section name="StructureMap"
           type="StructureMap.Configuration.
           StructureMapConfigurationSection, StructureMap"/>
</configSections>
XML configuration is a good option when you need to change the configuration of one or more components without recompiling the application; however, because it tends to be quite brittle, you should reserve it for only those occasions and use either AUTO-REGISTRATION or CODE AS CONFIGURATION for the main part of the container’s configuration.
Tip
Remember that the last configuration of a type wins? You can use this behavior to overwrite hard-coded configuration with XML configuration. To do this, you must remember to read in the XML configuration after any other components have been configured.
In this section, we mainly looked at various configuration APIs for StructureMap. Although it’s certainly possible to write one big block of unstructured configuration code, it’s better to modularize configuration. StructureMap supports this through Registries.
11.1.3. Packaging configuration
It’s sometimes desirable to package configuration logic into reusable groups, and even when reuse itself isn’t your top priority, you may want to provide a bit of structure if you have a big and complex application to configure.
With StructureMap, we can package configuration into Registries, which are classes deriving from the concrete Registry class. Figure 11.4 shows the relationship between the Registry class and the Configure method used in section 11.1.2.
Figure 11.4. The Configure method of the Container class takes as input a delegate that operates on a ConfigurationExpression—in this chapter, we represent this ConfigurationExpression instance with the variable name r. The ConfigurationExpression class is a child class of the concrete Registry class.

Whenever you use the Configure method in this chapter, you represent the ConfigurationExpression instance with the variable name r. Most of the methods we invoke on r (such as the For and Scan methods) are defined on the Registry class.
To implement a Registry, we implement a class that derives from Registry. The following listing shows an example that configures a default ICourse and also adds IIngredient types from an assembly. It uses the same API that we already used in section 11.1.2, but now packaged within a separate class.
Whereas most of the configuration API (such as the For and Scan methods) are still available when we derive directly from Registry, we can’t use the methods defined directly on the ConfigurationExpression class. What functionality do we lose?
There are only five methods defined directly on ConfigurationExpression, and they fall into two categories:
- Reading configuration from XML
- Adding Registries
It isn’t likely that we’d want to add a Registry from within a Registry, so this doesn’t seem like that big of a deal.
Configuration defined in XML is a completely different way to express configuration. We express a certain part of an application’s configuration either in XML or by using the configuration API, but not both. In that light, the inability to define XML sources from a Registry isn’t much of a limitation.
Even so, wouldn’t it be possible to derive a Registry from ConfigurationExpression instead of directly from Registry? Unfortunately, we can’t, because the ConfigurationExpression constructor is internal.
The bottom line is that a Registry can’t derive from ConfigurationExpression, but must derive from Registry itself.
Listing 11.2. Implementing a Registry

The MenuRegistry class derives from Registry and defines the entire configuration in the constructor. From within the class you can access the entire public API of the
Registry class, so you can use the For and Scan methods in the same way you did in section 11.1.2 ![]() —the only difference is that, in this case, you’re not implementing an anonymous delegate, but rather a constructor. Instead
of the code block and the ubiquitous r variable you may have grown accustomed to by now, you access the API through the this variable.
—the only difference is that, in this case, you’re not implementing an anonymous delegate, but rather a constructor. Instead
of the code block and the ubiquitous r variable you may have grown accustomed to by now, you access the API through the this variable.
With the MenuRegistry in place, you can now add it to the container with the Configure method:
container.Configure(r =>
    r.AddRegistry<MenuRegistry>());
This generic version of the AddRegistry method requires that the Registry implementation has a default constructor, but there’s also a non-generic overload available that takes a Registry instance as input, giving us full control over how it’s created.
Note
The AddRegistry methods are two of the five methods defined directly on ConfigurationExpression, and not available from within a Registry.
You can also supply a Registry directly through a Container’s constructor:
var container = new Container(new MenuRegistry());
I prefer the Configure method because it lets me add more than one Registry in a sequence.
Tip
Registries let you package and structure your container configuration code. Use them instead of inline configuration, because it will make your COMPOSITION ROOT more readable.
With Registries, we can configure StructureMap with CODE AS CONFIGURATION or AUTO-REGISTRATION, whereas XML configuration must be imported directly via the Configure method. We can still mix both approaches, pulling some configuration from XML and other from one or more Registries:
container.Configure(r =>
{
    r.AddConfigurationFromXmlFile(configName);
    r.AddRegistry<MenuRegistry>();
});
Once the container is configured, you can start resolving services with it as described in section 11.1.1.
This section introduced the StructureMap DI CONTAINER and demonstrated the fundamental mechanics: how to configure the container and subsequently use it to resolve services. Resolving services is easily done with a single call to the GetInstance method, so the complexity involves configuring the container. This can be done in several different ways, including imperative code and XML. Until now, we’ve only looked at the most basic API so there are more advanced areas we have yet to cover. One of the most important topics is how to manage component lifetime.
11.2. Managing lifetime
In chapter 8, we discussed LIFETIME MANAGEMENT, including the most common conceptual lifetime styles, such as SINGLETON and TRANSIENT. StructureMap supports many different lifestyles and enables us to configure the lifetime of all services. The lifestyles shown in table 11.2 are available as part of the API.
Table 11.2. StructureMap lifestyles
|
Name |
Comments |
|---|---|
| PerRequest | StructureMap’s name for PER GRAPH. This is the default lifestyle. Instances aren’t tracked by the container. |
| Singleton | Standard SINGLETON. |
| HttpContext | StructureMap’s name for WEB REQUEST CONTEXT. |
| ThreadLocal | One instance is created per thread. |
| Hybrid | A combination of HttpContext and ThreadLocal. HttpContext is used when available (for example, when the container is hosted in a web application), but ThreadLocal is used as a fallback scope. |
| HttpSession | One instance is created per HTTP session. Use with caution. |
| HybridHttpSession | A combination of HttpSession and ThreadLocal. HttpSession is used when available (for example, when the container is hosted in a web application), but ThreadLocal is used as a fallback scope. |
| Unique | StructureMap’s name for TRANSIENT. |
StructureMap’s implementations of the different lifestyles are equivalent to the general lifestyles described in chapter 8, so I won’t spend much time on them in this chapter.
Tip
The default lifestyle is PER GRAPH. As we discussed in section 8.3.3, this offers a good balance between efficiency and safety. Still, when you have thread-safe services, SINGLETON is a more efficient lifestyle, but you must explicitly remember to configure those services like that.
In this section, you’ll see how to define lifestyles for components in both code and XML. As a more advanced scenario, you’ll also see how to implement a custom lifestyle to showcase that you’re not limited to the built-in lifestyles supplied by StructureMap. At the end of this section, you should be able to use StructureMap’s lifestyles in your own application.
Let’s start by reviewing how to configure lifestyles for components.
11.2.1. Configuring lifestyles
In this section, we’ll review how to manage component lifestyles with StructureMap. Lifestyles are configured as part of configuring components, and you can define them in both code and XML. We’ll look at each in turn.
Configuring lifestyles with code
Lifestyles are configured as part of the Configure API you use to configure components in general. It’s as easy as this:
container.Configure(r =>
    r.For<SauceBéarnaise>().Singleton());
This configures the concrete SauceBéarnaise class as a SINGLETON so that the same instance is returned each time SauceBéarnaise is requested. If you want to map an ABSTRACTION to a concrete class with a specific lifetime, the lifestyle declaration comes between the For and the Use method calls:
container.Configure(r =>
    r.For<IIngredient>().Singleton().Use<SauceBéarnaise>());
This maps IIngredient to SauceBéarnaise and also configures it as a SINGLETON. There are other methods, similar to the Singleton method, which enable you to declare many of the other lifestyles; but not all lifestyles have a dedicated method. All lifestyles can be configured using the general-purpose LifecycleIs method. As an example, the Unique lifestyle has no dedicated method, but can be configured like this:
container.Configure(r => r
    .For<SauceBéarnaise>()
    .LifecycleIs(new UniquePerRequestLifecycle()));
The LifecycleIs method takes an instance of ILifecycle, so you can pass in any class that implements that interface. As you’ll see in section 11.2.2, this is also how we configure a component with a custom lifetime.
All built-in StructureMap lifestyles have a corresponding ILifecycle implementation except the PER GRAPH lifestyle, which is the default. This lifestyle is normally implicitly configured by omitting an explicit lifestyle. All the configurations you saw in section 11.1 used the PER GRAPH lifestyle.
Tip
Omitting the lifestyle declaration implies PER GRAPH, which is the default. But null in place of an ILifecycle instance also implies PER GRAPH.
If we’re writing some general-purpose code that takes an ILifecycle instance and passes it to the LifecycleIs method, we can still use it to configure a component with the PER GRAPH lifestyle; null implies PER GRAPH, so these two examples are functionally equivalent:
container.Configure(r => r
    .For<IIngredient>()
    .LifecycleIs(null)
    .Use<SauceBéarnaise>());
|
container.Configure(r => r
    .For<IIngredient>()
    .Use<SauceBéarnaise>());
|
Tip
Although you can use null to imply the PER GRAPH lifestyle, you should prefer omitting the lifestyle declaration completely.
Whereas the API exposed by the Configure method and the ConfigurationExpression enables us to declare lifestyles explicitly, the convention-based Scan API doesn’t in itself. There’s no method on the IAssemblyScanner interface that gives us the option of broadly declaring a lifestyle for a set of components in one go.
However, we can implement a simple IRegistrationConvention that can do that. Here’s how you’d use one called SingletonConvention:
container.Configure(r =>
    r.Scan(s =>
    {
        s.AssemblyContainingType<Steak>();
        s.AddAllTypesOf<IIngredient>();
        s.Convention<SingletonConvention>();
    }));
Notice how this is the same configuration as the first AUTO-REGISTRATION example in section 11.1.2, only you added a line of code that adds the SingletonConvention shown in the listing that follows.
Listing 11.3. Implementing a lifestyle-declaring convention
public class SingletonConvention : IRegistrationConvention
{
    public void Process(Type type, Registry registry)
    {
        registry.For(type).Singleton();
    }
}
If you recall from the previous discussion about IRegistrationConvention in listing 11.1, the Process method is invoked for each included type in the assembly Scan operation. In this case, the only thing you need to do is to declare the lifestyle for each using the Singleton method. This configures each type as a SINGLETON.
Using CODE AS CONFIGURATION, we can configure components with various lifestyles in any way we want. Whereas this is by far the most flexible way to configure components, we sometimes need to resort to XML for late binding purposes. In that case, we can also declare lifestyles.
Configuring lifestyles with XML
When we need to define components in XML, we’ll also want to be able to configure their lifestyles in the same place. This is easily done as part of the XML schema introduced in section 11.1.2. You can use the optional Scope attribute to declare the lifestyle:
<DefaultInstance PluginType="Ploeh.Samples.MenuModel.IIngredient,
                 Ploeh.Samples.MenuModel"
                 PluggedType="Ploeh.Samples.MenuModel.Steak,
                  Ploeh.Samples.MenuModel"
                 Scope="Singleton" />
Compared to the example in section 11.1.2, the only difference is the added Scope attribute that configures the instance as a SINGLETON. When you previously omitted the Scope attribute, StructureMap’s PER GRAPH default was automatically used.
In both code and XML, it’s easy to configure lifestyles for components. In all cases it’s done in a rather declarative fashion. Although configuration is easy, you must not forget that some lifestyles involve long-lived objects that use memory as long as they’re around.
Preventing memory leaks
Like any other DI CONTAINER, StructureMap creates object graphs for us. But it doesn’t track the created objects for us. It may keep track of those objects for its own purposes, but that depends on the object lifetime. As an example, to implement the SINGLETON scope, it must keep a reference to the created instance. This is also the case for the HttpContext lifestyle where all instances are stored in HttpContext.Current.Items; however, when the HTTP request finishes, all these instances go out of scope and are eligible for garbage collection.
On the other hand, the PER GRAPH and TRANSIENT lifestyles don’t keep track of the objects that StructureMap creates. As you saw in listings 8.7 and 8.8, object instances are created and returned with no internal tracking. This has some advantages and disadvantages.
Because StructureMap doesn’t hold on to instances unnecessarily, the risk of inadvertent memory leaks is much smaller. With a container like Castle Windsor, memory leaks are guaranteed if we forget to call the Release method for all resolved object graphs. This isn’t the case with StructureMap because objects will automatically be garbage-collected as they go out of scope.
The disadvantage is that disposable objects can’t be deterministically disposed of. Because we can’t explicitly release an object graph, we can’t dispose of any disposable objects. This means that it becomes even more important to wrap disposable APIs in non-disposable services, as discussed in section 6.2.1.
In short, StructureMap is well behaved and allows objects to be garbage-collected when they go out of scope in our code, but the requirement is that our own classes must be just as well behaved. We can’t rely on the container or the calling code to dispose of any services, so we must keep usage of disposable objects within single methods.
The built-in lifestyles of StructureMap are a rather comprehensive collection that should meet most daily needs. Still, in the rare cases where we need a specialized lifestyle, we still have the option to create one ourselves.
11.2.2. Developing a custom lifestyle
In most cases, we should be able to get by with the comprehensive selection of lifestyles already offered by StructureMap, but if we have special needs, it’s possible to implement a custom lifestyle. In this section, you’ll see how to do this. After a brief review of the SEAM that makes this possible, we’ll spend most of the time going through an example.
Understanding the lifestyle API
In section 11.2.1, you already got a glimpse of StructureMap’s lifestyle API. The LifecycleIs method takes an instance of the ILifecycle interface, which models how lifestyles interact with the rest of StructureMap:
public interface ILifecycle
{
    string Scope { get; }
    void EjectAll();
    IObjectCache FindCache();
}
Of those three methods, the FindCache method is the fulcrum. It returns a cache that StructureMap uses to look up and insert objects with that particular lifestyle. The ILifecycle interface mostly serves as an Abstract Factory[5] for IObjectCache instances that contain the implementation of the lifestyle. This interface is far more complex, but not terribly difficult to implement:
5 Erich Gamma et al., Design Patterns: Elements of Reusable Object-Oriented Software (New York: Addison-Wesley, 1994), 87.
public interface IObjectCache
{
    object Locker { get; }
    int Count { get; }
    bool Has(Type pluginType, Instance instance);
    void Eject(Type pluginType, Instance instance);
    object Get(Type pluginType, Instance instance);
    void Set(Type pluginType, Instance instance, object value);
    void DisposeAndClear();
}
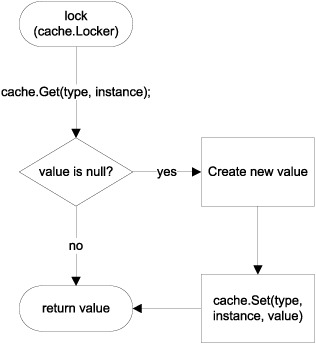
Most of the methods in this interface deal with looking up, supplying, or evicting an instance based on a Type and an Instance. Figure 11.5 illustrates how StructureMap interacts with an IObjectCache implementation.
Figure 11.5. StructureMap interacts with the IObjectCache interface by first invoking the Get method on a cache object. If the cache returns a value, this value is used immediately. If not, StructureMap creates the new value and adds it to the cache before returning it.
Note
The mechanism illustrated in figure 11.5 is similar to the interaction between Unity and ILifetimePolicy as shown in figure 14.6.
StructureMap first attempts to get the requested instance from the Get method. If this method returns null for the provided Type and Instance, StructureMap creates the requested instance and adds it to the cache through the Set method before returning it.
Let’s see how this works in an example.
Developing a caching lifestyle
In this example, you’ll develop the same caching lifestyle that you also created for Castle Windsor in section 10.2.3. In short, this lifestyle caches and reuses instances for a time before releasing them.
Warning
This sample code isn’t thread-safe, but a proper production implementation should be, because it’s likely that several threads would simultaneously attempt to resolve objects from the container.
Let’s start with the easy part: the following listing shows the implementation of the ILifecycle interface.
Listing 11.4. Implementing ILifecycle
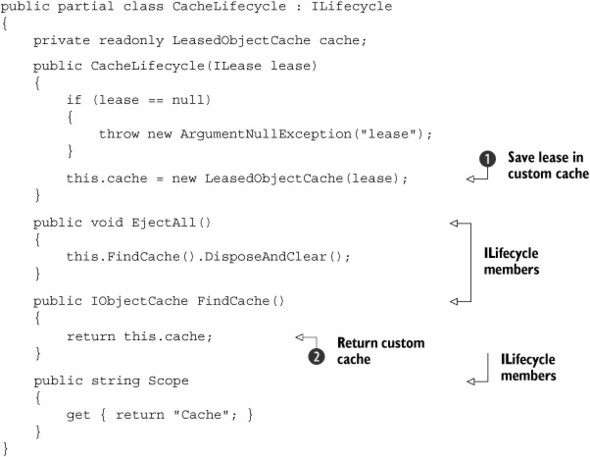
The CacheLifecycle class implements the ILifecycle interface as required. It uses CONSTRUCTOR INJECTION to receive an ILease instance. The ILease interface is a local helper interface that you introduce to implement the CacheLifestyle. It was initially introduced in section 10.2.3 and has nothing to do with StructureMap or any other particular DI CONTAINER.
Note
For an example of an ILease implementation, see section 10.2.3.
Instead of saving the ILease instance directly in a private field, you immediately wrap it ![]() in a custom implementation of the IObjectCache interface called LeasedObjectCache. This is the cache you return
in a custom implementation of the IObjectCache interface called LeasedObjectCache. This is the cache you return ![]() from the FindCache method.
from the FindCache method.
Note
Contrast the constructor in listing 11.4 with the much more complicated code from listing 10.2. This clearly illustrates the superiority of CONSTRUCTOR INJECTION over METHOD INJECTION.
Although the CacheLifecycle provides the root ILifecycle interface, the real implementation is provided by the custom LeasedObjectCache class, which implements the IObjectCache interface.
StructureMap already provides an implementation of IObjectCache called MainObjectCache. Unfortunately, MainObjectCache doesn’t have any virtual members that we can override to implement our caching lifestyle. Instead, we can decorate MainObjectCache with the custom LeasedObjectCache. The following listing shows the constructor.
Listing 11.5. Constructing LeasedObjectCache
private readonly IObjectCache objectCache;
private readonly ILease lease;

public LeasedObjectCache(ILease lease)
{
    if (lease == null)
    {
        throw new ArgumentNullException("lease");
    }

    this.lease = lease;
    this.objectCache = new MainObjectCache();
}
In the LeasedObjectCache constructor, you use standard CONSTRUCTOR INJECTION to inject an ILease instance. The LeasedObjectCache is a Decorator[6] of MainObjectCache so you create an instance and assign it to a private field. Notice that the objectCache field is declared as IObjectCache, so you could easily extend the LeasedObjectCache class with an overloaded constructor that enabled you to inject any IObjectCache implementation from the outside.
6 Erich Gamma et al., Design Patterns: Elements of Reusable Object-Oriented Software (New York: Addison-Wesley, 1994), 175.
The combination of a decorated IObjectCache and an ILease member makes it close to trivial to implement the LeasedObjectCache class. The following listing shows the implementation of the significant Get and Set methods, but the rest of the implementation follows the same blueprint.
Listing 11.6. Implementing Get and Set
public object Get(Type pluginType, Instance instance)
{
    this.CheckLease();
    return this.objectCache.Get(pluginType, instance);
}

public void Set(Type pluginType, Instance instance, object value)
{
    this.objectCache.Set(pluginType, instance, value);
    this.lease.Renew();
}

private void CheckLease()
{
    if (this.lease.IsExpired)
    {
        this.objectCache.DisposeAndClear();
    }
}
When StructureMap invokes the Set method, you first ensure that the cache doesn’t hold any stale instances. When that method returns, you can be certain that if the decorated cache holds the requested instance, you can safely return it.
Conversely, when the Set method is invoked, you immediately delegate the method to the decorated object cache. Because you understand that StructureMap uses IObjectCache as shown in figure 11.5, you know that the Set method is only invoked when the container has created a new instance because no cached instance was available. This means that the instance supplied by the value parameter represents a newly created instance, so you can safely renew the lease.
The CheckLease helper method is invoked by many of the IObjectCache member implementations in ways similar to the Get method. It flushes the decorated cache if the lease has expired.
Now that you know how to implement a custom lifestyle and any custom DEPENDENCIES it might have, you only need to learn how to use it.
Configuring components with a custom lifestyle
Using the CacheLifecycle when configuring a component is easy and is done the same way you’d configure any other lifestyle:
var lease = new SlidingLease(TimeSpan.FromMinutes(1));
var cache = new CacheLifecycle(lease);
container.Configure(r => r
    .For<IIngredient>()
    .LifecycleIs(cache)
    .Use<SauceBéarnaise>());
This configures the container to use a CacheLifecycle with a one-minute timeout for the IIngredient interface. Within a one-minute time span, you can request as many object graphs as you want, and you’ll always get the same SauceBéarnaise back whenever the graph contains an IIngredient instance. When that minute is up, subsequent requests will get a new SauceBéarnaise instance.
It’s worth noting that the way CacheLifecycle is implemented, it can be used to bundle together several instances with the same lease, like this:
container.Configure(r =>
{
    r.For<IIngredient>().LifecycleIs(cache).Use<Steak>();
    r.For<ICourse>().LifecycleIs(cache).Use<Course>();
});
This will cause the ICourse and IIngredient instances to expire and renew at the same time. This may sometimes be desirable and sometimes not. An alternative is to use two separate instances of CacheLifecycle. As the following listing shows, this also enables you to use two different timeouts.
Listing 11.7. Using different cache lifestyles for each Instance
container.Configure(r => r
    .For<IIngredient>()
    .LifecycleIs(
        new CacheLifecycle(
            new SlidingLease(
                TimeSpan.FromHours(1))))
    .Use<Steak>());
container.Configure(r => r
    .For<ICourse>()
    .LifecycleIs(
        new CacheLifecycle(
            new SlidingLease(
                TimeSpan.FromMinutes(15))))
   .Use<Course>());
The first cache is defined with a one-hour timeout. No matter how many or few times you need an IIngredient, you’ll get the same instance within a time span of one hour. When that hour is up, the old instance is discarded and a new instance is used indiscriminately for the next hour.
The cache for ICourse is a different instance configured with a 15-minute timeout. Within those 15 minutes, you’ll get the same instance, but when they’re up, a new instance is used. It’s worth noting that even when the ICourse times out, the IIngredient chugs along on its longer lease. Although they both use the same lifestyle type, they’re on different schedules.
In listing 11.7 you used different timeouts, but the SlidingLease type in both cases. This isn’t a requirement—you could’ve used two widely different ILease implementations for each instance.
Implementing a custom lifestyle for StructureMap isn’t particularly difficult. It may look complex on paper, but if you were to look at it in an IDE, you would quickly realize that it consists of only two classes where the most complex method (CheckLease) has a single if statement and two lines of code.
Even so, it should be a rare occurrence when we need to implement a custom lifestyle for StructureMap. The comprehensive set of built-in lifestyles should meet our everyday needs.
This completes our tour of LIFETIME MANAGEMENT with StructureMap. Components can be configured with mixed lifestyles and this is even true when we register multiple implementations of the same ABSTRACTION. We have yet to look at how to work with multiple components, so let’s now turn our attention in that direction.
11.3. Working with multiple components
DI CONTAINERS thrive on distinctness but have a hard time with ambiguity. When using CONSTRUCTOR INJECTION, a single constructor is preferred over overloaded constructors because it’s evident which constructor to use when there’s no choice. This is also the case when mapping from ABSTRACTIONS to concrete types. If we attempt to map multiple concrete types to the same ABSTRACTION, we introduce ambiguity.
Despite the undesirable qualities of ambiguity, we often need to work with multiple implementations of a single interface. This can be the case in these situations:
- Different concrete types should be used for different consumers.
- DEPENDENCIES are sequences.
- Decorators are in use.
In this section, we’ll look at each of these cases and see how StructureMap addresses each one in turn. When we’re done, you should be able to register and resolve components even when multiple implementations of the same ABSTRACTION are in play.
Let’s first see how we can provide more fine-grained control than what AUTO-WIRING provides.
11.3.1. Selecting among multiple candidates
AUTO-WIRING is convenient and powerful but provides us with little control. As long as all ABSTRACTIONS are distinctly mapped to concrete types we have no problems, but as soon as we introduce more implementations of the same interface, ambiguity rears its ugly head.
Let’s first recap how StructureMap deals with multiple registrations of the same ABSTRACTION.
Configuring multiple implementations of the same plug-in
As you saw in section 11.1.2, you can configure multiple plug-ins for the same service:
container.Configure(r =>
{
    r.For<IIngredient>().Use<SauceBéarnaise>();
    r.For<IIngredient>().Use<Steak>();
});
This example registers both the Steak and SauceBéarnaise classes with the IIngredient plug-in. The last registration wins, so if you resolve IIngredient with container.GetInstance<IIngredient>() you’ll get a Steak instance. However, a call to container.GetAllInstances<IIngredient>() returns an IList<IIngredient> that contains both Steak and SauceBéarnaise. That is, subsequent configurations aren’t forgotten but are harder to get at.
Tip
The last configuration for a given type wins. It defines the default instance for that type.
If there are configured instances of a plug-in that can’t be resolved when GetAllInstances is invoked, StructureMap throws an exception explaining that there are DEPENDENCIES which can’t be satisfied. This is consistent with the behavior of the GetInstance method, but different from the way that Castle Windsor or MEF behaves.
The following listing shows how you can provide hints that can later be used to select among different configured instances.
Listing 11.8. Naming Instances
container.Configure(r =>
{
    r.For<IIngredient>()
        .Use<SauceBéarnaise>()
        .Named("sauce");
    r.For<IIngredient>()
        .Use<Steak>()
        .Named("meat");
});
You can give each configured instance a unique name that you can later use to distinguish each from other similar instances.
Given the named instances in listing 11.8, you can resolve both Steak and Sauce-Béarnaise like this:
var meat = container.GetInstance<IIngredient>("meat");
var sauce = container.GetInstance<IIngredient>("sauce");
Notice that you supply the same key you used to name the instance during configuration.
Given that you should always resolve services in a single COMPOSITION ROOT, you should normally not expect to deal with such ambiguity on this level.
Tip
If you find yourself invoking the GetInstance method with a specific key, consider whether you can change your approach so it’s less ambiguous.
You can use named instances to select among multiple alternatives when configuring DEPENDENCIES for a given plug-in.
Configuring named dependencies
As useful as AUTO-WIRING is, sometimes we need to override the normal behavior to provide fine-grained control over which DEPENDENCIES go where. It may also be that we need to address an ambiguous API. As an example, consider this constructor:
public ThreeCourseMeal(ICourse entrée,
    ICourse mainCourse, ICourse dessert)
In this case, you have three identically typed DEPENDENCIES that each represents a different concept. In most cases, you want to map each of the DEPENDENCIES to a separate type. The following listing shows how you could choose to configure the ICourse mappings.
Listing 11.9. Configuring named courses
container.Configure(r => r
    .For<ICourse>()
    .Use<Rillettes>()
    .Named("entrée"));
container.Configure(r => r
    .For<ICourse>()
    .Use<CordonBleu>()
    .Named("mainCourse"));
container.Configure(r => r
    .For<ICourse>()
    .Use<MousseAuChocolat>()
    .Named("dessert"));
Like listing 11.8, you register three named components, mapping the Rilettes to an instance named “entrée,” CordonBleu to an instance named “mainCourse,” and the MousseAuChocolat to an instance named “dessert.”
Given this configuration, you can now register the ThreeCourseMeal class, as shown in the following listing.
Listing 11.10. Overriding AUTO-WIRING
container.Configure(r => r
    .For<IMeal>()
    .Use<ThreeCourseMeal>()
    .Ctor<ICourse>("entrée").Is(i =>
        i.TheInstanceNamed("entrée"))
    .Ctor<ICourse>("mainCourse").Is(i =>
        i.TheInstanceNamed("mainCourse"))
    .Ctor<ICourse>("dessert").Is(i =>
        i.TheInstanceNamed("dessert")));
You start the configuration expression as usual, by mapping the IMeal interface to the concrete ThreeCourseMeal. But then you extend the expression with the Ctor method. The Ctor (short for constructor) method enables you to express how a constructor parameter of a given type should be mapped. In the cases where there’s only a single parameter of a given type, you can use an overload where you don’t have to supply the parameter name. However, because the ThreeCourseMeal has three ICourse parameters, you need to identify the parameter by its name, “entrée.”
The Ctor method returns an object that enables you to define how the constructor parameter will be populated. The Is method allows you to use an IInstanceExpression<ICourse> to pick a named instance—yet another example of the Nested Closure pattern. You can then repeat this coding idiom for the next two parameters.
Note
In this example, I gave the configuration instances the same names as the parameters, but that isn’t required. I could’ve named the instances whatever I liked, whereas the parameter names are obviously bound by the names of the real constructor parameters.
Warning
Identifying parameters by their names is convenient but not refactoring-safe. If we rename a parameter, we may break the configuration (depending on your refactoring tool).
Overriding AUTO-WIRING by explicitly mapping parameters to named instances is a universally applicable solution. We can do this even if we configure the named instances in one expression and the constructor in a completely different expression because the only identification that ties a named instance together with a parameter is the name. This is always possible but can be brittle if we have a lot of names to manage.
Wiring Instance references
Whenever we have the opportunity to define the instances and the constructor in a single expression, we can do it more elegantly. The listing that follows shows how.
Listing 11.11. Using Instance references to override AUTO-WIRING
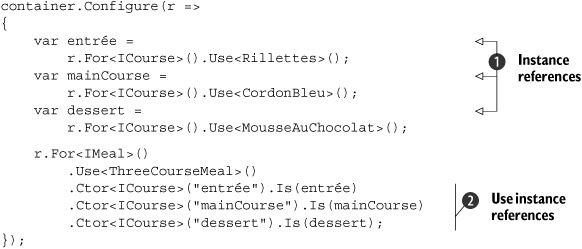
Until now, we have been ignoring that the typical For/Use method chain returns a result; we’ve had no use for it. But the returned values are SmartInstance<T> instances, which you can use as references to the configurations you made ![]() . Instead of the instance names you had to use in listing 11.10, you can use these references directly with one of the many overloads of the Is method
. Instead of the instance names you had to use in listing 11.10, you can use these references directly with one of the many overloads of the Is method ![]() , matching each local variable with the appropriate named constructor parameter.
, matching each local variable with the appropriate named constructor parameter.
Although this feature enables us to get rid of the instance names, we’re still left with magic strings that identify the constructor parameters. This API depends on a text-based match between the configuration and the parameter names, so it’s fragile and best avoided when possible. If we feel compelled to use it only to deal with ambiguity, a better solution is to design the API to get rid of that ambiguity. It often leads to a better overall design.
In the next section, you’ll see how you can use the less ambiguous and more flexible approach where you allow any number of courses in a meal. To this end, you must learn how StructureMap deals with lists and sequences.
11.3.2. Wiring sequences
In section 10.3.2, we discussed how to refactor an explicit ThreeCourseMeal class to the more general-purpose Meal class with this constructor:
public Meal(IEnumerable<ICourse> courses)
In this section, we’ll look at how you can configure StructureMap to wire up Meal instances with appropriate ICourse DEPENDENCIES. When we’re done, you should have a good idea of the options available to you when you need to configure instances with sequences of DEPENDENCIES.
Auto-Wiring sequences
StructureMap has a rather good understanding of sequences. If we want to use all configured instances of a given plug-in, AUTO-WIRING just works. As an example, given the configured ICourse instances in listing 11.9, you can configure the IMeal plug-in like this:
container.Configure(r => r.For<IMeal>().Use<Meal>());
Notice that this is a completely standard mapping from an ABSTRACTION to a concrete type. StructureMap will automatically understand the Meal constructor and determine that the correct course of action is to resolve all ICourse instances. When you resolve IMeal you get a Meal instance with the ICourse instances from listing 11.9: Rillettes, CordonBleu, and MousseAuChocolat.
Note
Contrast the ease of AUTO-WIRING sequences in StructureMap with section 10.3.2, which shows how hard it is to enable the same functionality in Castle Windsor.
StructureMap automatically handles sequences, and unless we specify otherwise, it does what we expect it to do: it resolves a sequence of DEPENDENCIES to all registered instances of that type. Only when we need to explicitly pick only some instances from a larger set do we need to do more. Let’s see how to do that.
Picking only some instances from a larger set
StructureMap’s default strategy of injecting all instances is often the correct policy, but as figure 11.6 shows, there may be cases where we want to pick only some configured instances from the larger set of all configured instances.
Figure 11.6. In the situation on the left, we wish to explicitly select only certain DEPENDENCIES from the larger list of all configured instances. This is different from the situation to the right, where we indiscriminately want them all.

When we previously let StructureMap AUTO-WIRE all configured instances, it corresponded to the situation depicted on the right side of figure 11.6. If we want to configure an instance like the left side, we must explicitly define which instances should be used.
When we have the option of configuring the DEPENDENCIES and the consumer in a single invocation of the Configure method, we can use referenced instances as you saw in listing 11.11. The following listing shows the equivalent configuration for the scenario where the constructor expects a sequence of DEPENDENCIES.
Listing 11.12. Using Instance references to inject a sequence
container.Configure(r =>
{
    var entrée = r.For<ICourse>().Use<Rillettes>();
    var entrée1 = r.For<ICourse>().Use<LobsterBisque>();
    var mainCourse = r.For<ICourse>().Use<CordonBleu>();
    var dessert = r.For<ICourse>().Use<MousseAuChocolat>();

    r.For<IMeal>().Use<Meal>()
        .EnumerableOf<ICourse>()
        .Contains(entrée, mainCourse, dessert);
});
Like the code in listing 11.11, you assign a variable to each Instance returned by the Use method. Notice that you configure four ICourse instances even though you only use three of them for the IMeal instance. However, you might need the mapping from ICourse to LobsterBisque for some other purpose not shown here. Because you don’t use the resulting entrée1 variable, you could’ve omitted it completely, but I chose to include it to keep the code consistent.
Because the Meal constructor takes an IEnumerable<ICourse> as input, you can use the EnumerableOf method to denote a sequence of ICourse instances, explicitly defined in the Contains method, where you supply the three Instance references you want to use.
This approach works well when we have the opportunity to configure all relevant ICourse instances in the same code block as the IMeal configuration. This isn’t always possible—it could be that configuration of ICourse instances are spattered over several different Registries from different assemblies. When that’s the case, we can still resort to referring to them by name. The following listing shows one way to do that.
Listing 11.13. Injecting named Instances into a sequence
container.Configure(r => r
    .For<IMeal>()
    .Use<Meal>()
    .EnumerableOf<ICourse>().Contains(i =>
    {
        i.TheInstanceNamed("entrée");
        i.TheInstanceNamed("mainCourse");
        i.TheInstanceNamed("dessert");
    }));
Given a set of named instances similar to those created in listing 11.9, you can refer to each named instance when configuring the IMeal instance. As you did in listing 11.12, you use the EnumerableOf/Contains method chain to denote a sequence of DEPENDENCIES. This time you don’t have Instance variables, so instead you must look them up by name. An overload to the Contains method enables you to supply a Nested Closure that expresses which named instances you wish to be injected into the Meal instance.
StructureMap understands sequences; unless we need to explicitly pick only some instances from all plug-ins of a given type, StructureMap automatically does the right thing. AUTO-WIRING works not only with single instances, but also for sequences, and the container maps a sequence to all configured instances of the corresponding type.
Consumers that rely on sequences of DEPENDENCIES may be the most intuitive users of multiple instances of the same ABSTRACTION, but before we leave this subject completely, we need to look at one last—and perhaps a bit surprising—case, where multiple instances come into play.
11.3.3. Wiring Decorators
In section 9.1.2, we discussed how the Decorator design pattern is useful when implementing CROSS-CUTTING CONCERNS. By definition, Decorators introduce multiple types of the same ABSTRACTION. At the very least, we have two implementations of an ABSTRACTION: the Decorator itself and the decorated type. If we stack the Decorators, we may have even more.
This is another example of having multiple registrations of the same service. Unlike the previous sections, these registrations aren’t conceptually equal, but rather are DEPENDENCIES of each other. In this section, you’ll see how to configure Structure-Map to deal with this pattern. There are many ways to configure a Decorator, and we’ll look at three different ways of achieving the same result. Each has its own advantages and disadvantages.
Decorating with Instance references
Let’s see how we can configure the Breading class, which is a Decorator of IIngredient. It uses CONSTRUCTOR INJECTION to receive the instance it should decorate:
public Breading(IIngredient ingredient)
To make a Cotoletta, you’d like to decorate a VealCutlet (another IIngredient) with the Breading class. One way to do this is to use Instance references within a single Configure method:
container.Configure(r =>
{
    var cutlet = r.For<IIngredient>().Use<VealCutlet>();
    r.For<IIngredient>().Use<Breading>()
        .Ctor<IIngredient>().Is(cutlet);
});
As you already saw in listing 11.11 and 11.12, you can use the return value from the Use method to capture a reference to an Instance. The cutlet variable represents the configured mapping from IIngredient to VealCutlet and you can use it to express that this is the appropriate Instance to use for the Breading class’s IIngredient constructor parameter. Because the last configuration wins, the Breading Instance is now the default Instance.
When you ask the container to resolve IIngredient, it will return an object based on the default Instance. This is the Breading Instance where you provided the extra hint that it should resolve the cutlet Instance for the Breading class’s IIngredient parameter. The end result is a Breading instance that contains a VealCutlet instance.
Passing objects around is safer than passing strings around, so we should prefer to use this technique whenever we have the option to configure Decorator and the decorated type in a single method call. However, that’s not always possible.
Decorating with named instances
Sometimes we have to resort to Instance names because we configure the involved collaborators in different method calls—perhaps even in different Registries implemented in separate assemblies. In such cases, we can’t pass objects around, but must rely on strings even though they’re easier to mess up.
Let’s assume that you have already configured a VealCutlet like this:
container.Configure(r => r
    .For<IIngredient>()
    .Use<VealCutlet>()
    .Named("cutlet"));
Because you know that the name of the instance is cutlet, you can use it to configure the Breading class:
container.Configure(r => r
    .For<IIngredient>()
    .Use<Breading>()
    .Ctor<IIngredient>()
    .Is(i => i.TheInstanceNamed("cutlet")));
As you did in listings 11.10 and 11.13, you use the overload of the Is method that enables you to provide a code block that identifies a named instance. Once again, you see the Nested Closure pattern in action.
If you compare the two previous examples, you won’t notice that they’re similar. In both cases you used the Ctor<T> method to represent a constructor parameter. The only difference is how you identify the parameter with the Is method.
The Ctor/Is method chain has the advantage in that we can use it to specify a single constructor parameter even if the constructor in question has more than one parameter. All the parameters we don’t configure with the Ctor method will be AUTO-WIRED according to StructureMap’s default algorithms. This is useful if we only want to explicitly configure a single among several parameters.
However, it isn’t a strongly typed solution. There’s no guarantee that the constructor in question has a parameter of the identified type. It could have, but then we changed the design, and now it takes parameters of a different type. The compiler doesn’t know, because it takes our word when we invoke the Ctor method with a particular type argument.
Another alternative offers a more strongly typed approach.
Decorating with delegates
Instead of referring to a constructor parameter by type and name, we can write a strongly typed code block that uses the constructor. Although it also has disadvantages we’ll return to, the benefit is that it’s strongly typed and, by that token, safer from a design-time perspective.
This sounds a bit abstract, so let’s see an example of how to configure the Cotoletta in this way:
container.Configure(r => r
    .For<IIngredient>().Use<VealCutlet>()
    .EnrichWith(i => new Breading(i)));
The EnrichWith method is a member of the generic SmartInstance<T> class returned by the Use method. In this case, you invoke the Use method with the VealCutlet type argument, which returns an instance of SmartInstance<VealCutlet>. The EnrichWith method takes a delegate that takes a VealCutlet as input and returns an object.
You can match this delegate with a code block that takes VealCutlet as input. The compiler infers that the variable i is an instance of VealCutlet, so you can now implement the code block by invoking the Breading constructor with that VealCutlet variable.
When you ask the container to resolve IIngredient, it will first create a VealCutlet instance and then pass that instance as input to the code block you defined with the EnrichWith method. When the code block executes, the VealCutlet instance is passed to the Breading constructor and the Breading instance is returned.
The advantage of this is that in the code block you write code that uses the Breading constructor. This is a line of code like any other line of code, so it’s checked by the compiler. This provides you with a great deal of confidence that if the Configure method compiles, the VealCutlet will be correctly decorated.
Although strong typing is safer, it also requires more maintenance. If you subsequently decide to add another constructor parameter to the Breading constructor, the code block no longer compiles, and you must manually address the issue. This wouldn’t be necessary if you’d used the Ctor<T> method, because StructureMap would’ve been able to sort out the new parameter for you, with AUTO-WIRING.
As you’ve seen, there are several different ways to configure Decorators. The strongly typed approach is a bit safer but may require more maintenance. The more weakly typed API is more flexible and enables StructureMap to deal with changes to our API, but at the expense of less type safety.
Note
In this section we didn’t discuss runtime INTERCEPTION. Although StructureMap has SEAMS that enable INTERCEPTION, it has no built-in support for dynamically emitting Proxies. It’s possible to use those SEAMS to use another library (such as Castle Dynamic Proxy) to emit such classes, but because this isn’t part of StructureMap itself, it’s beyond the scope of this chapter.
StructureMap lets us work with multiple instances in several different ways. We can configure instances as alternatives to each other, as peers resolved as sequences, or as hierarchical Decorators. In many cases, StructureMap will figure out what to do, but we can always explicitly define how services are composed if we need more explicit control.
This may also be the case when we need to deal with APIs that deviate from CONSTRUCTOR INJECTION. So far, you’ve seen how to configure instances, including how to specify lifetime styles and how to deal with multiple components, but until now you’ve allowed the container to wire DEPENDENCIES by implicitly assuming that all components use CONSTRUCTOR INJECTION. This isn’t always the case; in the next section, we’ll review how to deal with classes that must be instantiated in special ways.
11.4. Configuring difficult APIs
Until now, we’ve considered how to configure components that use CONSTRUCTOR INJECTION. One of the many benefits of CONSTRUCTOR INJECTION is that DI CONTAINERS such as StructureMap can easily understand how to compose and create all classes in a dependency graph.
This becomes less clear when APIs are less well behaved. In this section, you’ll see how to deal with primitive constructor arguments, static factories, and PROPERTY INJECTION. These all require special attention. Let’s start by looking at classes that take primitive types, such as strings or integers as constructor arguments.
11.4.1. Configuring primitive Dependencies
As long as we inject ABSTRACTIONS into consumers, all is well. It becomes more difficult when a constructor depends on a primitive type, such as a string, number, or enum. Often, this is the case for data access implementations that take a connection string as constructor parameter, but it’s also a more general issue that applies to strings and numbers.
Conceptually, it doesn’t make much sense to register a string or number as a component in a container, and with StructureMap it doesn’t even work. If we try to resolve a component with a primitive DEPENDENCY, we’ll get an exception, even though the primitive type was previously registered.
Consider, as an example, this constructor:
public ChiliConCarne(Spiciness spiciness)
In this example, Spiciness is an enum:
public enum Spiciness
{
    Mild = 0,
    Medium,
    Hot
}
Warning
As a rule of thumb, enums are code smells and should be refactored to polymorphic classes;[7] here, they serve us well for this example.
7 Martin Fowler et al., Refactoring: Improving the Design of Existing Code (New York: Addison-Wesley, 1999), 82.
You need to explicitly tell StructureMap how to resolve the spiciness constructor parameter. This example shows how it’s possible to use the Ctor<T> method to directly provide a value for a constructor parameter:
container.Configure(r => r
    .For<ICourse>()
    .Use<ChiliConCarne>()
    .Ctor<Spiciness>()
    .Is(Spiciness.Hot));
In section 11.3, you repeatedly saw how the Ctor<T> method can be used to override AUTO-WIRING for a particular constructor parameter. Here you implicitly state that you expect that the ChiliConCarne constructor only has a single Spiciness parameter—otherwise the Ctor<spiciness>() method call would be ambiguous, and you’d have to supply a parameter name as well.
The Ctor<T> method returns a SmartInstance<T> with various methods. There are five overloads of the Is method, and one of them enables you to provide an instance of the appropriate type. The type argument T is Spiciness in this example, so you provide Spiciness.Hot as a concrete value.
As we discussed in section 11.3, using the Ctor<T> method has advantages and disadvantages. If we want a more strongly typed configuration that invokes the constructor or a static factory, we can do this as well.
11.4.2. Creating objects with code blocks
Some classes can’t be instantiated through a public constructor. Instead, we must use some sort of factory to create instances of the type. This is always troublesome for DI CONTAINERS because, by default, they look after public constructors.
Consider this example constructor for the public JunkFood class:
internal JunkFood(string name)
Even though the JunkFood class is public, the constructor is internal. Obviously, instances of JunkFood should be created through the static JunkFoodFactory class:
public static class JunkFoodFactory
{
    public static IMeal Create(string name)
    {
        return new JunkFood(name);
    }
}
From StructureMap’s perspective, this is a problematic API because there are no unambiguous and well-established conventions around static factories. It needs help, and you can provide it by providing a code block it can execute to create the instance:
container.Configure(r => r
    .For<IMeal>()
    .Use(() =>
        JunkFoodFactory.Create("chicken meal")));
By now, the For/Use method chain should be familiar. However, in this variation, you use a different overload of the Use method than used previously. This overload enables you to supply a Func<IMeal> and you do that by providing a code block that invokes the static Create method on the JunkFoodFactory class.
Tip
If you want to resolve the ChiliConCarne class from section 11.4.1 in a strongly typed fashion, you can use this Use overload to directly invoke the constructor.
When you end up writing the code to create the instance, how is this in any way better than invoking the code directly? By using a code block inside a For/Use statement, you still gain something:
- You map from IMeal to JunkFood.
- A lifestyle can still be configured. Whereas the code block will be invoked to create the instance, it may not be invoked every time the instance is requested—unless you use the Unique lifestyle, a cached instance will sometimes be used instead.
In total, there are five different overloads of the Use method. We can use the generic version to define a concrete type, but other overloads enable us to supply a concrete instance, or code blocks that create a concrete instance.
The last common deviation from CONSTRUCTOR INJECTION we’ll examine here is PROPERTY INJECTION.
11.4.3. Wiring with Property Injection
PROPERTY INJECTION is a less well-defined form of DI because you’re not forced by the compiler to assign a value to a writable property. This is also the case for Structure-Map, which will leave writable properties alone unless we explicitly ask it to do something about them.
Consider this CaesarSalad class:
public class CaesarSalad : ICourse
{
    public IIngredient Extra { get; set; }
}
It’s a common misconception that a Caesar Salad includes chicken. A Caesar Salad is a salad, but it tastes great with chicken, so many restaurants offer chicken as an extra ingredient. The CaesarSalad class models this by exposing a writable property named Extra.
If you configure only the CaesarSalad without explicitly addressing the Extra property, the property won’t be assigned. You can still resolve the instance, but the property will have the default value that the constructor assigns to it (if any).
There are several ways you can configure the CaesarSalad so that the Extra property will be appropriately populated. One way to do it is to use Instance references, as you’ve seen several times already in this chapter:
container.Configure(r =>
{
    var chicken = r.For<IIngredient>().Use<Chicken>();
    r.For<ICourse>().Use<CaesarSalad>()
        .Setter<IIngredient>().Is(chicken);
});
You may recall from several previous examples that the Use method returns an Instance you can remember as a variable. In listing 11.10 and many subsequent examples, you used the Ctor<T> method to indicate a constructor parameter of a particular type. The Setter<T> method works in the same way, only for properties. You pass the chicken Instance to the Is method to make StructureMap assign the property when it builds the instance.
When you resolve ICourse based on this configuration, you’ll get back a CaesarSalad instance with a Chicken instance assigned to its Extra property. This gives you fine-grained control over specific properties for specific types. A more convention-based API provides the option to state that we want StructureMap to use all properties of a given type for PROPERTY INJECTION. As an example, we could state that all settable IIngredient properties should be injected with the appropriate instance.
For the CaesarSalad, you can express it like this:
container.Configure(r =>
    r.For<IIngredient>().Use<Chicken>());
container.Configure(r =>
    r.For<ICourse>().Use<CaesarSalad>());
container.Configure(r =>
    r.FillAllPropertiesOfType<IIngredient>());
With the FillAllPropertiesOfType method, you can state that all writable properties of the IIngredient type should be assigned a value. StructureMap will use the default instance configured for IIngredient, so when you resolve ICourse you’ll get a CaesarSalad instance with Extra Chicken.
The FillAllPropertiesOfType will fill any writable property of the identified type, so if other concrete classes also have writable properties of that type, they’ll also have the configured instances injected. This can be practical if we follow a convention that uses PROPERTY INJECTION for certain types.
In this section, you’ve seen how you can use StructureMap to deal with more difficult creational APIs. You can use the many overloads of the Use and Is methods to specify concrete instances or code blocks that will be used to create instances. You also saw that PROPERTY INJECTION can be configured explicitly while we configure instances, or as a convention for a specific type.
11.5. Summary
This chapter offered a tasting menu of StructureMap and its features, and we related the principles and patterns from the rest of the book to StructureMap’s API. Structure-Map is the oldest DI CONTAINER available on .NET, but it doesn’t show its age, with its pervasive use of Nested Closures, type-safe configuration API, and convention-based type scanning.
The use of Nested Closures may be one of its most distinguishing traits; using it requires familiarity with delegates and code blocks.
Getting started with StructureMap is quite easy. It supports AUTO-WIRING and automatically figures out how to create concrete types, even if they haven’t been explicitly configured. This means that you can focus on mapping ABSTRACTIONS to concrete types, and when you’re done with that, you’re able to resolve object graphs. The type-scanning API even enables you to configure a multitude of services with only a few lines of code, using a convention-based approach to configuration.
Although we don’t need to configure concrete services, we may still want to when we want to change the lifestyle. By default, the lifestyle is PER GRAPH, so whenever we have thread-safe services, we can potentially increase efficiency by configuring them as SINGLETONS. This requires an explicit step, although it can be expressed during type-scanning using a custom registration convention.
Instances aren’t guaranteed to be tracked by the container, so it offers no API to release a specific object graph. This effectively prevents memory leaks for normal classes, but on the other hand, almost guarantees memory leaks for disposable DEPENDENCIES. This makes it important to implement all DEPENDENCIES so that they themselves manage all use of disposable types internally.
StructureMap handles sequences of DEPENDENCIES well. When a class depends on a sequence of instances of the same type, StructureMap will AUTO-WIRE the instance with all instances of the DEPENDENCY type. Once again, it has intuitive default behavior, so we only need to take explicit action if we have special needs for selecting only a subset of all available instances.
Although we can configure Decorators explicitly, StructureMap has no convention for wiring Decorators, and no dynamic INTERCEPTION capabilities. There are SEAMS that can be used to integrate StructureMap with a dynamic proxy API if we would like to do such a thing.
Because StructureMap relies so heavily on Nested Closures, it should come as no surprise that many of the configuration methods have overloads that enable us to supply a code block that will be invoked upon creation. Although these overloads aren’t necessary when the classes we register use CONSTRUCTOR INJECTION, we can use them if one or more of our classes must be created in special ways.
StructureMap is a comprehensive DI CONTAINER that offers a wide range of advanced features. It has excellent default behavior and can be easy to use—particularly when it comes to AUTO-WIRING with concrete types or sequences. On the other hand, it has no dynamic INTERCEPTION capabilities and can’t dispose of disposable DEPENDENCIES. These apparent shortcomings are mostly the result of a design philosophy. If we never implement disposable services and prefer explicit Decorators instead of dynamic INTERCEPTION, StructureMap is an excellent choice because it uses those constraints to make other things simpler for its users.