
Chapter 8: Using Prototypes in Your Project Workflow
Way back in Chapter 2, we looked at the various times when you might use prototyping in your project workflow.
It is hoped you now have some ideas about the toolsets you might use to build prototypes at certain stages. We’ll now look in a little more detail at some techniques for using prototypes at such stages to get the most out of them.
It’s outside the scope of this book to discuss project management methodologies (or to get opinionated about them––there are plenty of others covering that ground elsewhere). So you might be doing “big A” or “little a” Agile, Kanban, Scrum, Sprints, Waterfall, some kind of hybrid of all of these, or perhaps not really following a structured methodology and just “getting on with it.” That’s all fine with us, because what's important is that however you manage projects, you can incorporate prototyping into your projects––and benefit from it––without pain and huge changes to teams and budgets.
We’ve already discussed why we should use prototypes in more detail in Chapter 1), but it’s worth reminding ourselves of what prototypes can give us when we bring them into a project, including:
- assisting the design team to develop, explore, and communicate design ideas among themselves
- enabling powerful stakeholder engagement because stakeholders can see and use our designs
- helping us bring users into our design process by allowing us to explore and test our designs with real users
We’re now going to discuss some tips and techniques to help you achieve these aims with various prototype toolsets.
Exploring and Communicating Design Ideas with the Team
The trick to using prototypes in your design process is to keep it lightweight, so that you can use them to try out your ideas without slowing you down. If it takes a lot of time and effort up front to set up your prototype, make changes, or share it with people, the odds are it will fail to happen.
For example, if you’re using sketches to explore ideas, try using a toolset that lets you turn those sketches into prototypes, such as Marvel, or the PDF options discussed in Chapter 6. Or you could switch to a tool such as Balsamiq, as it allows you to think quickly in a sketch-like way and add links to create an interactive prototype.
Lots of designers like sketching because it encourages rapid, collaborative working, as seen below. With most of the simple low-fidelity prototyping tools, you only require a small amount of up-front effort to set up working practices and workflow that maintains a level of collaborative working.
Take the example of a small group of designers working alongside a client team member to sketch out ideas for new features that support advanced searching on an existing site. They have some user research (including some recordings of power users struggling to find the specific search results they need), a stack of paper, sticky notes, marker pens, and coffee. They’re doing 6-8-5 sketching individually to brainstorm ideas for the search form and results list. They'll then come together to share their ideas, discuss, pick the best bits, then combine them onto larger A4 sketches stuck to the wall.

Conducting a collaborative sketching workshop
6-8-5 Sketching
6-8-5 sketching is a structured technique for encouraging individuals to come up with ideas for a design. The name comes from the aim of producing six to eight sketches in five minutes.
Participants are provided with sheets of paper or card that are divided into grids of four, six, or eight squares in which they sketch their ideas quickly.
Learn more about 6-8-5 sketching (and lots of other useful collaborative workshop activities) in the book Gamestorming and its accompanying website.
Let’s bring a basic prototyping toolset into this process. We’ll take a device (an iPhone or iPad, or an Android phone or tablet) that has the Marvel mobile app installed (a full description of Marvel can be found in Chapter 5). Each time a sketch is completed, the Marvel app is used to take a photo of the sketch. Hotspots are then added to it and it is linked together with the other pages that have already been added, seen below. We’ll take a participant out of the 6-8-5 sketching process to handle this role, and to keep everyone involved with the whole process, we’ll share that role around to a different person each time. Now we’re creating a prototype with the most basic of workflows. It’s potentially free, or at least very low-cost, depending on the Marvel plan you use.
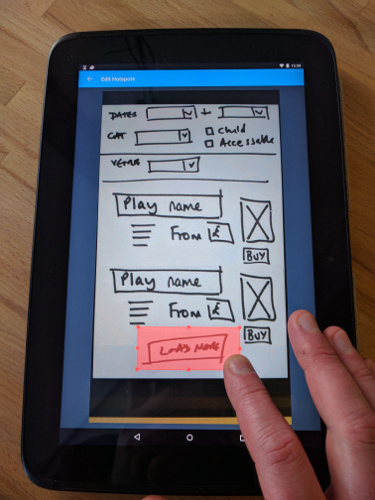
Adding a hotspot to a sketch to create a clickable prototype in the Marvel app
This prototype will be useful for the whole project team in the workshop environment. Everyone benefits from trying out the various parts of the advanced search feature in the context of a user flowing through it. It may help workshop participants to spot and raise problems with sketches that may not otherwise be apparent; for instance, in combining and stepping through the various steps combined, it becomes evident that the user journey is longer or more complicated than it need be. Or missing steps or features may be identified that hadn’t been considered in the sketching process.
We could make the workshop more powerful by bringing some stakeholders or users into the process, either throughout it or at defined points (for example, after the initial morning session). As they're not experienced designers, they may struggle to visualize how sketches and ideas fit together to create an advanced search feature to use. Having the prototype available will make this much easier for them to understand, and soliciting their feedback during the workshop means that there’s time to involve the whole team in resketching and adjusting the designs and prototype.
There are several options to improve this suggested basic workflow:
- use a Marvel account to sync the prototype we’re creating on the device with Marvel on other devices, or a laptop/desktop with the Marvel web app open
- employ a scanner to gain better quality images of the sketches, even something like a Doxie to go mobile and portable
- have workshop participants install the Marvel iOS/Android app, sign in, and add sketch photos as screens to a collaborative cloud-synced Marvel project
- give participants tablets and styluses to sketch their ideas directly into the Marvel app
InVision Options
The workflows discussed would all work equally well with InVision (discussed in Chapter 5), except for the option of sketching directly into the app. Because InVision doesn’t offer this, you’d require an additional app to complete the sketching activity, such as 53’s Paper app.
Engaging with Stakeholders and Project Teams
In Chapter 1, we discussed how prototypes are a great way to involve your stakeholders and get them excited in your designs. We’re now going to consider some approaches to involve stakeholders using prototypes you've created.
Let’s start by briefly reviewing what we mean by stakeholders. They’re not necessarily the people who you’re working directly with on a project, but they have an interest in the project’s success from an organization’s point of view. They might be part of an organization that will be profiled or promoted on a website. Or they could be part of a department with specific business goals that a web app you're designing is helping to meet. Typically, they’re at management or senior management level (typically a Marketing Director or Vice President, Chief Marketing Officer, or Chief Technical Officer), which means they:
- are very busy
- spend a lot of time reviewing reports, spreadsheets, and slide decks
- make lots of decisions that often have an impact on money and people
As a consequence, it can be difficult to engage stakeholders with our designs, particularly in the early stages when we’re coming up with ideas and trying them out, often working at low fidelity. Frustratingly, designers and project teams often find stakeholders engaging later in the process, when a design is at a higher fidelity and more developed. And, as we’ve discussed, making changes to our designs at that point is more expensive.
We’ve found that prototypes make it easier to interest stakeholders earlier, simply because a prototype can be opened and played with by stakeholders. Unlike other design deliverables––such as sitemap diagrams or wireframes––they can see how it will work without having to read explanatory notes or annotations.
When trying to engage stakeholders with your prototype, it's important that our prototypes are fast and straightforward enough to share widely. That’s handy for us and our project teams: if it’s hard work for us to do, we’ll avoid sharing our prototypes early and often. If it’s easy, we will share them. But it’s also useful for the stakeholders we share with because if it’s easy for them to share, they’ll share with more people. They might be other stakeholders who were not directly engaged with the product, or potential user research subjects. If people are saying, “I showed it to my partner/friend/Dad and …”, it basically means you have people doing usability testing for you, for free!
We should also strive for the lowest possible barriers to people opening and stepping through our prototypes. That means avoiding them having to install apps or software; minimising platform and browser-compatibility requirements; keeping file sizes small; and making the process for opening and viewing a prototype easy enough to do without instruction or assistance.
To meet these aims, our safest bets for prototyping toolsets:
- allow us to publish our prototypes online so that they can be opened in a web browser by simply hitting a link
- create file types that can be shared via email and opened by anyone on their computers or devices
Assuming you’ve chosen a toolset that meets these aims to a degree––perhaps InVision/Marvel, Keynote or Powerpoint, Balsamiq generating clickable PDFs, or HTML prototypes with a suitable platform for hosting/sharing online––what’s the best way to encourage stakeholders to look at your prototypes and engage with your designs? Here are our tips for making the most out of stakeholder engagement with a prototype.
Share at the Right Time, and Keep Sharing
Pick your moment wisely when sharing with stakeholders the first version of your prototype and later revisions. It’s a delicate balancing act between showing a prototype that works, has a reasonable amount of content and depth, and looks coherent, versus waiting too long in order to share one that is faultless, polished, and feature-complete.
Let stakeholders know that what you’re sharing with them is a work in progress, and not the final design. Then keep reminding them of this fact.
Encourage stakeholders to look at your prototype and give feedback often, in a way that is quick and easy for them. They shouldn’t have to book time to do it. Send quick email updates as you release iterations that quickly summarize what’s changed and (perhaps) why, but be aware that such notes may remain unread.
Ensure Stakeholders Are Seeing the Latest Version
If you’re sharing online, try to update the prototype in place; that is, where the stakeholder will see it. Once you’ve created a link, update the prototype that the link points to. This avoids people looking at an older version of your prototype and giving you irrelevant and out-of-date feedback.
If you’re sharing files, try to indicate what version it is. The most effective way is to append a date to the filename in a simple, commonly understood format. Try to nudge stakeholders into deleting earlier versions by using phrases such as “This replaces all previous versions of the prototype, which we suggest you delete.”
Efficiently Use Stakeholders’ Time and Attention
Avoid the need for face-to-face explanations of your prototype; stakeholders should be able to open it and get on with using it. That said, make yourself as accessible as you can to stakeholders who have queries or feedback. Be ready to open a prototype and talk it through with stakeholders when they pass your desk or bump into you in the corridor.
Aim to direct stakeholders to the part of the prototype you’re most interested in them looking at at any point. Use direct links or export parts of your prototype to assist with this.
Keep Promoting the Prototype
If you have regular (weekly, monthly) status meetings that involve stakeholders, take the time to show them the latest iteration of your prototype at each meeting. Then follow up by sharing that iteration so that they’re prompted to look at it.
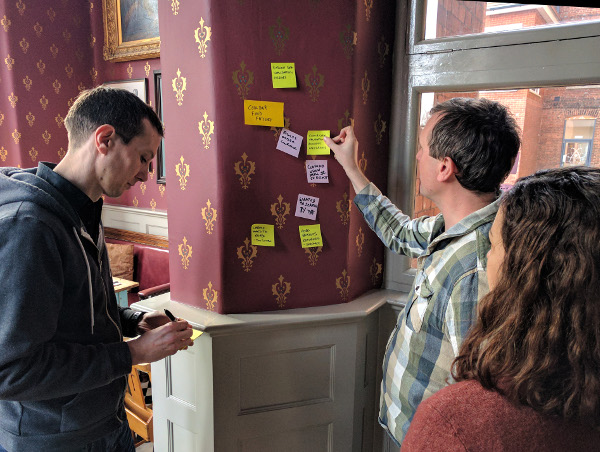
Consider promoting your prototype everywhere you can in an unobtrusive way. Stick sketches or screenshots on the wall listing the prototype's URL to encourage everyone to view it for themselves. Add the URL at the bottom of project status reports, meeting notes, or email updates. You could even look at printing little cards or stickers to hand out to people.

Displaying the URL for a prototype on a wall display to encourage stakeholders to look at it
Be Prepared for Stakeholder Feedback
Be open and receptive to all feedback you receive from stakeholders. Expect to receive subjective feedback that's unhelpful, or doesn't relate specifically to your prototype; for example, colors or lack of colors, font choice (“Can you use our corporate font?”), layout, and so on. Avoid becoming defensive or dismissing this feedback, but be prepared to disregard it. The really useful feedback from stakeholders relates to their expert domain knowledge around the organization (or part of it) and its goals, so make sure you listen out for that.
Every project is different, as is every stakeholder, so observe and use your judgement as you work with them. Work out what engages each stakeholder and then adapt your workflow and strategies to make the most out of your prototypes with stakeholders.
Bringing Users into the Design Process Using Prototypes
We’ve talked throughout the book about how a prototype is an important way to bring users into your design process. We won’t be providing a comprehensive guide to user research techniques here––that's a topic for another book. But what we can do is talk about how prototypes can make user research more efficient and effective.
The underlying benefits of having a prototype for user research are much the same as the benefits we see with stakeholders: they make it much easier for users to engage with your designs. That means that the interaction and feedback you gain from your user research participants is all the more valuable.
We’ll discuss two ways (which can often overlap) you can utilize prototypes to help you learn from users:
Exploring Motivations and Behaviors in Contextual Research
When we think about users as we design, we’re looking at their journey––particularly where it relates to the products and services we’re designing––and considering:
- context
- motivations
- goals
- happy moments
- pain points
- measures of success
Contextual research activities help us to learn about our users, explore their journeys, and consider these aspects. Research activities are generally qualitative and can include diary studies, observation, and user interviews.
We can use prototypes to explore new angles in a contextual research activity. For example, if you’re conducting user interviews, you can go armed with a selection of sketches, or a simple prototype put together with sketches or wireframes. As you discuss a participant’s journey around a specific scenario, you can refer to your prototype and have your participant try it out. Or you can potentially sketch ideas out with your participant during the interview, assemble them into a prototype, and discuss them. If you’re conducting a diary study, you could ask your participants to try out a specific prototype on a day when they’re recording their activities.
The aim of a prototype in these scenarios is to consider how the digital product or service you’re designing could fit into your participant’s journey through a task. Prototypes prompt discussion and exploration around your participants’ tasks and journeys. It’s just as important to observe, record, and consider these discussions with your participants as it is to observe their actions with your prototype.
Testing Your Designs with Users
Observed usability tests are a great way to get high-value feedback on your designs. All that's required are:
- representative users
- a thing that presents our designs to put in front of those users
A prototype is ideal to put in front of users, irrespective of what kind of prototype it is and how it's been created.
To achieve the most out of usability tests with your prototype, keep them lightweight and do them often. Building usability tests into your project workflow and arranging participants for a round of tests in advance helps to ensure that they will happen. It’s a good milestone to work towards with each unit of design work for your project team, regardless of what that unit may be––a sprint, a phase, a module, a feature, a week, and so on. Whatever prototype toolkits and methodologies you use, always endeavor to build in this cycle of rapid iteration and frequent usability testing.
User Research Testing
A great book to help anyone learn how to conduct beneficial low-cost usability tests is Steve Krug's Rocket Surgery Made Easy.
Here are some basic guidelines to make the most out of usability testing with a prototype:
- Prepare simple, standalone tasks for your participants to complete using your prototype. These should evolve out of the key tasks for which you’ve been designing.
- Give your participants the tasks to complete one at a time, and ask them to speak their thoughts.
- If something goes wrong, or if a participant strays into an area of your prototype that's yet to be developed, step in and navigate around the problem, or abandon the task and move on.
- Focus your observations and note-taking on the problems that participants have: where they get stuck, do something unexpected, or take a wrong turn. Resist the temptation to solve issues that you see during the test session––that’s a job for later.
- Think about how you can analyze as a team what you learn in usability testing, as portrayed in figure 8-4. Consider capturing the session on video, or sharing the job around your team of facilitating and observing test sessions. At the end of a round of tests, get the team together and have everyone present the key observations from each participant. Then you can work together on design ideas to solve any common problems.
Capturing and analyzing usability test observations with the project team
In-person/Remote and Moderated/Unmoderated Usability Testing
If you’re new to running usability tests, we’d recommend you start simple with moderated in-person tests. This involves sitting down with participants in front of a laptop, desktop, or device, giving them tasks to complete with your prototype, and observing them.
Remote usability testing means using communication tools to run the tests with your participants in a remote location. Remote tests can be moderated, where you join the participant at an agreed time, give them tasks, and observe them via the remote communication medium. Or they can be unmoderated, where you use a dedicated usability testing platform to set up tasks in advance. You then share details of the test with participants for them to join and complete the test at a time that suits them, then review recordings of the test sessions later.
Remote and unmoderated usability tests can give you more flexibility in terms of recruiting participants and having them complete tests in their own time. Yet they require tools and platforms to run and capture tests, and a prototype that is shareable and complete enough to stand up to participants using it unsupervised. It’s harder to deal with issues and problems that crop up in a remote test, and if the test is unmoderated, there’s no way to offer help at all.
Summary
In this chapter, we've discussed specific techniques and strategies to help you build prototyping into your project workflow, and get the most out of that prototype.
We’ve looked at some tools and workflows to create prototypes that aid in collaborative workshop scenarios, helping to generate, share, and develop design ideas.
We’ve discussed how we can best use prototypes to engage stakeholders, a group who traditionally don’t engage with designs as early and as often as they should.
And we’ve looked at some specific guidelines and techniques for bringing users into your design process by using prototypes in user research.
Which brings us to the end of the book.
What we hope we’ve achieved here is to have given you a solid overview of the prototyping landscape today. There are so many different tools, techniques, and approaches, and more are emerging every day (we’ve genuinely struggled to keep up over the six months we’ve been putting the book together). Whatever your level of design skill or technical proficiency, and whatever role you play in design projects, we’re confident that you’ll be able to pick some of these tools to try out in your design process. Your approach to prototyping and the toolsets you use will undoubtedly change and develop over time. But the key aims should remain the same: explore design ideas, engage stakeholders, and bring users into your design process.
As you continue to use prototypes in your designs, you and your teams will get more and more out of them. Your designs will be better, and your projects more effective as a result.
If you've yet to try out a tool, go and do it now––get your designs into it, and start sharing with stakeholders and users. We’re confident there's no looking back!