
Chapter 3: An Overview of Prototyping Tools and Techniques
We're about to explore the various prototyping tools and approaches available (Chapters 4 to 7), but before we do, we’ll use this chapter to present an overview of the landscape in which they sit.
One of the challenges we’ve faced while researching and writing this book is that the prototyping tools landscape is changing fast. There are several well-established tools, a swathe of tools that have emerged over the past couple of years, and new ones coming out every day. On top of that, we’re seeing tool providers collaborating, competing, and buying each other out (we had to rewrite part of Chapter 5 because that very situation happened when Marvel bought POP: Prototyping on Paper while we were writing).
Another challenge we’ve had to grapple with is how to split the tools into meaningful groups. This is so that readers can understand the various types of tools available, as well as us being able to divide the book into sensible chapters!
We spent plenty of time reviewing how others grouped and categorized prototyping tools in other publications, blog posts, articles, and tutorials. On the whole, people tend to categorize tools by the fidelity of the prototype they produce. That’s a good place to start, but we think that it’s more useful to view tools in the context of more categories than fidelity alone.
Segmenting and Categorizing Tools and Techniques
We’re going to build a framework comprising three groups by which to categorize prototyping tools.
Design Fidelity
If we consider different levels of fidelity, we might have a range from rapid, sketch-style prototypes, to wireframe-style prototypes that present layout up to full-fidelity design mockups that present our prototype using color palettes, typography, and other aspects of design.

Prototypes for the search feature in MacGuffin at increasing levels of fidelity: a sketch imported into InVision (1).
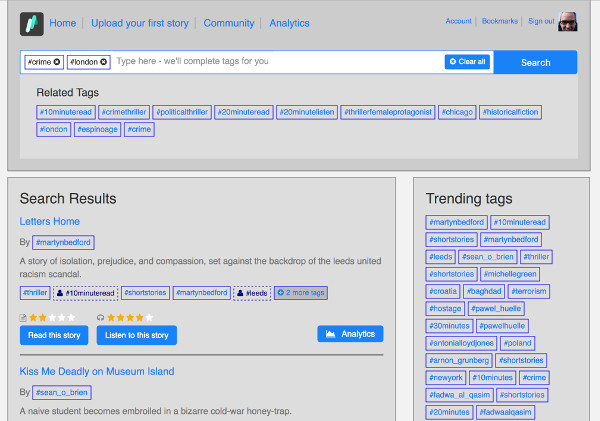
Prototypes for the search feature in MacGuffin at increasing levels of fidelity: an HTML prototype (2).

Prototypes for the search feature in MacGuffin at increasing levels of fidelity: a full-fidelity design mockup (3).
As we looked into grouping prototyping tools by fidelity, we realized there are some aspects that can make this task more complicated than one would think:
- There are more aspects to the fidelity of a prototype beyond the quality of visual design. These include: the level of complexity, realism, and breadth; and/or the depth of the prototype's content and navigation being presented; and the extent to which we implement user interfaces (that is, the richness and depth of interactions and whether or not transitions and animations are being presented).
- It’s easy to conflate and confuse fidelity with complexity, difficulty, and the speed of creation of a prototype. While it’s true that tools producing basic, sketch-style prototypes are typically quicker and easier to get going with, we've also noted that some more complex tools that take longer to master still only produce wireframe-level fidelity prototypes. And if you’re already producing high-fidelity design mockups, some tools make turning these into high-fidelity prototypes a breeze.
- Many tools are capable of operating across a range of fidelities. That applies particularly to tools that take any kind of design document and enable you to produce a prototype with them (such as InVision). That document could be a sketch, a simple wireframe, or a full-fidelity design mockup. It also applies to HTML prototypes, which can be used to create simple layout prototypes or higher-fidelity ones.
Tool Complexity and Speed of Use
Here we’re considering how smoothly it is to get going with a prototyping tool. How much specialist skill and knowledge must be picked up to use a tool?
If we deliberately keep this categorization straightforward, we can split tools into three groups:
- simple to use, easy to come to grips with, and can produce prototypes fairly quickly
- complex, have a steeper learning curve, and generally take longer to produce a prototype
- lie somewhere in between
As with fidelity, it’s not quite as simple as we’d like to organize prototyping tools into these categories. Here are some of the issues:
- Learning curve, speed of prototype creation, and complexity sometimes correlate, sometimes don’t. Some tools and techniques have a shallow learning curve because there’s simply little to learn: they’re quick and simple for anyone to use. Some tools have a steep learning curve with a lot to remember, but with the payoff that once they is mastered, prototypes can be quickly created.
- Some tools naturally suit those who are comfortable working in a more technical, analytical way; other tools suit those used to working in a more design-led way; and some are a combination of both. Different people have different aptitude, skills, and experience in these approaches. Putting it another way: your mileage may vary!
- Some prototyping tools particularly suit rapid, straightforward creation of prototypes where you’re already using other tools and techniques to create designs; for example, pen and paper sketching, Photoshop, or Sketch.
The Aim of Your Prototype
We’ve looked at various times when you might consider using a prototype in Chapter 2. In Chapter 8, we’ll explore how best to use prototypes to achieve various aims in a project.
If we wanted to classify prototyping tools by aims, some categories might include to:
- rapidly generate design ideas for interfaces and user flow, and explore them
- design and present simple structures and layouts
- design and present more complex content structures and/or lengthy and involved user journeys
Sorting Tools and Techniques into Our Three Categories
We have established three ways of categorizing prototyping tools. It turns out that these can all be presented as a linear progression, with various tools sitting somewhere in that progression.
To help you better understand the range of tools we look at in this book (which reflect the wider range of tools available), we'll visualize the tools within our categories.
We’re not going to attempt to map the various tools across all three categories in one diagram (well, okay, we may have actually attempted it and failed). But we can look at mappings of the tools within the three categories separately:
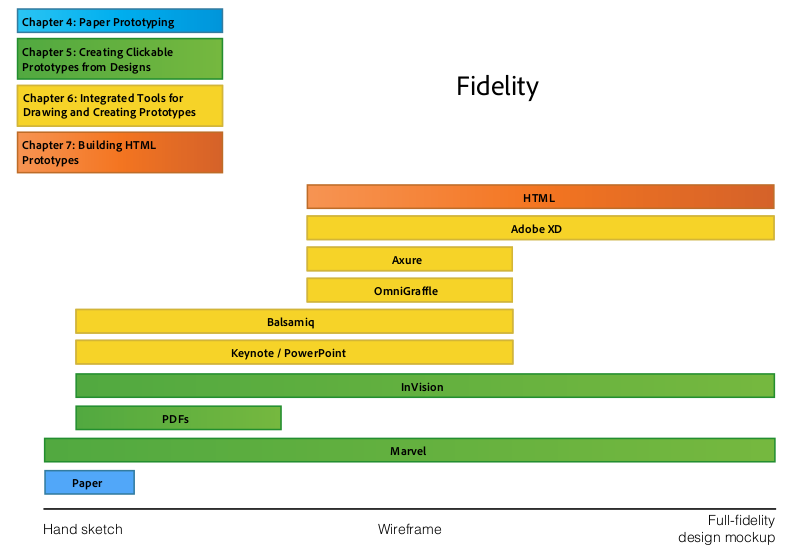
Prototype tool mapping by fidelity

Prototype tool mapping by learning curve
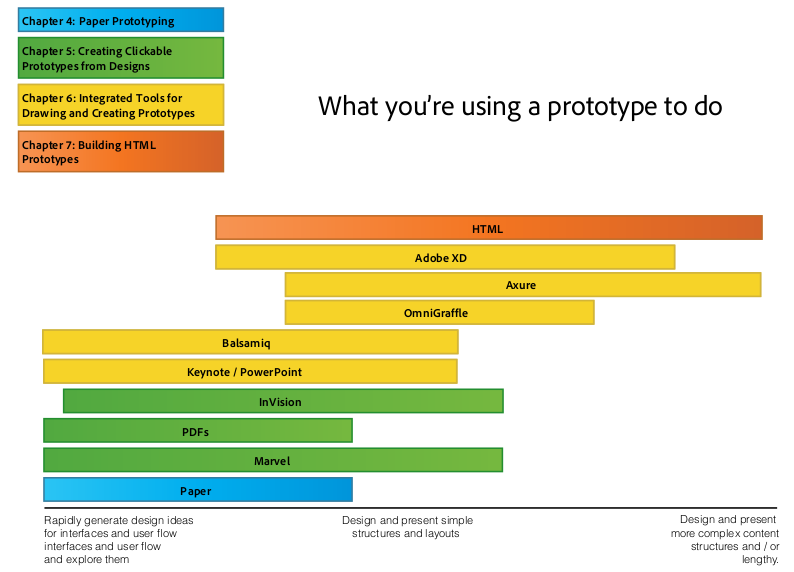
Prototype tool mapping by prototype use
It’s important to note that while we’re reflecting a linear progression in the horizontal axis of these mappings, we aren't presenting any other progression or scale on the vertical axis. Indeed, there is no vertical axis!
It is hoped these mappings will help you to understand the prototyping tools landscape better. By looking at these mappings and working out where your projects sit, you can narrow down the set of tools and techniques to try out.
Remember that every project is unique, so you’ll probably want to try different tools, techniques, and combinations with different projects that have different goals and aims, and different project and stakeholder teams.
Prototyping tools will continue to come and go, but it should be possible to consider new tools and think about where they sit within these mappings. That will help to understand when and how you can put them to best use.
Bear in mind that the three categories mapped out here will overlap to some extent and trade off against each other. Their relevance to you and your projects will apply in varying degrees. And there may well be other considerations important to you that we haven’t detailed. If that’s the case, you can consider mapping them out in a way that’s more useful for you and your team as you learn more about them.
How the Tools Have Been Grouped
As you have already seen in figures 3-4 to 3-6, because tools sit across the various category scales we’ve identified and mapped out, we’ve split them into the following chapters:
- Chapter 4: Paper prototyping (creating prototypes from sketches on paper)
- Chapter 5: Tools for creating a clickable prototype from existing designs (including Marvel, clickable PDFs, InVision, and Powerpoint/Keynote)
- Chapter 6: Tools in which to draw and create prototypes (including Balsamiq, OmniGraffle, Axure, and Adobe XD)
- Chapter 7: HTML prototypes (using HTML and CSS code to create prototypes that run in the browser)
It's recommended that you take the time to read at least chapters 4, 5, and 6. That way, you'll be able to get a feel for the tools in those chapters that sit across our mappings: fidelity, complexity, and tasks. We feel that anybody involved in the design of websites and web apps will find tools and techniques enabling them to create prototypes straight away.
If you feel that you’re “technically challenged”, you might have the preconception that HTML prototyping is beyond your abilities. But with the support of some more technically minded project team members and a little effort, you may find you can still reap the benefits of HTML prototyping in terms of flexibility and value. So we’d urge everyone to read Chapter 7 too.
Tools that Failed to Make the Cut
There are loads of tools that can be used to create prototypes. It is hoped that we’ve considered most of them to a degree as we researched and wrote this book. But we’re aware there are tools that we don’t even know about. And, as mentioned, some tools will fall out of favor, go out of production, and be bought out or assimilated into other tools. And we know that new tools are coming out all the time and will continue to do so.
This is why we’ve provided a framework to help you evaluate various tools from a range of perspectives, so that you can establish whether you're likely to find them useful.
There are some specific tools that didn't quite make it into the book. This is because:
- they’re more suited to prototyping native applications (we’re deliberately focusing on tools for prototyping websites and web apps in this book).
- they don’t easily fit into the structures of categories and chapters we’ve established.
- they’re arguably more technical-and developer-oriented than the intended core audience for the book
- it's down to a simple lack of time and space.
We’ve briefly covered the following tools in Appendix A:
- Craft by InVision
- Facebook Origami Studio
- Framer
- Principle
- Xcode
Summary
In this short chapter, we’ve attempted to map the prototyping tools landscape by coming up with three sets of categories into which the tools can be mapped: fidelity, complexity, and tasks.
We’ve shown that the various tools available sit in ranges across linear progressions of these three categories. And we’ve encouraged you to consider combinations of these categories and the tools within them to suit you and your projects.
We’ve also noted that there are many more prototyping tools than those we’ve written about here, and that the landscape is changing fast with new tools emerging (and disappearing) all the time. We’ve explained how you can consider new tools in the context of categories–—ours and others––to work out whether they’re likely to be useful.
In the next chapter, we’re going to start by looking at one of the simplest and yet most powerful prototyping tool sets: paper!