
Chapter 5: Creating Clickable Prototypes from Designs
In this chapter, we'll take a look at prototyping tools that are a step up from basic paper prototyping.
These tools enable us to take a set of flat designs of some kind and stitch them together to create a prototype that is clickable. This is more powerful and engaging for stakeholders, team members, and users because:
- there’s no need for us to drive the prototypes, switching paper templates and sketches in and out as users interact with them
- the prototype is more responsive, realistic, and immersive.
- it can work standalone, enabling us to share it remotely. The people we've shared the prototype with can test it on their own, at their own pace and––dependent on the tool––using a range of their own devices.
A flat design with which these tools can operate is anything that can be captured as a digital image, such as:
- Sketches
- Some tools in this category (for example, Marvel) support using a mobile device to take pictures of sketches, then adding hotspots to stitch them together into a clickable prototype. Using sketches in this way bridges the gap perfectly between simple paper prototyping and higher-fidelity techniques.
- Wireframes and user interface designs
- These typically present the layout of content and/or user interface elements in our designs; indeed, they could be regarded as higher-fidelity versions of a sketch. There are a variety of existing tools and methods to create such designs, such as Sketch, Balsamiq, Keynote/PowerPoint, OmniGraffle, or Photoshop. Regardless of what you use, if you can save flat images of your designs, you can build a prototype with them.
- Higher-fidelity mockups
- Higher-fidelity design comps or mockups created in Photoshop or with other design tools can be used to create prototypes. As we’ve already discussed in Chapter 1, this is not the most cost-effective way of working since the cost of implementing and changing designs increases with fidelity. Nevertheless, you may find yourself in a situation where you have high-fidelity mockups already prepared, and you can gain more value by using them to create a prototype.
We’ll start by discussing perhaps the simplest of the techniques that is one step up from paper prototyping: using a basic tool to turn sketches and paper prototypes into a clickable form.
From POP to Marvel
Until recently, many folks used an app called POP (Prototyping on Paper) to turn sketches into a prototype. As we were writing this book, Marvel bought POP and retired the POP app. Marvel does what POP does––and more, hence why we discuss Marvel here.
Marvel
Marvel is a prototyping tool that is growing rapidly––in terms of maturity and feature set, and in terms of popularity. Similar to InVision (discussed later on), it can be used to create prototypes by importing design files of any kind and adding hotspots to them. It also includes design and drawing functionality so you can design layouts in the application itself (also the case with the tools we discuss in Chapter 6). In fact, it’s a powerful and flexible prototyping powerhouse!
We’re featuring it here because as well as being a fully featured, flexible web-based application, there are also native iOS and Android apps that support the rapid creation of prototypes on phones and tablets from sketches. As such, Marvel is––at the time of writing––the best example of an app that simplifies the process of taking pictures, adding hotspots, and linking them together to produce a clickable prototype on one device.
Here's a typical process for creating a prototype:
- Start with a series of sketches you’ve come up with for a design problem. It works better if the sketches are all the same size and have same aspect ratio (that is, they’re all landscape or all portrait). When you start a Marvel project using the mobile app, you have to select an aspect ratio and viewport size; this differs from using the web application on a desktop or laptop).
- Take pictures of your sketches with your mobile device to create prototype screens. You can do this in the Marvel app, or you can use your device’s camera (which gives you more control over capturing and editing your pictures) and then import them in from your image gallery. Each image becomes a screen in your prototype.
- Add one or more linked hotspots to a screen that, when tapped, will move to another screen, as shown below. A range of transitions between screens are supported, such as fade, push left, slide left, and slide up.
- Hit Play to run the prototype you’ve created on the device. You could use this as a demo for your team and stakeholders, or hand it to a user to step through and test your prototype.
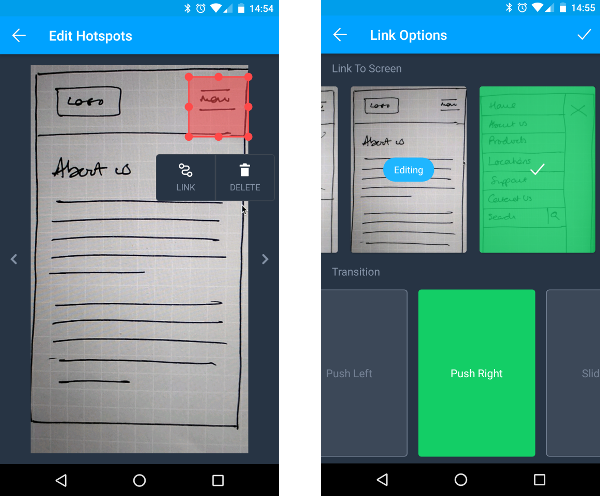
Adding a hotspot to link a page to another page in a sketch-based prototype that is created on an Android phone using Marvel
And that’s really it!
On desktops or laptops, you'll have to create a user account to use the web-based app. If you sign in to the mobile app with your user account, you can sync your prototypes between devices and the cloud or the web app. This means that they’re backed up; you can share them with other Marvel users in your team for potential collaboration; and you can share the prototype through a URL with stakeholders for reviews, demos, and user research.
Marvel further supports creating prototype screens by drawing on devices. You can use your fingers or, with the relevant hardware, a stylus.
The Marvel desktop/laptop web app also supports creation of prototypes by importing images or designs from other design tools, or by syncing them using Dropbox or Google Drive. But if you’re using these features, you’re moving beyond the simple paper sketch-based workflow we’re discussing here.
Using Marvel to create prototypes from sketches makes sense in a situation where you’re already sketching out your designs, whether you’re working on ideas solo or in a collaborative situation (such as a workshop). If you have sketches, you might as well pick up Marvel, snap some pictures, and stitch them together to create a prototype.
At a certain point your prototype may grow and you’ll probably find yourself wanting a higher-fidelity version, whether that’s in terms of visual quality, depth/breadth, or presentation of interaction. At that point, you could move on to use Marvel in other ways with other design resources and a more involved workflow, or indeed some of the other prototyping tools and techniques.
Marvel Summary
Product name: Marvel
By: Marvel
Platform: iOS and Android, desktop/laptop web app.
Single user license cost: free version for two projects; $12/month Pro; variable pricing for multiple-user company license.
URL: https://marvelapp.com/
Pros:
- simple, quick, and easy to take sketches and turn them into clickable prototypes
- ideal for testing quick ideas, especially in collaborative working situations
Cons:
- with the iOS/Android app, you’re restricted to working in a range of mobile device screen sizes and aspect ratios
- no support for adaptive/responsive designs
- with the iOS/Android app on devices, the limited workflow for supporting larger prototypes and higher-fidelity quickly becomes inefficient and restrictive. At this point, consider moving to Marvel on desktop/laptop or other tools
Comparable tools:
- Other tools offer support for stitching together flat images to create a prototype with more features, flexibility, and higher fidelity (for example, PDFs/Acrobat, InVision), and these are discussed in this chapter. But there’s nothing else of which we’re aware with the same basic on-device image capture, prototype creation, and prototype running functionality as Marvel.
- For the laptop/desktop version of Marvel, its feature set closely matches InVision (discussed in more detail in this chapter).
Clickable PDFs
PDF is a file format we all know and love (perhaps the second point is debatable). It’s certainly a widely used one, with benefits including the ability to publish and read across different platforms, and generally sensible file sizes (as long as you’re careful with the export settings). PDF reading software is widely and freely available, and is installed by default on many platforms and devices. Almost anyone can open a PDF document, so designs are often shared using them with project team members and stakeholders.
The PDF standard includes the ability to create hyperlinks in documents. This means we can create a basic prototype if we’re working with a tool that either:
- supports creating links between pages and can export to PDF; examples include Adobe InDesign and Balsamiq (which we talk about in more detail in Chapter 6).
- can edit an existing PDF; examples include Adobe Acrobat Pro and pdfforge
Linking between Pages in a Design Tool
You may already be working in a tool that exports PDFs and is able to group layouts into pages, or an item that can be mapped to a page (such as a canvas or an artboard). If so, you should investigate whether you can go one step further and create internal links between these pages or layout groups.
For example, Adobe InDesign lets you add various kinds of hyperlinks to text or graphical elements. The one we’re interested in is the ability to create a hyperlink to a page, as shown below.
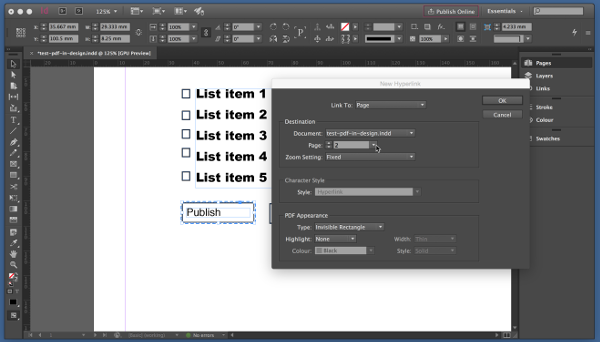
Adding a hyperlink to a button object in another page in InDesign
Similarly, links created between mockups in Balsamiq will be exported so that they link between mockups on different pages of a PDF.
Editing an Existing PDF to Add Hyperlinks
If you have an existing PDF that presents layouts or mockups for a design you’re working on, or if the tool(s) in which you’re working can output a PDF but lack the facility to create hyperlinks, you can still use an additional third-party tool to add hyperlinks to pages in your PDF. A tool you may already have access to is Adobe Acrobat Pro, which is a full-featured PDF creation/editing tool, shown below.

Adding an invisible hyperlink to another page in Adobe Acrobat Pro
Clickable PDFs Summary
Pros:
- easy and cheap creation of basic clickable prototypes if you’re already working in tools that can create a PDF
- able to create prototypes across a range of fidelities from sketches, through wireframes, up to high-fidelity mockups
- PDF is a commonly used format so it’s well supported across platforms and easy to present and share with your project team, stakeholders, and user research participants
- the ability to present and use prototypes on touch and narrow viewport devices
Cons:
- workflow can be awkward and time-consuming, particularly if you’re not already exporting and creating PDFs
- responsive/adaptive presentation of prototypes is limited to an individual PDF's ability to scale
- limited to the very basic functionality that hyperlinks between pages in PDFs supports
Apps that support adding hyperlinks to PDFs include:
- Adobe Acrobat Pro (Windows and Mac)
- Foxit PhantomPDF (Windows only)
- iSkysoft PDF Editor (Windows and Mac)
- PDFescape (web app, use in browser)
- pdfforge PDF Architect Standard
Tools Dedicated to Creating Clickable Prototypes
A number of tools have emerged over the past couple of years that have developed the idea of stitching together images to create clickable prototypes. These tools operate on the same principles as the clickable PDF techniques previously described. But since they are tools developed specifically for prototyping, they have features and workflows that make the process of creating, updating, and maintaining a prototype much easier. And most support the processes of sharing, demonstrating, and testing prototypes with integration with other apps and services. All of this adds up to a prototyping workflow that's quicker and easier to get going and maintain.
The typical features these tools offer include:
- bulk upload of multiple images that represent the screens in the prototype
- uploading Sketch or Photoshop files that contain designs for multiple screens and unpacking them to create screens in the prototype
- directly uploading files from file-sharing services such as Dropbox and Google Drive
- syncing between image and/or design files linked through a file-sharing service so that changes to these files will be reflected in the prototype
- workflow to help with the organization of large numbers of screen images into groups or folders
- an edit mode for screens that allows the creation of clickable hotspots to link to other screens
- a selection of transition effects between screens to make prototypes more realistic (particularly those presenting mobile sites or apps)
- a range of interactions that can be acted on beyond simple single-click tap; such as double-click tap, swiping, and pinching
- a preview mode that enables you to test your prototype and demo it face-to-face with team members, stakeholders, and user research participants
- features to share a prototype with others via links that open the prototype in a browser
- commenting features so that people reviewing the prototype can leave general feedback or annotations on specific elements
Sketch
Unfortunately, it’s Mac-only and its creators, Bohemian, indicate that there will be no support on other platforms. Tools such as InVision typically offer integration with Photoshop, so that could be your best option if you’re a Windows user.
We’ll now take a quick walkthrough of InVision (a popular example in this category of tools) to create a prototype from a set of wireframes. This basic workflow represents the kind of steps you’d go through to create a prototype from a set of images using this category of prototyping tool.
We start with a Sketch file containing wireframes for three screens in three separate artboards. The Sketch file is dragged into InVision to create a new project.
The InVision Craft Plugin for Sketch
InVision has developed a plugin for Sketch called Craft, which has a number of features that make the workflow for creating and sharing a prototype easier and more powerful. We discuss Craft in some more detail in Appendix A.
Because we’ve given the artboards for each screen sensible names, InVision understands these and presents the three screens on the Screens tab for the prototype, seen below. As a prototype grows in size and includes more screens, we can reorder the screens in this listing and arrange them into logical groups to make our workflow easier.
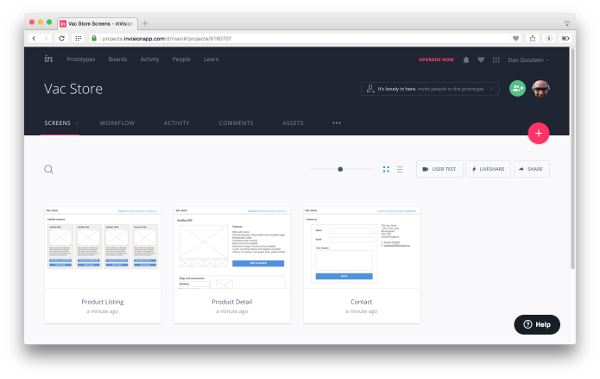
The Screens tab presents the screens in our prototype
When we open up an individual screen for editing, the toolbar at the bottom allows us to switch between Preview, Build, Comment, and History modes. Selecting Build mode gives us a tool for adding a hotspot to the screen as presented below, which we can then link to other screens.
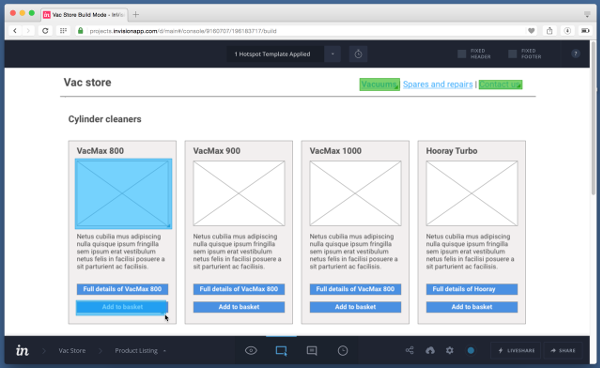
Adding hotspots to a screen in Build mode so as to link it to other screens (1)
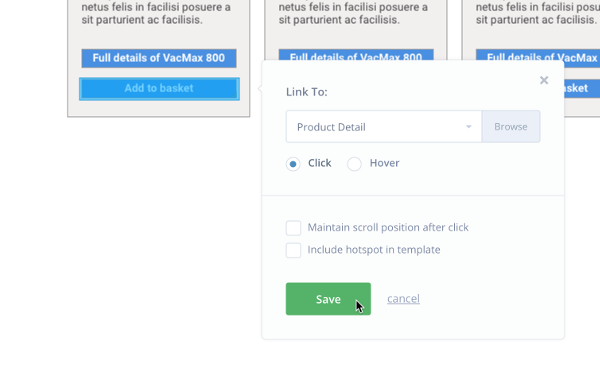
Adding hotspots to a screen in Build mode so as to link it to other screens (2)
You can also note the Hotspot Template feature in the figure above, which makes it easier to add the same links to our masthead navigation that is common to all screens. Once we’ve added hotspots to all our screens, we can then switch to Preview mode and click around our prototype to move between screens. And we’ve created our prototype.
Further features of InVision allow us to work collaboratively on projects; track our workflow (screens can be tagged as In Progress, Needs Review, Approved, and so on); add comments to screens; and share projects with others (regardless of whether or not they’re registered InVision users) for demo, feedback, and testing with users.
InVision’s ability to accept Sketch files and Photoshop files makes for a rapid workflow if you use these tools to create wireframes or mockups. But InVision and other similar tools (such as Marvel and Concept.ly) can also import images. All this means is that the fidelity of prototypes that we create using these kind of tools is dictated only by the fidelity of the input files and screens therein. So we can use these tools to create prototypes from sketches, wireframes, higher-fidelity mockups––all the way up to full fidelity design comps.

Importing a high-fidelity comp that was created in Photoshop into InVision to create a prototype
InVision Summary
By: InVision
Platform: Desktop web browser interface.
Single-user license cost: free version for one prototype; $15/month for three prototypes; $25/month for unlimited prototypes; $99/month for unlimited prototypes for up to five team members.
URL: http://www.invisionapp.com
Pros:
- flexibility to create prototypes with images of any level of fidelity
- quick and easy to create a basic prototype from your existing designs, with lots of features to support workflow; collaboration; design feedback; and demoing, sharing, and testing
- easily create multiscreened prototypes by importing Sketch and Photoshop files with screens defined by artboards or layers/layer groups
- integration with file-sharing services such as Dropbox means that changes to your designs can be automatically transferred into your prototype
- free to get going and trial with one full-scale fully featured prototype
- integrates well with existing design tools and workflows; for example, using Sketch or Photoshop to create wireframes or mockups
- the Craft plugin for Sketch created by InVision brings a solid set of features to Sketch to make prototyping with these tools quicker and more powerful (we discuss Craft in more detail in Appendix A)
Cons:
- you’re forced to work with a range of mobile device screen sizes and aspect ratios
- there’s no support for adaptive/responsive designs, so each prototype is fixed to a defined screen size / aspect ratio
- with InVision, there are no built-in drawing tools so you’ll have to use other tools to create designs; other tools in this category (such as Marvel and UXPin) support images and/or drawing
Comparable tools:
Links to other tools mentioned:
Summary
In this chapter, we looked at tools that help us to create an interactive prototype using outputs from existing design workflow processes. Those outputs could be hand-drawn sketches, wireframes, or higher-fidelity mockups produced using tools such as Balsamiq, Sketch, or Photoshop.
We explored the Marvel mobile app, which bridges the gap between paper prototyping and interactive prototypes brilliantly, particularly when you’re working on ideas and sketches collaboratively.
We looked at creating PDF interactive prototypes, either using tools that can output a clickable PDF (such as InDesign or Balsamiq) or tools for editing PDFs (such as Adobe Acrobat Pro or Foxit PhantomPDF).
Finally, we covered a new generation of dedicated prototyping tools (such as InVision) that add features and workflows, making the job of creating interactive prototypes from existing designs easier, more collaborative, and powerful.
In the next chapter, we discuss various tools containing drawing/editing functionality, so they are seen as a more all-in-one option for creating prototypes.