
Chapter 2: The Prototyping Process
In this chapter we're going to discuss getting started with a prototype. We’ll look at the process, including:
- when you should consider creating a prototype
- planning its creation
- gathering resources you might need
- approaches to working on your prototype
Chapter 8 will build on this, going into more depth around how a prototype fits into various project workflows. For now, we'll cover the basics here so that you can start on a prototype today.
When to Prototype
The short and easy answer to this question is: any time, whatever you’re working on––now! But there are some specific triggers to watch out for, at which point you’re likely to benefit from a prototype, so you should consider building one.
You have an Idea
Maybe you have an idea for a design, or for a feature to add to an existing design; for example, a new approach for browsing products on an ecommerce website. You think it’s a good idea but are unsure whether there’s a market for the design, or whether users will want to use it, understand it, or value it.
You could ask people if they think your idea is good. If you’re adding a feature to an existing site, you could ask the site’s users by running a survey. The problem with these approaches is that asking people what they think of an idea, or if they’d use this new feature, tends to be unhelpful. The odds are users will say it’s a good idea and that they’d probably use it. And you’re not much the wiser.
But if you can present your idea in the form of a prototype and ask people to try it out, the feedback from observing people using your design will be much more helpful.
Buy-in from Others
You may have an idea for a new design and need to build a team around you. You may require investors on board to fund development of an idea. Or you may be in a situation where you have to convince management, stakeholders, or other budget owners in your organization that your idea is worth investing in.
A prototype will help you present your idea in a way that the people you’re trying to convince can visualize, experiment with, and get excited about. Investing a little extra time up front will make your pitch that much stronger.
Information Architecture to Visualize, Present, and Test
Information architectures can be unwieldy and hard to visualize and test quickly. Even more so if the structure you’re proposing is broad (that is, lots of pages across a few levels), deep (lots of levels going down), or broad and deep.
You can build a prototype that presents your information architecture (or part of it) with the structure and/or labelling you’re proposing. The prototype will present your structure with an implementation that people can see and explore. This will be much easier to share with your team and stakeholders, and to test with users than any structural diagram.
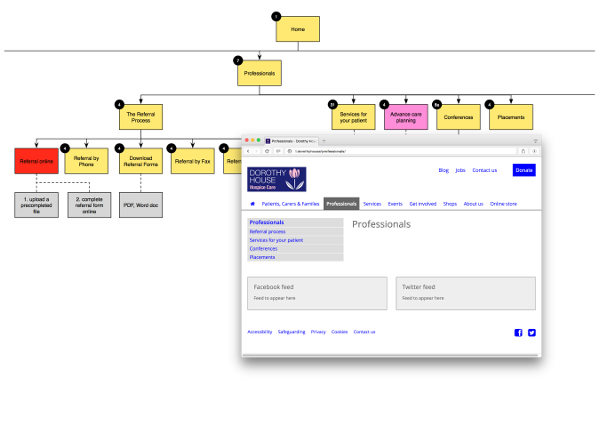
A prototype can present the structure of a website in a way that’s more understandable, engaging, and testable than a structure diagram
A Lengthy User Journey or Several Changes of State over Time
Some designs for a product or feature will have a lengthy user flow, with the user moving across many screens, templates, and elements in order to complete tasks and meet goals. Some will require a user to return to a site or app repeatedly to complete different steps on a user journey. And some will need to present screens and elements in different states at different times throughout a user journey.
In these situations, it can quickly become difficult and unwieldy to develop ideas and explore, communicate, and test your designs when you’re limited to producing static sketches, wireframes, and design mockups. An interactive prototype can tie the different screens, elements, and states together, enabling you to communicate and explore these complex interactions and lengthy user journeys. And testing the designs for these journeys with users becomes much more powerful when users can input and see their own information, rather than having to put themselves into test scenarios.
If you find yourself getting bogged down in the complexity of a design, or you think you might, consider prototyping early to save time and effort.
A Pool of Available Users
You may find yourself working in a situation where it’s easy and cheap to get to real users who can test designs you’re working on.
Examples include:
- an in-house project where you have easy access to staff who will be using your designs
- engaged by a client in a place where you can set up a laptop/tablet and access potential users for quick testing (such as in a museum)
- working on an agile/lean-style project where there are users or user representatives on the project team
In such situations, creating prototypes to place in front of these users can lead to a significant improvement in the quality of your designs, as well as the speed at which you can produce them.
Communicate and Test Designs across Devices
We’ve discussed in Chapter 1 how important it is to be designing across devices, including presenting and testing your designs across devices.
The power of prototypes to help with this cannot be overstated. It’s rare to not need a design to work in several devices. So the odds are strong that most people will benefit from a using a prototype here.
Lots of Ideas–or No Ideas–for Solving a Problem
Collaborative working is a terrific way to solve complex design problems. It can result in a multitude of design ideas; indeed, that’s a benefit of designing in groups. But how do you decide between ideas?
The process of creating a prototype forces you to think about the practicality and reality of implementing designs. You might start to carry out your idea and then realize that you lack the data required to execute your design, or that although the idea seems good on a paper sketch, in reality it will never work onscreen.
You can also use prototypes to test and compare different ideas. You might start working at a high level with several ideas, weeding out those that perform poorly and implementing others to increasing levels of fidelity.

Building out different ideas for a design in a prototype can help to work out which will work best when implemented (1).

Building out different ideas for a design in a prototype can help to work out which will work best when implemented (2).
Building out different ideas for a design in a prototype can help to work out which will work best when implemented (3).
Similarly, if you’re completely stuck on a design, or you feel like your ideas are terrible, the act of building a feature onscreen and have a user try it out might help you out of your design rut.
More Time Spent Communicating than Developing
If you’re having to produce lots of design deliverables, then distribute, share, and explain them to others, you’re probably not spending as much time as you should be actually developing your design ideas.
You might find that a simple change of approach might require resketching, revisiting the information architecture diagram, developing new wireframes, and then sharing all these changes.
A prototype can help to reduce time, effort, and pain spent updating a set of deliverables to make changes to your designs. For instance, changing the label on a navigation item and then sharing that change is trivial if it only needs tweaking in one place.
Specific Aspects of a Design Are Performing Poorly
User research might be run on an existing site, or perhaps there’s tracking of analytics, measurement of conversions, or tracking of users down a sales funnel. Then the research tells you that there’s a problem with a feature, or lots of users are dropping out of a conversion funnel at a specific point. Let's say you’re the product manager responsible and you’ve been tasked with improving it.
This could be a great opportunity to take an existing implementation, come up with design ideas for improving the problematic steps, and implement them in a prototype.
Your starting point for the prototype could be a copy or basic representation of the existing scenario. Then you focus on the problematic point, explore new ideas, communicate them with the team and stakeholders, and test them with users.
Planning
A key approach when building a prototype is to get on with it (see Get On With It! below). But it’s a good idea to be aware of what to consider before you begin so that you start off on the right foot with the prototype. It will make the process easier and help you get the most out of it.
What are you aiming to achieve?
It’s worth setting specific goals that you’re trying to achieve in building a prototype. Following on from the triggers for prototyping that we've discussed, here are some examples:
- Develop the faceted navigation idea for the products page and test it with five users.
- Present the initial site structure proposal to the project team and the client’s stakeholders.
- Improve conversion from the initial login step of the checkout process from 40% to 60%. Explore three UI ideas for improving this step, test it with users, and select one for further design and implementation.
- Create a prototype to demonstrate the photo-sharing concept to investors as part of our initial funding round.
Your goals will almost certainly change over time. Some will be met, others will be discarded, and often you’ll need to introduce new ones. If you have your goals in mind throughout the lifetime of your prototype (that is, as you start building, when demonstrating it to a stakeholder, when sharing it, when planning and conducting a user test), you’ll be better focused, and benefit more from it.
What will you test and demonstrate?
From setting your goals, you can determine early on what kind of tests to run on your prototype. It is hoped that you’ll also have some user research stating some of the key goals and tasks for your users (or user groups).
Given these, you'll probably come up with a set of tasks to present to users in testing as you present and share your prototype. Try to set down these tasks in advance of building your prototype. Then, as you build, come back to your tasks to see if they are achievable. In checking tasks off your list, you’ll know you’re making progress and when to start testing (or retesting) with your prototype, and when to share it with your team and stakeholders, or highlight changes or additions.
Where will you place the boundaries?
You’re developing a prototype, not a full-blown implementation. Given your goals, and the tasks you expect to demonstrate and test with your prototype, you're in a position to define the boundaries. You'll need to consider how much of what you’re designing will be presented, and at what levels of fidelity.
If you’re designing a new feature for an existing site, think about how you will present that feature within the context of the existing site. You could take a copy of the whole site including the content within it as your starting point. Then again, it may be more sensible to just recreate some of the site structure; for example, the top-level navigation in full, but lower level navigation only involving the new feature that you’re designing and testing.
If you’re testing a site structure, you may need to implement all the levels of that structure across the navigation. Initially, you may only need to test the primary navigation, so you’re less concerned about presenting any proposed secondary navigation in the header or footer.
Think about how the prototype will behave when users reach the boundaries of what’s implemented and potentially go beyond them. Users may try to access an area of the site outside the scope of the prototype, either accidentally or because they’re exploring. Strategies for boundary elements (such as links and buttons) to consider here include presenting them as:
- elements with which users can interact but with no onward function; hence, if users click a link, nothing happens
- obvious placeholder content; for example, ‘[link to sign-up form]’ so that users can see what is the next step, yet realize that they’re unable to interact with it
- links to generic ‘Not implemented,’ ‘Not ready,’ or ’Not part of the prototype’ content
- links that go to a specific page but only contain placeholder content, such as a wireframe-style placeholder panel titled ‘Sign-up form’
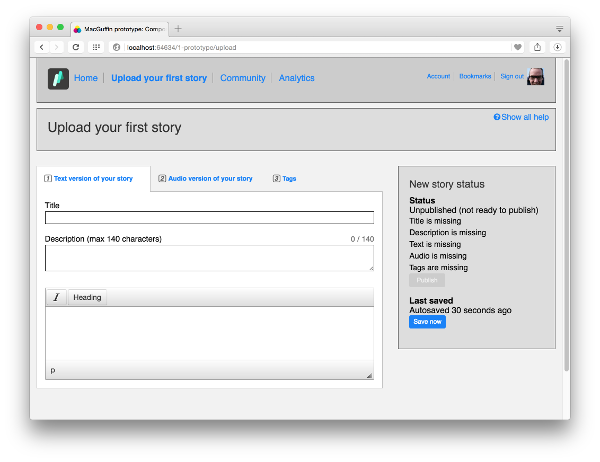
A popular approach is to initially implement widely across a prototype, but shallow. At fffunction, we implement across the range of navigation across the site structure. But we start by implementing at low fidelity with wireframe-style placeholders for modules, features, and content. Then we increase this fidelity as we design the specific areas that we want to explore, present and test with the prototype. We take a placeholder block and expand it out, break it down, and add the content it will contain. This approach suits presentation and testing of a prototype. Stakeholders and users can get a feel for the whole site and explore it, but naturally learn where the boundaries of the design are––where there’s no detail and nothing to explore. This approach works more smoothly than users hitting dead ends with ‘Not implemented’ type messages, or the prototype breaking when users stray outside what’s been implemented.
A simple clickable prototype in OmniGraffle moving into an HTML prototype, increasing fidelity as we work through designs, add detail, and obtain real content (1).

A simple clickable prototype in OmniGraffle moving into an HTML prototype, increasing fidelity as we work through designs, add detail, and obtain real content (2).

A simple clickable prototype in OmniGraffle moving into an HTML prototype, increasing fidelity as we work through designs, add detail, and obtain real content (3).
How will you use your prototype?
It’s crucial to consider what you want to achieve with your prototype and how you want to share it. This will inform which prototype tools and techniques you'll employ, as well as the way you'll use them.
If you’re developing and testing early-stage design ideas for yourself or with a small group of collaborators, the ability to share and demo higher fidelity prototypes may be less important. In this case, you can consider quicker, more basic tools and techniques such as paper prototyping, Keynote/Powerpoint, or a tool such as Marvel or InVision to stitch together sketches or basic mockups. These basic tools and techniques should support enough rapid user research and iteration to enable you to test and refine these early-stage ideas. We'll cover these tools and techniques in more detail later in this book.
If, however, you need to share your designs with the wider project team, or with clients, stakeholders, and third parties, tools that tend towards higher fidelity are likely to be more appropriate. They support sharing and presenting across devices in a more engaging and powerful way, but, conversely, also tend towards higher complexity and slower speeds in the creation of prototypes.
Similarly, you should think about how you conduct user research with your prototype. If you're planning on remote testing, or want users to try your prototype on their own mobile or tablet, you’ll want a tool that makes it easy to create and share an online version. But if you're doing in-person research in a lab or cafe, it may be suitable to create a prototype that only runs on your own device.
Bear in mind that although you may start simple, you may require a more complicated, higher fidelity presentation later on with greater flexibility that's easier to share. You’ll need to weigh up the benefits of a quicker start with basic techniques against the potential time and effort cost of switching later on. There are some tools and techniques that suit working over a wider––and changing––range of fidelities over time.
Only with experimentation and experience will you find which method will suit you and your projects best. The broad overview of the tools and techniques that we give in later chapters should help start you on the road to that experimentation.
Who will work on your prototype, and how?
You need to consider how many people are likely to be involved in your prototyping project, including in what capacity and at what point of the assignment.
If you’re looking to prototype ideas in a workshop environment with multiple collaborators (perhaps including users or stakeholders), think about prototyping in a way that involves everyone quickly and easily. This would include paper prototyping, or using tools such as Marvel or InVision to link sketches and mockups together into clickable prototypes. You’re unlikely to want to consume time and resources getting everyone up to speed with a bespoke prototyping tool, or by developing an HTML prototype.
Some tools and techniques (such as Keynote/PowerPoint, Axure, or OmniGraffle) may be better suited to those working in product or design management roles. The lack of a learning curve for creating prototypes with these tools may suit them if they’re already familiar with office, publishing, productivity, and basic design software and tools.
If you’re working with a team of experienced web designers and developers, HTML prototyping could be a better choice. They will have plenty of experience of the technologies and processes involved, so they'll be able to contribute effectively to design ideas. They’re also likely to be able to pull real content and data into a prototype, as well as process and present real user input with web development tools with which they’re already familiar.
How much time, budget, and resources do you have?
If you have time, money, and resources available, you can afford to invest more in getting up to speed with a new way of working. With this scenario, you can potentially trial bespoke software and tools for a time so see if they suit your approach.
Alternatively, you might be in a situation where you’re taking a risk and using your time and budget to sell the idea of prototyping where it hasn’t been used before. In this case, you’ll need to work as efficiently as possible, probably with limited resources. This is where you can consider cheaper and more basic approaches such as Keynote or Powerpoint, which are described in Chapter 6.
What’s the starting point for your prototype?
If you (or somebody else) have already developed some design ideas with wireframes or mockups, consider using tools or techniques that enable you to use them to create interactive prototypes. Tools such as Marvel or InVision allow you to take images of sketches and wireframes (potentially at varying levels of fidelity) and quickly turn them into clickable prototypes.
If you’ve been given feedback on a problematic feature from a round of user tests, you may want to pick an approach that allows you to take what’s there and experiment with changes to it. That might be using HTML prototyping, where you take the HTML and CSS to present a template with the current implementation before reworking to develop and test design changes. On the other hand, if the feature was developed from wireframes in a program such as Balsamiq, Keynote, or OmniGraffle, you could explore design ideas with an interactive prototype from the existing wireframes, making changes as you see fit.
Gather Resources
You’ll have a better run at building a prototype if you spend time up front thinking about what resources you’ll need, as well as where they’ll come from.
What you need will depend on the prototyping technique you employ and the task you want to achieve with your prototype. Here is what you might need as you progress.
Existing Design Resources
Design resources in developing your prototype may include:
- relevant background information, whether it be from kickoff meetings; about the project team and stakeholders; outlining the business/organization and its goals; detailing marketing plans or audience segmentation; the project plan, timescales, and milestones
- any user research that's available, including personas or outputs from user interviews or surveys
- information architecture such as sitemaps; taxonomies; guides to labelling, terminology and language; outputs from any card-sorting exercises; or suggested navigation content, layout, and structure
- brand guidelines, visual design style guides, style tiles, or pattern libraries
- sketches and wireframes
Gather all the existing design resources that are available, such as sitemaps, brand guidelines, and insights/output from user research
Stationery (for paper prototyping)
We will discuss paper prototyping in depth in Chapter 4. But since we’re talking about resource gathering here, what you'll need for this technique is stationery––paper, card, adhesive tape, and sticky notes––and lots of it.
Content
This could be underpinned by a documented content strategy and/or content style guides. It might include existing marketing content, or you might be able to access content from an old or existing site. If you’re lucky enough to be working on a “content first” project, you may have early content around which you can design. Content that’s helpful in a prototype includes labelling, navigation and taxonomies; headings; copy; images; video and other media; and download files.
As you see what content you have to use and reuse, look out for gaps of missing content, then flag these as tasks for the project team and stakeholders. You might discover that you need a copywriter working on your project.
Data
If you’re working on a design that is data-driven or involves the presentation of data, having real data to work with will significantly improve the quality of your prototype. Depending on how you build your prototype, you might use data sources such as databases, APIs (application programming interfaces), CSV (comma-separated values) files, and other forms. You may be able to load and interrogate these sources, or you may have to roll your sleeves up and manually load data. Having realistic data (even if it’s unofficial or less than perfect) makes a big difference to the quality, power, and usefulness of a prototype. But it can come with a price: don’t underestimate the potential effort involved in finding data, moving it around, manipulating it, cleaning it up, importing it, and working with it.
An example of real data making a big difference to the quality and usefulness of a prototype is an ecommerce site. Being able to load in realistic product numbers with sufficient levels of detail (such as brands, descriptions, categories, prices, and images) makes designing and testing the site's features easier and more powerful.
If you can use real or sample data sets in your prototype, it will be more realistic and compelling
Get On With It!
As a section title this sounds a little flippant, but it expresses an important point with prototyping. Although you should spend some time planning your prototyping approach, avoid getting bogged down in planning and preparation.
One of the main benefits of prototyping is that it is, to some degree, quick and dirty. We should never expect to get it right first time––indeed, it would be surprising if it did. In prototyping, we should adopt a mindset where we are prepared to throw things away. Be prepared to try a tool or technique, realize when it fails to work, and throw away what you’ve done and try a different approach. Do the bare minimum of planning so that you’re reasonably happy that you have an approach to try and then get started.
Open your tool of choice––your editor, or your pack of paper and sticky notes––and start creating.
Starting Top-down versus Bottom-up
To help decide where you'll start, use your prototype's goals and boundaries, and your ideas for how you will use and share it. If you’re using a prototype to help you design specific features and elements, start to build your prototype around them. Think of this as bottom-up design.
If you’re using your prototype to help inform decisions around information architecture and site structure, you’ll probably be better off starting your prototype at the top levels of that structure, working down to the specific content, elements, and features. This is top-down design.
You'll probably find that you end up using a mixture of both approaches. At fffunction, we work in stages, so we use a prototype to explore initial feature design and/or structure ideas, working it up to a state where it’s suitable for presenting, sharing, and testing.
Recycling Your Material
If you’ve been creating prototypes for a while, you probably have a collection of material to work with already. In production code, we might be cautious about copying and pasting old code to implement a new design, as it’s potentially inefficient and risky. But when we’re prototyping, we tend not to worry so much about reusing code, or whether it’s an inefficient or inelegant way of working.
Use old projects as a starting point to get you started quickly. Throw away what you don’t want, and grab, adapt, and reuse the content that you do wish to use.
None of this is to say that you should avoid working efficiently altogether. If you find yourself continually reusing the same components, create a library. And if you're copying and pasting the same group of elements over and over again, create a symbol to benefit from the “edit once, update everywhere” capability. Sketch provides a good example of using symbols––we'll discuss Sketch in Chapter 5.
Working Collaboratively
Generally, prototypes suit the collaborative working process very well. The various design skills of members on the project team can be used to best effect by working together on a prototype.
For example, someone who is responsible for information architecture can build out the top-level structure of a prototype, adding in navigation, labels, and so on. Simultaneously, another team member could be developing a user interface for a specific feature, which is then integrated into the overall structure.
Similarly, if you’re working on a complicated piece of interaction design, you could set up a basic framework in which that interaction will sit, and then have different team members try out their own ideas for that interaction. You can then switch between the ideas, sharing, demonstrating, and testing them out. Then you might bring together the best aspects of the various implementations to produce the team’s combined design effort.
You can work together efficiently if there's a way to give other members of the team the ability to edit content and data in your prototype. You might start by demonstrating a prototype with dummy content to a client. If they can then replace that content with real content, they can be involved in improving the fidelity of the prototype, testing out real content to see what works best in achieving the design aims.
The degree to which different prototyping methods support this kind of collaboration and integration of designs varies. Paper prototyping is very well suited to this kind of work because “integration” here means cutting and sticking pieces of paper together. If you’re working in HTML, a solid collaborative workflow (such as using version control to manage everyone’s code and help merge code) will make a big difference. Some tools don’t easily support such collaborative working, making it difficult to work in this way. So it’s another factor of which you should be aware when considering how you work.
Iterate and Demo, Testing Early and Often
Prototypes are most effective when you work quickly and share your work with your project team, stakeholders, and users as often as you can.
If you spend too long polishing a prototype to make it look amazing––populating it with loads of real content and data, and building out every element and interaction to a high degree of a detail––you miss out on the benefit of receiving feedback early and often.
Encourage your team and stakeholders to review your work as it progresses, giving feedback quickly. If you can, aim to put your work in front of users every week, or every day, or every time you finish up implementing a design idea. If you’re working in sprints, test your prototype with users at the end of each one.
Summary
In this chapter, we’ve aimed to establish a balance between planning your prototype and getting on with building it.
We’ve considered some points at which you might consider using a prototype, and then we’ve looked at factors you should be thinking about when planning.
Finally, we’ve talked about the benefits of working quickly and collaboratively, iterating frequently, and demoing and testing early and often.
In the next chapter, we’ll start looking at the range of prototyping tools and techniques available to use.