
Chapter Five. Scripting Enhancements and Interactivity
From its humble beginnings—when it was often misunderstood as a quirky “toy” language—to its current status as one of the most widely used programming languages in the world, JavaScript has come a long way in a short time. Today’s browsers are built on powerful processing engines that enable us to create rich experiences with JavaScript that rival those found on the desktop, with speed and capabilities advancing at a rapid pace.
Using a test-driven progressive enhancement approach, we can apply JavaScript in a more targeted manner, enhancing foundation markup in powerful ways to create the highly interactive web applications users want, while making sure we protect accessibility for browsers that lack JavaScript support.
In this chapter, we’ll discuss how to apply JavaScript unobtrusively to extend a page’s functionality, while preserving and even enhancing its accessibility. We’ll consider JavaScript development in the context of four basic areas:
• Applying JavaScript to HTML
• Understanding JavaScript’s place in the basic experience
• Scripting the enhanced experience
• Preserving and enhancing usability and accessibility
As we go, we’ll detail the ways to structure JavaScript unobtrusively and write it as generically as possible so that it may be reused in different contexts.
How to properly reference JavaScript
Separating JavaScript-driven behavior from HTML markup is an essential best practice in making progressive enhancement possible; clean separation allows scripting enhancements to be targeted to capable browsers. When coding with a PE approach, JavaScript should be applied unobtrusively by placing it in an external file and referencing it in the page head.
Avoiding inline JavaScript
It’s very common to see inline JavaScript code blocks or event handlers—like markup such as onclick or onmouseover attributes—added to HTML markup. Inline JavaScript may seem like a convenient way to quickly add interactivity, but there are several important reasons why this approach is a bad idea:
• It increases code weight. When events are applied inline, they must be repeated on each individual element in the markup, bloating the page file size and slowing load times.
• It increases maintenance complexity. Maintaining inline scripts requires meticulously noting where instances of events are written into the markup, and then painstakingly finding and updating each instance where JavaScript is embedded directly in the content of HTML documents. If individual instances are missed, they could cause errors.
• It applies behavior in all browsers that support JavaScript, including those with poor support. Some users may experience errors and accessibility problems when certain scripting techniques fail.
Fortunately, in the vast majority of cases, inline scripts are entirely avoidable; JavaScript provides native methods for traversing the markup structure of a document to apply events without having to add attributes or edit the markup.
Referencing external JavaScript
Well-formatted script-file references are easy to construct and apply in HTML. For each file, add a script element to the head of the HTML document, and set its src attribute to the path of an external JavaScript file:
<script src="js/enhancements.js" type="text/javascript"></script>
The type attribute is also necessary to communicate the file’s content type—in this case, text/javascript—for the server to interpret it properly.
There is an ongoing debate in the development community around where script files are best served: Does it belong in the head element along with CSS references, as noted in the HTML 4 specification? Or at the end of the document so that content loads first?
From our perspective, these are not the critical questions. When coding for progressive enhancement, the most important aspect of referencing external scripts is not where they go, but when they’re introduced. Script files should be loaded to the page only after it’s certain that the browser can render them properly. To determine which script files will work on a device, it’s necessary to test the scripts before the browser loads them, and then serve only the script enhancements that pass the test. (We’ll describe in detail how to load scripts in this way in the next chapter, “Testing browser capabilities.”)
Understanding JavaScript’s place in the basic experience
In the previous chapter, we listed several “safe” CSS properties that we recommend for making small visual improvements to a page’s basic experience that don’t run the risk of introducing usability problems.
In the case of JavaScript, however, there is no such list. When JavaScript encounters a problem—whether due to poor browser support or faulty developer logic—it has a tendency to go out with a bang and expose errors to the user regardless of their severity. Worse, JavaScript errors can stop a process from running, and leave a page partially enhanced or entirely unusable.
For this reason, we recommend including one JavaScript reference in the foundation markup: the very limited JavaScript to run the capabilities test suite. We always build the basic experience—foundation markup and safe styles—with standard HTML static elements and form controls, to build a functioning interface that works universally across devices without any JavaScript events attached. If—and only if—the browser passes all capabilities tests required for the enhanced experience, do we use EnhanceJS to load in additional JavaScript for layering on enhancements.
Best practices for scripting enhancements
JavaScript can be used to enhance a page in a number of ways, from minor content show/hide toggles to complex transformations that alter the user experience entirely. In this section, we’ll demonstrate some best practice approaches for applying JavaScript to a page using progressive enhancement, to add enhanced behaviors to content already on the page, generate or request new markup, apply enhanced styles, and manage content visibility.
Running scripts when content is ready
Unlike CSS, JavaScript requires that the HTML elements it manipulates be present the moment it executes; if a required element is not available for the script, the browser will throw errors. To avoid this situation, JavaScript must be delayed from executing until the markup has finished loading.
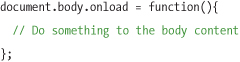
JavaScript’s native onload event handler triggers when all contents contained within the element it’s bound to—including all dependencies like images and iframes—have finished loading. Enclosing a script in an onload event handler ensures that the elements acted on by the script are loaded and ready before it runs:
In many cases, scripts can safely execute once the HTML markup is available, and before the complete page assets (images, iframes, etc.) have finished loading. There is no single native JavaScript method that works across all current browsers, but popular JavaScript libraries provide custom event handlers—such as jQuery’s ready method—that execute a script as soon as the basic markup structure is in place:

Applying behavior to markup
In the enhanced experience, one of the main activities JavaScript controls is unobtrusively applying behavior to respond to user interaction. There are two ways to attach or bind JavaScript event handlers to enhanced markup:
• Event binding applies event handlers like mouse clicks or keypresses to specific elements on the page.
• Event delegation takes advantage of JavaScript’s event bubbling feature to apply event listeners to a parent container, instead of binding handlers directly to individual elements.
Using event binding
JavaScript is an event-driven language, meaning that it can either execute the moment it loads, or it can “listen” for an event to trigger it at a later time. JavaScript events correspond to environmental actions such as load and error, and to user actions like mousedown, mouseup, click, mouseover, mouseout, keypress, and more.
JavaScript event handlers are built-in methods for applying behavior to page elements. When behavior is bound to elements using an event handler, its execution will delay until the event occurs. JavaScript’s event-listening capability is a major factor in building web applications that feel smart and responsive.
For example, the following code shows how to bind a click event handler to an anchor element after finding it by its id:

This method of binding event listeners, however, will overwrite any listener previously applied to the same event on that element. To add event listeners without overwriting others, the W3C’s DOM Level 2 event model specifies the addEventListener method. Internet Explorer implemented its own event binding method, attachEvent, meaning a cross-browser solution for adding event listeners requires a check to utilize the supported method.
To simplify binding multiple event listeners, JavaScript libraries provide custom methods, such as jQuery’s custom bind method. Libraries also provide selector engines that allow elements to be found with CSS style syntax, making it simple to bind events by ID, class name, or any CSS selector. The following code demonstrates a bind method that accepts two arguments: an event name (in this case click, but it could also accept others like mouseover, mouseout, etc., or even multiple events) and a callback function to execute when that event is triggered:

The jQuery bind method’s callback function executes within the scope of the DOM element to which the event is bound, which allows you to refer to the element with the JavaScript keyword, this. For example, an element’s class attribute can be modified using the this keyword when the element is clicked:

Using event delegation
Binding events directly to elements is useful, but when you’re building complex applications with lots of elements that should behave in a similar way, it’s more efficient and manageable to use event delegation to assign events.
One advantage of event delegation is that events bound to a parent element automatically apply behavior to child elements, even if they are not yet on the page. This makes it a particularly useful technique for scripting enhancements on pages where markup is added after the widget is created. Event delegation also applies events quickly, and is very efficient with memory consumption: instead of looping through every node in a tree to bind individual events, all the logic can be assigned once at the parent level.
Events have native properties—such as pageX and pageY (referring to the mouse coordinates) and target (referencing the element that triggered the event)—and jQuery normalizes these properties’ names across browsers. The target property is particularly useful for applying event delegation because it can be used to find out which element triggered an event.
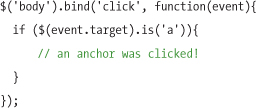
Event delegation refers to the practice of binding an event to a parent element, like a widget container or the body element; when an event is triggered on an element nested inside the parent, the event “bubbles” up to the parent node and triggers the execution of a script that checks which element was the target of the event, and if that target matches the element we’re looking for, the appropriate script will run.
The first argument passed to an event handler’s callback function references its event object, which contains all of that event’s properties. The following code shows an event bound to the body element, with conditional logic enclosed to check if the target of the click was an anchor:
jQuery simplifies event delegation even further through its live method, which automates event delegation by applying the event to the document itself, and checking the target of the event to see if it matches element to which the live method was applied:
$('#myAnchor').live('click', function(){
this.className = "clicked";
});
Building enhanced markup with JavaScript
It’s often necessary to use JavaScript to create and insert additional HTML for an enhanced experience. For example, a select menu in the basic experience may be transformed into a slider in the enhanced experience. Since this slider markup isn’t usable without JavaScript behavior, and would just add extra bandwidth and clutter to the foundation markup, it should not be included in the foundation markup. Instead, the new slider markup must be inserted during the enhancement process.
Enhancement-specific markup can come from one of two places: it’s either generated with JavaScript based on information derived from the foundation markup, or retrieved from the server with an Ajax request.
Using the foundation markup as a guide for generating enhanced markup
When possible, it’s good practice to use the basic foundation markup as the reference when generating the enhanced markup.
For example, imagine you want to create a slider from a native HTML select element in the foundation markup. We can use JavaScript to parse text from each option element and find out which is currently selected in the native select. With this data, we populate a generic slider markup “template” in the script, and then inject the resulting enhanced markup into the page. Dynamically generating content is much faster than requesting additional content with Ajax, because everything is already in the page. And by writing the script generically to grab the foundation markup as a data source to populate the template—rather than embedding content into the script—we can reuse the same script logic for many different sliders in a site. (We’ll present two examples of this technique in detail in Chapters 12 and 17.)
There are situations where we choose to encode data in the foundation markup so that it’s available to be used by the enhancement script. For example, the location of external content that will populate a tooltip can be encoded in a data attribute that the enhancement script will use to generate an Ajax request. The HTML5 data prefix can be added to any string of text to create a custom attribute that complies with web standards.
In rare cases, storing a small fragment of content or markup in a script is the best course of action. Consider, for example, the text for a Close button in a dialog’s title bar. While the dialog’s main content could come from either the foundation markup or a separate file via server request, its title bar controls and Close button are necessary only for using the dialog itself. The content has no place in the foundation markup, and from a performance standpoint, it’s very inefficient to make a server request for this small bit of text. In specific cases like this, we believe it makes sense to put content into JavaScript; when we do, we’re careful to store the text in a configurable JavaScript variable, and to define variables in a convenient location such as at the top of the JavaScript file.
Requesting additional content with Ajax
In some cases, adding additional markup to the page using Ajax makes more sense than keeping it in the foundation markup—for page size or speed optimization, to avoid confusing the basic experience with extra markup, or for other business reasons.
Ajax—a technology that began as a proprietary feature of Internet Explorer 5, and was later adapted as a web standard and integrated into most modern browsers—lets JavaScript request data from the server to update portions of a page without having to reload the entire page.
Requesting content from the server using Ajax is a straightforward process: a script sends a request to the server for a particular piece of HTML; the server returns a text response that can be in plain text, XML, JavaScript (JSON), or HTML format; and the script inserts the text into the page.
jQuery offers several methods for Ajax functionality, such as:
• The ajax method, which is the most robust, offering a normalized interface to the browser’s XMLHttpRequest API, as well as various events and properties unique to jQuery
• The get and post methods, which offer shortcuts to the ajax method, to make requests with more concise configuration
• The load method, which is similar to get, except that you call it on a DOM element within which you’d like the response to be inserted
The load method comes with the additional benefit of letting you specify a request filtered to a subset of the response content. For example, the following code requests only a portion of a page (news.php) by specifying a CSS selector (#latest):
$('div#news-ticker').load('news.php #latest'),
Loading HTML fragments in this way is particularly helpful for retrieving a small subset of content from a larger page.
One potential downfall of requesting content with Ajax is the time required for a server response, which can cause noticeable delays in the user interface on slower connections or with larger requests. When retrieving data from the server, it’s good practice to display a “loading” indicator while the request is in progress.
Deciding when content should be included in the foundation markup
In most situations, all content or functionality should be presented in the foundation markup. But there may be situations where a particular feature may be too complicated to use comfortably without JavaScript behavior. For example, in Chapter 2, we noted that recreating the enhanced photo-cropping tool in the photo manager—in which the user needs to specify the exact pixel coordinates for crop points—would be too difficult to use in the basic experience. Given the complexity, cases like this might best be reserved for the enhanced experience.
There also may be cases where content doesn’t make sense when JavaScript is disabled. For example, a “Print this page” link relies entirely on JavaScript to work, so it will appear broken to users when JavaScript is unavailable or disabled. Similarly, markup for a custom form control that requires JavaScript to function will only confuse users in a non-JavaScript environment. Markup for these types of features should be excluded from the foundation markup, and added with JavaScript only in the enhanced experience.
Managing content visibility
When adding additional content and markup to an enhanced page with JavaScript, there is a decision to be made about whether the original foundation markup should remain visible.
Sometimes the enhanced content acts as a supplement to the foundation markup, allowing both to meaningfully coexist on the page. Consider a canvas-based chart generated from an HTML data table in the foundation markup: the visual chart presentation and the detailed data table could work together and provide additional richness and meaning for users, so we would definitely consider displaying both in the page together. Similarly, if we enhance an input or a custom select element to a slider, we frequently keep both the native element and the enhanced slider on the page to give users a wider range of interaction opportunities.
There are cases, though, where the enhanced content completely replaces the foundation markup version, like when we replace a native select element with a custom-styled version of that control. Having them both visible at once is not only redundant, but also potentially confusing to the user. In these cases, it’s important to hide the native control from users.
Hiding content visually, but not audibly
When we think about showing and hiding, we’re always considering the broadest range of users, including those using screen readers. As we discussed above, when we use HTML table data to create a chart using the HTML5 canvas element (described in detail in Chapter 12), the chart and the table are somewhat redundant content; since they’re repetitive, some designers might choose to hide the data table and display the chart. But the chart is useful to sighted users only—removing the table of data values from the page entirely would render the content inaccessible to people using screen readers.
When hiding content from display that is still necessary for screen readers, it’s crucial avoid using CSS properties like display: none or visibility: hidden; they’ll not only hide content from sight, but potentially from screen readers as well. To hide content safely, it should be absolutely positioned with a large negative left value (position: absolute; left: -99999px;) that moves it reliably off screen.
Hiding content from all users
A few custom form controls generate content in the enhanced experience that performs the same essential function as the foundation markup; keeping both the native and enhanced version of the control on the page is a nuisance to all users. Take the case of a custom-styled select menu (described in detail in Chapter 17), which uses elements such as a, ul, li, and div to create a CSS-friendly, functional replacement for a native select element. Once the enhanced control is generated and inserted into the page, the foundation select element is wholly redundant, and seeing both may be very confusing.
Many designers/developers would remove the native control entirely from the page with JavaScript, and leave only the enhanced control. Unfortunately, this can cause big problems: the new markup, while perfectly functional for making a selection, has no way of submitting its data along with the rest of the form—it’s just divs and a list.
In this case, it’s necessary to create a proxy, which means we hide the native form control visually from the screen using display: none, but still keep it in the page markup to hold the value for form submission. Then, we use JavaScript to connect the replacement enhanced control to its native counterpart, so it manipulates the hidden select element programmatically as the user changes its values. When coded properly, a proxy allows the form to be submitted with the value from the native control—as far as the server is concerned, it’s as if the enhanced control is not even there.
Applying style enhancements
Loading and manipulating CSS to style the HTML markup is fundamental to creating an enhanced experience. JavaScript can facilitate enhancement in a number of ways:
• Dynamically loading additional CSS files. JavaScript can be used to load style sheets into a page. This is a key factor of our approach: we keep complex styles that we know are inconsistently supported in some browsers in external style sheets, use EnhanceJS to first test whether a browser can successfully render style enhancements, and then inject one or more enhanced style sheets when those certain conditions are met. This technique is useful for making large-scale enhancements that require application of complex styles, like transforming a linear page into a multi-column grid layout.
• Toggling HTML classes. We advocate using JavaScript to add, remove, and toggle CSS classes, instead of writing inline CSS rules with JavaScript. Because style rules are contained in external CSS files and not sprinkled throughout the script logic, we can maintain a crisp separation between style and behavior, and simplify debugging and maintenance. JavaScript also provides a way to extend CSS support to browsers that don’t natively support pseudo-classes such as :hover or :focus—for example, JavaScript makes it possible to dynamically assign a “hover” class when the user places the mouse over an element.
• Applying style inline with the style attribute. There are very limited situations where it’s not practical to manipulate CSS classes. For example, when JavaScript needs to dynamically set or animate style rules—where the position and dimension properties of a dialog window may need to be manipulated hundreds of times as it’s animated, resized, and repositioned on the screen—creating a fixed set of static classes would be impractical. In this case, limited use of setting inline styles dynamically provides the most efficient option. When an animation requires dynamic style scripting, like a cross-fade effect, it’s also good practice to remove any inline styles when the animation is complete and replace them with class attributes to maintain their visual appearance and avoid leaving inline styles in the page. Finally, in cases where markup is used to present data visually—such as a div element styled to appear as a bar in a bar chart—it’s practical to use JavaScript to generate an inline style and apply it to that div so its appearance matches the data dimension.
Preserving and enhancing usability and accessibility
Basic pages built with semantic HTML tend to be naturally accessible. Screen readers and other assistive technologies are designed to understand HTML and convey its content to the user; foundation markup will rarely need to be tested in these environments—quite frequently, it just works.
Unfortunately, with enhanced experiences, this rule doesn’t usually apply. Even enhancements built with the most descriptive markup possible are likely to run into situations where HTML simply doesn’t have elements to describe every feature. A sighted user can easily recognize a custom-styled select menu as the equivalent to a native select. By contrast, a screen reader will recognize it only by the elements used to make the control—a standard HTML link, a div or two, and an unordered list—which are hardly descriptive of its role in the user interface. Fortunately, ARIA attributes help alleviate this problem—at least for users with modern screen-reader software—which we’ll discuss later in this section.
When users recognize a familiar control, they often expect they’ll be able to use familiar keyboard conventions—like opening a select menu with the spacebar, navigating through its options with arrow keys, and making a selection by pressing the spacebar again. When creating custom controls, the developer is often responsible for manually implementing behaviors that are native to HTML controls. Building custom controls that are both keyboard accessible and meaningful to screen readers requires additional effort and coding time, and unfortunately is often left to the last minute and implemented sloppily—or left out of the finished product entirely.
This is a major problem, not only for users with disabilities, but also for those who choose to browse the web with, or are limited to, keyboard navigation. Custom controls that lack keyboard shortcut functionality are a step behind their native equivalents, and can frustrate users to the extent that it negates the benefits of the enhancements.
For these reasons, it’s important that custom controls replace the native control’s functionality, and not only support the spacebar, Enter, and arrow keys, but also Page Up, Page Down, Home, End, and more. These features require additional time and careful attention to develop well and accurately (which is why, when in doubt, we recommend always considering native controls first). But there are definitely cases where custom enhanced controls are worth the effort, and that’s why we feel it’s crucial to factor in all the accessibility and usability features of the native control into a custom component.
Implementing keyboard access
When developing custom components, it’s important to replicate native functionality before extending it with additional features. This is especially critical with keyboard events, because users have preconceived expectations about how they can interact with a familiar control. In this section, we’ll discuss the two main areas to consider with keyboard access: tab focus and scripting events.
Managing tab focus
Of all the HTML elements, only a few—including a, input, button, select, and textarea—can receive native keyboard focus. Focus is handled via the Tab key, and tabbing repeatedly will move focus between eligible elements on the page.
In basic pages, the order in which elements are tabbed through is called the tab order, and that order can be controlled with the tabindex attribute, which accepts two values: zero to make an element focusable and assign it to the tab order in default source code order; or negative one (-1) to remove an element from the tab order entirely. (Though it’s technically valid to assign a positive integer to override the default tab order, doing so is not recommended because, when done incorrectly, it can introduce usability issues.)
Managing focus within an enhanced web page requires the use of JavaScript to make a custom control behave like its native counterpart: specifically, it’s important to write logic that assigns focus to the control with the Tab key, and once focused, enables the spacebar, Enter, arrow keys, and others to navigate within the control, depending on its intended use. Similarly, pressing the Tab key should move focus away from one control and onto the next.
Some elements within a custom control will sometimes have native focus capabilities that we don’t want to replicate. For example, in our custom-styled select menu, we use an unordered list with a set of anchor links (which would natively receive Tab focus) for our options. In that case, we want our anchors to behave like standard select option values, which are natively accessed using arrow keys—we can set the tabindex of each link (a) to -1 to prevent it from receiving Tab key focus. It’s crucial to note that once an element’s tabindex is set to -1, its focus can be managed only programmatically, using JavaScript. (We’ll demonstrate in detail how to manage focus with a custom select menu control in Chapter 17, “Select menu.”)
Scripting keyboard events
A number of keyboard events in JavaScript—such as keydown, keyup, and keypress—can be bound to elements. Once a keyboard event is bound, you can use conditional logic to determine which key was pressed, and which actions should occur as a result.
The keyboard events provide a property called keyCode, which stores a number corresponding to the key that was pressed to trigger an event. (Keycode number references are freely available online.) The following code demonstrates binding a keypress event to an anchor, using jQuery:
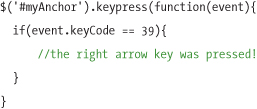
Building on this logic, you can map functionality in a custom component to keyboard equivalents. For example, the previous code example binds a keypress event to a link, and executes a script when the Right Arrow key is pressed. This particular code could be useful when adding keyboard support to a tree control, for example, to focus on a tree node and toggle its child elements’ visibility with the arrow keys.
Assigning WAI-ARIA attributes
When keyboard support is integrated into a custom control, it’s much more accessible to all users. But screen readers must still be properly notified when markup is playing the role of a custom component, and isn’t simply there to organize content. To handle this, we use attributes outlined in the W3C WAI-ARIA specification (commonly referred to simply as “ARIA”).
In Chapter 3, “Writing meaningful markup,” we introduced ARIA and discussed how applying roles to elements in the foundation markup enables a logical set of navigation options for screen-reader users. ARIA attributes can also play an important role in identifying and describing dynamic content in the enhanced experience. For example, a clickable Print button may be built with a standard HTML anchor link; it can be appropriately described as a button by applying an ARIA role attribute with the value button.
The majority of ARIA attributes and their associated values are intended for use in enhanced experiences, and as such are commonly applied using JavaScript. Like any HTML attribute, ARIA attributes can be set or modified using JavaScript’s native setAttribute method. The following code demonstrates assigning a role of button to an anchor link:
document.getElementById('myAnchor').setAttribute('role','button'),
And jQuery makes the same code significantly shorter:
$('#myAnchor').attr('role','button'),
Testing accessibility
Enhanced experiences often depart from and change native behaviors, so it’s critical to test them using assistive technology such as screen readers. Developers need to not only make sure their code is technically compatible with these devices, but also that the page makes sense from the user’s perspective.
Some of the most popular screen readers are quite expensive, to the point of being cost-prohibitive for many developers. Luckily, there are many free readers available that are comparable and quite useful for accessibility testing:
• The Mac operating system comes with a very robust built-in screen reader called VoiceOver, which can be enabled by launching System Preferences and navigating to the Universal Access section. (There are also a number of other useful features for testing accessibility under Universal Access, like the ability to toggle the screen into grayscale to check for appropriate levels of contrast.)
• For Windows users and developers testing on a PC, we recommend downloading and installing the free NVDA screen reader, available at http://nvda-project.org.
Tip
For a great intro on installing and using NVDA, visit www.marcozehe.de/articles/how-to-use-nvda-and-firefox-to-test-your-web-pages-for-accessibility.
• JAWS, one of the most popular screen readers on the web, is available as a free 40-minute demo version. This version is slightly inconvenient to use (it requires restarting Windows after 40 minutes of usage), but we still think it’s worth it, given the popularity of this commonly used screen reader. (At Filament Group, we install VMWare Fusion on our Macs to run Windows alongside our other applications, so we can test all three screen readers mentioned above.)
In addition to internal testing with screen readers, one other very valuable way to know if a website is accessible is to perform live usability testing with disabled users. The authors of Just Ask: Integrating Accessibility Throughout Design maintain a very helpful resource site with helpful tips, guidance, and resources at www.uiaccess.com/accessucd/ut_plan.html.
Maintaining state and preserving the Back button
Ajax applications in particular introduce a unique accessibility problem: as users interact with the page, a disconnect may develop between the content represented on the screen and the page state as shown in the browser’s address bar. Ajax calls are not natively tracked in browser history, so changes may not reflect the user’s perception of his or her actions.
A good rule of thumb when deciding whether to track page changes in the browser’s history is whether a user would likely think that their action moved them to a new “page.” For example, if a JavaScript-based tab strip controls enough of the page that it feels like a primary navigation element, each tab click may be worthy of tracking via history, so the user has the option of going back through the history of tab views or bookmarking that page. Tracking may also be appropriate on a search-results page for navigating among sets of results, or for keeping one’s place in a set of tabs.
Tracking state in Ajax applications requires JavaScript to update and watch for changes to the URL hash (a segment of the page URL intended for linking to a section of a document by its ID attribute). For example, the following URL would scroll the page to the element with an ID of content:
http://example.com/#content
In the “Taking it further” section of Chapter 9, we review how to build a plugin that manages history within an Ajax application using the URL hash.
* * *
Now that we’ve reviewed how to apply JavaScript unobtrusively, as well as how to write semantic HTML, and cleanly separate and write effective styles, you have all the core elements of progressive enhancement in hand. Next, we’ll show you how to tie it all together using capabilities testing to ensure that you’re delivering enhancements to only capable browsers.