
Chapter 10. Hardware Testing
A CRUCIAL STEP OF the sound design process is hardware testing. This chapter should give you a good understanding of how the hardware will function, and serve as a guide on how to diagnose and fix a number of common problems related to distortion, playback hardware, and client expectations.
The testing phase consists of quality control, synchronization, and tuning. Testing helps identify not just the performance but the character of the audio hardware you’re designing for.
When you don’t have access to quality speakers, it is important to work within your hardware limitations. Limit instrumental tone color to what sounds good on the target hardware. Work with frequencies that don’t cause the internal components of the speakers to rattle when played. Avoid sudden onset transients like the clang of a bell, the thump of a snare, or the heavy hammer of a piano note.
How Speakers Work
A typical speaker consists of a permanent magnet, an electromagnet, a frame, and a cone (see Figure 10-1). The responsive component of the speaker, which converts signals into sound, is a copper coil wrapped around Kapton, a fire-resistant polymer material that replaced the paper used in pre-1970s speakers, making them less likely to catch fire. This component is the electromagnet of the speaker, also called a voice coil. The voice coil is attached with flexibility of movement to the frame, attached rigidly to the speaker cone, and suspended above the permanent magnet at the base of the speaker.
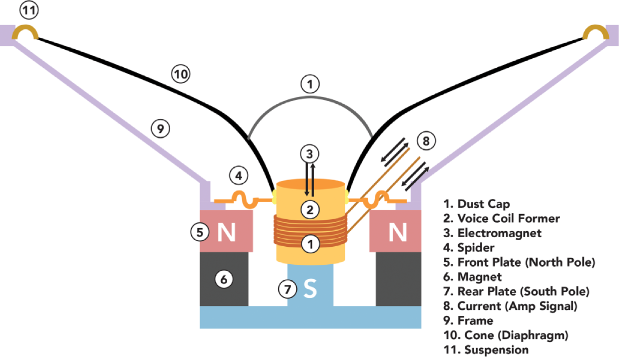
Figure 10-1. How a speaker works. It’s possible to overwhelm a cheap speaker with a loud sound (such as the onset transient of a piano note), causing distortion.
The electrical current running to the voice coil is an alternating current, which causes the poles to rapidly reverse position. This makes the magnets attract and repel each other, causing the voice coil to move back and forth, rapidly vibrating the cone and creating sound waves.
Quality Speakers
There are many differences between cheap and expensive speakers. Quality speakers:
- Do a great job of reproducing accurate instrumental tone color.
- Have a large dynamic range and can faithfully reproduce the wide range of sound the human ear can experience. Top-quality speakers use different-sized cones for high, medium, and low frequencies.
- Are able to reproduce a large set of frequencies without distortion. You might find that turning up the volume of a low-quality speaker causes sound to distort. That is because the signal overwhelms the speaker’s capability. Low frequencies take more energy to produce than high frequencies, so cheap speakers and hardware alarms often operate in the higher end of the spectrum. It is more expensive to create a speaker that can reproduce the deep thundering noise of low bass frequencies.
- Can convey a sense of the acoustic space in which the recording was originally made. You can hear the reverb, room size, and position of instruments in the room.
- Include vibration insulation. Some of the cost of a quality speaker can be attributed to the materials, such as wood and metal, from which its cabinet is built, as well as attention given to the construction, fit, shape, and insulation of the cabinet walls. The speaker diaphragm creates intense vibrations in order to produce sound waves, so the cabinet must be constructed so as to not add any vibrations of its own.
Low-Quality Speakers
A lot of people record and play back sounds on their laptop speakers, which miss a lot of the low end (see Figure 10-2).

Figure 10-2. The range of typical laptop speakers is mostly mid to high frequencies. Testing sound with a laptop setup can miss bass frequencies.
Laptop speakers are not powerful enough to produce low frequencies at high enough decibels to create a full sound in playout. It’s a good idea to have at least one “studio monitor” to test on while designing sounds. Studio monitors are quality speakers that allow you to hear sounds in high definition, and they are used in studios for mixing, mastering, and sound creation (see Figure 10-3).
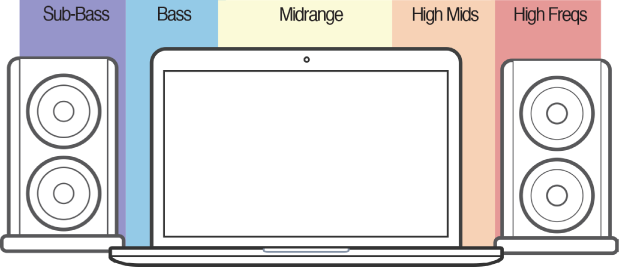
Figure 10-3. Studio monitor speakers can give you a better understanding of sound than laptop speakers, because they produce a fuller range of sound without distortion.
If you are designing sounds with low frequencies and only have a laptop for demonstrating them, then using headphones will allow you to hear those frequencies better than the laptop speakers alone. In this case, a good pair of noise-cancelling headphones will allow you to hear sounds in an uninterrupted environment, and can be helpful to focus clients’ attention when you’re playing back sounds in echoey conference rooms with lots of background noise.
Sound Channels and Playback Types
Each different type of sound and target hardware requires a different process. Let’s look at each speaker configuration in a little more detail:
- Mono
- Mono simply means that the sound is coming out of a single channel. This is usually the case for products like microwaves, ovens, or alarm clocks where the sound comes out of one speaker.
- Stereo
- Stereo means that sound is coming out of two speakers, and you can mix different sounds for different speakers and hear them in the left or right channel. This simple setup can provide a sense of movement and space as different sounds pan back and forth from one channel to another.
- Surround sound
- Surround sound literally surrounds the listener. For a spatial sound system in a museum, for example, a quadrophonic (or 4.0 surround sound) approach will result in high-quality, immersive sound that can be mixed to four independent channels. The system consists of four speakers, one in each corner of the room (see Figure 10-4).

Figure 10-4. Quadraphonic sound uses four unique channels of audio to create an immersive experience. It can be used in museum installations, airports, and art exhibits to bring people fully into sound.
More sophisticated surround sound systems are commonly used for film and home theaters because they can play back dialogue and sound effects in separate channels. A 5.1 surround sound system includes six speakers, while 7.1 surround sound system adds two more speakers for a total of eight. These systems may also be used in auditoriums.
- Binaural sound
- Binaural recordings, covered in Chapter 9, are recorded through special microphones that you can wear on your ears just as you would headphones. You can also place these microphones on a dummy head to record sound. Binaural recordings are useful for playing back sounds as they’ll be experienced in person. Want to hear what a microwave sounds like when you’re in front of it? How about in another room? Playing binaural recordings is a useful way to help clients understand the experience of hearing a product’s sound.
As a rule of thumb, test the sounds on the playout setup that will be used in the final product. If you know that you are designing for mono playback, not stereo, it is recommended that you make design decisions while listening on a single studio-quality speaker. All other things being equal, playing sounds on a single speaker eliminates problems, such as phase coherence, that can be created by playing sounds on two speakers.
Two speakers will give you stereo, which is important for designing sounds that use left and right channels of audio. Surround sound adds multiple speakers placed around the room, whereas quadraphonic sound uses four unique channels of audio to create an immersive experience.
If you are creating a sound for multiple sound setups—some of them stereo, some of them mono—make sure to check the mix for the mono. Converting a stereo sound to mono can introduce phase cancellation of your lower frequencies, making it sound uncharacteristically thin, which makes it have less of an impact. Although eliminating this problem is beyond the scope of this book, check with a sound designer if you think this might be an issue. They can work with the original sound file to convert it from stereo to mono more successfully.
Headphones allow you to listen to mono, stereo, or binaural sounds, depending on how the sound was recorded.
Testing the Target Hardware
You can save a lot of time and money by testing your designs as early as possible on the target hardware. This will calibrate all stakeholders’ expectations to the same level.
Do not choose sounds that will constitute your product’s auditory experience only by listening to them through a nice stereo system or through the speakers of a laptop. Nuances that might be clear while you’re auditioning sound on high-quality hardware might not be apparent at all on the target hardware. Instead, make a point of listening to your sounds over the actual hardware in a variety of contexts. Otherwise, there may be a disconnect between expectations and actual playout.
If you don’t already have a contact in engineering, ask for one. If the hardware is settled, consider using it for demonstrations and making your design decisions. If the hardware isn’t settled, consider holding off on designing sounds until you have a good idea of the frequency landscape you’re working with.
Design your sound set with the expectation that audio hardware will be improving in the future. In practice, this means creating a range of sounds, with some elements that are too rich, complex, or “ambitious” for current limitations. This will allow you to ensure that there is something ready to take advantage of future improvements in hardware. It also allows decision makers to experience what a product could achieve in later releases with small additional investments in hardware.
Testing for Distortion
Every sound is distorted to some degree.
Unless you are in an acoustically perfect space (which does not exist) with nothing occupying it except for the source, any sound that is produced is modified by the time you hear it. For the most part, this is not a problem—our brains are good at filtering out modest amounts of distortion and spotting the content, or “signal,” contained within. This allowed our ancestors to identify the rustle of potential prey against the backdrop of wind blowing through the trees. Today it lets us pick out the song on a static-filled radio station, or concentrate on a conversation in a noisy restaurant. We are good at this kind of filtering, but it demands concentration and effort.
With the advent of electronic amplification, potential sources of distortion have multiplied. Distortion can take many forms: echoes, static, compression artifacts (like the “robotic” sound of a voice over Skype), or poor equalization that alters the tone quality. When sound is too bright, rumbly, or tinny, your brain must compensate to understand what it’s “supposed” to sound like. This is why playing music in a car with the treble or bass all the way up feels vaguely unsettling.
In each case, the more noise there is, the more mental effort we must put into filtering out the signal. This is where thoughtful sound design can have a real, profound impact on our lives, beyond simply making things “sound nicer.”
What Causes Distortion?
Distortion is when the speaker cannot play back the sound in the way it was produced. The audio waves distort in some way and do not sound the way they were intended by the sound designer. You’ve heard this before with low-quality speakers when you turn the volume all the way up. Transients are one of the leading causes of distortion. We introduced transients in Chapter 8, but we’ll go into further detail here.
Distortion and Transients
Things like snare drums and piano notes might cause a low-quality playout system to exhibit transient distortion. You might say that the amplifier is “too slow” to handle the onset or the start of a sound, if the initial buildup is very fast.
In other words, high-intensity onset transients such as those caused by piano notes may overwhelm speaker hardware, causing distortion; see Figures 10-5 and 10-6.
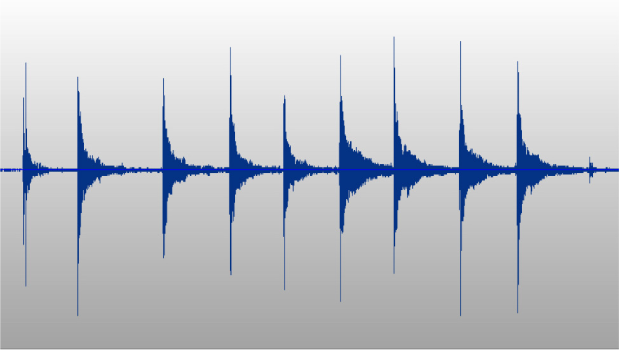
Figure 10-5. These are piano notes played slowly, with separation between them. You can see the onset transient that happens when the hammer hits the string of the piano, and the overtones from vibration of the string as it loses energy.
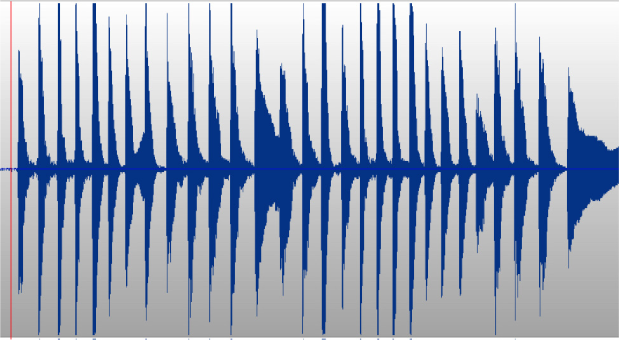
Figure 10-6. Piano notes are examples of fast, powerful transients. Playing piano notes very quickly together can result in distortion that overwhelms microphones and playback devices.
Hardware that has “good transient response” is just that: it is able to reproduce sharp transients in music, speech, or other sounds without distorting them.
If you are designing for a system that has poor transient response, try to use sounds that have a gentle onset rather than a sharp, fast start. Alternatively, you can use dynamic compression to “push down” that transient and prevent, or at least reduce, the effects of this kind of distortion. You can also turn down the attack or find a transient shaper plug-in for your audio-editing software.
Even when it’s less drastic, the loss of transient information still has a significant impact on the perceived quality of a sound, and is a particular problem with audio such as MP3. At lower bit rates and/or with poor-quality encoding algorithms, transients in encoded audio suffer noticeably. Using compressors and limiters to “tame” sounds with strong transients is a common application.
A product’s audio hardware quality has a direct effect on sound playout. The sum of all the audio hardware components is what determines the overall performance of the sound. Subpar elements like tiny speakers, underpowered amplifiers, and extremely band-limited frequency response have been the hobgoblins of sound designers for a long time—especially on mobile devices—but as mentioned earlier, this area is rapidly evolving. As we’ll discuss next, there are now ways to mitigate the negative effects of distortion and poor transient response.
Soften transients or increase onset times
If your target hardware is going to have tiny speakers (which is often the case), avoid sounds that rely on lots of energy in the bass frequencies to deliver your message, or change the design to feature sounds with longer onset times.
Low-quality audio hardware can also impact transient response—the ability to change volume very rapidly—so loud sounds that reach their full volume quickly might end up distorting. The basic limitations of physics mean that lower frequencies need larger drivers. Don’t rely on a lot of high-frequency information if you know that the playout hardware won’t reproduce it faithfully.
Use hardware onboard processing to modify sounds
If there is digital signal processing (DSP) available on the target hardware, it will likely have some basic equalization controls, which have probably been configured with presets. Investigate these presets and listen to how they sound when turned off or changed. Small tweaks to basic equalization and volume performance on the playout hardware might take your sound from “meh” to “okay!”
If your sounds are going to play on different kinds of target hardware, you’ll need to compare how the audio sounds on each piece of hardware. One way to test these differences is to play white noise through the speaker of each device, and then record the output (Figure 10-7).
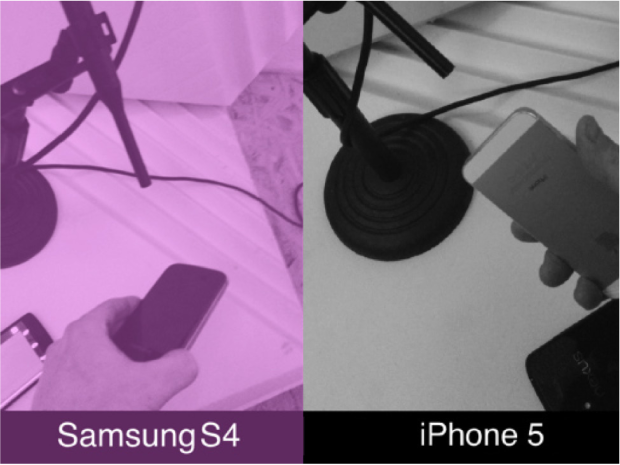
Figure 10-7. White noise played through the speakers of two different phones, then recorded through an external mic.
Analyze each device’s audio performance. You’re looking for peaks, or how much it distorts the white noise. The less it distorts the white noise, the better (Figure 10-8).

Figure 10-8. This is the ideal response for white noise through speaker hardware.
In Figure 10-9, you can see significant differences between the playback hardware on the Samsung S4 compared to the iPhone 5. This illustrates the often stark difference between playback hardware on similar devices.
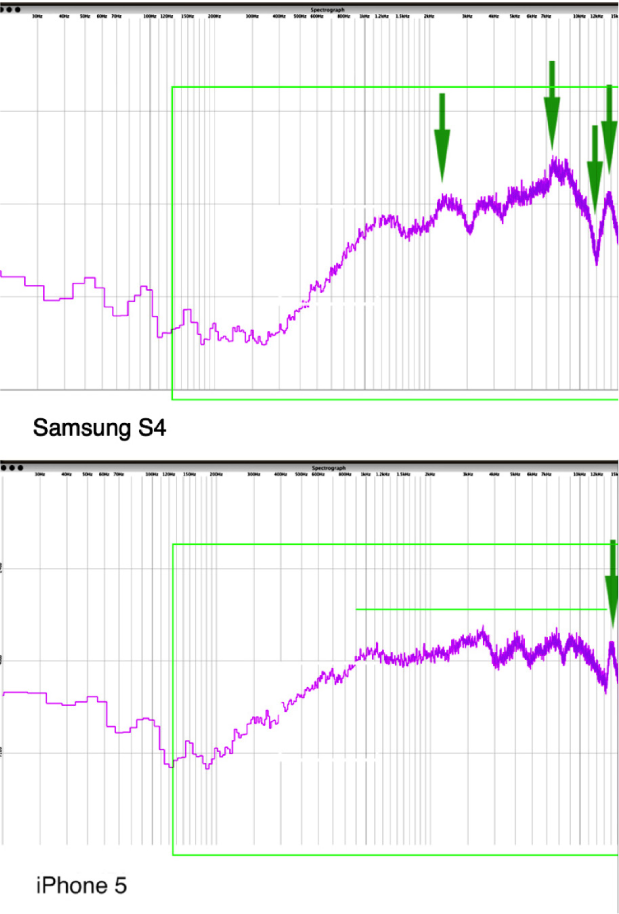
Figure 10-9. These images show how much better the quality of the iPhone’s hardware speaker response is. You can see the peaks of the audio versus the room noise on the left.
You’ll want to equalize your sounds for each playback device and model to remove distortion and to ensure consistency across sound sets on multiple devices (Figure 10-10).

Figure 10-10. Applying corrective equalization levels out the speaker response by applying a curve opposite to the peaks.
You can modify the sound through an equalizer in the software you used to create the sound, before loading it onto the hardware. Or, depending on what DSP capabilities are built into the playback hardware, you can modify it there.
Design with distortion
If you can’t change the target hardware and you’re working within limited constraints, you will have to design with distortion. Here’s one example of where coauthor Aaron Day made distortion work.
In 2007 Day designed what became a de facto signature for the Sprint-Samsung Instinct smartphone, one of the first touchscreen phones to follow the iPhone. The ringtone entered popular culture and eventually took on a life of its own.
Along with a fresh visual and physical design, stakeholders wanted some new, iconic ringtones—something that “really jumped from the phone.” Unfortunately, the sound quality of the device wasn’t capable of playing sharp transients loudly without noticeable distortion.
The product needed a solution that had a lot of energy but didn’t rely on loud, sharp transients, and that sounded good even when distorted. The phone was intended for use in cars and in public, so it needed to cut through a purse or jacket pocket, and be able to overcome background noise.
After a few experiments with different basic waveforms, Day realized that a big fat synthetic sawtooth wave would be the best foundation. Sawtooth waves contain even and odd harmonics, which makes them sound “full.” While the ringtone featured some electronic drum sounds, it was the sawtooth bass line that gave it energy.
Day also borrowed a technique from dance music that he calls the “octave bounce,” a bass line that jumps up and down an octave every eighth note, creating a progression that sounds something like rooo DEE rooo DEE rooo DEE and is frequently used in disco remixes and as background music in high-energy advertising.
This combination of approaches worked well within the constraints: sawtooth waves sounded good when distorted or with their high frequencies attenuated, and the octave bounce had such a strong rhythmic and melodic identity that it was recognizable even when muffled. Day also tuned the fundamental note of the bass line so that it sounded as good as possible within the cavity resonance of the phone. The result was a ringtone that sounded fresh and full even when distorted.
Users liked it, and after a while the ringtone became popularly associated with the phone. It became the signature to let you know “an Instinct is ringing,” much like the marimba ringer on the early iPhone. Not only did users of the Instinct record internet videos of themselves dancing to the ringtone but at least one person sampled the ringtone, looped it, and overdubbed lyrics about…ringtones!
Use the Missing Fundamental
As we discussed in Chapter 3, one way to improve the sound of low-quality speakers is to use a psychoacoustic technique to create the perception of a bass note that is not actually there. When we hear the third and fifth harmonic of a chord, our brain automatically fills in the missing information, giving us a rich perception of the fundamental note. Because this does not rely on the speaker hardware at all, it always sounds excellent, regardless of where it is played. To remind yourself of how this sounds, listen to “Rubber Soul” for that characteristic “Beatles bass.”
Final Tuning
Often, by the time sound in a product is considered, the hardware requirements have already been set; or even worse, they’re still in flux and completely out of your remit. If this is the case, be prepared to break some principles.
This section lists things you can do to improve the perceived audio quality of your product, organized by relative difficulty. These tips work for most situations where you need to tune the audio user interface of a consumer-facing device or digital product.
Test or Modify the Sound Source
You can change the quality of what is played by modifying your sound file or the code that generates the sound. Depending on your specific project, this could easily be ranked after the second or even third suggestion, but it’s listed first because problems that you only need one person to solve generally get fixed quicker and easier than if you need more people.
Change the Interaction Logic
You can change when, why, and if sound is played. For example: instead of making an alert louder and playing it only once, enable it to play at a lower volume three times in a row. This is a useful way to make the most of existing sounds and to modify them to create a user interface that works well.
Test the Playout Software and Work with DSP
The digital part of your product’s playout capability, which might contain built-in DSP, can offer parameterized control of audio processing that could benefit your sound.
For example, say you have delivered a sound to be used in a mobile device and the client complains that there isn’t enough bass. You know that the small speaker has no way of moving enough air to make users feel low frequencies. However, you also know that there is likely a software-controlled high-pass filter somewhere before the sound reaches the speaker. A 12 dB/oct high-pass filter with a cutoff frequency of 900–1,100 Hz is typical in many small or mobile devices that have an audio user interface. This doesn’t leave much, if any, room for what someone would call “warmth.” Many of these filters have been set too conservatively. Sometimes, dropping the cutoff frequency only a few hundred hertz can make the sound be perceived as fuller.
This kind of tuning is program-dependent. Since audio hardware is more likely to distort when operated near its limits, material that has very fast transients or other dynamic changes may not work with lower cutoff frequencies. This approach takes advantage of the difference between what the hardware can produce and what it is specified to do in the software. Don’t expect a tiny speaker to start producing bass just because you dropped the high-pass filter—it’s still a tiny speaker but this should help.
Finally, if you lower the cutoff frequency of a high-pass filter to fix one problem, make sure that it doesn’t introduce another, like speaker damage. For instance, some hardware-based audio filters are there for a reason—to protect the speakers from damage from high-energy transients and other sounds that might overwhelm the hardware.
Set Limits on Volume
If you set a hard limit on maximum volume, you’ll be able to control distortion and potential damage to device hardware.
Test or Improve the Hardware
Hardware improvement is one of the most obvious solutions, but also one of the most difficult to implement. At scale, even small changes can significantly affect costs. Any changes at this level of a project will almost always trigger budget and quality assurance alarms. Even if you discover a way to make a change that improves audio quality and lowers costs, changes in hardware design can require the retesting or recertification of engineering that was already considered “done.”
It’s not just about sound quality: better hardware increases the range of frequencies to sonify information. With a greater frequency range, you can still meet compliance but also increase the range of “words” the alerts can output.
Improving hardware is not just about speaker quality, either: it can be in the form of subtractive design, such as adding noise-insulating materials or improving component fit. It can also take the form of a passive component, such as weights that help give car doors that satisfying “thunk.”
These changes may dramatically improve the product but are likely to increase the cost. If you are on the design side of the problem, you should probably accept that, unless you find a “showstopper” of a reason that justifies the additional expense, you aren’t going to get the hardware changed. More often, you’ll need to find creative solutions, such as making sure your design works as well as possible within the performance constraints of the product.
Change or Modify the Hardware Container
You’ll face the same problems changing or modifying the hardware container as with the playout hardware just discussed—except now the product manager, industrial designer, and possibly brand departments may need to approve any changes.
If you do change or modify the hardware container, you’ll have to retune your sounds through the cavity resonance process.
Ensure Sounds are Associated with Interactions
Go through all states of the product and ensure that all audio and haptics mapped to interactions play out correctly.
Perform Stress Testing
Press the buttons really quickly to simulate a child playing with a device, or someone using the device in frustration, and see how the hardware and playback software handle the interactions.
Test Multiple Sounds at Once
Can the playback hardware play sounds on top of each other, or only one sound at a time? If your product allows multiple sounds to play simultaneously, consider how they sound together, or whether one sound might need to stop before another one starts.
Test Synchronization
When you’re playing a video game, you’re often in a state of flow. Imagine playing Super Mario Brothers and jumping into the air for a coin. If the coin collection sound doesn’t happen, you’ll be shaken out of the game world, and it can affect your gameplay. A delayed sound is even worse, and can diminish your experience of the game. Instead of jumping at the appropriate time, you might end up jumping late, missing the coin, or landing on an enemy. The same thing can happen when haptic signals are not lined up properly with the sound or the visual event. In each of these cases, the mismatch can be more than just irritating—it can be infuriating, ruining the entire experience by obscuring it with a difficult cognitive task: trying to match two events that should be concurrent but are not.
To ensure ideal user interactions on a mobile device, you’ll want to measure synchronization between vibration and sound (see Figure 10-11). Fortunately, there’s an easy way to do this.
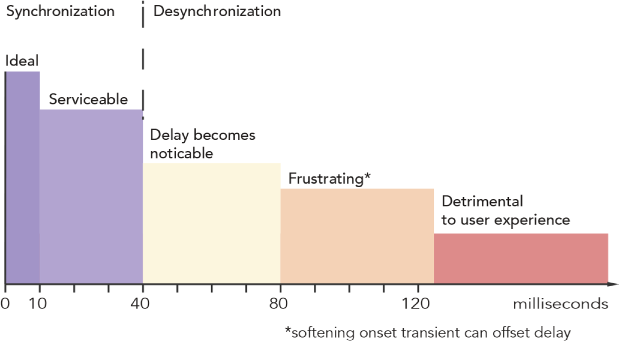
Figure 10-11. Ideal synchronization times for interactions.
First, you will need two microphones. Use rubber bands or something similar to attach a microphone to the device. If the device uses haptics and you know where to find the haptic motor, place the microphone capsule close to that. Set the device with its rubber-banded mic on some thick foam or stacked cloth, with the speaker facing up. Use a stand to position the second microphone over the device’s speaker.
Now, perform whatever interactions you want to test for. You will see clearly on your audio-editing software’s waveform display the points at which you physically interact with the device. For example, if it has a touchscreen, you will see screen touches as a “bump” in the waveform display for the first microphone. This will be followed by a haptic pulse and sound. It is the time difference between the touch event, the haptic response, and the sound that determines how well the three modalities fuse (see Figure 10-12).
[ TIP ]
These examples assume that you want sound and vibration to fuse, and are able to make them do so.

Figure 10-12. Synchronizing a sound and vibration to a single touch event. In this case, the sound and haptic feedback should fuse, in order to create a subtle but vital enhancement of the keypress experience.
A light switch is an easy way to think about the many types of information a person experiences when they interact with even a simple device. You click a light switch and the mechanical sound matches your action. You feel a snap, hear a click, and see a light come on. These things don’t actually all happen at the same time. At the microsecond level, the gaps between the events are significant. However, since they are within a millisecond or two of each other, we experience perceptual fusion and call them “one.”
In the cases where perceptual fusion isn’t possible or would feel sloppy if implemented, it is best to decorrelate entirely and make the parts distinct. With these longer intervals, where the sound and haptic element are separated enough in time that at least one transient from each is distinct, you can think of them as two parts of a whole.
Many things in our lives that we interact with display these kinds of micro-rhythmic characteristics. Latches, door locks (ka-schack!), punch buttons, and many plastic closures are excellent examples.
[ TIP ]
Don’t forget to test for delays while the device is running other programs.
It is always possible for extra computational load to affect synchronization of haptics and sound. Always test the synchronization of the product while it is experiencing high demand on the processor.
Retest everything after you’ve made any changes, using the flowchart in Figure 10-13.

Figure 10-13. Synchronization flowchart for checking each sound.
Conclusion
Testing hardware might be a tedious process, but it is just as crucial as testing the user experience (which you’ll learn about in the next chapter). All sounds are limited by the frequency range of playout hardware, the speaker response profile, and the product’s casing or cabinet. Applying the concepts in this chapter will allow you to work with limited hardware, distortion, and the product’s shape in order to make products that sound consistently good.