
CHAPTER 18
When the Picture Changes
You've been editing the dialogue for weeks, and you've made thousands of detailed, interrelated edits and countless fragile overlaps. Knowing that the film was locked long ago, you confidently built your editorial house of cards. Now you learn that the director and picture editor have made hundreds of “small” changes. “Don't worry,” they tell you, “most of the changes are just a couple of frames each.” Will it be murder or suicide?
It's much more common to run into picture changes after lock-off than to work on a movie whose structure is set in stone. Changes happen, and it's unimportant why. When you get the “Oh, by the way” news that the picture editor has turned the film upside down, yet the temp dub is still scheduled for Thursday, quietly throw your brief silent tantrum, then come up with a plan.
The Reconform Defined
The process of matching sound sessions, whether dialogue, SFX, BG, Foley, or music, to an altered picture edit is known as a reconform, colloquially a “confo.” (There are all sorts of names for this process. Call it whatever your colleagues do.) Since film editors have been making eleventh-hour changes for years, there's a well-developed system for conveying those changes to the editors and assistants in the sound department.
Communicating change instructions was simpler when editing was done on film and mag. A reconform was a very physical process, so it was easy to communicate between one department and another when there was something real to move. Change notes—detailed, step-by-step instructions on what to remove, replace, lengthen, insert, or move—were handwritten, highly standardized, and intolerant of improvisation. Someone in the picture editing room would use edge numbers on the workprint to systematically log the changes.1 If the dialogue editor or assistant faithfully followed the resulting recipe, it worked like magic. If he tried to outsmart the change list, combining steps or skipping others, then trouble was waiting in the wings.
Now that everyone edits on a workstation, moving vapor rather than chunks of film, the process has gotten more complicated and, worse, more prone to error. Today, reconforming information is passed between picture and sound in several formats: EDLs, FCP XML interchange format files, and Avid change notes. An experienced picture editor or assistant should be able to produce an accurate report from any professional picture workstation. On low-budget films, however, it's not uncommon that an inexperienced picture editor will hand you nothing but a new OMF and shrug when you're not impressed. If that's the case, you may need to educate him about how to move change information from picture to sound. This, of course, means that you need to learn a bit about this yourself.
Change EDLs
Software conformation tools work much like the Compare Document routine in a word processor You point to two documents and specify how to note the differences. You're then presented a new document where you can see what's changed. Film reconforming software compares lists from two sessions—old and new—and usually generates a “change EDL” that is then used to automatically reconform various sound-related data like DAW sessions, ADR databases, mix automation, etc. Figure 18.1 shows an example of creating a change EDL, which next will be used to reconform a session.
All serious reconforming programs can accept change information in more than one of the above formats, so it's likely that you can deal with most projects. But it helps to know what you're up against, so that you don't end up with a file you can't read. Also, it's not a bad idea to add to your specification sheet the details of what kind of change data you can accept.
Avid Change Lists
If you grew up using handwritten change notes, then Avid change notes is probably the format that you're most comfortable with (see Figure 18.1).
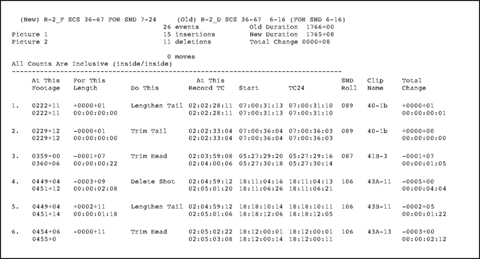
This is a tried and true list format, long used by experienced sound editors, especially on big projects. Avid change lists do indeed carry an abundance of information, but making an accurate and reliable Avid change notes document is not the easiest thing in the world.
Normally the picture editor will prepare two change lists—one for conforming the picture and one for the sound department. Logic may tell you that all you need is the sound list, but insist on both, because in regions of high track congestion or complexity the sound change list may be complicated to the point of uselessness. In such cases, the picture change list can provide just the overview you need to figure out the cut. Avid change notes provide lots of information that can be helpful, but they have a few draw backs. For example, change notes can be troublesome when reconforming across reels. And they typically require picture department intervention with each change, while other list methods—XML and EDL, for example— can provide more flexibly.
Edit Decision Lists (EDLs)
Unlike Avid change notes, which are packed with useful information, EDLs are bare-bones documents. The CMX 3600 EDL is the most common EDL
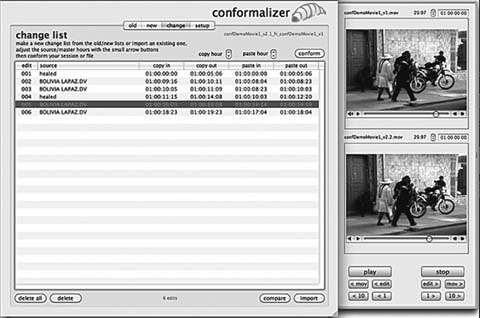
Figure 18.2 Reconforming tools compare two sessions, whether picture EDLs, XML, cutlists or change notes, and then create a new “change EDL” that reflects the difference between two versions of the picture. Above is the Conformalizer change panel, where an editor creates the change EDL. Note the two QuickTime images at the right, used to compare the two picture versions.
format, and it's older than most people reading this book.2 Its stinginess with information, its maturity, and the fact that humans can easily read it make this a standard means of moving source and destination information back and forth. It's by no means perfect: it can handle only four tracks of audio, which are reported in a convoluted manner, and it carries a maximum of 999 events. Nonetheless, it's a very flexible note tool for reconforming. Some reconform programs use EDLs to keep track of visual effects changes and to dig through previous picture versions.
FCP XML
XML is an interchange language that enables different applications to share the same source material and to communicate efficiently. It works much like the familiar HTML that allows different parts of a web browser window to call upon the same information. FCP XML is Apple's implementation of this tool. It allows FCP projects to work in conjunction with other applications in a reasonably transparent manner. Most importantly, XML files are readable by machine and human alike, so after a bit of getting used to them, you can usually make sense of what's going on in the lists (see Figure 18.3).
FCP XML lists offer the density of information of Avid change lists with the relative simplicity of EDLs. And unlike change lists, which typically offer the picture department lots of options—and lots of opportunities for error, XML export routines ask fewer questions, making them a more bulletproof way to pass along change information to the sound guys.
<parameter name=“Alpha” id=“2” flags=“4176”>
<flags>4176</flags>
<parameter name=“Alpha” id=“27534” factoryID=“10”>
<flags>4176</flags>
<parameter name=“Offset” id=“1” factoryID=“4”>
<flags>80</flags>
<curve type=“1” value=“0”/>
</parameter>
<parameter name=“Middle” id=“2” factoryID=“4”>
<flags> 80</flags>
<curve type=“1” value=“0.287037>
</parameter>
<parameter name=“Alpha” id=“3” factoryID=“4”>
<flags>80</flags>
<curve type=“1” value=“0”/>
</parameter>
<parameter name=“Alpha” id=“27534” factoryID=“10”>
<flags>4176</flags>
<parameter name=“Offset” id=“1” factoryID=“4”>
<flags>80</flags>
<curve type=“1” value=“0.45”/>
</parameter>
<parameter name=“Middle” id=“2” factoryID=“4”>
flags>80</flags>
<curve type=“1” value=“0.74031”/>
</parameter>
Figure 18.3 Detail of an XML file.
Guide Track
Some reconforming applications require a guide track, which, once conformed, serves as a roadmap for locating new edits. Even if you're performing a manual reconform, a guide track provides a much more manageable sync reference than do a couple of dozen edited dialogue tracks and the hitchhikers that you must drag along with them (original AAF, junk/outs tracks, ADR and post sync, etc.). Refer to Chapter 11 to learn more about guide tracks.
Picture Changes—and change lists—have a way of showing up on your desk very late at night. While you're trying to make sense of them, the picture department is at home with their teddy bears and you have no one to turn to for clarification. To avoid this frustration, convince the assistant picture editor to create a test change list a few days (or hours) before you're due to make the conforms. Whether you're using conformation software or doing it by hand, this will give you time to digest the specifics and request alterations or at least clarifications.
On shows with multiple picture changes, it's very helpful to keep all older versions of your cut sitting down the timeline at each hour. Conforms with lots of events can tend to shred your edit, and it's nice to have the older versions intact to go back and mine from them. Also useful for scenes that have been completely dropped, and then reappear in a later cut… you can go back and copy/paste rather than start over.
Polly McKinnon, dialogue editor
Toys in the Attic
Automated Reconforms
If ever there's been a place for computers, it's in the process of conforming changes in films. Reconforms can—and are—done by hand, but this breed of labor-saving software is a good reason to smash the piggy bank. Picture changes never come at a good time but inevitably fall in your lap when you'd rather be focusing on tomorrow's temp dub or when you have opera tickets.
There are several software solutions that automate reconforms, among them Virtual Katy, Conformalizer, and EdiTrace.3 They all do essentially the same thing, but each goes about it in its own way. Some focus their attention on audio change information, while others focus more on picture cuts. Most are freestanding applications that work in conjunction with your DAW. Others offer web-based reconform services that produce change lists and offset lists with which to create new sessions. If your workstation includes an assembly/reconform routine, as does Pyramix,4 you can import the new EDL directly into your session and then conform it (see Figure 18.4). In any case, the goal here is to create a change EDL that contains enough information to tell the application or the DAW how to update the session.
Some reconform software/workstation combinations require a third-party application, such as Titan, to create a new DAW session. And there's a chance that your EDL will need some sprucing up before it can be used for reconforming. If that's the case, use an EDL data management application such as EDLMax. Aside from that, it's pretty straightforward.
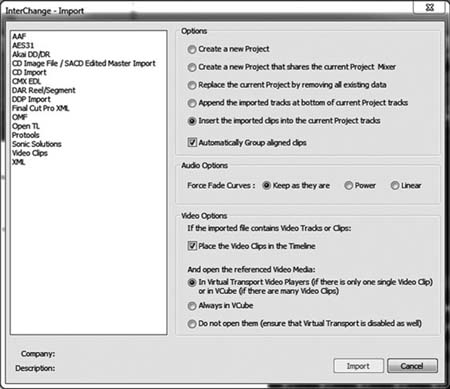
Figure 18.4 Using Pyramix to reconform to a new picture. In this case, the Interchange Import Dialogue is used to determine which sessions to compare and what will be the results.
If you follow the instructions of the change list, your session's structure should reflect that of the new picture version, but you still need to verify sync and repair damaged transitions. Some of your beautifully laced edits will have been sullied, so don't be impatient as you check the confo. Use the new OMF and guide track to confirm the sync of your new assembly. Find easy landmarks, then nudge the tracks of the conformed session until the geography is identical in both old and new. You can also use Titan's “Fix Sync” to snap the new events into sync. As you repair transitions and regions damaged during the reconform, remember to check your volume and panning automation, which will certainly have sustained some injury.
No matter how you conform the material, remember to check the LFOA of the new reel and confirm that it matches the picture. Landing solidly on the last frame of action is no guarantee that the conform is correct, but discovering that your new LFOA doesn't match the new picture is proof that it's wrong.
VFX and the Troubles They Bring
More and more movies include more and more visual effects. It's not just impossible action scenes that go under the digital knife. Even the most straight ahead drama is likely to incorporate VFX—to modify a location, to change an onscreen element, or to modify a mood. Each new VFX version brings with it invisible changes that are hard to find and harder yet to reliably track. But what looks in the EDL like a change often isn't something new, but rather an unmodified reincarnation of the way things were in a much earlier iteration. Change-upon-change of maybe old, maybe new material is vexing in any film, but it's especially frustrating with VFX-heavy films.
If you expect to find yourself in this world of ever-changing VFX edits, be prepared to move back and forth between different generations of change EDLs. You just have to be able to negotiate this family tree. Some conformation software can track such information for you. Otherwise, go to web forums and ask colleagues how to keep from drowning in the VFX soup.
Manual Reconforms
If you don't have software to help with your conforms, you'll have to do it on your own. I have, perhaps unjustifiably, made this out to be a wretched task. It's not; you just have to pay careful attention and continually save every change you make. As with automated reconforms, you'll receive a new picture, an OMF, an EDL, and/or the change list from the picture
department, and likely a guide track. Ask for both audio and video EDLs. Knowing something about the picture cuts may prove useful later. Then:
• Before you do anything else, make a backup copy of your session.
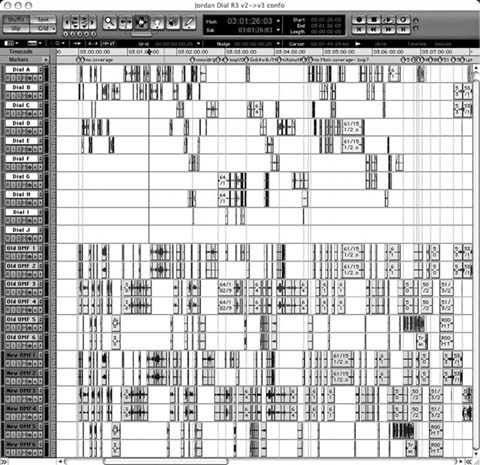
• Import the new OMF/AAF tracks into your old session and save the combined session under a new name (see Figure 18.5). Confirm that the revised picture is in sync with the new OMF.
• Unhide and make active the original OMF tracks so you can conform them along with the rest of the session.
• Reduce all tracks to the smallest size so that you can see as many tracks as possible.
• Create two edit sync groups: one containing all of the tracks of the new OMF; the other, all tracks in the old session. This includes the active dialogue tracks, PFX, ADR, and any junk tracks containing synchronous material.
Removing Material
Activate the group containing the old (original) session, complete with all of the tracks associated with that session, and do whatever it takes on your workstation to ensure that your markers will move along with the audio. The cursor should span all of the tracks. Locate the session to the time or footage noted in the first event of the change list. If the event simply calls for removing material, you'll see an instruction like this:
at 243+04 remove 6+13
Or perhaps:
at 4:10:22:23 remove 4:03
When you type the required duration in the Length field, you'll see a selection of the correct duration crossing all tracks of the old session, including the marker region. If you're working with Pro Tools, select Shuffle mode and delete. Then immediately return to Slip mode. If you're working on another workstation, make the edit in a mode that ripples the session when you remove material. Confirm that you've executed the move across all of the old tracks, including the old OMF copy, junk tracks, PFX, markers, and so on.
Opening up a Track
Making a shot or scene longer is a bit more complicated than removing material. You will need to do the following:
1. Click on any track within the group of your original session.
2. Locate the time or footage indicated in the change list.
3. Make a cut across all tracks. This will undoubtedly result in some track carnage, but you can sort that out later.
4. Set the Nudge key to the time specified in the change list.
5. In the “old material” edit group, select everything from the insertion point to the end of the reel. Make sure you're in Slip mode. Press the Nudge key (“+”) once only. Make sure you're moving your markers as well as the sounds.
6. Confirm that all tracks move together, and then nudge all material to the new location on the timeline.
7. Reset the Nudge key to a normal value before you do something silly.
Changing the Order
Changing the sequence of shots or scenes is the least pleasant of all manual reconforms because you have to juggle a lot of material. For example, changing the sequence of scenes from A, B, C to A, C, B involves these steps:
1. Prepare B. Before removing B, I like to add two silent, one-frame regions on its first and last frames. These marks will travel with the scene and serve as reference anchors. When you've moved section B to its new home, these anchors should line up with the beginning and end of the picture at the new location.
2. Remove B from the sequence. Select the two scene B anchors and everything between them. Enter Shuffle mode and cut all of scene B. Scene C and everything after it will advance to B's old start position.
3. Choose where to insert scene B. Locate to the end of C, where B is to be inserted. Make an edit that will result in a cut across all of the tracks of the old session.
4. Insert B after C. Still in Shuffle mode, paste section B at its new location. Return to Slip mode and assess the damage.
Adding New Material
If the new version contains material not in the old session, copy these extensions, shots, or scenes from the new OMF. Wherever you insert new material, place a marker to remind yourself that you have unedited material to deal with. If the OMF audio is unacceptable for any number of reasons, you must recreate this section from the original tapes. This is where the EDLs come in handy.
Use your auto-assembly software or file-linking program to assemble the new (missing) sections of the film. Auto-assembly programs allow you to pick the EDL range that you want to conform. If this proves frustrating, open the new EDL in a text editor, delete all events except those you want to conform, and save in a text format. This will leave you with a very tiny auto-assembly task. The new events can be imported into your revised session, where they ought to fit nicely.
First Try the Simplest Path
If the project hasn't suffered too many changes in the picture department, you might start with the simplest manual confo technique before you commit to more heroic strategies: Initially base your changes on picture—not audio— changes. This is, after all, how many reconform programs think. Concerning yourself first with picture changes offers two advantages:
1. If the bulk of the edits are audio/video (a quick perusal of the EDLs will answer that question), then cutting your session with the new picture edits is much easier.
2. If many of the new picture edits are either cutaways or swapping out of existing onscreen images (in other words, no change in shot duration), then there's nothing for you to do. Just check your sync on either side of the inserted picture and you can check that confo event off your to-do list.
Compare video EDLs or note the timecodes of certain picture cuts in each version, and work from there. If the conform is more complicated or contains a lot of audio-only changes, this picture-based method is probably not your best plan of attack.
Ask any experienced dialogue editor about reconforms and you'll discover that there is no perfect formula for painless success. The procedures just described make up only one of many methods for matching an old sound edit to a new picture cut. Talk to enough sound editors and you'll develop a system that suits your personality.
_______________
1. Edge numbers are described in Chapter 2.
2. See Chapter 7 for a detailed description of the CMX 3600 EDL.
3. See www.virtualkaty.com, www.maggot.co.nz, and www.editrace.com.
4. See www.merging.com.