
Investigating web browsers and e-mail messages for forensics artifacts
Internet applications already installed on Windows can give important information about user actions performed previously on his/her computer. For instance, a web browser is the only way to access the Internet, and criminals are using it to commit crimes related to the Internet or to target other users online. Internet users use web browsers to socialize, purchase online items, or to send e-mails and browse the web contents, among other things. This fact makes web browsers the preferred target for malicious actors to steal confidential information like account credentials.
Note!
The main sources of malware/spyware/adware are e-mails in addition to social networking web sites, and all these resources are usually accessed using web browsers.
Analyzing web browser artifacts is a major part of any computer forensic investigation, as it can effectively in many cases determine the source of compromise or the user’s previous activities. For example, if we investigate web browsers and see that the suspect was downloading or searching online for information on steganography and encryption tools, this will give a clear sign that this user may employ such techniques to conceal secret data.
In this chapter, we will describe how to investigate different web browsers for interesting leads that can help us to solve the case at hand. E-mail also plays an integral role in today’s digital age communications; understanding how to analyze e-mail messages to find clues will also get covered in a dedicated section.
Web Browser Forensics
As of September 2018, the web browser market share was mainly divided between Google Chrome (67.88%), Mozilla Firefox (10.94%) and Internet Browser (6.45%) from Microsoft.1 The focus of the first section will be on using various digital forensic techniques to analyze artifacts from these three major web browsers.
Note!
To keep the privacy of the end users, different web browsers introduce special configuration known as Private Browsing (Firefox) or Incognito Mode (Google Chrome), which allows a user to browse the web without storing local data that can reveal a user’s previous web activity on his/her machine. When this mode is activated, information like browsing history, cookies, form and search bar entries, download list history, entered passwords, and offline web contents will get deleted upon closing the browser. Tracking protection will also get activated as a part of this configuration, preventing web sites from tracking user browsing history across multiple sites.
The focus of this book is on Windows systems, so we will begin with the Windows default web browser, Internet Explorer (IE), and its new successor, Microsoft Edge.
IE
HKEY_CURRENT_USERSoftwareMicrosoftInternet ExplorerMain This key stores IE configuration settings like the home page, search bar, default search engine, and so on.
- HKEY_CURRENT_USERSoftwareMicrosoftInternet ExplorerTypedURLs The TypedURLs key maintains a list of the URLs the user types in the address bar in IE (see Figure 8-1).
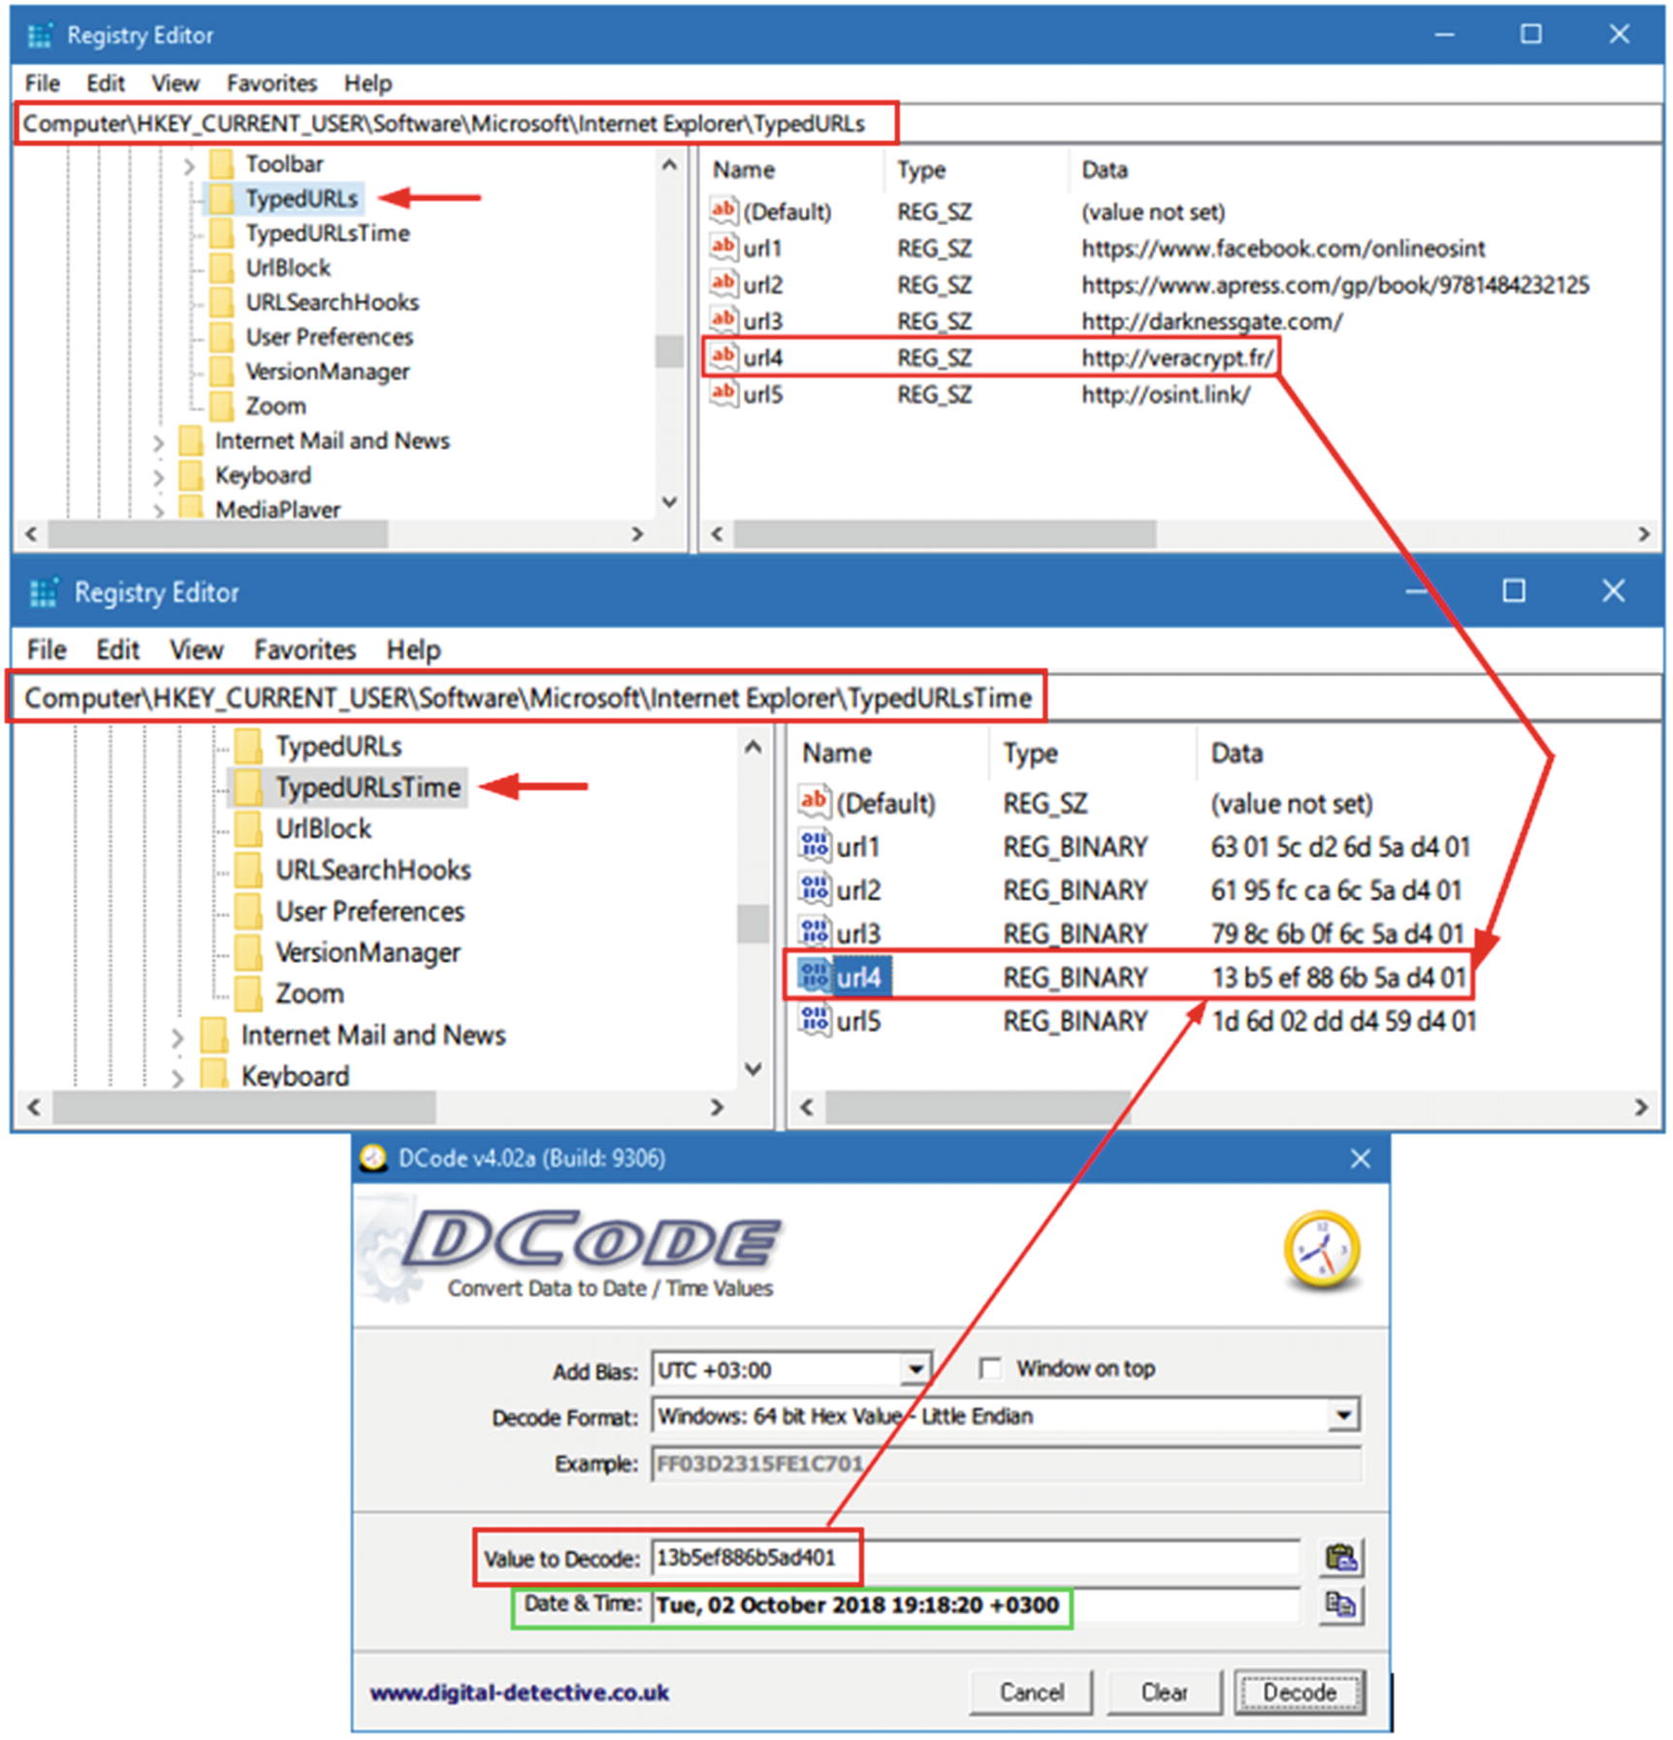 Figure 8-1
Windows showing previous URLs and their associated access dates/times entered by a particular user of IE
HKEY_CURRENT_USERSoftwareMicrosoftInternet ExplorerTypedURLsTime Reveals the browsing time (visit time) when a particular URL (from the previous key [TypedURLs]) was accessed. The date/time value is stored in binary, so convert it using the DCode tool, as we have done many times before (see Figure 8-1).
IE (version 9 and below) uses a file called index.dat; this is a database file used to improve the overall performance of IE by indexing various contents (e.g., store all the URLs you have visited using IE in addition to search queries, cookies, and recently opened files) in one place to offer a more customized experience for the user. For example, when a user wants to access a previously visited web page, IE can autocomplete the web address as the user types it in the browser address bar by retrieving browsing history from a particular index.dat file.
Other locations of index.dat files in various Windows versions can be found at www.milincorporated.com/a2_index.dat.html .
- 1.
IEHistoryView ( www.nirsoft.net/utils/iehv.html ): Displays browser history from index.dat files (up to IE version 9).
- 2.
IECacheView ( www.nirsoft.net/utils/ie_cache_viewer.html ): Displays all cache folder contents of IE (supports IE versions 6.0-11.0).
- 3.
IECookiesView ( www.nirsoft.net/utils/iecookies.html ): Display all cookies saved by IE.
- 4.
IE PassView ( www.nirsoft.net/utils/internet_explorer_password.html ): Display all passwords stored by IE. This tool supports a modern version of IE like 10 and 11 in addition to Microsoft Edge.
Microsoft Edge Web Browser
Microsoft Edge (code name Spartan) is the replacement of the IE browser and the default browser for Windows 10. This is a lightweight web browser that integrates with the Cortana feature available in Windows 10, allowing a user to complete many tasks (e.g., open web pages, conduct online searches) using voice commands only.
From a forensics perspective, we can expect more users to use Microsoft Edge instead of IE, so knowing where this browser stores its data is essential for our forensics work.
Note!
IE version 11 comes preinstalled side by side with Edge on Windows 10.

Display database scheme of Spartan.edb using ESDatabaseView from Nirsoft; image display saved web favorites in the “Favorites” container
Further analysis of Edge artifacts can reveal valuable forensics information; as we already saw, the valuable information is located in the Edge databases named spartan.edb and WebCacheV01.dat and in various locations inside its main folder, located at:Users<UserName>AppDataLocalPackagesMicrosoft.MicrosoftEdge_*****
Firefox
In the search box, your Firefox profile will appear in the search result as a folder; click to access it.
Note!
You can also access the Firefox profile folder by pressing Windows button + R, and then typing the following in the Run window: %APPDATA%.
Now click OK. A Windows Explorer window will appear. Go to Mozilla ➤ Firefox ➤ Profiles.
What we care about in our forensic search are the files surrounded with squares, as shown in Figure 8-3. We’ll describe each one briefly and suggest tools to automate our search:
- 1.
places.sqlite: Holds bookmarks, visited web sites, and download history.
The following tools can be used to retrieve information from the places.sqlite database file:DB Browser for SQLite ( http://sqlitebrowser.org ). We can browse target sqlite database tables and their content using this tool as we did previously.
MZHistoryView ( www.nirsoft.net/utils/mozilla_history_view.html ). Displays list of previously visited web sites from the places.sqlite database.
- 2.
cookies.sqlite : Stores cookies planted by web sites you already visited (cookies are usually used to save login usernames and passwords of previously visited web sites and/or to store web site preferences where applicable).
The following tools can be used to retrieve information from cookies.sqlite database file:MZCookiesView ( www.nirsoft.net/utils/mzcv.html ). Displays all cookies stored in a Firefox cookie file; you can also export results into a text, XML, or HTML file.
DB Browser for SQLite.
- 3.
formhistory.sqlite: Stores your search keywords used in Firefox search bar and your searches entered into web forms.
- 4.
key4.db and logins.json: Here is where Firefox saves your passwords. (Older versions of Firefox use the name key3.db for the key database file; beginning from Firefox version 58, the name changed to Key4.db while the logins.json file name—which stores passwords in encrypted format—remain as it is.)
You can use PasswordFox ( www.nirsoft.net/utils/passwordfox.html ) to display all usernames and passwords stored by Firefox. When executing this tool on the target machine, it will display the passwords for the current Firefox profile; if you want to view passwords of another profile, go to File menu ➤ Select Folders and select your target profile folder (see Figure 8-4).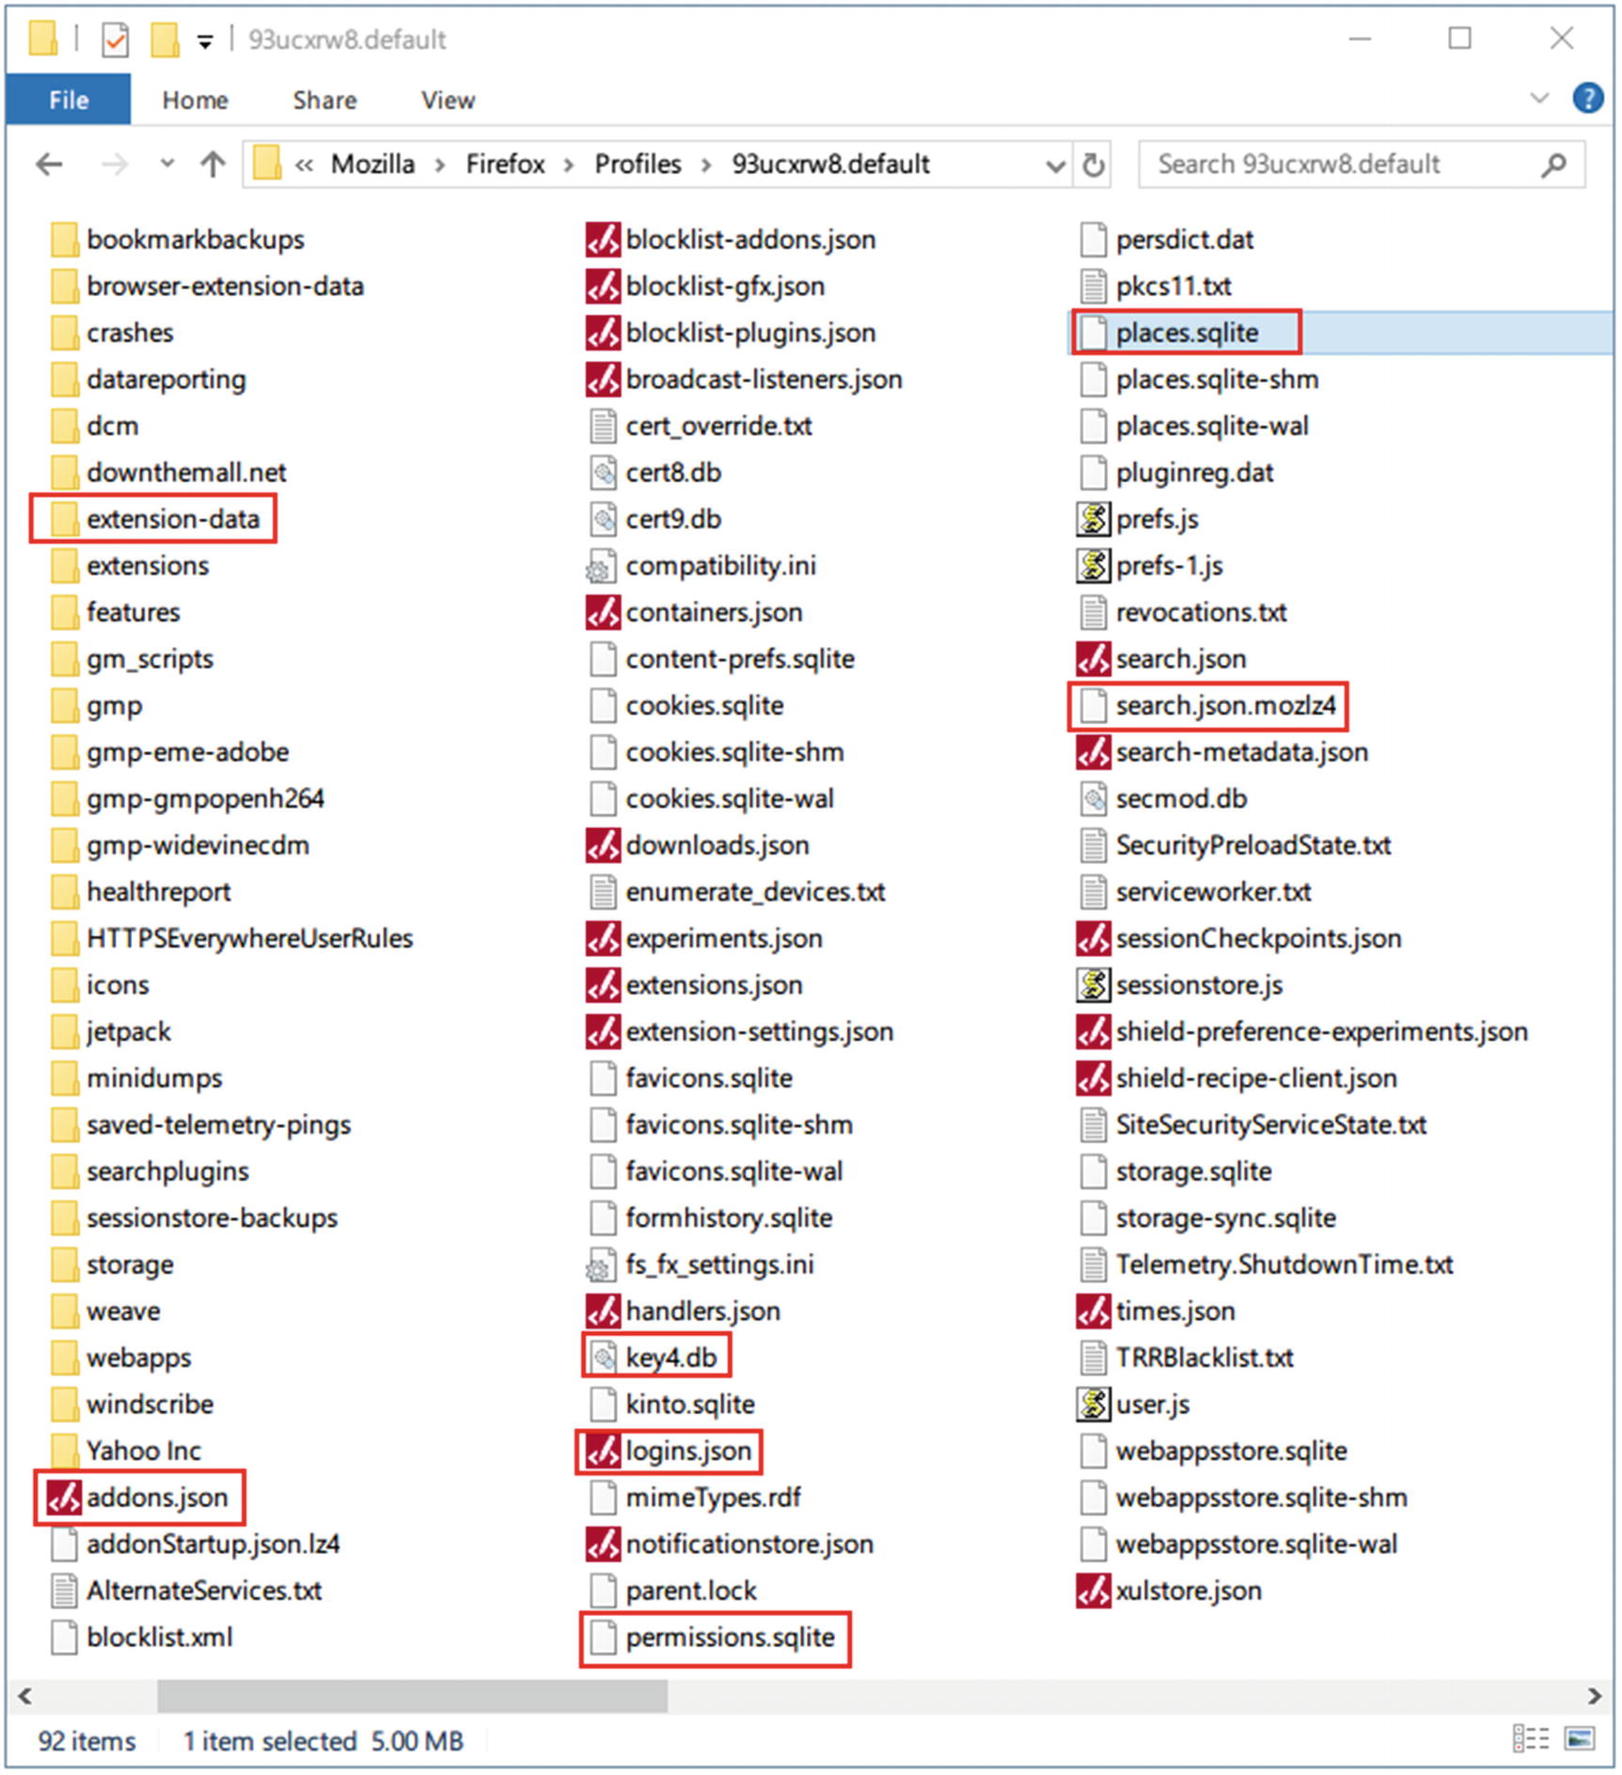 Figure 8-3
Firefox profile folder contents
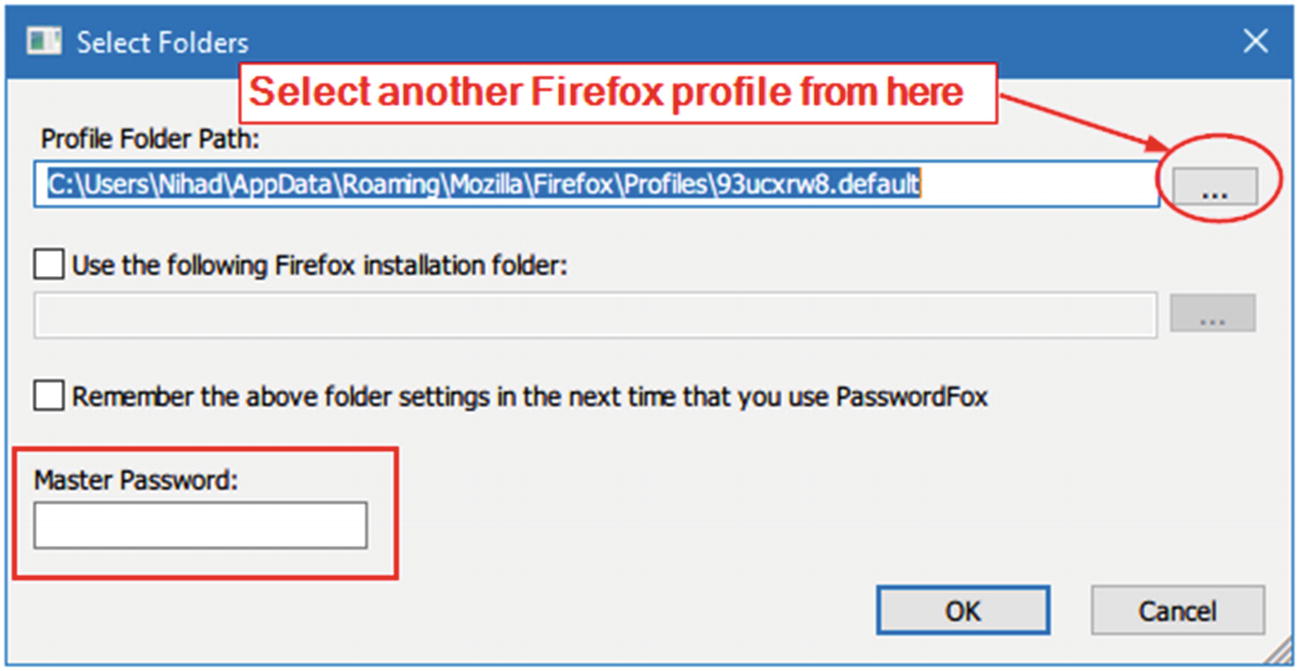 Figure 8-4
Select target Firefox profile folder using PasswordFox from Nirsoft
Note! If the suspect was protecting his/her Firefox stored logins and passwords with a master password, then you need to supply it in order to view saved passwords (see Figure 8-4). Otherwise, the PasswordFox tool will reveal the remaining login information (such as username, web site, date created, etc.) only without displaying the associated passwords.
- 5.
permissions.sqlite: Stores Firefox permission for individual web sites. For example, when you allow a specific web site to display pop-ups, Firefox saves this permission in this file. The same is true when installing an add-on from a particular web site.
- 6.
search.json.mozlz4: Holds user-installed search engines.
- 7.
prefs.js: Stores Firefox preferences.
- 8.
addons.json: Views installed add-ons on Firefox.
- 9.
extension-data [Folder] : Holds data generated by installed extensions (add-ons).
Google Chrome
This is the fastest and most used web browser on desktop computers worldwide today; most digital forensics examiners will likely come across this browser in one of their investigations.
Google Chrome is based on Chromium, which is an open source browser project developed by Google. The Chromium project has not seen the light as a standalone browser, so we can consider Google Chrome as the public version of this project. Many third-party web browsers are based on the Chromium project, like Vivaldi ( https://vivaldi.com ), Yandex browser ( https://browser.yandex.com ), Cent browser ( www.centbrowser.com ), and Opera browser ( www.opera.com ), to name a few.
Most web browsers that are based on the Chromium project are going to store data in a similar way; this fact allows examiners to use the same investigative techniques used with Google Chrome to investigate these browsers, making investigating Google Chrome act as a standard template for most Chromium-based web browsers.
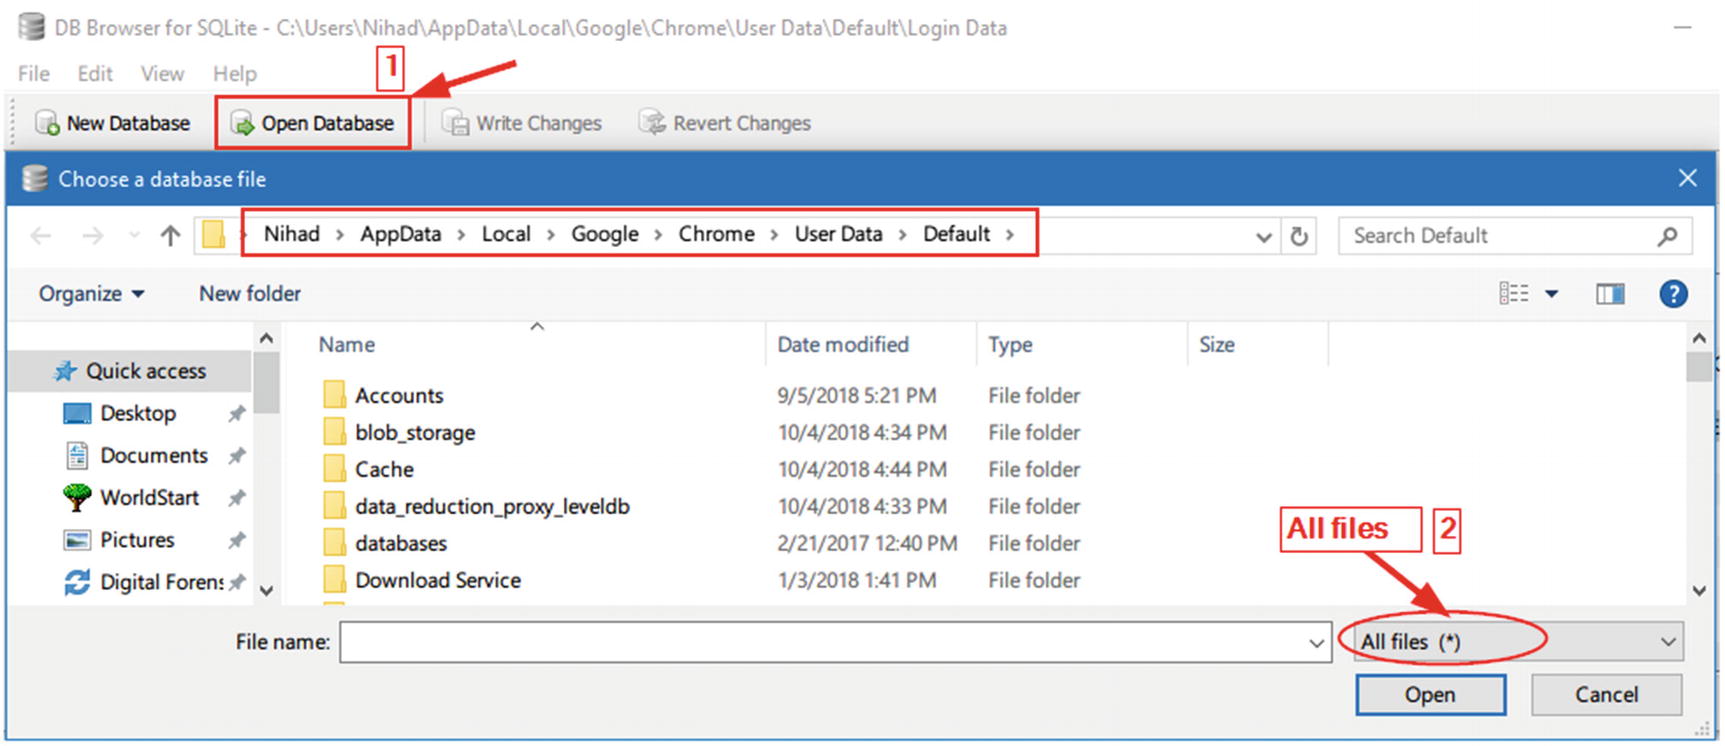
Open Google Chrome SQLite database files using DB Browser for SQLite
If there is more than one profile in Google Chrome, each profile will have its own folder where browser settings and user (profile owner) private data (e.g., passwords, browsing history, bookmarks, etc.) is stored. Google Chrome does not name any additional profile according to its username; instead, it uses a generic name (e.g., Profile 1, Profile 2, and so on). The location of additional Chrome profiles can be found here:
Users<UserName>AppDataLocalGoogleChromeUser DataProfile x(x could be any positive integer number beginning from 1).

Location of current Google Chrome profile folder
Then check the “Profile Path” in the resulting window.
Now that we know how to access Google Chrome profile(s) folder, let us begin investigating the files contained within it.
Note!
We are using Google Chrome Version 69 (official build; 64 bit) and the default profile folder located at Users<UserName>AppDataLocalGoogleChromeUser DataDefault during our coming experiments.
History

Database schema of Google Chrome “History” file
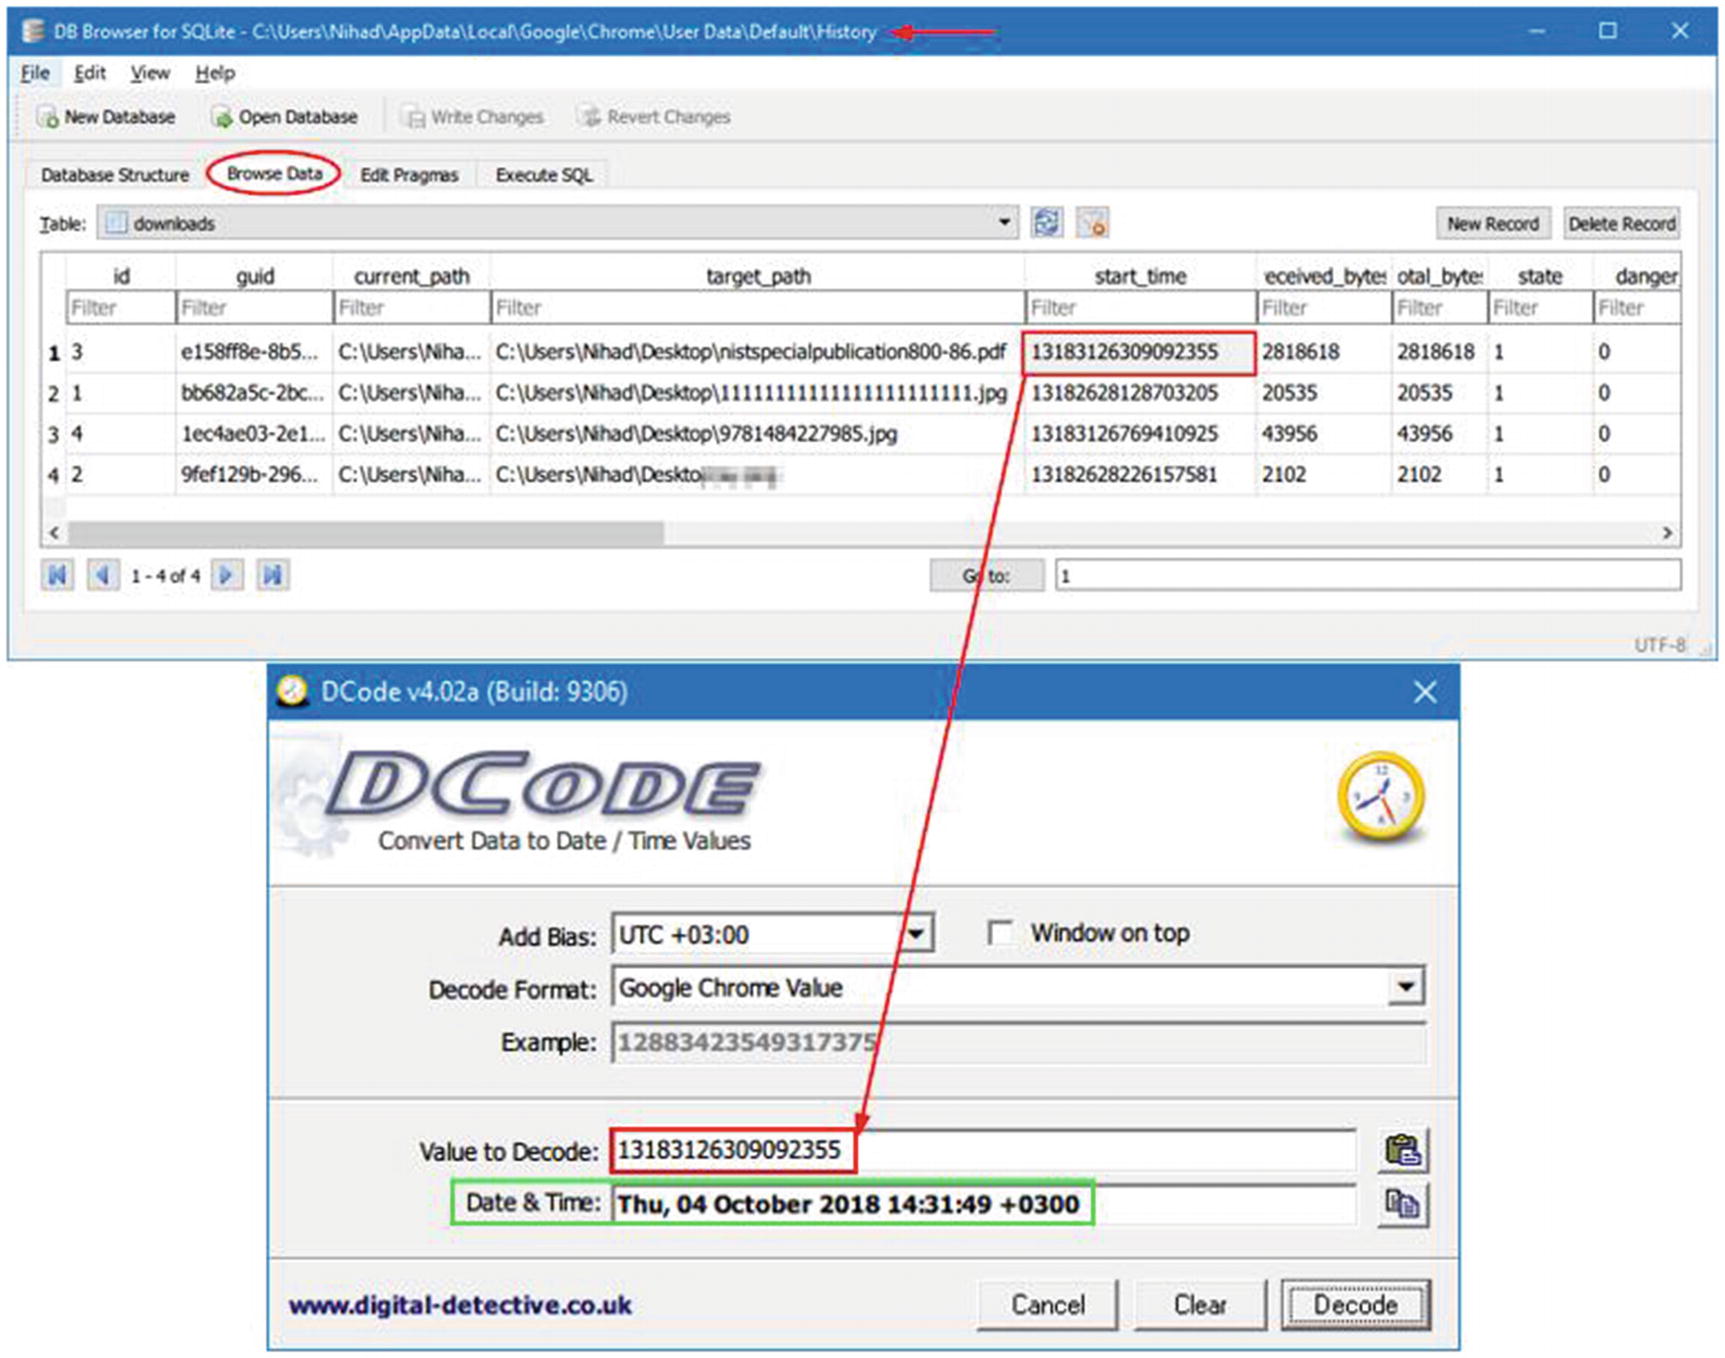
Reveal the start date/time of a particular download found in the “Downloads” table of the Google Chrome “History” file
Nirsoft offers a tool to reveal Chrome history; it is called ChromeHistoryView ( www.nirsoft.net/utils/chrome_history_view.html ). This tool reads the “History” file of the Google Chrome web browser.
Cookies
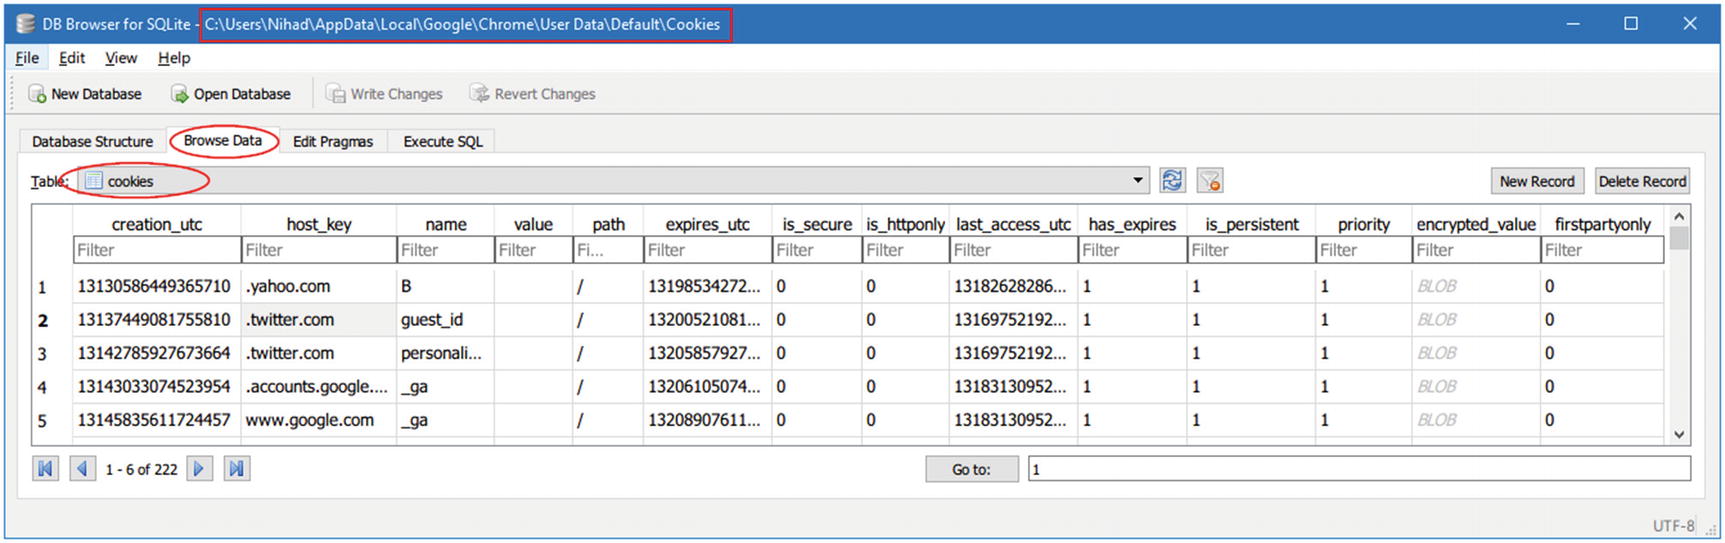
Viewing saved cookies information in the Google Chrome “Cookies” file using DB Browser for SQLite
Top Sites
This database file stores top web sites visited by Google Chrome. It holds two tables, meta and thumbnails, and the information is stored in the thumbnail table.
Shortcuts
This database is responsible for supporting the autocomplete feature of Google Chrome when typing (e.g., a search keyword in the address bar and in web forms). It contains two tables: meta and omni_box_shortcuts. The second table holds the autocomplete text and URLs.
Login Data
This database file holds three tables: login, meta, and stats. The “login” table holds usernames and passwords (sometimes encrypted), in addition to other related attributes, for various web sites.

ChromePass by Nirsoft reveals all passwords stored by Google Chrome browser
Web Data
This function stores the login credentials of users (without passwords, as Chrome moved the login passwords to another file “Login Data” in newer Google Chrome versions), so when a user fills in a login form next time, searches keywords, and so on, Google Chrome will offer its autocomplete suggestions while typing.
Bookmarks

Analyzing Google Chrome “Bookmarks” database file using a free text editor, Geany ( www.geany.org )
Bookmarks.bak
This database file holds recent backups of the Chrome bookmarks; please note that this file will get overwritten periodically, each time Google Chrome launches. The forensic value of this file is that if a suspect deletes a particular bookmark(s) before closing his/her Chrome browser, we can find the deleted bookmark(s) here in this file (we should not launch Google Chrome till we have a copy of this file in a safe location to avoid overwriting it as we have already described).
Cache Folder
This folder holds frequently accessed static contents like images and parts of HTML files, so the next time a user visits the same web site, the browser loads it faster because it loads parts of contents from a local cache folder instead of downloading it again from the origin server housing the web site.

Using ChromeCacheView to view Google Chrome cache folder contents
As we saw, Google Chrome stores quite a lot of personal information about its user. Investigating all these artifacts can help examiners to draw a complete timeline of a user’s activities online in addition to understanding his/her intentions or interests by analyzing browsing history.
To conclude the last section of web browser forensics, we are going to give additional tools that can prove useful for digital examiners when investigating the three most widely used web browsers mentioned in this section.
Other Web Browser Investigation Tools
- 1.
WebCacheImageInfo ( www.nirsoft.net/utils/web_cache_image_info.html ): Search and list all JPEG images with EXIF metadata information stored inside the cache folder of the following web browsers: IE, Firefox, and Google Chrome. As we have already discussed in Chapter 2, EXIF holds important information about JPG images like the camera model used to take the photo, and the date and time when that image was created.
- 2.ImageCacheViewer ( www.nirsoft.net/utils/image_cache_viewer.html ): Scan cache folder in any of the three major browsers (IE, Firefox, and Google Chrome) and list all images found inside (see Figure 8-13).
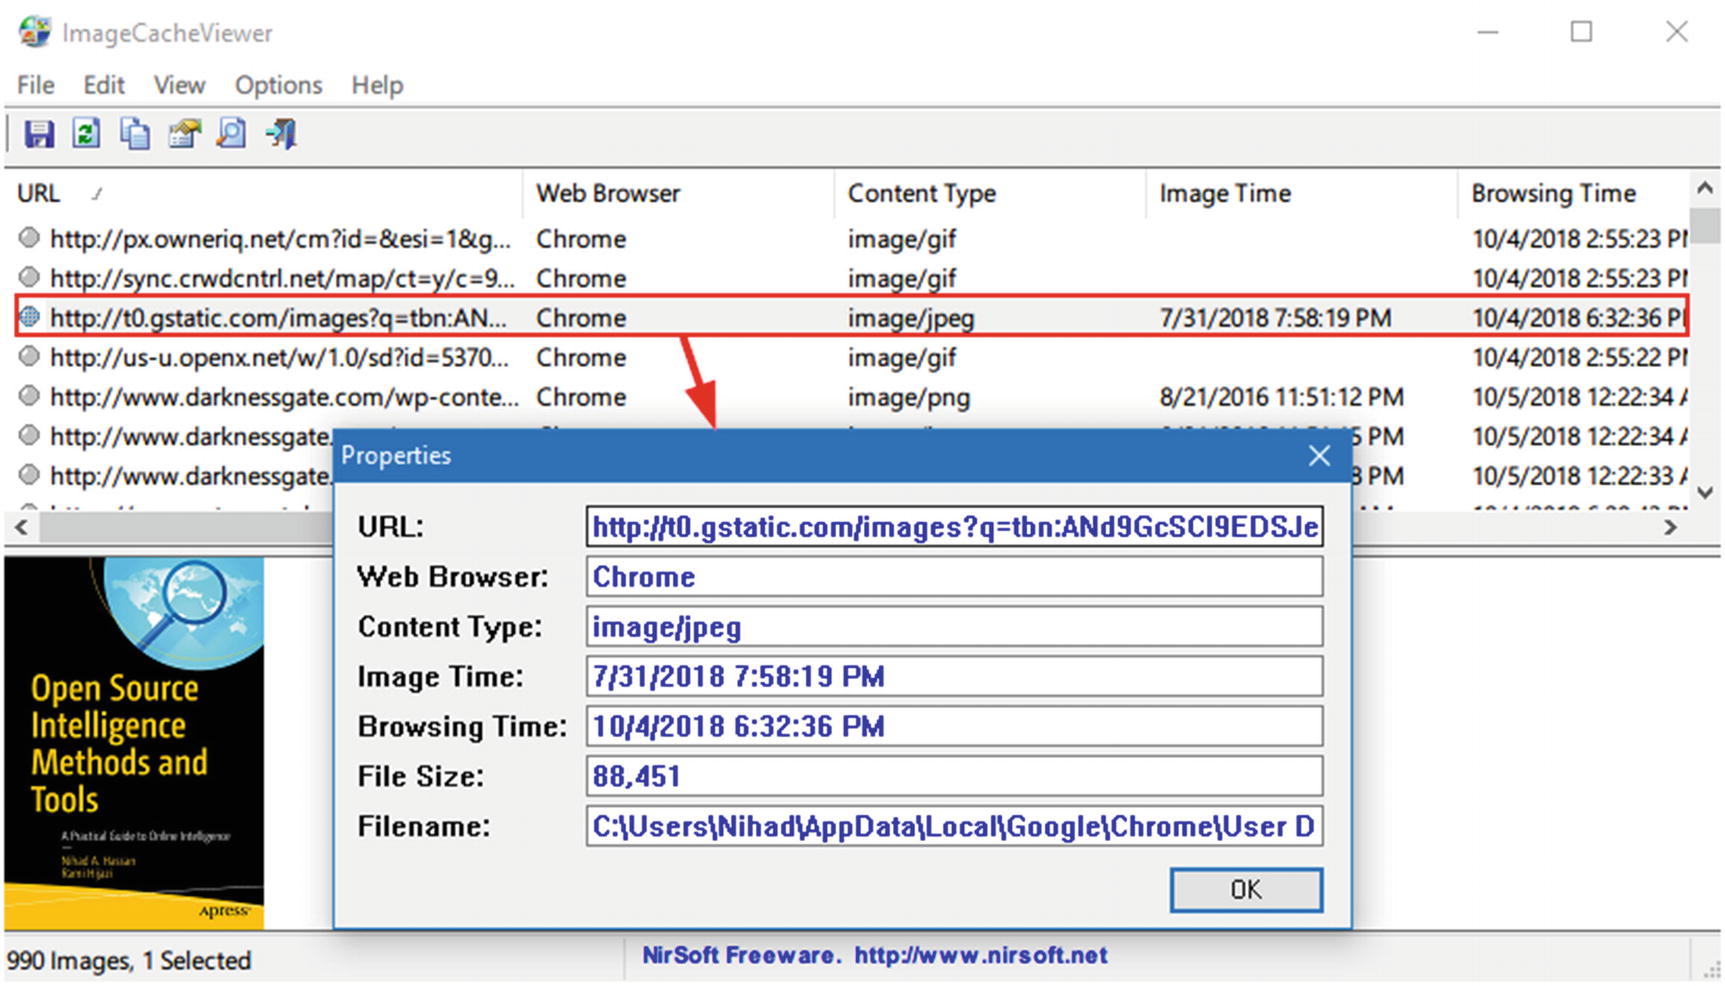 Figure 8-13
Using the ImageCacheViewer tool to display all cached images stored in three major web browsers (IE, Firefox, and Chrome)
- 3.
BrowserAddonsView ( www.nirsoft.net/utils/web_browser_addons_view.html ): Display all add-ons/extensions installed on all major web browsers (Chrome, Firefox, and IE). For Firefox and Chrome, if there is more than one profile for each browser, the tool can show add-ons for all profiles.
- 4.
MyLastSearch ( www.nirsoft.net/utils/my_last_search.html ): Scan web history in all major browsers (Chrome, Firefox, and IE), cache folder, and retrieve all search queries made previously. This tool is important to know what a suspect was searching for at any date/time and what search engine he used to conduct this search.
- 5.
WebBrowserPassView ( www.nirsoft.net/utils/web_browser_password.html ): A general password recovery tool that reveals passwords stored in IE (Version 4.0-11.0), Mozilla Firefox (all versions), Google Chrome, Safari, and Opera.
- 6.
Web Historian ( www.webhistorian.org ): This is a great tool (browser extension for Google Chrome) to visualize web browsing history stored within Google Chrome; it shows graphical circles of the number of days a web site was visited (based on the time order of your web site visits) and keyword search terms, in addition to showing the most active browsing hours of a day and days of the week.
In this section, we shed light on how to perform a manual forensic analysis—in a variety of places and using a variety of utilities—of major web browser artifacts. Please keep in mind that commercial forensics suites have the ability to analyze and extract information contained in various web browsers automatically. As we always repeat, consult a computer forensic tool’s features list for the ability to investigate different web browsers’ data before buying it.
E-mail Forensics
E-mails have become the primary means of communications in today’s digital age; for instance, it is rare to see a person who owns a computer, smartphone, or tablet without having an active e-mail account. A study conducted by The Radicati Group2 estimated that there are 3.8 billion e-mail users (March 2018), and this number is estimated to exceed 4.1 billion in 2021. This is a huge number already and yet is continuing to increase steadily as more people around the world enter the digital era.
Basically, there are two standard methods to send/receive e-mails: the first one is using an application to send and receive e-mails (e.g., e-mail clients like Mozilla Thunderbird), and the second is using a web interface browser to access your e-mail account (e.g., Gmail, Yahoo, Outlook).
From a digital forensics viewpoint, we are concerned about finding and recovering e-mails from a suspect forensic image file/device, analyzing the e-mail header, extracting useful information from it like IP address and date/time when a particular e-mail was sent, and finally tracing e-mail back to its origin (the sender).
Sending spam e-mails
Using it to commit a crime, e.g., e-mail harassment
Invading other user’s privacy by stealing their e-mail login credentials
Before we begin our discussion on how to track e-mails, let us give some important prerequisite information regarding how e-mail communications work.
Steps in E-mail Communications
- 1.
Susan composes an e-mail ([email protected]) using her computer for Nihad ([email protected]); the message needs to be sent to her sending SMTP server (smtp.apress.org) using the SMTP protocol.
- 2.
The sending server performs a lookup to find the mail exchange record of the receiving server (darknessgate.com) through DNS protocol on DNS mx.darknessgate.com for the domain darknessgate.com.
- 3.
The DNS server responds and gives the mail exchange server mx.darknessgate.com for the domain darknessgate.com.
- 4.
Now, the sending server will establish an SMTP connection with the receiving server and send the e-mail to Nihad’s mailbox on the receiving server.
- 5.
The receiving server will receive the incoming e-mail and store it in Nihad’s mailbox.
- 6.
Nihad can either download the e-mail message from his mailbox on the receiving sever into his e-mail client (e.g., Mozilla Thunderbird) on local machine using POP3 or IMAP protocols or he can use webmail (through a web browser) to read the e-mail directly on the receiving server.
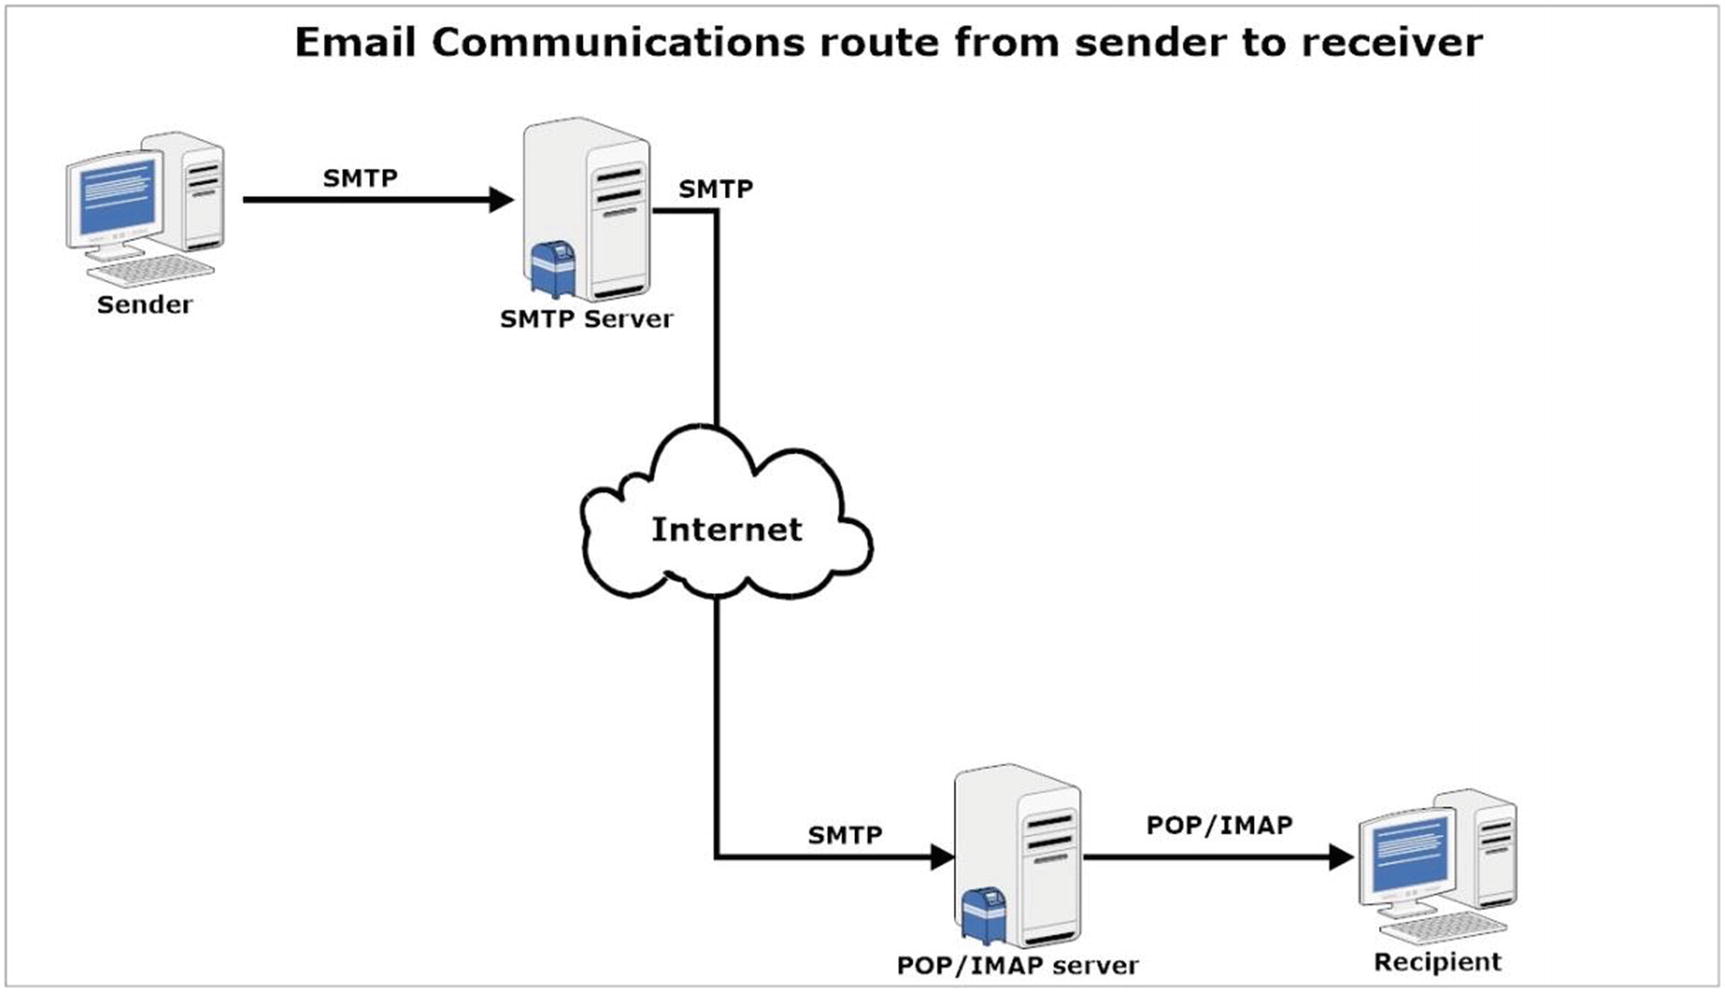
How e-mail communication works. Source: www.darknessgate.com
List of E-mail Protocols
Common E-mail Protocols
Protocol Name | Role |
|---|---|
SMTP | Simple Mail Transfer Protocol: Used to transfer e-mail messages from client to server and between servers. |
POP3 | Post Office Protocol: Clients use it to download their incoming e-mail from their e-mailbox to their local machine (using a proper e-mail client like MS Outlook or Thunderbird) without saving a copy on the POP3 server. |
IMAP | Internet Message Access Protocol: This is another incoming mail protocol (like POP3) and plays the same role; however, it differs from the POP3 protocol in allowing a user to store a copy of his/her incoming e-mail message on the mail server even after a user downloads it to his/her local machine. |
HTTP | HyperText Transfer Protocol: When a user sends and receive e-mails using the webmail interface (Web browser), like Google and Yahoo!, the HTTP protocol will be used. |
E-mail Header Examination
When examining e-mails for forensic information, (e.g., to see where the e-mail come from), the needed information is already stored within it, specifically in the e-mail header section. An E-mail header stores a wealth of forensically useful information about an e-mail under investigation, like the path it took over the Internet to arrive, stop points/delays made during e-mail delivery, and the IP address of the machine that sent this e-mail, in addition to the client (e.g., e-mail program) who sent this e-mail and the type of OS used (in some cases).
Please note that most of the information (including the technical information) in the e-mail header can be forged! Tech-savvy criminals can conceal the origin of their e-mails and even make it similar to an original e-mail that they are trying to reproduce (e.g., phishing e-mails); however, the role of a forensic examiner is to gather the information in the e-mail header and examine it thoroughly, as it can lead to something useful for solving the case at hand.
Reveal Full E-mail Header Information
Before we begin examining the e-mail header, let us give some examples of how to view e-mail headers using popular webmail services (Gmail and Microsoft Outlook mail) and e-mail clients (Thunderbird and MS Outlook).
View Full Gmail Headers
- 1.
Access the target Gmail account using your preferred browser
- 2.
Open the e-mail whose header you want to view
- 3.Next to Reply, click the down arrow (see Figure 8-15)
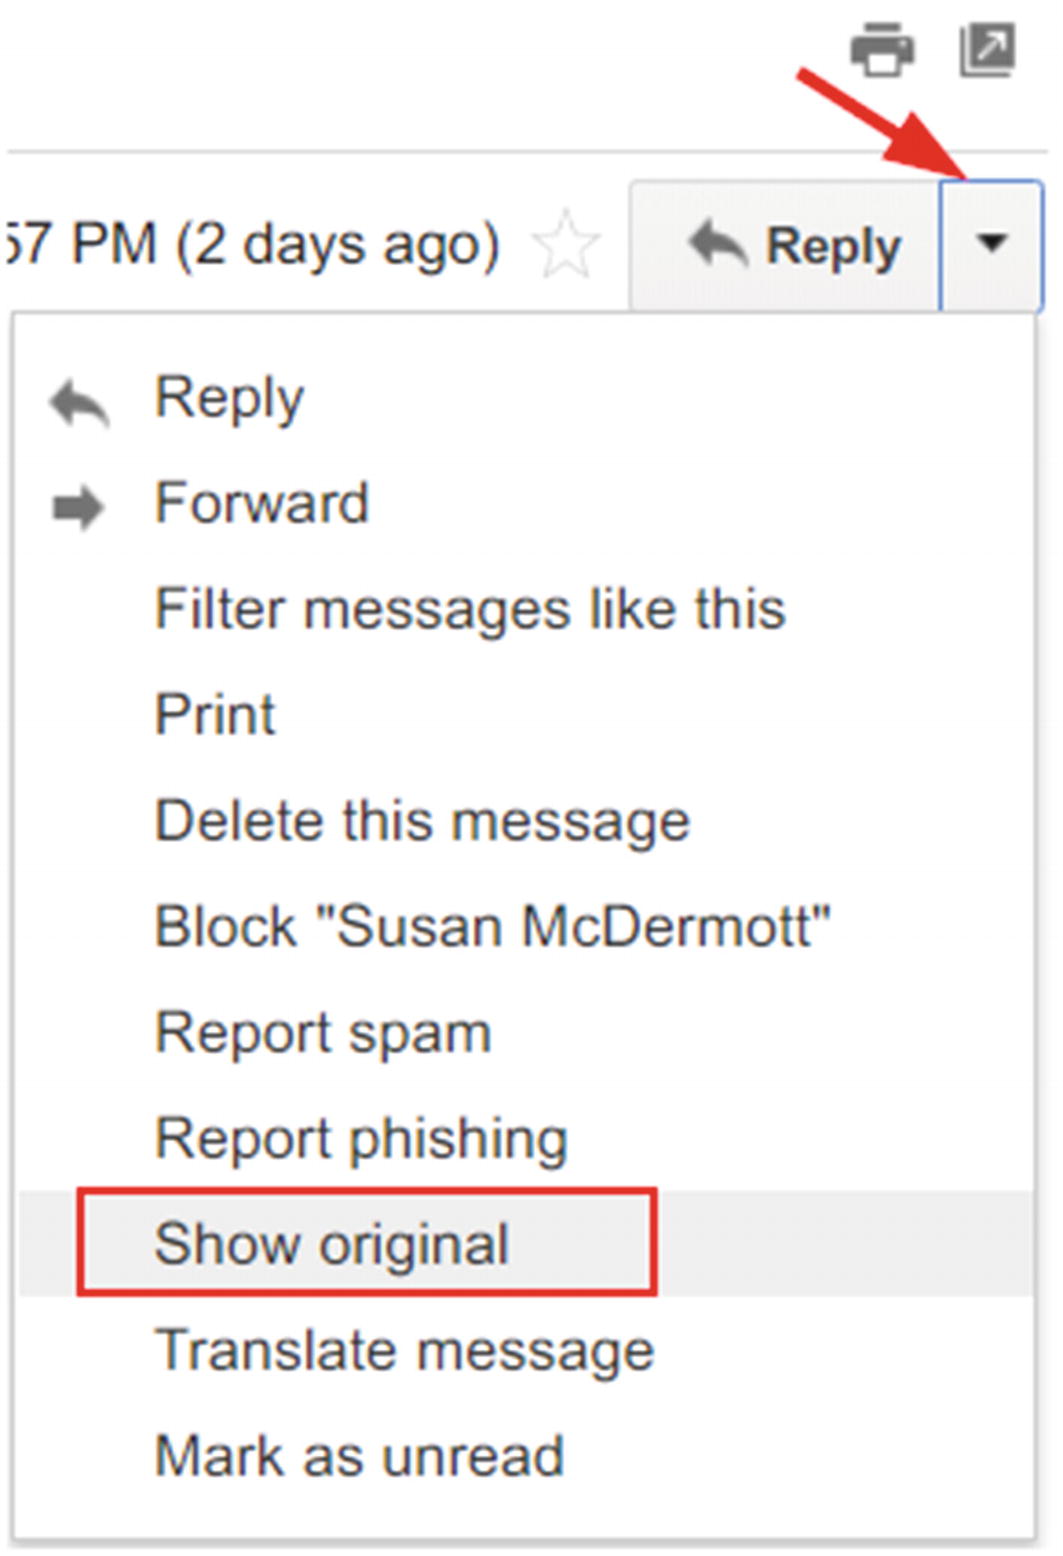 Figure 8-15
Show Gmail e-mail message header
- 4.
Click “Show original”
View E-mail Header Using Outlook Mail
- 1.
Access Outlook mail account using your preferred browser
- 2.
Open the e-mail whose header you want to view
- 3.
Next to Reply, click the down arrow in the top right-hand corner of the e-mail
- 4.
Click “View message source” (see Figure 8-16)
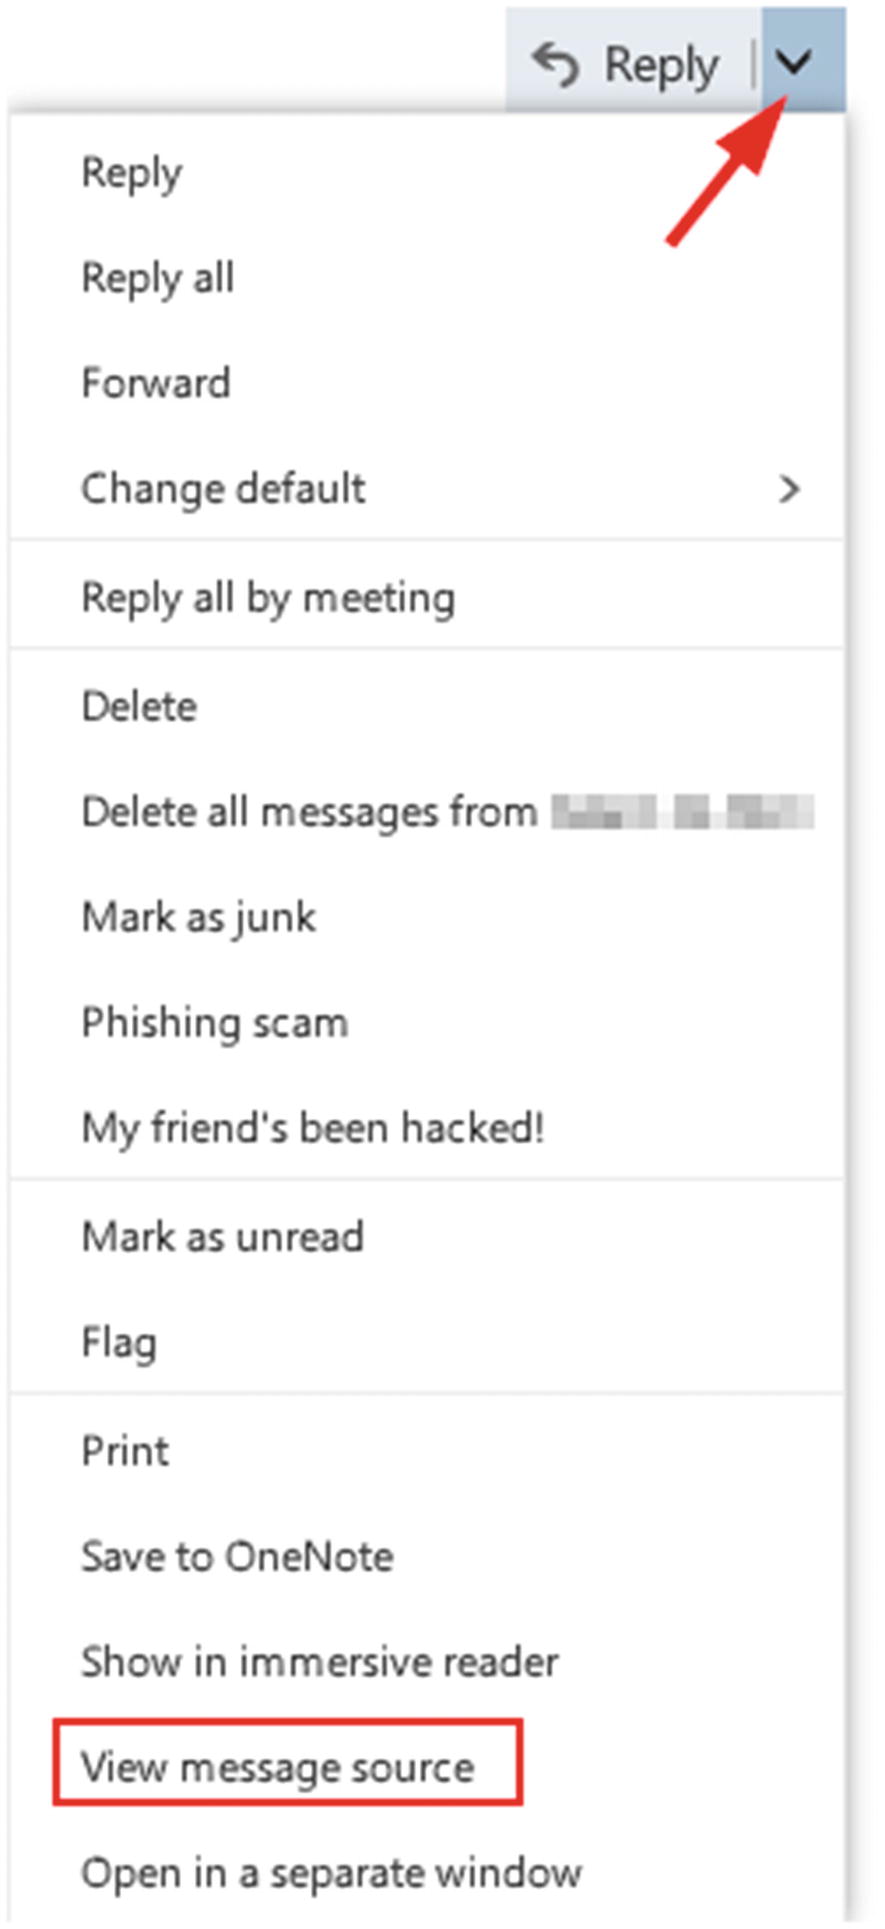
View message source using Outlook Mail
View Full E-mail Headers in Mozilla Thunderbird
- 1.
Open Thunderbird, then open the message whose header you want to investigate in a new window by double-clicking over it.
- 2.
Got to View ➤ Headers ➤ All.
- 3.
Another option to view the header is to open the message in a new window, and then go to the “More” button on the top right message window and select “View Source” (see Figure 8-17).
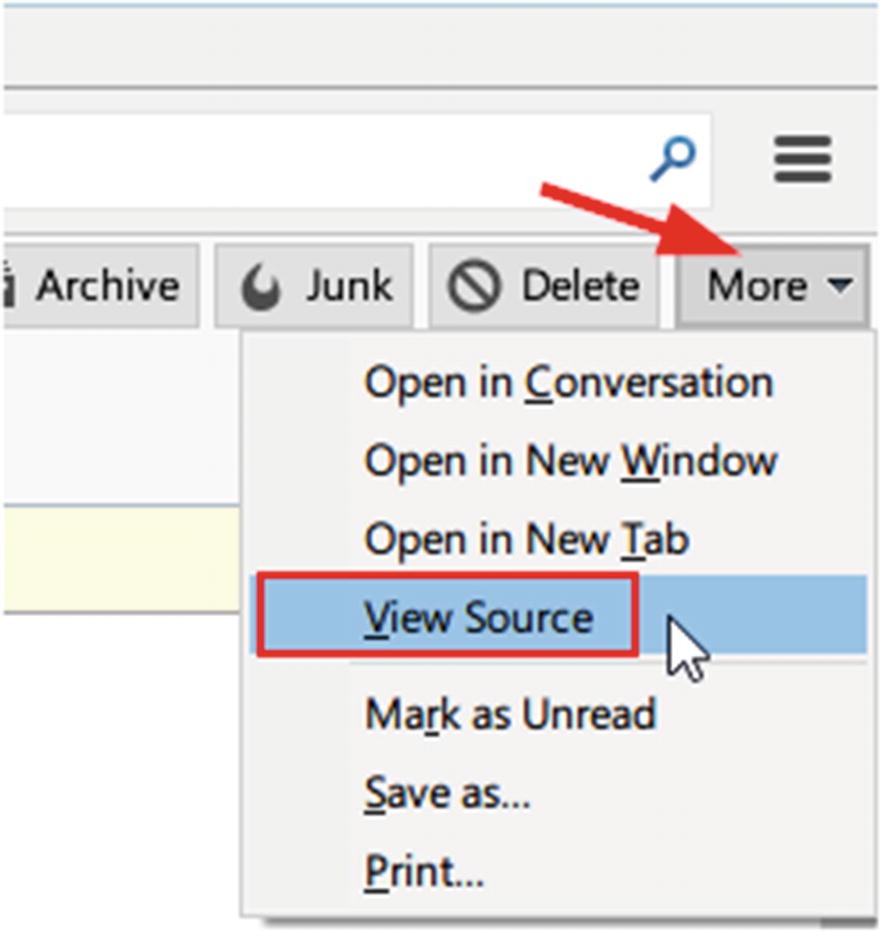
View e-mail header using Mozilla Thunderbird e-mail client
View Full E-mail Header in Outlook Mail Client
- 1.
Open MS Outlook and go to the e-mail whose header information you want to view. Double-click this e-mail to open it in a new window.
- 2.
Click File ➤ Properties; the header info is located in the “Internet headers” box (see Figure 8-18).

Viewing e-mail header info using MS Outlook e-mail client
Analyzing E-mail Headers
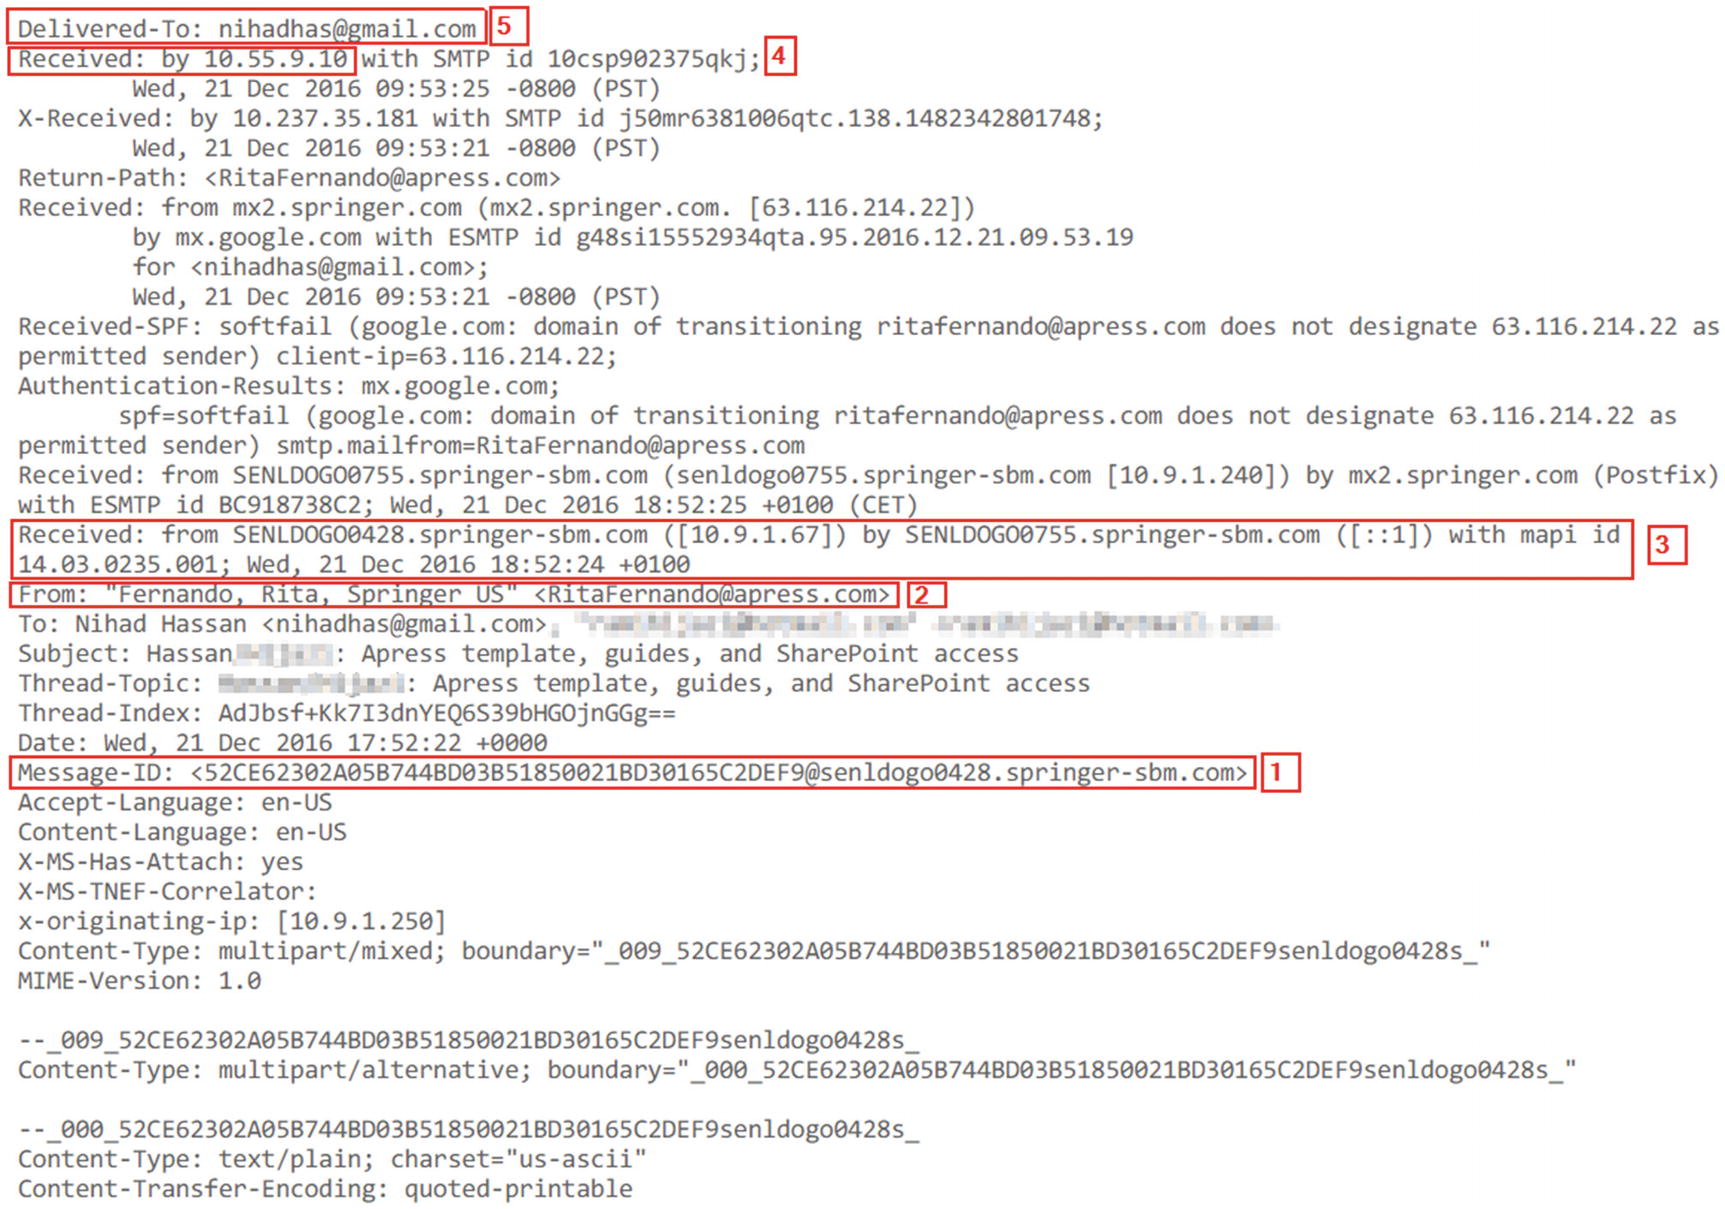
Sample e-mail header; always read it from bottom to top
In Figure 8-19, The number [1] points to Message-ID; this is a unique number assigned by the sending e-mail server. The number [2] points to the e-mail address of the sender (this can also be false, as anyone can adjust the sender’s “e-mail address” from his/her end). Number [3] points to the originating IP address (IP address of the sender); keep in mind that this IP address can be forged or spoofed. Expect to see more than one “Received” line. However, always read the e-mail header from bottom to top; this makes the first “Received” line highly probably point to the sender itself. Number [4] is the recipient IP address. Number [5] is the e-mail address of the recipient.
Lines starting with “X” in the e-mail header are comments written by the sending software (e.g., e-mail clients), by the SMTP servers, and even by the antivirus/spam servers found along the path the e-mail traveled.
E-mail Headers

An e-mail header can reveal additional information about the message like an e-mail client’s name and version and the OS used to compose and send the message
Analyzing e-mail headers manually can be a daunting task for beginners, but many tools and online services are available to extract useful information from e-mail headers automatically. Let us begin with a simple online tool developed by Google named “Message header” ( https://toolbox.googleapps.com/apps/messageheader ).
- 1.
Copy the target e-mail header as we did previously.
- 2.
Paste the contents into the box “Paste email header here”.
- 3.
Finally, click “Analyze the header above”.

Message route from sender to receiver revealed by the Message header online tool ( https://toolbox.googleapps.com/apps/messageheader/ )
There are various tools to analyze e-mail headers. The following are some popular one:
E-mail Header Analyzer ( https://mxtoolbox.com/EmailHeaders.aspx )
This is an online tool for parsing e-mail headers, making them human readable. To use this tool, just go to the web site and paste the target e-mail header info. The result will show—among other info—the path this e-mail took over the Internet in addition to any delays that may have happened.
eMailTrackerPro ( www.emailtrackerpro.com )
- 1.
Go to the tool web site, and download and install the tool as you do with any Windows app.
- 2.Launch the program and click the “Trace Headers” button in the main tool window (see Figure 8-22).
 Figure 8-22
Using eMailTrackerPro to track e-mail headers
- 3.
A new window appears, in which you can paste the target e-mail header and press the “Trace” button to begin tracing.
- 4.
When tracing finish, click the “My Trace Reports” button in the main program window to show a detailed tracing report (see Figure 8-23).
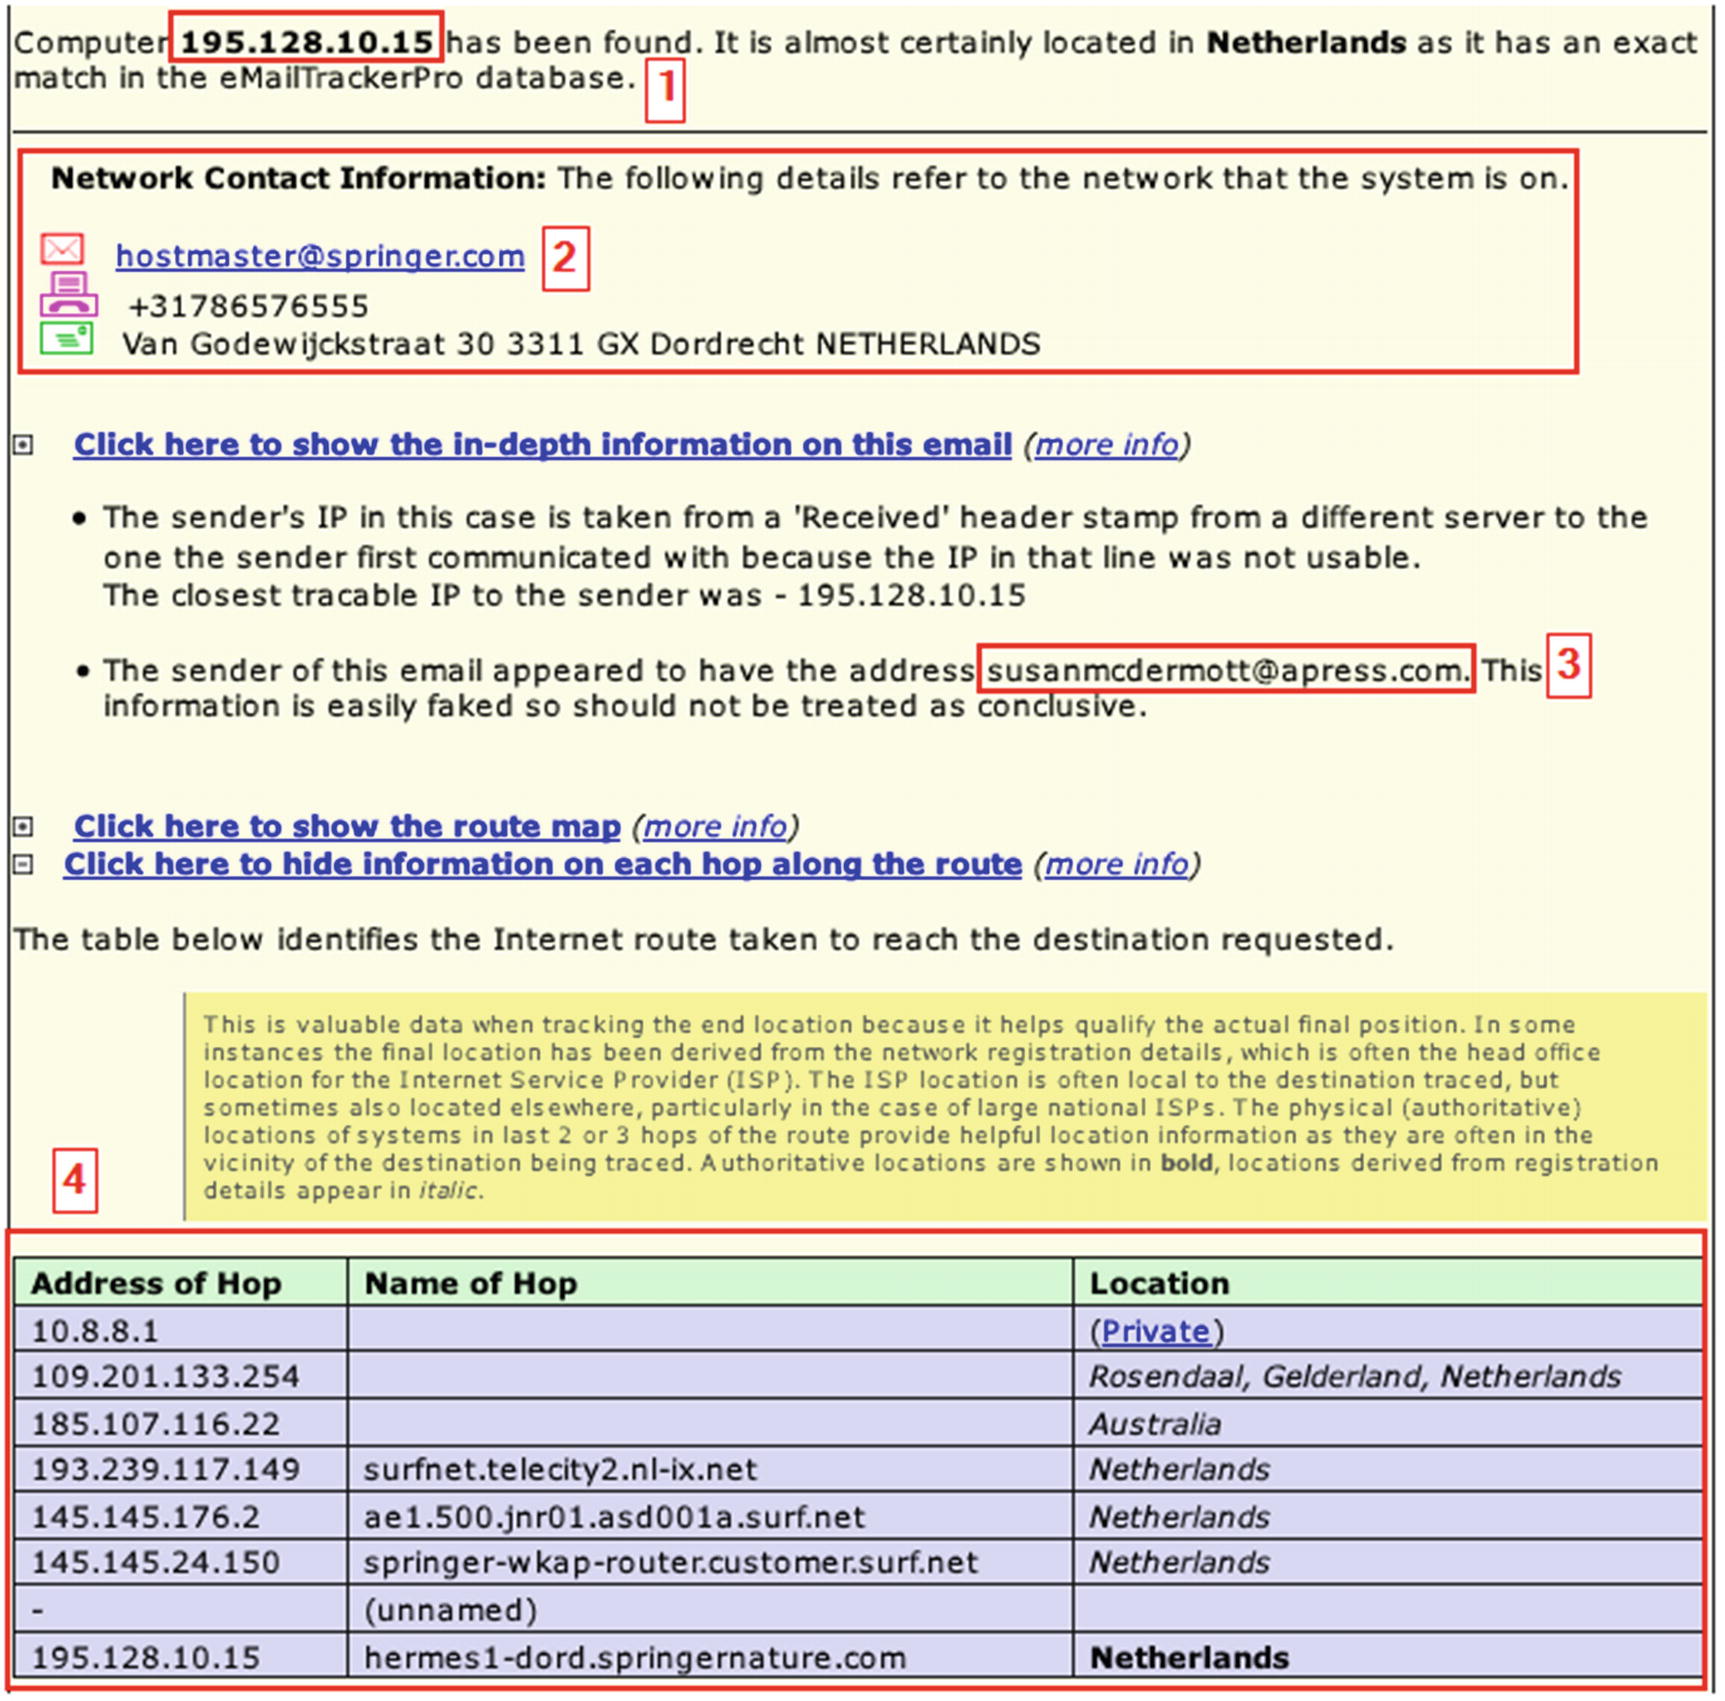
Report generated by eMailTrackerPro for tracing an e-mail address using its header
- 1.
Sender originating IP address: keep in mind that this address can be internal (private IP address) or simply a fake/spoofed IP address.
- 2.
Information about the network responsible for sending this e-mail.
- 3.
Sender e-mail address.
- 4.
Internet route that the target e-mail follows to reach its final destination .
Determining a Sender’s Geographic Location
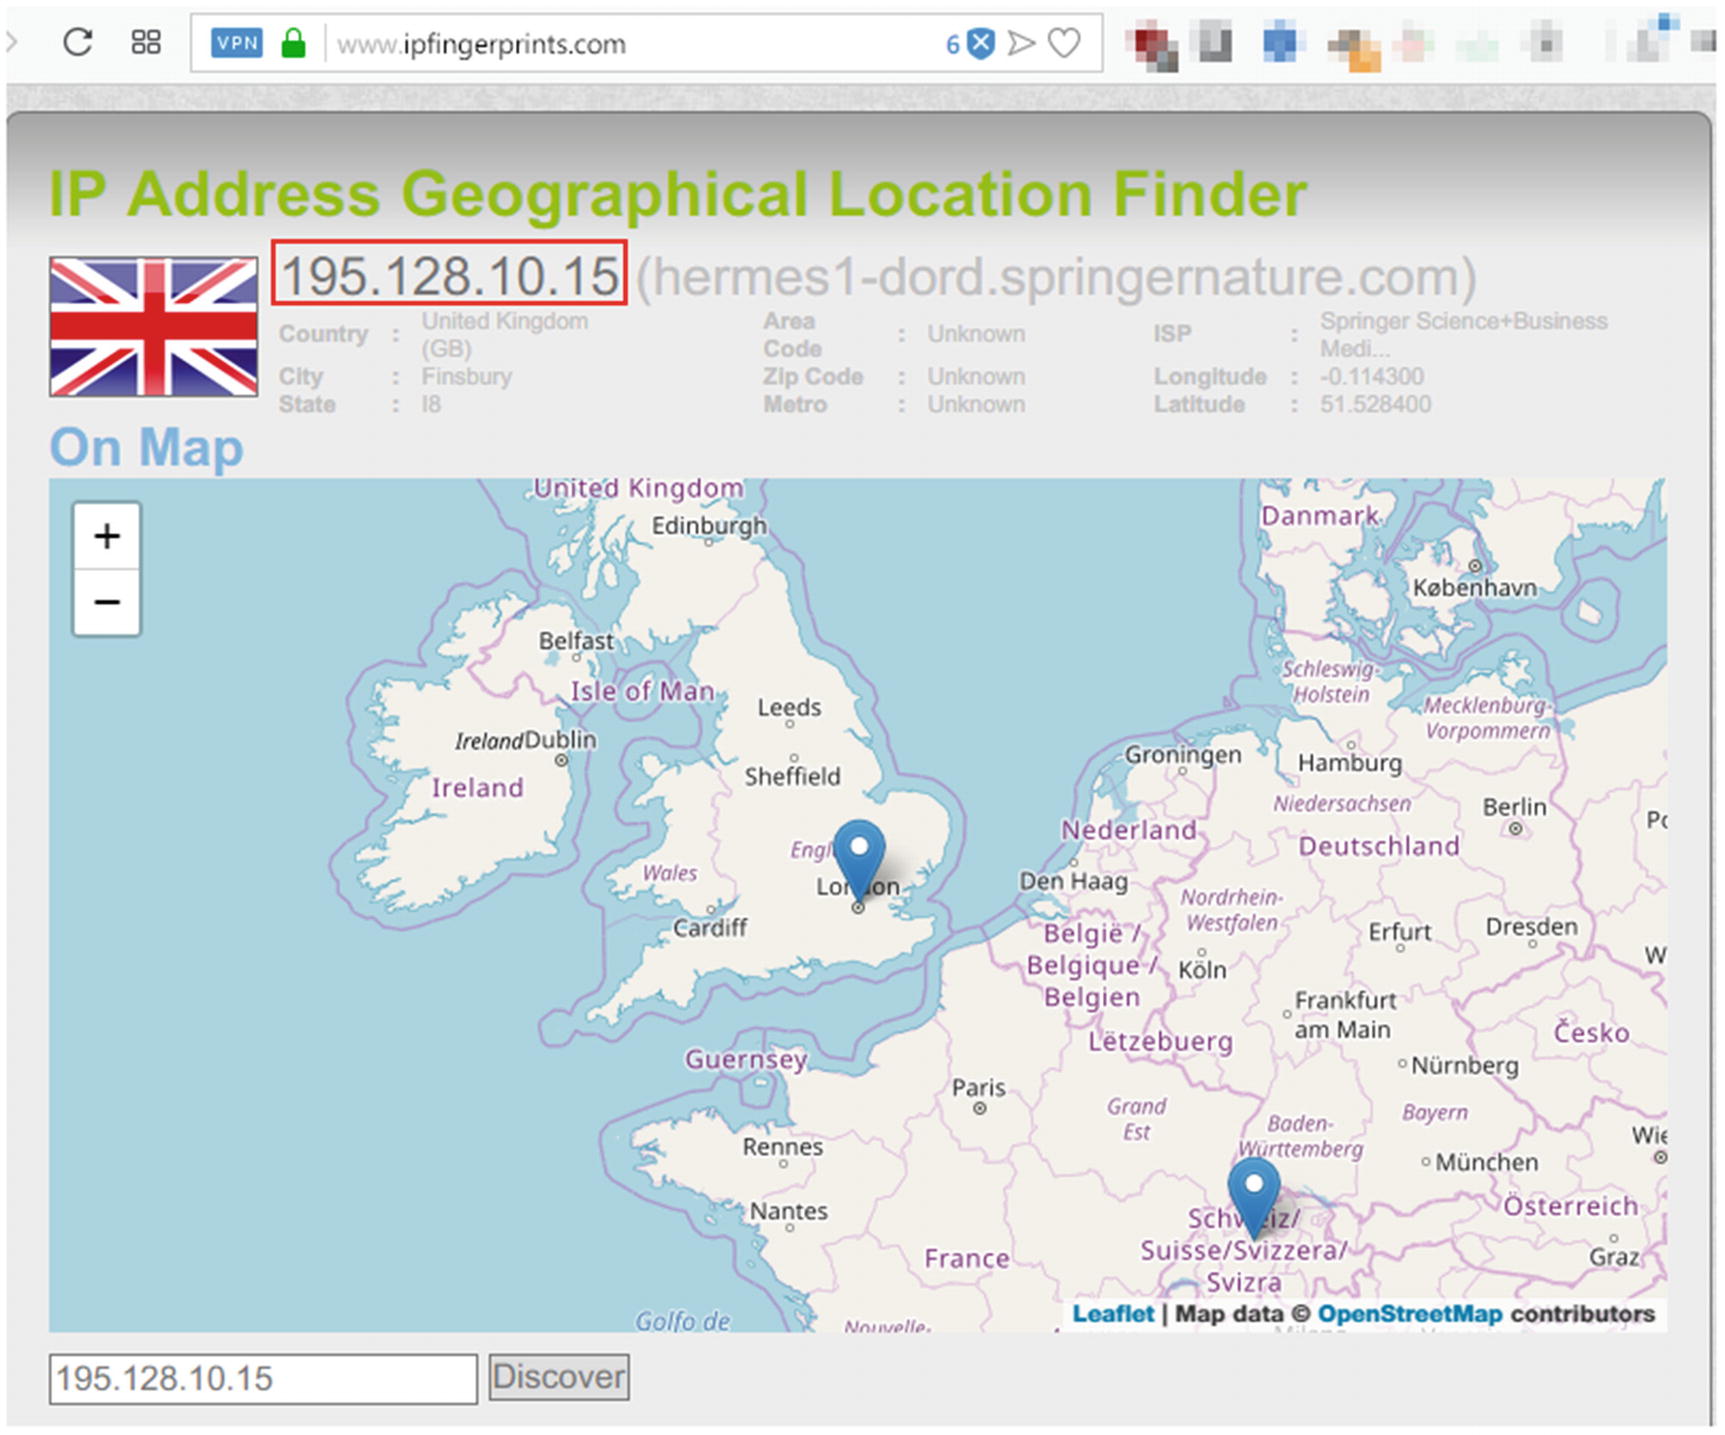
Mapping IP address to geographical location using www.ipfingerprints.com
- 1.
IPverse ( http://ipverse.net ): This shows the IPv4 and IPv6 address block lists by country code.
- 2.
IP2Location ( www.ip2location.com/demo.aspx ): This is a free IP location service.
- 3.
DB-IP ( https://db-ip.com ): This shows the IP geolocation and network intelligence.
- 4.
IPINTEL ( https://ipintel.io ): This shows the IP address on a map and shows the ISP.
- 5.
IP Location ( www.iplocation.net ): This shows IP geolocation data.
- 6.
UTrace ( http://en.utrace.de ): Locate IP address and domain names.
- 7.
Onyphe ( www.onyphe.io ): This is a search engine for open source and cyberthreat intelligence data. You can use it to find more info about any IP address.
- 8.
IP to ASN ( https://iptoasn.com ): This shows the IP address to the ASN database; updated hourly.
- 9.
Reverse DNS Lookup ( https://hackertarget.com/reverse-dns-lookup ): This shows reverse DNS entries for a target IP address.
- 10.
Reverse IP lookup ( https://dnslytics.com/reverse-ip ): Find domains sharing the same IP address or subnet.
- 11.
Same IP ( www.sameip.org ): This shows sites hosted on the same IP address.
- 12.
IP Address Tools ( www.ipvoid.com ): Offers various IP address online tools.
- 13.
ExoneraTor ( https://exonerator.torproject.org ): Here you can check whether a particular IP address was used as a Tor relay before.
Determine Sender Geographic Location Using Sender’s Time Zone

Revealing sender local time zone
Investigating E-mail Clients
Many users rely on e-mail clients to send/receive e-mails; for instance, the most two popular e-mail programs are MS Outlook and Mozilla Thunderbird.
Autopsy has a default ingest module to investigate e-mail messages (Thunderbird and Outlook e-mail clients) found within the supplied data source (e.g., forensic image or e-mail client folder when performing analysis of logical files).
- 1.
We already covered how to create a new case using Autopsy; in this experiment, we will create a case as we did previously. However, we will change the data source to include only the Thunderbird profile folder instead of a whole hard drive image as we did previously.
- 2.We will not demonstrate all steps of creating a new case from the beginning, so begin the wizard, and when you reach the “Add Data Source” window, select “Logical Files” (see Figure 8-26) and then click “Next” to continue.
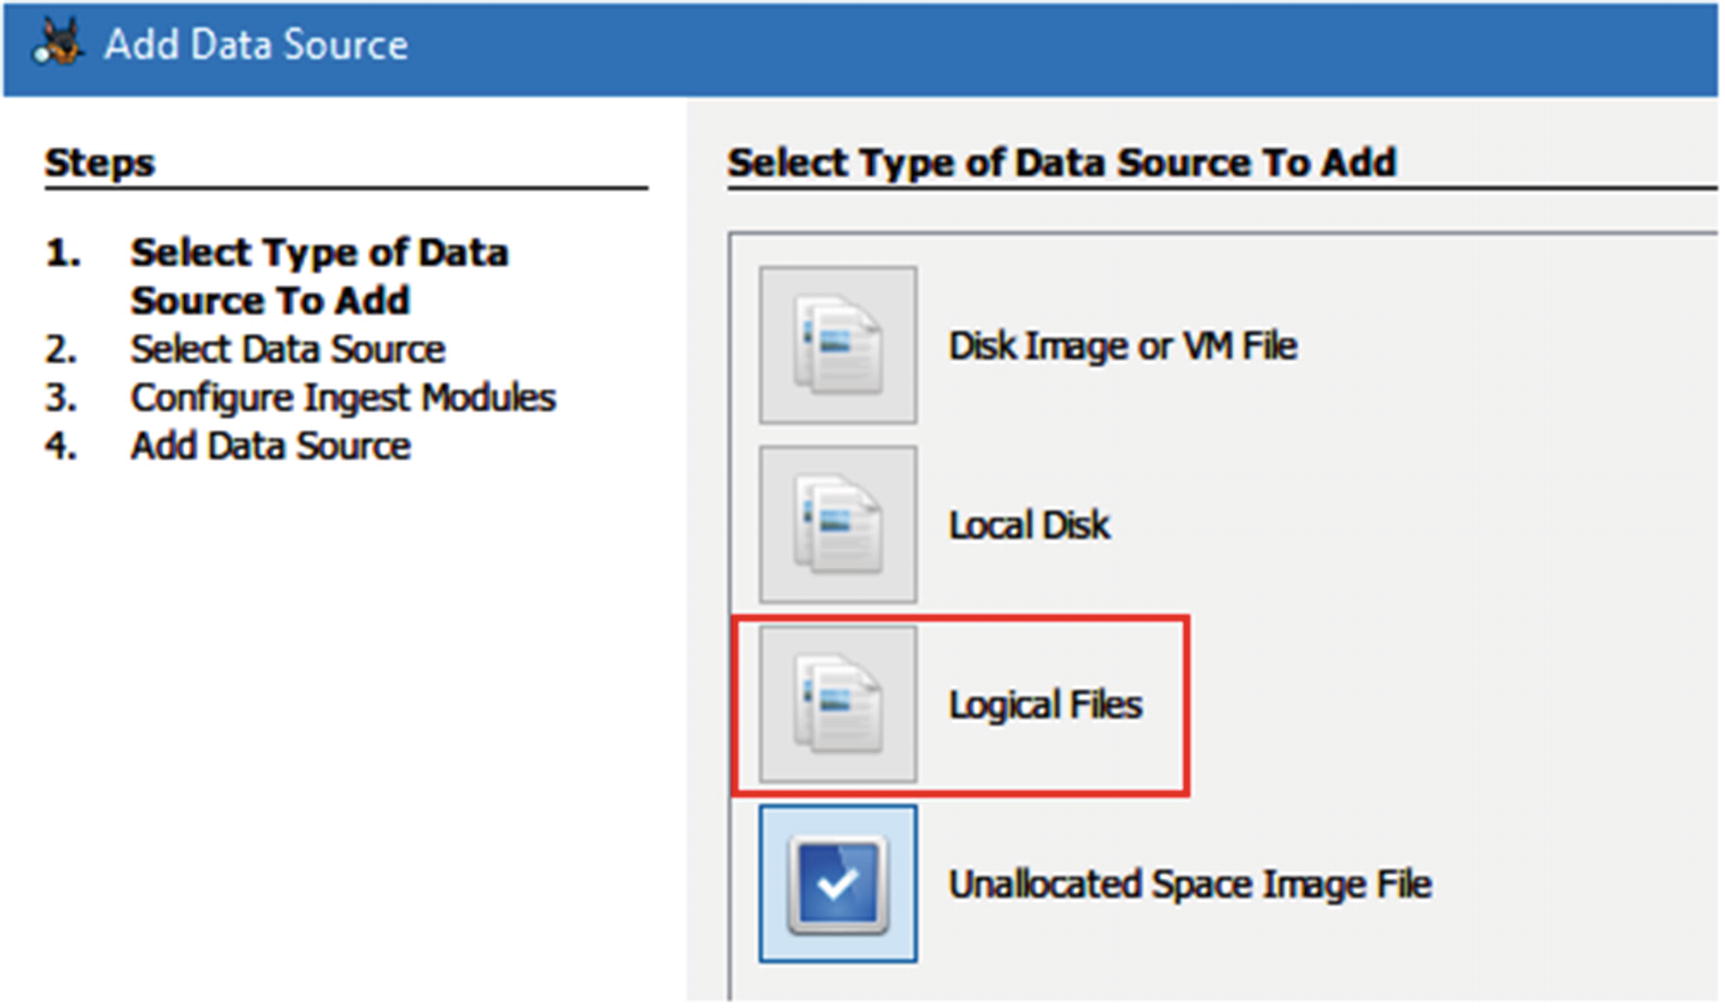 Figure 8-26
Select “Logical Files” as a data source
- 3.Now, click the “Add” button to select the Thunderbird profile folder; make sure the option “Local files and folders” is selected (see Figure 8-27). Click “Next” to continue.
 Figure 8-27
Select Thunderbird profile folder as a data source
- 4.Now, you need to configure the ingest modules; for instance, we are concerned with e-mail forensics only, so we will select two ingest modules only: Email Parse and Keyword Search (see Figure 8-28). Click “Next” to continue.
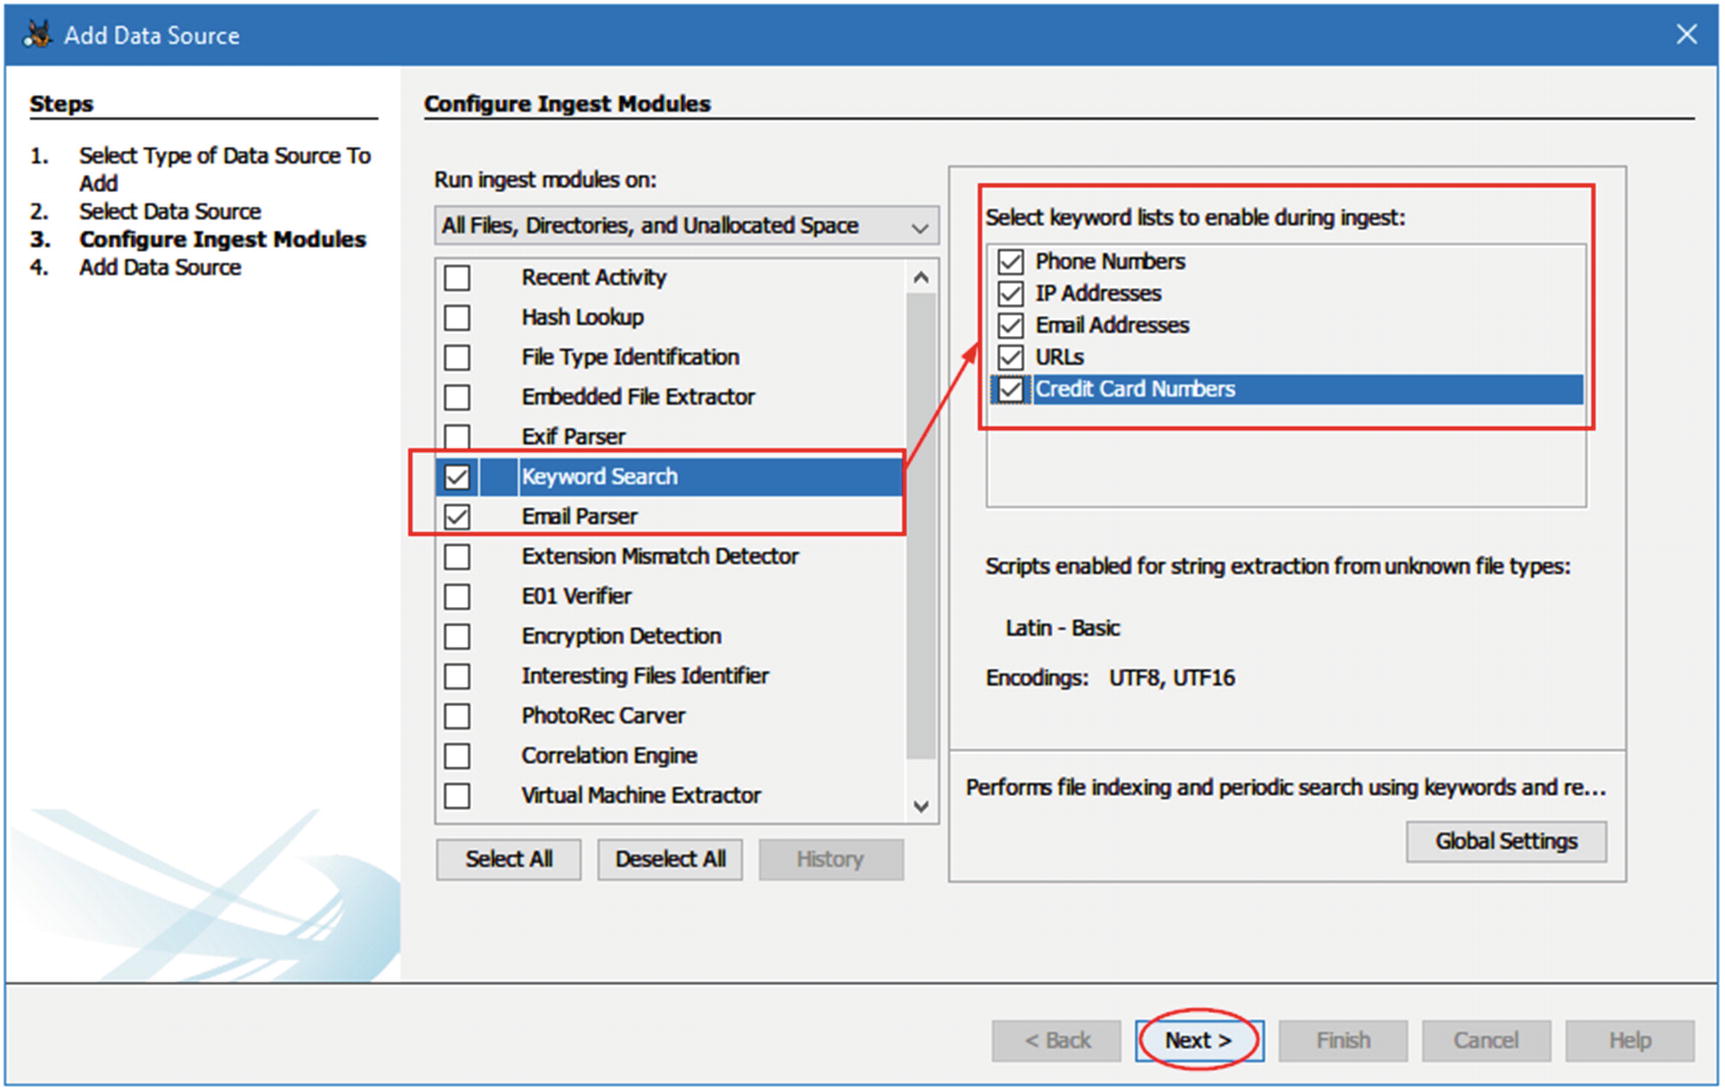 Figure 8-28
Configure ingest modules window; select only two modules to parse e-mails and search within returned results
- 5.
The final window in the wizard appears, announcing that the data source has been added successfully. Click “Finish” to continue.

The results of parsing the Thunderbird profile folder
Webmail Forensics
- 1.
Most webmail providers give their users POP3/IMAP access to their stored e-mail. We can use an e-mail client like Thunderbird to synchronize a target e-mail account for offline analysis—of course, we need to have access to this account first.
- 2.
If the suspect e-mail is in Gmail (Google e-mail service), we can use a tool offered by Google called “Google takeout” to create/download an offline backup of all Google application data that belongs to the target Google user account. To use this tool, just go to https://takeout.google.com/settings/takeout (you need to be signed in first to the Google account that you want to acquire) and then select which Google products you want to include in your archive. After that, click “Next” to move to the next window where you can customize the archive format. Finally, click “Create Achieve” and wait Google to send you a link to the target user Gmail account to download the archive for offline usage.
E-mail Investigations Challenge
- 1.
Disposable e-mail addresses: It is extremely difficult and even impossible in many cases to track disposable (temporary) e-mail addresses. This kind of e-mail lives for a short time and is usually used for one time (or one contact) only.
- 2.
Anonymous e-mails: For example, using the TOR network to send anonymous e-mail messages. Tracking such e-mails is nearly impossible, since they follow strict precautionary steps.
- 3.
Shared e-mail accounts : Here, a suspect creates an e-mail account using a free service like Yahoo! or Gmail, then shares the access to this account with his/her partner. The parties do not exchange e-mails: a suspect has just to write an e-mail (e.g., instructions for criminal activity) and then leave it in the draft folder. His/her partner will access this account, read the instructions, and then delete the draft message.
- 4.
Different jurisdictions: We have already covered this in Chapter 1; cloud e-mail providers may store your e-mails in servers located in countries other than the one in which you currently reside. For example, consider a suspect involved in a criminal activity in the United States who has an e-mail account with an e-mail provider in Switzerland; can law enforcement in the United States force the Swiss provider to release suspect data?
Chapter Summary
In this chapter, we have thoroughly covered how to investigate the most used web browsers—Google Chrome, Firefox, and IE/Edge—for forensic artifacts. The dependence in this chapter was on manual analysis, in addition to using some simple, free tools that can aid investigators in their forensics work.
Currently, most cybercrimes involve using the Internet in one way or another to commit or facilitate a criminal activity. This leaves digital traces on both the client machine (e.g., browsing history, previous searches, download history, and login credentials to social media accounts) and the web server such as communication logs (e.g., IP address and timestamp information).
In the next chapter, we will reverse the situation and show you how criminals can use various techniques to frustrate computer forensic examiners’ efforts and prevent them from doing their jobs in capturing and analyzing digital evidence.