
Investigating Windows OS for forensics artifacts

Operating system market share (October 2017 to September 2018) . Data source: www.netmarketshare.com/operating-system-market-share.aspx .
The ultimate goal of any digital forensic examination is investigating the action of a person(s) conducted on his/her computing device. For instance, operating system forensics help examiners to correlate events conducted using the suspect device’s operating system to other actions/events that have happened in the real world.
Almost any event or state change on a system is considered a result of a user action. A Windows user will leave traces while using it; actually, Windows is notorious for leaving too many traces at different places as a part of its normal use, compared with other operating system types. Advanced Windows users—who know how to delete and cover their traces—will not always succeed in deleting all these traces, leaving valuable evidence for digital forensic examiners to retrieve.
This book is about teaching readers how to conduct digital forensics investigations using Windows OS, so this chapter will introduce the different types of artifacts left by Windows users/operating system functions and the forensics significance of these artifacts.
In the previous chapter, we’ve covered how to configure Autopsy to conduct basic searches within supplied data source—hence the forensic image file. In this chapter, we will continue demonstrating how to use different tools, in addition to many functions supplied by Autopsy, to capture and analyze Windows artifacts.
Booting From a Forensic Image
In this chapter, we will practice most forensics techniques with a live system. Being able to boot an image of acquired evidence into a computer or using a virtual machine environment will give investigators a perspective on suspect computer usage in an entirely forensic manner. Of course, in order to work, the subject forensic image must contain either a full HDD image or the partition that contains the installed OS (e.g., C: drive when acquiring a Windows machine). In addition to this, live booting will allow investigators to use some techniques that cannot be performed easily using a static analysis conducted by computer forensics software (e.g., cracking a Windows account password). Many computer forensics suites offer the ability to boot from image files. You can also convert the forensic image (e.g., DD or E01 format) into a format compatible with the target virtual machine software (e.g., VMWare, VirtualBox, Hyper-V).
Timeline Analysis
Timeline analysis is considered an important element in most digital forensics investigations, as it gives a holistic view about the succession of events that have happened to the system of question and is used to answer a main question in any investigation: when did a specific activity take place? Timeline analysis allows investigators to save their investigation time by reducing the volume of data that needs to be investigated to a specific timeframe (e.g., after the incident took place). Timeline analysis is very important when investigating malware incidents to identify when a system state has changed because of a malware attack.
Creating a Timeline Using Autopsy
Recent versions of Autopsy (3.0.5+) come equipped with an advanced timeline interface that groups different artifacts found within the supplied forensic image according to their timestamps.
Note!
Timestamp information exists for each file in the forensic image. A file’s time attributes include when the file was created, changed, modified, and accessed. Please note that each operating system type treats the “Change” and “Create” time attributes of files differently. For instance, in Windows, the file creation and change times indicate when the file’s content has changed, while UNIX file systems do not store the creation time attributes and consider a file to be changed when its metadata get changed, regardless of the file’s content change.
- 1.
Launch Autopsy and create a new case (as we did in the previous chapter) or launch an existing one.
- 2.
Go to the Tools menu ➤ Timeline.
- 3.Autopsy will need some time (depending on the supplied forensic image size) to populate the data for the timeline (see Figure 7-2).
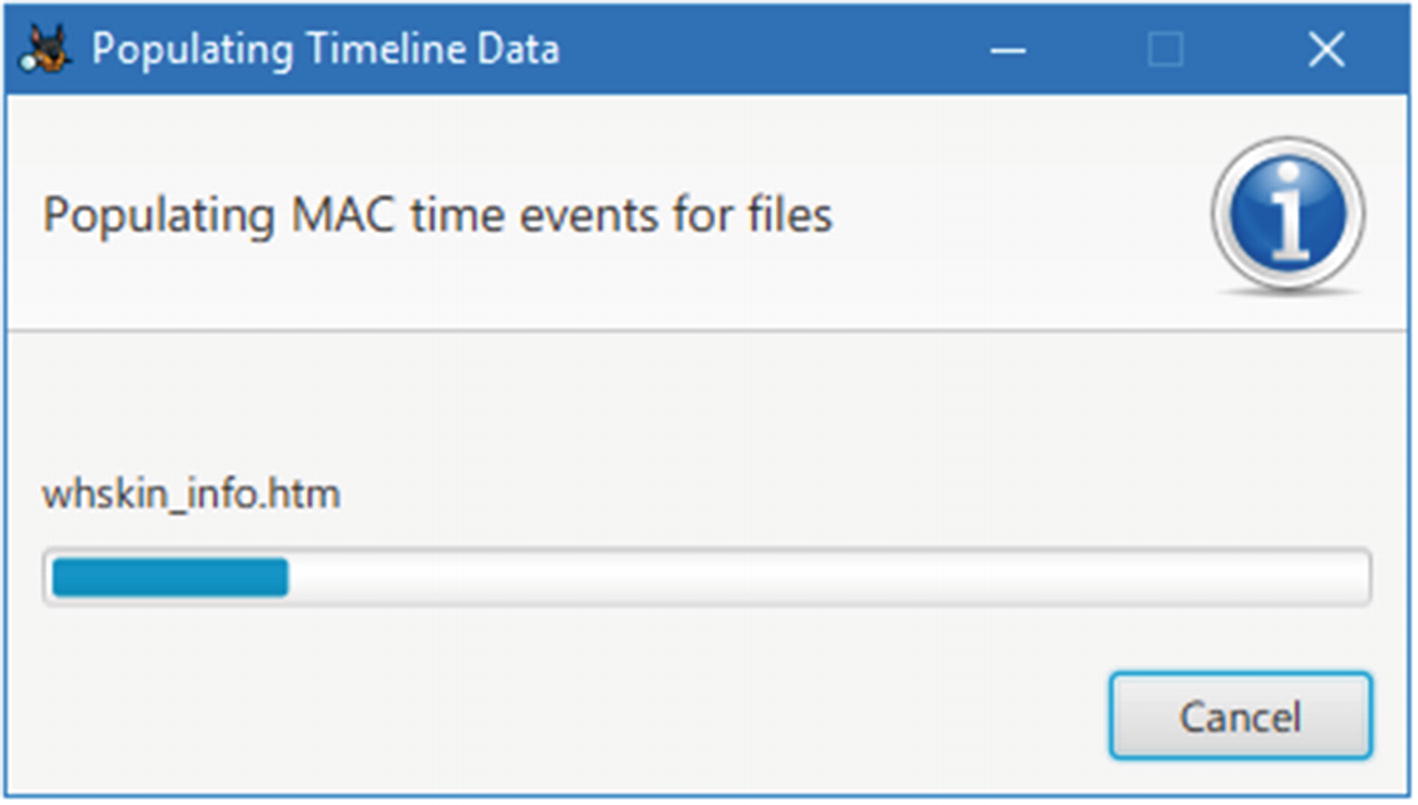 Figure 7-2
Autopsy population of timeline data in progress
- 4.After finishing timeline data population, Autopsy can present data using three view modes:
Bar chart (counts) mode: This mode offers less detail and is intended to answer questions about how much data alteration occurred in a given timeframe.
Detail mode: This mode will give you details about events and present those events to you using a unique clustering approach (e.g., grouping all files in the same folder as one event and showing all URLs that belong to one domain as one event).
List mode: Similar to detail mode, but it shows the results in a list organized from oldest to newest.

Timeline analysis in detail mode using Autopsy; file content can be viewed in the bottom right corner of the main window
Generate a Timeline Report Using Autopsy
- 1.Go to Tools menu ➤ Generate Report. The Generate Report wizard appears; the first window allows you to select the report format (see Figure 7-4).
 Figure 7-4
Select report format for your generated timeline in Autopsy
- 2.
In our case, we select “Excel Report,” so we can play with the data using the MS Excel spreadsheet program or any other alternative program that can read Excel files like Apache OpenOffice ( www.openoffice.org ). Click “Next” to continue.
- 3.The next window asks you to configure the returned results. You have two options: All Results and Tagged Results. In our case, we will select all results and click “Finish”; then, Autopsy will begin the report generation process (see Figure 7-5).
 Figure 7-5
Report Generation Progress window
- 4.
After it finishes generating the report, Autopsy will show you the link where your generated report is saved; click over this link to open the file using your default program (see Figure 7-6).
- 5.Finally, click “Close” to close the Report Generation Progress window.
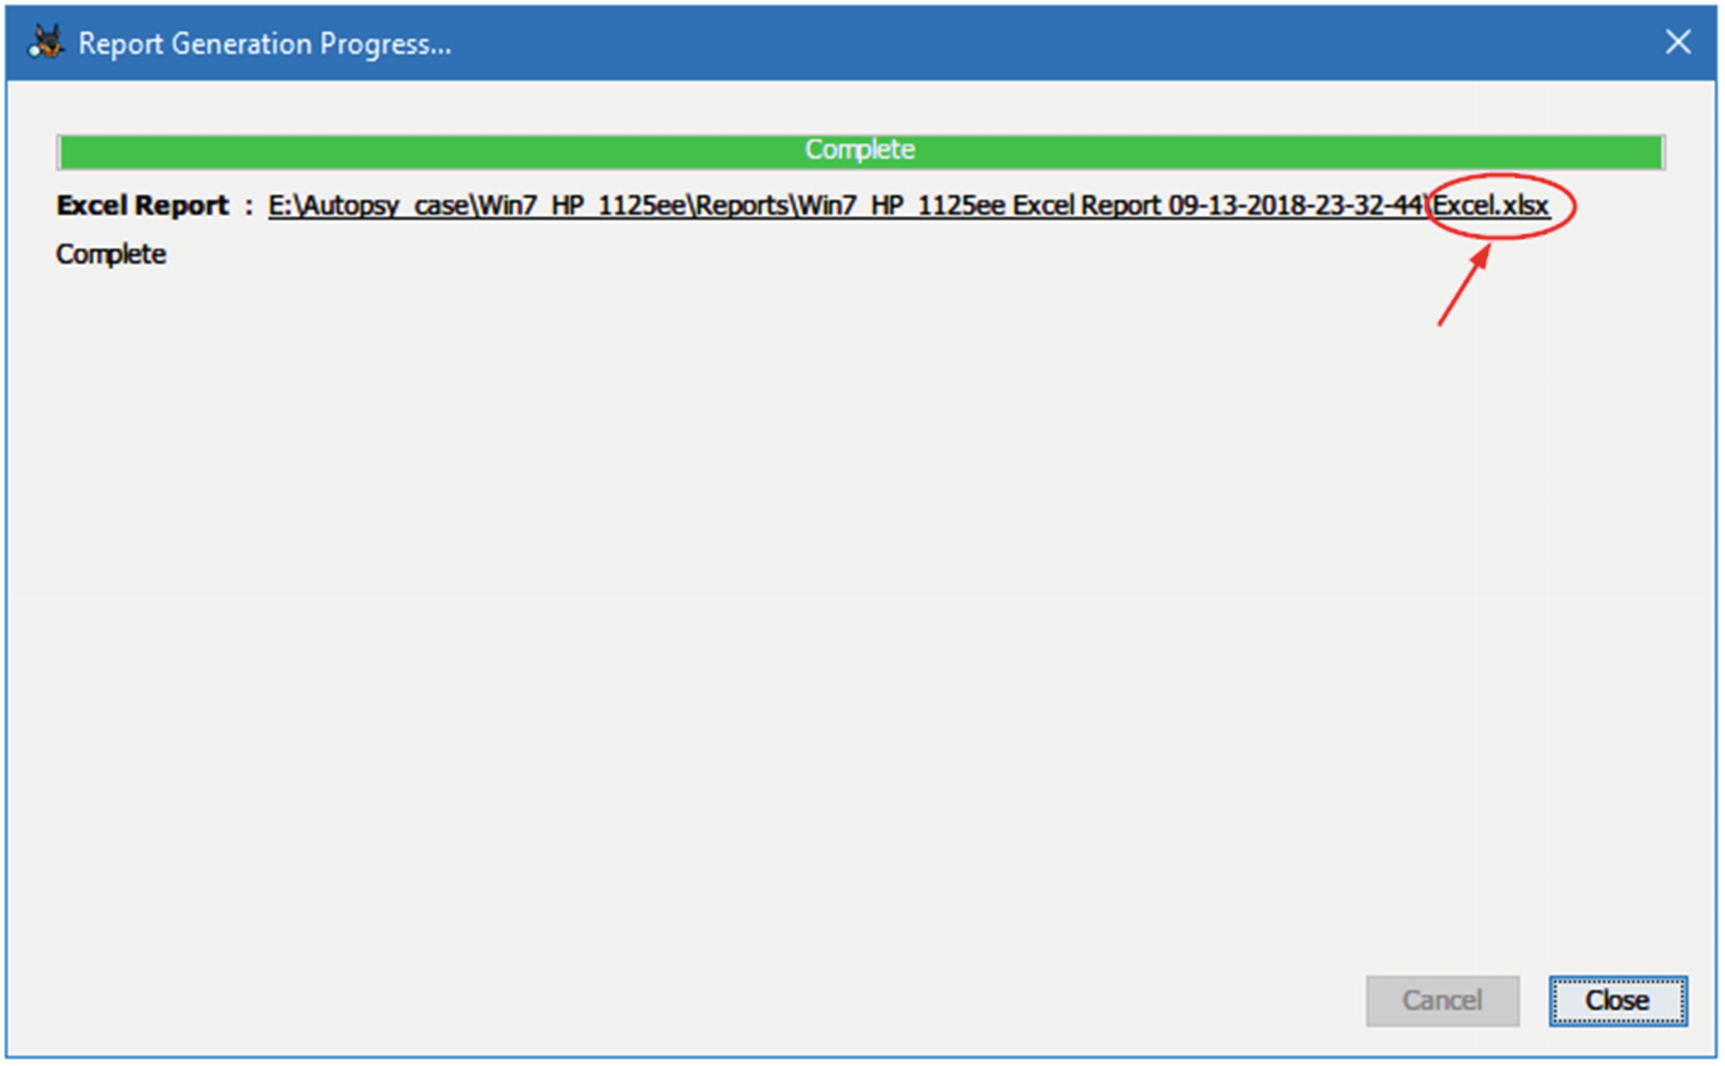 Figure 7-6
The location of Autopsy-generated report
Retrieving Last Seven Days of Activity Using Autopsy

Viewing the results of “Recent Activity” module: you must activate the “Recent Activity” ingest module to view this info
File Recovery
Analysis of deleted files is a key task in any type of digital forensic investigation. To become a successful digital forensic examiner, you must know how Windows deletes files; where such files can be located, even after they are deleted; and methods/techniques to investigate these files (e.g., retrieving deleted files’ metadata to support a criminal investigation). In this section, we will list some tools and techniques to recover critically important documents and file fragments that can help us solve the case at hand.
Undeleting Files Using Autopsy
In the previous chapter, we talked about how to use Autopsy to recover deleted files from supplied forensic image files’ slack space. Actually, using Autopsy to recover deleted files does not require any interference by the forensic examiner. All you need to do is just to create the case as we did previously and select the “PhotoRec Carver module” from the ingest modules (make sure that “Process Unallocated Space” is selected); then, you are ready to go. Autopsy will automatically retrieve data from unallocated space of the supplied data source and show them in the Data Explorer pane under Views ➤ Deleted Files.
The PhotoRec tool ( www.cgsecurity.org/wiki/PhotoRec ) is a free, open source application that can be used as a standalone application to recover files from different digital media devices like HDDs, USB drives, SD cards (e.g., those in smartphones and digital cameras), and CD-ROMs.
PhotoRec can be used with TestDisk ( www.cgsecurity.org/wiki/TestDisk , from the same developer); this is another open source program that is specialized in recovering lost partitions and/or fixing the problem of nonbooting disks, making them bootable again.
A step-by-step tutorial on how to use TestDisk is available at www.cgsecurity.org/wiki/TestDisk_Step_By_Step . Another tutorial for using PhotoRec can be found at www.cgsecurity.org/wiki/PhotoRec_Step_By_Step .
Windows Recycle Bin Forensics
The Windows recycle bin—first introduced in Windows 95—contains files that have been deleted by users but still exist within the system. For instance, when a user deletes a file (using the standard delete button on the keyboard after selecting the target file OR selecting a file, right-clicking it, and choosing “Delete” from the pop-up menu), Windows moves the subject file to the recycle bin without deleting it permanently. This is the default behavior of Windows; however, a user can configure the recycle bin settings to permanently delete files without moving them into the recycle bin; besides, some users press and hold the Shift key when deleting a file to delete it permanently without moving it into the recycle bin. In practice, few people employ permanent deletion of recycled files (or even know about it); this makes it possible for the recycle bin to hold important recycled artifacts, which are considered a valuable source for digital evidence.
As we already said, when a user deletes a file, the default behavior of Windows is to move it into the recycle bin. Different versions of Windows have different recycle bin file names and locations. For Windows XP (formatted using the FAT file system), deleted files are stored in the “Recycler” folder in the root directory where Windows is installed (usually the C: drive), which in turn holds another important file named “INFO2.”Both “Recycler” and “INFO2” are hidden files: you must first display hidden files—including OS files—to display them.
Inside the “Recycler” folder, we can see one or more folders; these folders are named according to each user’s specific security identifier (SID) (e.g., S-1-5-21-2602240047-739648611-3566628919-501); if a system has more than one user, then each one will have its own folder that stores the deleted files belonging to that user account. There is also another important file inside each user recycle bin folder called “INFO2”; this file contains an index of all the files that have been previously deleted by the user. It also contains metadata about each deleted file like its original path, file size, and date/time when it was deleted.
Note!
When you delete a file from a removable media or mapped network path, it will bypass recycle bin and be cleared permanently.
With Vista and beyond (7, 8, 8.1, and 10), Windows has changed both the recycle bin main folder and the way deleted files are organized. For instance, deleted files are stored in a folder named “$Recycle.Bin,” under which there is a subfolder for each user on the system named using that user’s SID. The “$Recycle.Bin” is stored under the C: drive (assuming Windows is installed there). Now, in these modern versions of Windows, when a file is deleted, Windows will move it into the recycle bin as two files: one contains the actual data of the recycled file (its name begins with “$R”), while the other contains the deleted file’s metadata (its name begins with “$I”). Obviously, this discards the need for the “INFO2” file from older Windows versions, which was used to store recycled a file’s metadata.
Note!
The Windows recycle bin has limited storage capacity with regard to the volume of deleted files that it can accommodate. In Windows XP, the recycle bin is configured by default to hold 10% of hard drive; if it fills up to maximum capacity, it will delete the old files to make room for incoming deleted files. In newer Windows versions like Vista and later, the default size is 10% of the first 40GB of the drive and 5% of the remaining storage space that is above 40GB.
Now, let us experiment with deleting a file and analyzing it using Windows 10 and a free tool called $I Parse.

Viewing $Recycle.Bin contents under Windows 10 using DOS prompt
As we note from Figure 7-8, the $Recycle.Bin contains four subfolders: these are SID subfolders and correspond to the SID of the user who deleted the file. Each subfolder is created the first time a user deletes a file that is sent to the recycle bin.
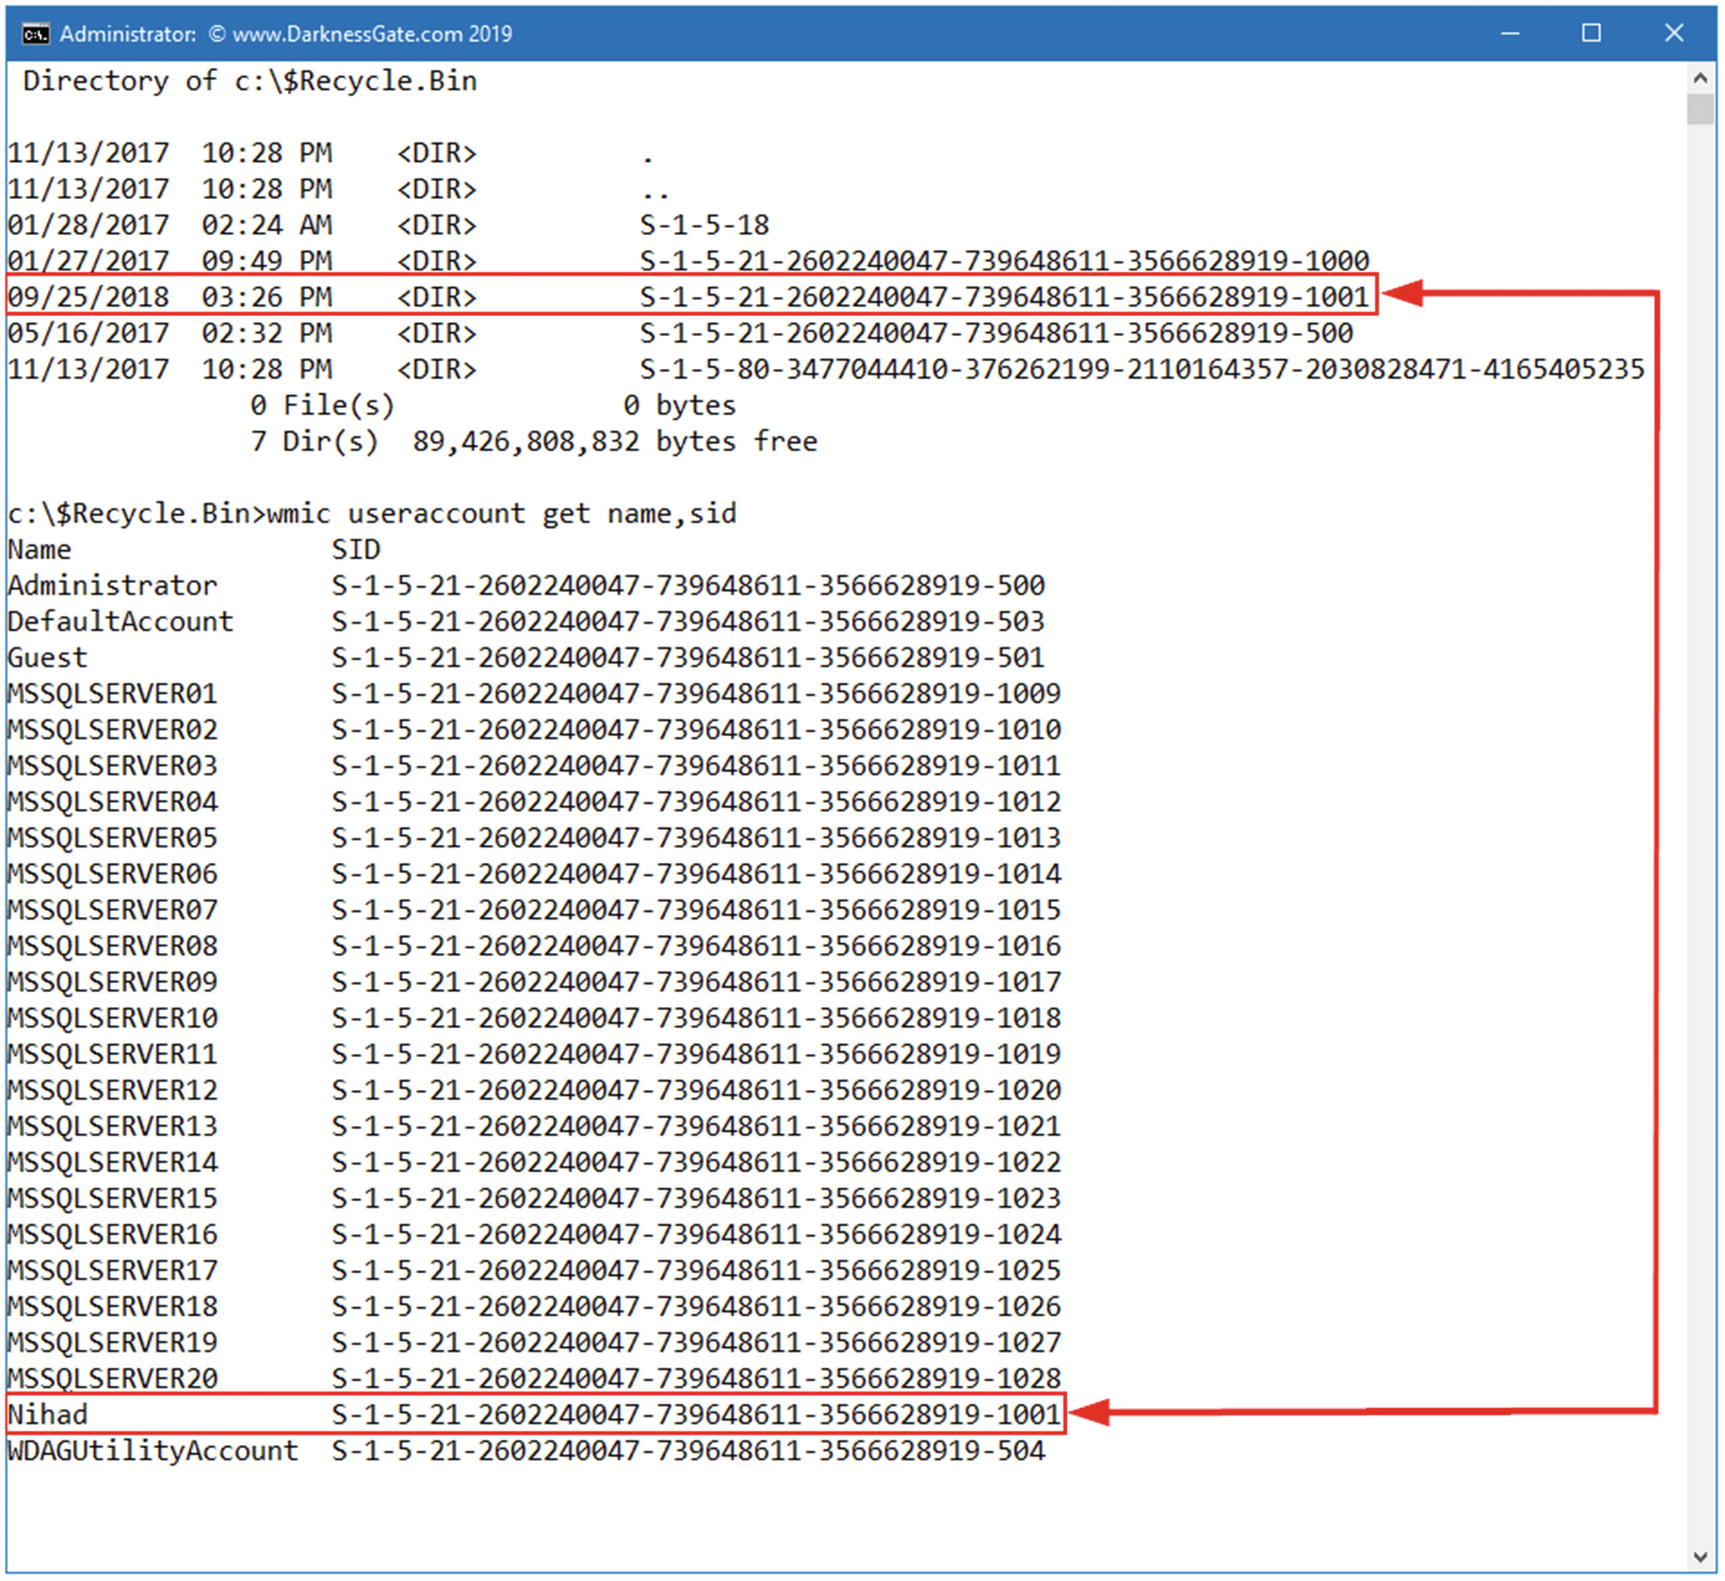
Knowing the owner of a specific SID subfolder within $Recycle.Bin

Viewing target recycle bin: contents display two deleted files

Two deleted files in the recycle bin
- 1.
Go to https://df-stream.com/recycle-bin-i-parser/ and download the tool and extract its contents (if it is zipped).
- 2.To use this tool, we need first to extract the recycled file metadata file. To do this, type the following in the command prompt (see Figure 7-12): copy $I* users ihaddesktop ecover
 Figure 7-12
Copy recycled files’ metadata files from the recycle bin into another folder for analysis
- 3.
Execute the $I Parse tool, go to File menu ➤ Browse…, and select the folder that contains metadata files.
Note! If you want to analyze only one file at a time, select File ➤ Choose… instead.
- 4.From the main program menu, click the Choose… button and select where to save the output file (a file with CSV extension that will hold parsing results) (see Figure 7-13) .
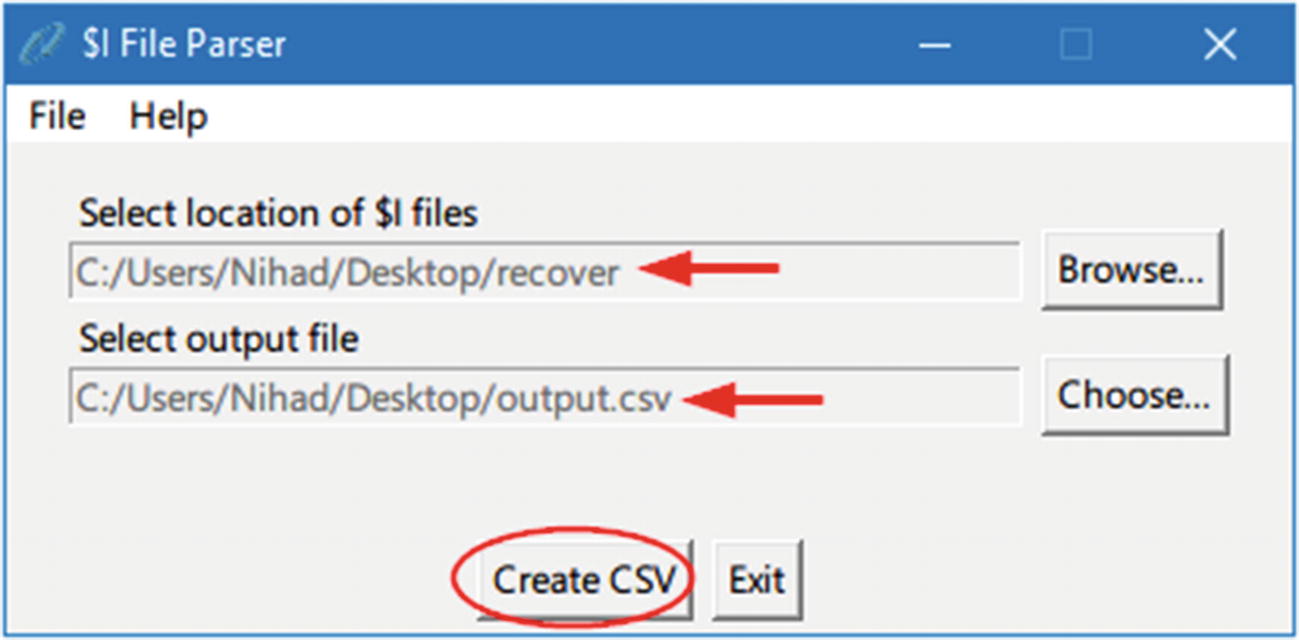 Figure 7-13
Parse all metadata files in the target directory
- 5.
Finally, click “Create CSV”; a success window will appear after parsing all files is finished, and you are done!

output.csv shows that information existed within subject recycled files’ metadata files
To extract information from the recycled files’ metadata files (INFO2 files) under Windows XP (and other ancient versions of Windows like 95, NT4, and ME since 0.7.0), you can use “Rifiuti2” ( https://abelcheung.github.io/rifiuti2 ).
Data Carving
Data carving is an advanced type of data recovery, usually used in digital forensic investigations to extract a particular file (using file’s header and footer information) from unallocated space (raw data) without the assistance of any file system structure (e.g., MFT).
Data carving can be the only method to recover important evidence files and fragments of files in a criminal investigation where the file system that was originally responsible for organizing these files on the hard drive is missing or corrupted. Data carving is also needed when extracting a file(s) from a captured network traffic stream.
Data carving is an advanced technique in digital forensics and is beyond this book’s scope. However, you should know that expert forensic examiners can extract (recover) structured data, and hence a file like a document or photo, out of nonstructured data or raw data using data carving techniques.
File Carving With a Hex Editor
- 1.
Foremost ( http://foremost.sourceforge.net )
- 2.
Scalpel ( https://github.com/sleuthkit/scalpel )
- 3.
Jpegcarver ( www.seedstech.net/jpegcarver )
- 4.
List of data recovery (including some file carving) tools from forensics wiki ( www.forensicswiki.org/wiki/Tools:Data_Recovery )
Attributing an Action to Its Associated User Account
Sometimes, a suspect Windows PC can have more than one account, for example, one for Nihad, another for Rita, and the third for Susan. For each account on a Windows PC, there is a unique number that distinguishes it called the SID. By using this SID, a digital forensic examiner can know which user account conducted which action or when a particular user account triggered a specific event. The MS-DOS command (wmic useraccount get name,sid) can show us the available user accounts and their associated SIDs of any Windows machine (see Figure 7-9).
Windows Registry Analysis
The registry is considered the heart of Windows OS; it contains critical information needed by the operating system and installed applications in order to function. Almost every action conducted by a Windows user is stored in its registry in one way or another; this makes the Windows registry a rich source of evidence that can be extremely valuable for any digital forensic investigation.
Architecture of Windows Registry
The registry is a hierarchical database that stores Windows system configuration settings for hardware, software applications, and the operating system in addition to the user’s preferences and the computer’s and applications’ usage history.

Windows registry structure
Windows Registry Root Folders (Hives)
Hive Name | Contents |
|---|---|
HKEY_CLASSES_ROOT | Contains file association information (configuration information that tells Windows which program to use to open files). |
HKEY_CURRENT_USER | Stores configuration information (related to the installed software and operating system) to the currently logged-in user. |
HKEY_LOCAL_MACHINE | Contains the majority of the configuration information for currently installed programs and the Windows OS itself. |
HKEY_USERS | Contains configuration information (user profiles) for all active users on the system. |
HKEY_CURRENT_CONFIG | Does not store information itself; instead, acts as a pointer to another registry key (HKEY_LOCAL_MACHINESystemCurrentControlSetHardware ProfilesCurrent). This hive keeps information about the hardware profile of the local computer system. |
Root hives are divided into two types with regard to their data persistence: volatile and nonvolatile. HKEY_LOCAL_MACHINE and HKEY_USERS keys are nonvolatile and are stored on the hard drive, while the remaining hives are volatile and should be captured while the system is running in order to acquire useful information from them.
- 1.
The registry is contained within a forensic image. In this way, the computer forensic program will be used to investigate registry files as you do when browsing files/folders using Windows File Explorer.
- 2.
Live analysis (e.g., when booting up from the suspect forensic image). In this method, you can access the registry as you do with any computer using the Windows built-in registry editor.
If we are examining the Windows registry using a captured forensic image, it is necessary to know where the registry files are stored. Registry hives are located in WindowsSystem32Config folder, so if your OS is installed on the C: drive, your registry files will be located in the C:WindowsSystem32Config folder. After accessing this folder, you will find many files (a separate file for each root hive and a couple of supporting files for each one, except for the HKEY_CURRENT_USER hive, as this one is stored in your profile folder) .
- 1.
Press the Windows button and the R button (Win+R) to open the Run dialog.
- 2.
Type “regedit” and press OK.
Acquiring Windows Registry
As we saw in Chapter 5, computer forensics tools will acquire Windows registry files as a part of acquiring the target machine’s system drive or when performing a complete hard drive acquisition. You can also extract only the registry files from a live system and store it separately for later analysis (this is usually referred as “Registry Image”). The following shows how we can do this using AccessData FTK Imager.
- 1.
Download AccessData FTK Imager as we did in Chapter 5 and transfer it into your USB thumb drive.
- 2.
Attach the USB drive that contains FTK Imager to the suspect machine, open FTK Image, and go to File menu ➤ Obtain Protected Files…
- 3.A new dialog appears; select where you want to store obtained files, and check the option “Password recovery and all registry files” (see Figure 7-16). Finally, click the “OK” button.
 Figure 7-16
Using FTK Imager to acquire target Windows registry database
- 4.
A progress window will appear showing registry files’ export progress; upon finishing, the window will disappear without announcing any success message.

A registry forensic image captured with AccessData FTK Imager
Now that we have successfully exported our target machine registry, we can use different forensics tools to analyze it.
Registry Examination
Most computer forensics suites have the ability to investigate the Windows registry from the acquired forensic image. There are also many programs specializing in analyzing Windows registry files alone. In this section, we will assume that we have booted up using a suspect forensic image to perform various forensic analyses on it. Some dedicated tools for investigating specific areas within the registry will get covered too where applicable.
Automatic Startup Locations
Windows has a feature that allows programs to launch automatically as it boots; this feature is necessary for some applications like antivirus software that must run first to stop any malicious software before Windows gets booted completely.
Common Windows Registry Startup Location Keys
No | Registry key |
|---|---|
1 | HKEY_LOCAL_MACHINESystemCurrentControlSetServices |
2 | HKEY_LOCAL_MACHINESoftwareMicrosoftWindowsCurrentVersionExplorerShellServiceObjects |
3 | HKEY_LOCAL_MACHINESoftwareMicrosoftWindowsCurrentVersionRunServicesOnce |
4 | HKEY_LOCAL_MACHINESoftwareMicrosoftWindowsCurrentVersionRunOnce |
5 | HKEY_LOCAL_MACHINESoftwareMicrosoftWindowsCurrentVersionPoliciesExplorerRun |
6 | HKEY_LOCAL_MACHINESoftwareMicrosoftWindowsCurrentVersionRun |
7 | HKEY_LOCAL_MACHINESoftwareMicrosoftWindows NTCurrentVersionWindows |
8 | HKEY_LOCAL_MACHINESoftwareMicrosoftWindowsCurrentVersionShellServiceObjectDelayLoad |
9 | HKEY_LOCAL_MACHINESoftwareMicrosoftWindowsCurrentVersionExplorerSharedTaskScheduler |
10 | HKEY_LOCAL_MACHINESoftwareMicrosoftActive SetupInstalled Components |
11 | HKEY_LOCAL_MACHINEWow6432NodeMicrosoftActive SetupInstalled Components |
12 | HKEY_LOCAL_MACHINESoftwareMicrosoftWindowsCurrentVersionExplorerSharedTaskScheduler |
13 | HKEY_LOCAL_MACHINESoftwareMicrosoftWindows NTCurrentVersionDrivers32 |
14 | HKEY_CURRENT_USERSoftwareMicrosoftWindowsCurrentVersionRunOnce |
15 | HKEY_CURRENT_USERSoftwareMicrosoftWindowsCurrentVersionRun |
16 | HKEY_CURRENT_USERSoftwareMicrosoftWindowsCurrentVersionPoliciesExplorerRun |
17 | HKEY_CURRENT_USERSoftwareMicrosoftWindows NTCurrentVersionWindowsload |
18 | HKEY_CURRENT_USERSOFTWAREWow6432NodeMicrosoftWindowsCurrentVersionRun (64 bit systems only) |
19 | HKEY_CURRENT_USERSoftwareMicrosoftWindowsCurrentVersionRunServices |
20 | HKEY_CURRENT_USER SoftwareMicrosoftWindowsCurrentVersionRunServicesOnce |
21 | HKEY_CURRENT_USERSoftwareMicrosoftWindowsCurrentVersionRunOnceEx |

Using Autoruns from Sysinternals to view automatic startup programs and associated registry key in Windows
Investigating startup programs has a great forensics value in many cases; for example, a malware can control a suspect machine and launch DDoS attacks using it without the owner’s knowledge. When something like this is investigated, a suspect might become very forthcoming to investigators, even though his/her PC was used to commit a crime.
Installed Program Keys in the Windows Registry
Learning what programs are currently or were previously installed on the suspect machine can be of a great value for forensic investigators. For example, the existence of steganography and encryption programs—or the leftovers belonging to such tools—will give an indication that the suspect machine may contain hidden data or simply was used to execute such programs.
Registry Keys That Hold Information About Installed Programs (Current and Previous Leftover)
No | Registry key |
|---|---|
1 | HKEY_LOCAL_MACHI NESOFTWAREMICROSOFTWINDOWSCURRENTVERSIONUNINSTALL |
2 | HKEY_CURRENT _ U S E R S O F TWAREMICROSOFTWINDOWSCURRENTVERSIONUNINSTALL* |
3 | HKEY_LOCAL_MACHINESOFTWAREWOW6432NODEMICROSOFTWINDOWSCURRENTVERSIONUNINSTALL** |
4 | HKEY _ CLASSES_ROOT INSTALLERPRODUCTS<PRODUCT CODE>SOURCELISTNET |
5 | HKEY_CURRENT_USERSOFTWAREMICROSOFTINSTALLERPRODUCTS<PRODUCT CODE>SOURCELISTNET |
We can use automated tools to search for a program installed on the Windows registry or lost information such as parts of installed programs, applications left over, or any data items that could be hidden in the Windows registry.
Nirsoft offers a free tool called RegScanner ( www.nirsoft.net/utils/regscanner.html ), which is a small tool used to search the Windows registry according to specific search criteria entered by the user. The returned results appear in a list, and a user can click any item in this list to go to the associated value in RegEdit. We can also export the found registry values into a .reg file.
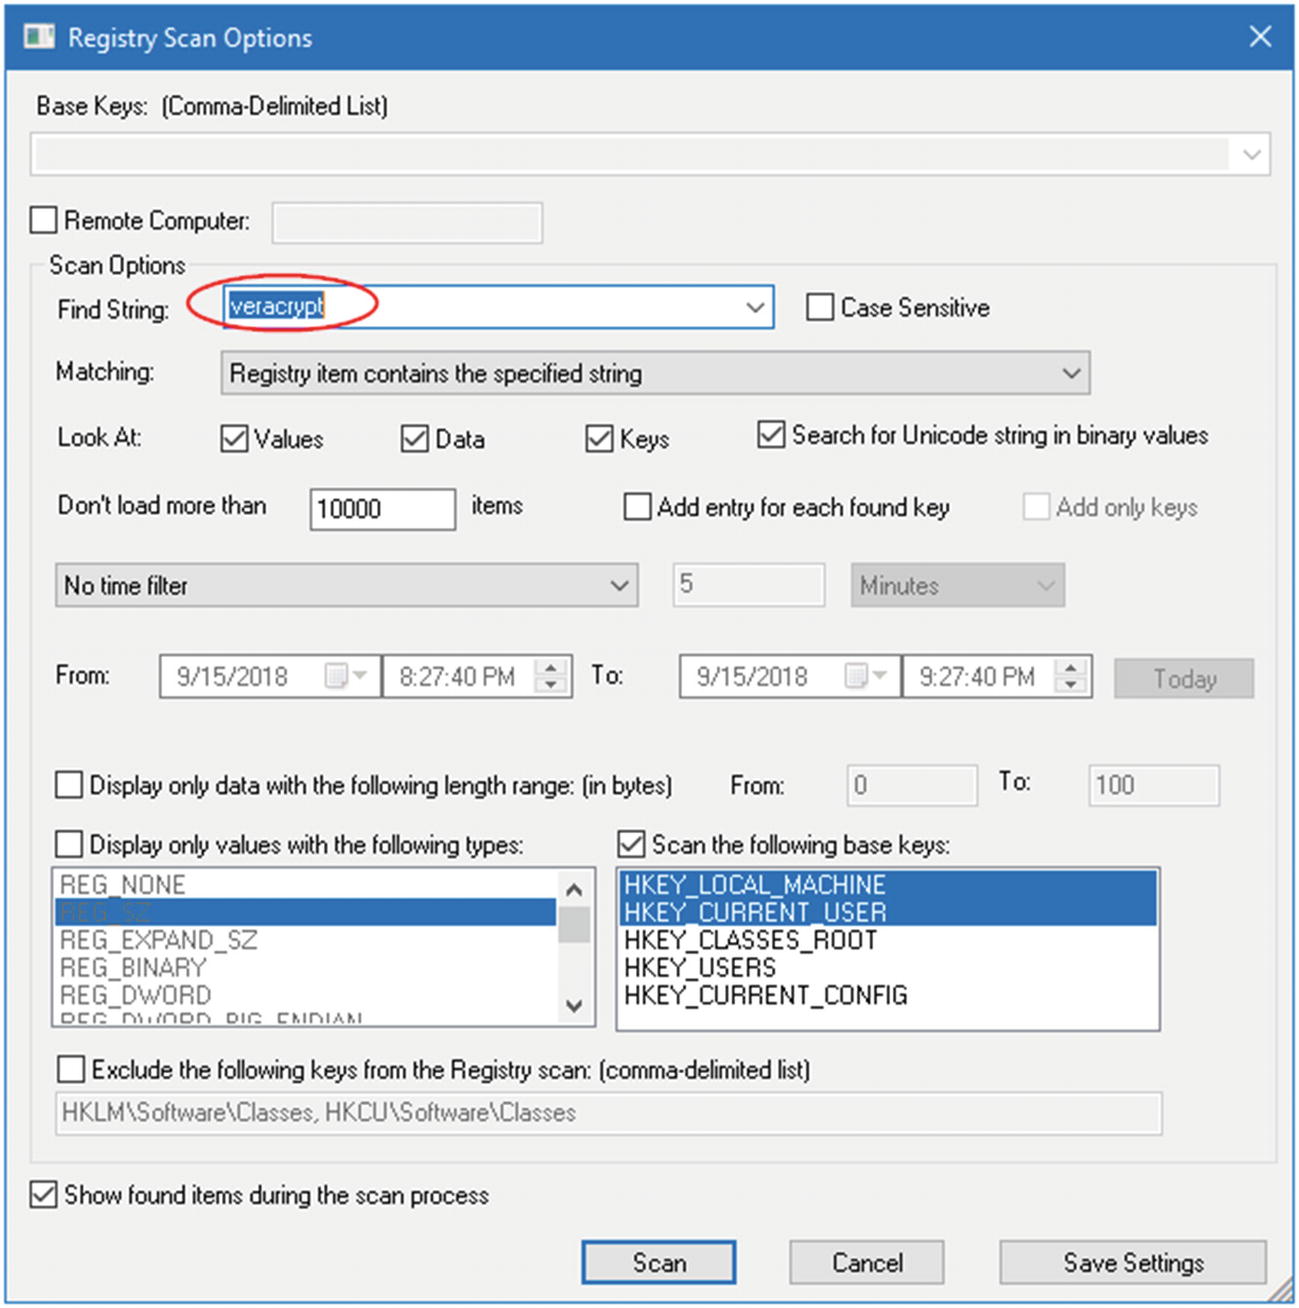
Registry scan options used by the RegScanner tool to search within the Windows registry
Please note that not all programs need to install a registry key before using it; for instance, portable applications do not need to be installed on Windows in order to run (e.g., applications launched from a U3 USB stick).
To investigate the possibility of launching portable applications from a suspect computer, we can scan the registry for all previously connected USB devices. Another method to reveal the execution of portable programs is to check the Windows Prefetch folder for such programs. We will examine both methods later on in this chapter .
USB Device Forensics
Windows keeps a history log of all previously connected USB devices along with their connection times in addition to the associated user account which installs them. The Windows registry also stores important technical information for each connected USB device such as vendor ID, product ID, revision, and serial number.
- 1.HKEY_LOCAL_MACHINESYSTEMCurrentControlSetEnumUSBSTOR Here you will find all USB devices that have been plugged into the operating system since its installation. It shows the USB vendor ID (manufacturer name), product ID, and the device serial number (note that if the second character of the device serial number is “&,” it means the connected device does not have a serial number and the device ID has been generated by the system). See Figure 7-20 for a list of previously connected USB devices on the author’s machine.
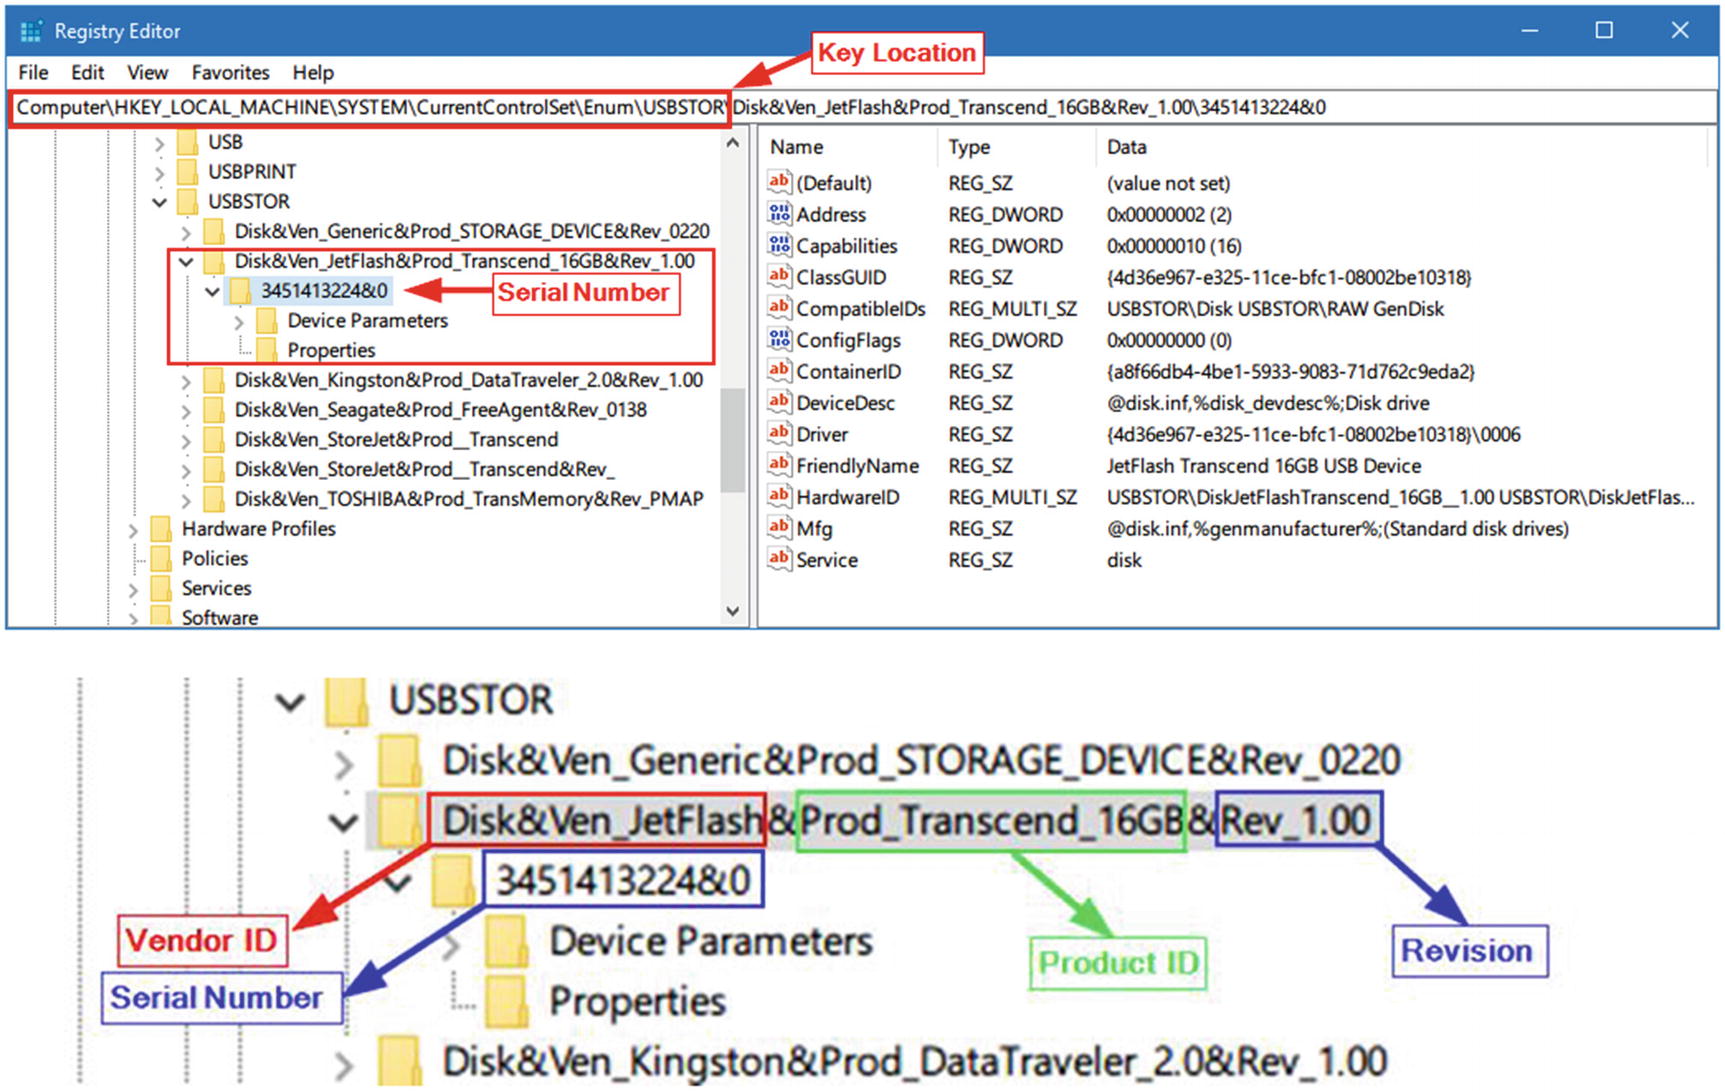 Figure 7-20
History of USB connected devices
- 2.
HKEY_LOCAL_MACHINESYSTEMMountedDevices The MountedDevices subkey stores the drive letter allocations; it matches the serial number of a USB device to a given drive letter or volume that was mounted when the USB device was inserted.
- 3.
HKEY_CURRENT_USERSoftwareMicrosoftWindowsCurrentVersionExplorerMountPoints2 This key will record which user was logged into Windows when a specific USB device was connected. The key also includes the “Last Write Time” for each device that was connected to the system.
- 4.
HKEY_LOCAL_MACHINESYSTEMCurrentcontrolsetEnumUsb This key holds technical information about each connected USB device in addition to the last time the subject USB was connected to the investigated computer.
- 5.
Identify the first time device was connected: Check this file at Windowsinfsetupapi.dev.log for Windows Vista, 7, and 8, and at Windowsinfsetupapi.upgrade.log for Windows 10. On Windows XP, this file will be located at Windowssetupapi.log. Search in this file for a particular USB device’s serial number to learn when it was first connected to the subject system (in local time) .
To automate the process of finding information about the current and previous USB connected devices, you can download a free tool by Nirsoft that can perform all the tasks we just did manually; this tool is called USBDeview ( www.nirsoft.net/utils/usb_devices_view.html ). After executing this tool on the target system, extended information (e.g., device name/description, device type, serial number, and much more) about each connected USB device will appear.
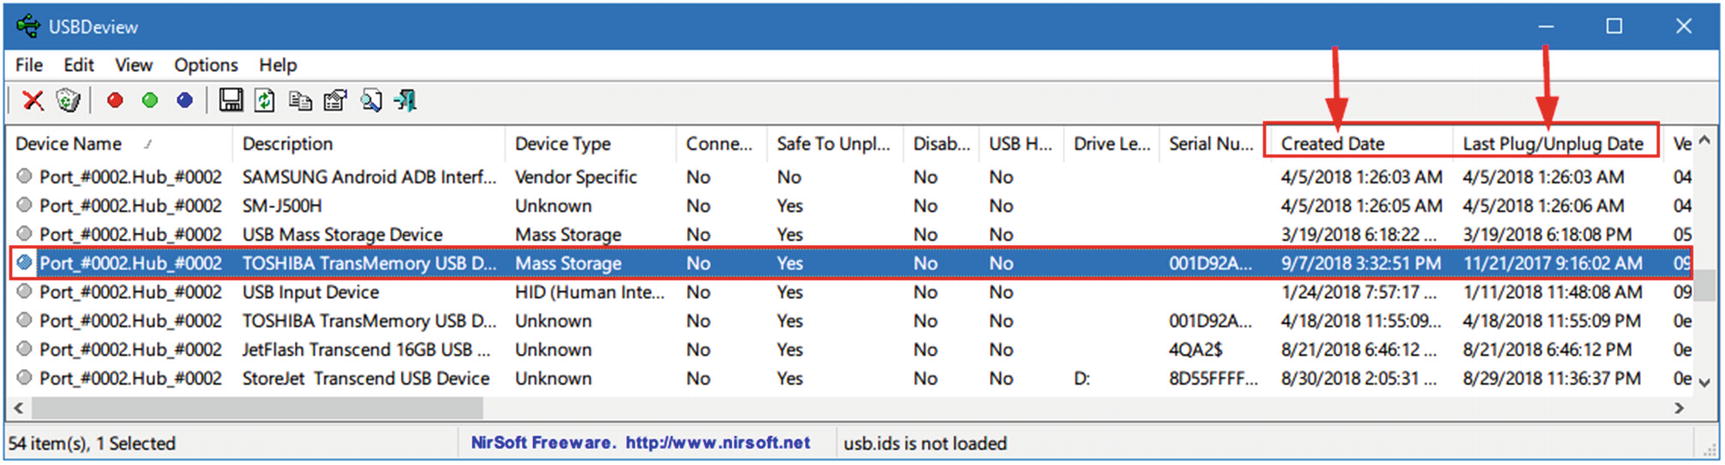
Using USBDeview to view different artifacts about previously connected USB devices
Unfortunately, not all USB device types will leave traces in Windows registry as we have described, for instance, USB devices that use media transfer protocol (MTP) when connecting with computers. Devices equipped with the modern Android OS versions in addition to Windows phones and Blackberry all use the MTP protocol; this protocol does not leave traces in the Windows registry when a USB device is connected to a Windows computer. This necessitates a specialized tool to handle the investigation of such artifacts.
USB Detective ( https://usbdetective.com ) supports detecting USB devices that use the MTP protocol to connect to Windows. It also offers rich features for thoroughly investigating connected USB devices, like creating timelines of all unique connection/disconnection and deletion timestamps for each device; however, you need to upgrade to the professional paid version to use all features.
To conclude this section, a USB device connected through an MTP connection needs special treatment to acquire its traces from a Windows machine; consult your computer forensic software documentation for the availability of such a feature.
Additional Reading
SANS DFIR Summit presentation: https://digital-forensics.sans.org/summit-archives/dfir14/USB_Devices_and_Media_Transfer_Protocol_Nicole_Ibrahim.pdf
Nicole Ibrahim’s series of blog posts about this topic: http://nicoleibrahim.com/part-1-mtp-and-ptp-usb-device-research/
Note!
USB Forensic Tracker (USBFT), available at www.orionforensics.com/w_en_page/USB_forensic_tracker.php , is a free, comprehensive suite for investigating USB devices. It supports Windows, Linux, and Mac and can retrieve USB device connection artifacts from live systems, mounted forensic images, or volume shadow copies.
Most Recently Used List
Common Windows Registry History List Keys: Windows 10
No | Registry key |
|---|---|
1 | HKEY_CURRENT_USERSoftwareMicrosoftInternet ExplorerTypedURLs |
2 | HKEY_CURRENT_USERSoftwareMicrosoftOffice16.0Word*File MRU |
3 | HKEY_CURRENT_USERSoftwareMicrosoftWindowsCurrentVersionExplorerComDlg32OpenSavePidlMRU |
4 | HKEY_CURRENT_USERSoftwareMicrosoftWindowsCurrentVersionExplorerComDlg32LastVisitedPidlMRU** |
5 | HKEY_CURRENT_USERSoftwareMicrosoftWindowsCurrentVersionExplorerRunMRU |
6 | HKEY_CURRENT_USERSoftwareMicrosoftWindowsCurrentVersionExplorerRecentDocs |
7 | HKEY_CURRENT_USERSoftwareMicrosoftWindowsCurrentVersionAppletsRegedit |
** This key tracks the application (executable) used to open the files in the previous (OpenSavePidlMRU) key .
Replace “Word” with “Excel,” “Access,” “PowerPoint,” “Outlook,” or “Groove” as needed. The MRU list for each MS Office program currently installed is located under this General key. We are testing now using Windows 10 with MS Office 2016 already installed.
Note!
Further info about OpenSaveMRU and LastVisitedMRU can be found at https://digital-forensics.sans.org/blog/2010/04/02/openrunsavemru-lastvisitedmru .
- 1.
ExecutedProgramsList ( www.nirsoft.net/utils/executed_programs_list.html ): List of programs and batch files that have executed previously on the target machine.
- 2.
OpenSaveFilesView ( www.nirsoft.net/utils/open_save_files_view.html ): List of files that have been previously opened on the target machine using the standard open/save dialog box of Windows.
Network Analysis
Whenever a Windows user connects his/her machine to the Internet or intranet, Windows will log this action in the registry. Knowing the network connection has vital forensic value; for instance, the registry lists all network cards that have been used on the suspect machine whether it is built in or attached (e.g., via USB port). The registry will also reveal the wireless connection profile (name, IP address, subnet mask, DHCP) in addition to the date the connection was first created and the last date the connection took place.
Common Windows Registry Keys for Storing Network Connections
No | Registry key |
|---|---|
1 | HKEY_LOCAL_MACHINESOFTWAREMicrosoftWindows NTCurrentVersionNetworkCards |
2 | HKEY_LOCAL_MACHINESOFTWAREMicrosoftWindowsNTCurrentVersionNetworkListNlaCacheIntranet |
3 | HKEY_LOCAL_MACHINESOFTWAREMicrosoftWindows NTCurrentVersionNetworkListNlaWireless* |
4 | HKEY_LOCAL_MACHINESOFTWAREMicrosoftWindowsNTCurrentVersionNetworkListSignaturesUnmanaged** |
5 | HKEY_LOCAL_MACHINESOFTWAREMicrosoftWindows NTCurrentVersionNetworkListProfiles*** |

Revealing wireless connection (access point) network properties

Viewing “Creation date” and “Last connected date” of the selected wireless connection
Windows Shutdown Time
The Windows registry records when the system was last closed down in the following registry key:
HKEY_LOCAL_MACHINESYSTEMCurrentControlSetControlWindows under the ShutdownTime value. The shutdown value is stored using a binary value; to decode it to a readable form, use a tool called DCode from Digital Detective ( www.digital-detective.net/dcode ).

UserAssist Forensics
Note!
UserAssist will only record programs launched via Windows Explorer; programs launched through the command line will not appear in UserAssist registry keys.
Information stored in UserAssist keys is encoded using ROT-13 encoding schema. To decode this information, use UserAssist-View ( www.nirsoft.net/utils/userassist_view.html ), a tool by Nirsoft that can display stored info in a readable format.
Printer Registry Information
Location of Installed Printer’s Keys in Windows Registry
Registry key | Description |
|---|---|
HKEY_CURRENT_USERPrinters | Holds settings of the current default printer. |
HKEY_LOCAL_MACHINESYSTEMCurrentControlSetControlPrint | Contains additional subkeys that hold information about installed printer. |

Viewing currently installed printers’ properties
Deleted Registry Key Recovery
- 1.
Go to https://ericzimmerman.github.io/#!index.md and download Registry Explorer/RECmd.
- 2.
Double-click to execute the tool; go to File ➤ Load offline hive.
- 3.
Browse to where the registry files are stored (we already showed you how to acquire registry files using FTK Imager) and select the file(s) you want to open. If you want to open more than one file, hold Ctrl and click files to select them individually.
- 4.Registry Explorer will recover any deleted records available during hive loading (see Figure 7-26). The option “Recover deleted files/values” should be enabled (it is already enabled by default) to view deleted registry records. You can access this option from: Options menu ➤ Recover deleted files/values (the selector is to the right) .
 Figure 7-26
View deleted registry keys using Registry Explorer (“Associated deleted records” are still associated with keys in the active registry, while the “Unassociated delete records” are not) .
- 5.
Right-click over any deleted registry key to export it or to export its value (you can export recovered key value into HTML, PDF, Excel, JSON, or TSV).
File Format Identification
A signature analysis is a process where file headers and extensions are compared with a known database of file headers and extensions to discover whether an attempt to conceal original file type has been made (changing the file extension to something else to hide it from the investigators’ eyes). As we know, each file under Windows has a unique signature, usually stored in the first 20 bytes of the file. We can check the original file signature of any file by examining it with Notepad or through using a Hex editor. In Chapter 2, we showed you how to manually determine file type by examining its signature. We can automate this process by using a free tool called HexBrowser.
- 1.
Go to www.hexbrowser.com and download HexBrowser.
- 2.
Click the “Open” button in the main program menu, select the suspect file, and you are done!
- 3.See the results on the right pane of the program window (see Figure 7-27) .
 Figure 7-27
Using HexBrowser to discover specified original file format. In this example, a file with a DLL extension was investigated, and HexBrowser discovered that the original file type is MS Word 2016.
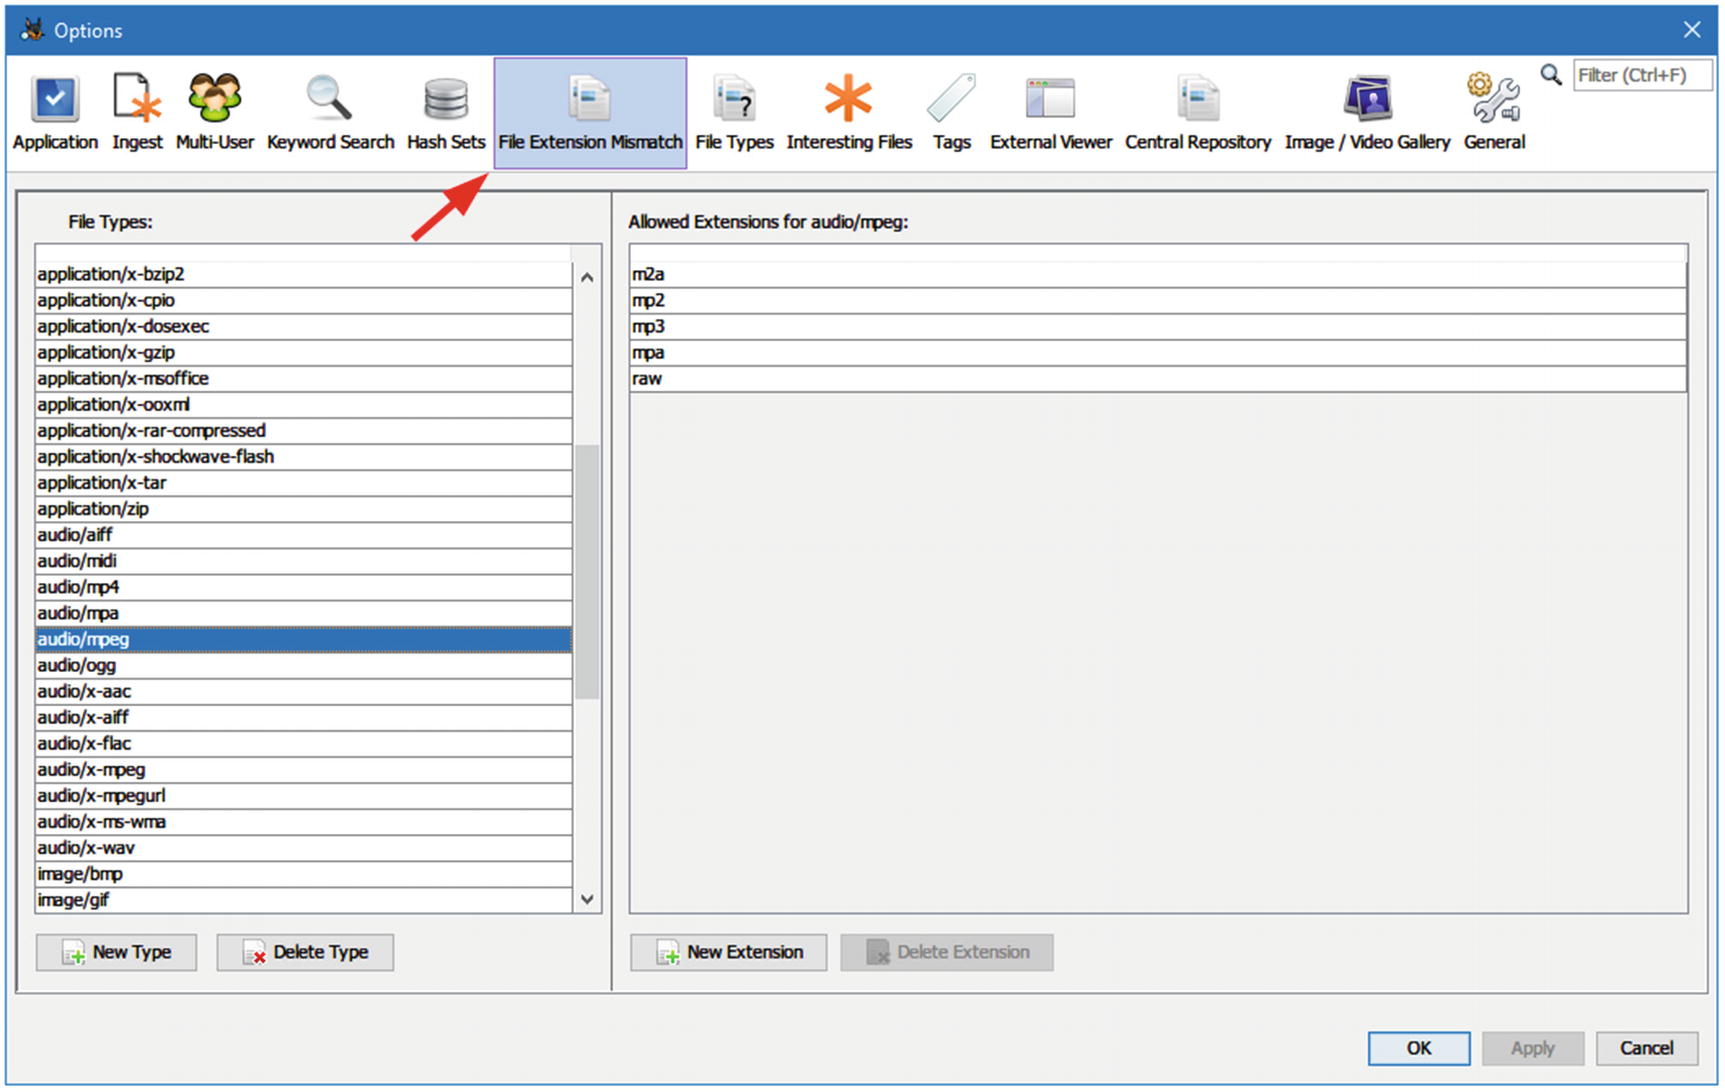
Configure File Extension Mismatch in Autopsy

Discover file mismatch results using Autopsy
Windows Features Forensics Analysis
There are many features offered by Windows OS to optimize—or to allow a user to customize—some of its functions to become more user friendly. Investigating such features is essential, as they can be a source of digital evidence. In this section, we will examine some common features of Windows for interesting artifacts.
Windows Prefetch Analysis
Prefetch is a feature used by Windows to speed up loading applications. Windows creates a Prefetch file when a user executes an application for the first time, and then it will record which files have been loaded as a part of this application execution, in addition to the last time this application was executed, so the next time a user launches it, Windows will load it quicker. From a digital forensic perspective, the Prefetch feature can tell us what program(s) was executed on the target system even though the subject program was uninstalled after executing it, as it will remain in the Windows Prefetch folder.
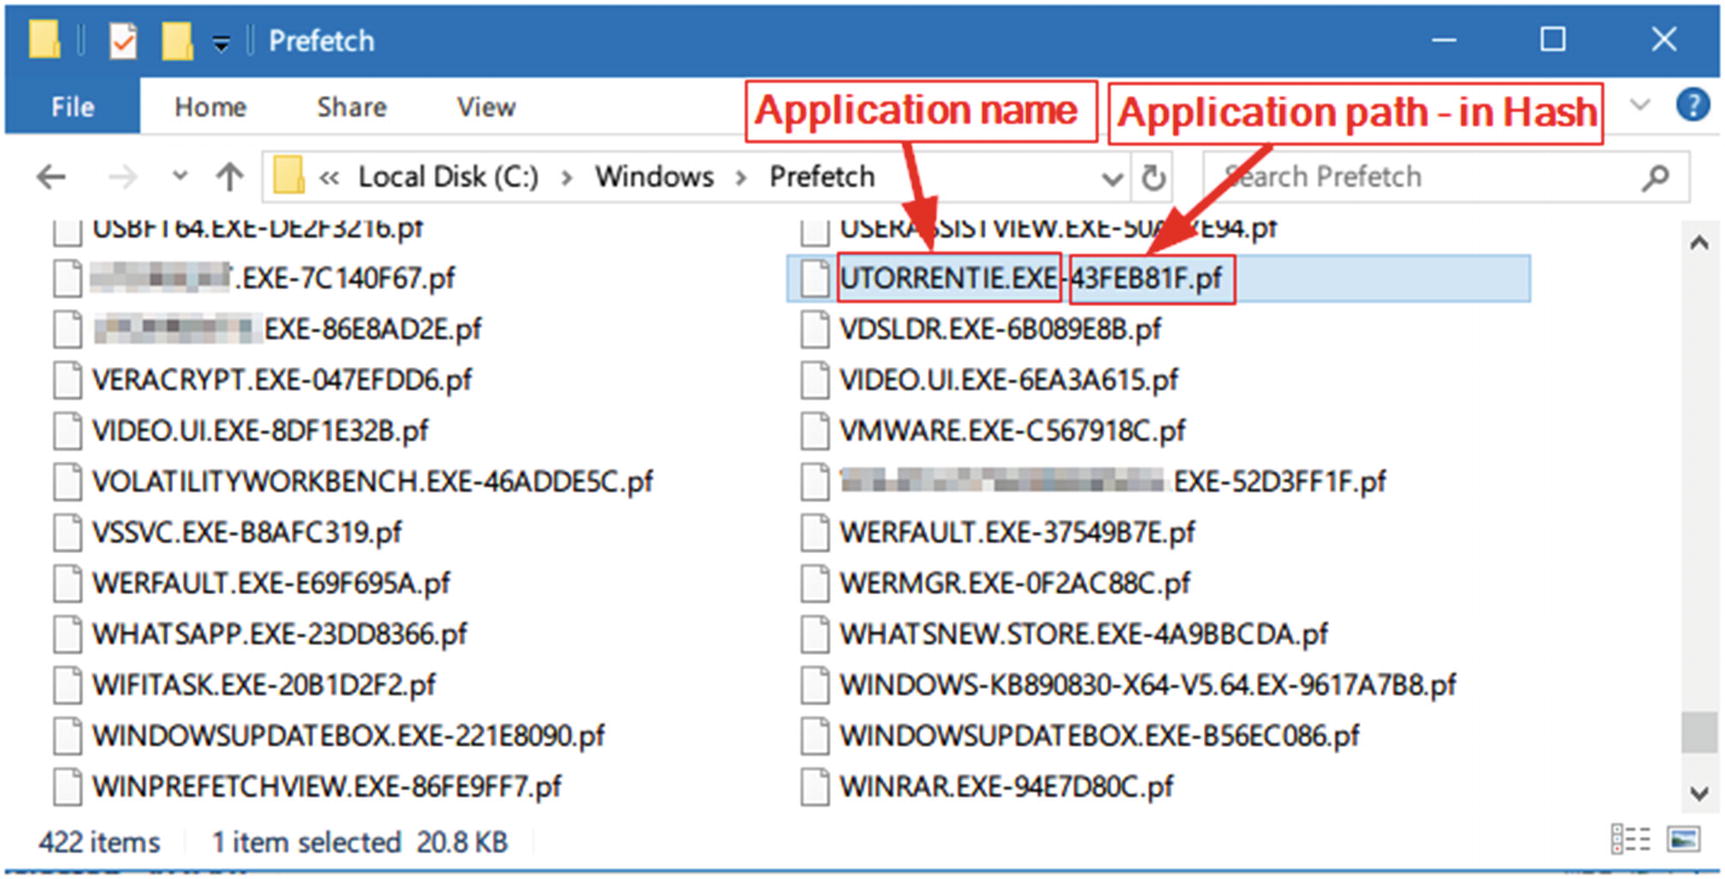
Contents of Windows Prefetch folder; image taken from Windows 10
WinPrefetchView from Nirsoft ( www.nirsoft.net/utils/win_prefetch_view.html ) is a simple, portable tool for reading the Prefetch files stored in the target Windows computer.
Another tool for investigating Windows Prefetch files also comes from Eric Zimmerman: Prefetch Parser ( https://ericzimmerman.github.io/#!index.md ) is a portable command-line tool for reading the information associated with each Prefetch file located in the Windows Prefetch folder.

Using Prefetch Parser and storing the output results directly in the same working directory under the name “result.txt”
Windows Thumbnail Forensics
Windows stores thumbnails of graphics files (JPEG, BMP, GIF, PNG, TIFF) and some document types (DOCX, PPTX, PDF) and movie files in the thumbnail cache file called thumbs.db when a user selects to view files as thumbnail, for quick viewing at a later time.
Investigating this feature can tell examiners about previous files (e.g., images) that existed on a system even though the user has deleted them, as image thumbnails may still exist at thumbs.db.
Modern Windows versions (Vista+) store thumbnail previews on a central location in the system. The cache is stored at %userprofile%AppDataLocalMicrosoftWindowsExplorer as a series of files with the standard name thumbcache_xxx.db (XXX refers to its size), in addition to an index file to find thumbnails in each database.
Thumbs Viewer is a portable tool for extracting thumbnail images from the Thumbs.db, ehthumbs.db, ehthumbs_vista.db, Image.db, Video.db, TVThumb.db, and musicThumbs.db database files found on all versions of Windows OS. You can download it from https://thumbsviewer.github.io .
Note!
Thumb.db files come hidden. In order to view them, you need first to show hidden files and folders by going to the Control Panel ➤ Folder Options➤ View tab and checking the option “Show hidden files, folders, and drives.” Uncheck the option “Hide protected operating system files (Recommended).”
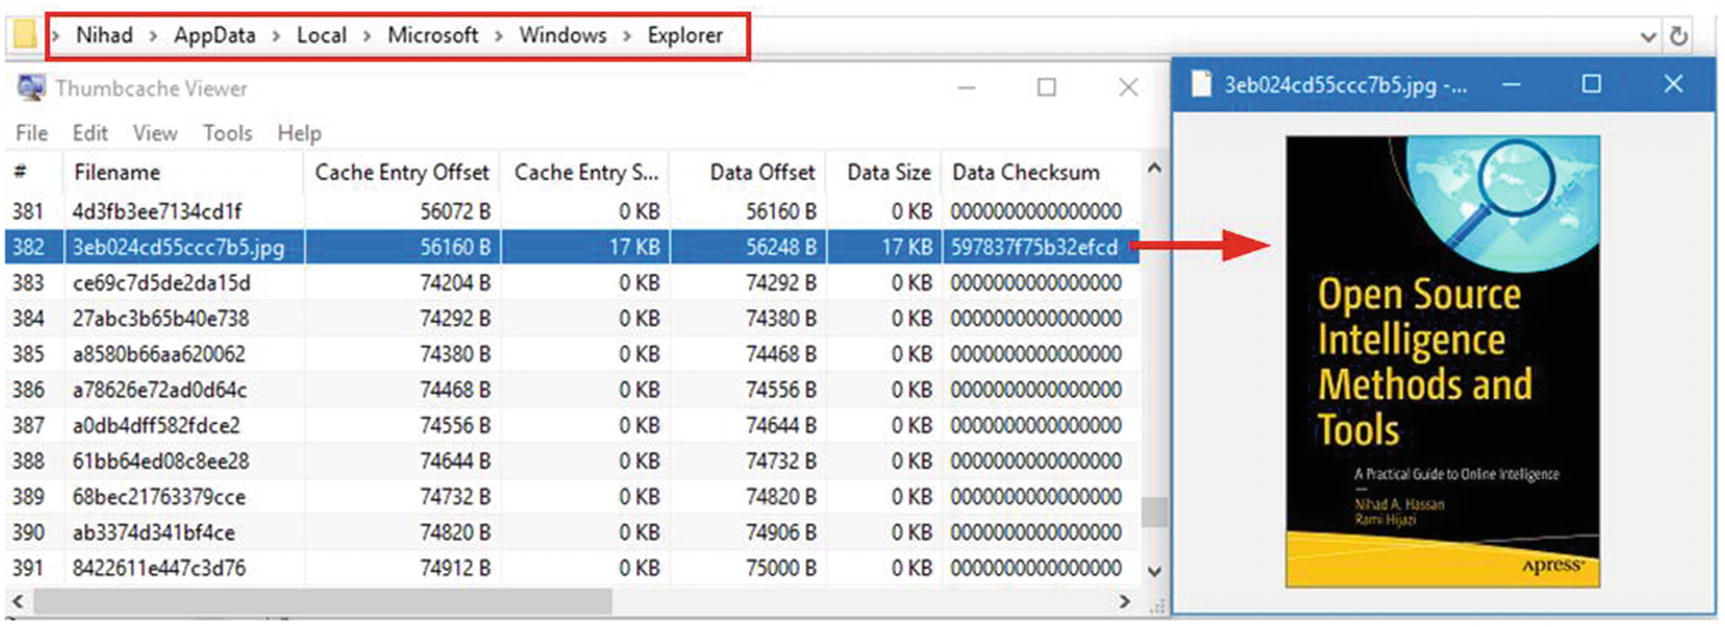
Using Thumbcache Viewer to extract information from thumbcache_*.db and iconcache_*.db files
Jump Lists Forensics
Beginning with Windows 7, Microsoft released a new feature for Windows users. Jump Lists is a feature that allows users to view recently viewed or accessed files for each installed application. Investigating this feature has great forensic value, as it gives deep insight into the user’s computer habits and recently accessed files, especially in criminal cases when the user’s activities on the computer are the focus of the investigation.
This feature is enabled by default in Windows 10; you can configure it by going to Windows Settings (Win + i button) ➤ Personalization ➤ Start.
Note!
The “AppData” directory is hidden by default; you need to view hidden files under Windows as we did previously in order to see it.
We can differentiate between two types of Jump List, automatic and custom:
AUTOMATICDESTINATIONS-MS

Viewing hidden directory Users<username>AppDataRoamingMicrosoftWindowsRecentAutomaticDestinations-ms
CUSTOMDESTINATIONS-MS
These files are created in Users<username>AppDataRoamingMicrosoftWindowsRecentCustomDestinations-ms when a user pins a file to the Start menu or task bar.
For both AutomaticDestinations-ms and CustomDestinations-Ms, files are named using the relevant application name (AppID), which consists of 16 hexadecimal digits, followed by the “.customDestinations-ms” or “automaticDestinations-ms” extensions. These AppIDs are named by the application or the system during application runtime.
Knowing the AppID name will allow the examiner to learn the identity of the application used to access or view the intended file in the Jump List. There are different web sites that list Jump List IDs, like Forensics Wiki ( www.forensicswiki.org/wiki/List_of_Jump_List_IDs ) and Github ( https://github.com/4n6k/Jump_List_AppIDs/blob/master/4n6k_AppID_Master_List.md ).
Nirsoft offers a tool to automate the process of extracting information from Windows Jump List files. This tool, JumpListsView ( www.nirsoft.net/utils/jump_lists_view.html ), displays the information stored by the Jump Lists, like the name of the file opened by the user and the date/time when the open event took place. However, you still need to investigate the AppID manually to determine which program was used to open a subject file.
LNK File Forensics
The Windows shortcut file (LNK extension) is a shortcut file (consider it a kind of metadata file) that points to an application or file on Windows OS. Such files are commonly found at a user’s desktop; however, we can also see them scattered in other locations. LNK files can be created by a user or autogenerated by Windows when a user opens a local or remote file.
LNK files hold a wealth of useful information about the computer at which the file was first created time in addition to the computer where it resides currently.
- 1.
MAC time attributes (Creation, Modification, and Access time) for the LNK file itself and for the linked file.
- 2.
The user’s previous activities on the computer; for example, if a suspect moves a file into a USB drive or deletes it permanently from his/computer, the associated LNK file will still exist, giving valuable information about what has executed on the target system before.
- 3.
Linked file size.
- 4.
Original path of the linked file.
- 5.
The serial number and name of the volume that held the linked file.
- 6.
The network adapter MAC address and original network path of the original computer.
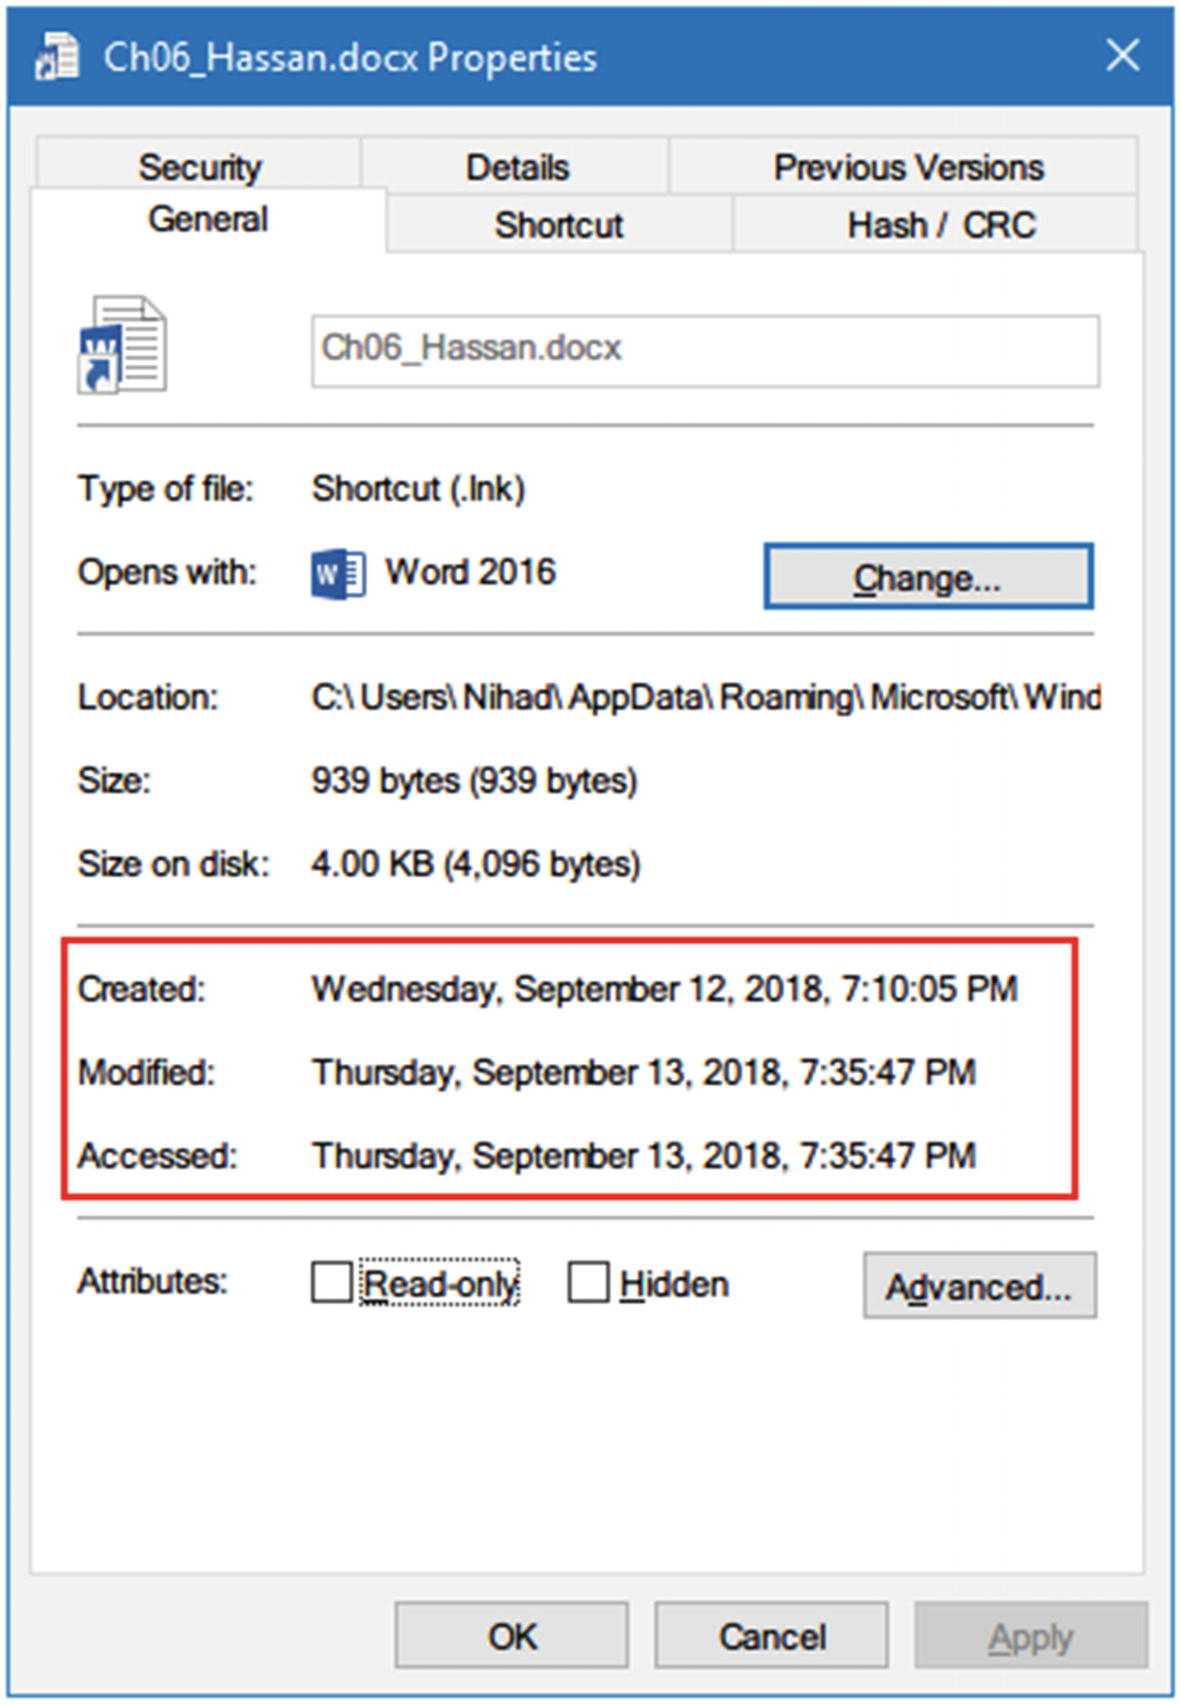
Properties of LNK file reveal a MAC time of a LNK file in addition to the original (linked) file path, which can be found under the “Shortcut” tab
However, there is much information that can be retrieved by using third-party tools specializing in parsing LNK files. The following are two popular tools for investigating LNK files.
Windows File Analyzer (WFA)
- 1.
Download the tool from www.mitec.cz/wfa.html (this is a portable free program).
- 2.Launch the tool, and go to File ➤ Analyze Shortcuts ➤ Browse and select target folder (see Figure 7-35). The program will ask you to the select target OS. Finally click the “OK” button and you are done!
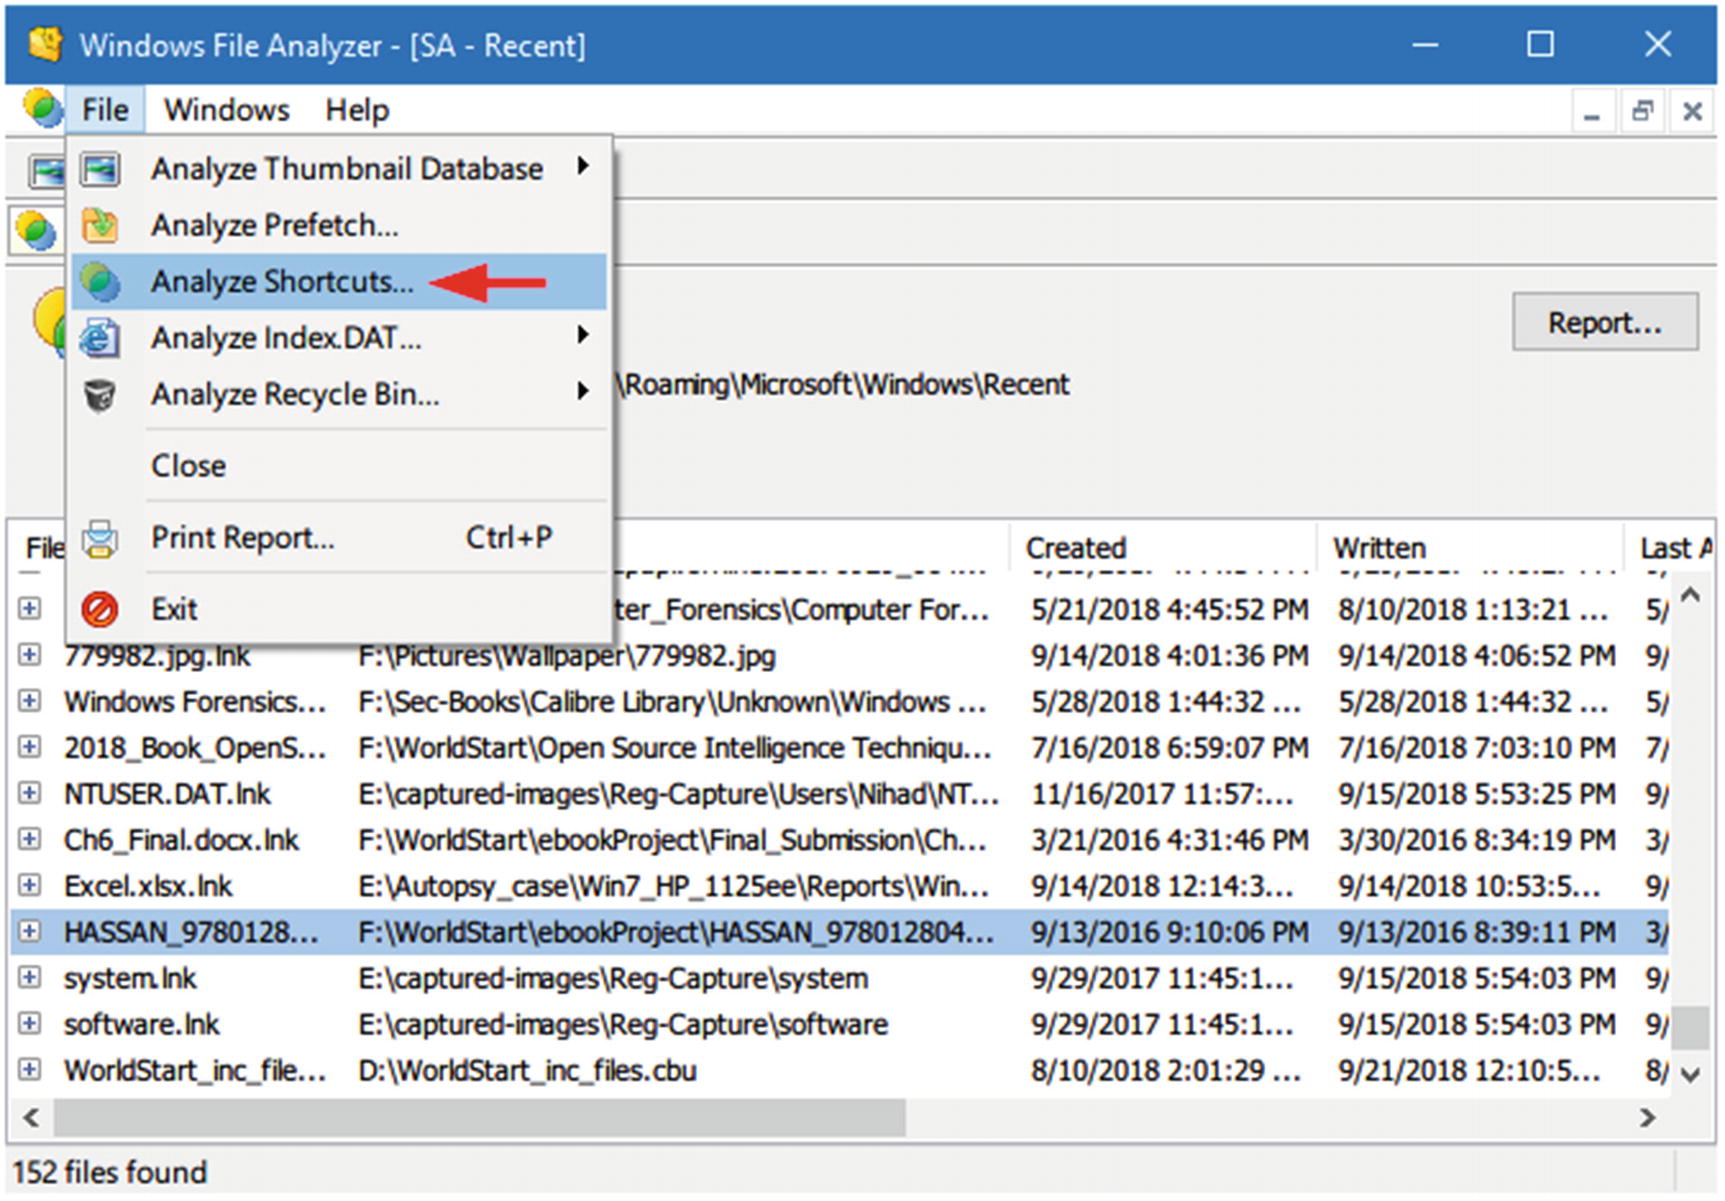 Figure 7-35
Using WFA to extract useful information from LNK files
Link Parser
Developed by 4Discovery, Link Parser ( www.4discovery.com/our-tools ) is a free portable tool for extracting information from LNK files. It can parse a single item or multiple items, a complete forensic image, or a folder and list all found LNK files in addition to their information (about 30 attributes). The gathered information can be exported into a CSV.
Event Log Analysis
Windows records important events (both hardware and software events) that have happened to the system, applications, or other services in what is called an event log. Recording events like low memory, excessive access to hard drive, failed login, and others can assist system administrators or users in learning the exact source of a particular event in addition to helping them predict future events (e.g., replace hard drive before its complete failure).
From a computer forensic standpoint, Windows event logs help examiners learn what a user has done on a computer at a particular time.
Older Windows versions (2000, XP, and 2003) have three event log files (with EVT format): Application, System, and Security. Their files are located at Windowssystem32config; please note that Windows server OS maintains more logs (e.g., DNS server and directory service) to support server functions.
Modern Windows versions (Vista and newer) use the Windows XML event log (EVTX) format, and their log files can be found at WindowsSystem32winevtLogs.
- 1.
Error: Indicates that a significant problem has occurred: for example, when a service fails to load at startup.
- 2.
Warning: Not a significant event, but may lead to serious problems in the future.
- 3.
Information: Indicates successful operation of an object like service, application, or driver.
- 4.
Success Audit: Points to a successful security event (e.g., successful login is recorded as “Success Audit event”).
- 5.
Failure Audit: Reverses a Success Audit (e.g., when a user fails to log in to Windows, the event is logged as a “Failure Audit event”) .
Note!
Microsoft recommends a list of Windows log events to be monitored because they can give a sign of compromise. You can find the list at https://docs.microsoft.com/en-us/windows-server/identity/ad-ds/plan/appendix-l--events-to-monitor .
- 1.
User: Username of the account logged into the machine when the event occurs.
- 2.
Event ID: A number generated by Windows that identifies event type.
- 3.
Source: The object which caused the event to occur.
- 4.
Computer: Name of the computer where the event occurred.
- 5.
Date and time: The date and time when the event occurred.
- 6.
Description: Description of what happened to launch the event.

Event Viewer using Windows 10 OS
The built-in Windows event viewer offers an adequate interface to search and explore within available events; however, some third-party tools can offer a more convenient way to browse Windows events.
FullEventLogView ( www.nirsoft.net/utils/full_event_log_view.html ) is a portable tool developed by Nirsoft that displays all Windows event logs in one table. By using this tool, you can view events stored on a local machine or a remote computer, or you can examine an exported Windows log file with an .evtx extension. An event list can be exported into a TXT or HTML file, allowing easy manipulation of results in another program.
Using this tool is simple: after the tool is executed, it will automatically display a log of all events of the current machine in the past seven days. To change this setting, go to Options ➤ Advanced Options and change these settings to “Show events from all times.”
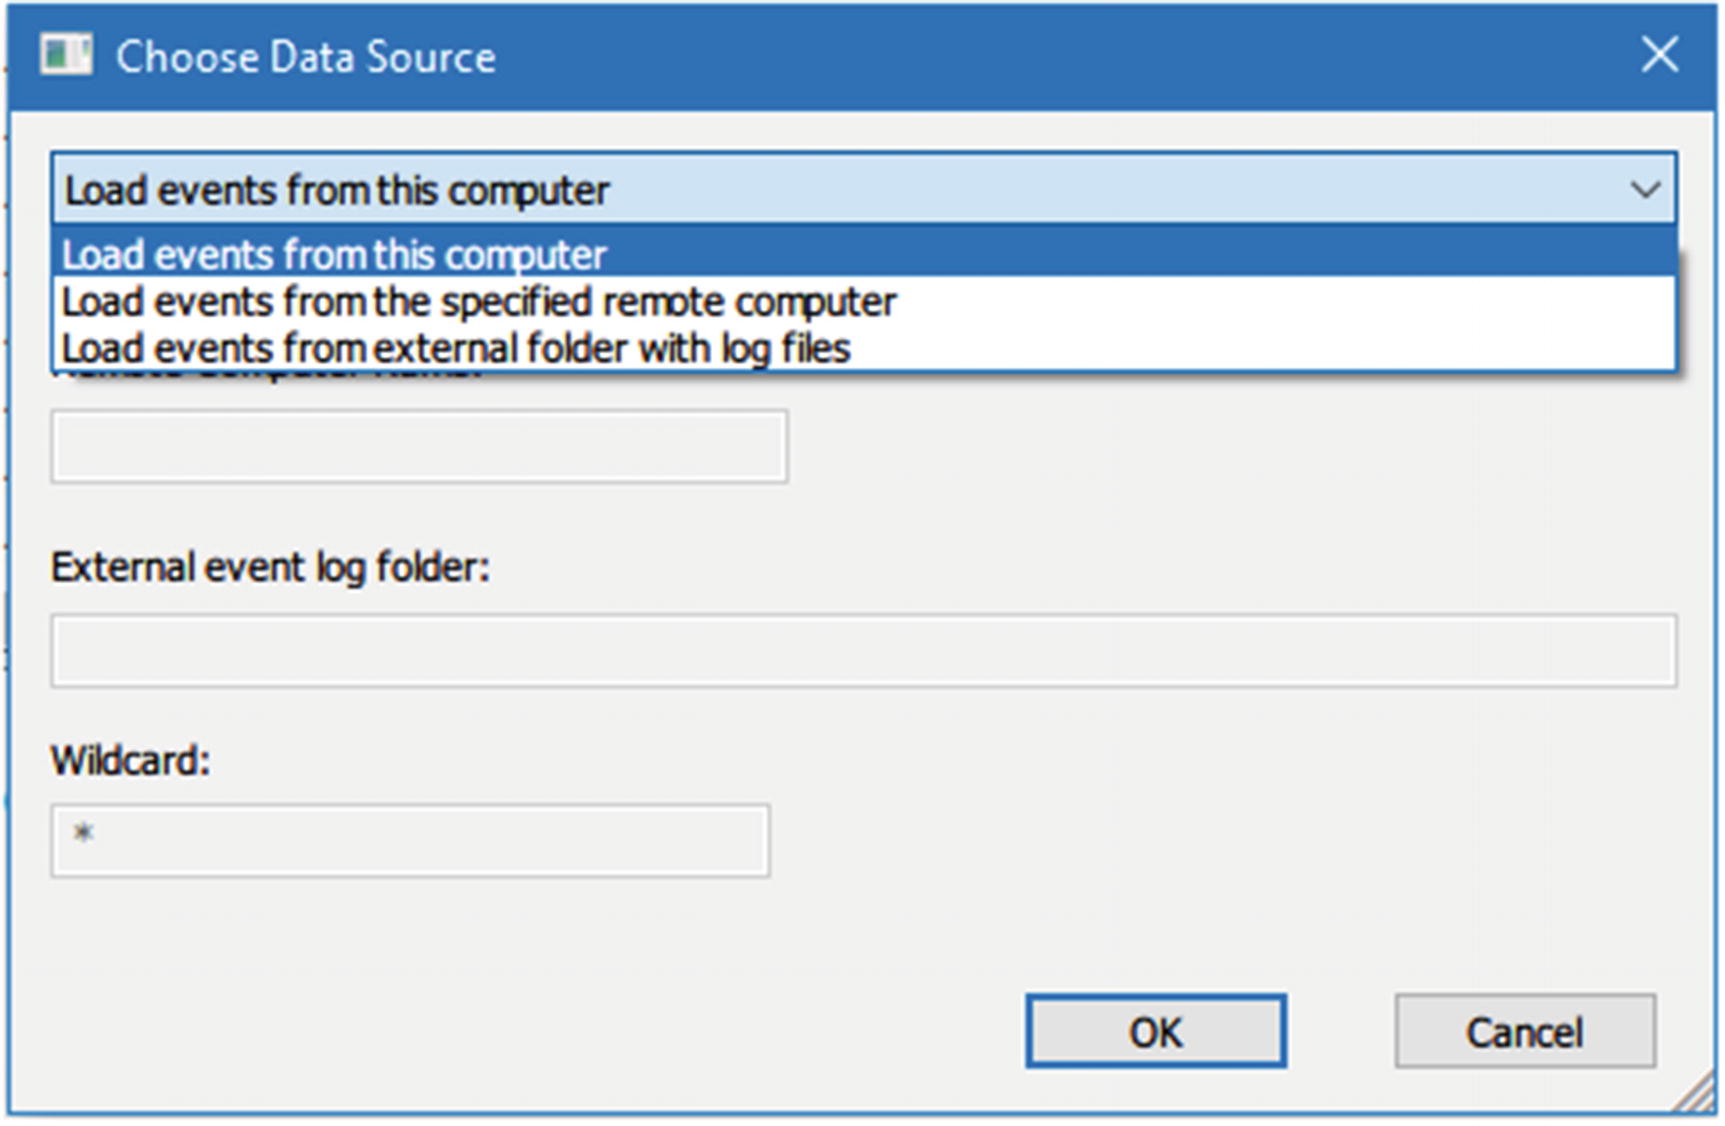
Choosing data source in FullEventLogView

Viewing all available Windows event logs from target machine using FullEventLogView
- 1.
Log parser ( www.microsoft.com/en-us/download/details.aspx?id=24659 ). Query Windows event log using the SQL query language.
- 2.
Log Parser Lizard GUI ( www.lizard-labs.com/log_parser_lizard.aspx ). Query software tool; it uses SQL to query Windows event log, IIS log, the registry, the file system, the active directory services, and more. This is a commercial application; a free trial is available.
Hidden Hard Drive Partition Analysis
Most hard drives (HDD and SSD) usually come divided into partitions. Dividing a partition is useful for many reasons; for example, a user can dedicate one partition for housing the OS files and another one for storing user private data.
Dividing hard drives into partitions is not only limited to end users; for instance, most computer vendors create a hidden partition to store a recovery image of an installed OS. However, hidden partitions can also contain incriminating data and other files of interest.
To check if a particular hard drive or USB stick contains hidden partitions, we can use the DiskPart command-line utility, which comes as a part of the Microsoft Windows family (Windows 10, 8, 8.1, 7, Vista, XP, and Server 2003).
- 1.
Type “List disk” to view a list of hard disks/drives connected to this PC and associated numbers.
- 2.
To view the partitions of a selected hard drive, you first need to select it through the “select disk = n” command, where n points to the disk/drive number that appears in the first command.
- 3.
After selecting the disk/drive, type “list partition” to see a list of partitions associated with this disk drive.
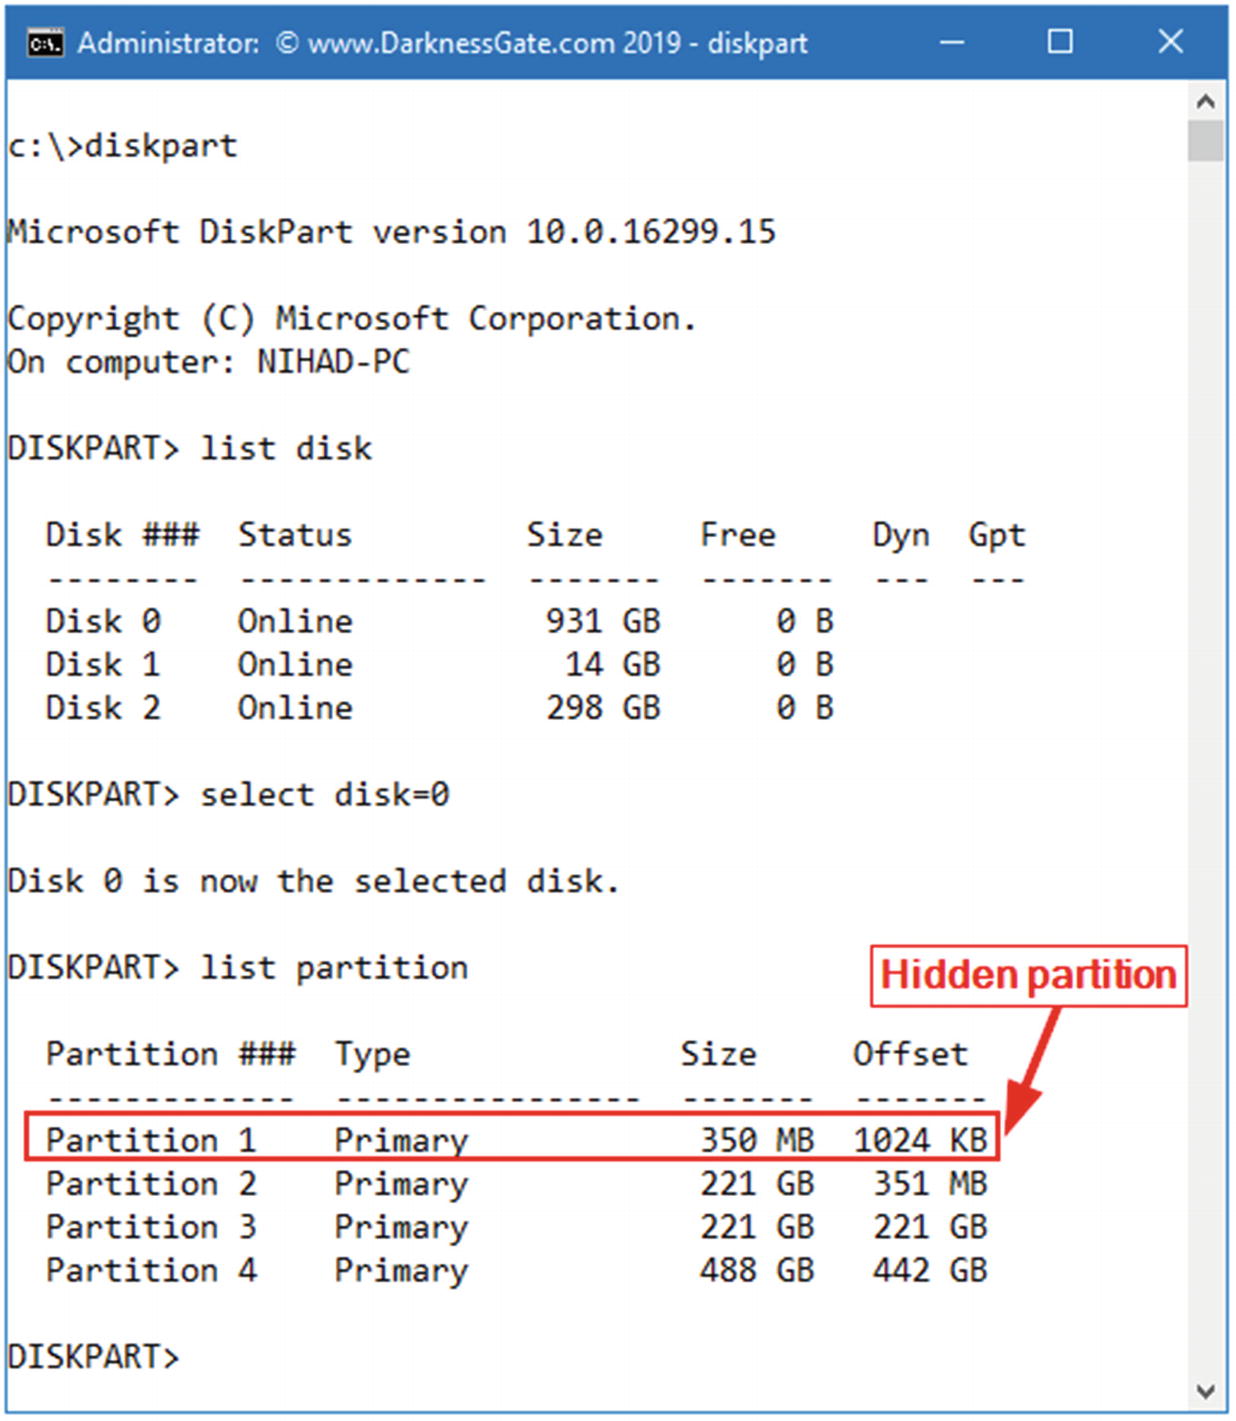
Using DiskPart command to view hidden partitions within the Windows OS
Windows Minidump File Forensics
- 1.
Small memory dump (256 KB)
- 2.
Kernel memory dump
- 3.
Complete memory dump
- 4.
Automatic memory dump (default option)
- 5.
Active memory dump
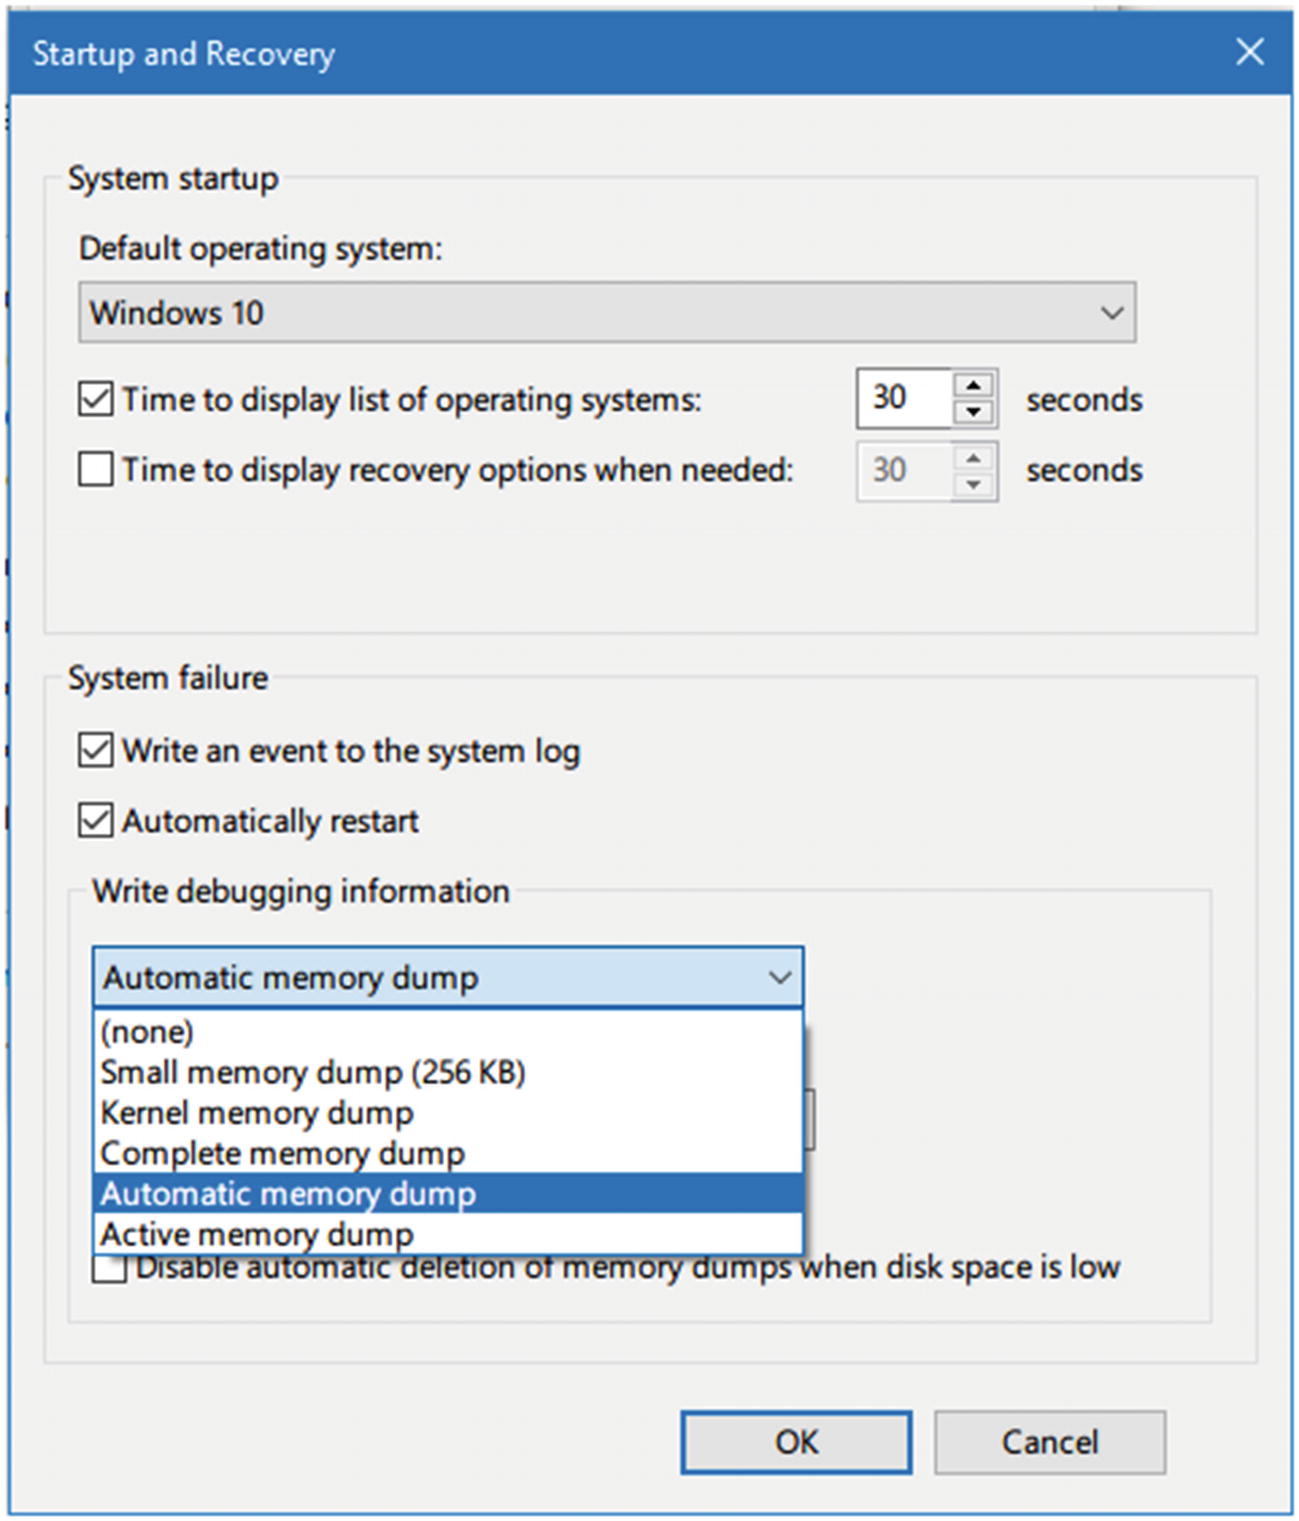
Configuring memory dump under Windows 10
Minidump files will usually contain the programs that were running/installed at the time of the crash; this can be very useful for digital forensic examiners. For example, if we think that a suspect was using a portable steganography tool to conceal a secret file when the crash happened, the steganography tool name will appear in the dump file, making it available for forensic investigations.
BlueScreenView is a portable by Nirsoft for investigating ( www.nirsoft.net/utils/blue_screen_view.html ). This tool will scan all your Minidump files created during crashes and display relevant information about all crashes in one table.
Pagefile.sys, Hiberfil.sys, and Swapfile.sys
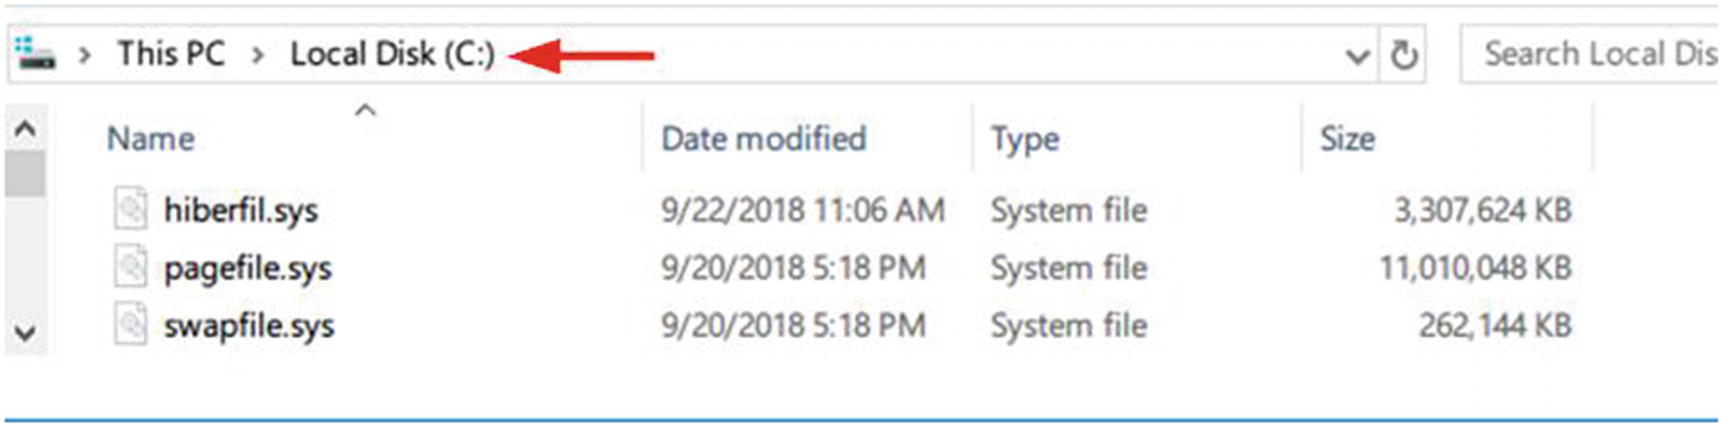
The location of Swapfile.sys, Hiberfil.sys, and Pagefile.sys
Pagefile.sys
We’ve already defined the concept of virtual memory (Pagefile.sys in Windows OS) in Chapter 5. Forensic examiners should not omit the forensic value of virtual memory, as this file can hold important information shifted from RAM. For example, fragments of decrypted files can still reside there, and encryption keys or passwords (or a fragment of it) can also be found here.
The capacity of the physical memory increases with the continual advance of computing power (for example, it is common these days to buy a laptop with 16 GB of RAM memory). This effectively limits the need to swap any files to the virtual memory. All these issues result in low expectations of computer forensic investigators when investigating pagefile.sys.
Note!
pagefile.sys is a hidden system file, it resides by default at %SystemDrive%pagefile.sys; however, a user can change its default location to learn the exact location of pagefile.sys. If in doubt, check the following registry key:
HKEY_LOCAL_MACHINESYSTEMCurrentControlSetControlSession ManagerMemory Management.
Despite the limited possibility in modern computers of finding valuable data inside pagefile.sys, we can’t discard its importance during an investigation. Most computer forensics suites can analyze pagefile.sys; consult tool documentation for related instructions.
Hiberfil.sys
This is a file used by Windows to support the hibernation feature, the approximate size of this file is about 3/4th of your RAM. The hibernation file in earlier versions of Windows (e.g., 7 and Vista) stored kernel session, device drivers, and application data while in modern versions of Windows (like 8 and 10) it stores only the kernel session and device drivers, making it notably less in size.
Volatility, free and open source tool: www.volatilityfoundation.org
Belkasoft Evidence Center (commercial application): https://belkasoft.com
Swapfile.sys
Used to store the idle and other nonactive objects ejected from the RAM memory, whenever a user tries to access an idle process again, its information will get shifted to the RAM memory again. In modern Windows versions (like 8 and 10) we can see that both Pagefile and Swapfile exist together on a system drive; we can consider that these two files form together what is known now as virtual memory in Windows OS. Swapfile has a fixed size in modern Windows versions (8, 10), which is 256 MB.
More information about the Swapfile can be found at the Microsoft Technet web site ( https://blogs.technet.microsoft.com/askperf/2012/10/28/windows-8-windows-server-2012-the-new-swap-file/ ) .
Windows Volume Shadow Copies Forensics
The Volume Shadow Copy Service (VSS)— available in all Windows versions beginning with Windows XP—is a service that coordinates the creation of a consistent snapshot of data at a specific point in time for each partition where it is activated. VSS helps Windows to recover if some of its files get corrupted; in such case, Windows will restore the good version of files from the previous backups (restore points). These restore points are taken at specific time intervals determined by Windows. The VSS feature is only supported on volumes formatted as NTFS and can be accessed using the system restore functionality.
Investigating Windows restore points snapshots can reveal a wealth of forensically useful information; the biggest gain from examining this feature is locating deleted files and folders that still reside in restore points after the original versions are deleted by the user.
Windows restore point snapshots also capture the registry hive files, opening the door to examining previous snapshots of the Windows registry as we did before. To extract Windows registry files from a particular Windows restore point, you can use a free portable tool from Nirsoft named RegistryChangesView ( www.nirsoft.net/utils/registry_changes_view.html ).
Note!
To configure VSS under Windows 10 (also applies to Windows 8 and 7), we can access it from Control Panel ➤ System ➤ System protection ➤ System Protection tab; then, select the drive you want to turn ON/OFF system protection and click the Configure… button (see Figure 7-42).
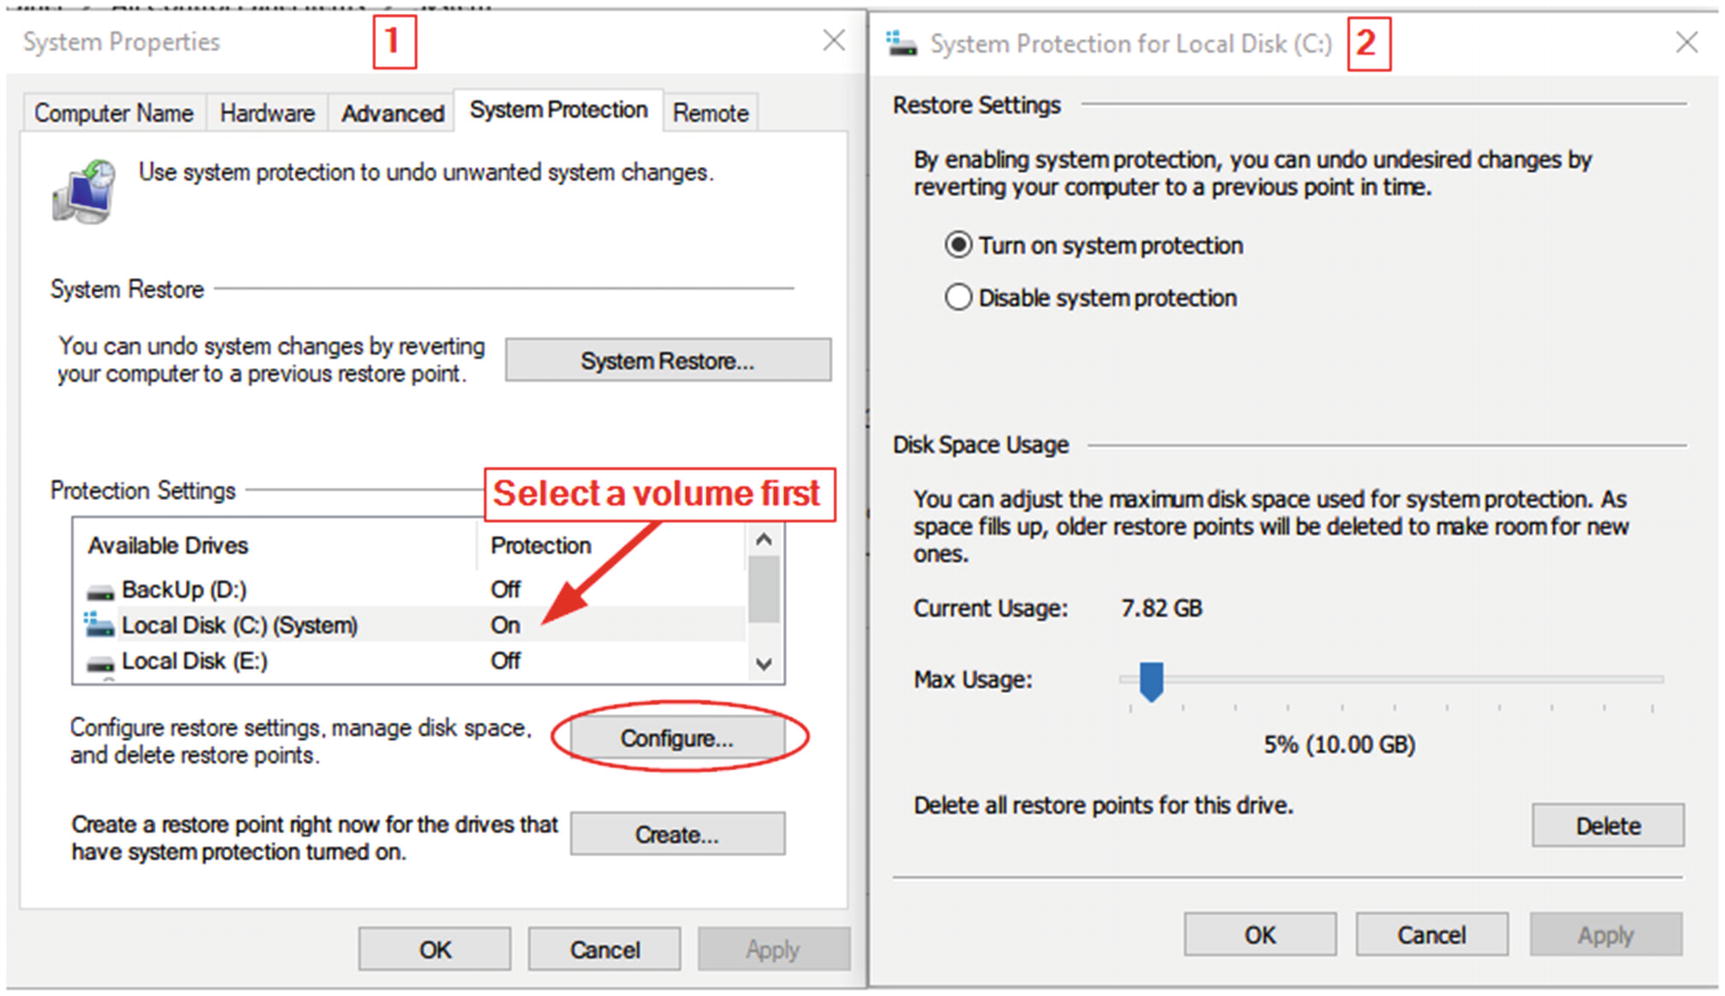
Configuring restore points under Windows 10
Investigating Windows restore points can be done manually using a built-in command-line utility called VSSadmin, which comes with Windows Vista, 7,8, and 10. However, we will not cover this method here, as it is already described in detail in the author’s blog ( www.darknessgate.com/security-tutorials/date-hiding/volume-shadow-copy-data-hiding ) and there are other excellent free tools that can do the same task of analyzing Windows restore point files. The following are two popular tools for analyzing Windows restore point file contents:
ShadowCopyView
ShadowCopyView ( www.nirsoft.net/utils/shadow_copy_view.html ) lists all restore points of your hard drive created by the 'Volume Shadow Copy’ service of Windows. It supports Windows 10, 8, 7, and Vista.

Using ShadowCopyView to list/view existing restore points in Windows

Extract/copy files from selected snapshot using the ShadowCopyView tool
Shadow Explorer

Using ShadowExplorer to browse old restore point contents
Windows 10 Forensics
Windows 10 introduces new features and applications to its users like Edge browser, Windows 10 apps, Cortana (Microsoft’s voice-controlled digital assistant), and many more. The most important one was the introduction of Universal Application Platform (UAP), which enables the same application to run on different device types like laptops, desktops, IoT devices, tablets, smartphones, and so on.
We already covered how to implement various digital forensics investigation techniques covering different Windows versions, with a special focus on Windows 10. In this section, we will cover how to conduct digital forensics’ analysis covering two common features of Windows 10.
Note!
The scope of this book is to teach you how to conduct digital forensic investigations using Windows OS. Please note that we cannot cover all forensic aspects of all Windows features—and other popular third-party apps that could be installed on it like Facebook—in one book, so do not consider this book inclusive in terms of analyzing all Windows features. Nevertheless, this book still considered a great practical introduction to the digital forensic subject as a whole, with practical experiments covering the main aspects of Windows OS.
Windows 10 Features Forensics
- 1.
Notification area database
- 2.
Cortana forensics
Notification Area Database
Note!
Images displayed on the Start menu tiles or appearing within notification are stored at Users<UserName>AppDataLocalMicrosoftWindowsNotificationswpnidm
The notification database holds various notification types seen by Windows users on the bottom right corner of the screen, such as pop-up messages from various parts of the OS (e.g., backup and restore), e-mail alerts, and messages related to specific apps like Torrent downloads, among other things. The forensic value of Windows notification is that it can reveal previous user activities on the target machine.
Go to http://sqlitebrowser.org and download DB Browser for SQLite; select the version appropriate for your OS version.
Launch the program, go to File menu ➤ Open Database…; browse to Users<UserName>AppDataLocalMicrosoftWindowsNotifications; and select wpndatabase.db.
- In Figure 7-46, we can see the database schema of the Windows notification area (wpndatabase.db). In the Notification table, we can find the following attributes:
“HandlerId”, which tells which program has created the notification (retrieve program name from table “NotificationHandler”).
“Payload” contains notification contents (see Figure 7-47).
“ArrivalTime”; date/time when notification received.
“ExpiryTime”; date/time when notification will be deleted from the database.

Browse Windows notification area database using DB Browser
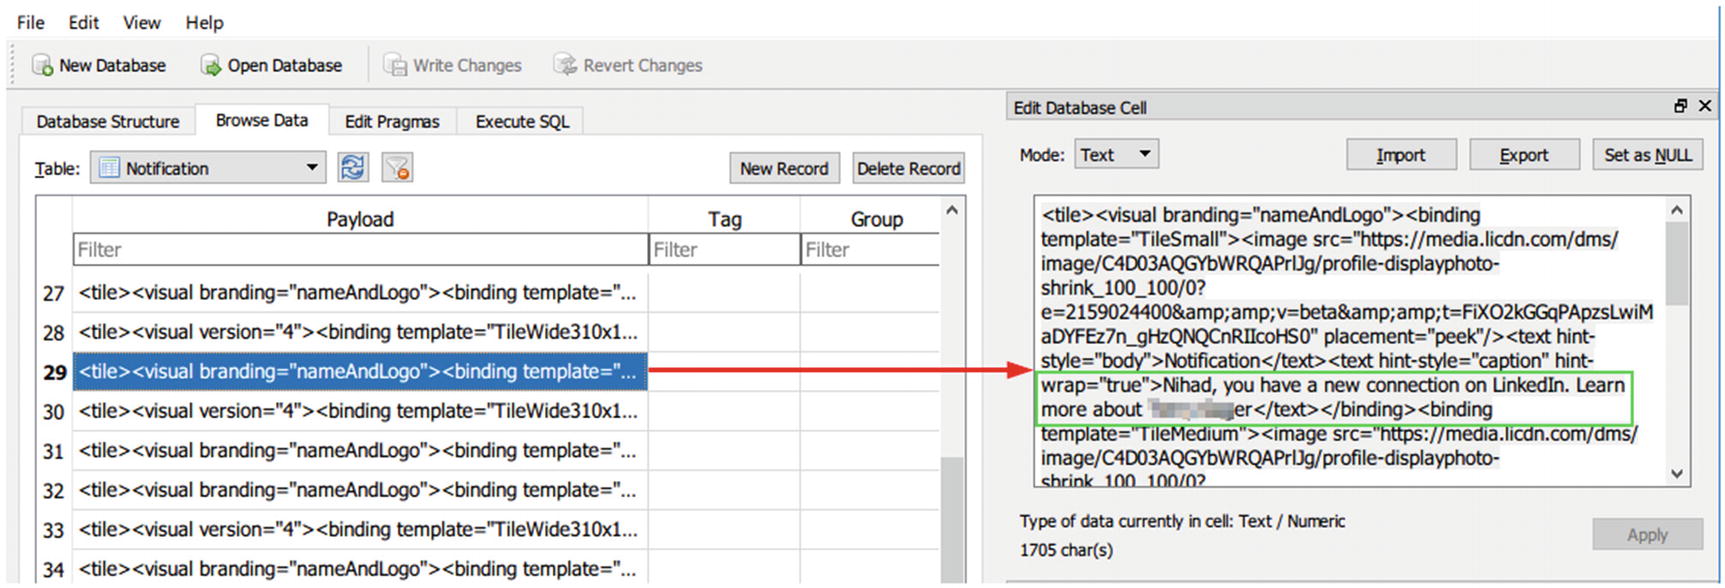
Notification content shows a pop-up notification by LinkedIn (adding a new connection on LinkedIn)
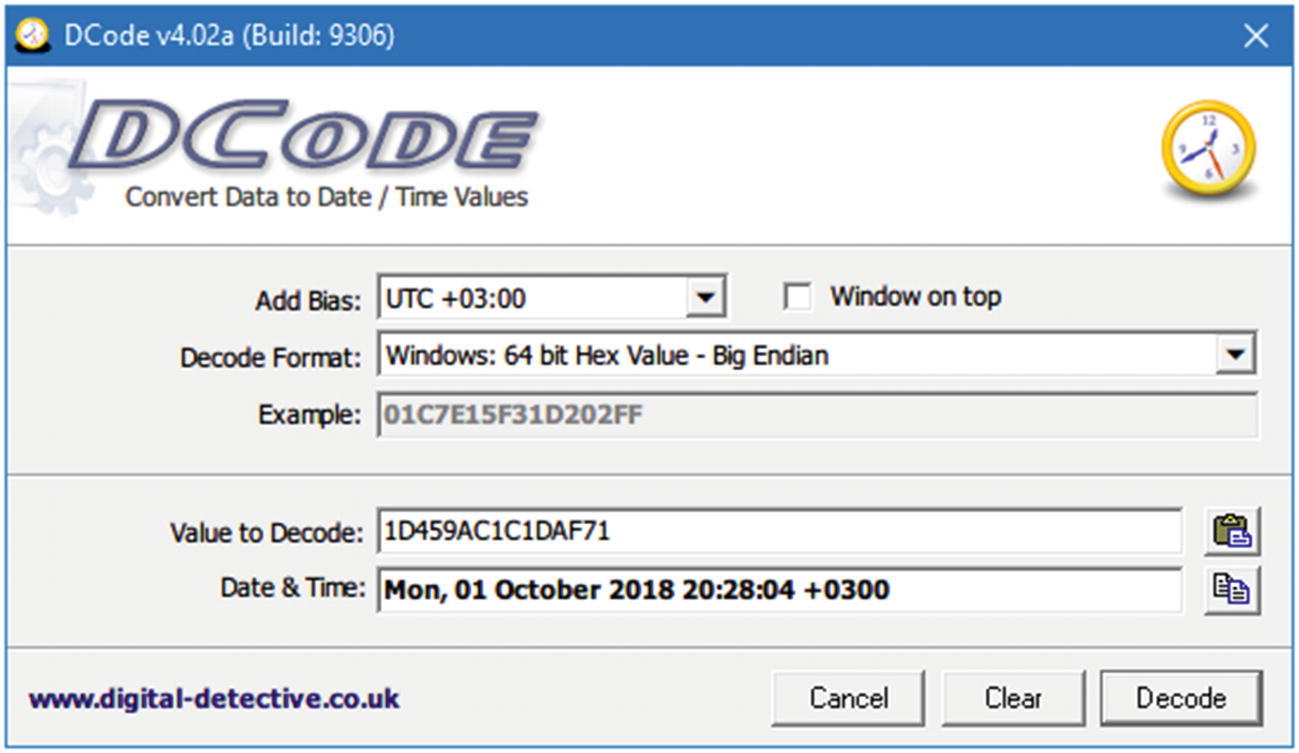
Convert date/time attributes from decimal values into a readable format using the DCode tool
Cortana Forensics
Cortana is a voice-activated personal assistant (similar to Siri developed by Apple Inc. for its iOS). Cortana is a relatively new feature first introduced in Windows phone version 8.1; later, with the release of Windows 10, it has ported into Windows desktop as well. Its main task is to provide a personalized experience for Windows 10 users by offering suggestions when conducting searches in addition to remembering events, sending e-mails on the user’s behalf (when configured properly), searching the Web, checking weather forecasts, and many more useful things. Cortana works through cumulative learning. Hence, when the user communicates with it more (through the PC microphone or by typing), it will understand the user’s personal habits and attitudes more, leading to more accurate results in future interactions.
Note!
If you cannot find the second database named “CortanaCoreDb.dat,” this means the Cortana feature is disabled on the examined machine.
The “CortanaCoreDb.dat” holds forensically valuable information related to user geolocation data in addition to reminders set by a user and where and when these remainders have triggered. Please note that Cortana can record extensive private information about its users; however, it seems that Microsoft has shifted many user interactions with Cortana onto Microsoft cloud servers.
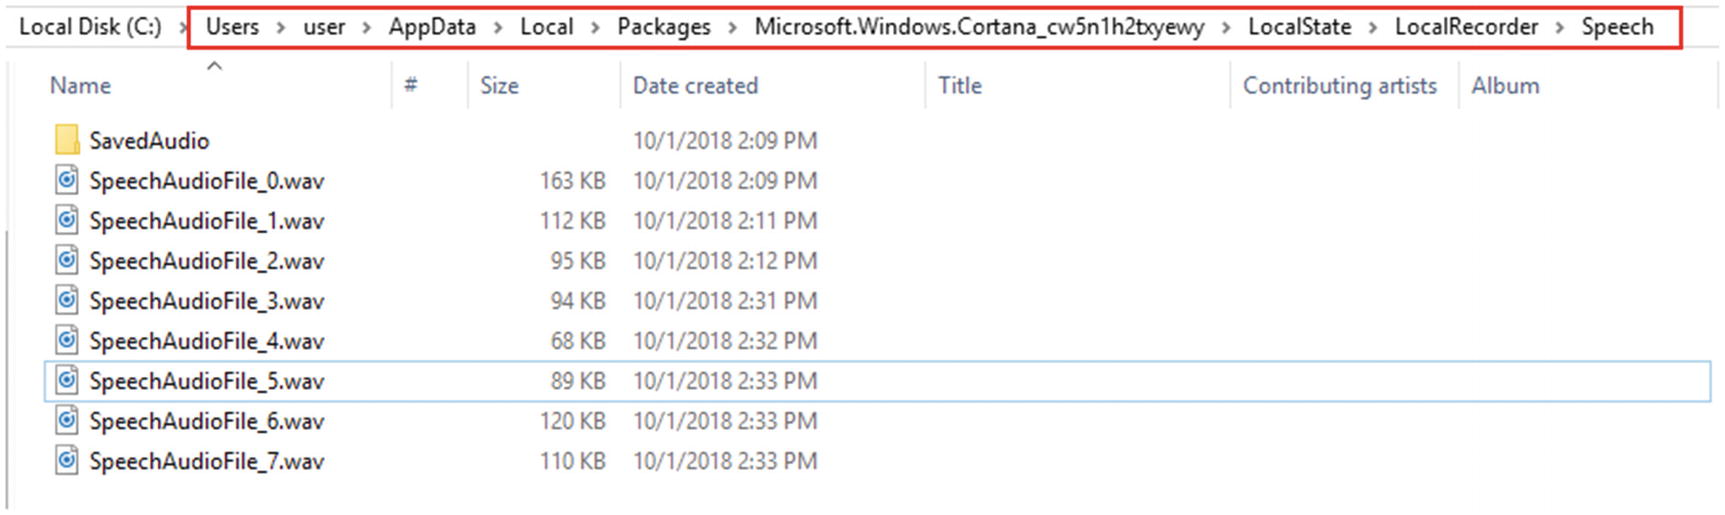
The location where Cortana stores voice command recordings
This folder stores voice command (WAV audio files) recordings issued by a user to Cortana to perform a task.
Please note that not all computer forensic suites support decoding the Cortana database; always consult the manual or tool features before buying it. For instance, EnCase has a script to decode Cortana search terms of user-specified IndexedDB.edb files .
Note!
ESEDatabaseView from Nirsoft ( www.nirsoft.net/utils/ese_database_view.html ) is a tool for displaying data and available tables inside the ESE database.
Chapter Summary
Windows records huge amounts of information about its users; this information, which is also known as artifacts in the computer forensics domain, can be scattered across the system in different locations. For example, few people know that the artifacts of all applications that have been launched and all USB thumb drives that have attached to a particular Windows machine since its installation will remain stored in multiple locations in Windows. The same thing happens with deleted items: the recycle bin will hold information about each deleted file in addition to the account responsible for deleting it. Even if the data has been deleted on purpose or simply overwritten, copies of the deleted, formatted, modified, damaged, or lost files and folders can still be located on various places in the target system.
This chapter has been about Windows forensics only; we tried to cover the main areas where forensics artifacts can be found. In the next chapter, we will continue our examination work and see how web browsers and e-mails can be investigated for forensic evidence.