
Chapter 4: Incident Response and Data Acquisition
It's sometimes difficult to ascertain exactly what qualifies as evidence, especially at the exact start of an investigation, when all the facts on what occurred may not have yet been collected or stated. In any investigation, we should be aware of and follow the guidelines, practices, and procedures for acquiring evidence in such a way that it is not altered or, in a worst-case scenario, lost.
At the scene of a crime, let's say a robbery, there are specific items that may immediately qualify as evidence. The physical evidence is easily collected, put into evidence bags, labeled, and then shipped off to the labs and secure storage areas for safekeeping. This evidence may include spent bullet casings, a gun, fingerprints, and blood samples. Let's not forget witness statements and Closed Circuit Television (CCTV) footage, also. It's also of interest to consider the individuals from law enforcement agencies that would be at the scene and the order in which they may have arrived. Seems simple enough, right?
However, when a breach or crime involving a computer or smart device is reported, collecting the evidence is sometimes not as simple, as there are many factors to consider before labeling any items as evidence.
If a desktop was involved in the act, for example, do we take the tower alone or do we also seize the monitor, keyboard, mouse, and speakers? What about the other peripherals, such as printers and scanners? Are there any additional fixed or removable storage media at the scene and do we also seize them? We must also consider the handling and storage of evidence by first responders, which includes anti-static and stronghold bags for evidence storage, along with forensically sound media for the cloning of hard disks and other media that must be acquired for analysis. If the first responders are to examine the internal components of systems, anti-static wrist-bands should also be worn to avoid electrostatic discharge, which may damage components such as RAM and thereby compromise the investigation.
This chapter answers all these questions and provides guidelines and the best practices for incident response, evidence acquisition, and other topics, including the following:
- Digital evidence acquisition and procedures
- Documentation and evidence collection
- Preserving evidence integrity
- Write blocking and hashing
- Live acquisition versus post-mortem acquisition
- Live acquisition best practices
- Data imaging and hashing the chain of custody
Digital evidence acquisition and procedures
As we covered in the last chapter, data can be stored on both fixed and removable storage media. Data, however, can easily be deleted or completely lost depending on a multitude of factors that must be considered if we are to ensure the preservation of data. It might even be argued that there are more threats to digital than paper-based storage. The following are threats to paper-based storage:
- Water
- Fire and humidity
- Bugs
- Age
- Natural disasters—floods, earthquakes, tornadoes, hurricanes, and so on
The following are threats to data on storage media:
- Human error and negligence
- Magnetism and electromagnetic fields
- Water and condensation
- Heat
- Dust
- Physical impacts
- Voltage
- Static electricity
- Natural disasters—floods, earthquakes, tornadoes, hurricanes, and so on
When exactly does data become evidence?
Specific data may have a value that is relative to an investigation when considering the events that transpired.
Incident response and first responders
Preserving evidence does not begin only at the acquisition of data, but as early on as the physical viewing of the suspect device. There should be some kind of structured response to the suspected crime or breach in the same way as with a crime reported to the police. A person makes a call to the emergency services who then dispatch the police, fire services, and ambulance personnel, and other first responders who may then escalate the issue to the FBI or other agencies. There should also be a similar chain of command when dealing with reports that require digital investigation.
There are many sources for guidelines, best practices, and cybersecurity strategies, which you should familiarize yourself with. I'd suggest researching your local Computer Emergency Response Team (CERT) and/or Computer Security Incident Response Team (CSIRT) to begin with, such as the US-CERT (https://www.us-cert.gov/resources) and the European Union Agency for CyberSecurity (ENISA), which has all the national cybersecurity strategies for EU member states, available at https://www.enisa.europa.eu/topics/national-cyber-security-strategies/ncss-map/national-cyber-security-strategies-interactive-map.
The Cybersecurity and Infrastructure Security Agency (CISA) also has publicly available resources, which provide information on reporting vulnerabilities and also provide alerts and bulletins on security activity and new vulnerabilities. The Scientific Working Group on Digital Forensics (SWGDE) also has individual best practices guidelines for evidence collection, acquisition, and much more, all publicly available at https://www.swgde.org/.
When a breach or crime is discovered or suspected, there should be a dedicated first responder who is alerted and called to the scene. This person usually has some knowledge or understanding of the workings of devices, networks, and even of the IT infrastructure in the organization, if applicable.
First responder personnel can include the following:
- Systems administrators
- Network administrators
- Security administrators
- IT managers
While the people in the preceding roles may not be skilled in digital forensics or digital investigations, they will be responsible for securing the scene and ensuring that the data, peripherals, equipment, and storage are not used, tampered with, removed, or compromised by unauthorized individuals. First responder roles must be clearly defined prior to any investigation or examination at the scene so as not to compromise the investigation or tamper with evidence.
The duties of first responders include the following:
- Being the first to respond to the scene (as the name suggests) and making an initial assessment
- Documenting the scene and room fully in a circular fashion, using the center of the room as a focal point
- Securing the scene by not allowing unauthorized users or suspects to access the devices or area and especially to volatile data and storage media
- Preserving and packaging evidence for transportation and ensuring the use of the Chain of Custody (CoC) forms
You may wish to refer to the Electronic Evidence – A Basic Guide for First Responders document from ENISA, which outlines evidence collection, first responder roles and toolkits, and evidence acquisition and examination, and can be downloaded at shorturl.at/aksy7.
Documentation and evidence collection
Documentation of the scene should also be done by the first responders to aid in investigations. Documentation of the scene should include photographs, video, voice recording, and manual documentation of the following:
- The room where the device is located (desk, ceiling, entrance/exit, windows, lighting, electrical outlets, and data drops)
- The state of the device (on, off, power light blinking)
- The screen contents and whether the device is on (operating system, running programs, date and time, wired and/or wireless network connectivity)
- Books, notes, and pieces of paper
- Connected and disconnected cables
Once the scene has been secured and documented by the first responders, the forensic investigator should also be called in, if not already alerted.
If the first responder has been trained in evidence collection and preservation, they can also begin the process of acquiring what can be considered as physical evidence.
Examples of physical evidence include the following:
Physical evidence collection and preservation
Consideration should be given to the physical aspect of the evidence collection phase. Like any other investigation, documentation, collection, and preservation should be done while following proper guidelines and best practices by ENISA, SWGDE, CERT, and local CSIRTs, as mentioned in the previous section, to ensure the integrity of the investigation. At a crime scene, for example, evidence has to be properly identified, labeled, and handled by authorized staff, who are trained in investigative procedures that can be scrutinized in a court of law.
A first responder toolkit should contain the following items in preparation for documentation, evidence collection, and preservation at the scene:
- Protective clothing, including eyewear and gloves
- An anti-static mat or wristbands
- Identification label tags, stickers, and portable labeling devices (if available)
- Various pens and markers for easy identification
- Cable ties
- A toolkit with various sizes of Phillips, flathead, Torx, and specialized screwdrivers or heads
- A flashlight and magnifying glasses
- Seizure and CoC forms
- Containers, boxes, and packaging materials, including anti-static and stronghold bags
- Write-blocking hardware
- Portable imaging and acquisition devices
Here's an affordable but portable and very well-organized screwdriver kit, which I keep in my first responder toolkit. It has all the attachments for opening desktops, laptops, tablets, and for removing and even opening removable storage media, such as hard disk drives, optical drives, and even floppy drives, if I encounter them:

Figure 4.1 – A portable screwdriver kit
Let's now take a look at the other tools required for the physical acquisition of forensic evidence.
Physical acquisition tools
We've looked at the tools necessary for the collection and acquisition of physical evidence, but what tools do we need for the acquisition and extraction of digital evidence? Remember when we covered the different types of storage media back in Chapter 3, Understanding Filesystems and Storage Media? We saw that many of them had their own connectors as they were of various sizes.
Here's a list of some of the equipment required when acquiring data from evidence:
- A write blocker (can also be software-based)
- A card reader
- Various adapters (USB to SATA and EIDE, USB to various types of USB)
- Device cables, such as power, SATA, EIDE, HDMI, and VGA
- Networking cables, such as straight-through, crossover, and console
The following photo shows a collection of various USB adapters, all costing under $10 and available on Amazon:
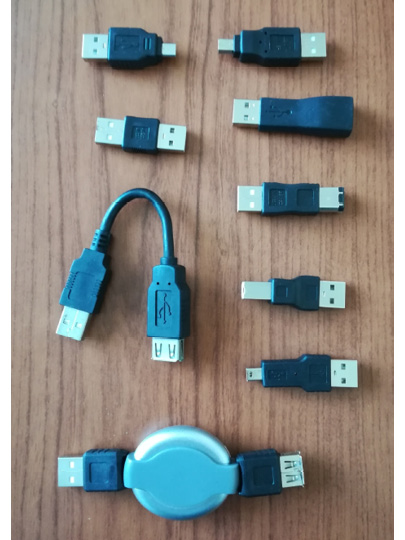
Figure 4.2 – Various USB adapters
For laptop drives, I also use an SATA to USB 3.0 adapter, such as the one seen here:

Figure 4.3 – A USB 3.0 to SATA drive adapter
For connecting to routers and switches, console cables and serial to USB cables can also be included in your kit, such as the ones seen here:

Figure 4.4 – Serial to RJ-45 and Serial to USB cables
All mobile devices, including phones and tablets, can also connect to laptops and desktops via USB ports. The following image shows an On-The-Go (OTG) cable, which can connect a USB device to phones or tablets with OTG capabilities:

Figure 4.5 – USB OTG cable
In the following image, we have a USB 3.0 type C adapter:

Figure 4.6 – USB to USB type-C adapter
The guidelines for physical collection and preservation are as follows:
- Label all cables and connectors.
- Use labeled evidence collection bags as needed.
- Special stronghold bags may have to be used when storing devices with wireless and radio capabilities, preventing communication with other devices.
- Store sensitive equipment, such as hard drives and flash drives, in anti-static bags and protective casings.
- Label containers used for storage during transportation.
- Maintain the CoC forms when passing evidence from one person/handler to another (this is discussed later in this chapter).
Order of volatility
When collecting evidence, we should keep in mind the volatility of data. As mentioned earlier in this chapter, data can be easily lost or destroyed. As such, when collecting data, a well-documented and common best practice would be to collect evidence in the order of most to least volatile, if possible.
The Scientific Working Group on Digital Evidence (SWGDE) Capture of Live Systems document lists the order of volatility from most to least volatile and crucial as follows:
- RAM
- Running processes
- Active network connections
- System settings
- Storage media
With this in mind, it is essential to acquire the contents of the memory and the paging file first as they are the most volatile and can be easily lost, resulting in the loss of very useful information, including unencrypted passwords, user and program information, network connection information, and other types of useful data.
Chain of custody
CoC is a form that legally ensures the integrity of evidence as it is exchanged between individuals, and so it also provides a level of accountability as personal identification is required when completing the forms. This form gives an exact log and account of the transportation and the exchange between parties, from collection at the scene to a presentation in a court.
Some of the typical fields on the CoC form are as follows:
- Case number offence
- Victim and suspect names
- Date and time seized:
a) Location where seized
b) Item number
c) Description of item
d) Signatures and IDs of individuals releasing and receiving the items
- Authorization for disposal
- Witness to destruction of evidence
- Release to lawful owner
A sample CoC form can be downloaded directly from the National Institute of Standards and Technology (NIST), at https://www.nist.gov/document/sample-chain-custody-formdocx.
Live acquisition versus post-mortem acquisition
When investigating devices that are powered on and powered off, special consideration must be given to the volatility of data. Booting, rebooting, or shutting down a device can cause data to be written to the hard drive, resulting in data (deleted files) in unallocated space being overwritten.
Powered-on devices
Before we begin any examination of live systems, it is of high importance that all steps be thoroughly documented, particularly if the report and evidence are to be presented in court. Investigating a live system means that logs and timestamps will be generated while the system is being examined. Therefore, thorough documentation will justify the actions taken by the forensic examiner and not be viewed as evidence tampering.
When investigating a powered-on device, the following precautions should be taken:
- Move the mouse or glide your fingers across the touchpad if you suspect the device may be in a sleep state. Do not click on the buttons as this may open or close programs and processes.
- Photograph and record the screen and all visible programs, data, time, and desktop items.
- Unplug the power cord on desktops and remove the battery, if possible, on portables.
It is of the utmost importance that data stored in RAM and paging files be collected with as little modification to the data as possible. More on this will be covered in later chapters using imaging tools such as Guymager and dc3dd in Kali Linux. Other live acquisition tools such as Computer Aided INvestigative Environment (CAINE) and Helix can also be used for acquiring RAM and the paging file.
There are quite a few reasons for imaging and acquiring the RAM. As mentioned in the previous chapter, data that may have been encrypted by the user may be stored in an unencrypted state in the RAM. Logged-in users, opened programs, accessed files, and running processes can all be extracted and analyzed if the RAM and paging file are analyzed.
However, if the device is switched off or rebooted, this data and evidence can easily be lost.
For powered-on portable devices (such as laptops and mobile), the battery can be removed, if possible. Some devices, however, may not have a removable battery. In these cases, the power button should be held down for 30 to 40 seconds, which forces the device to power off.
Powered-off devices
Powered-off devices should never be turned on unless done so by the forensic investigator. Special steps must be taken to ensure that existing data is not erased and that new data is not written.
Before examining the system, you may want to consider using a pair of latex gloves, to avoid leaving additional fingerprints on the system and components. Devices can often appear as if they are off but they can be in a sleep or hibernate state. As a simple test, the mouse can be moved and monitors (if any) can be switched on to determine whether they are, in fact, in either of those states. Even if they are in an off state, one should still photograph the screen and ports.
When investigating portable and mobile devices in an already off state, it is suggested that the battery is removed (if possible) and placed in an evidence bag to ensure that there will be no way of accidentally turning on the device once unplugged. The device should also be switched to airplane mode to avoid any further connections and communications. According to the NIST.SP.800-101r1—Guidelines on Mobile Forensics documentation, it should be noted that removing the battery can alter the contents in the volatile memory, even when in an off state.
Write blocking
Once our evidence has been properly documented and collected, we can begin working on acquiring the actual digital evidence. I'll mention this a couple times in an effort to drive home the point, but the original evidence should only be used to create forensic copies or images, which will be discussed further on in this chapter and again in other chapters.
Working on the original evidence can, and usually will, modify the contents of the medium. For instance, booting a seized laptop into its native OS will allow data to be written to the hard drive and may also erase and modify the contents contained in RAM and the paging file.
To prevent this from happening, the use of a write blocker must be employed. Write blockers, as the name suggests, prevent data from being written to the evidence media. Write blockers can be found in both hardware and software types. If a hardware write blocker is not available, software versions are readily available as standalone features in forensic operating systems, including C.A.I.N.E, as mentioned in Chapter 1, Introduction to Digital Forensics, and also as a part of some commercial and open source tools, such as EnCase and Autopsy.
Again, it is of high importance that a write blocker is used in investigations to protect and preserve the original evidence from being modified. It is also important that you test hardware and software write blockers to ensure that they are functional and do not lead to the compromise of the evidence. The following image shows a cost-effective and efficient portable SATA and IDE adapter with write-blocking switches, used in drive acquisition and recovery:

Figure 4.7 – Portable Coolgear Write Blocker
Be sure to choose a write blocker based on functionality, not just cost.
Data imaging and hashing
Imaging refers to the exact copying of data either as a file, folder, partition, or entire storage media or drive. When doing a regular copy of files and folders, not all files may be copied due to their attributes being set to the system or even hidden. To prevent files from being left out, we perform a special type of copy where every bit is copied or imaged exactly as it is on the current medium as if taking a picture or snapshot of the data.
Creating a copy of each bit of data exactly is referred to as creating a physical image. Performing a bit-stream copy ensures the integrity of the copy. To further prove this, a hash of the original evidence and the physical image are calculated and compared. A hash can be compared to a digital fingerprint of the data whereby an algorithm such as MD5, SHA1, SHA-256, or even SHA-512 can be run against the evidence data to produce a unique output. If one bit changes in the evidence and the hash is again calculated, the output string of characters drastically changes. Hashes are used to verify that the evidence was not tampered with or modified after the evidence was acquired.
Tip:
The original evidence should only be handled by qualified and authorized professionals and should also only be used to create forensically sound physical images. The original evidence should otherwise never be used as this compromises the integrity of the investigation.
Message Digest hash
Hash values are produced by specific algorithms and are used to verify the integrity of the evidence by proving that the data was not modified. Hash values can be thought of as digital fingerprints in that they are unique and play a major role in the identification of evidence and physical images.
One such algorithm, although older and containing vulnerabilities, is the Message Digest (MD5) cryptographic hashing algorithm, which produces a 128-bit hexadecimal output value.
For a working example, let's open a browser and head over to http://passwordsgenerator.net/md5-hash-generator/.
This site creates hashes of words and sentences as strings. For this example, I've entered the string Digital Forensics with Kali Linux. The MD5 value, which was automatically calculated, was displayed as 7E9506C4D9DD85220FB3DF671F09DA35, as in the following screenshot:

Figure 4.8 – Hash calculation of a text phrase
By removing the K from the Kali in the same string, which now reads as Digital Forensics with ali Linux, the MD5 now reads 7A4C7AA85B114E91F247779D6A0B3022, as in the following screenshot:
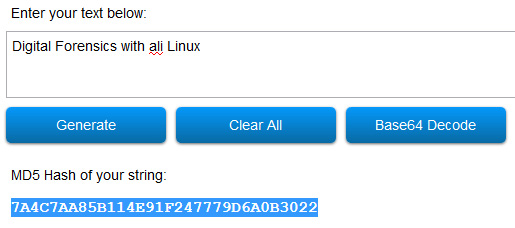
Figure 4.9 – Changes in hash output
As a quick comparison, we can see that just removing K from Kali yields a noticeably different result.
I encourage you to try this yourself and perhaps add a comma or period to the string to further compare hash values.
Secure Hashing Algorithm (SHA)
Another cryptographic hash algorithm commonly used in forensics and also used in the next chapter is SHA1. The Secure Hashing Algorithm-1 (SHA1) is more secure than MD5 as it produces a 160-bit output instead of a 128-bit output as with MD5. Due to known collision attacks against both MD5 and SHA-1, the safer and more robust option for hashing is now the Secure Hashing Algorithm-2 (SHA-2).
SHA-2 is actually a group of hashes, not just one, as with SHA-1, with the most common bit-length being SHA-256, which produces a 256-bit output. The alternate bit-length algorithms of SHA-2 are SHA-224, SHA-384, and SHA-512.
The stronger the cryptographic algorithm used, the less chance of it being attacked or compromised. This means that the integrity of the evidence and physical images created remain intact, which will prove useful in forensic cases and expert testimony.
More on creating hashes will be demonstrated in Chapter 5, Evidence Acquisition and Preservation with dc3dd and Guymager.
Device and data acquisition guidelines and best practices
While I've tried to give you a general and summarized overview of the procedures when collecting and preserving evidence, there are several official documents that I highly recommend you read and become familiar with, as they all give good details and guidelines on the documentation of the scene, evidence collection, and data acquisition.
SWGDE Best Practices for Digital Evidence Collection, Version 1.0, published in July 2018, outlines the best practices for computer forensics in the following areas:
- Evidence collection and handling
- Documentation
The full SWGDE best practices for computer forensics document can be downloaded from https://www.swgde.org/documents/Current%20Documents/SWGDE%20Best%20Practices%20for%20Digital%20Evidence%20Collection.
The SWGDE Best Practices for Computer Forensics Acquisitions document, version 1.0, released in April 2018, provides guidelines on evidence collection and acquisition, types of acquisitions, verification, and documentation.
This document is only 11 pages long and can be downloaded from https://www.swgde.org/documents/Current%20Documents/SWGDE%20Best%20Practices%20for%20Computer%20Forensic%20Acquisitions.
In July 2019, SWGDE also released the Best Practices for Mobile Device Evidence Collection & Preservation, Handling, and Acquisition document, detailing guidelines on scene documentation, iOS and Android preservation processes, extraction methods, and other topics for mobile evidence handling and acquisition.
The full eighteen-page document can be downloaded at https://www.swgde.org/documents/Current%20Documents/SWGDE%20Best%20Practices%20for%20Mobile%20Device%20Evidence%20Collection%20and%20Preservation,%20Handling,%20and%20Acquisition.
The NIST Guidelines on Mobile Device Forensics documentation, although older, is also another very useful document, which applies specifically to mobile devices. Revision one of this document, released in 2014, goes into great detail about the different aspects of mobile forensics investigations. Its content includes the following:
- Mobile and cellular characteristics
- Evaluation and documentation of the scene
- Device isolation and packaging
- Device and memory acquisition
- Examination, analysis, and reporting
The full document can be downloaded from http://nvlpubs.nist.gov/nistpubs/SpecialPublications/NIST.SP.800-101r1.pdf
Summary
If there was only one thing that I'd like you to take away from this chapter, it would be to remember that the original evidence, particularly hard drives, storage media, and RAM images, should only be used to create forensically sound bit-stream copies. The original evidence is never to be worked on.
To recap, when a breach is reported there should be an established first responder who, as per protocol, performs the tasks of documenting and securing the scene as well as collecting and preserving the evidence. The first responder should have a toolkit with various tools and items for the acquisition of evidence and, when handing over the evidence to other parties, ensure that the chain of custody is maintained.
We also had a look at the various procedures and best practices when investigating devices that are powered on and powered off, and also discussed the importance of using a write blocker to prevent the original evidence from being tampered with and then using a hashing tool for integrity verification purposes.
The best evidence rule of law is a legal term that states that the original evidence must be provided unless unavailable. Forensic acquisition may involve the acquisition of volatile and temporary data, such as data stored in RAM and the paging file, which are lost once power to the device is disrupted or lost. Forensic imaging and hashing of the volatile data provides a bit-by-bit or bit-stream copy of the evidence, which can then be submitted as evidence.
Admissibility of digital evidence can be a challenge also when best practices and official procedures are not adhered to in the data collection or storage and preservation phases.
You've come this far and I know it must have been a bit of an information overload, but now we can get to the practical section of this book where we can begin our investigation using digital forensics tools in Kali Linux. We'll continue our journey by using two tools called DC3DD and Guymager to perform forensic acquisitions (imaging) of evidence drives. Let's go!