After you have taken a few good photos and edited them, you are ready to use your photos in digital photo projects. One of the most exciting aspects of digital photography is that you can easily share and enjoy your digital photos in so many ways. You can attach one or more photos to e-mail, create slideshows to show on your computer screen or even on a TV screen, publish online photo galleries, create digital photo albums, make collages, and more.
Software products that enable you to easily manage large digital photo collections are called image managers, and there are a number of good ones available. One of the more powerful and easy-to-use image managers is Cerious Software's ThumbsPlus, which you can download from www.cerious.com.
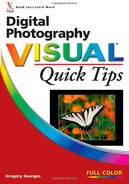
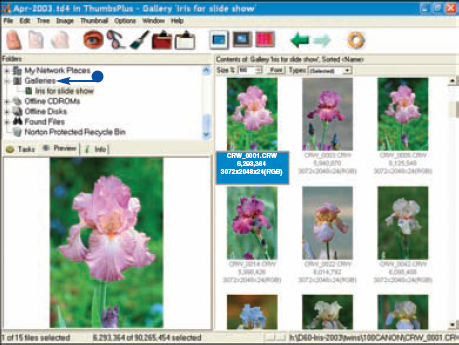
After you pick one or more folders or a drive to manage, ThumbsPlus automatically creates thumbnail images for every digital photo file in the selected folders or drives. In addition to viewing the images quickly by looking at the thumbnails, you can also view a variety of textual information, such as the EXIF data that image files may contain.
VIEW IMAGES AND IMAGE INFORMATION
• The Preview and Info tabs display details about the selected image or images.
• Thumbnail images display user-selected information below.
The user-selected information shows camera settings such as f-stop, shutter speed, ISO, and focal length.

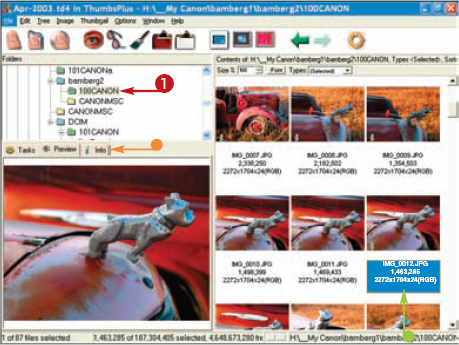
The Properties dialog box appears.
The EXIF data appears.

ANNOTATE AN IMAGE
The Properties dialog box appears.
Your annotation is saved with the image's information.
Tip
Did You Know?
ThumbsPlus offers many features for viewing digital photos. Besides being able to scale the thumbnails and view more or fewer of them at a time, you can also choose a list or report view, which you can customize to show just the textual information that you want. You can also open more than one copy of ThumbsPlus at a time. This enables you to drag and drop photos from one folder to another while viewing the contents of more than one folder.
Many software vendors who initially created image managers have realized the value of adding features that not only increase your ability to organize and manage your digital photo collection, but also take advantage of a considerable number of project features such as slideshows, Web galleries, contact sheets, printed image catalogs, and much more.
A few of the more feature-rich and easy-to-use image managers with useful project features are the following: ACDSee (www.acdsystems.com), Adobe Photoshop Elements (www.adobe.com), Apple iPhoto (www.apple.com), Cerious Software ThumbsPlus (www.cerious.com), Corel Paint Shop Pro (www.corel.com), Ulead PhotoImpact (www.ulead.com).
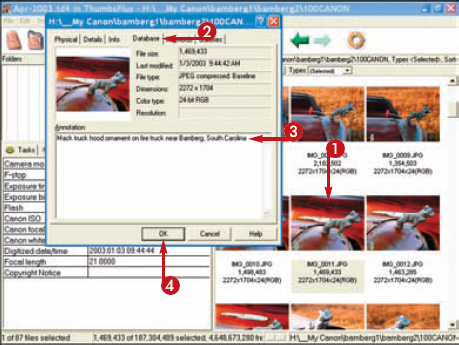
SEARCH FOR FILES BY NAME
The Find Files dialog box appears.
ThumbsPlus searches for matching files and displays the thumbnails of the files that it finds.
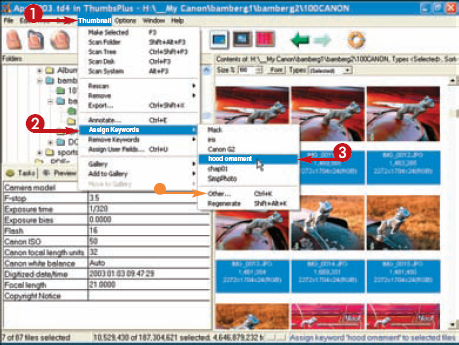
ASSIGN A KEYWORD FOR SEARCH QUERIES
• Alternatively, you can click Other and add other keyword choices.
The keywords are written to the ThumbsPlus database.
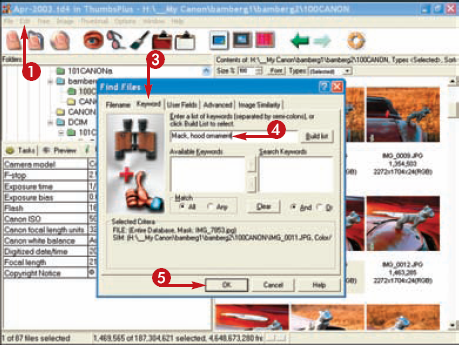
FIND AN IMAGE CONTAINING KEYWORDS
The Find Files dialog box appears.
A window displays all images with the selected keywords.
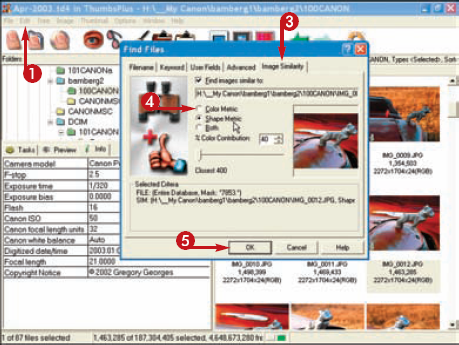
FIND A SIMILARLOOKING IMAGE
The Find Files dialog box appears.
ThumbsPlus displays a folder with images similar to the one that was initially selected.
One of the greatest challenges in organizing your digital photos is to manage images that are stored on multiple drives, on networks, and on removable media — and to have all the images accessible at the same time. Using ThumbsPlus, you can manage images on multiple drives on one PC or one or more drives on some networks.
You can also create thumbnail images and build ThumbsPlus database information on digital photos stored on removable media and external drives. When you remove an external drive, the thumbnails and database information remain inside the Offline Disks folder.
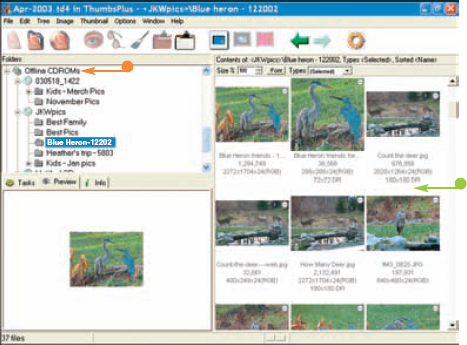
VIEW FILES IN OFFLINE STORAGE CREATE A WEB PAGE OF SELECTED IMAGES
After creating thumbnails for removable media such as a CD-ROM, ThumbsPlus saves the thumbnails and associated information in an offline CD-ROMs folder.
You can view thumbnails for offline media without inserting the media in a drive.
Galleries are logical containers that contain thumbnails stored in a database, but not the full images themselves.
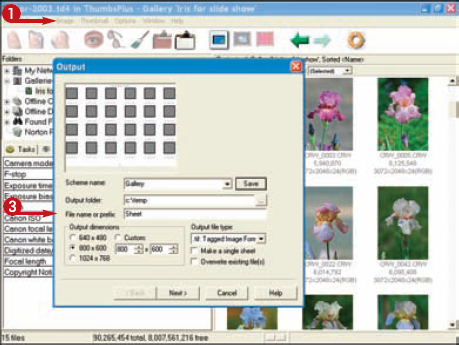
CREATE A WEB PAGE OF SELECTED IMAGES
An easy-to-use wizard appears, which enables you to customize a Web page to suit your needs.
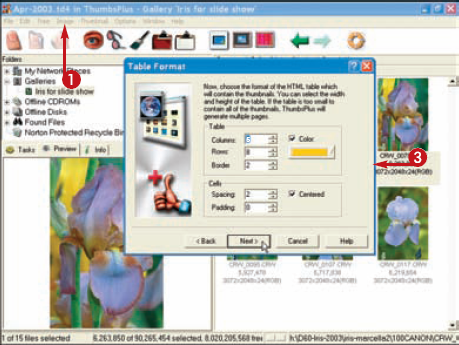
CREATE A CONTACT SHEET
An easy-to-use wizard appears, which enables you to customize the contact sheet's size and layout to suit your needs.
Tip
Did You Know?
ThumbsPlus's Gallery feature enables you to save disk space while being able to view thumbnails of the same digital photo in multiple folders. For example, you can save all the digital photos from a trip to Europe in a single folder. You can then create separate gallery folders for landscapes, cities, seascapes, and castles. By right-clicking a group of landscape photos in the Europe folder, you can add them to the landscape gallery.
IMs allow a much more interactive way to communicate than the slower e-mail. You can also create a chat room where you can invite multiple people to join in the chat. Besides messaging capability, many of the more popular IMs have features that enable you to send a file, which means that you can easily send digital photo files.
Sharing your digital photos while chatting about them is a wonderful way not only to share your photos with others, but also for you to get feedback.
Although AOL's Instant Messenger is one of the more popular IMs, you can use other versions like ICQ (www.icq.com) and MSN Messenger (www.microsoft.com).

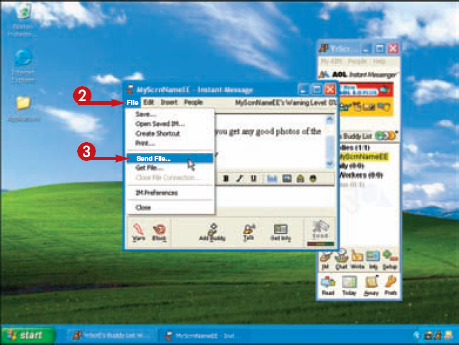
The Send File dialog box appears.
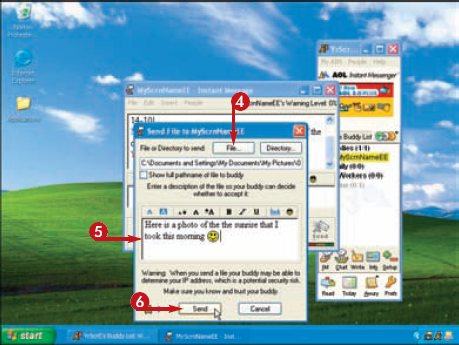
• The AOL Instant Message text window shows that the digital photo was sent.

Tip
Did You Know?
AOL Instant Messenger is available for those that have paid for and have subscribed to the AOL service. Plus, AOL offers a free version that is available to non-AOL subscribers. You can download the free version from the AOL Web site (www.aim.com). After downloading the software, you can install it, register a screen name, and be chatting within a few minutes.
Occasionally, a hard drive fails. The older your hard drive is, the more likely it is to fail. To avoid losing all or part of your digital photo collection, you should keep your photos well organized with an image manager and have a procedure in place for periodically archiving, or copying, them to another hard drive or to removable media such as a CD or DVD.
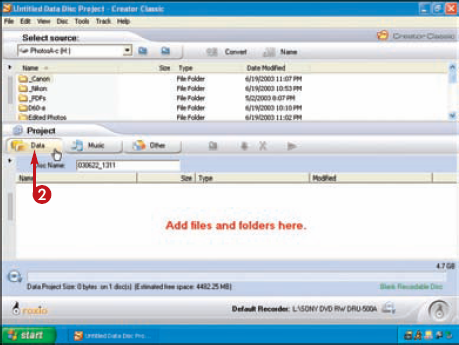
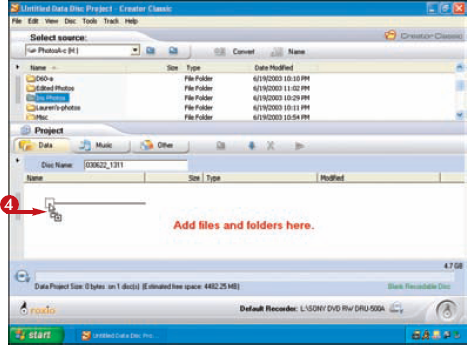
One of the easiest and safest ways to archive your digital photos is to burn, or write, them to a DVD. To do that you need a DVD burner — a DVD drive that both reads and writes DVD discs — and you will need software to manage the process. One excellent software product for archiving digital photos to a DVD is Roxio Easy CD & DVD Creator. It is a feature-rich product that enables you to easily archive just a few files or many files that require multiple DVD discs. It also comes with software for printing disc labels and jewel and DVD case inserts.

Tip
Did You Know?
A DVD holds 4.7GB of digital photos or slightly more than seven CDs. Using a 3-megapixel camera to shoot in the RAW format, you can archive around 1,500 digital photos or the equivalent of about 40 rolls of 36-exposure film on a single DVD.
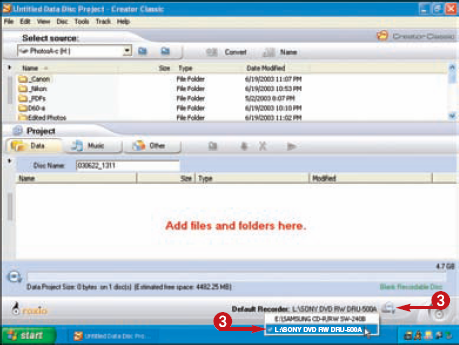
When choosing a DVD burner and DVD discs, you must be careful to choose the right format. What is the right format? Unfortunately, drive and media manufacturers are engaged in a standards war, so there are multiple competing formats in the marketplace. Some of the more common formats include DVD-R, DVD+R, DVD-RW, and DVD+RW; then there are also DVD-Video and DVD-RAM.
When choosing a format to archive your digital photographs, you may want to make sure that you choose a drive that allows you to write digital video slideshows to view on your computer or TV screen. Several manufacturers are making the choice easier by offering DVD burners that can write in multiple formats.
Even though there are competing DVD formats, there is not a good reason not to buy a DVD burner for archiving your digital photographs. DVD burners are currently one of the best ways to archive your digital photos for safekeeping.
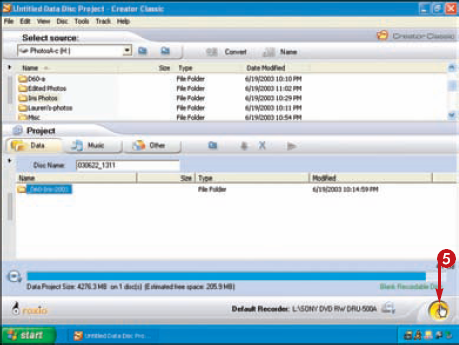
• The Disc Info bar shows how many discs are needed and the available space.
Note: Large digital photo collections may need to be archived to more than one disk.
• You can click a folder or file and then clicking the Remove from Project button to remove that folder or file from the list of items to be copied.

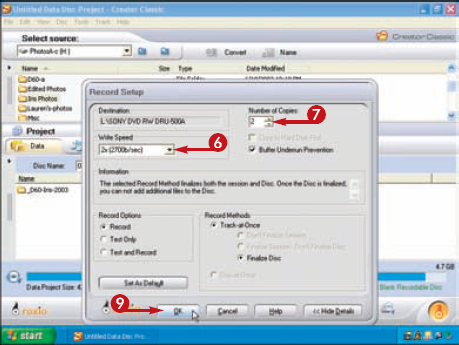
The Record Setup dialog box appears.
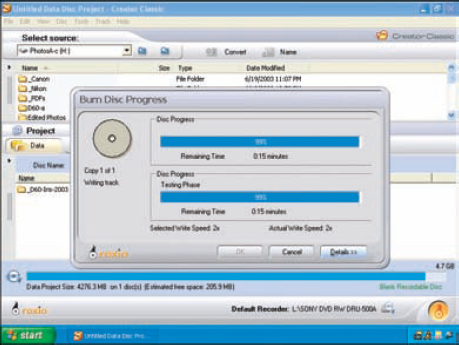
The Burn Disc Progress dialog box shows the percentage of completion and the estimated time to complete recording.
Tip
Did You Know?
DVD drives require firmware and a driver. If you are having problems with your DVD drive, you should check the vendor's Web site for new drivers or firmware. Vendors usually provide easy-to-follow instructions for downloading and installing both the drivers and firmware. When downloading the drivers, make sure to select the correct one for your operating system.
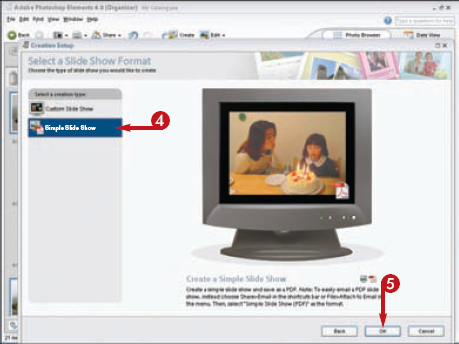
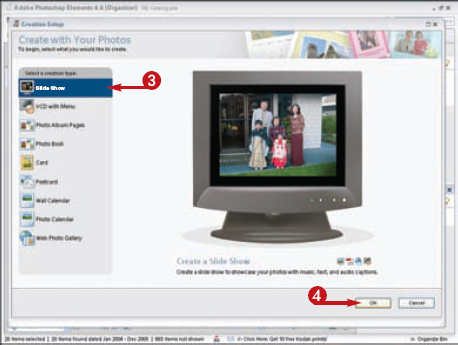
One of the more fun ways to share photos is to create and view them in a slideshow on a computer screen. You can use many applications to create slideshows. Adobe Photoshop Elements enables you to quickly and easily create a PDF slideshow. A PDF (portable document format) is a special file that can be read only using Adobe Acrobat or the free Adobe Acrobat Reader. You can view PDF files on just about all computers, including PCs and Macintoshes. So, you can create a slideshow using a PC or Mac and share it with anyone, no matter what computer he or she is using.
After you have created a PDF slideshow, all the photos and the settings that you selected for playback are contained in a single file. One of the significant advantages of sharing your digital photos in PDF format is that there are a number of useful features built into Acrobat Reader that allow the images to be exported, edited, printed, and so on.
The Creation Setup dialog box appears.
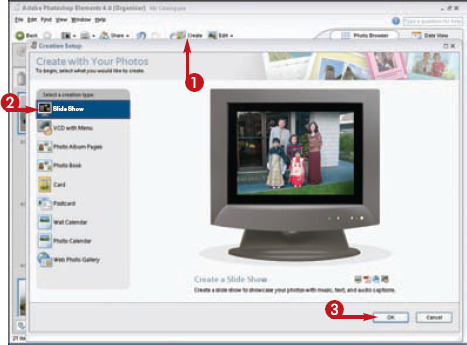
The Select a Slide Show Format page appears.
The Simple Slide Show dialog box appears.
The Add Photos dialog box appears.
You are returned to the Simple Slide Show dialog box.
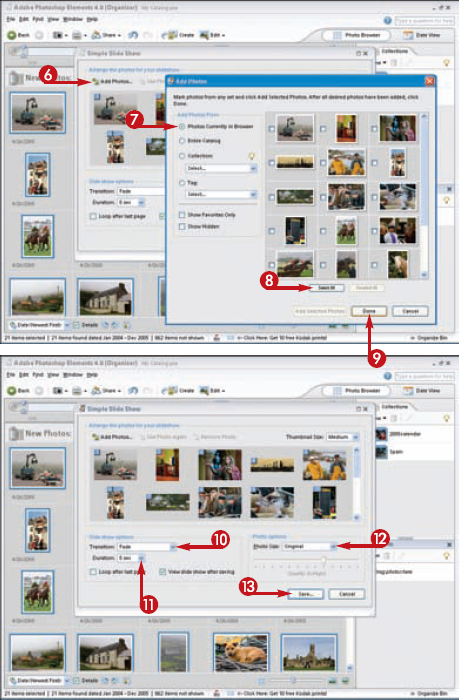
The slideshow is generated and displayed in Adobe Acrobat.
Note: The slideshow is now ready to be played or e-mailed.
Tip
Did You Know?
To view Acrobat slideshows created with Adobe Photoshop Elements, you need a copy of Adobe Acrobat or the free Acrobat Reader. You can download a free copy of Adobe Acrobat Reader at www.adobe.com/products/acrobat/readermain.html. When using Acrobat Reader, you can easily export pictures, export and edit pictures, print pictures, order prints online, and order photo objects online by simply clicking the Picture Tasks button in Acrobat Reader.
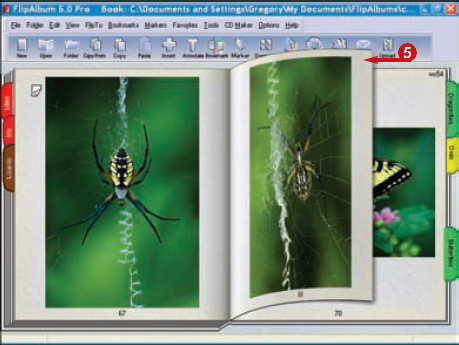
You can create the digital equivalent of a photo album with realistic flipping pages with one of E-Book Systems's FlipAlbum products, available at www.flipalbum.com. You can choose from multiple versions of FlipAlbum. FlipAlbum Standard automatically organizes your photos into realistic page-flipping albums that you can view on a PC and share on the Internet. FlipAlbum Suite has extra features that enable you to share your albums on CDs or to play them on some DVD players. FlipAlbum Pro offers all the features of the other two products plus a few more features, including a CD password option, image encryption, watermark capabilities, and a print lock feature to control how images are printed.
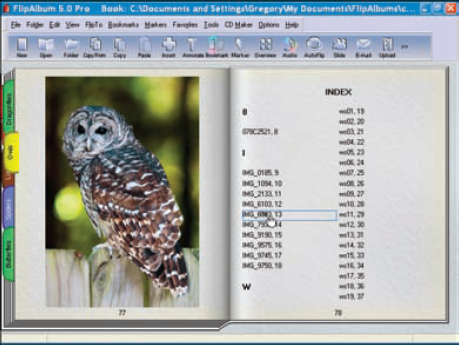
When you create an album, FlipAlbum automatically creates a front and back cover, thumbnail image pages to be used as a table of contents, and an index.
The Open Folder dialog box appears.
FlipAlbum automatically creates a flip album based on the default settings.
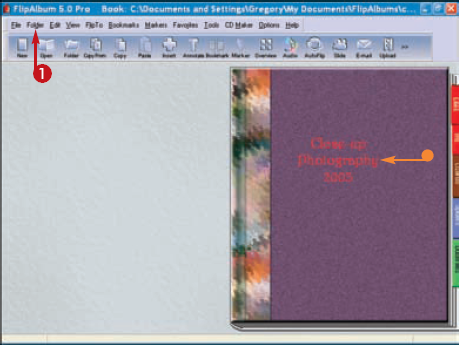
• You can add cover title text with the Annotations tool.
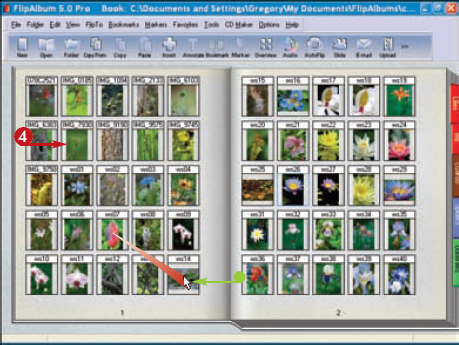
Thumbnails are automatically generated and placed at the front of the album.
• To change the viewing order of the images, you can click and drag and drop the thumbnails.
To add a tab, you can right-click the selected page, click Bookmarks
FlipAlbum automatically creates clickable indexes at the end of each album when a folder is opened.
Tip
Did You Know?
You can further customize a FlipAlbum by selecting a different cover style or by choosing your own cover color, cover image, texture, and binding. You can also choose the color and texture of the pages, the margins, and how the pages "flip." You can add background music and set the entire album to flip automatically. You can add text to each page in the font style and color of your choice, and you can add even add a link to a specified Web page.
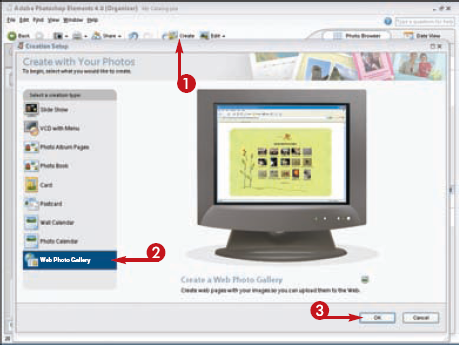
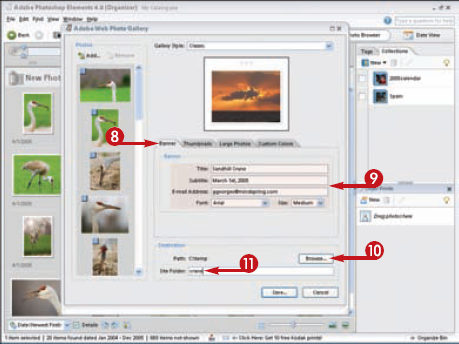
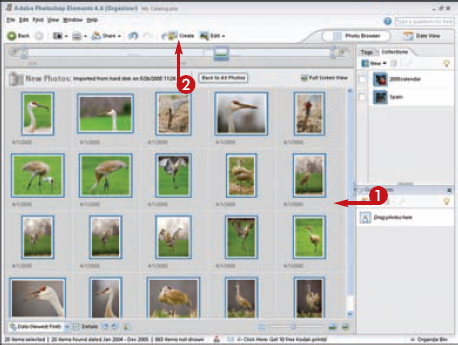
If you want to make your photos available to anyone in the world who has a computer and a connection to the Internet, you can create an online photo gallery. To create an online photo gallery, you typically need digital photos sized and optimized for use on the Internet, thumbnail photos sized and optimized for use on the Internet, and HTML-based pages (Web pages) with links to the digital photos, thumbnails, and HTML pages. Creating all of this without a tool such as Adobe Photoshop Elements is a tedious and time-consuming process. Using the Adobe Photoshop Elements Web Photo Gallery feature, you can have your online gallery up and running in just a few minutes. Before you run the Web Photo Gallery feature, you should first prepare your digital photos and create a folder in which to put all the images. You should then select these images in Elements Organizer.
CREATE A WEB GALLERY
The Creation Setup dialog box appears.
The Adobe Web Photo Gallery dialog box appears.
The Add Photos dialog box appears.
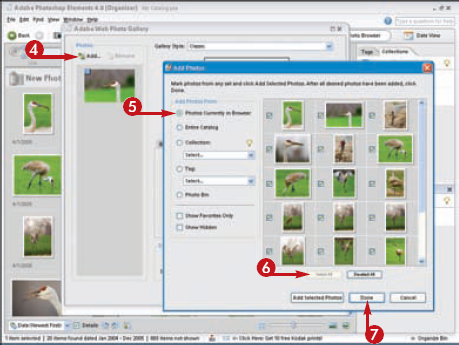
You are returned to the Adobe Web Photo Gallery dialog box.

Tip
Did You Know?
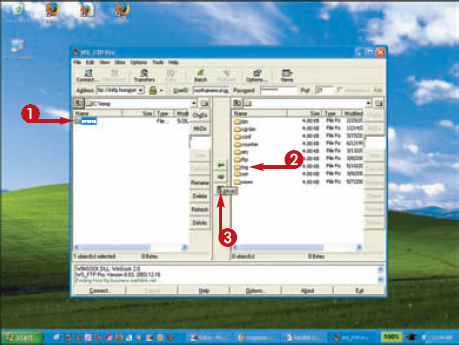
Most Internet service providers offer you 10MB or more of personal Web space that you can use for your digital photo gallery. Check with your service provider to learn more about the file transfer tools that it offers and how to upload your digital photo gallery. Often, you can find this information on your Internet service provider's Web pages.
Many photographers worry about having their digital photos being stolen from online photo galleries and used without payment or permission. Although this is a reasonable concern because it does happen, small digital photo files are not all that useful for most commercial purposes. If you keep all your posted images small, with the maximum size of less than 400 pixels, you are not likely to suffer any great loss.
You can take steps to prevent an image from being copied, or you can add a copyright or watermark to online images so that they can be tracked and identified. However, the effort that it takes to add this extra protection is generally not worth it because there are ways around each different approach. If you have good reasons for not wanting your digital photos copied, you should not post them to a Web page on the Internet.
• You can also add a caption and the date.

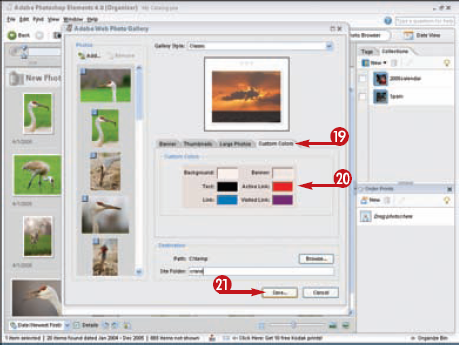
Elements begins the automatic generation of the Web pages, thumbnails, and any image resizing that is required.
VIEW THE WEB GALLERY
Your Web gallery appears like this when using Microsoft Internet Explorer.

TRANSFER THE FILES
To upload the folders, images, and HTML pages to the Internet, you need to use file transfer software such as CuteFTP.
Your files are uploaded.
Tip
Did You Know?
You can change the graphics and the layout of any of the more than 30 preset Web page styles that are supplied with Adobe Photoshop Elements. You can find a separate folder in the Photoshop Elements 4.0shared_assetswebcontactssheet folder for each of the styles. To modify a style, first copy the contents of the folder containing the style that you want to a new folder with a different name. Then edit or replace the images or modify the HTML code with an HTML editor.
People create slideshows for many reasons. Maybe you have just returned from an overseas trip with lots of great photos, and you want to share them with friends and family. Or maybe you have dozens of flower or antique car photos that you would like to share. Whatever the reason, there are many ways to both create and present slideshows.
One of the most useful software products to use to create slideshows on CDs and DVDs is Adobe Photoshop Elements.
Using the Photoshop Elements Slide Show Editor, you can create slideshows that you can view on a computer screen or on a TV that is connected to a DVD player if you have used an appropriate disc format.
An advantage of using a DVD player and a TV for viewing your slideshows is that you can control each slide with the DVD player control, which enables you to go forward or backward, or go to a main menu to select another slideshow.
The Creations Setup dialog box appears.
The Select a Slide Show Format page appears.

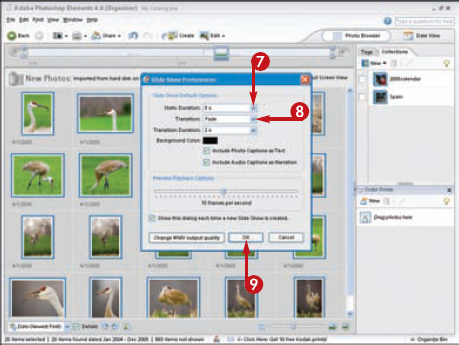
The Slide Show Preferences dialog box appears.
Tip
Did You Know?
Video CDs (VCDs) are CD-recordable discs containing audio, video, and still images. Super video CDs (SVCDs) offer better image and sound quality than VCDs. A DVD is a DVD-recordable disc that can be played in most standalone DVD players and computer DVD-ROM drives. The DVD format holds the most content and has the highest image quality.
Just because CD burners, DVD burners, and set-top DVD players are an evolving technology, there is no reason why you should not enjoy the benefits of this new technology now. Carefully check documentation and consult knowledgeable sales staff when purchasing new hardware and media and read the documentation that came with products you already have.
Each of the many types of discs and file formats has advantages and disadvantages. If you have only a CD burner, it is possible that you can use it to create a VCD or SVCD featuring a photo slideshow that can be viewed on a computer with a CD-ROM reader or on a newer DVD player.
To output a DVD slideshow, you must have a DVD burner and DVD-recordable discs (DVD-R/RWs or DVD+R/RWs). For a VCD or SVCD slideshow, you will need a CD burner and CD-R/RWs. Picking the right disc for the CD or DVD reader or set-top DVD player is as easy as reading the manuals or checking with the vendor.
The Slide Show Editor appears with the photos that were loaded from Organizer.

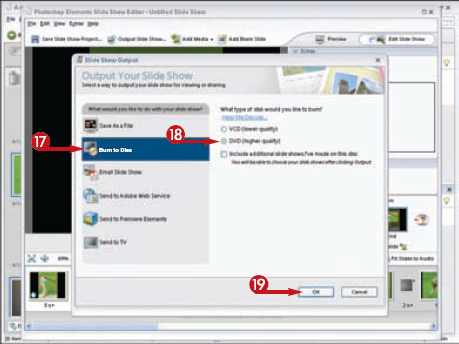
The Slide Show Output dialog box appears.
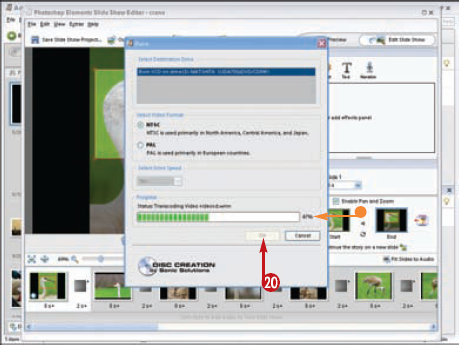
The Burn dialog box appears.
• The burn-to-DVD process begins, and a status bar indicates the percentage that is completed.
After the disc has been burned, it will eject and be ready to be played in a DVD player.
Tip
Did You Know?
When you create a video slideshow using Adobe Photoshop Elements Slide Show Editor, you can add digital video clips, music, and multiple slideshows. You can also create your own title screen with selectable menu options similar to those generally found in commercially produced DVD movies; this enables you to have more than one slideshow on a DVD.
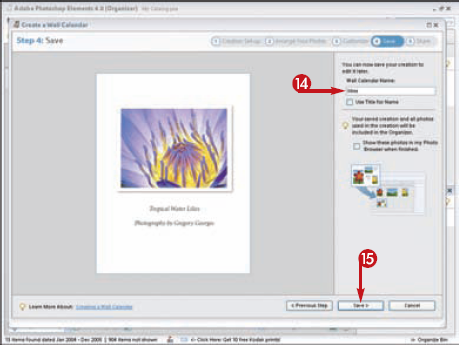
Everyone needs at least one calendar. Using Adobe Photoshop Elements, you can easily create calendars that display your photographs while providing 12 months' worth of calendar pages. Creating a calendar is as easy as following the steps in the Create a Wall Calendar Wizard. You have a choice of several different styles, including styles for both horizontal and vertical pages. If you choose to add captions below each photo, you can do so by adding the captions that you want to the image file.
After you have created your photo calendar, you can print it out on your own desktop photo printer, or you can use an online printing service.
Photo calendars make excellent gifts. The next time that you need to give a gift, consider making a photo calendar customized for the recipient using your photographs.
Note: You need 13 photos if you want to have an image on the cover.
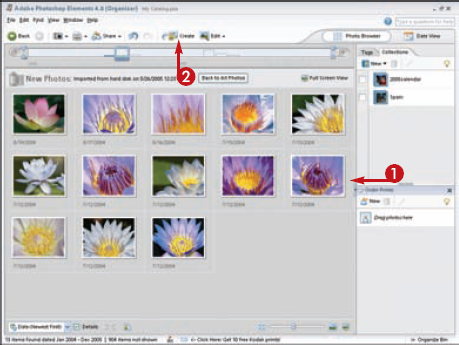
The Creation Setup dialog box appears.
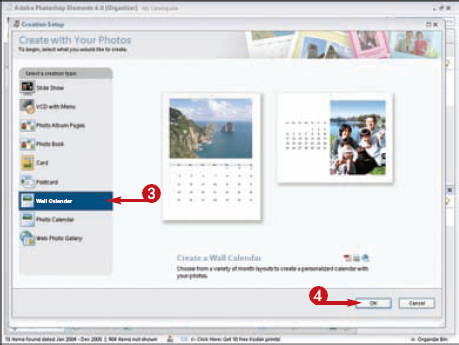
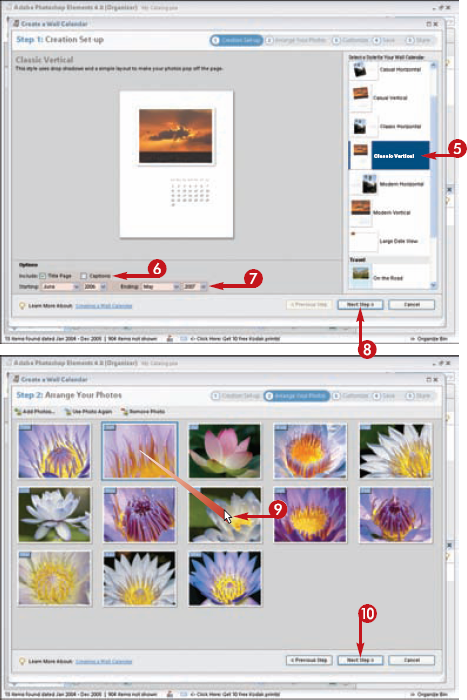
The Create a Wall Calendar Wizard appears.
The Step 2: Arrange Your Photos page appears.
Tip
Did You Know?
You can use other software products to create a photo calendar, including Microsoft Word. You can download several Microsoft Word style sheets from the Microsoft Web site at officeupdate.Microsoft.com/ templategallery. You can also download the Snapfish Photo Wizard at www.snapfish.com/photowizard and use the wizard to order prints online from Snapfish. Shutterfly (www.shutterfly.com) also offers a service for printing photo calendars.
Adobe Photoshop Elements enables you to create a wide variety of photo-based print projects. In addition to creating calendars, you can make greeting cards, photo albums, and much more with a simple click of a button. Adobe Photoshop Elements also enables you to retouch, crop, and resize photos. This relatively low-priced software even provides tools for sharing your favorite photos online, including built-in templates for creating a Web photo gallery.
You do not have to use Adobe Photoshop Elements to create your own photo calendars. Most imaging software vendors sell similar software, including Ulead Photo Explorer, Broderbund Calendar Creator, and Microsoft Picture It!. So now that you have taken, enhanced, and archived wonderful digital photos, you can invest in a calendar application and share them in a way that is not only fun but very practical.
The Step 3: Customize page appears.
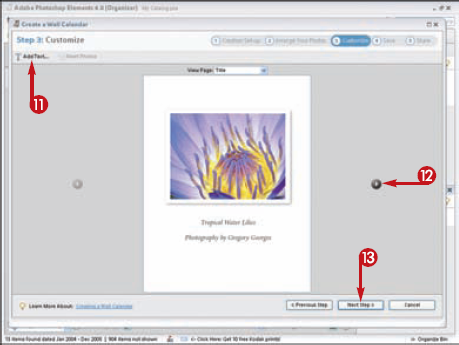
The Step 4: Save page appears.
The Step 5: Share page appears.
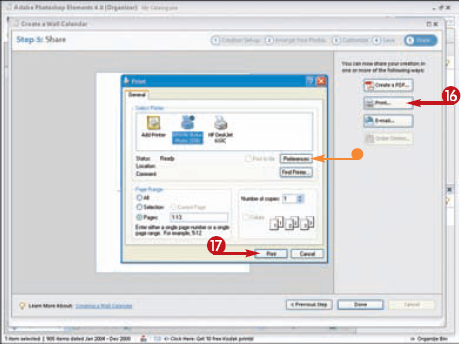
The Print dialog box appears.
• You can click Preferences to choose any additional settings that are appropriate for your printer.
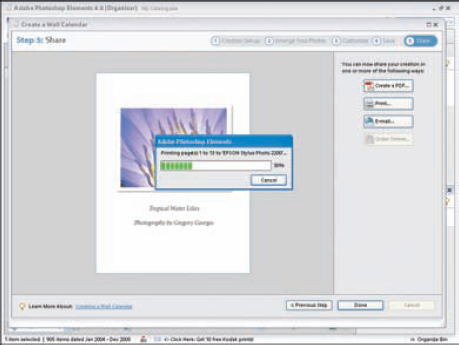
Your calendar begins to print.
Tip
Did You Know?
You can create a PDF file instead of printing the calendar. In the Step 5: Share part of the Create a Wall Calendar Wizard, click Create a PDF. Then you can select settings to optimize the file for viewing onscreen, for printing, or for full resolution. This is a nice feature if you want to create a calendar, add events to it using Adobe Acrobat, and share it. If you use the Optimize for Printing setting, you can add dates and then provide the file on a CD.
The next time that you need a greeting card, you can make your own personalized card especially for the recipient using one or more of your photos. As you work through each step of the Create a Card Wizard, your steps are automatically saved in a file so that you can quickly make another copy or modify an existing card to create a new one.
One of the strengths of Adobe Photoshop Elements is that the product is designed so that you can download new templates or styles for many of the creation types when they become available. You can also use various online services such as MyPublisher print services and Shutterfly. After you have signed up for one of these services, you can use them as quickly as you can complete your digital photo projects. To see if new services are available, click Edit
The Creation Setup dialog box appears.
The Create a Card Wizard appears.

The Step 2: Arrange Your Photos page appears.
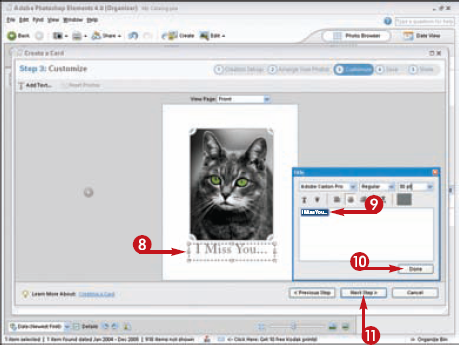
The Step 3: Customize page appears.
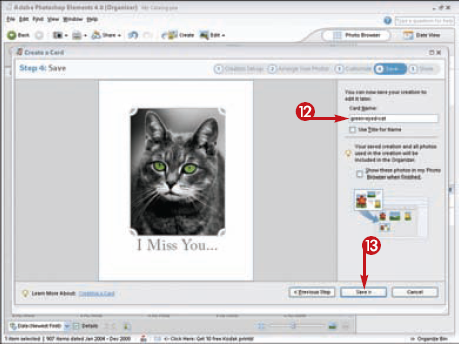
The Step 4: Save page appears.
The greeting card project is saved to your hard drive.
The Step 5: Share page appears.
The Print dialog box appears.
• You can click Preferences to choose any additional settings that are appropriate for your printer.
Your card begins to print.

Tip
Did You Know?
The Adobe Photoshop Elements Create a Card Wizard makes it easy for you to print greeting cards with your own desktop printer. You can also publish cards as a PDF file or as an attachment for e-mail; plus, you can save the card to a CD or order the card to be printed professionally from an online service vendor.
A popular thing to do with printed photographs is to cut them up and creatively place and glue them on a single board, making a photo collage. The collage technique is good for assembling a group of photos taken on a vacation, a family get-together, or a sporting event. However, the process of creating a collage in this manner takes some skill and lots of time.
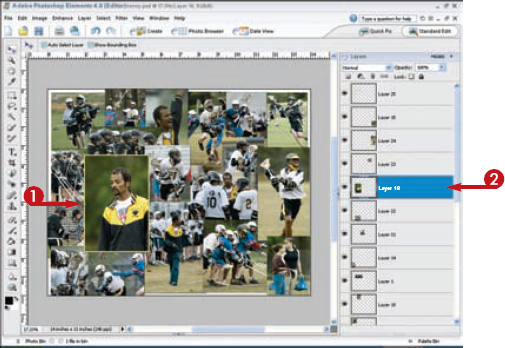
In sharp contrast, making a photomontage with Adobe Photoshop Elements is both easy and fun. Not only are all the photos printed on a single page, which is why it is called a photomontage instead of a collage, but the process enables you to size and easily crop each image as needed.
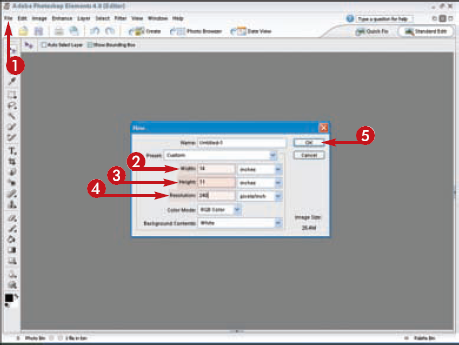
Before you begin placing the digital photos on a new blank document, you should first roughly size the photos so that you minimize the work that it takes to resize them as you place them. When you have resized each photo, you can begin the simple process of dragging, dropping, placing, and sizing each digital photo.
CREATE A PHOTO MONTAGE
The New dialog box appears.
The images appear in the new document window.

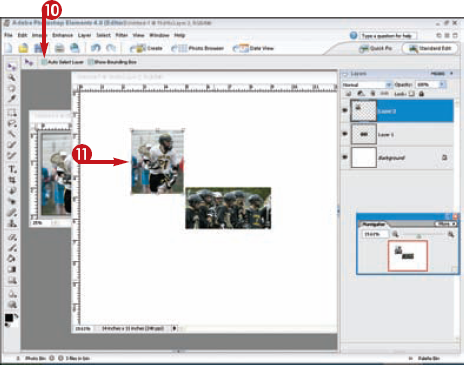
PLACE AN IMAGE IN FRONT OF ANOTHER
Tip
Did You Know?
When you have completed placing, sizing, and ordering all the images in a photomontage, you can easily add a shadow line to each photo to add depth to your work. Simply click each layer in the Layers palette and then click your choice of shadow from the Drop Shadows styles found in the Layer Styles palette.