
Appendix D
Assorted Tips and
Tricks
Regular Operating System Maintenance
Your Macintosh is a computer, and computers, like cats, tend to bite you when you refuse to pay attention to them. No matter how much buzz you hear about systems that never have to be shut down and that never fail, you just know that your experience will not be like that. You are correct—it won’t be, unless you regularly follow some maintenance procedures to make sure the computer is keeping its nose clean.
But what maintenance is proper and when should you do it? Apple’s own resources are relatively vague about the periodic maintenance techniques that will keep the whole system happy. Partially, this is because the Mac OS does many of the tasks. Mac OSX is built on a UNIX system that is programmed to clean up after itself periodically. That UNIX core gives it the ability to repair and maintain itself to a limited degree. It also hides many of the files that are doing a lot of the work, so that you can’t “see” them in the GUI (the graphical user interface, the “desktop” and windows you use) even if you could figure out what to do with them in the first place (the short answer is absolutely nothing). To make matters more confusing, OSX uses file permissions, essentially allowing only certain users access to certain files.
Is there anything you can to do to keep your system happy? Yes, you still have to do a regular maintenance routine to keep things in order. The good news is that this is very simple and that much of it can be automated, except in extreme situations. What follows is a good system to follow on a weekly basis to make your editor bulletproof, or at least easy to restore in case disaster strikes.
Repair Permissions
UNIX ushers in a whole new idea for old-school Mac users: permissions. With UNIX, all files and folders have access permissions determining whether a user can read and/or modify a file or folder. This is very secure and is one of the reasons that multiuser logins in OSX work. Unfortunately, this can be confusing for the user who is trying to clean up their system or improve performance. A “user” isn’t always your weird friend who accesses the same machine you do. In fact, the operating system itself is a user. A whole host of users and groups is acting in the background to make sure that any part of the system that needs access to any file or folder can get it when necessary.
Unfortunately for us, these permissions are largely transparent. When permissions are set incorrectly or are corrupt, the machine doesn’t die, it just gets weird. It may begin to operate very slowly. You may hear your hard drive start spinning at top speed when the machine is doing nothing. You may suddenly be locked out of hard drive directories or be unable to start certain applications, and then tomorrow have access to them again. Most importantly, your machine will slow down dramatically.
To avoid this, you should periodically repair permissions. Go to the Utilities folder in the Applications folder on your System drive. Locate and start up the Disk Utility application. On the left, select your Mac OSX system partition (where the System and the User folder are located), click the First Aid tab, and choose Repair Disk Permissions (see Figure D-1). You can repair permissions only on the partition you are booted from, and only if it is a true Mac OSX boot partition. After initiating a repair-permissions action, get some coffee, walk the dog—this process takes a long time (10 to 15 minutes, give or take). Repeat it until you are only getting the initial repair report that ends in “New permissions are
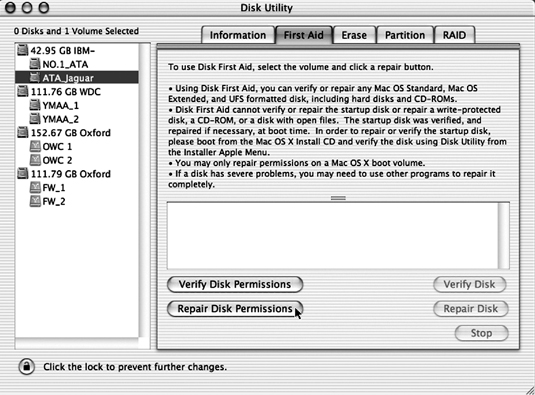
Figure D-1Disk Utility: First Aid tab
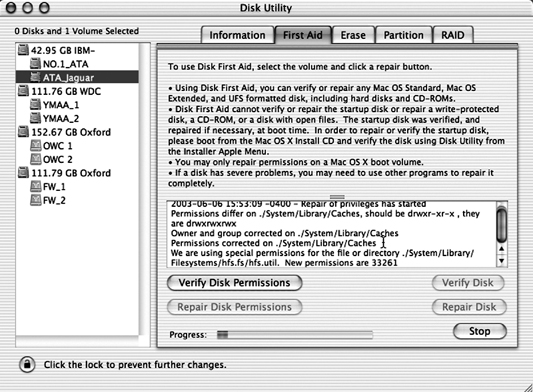
33261,” followed by the date (see Figure D-2); this will always appear, even if there is nothing wrong with the permissions on the partition.
Obviously, you can’t repair permissions on an OS 9—only or nonsystem partition, since permissions affected by this tool only exist on a Mac OSX partition. Although files on removable and other drives in your machine can have permissions, the repair-permissions action works only on Apple-installed or—configured files; it doesn’t touch files or folders it didn’t create, so you don’t have to worry about it messing up permissions of your personal stuff.
As a side note, it is a good idea to eliminate the option of permissions on extra media volumes you are using for storage rather than system/applications (don’t do this to any volume or partition that has a Mac OSX system installed—only to media and scratch disk volumes). You can easily accomplish this by selecting a volume or partition and hitting Command-I, for Get Info. Open the Ownership and Permissions tab, and look to the bottom for the “Ignore Ownership on this volume” check box. Check it, and now all files created there will always be read-and-write accessible to anyone. This is particularly important for Firewire hard drives that you may be using on several different systems with different users accessing the same media.
Repair permissions at least once a week if you use your machine a lot (more than 5 hours per day). You will likely see a tremendous speed boost the first time you do this, and that speed will stay consistent if you regularly repair them. It’s also a good idea to repair them anytime you install any applications, since apparently that’s frequently a time when permissions get misassigned. Either way, you cannot do damage repairing permissions, so once a week is a good idea.
Single User Mode
The way the Mac OSX file system works, you can’t run any sort of disk utility on a disk partition while booted up to that partition. If you open up Disk Utility, which we just used, your drives and partitions are listed on the left side of the window. If you select your Mac OSX boot partition from the list and then click the First Aid tab, you’ll see that the Verify Disk and Repair Disk buttons are grayed. Although you can use Verify Disk and Repair Disk for any partitions or volumes that are not the current boot partition, you can’t repair a partition you are running from. That makes fixing disk problems difficult, if not impossible, when you only have one boot partition with both OSX and OS 9 installed there. Booting from a CD to repair disks is so painfully slow with OSX that there must be a better way.
Of course there is. Apple allows you to enter a mode called Single User Mode. Restart your machine and as soon as you hear the “bong,” hold down the Command-S keys. Continue holding them down until you see some rather obnoxious-looking old ASCII text go streaming down the screen, and then release the keys. This text means the Macintosh is booted up outside the Mac OSX GUI and can directly perform file system repairs. Once you get to a cursor prompt (a solid white box that doesn’t blink), type in the following without quotes: “fsck –y” (note the blank space before the “ –y”). All this means in code is “File System Check; yes, repair any problems you find.” It will immediately start running through your boot partition, looking for and correcting any problems. This can take a while; the Mac OSX file system has tens of thousands of files.
When it is finished checking the disk, it will give you a one-line report. If it found problems, it will state, “Disk X has been modified.” If no problems were found, it will state, “Disk X appears to be OK.” If you get the “… modified” statement, run “fsck –y” again repeatedly until you get the “… OK” statement. I have seen this process take up to four times to repeat in a system with serious problems.
When you get the “… OK” message, type (without quotes) “Reboot –n” (see Figure D-3). This will restart your machine (the “–n” tells the system not to perform a certain memory operation) and return you to the User GUI you know and love. Perform this once a week or whenever you smell trouble. It can’t hurt you and it might help catch a problem before the problem catches you.

When Single User Mode Doesn’t Fix It
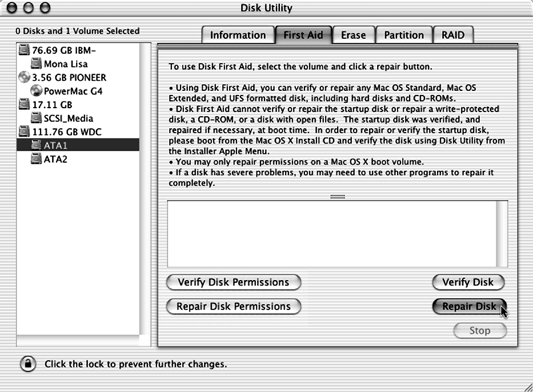
On rare occasions, your system may be so completely messed up that “fsck –y” won’t clear the problem even after repeated doses. In that case, get out your Mac OSX installer CD and boot up from it in the time-honored method of restarting and holding down the C key. When you have booted to the Apple CD, look under the Apple menu, and access the Run Disk Utility option. When Disk Utility opens, access the First Aid tab and run Repair Disk and Repair Disk Permissions for all volumes and partitions until they come clean (see Figure D-4). Then reboot and see if the problems have cleared up.
There have been rare instances where even running Repair Disk while booted from the Apple CD did not clear up serious problems. On such occasions, it may be necessary to invest in some form of third-party disk maintenance software. Alsoft’s DiskWarrior is a great example (see Figure D-5); it can rebuild a damaged disk directory that even Apple’s tools can’t correct. I have seen it pull both Mac OSX boot partitions and Firewire drive partitions back from the dead when no other software tools could rescue them.
Cleaning House
UNIX is unique in that it performs its own system maintenance on a regular basis without prompting. Although it isn’t going to fix any disk-related trouble for you, it does do things like dump temporary cache files and logs that can get bloated when the system doesn’t throw them out as it should. But there’s a catch, of course. UNIX only performs these activities in the wee hours of the morning (when it assumes all the IT people are home and no one needs the processor or the files it will be doctoring). There are daily, weekly, and monthly tasks that UNIX schedules for these early-morning hours.
Now, many folks, especially those from pre-OSX days, shut their systems down when they are finished working. Mac OS 9 liked a regular reboot anyway, and not everyone is willing to leave a machine on 24 hours a day. I’m not going to discuss those merits here; that’s your choice as a machine owner. But you have to know that the UNIX autocleaning isn’t going to happen if your machine is off or asleep.
There is a way to beat this. Although you could figure out the command-line code to perform these actions, it’s easier to find one of the nice shareware apps out there that give you a GUI to accomplish the same thing. Go to the Apple Web site and investigate the Mac OSX page for links to freeware and shareware applications that will perform these
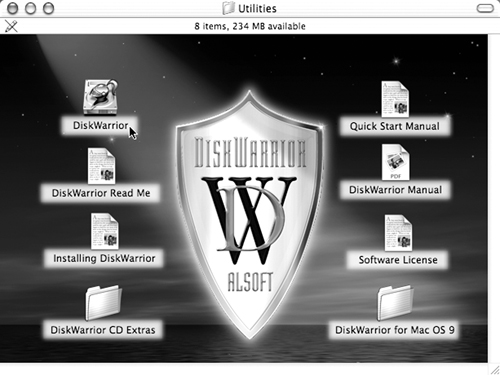
Figure D-5Alsoft’s DiskWarrior
actions for you. In particular, check out MacJanitor from Brian Hill Software, which gives a nice, simple push-button interface to perform each of these UNIX cleanup tasks whenever you feel like it (see Figure D-6). Basically, you can have MacJanitor initiate the UNIX cleanup scripts for you at the push of a button, rather than having to type in code or leave your machine on all the time. And MacJanitor, as of this writing, is free!
Another great tool to check out for regular maintenance is Cache Out X, from NoName Scriptware (see Figure D-7). It performs a bit of maintenance that MacJanitor leaves out. Mac OSX, in normal operation, creates many different “temp” files. These files are intended to be in existence only for the short time they are in use; thus, they are “temp,” or temporary. However, sometimes the applications that create them forget to delete them after they are no longer useful. This can lead to unexplainable missing disk space and even constant crashing. Because temp and cache files are often invisible, there is no easy way to find them and delete them.
Applications like Cache Out X (and there are a few others, though not all of them are completely free), simply delete all cache files they find. Generally this requires a restart of the Macintosh, because they also clear out cache and temp files for the operating system itself. This doesn’t hurt your system; it may help it in fact, because it can catch and delete corrupt temp files before they become a problem to your system.


Figure D-7NoName Scriptware’s Cache Out X
Backing Up Your System
Gone are the days of the easily copied System folder. In the previous Mac OS 9, you could back up your system with a single drag-and-drop of a folder. You could create a bootable backup CD by dragging one group of folders into Toast. Mac OSX, on the other hand, has many little invisible files and structures that don’t copy over when you drag a volume’s contents. This means you can back up normal data with no problems, but you can’t just duplicate your drive by dragging and dropping it.
There is, thankfully, at least one way to safely back up a partition these days, and it’s one of the coolest shareware applications out there today: Carbon Copy Cloner (see Figure D-8). This application, created by Mike Bombich, clones one partition onto another partition. The clone carries all those invisible files and makes a perfect duplicate of the original partition that is even bootable (although most of your System Preferences get reset; they will need to be visited again when you boot to that cloned partition). It’s very handy; you will use it more than once if you try it. If you download this software, pay the man. We have saved many gray hairs with this simple GUI application.
Here’s the method you can use for a regular, bulletproof backup. First, run all the previously described maintenance routines, such as repairing permissions and entering Single User Mode. You don’t want to clone a start-up partition that has problems! Then, get a small, cheap, dedicated Firewire hard drive and hook it up to your system. Use it with Carbon Copy Cloner for a regular, portable high-speed backup. In the Carbon Copy Cloner Preferences, you can even set the application to schedule this cloning to occur when you are sleeping and to perform sync actions that don’t overwrite data you want to keep continuous on your backup drive.
Do this process once a week. If your system ever goes south at a bad time, you can just boot to the backup Firewire drive and get your work done until you can take the time to run Repair Disk and Single User Mode and let them do their jobs. This has allowed me to

Figure D-8Bombich Software’s Carbon Copy Cloner
hit deadlines with work when one of my machines decided to behave badly at a clutch moment.
If you have several systems, as I do, you can partition this backup Firewire drive such that there is a different backup partition for each computer. When you want to back up a particular computer, plug the Firewire drive in to mount the partitions, start up Carbon Copy Cloner, and set it to clone to the partition that you dedicate to that computer. Since you are cloning to one of several partitions on the drive, you won’t affect the other backup partitions. This is a good regimen; it will keep downtime to a minimum even if you do run into problems.
Conclusion
This is not the absolute last word in Mac maintenance, but it’s enough to keep your system in good working order and at its best performance level. Do these things consistently and regularly, and even if you do rarely run into problems, at least they won’t keep you from working. Schedule your maintenance so that it happens while you are sleeping or otherwise occupied, so that you don’t waste half your workday doing something the machine can do by itself just as well. You want to keep the thing working without sacrificing editing time, so be realistic, schedule your maintenance, and then actually do it.
Backing Up to CD-Rs
All new Macintoshes ship with either a CD or DVD burner. You can use a single CD-R optical disk to back up in excess of 600 copies of your project. The bonus is that CDs are far cheaper and more reliable than floppy, Zip, and other removable disks as long as you don’t scratch the shiny side. You can use either the Apple Disk Copy application in your Utilities folder or a third-party application such as Roxio’s Toast to burn the folder holding the project file. Although Toast costs a little extra, you will find that it is very useful for other functionality, such as burning video CD and DVD disks, as well as audio CDs and data disks.
Regardless of which you choose, simply change the name of the project folder on your Desktop to the date and time each time you burn a copy of it. After doing this a couple of times per edit session, you will end up with an imperishable copy of your project as it was at every stage of your edit. If you need to return to your project at any stage of its development, you can simply pop the CD in, grab the appropriate folder, and launch it. This method, combined with the Autosave Vault feature addressed in the Preferences, is the best way to work for those who don’t want to have to redo entire projects after an accident.
Using Apple Disk Copy
To burn a copy of this project folder using Disk Copy, start the Disk Copy application (found in the Utilities folder in the Applications folder of your Macintosh hard drive), and then choose “New>Image from Folder or Volume” from the File drop-down menu (see Figure D-9). In the dialog box, choose Desktop from the Where drop-down tab, and then find and double-click the project folder you want to back up.
This will lead to a new dialog box wherein you are asked to save the disk image you will be burning. Choose Desktop as the location again, select “compressed” from the Image Format choice bar, and click Save. Once the image has been saved, return to the File menu

Figure D-9Apple Disk Copy: steps to burn multisession CDs
and choose Burn Image. In the dialog box, select the image you just created. When you select it and choose OK, you will be given the option of making this a “multisession” CD by selecting Allow Additional Burns. A multisession CD allows you to burn additional images to the CD-R after the first one. If you do not make it a multisession CD, you will have to burn a fresh CD every time you back up your project. If you choose multisession, you can probably fit nearly 600 backups on one 700MB CD-R!
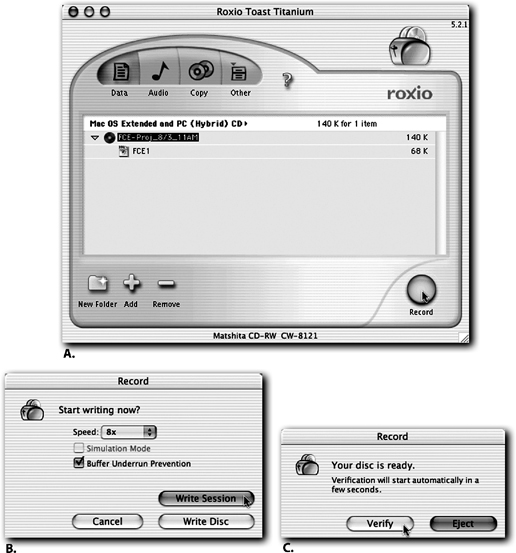
Using Roxio Toast
If you already own Roxio Toast, you may want to use it instead. The setup for burning is much more streamlined and easy. In addition to the backups you can perform as we describe here, Roxio Toast adds a great deal of flexibility that will come in handy as you start to send your productions out into the world. Toast can burn special VCDs (video compact discs that can play back in most consumer DVD players), audio CDs, and data CDs of all types. It’s even a snap to duplicate your homemade DVDs that you produce in iDVD and DVD Studio Pro without having to remaster them from the original projects!
To back up your project folder in Toast, start up the application. Make sure that the Data button is selected in the top of the window, as opposed to the Audio, Copy, and Other buttons (see Figure D-10). When it is running, you will see the Toast window. Grab the project folder off of the Desktop and drop it into this window.
A CD will appear in the window. Its name will be whatever the name of the folder was. If you want to change this name—say, to the date and time of the burn—just single-click this name and change it. As a last step, click the triangle to see the contents of the CD. Select the file named .DS_Store and click the Remove button at the bottom of the window. This file will cause verification errors after the burn is complete.
Once you have this set, insert a blank CD-R. Click the Record button. After a moment, you will enter a final dialog box in which you select the speed and tell Toast how to burn the CD. Generally, burning at a speed other than the fastest possible leads to fewer coasters; waste a few extra seconds, and you may end up with fewer coasters. Select Make Session rather than Make Disk to make this a multisession CD, as described in the previous section.
When you choose Make Session, the burn will begin. After it is complete, make sure you verify the disk. You want to know if there is any chance of corrupted data on the disk. A backup CD isn’t worth much if the data can’t be used! After the verification, hit Eject, and your backup is complete!
Vectors and Bitmaps: A Primer
To understand the problem of integrating Photoshop’s unique shading, texturing, and contouring layer effects into Final Cut Express, we need to understand a little about the difference between vector-based and bitmap-based graphics. Vector-based is from Mars,
bitmap-based is from Venus, and you are sitting here on Earth. With the exception of a few rare interesting examples, applications cannot deal directly with both types of graphics, because they measure and plot space in a distinctly different way. The vector-based method describes the world in a series of geometric shapes, since all complex shapes, like the human body, can be broken down into many smaller, less complex shapes. The bitmap method, on the other hand, is an atomic model, based on the earlier described pixels, in which image matter is composed of an exact number of indivisible individually colored dots.
These two methods of generating an image are at loggerheads. There is no such thing as a single reducible geometric shape. As your high school geometry teacher might have drilled into you, “A point is not a shape.” Shapes are possible between points. With a vector-based graphic, you have a point A and a point B. To describe a simple shape such as a line, all you have to know is that it is the shortest distance between A and B. To make things more complex, just add another point, or vector, C, and now you’ve got a triangle. The more vectors you add, the more complex the shapes get, until at some point you aren’t looking at geometry, you’re looking at images.
If you look around at naturally occurring shapes, it’s difficult to escape the notion that vector geometry is a natural science, as well as a thoroughly artificial one. Infinitely thin lines and small points aren’t physically possible, but nature does generate uncannily geometric patterns. Philosophical pondering aside, it is important to note that vector geometry is an exceptional way of creating computer graphics, one that allows a lot of flexibility and efficiency in adapting shapes in such applications as Adobe Photoshop and Illustrator.
Geometric shapes do not exist in the bitmap universe. Neither does empty space, which in a vector space would be an area with no points. This is the primary difference between the bitmap and the vector. With a bitmap image, each space of the image is occupied by a pixel. The color of that pixel determines what you see in that section of the image. The larger the number of pixels squeezed into an image, the higher the detail (resolution) of the image, since there will be more opportunities for pixels to change color over a distance.
But that is the key; no matter what color the pixels are, they are there, completely filling the image. Vector images, on the other hand, are shapes created from points in an empty space. You see a geometric shape because it has an inside and an outside. A bitmap has no outside, unless you go outside the image file entirely. Vector-based images tend to get ridiculously complicated once you get to the level of detail we think looks acceptable for broadcast video. The simplicity of describing images with geometric shapes isn’t really worth much when you have to express a geometric shape with 6,000,000,000,000,000,000,000 different vectors. That could take years just to express one frame of video.
But in the bitmapped view, there is no such thing as empty space. A complicated shape takes exactly as much information to record as a simple one. The vector-based model has to record all the different points in the shapes it is describing, making simple shapes easier to record and complicated ones difficult. A bitmapped image uses exactly the same amount of information to record both.
The problem with vector-based images for video should be obvious, and in fact, it is only used in multimedia-delivered content such as Macromedia Flash files, where the limit of image complexity is more easily controlled. The problem with bitmap as a system is that if you don’t have enough pixels squeezed into the image—in other words, the resolution— you get less and less detail. It takes a lot of resolution, or pixels per inch, to generate a respectable bitmap image.
Thus, video usually uses bitmapped frames, since it is easier to describe the wildly fluctuating colors and luminance levels using individual pixels rather than vectors, which are better at describing fairly continuous values.
Using the Boris Title 3D Text Generator
Although it is not an Apple Final Cut Express text generator per se, the Boris Title 3D Text Generator comes free, bundled with your Final Cut Express license. Its functionality and quality far exceed that of the standard text generator that ships with Final Cut Express. It offers many more controls and text customization options than are available with the standard title generators found in Final Cut Express.
Because it is a bundled product, you do have to specify that you want it installed when you install the Final Cut Express application itself. If you did not do this, get out your installer CD and choose install. You will be offered extra install options for Boris Calligraphy (which is the umbrella name for the Title 3D and Title Crawl generators) as well as the CGM FX Script DVEs (another nice bundle that we will not cover here but that offers interesting functionality and control in the video filters). You do not have to reinstall Final Cut Express to install the Boris plug-ins; simply check the Boris Calligraphy box and install. Make sure to hit the Boris FX Web site for updates and freebies to augment the bundle that comes with Final Cut Express.
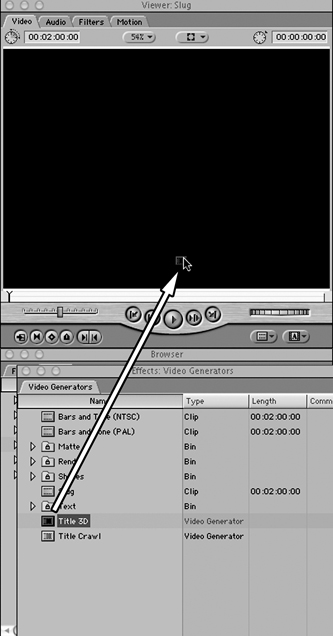
To generate a text clip using the Boris Title 3D Text Generator, go to the Effects tab of the Browser window. Double-click and open the bin named Video Generators. Locate the generator clip named Title 3D and drag it to the Viewer window (see Figure D-11). You can also load this generator into the Viewer window by clicking the Effects drop-down button at the bottom right corner of the Viewer and selecting Title 3D.
When you do this, the Viewer window loads the Title 3D generator as a clip. Although it’s easy to think of the text generator as an effect, titlers, slugs (black footage), and color bars, which are available in the Effects tab, all belong to a family of effects called generators. They provide standard shapes, colors, and patterns for use in your production that are always available and customizable. Such generators always act as clips and as such must be loaded into the Viewer and edited into a sequence just like a clip, rather than being applied to clips, as other effects from the Effects tab are.
Arranging the Title 3D Clip Using the Control Tab
The way that the Boris Title 3D generator operates in conjunction with the Viewer window can be a little confusing at first. The first time you access it from the Effects tab or the Effects drop-down tab in the Viewer window, its text customization box will automatically open. After the text customization box has loaded the first time, you will have to access it through the Controls tab in the Viewer window to make changes. The first time that you load it, you should be looking at a window with a text entry area and some formatting tools in the bottom of the window.
If you are not seeing this, you may need to manually open the text customization box. With the Boris Title 3D generator loaded into the Viewer window, click the Controls tab. At the top of the tab you will see a box labeled “Title 3D: Click for Options.”
Clicking this box will lead you to the text customization box, where you’ll enter text (see Figure D-12). It is this interface that you use to define exactly how the text will look, right down to the drop shadows.
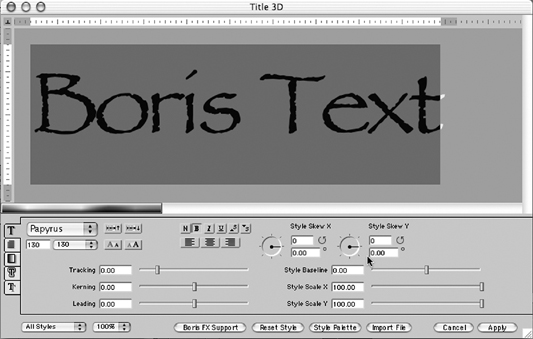
First we need to add a bit of text to the text entry field to see what we are doing. The Title 3D is a very flexible tool with a huge feature set. Although we will not cover every feature, make sure that you read through the accompanying Calligraphy manual for a great quick introduction to all the possibilities. At the top of the box is a field in which to enter your text. Type in the words “Boris Text.” Hitting the Return key after your text entry would be a mistake here, since it would just result in a hard return line break in the text field. The text entry field acts just like any word processor; any typing will register in the text field.
Also, just as with any word processor, after typing text in, you must select the text to change any of its style formatting. If you apply a text formatting or style change and do not see that change reflected in your text, make sure you selected the text first. Why is this so? One of the nice things about the Boris text generator is that you can apply different formatting to individual items of text in the field, something that is difficult, if not impossible, to do with other text generators. For instance, you could give only some of the letters a drop shadow or give each letter a different color.
On the far left-hand side of the interface box, you will see five tabs that correspond to each of the areas of text customization available to you (see Figure D-13). They are, from top to bottom, Text Formatting, Wrapping, Fill, Edge, and Drop Shadow. You don’t have to visit each one of these tabs if you don’t want to change the settings you have already, but you are encouraged to spend some time investigating the possible variations. In particular, the Edge and Drop Shadow tabs allow you to store up to five presets you regularly access. In addition to this, once you get text looking just right, you can save the settings as presets in the Style Palette. For more details on fully exercising the Style Palette, as well as information
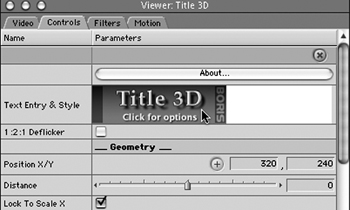
Figure D-12Double-clicking the Title 3D box in the Viewer to open the text customization window
on where you can get tons of free styles, consult the Boris FX Web site and look for Freebies.
Make sure the text in the text entry field is selected, then click on the Font tab (symbolized by the letter T), and choose an interesting font. If you want to browse the fonts and see how your text will look using various fonts, click one of the two “menu tabs” next to the font drop-down menu. Clicking one of these buttons changes the font in use to the next one on the font list, either up or down based on which button you hit. Set the Font Size to 130, and notice that there are an “increase” and a “decrease” button for quickly altering the font size. Hit the B for Bold and set Alignment to Center.
The second tab is the Alignment tab (see Figure D-14), and it allows you to organize the text and constrain it to a narrow or wide column. You generally should set this tab for Wrap, with a page width of 500 pixels. This will force the text you enter to have a line break when it reaches the screen width entered into the Page Width field. The value 500 is a good one for the page width field, because this is just a bit narrower than the Title Safe zone.
The next tab, the Fill tab (see Figure D-15), allows you to choose the text color. An interesting option is the ability to use gradient fills for your text, meaning that you can have the color change within the text itself. Choose the Text Fill tab and switch to Gradient to enable this. When you do, a Click to Edit Gradient” box becomes available,


Figure D-15The Fill tab
allowing you to choose the type and shape of the gradient as well as the colors that the gradient shifts between.
On the Edge tab (see Figure D-16), we find probably the most beautiful and useful styles available in the Calligraphy toolset. In order to put Edge styles to work, you need to check at least one of the check boxes. These check boxes are for presets you keep on the corresponding tab. If you click the Edge2 tab and make adjustments there, the adjustments will stick to the Edge2 tab, even if you don’t apply it to any text. To apply the Edge style to your selected text, you need to check the tab’s check box.
To see how great and easy the results are, check the Edge1 check box, and then change the Edge Style to Bevel. Change the Position to Inside, meaning that the text beveling will be located inside the text. Because the Bevel effect is a three-dimensional effect, you can also specify which direction the light appears to come from that is illuminating it on the Highlight Angle. Experiment widely with the Edge styles, and you will find that creating complex, beautiful text is quite easy.
We want to add a nice, light drop shadow, so click the fifth tab (see Figure D-17), and, just like the method of enabling the Edge style, click the first check box to enable a preset.

Figure D-16The Edge tab

Set the Shadow Type of this preset to Drop Shadow, make the Shadow Color relatively dark, and set the Shadow Distance at 10. Keep the Shadow Opacity at 50, but increase the Shadow Softness to 5. Finally, manually drag the Shadow angle around to 45 degrees.
Click the Apply button in the bottom right corner again to apply your text settings. After you have applied them, you will be returned to the Viewer window. Now edit the Boris text clip into your sequence. It will carry alpha channel transparency just like the Final Cut Express Text Generator. If you need to change anything in the Boris Title 3D text clip after editing it into the sequence, simply double-click the text clip, choose the Controls tab, and select the “Click for Options” button to return to the text customization box.
Audio Production and GIGO: First Things First
A huge part of any video project is the audio. Although most people think of visual elements when we talk about video and movies, in reality, anyone in the business will tell you it’s far more than 50% audio. Bad audio recording and mixing sticks out like a sore thumb and can ruin an otherwise fantastically shot and edited piece of work. New artists usually discover this sad fact of life after it’s too late.
The key to success in video work is understanding and applying an old production term: GIGO—Garbage In, Garbage Out. If you don’t start with a suitable recording, chances are that you won’t have much luck when the time comes to edit. There’s another line to go along with this that many editors use sarcastically: “We’ll fix it in postproduction.” They are being sarcastic because in most cases, and particularly with audio, you just can’t fix it in post. The fact is that if you want good clean audio for your productions, you have to start by recording good audio. Although this is not a production book, there are a few tips about things to look out for as you shoot video and record audio. Although some of these suggestions require a little investment in time and money, they will pay for themselves in the long run with quality results and lack of frustration.
Use Professional Microphones
One thing that you can do to instantly improve the quality of your work is to use a professional-quality microphone. Using the onboard mike on a camera is almost a guarantee of recordings full of noise, crackling, and the whirring of camera motors. Within the $100 to $300 range there are quite a few great-sounding mikes you can plug into your camera for a phenomenal increase in quality. Depending on the work you intend to perform, you will be interested in one of two types of microphones.
The first is the lapel, or “lavalier,” microphone (see Figure D-18). These are very small microphones that can be pinned to the cast members’ clothing. They are great for recording interview and “talking head”—type videos. Because their pickup range is very small, they get very clear, strong recordings of things close to the mike, while “rejecting,” or not picking up, annoying noises like environmental noise and ventilation systems such as air conditioners and heaters. If your subjects are going to be mostly stationary and don’t mind having a microphone cable threaded through their clothing, the lavalier microphone is usually your best bet.
The second common microphone in video production is the “short shotgun” microphone (see Figure D-19). This microphone is very directional, which means it records sound better from certain directions than others. Shotgun mikes tend to reject sound (and unwanted noise) behind the mike very effectively, allowing you to isolate your subject from the noise generated by the rest of the world. Shotguns generally are so sensitive that they cannot be handheld and require special microphone mounts to be used effectively. But the ability to record clean audio from a distance (up to 15 feet in some circumstances) and get strong, clear audio recordings free of environmental noise makes them the workhorse of the industry.

Figure D-18Lavalier microphone
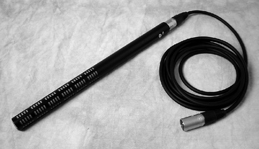
Figure D-19Short shotgun microphone
You might have access to the inexpensive and more common “dynamic” mike, the mike that your favorite rock star can be seen singing into onstage. But these microphones are rarely suitable for film and video work, with the possible exception of news gathering and documentary work, where the convenience, ruggedness and lack of batteries of the dynamic mike is worth more than the unsightly image of a giant mike head sticking up in front of the camera subject.
Use Decent Headphones
Get a pair of quality headphones that actually cover your ears (Walkman-type light headphones won’t do), and use them to monitor the sound from your camera while you record. Audio recording devices aren’t like your ears. We tend to tune out the things that aren’t important to us, such as ventilation and other environmental noise. But audio recording devices listen to everything, picking up hisses, hums, and everything else in the room. The only way you will hear that these things are intruding on your clean audio tracks is if you listen closely to what is being recorded. Never take this for granted.
Always Record Room Tone
Whenever you record audio in a location, make sure you record a minute or two of just pure silence in the space. Although the idea in recording is to minimize the noise in a location, a complete lack of sound is just as bad. Every room has a different “tone” or sound characteristic that is based on its size, what the walls are made of, etc. You can tell a lot about a room even with your eyes closed, simply because once you are trained to hear it, your ears can easily detect the size and shape of a space just by the “sound of silence.” This “room tone” is critical in cleaning up noisy tracks, since it allows you to chop out sections of an audio clip that may have big noises, such as an airplane or a cough, without leaving an empty vacuum of sound. When you replace the background coughing noises with a little bit of quiet room sound that you intelligently recorded as a backup resource, you will feel very smart indeed!
Plan Ahead
Do a little research and scout the location you are going to record in. Are there things like air conditioner and heater vents, and can they be shut down for the duration of the recording? Are there refrigerators or other big, noisy appliances, and can you get permission to turn them off? Are there windows that you can close? How close is the location to streets with loud traffic and, believe it or not, the worst enemy, the random airplane? You can solve 99% of location audio problems by showing up 10 minutes early with a couple of thick blankets and some gaffers tape!