
| 2 | Getting Your Footage into Final Cut Express |
What Is Media and What Is Capturing?
In order to build a project, you need media to work with. Media is much more than just video or audio that you capture from Firewire. The term media refers to any content that you use in a project. This can range from video and audio captured from DV tape to audio imported from an audio CD. You can also use image files created in applications such as Adobe Photoshop or image sequences from compositing applications such as Adobe After Effects, Discreet Combustion, or Pinnacle Systems Commotion. You can even import special vector-based files such as the Macromedia Flash file format. In short, you can use nearly anything you can create elsewhere.
Anything that you bring into a Final Cut Express project to work with is media. This seemingly simple concept is an important one. There is a tendency among new users of nonlinear editing applications to think of the objects in the Browser window or Timeline as the actual media files themselves. This is an intuitive conclusion that unfortunately oversimplifies what is actually going on when you capture or import, and can lead to problems.
When you bring resources like video and audio into Final Cut Express, you are allowing Final Cut Express to access video, audio, or other such media files that exist somewhere on your hard drives. The clip that you see in the Viewer and in the sequence is not the actual media but is really just a reference or pointer to the real media; they are simply graphic icons that point to a media file. When you edit, you are telling Final Cut Express how much of the original media file to display.
The Clip icon, the pointer, is just computer code and is a part of your project file. Its code is used to determine how much of the captured media file is accessed and the way it is displayed. When you use an effect or you trim a clip for use in a sequence, you are not really affecting the media file on your hard drive. You are simply telling Final Cut Express how to display the media file in your project. The media icon in your Project tab can direct the media to appear shortened or lengthened and arranged in any order or repeated endlessly. It is said to be nonlinear, hence the name “nonlinear editor.” This concept is also referred to as nondestructive editing, because you are making changes to the clip in your project file, not to the actual media. You are only changing the way that Final Cut Express displays the media when it plays back.
This is to be contrasted with the venerable system of linear tape editing, in which one edits with the original tape media and must assemble each piece in the order it is to occur in playback. The convenience of nonlinear editing should be obvious compared with this. In linear tape editing, if you aren’t happy with an edit you have made, you must go back and re-record a new edit the way you want it using the original tapes. In addition, all the edits you have made following the edit you are changing generally must be reedited.
With a nonlinear editor, on the other hand, we can simply arrange our clips in the sequence in any order that we like. Not happy with an edit? Just rearrange the clips. Since the clip is just referring to a media file, it makes no difference where it is displayed in the sequence; it will play back every time in just the way you planned it.
The reason for belaboring this point is that the safe and secure capturing process depends on our understanding of what media is, the distinction between our project clips and our actual media files, and where those media files go when we capture or save them. In this chapter, we will investigate the proper procedure for getting media into our project. We will first set all the necessary Preferences and Easy Setup to make sure that our media comes into the project properly so as to avoid problems later on. Then we will walk through the process of capturing our media so that we can edit with it.
Setting the Preferences and the Easy Setup
The first step before capturing media is setting up Final Cut Express’s Preferences and the Easy Setup. This step is an absolute necessity. Some other applications do not require the user to alter the default preferences at all. Many of the settings in Final Cut Express, however, directly affect the way it functions and interacts with the Mac OS, your camera or deck, and hard drives. Thus these settings must be checked and set correctly. Users who skip taking care of these settings usually pay for it in frustration later on down the line.
Preferences are mostly concerned with the toolset and functionality of Final Cut Express and, generally speaking, won’t require changing until your working methods themselves change (the one important exception is that of Scratch Disk Preferences assignment). Preferences define the workflow of Final Cut Express and allow you to focus the way you approach editing. These settings are generally not application-critical; changing them in most cases would not cause Final Cut Express to malfunction.
The Easy Setup and the Scratch Disk Preferences located in the Preferences window, on the other hand, are directly related to how Final Cut Express deals with your particular hardware and software situation. These settings are critical to Final Cut Express’s functioning correctly, and you must define them.
Unlike the Mac OS System settings you completed in Chapter 1 that must be set or checked only initially or when you encounter system misbehavior, the Easy Setup and the Scratch Disk Preferences should be checked and set properly whenever you work with Final Cut Express. Setting the preferences is a very quick process, and Apple has instituted some great preset tools for streamlining the preferences process. However, you should check them every time, especially if you are not the sole user of FCE or if there is more than one active Final Cut Express project per machine. Depending on how your editing station has been configured under Mac OSX, it is possible that no one else has reset your Preferences or Easy Setup; but even under these circumstances, it’s always a good idea to check them every time to keep up with how your system is configured and where you are storing media and backup files. It only takes a second, but it could save you hours.
The reason for this is that Final Cut Express does not store or link your preference settings with your particular project file. Thus, when you start a Final Cut Express project, the preferences you encounter will be whatever they were set to the last time Final Cut Express was used. In a multiuser environment not configured with separate User Login Identities for each user, this can have disastrous effects if it is allowed to get out of control. Setting preferences is a user’s responsibility; the awesome flexibility of Final Cut Express really depends on the individual users keeping their end of the bargain and doing their settings.
The Essential Preferences
Open the Preferences dialog box in the Final Cut Express drop-down menu. A dialog box with four tabs at the top will appear, as shown in Figure 2-1.

Figure 2-1General Preferences
The General Preferences Tab
The first tab is General settings. Many of the items on this tab have important implications in the workflow of Final Cut Express and can ensure that the application warns you in the event of problematic behavior. Although some settings on this and other Preferences tabs do not directly affect Final Cut Express’s performance, as we go through and set the crucial ones, we will also visit the other items and discuss their functionality.
Levels of Undo
The first item is the Levels of Undo. Levels of Undo are the number of actions that you can undo in sequential order should you make a mistake while editing or simply want to go back to where you were. Having a certain number of actions available for undoing is very handy if you want to try something in your editing that you’re not sure you will want to keep, or if you make a mistake. If you don’t like the results of any action, select Undo from the Edit drop-down menu or simply hit Command-Z, the keyboard shortcut. Final Cut Express will return your project to the way it was prior to initiating the last action. You can go backward in your actions as many times as you have specified in the Levels of Undo setting in the General tab of the Preferences (see Figure 2-2). Undoing also acts as a sort of “actions list” in that you can redo actions you have undone, by using the keyboard shortcut Command-Y.
The number of undoable actions can be set up to 99, although be warned that greater levels of Undo require more RAM. As you perform each action, it is stored in Final Cut Express’s RAM allocation for instant removal should you choose to undo it. The more actions you store away, the more RAM you burn up. There are more effective ways of returning to earlier versions of your project, and it is recommended that you leave Levels of Undo set to the default value of 10.
List Recent Clips
The List Recent Clips box (see Figure 2-3) allows you to specify how many recently used clips are displayed in a certain pop-up menu of the Viewer window. This can be a handy way to access clips you want to work with without having to manually drag them across the Desktop. The default value here is 10, although you can set it for up to 20. However, 20 is too many to choose from in most situations and will create a giant drop-down bar if set that high. Leave this set at the default of 10 unless you find that you need more to speed up your working style.
Figure 2-2Setting Levels of Undo
Figure 2-3List Recent Clips
Multi-frame Trim Size
Multi-frame Trim Size is a setting for a specialized editing tool within Final Cut Express. Each editor has an opinion about how many frames should be available for quick trimming in the Trim Edit window, and until you have used it, leave this set for the default of five frames (see Figure 2-4). When you get to the editing stage and begin using the Trim window, you will find that this setting not only allows for a very precise adjustment of your edit but also helps you make very quick adjustments of the edit. This is not an application-critical setting but one that should be set according to your editing style.
Sync Adjust Movies Over
This setting (see Figure 2-5) is fraught with confusion in the community of Final Cut Express and Final Cut Pro users. To dispel that confusion, we need to understand what this feature is supposed to address and how it works. The Sync Adjust Movies (SAM) feature was designed to deal with the issue of nonstandard audio sample rates in prosumer DV cameras and decks, particularly the Canon XL1 DV cameras.
For the moment, use the following guideline for setting Sync Adjust Movies. If you are using footage recorded with the Canon XL1 camera and your clips are longer than 5 minutes, you should enable this feature. If you are using any other cameras or decks, you can safely disable it. Just remember that if you have even a hint of timecode breaks on your tape, or you are using a DV converter or any DV device that does not access timecode, you should disable it. For more detailed information about the nature of the problems that SAM fixes (and potentially causes), see Appendix A.
Real-time Audio Mixing
The Real-time Audio Mixing setting (see Figure 2-6) allows you to put a limit on the number of audio tracks in the sequence that Final Cut Express will attempt to play back without rendering. You can have up to 99 tracks of audio in any sequence, but your system hardware determines how many of these can be played back simultaneously without having to be mixed together in a rendering process.
The default value of eight tracks is the maximum for Firewire configurations of Final Cut Express, provided there are few or no audio filters. Eight tracks of real-time mixed audio should perform fine in a system that has the recommended amount of RAM and is using a hard drive configuration that isn’t below par or overly fragmented. If you use more
Figure 2-4Multi-frame Trim Size
Figure 2-5Sync Adjust Movies Over
Figure 2-6Real-time Audio Mixing
than eight tracks of audio at a time, you will likely hear the beeping alarm warning you that you have exceeded the possible number of tracks. In most cases, simply rendering the audio sections in question by using Mixdown Audio (from the Sequence drop-down menu) will allow them to be played back correctly. Audio rendering is incredibly fast. If you hear this beeping and you only have a couple of audio tracks, you should check your Easy Setup, as well as the sample rates of your clips, to determine whether you have other problems, such as seriously nonstandard sample rates.
Audio Playback Quality
The exact function of the Audio Playback Quality drop-down bar (see Figure 2-7) is a little different from what it probably sounds like. We all want the best in audio quality, right? What Audio Playback Quality really does is determine the quality of the playback of audio resampled on the fly. This could be audio resampled during playback for the reasons described in the section on Sync Adjust Movies in Appendix A. It could also be resampling of audio tracks with other sample rates, such as audio CD tracks that have not been converted using the import process, to be described in the next chapter.
High means that the best quality resampling is taking place, and the processor takes a correspondingly large performance hit, potentially causing Final Cut Express to beep and ask for an Audio Mixdown. Low means that Final Cut Express is doing a sloppier job of resampling the audio on the fly. The audio quality will be lower (unacceptably lower for most purposes other than quick preview), but the processor is taxed less, and Final Cut Express will allow more real-time audio tracks to be mixed.
Later, in Chapter 3, you will be shown the method for converting sample rates manually to avoid the need for resampling on the fly. Typically, the only time this resampling will occur is when Sync Adjust Movies kicks in, when you have gotten the Easy Setup incorrect, or if you bring in audio CD tracks without properly prepping the sample rate of the files. These are situations you should avoid by setting things up correctly, rather than using Audio Playback Quality to patch things up after the fact. Set this drop-down bar to High and forget about it. It should never come into play if you do things correctly. If you get beeping because you need more tracks of audio than the High setting will allow, either use Mixdown Audio or set this preference to Medium, which doesn’t sound too bad, but is more relaxed in regard to processor demand.
Show ToolTips
Let’s return to the top of the General tab, where the ToolTips setting should be enabled (see Figure 2-8), particularly for new users and those unfamiliar with the Macintosh
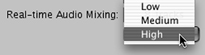
Figure 2-7Audio Playback Quality drop-down menu
Figure 2-8Show ToolTips
platform’s keystroke conventions. When ToolTips is enabled, Final Cut tells you the function of any on-screen item. Simply leave the mouse pointer over the item for a couple of seconds without clicking, and a small text box will appear, telling you what the item does. The bonus is that many ToolTips boxes include the keyboard shortcut for the item as well. As we will see, keyboard shortcuts are something all users of Final Cut Express should master to speed up their workflow and reduce strain on their wrists.
Warn If Visibility Change Deletes Render File
As with all “alarm” switches, this preference should be left enabled (see Figure 2-9). It refers to a situation in Final Cut Express in which clips can become unrendered simply by turning off track visibility, a Timeline feature that is discussed in Chapter 4. Doing so can accidentally eliminate hours and hours of rendering with the push of one button. This preset simply forces you to go through a dialog box before committing to that action. Leave it enabled.
Report Dropped Frames During Playback
This setting is an alarm switch to let you know if, for some reason, playback performance was impaired and Final Cut Express was unable to play back at the required frame rate. Dropped Frames is a situation in which, for whatever reason, Final Cut Express was not able to process the video and/or audio data quickly enough to provide the 29.97 or 25 frames per second demanded by NTSC or PAL. Many different things can cause Dropped Frames; this is the primary reason for doing your Preferences and Easy Setup! Sometimes the problems are hardware-related (e.g., fragmented drives), but most often they are the result of not having your settings in order.
Dropped Frames are not acceptable. Final Cut Express is fully capable of playing back NTSC and PAL video at the proper frame rate, given that your hardware and settings are in order. If you are receiving reports of Dropped Frames, go through your settings first and make sure that you haven’t missed something. You should keep the Report Dropped Frames During Playback switch enabled (see Figure 2-10) so that you become aware the instant that Final Cut Express is not performing properly. Disabling the Dropped Frames report is like trying to put out a fire by removing the batteries from a smoke alarm. If you receive a Dropped Frames warning while playing back, eliminate the problem, not the alarm.
Abort Capture on Dropped Frames
This alarm setting is similar to the preceding one. The application will halt what it is doing if it encounters impaired performance and Dropped Frames. The only difference here is that it is occurring during capture, not during playback. That distinction is unimportant.
Figure 2-9Warn If Visibility Change Deletes Render File
Figure 2-10Report Dropped Frames During Playback
Figure 2-12Abort Capture on Timecode Break
Dropped Frames are unacceptable in either situation. This setting should be enabled (see Figure 2-11). If you are not capturing and playing back at the full frame rate, then you are not exercising the true value and potential of the Final Cut Express editing software.
Abort Capture on Timecode Break
Once again, this alarm switch should be enabled (see Figure 2-12). It will stop a capture if Final Cut Express encounters a break in the timecode of your DV tape. Although time-code isn’t always necessary to capture DV footage, you will find that you don’t ever want to work without it. Not having clips with timecode means that if something happens to your captured media files, you will have to start over from scratch.
Timecode is a system that videotapes use to identify individual frames of video. Each frame of video on the DV tape has a unique number that never changes, unlike the time counter you may have seen on consumer VCRs. This number is much like a digital clock— i.e., 01:29:15;18—where the fourth number is the frame number. For much more detail about timecode, see Appendix A.
In addition to allowing you to automate your capturing and editing process, timecode allows you to easily and effortlessly reconstruct your project from the original tapes. Unfortunately, if you have timecode breaks on your tapes, recapturing them becomes difficult and in some cases may be impossible. Either way, if you originally capture a clip that has broken timecode, you will not be able to automatically recapture that clip. There are ways to get around the problem of DV tape footage with timecode breaks, but the main thing to remember here is that you need timecode, you need to know when it is flawed or broken, and you should not disable the alarm that does this for you.
Prompt for Settings on New Sequence
This preset is another setting that should be enabled for safety (see Figure 2-13). Whenever you create a new sequence in the Timeline, Final Cut Express will ask you for its specifics, ensuring that you choose the right ones instead of simply using whichever sequence settings have been previously invoked. Sequence settings are some of the most critical ones, so having Final Cut Express put this reminder in front of you is a good way of making sure you never forget to do the settings correctly.
Bring All Windows to the Front on Activation
One very convenient option for users is to choose whether all of Final Cut Express’s windows come up front when you switch to that application from another one (see Figure 2-14).
Figure 2-13Prompt for Settings on New Sequence
Figure 2-15Still/Freeze Duration
Like most computers, the Macintosh can have more than one application open at a time. When you click on another application’s window, it becomes the active application. Two applications cannot both be active at the same time. So it is often necessary to switch back and forth between applications.
The option offered here is that if “Bring all windows …” is disabled, clicking a Final Cut Express window will bring only that particular window to the front as active. If the option is enabled, clicking any Final Cut Express window will bring all of its windows up to the front of the Desktop. This feature will help you make the most of limited screen real estate, especially for those users with only one computer monitor. In general, keep this turned on so that all of Final Cut Express’s windows will come up when you switch. But if you begin to work frequently with several other applications open at the same time, you may want to experiment with it disabled.
Still/Freeze Duration
This setting allows the user to determine the duration of the clip that results from importing a still image generated by another application, such as Adobe Photoshop, into Final Cut Express. It also applies to the length of a freeze frame generated by Final Cut Express. Although you can easily change the lengths of either the imported image clip or a freeze frame, this setting allows you to specify its initial duration (see Figure 2-15). The default is 10 seconds.
Preview Pre-Roll and Preview Post-Roll
These two settings are preferences that relate to the way the Canvas, Viewer, and Trim Edit windows allow the user to quickly check an edit within a user-defined range of time. That functionality is described later. For now, it’s best to leave these set at the defaults (see Figure 2-16).
Thumbnail Cache, Disk and RAM
These settings allow you flexibility in dedicating drive space and RAM for thumbnails of the clips you will be working with. Thumbnails are very small icons that represent your captured or imported clips in a project and contain a still image, called a “poster frame,” representing the footage in the clip. You can always adjust these amounts (see Figure 2-17) later if you notice sluggish performance in previewing thumbnail clips.
Figure 2-16Preview Pre-roll and Preview Post-roll
RT Still Cache (RAM)
In Final Cut Express, certain features can generate real-time effects that do not have to be rendered to be played back for preview on your desktop computer monitor. Although you cannot preview these features out through Firewire to an NTSC monitor, users who have access to a G4 desktop unit with processor speeds in excess of 500MHz have access to realtime effects for preview on the desktop.
One of the real-time preview features available on such machines is the ability to play back still images without having to render them. Titles and other still images you create in Photoshop, or even freeze frames you make from a single frame in a Final Cut Express video clip, can be previewed in playback in the sequence. When you set the RT Still Cache (RAM), you tell Final Cut Express how much extra RAM it should use for storing these still images. This number should obviously factor in how much RAM your system has installed, and is another good reason to get more RAM if possible. Remember, this RAM will be in addition to any RAM in use by the Mac OS and Final Cut Express, so you’ll soon be wanting more. We have to be careful to make sure that we are not forcing the system into using virtual memory because we have asked it to use too much RAM in the RT Still Cache. If you set the RT Still Cache too high for the amount of physical RAM you have installed, you could quite possibly choke your system by denying it the RAM it needs, causing virtual memory pageouts and Dropped Frames errors. See Appendix C about the Mac, its operating system, and how this relates to RAM and hard drive use.
Until this becomes a real burning issue for you as an editor, set it for 10MB (see Figure 2-18) and forget about it. If and when you decide to use the real-time preview system with stills and Photoshop images, you may want to bump the number up, congruent with the amount of installed physical RAM in your system. Of course, if you have a G3 or a G4 Power Macintosh with a 450 or slower processor, you will not have access to real-time effects and previews, and this option will be missing in your General Preferences tab.
Autosave Vault
Autosave Vault has two parts; there is a check box for enabling it, and three boxes for entering some specifics about how you want to configure the automatic backups of your project. The Autosave Vault is a pretty nice functional short-term backup system that you should enable. Although it should not replace the backing up of your project files to CD-R, as described in Appendix D, Autosave Vault is another method of making your project bulletproof from accidental loss in the event of a crash.
Figure 2-18RT Still Cache
There are two important things to remember with the Autosave function. First, Autosave is an automatically timed function that does not wait until you have completed a task before beginning a timed save. It begins its saving operation whether you are in the middle of a complex series of edits or simply staring at the screen. Thus, it can be a very interruptive function, particularly since a highly complicated project file can take up to 30 seconds to completely save. If you are concentrating on your editing, having the whole application lock up every 5 minutes to save itself can ruin your concentration.
The way Autosave works is that every so often, at the predetermined intervals that you specify in the Preferences, the application saves a copy of your project file into a special backup archive folder called the Vault. This Autosave file is an exact copy of your project as it is at that moment, and is named with the date and the time of the autosave. If you ever need to return to your project as it was at the time it was saved, you have only to use Restore Project from the File menu, which will show you a list of all the autosaved copies of the project it sees in the Vault. Autosave never actually saves your original project file; it merely creates copies in a separate folder for safety. You need to manually save (drop-down menu File > Save Project) to your real project file to save it.
Since this feature can only help, the only reason you would consider disabling Autosave Vault would be to eliminate its interruptive behavior. But when doing so, you must be very careful to develop excellent project backup behavior. Most people aren’t so diligent and have to learn the hard way that regular saving, whether through Autosave, manual backup, or both, is a must.
What should your settings be? Although they will be different for each user, a good place to start is with Autosave enabled; “Save a copy every” set for 30 minutes; “Keep at most: X copies per project” set for 100; and “Maximum of: X projects” set for 25 (see Figure 2-19).
“Keep at most: X copies per project” defines when Final Cut Express begins removing the oldest copy and replacing it with a newer one. Even so, Final Cut Express never actually deletes any copies; it simply moves the oldest one out of the Vault folder and into the Trash, intending for you to save it to a another disk before deleting it.
The Timeline Options Tab
The second tab in the Preferences is used to set the Timeline Options (see Figure 2-20). In general, you will set these once and not alter them again until your editing needs change.

Figure 2-19Autosave Vault
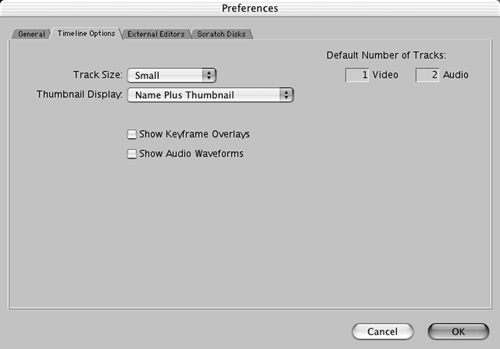
Although they are mostly noncritical, they deserve mention. Since Final Cut Express contains many separate windows, and Desktop real estate is at a premium, the way you set your Timeline Options can optimize your workflow, prioritizing the way you see things in the Timeline as well as its defaults. The Timeline is the only truly linear part of Final Cut Express. It is a beginning-to-end cutting window that can be customized according to your needs.
Track Size
The first setting is for Track Size. The default track size of a new sequence can be preset using this option (see Figure 2-21). Small, the default setting, represents the most efficient trade-off between convenience and accessibility, although you can adjust this according to your needs and available workspace. Like many options in the Preferences, this setting affects only the default settings for new sequences. To change the appearance or features of
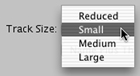
Figure 2-21Track Size
an existing sequence, you will have to make the change in the Sequence Settings, found in the Sequence drop down menu. This Timeline option can also be adjusted directly from the Timeline.
Thumbnail Display
Thumbnail Display is an option that displays a thumbnail of the clip as it sits on the Timeline. This can be a very handy way of remembering which clip you are looking at on the Timeline. The options in this field are Name, which displays only the name of the clip; Name Plus Thumbnail, which displays the name of the clip plus one thumbnail image from the clip; and Filmstrip, which displays as many thumbnail images as can be fitted within the clip, depending on the current time scale and range of the Timeline itself. The default is Name Plus Thumbnail (see Figure 2-22).
It is worth noting that generating a thumbnail in a clip on the Timeline actually steals some processor power. Although in small doses this is negligible, when you have constructed a sequence with 500 clips, it can take Final Cut Express a few seconds to call up and generate them all, during which time you may be stuck looking at a “Preparing Video For Display” progress bar. On another tab, you will be shown how to adjust a setting to improve this performance. If you are getting repeated and long “Preparing” messages, you may want to set the preference to Name instead of Name Plus Thumbnail and see if the processor is simply overburdened by the display of thumbnails in your Timeline clips.
Show Keyframe Overlays
Show Keyframe Overlays (see Figure 2-23) enables a special tool for each clip on the Timeline. This functionality is commonly known as rubberbanding. When Show Keyframe Overlays is enabled, you can adjust the opacity, or transparency, of a video clip or the volume level of an audio clip simply by grabbing the line that appears in the clip on the Timeline and dragging it up or down. This is a very easy way to create fades or quickly control audio levels without having to go into a clip’s window to apply an effect.
The keyframing of these lines is also possible, allowing you to change the level of opacity or volume over time. The term rubberbanding comes from the fact that the straight line created from keyframe to keyframe when rubberbanding resembles a rubber band stretched from nail to nail on a flat surface (see Figure 2-24). Keyframing is thoroughly covered in Chapter 5. Setting this preference isn’t critical, since the feature can be enabled directly from the Timeline window.
Show Audio Waveforms
When this preference is enabled (see Figure 2-25), clips on the Timeline will display their audio levels as a waveform. Audio level, or the clip’s loudness, is displayed as a long
Figure 2-22Thumbnail Display
Figure 2-23Show Keyframe Overlays
Figure 2-25Show Audio Waveforms
continuous series of waves. The higher the peak and the lower the trough of each wave, the higher the level of audio.
Sometimes, the easiest way of finding footage in a clip on the Timeline is to have the Timeline display the Audio Waveform and to look for the waveform spike that identifies your footage (see Figure 2-26). You’d be surprised how easy it is to see the relationship between volume levels and different types of footage. Audio Waveforms can also be a very convenient marker for finding footage or for resyncing tracks that have accidentally been unlinked. Unlike other Timeline preferences, this setting cannot be enabled by a button in the Timeline window itself, but can be turned on and off using the keyboard shortcut Command-Option-W.
One might wonder why such a useful tool should not be enabled all the time. The simple answer is that Final Cut Express must draw many thousands of separate tiny Audio Waveforms on the clips in the sequence when the feature is enabled (remember the 48 in 48K audio is 48,000 times per second!). Each time you make a change, it must redraw all of these thousands of waves. The delay caused by redrawing can take forever, even when using the latest and fastest processors of the Macintosh line. In general, you should keep this feature disabled unless you have a specific need for it; then use the keyboard shortcut to toggle it on and off.
Default Number of Tracks
The final setting for the Timeline Options is for the Default Number of Tracks. This will determine how many new tracks of video and audio are included in the Timeline when you create a new sequence. The default is set at 1 video track and 2 audio tracks (see Figure 2-27), although you can set either for up to 99. In general, you should leave the default setting. As you will see, creating new tracks on a Final Cut Express Timeline is as easy as dropping a clip where you want the new track to be. There is no reason to start out with extra tracks; simply create them as they become necessary.
The External Editors Tab
The third tab in the General Preferences is called External Editors tab. This tab allows you to assign specific applications to work on individual pieces of your project (see Figure 2-28). You could, for instance, set Photoshop as the external application to work on Still Image files that you are currently using in your project. Likewise, you could set Adobe After Effects as the external editor for working with video clips, and Protools or Peak DV to work with audio clips.
While editing in Final Cut Express, you could quickly jump over to another application to tweak some aspect of an item in a sequence or the Project tab without bothering with the import/export process of taking the item outside of Final Cut Express. This can be a very valuable timesaving operation if you use other applications in your media generation process. There are special rules that apply to using external editors for items in your project, though, so make sure to investigate the specifics before engaging in the heavy use of the External Editors tab. For basic work inside Final Cut Express, there is no need to adjust or set this tab.

Figure 2-28External Editors
The Scratch Disk Preferences Tab: The Issues for Scratch Disk Assignment
The fourth and final tab of the Preferences is perhaps the most critical setting in Final Cut Express. It is called Scratch Disk Preferences, and its name does not belie its importance. It is in the Scratch Disk Preferences that you assign the media drive to which all the captured video, audio, and render files are written (see Figure 2-29). It is imperative that this setting be done correctly. There is no getting around the need to visit this setting each time you start to work.
Before we describe the proper procedure for setting up the Scratch Disks tab, it is important to take a moment and examine the physical issues at play here, and make sure that you have arranged your system in the best possible configuration. The footage we want to capture from the DV tape is already digital video. It was digitized as it was recorded in the camera. Digital video contains a certain amount of data, or digital information, in every frame. For high-quality video like DV, this yields a relatively high “data rate,” or amount of data per frame per second. There are 29.97 frames per second in NTSC video, and the data rate of DV NTSC is just over 3.6MB per second. For more detailed information about the processes of analog (pre-digital) and digital video, please refer to Appendix A.
Figure 2-29Scratch Disk Preferences
What all this means is that as the camera or deck is playing the footage, it is also sending the video data down the Firewire tube to the Macintosh. When it reaches the Macintosh, Final Cut Express writes that data to the hard drive you have set here as the Scratch Disk location. For the data to be written to or played from the Scratch Disk drive correctly, the hard drives installed in our Macintosh will need to be able meet or exceed this 3.6MB per second data rate when writing the digital video data to the Scratch Disk.
In practice, this is relatively easy. The standard hard drives and buses on today’s Macintosh far exceed the 3.6MB per second data rates required. There’s no need to spend lots of money on extremely fast drives to work with broadcast-quality video anymore. However, the inexpensive drives we are talking about must be configured correctly, and you must access and assign them appropriately in Final Cut Express if you expect them to deliver satisfactory performance. Like anything else, the devil is in the details, and if you pay attention to the details, you will find that you never run into data rate-related issues.
The first issue to be addressed is that it is highly recommended that you use at least two separate physical hard drives with Final Cut Express. One of these hard drives is your start-up drive. This is the drive that contains your Mac OS System, Users folder, the Applications folder, Final Cut Express, and any other software you want to install on your system, such as image or audio editing apps. This hard drive is dedicated to software only.
The rest of the drives on your system will be dedicated as media drives (see Figure 2-30). These media drives will be used only to capture and play back the digital files you bring in from the deck or the camera. You will also use these media drives for the render files, which are generated whenever you render an effect in Final Cut Express.
Keeping your start-up and media drives separate will keep Final Cut Express from fighting itself to maintain an acceptable data rate; consequently, it will play back your video files correctly. Although 3.6MB per second is not an astonishingly high data rate, it does require
Figure 2-30Maintain separate physical start-up and media drives
that Final Cut Express have unfettered access to the media files on the drive. That access can be compromised if a drive is busy accessing system files or application files at the same time it is trying to access media files. Any interruption in the steady data rate of 3.6MB per second can result in unacceptable performance, Dropped Frames, and an interruption of capture or playback.
Another problem with using a start-up drive as a media drive is that it may result in fragmentation of the drive and thus poor performance. A start-up drive containing the system and applications contains many thousands of small files that are used constantly by the system. As you work, you will also be saving files all the time that relate to your work. Since files are constantly being created, saved, thrown away, and so forth, the hard drive can quickly become littered with files scattered across a large, relatively empty disk.
A frequent result of mixing a lot of these small files and large files on a single hard drive is that sometimes the larger files must be broken up into smaller pieces to fit on the drive. Although there is plenty of free space on the drive, it may not be contiguous (i.e., unbroken) space. For example, if you have 2GB of space left on a drive, but that drive has small files written randomly around its area, you may have only a few much smaller contiguous spaces left on the drive. The space left may equal 2GB, but it is actually 1GB plus 250MB plus 500MB plus 250MB.
In order to write or read at the highest level of efficiency, you want to be able to write large files as contiguous files that are not broken up into smaller pieces to fit the available drive space. Fragmentation is not merely a malady for start-up drives. It occurs anytime you begin to approach the limits of capacity for a hard drive. Fragmentation can also occur on a dedicated media drive, even though there are few small files there. Whenever you are constantly writing and throwing away files, especially as you approach a drive’s capacity, fragmentation can occur.
Consider this analogy. You are a parking lot attendant, and you have a certain number of parking spaces to use. At the beginning of the day, there are a lot of free parking spaces for you to choose from to park the incoming cars. It takes you almost no time to find a place to park a car. But as the lot fills up, the empty spaces get farther and farther apart and harder to find, until it takes you several minutes to find a free space. The cars leaving the lot do not leave in an orderly fashion, but just free up spaces based on where they were originally parked. As the cars back up, waiting to be parked in your lot, your performance as an attendant decreases.
As the drive fills up from capturing, the free spaces get harder and harder to piece together so that large video files can be written to them. As the drive reaches full capacity, it takes longer and longer to write or read the file. As a result, our data rate dips down below the necessary 3.6MB per second. Correct playback and capture become impossible, and you start to get Dropped Frames warning messages.
One method that some people use to try to wring more drive space from their Macintosh is to partition their single hard drive into smaller partitions. Partitioning involves creating two apparent logical drives from a single physical hard drive. The single physical hard drive is formatted into two distinct sections that are treated by the system as two completely different hard drives. If you had an 80GB start-up drive, this might seem like a clever way to reclaim much of the wasted start-up drive space for media purposes, since any given start-up drive uses at the most 20GB.
The problem is that this method does not really increase data rate performance, since you are still dealing with a single physical hard drive, however dissected. While you may eliminate fragmentation as an issue, you will encounter spotty performance as your startup partition and the media partition fight for dominance. Using two separate physical hard drives, on the other hand, ensures that if the system or application files need to be accessed while media files are in use, there will be no competition between the two, and there will be a lower probability of fragmentation resulting from the mixture of system or application and media files. There’s nothing wrong with partitioning your start-up drive or partitioning your media drive either, as long as you don’t use the same physical drive for your start-up drive and for your Scratch Disk media drive.
Learning to manage your media drives through the Scratch Disk Preferences will keep this from happening to you. You must learn to organize your media and not simply blindly accept the default media locations that appear when you start up Final Cut Express. Although you may not experience problems initially when you begin working or even after many edit sessions, the time will come when sloppiness in maintaining your media will come back to haunt you. Those situations can be avoided if you begin work with your media resources organized and under control. Before you scream about Final Cut Express being buggy and causing Dropped Frames messages, consider whether your drive configuration is the culprit!
Can you get away with using your system drive for your Scratch Disk location? Sure, Final Cut Express will let you set any drive location as a Scratch Disk location. It will even let you specify that an Iomega Zip disk is your Capture Scratch! Obviously, that would never do. Unfortunately, this makes it your responsibility to use a separate hard drive. You can work for a while without a dedicated media hard drive for your video, but eventually it will cause performance problems, and probably at the worst possible moment. If you don’t have a separate physical hard drive that you can dedicate to capturing video, start saving and looking for one so that you can rectify the situation. For help on figuring out hard drive solutions, refer to Appendix C.
A Look at the Scratch Disks Preferences Tab
To properly set your Scratch Disk Preferences, take a look at the top of the Scratch Disk Preferences tab (see Figure 2-31). Starting at the left of the tab, you will see four check boxes, two buttons, and a bit of text. The four check boxes are labeled Video Capture, Audio Capture, Video Render, and Audio Render. The two buttons are labeled Clear and Set. The information to the right of these items is a number describing the amount of free space that currently exists on the presently set Scratch Disk drive, followed by the directory path to that drive. The default drive assignment when you install Final Cut Express is the start-up drive, and it should be changed before you begin work if you have a second drive specifically for capturing media (the recommended configuration). You will see that
there are a total of 12 lines of check boxes and buttons, which means that you can assign up to 12 different media drives or partitions (you’ll have to use the scroll bar there to get to them all).
When you capture or render media, the check boxes on the left indicate the drive location where Final Cut Express will send the designated media files. If you are using Firewire and DV, you should always have all four enabled for each Scratch Disk location you assign. You should be using the same drive and folder for not only the video and audio files you capture through Firewire, but also the video and audio files that you generate when rendering footage in Final Cut Express. If you assign more than one drive or folder for your media, make sure to enable each check box for each assigned location.
The Clear and Set buttons allow you to navigate to and change the media locations when necessary. Clicking Clear will remove the current media location from the right and replace it with the message “〈None Set〉”. The only exception to this is that there must always be at least one media location assigned, so if you have only one line assigned, the Clear button will be grayed out and unavailable.
Scratch Disk Assignment: Follow the Next Steps Precisely
1. Click the Set button of the first Scratch Disk assignment line. You will be immediately be confronted by a dialog box named Choose a Folder, asking you to select the appropriate location for designation as the Scratch Disk. Drag the bottom scroll bar all the way to the left so that you are looking at all the drives available on your system (see Figure 2-32).
2. Single-click the drive you want to set as your media drive. When you do, the pane to the right should show you what, if anything, already exists there. Hit the New Folder button below the directory panes. In the New Folder dialog box, name the folder “1stProject_Media_Folder” or something equally project-specific and
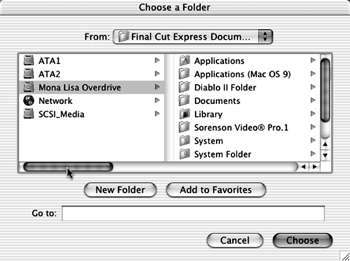
distinctive. Be careful not to include any forward slash characters (“/”) in the name of this folder, which can cause problems in the file naming method of the Mac OS. Click the Create button (see Figure 2-33).
3. After clicking the Create button, you will see that the folder has been created and that it is selected in the dialog box. If you accidentally click something else and deselect it, simply single-click it again to reselect it. With the folder selected, hit the Choose button at the bottom right of the dialog box (see Figure 2-34). Immediately after hitting this button, you will be returned to the Scratch Disk Preferences.

Figure 2-33Create a new folder

You’ve just set your first Scratch Disk, and you’ve done it correctly! Take a look at the information next to the Set button, and you should see the amount of free space on your media drive displayed in gigabytes (GB), followed by the exact directory path to the place in which you saved the folder (see Figure 2-35).
When you name your media drive and your project’s media folder, make sure to give them distinctive names. Final Cut Express can miss the difference between “Media1” and “Media2,” for example. A better system is to actually number the drives, using a number at the beginning of the drive’s name (e.g., “1Media” and “2Media”). If you have more than

Figure 2-35A correctly chosen Scratch Disk
one type of drive on your system, such as both ATA and SCSI drives, you may want to include such information in the drive name (e.g., “1_SCSI_30GB”), where 1 is the drive name, SCSI is the drive type, and 30GB is the capacity. The name might look a little ungainly, but after you’ve got four or five drives in your system, it can be a little difficult to remember whether “Fred” is an ATA or a SCSI and how big it is.
To rename a drive or partition, simply single-click its present name. When the name becomes highlighted, type in the new name, up to 31 characters. You should take similar care when you name the Capture Scratch folder you will be selecting in the Scratch Disk Preferences tab. “1stProject_Media_Folder” may be a good idea for the folder you establish on your first media drive, but you should name the next one something distinctly different.
Another thing to remember is not to include the forward slash character (“/”) in any Scratch Disk name or directory. Since Mac OSX is a Unix-based operating system, the forward slash has a unique meaning to the system itself. Using it for a folder, file, or drive name can cause huge problems. Restrict naming conventions to alphanumeric characters.
Every location that you have dedicated as a Scratch Disk will have one such media folder on it. It may seem a little strange to create a folder on the media drive, but understanding how Final Cut Express organizes its captured media resources will demonstrate how quickly media can get out of control and clarify how important it is to have media folders set up uniformly and consistently.
Take a look at the project media folders you just created on your media drive (see Figure 2-36). When you assign a drive or folder as the Scratch Disk, Final Cut Express creates three folders inside of it: a Capture folder (for video and audio, which Firewire captures together and considers as one file), a Render folder (for rendered video from the project),

Figure 2-36The project media folders created by Final Cut Express
and an Audio Render folder. These Final Cut Express-generated folders cannot be renamed without unlinking everything in your project, so don’t rename or even move them, especially while Final Cut Express is running.
When you go to capture video or audio, Final Cut Express looks in the Capture folder in the Scratch Disk folder you assigned. If it does not find a folder whose name matches the name of the current project, it creates a new folder for this purpose. Every time media is captured using a new project, Final Cut Express will create yet another project media folder in the Capture folder of the folder you have assigned as the Scratch Disk.
It is easy for this process to get out of hand, particularly if you are sharing your editing station with other users. The problem can be compounded by the fact that, when started up from the application alias, Final Cut Express always opens the last project that was open and always retains the Scratch Disk settings that were used the last time Final Cut Express was run (with the exception that logging in as individual users keeps these settings separate). This means that unwary users can start up another person’s project, capture a lot of media to the wrong drive or folder, and then walk away without realizing the damage they have done to both themselves and their colleague.
These issues highlight the care that must be taken in the proper setup and maintenance of media resources in a Final Cut Express editing station. Setting up the Scratch Disk is not difficult, and if you follow the preceding method for setting it up, you may never have to find out why the process is so necessary. After you have set up a Scratch Disk folder for each media drive you want to use, you can get to work. As you return to Final Cut Express to continue editing your project, simply select the media folder you created the first time for your Scratch Disk again rather than setting up a new media folder each time you edit. Make sure you do so, though.
To wrap up the settings on the Scratch Disks tab, look underneath the Scratch Disk assignment columns. You will find six items that need to be addressed (see Figure 2-37).
Waveform and Thumbnail Cache
Waveform and Thumbnail Cache locations are set on this tab. Thumbnail and Waveform caches store the thumbnail and waveform data for faster screen redraw. Final Cut Express will function quite well with these caches defaulted to the start-up drive, although choosing a very fast media disk can dramatically improve the rubberbanding and thumbnail

Figure 2-37Additional Scratch Disk settings
display performance described earlier in the chapter. Some users have reported performance boosts through using high-speed disk solutions for these caches. If you are getting a lot of “Preparing Video for Display” dialogs and long hangs before a sequence loads, consider reassigning these caches to your media drive.
Autosave Vault
Once again, we encounter the Autosave function, this time in determining the location that Final Cut Express will use to save the autosave archive files. Click the Set button and locate the Documents folder within the Users directory on your start-up drive. Simply pull the bottom scroll bar all the way to the left of the dialog box, and then select the Mac OSX start-up drive. In the next pane, select the Users folder, and in the next pane select the appropriate user (if more than one exists on that station). Finally, choose the Final Cut Express Documents folder (see Figure 2-38). Within this folder, Final Cut Express will create a folder called Autosave Vault. It will further create a folder for each project inside the Autosave folder. In this final folder, Final Cut Express will automatically save each copy it makes of your project.
Don’t worry; you will rarely, if ever, have to search in that folder for anything. One of the coolest features of Final Cut Express is that if you ever have to return your project to the way it was when it was autosaved at any time, there is a command in the File dropdown menu to allow you to choose the correct backup project file from inside Final Cut Express itself (see Figure 2-39)!
Minimum Allowable Free Space on Scratch Disks
Adjust the Minimum Allowable Free Space on Scratch Disks setting to at least 10% of your smallest media drive capacity. Minimum Allowable Free Space on Scratch Disks is a setting that helps to eliminate the problem of disk fragmentation mentioned earlier in the chapter. The field next to it allows you to enter an amount in megabytes (see Figure 2-40). When a Scratch Disk fills up and has only the assigned value of remaining storage space, Final Cut Express either switches to your next assigned Scratch Disk, or, if another Scratch Disk has not been assigned, aborts the capture. We can set a healthy buffer here to avoid reaching a situation in which an overcrowded drive might deliver compromised drive performance.
The default setting for this field is 10MB, but this is far too low to provide any measure of security. There is much room for argument regarding the best Minimum Allowable setting, and it really depends on the size of the media drives in question. A good rule of thumb is that the Minimum Allowable should be set to at least 10% of the drive’s capacity. This means a setting of 2GB (or 2,000MB) for a 20GB drive. Such a buffer space is generally large enough to protect a drive from fragmentation but doesn’t waste much drive space.
Limit Capture/Export File Segment Size To
This setting contains a couple of options, a couple of implications, and a bit of history. The options of the setting are to disable it completely or to enable it with a specified limitation

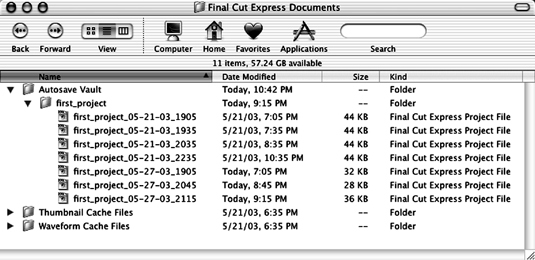
Figure 2-40Adjust the Minimum Allowable Free Space
to the size of the file either captured or exported using Final Cut Express. If the setting is enabled, the default file size limitation is set for 2,000MB, or 2GB (see Figure 2-41).
Several years ago, in the old days of Mac OS version 8 disk formatting, file sizes larger than 2GB would result in a file error. In order to capture DV clips that were longer than about 10 minutes (about 5 minutes to the gigabyte for DV compressed material), the solution was to segment the capture files so that no individual file size reached this 2GB file size limit. The segments were linked together for correct playback, but they were individual files on their own. All video editing applications had to deal with the file size limit of 2GB in some proprietary way.
With the arrival of Mac OS 9.1, the 2GB file size limitation was eliminated, allowing the capture or export of file sizes up to 2 TB (terabytes)! File segmentation is no longer necessary, and this option may be safely disabled, with an important rare exception: Files larger than 2GB—or “>2gig,” as they are sometimes referred to—require the drive to which they are written to be formatted with the Mac OS Extended Format. If you have a disk in your system that is formatted using the original Mac OS Standard Format, or that is PC-formatted (quite possible if you purchased the drive bare from a company that sells both
Figure 2-41Limit Capture/Export File Segment Size

Macs and PCs), you cannot write files larger than 2GB to it. If you are receiving file errors whenever you capture or attempt to export files or clips longer than 10 minutes, this may be the cause.
If you are not sure about the type of format of a disk, select the disk at the Desktop level, go to the File drop-down menu and select Get Info, or hit Command-I for the shortcut. The General Information will describe the format type as either Standard or Extended (see Figure 2-42). If the drive shows Standard, you should reformat at your earliest convenience to Extended using Mac OSX’s Disk Utility tool. Be aware that this reformatting will wipe the drive and irrevocably delete any data on it.
Limit Capture Now To
The setting Limit Capture Now To can be disabled or set to limit the length of the capture to a specified number of minutes (see Figure 2-43). You can use this setting to capture long clips without having to sit and watch your machine go through the process. Since there are issues with capturing clips that have timecode breaks, you can avoid the problem by starting a Capture Now process and setting a limit to the length of the capture such that the capture process ends before the footage on the tape. This eliminates the necessity of your being present to stop the capture.
Another issue of relevance is that this avoids long hang-ups between the time you hit the Capture Now button and the time the capturing process actually begins. When Final Cut Express captures a clip, it has to prepare a space for the clip on the Scratch Disk drive. If you are using the Capture Clip process, this is quick and simple. Final Cut Express knows
Figure 2-43Limit Capture Now To
exactly how much drive space will be necessary for the clip to be captured, since it knows both the data rate of the capture and the length of the capture (for instance: 10-second clip ×3.6MB per second = 36MB capture file).
If you are using Capture Now, Final Cut Express has not been informed of the ultimate length of the capture and assumes that the resultant clip will use up all the available disk space on the Scratch Disk! It can take time to arrange this, which can lead to a rather long hang-up as you wait for Final Cut Express to actually begin capturing. If you have very large Scratch Disks in excess of 120GB, you might have to wait for as long as several minutes, all the while watching your footage pass by with Final Cut Express still not beginning the capture. Timing the beginning of the capture so that it begins where you want it to begin can be frustrating as well.
If you cannot log your clips and must rely on Capture Now, the Limit Capture Now To setting can correct this problem. If you set it to, say, 5 minutes, Final Cut Express will know that the captured clip will need only so much Scratch Disk space, and the capture process will begin almost instantly. The default time, if the setting is enabled, is 30 minutes, but you can choose a limit that suits your purposes.
The Easy Setup
Having completed the Preferences for the application, we now move on to the Easy Setup necessary for correctly capturing video and audio footage. Many of these settings are critical, and you should visit them at each edit session and make sure that they are appropriate for your situation. As with the Preferences, these settings are not stored in the project file and will simply be the same as the last time they were used.
Although the hardware on your Final Cut Express station will not change much over time, you must inform Final Cut Express correctly about such things as the type of video and audio data it will be receiving, whether or not timecode will be present, etc. The beauty of Final Cut Express is that it is what we call hardware agnostic. This means that it will function more or less the same whether we have a camcorder, deck, or Firewire converter box.
Easy Setups are simply presets of all different possible arrangements that are to be used at a given edit session. The Final Cut Express software installs 18 presets that are a pretty good generic guess at what you will be using. Unfortunately, even within the closely standardized world of Final Cut Express Firewire DV editing, there are subtle variations in the Easy Setup that can have a major impact on the progress of your project. The presets that Final Cut Express installs may not be accurate for your DV source footage, camera, deck or converter box, timeline needs, or video and audio monitoring situation. Clearly you need to correctly configure based on your specific needs. The rule of thumb is “Your capture settings must match what’s on your tape, and your sequence settings must match your capture settings.”
Fortunately, this is an easy process. Upon launch, Final Cut Express is able to detect video and audio hardware such as camera and decks at each of the Macintosh’s ports and buses. Before going through the process of choosing your Easy Setup, make sure that your camera, deck, or converter is plugged in, turned on, and connected to the Macintosh via Firewire. If you do this and still do not see the device as an option as you step through the settings, quit Final Cut Express, reboot your Macintosh, and then restart Final Cut Express. That should cause Final Cut Express to recognize and initialize the device.
In the section that follows, we will go through and come to understand the settings in the Easy Setup tabs that must be addressed specifically for correct capturing of video and audio. In working on your own materials, you will likely find that it is easiest to approach these settings by glancing through them at the beginning of each session with Final Cut Express (or whenever you need to change them!).
The Easy Setup Dialog Box
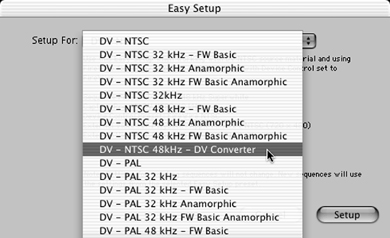
To access the Easy Setup choices, look under the Final Cut Express drop-down menu and choose Easy Setup, or hit Control-Q (see Figure 2-44). A window will pop up with a dropdown menu and some descriptive text (see Figure 2-45). The drop-down menu lets you pick the Easy Setup that’s appropriate to your situation. The text gives you the particulars of that setup. Each bit of information in this text tells you which option in the Easy Setup tab is appropriate for your own system. No matter what camera, DV deck, or converter you have, Apple has an Easy Setup preset ready for you in the list. It’s your job just to select the right one.
The default drop-down choice will be the one you selected after you first installed Final Cut Express, probably DV-NTSC or DV-PAL. Although everything you will be capturing and editing will be DV material, there are still some variations that have to be taken into account. When you capture video and audio, you create a link from a clip in your project file in the Browser to the digital video and audio data that is saved in the media folder of your Scratch Disk or media drive. Correct capture settings determine whether the media works correctly once it is in your system, whether the clip in your project accurately reflects
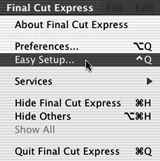
Figure 2-44Accessing Easy Setup

the media that is on your drive. If they are not set correctly, the media in your projects will misbehave, causing you no end of grief. This is the most common cause of problems in beginner use. You have to tell Final Cut Express exactly what it is capturing. If you don’t give it the correct information about the video and audio coming in, it will misbehave later on.
There are many different presets for generic DV Firewire capture with audio sample rate settings for 48K and 32K, for anamorphic 16×9, and Basic Firewire or Normal Firewire for both NTSC and PAL. In addition, there is a DV Converter variation. Each of these possible arrangements of audio sample rates, aspect ratio (normal 4×3 and widescreen 16×9), basic or more specialized Firewire protocols, and DV Converter is available. In the next section, we will sort out the correct Easy Setup for your project.
Audio Sample Rates
When we capture from DV tape, we need to tell Final Cut Express which audio sample rate the tape was originally recorded (see Figure 2-46). In DV cameras, the sample rate is usually referred to as 12bit or 16bit rather than 32K or 48K. If you are not sure about the correct rate, play the tape back in the camera or deck. In most devices, you will see an onscreen display telling you the sample rate of the footage. When you see the 12bit or 16bit rate displayed, you will know which to use in your Easy Setup—12bit means 32K and 16 bit means 48K. Determine which sample rate the footage you intend to capture is recorded at and keep this in mind as we look at the other variations. For a great deal more information about sample rates, see Appendix A.

Anamorphic Video
The next variation is called anamorphic (see Figure 2-47). This is a more technical term for what we usually call widescreen or 16×9. With DV, it is possible to shoot with a far wider angle, and thus differently shaped video frame, than normal, or 4×3, video. The two different possible shapes of the film and video screen are referred to as aspect ratios. If you’ve ever watched a Hollywood film on television and wondered why there are black bars at the top and bottom of the video frame, known as letterboxing, it is because the wider angle of widescreen and the different shape of the 16×9 aspect ratio mean the whole frame must be shrunk to fit in the regular television 4×3 frame.

Figure 2-47Anamorphic video
Now to explain what anamorphic really means, we have to go into how cameras and decks do this magic of widescreen. When you change the camera into widescreen, or 16×9 mode, the camera stretches the image it is recording so that the subjects in the frame look too thin. When the time comes for playback, the image will be squeezed back into the correct ratio. When it is squeezed down to display correctly, the video frame will have black bars at the top and bottom, which is the area left blank when the originally stretched footage is compensated for.
Why use anamorphic instead of normal 4×3 aspect ratios? There are a few reasons. Many people consider it to be particularly cinematic, since the short, wide shape of the frame is very close to the elongated shape of a movie theater projection screen (this is why Hollywood movie releases for home viewing are usually letterboxed). Another reason that it is useful is that the high definition television standards approaching on the horizon will use 16×9 as the normal aspect ratio. This is why the High Definition Televisions (HDTVs) you see in stores and advertisements appear so wide. Many content producers are now generating material in 16×9 so that it can be repurposed when HDTV becomes a reality in most homes.
When Final Cut Express encounters DV footage that was shot with the widescreen setting in the camera’s menus, it is smart enough to recognize that the material is anamorphic and to mark the captured clip as such. Unfortunately, many DV shooters are increasingly using “widescreen adapters,” relatively expensive special lens adapters that optically stretch the image out rather than letting the camera do it digitally from a menu setting. The reason is that the camera’s menu option doesn’t yield as high quality an image as does the lens adapter, because the camera’s digital method doesn’t actually use the entire camera imaging chip. The problem is that when one uses the lens adapter, Final Cut Express will be unable to see that the footage needs to be squeezed. Thus, for the material to be handled correctly, you need to tell it that the footage is stretched, or it will appear skinny and weird. Thus, if you have used a widescreen setting in the camera or have used a lens adapter, you want to make sure that you have this set correctly in Final Cut Express.
Device Control
This option is concerned with Final Cut Express’s ability (or inability) to remotely control the deck or camera you are capturing from. DV Firewire carries timecode and Device Control data along with the video and audio. Correctly configuring the Device Control presets allows you to take advantage of this feature, adding both security and convenience to your working process (see Figure 2-48).
Final Cut Express preinstalls three variations on the Device Control concept that work with most DV editing setups. The options are Firewire, Basic, and DV Converter. The difference between Firewire and Basic are that Firewire contains some special tweaks that may improve performance with devices that can access them. Essentially, Basic is a stripped-down version of Firewire that only includes the most basic device controller. The Firewire preset will work with most DV cameras or decks that are approved for use with Final Cut

Express (and quite a few that aren’t). That said, there are a few cameras and decks that deliver much more stable performance when set to Basic. You can find this information about your particular camera or deck on the compatibility charts at Apple’s Web site.
DV Converter
DV Converter is an option for working with a DV device that does not generate timecode, or is used in situations in which timecode could hamper your capture operations. DV converter boxes convert analog video and audio, such as Betacam or VHS/SVHS source tape into DV data that can be captured using the Firewire connection and Final Cut Express. However, most converter boxes do not generate DV timecode or Device Control data along with that DV data stream when capturing. Final Cut Express always looks for timecode and Device Control data in the Firewire data stream prior to a capture unless you tell it not to by selecting the DV Converter option in the Easy Setup (see Figure 2-49). In order to capture video through Firewire from a source that does not generate timecode and Device Control data, you must tell Final Cut Express to stop looking for it. If you experience a long delay when you start to capture, and the Capture window says, “Waiting for Timecode,” chances are you have this set incorrectly.
There is another situation where this Device Control setting can be useful. Suppose you are working with a deck or camera that does in fact generate timecode and Device Control data but has lots of timecode breaks on the tape. When there is a space between two recorded segments on a tape in which nothing is recorded, we say that there is a time-code break on the tape. Timecode breaks are the bane of editors and can cause tons of problems in capture.
Timecode breaks are usually easy to identify on most consumer and prosumer DV cameras and decks, because when the device begins recording on a tape where there is no
timecode already present, the deck or camera sets the timecode of the first frame recorded to 00:00:00:00. If recording is begun where timecode already exists, the device will pick up the timecode number that is present and continue from that number, a process called regenerating timecode.
You can therefore easily determine whether your timecode is clean (i.e., has no breaks) by watching the numbers as the tape plays. As long as the displayed timecode number never resets to 00:00:00:00 (or skips a large number of frames), you can be reasonably sure that your tape has no timecode breaks.
If you have timecode breaks that keep you from being able to capture specific areas of your material, setting Easy Setup to DV Converter, and thereby ignoring timecode entirely, may provide some flexibility in overcoming the problem. In general, though, the best medicine is always prevention. Avoid timecode breaks, and always work with a preset other than DV Converter whenever possible. Taking advantage of timecode will make your editing experience much safer and more efficient. Remember that capturing footage with timecode breaks can have a consequence with the audio sample rate and the Sync Adjust Movies feature of the Preferences as well. Timecode breaks are just no good.
Making the Easy Setup Choice
Knowing what we know of the options now, we can correctly set up based on what we are going to capture and edit with. Look at the tapes you are capturing, take note of the video standard in use in your area (NTSC or PAL), the audio sample rate (32K or 48K), the aspect ratio (anamorphic or normal) and Device Control (Firewire Basic or normal). After you have selected the appropriate combination, select the one you need, hit Setup, and the application will be ready to go.
Capture
Now that we have Final Cut Express perfectly set up to capture our video and audio from DV, let’s get right to it. There are three basic techniques to bring media in: capturing logged clips, capturing “Now,” and Project (see Figure 2-50). These three methods have different requirements and come into play based on differing situations. Capturing logged clips requires not only that you use a deck or camera that Final Cut Express can control, but also that you use timecode. Capture Now, on the other hand, simply captures whatever is currently streaming through the Firewire connection, regardless of the presence or lack of timecode data or Device Control. Finally, Project allows you to recapture your entire project if something goes wrong, such as accidental deletion or a failed hard drive.
What Is Capture?
Capturing is the actual method of finding the footage on the DV tapes you want to edit and bringing them onto the computer’s hard drives so that you can access the material in your project. There are two different ways to capture your footage in Final Cut Express: Capture Now and Capture Clip. Each involves a different approach to the initial stages of our edit session, so we will go through both. But first, we will look at a few things you can do to make the most out of your hard drive storage resources.
Efficient Capture Techniques: The Paper Log
Before we discuss the capture process, it is important to mention that there are a couple of different strategies you can use to make the most of your hard drive resources. The first is referred to as a paper log. This old but reliable system involves simply watching your tapes and writing down the timecode numbers of the clips you want to use when editing.
Most shooters produce source tapes that include far more material than will be used by the editor. The amount of material shot on tape compared with the amount of material used in the final edited project is called a shooting ratio. Because tape is so incredibly cheap, many shooters are inclined to let the tape run rather than stop and start it for the important parts. Common shooting ratios for video production are often higher than 6×1 and produce tons of material that will only waste space on your drives if captured en masse.
Captured video files are huge, even when using DV, which has a relatively low data rate of 3.6MB per second. Five minutes of footage takes up over a gigabyte of hard drive storage space. If you were shooting at roughly a 6×1 ratio and you just captured an entire tape, this would mean that you stored 60 minutes, or 12GB of video on your drive, when you only needed to store 2GB at most.
Clearly, this is not the most efficient way to work, even with today’s enormous and inexpensive hard drive solutions. You will find that you still run out of drive space far too quickly. There is no such thing as too much hard drive space. Previewing your tapes and

taking loose notes can easily eliminate the problem. Simply jot down the beginning and ending timecode numbers for each section of footage you know you need to capture and edit (see Figure 2-51). Never fear that you might need something you forgot; if you ever need more footage, simply go back in and get that as well.
What if you are collaborating with someone in a project and you both need access to the tapes to create paper logs? You have only one set of source tapes, and moving them around makes you a little nervous, not to mention the fact that constantly playing back and shuttling around on the source tapes increases the likelihood of damage to the tapes themselves.
The solution is another time-tested one. Create what is referred to as a Timecode Window Burn Dub. Most DV cameras will allow you to output the video and audio to analog VCRs. Indeed, your Final Cut Express editing station will be based on this ability so that you can preview the editing on an NTSC or PAL video monitor. Many DV decks and cameras will also let you display the timecode numbers of the footage on-screen in the bottom corner as the video plays.
To create a Timecode Window Burn Dub, simply record a copy of your source tapes to VHS tape with the timecode display turned on in the deck or camera (see Figure 2-52). Then you can use this VHS dub to get the numbers you want by pulling them right off
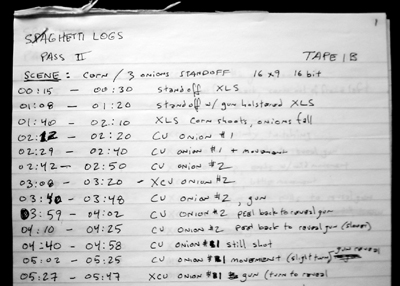
the television screen without having to jeopardize your precious source DV tapes. Since the displayed timecode numbers will exactly match the timecode numbers on the DV source tape, you will have an accurate log display of timecode on your VHS tapes. This will eliminate excess playing of the original DV source tapes.
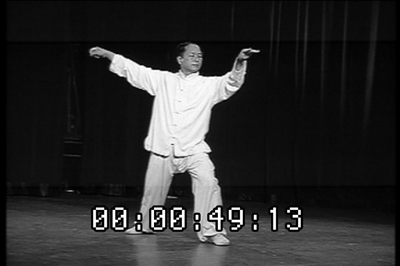
Figure 2-52Timecode Window Burn Dub
Do you have to use paper logs to capture, though? Not at all. You can easily manually log and capture your clips from right inside Final Cut Express (albeit one at a time). Either system is good, although you will find that, once again, your particular source material decides which method is most appropriate. Paper logs are most useful when the shooting ratio is very high and when your necessary footage is spread over many source tapes. Manually logging your tapes from inside of Final Cut Express is more useful when very precise and instant logging and capturing is necessary over a limited amount of source material and, of course, when paper logs do not exist for whatever reason.
Manual logging is a very simple act. Simply shuttle back and forth around your footage in the Capture window, locating the footage that you want, setting In and Out points, and naming each of the clips you intend to create. After setting an In and Out point for a clip, you simply hit the Capture button, and Final Cut Express will roll up and capture exactly what you want, right down to the frame.
Let’s go through and log a clip. As you might expect, there is a recommended process for this. Although Final Cut Express will allow you to log clips in a sloppy, haphazard manner, doing so really negates the safety, security, and reliability you are gaining through the process of capturing with timecode. Setting up and organizing your project will save headaches later on.
Create a Capture Bin
First we will create a Capture Bin, which is simply a bin in your project, but is the specific bin that all clips will be placed in as they are captured. If you have not established a Capture Bin yet, Final Cut Express assumes that the Project tab itself is the Capture Bin. This might be OK for the first few clips you create, but very quickly, you will have masses and masses of clips cluttering your Project tab, making it difficult to find anything at all.
Don’t make that mistake. Start out with good organizational habits. Final Cut Express offers really strong tools for organizing your project, so take advantage of them. Start by creating and naming a separate Capture Bin for each source tape you capture from. As you get the hang of logging, you will find that certain types of projects need different organizational techniques, and you will find that Final Cut Express is flexible enough to accommodate them.
- Go to the File drop-down menu, and select New and then Bin in the submenu. When the bin appears in your Project tab, change the name of the bin to “#1 Tape_Logging_Bin” and hit Enter (see Figure 2-53). If you Control-click the Project tab, you will find options for both creating a new bin and setting the Capture Bin.
- After changing the name of the Bin, make sure it is still highlighted, then Control-click the bin, and select Set Capture Bin (see Figure 2-54). When you do this, a little film-slate clapper icon should appear next to the bin’s icon in the Project tab.

This clapper icon identifies the bin as the current Capture Bin. Once you change that status, any clips that you capture will be automatically sent to that bin for storage, rather than just dumped into the Project tab.
Opening the Capture Window
Make sure that your deck or camera is connected through Firewire to the Macintosh, is powered on, and the camera set to the VTR mode. Make sure that there is no DV tape inserted in the deck or camera just yet. Although it is not technically necessary to remove the tape before going through the next few steps, in a moment you will see the rationale for doing so.

Figure 2-54Set Capture Bin
Go back to the File drop-down menu and select Capture, as shown in Figure 2-55. A window will appear that bears the name Capture. From this window, you will capture your clips, either by running through your tapes and manually finding the footage you want or by using previously organized paper logs.
You may notice that when the Capture window appears, the video signal from your deck or camera jumps a little and switches from whatever was showing before to a blank screen. This is because, despite Firewire’s amazing flexibility, it can still send data in only one direction at a time. When you initialize the Capture window, Final Cut Express reverses the direction of this data from going out of the Macintosh and into the DV device, to going out of the DV device and into the Macintosh. For this reason, you have to remember to close the Capture window when you are finished working in it. Otherwise, you will not be able to switch back to Firewire output from the Macintosh.
The Capture window is divided into halves. On the left is the Video Preview window, which initially displays color bars when not being fed a video source. Ignore the “Preview Disabled” message. The preview will be enabled as soon as you feed it some video. More important, below the preview window and underneath the Play transport button, you should see the message “Not Threaded,” which means that the DV device is present, but
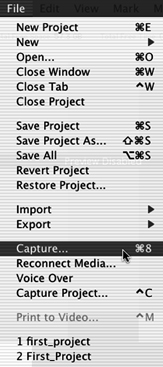
Figure 2-55Opening the Capture window
no tape is inserted (see Figure 2-56). If you see “VTR OK,” this means that a deck or camera is connected, it currently has a tape loaded, and Final Cut Express sees it. Either of these messages indicates that Final Cut Express is in fact communicating with the deck or camera.
Any other messages in this location when you open the Capture window could be an indication of misconfigured settings or even hardware problems. Setting your Easy Setup to DV Converter, for example, will yield a “No Communication” message, as if you had a Firewire device connected but turned off. Of course, if you are using a converter box without timecode or Device Control, you will have to get used to the “No Communication” message.
In addition, do not be concerned that the video quality in this window is rather low. DV Firewire capture is simply a data transfer, and your footage will look exactly the same in Final Cut Express as it does on the tape. The low quality in this window is simply a result of Final Cut Express’s saving a little processing power for the capture process. If you need to see higher quality as you scan your tapes, you can watch the footage on a video monitor coming from the video outputs on your DV device. The frames you choose will be the same ones whether you select them by viewing the monitor outputs from the DV device or from the Capture window.
The right half of the Capture window is the Logging tab (see Figure 2-57). The Logging tab contains information fields that we need to fill out for each clip as we log it. The information you include in this tab when you log a clip will stick with it even after you have captured it. While most of the information you enter here is basically gratuitous and is necessary only for your own organizational purposes, some is critical to your ability to later recapture the media you associate with the clip.
You can never have too much information about a clip. Be as thorough as possible when filling out the fields. You might not think some items are important, but keep in mind that you will be able to organize or perform searches for clips based on the information you put in these fields. For instance, you could stratify a bin based on which clips are marked Good, or alphabetically by name, description, date, or Reel Name. The more information, the better. Because most of this sort of logging work is often repetitive, Final Cut Express will automatically repeat information in some fields, such as the Reel Name and the Clip Name, from one clip into the next as you go.

Figure 2-56“Not Threaded” message

The Reel Name
The most critical field for you to address here is the Reel Name. The Reel Name refers to the particular tape that relates to the timecode numbers you assign with the clip you are logging. The Reel Name is the special link between the real-world DV tape and the Final Cut Express clips you are capturing. Different source tapes can and will have the exact same timecode numbers you are associating with this clip (because almost all DV cameras start their timecodes at 00:00:00:00). The only way to differentiate one clip’s timecode numbers from another clip’s identical timecode numbers is to give them different Reel Names based on the different tapes they were captured from. If you wanted to recapture a project’s clips based on their timecode numbers and then were unable to remember which particular tapes all those clips were originally captured from, you’d be in a lot of trouble very quickly.
It is imperative, therefore, that you develop a system of individually naming your tapes and labeling them in a durable and easily recognizable fashion. Then you must consistently change the Reel Names as you log and capture clips from different named tapes. You will find that if ever the time comes to recapture all the clips you have logged, Final Cut Express will go through and ask you for each tape by Reel Name as it needs them.
We initialized the Capture window without a tape inserted in the DV device for a reason. We want to get into the habit of giving each separate DV tape a distinct Reel Name, as described earlier. Although Final Cut Express will happily allow you to go to the Log window with a tape already queued up in the deck or camera, doing so causes a default Reel Name of 001 to be inserted in the Reel Name field of the Logging tab. Unless you make a point of changing the Reel Name before you begin logging clips, each clip will be assigned the Reel Name 001.
This obviously will not do. However, if you get into the habit of inserting tapes only after initializing the Log window, you will find that each time, Final Cut Express will greet you with this message, as shown in Figure 2-58: “A new tape has been inserted in the VTR. You may wish to change the Reel setting.” Although Final Cut Express will not change the Reel Name for you, you will find that you never forget to stop and change it as necessary if you are alerted by this message. The message will reappear anytime you insert a new tape in the deck or camera with the Capture window open.
If you found that you accidentally set the wrong Reel Name for your clips, you do have a way to correct this. If your Browser window is set to display in List view with columns, scroll the window all the way to the right until you find the Reel Name category for the clip(s). You can always select the clip’s Reel Name and change it here (see Figure 2-59). Final Cut Express will wisely ask you if you are sure you want to do that, since the Reel Name is so critical. When you go to recapture, Final Cut Express will ask for the correct Reel Name, based on the current information in the Reel Name field of the clip in the Browser window.
In the Logging tab, look above the Reel box, and you will see a broad button labeled Capture Bin. Inside the button should be the name “#1 Tape_Logging_Bin,” which you assigned as the Capture Bin earlier in the chapter. Although you cannot directly change the Capture Bin to another preexisting bin from the Capture window, you can create a totally fresh Capture Bin by clicking the New Bin button to the right. You can also open the current Capture Bin into a new window by clicking the Capture Bin button. You can have only one Capture Bin set at a time, no matter how many projects you have open at one time, so you have to be a little careful about where you are sending your logged clips.

Figure 2-58Prompt when inserting a new tape
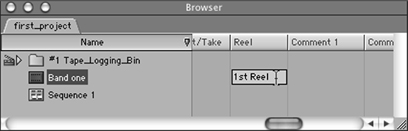
Figure 2-59Changing the Reel Name
Keeping your eye on the ball will keep your clips in order and your project free of clutter and lost work.
The Name, Description, and Marker Fields
Below the Reel field is the Name field. You have two choices here, since for some reason you cannot type directly into the Name field. You can type the name into the Description field, and when you hit Enter, you will see the information appear as well in the Name field. The other method is to wait until you have selected your Timecode In and Out Points and are ready to actually capture the clip to name it. Next to the Name field is a small check box labeled Prompt. If you check this box, on starting the capture of a clip you will be greeted by a dialog box that asks you to name it. The box will provide fields to describe it with logging notes and to mark it as Good or Not Good (see Figure 2-60). Although this method does not give you the option of giving the clip Scene or Shot/Take designations or Markers, you may find it more useful because it forces you to make choices about the naming of your clip, rather than letting Final Cut Express simply add a number onto the end of the name of the last Clip Name you logged. Always take responsibility and make choices that are right for your project.
In the Logging tab, click the sideways triangle to reveal the area labeled Markers (see Figure 2-61). As you log each clip, you can leave special Markers at various points in the clip to help you remember where specific sections are. The Markers are associated only with the timecode of the clip and do not affect your footage at all. But they can make it very easy to divide larger clips into smaller ones, as well as remind you where important parts of the clip are once you bring the media into Final Cut Express.
As you log the clip, just hit the Set Marker button when the playhead is parked on a frame you want to mark, making sure that you enter both the first frame and the last frame of the marked sections. If you want to mark only a single frame, make that frame’s timecode value both the beginning and end timecode value for the Marker. If you want to mark a range of frames, add a Mark In point, then move to the end of the range of frames you want to mark and add a Mark Out point. Add as many Markers or ranges of marked frames
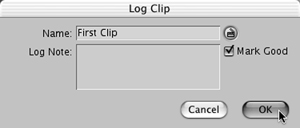
Figure 2-60The prompt for naming new logged clips
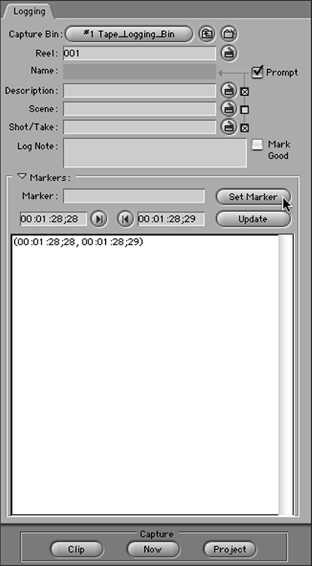
as you want. Name each Marker; you’ll be able to go in and change any information in the Marker after the clip is captured.
The Capture Buttons
Finally, at the very bottom of the Logging tab, you will find three buttons of great importance. The three buttons are enclosed in a box labeled Capture (see Figure 2-62). They refer
to the different methods by which Final Cut Express can capture media. The three buttons are named Clip, Now, and Project, and when pushed, they initiate the kind of capture that they refer to. Each one has a different value in the production process. There are instances where Capture Now will be the smartest option, whereas in other situations, Clip will be the most effective. And in case of disasters such as failed hard drives and the like, Final Cut Express will allow you to recapture the entire project from your original tapes, provided you have been careful to use Reel Names and avoid timecode breaks.
Capture Clip
The first method, Capture Clip, functions by capturing one clip at a time, based on the present values in the Timecode In and Out Points in the Capture window. You can get only one clip at a time this way, although you must still log your footage to get the timecode values you need to capture with. This option will be most useful if you have paper logs with the timecode right in front of you.
Capture Now
The second method, Capture Now, is probably the most frequently used method of capturing clips into Final Cut Express, because to the new user it often appears more intuitive. Push the button and the capture starts. Capture Now begins capturing whatever happens to be streaming down the Firewire tube when you press the button. It will continue capturing from the Firewire tube until you hit the Escape key on your keyboard, or until it reaches the time limit you specified in the Scratch Disk Preferences.
The most important feature of Capture Now is that, unlike Capture Clip, it does not require timecode data for capturing clips. Although when capturing without timecode, you must specify that no timecode is present by choosing DV Converter in the Easy Setup, Capture Now will capture anything coming down the Firewire tube, including a blank blue video screen from a deck with no tape inserted!
Of course, if you are capturing from a DV device that does have timecode, Capture Now will capture and use the timecode that is there. But if you are using any of a number of solutions that do not pass timecode data through the Firewire tube—such as DV converter boxes, Digital 8 camcorders that are playing back video originally recorded on a Hi8 camera, or DV tapes that have extremely spotty timecode data—Capture Now will be the only way that you can capture directly into Final Cut Express.
The Process of Capturing
Let’s log and capture a single clip, using the Capture window to the left of the tabs. We will go through both methods for capturing, first using Capture Clip and then using Capture Now.
Incidentally, if the Capture window is too large and takes up too much of the window, close it and reduce the size of your Canvas and Viewer windows. The size of the Log window is based on the size of those two windows. Keep the Viewer and the Canvas set at 50%, and then tighten up the window dimensions using the pull tab in the bottom right-hand corner of each window (or the green Aqua Minimize Window button that is found in the top left-hand corner of all Mac OSX windows). You want the video window to fit the Viewer and Canvas without resulting in scroll bars on either the side or the bottom. You should adjust the window so that there is almost no gray area surrounding the video window itself. Then reopen the Capture window, and you will see that its size is minimized as well.
The Capture Window
The Capture window is dominated by the Capture screen on the left. Unless Final Cut Express is currently receiving video data through the Firewire tube, the Log preview window will simply show color bars. Insert a DV tape. As soon as you do so, you will receive a message recommending that you assign a Reel Name to the new tape that has been inserted. Do so, using the Reel Name “Tape_#1,” which corresponds to your Capture Bin name (see Figure 2-63).
Scratch Disk Info
After you name the reel, take a look back at the Capture window. At the very top of the window you will see two phrases: Total Free Space and Total Free Time (see Figure 2-64). The values for these designations are the amount of free disk space on the current Scratch Disk-assigned drive and the amount of footage that free drive space can accommodate. This is merely another warning for you regarding your Scratch Disk Preferences. If you see anything unusual here, such as a drive space figure that is too high or low, or a capture limit that is too short, you may have committed an error in assigning the Scratch Disk

Figure 2-63Assigning a Reel Name “Tape_#1”

location. Final Cut Express can’t fix this for you, but it can help you catch your own errors.
Current Frame Timecode Field
Moving to the top right-hand corner of the window, you will see a small watch dial followed by a field containing a timecode value. This field is the timecode for the video frame on which the DV tape is currently parked (i.e., paused). If you have a tape in your deck that contains timecode and Final Cut Express is configured correctly, this window will always report the exact timecode number of the frame on which the tape head is currently parked.
You can also use this field to shuttle around the tape. Because the Capture window actually controls the deck as well as receiving video from it, this field works both ways; it tells you which frame is queued up on the tape head, and you can tell it to go to a certain frame by entering the timecode number into the box and hitting Enter. This is but one of many ways to navigate to locations on your tape.
The Tape Transport Controls and J-K-L Support
Moving below the video window, you will see the playback buttons, otherwise referred to as transport controls. Using these controls, you can shuttle back and forth, remotely controlling the deck from inside Final Cut Express. There are six buttons for controlling playback as well as two knob-wheel-type controllers that mimic physical deck controls.
The most important buttons on the transport controls on any deck are obviously the rewind, pause, play, and fast-forward controls. Final Cut Express makes using this window—and other windows—easier by using a keyboard shortcut convention called J-K-L support. What J-K-L means is that the J key initiates rewind, the L key initiates play, and the K key simply pauses the playhead where it is (see Figure 2-65). Beyond this, J-K-L has the flexibility of variable-speed playback. If you hit either the J key or the L key repeatedly, you will find that the playback speed increases, while K always stops the playback entirely.
Using J-K-L means that you can leave the mouse alone and forget about looking at the keyboard to find the right combination. Resting your hand on the keyboard with your
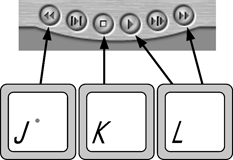
middle three fingers spread over the J-K-L keys is very natural, which is why it has become very popular. Practice using it to move back and forth to find frames you want, and you’ll quickly get addicted to using it.
The other two buttons on the transport are Play Around Current and Play In to Out. Play Around Current simply plays a certain number of frames before and after the frame on which the tape is currently paused. Where does this certain number of frames originate? It is determined by the settings in the General tab of the Preferences, where it is referred to as Preview Pre-roll and Preview Post-roll. Whatever values you entered in that preference correspond to the number of frames that will be played before and after the current frame on which the playhead is parked. Play In to Out is simply a preview of the In point to the Out point based on what is currently entered in the In and Out point fields.
The Jog and Shuttle Wheels
The other two controllers hark back to the world of physical decks. They are referred to as Jog and Shuttle controls. The control on the left-hand side is the Shuttle controller. If you click the Shuttle knob and drag it in either direction, you will find that the deck responds by moving in that direction. The speed of playback corresponds directly to how far in either direction you tug the knob. Shuttling is a great variable-speed method of moving around. The J-K-L controls we just described are referred to as Shuttle controls, because we can determine how fast or slow the playback is by the number of times we strike the same key repeatedly.
The controller on the right-hand side is called a Jog controller. The difference between Jog and Shuttle is that with Jog, a complete turn of the knob results in a limited number of frames playing on the tape, no matter how much force you use to tug the controller. Unlike the Shuttle controller, which can be pulled only so far in either direction, the Jog controller turns a complete 360 degrees, after which a number of individual frames have been advanced. There is also a keyboard frame advance and retreat that corresponds to the Jog controller’s frame-by-frame navigation. These are the Left and Right Arrow keys, which will advance or retreat one frame at a time. Hold the Shift key down when doing so, and it advances or retreats one second.
You will find that Jog and Shuttle have their places and are meant to be used together. Shuttle is useful for moving quickly over large sections of tape, while Jog finds the exact frame you need to edit with. Use Shuttle to get into the neighborhood and then Jog to get the perfect edit frame. But master the J-K-L and Left Arrow–Right Arrow shortcuts rather than dragging the mouse around. Apple will not compensate you for damages caused by carpal tunnel syndrome, so you’d better start protecting your wrist from harm with the keyboard shortcut conventions.
Set the In and Out Points for a Clip
Once you have decided on the In and Out points (i.e., the frames you want to use for the beginning and end of your clip), look below the transport controls to find two timecode data fields, each of which is accompanied by two buttons (see Figure 2-66). These are the In and Out points you will establish for your clip. Before you set any In or Out points, these fields will read, “Not Set.”
Remember that you have to leave enough room for the deck to pre-roll, or get the tape rolling at the right speed, before the capturing starts. The recommended Pre-roll setting is 5 seconds, so you need to make sure that there are 5 full seconds for the deck to roll into before you begin the capture. Otherwise, you will receive an “Unable to lock deck servo” error message when you initiate the actual capture. That means that you can’t really set your first In point for your clips before 00:00:00:06 on your tape! This issue is usually only related to the first clip on each reel number, although it may also apply if you are dealing with a broken timecode, where your timecode resets to 00:00:00:00 in the middle of the tape.
When you have selected a suitable frame for an In point, locate the timecode field on the bottom left-hand side of the window. Click the button to the right of this timecode field, and you will see the timecode number appear there. This button is the Mark In point. The button to the left of the In point field is the Go To In point button, which will simply return the tape to the currently established In point should you need to get there quickly.
Now shuttle a little farther into your tape. When you have found a good location for the end of the clip, look over to the timecode data field on the bottom right-hand side of the window. You will find an Out point button on the left side of this field. Clicking the Out point button inserts a value into the Out point field. As with the In point field, the button on the right of the Out point field is Go To Out point and will quickly roll the
Figure 2-66Setting In and Out points
tape to that frame if engaged. With the establishment of an In and an Out point, you now have a valid, if not yet captured, clip in the Capture window. If you don’t like the In or Out points you created, simply go to a new frame and hit In or Out again.
As always, there is a much faster way to insert In and Out points using convenient keyboard shortcuts. The I key and the O key will insert In and Out points into these fields. The convenience is reinforced by the fact that these keys are directly above the J-K-L keys that you use for shuttling (see Figure 2-67). You rarely need look at keyboard again. Simply keep your hand poised on the J-K-L keys, and when you find either an In or an Out point, move your fingers a half inch up and strike the key. There’s no faster way to log clips, or one that is less stressful on the wrist. A little practice is all it takes, and you’ll be able to log clips without thinking about the process at all. Being able to focus on your editing without thinking about which on-screen button you need to mouse your way to is the key to becoming a good editor.
The Clip Duration Timecode Field
Now that you have entered a valid In and Out point for the clip, look in the top left-hand corner of the window, where you will find another timecode data field (see Figure 2-68). This is the Clip Duration field, which calculates the duration of the current clip, based on the In and Out points. You should see a value here now that you have entered an Out point that follows an In point.
Of course, as with the Current Frame field on the upper right-hand corner of the window, this field can affect the other fields. If, for example, you have already set the In point and you know that you need to log 10 seconds following that In point, there is no need to shuttle forward and find the frame number or even to calculate the Out point in your head. Simply type 1000—which is a shorthand for the timecode value of 00:00:10:00, or 10 seconds—into the Clip Duration field, and it will automatically update the Out point based on the In point and the Duration timecode value.

Figure 2-67Using I and O keys to set In and Out points
Figure 2-68Clip Duration field
Capture Using Capture Clip
Now that you have entered the required information for the clip, you are ready to capture. Click the Clip button in the Capture box on the Logging tab side of the window, and Final Cut Express will begin the capture process. If you selected the Prompt check box on the Logging tab, you will be presented with a box asking you to name the clip. Do so, click OK, and Final Cut Express will wake up the deck and begin searching for the In point. You will see a black screen with a message at the bottom telling you what Final Cut Express is doing at the moment. When it finds the In point on the tape, it will begin capturing and continue to do so until your clip is completely captured. It is now located in your Capture Bin and available for editing (see Figure 2-69).
If you take a moment and look back into the Capture window, you will see that it has set a new In point that is one frame later than the Out point of the clip you have just finished capturing. The new Out point is one frame later than the new In point because you will need to log a new Out point, no matter what the new In point is. This means that Final Cut Express is now ready for you to log the next clip you want to capture.
Capture Now
Logging your clips with timecode for immediate capture strategies is definitely the safest and most efficient method of capturing media. But some Firewire configurations do not

Figure 2-69Using Capture Clip
have access to timecode. And in some situations, capturing a quick clip will be more productive than logging a clip manually as described in the previous section. In these instances, Capture Now will be more effective.
Capture Now and the Relationship with DV Timecode
First, you need to determine whether you are sending timecode data from the DV device through the Firewire tube to Final Cut Express. Remember that just because video and audio are getting captured doesn’t mean that timecode data is being captured as well.
If you are using a Digital 8 camera, only footage that was shot using the Digital 8 camera has valid DV timecode written into the data of the footage. If you are using a tape that was recorded in a standard Hi8 or 8mm video camera, the footage will not have DV timecode. Although you can still easily capture this footage using Capture Now, you cannot do so using the normal Easy Setup and will have to use the DV Converter preset; thus you will not be able to get timecode data for the clip when you capture it. If you are using a DV converter box, no DV timecode will accompany the DV data stream through Firewire.
Also, remember that this refers to any device that offers pass-through (also known as EE-In-Out) operation. Many DV decks and cameras will allow you to connect an analog device to the inputs of the DV deck or camera, which will convert the analog signal to DV on the fly and pass it directly to Final Cut Express through the Firewire connection. Such pass-through connections also do not carry DV timecode and act precisely like a DV converter box.
If you are using Capture Now with one of the aforementioned devices and do not have DV timecode, you may use Capture Now to capture your clips, but you must switch your Easy Setup to DV Converter. This preset will keep Final Cut Express from looking for DV timecode that does not exist. If you do not switch this preset, the attempt to Capture Now will result in a long system hang followed by an error message complaining about “No Communication.”
On disabling Device Control, you will see that the Clip and Project buttons have gone gray and become unavailable. This is because they require Device Control and timecode to operate. Because you have no access to timecode, Final Cut Express will not be able to control the device. This means that you will have to queue up the footage that you want to capture on the deck by hand. This is a slightly awkward way of working in which you hit Play on the device, hit Now in Final Cut Express, and hope that it begins capturing before the first frame you wanted to work with passes by. Although it may work in a pinch, it becomes frustrating rather quickly in larger jobs.
On the other hand, if your device has DV timecode, you can use Capture Now with complete Device Control and timecode. In this case, make sure that the Device Control preset is still set correctly for the configuration you want to use and not to DV Converter.
The Capture Now Process
If you have Device Control and DV timecode, make sure that you fill out the Logging tab information to the right, as if you were performing a logged capture. In particular, make sure to enter a Reel Name and Clip Name, since your clip will carry valid timecode data and should be associated with a specific tape. Of course, if you have no DV timecode, such logging data will not be stored with the clip anyway.
If you have Device Control, start the tape rolling using the J-K-L keys, as described in the section on Log. They will perform the same way. If you have no Device Control, simply hit Play on the DV deck or camera. You will need to queue up your tape a few seconds ahead of the place you want to start capturing, because it takes a moment for Final Cut Express to prepare the Scratch Disk for your media. Think of this as a pre-roll and add at least 5 seconds so that you are sure you get the In point you wanted plus a little extra. If you have rather large media drives, be warned that you will need to start the tape rolling much earlier than you think. Setting the Limit Capture Now To field in the Scratch Disk Preferences to a reasonable number will help speed the beginning of the Capture a great deal.
As the tape is rolling, hit the Now button in the Capture options. When you do so, the Currently Capturing window will pop up, and you will watch what is being captured stream in (see Figure 2-70). When you are ready to stop the capture, simply hit the Escape key. The Escape key is the only way to stop Capture Now, with the exception of reaching the Capture Now limit that you set in the Scratch Disk Preferences tab in the Preferences.

Figure 2-70Using Capture Now

When the Currently Capturing window disappears, you will see that a new clip has appeared in the Capture Bin (see Figure 2-71). If you did not name the clip in the Description field of the Capture window, the clip will carry the name Untitled 0000 (or 0001, 0002, and so on as you accumulate clips). Now your clip is available for editing, just as is the clip we logged earlier.
When was the last time you saved and backed up your project? After you have completed your capturing is the right time to save the project you have created the clips in. Although the actual media files have been properly saved to the media drive, the clip, which is now associated with the project, has not yet been saved as part of the project file. If your system had crashed for any reason, the clip would not be there when you reopened the project, and you would need to find the media files in your Capture Scratch folder and manually import them.
Using DV Start/Stop Detection
In the preceding description of Capture Now, it was stated that Capture Now is a very inefficient system for getting lots of different clips into a project. Although that is generally accurate, there is one example in which it can be even more efficient than capturing logged clips. Final Cut Express includes a feature called DV Start/Stop Detection, which can easily and automatically break up your camera’s DV footage from a one huge captured clip into individual clips. Although it won’t work in all situations, it bears mentioning since for some it may dramatically decrease the amount of time they have to sit in front of the screen scrolling through their footage.
When you are shooting with your camera, it includes data based on the time and date of the recording taking place. When you hit Pause and then start recording again later, the camera records data about the date and time, even if you have Date and Time display turned off in the controls. Although there is no timecode break between these pause and record actions, the fact that the recording action started a little later than previous material on the tape is retained by the video frames as a “scene break” on the tape.
If you bring in a clip that has a series of takes or pauses (for instance, if you shot with the camera, getting this shot and then pausing, that shot and then pausing, etc.) and you have no timecode breaks on the tape, use Capture Now to capture the entire section of tape, pauses and all. After the capture is complete and the clip is loaded into the Viewer (or selected in the Project tab), you can go to the Mark drop-down menu and choose DV Start/Stop Detection (see Figure 2-72). It is not necessary that you use Capture Now for DV Start/Stop Detection; clips captured from the log process will work just as well, since the tool is only concerned with the clip, no matter how it got into Final Cut Express. It is mentioned here because the workflow of DV Start/Stop Detection is extremely useful for those with long camera-recorded tapes that must be captured completely from beginning to end and that may be more easily captured and chopped up in this way rather than through laborious logging.
When you choose this option, Final Cut Express will examine the clip and automatically insert special markers everywhere that it sees evidence that the camera was paused while in the midst of shooting. The great news is that the markers it inserts are treated like clips themselves, independently manipulated from the master clip they were captured as a part of (we will explore subclips in greater detail in Chapter 4). If you keep good shot logs while acquiring your footage, you can save yourself the hassle of shuttling through your footage to organize your clips, and let Final Cut Express break it up into scenes for you.
As an example, find a clip you have just captured (or capture another such clip) that has scene breaks as described earlier. This time, double-click the clip to load it into the Viewer window. After it is loaded into the Viewer, go to the Mark drop-down menu and select DV Start/Stop Detection. After a short progress bar appears, you will see a series of yellow markers in the Viewer window’s timeline (see Figure 2-73). Each of these markers indicates a scene break.

Figure 2-72DV Start/Stop Detection

Even better, look back at the original clip in the Project tab, and you will see a small widget next to its icon (make sure you are in List view mode). If you click this widget, you will see it drop down to reveal a number of these same markers (see Figure 2-74). Doubleclick any of the markers, and you will see that only the section delimited by that particular marker loads into the Viewer, not the entire original clip.
Capture Project
Disaster often strikes without warning. One day you are working on a project that has taken you a month to construct. The next day you start up the machine and the drive holding all your footage is no longer on the Desktop. All the clips in the Project window now have

red slashes running through them telling you that the clips are now offline. A cold chill runs down your spine. You reboot, you run maintenance, you pray, and still nothing. The drive is dead.
Without timecode and proper reel names, you would really be in trouble. There would be no way to reconstruct your project short of having an expensive computer repair facility try to repair the drive (a shaky proposition at best). Now it may be a little more obvious why the precautions are necessary. Every editor has a story like this to tell, and it is usually followed by the warnings you are hearing here. These are mistakes you tend to make only once!
It doesn’t take much time or effort to do things right, and if you stick to the rules, you can completely reconstruct your project by simply popping your original tapes in the deck and hitting a few buttons. What follows is the method for recapturing a project when the originally captured media has disappeared for whatever reason.
Getting Your Project Back Online
When you want to get everything back on the drives again, all you have to do is go to the Capture window as if you were going to bring more media in, but this time choose Project instead. You can also use the Control-C keyboard shortcut without even having to pull up the Capture window. When you do this, you will get the Capture Project window (see Figure 2-75).
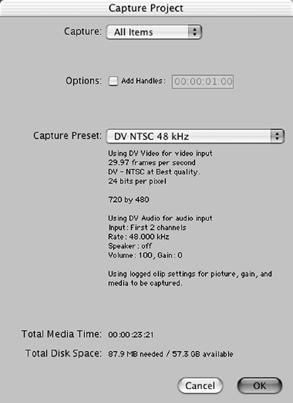
If there is nothing in the sequence yet, you will also be given a message that the project cannot be recaptured because it is empty; simply hit Continue in that instance.
In the Capture Project window, you need to look at a few options before proceeding.
Capture Drop-Down Bar
It appears that there are never any options for this bar.
Options Check Box: Handles
The Options check box contains a timecode field for entering handles. “Handles” simply means having Final Cut Express grab a specified extra number of video frames during the capture in addition to the number you asked for when you logged In and Out timecode numbers for the clip. If you set a value for handles of 15 frames, Final Cut Express will capture an extra 15 frames at the beginning and end of every clip you capture (see Figure 2-76). This will not affect the In and Out points of your captured clip. The frame handles

will stay safely out of view until you need to bring them into play. Your In and Out points will always reflect the way that you logged them for the clip.
You can, of course, override the option to get handles on your captured clips by disabling the check box, but doing so is a pretty bad idea. Once you’ve captured the clip and you begin editing, you will usually find at least one clip for which you need a little more material than you originally thought while logging, especially when an edit between one clip and the next requires a transition such as a fade or a dissolve, a subject we will work with in Chapter 4. It’s hard to predict exactly how much video you’ll need for these purposes, but a good solid 15-frame handle is usually about right. In addition, this will protect you from a rare occurrence in which the capture process accidentally duplicates the first frame it captures. Inserting handles will completely eliminate this as a potential threat.
Capture Preset Choice Bar
The next item is a drop-down bar that allows you at the last minute to switch the Capture Preset you want to use for the Batch Capture (see Figure 2-77). Although it is not likely that you will have to change this, you at least have the option. This would be the right time to make sure that you have selected the proper audio sample rate and to switch it if you
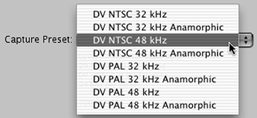
have chosen an incorrect one. Below the Capture Preset drop-down bar, you will find a summary of the settings for the current Capture Preset.
Batch Capture Idiot Check Summary
Underneath the Capture Preset bar, you will see your last “idiot check” summary information. The first item, labeled Total Media Time, refers to the total amount of time to be captured in the entire Batch Capture. It is the total of all the clips’ durations combined. If you see a particularly odd number here, such as 12 hours, you should probably abort the capture and check your clips.
The second item is labeled Total Disk Space and will contain two numbers. The first number is a calculation of the total amount of drive space necessary to capture the amount of Total Media Time based on the data rate of the codec in your Capture Preset. Since Firewire DV editors will be using the DV codec, which we know has a data rate of roughly 3.6MB per second, this number should be easy to calculate mentally. The second number is the amount of drive space currently available on the assigned Scratch Disk drive.
If you see a problem, hit the Cancel button and rectify the issue. If everything is set and checks out, click OK and begin the Capture Project process. You will be greeted with a box confirming which tapes are necessary for the capture and how many clips are to be
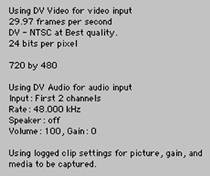
Figure 2-78Batch Capture idiot check summary

captured from the tapes (see Figure 2-79). When you hit Continue, Final Cut Express will proceed to capture all the clips. When it has finished capturing, you will receive a similar box showing that the capture is complete. Hit Done, save your project, look in the Logging Bin in the Project tab, and you will find that the offline clips have lost their red lines. Having associated media files, they will now appear as online clips.