
| 1 | The Initial Setup: Optimizing the Mac OS and Final Cut Express |
Final Cut Express is a fully functional nonlinear digital video (DV) editing application. It stands alone as the most feature-rich application on the market in its price range. With this functionality comes a degree of user responsibility. The user still has to configure the application correctly and organize it for optimal performance and safety. Final Cut Express will function even if you configure it incorrectly. However, you will pay for such mistakes further down the road when you run across foul-ups that could have been easily avoided had you set up the application and project in an organized and safe fashion at the beginning.
What follows is a tried-and-true path for setting up Final Cut Express with a Firewire-based camera or deck. It is an especially effective method for multiuser editing stations in which more than one project or editor is working concurrently. If you follow these steps, you will experience few nasty surprises, and the few surprises you do encounter will be much less disastrous than if you simply plug in and begin editing.
The process for setting up your Final Cut Express station and project begins outside of Final Cut Express. The first thing we will do is to take a stroll through your Mac OS System settings and make sure they are optimized for Final Cut Express. Although you only see what is going on on the computer’s Desktop, the Macintosh is constantly doing many things in the background, some of which can have a negative impact on Final Cut Express’s performance. We will address the pre-critical system settings prior to moving on to Final Cut Express. For more in-depth information about the Macintosh hardware and operating software, read Appendix C of this book.
Macintosh OSX: The System Preferences
In Mac OSX, the System Preferences application (see Figure 1–2) replaces many of what were Control Panel settings in Mac OS 9. Like the old Control Panels, System Preferences is where you tell the Mac OS how to use many of its features. Access to System Preferences can be found in three different places. There will be an icon for the System Preferences on the Dock located on the Desktop. Alternately, the Apple Drop Down Menu in the top left-hand corner of the screen has a link to it. And finally, since the System Preferences window is actually an application, you can access it directly from the Applications folder inside the hard drive.

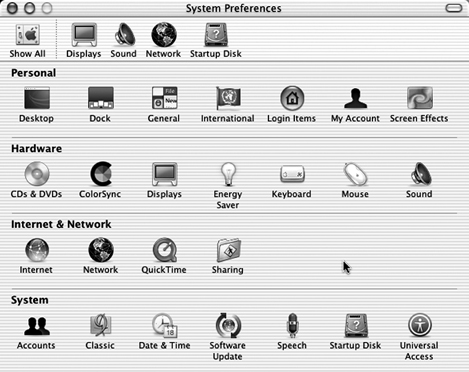
Figure 1-2System Preferences
The Energy Saver Preference
After opening System Preferences, locate the Energy Saver Preference icon and click to open. Click the Show Details button in the bottom right-hand corner to view all the possible options. You want to set System to Never and uncheck “Put Hard Disk to Sleep Whenever Possible.” You can also set the Monitor Sleep to Never, although you may want to check it for a separate sleep setting—for instance, 15 minutes (see Figure 1–3)—to prolong its life and save on bills and CRT-generated heat, since monitor sleep should have no effect on Final Cut Express’s performance. Once you have Energy Saver set, hit the Show All button in the top left corner of the window to return to the original System Preferences screen.
The Displays Preference
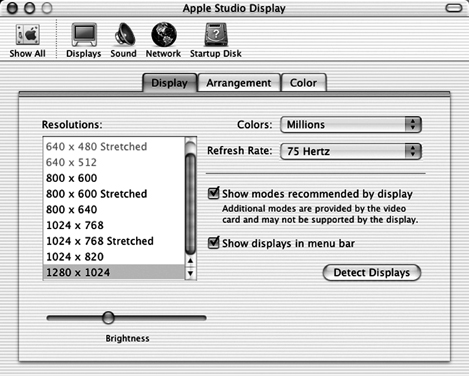
Next, from the System Preferences panel, click the Displays Preference icon. Here you can control not only how your monitors are set, but how multiple monitors are arranged with each other. On the right side of the panel, make sure to choose a refresh rate of 75 Hz or higher. If such a rate is not available, select a lower resolution on the left side of the window, and then see if 75Hz is available. Make sure that Colors is set to Millions (see Figure 1–4).
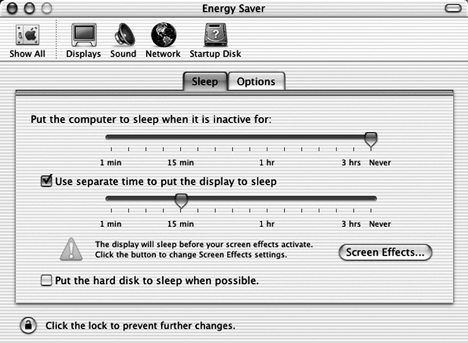
Figure 1-3Setting the Energy Saver Preference
If you have to select a smaller screen size than you feel comfortable working with, look into purchasing a new, more efficient monitor that can support higher screen resolutions at the refresh rate of 75Hz. Although you can work in Final Cut Express with a screen refresh of 60Hz, be aware that Final Cut Express’s performance can suffer when the application is run at this lower refresh rate. In addition, you will soon find that 60Hz can cause eyestrain because of the perceptible flicker that accompanies it. Editing usually involves a great deal of quickly focusing your eyes on the computer screen, and low refreshes like 60 Hz can lead to headaches and eye strain.
Note: Never deselect “Show Modes Recommended by Display.” Although in rare cases you can get away with a better refresh rate that is unsupported by Apple and the monitor manufacturer, it is quite possible to accidentally select a refresh rate that your monitor cannot support but that the OS will not reject! If you do this, you may lose your display, which will be replaced with a message from the monitor that reads something on the order of “Scan Rate Out Of Range.” Your computer is still working cheerfully away, waiting for you to respond, but it has no idea that you can’t see the screen it thinks it is displaying.
If you choose a resolution that your monitor cannot display, give it at least 15 seconds before beginning the process of correcting this dreadful error. When you change the resolution of your monitor through the System Preferences panel, usually you will be given a dialog box asking you to confirm the change. This is precisely to avoid the situation in the previous paragraph. However, be warned that sometimes this message does not appear, and you will have to perform some interesting contortions to correct the problem. If you accidentally choose a scan rate the monitor cannot support, you’ll have to reboot into Mac OS 9 to manually remove the System Preferences file and reset display. Since Mac OS 9 is not an option on newer Macintoshes, you need to be very careful with this.
Software Update
A final System Preference that should be visited is Software Update. When enabled, this feature automatically connects to the Internet periodically to check for updates to the system’s software (see Figure 1–5). There are a few reasons to disable this automatic checking feature. First, if you are not on a WAN network or cable/DSL connection, Software Update will engage the modem and try to call your ISP. It is just doing its job, but remember that it is likely to do so when you are not at home as well! If you keep Software Update disabled, you can manually run the Updater at more suitable times.
Further, the capturing of video is a very system-intensive activity. Network activity, as we will see in the next section, can have serious negative impacts on system performance, and downloading and installing software from the Internet is a particularly demanding set of operations. Since the default Software Update checking time varies, your machine may try to look for updates at the worst possible moment. Disabling will avoid this problem.
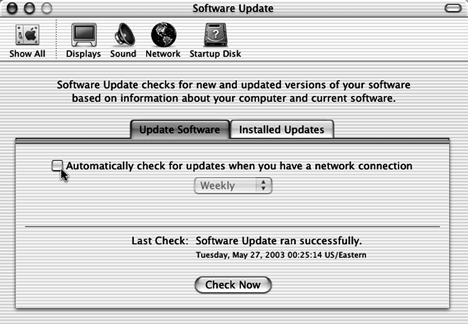
Figure 1-5Disabling Software Update
Finally, disabling can eliminate a complication that has plagued video editors since the beginning of computer-based editing solutions. Although software updates generally deliver improved performance, it is an understood rule of thumb that you never want to make serious changes to your system’s software in midproject. Nothing is more frustrating than allowing a system update to occur and then finding out that some small piece of it conflicts with your present third-party software. The time to upgrade your system is between projects or, at the very least, when you have some breathing space and the ability to patiently troubleshoot if you do run into problems.
Network Issues and AppleTalk
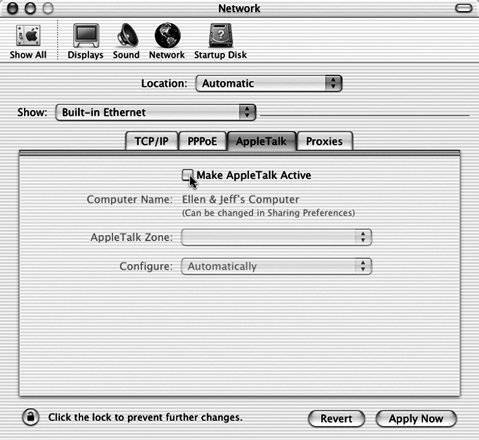
After setting the other System Preferences, click the Show All button in the upper left corner of the window and return to the System Preferences window. Find the Network Preference button and hit it. When the Network Preferences window loads, change the drop-down bar from Internal Modem to Built-in Ethernet, as shown in Figure 1–6. Select the AppleTalk tab. Uncheck Make AppleTalk Active, as shown in Figure 1–7.

Figure 1-6The Network Preferences panel
One of the nicer things about Mac OSX is its incredibly sophisticated network capabilities. The operating system really does do most of the work for you if you need to set up a network. Simply plug up your Mac to a hub/router/switch and plug your other systems in, and let the Mac OSX figure out and negotiate the protocols. Connecting with other computers and printers is effortless, even for a network novice.
Unfortunately, there are some situations where being on a network while running Final Cut Express could cause problems. These are rare situations, but you must take note and precautions. Whenever you are capturing or printing to tape, AppleTalk generally should be disabled. Some printers and networks must be accessed through AppleTalk, so you may want to keep it enabled most of the time. Just remember that when you are performing critical operations such as capture and print to tape, AppleTalk should be disabled, and you should remember to check it if you run into inexplicable bad behavior later on.
You should also always dismount any networked volumes before working in Final Cut Express. If you are accessing the drives of another computer through an Ethernet network, you should remove them from the Desktop of your Macintosh before running Final Cut Express. It’s easy to forget that you’ve mounted another machine’s hard drive on your Desktop for a moment. But as you start working in Final Cut Express, any activity on the other computer that the mounted drive lives on could cause interruptions on your machine, leading to very annoying and unpredictable behavior.
A final note about networks and Final Cut Express is that being on a network is not necessarily anathematic to editing video. In fact, many editors have to rely on networks as an important part of their workflow. Clearly, the ability of your Macintosh to operate properly in a networked environment is important. The precautions about turning off AppleTalk and networked drives is simply a warning that networks, especially when utilized at critical moments, can cause lousy performance. Printing a giant file to a PostScript printer while capturing is not going to yield positive results! The injunction is not to isolate your editor from the rest of the world, but to realize that your Macintosh will likely have fits if asked to capture video and audio to a hard drive and parse out 5MB per second to a printer or a network drive at the same time.
Multiuser and Administrator Issues
Mac OSX has fantastic administrative and multiuser functionality. It’s possible to have many people using the same machine and allow each of them to contour the appearance and organization of their materials according to their own methods. It also protects individual users from their coworkers’ tendency to accidentally wipe all their hard work away or steal their materials. As a final bonus, it allows a system administrator to retain total control over the workstation, keeping individual users from getting access to data they shouldn’t or making changes to the hardware or software of the machine without permission.
In the past, keeping this running required additional software and some measure of professional expertise. But with Mac OSX, this level of administrative control is built into the system as a normal thing. When you get your Mac, or when you first install Mac OSX, you are installed as the Administrative User of the machine. The identity you create right then is the one that the Mac OS will regard from that point on as the user that can make changes to the system and install applications. After you configure your system the way you want, you can create new identities for each new user, and you can even allow administrative access for these new users if you choose. As the administrator, you set permissions for these users, allowing them access to different applications and files based on what you believe they will need to use while working (see Figure 1–8).
Sound like a great thing? Well it is, with a few caveats. The administrator has such control over the system that it really can’t function optimally without relatively frequent oversight. Taking care of the periodic maintenance, and the rare emergencies that crop up, will usually require an administrative password. If anything needs to be changed or reinstalled, only the system administrator is allowed to perform these actions. If the administrator is difficult to track down, the system may be effectively out of service until they return! These maintenance situations can be anything from a lost password to the inability to access certain types of documents, folders, and hardware or software settings. Mac

OSX is incredibly secure, but keeping everybody locked out of everything may not always be such a great idea. For more information about setting up users in Mac OSX, consult the software manual and look into books and Web sites about Mac OSX. The more you know about the way multiuser functionality works, the more likely you’ll set it up correctly and it will function efficiently and meet your laboratory needs.
Installing Final Cut Express Software
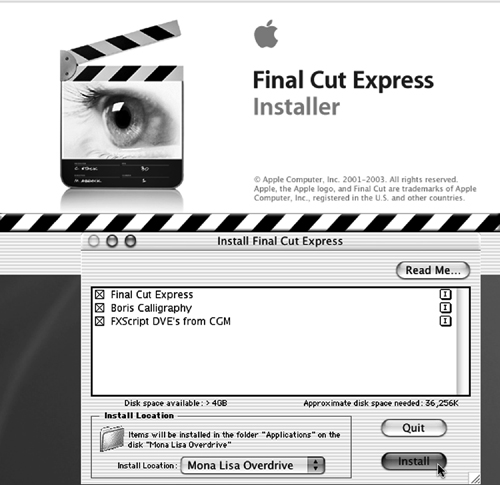
If you have now ascertained that the Mac OS is primed for editing, it is time to install the Final Cut Express software. Simply insert the CD, click the install icon, and let the installer go to work (see Figure 1–9).
Many new users are often frustrated by the process of registering their software with the provided serial number. If you try to enter the serial number that accompanies the Final Cut Express license, but the OK button remains grayed out, remember that Final Cut Express serial numbers are always a series of letters followed by numbers, followed by letters, etc. This will keep you from entering ones as Ls and so forth.
At the end of the installation process, Final Cut Express will ask you to give it some initial preset information about your equipment setup. After entering your serial number, you will be faced with a dialog box titled Choose Setup. This is simply Final Cut Express
asking you to establish the initial parameters for a project. You will later be able to change anything you enter at this time. If you are unsure, simply choose either DV-NTSC (see Figure 1–10) or DV-PAL (whichever system your country uses) and pass on to the next window.
On choosing OK, you may be told that Final Cut Express is unable to locate a DV device. When Final Cut Express starts up, it will look for your DV camera or deck. The setup you just chose was telling the application which type of camera or deck it will be capturing video and audio from. If your camera or deck is not connected to the Mac, turned on, and (if applicable) switched to VTR rather than camera, Final Cut Express will ask where it is. The two choices given are Continue or Check Again (see Figure 1–11). If you will not be capturing video or printing video back out to tape, you can choose Continue

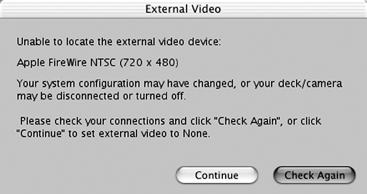
Figure 1-11A camera or deck is not properly set up
and get to work. If you indeed need the camera or deck, make sure that it is properly connected, powered up, and set correctly; then hit Check Again. Beware that if you choose Continue when you meant Check Again, you will need to quit the application and start it again for it to see the device.
“Why bother with the camera if you aren’t capturing from or recording finished productions out to tape?” you might ask. Because we can also watch our editing progress, the final video output, by using the DV deck or camera patched through to a television monitor for preview. You should also attach your external audio speakers to your camera or deck to monitor your Final Cut Express audio. This is always the preferable way to work, unless you are in a car or on an airplane, where such monitoring is impractical, or you are accessing the Real Time Effects that are only available with Firewire output disabled.
One of the greatest features of Final Cut Express is that your deck or camera will convert the DV coming out of the Firewire tube into real video that can be watched on a true video monitor. Although you can certainly edit using just the computer screen windows, you really can’t get a sense of the impact of your edits until you see them play back in all their glory on an external video monitor. Colors will be different, playback on the computer screen may seem slightly stuttery, and in general what you see is not exactly what you get. However, what you see coming out of the Firewire connection and displayed on an external video monitor is what your final product will look like.
It is also very difficult to get a sense of audio and video sync when you are working only with the computer screen windows. Since audio follows video out through Firewire to the DV deck or camera, you can get timing down much tighter in your cutting when you base your editing decisions on what you see and hear in the external video monitor. Many new users are often confused by the fact that what happens on their computer screen window appears to be slightly out of sync with audio and video going out to the DV deck or camera and the external monitor. The best solution to this is to always monitor your editing progress by using your DV device hooked up to a video monitor with external audio speakers, as shown in Figure 1–12.
In addition, many users wonder initially why their text and graphics images look so bad on the computer monitor. The fact is that previewing these project elements in the Canvas and Viewer windows yields poor results. The Canvas and Viewer windows lower the quality level somewhat on the computer screen in order to salvage a little computer processing power. It is only on the true Firewire DV output to an NTSC or PAL monitor that you are able to make qualified judgments about the elements in your projects. You will also feel much better about your work when you see it the way it is supposed to look. Desktop previews in the Canvas and Viewer are exactly that—previews. They are meant only to get your project roughly in shape, not for critical judgment.
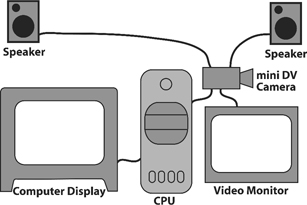
Figure 1-12How to properly configure the components in your system
Project Setup: Do It Right the First Time and Every Time
So, you have completed the necessary installation steps and given the setup information. The next step is to set things up so that the application works properly. Then we want to create and save a new project. Finally, we want to institute an archival backup process that will keep us working even in the unlikely event that something happens to our original project file.
Starting Up Final Cut Express
To start up Final Cut Express, double-click the Final Cut Express icon, located in the Applications folder on your hard drive. You can create an alias, or application shortcut icon, by Control-clicking the Final Cut Express icon, selecting Make Alias, and then dragging the new alias to the Desktop of your Macintosh. You can also create a link to Final Cut Express by dragging the application directly from the Applications folder to the Dock. Whenever you want to start Final Cut Express, click the alias or the icon in the Dock.
If you have just installed Final Cut Express, when you start it for the first time, it will open with a new Untitled Project. If, on the other hand, Final Cut Express was already installed and you have already created a project, it will open the project that was open when the application was last shut down. If you are looking at an Untitled Project in the Browser window, you should immediately name and save your new project (see Figure 1–13).
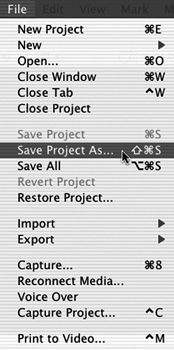
Figure 1-13Never save a project as “Untitled”
Final Cut Express will actually let you name and save your project using “Untitled Project.” But “Untitled” is never a suitable name for a project, especially since every new project created will initially carry this name. To work safely and effectively, you need to immediately give your project a unique name and save it, using the process described in the following section.
There is one exception to the rule that Final Cut Express always opens the last open project when starting up. If you start Final Cut Express up by double-clicking a project file you have previously saved rather than the Final Cut Express application icon, Final Cut Express will open that project. Once you have begun working with a Final Cut Express project, this will be the preferred method of starting the application, because only your intended project will open, rather than an untitled one or someone else’s. But when beginning a new project from scratch, you must start from the Final Cut Express application icon and an Untitled Project.
Now it’s time to save your project correctly and set up a solid system of archived backups. This process isn’t complicated or time-consuming, but it is very necessary. Most editors unfortunately do not use such a system, and they are the ones who sweat the hardest when their project file corrupts or gets trashed accidentally. If you are careful and organized, you will find not only that you never lose a project, but that you can actually return to your project at any stage of its progress. And all it takes is a couple of seconds every hour or so and keeping your eye on the ball.
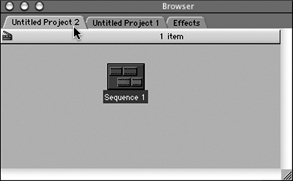
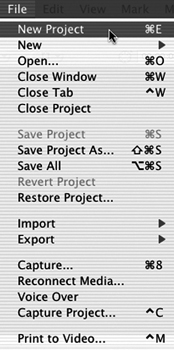
If someone else’s project is open in the Browser window (more on this window momentarily), as shown in Figure 1–14, go to File>Close Project to return yourself to a pristine state with no open projects. When no project currently exists in the Browser window, go to the File drop-down menu and select New Project, as shown in Figure 1–15.
Saving Your Project Correctly
After you have a new Untitled Project in the Browser window, go to the File drop-down menu and choose Save Project As. In the dialog box that follows, simply click the Where
drop-down bar and choose Desktop, as shown in Figure 1–16. You could also save it in your Documents folder in your Home folder, which is located in the Users folder assigned to you by the administrator.
You also want to save this project in its own folder rather than simply as a lone file sitting on the Desktop. Before you name it and click the Save button, choose the New Folder button. In the dialog box that appears, type the name “first_project_folder” and hit Create, as shown in Figure 1–17.
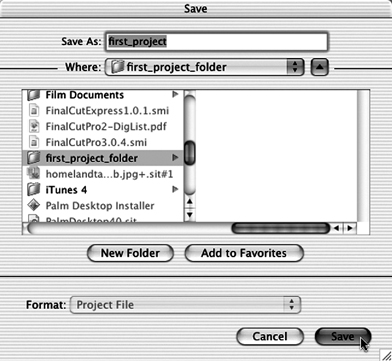
On selecting Create, you will be returned to the Save Project As dialog box, but you should note that you are now inside the folder you just created, which will appear on the Desktop. Finally, type in the name “first_project” and hit Save (see Figure 1–18). You have now named and saved your project correctly. We want to save and run our project files from the start-up drive, where Final Cut Express and the Mac OS System live.
But we’ve only completed the first part of the naming and saving process. Although we have yet to actually do anything in our project, now is the time to start our archive of backups. You want to back up your project files to something safer and more permanent, such as a CD-R or an Iomega Zip drive. All new Macintoshes ship with either a CD or DVD/CD burner, and you should take advantage of this to make your project as secure as it can be. For the particular methods for doing this with Apple’s included Disk Copy or the fantastically flexible and inexpensive Roxio Toast, see Appendix D of this book.
Now that your project is correctly named and saved, return to the application by bringing it up front (by clicking any Final Cut Express window). You can also simply
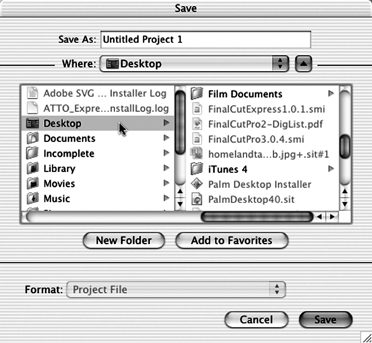
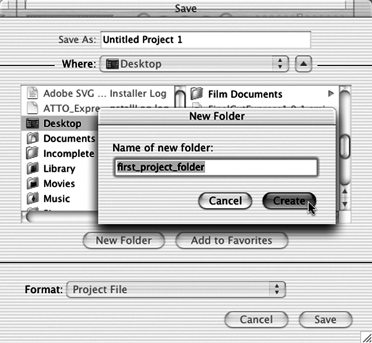
Figure 1-17Creating your first project folder
click the Final Cut Express icon in the Dock, and all the windows will reappear on your Desktop.
The Structure of Final Cut Express
Now that the project has been named and saved correctly, let’s take a look around and see what all those windows are for. When you created your new project, more than a few windows should have spontaneously opened up. These windows, in clockwise order from the top left (see Figure 1–19), are the Viewer, the Canvas, the Audio Meters, the Toolbar, the Timeline, and the Browser windows. The arrangement you see when you start the project is the default arrangement, which you can customize in any way you like.
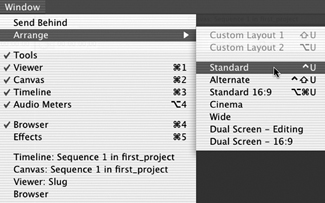
If you ever get mixed up and are missing windows that have somehow gone offscreen, look under the Window drop-down menu, select the Arrange submenu, and then choose Standard, as shown in Figure 1–20. This will return your screen to the Final Cut Express default window setup. If any of your windows have closed and you need to access them, they are available from the Window drop-down menu as well.
Before we begin the discussion of Final Cut Express windows, it is important to note that most of the windows utilize what is referred to as tab architecture. A tab in Final Cut

Express is actually an individual page inside a window. This means that one Final Cut Express window may hold more than one tab, just as one filing cabinet can hold more than one folder. At the top of each window, you will see the tabs. To switch back and forth between the different tabs in a window, simply click the tab you want to bring up front.
Tabs can also be “torn away” from a window to create a new window occupied only by the “torn-away” tab. If you need to look at two tabs from the same window, simply grab one tab and drag it away from the window to create a new window, as shown in Figure 1–21. You can restore tabs to the windows from which they originated by clicking the tab and dragging it back into the window it came from. Simply let go of the tab when you see the heavy border appear around the tab you are inserting back into a window. You might want to take a moment and goof around with tearing away and returning tabs before
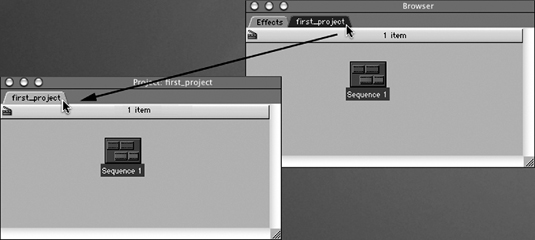
Figure 1-21You can tear away a tab into its own window
moving on, to get familiar with this feature. It’s one of the great innovative features of Final Cut Express that speeds up an editor’s workflow, and being able to quickly tear a tab away and replace it can be useful when you start working out of several clip windows simultaneously.
The Browser Window
The Browser window is home to two separate tabs; the Project tab and the Effects tab. As in all windows we will explore, each tab has very specific uses and contents.
The Project Tab
The Browser window contains the Project tab, which represents your entire Final Cut Express project and all its contents (see Figure 1–22). The three objects used within the Project tab are the Clip; the Sequence, which is a linear timeline; and the Bin, which is an organizational folder. As you capture or import video, audio, and graphics clips, they will appear in this Project tab. When you create a new sequence to edit in the Timeline window, it will also appear in the Project tab. There should initially be one sequence in the Project tab, because all new projects are created with one sequence. Finally, anything that goes into the Project tab can be further organized inside bins, which are simply organizational folders that can be created in the Project tab of the Browser.
The two primary resources of a Final Cut Express project are the Sequence, the linear timeline into which we are editing the Clips, and the Clip, the individual icon that represents the media we edit into the Sequence. Both are available here in the Project tab. They are easily organized through the Bin, a folder that is used to store and organize Clips and Sequences according to your organizational needs.

Figure 1-22Clips, sequences, and bins in the Browser window
The Effects Tab
There is another tab in the Browser window that is always open, even when there are no open projects. This is the Effects tab (see Figure 1–23). It contains Final Cut Express’s many different built-in effects, such as transitions, special effects filters, color bars, audio filters, and video and title generators. When you have clips available on the Timeline, you will be able to apply effects to them from this tab simply by dragging and dropping the effect filter you want to use on the clip. We will return to the Effects tab in Chapter 5.
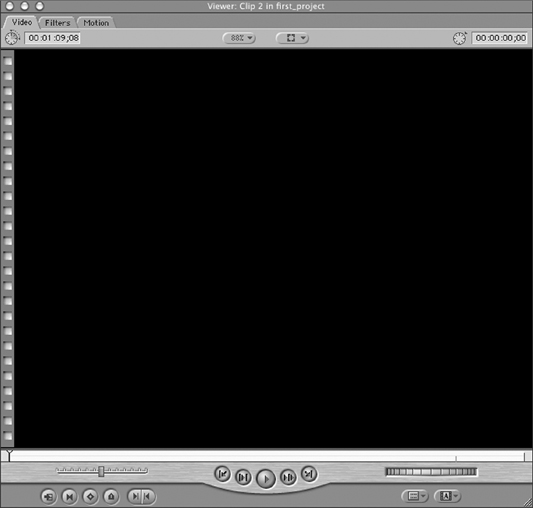
The Viewer Window
The Viewer window (see Figure 1–24) is the window in which we directly work with individual clips. When you load a clip into the Viewer window by double-clicking it in the Browser or Timeline, you can manipulate it in many ways. You can play it back and review the footage. You can assign new In and Out, or edit, points, defining how much of the clip is to be used in the sequence. The tabs at the top of the Viewer window allow you to adjust features of the video and audio as well as apply special effects. These effects range from the motion-based suite on the Motion tab, which control the size, position, scale, and many other attributes of the clip, to the Filters tab and Controls tab, which offer an enormous choice of special effects plug-ins that you can apply to your work.
The general workflow in Final Cut Express is to capture clips from your DV tapes, which will appear in your Project tab. In the Project tab, you will organize these clips and sequences in bins. You will load clips into the Viewer window to trim them for use in your
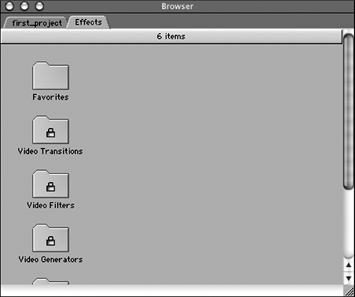
Figure 1-23The Effects tab
edited sequence. When you are completely happy with your edit, you will play the sequence. As it plays, the video and audio will stream out the Firewire tube to your deck or camera, where you will record it on DV tape. That is your Final Cut, a term meaning the finished edited film. As you play your video from the Timeline, it will also appear in the Canvas window.
The Canvas Window
The next window is the Canvas window (see Figure 1–25), which displays a video preview of the Timeline. Whereas the Viewer window allows you to load, prepare, and preview clips

for editing into a sequence, the Canvas window allows you to preview clips that have been placed into the sequence. Once again, there is a tab architecture to the Canvas, allowing you to switch back and forth between different sequences as you work, since it is quite normal to have many sequences in one project. One of the features of Final Cut Express that really shines is its ability to have more than one sequence in a project, which enables you to try many alternate edits of the same materials without having to undo your work each time.
Both the Viewer and the Canvas have video windows through which you view your progress as you edit. You can—and should—adjust these windows for optimum performance. Although some machines may have no trouble with other display settings, you

should generally set the window size to Fit to Window (see Figure 1–26) and have the window’s frame size at the default size when playing back video. To get your windows back to the default size and arrangement, go to Window>Arrange>Standard. Having the video windows play at odd percentages can yield quirky performance, and 100% is usually too much to ask of the processor. Using the Window>Arrange>Standard selection along with choosing Fit to Window for the frame size will also keep you from getting the scroll bars in your video windows, which can cause severe performance problems. Scroll bars in these windows can even keep the application from outputting video to Firewire! If you have this problem, you might check your windows and set them for Fit to Window.
You should make sure that no objects or other windows ever overlap a video window when you are attempting to play back video (see Figure 1–27). Also make sure that the entire video window is visible and that there are no scroll bars along either the side or bottom of the window. If there is any cramping of the Viewer or Canvas window’s style, you will get compromised performance or no performance at all. If you get Dropped Frames messages during playback, overlapping windows or scroll bars in the window are two of the first things you should check for.
Because you can have more than one project open at a time, it is easy to edit using resources from many different projects. Clips or sequences from one project can easily be edited into another one by simply dragging them into place from one open Project tab to another. Although this ability may seem minor at first glance, Final Cut Express is the only economically priced video editing application that offers this very handy timesaving feature. Rather than spending time shutting down and starting up new projects or exporting or importing huge files, you simply open whichever projects you want to access, move materials to or from them, and get right to work.
The Audio Meters
If we go clockwise, the next window is the Audio Meters. These meters show rising or falling bars in the left and right channels based on the level of audio. This allows you to keep an eye on the decibel (dB) level of your audio as well as troubleshoot your system’s
audio (see Figure 1–28). If you don’t hear audio but you see audio levels in the meters, or if you hear nasty distortion but your Audio Meter levels are acceptable, it may be time to go in for a little system maintenance. Before suspecting problems in your system, though, make sure that you have your system put together correctly. If Firewire output is enabled (drop-down menu View>Video>Firewire) and you don’t have external speakers attached to your camera or deck, you won’t hear your audio. Audio always follows video out the Firewire tube; it is only available through your computer speakers when set to Realtime in the View>Video option.
Those with a background in analog audio should take special notice of these Audio Meters, which are based on digital audio. With digital audio, 0 dB is the highest possible audio level before clipping, or unacceptable noise artifacting, occurs. Unity, or the optimum reference level generally used by professionals, does not occur at zero as with common VU meters, but registers at —12dB. Thus, we will use a —12dB reference tone when mastering to tape in Chapter 7.
The Toolbar
The next window is the Toolbar. This strip contains all the useful tools that come into play when editing (see Figure 1–29). They are the same toolset found in Final Cut Express’s big sibling, Final Cut Pro. Selecting an icon on the Toolbar changes the mouse pointer, making that tool available. Some of the tools have several different variations, or toolsets, which you can access by clicking a tool and holding the mouse button down for an extra moment. These tools will be covered in the sections on editing and compositing in Chapters 4 and 5.
The Timeline
Finally, the last window is the Timeline. The Timeline is not a sequence in and of itself; it is merely a container window that holds sequences. As with the Project, Viewer, and Canvas
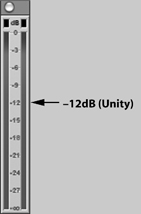
Figure 1-28The Audio Meters
Figure 1-29The Toolbar
windows, the Timeline is based on a tab architecture so that you can have more than one sequence available in the Timeline window (see Figure 1–30). To switch from one sequence to another, simply click the tab. The Timeline window is linked to the Canvas through the sequence; whichever sequence is active in the Timeline window will be the sequence that is displayed in the Canvas window. The current location of the playhead in the sequence is displayed in the Canvas and down the Firewire tube to your monitor.
You will notice rather quickly that each of these windows is linked directly to the others. Adjustments made in one window will change the project globally, meaning that whenever you make a change in one window of the project, that change will automatically be reflected in the other windows. For instance, when you switch sequences in the Timeline window, the Canvas window tabs switch around to show that same sequence.
Moving a Clip Around the Windows
To see an example of this, and to exhibit the way the windows work, let’s utilize a useful little video generator from the Effects tab that behaves like a clip, and pass it back and forth between the windows. Since we don’t yet have any captured clips to work with, we’ll use the Bars and Tone clip that comes preinstalled with Final Cut Express.
The Color Bars and Tone Generator Clip from the Effects Tab
Color bars and audio test tones are used with any video production to allow the viewer who receives edited video tapes to calibrate their equipment for the best possible playback. There is a standard audio tone, and a range of colors that you use to adjust your NTSC or PAL monitor. This Bars and Tone clip will come into play in the final chapter of the book, concerning output to tape. Since the preinstalled Bars and Tone clip acts just like a regular captured clip, we’ll use it for example footage.

First, make sure that the Project tab in the Browser is set to be viewed as a list, rather than as icons. To view it as a list, click the Browser window so that the Project tab is active, and then go to the View drop-down menu. Select the Browser Items submenu, and then choose As List. Alternatively, hold down the Control key and click (or Control-click) in the gray area of the Project tab and choose List view. Control-clicking will often reveal a contextual menu that offers shortcuts to common actions, such as changing the Browser view, as shown in Figure 1–31. As you get started editing in Final Cut Express, it’s a good idea to Control-click periodically to find out what contextual menu shortcuts are available in each area and editing situation.
If any of your Project or Effects tab items appear as icons rather than a vertical list with information columns to the right, perform this View As List action for each separate tab or bin of the Browser. For this exercise, it is important to see the items as a list.
Moving the Clip from the Effects Tab to the Project Tab
Go to the Browser window and click the Effects tab. Grab the tab, drag it away from the Browser window, and drop it so that it becomes its own window. Locate the Video Generators bin and double-click it. The Video Generators bin will open up into yet another new window.
In the Video Generators bin, locate the Bars and Tone clip. There will be two Bars and Tone clips available—one for NTSC and one for PAL. Select the one that is correct for
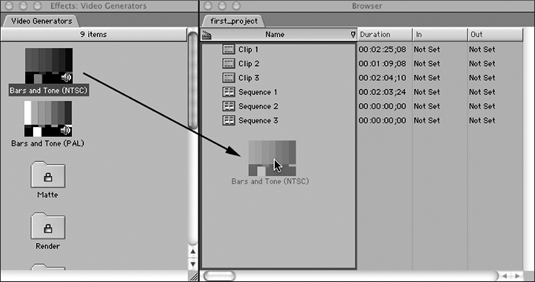
your video standard and drag it from the Effects tab into your Project tab in the Browser window, as shown in Figure 1–32.
Creating a Bin and Using It as an Organizing Tool
With the Project tab active, go to the File drop-down menu and select New, followed by Bin in the submenu that appears, as shown in Figure 1–33. Alternatively again, you could have Control-clicked the gray area of the Project tab. A new bin will appear in the Project tab. When a new bin is created, the name of the bin will be highlighted. Immediately type in the name “First Bin.” If the bin’s name is not highlighted, single-click the default name “Bin 1” to highlight the name; then you can change it.

Figure 1-33Creating a new bin
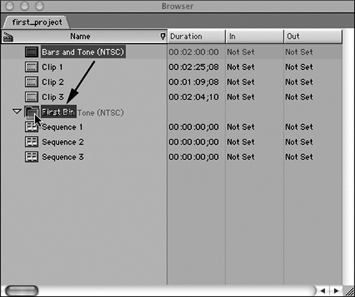
After renaming the bin, grab the Bars and Tone clip you just dragged from the Video Generators bin and drop it onto the First Bin icon (see Figure 1–34). It will disappear inside (hold the clip on the bin until you see that the bin is selected). If you double-click the First Bin, it will open into its own window, showing you the Bars and Tone clip inside. You’ve just completed your first act of project organization! You also could have opened up the bin first and dragged the Bars and Tone clip into the bin’s window, although simply dropping the clip on the bin’s icon is certainly faster and does exactly the same thing.
Moving the Clip from the Bin to the Viewer
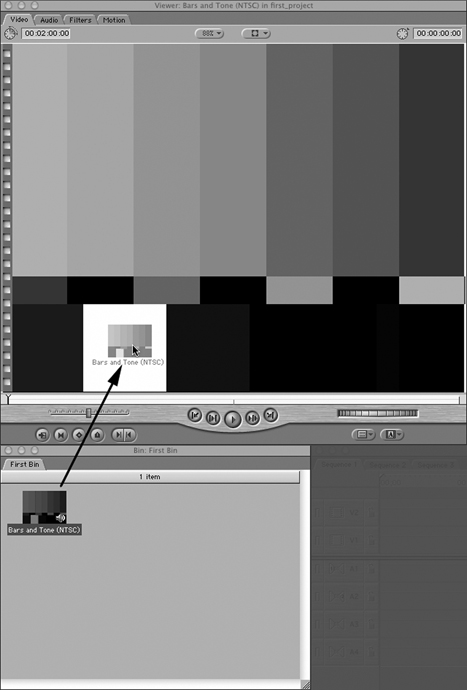
Now let’s open the Bars and Tone clip in the Viewer. This can be done in two ways. You can drag the clip physically from the First Bin into the Viewer window (see Figure 1–35), or simply double-click the clip in the bin. When you do either, the title at the top of the Viewer window will change, revealing that the clip loaded in the Viewer is the Bars and Tone clip from your project.
Clicking the play button in the Viewer window will begin playback of the clip. You will hear the 1KHz audio test tone that accompanies the video color bars in the Bars and Tone clip. A quick glance at the Audio Meters window will show that the 1KHz audio test tone registers at —12 dB, exactly as it should.
Although the color bars show no motion, the little yellow indicator (called the Playhead) near the play button at the bottom of the Viewer window moves along as the clip plays. You can click anywhere in the current time indicator bar and drag to move back and
forth in the clip. After we have captured a little video, you will see all the frames play back here, rather than the static color bars image.
Clicking the tabs at the top of the window reveals other aspects of the clip. The Audio tab (see Figure 1–36) shows a solid gray mass for levels, because the clip is a test tone with no variations in audio level. In other video clips you will work with, you will see a waveform, or a graphic representation of how loud or soft a clip’s audio is. You will also be able to adjust those levels on this tab.
The Filters tab has no Effects filters listed, because we have not yet applied any. These will be covered later in Chapter 5, where we encounter compositing and special effects. The Motion tab presents many options, including the ability to change the size, position, rotation, and scale of the clip so that we can create professional-looking effects easily and naturally. We will also cover these in Chapter 5.
Moving the Clip from the Viewer Window to the Sequence
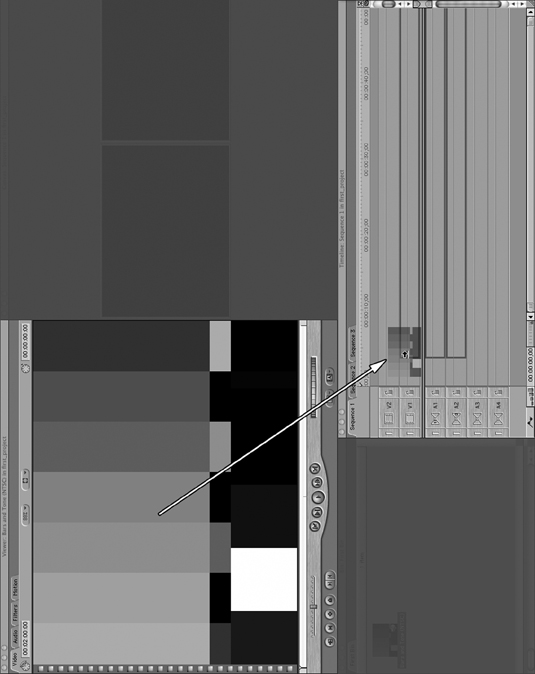
To move the clip to a sequence in the Timeline window, we can once again choose from a few different techniques, each of which will produce the same result. First, click anywhere in the video window of the Viewer that has the Bars and Tone clip loaded. Continuing to hold down the mouse button, drag the clip down into the beginning of the sequence on the Timeline window (see Figure 1–37). It will appear there as a long linear clip and stay positioned wherever you drop it. You have just edited your first clip into the Timeline.
Another method of moving the clip to the sequence is to grab the Bars and Tone clip in the Viewer as in the previous example, but this time drag it instead into the Canvas window and continue holding down the mouse button. Doing so will reveal a graphic overlay of boxes in the Canvas window proposing several different types of edits. Final Cut Express is asking how you wish to put the clip into the sequence. We will cover these in detail in Chapter 4, which covers editing techniques, but for now, drop the clip onto the red Overwrite box (see Figure 1–38). The clip will appear in the sequence in the Timeline window. It will be placed wherever the sequence playhead was positioned right before the edit took place.
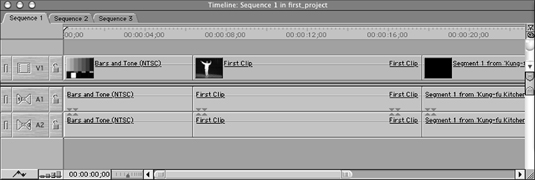
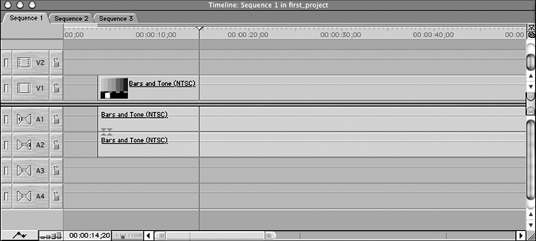
Having completed either of these actions, you will find that there is now a Bars and Tone clip in the sequence in the Timeline window and that the Canvas window also now displays the Bars and Tone clip (see Figure 1–39). Clicking the play button in the Canvas window will show the current time indicator moving forward and, once again, we will hear the 1KHz audio test tone.
These are not the limits of our ability to move clips around Final Cut Express, merely the basic methods meant to show how the windows work together in a project. For instance, we could have simply dragged a clip directly from the bin to the sequence or the Canvas if we had no need to work with it in the Viewer. There’s really very little limit on how you can work with clips and sequences inside your project.


But we get ahead of ourselves. The main thing to remember as you work through Final Cut Express is that there is always more than one way to get something done. The options are there to help you increase productivity and speed, based on the individual nature of your project and media. The more you work, the clearer this will become and the better judge you will be of which method is best for your needs.