
| 3 | Importing Media |
Capturing footage from DV tape is not the only way of getting media to work with in Final Cut Express. This chapter is concerned with the process of importing the large range of file formats that Final Cut Express is capable of accepting and using as media. A very common misconception for beginners is that opening a file is the same thing as importing. This eventually leads to confusion over what needs to be backed up, what applications can deal with which sorts of files, etc. This misconception is totally unnecessary.
This chapter’s aim is to give the reader a clear understanding of the import process. Although we will only be working through two of the most common examples, importing CD audio tracks and Photoshop image files, the import process in theory is universal. Master these import techniques and you will be able to apply what you do here to every other file format Final Cut Express is capable of working with.
What Importing Is and What It Is Not
Frequently, when we try to describe what we are doing with digital applications, we get a little fast and loose with our terminology. But sometimes, splitting hairs is important in describing what you need to do to avoid problems. Importing and exporting from an application is one such instance.
In the video editing world, there are two types of files: project files and media files A project file is a file that is opened by Final Cut Express. It contains all the code that describes what happens with the media files in use by the project. The project file itself is not video or audio footage; it is a sort of director for all the footage you use in the project, like a blueprint. You open it, and then you work inside it.
A media file, on the other hand, is your footage or other elements such as graphics from Photoshop or CD audio—things you use inside your project. It is what is controlled by the project file. Although you can watch or listen to your media files in various other applications, you cannot edit or arrange them unless they are inside a Final Cut Express project. The video footage you captured in Chapter 2, for instance, is media. Likewise, files that we import into the project will be media files.
So you can see that these two types of files are very different, though very dependent on each other when you edit. A project file is something you open with an application, while a media file is something you bring into that project by either capturing while in the application or by importing.
Final Cut Express can easily import the following file formats, arranged by file type: Still Image
- BMP
- Flashpix
- GIF
- JPEG/JFIF
- MacPaint
- Photoshop
- PICS
- PICT
- PING
- QuickTime Image File (QTIF)
- SGI
- Targa
- TIFF
Video
- AVI
- QuickTime Movie (MOV)
- Image Sequences
- Flash (Video only)
- MPEG1 (Video only)
Audio
- AIFF
- Audio CD Data (Macintosh)
- System 7 Sound
- Wave (WAV)
Some of these formats may seem obscure, but they all have one thing in common: Final Cut Express can import them into your project and use them as clips for editing. Such importing is very common. By using audio tracks from an audio CD or using Photoshop files to create graphics, you can easily add professionalism and class to your finished production. Although Final Cut Express is an advanced editing solution, there are some things that other applications can do much better.
Graphics applications such as Photoshop have tools that are much more suited to developing beautiful text and other visual elements. Audio applications such as Digidesign Pro-tools and Bias Peak DV are often used to texture, mix, and clean up audio tracks that initially don’t sound their best. Further, if you deal with clients who provide you with standard graphics or sound elements, you’ll have to deal with importing their materials.
CD Import: The Right Way
To import CD audio tracks, we have to take a couple of things into account. First, we can’t simply put the CD in the Macintosh and select Import from the File menu. That is a rookie mistake that will backfire on the user in 10 minutes. Getting your CD audio tracks into Final Cut Express isn’t complicated, but you have to take care of a few things along the way.
If you put the CD in and selected Import, your project would link itself to the CD. The problem is that as soon as you removed the CD from the Macintosh, the audio track would become unavailable to your project! Second, even if the CD were still inside the player, if you tried to play the clip in the Timeline, you would likely end up receiving a Dropped Frames warning. CD-ROMs, though reasonably fast, are generally not fast enough to keep up with the demands that Final Cut Express places on playback. As a result, the CD-ROM drive would spin at top speed, but not fast enough, thus yielding Dropped Frames warnings.
Importing by saving your music tracks as files to your hard drive is very important. But there is still one complication for importing audio CD tracks to Final Cut Express. Our audio recorded in camera—and therefore the appropriate audio sample rate for our Easy Setup—is either 48K or 32 K. The standard sample rate for audio CDs is 44.1 K. But we are aware that we should never mix audio sample rates in our sequences. So how can we get the sample rate of the 44.1K audio CD track up to the 48K or down to the 32K that will be required by our sequence?
Using iTunes to Import and Convert Sample Rates
The answer is simple: When we import the audio track, we will use another application, such as iTunes, to convert it to 48K from its original 44.1K. To do so, we need to do a little setup work in iTunes. Start up the iTunes application. When it is opened, go to the iTunes menu and choose Preferences. In the Preferences window, click the Importing button at the top. First, change the encoder setting from the default MP3 Encoder to AIFF Encoder (see Figure 3-1).
You will see that the default settings for AIFF encoding are the standard 44.1K that we are trying to avoid. We need to change this by clicking the Configuration bar and selecting Custom. When we do, we will get a window that allows us to specify exactly what we want to change (see Figure 3-2). Set the Sample Rate for 48 K, the Channels to Stereo, and the Sample Size to 16 bit. Now, when we import CD tracks to iTunes, the tracks will be automatically converted to 48 K.
One last step remains; we want iTunes to save its imported 48 K audio tracks into an easily accessible place. Now you have to be careful, because if you have been using iTunes for your personal music collection, you will need to set a different location for saving to keep your AIFF imports at 48 K separate from your MP3s and such in normal use. You’ll only want to change the next setting when you create AIFFs; then you’ll change it back.

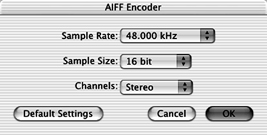
Figure 3-2Customizing the AIFF Encoder
Click the Advanced button. You will see the iTunes Music Folder Location. Hit the Change button. Choose Desktop from the from drop-down and then navigate to your Scratch Disk folder location. In the Scratch Disk folder, click the New Folder button and create a folder called “CD audio,” and then hit Choose. The location you chose will appear in the iTunes Music Folder Location (see Figure 3-3). Hit OK, and you’ll return to the main window.
Now that you have set up the location, pop the audio CD in. It will appear in the left-hand side of the iTunes window. Select it and you will see all the tracks on the CD. Instead of hitting Import immediately, uncheck all the tracks you don’t want so that the ones you want to use are still selected. Then hit the Import button in the upper right-hand corner of the window. iTunes will start importing the selected tracks (see Figure 3-4), in the process converting the sample rate to 48K as AIFF and saving them into your Capture Scratch location.


Figure 3-4Import CD tracks in iTunes

Once the import and conversion is complete, be sure to reset your iTunes Music Folder Location and the AIFF Encoder in the Preferences if you use iTunes regularly for encoding MP3s and such.
Next we have to get the converted tracks into Final Cut Express. From here the process is very simple. Click the Browser window Project tab. Go to the File menu and choose Import>Folder (see Figure 3-5). From the dialog box that follows, navigate to the folder you just used for the iTunes import in your Scratch Disk. Select it and hit Import. Of course, if you had brought only one CD track into the Scratch Disk you could have selected Import>File and selected the single CD track.
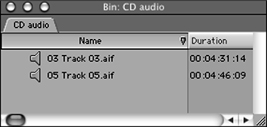
When you have completed this folder import, a new bin will appear in the Project tab. In that bin will be the audio tracks from the CD. They will be identified with a small speaker icon, which means that the clip contains no video content (see Figure 3-6). It is now available for use in your project.
Using QuickTime Pro to Import and Convert Sample Rates
One of the nice things about OSX is the degree to which Apple’s own applications are designed to work with each other and augment each other’s functionalities. Another useful application that Apple distributes is QuickTime Pro. QuickTime Player is a QuickTime viewer application that Apple distributes for free so that people on both PCs and Macs can access various QuickTime files and formats. QuickTime Player is very limited in its functionality,
mostly giving the ability to play back QuickTime files that already exist, say, as downloaded from the Web or distributed via CD-ROM.
For a small price (currently around $30), you can upgrade Player to QuickTime Pro. Using QuickTime Pro, you can open almost any file format and then export it in a QuickTime format at the drop of a hat. After you purchase the Pro upgrade (from The Apple Store), you need to unlock your Player application to Pro functionality. To unlock QuickTime Pro, go to your Applications folder and start the QuickTime Player application. When QuickTime Player has finished loading, go to QuickTime Player>Preferences and select Registration. In the window that follows (see Figure 3-7), be careful to enter your serial number correctly (ones aren’t Ls, and Os aren’t zeroes).
Using QuickTime Pro to import audio from a CD is a little more streamlined than doing so with iTunes, and it is also faster at converting the audio. QuickTime Pro opens

Figure 3-7Registering QuickTime Pro
CD audio tracks directly and then allows you to save them in another format, such as 48 K AIFF. With your CD mounted on the Desktop, in QuickTime Pro go to the File dropdown menu and select Import. In the following dialog box, pick the track you want and hit Open (see Figure 3-8).
A moment later, your track will open up in a Player window. Because it is only a stereo audio track, there will be no video window. In the Player window, you will find the usual transport controls: play, rewind, fast forward, beginning of track, and end of track (see Figure 3-9). In the Timeline, you will see a playhead triangle on the top and two smaller triangle shapes underneath.
The two triangle shapes underneath the track are a very useful reason for going through QuickTime Pro instead of iTunes for the import/sample rate conversion. Here you can set an In and an Out point for the audio track you are about to convert. Thus, if you only wanted about 10 seconds of the song, you can specify that instead of converting and importing the entire song, only to have to trim it down later in Final Cut Express.
To set the In and Out points, click the right triangle and drag it to the right. You will see that it is repositioned wherever you drop it; this is your Out point (see Figure 3-10). Go back and click and drag the In point to a new position. To listen to only the selection
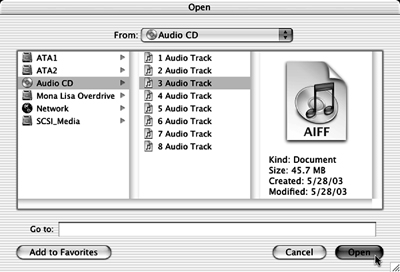
Figure 3-8Importing a CD track in QuickTime Pro

Figure 3-9QuickTime Pro Audio Timeline

you have created with the In and Out points, go to the Movie drop-down menu, and toggle Play Selection Only. If you have made a very short selection and you need to hear it repeatedly, toggle Loop from the same menu. When you have set your In and Out points, from the Edit menu select Trim.
After you are satisfied with your selection, the time has come to convert the sample rate and make the audio track available to Final Cut Express. Go to the File drop-down menu and select Export (see Figure 3-11).
First, address the sample rate conversion settings. Click the Export bar and select Sound to AIFF. Then click the Options button. In the next box, make sure the setting is for no compression, and switch the sample rate to 48K (unless you will be using 32K sequences in your project, in which case you should convert to 32K instead). Choose 16 bit and Stereo, hit OK, and return to the dialog box (see Figure 3-12).
Finally, you need to name the file and choose the correct folder on your media drive to save it to. Just as with the iTunes import process, you want to save this file in a dedicated “imported audio files” folder in your project’s Scratch Disk folder (see Figure 3-13). After completing this task, hit OK to begin the conversion process.
Once that process is complete, all that remains is importing the correct audio files into your project. This can be done by importing from the File drop-down menu, as we have done before. If you did all your importing and exporting to a dedicated “audio imports”
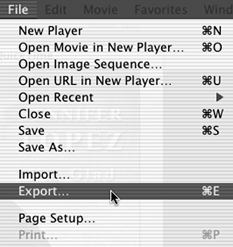
Figure 3-11Exporting from QuickTime Pro
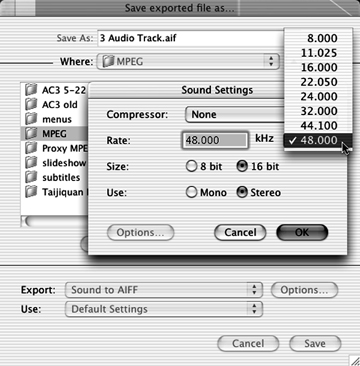
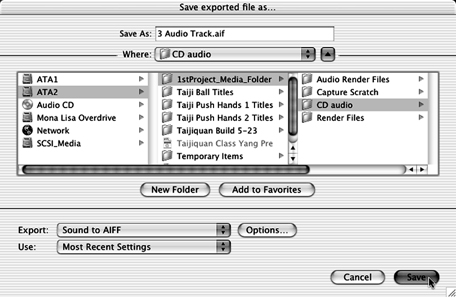
Figure 3-13Saving your audio files in a dedicated folder in your project’s Scratch Disk folder
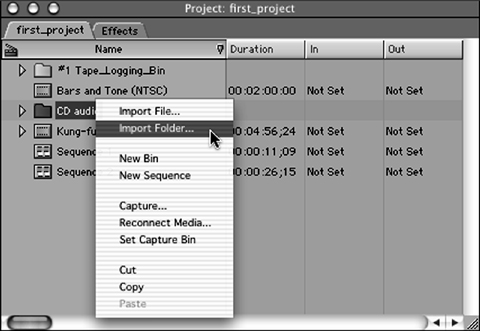
folder, you can choose Folder from the Import contextual menu, rather than File, and get them all at once (see Figure 3-14). Beyond this you can grab the audio files from your Scratch Disk folder and drop them directly into your Project tab in the Browser window, which automatically imports them as audio-only clips.
Importing Photoshop Image Files
Graphics files created in Photoshop are easy to integrate into your Final Cut Express project. Why settle for the limitations of Final Cut Express’s built-in Title Generator, when you can come up with well-designed graphics files that incorporate image content as well as stylistic text? Best of all, it’s easy to get these into your project.
As with audio files, there are a couple of complications in the import process that must be taken into account. With image files from Photoshop, the two issues are square vs. non-square pixels and accessing Photoshop layer effects in Final Cut Express. Failure to take these into account will result in distorted images and/or missing features on completion of the import process.
Square vs. Nonsquare Pixels
The first issue, that of square vs. nonsquare pixels, calls for a little explanation about the way different systems display images. A digital image (see Figure 3-15) is broken down into

individual dots of image detail called pixels, short for picture elements. It is an atomic model in which the pixel is the smallest indivisible section of an image. We measure all digital images using pixels (with the exception of vector-based images, which are addressed in the section that follows), whether that image is a still digital video frame or a scanned image.
If computer and video pixels were both square, this would make things very simple. And in fact, all computer-driven display systems use square pixels to interpret digital imagery. Most computer applications, like Photoshop, also use square pixels. Video that is to be viewed only on computer screens, such as Web and CD-ROM multimedia codecs, uses square pixels as well.
But the problem is that most professional DV editing systems, including Final Cut Express, use video codecs that require images to be processed using rectangular pixels (taller than wide), which are commonly referred to as nonsquare pixels. If your images are not prepared in advance to deal with the difference in the shape of the pixels, the images will be stretched vertically and will appear tall and thin. The square pixels of the image that were created in a square pixel graphics application such as Photoshop are interpreted into the nonsquare pixel shape of the DV codec Final Cut Express is using (see Figure 3-16).
There is a way around this problem. Create your images in your square pixel graphics application using a stretched frame size that Final Cut Express can stretch back to the proper pixel shape for mixing with nonsquare pixel video. The process involves prefiguring the dimensions of the DV frame in the graphics application slightly larger than it would normally be. Then, right before importing into Final Cut Express, you squeeze the image down in the equal and opposite direction that you know it will be stretched in when the square pixels get interpreted as nonsquare.

Don’t let the math or the process bother you. It’s a simple series of steps that has been ingrained in every Final Cut editor’s head since day one. DV NTSC, which has an actual nonsquare pixel size of 720×480, would be 720×534 if its pixels were perfectly square. DV PAL, which has an actual nonsquare pixel frame size of 720×546, would be 768×576 if its pixels were perfectly square.
In Photoshop, you will create graphics images using the prefigured 720×534 or 768×576 square pixel size of your DV video frame. Then the last step you will take before saving your graphics file will be to use the Image Size command in Photoshop (or the equivalent in whichever application you use) to squeeze the pixel dimensions of the graphics file down (to 720×480 for NTSC or 720×546 for PAL) for import into Final Cut Express (see Figure 3–17). When you import to Final Cut Express, the squeezed image will automatically be stretched back out as the square pixels are stretched into nonsquare pixel shapes. No detail or data is lost or gained. The pixels are just shaped a little differently. This process will be covered later in this chapter.
Getting Photoshop Layer Effects into Final Cut Express Intact
The other thing to understand about importing images is the way that Final Cut Express deals with Photoshop layers. Photoshop files can be flattened single-layer files or stacked multilayer files. When you create a Photoshop image, you can add imagery to it either on the initial image layer, rather like painting on a flat canvas, or on new layers that exist

as discrete images stacked one on top of another. This adds a lot of functionality to the Photoshop image, allowing you to edit parts of an image without altering other parts of it and to create one file that contains many different image components, all separated and discrete.
The way this is organized in the Photoshop file is that each layer of a multilayer file is actually a distinct image layer. Each layer of the Photoshop multilayer file could be viewed as an individual still image, but they are composited together, one on top of the next so that you see them from the top down as a composite image (see Figure 3-18). This just means that you see the multiple layers of the file from the top down as if they were one image. Anything on the upper layers covers whatever is beneath on the lower layers.
Final Cut Express integrates with Photoshop in a special way. It accepts single-layer flattened Photoshop files as you would expect, simply translating the still image into video frames. But it can also import multilayer Photoshop images with the individual layers still separate, each layer being regarded as an individual still image, even maintaining transparent backgrounds. When a layered Photoshop file is imported into Final Cut Express, it comes in as a sequence with each layer of the Photoshop image acting as an individual clip in the sequence stacked one above the other, each in its own video layer (see Figure 3-19).


Figure 3-19A multilayer Photoshop file imports as a sequence
This is a real bonus, because it allows you to apply Final Cut Express effects or motion to the individual layers of the graphics you’ve created, rather than having to apply all your effects to an entire image. This can speed up your workflow enormously, especially if you work with a lot of Photoshop-generated text and graphics that must be manipulated and adjusted on a case-by-case basis.
The problem with this is that many of the really excellent effects that can be applied to image layers in Photoshop cannot be directly accessed when a multilayer file is imported to Final Cut Express. Because many of these effects are Photoshop’s proprietary vector-based effects, they are lost when the image is directly imported into Final Cut Express, which cannot understand them. On the other hand, if you convert the multiple layers to bitmapped layers while still in Photoshop, the layer effects cease to be vector-based and become a part of a rasterized bitmap, or raw pixel data. This means that they will still be present when you import the image into Final Cut Express. For much more on the difference between vector-based and bitmap-based systems, please refer to Appendix D.
The Process
The issue for our two applications here is that Photoshop performs some of its image editing effects using vector-based calculation and display methods. At present, video applications, with only a couple of fairly limited exceptions, use a bitmap format, in which every space in the image contains a colored pixel. A video frame is simply a still image composed of a certain number of pixels. The series of these still images creates video, and those still images are all bitmaps.
Photoshop has many applications and tools that were not created strictly to address creating images for video applications. For this reason, some of the more interesting visual effects, such as Drop Shadow or Bevel and Emboss, that you can create with text and image are vector-based and unavailable for direct use in Final Cut Express (see Figure 3-20).

Figure 3-20Layer effects are vector-based and will not import into Final Cut Express
This does not mean that we have no way of taking advantage of such vector-based effects. It just means that we have to, at some point, convert the vector-based effects into bitmapped image data. This is a process called bitmapping, or rasterizing. When you bitmap a layer that has vector effects, you take all the geometric vector shape information and turn it into raw pixel bitmaps that describe the shape of the original vector-based effects (see Figure 3-21).
We will create a Photoshop text graphics file, add some vector-based shading effects, then bitmap it and import it into Final Cut Express. Let’s step through the process of importing a text image from Photoshop. In Photoshop, create a new image that has a resolution of 72 pixels per inch (the native resolution for DV video) and whose size is 720×534 for DV NTSC projects or 768×576 for DV PAL (see Figure 3-22). Since we will want to be able to use this text image over a video clip as a superimposed element, select Transparent for background. Photoshop will record transparency information in the empty areas
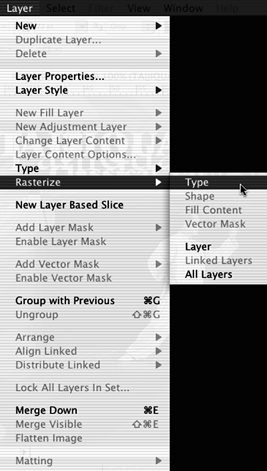
Figure 3-21Rasterizing a type layer in Photoshop

Figure 3-22Create a new file in Photoshop
of the image that Final Cut Express will be able to interpret as transparent, thus allowing you to see through those spaces and view the video on the layer underneath.
The Title-Safe Zone and Overscan
Create some text using the Photoshop text tool. Be careful not to get your text too close to the edge of the image, or it will go out of what is called the title-safe zone. The title-safe zone is a rectangle slightly smaller than the actual frame size of the video standard you are using (see Figure 3-23). All video monitors and television have a frame running around the front edge of the screen, cropping what the cathode ray tube displays into a nice, tidy 4×3 rectangle. Unfortunately, this crop is not only slightly different on all video monitors and TVs, it is also a good deal smaller than what the television tube is capable of displaying. The area that is cropped from display is called the overscan.
When you are working in Photoshop, you have to imagine where this title-safe area rectangle should be and get your text inside of it. There is no law about the size of the title-safe zone any more than there is a law about the individual cropping of the television screens by television manufacturers. A safe bet is to use 10% of the screen height and width to determine the distance in pixels from each side. For DV NTSC, this would be a centered rectangle in the Photoshop image of 576 pixels wide and 384 pixels high. You can easily set up guides in the Photoshop image window to keep you in the safe area (see Figure 3-24).
Once you have the image set up, select the text tool. Click near the center of the image and type in the word “Text” (see Figure 3-25). If the text is very small, you can select it and increase the font size on the Character palette. You could also switch to the selection

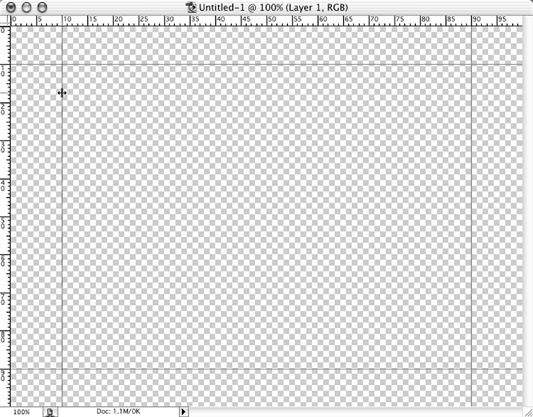
Figure 3-24Setting up 10% title-safe guides
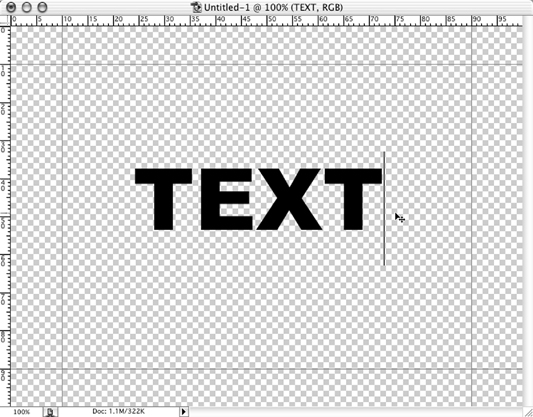
tool and then choose Edit>Transform>Scale. Until we commit the step of rasterizing, any reshaping or resizing of the text will not harm its quality. When you are happy with the size of the text, move on to the next step.
Select the text layer in the Layer palette, go to the Layer drop-down menu, select the Layer Style, and then in the submenu that follows, select Bevel and Emboss. Tweak the settings to your amusement and hit the OK button (see Figure 3-26). This will add a nice 3-D rounded edge and some shading to give the text a little depth.
Now is the time to save a copy of the image. The next two steps will perform actions that make it impossible to change the content, such as the spelling of words or the size of the text. If you need to go back in and change something, you can always open the file you have saved at this point, make the change, and perform the following steps to get it ready. That’s a lot faster than starting from scratch every time you need to make a little change. Simply save the file as a Photoshop document and include some indicator in the name that it is a production image, not the image you are going to actually use in Final Cut Express.

Prepping the Image for Final Cut Express
We now have some nice looking text to take into Final Cut Express. But there are two steps left that are necessary if we want the image to look this good once it gets there. First we have to resize it to account for the nonsquare pixel issue we described earlier in this chapter. Then we have to convert the vector-based effects to rasterized bitmap so that we get the Bevel and Emboss effect on import. Although it is not necessary to complete these steps in the following order, you should maintain the highest quality, since the resizing might degrade the image if committed after rasterizing.
First, we want to do the image squeeze that we described earlier, to prepare the image for import to Final Cut Express. Go to the Image drop-down menu and select Image Size. Immediately uncheck Constrain Proportions, since we need to squeeze the image vertically and not horizontally. For DV NTSC projects, leave 720 for the width and type in 480 for the height (see Figure 3-27). For DV PAL projects, enter 720 for the width and 546 for the height. Hit OK. The image should resize itself, gently squishing the text slightly out of shape. It is now ready to be interpreted by Final Cut Express as a correctly nonsquare pixel image.
Unfortunately, the Bevel and Emboss shading effects, being vector-based layer effects, will disappear if we import this Photoshop file as is into Final Cut Express. Since we want

to retain the special layer effects we just added, we will have to bitmap this layer such that its vector-based effects are retained in Final Cut Express.
The easiest way to change vector-based effects into bitmapped information is to merge two layers into one. When two Photoshop layers are merged, all the separate layer information (e.g., vector-based effects) is bitmapped into the one layer. It becomes a flat group of pixels, rather than a range of vector data.
We could do this by merging down or flattening from the Layer drop-down menu right now. But there’s a complication. If we flatten this text layer, we will lose the transparency of the areas surrounding our text and be left with a white background. The easiest way to get around this problem is to create an empty layer just beneath the text layer and merge down. That way, the text layer gets bitmapped with an empty layer, and the transparency areas stay intact.
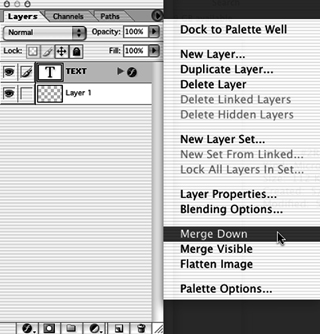
Go to the Layer drop-down menu, and select New and then Layer from the submenu. Click OK in the Layer dialog box that follows. Go to the Layer palette, grab the text layer, and drag it up above the new empty layer in the palette. Make sure the text layer is selected. Go back to the Layer drop-down menu and choose Merge Down (see Figure 3-28). When you choose Merge Down, the text layer will merge with the empty layer directly underneath it, converting the nice shading effects of the text to bitmapped image data.
Now we need to save the Photoshop image for import. Go to the File drop-down menu and select Save As. In the Save As dialog box, navigate to the Desktop and select New Folder. Name the folder “Production Graphics folder,” and click Create. Name the file “Text.psd,” making sure that it is followed by the .psd suffix (see Figure 3-29). Click Save. Quit Photoshop and start up Final Cut Express.
Importing Photoshop files into Final Cut Express is simple. You can go through the File drop-down menu process of importing the individual file, but it is much easier to
simply pick up the folder your Photoshop files are in and drag it directly into the Project tab or individual bin of the Browser window, as shown in Figure 3-30. The folder you drop into your project becomes a bin, and Final Cut Express automatically imports all the files it contains. With no fuss, Final Cut Express instantly recognizes the files and creates icons for them. The actual Photoshop files do not move from the Production Graphics folder; Final Cut Express merely creates a link to them from the icons representing them in the Project tab.
Unlike the audio file we imported and the video clips we captured, still images need not be saved to a special media drive. This is because the image file will not come into play when the clip referencing it is played. Instead, imported still image files must be rendered to play back correctly. The render files that will be created during the render process will be played back from the Scratch Disk location. Thus the original graphics file will not be directly accessed during playback. Still, if it helps you to keep your graphics folder in a unique location, such as your Scratch Disk folder, to maintain order and organization, then by all means do it. Just remember not to move the image file’s location after importing it to the project, or you will break the link between the graphics files themselves and the clip in the project.
If your Macintosh is a G4 with a 500MHz or faster processor, this Photoshop still image can be played back without rendering by virtue of the RT Cache (RAM) setting mentioned in Chapter 2 section on Preferences. Although Firewire output of the video

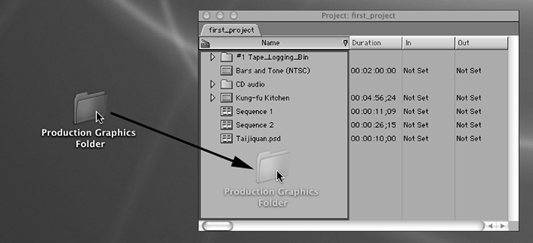
Figure 3-30Drag and drop to import a folder filled with Photoshop files
preview needs to be disabled, you can watch these stills played back without rendering on your computer monitor. To disable Firewire output briefly, hit Command-F12 or go to the View drop-down menu and select Video>Real-Time (see Figure 3-31). For Firewire output, the stills must be rendered, though.
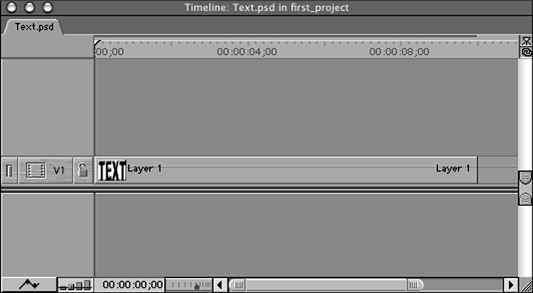
Open the new “Production Graphics” bin. Take a look at the icon used for the “Text.psd” Photoshop image file. Immediately you will notice something interesting. Instead of your Photoshop image file being imported as a normal clip, it is imported as a sequence. When Final Cut Express encounters a Photoshop image that contains layers (is not flattened), it interprets it as a nested sequence, a concept we will discuss in Chapter 5. For now, take a look at what is in this sequence.
Double-click “Text.psd” in the Project tab so that it opens as a sequence in the Timeline window. You will see that there is one video layer; it contains the text image. If you had created more layers of text in Photoshop, each would be on its own video track in this special sequence (see Figure 3-32). This is the best part about importing Photoshop multilayer images. Because the Photoshop layers are still discrete, you can manipulate them as individual clips. This sequence can be used just like a clip. To see its transparency, you’ll need to superimpose it on a video layer above another clip, one of the subjects of the upcoming chapters.
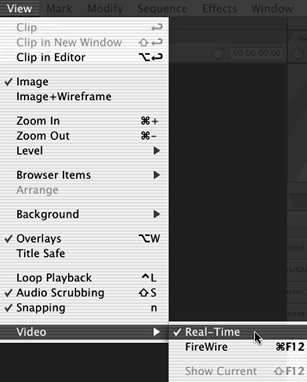
Figure 3-31Set Video to preview in real time
Organizing and Backing Up Your Project’s Imported Media
Much was said in the preceding chapter about ways of organizing the various media in your projects, and for good reason. The Project tab is an open slate at the beginning of a project, but it quickly gets confusing as the many different forms of media crowd in (see Figure 3-33).
Simply employing unique naming conventions is not enough. It is important to use the many tools Final Cut Express offers for keeping your project clean. Make sure to establish bins early, separating not only different types of media, such as imported audio and graphics files, but also the different Reel Names and tapes utilized in your projects.
A more important issue for any media you import rather than capture is that such media will most likely not have timecode data the way that a captured DV clip does. Although there are exceptions to this rule, any file that does not carry timecode should be backed up to an archive format, such as CD-R or removable disk. If anything happens to your drives, you can use timecode to recapture your video clips. But without timecode, your production graphics and CD audio tracks would have to be prepared all over again from scratch.
Most audio files and production graphics files are relatively small in comparison to video files, and since they cannot be recaptured the way that video can, backing up copies is good insurance against accidental loss. This is especially easy in view of the fact that all


new Macintosh models ship with CD and DVD burners as the stock CD-ROM drive. A good idea at the end of each workday would be to pop in a CD-ROM disk and, using the Apple Disc Burner application or Roxio’s great, ubiquitous Toast, burn a copy of all new or changed graphics, audio tracks, and project files (see Figure 3-34). You don’t need to do this with captured video and audio since you can simply use timecode to restore them. But a burned CD-ROM containing all your nontimecode media and project files is the best sort of insurance against disaster.