Chapter 11: Postproduction
The wedding is over and the bride and groom are hopefully on their way to a wonderful honeymoon, but you still have a lot of work to do before you can call it a day. You need to deal with all those wonderful images that were taken during the events of the day. The photos need to be downloaded from the memory cards into the computer, sorted and edited, including applying any software actions, and then output for the newlyweds to view. After the couple have made their selections, the images can be archived. This chapter provides a basic look at the workflow and processes involved in the image postproduction.
Importing, sorting, and editing images
The first step when you are preparing the images for the newlyweds is to get the images from the memory cards into the computer, which is the easy part. After that is done, you are faced with one of the hardest parts of the post-processing: deciding which images make the cut. Once you make those decisions, you do the basic editing.
Importing
Every camera has a port that you can connect to a computer to download images via a USB cable. Many cameras come with this cable and for those that don’t, you can get the cable at most office supply stores for a few dollars. Just check in the camera manual for the cable specifications. While this is definitely the cheapest solution because most of the time it doesn’t cost anything extra, two negative factors make it impractical. The first is that the transfer times are usually really slow, and the second is that it can really suck the life out of the camera battery. A much better solution is to purchase a stand-alone card reader to use for importing your images. There are many different card readers on the market, such as the one from Lexar and one from Hoodman shown in Figure 11-1; and some things to look for when choosing one include the following:
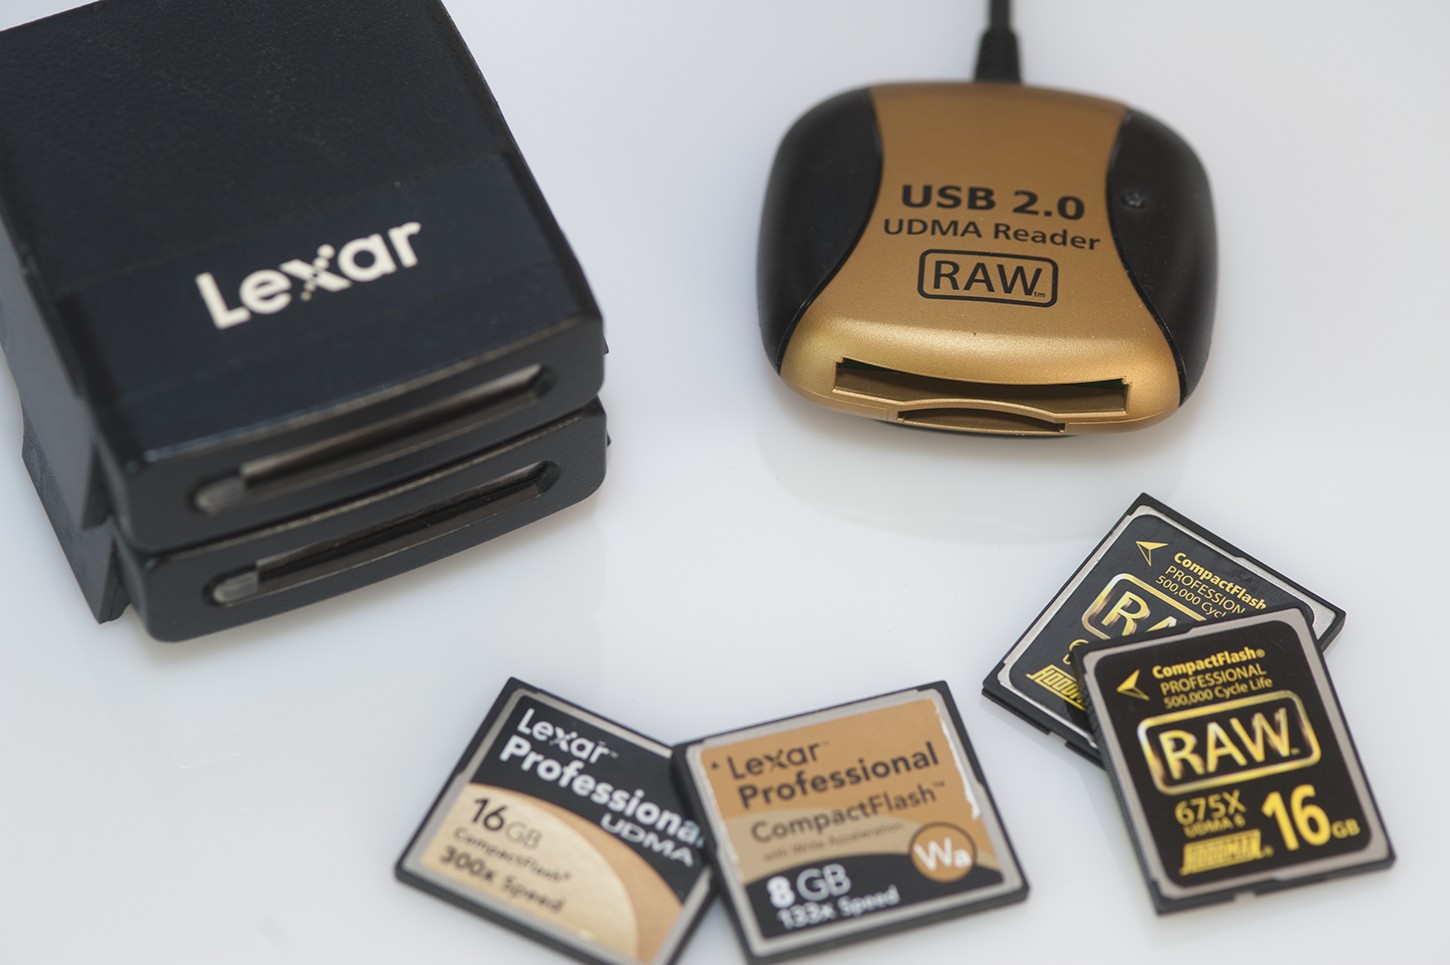
11-1
ABOUT THIS PHOTO Card readers come in a variety of types. Pick one that can handle the speed of your memory card.
• The speed of the transfer. The faster the transfer rate, the faster the images are imported onto your computer and the quicker you can get work done. The memory card you use also determines the transfer rate speed: Slower speed cards will be slower when transferring the data to the computer. Look for UDMA (Ultra Direct Memory Access) compatible card readers that take advantage of the higher-speed card transfer rates when used with UDMA memory cards.
• The type of cards it supports. There are different types of digital media, and it is key to make sure that the card reader you get is compatible with the cards you use. The two main cards used in today’s cameras are the CompactFlash card and the Secure Digital card. It is best to get a card reader that can deal with both of these types of cards so you are ready for anything. For example, if a second shooter uses a different type of card than you, you will be able to import the files without having to change card readers. A good example of this is the Lexar Professional Dual Slot card reader, which will read both CompactFlash and Secure Digital cards and costs roughly $50.
• The connection it uses. Card readers connect to your computer like any other peripheral, and there are choices regarding what connection type they use. Some readers use the USB 2.0 standard, while others still use FireWire; and with USB 3.0 emerging, the choices are growing. Find the card reader that has the same type of connection that you have on your computer, and if you have doubts, stick with USB.
There are many ways to import the images from the memory cards to the computer, and programs such as Adobe Photoshop Lightroom and Apple Aperture have built-in photo importers, as will the software that comes with your camera. For image importing, I use a program called Photo Mechanic (by Camera Bits) that ingests (their word for import) the images and allows me to add a huge amount of information in the IPTC window, shown in Figure 11-2. This data makes it possible to look at an image years from now and know when it was taken, why it was taken, and who took it. Some of the information is written by the camera directly into the digital file, but the rest of it needs to be added. Some of the options you have when importing your images are available in just about every software package. These options enable you to do the following:
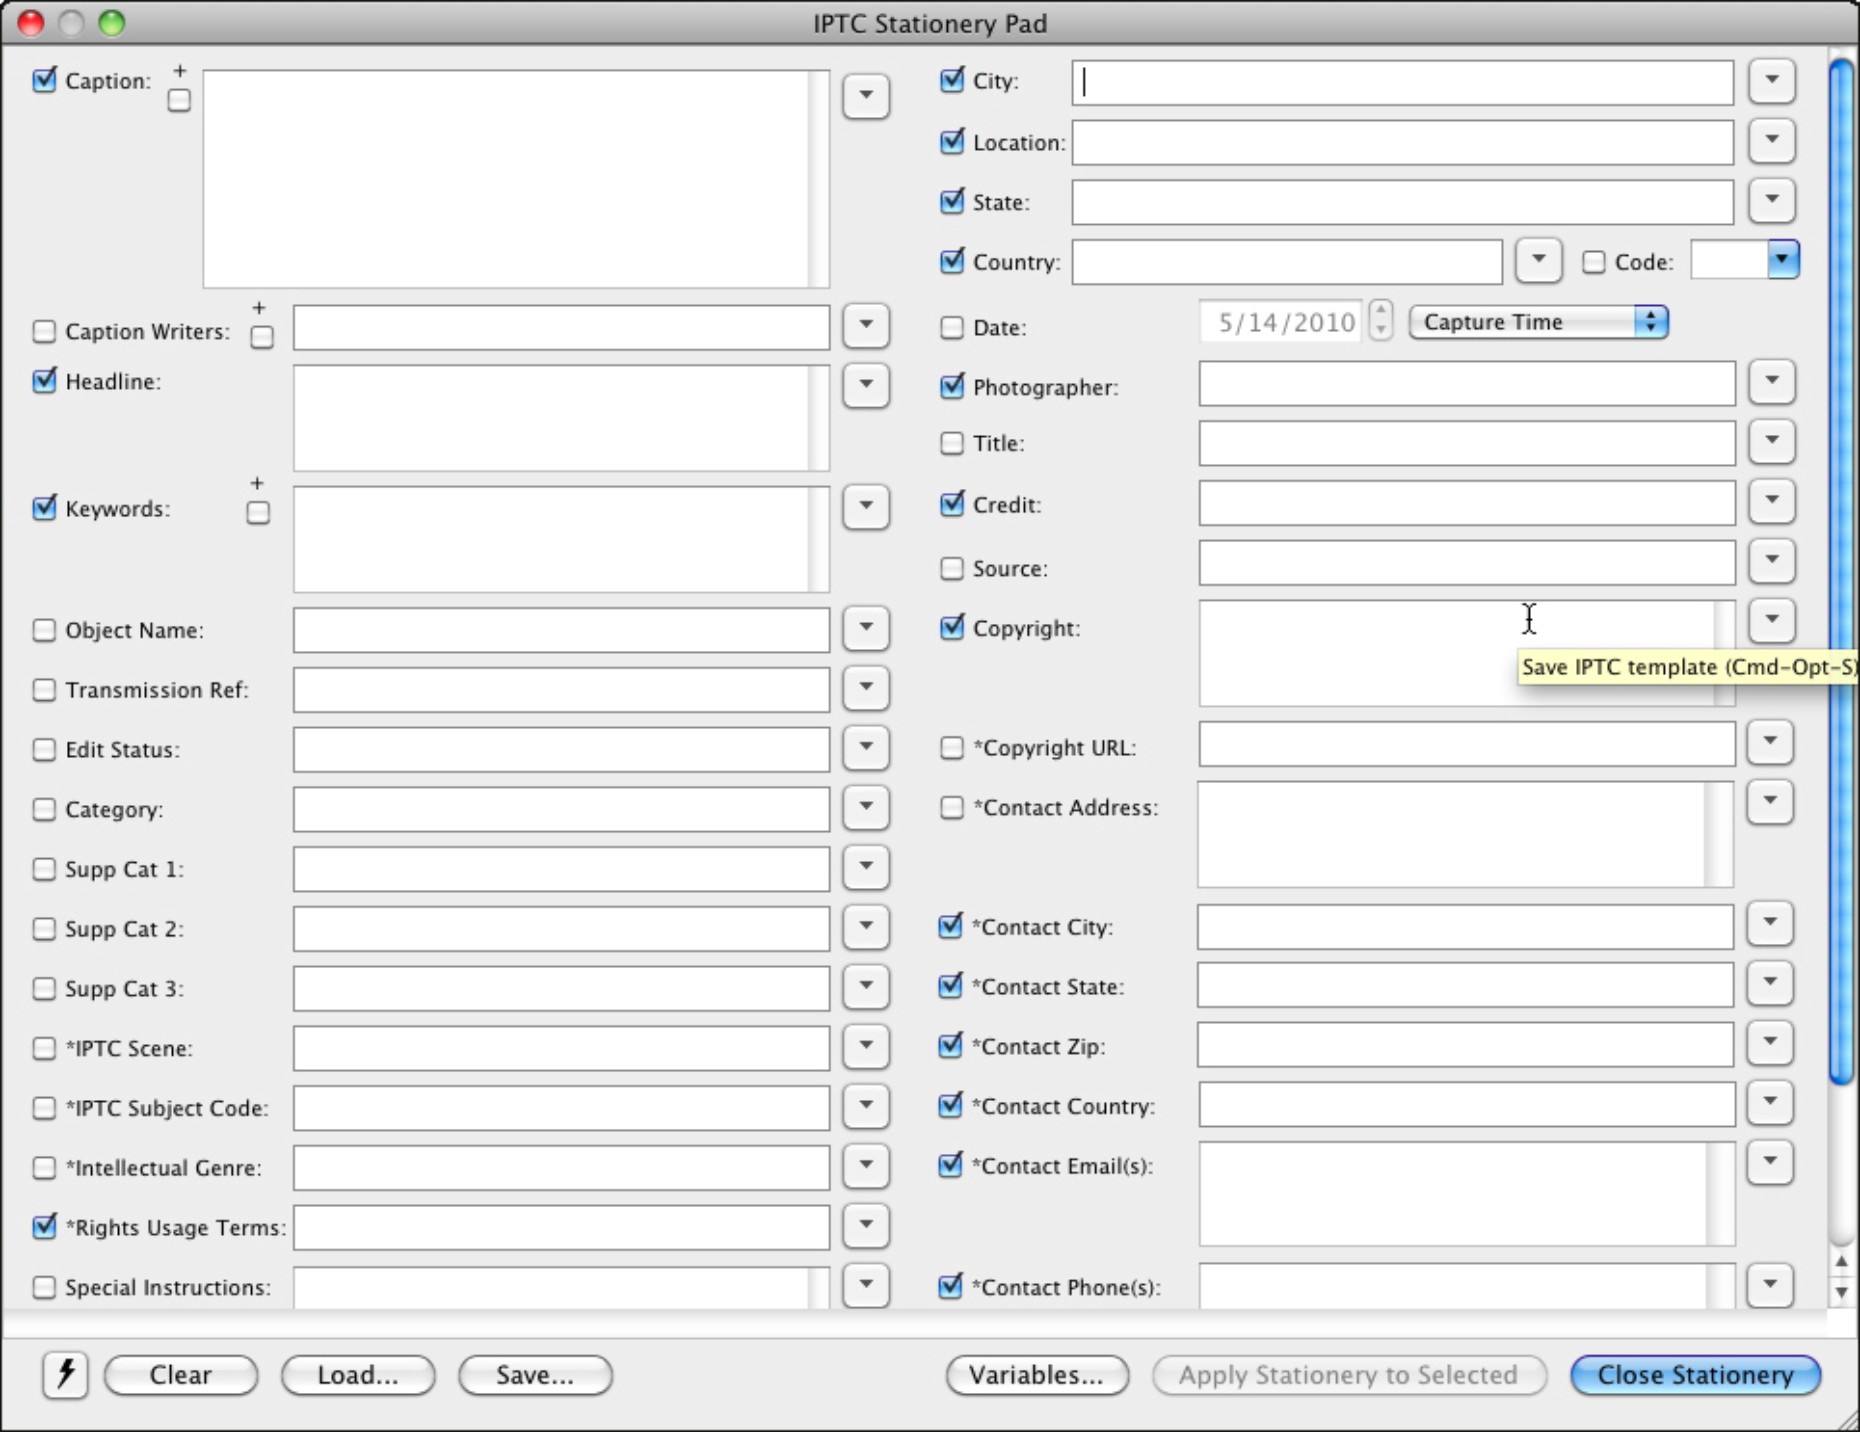
11-2
ABOUT THIS PHOTO The IPTC Stationery Pad dialog box in the Photo Mechanic software allows you to add a lot of data to your images as they are imported.
• Rename the files. Your camera uses a file-numbering system that doesn’t really make much sense, so the good news is that you can change the filenames when you import the images into the computer. A good idea is to use the name of the couple and/or the date of the event. That way you can easily find the images later on.
• Add copyright information. Many times you can add your copyright right into the image during the import. This is a great idea, because it adds a level of protection to your images with very little work on your part.
• Add shooting data. You can add a location and description of the shoot in the image data at import. This enables you to instantly have the data on each shoot available on each image, which means you will never have to guess where the image came from.
• Make a backup copy. Many image import programs allow you to save the files to two different locations at the same time. This gives you an instant backup copy of the photos, which is always a good thing.
Sorting
Not every image you shoot at a wedding will be great, and you will need to delete some of the bad ones. You may not be surprised to know that photographers tend to become emotionally attached to their images and can have a hard time getting rid of any of them. So, the first thing to do is to toss away the ones that are obvious mistakes, like shots of the floor or ceiling that were inadvertently taken while carrying the camera (which happens to every photographer at some point).
Many programs allow you to sort in a variety of ways; examples include a simple select/unselect checkbox, using a variety of colors, and a star rating that runs from one star to five stars, as shown in the Adobe Lightroom interface in Figure 11-3.

11-3
ABOUT THIS PHOTO Sorting by using a five-star system makes it easy to find the images you want later.
If you are shooting a wedding with a second or third photographer, then make sure that you all get together before the photography starts and sync the clocks on your cameras. This makes the editing process a lot easier, because you can sort the images by time. To do this, open the date/time feature on all the cameras and make sure everything is identically set, down to the second. This means that when all the photos from all the cameras are imported into the computer, you can view them chronologically.
The key thing to remember is that you should only show the best images: those that show the subjects in the best possible way, or those that capture a special moment, look, or gesture.
When I sort a wedding, I do it in the following steps. I find this allows me to pick the best images from the day and supply the clients with a complete set of images.
• Quick scan. The first thing I do when the images are imported is a quick scan of the images. This scan through the images is not to pick the good images but to get rid of those really bad images. I look for the images that are really out of focus or so over- or underexposed that they can’t be fixed. Even professional photographers take a few really bad shots, so this is to just get rid of them.
• Sorting scan. After the really bad images are thrown away, the next step is to look at the remaining images and sort them as either those to keep in the wedding album or those to get rid of. When it comes to this sort, the following items are what I look for:
> Focus. Check the focus; is the image really sharp? The viewer’s eye will travel to the parts that are in focus first, and if that’s not your subject, then the image isn’t doing what it should.
> Exposure. Is the image too dark or too light? You can adjust this using software, but if the exposure is really far off, then chances are it’s not a great shot and definitely not your best.
> Emotion. Is there something in the photo that shows how the subjects were feeling about each other — a look, a touch, some gesture that conveys the emotion of the moment?
> Don’t explain. The image should be able to stand by itself and not need any explanation. If the image needs to be explained, then chances are it’s not a great shot.
• Check the different events for completeness. After I have looked at all the images, I make sure that there is coverage of all the different parts of the wedding day. This means that there is coverage of the whole day, from the bride and groom getting ready all the way through the end of the reception. If there are gaps or places where the coverage seems a little thin, I will go back through the images I rejected in the sorting scan of that part of the wedding and look for images that can be fixed in postproduction.
• Check the requests. This is where I make sure that all image requests from the couple have been met. If they asked for extra photos of a part of the wedding or of a person, I make sure that those requests have been met.
Many of the software packages available to photographers, including Lightroom and Aperture, allow you to compare different photos side by side. This is a great way to decide which of the two images is better, and it is important to always pick the best shot.
Editing
Most images need to be edited, at least a little, before they are ready for the customers. This might be as simple as adjusting the exposure slightly or cropping the image. One of the key things to edit is the white balance to make sure that the colors are properly reproduced. Each of the image-editing programs I discuss here can handle the basic edits, but some go much further, allowing you to import, sort, edit, and output the images in different formats, all from the same program.
You also have another option when it comes to editing your wedding images, and that is to outsource the editing to a third party. A company I use on occasion called Photographer’s Edit (photographersedit.com) will do the processing for you. They not only correct your images but also provide a Lightroom catalog of the files, so that you can fine-tune the images yourself if needed, but the bulk of the work is done by them. This is a great option if you find yourself extremely busy because it frees you up to book more weddings, and the images from the already shot weddings still get to the customers in a timely manner.
Photo-editing software
Image-editing software is really big business, and the leader of the pack is Adobe with Photoshop and Photoshop Lightroom. Adobe also has an image-editing package for the hobbyist called Photoshop Elements. Apple has a professional-level image editor as well, Aperture, that only runs on Apple computers, but has a very loyal customer base and does a lot of things very well. The following sections take a brief look at each of these.
Photoshop
Adobe Photoshop is the most well-known image-editing software in the world and has been the leader in digital image editing for more than twenty years. It is the gold standard by which all other image editors are judged. Along with the serious image-editing capability comes a serious price tag; you truly get what you pay for.
Adobe Photoshop is actually three separate programs all in one:
• Bridge. The Bridge is a free program that ships along with Photoshop and is a basic image-sorting and viewing application. It is also the program you can use to import your images into the computer.
• Adobe Camera Raw. Adobe Camera Raw (ACR) reads the RAW files produced by digital cameras and lets you develop these files before opening them up in Photoshop. RAW files cannot be used before they are translated by software like ACR, and because ACR is updated independent of Photoshop, support for newer cameras is added regularly. The layout of ACR is very simple, as you can see in Figure 11-4. ACR has a big preview window on the left and the main editing controls on the right. There are nine different editing menus built right into ACR, and they all relate to digital photography, unlike the more general image-editing menus in Photoshop. The editing menus in ACR are Basic, Tone Curve, Detail, HSL/Grayscale, Split Toning, Lens Corrections, Camera Calibration, Presets, and Snapshots. The controls are exactly the same as those found in the Lightroom’s Develop module.
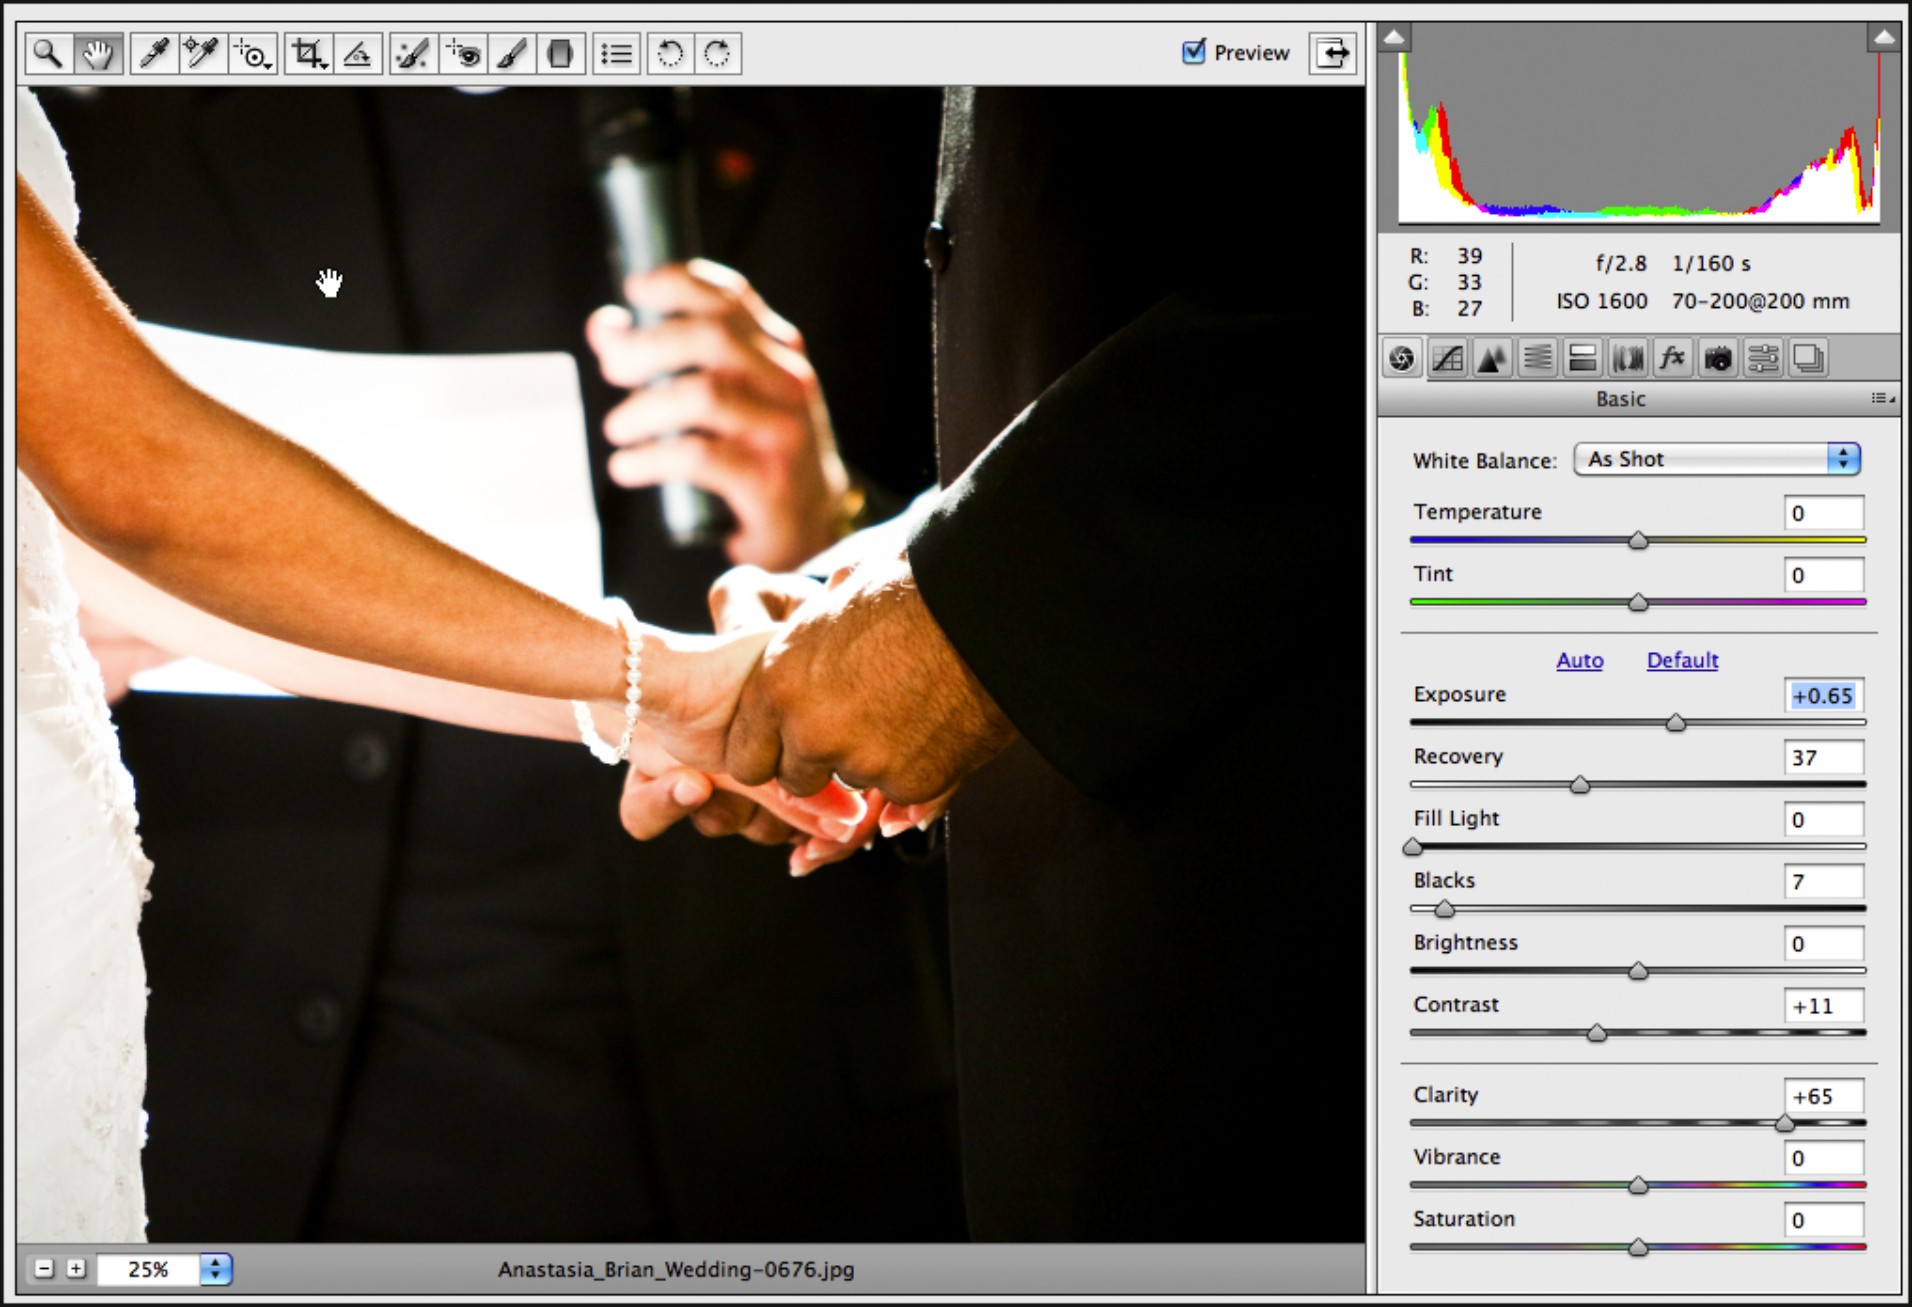
11-4
ABOUT THIS PHOTO The Adobe Camera Raw window showing the basic editing controls on the right.
• Photoshop editing workspace. This is the main editing area of Photoshop, and while the controls move around some each time a new version comes out, the basic layout is the same. In Figure 11-5, the main image is ready to be edited in Photoshop. The tools are on the left with the many different information palettes on the right.
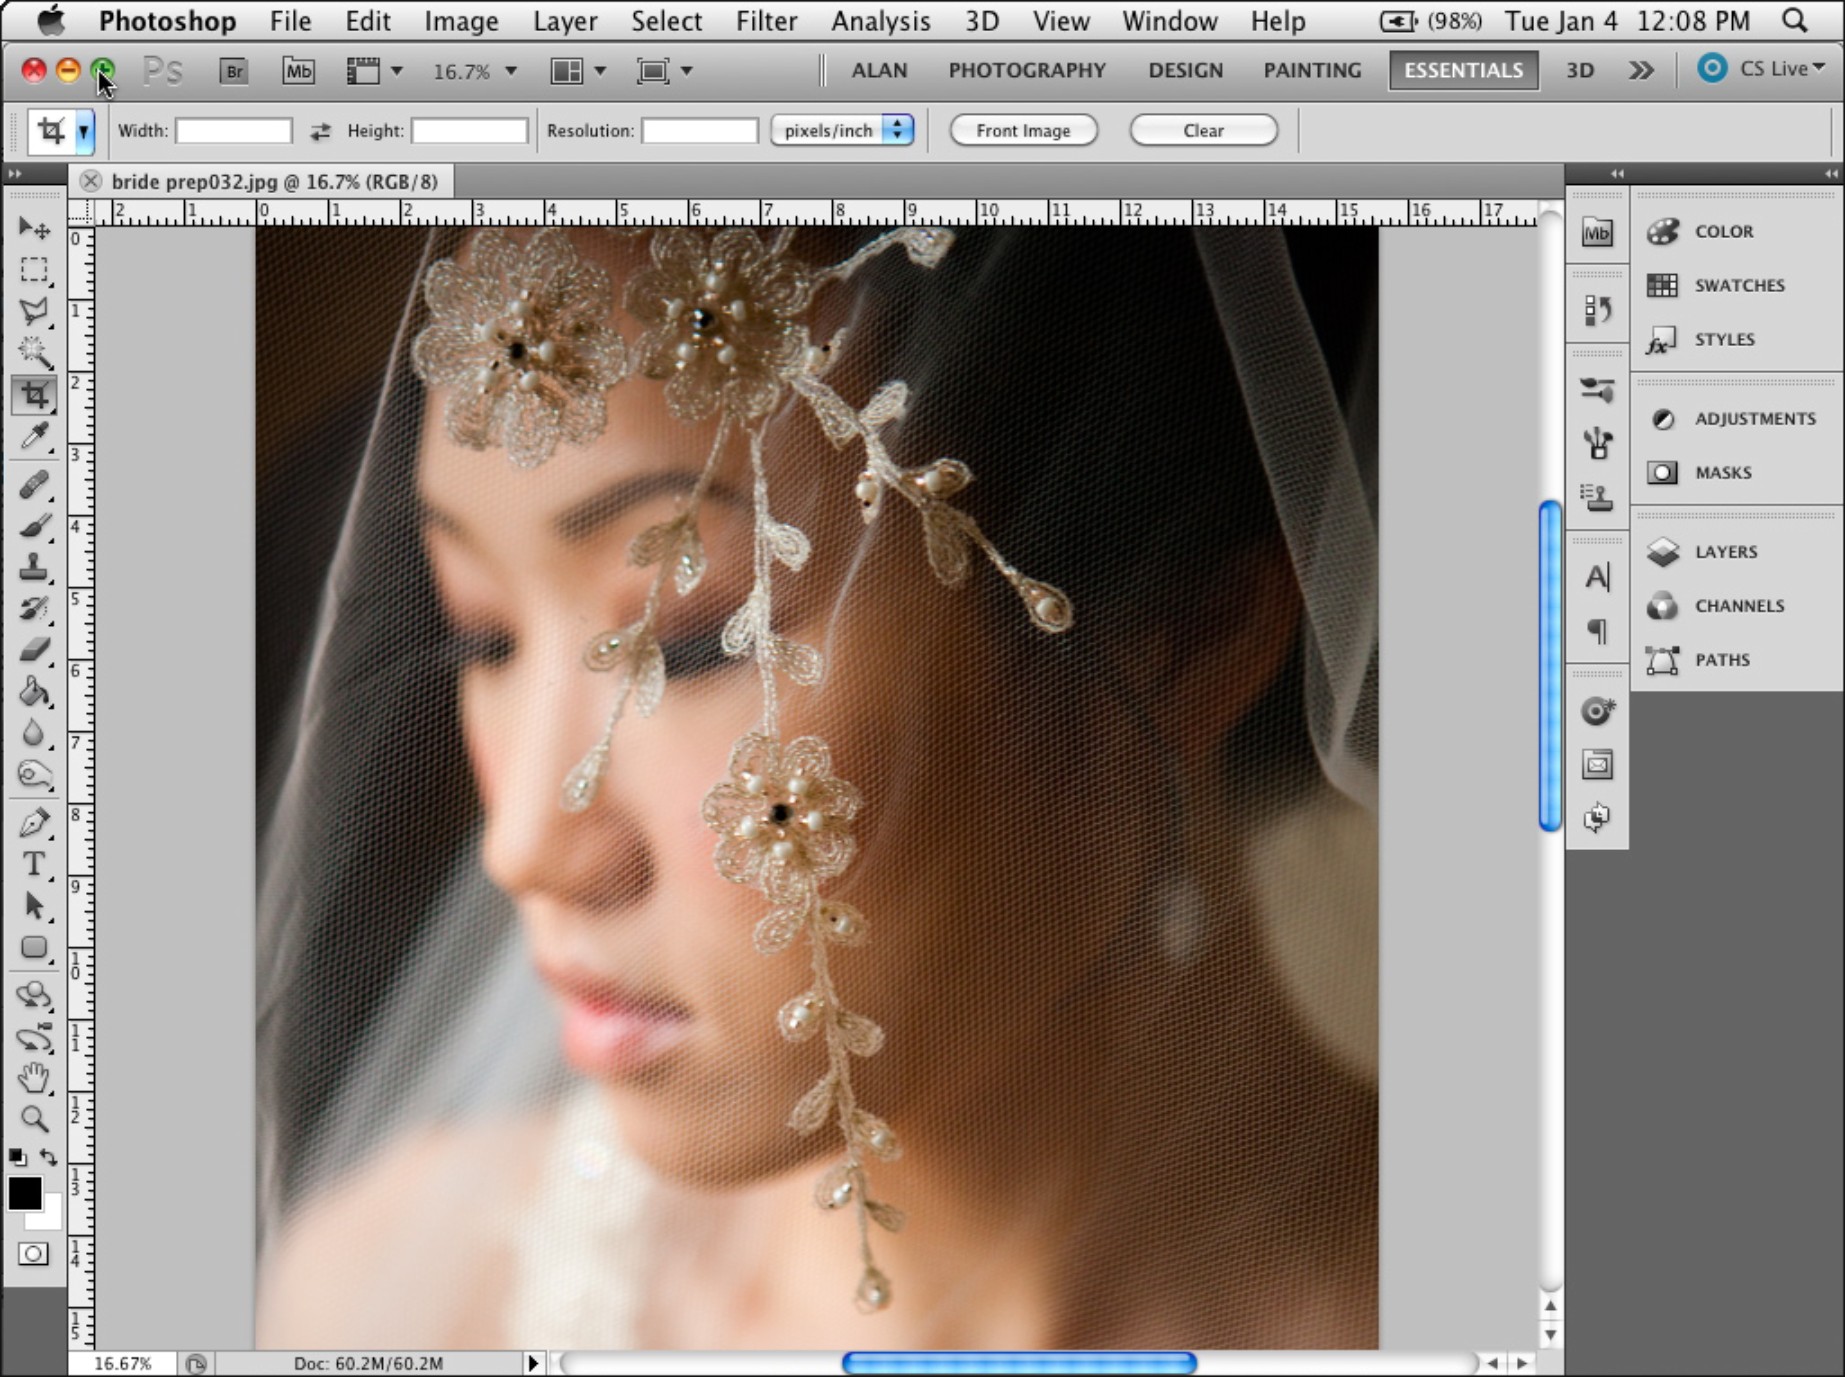
11-5
ABOUT THIS PHOTO The Adobe Photoshop workspace showing the tools on the left, the main image in the middle, and the information panels on the right.
Adobe Photoshop is the top-of-the-line image-editing program, and while you can use Bridge to sort your images, Photoshop’s real strength lies in the pixel-level editing it can do.
Photoshop Lightroom
Adobe released Lightroom specifically for photographers’ workflow. Now in version 3, the program allows you to import and sort files and do some minor image editing. It also allows you to create custom print packages and Web galleries if you are the do-it-yourself type.
You start with the Lightroom Import menu, which not only lets you import the images from the memory cards to the computer but also lets you add information to the images as they are transferred. The Lightroom workspace is split into five modules: Library, Develop, Slideshow, Print, and Web. This module-based workflow is organized along the lines of a photographer’s workflow, which starts with importing images into the Library mode, where the sorting happens; next using the Develop mode, where any image editing happens; and then outputting the images using the Slideshow, Print, or Web modules.
You use the Library module to do all your sorting, and there are numerous ways to tag the images so they are sorted into different groups. You can use the Pick or Reject tags, rate the image from one to five stars, or use a color-rating system.
The Develop module in Lightroom, as shown in Figure 11-6, has the exact same controls as in ACR. The two different programs are updated at the same time and both can process RAW images.
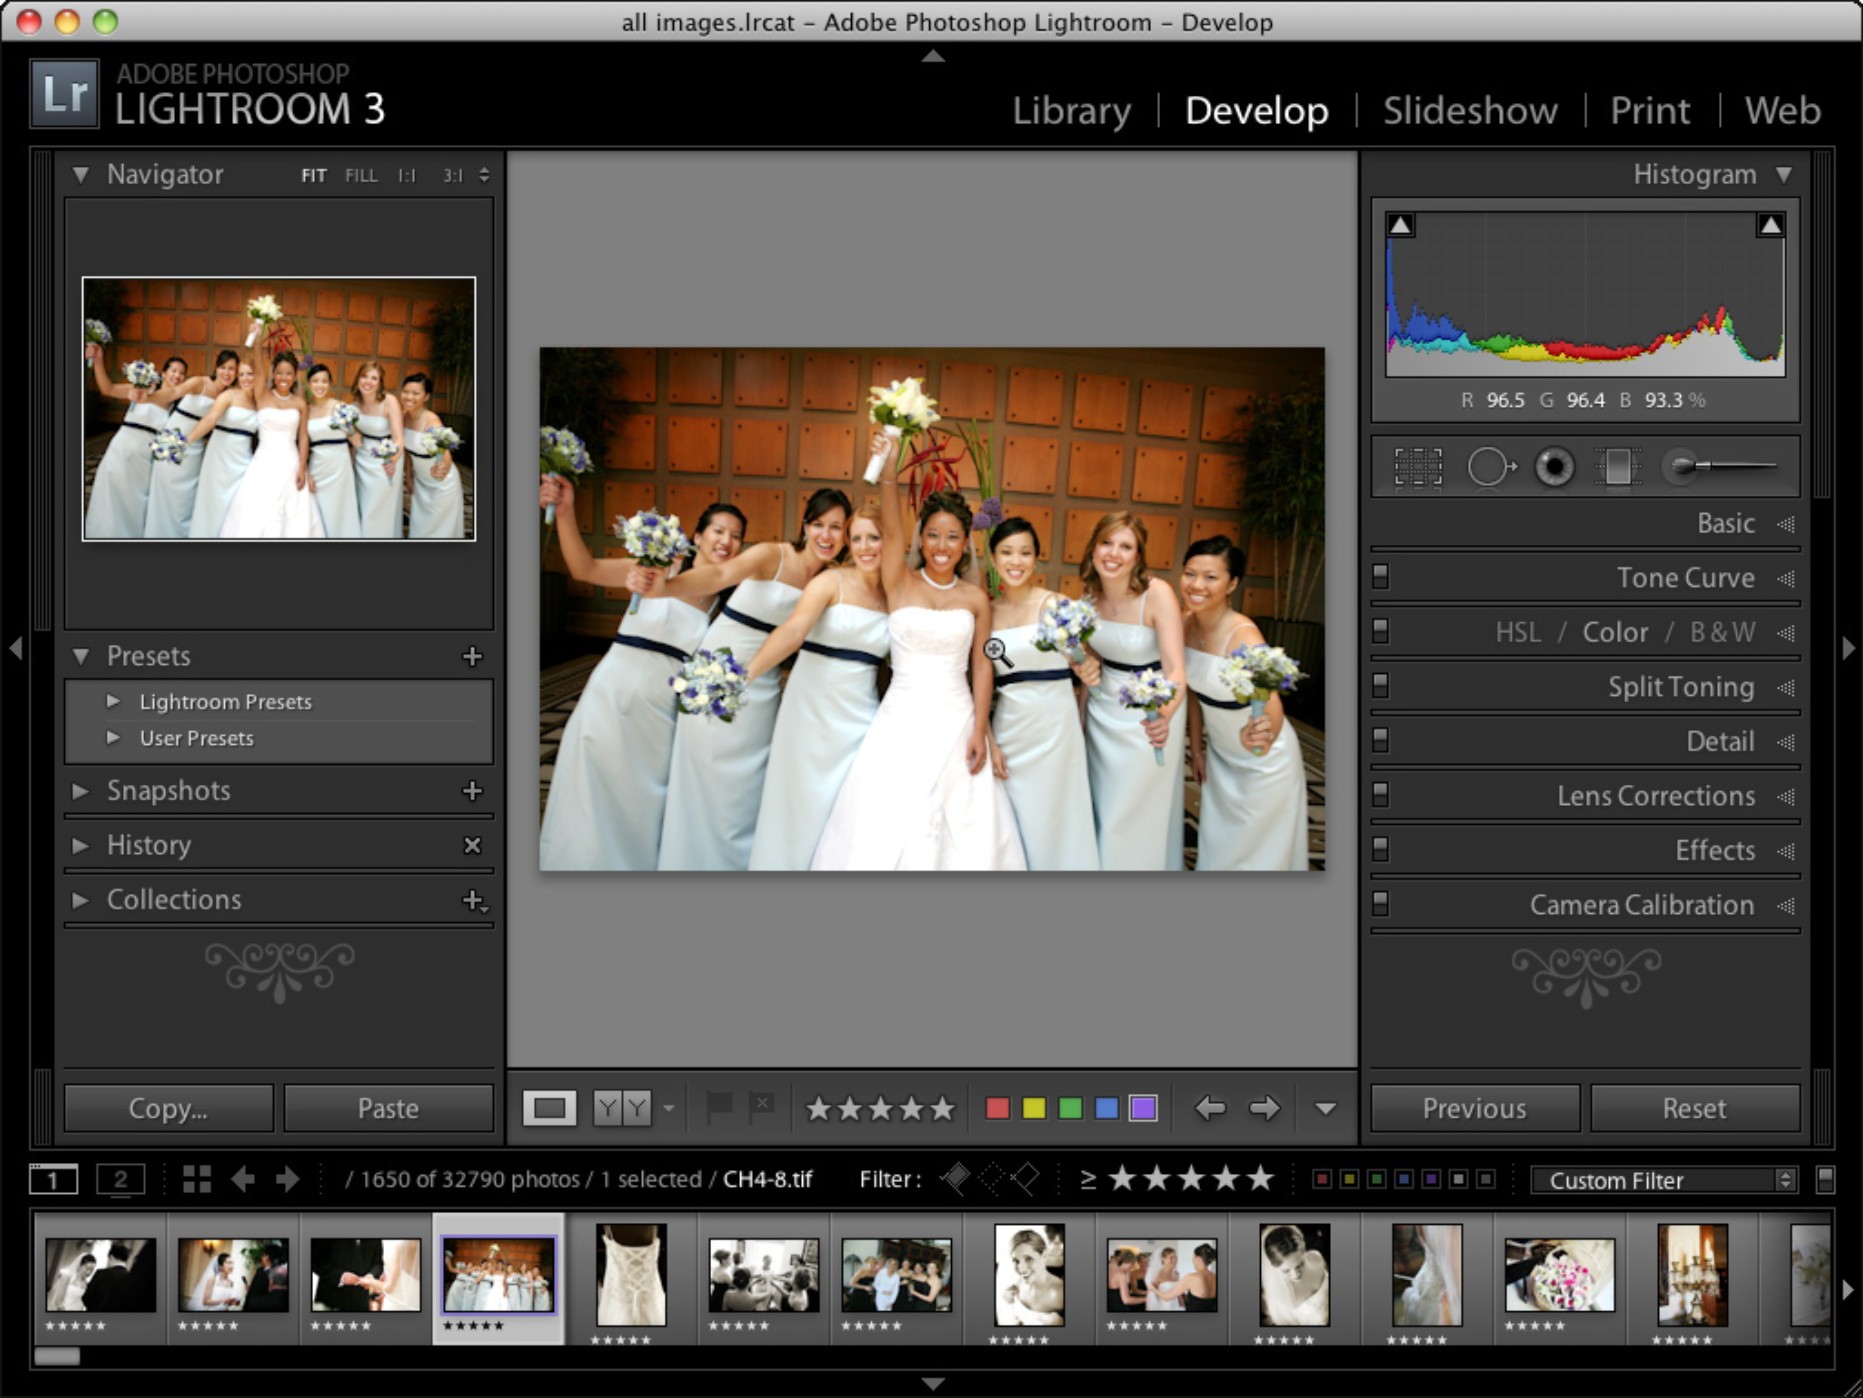
11-6
ABOUT THIS PHOTO The Develop module in Lightroom uses the same menu (shown on the right side of the screen) that is available in ACR.
Lightroom is a great solution for the photographer who wants to do everything himself because it allows Web galleries to be created and published directly from the Web module and prints on your printer directly from the Print module. However, if you are a busy wedding photographer, you might want to consider using a third-party company to handle this. Lightroom allows you to export your images in a variety of formats, allowing you to supply the images to a service provider like Pictage or Zenfolio. The export window allows you to pick the file type and other options. These preferences can be saved as a user preference and used over and over again. Figure 11-7 shows the Export window for Lightroom.
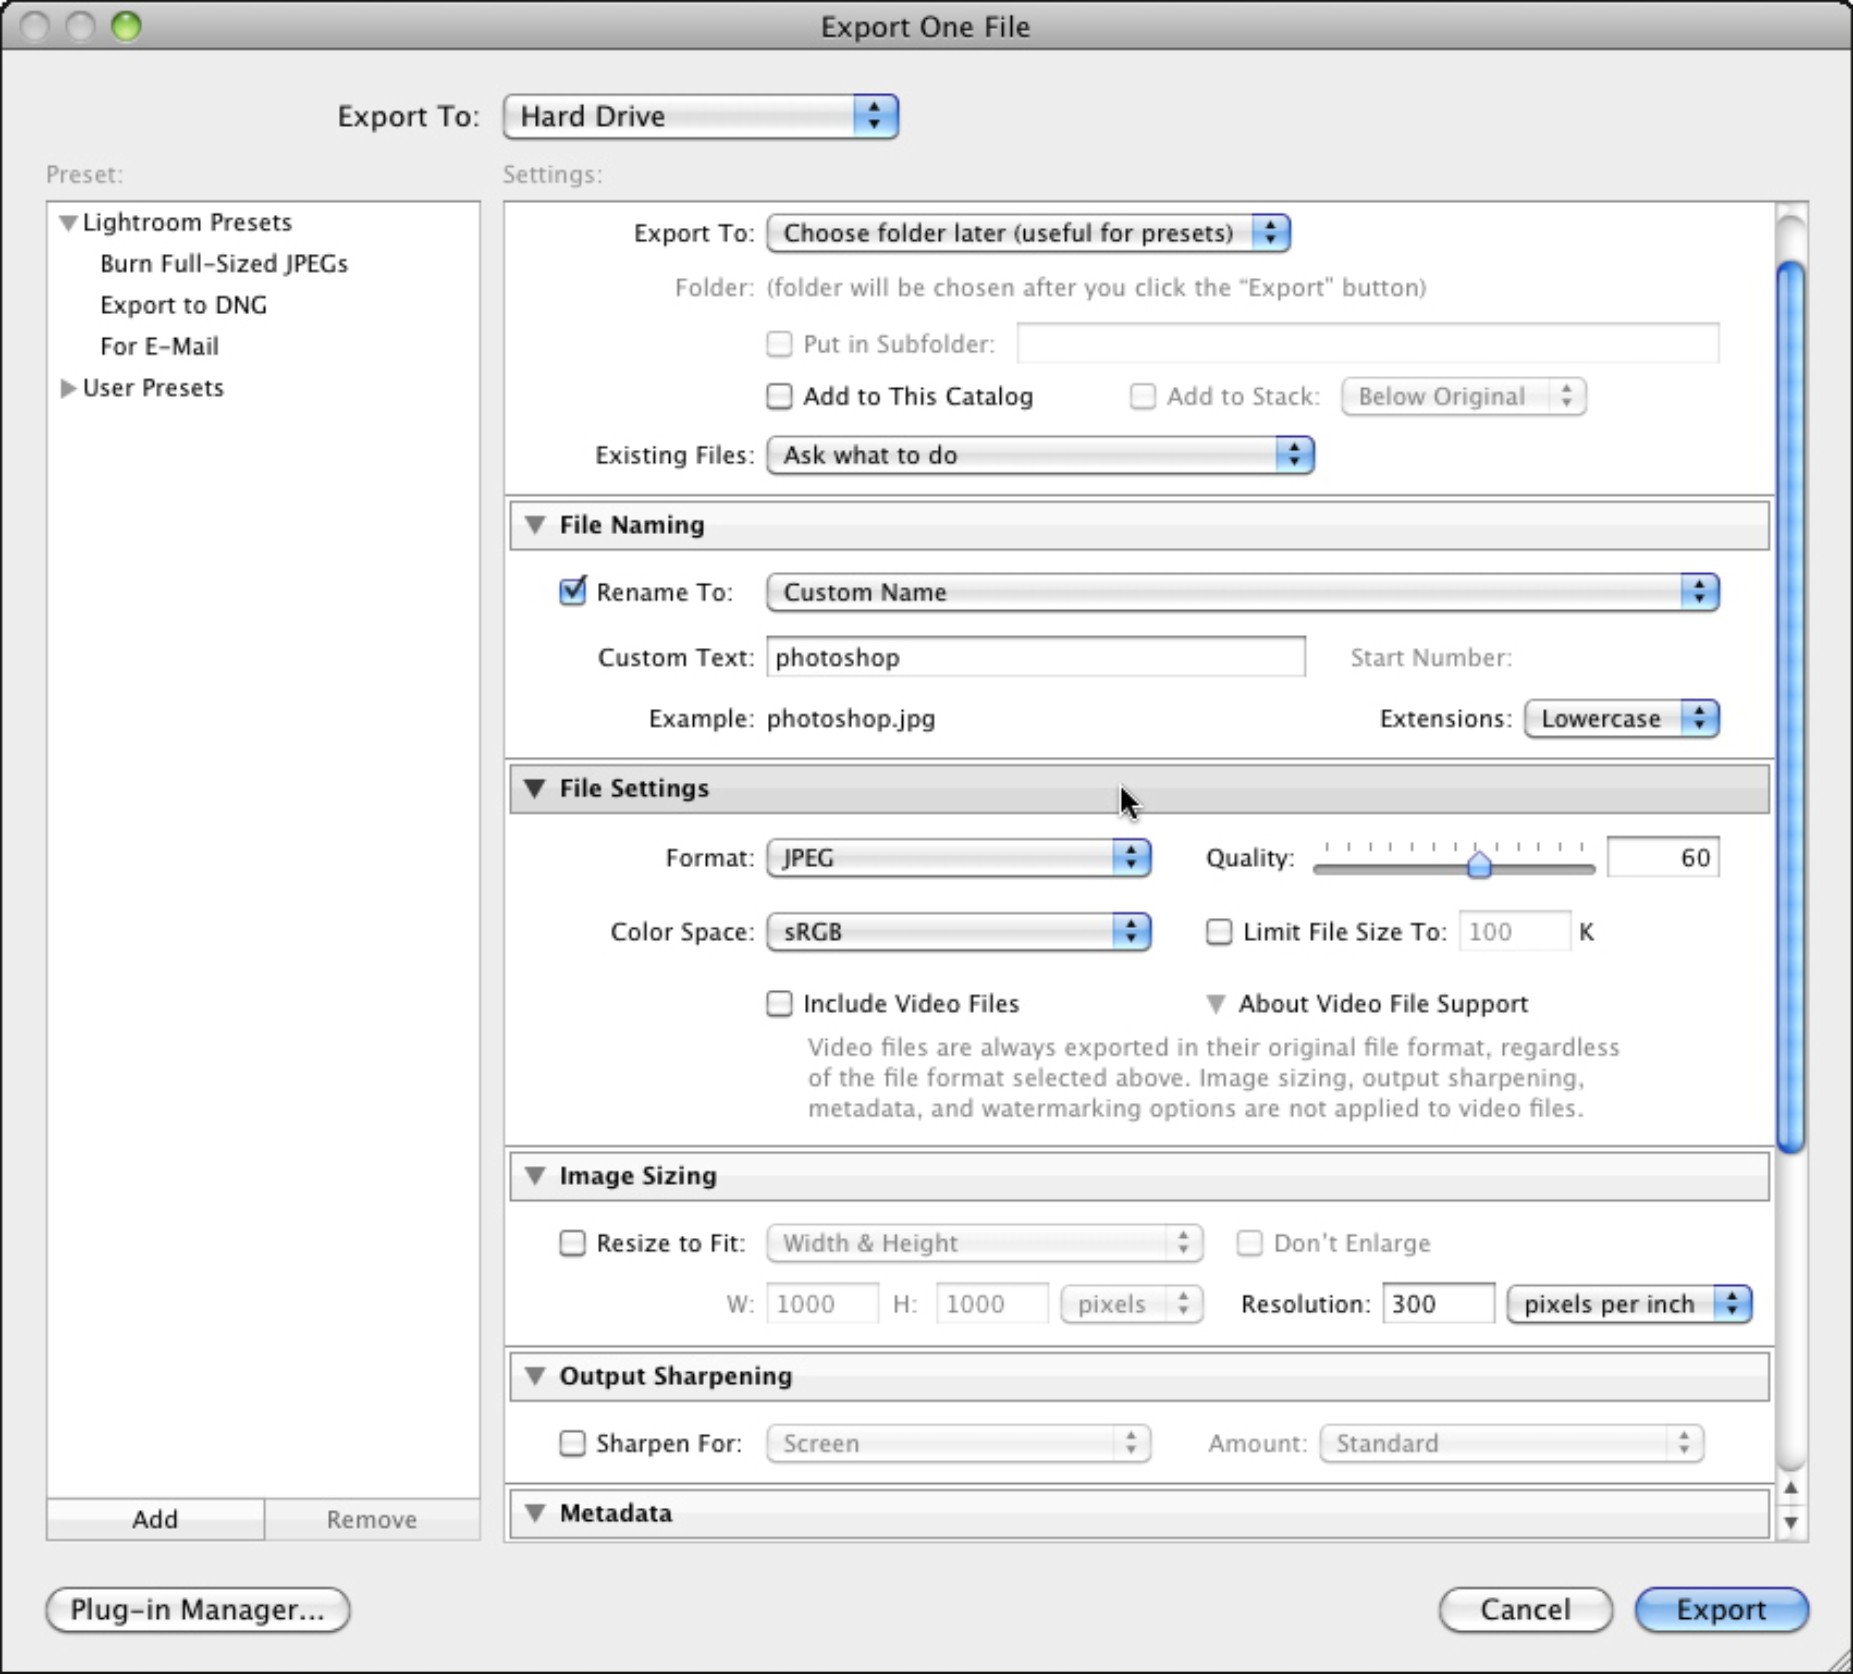
11-7
ABOUT THIS PHOTO The Export window in Lightroom showing the File Naming, File Settings, Image Sizing and Output Sharpening choices.
Apple Aperture
Apple computer created the Aperture photo-editing software for the Mac-using professional photographer. Aperture offers a complete set of tools for importing, sorting, and editing your images.
Aperture offers tools for sorting and rating your images, lets you create Web galleries and collections, and allows you to create books that can then be professionally printed and shipped directly to you or a client. For the wedding photographer who wants to do it all, this might be a solution worth looking into.
The exposure adjustments include the Exposure, Recovery, Black Point, and Brightness sliders. These four controls are the main adjustments when it comes to fine-tuning your exposures and are very similar in function to the controls in ACR. The four controls in this section, which are shown in Figure 11-8, are used to correct problems like overexposure and underexposure.
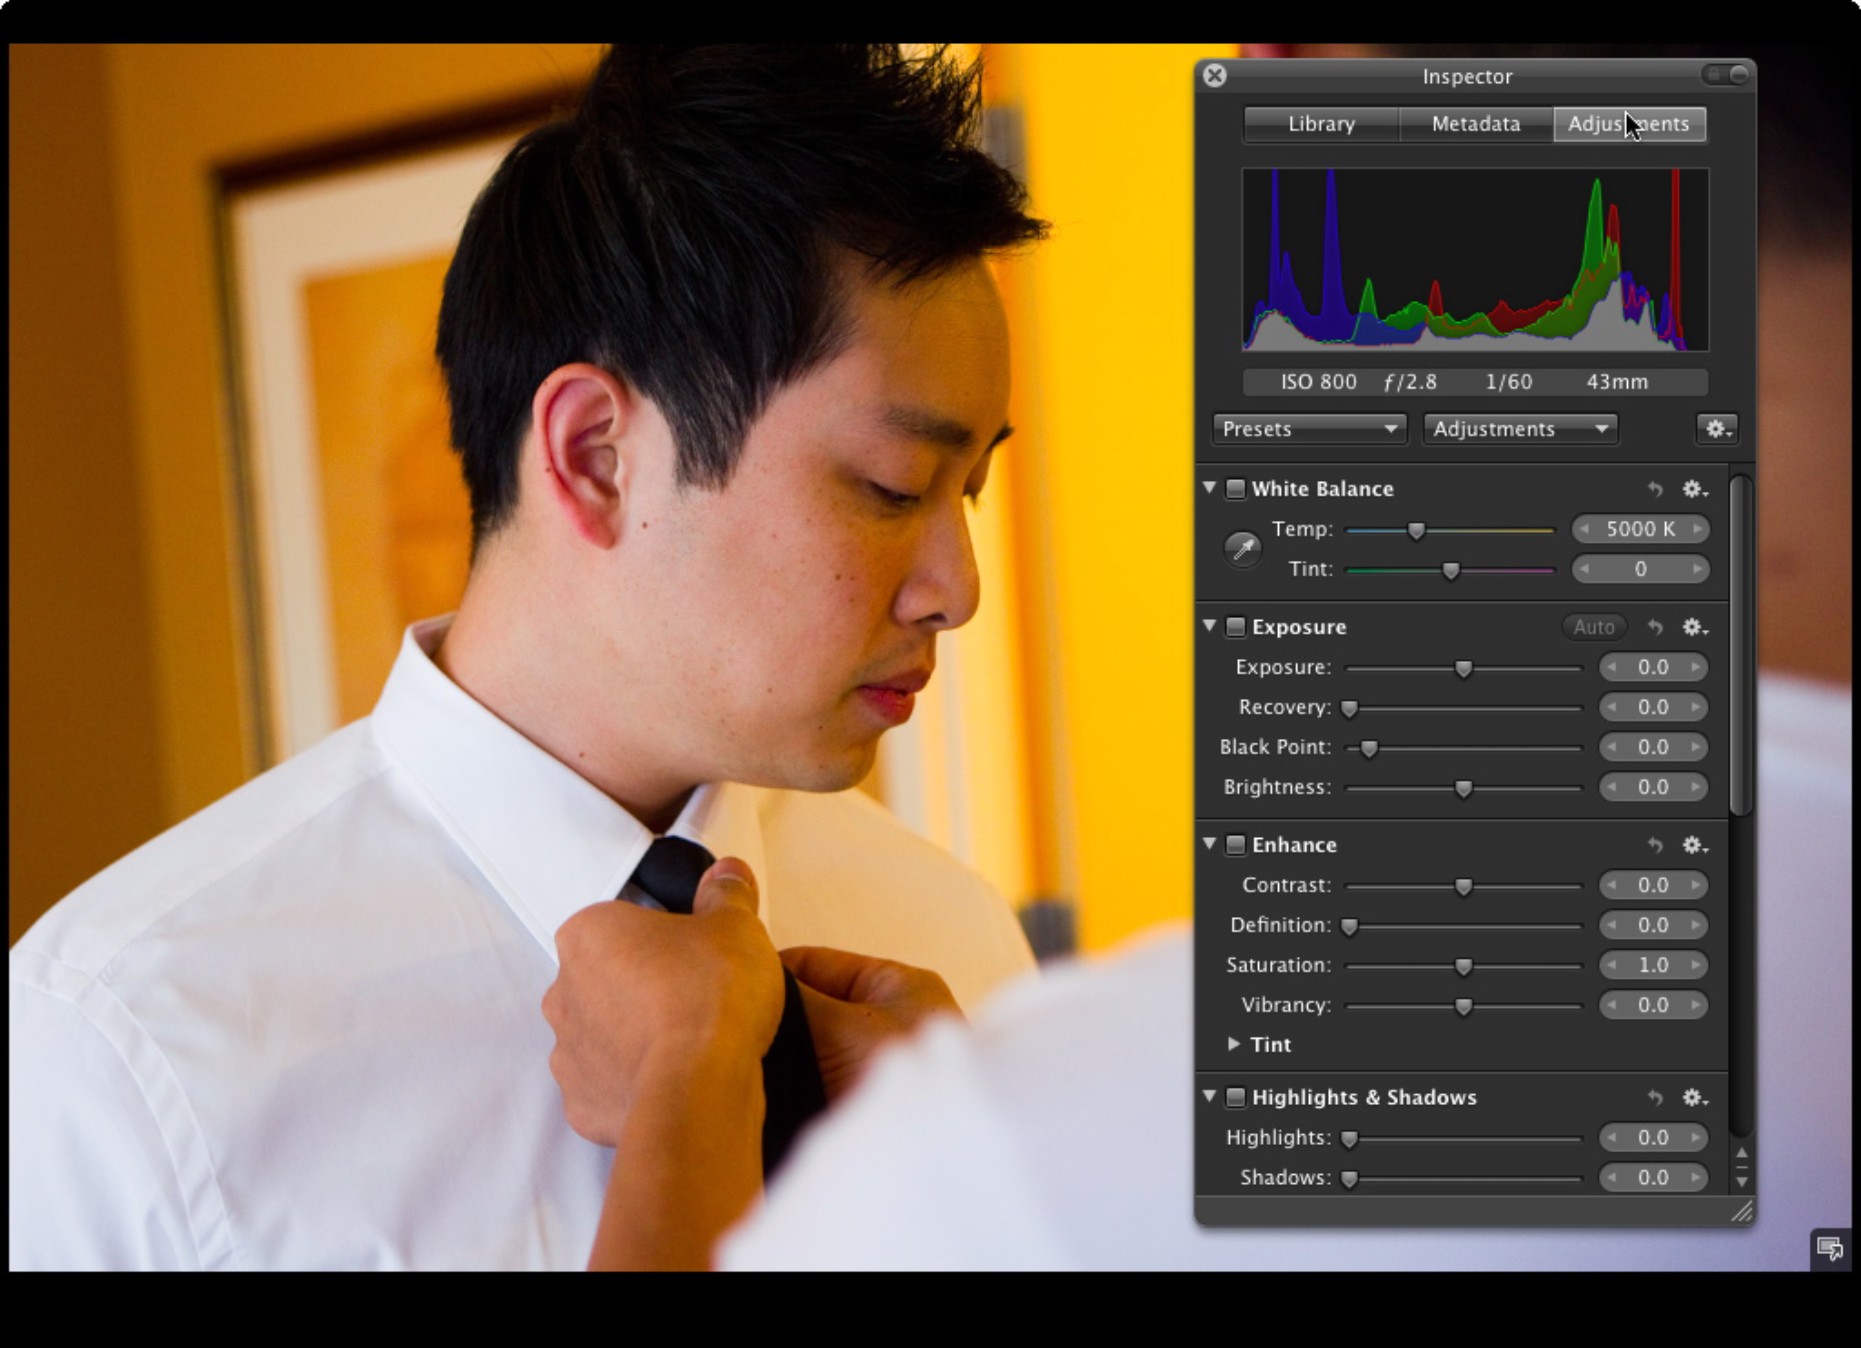
11-8
ABOUT THIS PHOTO The Apple Aperture workspace, showing the Inspector panel and the adjustment controls available.
Aperture has many more tools you can use to adjust the color, sharpness, tone, and saturation in your images, and it even allows you to remove small spots and blemishes. If you are already a Mac user, then this is definitely a good option and worth checking out.
Photoshop Elements
Photoshop Elements is Adobe’s consumer version of its professional image-editing software, Photoshop. The biggest plus to using Photoshop Elements is the price, which is a fraction of the cost of the full version of Photoshop.
If you are just starting out and can’t afford the full version of Photoshop, this can be a good place to start, because it provides some basic editing functions. However, it doesn’t offer any heavy-duty sorting and organizing features. So, while you can use it for your primary image-editing software, it is certainly not the best option or a good long-term solution if you plan to build your business.
Actions
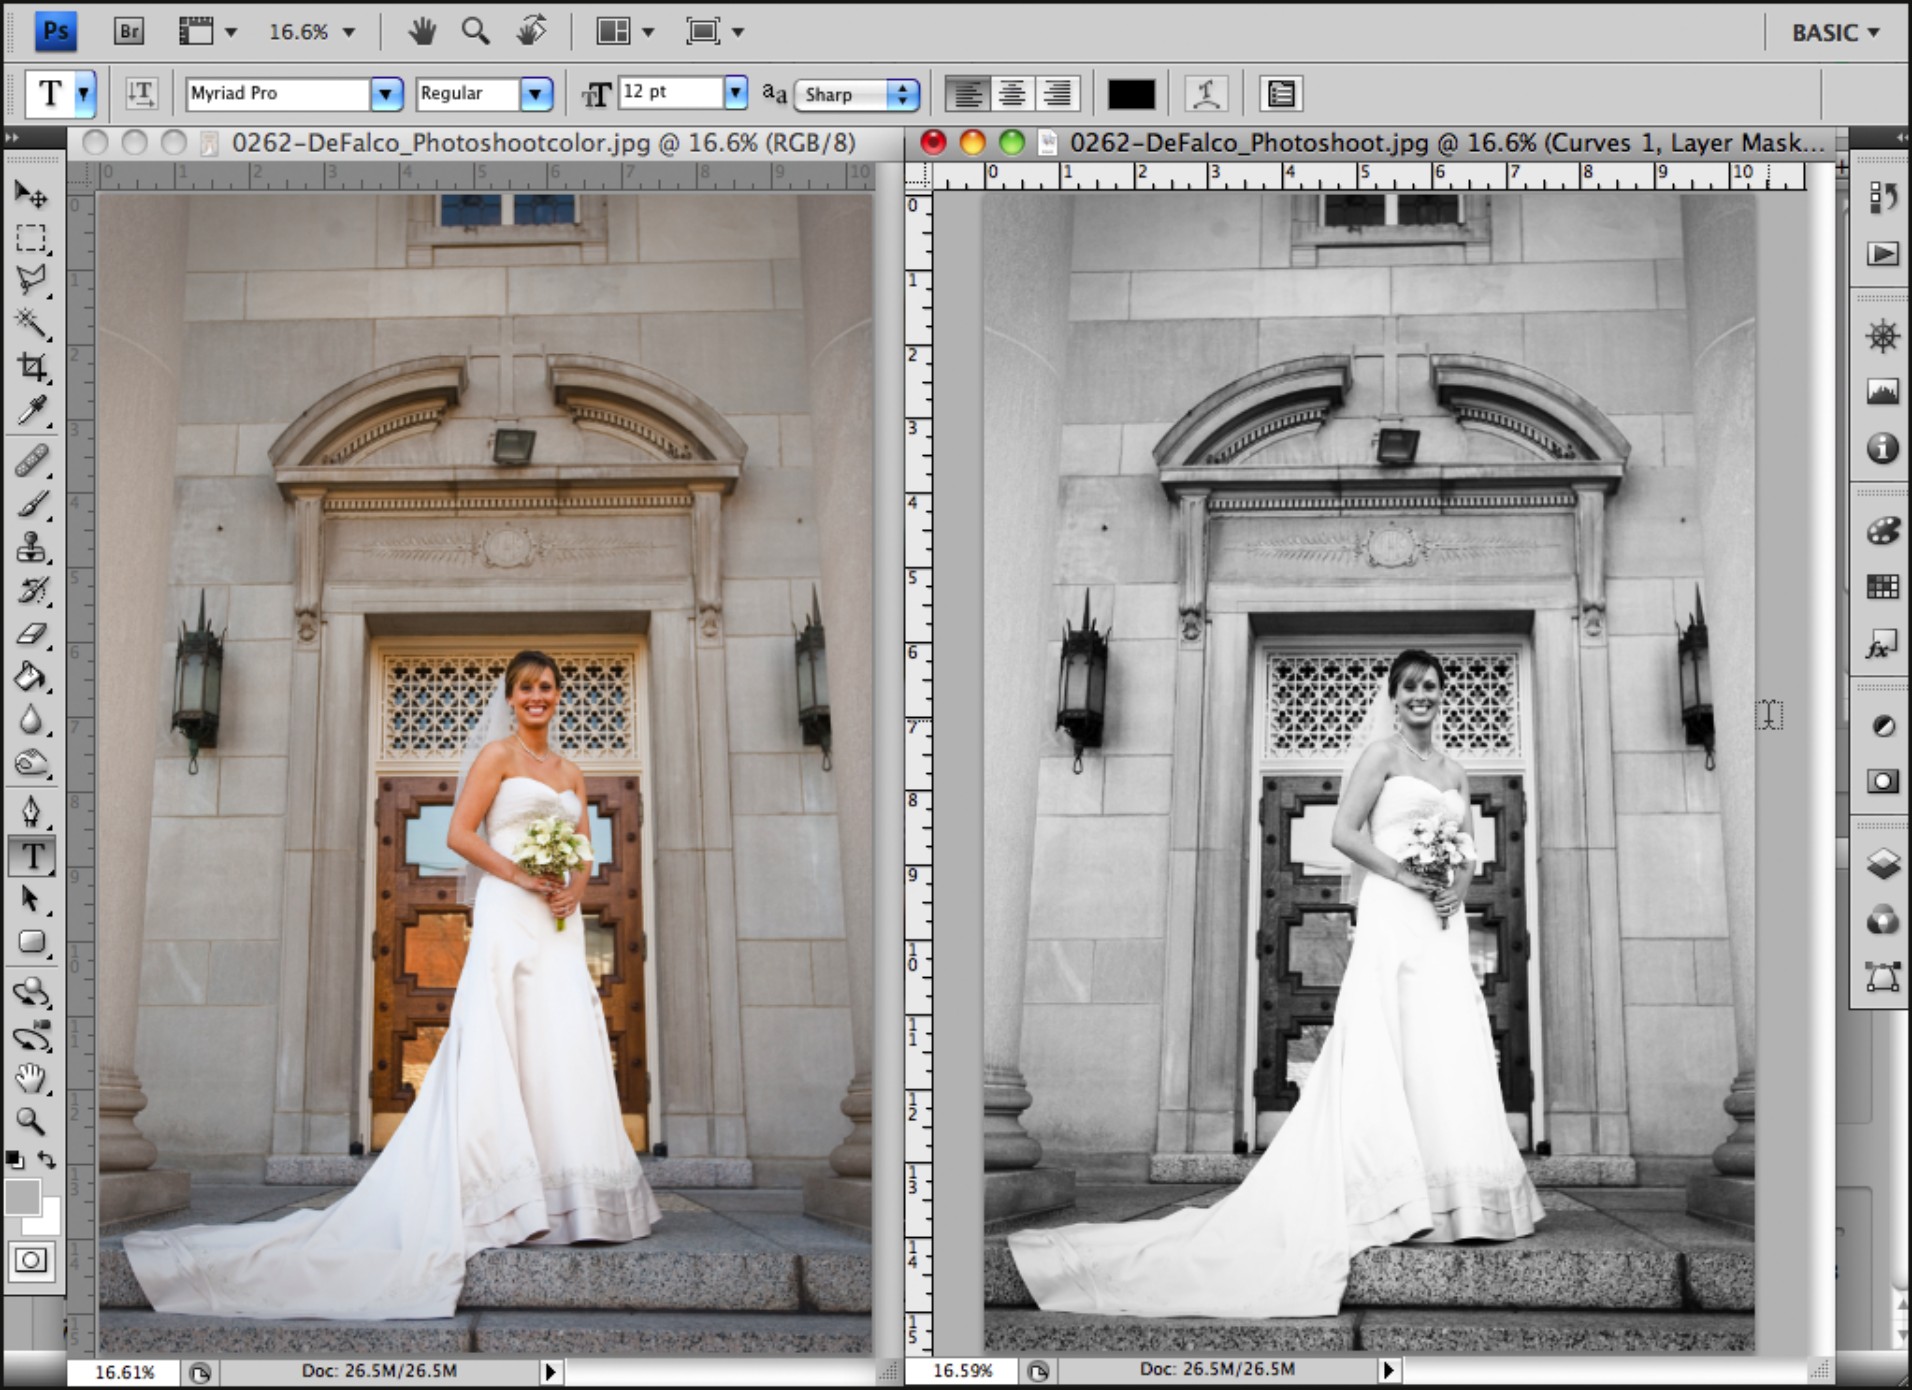
Actions are prepackaged instructions that when used with a photo-editing program, create a specific look. They enable you to create a certain look consistently without a lot of work. For example, I use an action that creates a black-and-white version of an image with a single click, as shown in Figure 11-9. The same action can also create a sepia-toned version of the image, or a color-tinted version, or all three. Using actions can really help speed up your editing time.
11-9
ABOUT THIS PHOTO The difference between a color and black-and-white version of the same image. Actions can produce myriad effects with a click of the mouse.
Actions are useful because they can cut down the editing time after a wedding drastically, but you need to take care that you don’t rely on actions alone to make up for poor photography. The actions can be used to enhance and tone an image, but the image needs to be correctly exposed and composed first. A quote that sums up actions for me comes from Denis Reggie, who said “Actions should be the salt and pepper of your image, not the steak.”
There are two types of actions: those that you purchase from others and those that you create yourself. There are a great many actions available out there that you can purchase and use, but keep in mind that if you can buy and use a certain action, so can any other wedding photographer. So while an action might give you a look that you really like, don’t rely solely on it to differentiate your work from your competition. One way to keep the actions unique to you is to adjust their opacity so that some of the original image shows through and the action is toned down a little.
It is a good idea to keep a copy of the file without the action so that if the couple ever asks for a color version, or a version that doesn’t have the action applied, you have it available.
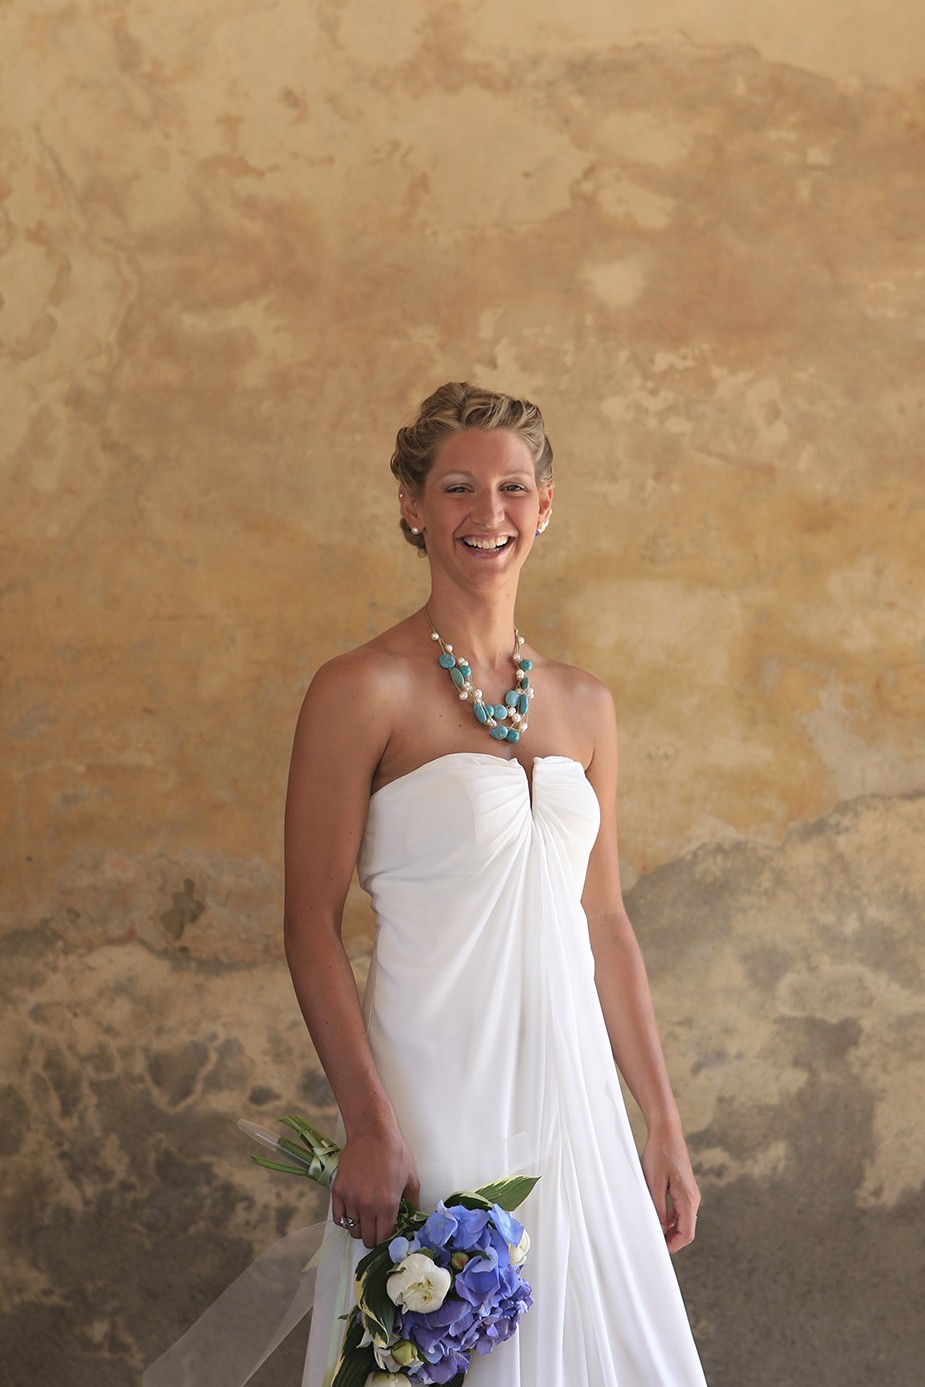
There are many prepackaged actions available for purchase from companies like Kubota Image Tools and Totally Rad Actions, both of which I highly recommend. One nice feature of the Kubota actions is the dashboard feature, which allows you to access all your actions, not just those from Kubota, from the same place. In Figure 11-10 you can see the image I started with. I applied the Fuji snappit by Kevin Kubota, then adjusted the opacity down to 35%, and then added a warm tone in Photoshop. The result is in Figure 11-11.
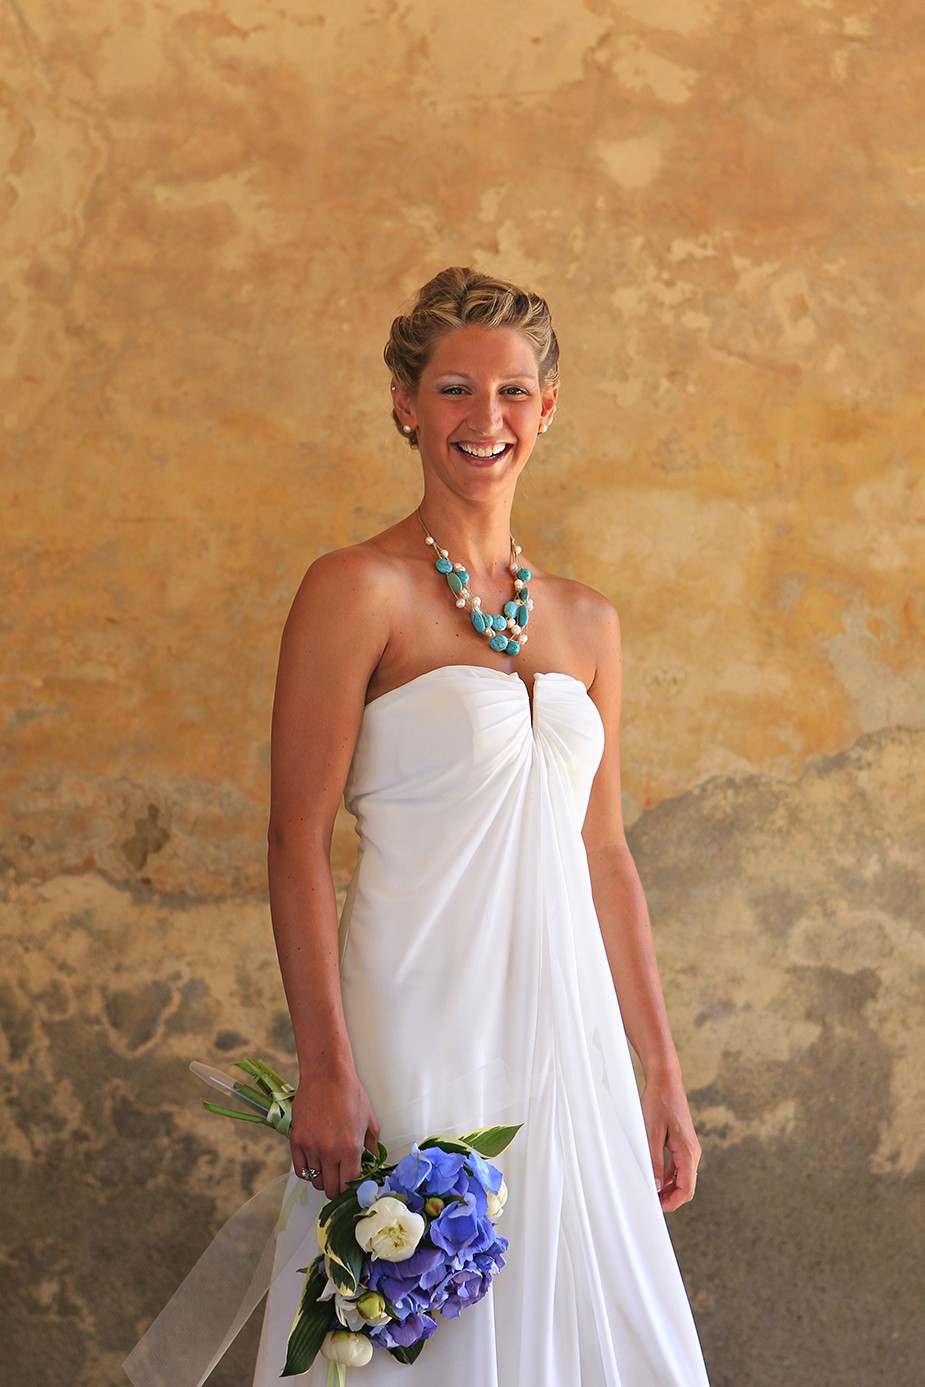
11-10
11-11
ABOUT THESE PHOTO The before in Figure 11-10 and after in Figure 11-11 show that while actions can help make your image stand out, it needs to be a good image to start with. Taken at ISO 500, f/4.0, 1/320 second.
Output
You have sorted and edited your images, and now it is time to output them for use in Web galleries and proof books for your clients. There are a few different things you will need to consider, the first of which is the type of file to use for the images.
• JPEG. The JPEG file type was created by the Joint Photographic Experts Group in 1992 and is the most common image file type. The advantage to the JPEG file format is that it is a universal file format that can be viewed, printed, and shared just about anywhere. You can view the image directly in an e-mail or on a Web site. If you need to e-mail a photo, upload it to a Web site, or even send it off to be printed, the JPEG file will fit your needs. The downside to the JPEG file is that it is compressed, and information is actually thrown away when you save the image as a JPEG. If you need to open and edit the file again, then that missing information can make it difficult to fully edit the image. It is best to output files in the JPEG format when you know you are not going to edit them again.
• TIFF. The Tagged Image File Format, or TIFF for short, was created for the express purpose of storing images for desktop publishing. These files save all the information in a form that a computer can read, but the downside is that the uncompressed file size makes it very large, too large for Web use or e-mails. TIFF files are a great way to save the images, especially if you think you might want to edit them again because they don’t compress the image or throw away any of the information when saved.
For example, the difference in size in the same image when it is saved in the two different formats is huge. The JPEG version is 1.5MB while the same image saved in the TIFF format is 38.3MB.
File management and storage
It is really important to be able to keep your images neatly sorted and cataloged so that if needed, you can find the images from a specific wedding easily. Many times a couple will want another copy of certain images months or even years after the wedding, and the first person they are going to ask is the wedding photographer.
You need to come up with a system that works for you, but here are a few things that I have found work for me:
• Name the files. Camera file-naming systems are terrible and totally incomprehensible when you need to find an image from a wedding months or years later. I change the name on import so that all the files are actually named for the wedding. I use a sequential number, then the couple’s last names and the category of the event — for example, 0371-Smith_Nash_Ceremony.jpg. This allows me to sort the image using the number, but by looking at the filename I know exactly what type of shot it is.
• Add information into the file. When I import the files to the computer, I add a lot of information to the IPTC data, including the clients’ names, the location of the shoot, any second photographers from the job, the location, and my copyright information. Other information is already present because it is added by the camera when the image was taken, including the camera type and model, the lens, focal length, ISO, aperture, shutter speed, flash usage, metering mode, white balance, and shooting mode. Software programs can access this data and use this information when and if I need to search for something in particular and for general sorting. For example, I can search for all the images that have taken place at a certain location or all the images from a specific second shooter.
• Backup. I back up every wedding onto a DVD and give a copy of that DVD of images to the clients when they have ordered their wedding album and all the print products are delivered. That way they have an archive copy of the wedding, which gives them a peace of mind, and they can ultimately be your last source of backup in the event that you lose everything. It’s good to have multiple backups.
• Backup. I back up every wedding onto a DVD that I keep just in case the couple ever needs a photo or I need one for a book like this.
• Backup. I keep a backup copy of the DVD at a different location from my main computer and hard drive just in case something catastrophic happens to the location. It could be not just a hard-drive crash, but also a fire, flood, or robbery. This way the files are safe in a separate location. I know this sounds extreme, but catastrophes have happened before and will happen again.
As you shoot more and more events, the small amount of time you spend adding the location, copyright, photographer’s info, and the client data and renaming files in the import step will have bigger and bigger payoffs. Create a system that works for you and implement it from the start.
Assignment
Choose the Best Shot
This assignment is to sort through your images, find two similar images, and choose the better of the two. If you thought that shooting a wedding was tough, wait until you have to sort and edit the wedding photos. In all seriousness, the sorting and editing stage can be the toughest part of the job, because photographers tend to be emotionally attached to their images and most of the time can’t bear to throw any away. As a photographer, it is your job to only show the best images.
When sorting your images, usually the first impression will be the most honest and, as you go through them checking the focus, exposure, and emotions, many times a photo will just seem to be better than the one next to it. Stop and compare the two, all the while working out why the one image stood out over the other. Post both images to the Web site and explain which image you believe to be the best of the two.
These two shots are very similar, and they should be, with the image on the left being taken less than two seconds after the right image, but the one on the left is clearly better in my opinion. The subject is composed slightly better, and because I moved in closer, the subject fills the frame better. These differences are fairly obvious, but some are subtle details, like the cropping out of the edge of the curtain from the bottom left or the more natural looking smile in the right figure that make or break a photo. Which one do you think is better? Both images were taken at ISO 800, f/2.8, 1/100 second.


Remember to visit www.pwassignments.com after you complete the assignment and share your favorite photo! It’s a community of enthusiastic photographers and a great place to view what other readers have created. You can also post comments and read encouraging suggestions and feedback.