Chapter 8: Group Portraits
Taking the group portraits can be the most difficult task to tackle during the wedding day. Shooting a good portrait of a single subject can be tough, but when you start adding more people into the shot, it can become chaotic. Some of the most common problems that can arise when you are trying to take group portraits include people looking away or off in different directions, people blinking during the photograph, people missing from the group, and having to deal with different emotions and personalities.
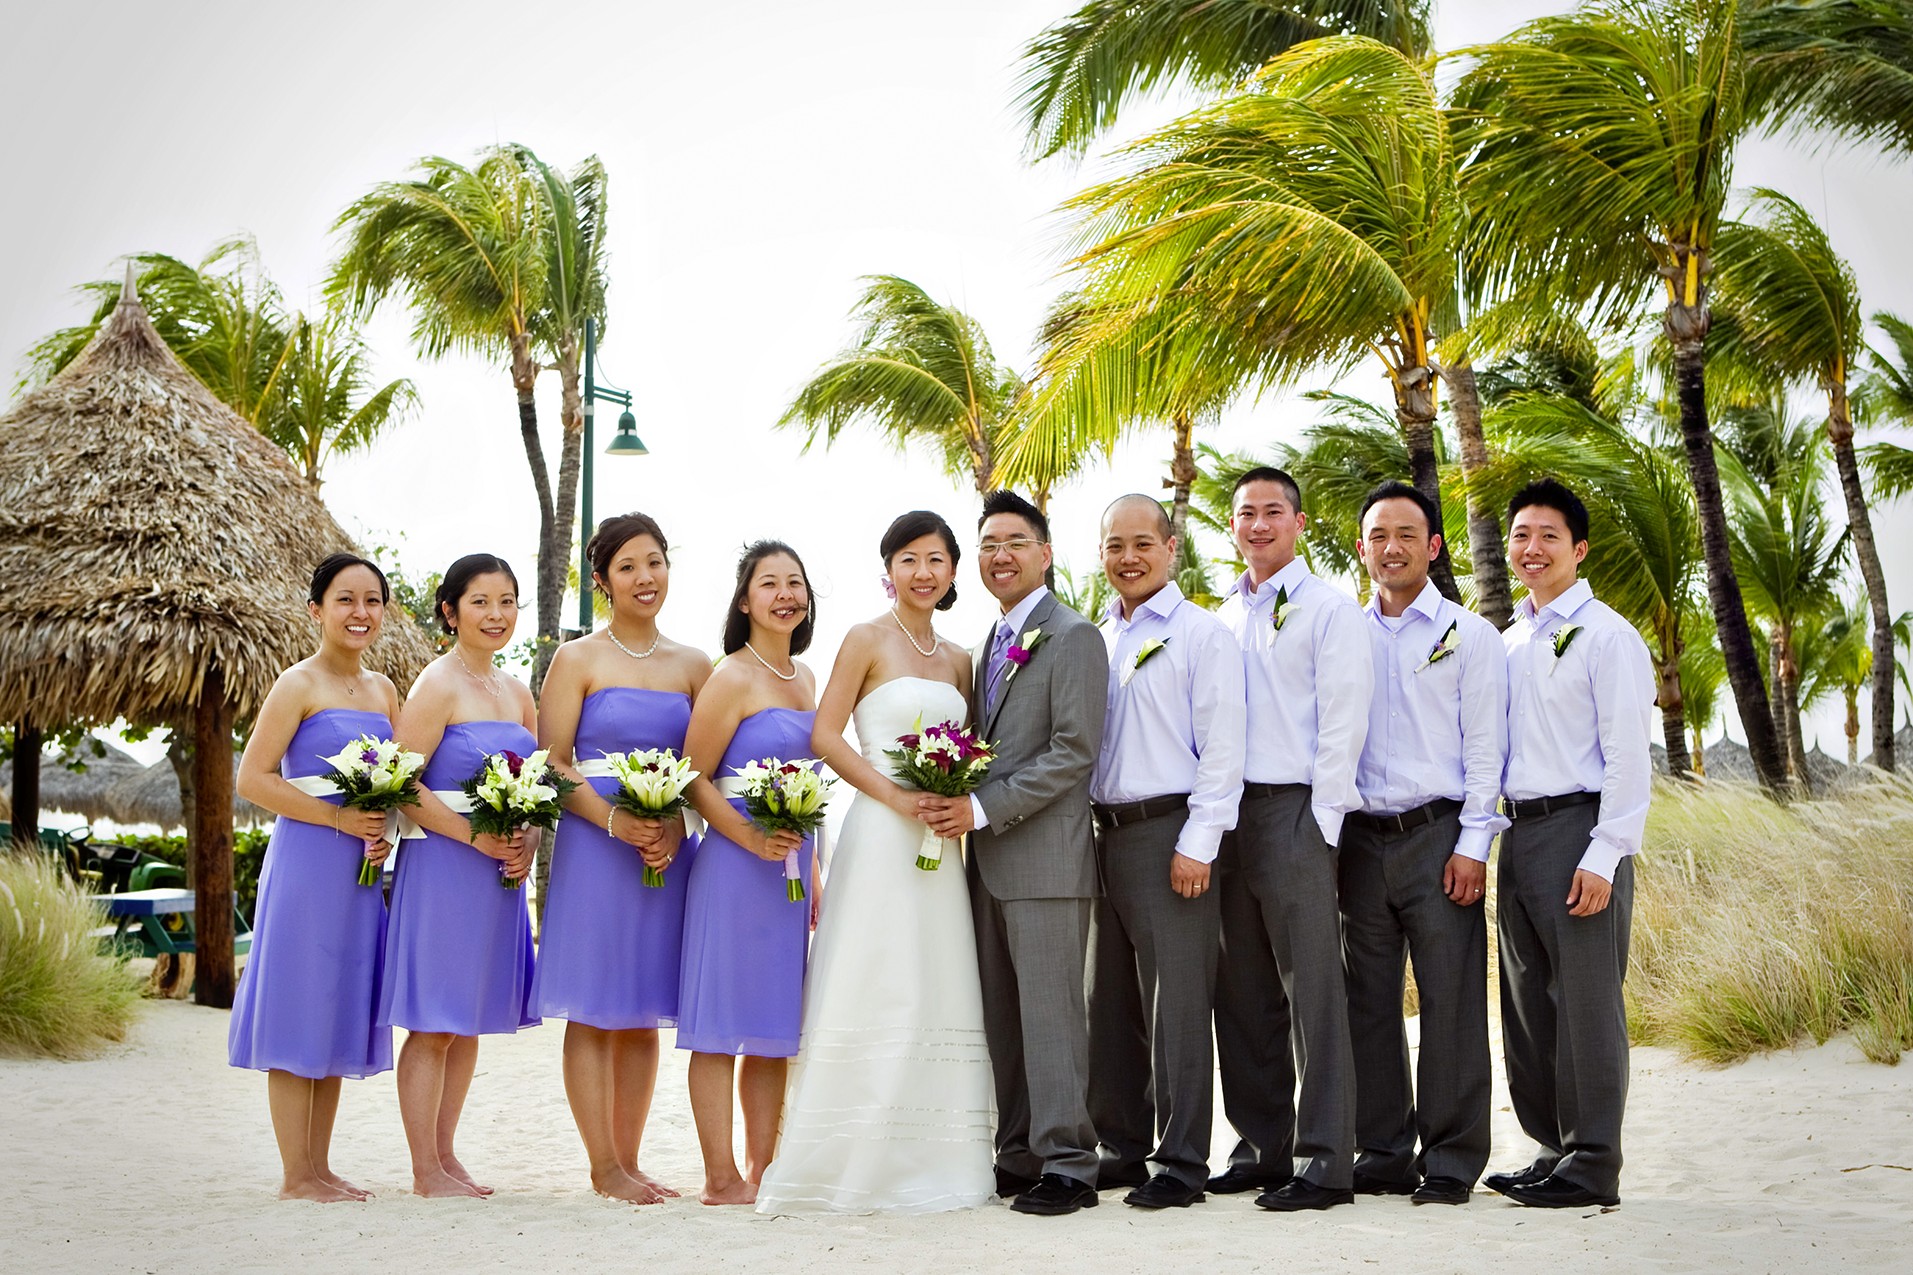
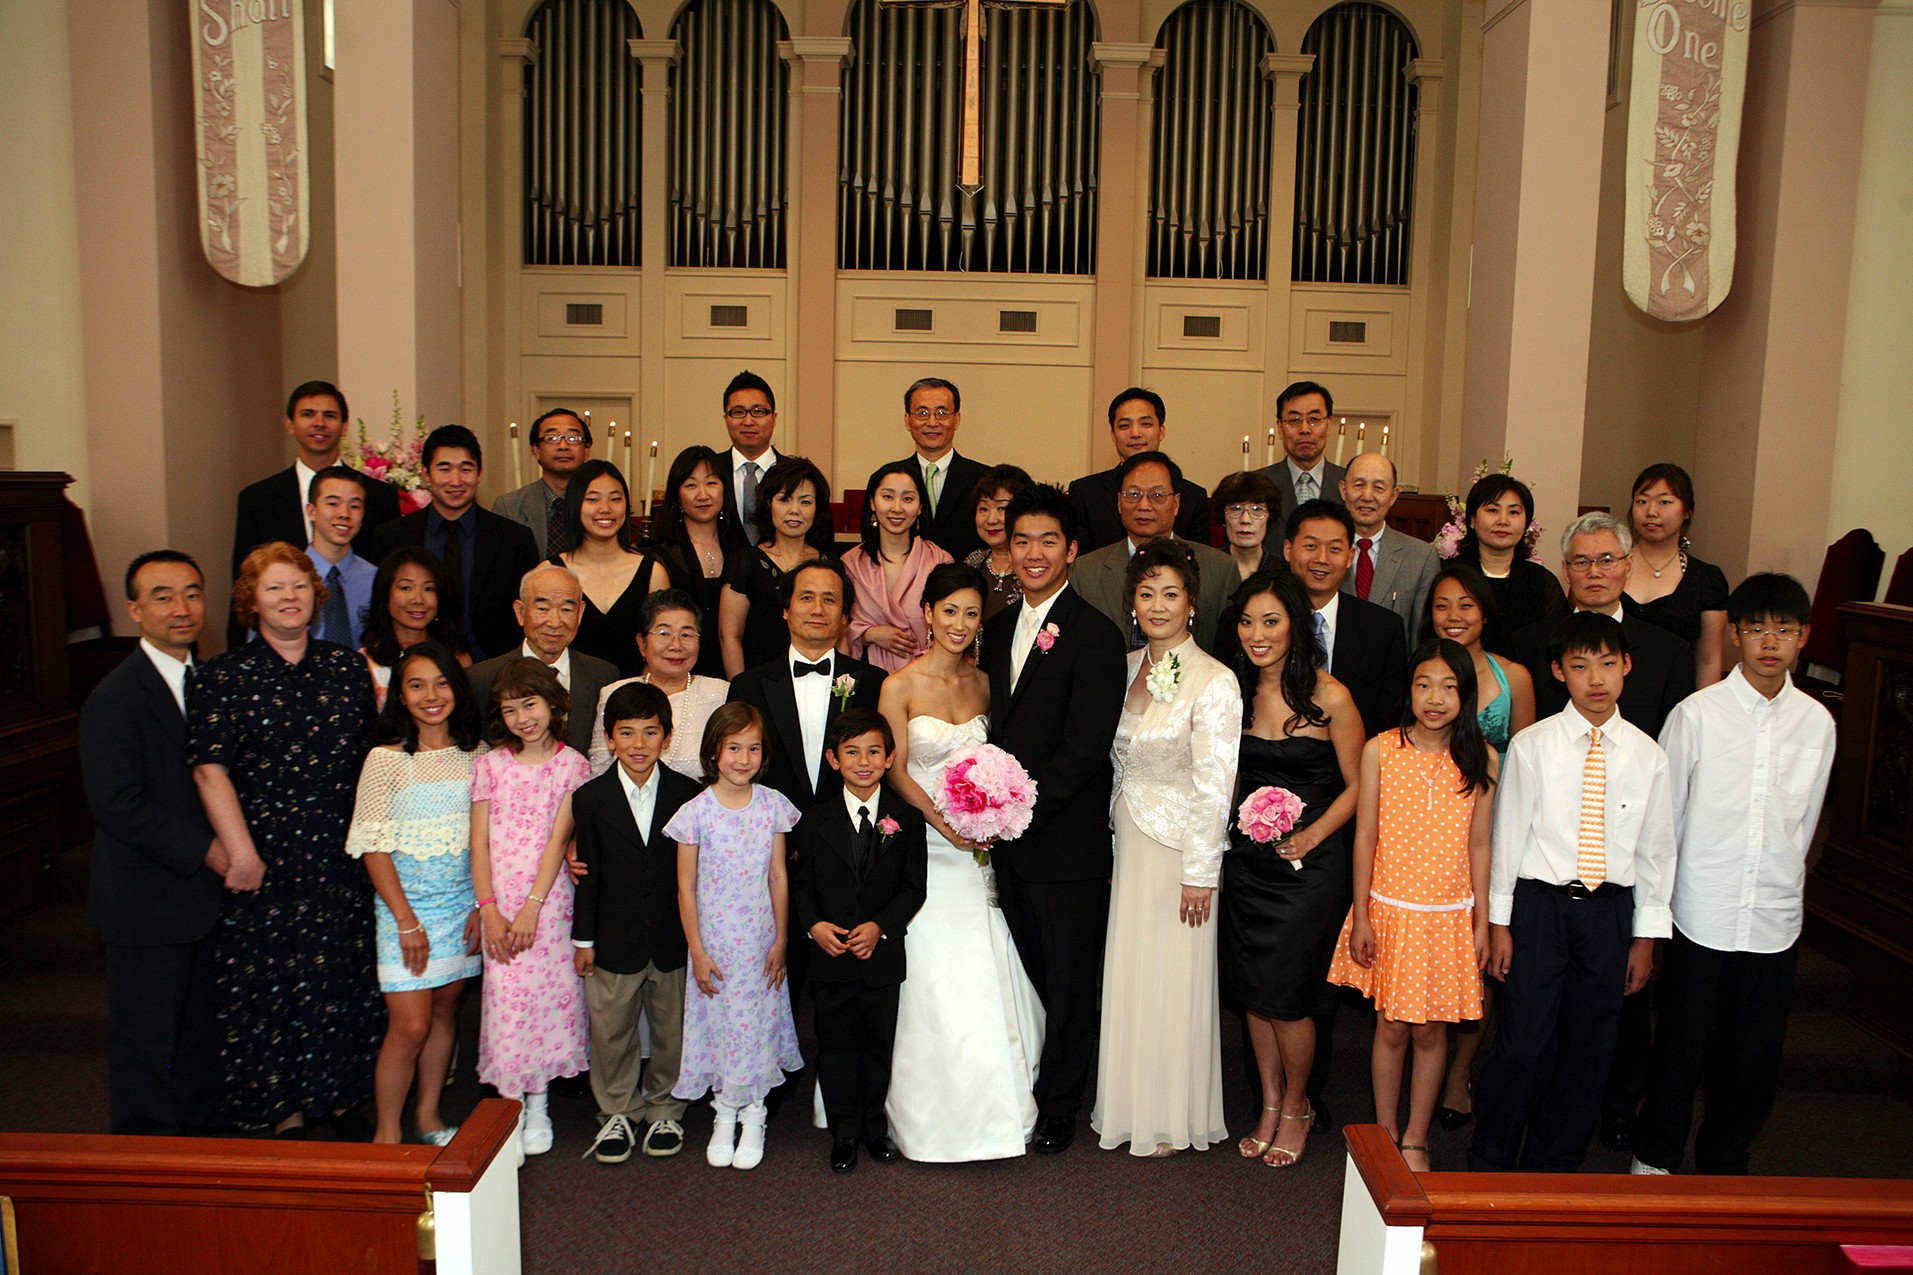
However, if you want to be a successful wedding photographer, you will have to master the group portraits, because no wedding album is complete without them. There are many different group portraits, from ones of the bride’s family and the groom’s family to ones of the whole wedding party, as shown in Figure 8-1. Each group configuration is a little different, but with some planning, you can take them all so you get the best results in the least amount of time, and the clients and their family and friends can go on to enjoy the wedding.
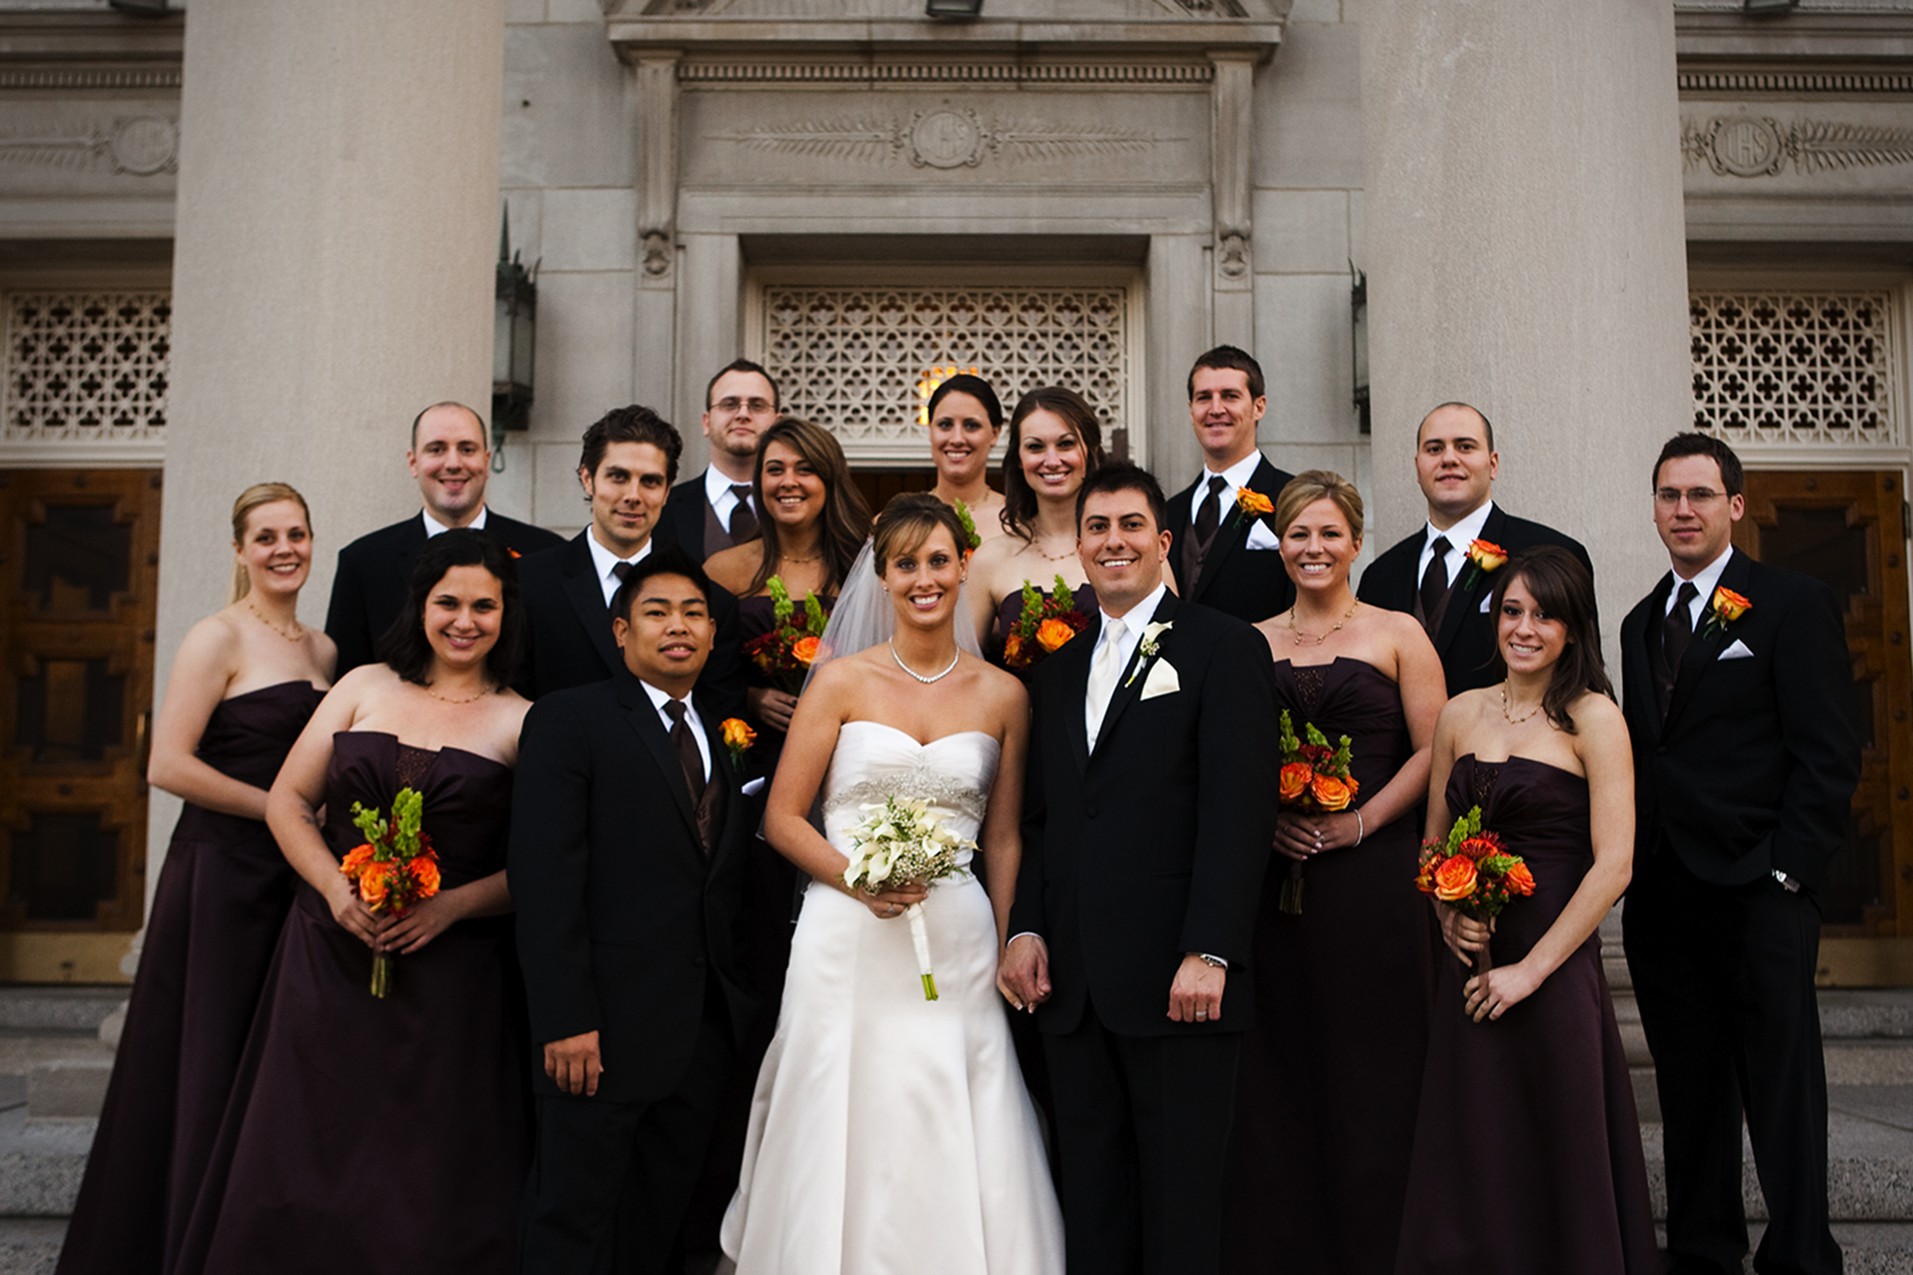
8-1
ABOUT THIS PHOTO The whole wedding party poses for a group portrait. Taken at ISO 1000, f/3.5, 1/160 second.
Making and sticking to a shot list
It is important as a wedding photographer, especially if you are just starting out, to make sure you have discussed a shot list with the clients. This is where the clients sit down with you and work out which groupings they want to make sure you capture during the wedding. It’s important for the bride and groom to realize that every extra grouping that they want takes time. So, use the opportunity to discuss doing a large group shot, like the one in Figure 8-2. A large shot like this one can take the place of multiple other group shots. Make sure they understand that because these shots are taken between the ceremony and the reception, the time it takes to take all the detailed group shots could instead be spent at the reception mingling with their guests.
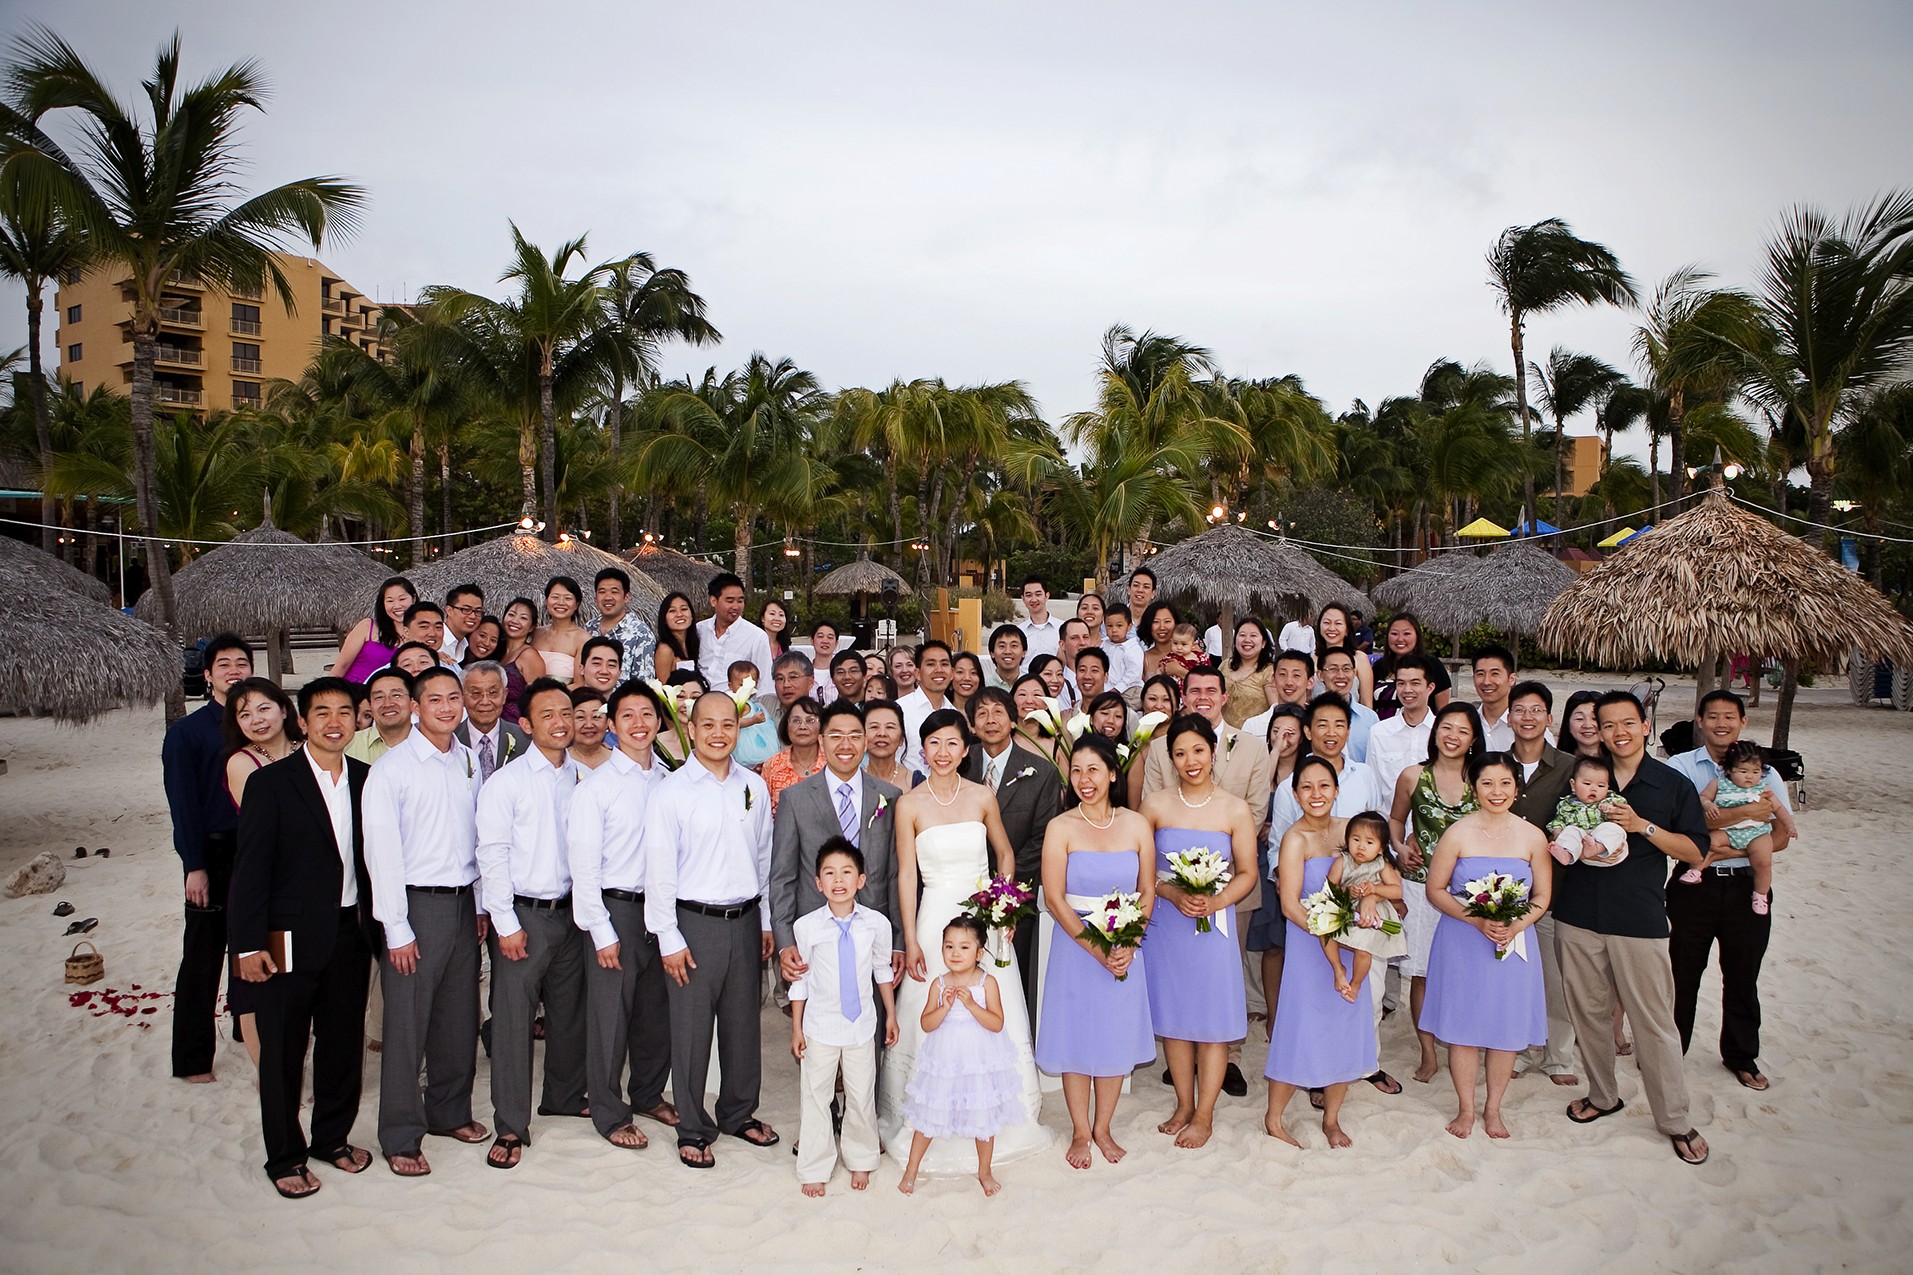
8-2
ABOUT THIS PHOTO Getting one big group shot can really help to keep the shot list to a minimum. Taken at ISO 3200, f/3.5, 1/50 second.
It is still important to make sure that if the couple have any special groupings that they want, you make a list and get the shots. This can include photos of favorite family members or special guests like the cousins who came in from out of town or a favorite childhood family friend of the bride or groom.
Here is a basic list of group shots to start with and to build on:
• Bride and groom plus bride’s parents
• Bride and groom plus groom’s parents
• Bride and groom plus both sets of parents
• Bride and groom plus both sets of parents and grandparents
• Bride and groom plus bride’s parents, siblings, grandparents, aunts, uncles, nephews, and nieces
• Bride and groom plus groom’s parents, siblings, grandparents, aunts, uncles, nephews, and nieces
• Bride and groom plus all family, immediate and extended
• Bride and groom plus bridesmaids
• Bride and groom plus groomsmen
• Bride and groom plus bridesmaids and groomsmen
Check with the clients about whether there are any special people that they want to get separate photos with. This could be a favorite aunt or uncle, a cousin or others members of the family, or a member of the wedding party who would usually just be included in the group shots, like the flower girls or ring bearers. However, suggest to the clients that they keep this number to a minimum because of the amount of time it will take to shoot them all. When it comes to shooting children, as shown in Figure 8-3, it is even more important to keep it really quick and fun.
8-3
ABOUT THIS PHOTO The bride and groom along with the youngest members of the wedding party. Taken at ISO 400, f/4, 1/60 second.
Location
One of the most important considerations when it comes to taking group portraits is where to take them. As the wedding photographer, you need to have a location in mind for the group shots before the wedding even starts so that you can make sure that the people who need to be in the photos are told where to go.
When it comes to picking a location for the group portraits, keep the following in mind:
• Choose a location where the whole group can fit. This makes it easier to position the group and makes it much easier for you as the photographer, because if the whole group can fit easily in the space, it is less likely that there will be distracting elements intruding on the scene, and the subjects will look more comfortable. Take Figure 8-4, for example: By choosing an open, uncluttered area outside, the wedding party fits easily.
8-4
ABOUT THIS PHOTO The entire wedding party can pose comfortably for a group portrait outdoors. Taken at ISO 100, f/5.6, and 1/160 second.
• Choose a location where the light is even. This makes your life much easier because the even light means you will have an easier time with the exposure and a lot less post-production work. An area that is half in deep shadow and half in bright light will not work well and you are better off looking elsewhere. If you are shooting inside, try to stay away from areas where there are windows with bright light only on one side of the group; instead, try to position the group so the light is even.
• Choose a location that is close by. The amount of time you have to shoot is precious, and it is best not to use it all up getting to the group portrait location. Try to find an area that is as short a distance as possible from where the subjects are to start with. For the wedding party images, there is usually a little more time if the photos are taken before the ceremony, and in this case, multiple locations can be used, as long as they are not too far apart.
• Choose a location that adds some context. While plain backgrounds are great, look for something that can add context to the image, such as the front steps of the church or even in the church, as shown in Figure 8-5. Use the location to set the scene.
8-5
ABOUT THIS PHOTO This photograph of the bride and groom along with the groom’s family was shot in the church. Taken at ISO 1250, f/4, 1/60 second.
• Choose a location that’s free of reflections. A glass window behind the group can cause unwanted reflections of you or your flash and should be avoided. If it is unavoidable, then change your angle to reduce the reflection.
There could be more than one location for the group portraits and in all likelihood there will be. You will need a setting for the bride and groom and the wedding party for photos before the ceremony and a location for the bigger family group shots after the ceremony. This could be because the preparation area could be too small for the whole family or it might just be too far away to get to after the ceremony. If possible, go to the wedding location before the wedding to get an idea of which places will make good portrait locations; it will also take some of the pressure off during the actual day. And it is important to make sure that any other photographers working with you know what the plans are for the couple and the subjects of the photos. Let the groomsmen and bridesmaids know where to go for the after-ceremony photos so they can help move things along in a timely manner.
Family
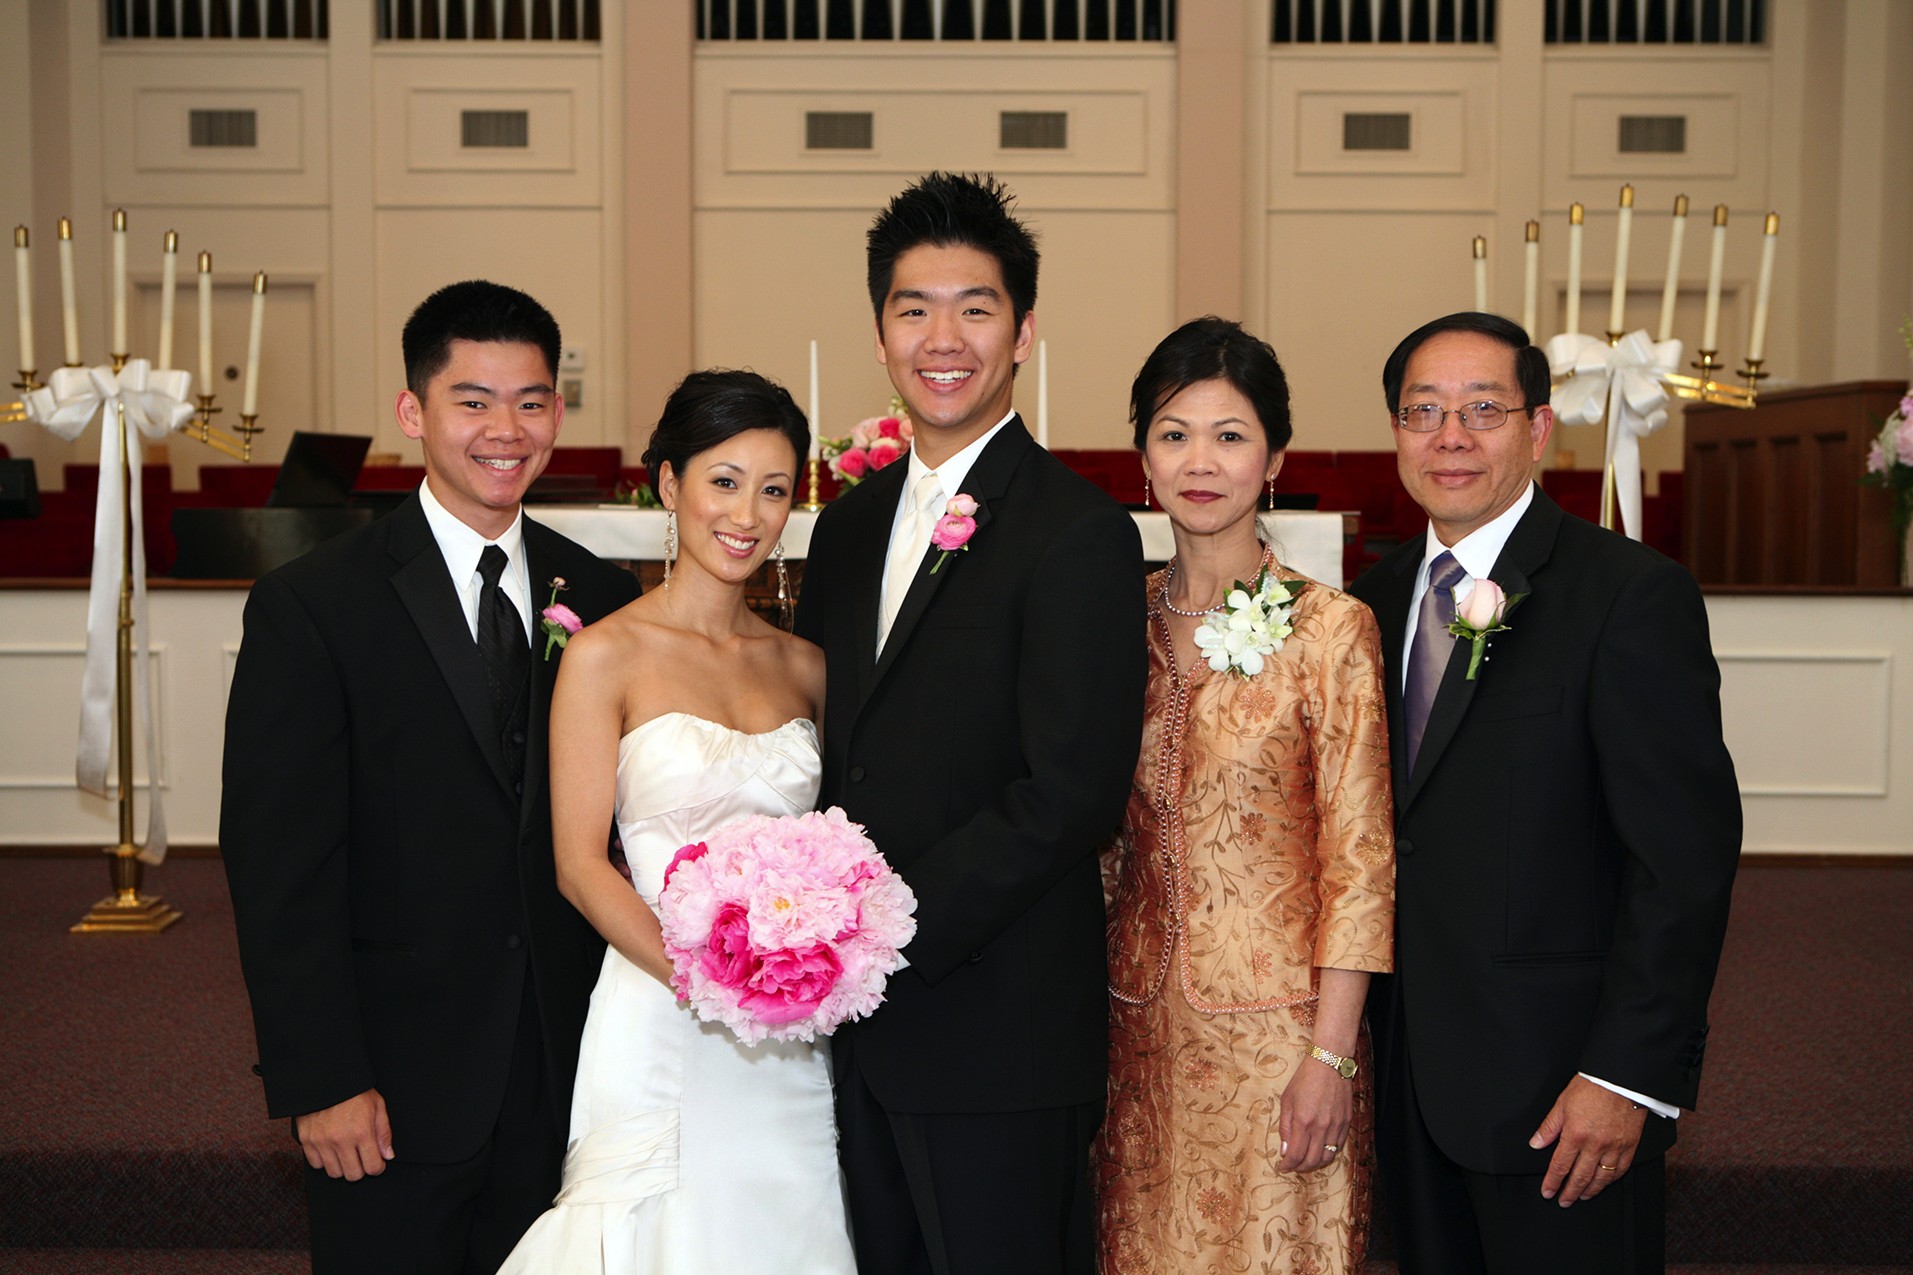
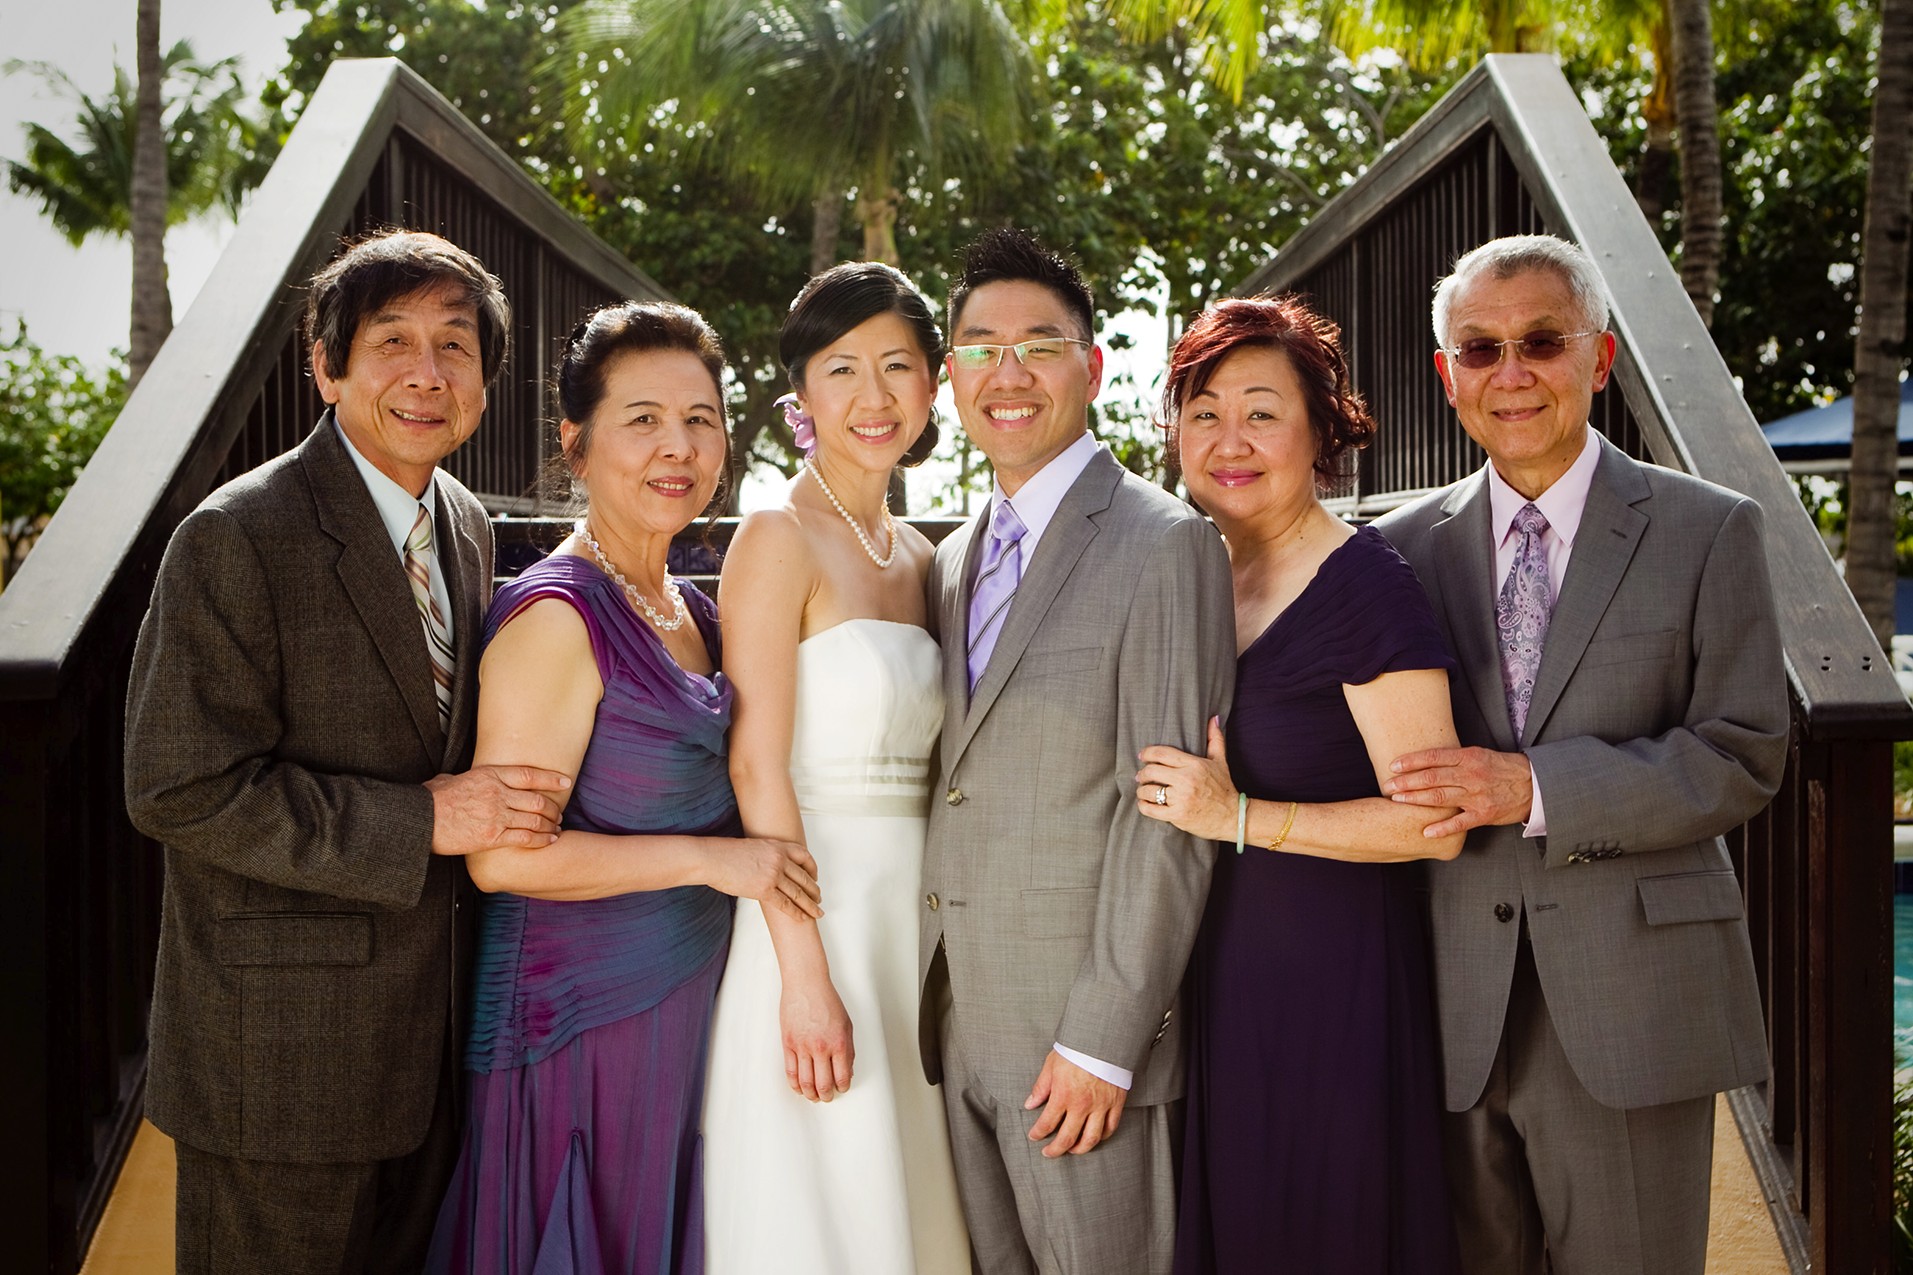
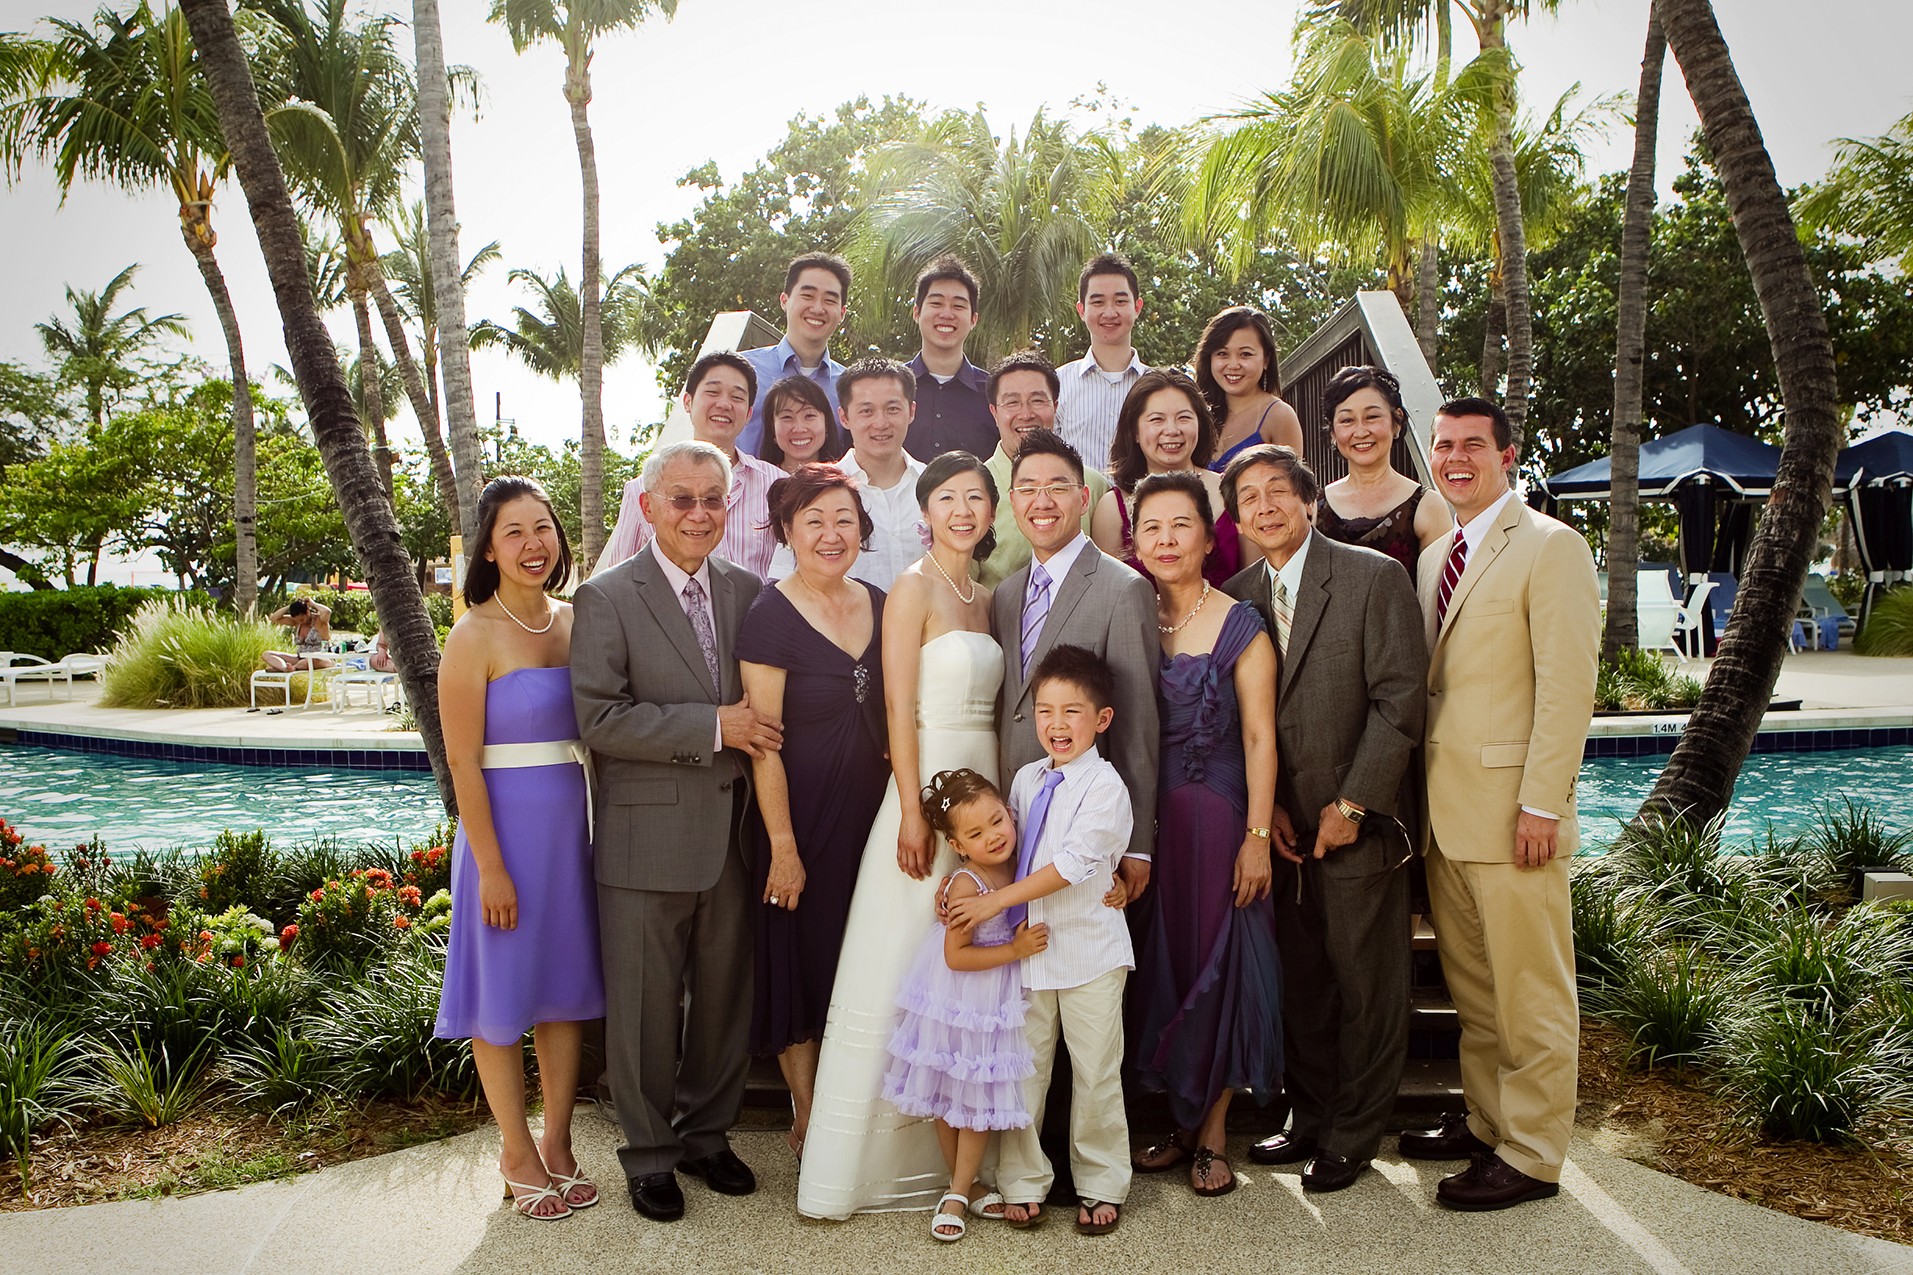
Family plays an important part of any wedding, and the family photos are a chance to capture a special moment in time, that moment when a daughter or son is off to start a family of her or his own. There are two types of family group photos: those with the parents and those with the extended family. It is easier to take the photos with the parents before the ceremony and take those with the extended family after the ceremony and before the reception. This gives you a little more time for the parent photographs. Many of the location details will have to be discussed and planned with the clients before the wedding. If the ceremony and reception take place at different locations, you will need to decide at which location the photos will be taken. This could mean doing a little research and checking out both sites with the group portraits in mind.
There is one emotion that is constant with the parents of the bride and the parents of the groom at a wedding and that is pride. They are happy and joyful and very proud of their respective children. The photos of them with the bride and groom will be treasured along with their own wedding photos forever. The time to take the parent photos depends on whether the bride and groom are going to have joint photos before the ceremony or after. If they are going to have photos done before the ceremony, then plan some shots with the parents as well. If the bride and groom have chosen not to have any joint photographs before the ceremony, then you can shoot the bride with her parents and the groom with his before the ceremony, but take all the other family shots after. Knowing who needs to be photographed when makes things run more smoothly and avoids wasting time.
There are some standard shots to take for family portraits, and while you can try to make them interesting, your best bet is just to make sure that everyone is looking at you or at the bride and groom, the light is good, and the exposure is correct. In Figure 8-6, both sets of parents are present with the bride and groom. The location for this photo was just right, with the banisters of the bridge acting as anchor points on either side of the group.
8-6
ABOUT THIS PHOTO The bride and groom with their respective parents posed before the ceremony. The wooden stairs and the railings make for a perfect framing element, keeping your eye in the frame and on the subjects. Taken at ISO 125, f/5.6, 1/250 second.
Talk about family dynamics with your clients and find out if there are any family tensions that exist with divorced parents or among other family members that you need to be aware of. While it would be nice to think that it never happens, divorce does happen and can create problems. Sometimes you might want to remind your clients that taking an extra photograph or two might make a bad situation better and doesn’t cost them anything but a few moments of time. The less friction there is at the wedding, the better.
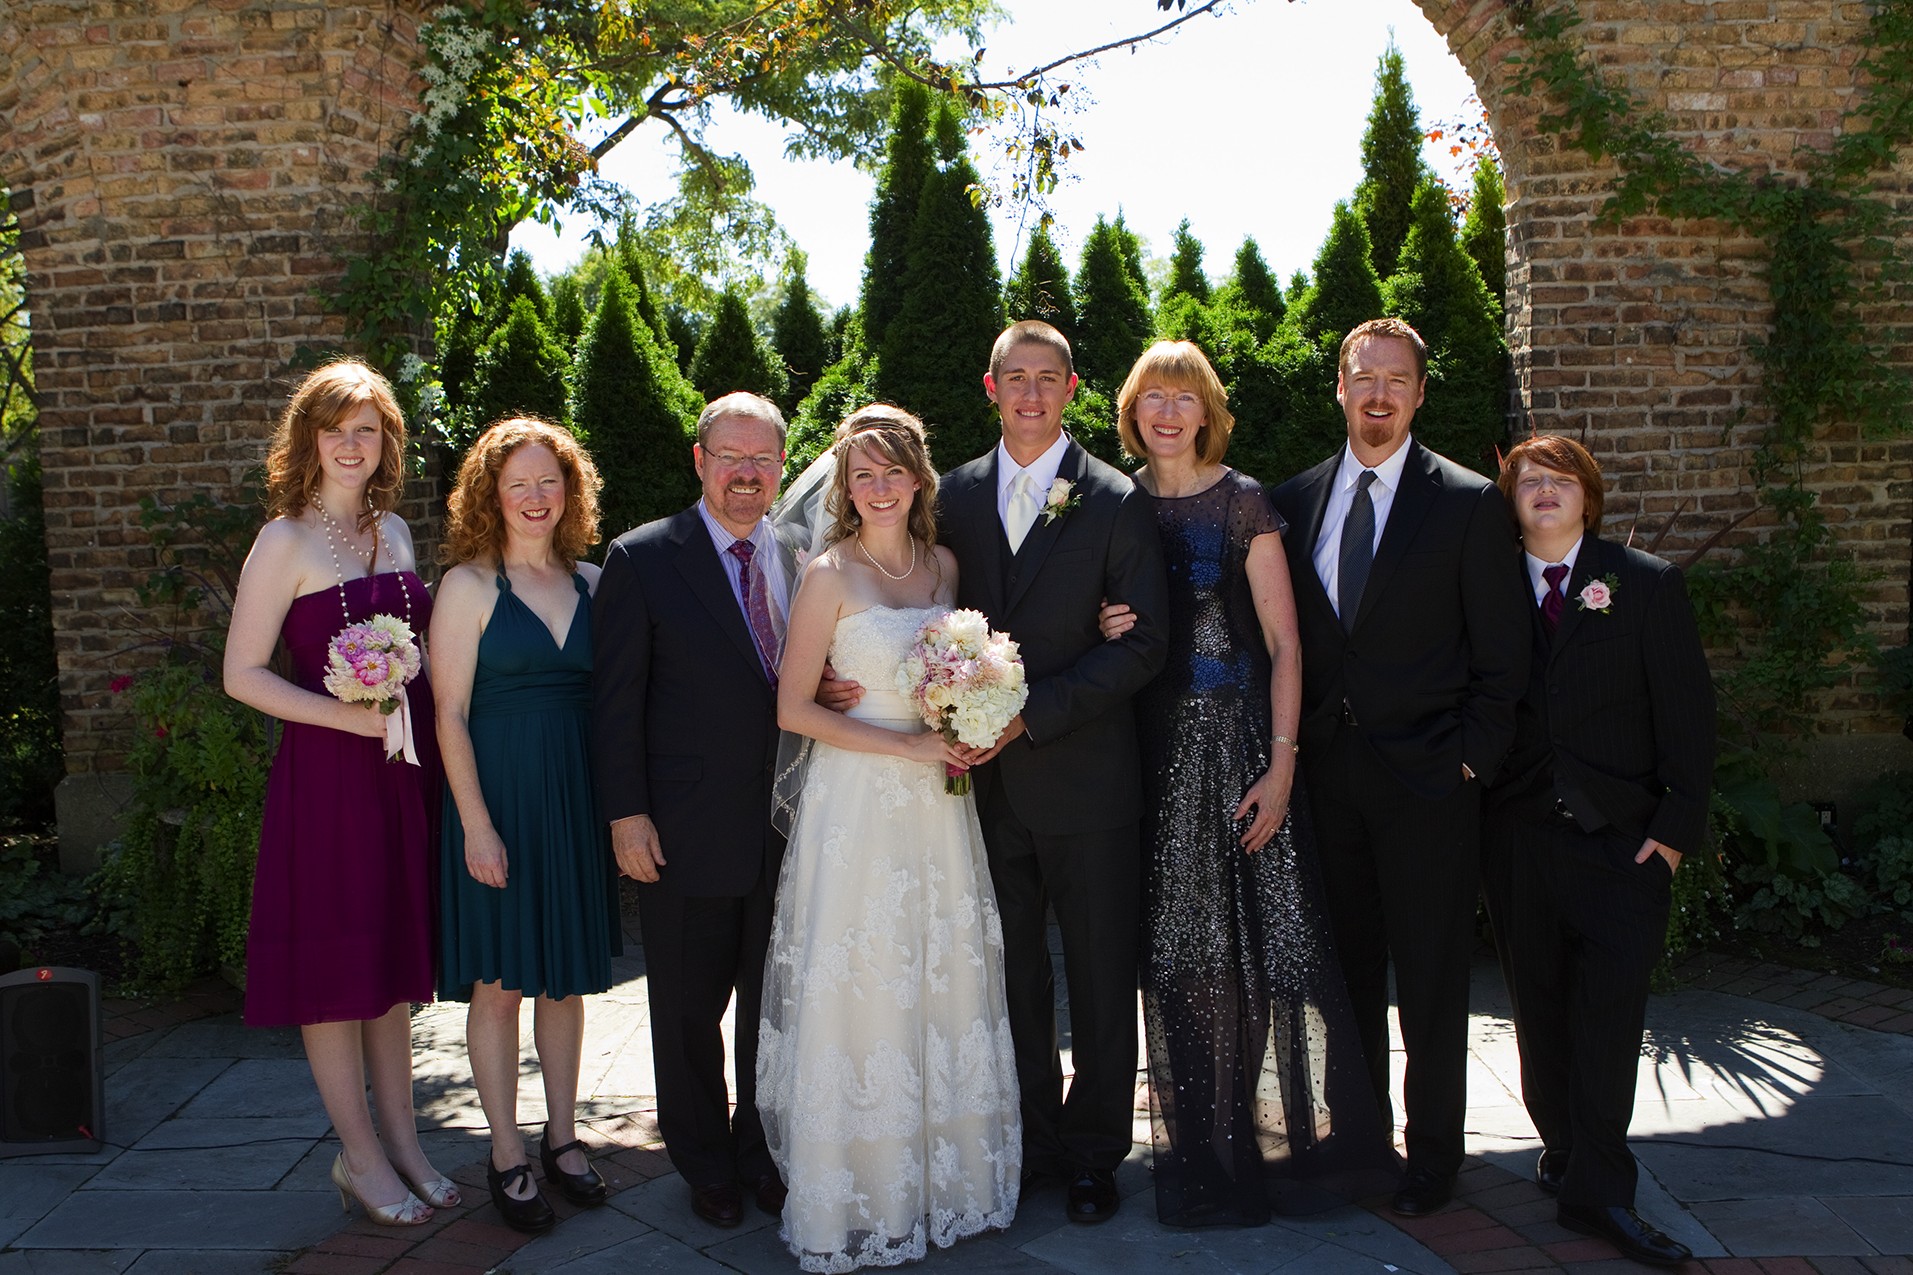
If the bride and groom have decided not to see each other before the ceremony and you need to shoot the bride with her family and the groom with his family separately before the ceremony, make sure everyone knows where to be and when. There really isn’t very much time, and to spend any of it waiting for someone to arrive will put undue pressure on the bride or groom and on you. Make sure that the people needed for the photos are notified before the wedding day so that they know where and when to arrive because these images are usually done before the guests arrive. Choose a location that is close to or at the site of the ceremony, as shown in Figure 8-7, and be ready to take the portraits as soon as the subjects arrive. If you are shooting indoors and using your flash, or flashes, make sure they are set up and ready to go before the bride and/or groom is on the scene.
8-7
ABOUT THIS PHOTO The bride and her family taken before the ceremony. A Gary Fong lightsphere was used on a flash on the camera to add soft light to the scene at ISO 1250, f/4, 1/60 second.
The Bridal Party
The bridal party is comprised of the friends and family nearest and dearest to the couple, and the images of the bridal party are some of the most cherished from the wedding. The bridal party photos can be broken into three different groups: the bride’s side of things, the groom’s side of things, and everyone all together.
The bride and her bridesmaids
There are two main styles of images of the bride and her bridesmaids to capture: those that seem candid and relaxed and those that are a little more formal. The first type of shot usually happens when the bride is getting ready and is surrounded by the bridesmaids, and while you can take these shots as candid ones, a posed moment works really well.
The idea is to keep the bride the center of attention and have the bridesmaids around her in a relaxed configuration, as shown in Figure 8-8, where the bridesmaids are arranged around the bride in the room where they got ready for the wedding. By having some of the bridesmaids sit next to the bride while others stand behind and to the sides of her, the composition is balanced, and the eye is drawn into the image and focuses on the bride, who is and should be, the center of attention.
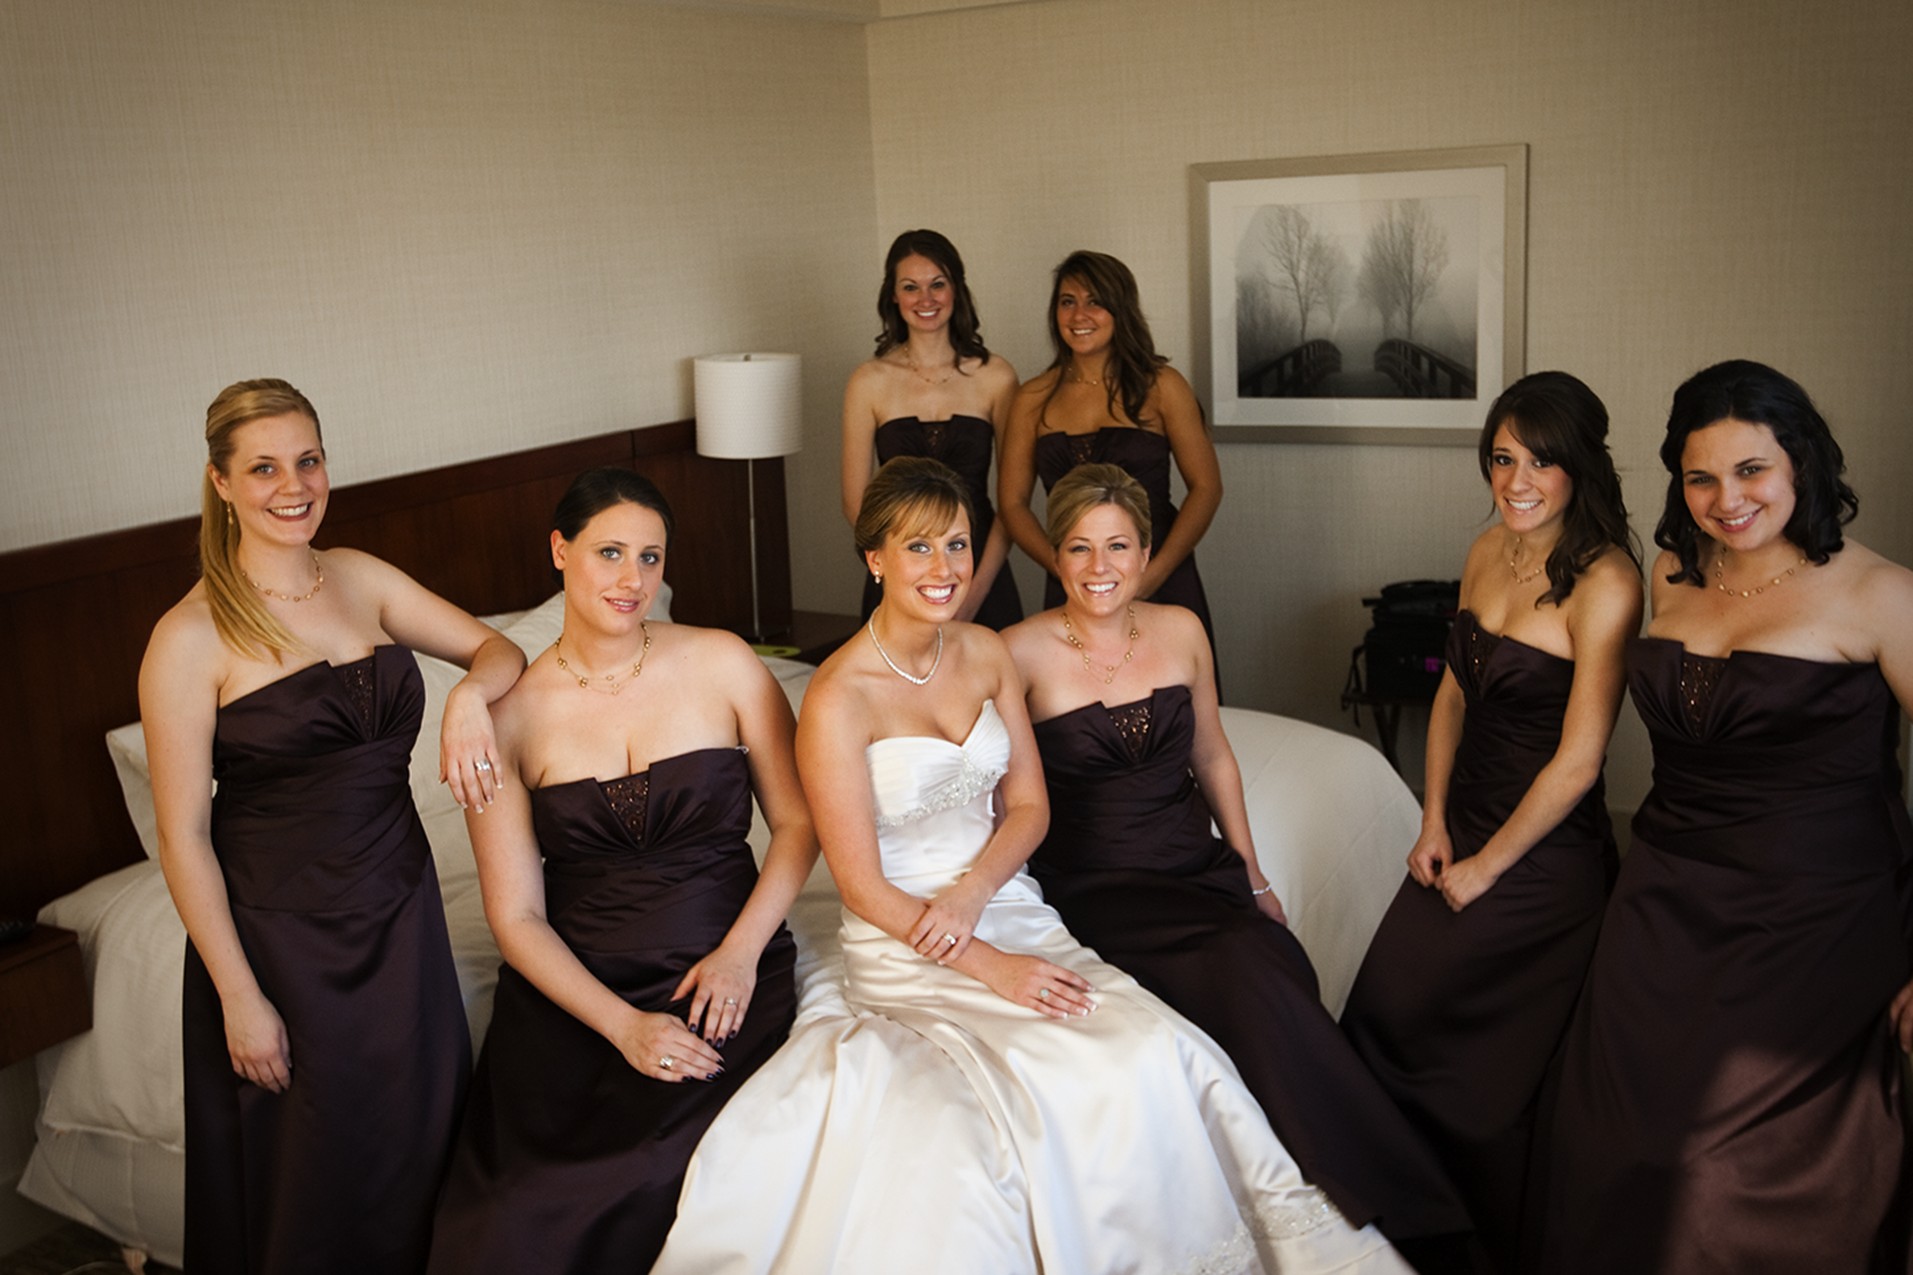
8-8
ABOUT THIS PHOTO The bridesmaids surrounding the bride, as they get ready to leave the brides room. Taken at ISOO 800, f/2.8, 1/160 second.
The other image to take with the bride and her bridesmaids is a more formal, posed shot, but it doesn’t always have to be serious. Keeping the mood light and joyous will result in images that are playful and fun, as shown in Figure 8-9, and allow the group to be more relaxed in front of the camera. That doesn’t mean all the photos should be irreverent; keep the personality of the couple in mind, and if you think that they would appreciate a more serious shot, then make sure you take one.

8-9
ABOUT THIS PHOTO The bride and her bridesmaids taken at the bride’s home before the wedding. Just asking the group to laugh out loud helped to capture this shot. Taken at ISO 400, f/4, 1/250 second.
Additionally, capturing a group shot taken with the bridesmaids helping the bride get ready for the wedding is important. It can really show the bond between her and her retinue. While it is a good idea to watch what the bride and her attendants are doing naturally and try to capture that feeling, don’t be afraid to do a little directing. If you place people where the light is the best, the photo will look the best. Many times capturing the moment that the bride is being helped into her dress or having a little touchup done to her makeup makes great moments. These are the types of images that the bride and her friends can look back on many years after the wedding and relive that moment. Take the moment captured in Figure 8-10: Not only is the bride being helped by her bridesmaids, but also the light coming in through the sheer curtains over the window is very soft and flattering, and the whole scene is uncluttered.

8-10
ABOUT THIS PHOTO The bridesmaid helping the bride to put on her shoes. I loved the light in the room and had them hold this pose for the photograph. Taken at ISO 800, f/2.8, 1/80 second.
Women tend to be a little subtler than men when they demonstrate their emotions, so make sure you pay close attention to everything going on. A small gesture or look can speak volumes, and capturing it can really make for a wonderful image.
The groom and his groomsmen
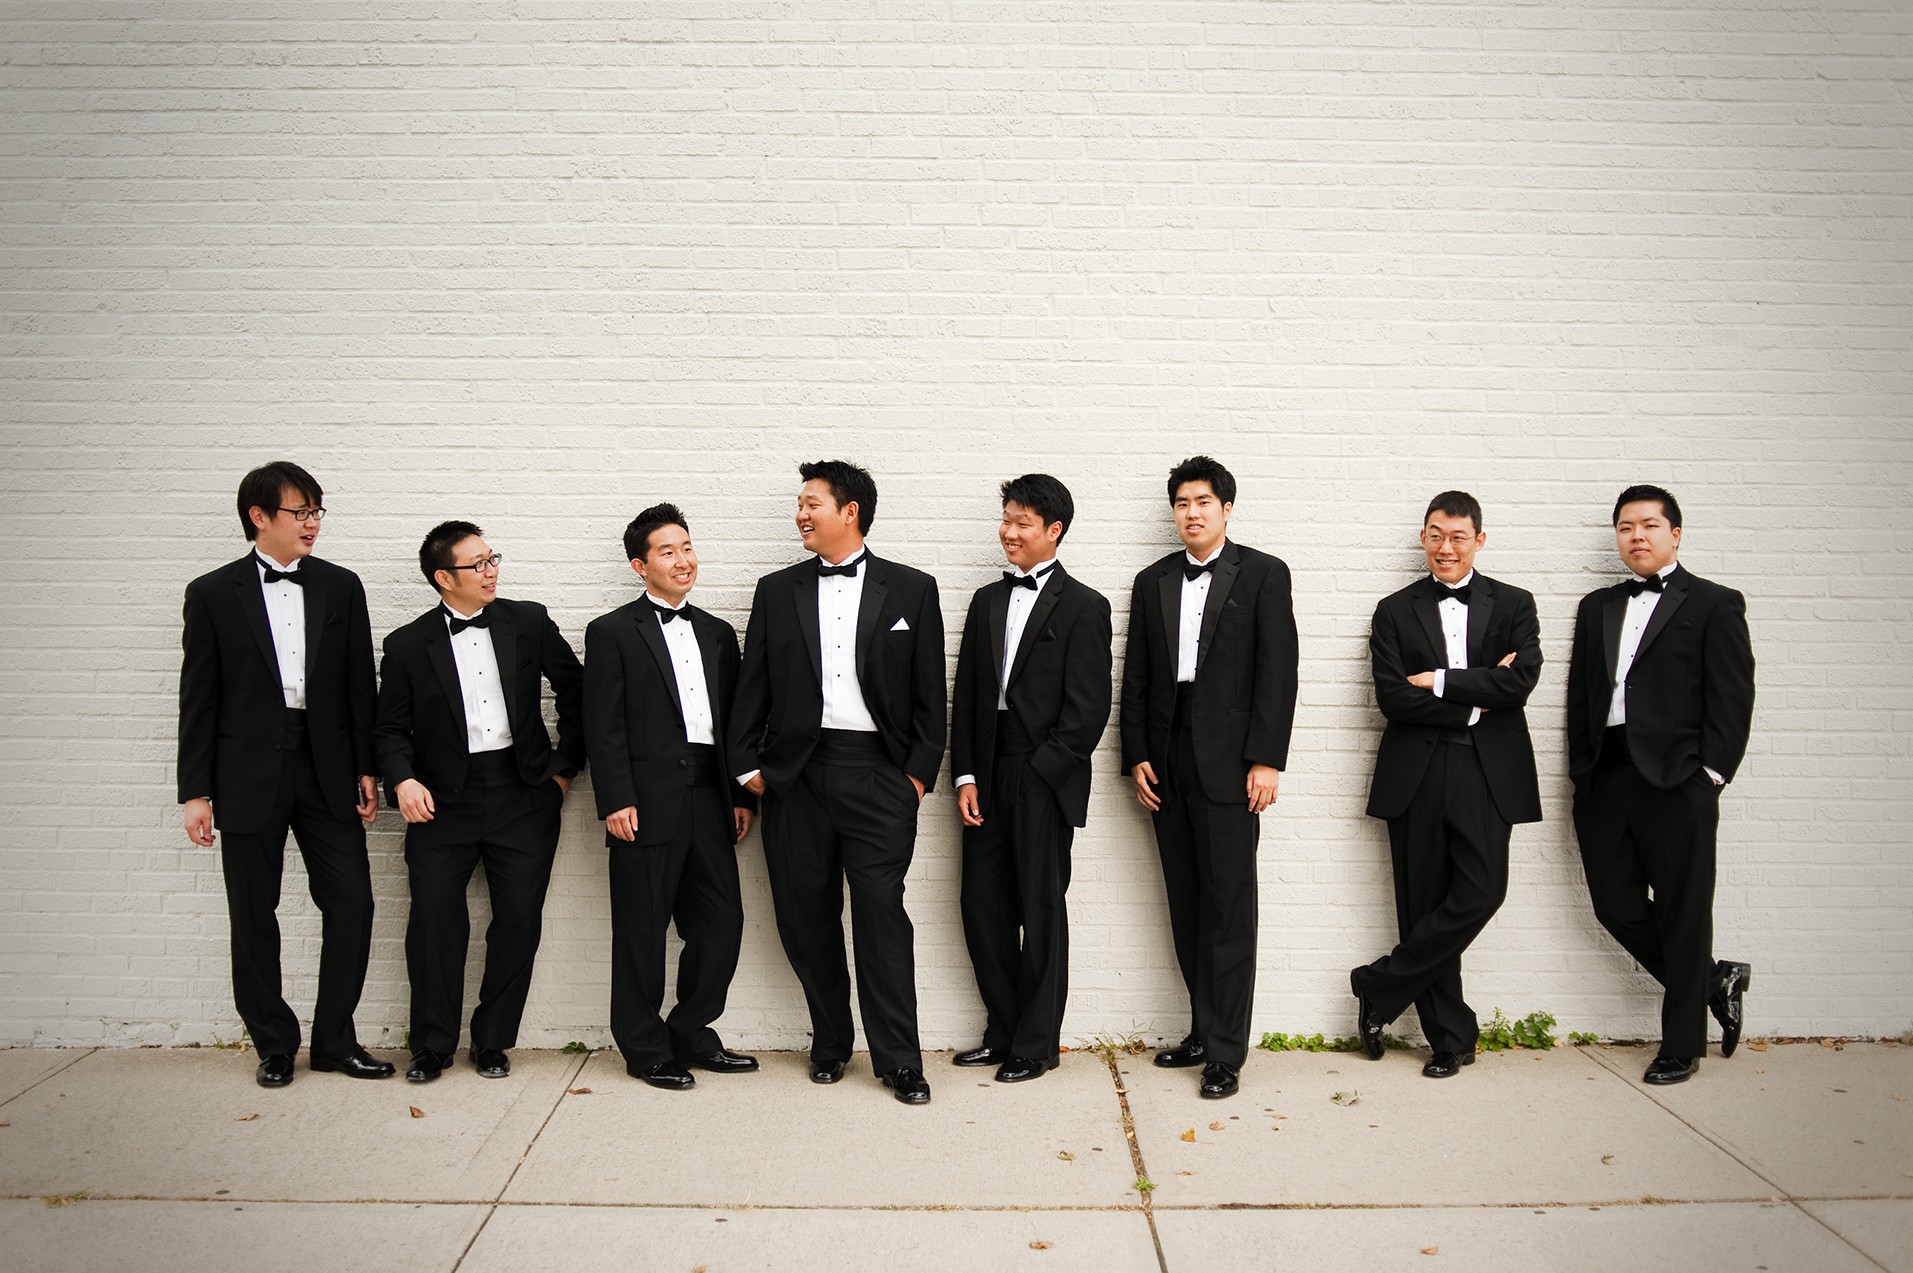
Some special moments can be had with the groom and the groomsmen. Many times if a wedding has more than one photographer, it’s the job of the second photographer to cover the groom getting ready, which includes taking group photos of the groom and his groomsmen. If you are the main photographer at a wedding, it is your responsibility to let the second shooter know what you want. Don’t assume that your second photographer will instinctively know what shots you want, and keep in mind that the second photographer didn’t meet with the clients — you did. Clear, concise directions and a shot list will help ensure that the second shooter returns with the images the bride and groom want. Many times the area the groom gets ready in isn’t as big as the bride’s room; if the groom and his men are getting ready at a location that makes it difficult to get everyone together for a full group shot before the ceremony, you will have to take it afterward. Another option is to walk outside and look for an area big enough for all the guys to be posed, as shown in Figure 8-11.
8-11
ABOUT THIS PHOTO The groomsmen with the groom outside before the wedding photographed by David Burke. The relaxed pose was set up so that the attention of the groomsmen was on the groom. Taken at ISO 400, f/2.8, 1/1250 second.
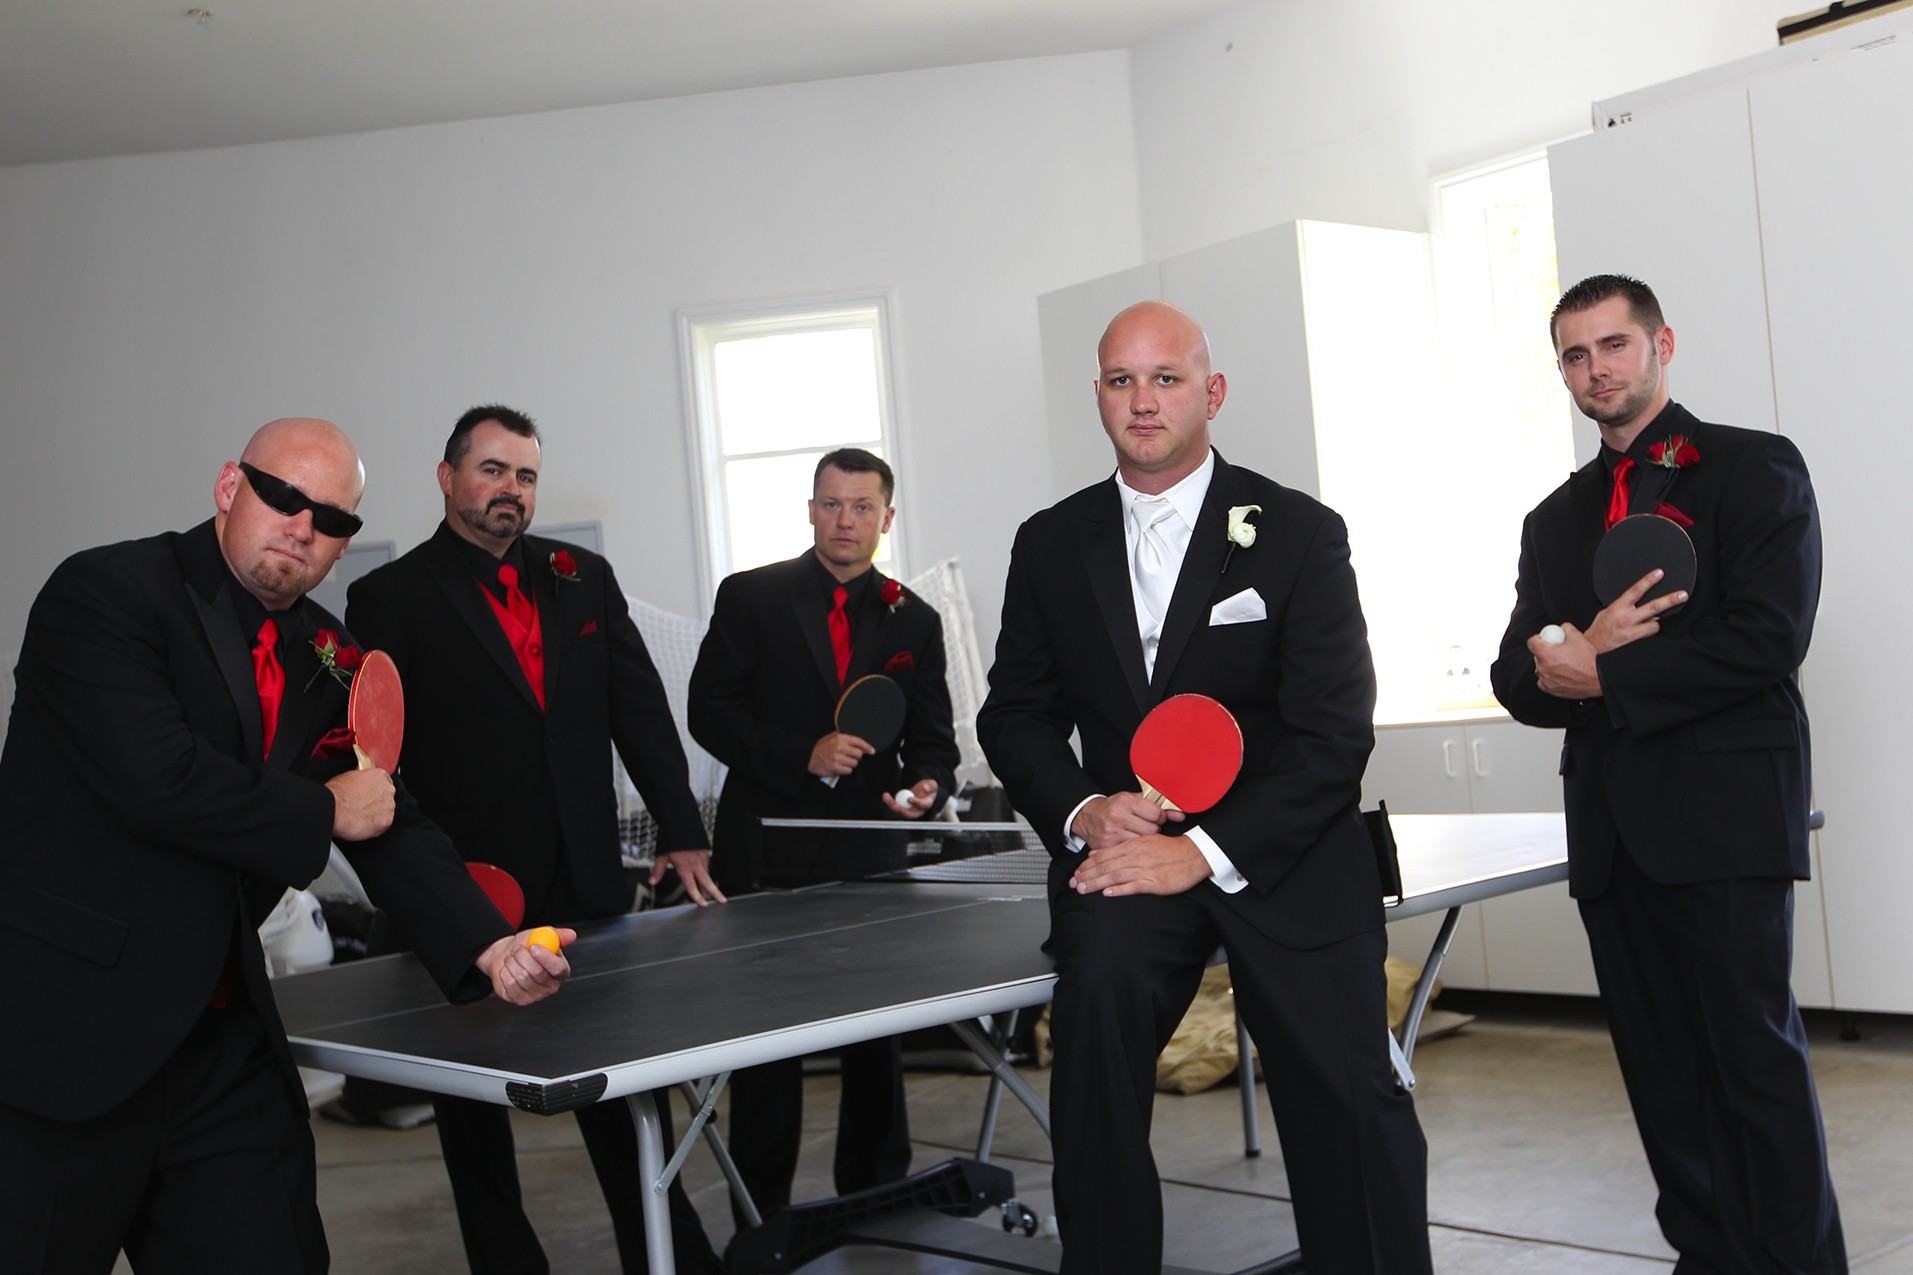
The groom is usually ready long before the bride, which gives you some time to get a wider variety of photographs. Once the images of the groom and his groomsmen getting ready are taken, like the groom being helped with his tuxedo, look to find something that the groomsmen can do to bring out their personalities. There is nothing quite like playing a quick game of table tennis while waiting for the bride and her bridesmaids, as shown in Figure 8-12. The table was there and the groomsmen were willing. It is a nice reminder of the time spent getting ready.
8-12
ABOUT THIS PHOTO Playing a little table tennis before the wedding is a great way to relax. Taken at ISO 400, f/4, 1/100 second.
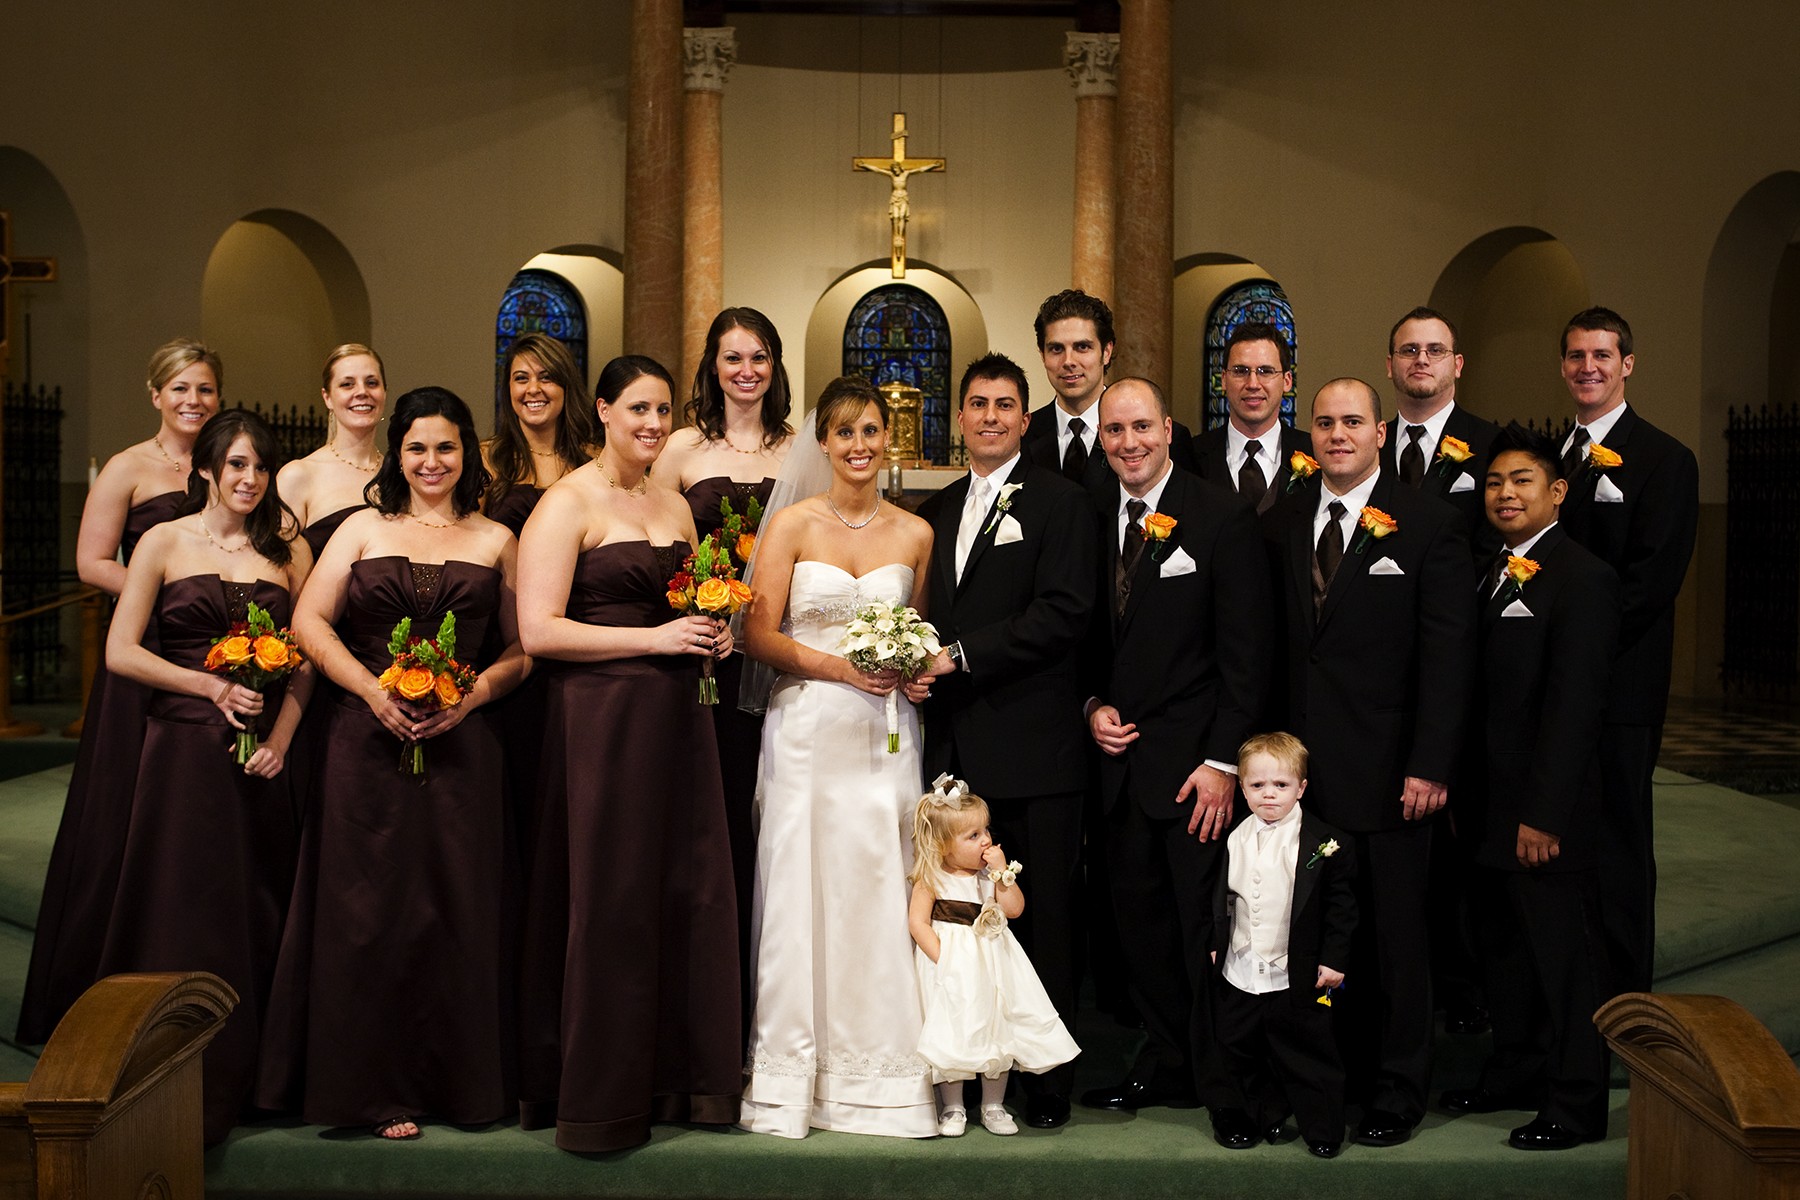
The entire bridal party
You have two opportunities to take photos of the full bridal party: before the ceremony if the bride and groom agree to it or before the reception. Taking these portraits can be some of the most fun you will have all day. You are photographing the people who are closest to the bride and groom, and the photos of them will be some of the most viewed after the wedding is over.
It doesn’t matter when you take the group shots of the bridal party; the setups are going to be the same. The only advantage to shooting before the ceremony is that the makeup will be fresh, and everyone will be looking their best. There is also more time to do some creative shots before the ceremony. Usually if the shoot is done after the ceremony, everyone is under a time crunch to make it to the reception quickly.
The best advice when it comes to group portraits is to keep them simple and easy. It is about getting the party relaxed and letting them enjoy this time. Have a set of poses that you already know will work compositionally based on the size of the wedding party, and let the wedding party have fun while they are doing them. While shooting the same set of standard poses may sound boring, you can still add some variation to the poses every time you shoot.
Have a location or two in mind and make sure that the whole bridal party knows where it is and is ready for the shoot. Once these photos are done, if there is some time left, you can get creative and try to come up with shots that you normally do not take. Let the wedding party know that you are experimenting and have fun with it. By now, the wedding party should have complete trust in your creativity and talent and will be willing to try anything to have some fun with the photos.
Some groupings to try when shooting the bridal party include:
• Pose the groom with the bridesmaids
• Pose the bride with the groomsmen
• Pose with the groomsmen on one side and the bridesmaids on the other
• Pose the wedding party as couples
Keep the proceedings light and let everyone have some fun. For example, take Figures 8-13 and 8-14, were the bride and groom posed first with the groomsmen and then with the bridesmaids. The two shots were taken at the same place and same time, and it is easy to see that everyone is having a really great time.
8-13
ABOUT THIS PHOTO The bride and groom with the groomsmen. Keeping the bride and groom in the center of the composition and just building the image by placing the group around them keeps the bride and groom as the center of attention. Taken at ISO 800, f/5.6, 1/320 second.
8-14
ABOUT THIS PHOTO The bride and groom with the bridesmaids. Keeping the bride and groom in the center of the composition and just building the image by placing the group around them keeps the bride and groom as the center of attention. Taken at ISO 800, f/5.6, 1/320 second.
Posing tips for groups
One of the toughest parts of getting a group to all look good in a photograph is to have them posed well. Just having everyone stand around in a clump is not very effective, and neither is just lining everyone up in a straight line because there is no visual impact and nothing to stop the viewer’s eye from just going in and then immediately out of the photo.
As a wedding photographer, you will start to feel the pressure to take a lot of group shots in a small period of time, and this can hinder your creativity. The following tips can help you still get the creative images and not waste much time:
• Control the group. As the photographer, your job is not only to take the photograph but also to keep the attention focused on you so that everyone is looking at the camera at the right time. At weddings this is even tougher to do because the bride and groom are getting a lot of the attention.
• Work quickly. The longer it takes to get the shot, the more likely it is that you will lose the attention and focus of the group, especially if there are kids involved. Be ready to take the shot the minute the group is set up.
• Shoot in burst mode. Set your camera to continuous advance and take a series of images that can really help with the blinkers in the crowd.
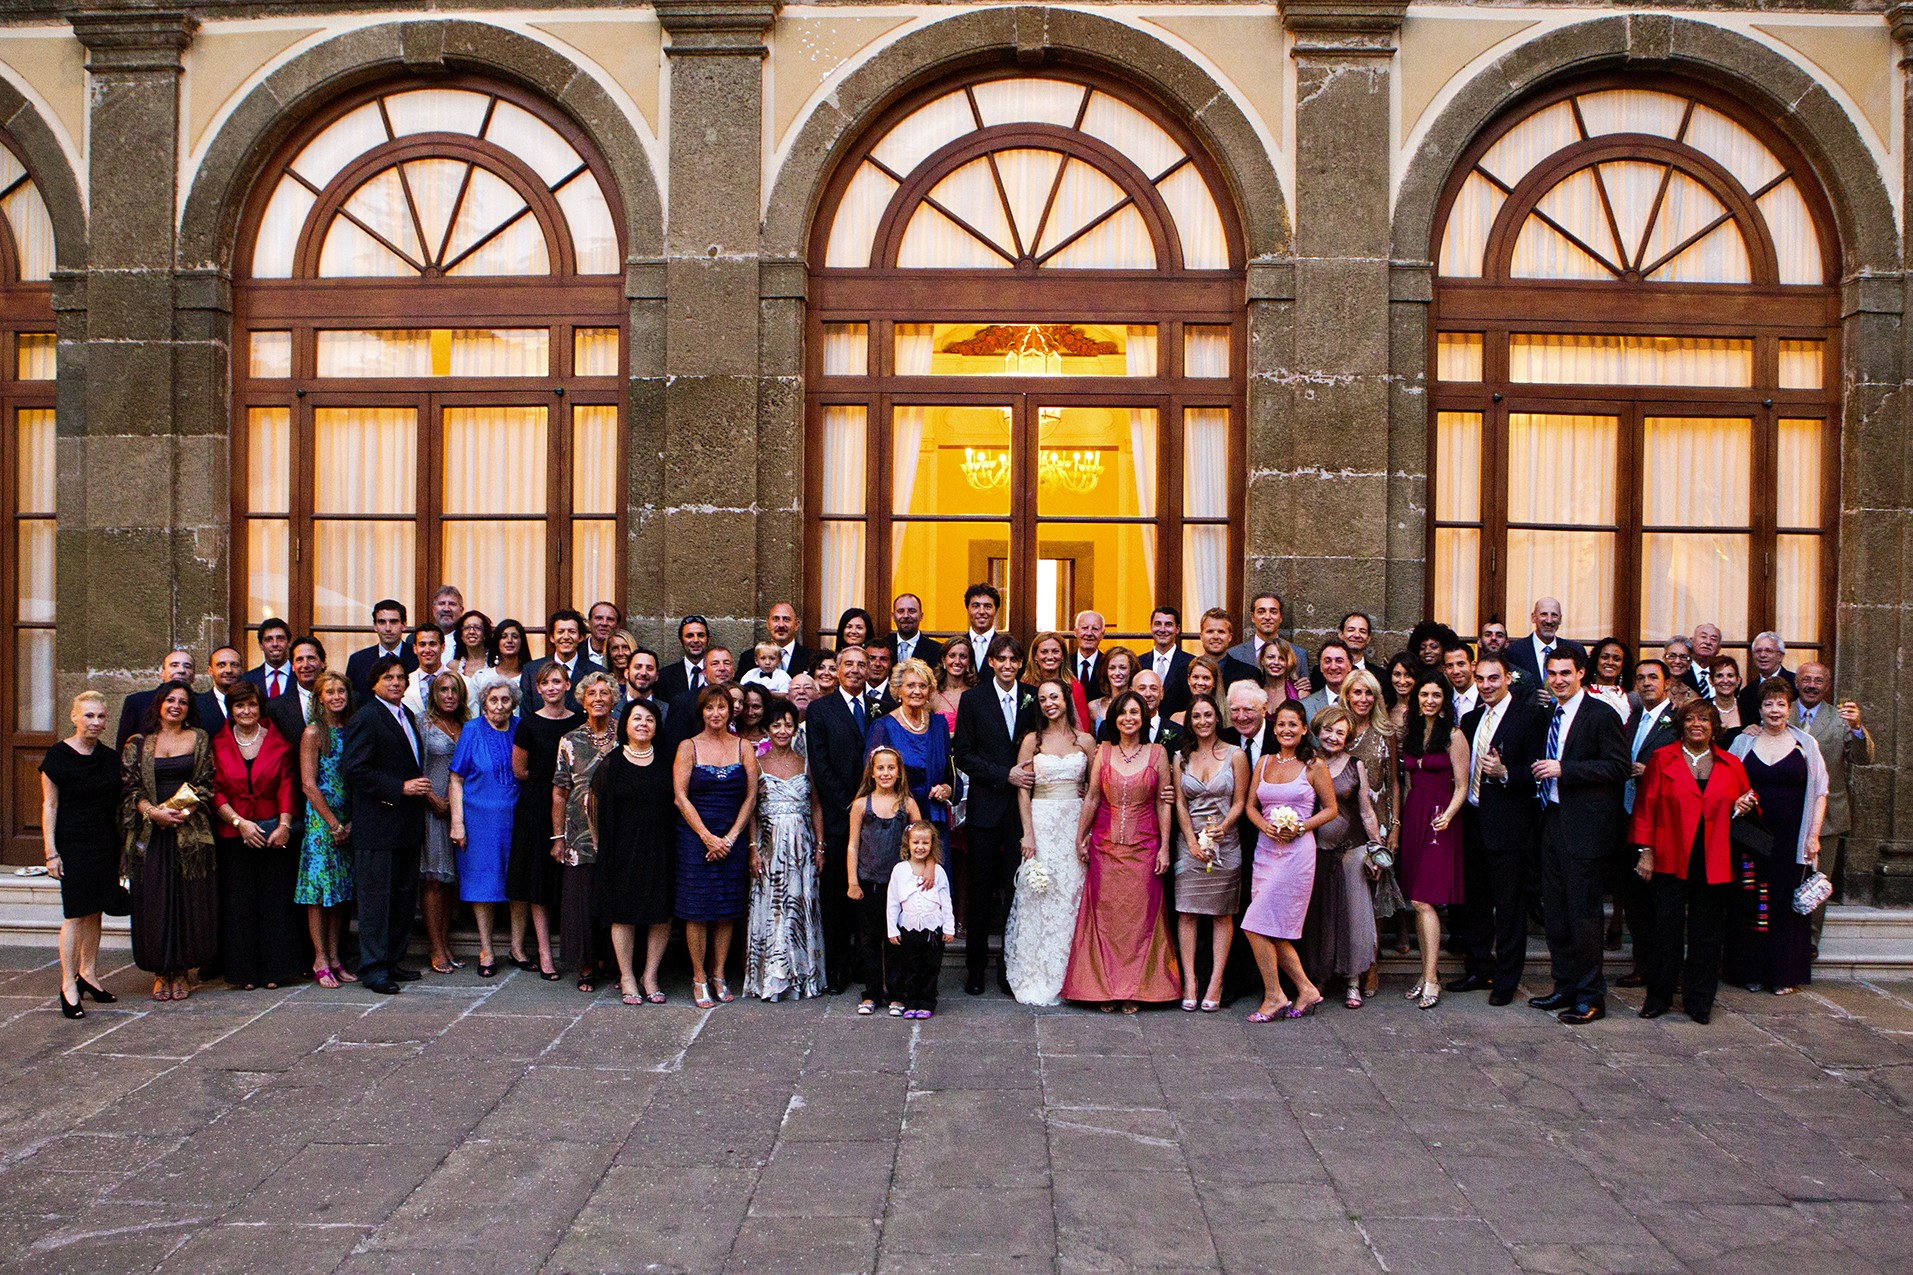
• Start with the biggest group. If you start with the largest group and work your way down to the smallest group, then the guests that you are done photographing can leave and start to enjoy themselves at the reception. If you start with the smallest group and work your way to the largest group, then you will have a lot of unneeded and unwanted distractions going on. Start with the bride and groom in the middle and build the group around them, as was done in Figure 8-15, and then start to peel people away until you are left with just the bride and groom at the end.
8-15
ABOUT THIS PHOTO All of the wedding guests at this wedding in Italy gathered around the bride and groom. Taken at ISO 3200, f/3.5, 1/50 second.
• Put the bride and groom together. Keep them together because it looks better, and they are now the center of attention as a couple. It also makes it easier for you to focus on them, and it is easier for the rest of the group to focus on them.
• Look for the faces. You need to be able to see the faces of your subjects, and they should all be able to see the camera. Check with the crowd to make sure that they can see you with both eyes; that way you should be able to see them and capture them in the image.
• Stagger the rows. When you start working with larger groups, it’s best to stagger the rows a little so that the people in the back can see and be seen. What you want is for the people to be able to look out at the camera over the shoulders of the people in front of them.
• Stagger the height. If it is possible, it’s best to stagger the heights of the rows so that there are two, three, or even more heights present. This is done really easily by posing the group on stairs, as shown in Figure 8-16. If there are no stairs, then you can always have the front row kneel, the middle row sit, and the back row stand. This enables everyone to see the camera, and you will be able to capture the shot with everyone’s faces showing.
8-16
ABOUT THIS PHOTO Stairs are a great way to stagger the people in the photo, and the different heights mean that everyone can be easily seen. Taken at ISO 100, f/5.6, 1/200 second.
• Watch the background. Just because you have a big group doesn’t mean that you can ignore the fundamentals, so make sure that your background is helping, not hurting. A great background is one that can add a sense of location to the photo. The stairs in front of the church are ideal, because they not only help you stagger the group but also add a sense of location to the wedding. The downside is that they might not be big enough.
• Watch the light and watch the shadows. The biggest concern when shooting groups is getting everyone well lit — you don’t want the shadows from some people falling on others. This happens when the light strikes the group from the side and the people on the edges block the light from illuminating the people toward the middle. The two ways to avoid this are to place the group where there is even light falling from above or to place your external flashes in front and as high up as possible so that the light falls down on the group. One of the best types of light is the open shadow, as is shown in Figure 8-17, where the shadow from the arch keeps all the faces in the same light, while the sun acts like a hair light, giving the group just a bit of pop.
8-17
ABOUT THIS PHOTO The group shot taken in shadow allows for a very even lighting on the faces of the subjects. Taken at ISO 400, f/5, 1/500 second.
Planning on the best time to take the group portraits
There are really only two times to take the group portraits: before the ceremony begins and after the ceremony ends, but before the reception. By dividing the shots up and having a plan, you can maximize both these times. As I’ve mentioned before, you will need to discuss with the bride and groom whether they are open to seeing each other before the ceremony and getting some of the group portraits taken then along with their individual portraits at that time. If they aren’t, you must plan accordingly to accommodate their wishes. Most importantly, discuss this with the clients so that they understand when and where the images will be taken. This will be important when creating the wedding day timeline.
For more on photographing the bride and groom together before the ceremony, see Chapter 7.
The time of the day can play a big part in when to do a big group portrait. If you are shooting a wedding that takes place in the afternoon and is outdoors, it is possible to take advantage of the available light and shoot the group portraits without any need for a flash.
How many photos do you actually need?
This is a matter of personal preference, but many beginning wedding photographers tend to take too many group shots, trying to get every possible combination of people posing with the bride and groom. This typically takes a lot of time, and the payout usually isn’t worth it. You might want to consider photographing larger groups, which results in fewer images but ones that are more likely to end up in the wedding album or as prints later on. That doesn’t mean that you should completely ignore shooting small groups, but pick those groups carefully with the help of the bride and groom. If there is a special family member they want a photo with, then by all means schedule taking it, but keep your list of shots relatively small, and use the extra time to shoot the more important portraits of the bride and groom alone or with the wedding party. As I mentioned earlier in this chapter, a full group shot like Figure 8-18 can take the place of a lot of other photos and is much more likely to end up printed and displayed in the couple’s home.
8-18
ABOUT THIS PHOTO Getting everyone in a single great photo can significantly reduce the number of individual shots you might need. Taken at ISO 640, f/4.5, 1/60 second.
Discuss the group shots with the clients before the wedding because you will want to be on the same page as the clients when you deliver the final images.
Assignment
Pose a Group
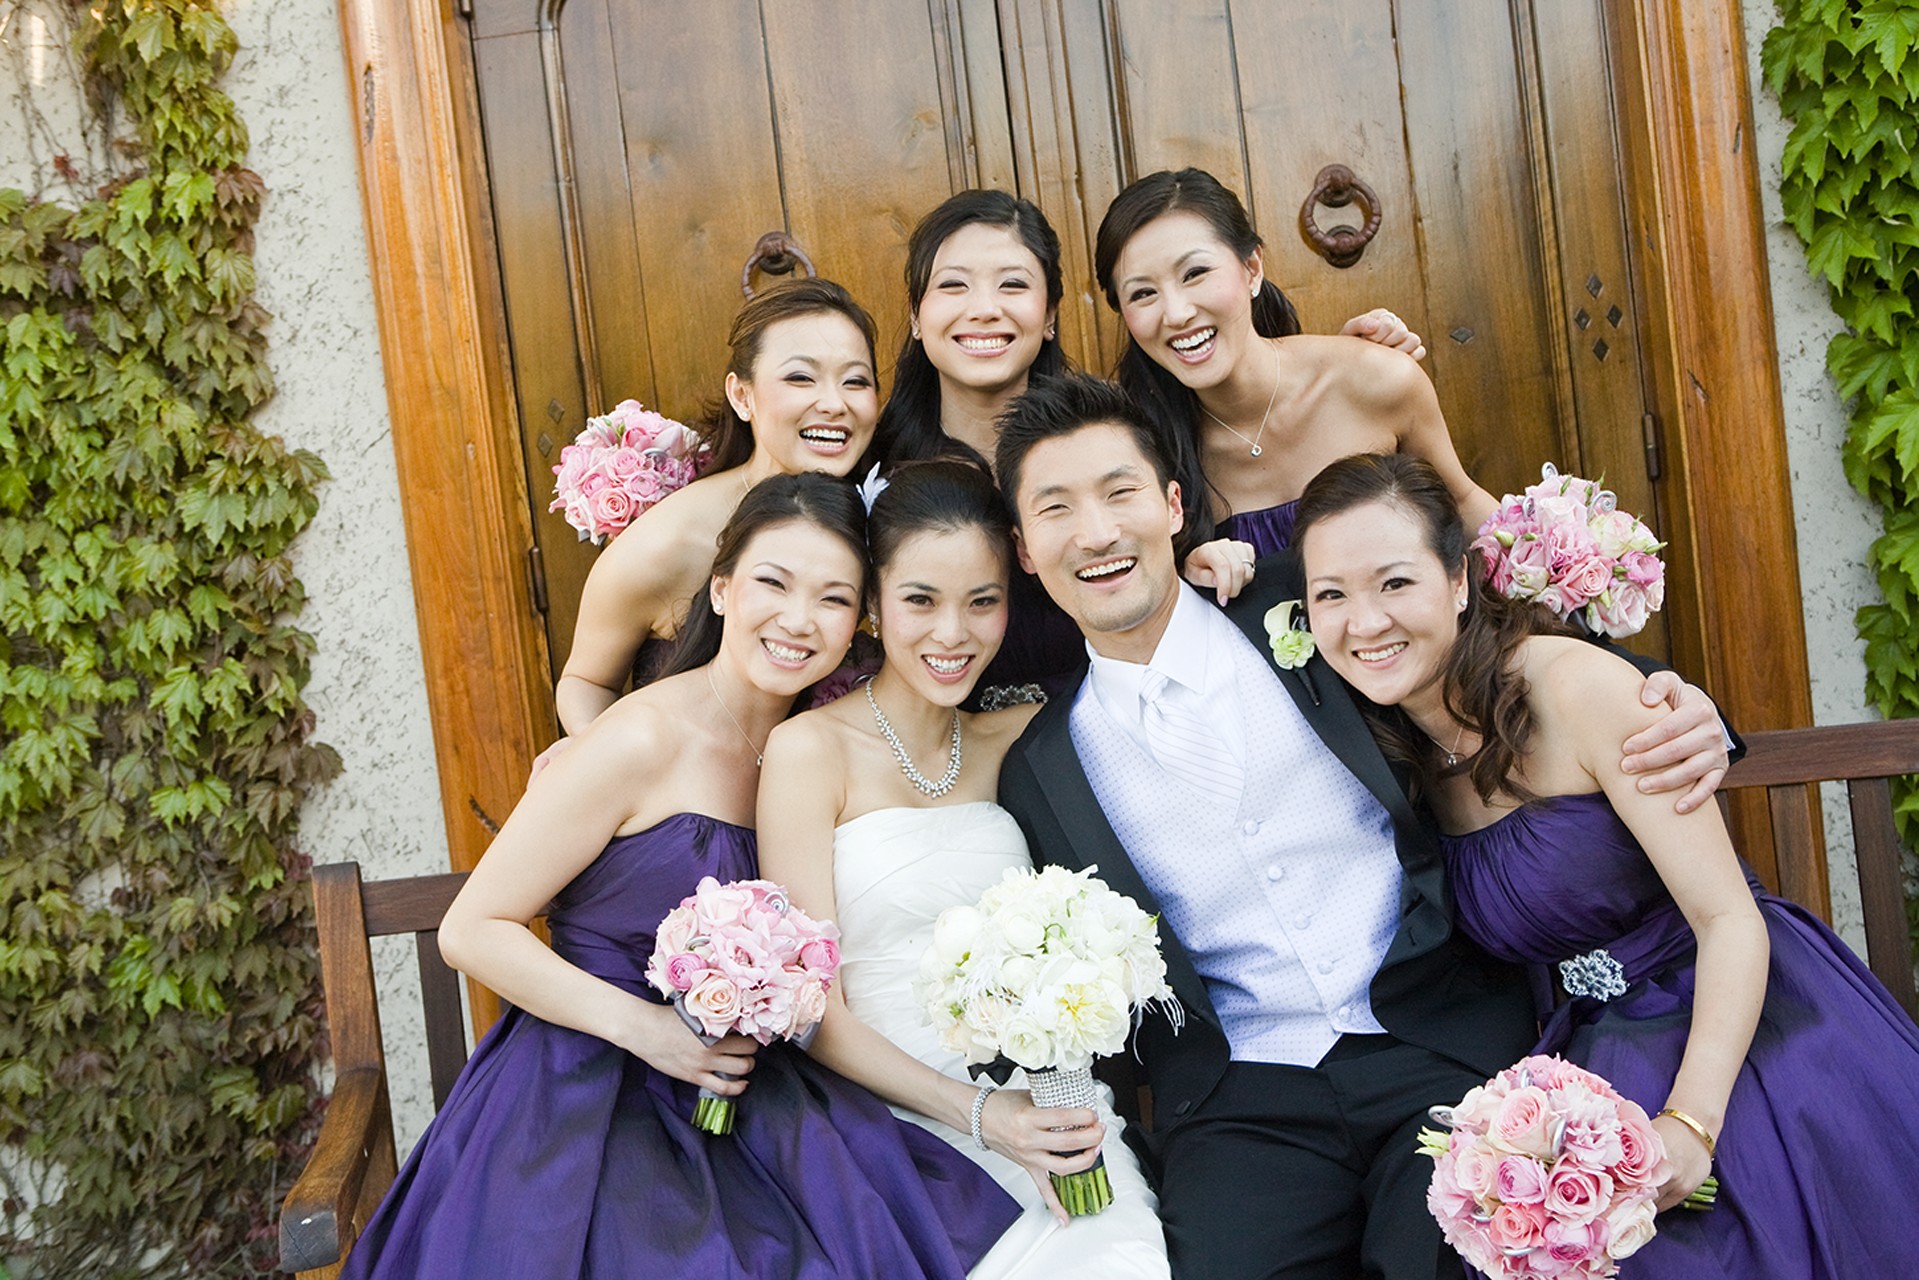
Posing a single person can be a challenge; posing a group is even tougher. It is best to be prepared by practicing posing a group. For this assignment, practice posing a group of people and taking their group portrait. Since it’s not a great idea to practice the poses at an actual wedding, my first suggestion is to get a group of friends together and work out a set of group poses. Then when you are shooting at a wedding, you will already know what will work.
For this shot, I made sure that the bride and groom were placed in the center and built the group around them. The bridesmaids and groomsmen were placed on either side at an angle that keeps the focus on the bride and groom. I loved having the kids in the images but it was very tough keeping their attention focused.
One way to make sure that everyone can see the camera and that the camera can see them is to stagger the heads as was done in this image. By making sure that each person is between the two in front of them, each face is visible. This group shot was taken at ISO 1250, f/4, 1/60 second.
Remember to visit www.pwassignments.com after you complete the assignment and share your favorite photo! It’s a community of enthusiastic photographers and a great place to view what other readers have created. You can also post comments and read encouraging suggestions and feedback.