
Chapter 1. Why Distributed?
Node.js is a self-contained platform for running JavaScript code on the server. It provides a JavaScript language runtime as well as dozens of APIs, many of which allow application code to interact with the underlying operating system and the world outside of it. But you probably already knew that.
This chapter takes a high level look at Node.js, in particular how it relates to this book. It looks at the single-threaded nature of JavaScript, simultaneously one of its greatest strengths and weaknesses and part of the reason why it’s so important to run Node.js in a distributed manner.
You’ll also build out a small pair of sample applications that will be used as a baseline to be upgraded numerous times throughout the book. The first iteration of these applications will likely be simpler than anything you’ve previously shipped to production.
If you find you already know the information in the first two sections, feel free to skip directly to “Sample Applications”.
Single-Threaded Nature of JavaScript
JavaScript, like most programming languages, makes heavy usage of functions. Functions are a way to combine units of related work. Functions can call other functions as well. Each time one function calls another function it adds frames to the call stack, which is a fancy way of saying the stack of currently run functions is getting taller. When you accidentally write a recursive function that would otherwise run forever you’re usually greeted with a RangeError: Maximum call stack size exceeded error. When this happens you’ve reached the maximum limit of frames in the call stack.
Note
The maximum call stack size is usually inconsequential and is chosen by the JavaScript engine. The V8 JavaScript engine used by Node.js as of v13 has a maximum call stack size of around 15,000 frames.
However, JavaScript is different from some other languages in that it does not constrain itself to running within a single call stack throughout the lifetime of a JavaScript application. For example, when I wrote PHP several years ago, the entire lifetime of a PHP script (a lifetime ties directly to the time it takes to serve an HTTP request) correlated to a single stack, growing and shrinking, and disappearing once the request has been finished.
JavaScript handles concurrency—performing multiple things at the same time—by way of an _event loop. The event loop is essentially an infinitely running loop that continuously checks to see if there is work to perform. When it finds something to do it begins its task—in this case it executes a function with a new call stack—and once the function is complete it waits until more work is ready to be performed.
The code sample in Example 1-1 is an example of this happening. First, it runs the a() function in the current stack. It also calls the setTimeout() function that will queue up the x() function. Once the current stack completes the event loop checks for more work to do. The event loop only gets to check for more work to do once a stack is complete. It isn’t, for example, checking after every instruction. Since there’s not a lot going on in this simple program the x() function will be the next thing that gets run.
Example 1-1. Example of multiple JavaScript stacks
functiona(){b();}functionb(){c();}functionc(){/**/}functionx(){y();}functiony(){z();}functionz(){/**/}setTimeout(x,0);a();
Figure 1-1 is a visualization of the preceding code sample. Notice how there are two separate stacks, and each stack increases in depth as more functions are called. The horizontal axis represents time; code within each function naturally takes time to execute.
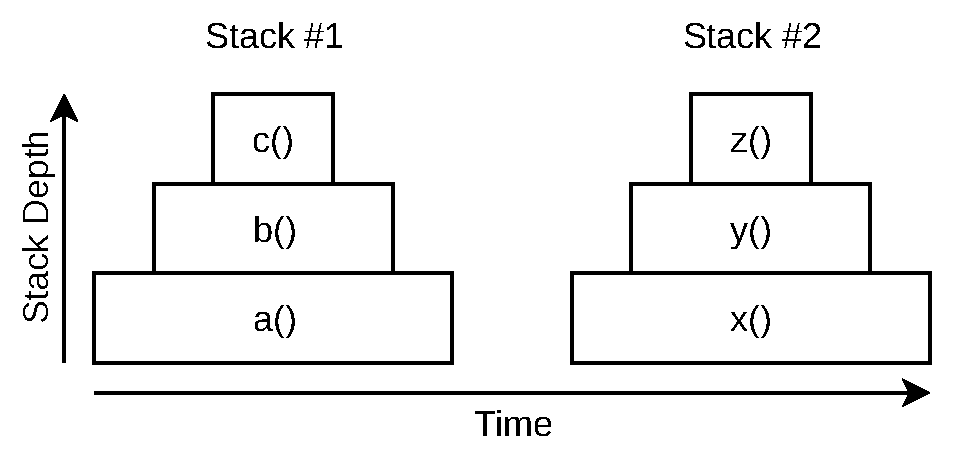
Figure 1-1. Visualization of multiple JavaScript stacks
The setTimeout() function is essentially saying “try to run the provided function 0ms from now.” However, the x() function doesn’t run immediately, as the a() call stack is still in progress. It doesn’t even run immediately after the a() call stack is complete, either. The event loop takes a non-zero amount of time to check for more work to perform. It also takes time to prepare the new call stack. So, even though x() was scheduled to run in 0ms, in practice it may take a few milliseconds before the code runs.
Another thing to keep in mind is that functions can take a long time to run. If the a() function took 100ms to run, then the earliest you would expect x() to run might be be 101ms. Because of this, think of the time argument as the earliest time the function can be called. A function that takes a long time to run is said to block the event loop—since the application has halted on some slow synchronous code, the event loop is temporarily unable to process further tasks.
Now that call stacks are out of the way, you can now move on to the interesting part of this section.
JavaScript is a single-threaded language. This means that two call stacks cannot exist at the same time, which also means that two functions cannot run in parallel. This fact exists at the very heart of JavaScript. This implies that multiple copies of an application will need to be run simultaneously by some means to make the application scale.
Several tools are available to make it easier to manage running multiple copies of an application. “The Cluster Module” looks at using the built in cluster module for routing incoming HTTP requests to different application instances. The built-in worker_threads module also helps run multiple JavaScript instances at once. The child_process module can be used to spawn and manage a full Node.js process as well.
However, with each of these approaches, JavaScript still can only run a single line of JavaScript within a single isolated context. This means that with each solution, each isolated JavaScript instance still has its own distinct global variables, no object references can be shared between them, and so on.
Since objects cannot be directly shared with the three aforementioned approaches, some other method for communicating between the different isolated JavaScript contexts is needed. Such a feature does exist and is called message passing. Message passing works by sharing some sort of serialized representation of an object or data between the separate isolates (such as JSON). This is necessary because directly sharing objects is impossible, not to mention it would be a painful debugging experience if two separate isolates could modify the same object at the same time. These types of issues are referred to as deadlocks and race conditions.
Note
By using worker_threads it is possible to share memory between two different JavaScript instances. This can be done by creating an instance of SharedArrayBuffer and passing it from one thread to another using the same postMessage(value) method used for worker thread message passing. This results in an array of bytes that both threads can read and write to at the same time.
With message passing overhead is incurred when the data is serialized and deserialized. In languages that support true multithreading, such overhead doesn’t need to exist as objects can be shared directly.
In the end this is a trade-off. By not supporting multithreading, JavaScript gets to ignore a whole class of headache that plagues other languages. But by not supporting multithreading, the language gets a performance hit when it comes to message passing.
This is one of the biggest contributors that necessitates running Node.js applications in a distributed manner. In order to handle scale, enough instances need to run so that any single instance of a Node.js process doesn’t completely saturate its available CPU.
Now that you’ve looked at JavaScript—the language that powers Node.js—it’s time to look at Node.js itself.
The solution to the surprise interview question is provided in Table 1-1. The most important part is the order that the messages print in, and the bonus is the time it takes them to print. Consider your bonus answer correct if you’re within a few milliseconds of the timing.
| Log Statement | Time |
|---|---|
B |
1ms |
E |
501ms |
A |
502ms |
D |
502ms |
C |
502ms |
The first thing that happens is the function to log A is scheduled with a timeout of 0ms. Recall that this doesn’t mean the function will call in 0ms, instead it is scheduled to happen as early as 0 seconds but after the current stack ends. Next, the log B method is called directly, so it’s the first to print. Then, the log C function is scheduled to happen as early as 100ms, and the log D is scheduled to happen as early as 0ms.
Then the application gets busy doing calculations with the while loop, which eats up half a second of CPU time. Once the loop concludes the final call for log E is made directly and it is now the second to print. The current function now has no work left to do and it exits. At this point, only a single stack has executed.
Once that’s done, the event loop looks for more work to do. It checks the queue and sees that there are three tasks scheduled to happen. The order of items in the queue is based on the provided timer value, and the order that the setTimeout calls were made. So, it first processes the log A function. At this point the script has been running for roughly half a second, and it sees that log A is roughtly 500ms overdue, and so that function is executed. The next item in the queue is the log D function, which is also roughtly 500ms overdue. Finally, the log C function is run, as it’s roughly 400ms overdue.
Quick Node.js Overview
Node.js fully embraces the Continuation-Passing Style (CPS) pattern throughout its internal modules by way of callbacks—functions that are passed around and invoked by the event loop once a task is complete. In Node.js parlance functions that are invoked in the future with a new stack are said to be run asynchronously. (Conversely, when one function calls another function in the same stack, that code is said to run synchronously.)
The types of tasks that are long-running are typically I/O tasks. For example, imagine that your application wants to perform two tasks. Task A is to read a file from disk, and Task B is to send an HTTP request to a third-party service. If an operation depends on both of these tasks being performed—an operation such as responding to an incoming HTTP request—the application can perform the operations in parallel as shown in Figure 1-2. If they couldn’t be performed at the same time, if they had to be run sequentially, then the overall time it takes to respond to the incoming HTTP request would be longer.
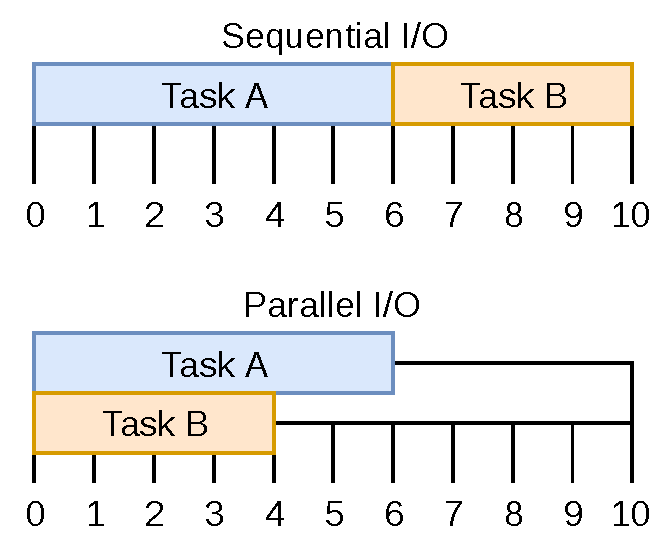
Figure 1-2. Visualization of sequential vs parallel I/O
At first this seems to violate the single-threaded nature of JavaScript. How can a Node.js application both read data from disk and do other work like render HTML responses at the same time if JavaScript is single-threaded?
This is where things start to get interesting. Node.js itself is multithreaded. The lower levels of Node.js are written in C++. This includes third-party tools like libuv, which handles operating system abstractions and I/O, as well as V8 (the JavaScript engine) and other third-party modules. The layer above that, the Node.js Binding layer, also contains a bit of C++. It’s only the higher-level layers of Node.js that are written in JavaScript, such as parts of the Node.js APIs that deal directly with objects provided by userland1. Figure Figure 1-3 depicts the relationship between these different layers.
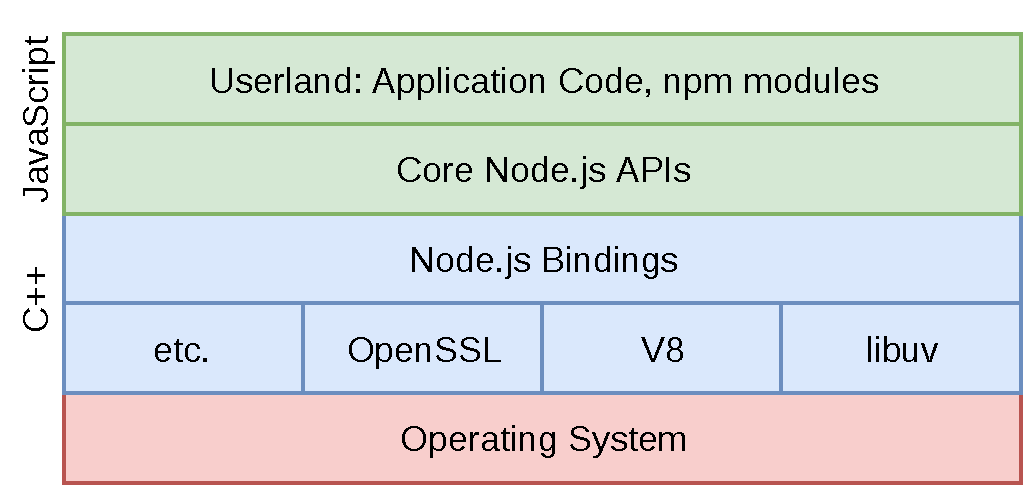
Figure 1-3. The layers of Node.js
Internally, libuv maintains a thread pool for managing I/O operations (as well as CPU-heavy operations, like crypto and zlib number crunching). This is a pool of finite size where I/O operations are allowed to happen. If the pool only contains four threads then only four files can be read at the same time. Consider Example 1-3 where the application opens a file, waits for it to be open, processes other work, and then processes the content within the file. Although the JavaScript code within the application is busy running, a thread within the bowels of Node.js is busy reading the content of the file from disk into memory.
Example 1-3. Example of Node.js threads
#!/usr/bin/env nodeconstfs=require('fs');fs.readFile('/etc/passwd',(err,data)=>{if(err)throwerr;console.log(data);});setImmediate(()=>{console.log('This runs while file is being read');});

Node.js reads
/etc/passwd. It’s scheduled by libuv.
Node.js runs a callback in a new stack. It’s scheduled by V8.

Once the previous stack ends a new stack is created and prints a message.

Once the file is done reading libuv passes the result to the V8 event loop.
Tip
The libuv thread pool size defaults to four and can be overridden by setting the UV_THREADPOOL_SIZE=<threads> environment variable. It can be set as high as 1,024. In practice it’s not that common for applications to change this value. Only change it if you benchmark the effects of doing so in a perfect replication of production scenarios! An app running locally on a macOS laptop will behave very differently than an app in a container on a Linux server.
Internally, Node.js maintains a list of asynchronous tasks that still need to be completed. This list is used to keep the process running. When a stack completes and the event loop looks for more work to do, if there are no more operations left to keep the process alive, it will exit. That is why a very simple application that does nothing asynchronous is able to exit when the stack ends. Here’s an example of such an application:
console.log('Print, then exit');
However, once an asynchronous task has been created, this is enough to keep a process alive. This application is an example:
setInterval(()=>{console.log('Process will run forever');},1000);
Many calls to Node.js APIs will result in the creation of objects that can keep the process alive. As another example of this, when an HTTP server is created, it also keeps the process running forever. A process that closes immediately after an HTTP server is created wouldn’t be very useful.
There is a common pattern in the Node.js APIs where such objects can be configured to no longer keep the process alive. Some of these are more obvious than others. For example, if a listening HTTP server port is closed, then the process may choose to end. Additionally, many of these objects have a pair of methods attached to them, .unref() and .ref(). The prior method is used to tell the object to no longer keep the process alive, while the latter does the opposite.
Example 1-4 shows an example of this happening.
Example 1-4. The common .ref() and .unref() methods
constt1=setTimeout(()=>{},1_000_000);constt2=setTimeout(()=>{},2_000_000);// ...t1.unref();// ...clearTimeout(t2);
There is now one asynchronous operation keeping Node.js alive. The process should end in 1,000 seconds.
There are now two such operations. The process should now end in 2,000 seconds.
The t1 timer has been unreferenced. It can still run in 1,000 seconds, but it won’t keep the process alive.
The t2 timer has been cleared and will never run. A side effect of this is that it is no longer keeping the process alive. With no remaining asynchronous operations keeping the process alive the next iteration of the event loop will end the process.
This example also highlights another feature of Node.js; not all of the functionality that exists in browser JavaScript behaves the same way in Node.js. The setTimeout() function, for example, returns an integer in web browsers. The Node.js implementation returns an object with several properties and methods.
Now that you’re a little more familiar with the inner workings of Node.js, it’s time to build out some sample applications.
Sample Applications
In this section you’ll build a pair of small sample Node.js applications. They will be intentionally simple and lack features that real applications will use. You’ll then add to the complexity of these base applications throughout the book.
I struggled with the decision to avoid using any third-party modules in these examples, but by using such modules the example was cut in half and increased in clarity. Feel free to choose whatever your preferred framework or request library is; it’s not the intent of this book to prescribe one module or another.
You’ll build two services so that later they can be combined in interesting ways, such as choosing the protocol they communicate with or the manner in which they discover each other.
The first application, namely the recipe-api, represents an internal API that will not be accessed via the outside world; it’ll only be accessed via other internal applications. Since you own both the service and any clients that access it, you’ll later be free to make different protocol choices. This also holds true for internal services within an organization.
The second application represents an API that is accessed from third parties over the internet. It must use HTTP so that web browsers can communicate with it. This application will be called the web-api.
The web-api service is downstream of the recipe-api and, conversely, recipe-api is upstream of the web-api. Figure 1-4 is a visualization of the relationship between these two services.
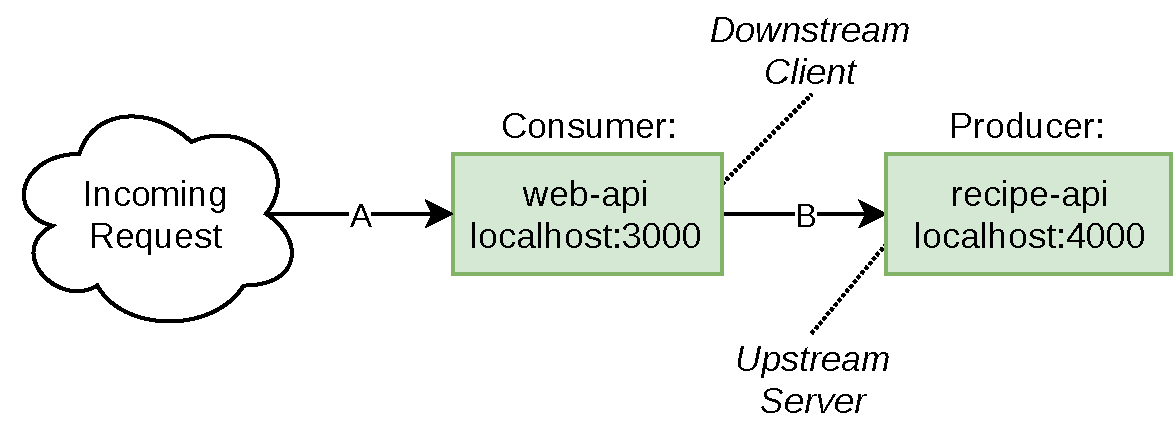
Figure 1-4. The relationship between web-api and recipe-api
Both of these applications can also be referred to as servers, since they are both actively listening for incoming network requests. However, when describing the specific relationship between the two APIs (arrow B in Figure 1-4), the web-api can be referred to as the client (or the consumer) and recipe-api as the server (or producer). Chapter 2 focuses on this relationship the most. When referring to the relationship between web browser and web-api (arrow A in Figure 1-4), the browser is called the client/consumer, and web-api is then called the server/producer.
Now it’s time to examine the source code of the two services. Since these two services will evolve throughout the book, now would be a good time to create some sample projects for them. Create two separate directories, one for each service. Create a distributed-node/ directory to hold all of the code samples you’ll create for this book. Most of the commands you’ll run will require that you’re inside of this directory (unless noted otherwise). Within this directory create a web-api/, a recipe-api/, and a shared/ directory. The first two directories will contain different service representations. The shared/ directory will contain shared files to make it easier to apply the examples in this book. In a real world scenario any shared files would be checked in via source control or loaded as an outside dependency via an npm module.
You’ll also need to install the required dependencies. Within both project directories run the following command:
$ npm init -yThis will create some basic package.json files for you. Once that’s done, run the appropriate npm install commands from the top comment of the code examples. Code samples will use this convention throughout the book to convey which modules need to be installed. Note that each project will start to contain superfluous dependencies since the code samples are reusing directories. Only necessary modules should be listed as dependencies in a real world project.
Now that the setup is complete it’s time to view the source code. Example 1-5 is the first example. This project is an internal Recipe API service, an upstream service that provides data. For this example it will simply provide some static data, however, in a real-world example it may instead communicate with a database.
Example 1-5. recipe-api/producer-http-basic.js
#!/usr/bin/env node// npm install fastify@2constserver=require('fastify')();constHOST=process.env.HOST||'127.0.0.1';constPORT=process.env.PORT||4000;console.log(`worker pid=${process.pid}`);server.get('/recipes/:id',async(req,reply)=>{console.log(`worker request pid=${process.pid}`);constid=Number(req.params.id);if(id!==42){reply.statusCode=404;return{error:'not_found'};}return{producer_pid:process.pid,recipe:{id,name:"Chicken Tikka Masala",steps:"Throw it in a pot...",ingredients:[{id:1,name:"Chicken",quantity:"1 lb",},{id:2,name:"Sauce",quantity:"2 cups",}]}};});server.listen(PORT,HOST,()=>{console.log(`Producer running at http://${HOST}:${PORT}`);});
Tip
The first line in these files is known as a shebang. When a file begins with this line and is made executable (by running chmod +x filename.js./filename.js
Once this service is ready you can run it in two different terminal windows. Execute the following commands; the first will start the recipe-api service, and the second will test that it’s running and returns data:
$node recipe-api/producer-http-basic.js$curl http://127.0.0.1:4000/recipes/42
You should then see JSON output like the following (whitespace added for clarity):
{"producer_pid":25765,"recipe":{"id":42,"name":"Chicken Tikka Masala","steps":"Throw it in a pot...","ingredients":[{"id":1,"name":"Chicken","quantity":"1 lb"},{"id":2,"name":"Sauce","quantity":"2 cups"}]}}
The second service, a public facing Web API service, doesn’t contain as much data but is more complex since it’s going to make an outbound request. Again, copy the source code from Example 1-6 to the file located at web-api/consumer-http-basic.js.
Example 1-6. web-api/consumer-http-basic.js
#!/usr/bin/env node// npm install fastify@2 node-fetch@2constserver=require('fastify')();constfetch=require('node-fetch');constHOST=process.env.HOST||'127.0.0.1';constPORT=process.env.PORT||3000;constTARGET=process.env.TARGET||'localhost:4000';server.get('/',async()=>{constreq=awaitfetch(`http://${TARGET}/recipes/42`);constproducer_data=awaitreq.json();return{consumer_pid:process.pid,producer_data};});server.listen(PORT,HOST,()=>{console.log(`Consumer running at http://${HOST}:${PORT}/`);});
Once you’ve created the file and added the source code, execute the service and send it a request using the following commands:
$node web-api/consumer-http-basic.js$curl http://127.0.0.1:3000/
The result of this operation will be a superset of the JSON provided from the previous command:
{"consumer_pid":25670,"producer_data":{"producer_pid":25765,"recipe":{...}}}
The pid values in the responses are the numeric process IDs of each service. These PID values are used by operating systems to differentiate running processes. They’re included in the responses to make it obvious that data from two separate services is being used. These values are unique across a particular running operating system, meaning there should not be collisions within the same running machine, but there will be collisions across separate running machines, virtual or otherwise.
1 “Userland” is a term borrowed from operating systems, meaning the space outside of the Kernel where a user’s applications can run. In the case of Node.js programs it refers to application code and npm packages—basically, everything not built into Node.js.