
Chapter 6. Deployments
A deployment, in its simplest form, refers to moving code from one location to another. With some platforms this is as simple as moving a bunch of files. For example, plenty of applications can be deployed by copying raw source code files like PHP, Python, and Perl scripts, and subsequent HTTP requests to a web server will execute the updated files. Static sites are typically deployed in the same manner. More complicated applications that run persistently will require an additional step to stop and restart a process. Examples of this includes shipping Node.js source files, a compiled Go binary, or a Python script1.
Modern applications should make themselves consumable by listening on a port. This is true whether an application is written in a platform that is traditionally invoked by a web server (like PHP, where you might include Apache and PHP inside of a Docker container) or if the application is written in Node.js (where the process will listen for requests directly, though, hopefully with an external reverse proxy still involved). Sure, Node.js processes can be restarted when a source code file has been changed. Packages like nodemon and forever provide such functionality to make local development easier. In theory, you could run nodemon on a production server, then just overwrite the JavaScript files with newer versions. But, you should never ever do such a thing.
In practice, a deployment is a much more formal process than “just copying some files”. The deployment process is usually made up of many stages, with the copying of application code being one of the final stages. Other things need to happen as well, such as checking out source code from version control, building an application, running automated tests, etc. The combination of stages required to deploy an application is referred to as a build pipeline.
Generally one piece of software becomes the most integral component for managing the build pipeline. A popular class of software to achieve this is called a Continuous Integration (CI) service. Continuous integration is a software development practice where self-contained changes made to an application are constantly being tested, merged into a mainline branch, and deployed. A CI server is in charge of managing the build pipeline to make such a process feasible.
Regardless of the tool used for managing a build pipeline, there are some concepts that are almost universally used:
- Build
-
A build is when a snapshot (such as a particular Git commit) of an application’s code base is converted into an executable form. This could involve transpiling code with Babel, installing dependencies from npm, and even generating a Docker image.
- Release
-
A release is a combination of a particular build with configuration settings. For example, one build might be released to both the staging and production environments where it will have two different configurations applied.
- Artifact
-
An artifact is a file or directory produced at some point during the build pipeline. This can be something that is used between multiple stages, like a Docker image, or a side effect of the build, like a code coverage report generated by the nyc package.
Each new release should have its own name. This name should be a value that increments, such as an integer or a timestamp. When an updated application is being deployed to a server it means that the new files representing a release are copied to the server, the application is executed, and the previous release is torn down.
When doing this, it’s important to keep several previous available in some manner. If a new release is found to be faulty, then an engineer should be able to revert to a previous release, an action called a rollback. Retaining previous releases can be as straightforward as keeping old Docker images in a Docker Repository.
Now that you’re familiar with some of the concepts around continuous integration and build pipelines, it’s time to get familiar with a particular CI service.
Build Pipeline with Travis CI
This book mostly considers open source tools, especially those that you can run yourself. However, due to the nature of deploying to a remote service, the next few sections will make use of free tiers of PaaS tools. This is mostly so that you aren’t required to spend money on things like server hosting or domain registration, and to get you up and running as quickly as possible.
For this section you need to setup two accounts. The first one is with GitHub. You probably already have a GitHub account and may even use it every day. GitHub is the world’s most popular service for hosting projects using Git version control. Most npm packages, and even the Node.js runtime itself, are hosted on GitHub. The second account you’ll need is with Travis CI which, as part of sign-up, will require that it be associated with your GitHub account. Travis is a popular continuous integration build pipeline service. It, too, is used by Node.js and many popular npm packages.
Now that your accounts are squared away, it’s time to create a new repository on GitHub. Visit the GitHub website, and click the plus sign in the navigational bar. This will take you to the Create a new repository screen. On this screen, name the repository as distnode-deploy. Set the visibility to public. Set the description to Distributed Node.js Sample Project. Elect to initialize the repository with a default README.md document. Also, use the drop downs to choose a default .gitignore file for Node.js, and add the MIT License as well. Once those options have been selected, click the Create repository button.
Creating a Basic Project
Once your repository is ready, navigate to your distributed-node/ directory using a terminal. Then checkout the git repository that you just created on GitHub. You can do this by running the following command and substituting <USERNAME> with your GitHub username:
$git clone [email protected]:<USERNAME>/distnode-deploy.git$cddistnode-deploy
Now that you’re inside of the repository you created, initialize a new npm project and install a web server module for the project. You can do that by running the following commands:
$npm init -y$npm install fastify@2
Next, create a new distnode-deploy/server.js file. This will be a fairly simple service following similar patterns that you’ve worked with before. Modify the file so that its contents contain the code in Example 6-1.
Example 6-1. distnode-deploy/server.js
#!/usr/bin/env node// npm install fastify@2constserver=require('fastify')();constHOST=process.env.HOST||'127.0.0.1';constPORT=process.env.PORT||8000;constRecipe=require('./recipe.js');server.get('/',async(req,reply)=>{return"Hello from Distributed Node.js!";});server.get('/recipes/:id',async(req,reply)=>{constrecipe=newRecipe(req.params.id);awaitrecipe.hydrate();returnrecipe;});server.listen(PORT,HOST,(err,host)=>{console.log(`Server running at${host}`);});
Also, create another file named distnode-deploy/recipe.js. This file represents a model used by the application. Modify the file so that it contains the code in Example 6-2.
Example 6-2. distnode-deploy/recipe.js
module.exports=classRecipe{constructor(id){this.id=Number(id);this.name=null;}asynchydrate(){// Pretend DB Lookupthis.name=`Recipe: #${this.id}`;}toJSON(){return{id:this.id,name:this.name};}};
While you’re at it, modify the distnode-deploy/package.json file so that whenever the npm test command is run it will pass. You can do this by modifying the file and overwriting the test field in the scripts section to look like this:
"scripts": {
  "test": "echo "Fake Tests" && exit 0"
},
And finally, create a distnode-deploy/.travis.yml file. This is what will be used to control Travis CI when it interacts with the repository. Add the content from Example 6-3 to this file.
Example 6-3. distnode-deploy/.travis.yml
language:node_jsnode_js:-"13"install:-npminstallscript:-PORT=0npmtest

This project will use Node.js v13.

The command to run at install time.

The command to run at test time.
These files represent an early version of the application. Over time you’ll make various changes to them. Once you’ve created the files, add them to git and push them to master by running the following commands:
$git add .$git commit -m"Application files"$git push
You’ve now pushed the application changes to GitHub. Switch back to your browser where you have the GitHub project page open and refresh. At this point you should see an updated listing of the files that you’ve modified.
Configuring Travis CI
Now that your GitHub repository has some content in it, you’re ready to configure Travis to integrate with it. Open the travis-ci.com website in your browser. Next, click your avatar icon in the upper right corner of the navigation bar, then select the settings option. This will take you to the repositories settings page.
On this page you should see a button to activate the GitHub Apps Integration. Click the Activate button to start the process to authorize Travis to work with your repository.
You’ll then be taken to the GitHub website where you can choose which repositories to enable. By default, the All repositories option is selected. Feel free to keep this option if you’d like to use Travis with other repositories. Otherwise, click the Only select repositories option. Once you select this option, you’ll be able to search for a repository. Find and select the distnode-deploy repository. Next, click the Approve & Install button on the bottom of the screen.
You will then be taken back to the repositories settings page in the Travis interface. This time you should see a list of GitHub-hosted repositories that Travis has access to. In particular, you should now see the distnode-deploy repository listed. Click the Settings button next to the repository name.
This should take you to the settings page for your distnode-deploy project. By default it is configured to both Build pushed branches and to Build pushed pull requests. These default settings are fine.
Testing a Pull Request
With your repository now configured to run commands against pull requests, it’s now time to give it a try. Currently, when you run npm test, the result is that the tests will pass. So, you’ll now simulate a pull request that will cause the test to fail. Ideally the pull request will be prevented from being merged in this situation.
Switch back to your project files and modify the package.json file. This time, modify the test line to look like the following:
"scripts": {
  "test": "echo "Fake Tests" && exit 1"
},
Once you’ve modified the file, create a new branch, add the file, commit the change, and push it to GitHub. You can do that by running the following commands:
$git checkout -b feature-1$git add .$git commit -m"Causing a failure"$git push --set-upstream origin feature-1
Now switch back to the GitHub project page for your distnode-deploy repository. GitHub has detected that you’ve pushed a branch and displays a banner to create a pull request, assuming you’re on either the Code or Pull requests tabs. Note that you might need to refresh the page if the banner isn’t present. Click the Compare & pull request button in the banner to create a pull request based on the branch you pushed.
This will take you to the screen to create a pull request. The branch merge options should show that you’re attempting to merge a branch named feature-1 into a branch named master. The default settings on this screen are fine. Click the Create pull request button to officially create a pull request.
This will take you to the pull request screen for your first pull request. Depending on how quickly you’ve created the pull request, and how busy the Travis CI build servers are, you will see either zero, one, or two failures. Recall that in the Travis settings screen for the project, the option to build branches was enabled. Because of this, Travis was able to start testing the code as soon as the branch was pushed, even before the pull request was created. On my screen, the pull request checks look like Figure 6-1.

Figure 6-1. GitHub pull request failure
The messages displayed so far in the pull request aren’t all that useful. It does show that something has failed, but it doesn’t say exactly why the failure has occurred. Travis does provide more detailed output, but it will take a few clicks to find it. Next to each of the failed checks is a link titled Details. Click the Details link next to the Travis CI - Pull Request check.
You should now be on a GitHub screen with more details about the failing pull request check. This screen provides a little more information about the failed pull request test, but it’s still pretty high level, displaying information about individual jobs that have run as part of the check. One important button on this screen is the Re-run checks button. This will allow you to repeat the checks multiple times while retaining the same build settings. This is useful when testing flaky tests. However, clicking that button won’t fix this particular test as it’s hard coded to fail.
In the check failure panel there’s a section titled Build Failed. Right below this is some text stating The build failed, where the text The build is a link; click it.
This time you’ve been taken to the Travis CI website. On this screen you should see a list of all of the sub-checks. This screen is useful for displaying permutations of tests. For example, you can configure the tests to run an application using different versions of Node.js, environment variables, architectures, and even different operating systems (though, some of these features require a paid account). Click the first failure row.
You’re now viewing details about a specific “Job”, which is the term that Travis uses to refer to a particular context where your code has been executed. In this case the application was executed using Node.js v13 on the AMD64 platform. Below the job overview section is the exciting stuff. The terminal output from all the commands that Travis has run is displayed. Looking at this output you can see everything from the steps Travis took to set up the environment, the output of the npm install command, but more importantly, the output of the npm test command. In my case, I see the following output:
$ npm test
> [email protected] test /home/travis/build/tlhunter/distnode-deploy
> echo "Fake Tests" && exit 1
Fake Tests
npm ERR! Test failed.  See above for more details.
The command "npm test" exited with 1.
Congratulations! You’ve now got a very simple build pipeline enabled for your project. Of course, it’s not that useful just yet since it only runs a fake test so far. In the next section you’ll create some useful tests, recreating some of the quality controls that a larger organization might impose. Leave your failing pull request unmerged for now; you’ll fix it up soon enough.
Automated Testing
Modern application consumers expect a continuous stream of new features and bug fixes. In order to provide them with such an experience, the applications you work on require continuous integration. Application changes require ample testing to give development teams—and the overall organization—the confidence required to support such a system. The practice of quarterly releases with vigorous QA schedules only apply to the most antiquated of industries. Instead, testing needs to be done in an automated manner and be applied to every change.
There are numerous approaches for testing code before it’s merged into the mainline branch. This section covers a few of these approaches, and in particular, how they are applied to Node.js applications. But, before any of these approaches can be used in your application, you’ll first need to setup a testing framework.
There are many testing frameworks available on npm. Some of them are very powerful, injecting global variables into test files and requiring a special executable to run. Others are simpler but may require more manual tweaking to get them to suite your needs. For the examples in this section you’re going to use Tape, a popular yet simple testing framework, to spruce up your distnode-deploy pull request.
First off, you need a directory to contain your test files. The most common pattern is to create a test/ directory and add JavaScript files containing tests to this directory. You’ll also need to install Tape. Run the following commands to do just that:
$ mkdir test
$ npm install --save-dev tape@4
Notice the --save-dev argument with the install command. This ensures that the tape package is installed as a development dependency. This is because the production version of the application shouldn’t have a testing framework deployed with it.
When it comes to creating tests, you’ll create individual JavaScript files and put them within the test/ directory. You’ll only end up with two separate test files in this section, and in theory, you could hard-code the paths to those files and run them. But, with more complex test suites like the ones used in real production applications, maintaining such a list would be difficult and error-prone. Instead, use a glob pattern to run any JavaScript files within the test/ directory. Modify the package.json file so that the test command looks like the following:
"scripts": {
  "test": "tape ./test/**/*.js"
},
This configures the npm test command to run the tape executable provided by the tape package. When npm packages declare that they provide an executable, npm will make them available in the node_modules/.bin/ directory. Later, when you execute an npm run script, npm will automatically check that directory for an executable. This is why the npm test command will be able to run the tape command, even though trying to run tape directly in your shell should result in a command not found error.
The ./test/**/*.js argument is a glob pattern, which means that any file ending in .js within the test/ directory, no matter how deeply nested, will be used as an argument. Tape doesn’t inject any magical globals, and test files can be executed directly, but the tape binary provides some other niceties that your pull request will depend on. For example, if any of the individual test files fail, then the overall test run will fail.
With the groundwork now in place, you’re ready to create your first test.
Unit Tests
Unit testing is a pattern where individual units of code, usually correlating to a function, are tested. These tests are applicable to all forms of code, everything from npm packages to complete applications. Unit tests should test every nook and cranny of a codebase. These tests should cover each branch of logic within a function, passing in various anticipated arguments, and even testing failure conditions.
A logical branch refers to things like if / else statements, switch statements, loop bodies, etc. Basically, anywhere an application can choose to run one set of code or another is considered a branch. When creating tests for real applications, be sure to create unit tests for each scenario.
There are a few approaches for laying out the files within an application’s test/ directory. For larger applications it’s pretty common to have the test/ directory structure mimic the application’s directory structure. For example, if an application had a src/models/account.js file, then it might also have a test/models/account.js file to test it. However, for this example project, you only need a single unit test file. Create a file named unit.js within your test/ directory. Within this file, add the content from Example 6-4.
Example 6-4. distnode-deploy/test/unit.js
#!/usr/bin/env node// npm install -D tape@4consttest=require('tape');constRecipe=require('../recipe.js');test('Recipe#hydrate()',async(t)=>{constr=newRecipe(42);awaitr.hydrate();t.equal(r.name,'Recipe: #42','name equality');t.end();});test('Recipe#serialize()',(t)=>{constr=newRecipe(17);t.deepEqual(r,{id:17,name:null},'serializes properly');t.end();});
Application code is loaded for testing.
Every test has a name and a function.
An assertion that two values are equal.

Tape needs to know when a test has finished.
This unit test file has two test cases in it. The first one is titled Recipe#hydrate(), and the second is titled Recipe#serialize(). These tests are named so that their output in a console tells you what they’re testing. Tape functions aren’t exactly promise-aware, so the first test case with an async function isn’t automatically complete once the promise it represents has resolved. Instead, the t.end() call tells Tape when a test case is complete.
Each test case can contain multiple assertions within it, though in this case each case only contains a single assertion. The function argument for the Tape test cases provides a single argument, named t in these examples, which contains a few assertion methods. The first test case uses t.equal(), which asserts that the two arguments are loosely equal to each other. If they aren’t, the test case will log a failure, and the process will exit with a non-zero exit status.
The second test case uses t.deepEqual(), which asserts that the two arguments are “deeply equal”. The concept of two things being deeply equal is used in many different JavaScript testing tools. Basically, it’s a way to recursively compare two objects for equality, without requiring that the two objects are the exact same object instance.
Tape has other assertion methods. For example, you can use t.ok() to assert an argument is truthy, t.notOk() to assert it’s falsey, t.throws() to wrap a function that should throw, it’s correlating t.doesNotThrow(), and several others. Each of these assertions accepts an optional argument for labeling the assertion.
Now that the file is complete, you’re ready to run your first test. Execute the following command to run the current iteration of the test suite:
$ npm test ; echo "STATUS: $?"
When I run this command I get the following output:
TAP version 13
# Recipe#hydrate()
ok 1 name equality
# Recipe#serialize()
ok 2 serializes properly

1..2
# tests 2
# pass  2

# ok

STATUS: 0
The output isn’t the most attractive—it’s actually designed for machine parsing—but it gets the job done. The Tap npm page provides a list of formatters that can make the output more palatable. This can be done by installing an additional development dependency and piping the output of the tape command through it.
The STATUS line isn’t part of the Tape command but is instead a shell command that’s printing the exit status from the tape command. This value is what will ultimately be used by the Travis CI server to determine if the test suite passed or not. A value of zero means the tests passed, and any other value represents failure.
My favorite unit test idiom goes a little like this: “If it touches the network, it’s not a unit test.” Don’t worry, the unit test you’ve written so far definitely doesn’t touch the network. Tests that involve network, filesystem access, or really any I/O, tend to be slower and flakier2.
Integration Tests
Integration testing covers an application at a layer logically higher than that covered by unit testing. Integration tests check how different parts of an application work together. Consider the unit tests created in the previous section. They test individual methods of the recipe model class. However, the request handler code should probably be tested as well.
There are different ways to write tests for route handlers. You could, for example, create a file that exports the handler functions. This same file could then be imported by a test file, passing in mocked request and reply objects. This would allow you to test the route handling code via unit tests. One way to do this is by using a package like sinon to create Stubs and Spies, which are special functions that keep track of how they’re called and interacted with.
Personally, the approach I like to take is to run the web service, have it listen on a port for requests, and send it real HTTP requests from an external client. This is the safest way to guarantee that an application actually listens for requests and serves them properly.
Integration tests are mostly beneficial for applications, though some npm packages will benefit from them as well. Unit tests usually run pretty quickly, and integration tests often run much slower. This is because more code is loaded and there are more moving parts. For example, unit tests might not ever instantiate the underlying web framework or other third party npm packages, while integration tests will.
For the integration tests you’re about to write, you’ll need to install a package to help make HTTP requests. Run the following command to install the familiar node-fetch package as a development dependency:
$ npm install --save-dev node-fetch@2
Next, create a file in the test/ directory called integration.js. With a more complex application, you might have a directory dedicated to integration tests. Each file within this directory could contain an individual test file for each application feature. This could mean test files like user-account.js and gallery-upload.js. But, for this simple app, you’re just going to make a single test file. Add the content from Example 6-5 to this file.
Example 6-5. distnode-deploy/test/integration.js (first version)
#!/usr/bin/env node// npm install --save-dev tape@4 node-fetch@2const{spawn}=require('child_process');consttest=require('tape');constfetch=require('node-fetch');constserverStart=()=>newPromise((resolve,_reject)=>{constserver=spawn('node',['../server.js'],{env:Object.assign({},process.env,{PORT:0}),cwd:__dirname});server.stdout.once('data',async(data)=>{constmessage=data.toString().trim();consturl=/Server running at (.+)$/.exec(message)[1];resolve({server,url});});});test('GET /recipes/42',async(t)=>{const{server,url}=awaitserverStart();constresult=awaitfetch(`${url}/recipes/42`);constbody=awaitresult.json();t.equal(body.id,42);server.kill();t.end();});
Spawn an instance of server.js.
Extract the URL of the server.
Kill the server.js instance once the test is complete.
The serverStart() method is an async function that spawns a new instance of server.js, tells it to listen on a random high port, waits for the first message to be printed to stdout, then extracts the URL from the message being logged. This allows the test to find the random port that server.js ends up using. Choosing a hard-coded port within the integration.js file could cause a headache in the future if two instances of the test were to ever run at the same time on the same machine.
The test suite then sends an HTTP request to the server after the server has been started. Once the response is received the JSON payload is parsed and the response body is compared to the expected value. And finally, once the test case has passed, the server.js instance is killed and the test is finished.
Now that you have your integration test in place, it’s time to run your newly created tests. Run the following command to execute both your unit test and integration test:
$ npm test ; echo "STATUS: $?"
The tests will now take a lot longer to run. Previously, just your unit test file, the tape package, and the recipe model were loaded. This ends up being a very fast process. This time, an entire web framework is loaded and network requests are made before the tests complete. On my machine this goes from taking tens of milliseconds to just over one second.
Here’s what the output on my machine looks like. Notice the additional entry for the integration test:
TAP version 13
# GET /recipes/42
ok 1 should be equal
# Recipe#hydrate()
ok 2 name equality
# Recipe#serialize()
ok 3 serializes properly
Notice how the integration test is now running first, and the unit tests are run afterwards. This is probably because the files are sorted alphabetically.
And there you have it: a very simple integration test is running where real HTTP requests are being made and a real server is responding.
I’ve worked with many different Node.js application codebases and have seen many patterns form. A few times I’ve seen the pattern where no real HTTP requests are made, and instead, pseudo request objects are provided. For example, consider the following contrived test code:
// Application code: foo-router.js// GET http://host/resource?foo[bar]=1module.exports.fooHandler=async(req,_reply)=>{constfoobar=req.query.foo.bar;returnfoobar+1;}// Test code: test.jsconstrouter=require('foo-router.js');test('#fooHandler()',(t)=>{constfoobar=awaitrouter.fooHandler({foo:{bar:1}});t.strictEqual(foobar,2);t.end();});
Can you think of any issues with the above example code? Well, one issue is that query parameters are usually represented as strings. So, that bar: 1 value in the above example should really be bar: 1. The request object being passed in therefore represents an impossible representation of the request object. In this case, the code assumes the foo.bar value will be a number and the tests pass, but once this handler is invoked by the real web server, it’ll get a string and a logic error.
Here’s another issue that can happen and which did cause an outage for an API at a company I once worked for. An engineer switched query string parsing packages from an outdated and opinionated package to a well-maintained and highly configurable package.
One thing the engineer forgot to do was configure the package to treat square brackets as array identifiers. This is a syntax that allows a query string like a[]=1&a[]=2 to be converted into an array containing the values 1 and 2, resulting in this: {"a": [1, 2]}. Instead, the new package ignored the square brackets and overwrote repeated keys, resulting in this: {"a": 2}. The API would then call an array method on a number and crash. The tests passed in hard-codes objects representing what the request was assumed to resemble, not the real output from the query string library, and when the tests passed the broken application was deployed to production.
There’s always going to be some unanticipated edge case with how an application runs and how it is tested. For that reason I encourage you to create integration tests that interact with your application the same way a client would in production.
Unit tests and integration tests are both powerful ways to test an application’s functionality. But, how do you ensure that engineers are creating enough tests for their features?
Code Coverage Enforcement
Code coverage is a way to measure how much of an application’s code is being executed when a test suite runs. This value can be measured using different criteria, and the tool you’re going to use in this section measures coverage in four areas: statements, branches, functions, and lines. Measuring code coverage is beneficial for all types of codebases, including both npm packages and complete applications.
Code coverage is an attempt to require engineers to test every feature that they add to a codebase. Not only can it be measured, but it can also be used as pull request criteria, failing if a threshold isn’t met.
Warning
Code coverage measurements should not be the only consideration for the quality of a proposed code change. It’s unfortunately easy to write tests that run each line of code but don’t actually test the underlying feature. At the end of the day it takes a second engineer to determine if code is properly tested.
One of the most popular packages for testing code coverage is nyc. Install the package by running the following command:
$ npm install --save-dev nyc@15
This will make a new executable available for use in your npm scripts. It can be activated by preceding the test command you would normally execute with nyc. For your application, modify the package.json file to introduce this new command. Your test script should now look like the following:
"scripts": {
  "test": "nyc tape ./test/*.js"
},
The nyc executable can be configured by providing command line arguments. But, it’s generally cleaner to configure it by writing configuration to a file. One way to do this is to create a file named .nycrc in the root of a project directory. Create a file with this name and add the content from Example 6-6 to it.
Example 6-6. distnode-deploy/.nycrc
{"reporter":["lcov","text-summary"],"all":true,"check-coverage":true,"branches":100,"lines":100,"functions":100,"statements":100}
This configuration file contains several notable entries. The first one, reporter, describes how the reporting of the code coverage check should happen. The first entry, lcov, tells nyc to write an HTML summary to disk. This will allow you to visually see which parts of the application source code are covered and which are not. The second entry, text-summary, means that a summary of coverage is provided via stdout. This allows you to see a summary both when running coverage locally, and later when checking CI logs.
The next entry, all, tells nyc to consider coverage for all JavaScript files, not just the ones that were required when the tests run. Without this set to true, a developer might forget to test newly added files.
The check-coverage entry instructs nyc to fail—by returning a non-zero exit code—when code coverage thresholds aren’t met. The final four entries, branches, lines, functions, and statements, are the code coverage thresholds measured in percent. As a rule of thumb, there are only two numbers available here: 100, and everything else. Setting this value less than 100% is a nice way to introduce testing to an existing code base, but for new projects, you should strive to hit 100%.
Now that you’ve enforced code coverage, run the following command to run the test suite again:
$npmtest;echo"STATUS:$?"
This time you should have some additional information about the test suite printed after the normal test results. On my machine I get the following output:
ERROR: Coverage for lines (94.12%) ...
ERROR: Coverage for functions (83.33%) ...
ERROR: Coverage for branches (75%) ...
ERROR: Coverage for statements (94.12%) ...
=========== Coverage summary ===========
Statements   : 94.12% ( 16/17 )
Branches     : 75% ( 3/4 )
Functions    : 83.33% ( 5/6 )
Lines        : 94.12% ( 16/17 )
========================================
STATUS: 1
This is a nice overview, but it doesn’t state exactly why the code coverage enforcement has failed. You might be able to guess why by digging through the test cases and application code. For example, there’s the GET / route that isn’t being requested, but is there anything else?
Since one of the reporters was set to lcov in the .nycrc file, a report containing information about the code coverage has been written to disk. This is added to a newly created directory called coverage/. This is such a commonly used directory for writing code coverage output that the default .gitignore file created by GitHub already ignores that directory.
Open the file located at coverage/lcov-report/index.html in a web browser to view the coverage report. Figure 6-2 is what the coverage report looks like on my computer.

Figure 6-2. nyc listing for recipe.js and server.js
This file contains an overall summary at the top of the screen, and a listing of each file below it. In this case, the recipe.js file is completely covered, but the server.js file is still missing a few things. Click the server.js link to view coverage details for this specific file. Figure 6-3 is what this screen looks like on my computer.
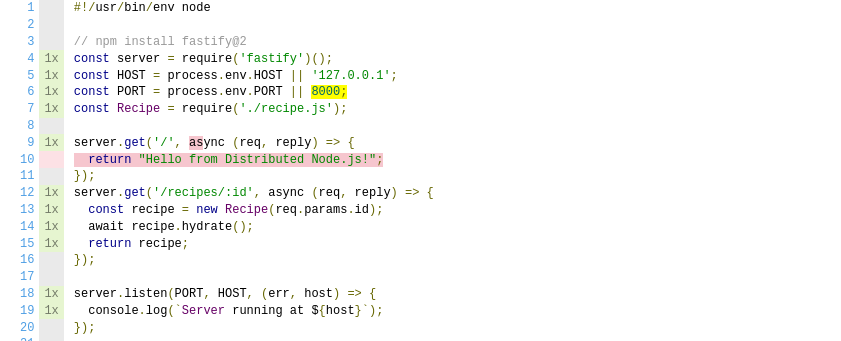
Figure 6-3. nyc code coverage for server.js
The left margin displays a counter for how many times each line in the file has been executed. Everything that has been executed has only been executed a single time. Lines that only contain whitespace, comments, or the shebang don’t have an execution count since they’re never technically executed.
The handler function for the GET / route is highlighted in red. This means that the code has not been covered. Hover your mouse over the return keyword highlighted in red. The tooltip displays the message “statement not covered”. Next, hover your mouse over the highlighted async keyword. The tooltip this time says “function not covered”. This will require a second HTTP request to the server to fix this issue.
This can be fixed by making a second request from the integration test. Open up the integration.js file again and add the content from Example 6-7 to the end of the file.
Example 6-7. distnode-deploy/test/integration.js (second test)
test('GET /',async(t)=>{const{server,url}=awaitserverStart();constresult=awaitfetch(`${url}/`);constbody=awaitresult.text();t.equal(body,'Hello from Distributed Node.js!');server.kill();t.end();});
Now, switch back to the web browser where you were viewing the coverage report. Something else in this file is still wrong. Near the top of the file, the default port fallback value of 8000 is highlighted in yellow. Hover your mouse over the value and the tooltip will say “branch not covered”. This means that the right operand for the or operator has never been executed. This is because the file is always executed with an environment variable pair of PORT=0. The zero is passed in as the string "0", which is a truthy value.
The easiest way to fix this problem is to instruct nyc to ignore the offending line. Add the following line to server.js just above the PORT assignment line:
/* istanbul ignore next */
This comment instructs the code coverage checker to ignore the following line. There used to be two separate npm packages, one called istanbul, and one called nyc. The two projects were eventually merged. The CLI utility kept the name of nyc, while the comments used to configure the utility from within code kept the prefix of istanbul.
Another way to get past this situation would be to reduce the required code coverage value. Since the application is so small, the values would actually have to be changed significantly, dropping the branches threshold from 100% to 75%. For a larger project, this drop would be much smaller, say from 100% to 99%. As tempting as that may be, it is actually a very annoying situation in practice. In the situation with sub-100% coverage, if an engineer removes a bunch of code from the repository, the code coverage percent will actually drop. Then the engineer will need to also reduce the code coverage threshold in .nycrc as well, despite not adding any untested code.
Is it okay to not test the default port assignment line? In this case it depends on how the application is intended to be launched in production. If the default port is only used to make local development easier, and in production a port is always assigned, then go ahead and ignore that line guilt-free.
Now that you’ve added the new integration test and have added the ignore statement, run the test suite again. Run the following command to both run the tests and generate a new report:
$npmtest;echo"STATUS:$?"
This time the coverage summary will show that all four code coverage measurements have hit their 100% code coverage requirements! Now you’re ready to commit the changes and push them to your branch. Run the following commands to do just that:
$git add .$git commit -m"Adding a test suite and code coverage"$git push
Now that you’ve done that, switch back to your GitHub pull request and reload the page. The once-failing checks are now passing and your PR is now ready to be merged! Click the green “Merge pull request” button on the pull request screen to finish the process. You’ve now got a project happily testing pull requests.
Switch back to your terminal and run the following commands to get your local master branch caught up with the remote:
$git checkout master$git pull
There are other types of tests that are commonly used to enforce code quality standards as well. One class that is very popular, used by projects from open source npm packages to closed source enterprise applications, is a code format test. By using packages like eslint or standard, a pull request can fail if the newly added code doesn’t follow the required format.
Now that your repository is configured to test code quality before merging changes, it’s time to configure the project to actually do something with the code once it’s been merged. In the next section you’ll configure your project to automatically deploy merged code to production.
Deploying to Heroku
A chapter about deployments wouldn’t be very exciting if you didn’t actually end up deploying something. Prepare yourself, for now is your chance. In this section you’ll configure Travis CI to execute the commands necessary to deploy your application to a production server.
For this section you’ll make use of another SaaS tool, Heroku. Heroku is a cloud platform that makes it very easy to deploy applications, configure databases, and scale out running application instances. It comes with many third-party integrations to make deployments easy and can be configured to automatically deploy your Node.js application code once a branch is merged in GitHub. This is so easy to configure that this section could have been written in a few paragraphs.
But, that would be too easy. Instead, you’ll get your hands a bit more dirty by configuring Travis CI to execute a deployment script. This script will run commands that will interact with Heroku. This is a universal approach that can be modified to deploy the application to other platforms.
In the previous section, you configured Travis to build and test your pull requests. In this section, Travis will build and test code once it’s merged into the master branch, and once that passes, it’ll deploy that code to production. It might sound redundant to test code both when it’s in a pull request and again once it’s merged to master. However, it’s possible to do things like rebase or squash or other operations where GitHub will otherwise modify the code before it’s merged to master. It’s also possible to push directly to master in your GitHub repository. For those reasons it’s better to test the code again before deploying to ensure only (seemingly) valid code is shipped to production.
What does it mean to deploy? Well, as you saw in “Internal Docker Registry”, there is a Docker Registry service that is used for storing Docker images and their layers, providing an API to interact with. When you deploy a Docker based application, you trigger two basic steps. The first step is to upload a copy of the image to the Docker Registry, and the second step is to run a container based on the image. Figure 6-4 visually explains this process and how you’ll configure it with Travis and Heroku.

Figure 6-4. GitHub, Travis CI, and Heroku
In this case, changes to your application’s code living in the master branch on GitHub triggers a call to Travis. Travis sees the updated code and triggers a build. The build will generate a Docker image that gets uploaded to a Docker Registry. In this case the image is sent to the Docker Registry hosted by Heroku at registry.docker.com. Once that’s done, Travis tells Heroku to deploy the most recent version of your application’s image. Heroku then works its magic, downloading the image to a server somewhere, before finally running the container.
But, before you can build all that, you first need to crate a Heroku account and make your first Heroku application.
Create a Heroku App
Visit the Heroku website and create an account. For the purpose of this section the free account tier is enough to deploy and run your application.
Once you’re logged in to the Heroku site, you should be taken to the dashboard screen. The dashboard will normally list your applications but at this point you should have none. Click the drop down titled “New” in the upper right corner of the screen, then click “Create New App”.
Now that you’re on the Create New App screen you’re free to describe your application. Use the information in Table 6-1 to describe your application.
App name |
|
Region |
US |
Pipeline |
empty |
Heroku gives your application a URL based on the application name you choose. This URL isn’t namespaced by your account so if you were to just call the application something like distnode, you would be competing with other readers of this book. This is why you need to add your own namespace using something like your username. Keep track of the name you choose as you’ll refer to it elsewhere. Your application’s URL will end up looking like this:
https://<USERNAME>-distnode.herokuapp.com/
Once you’ve described your application click the “Create app” button to finish creating your application.
You’ll need another piece of information to interact with Heroku, specifically a string called the “Heroku API Key”. This string is formatted like a UUID and is useful for authenticating with Heroku from within a script.
To get your Heroku API Key, first click your avatar in the top right corner of the Heroku website. In the drop down that appears, click the “Account settings” link. Within the account settings screen, scroll down to the section titled “API Key”. By default, the content in this field is hidden. Click the “Reveal” button to view it. Copy the key for now, you’ll need it soon enough. This key is an important value that you should keep secret. You should never check it into a git repository directly, though you will end up checking in an encrypted version of the key.
Configure Travis CI
Now that you’ve created your Heroku application using the web interface, it’s time to get back into the console. Open up a terminal window and navigate back to your distnode-deploy/ directory.
This time you’re going to work directly in the master branch, pushing changes without creating a pull request. Make sure you’re in the right branch by running the following:
$ git checkout masterThe first thing you’re going to do is to encrypt the Heroku API Key that you obtained in the previous section. By encrypting the value you’ll be able to check it into the repository without the fear of someone stealing it and using it to wreak havoc on your application (or your credit card).
In order to encrypt the value you’ll need to use the official travis executable. This executable is obtained differently depending on the operating system you’re using. The following commands should help you out. For macOS users, there’s a brew one-liner. For Linux, you might need to first install a dev package like I did before being able to install the travis gem package. Try these commands to get the executable installed:
### macOS$brew install travis### Debian / Ubuntu Linux$ruby --version$sudo apt-get install ruby2.3-dev# depending on Ruby version$sudo gem install travis
Documentation on how to install the Travis executable is readily available online if these commands don’t work out. Once you have the tool installed you’re now ready to encrypt the Heroku API Key that you obtained earlier for use as an environment variable within the Travis deployment script. Run the following commands to first log in to your Travis account using your GitHub credentials, and then to generate the encrypted environment variable:
$travis login --pro --auto-token$travis encrypt --proHEROKU_API_KEY=<YOUR_HEROKU_API_KEY>
The --pro arguments tell the Travis executable that you’re using a travis-ci.com account, as opposed to a self-hosted version.
Keep track of the output from the travis encrypt command. You’ll need to add it soon. The output string specifically locks the key and value together. By looking at the encrypted value you can’t even tell that the environment variable name is HEROKU_API_KEY.
Now that you’ve got the encrypted environment variable, you’re ready to make some additional changes to the .travis.yml that you created previously. Open the file and append the content in Example 6-8 to the end of the file.
Example 6-8. distnode-deploy/.travis.yml (amended)
deploy:provider:scriptscript:bashdeploy-heroku.shon:branch:masterenv:global:
The docker image will be built.
The master branch will run deploy-heroku.sh.
The encrypted environment variable will go here.
This configures the deploy section of the file. Travis CI offers several different provider options, which are integrations with third-party services. In this case you’re using the script provider, which allows you to manually run shell commands. All together, this configuration tells Travis to run the deploy-heroku.sh script when changes are made to the master branch.
The other section being configured here is the env section, though technically you haven’t yet added an entry. Take the output from the travis encrypt command and add it to .travis.yml. It should be on a line of its own, starting with four spaces, followed by a hyphen, another space, then the word “secure:” and the long encrypted string surrounded in quotes. The env section in your file should now resemble the following:
env:global:-secure:"LONGSTRINGHERE"
You also need to create a Dockerfile. For this example you can just use a variation of the basic Dockerfile you created in previous sections. One thing that makes it different is that this Dockerfile sets a default HOST environment variable to 0.0.0.0. Add the content from Example 6-9 to get your application ready to run.
Example 6-9. distnode-deploy/Dockerfile
FROM node:13-alpine
WORKDIR /srv
COPY package*.json ./
RUN npm ci --only=production
COPY . .
ENV HOST=0.0.0.0
CMD [ "node", "server.js" ]
Now that your .travis.yml file is configured and your Dockerfile is finished, you’re now ready to work on deploying your application.
Deploy your Application
In the previous section you added a reference to a shell script named deploy-heroku.sh to your .travis.yml file. Now you’re ready to add the content for this file. Create the file and add the content from Example 6-10 to it. Note that you’ll need to change the two --app <USERNAME>-distnode flags to use the name of your Heroku application that you chose previously.
Example 6-10. distnode-deploy/deploy-heroku.sh
#!/bin/bashwget -qO- https://toolbelt.heroku.com/install-ubuntu.sh|sh heroku plugins:install @heroku-cli/plugin-container-registry heroku container:login heroku container:push web --app <USERNAME>-distnode heroku container:release web --app <USERNAME>-distnode
This file uses another CLI utility called heroku. This utility allows you to configure your Heroku applications from the command line. It’s available for install on your local development machine, but in this case, it’s being run in an automated fashion on a Travis CI build server. The command doesn’t already exist on Travis so the first wget command installs it. The second command installs an additional plugin that allows heroku to manage Docker containers.
The heroku container:login subcommand instructs heroku to log in to the Docker Registry hosted by Heroku. This command will look for an environment variable named HEROKU_API_KEY in order to log in (otherwise it will prompt for login credentials). That value is provided by the encrypted environment variable you configured previously.
The heroku container:push command does two things. First, it builds a docker image based on the Dockerfile in the current directory. Next, it pushes that image to the Docker Registry.
Finally, the heroku container:release command is what tells the Heroku service to perform an actual release. This results in the server pulling the image from the Docker Registry, running a new container, switching traffic to your URL from the old container to the new container, then destroying the old container. These few short commands result in a lot of work being run behind the scenes.
Now that you’ve finished making the necessary file changes you’re ready to trigger a deployment. Add the files you’ve changed to git, commit them, and then push. You can do this by running the following commands:
$git add .$git commit -m"Enabling Heroku deployment"$git push
At this point you’ve triggered the build pipeline. This can take a minute or two to deploy. Since it’s not immediate you can attempt to view the process while it’s happening.
First, return to the Travis CI dashboard screen, where you will see a list of your repositories. Then, click the entry for your project’s repository.
The repository screen has a few tabs, with the default tab you’re currently looking at called “Current”. Click the second tab, titled “Branches”, to view a list of branches. This list of branches shows the various branches that Travis has seen and has built. You should see two branches listed, the first being the master branch that’s now being built, and the second being the feature-1 branch, that previously represented the pull request you made. Figure 6-5 is what my branch list looks like for my project. Yours should look a little simpler since I’ve run more than one build for my master branch.
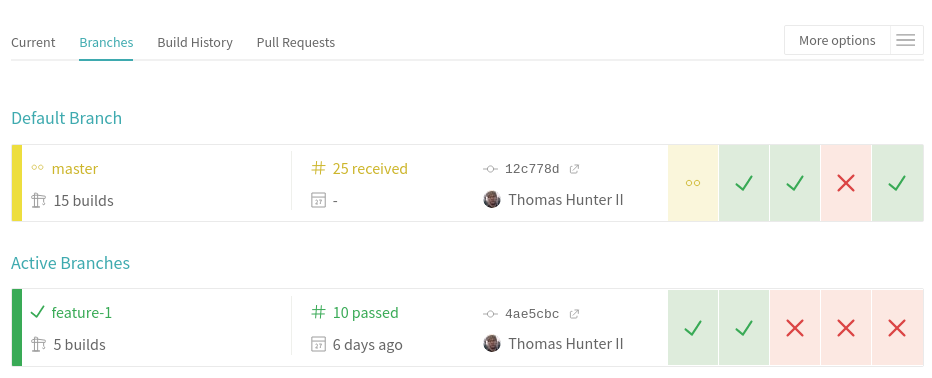
Figure 6-5. Travis branch list
Click on the build number link next to the master branch. In my case the link is titled “# 25 received”, you should see a different number. This will take you to the build details screen.
On this screen you should again see an overview of the build process. The screen will look a little different from when you previously looked at the pull request builds on Travis. For example, this screen lists the new environment variable that you created. In this case it should list HEROKU_API_KEY=[secure], signaling that the value is present and has been encrypted. Figure 6-6 is what I see on my screen.
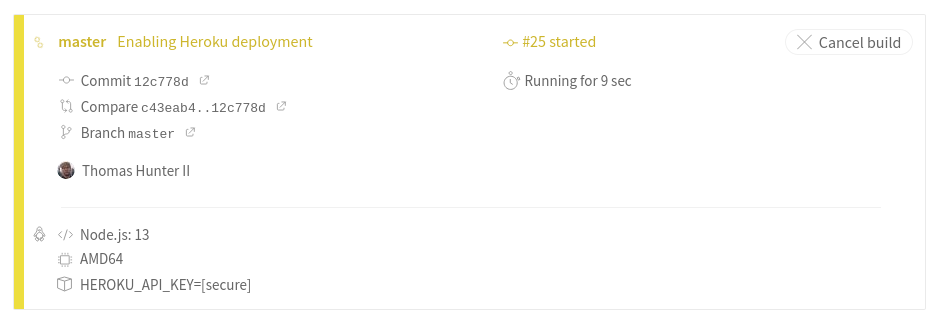
Figure 6-6. Travis branch list
At this point the job log should be displaying updates as the build process writes content to the console. In this output is a new section titled “Deploying application”. If you expand this section you should see the output from the various Docker commands being executed on Travis by the heroku executable. Eventually you should see the following message displayed:
Releasing images web to <USERNAME>-distnode... done
Note that the Travis CI interface expands and collapses sections as the build stage changes, so you might need to go back to expand the section, or even wait until the section is available if you opened the page too early in the build process.
Once that message has been displayed your application is now ready and running in production. Open a new tab in your browser and navigate to the following URL, adapting it to match your Heroku application name:
https://<USERNAME>-distnode.herokuapp.com/
If all goes to plan you should see the message “Hello from Distributed Node.js!” displayed in your browser window.
Modules, Packages, and SemVer
Node.js applications can get complex. While it’s technically possible to run everything in a single massive file, and goodness knows some of my earliest projects were built this way, an application must be broken up into smaller files to avoid driving developers insane. Developers are able to better focus on a smaller part of a complex codebase if code is properly isolated to individual files. Smaller files also help avoid collisions when multiple developers are making changes to a project in version control. This is what modules are for.
Code will sometimes need to be reused between multiple applications. When this happens the code is converted into a package. Such code reuse typically falls into two categories. In the first category, a package is so generic that it is beneficial to other organizations. In the second category, the package may contain trade secrets or is otherwise only beneficial to the organization that wrote it, but may still be beneficial to multiple applications within the organization. Either way, these packages will need to be versioned and published.
But, before diving into the complexities of packaging, it’s time to get a solid understanding of modules as they’re implemented in Node.js.
Node.js Modules
A Node.js module is a JavaScript file that has either been directly executed or otherwise required by a Node.js process. JavaScript files being run in this manner differ from files being run in a web browser. Namely, Node.js modules follow a pattern called CommonJS. With this pattern, functionality is exported by the use of a global named exports, and functionality is imported using a function named require. Neither of these features are a core part of the JavaScript language and are instead introduced by the Node.js runtime.
Another thing that makes Node.js modules different from browser JavaScript is that if you declare a variable first thing in a JavaScript file, such as var foo = bar, that value won’t become a global variable. Instead, it will only be accessible in the current file. The reason Node.js modules work this way is because Node.js automatically wraps each JavaScript file in the following function declaration:
(function(exports,require,module,__filename,__dirname){// File contents go here});
This wrapper makes a few things convenient for application developers. Most importantly it provides exports and require, which are required by the CommonJS standard. Both __filename and __dirname are strings that make it convenient to know where your file is located. Both of them are absolute paths. The require function is also an object with several properties attached to it.
The module object contains several properties as well and is used to describe the current Node.js module. The exports function wrapper argument is a reference to the module.exports property. The __filename variable is a convenient reference to module.filename, while __dirname is a convenience for path.dirname(__filename).
With this information you can check to see if the current module happens to be the application entry point with require.main === module. I’ve seen this used when testing a server.js file; if the module is the entry point, then start the server. If it is not the entry point, export the server instance so that tests can interact with it.
It is possible, though almost universally frowned-upon, to set globals within Node.js. The V8 engine provides two references to the global object: the newer globalThis and the older global. Browsers have two references to their global object object: the newer globalThis and the older window. Of course, Node.js applications don’t really have a concept of a “window”, so global is used. Due to the popularity of sharing JavaScript files between server and browser, globalThis was created to bridge the gap.
The require() function is something that you’ve likely used many times by now. But, sometimes it might not behave quite the way you would expect it to. It turns out there’s quite a bit of complexity involved when Node.js attempts to load a module when you call this function, a process using the module resolution algorithm. There’s a lot to it, but here’s a few examples of what happens when you call require(mod):
-
If mod is the name of a core Node.js module (like
fs), then load it. -
If mod starts with “
/”, “./”, or “../”, load the resolved path to the file or directory.-
If a directory is loaded, look for a package.json file with a
mainfield and load that file. -
If a directory without package.json, try to load index.js.
-
If loading a file, try to load the exact filename, then fallback to adding file extensions .js, .json, and .node (native module).
-
-
Look for a directory in ./node_modules matching the mod string.
-
Look for a node_modules directory in each parent directory until the root directory is encountered.
-
As I mentioned, it’s a bit complex. Table 6-2 shows some examples of require() calls and where the Node.js runtime will look for matching files. This assumes the require() is happening within a file at /srv/server.js.
|
Core url module |
|
/srv/server.js |
|
/srv/node_modules/left-pad/, /node_modules/left-pad/ |
|
/srv/node_modules/foo.js/, /node_modules/foo.js/ |
|
/srv/foo, /srv/foo.js, /srv/foo.json, /srv/foo.node |
One thing that’s tricky about the examples is the require('foo.js') call. It appears to be a reference to a JavaScript file, but it actually ends up looking for a directory named foo.js/ within node_modules directories.
When it comes to requiring files it’s generally better to be explicit and provide the file extension than to omit it. This can actually cause bugs that might be hard to catch. For example, if a directory contains a contacts.js file and a contacts.json file, a require('./contacts') call will correctly load the contact.js file. But, when a refactor happens and the contacts.js file is removed, the contacts.json file will then be loaded. This may then cause a bug at runtime.
When modules are loaded within a running Node.js process, they get added to something called the require cache. The cache is located at require.cache and is available to every module. The cache is an object where the keys are the absolute path to a file and the values are a “Module” object. The module variable is also a Module object. Among other things, these Module objects contain a property called exports, which is a reference to the module’s exported functionality.
This module cache is important. When a call to require() is made and the path the file to be loaded has been resolved, Node.js will first consult with the require cache. If a matching entry is encountered, that entry will be used. Otherwise, if the file is being loaded for the first time, the file will be read from disk and evaluated. This is how Node.js prevents a dependency that was loaded multiple times from being executed multiple times.
Now that you know a bit more about Node.js modules, you’re just about ready to learn about npm packages. But before you do that, take a look at something called SemVer. This is a very important concept when it comes to working with npm packages.
SemVer (Semantic Versioning)
SemVer is short for Semantic Versioning. It’s a philosophy used for deciding the version number to attach to dependencies as they are updated and released. SemVer is used by many different package management platforms and is relied on heavily by npm.
A SemVer version is primarily made up of three separate numbers, such as 1.2.3. The first number is called the major version, the second number is the minor version, and the final third number is the patch version. Additional information about pre-releases can be described by appending a hyphen and an additional string after the version string, but production applications don’t usually use such pre-releases so it won’t be covered here.
Each component of the overall version number has a special meaning. When a package makes a change that breaks backwards compatibility, the major version should be incremented. When a package adds a new feature but backwards compatibility is maintained, then the minor version should be incremented. If a change only results in a bug fix and nothing else, then the patch version should be incremented. Whenever a version is incremented, the lower versions reset at zero. For example, if a major change is introduced to a package at version 1.2.3, it should become 2.0.0 (not 2.2.3). If a release of a package introduces multiple changes, then the effects of the most significant change determines the new version number.
What does it mean to make a backwards-breaking change or add a new feature? Well, every package needs to not only provide functionality but it also needs to document its functionality. This documented functionality is a contract made between the package author and anyone who chooses to use the package. Violations of this contract will result in pull requests, angry GitHub issues, and forks that outlive the original package. It’s the responsibility of every engineer who publishes a package to adhere to SemVer and to uphold their documented feature list.
A special case for SemVer is when the most significant digits of a version number begin with zero. In these cases, the first non-zero digit is essentially considered the major version, the next digit the minor, etc. What this means is that if a breaking change is introduced to a package at version 0.1.2, it becomes version 0.2.0. If a package has the version of 0.0.1, then any breaking changes can result in a version of 0.0.2.
A package author is free to arbitrarily increment any of the version numbers at any point in time. For example, if a package is on version 0.0.7, and a significant milestone is reached, the author may increment it to 0.1.0. Generally, once an author has determined that a package is ready for production, the package will graduate to a version of 1.0.0.
The real power of SemVer is that an application making use of a package should be free to blindly accept all minor or patch updates of a package without any fears that their application might break. In practice, authors of npm packages aren’t always so disciplined, which is why any updates to an application’s dependencies will require that a test suite pass is run. In many cases the application author may need to interact with the application to make sure it continues to work as intended.
Dependencies are specified for a Node.js project using the dependencies section of the package.json file. When running npm install or yarn, this list of dependencies is consulted when determining which packages to copy from the npm registry to the local filesystem. Package versions can be specified directly, or they can make use of a prefix. They can even make use of more complex syntax such as verbose version ranges and asterisks, but that won’t be covered here. The following is an example of some dependency strings:
"dependencies":{"fastify":"^2.11.0","ioredis":"~4.14.1","pg":"7.17.1"}
The first package loaded in this list, fastify, has a version prefix of ^ (caret). What this means is that any future version of the package that is compatible with the specified version will be installed. For example, at install time, if version 2.11.1 is the most recent, that will be used. Or, if version 2.17.0 is the most recent, that will be used instead. If version 3.0.0 is available, it will not be used. The caret prefix is the default prefix given when running an npm install command. For this reason it is vital that every package adheres with SemVer. Otherwise, many applications may break when sloppy updates are made to an npm package.
The next package, ioredis, will only accept package updates that contain bug fixes (patch updates). It may be upgraded to 4.14.2, but never to 4.15.1. This is a more conservative way to install a package. The third package, pg, will only ever install the 7.17.1 version of the package. This is even more conservative.
Now, for a thought experiment. Pretend that you’re the author of a package that exposes a single class. This package is only used by teams within your organization. This version of your package, 1.0.0, only contains three methods, each of which are documented. The package looks like this:
module.exports=classWidget{getName(){returnthis.name;}setName(name){this.name=name;}nameLength(){returnthis.name.length;}}
At some point you discover that some users pass a number into the setName() method, which later causes a bug with the nameLength() method. What version number would you pick if you were to modify the setName() method in the following manner:
setName(name){this.name=String(name);}
At some point you decide to add a method to check if the name has been set. You do this by adding an additional method named hasName(). What version number would you pick if you did this by adding the following method:
hasName(){return!!this.name;}
And finally, you realize that the nameLength() method might be a bit unnecessary. You ask all of the teams within your organization that rely on your package if they are using the method and everybody tells you no. So, you decide to remove the nameLength() method entirely. What version should you then choose for your package?
In the first example, the modification to the setName() method is considered a bug fix. This should result in a patch change, and a new version of 1.0.1. In the second example, the addition of a hasName() method adds new functionality. The code is nearly 100% backwards compatible with the previous version. This means the change is a minor change and should have a version number of 1.1.0. And finally, the third example removes functionality. Sure, you spoke with every team that makes use of your package and determined that nobody is using the functionality. But, this fact only signals that it is okay to make the change, it does not mean that the change still isn’t a big deal. For this reason the change is major and the package version should then be 2.0.0.
These examples illustrate the most basic of situations you’ll have to deal with when making version updates to your packages. In practice, you’ll often have to deal with much harder problems. For example, say that you export a class that is an instance of a Node.js Event Emitter. This class represents a bucket that can have water added to it and emits several events, including ready, empty, and full. In version 1.0.0 of your package, the empty event is emitted immediately before the ready event. But, you do some refactoring and pondering and change the package to emit empty after the ready event. What SemVer version change would you expect this to result in? Is it just a bug fix? Is it a new feature? Is it backwards breaking?
In these situations it’s often better to err on the side of a more significant version change. If you release this change as a patch change, it could cause production bugs and people may find their water buckets overflowing. However, if you release it as a major change, engineers will need to manually upgrade and should then consult your release notes. At this point they can audit their application code to determine if any application code changes must accompany the dependency upgrade.
Packages can also have other packages as dependencies. These are often referred to as sub-dependencies. Sometimes, if a package upgrades a sub-dependency from one major version to another, it will require that the package itself receives an increment to its major version. This can happen if a sub-dependency updates its required Node.js version. For example, if package A @ 1.2.3 depends on B @ 5.0.0, and package B @ 6.0.0 drops support for Node.js v10, then package A would need to increment its version to 2.0.0. Otherwise, if a change to a sub-dependency doesn’t have any public side effects, less severe SemVer version bumps can be made.
It may be tempting to assign SemVer versions to an application, but often times this just doesn’t work out. For example, if you’re working on a web application, and you change the background from red to pink, is this a minor change? Is it a patch change? Things like UX changes don’t easily translate to the SemVer paradigm. Deciding on API endpoint versions is a completely different beast where SemVer is also not applicable.
Now that you’re a little more familiar with the nuances of SemVer, it’s time to look at npm package development.
npm Packages and the npm CLI
An npm package is a collection of Node.js modules and other supporting files that have been combined into a single tarball file. This tarball file can be uploaded to a registry, such as the public npm registry, a private registry, or even distributed as a tarball for manual installation3. In any case the npm CLI can install these packages into the node_modules/ directory of a particular project.
The Node.js runtime doesn’t technically know what an npm package is. In fact, the dependencies section of an application’s package.json file isn’t even consulted by the Node.js runtime. But, Node.js does know how to require packages located within the node_modules/ directory. It’s ultimately up to the npm CLI to perform the task of taking an application’s list of dependencies and converting that into a filesystem hierarchy.
Node.js has a tiny standard library, much smaller than many other languages. There’s no official “kitchen sink” package to provide the basic functionality required by many applications. The Node.js motto is to keep as many features out of the core platform as possible, instead deferring to the community to build such functionality and publish it as npm packages. For example, there is no built-in mechanism for generating UUID values, but there are dozens of implementations available on npm. Node.js only provides the core functionality that these packages depend on, such as crypto.randomBytes().
Because of the decision to keep core Node.js small, most security vulnerabilities for a given Node.js application will require an update to an npm package instead of an upgrade of the Node.js runtime. This usually results in quicker turn-around for security fixes. Another effect is that many JavaScript developers have published many packages. The npm registry is the world’s largest software package repository. A package exists for almost anything a developer needs, which has contributed to the popularity of Node.js.
Controlling Package Content
Now that you’re familiar with some of the theory behind npm packages, it’s time that you create one. Run the following commands to create a new directory for your package and to initialize a package.json file. When prompted, set the version to 0.1.0, but otherwise leave the default values:
$mkdir leftish-padder&&cdleftish-padder$npm init# set version to: 0.1.0$touch index.js README.md foo.js bar.js baz.js$mkdirtest&&touchtest/index.js$npm install --save [email protected]$ddif=/dev/urandombs=1048576count=1of=screenshot.bin$ddif=/dev/urandombs=1048576count=1of=temp.bin
You now have a directory structure similar to many npm packages. screenshot.bin represents a file that should be uploaded to a version control repository, for example to provide a screenshot in a GitHub repository’s README.md file, though it shouldn’t actually be made part of an npm package. temp.bin represents a side-effect file that shouldn’t be checked into version control or packaged at all. The remaining JavaScript files should be checked in and packaged.
Run the ls -la command to view all the files you now have on disk. Table 6-3 is a list of the files present on my machine.
| Size | Filename | Size | Filename | Size | Filename |
|---|---|---|---|---|---|
0 |
bar.js |
0 |
baz.js |
0 |
foo.js |
0 |
index.js |
4.0K |
node_modules |
260 |
package.json |
14K |
package-lock.json |
0 |
README.md |
1.0M |
screenshot.bin |
This doesn’t exactly represent the ideal package contents. The only files that are technically needed are the JavaScript files and the package.json file. It’s customary to ship the README.md document as well so that any engineer digging through their node_modules/ directory to fix a bug will have some insight into what the package is for.
The npm CLI tool does come with some sane defaults for ignoring certain files that should never be included in an npm package. For example, the package-lock.json file is only useful for an application and is entirely meaningless when included in individual packages. The node_modules/ directory also shouldn’t be included in the package. Instead, the npm CLI will examine all nested dependencies and figure out the best filesystem layout.
It’s possible to see what the contents of an npm package tarball will look like without actually having to generate and upload the package to the npm registry. Run the npm publish --dry-run command to simulate the generation of this package. This command displays the file contents of the package as well as the sizes of the files. Table 6-4 is the listing that I get on my machine.
| Size | Filename | Size | Filename | Size | Filename |
|---|---|---|---|---|---|
1.0MB |
screenshot.bin |
1.0MB |
temp.bin |
0 |
bar.js |
0 |
baz.js |
0 |
foo.js |
0 |
index.js |
0 |
test/index.js |
260B |
package.json |
0 |
README.md |
The default behavior of npm is convenient, but it isn’t completely aware of the requirements if this particular package. For example, it has no idea that temp.bin isn’t required for the package to work. For the remaining unwanted files you’ll have to manually create rules to ignore them. The npm CLI honors the entries contained in a .gitignore file, which you need to edit anyway since some files shouldn’t be checked in.
Create a file named .gitignore and add the entries in Example 6-11 to the file to prevent the unwanted files from getting added to version control.
Example 6-11. leftish-padder/.gitignore
node_modules
temp.bin
package-lock.json
The node_modules/ directory should never be checked into version control. This is universal across all Node.js projects—whether package or application. The temp.bin file is specific to this package and shouldn’t be included. The package-lock.json file is a special situation. If you’re building an application, this file shouldn’t be ignored, it’s actually pretty important. But, with an npm package, the contents are ignored at install time, so it’s presence will only end up confusing contributors.
At this point, you’re free to see what the new package contents will look like. Run the npm publish --dry-run command again to see the new package contents. The listing should look the same except that the temp.bin file is now missing.
Finally, create a new file called .npmignore. This file contains entries that should be omitted in the resulting npm package. Entries that are already ignored by npm, such as the node_modules/ directory, customarily aren’t added since they would be redundant. If you only have a .gitignore file, it is honored by npm, but once you create a .npmignore file, npm will no longer consider .gitignore. For this reason you need to repeat entries from .gitignore that npm doesn’t ignore by default. Add the content from Example 6-12 to your new .npmignore file.
Example 6-12. leftish-padder/.npmignore
temp.bin
screenshot.bin
test
Now that you’ve made the final changes, run the npm publish --dry-run command one more time. Table 6-5 contains the list of files I get on my machine.
| Size | Filename | Size | Filename | Size | Filename |
|---|---|---|---|---|---|
0 |
bar.js |
0 |
baz.js |
0 |
foo.js |
0 |
index.js |
260B |
package.json |
0 |
README.md |
And there you go! You’ve now fine-tuned the contents of an npm package.
Tip
If you were to log in to an npmjs.com account using the npm CLI, and you were to run the npm publish command, then you would create a new public package named leftish-padder (assuming another reader didn’t beat you to it). Often times the code you’re working on represents something that you don’t want to get published. For example, if you’re working on a closed source package, or even a Node.js application, then running npm publish could copy proprietary code to a public location. One thing you can do to prevent this is to add top-level entry to package.json containing "private": true. With this in place the publish command should fail.
When you publish a package, the versions that are published are essentially immutable. The npm registry won’t let you change them. There is a grace period of 72 hours during which you can unpublish a package. This is in case you find yourself publishing something that shouldn’t have been published, such as private credentials. That said, there are plenty of services that constantly crawl the npm registry, so any published credentials should be considered compromised no matter how fast you unpublish.
If you ever publish a “broken” package, like a patch release that introduces a breaking change, the recommended way to fix this with SemVer is to immediately release a new version of the package that reverts the breaking change and release it as another patch release. As an example, if version 1.2.3 of a package is working fine, and version 1.2.4 introduces the break, re-publish the code from 1.2.3 (or otherwise fix the breaking change) and publish it as 1.2.5. If you catch the problem early enough you might be able to unpublish 1.2.4.
The reason that npm doesn’t allow just any package version to be unpublished is that doing so can cause breaking changes to other people’s applications. The left-pad package was famously unpublished, leading to broken application builds across the internet. The 72 hour limit theoretically minimizes the damage from an unpublish since the number of package.json files in the wild referring to the unpublished version should be small.
Dependency Hierarchy and Deduplication
A Node.js application will almost always depend on npm packages. Those packages will in turn depend on other packages. This leads to a tree structure of dependencies. Recall that when the require() function determines that the argument resembles a package, it will look inside the node_modules/ directory within the same directory as the file calling require(), and then in each parent directory. This means that a naive implementation of an npm install algorithm could simply place a copy of every package’s sub-dependencies into a node_modules/ directory specific to that package and be done.
As an example of this, consider a fictional situation in which an application’s package.json file depends on two packages, [email protected] and [email protected]. The foo package has no dependencies, but the bar package also depends on [email protected]. In this situation, the naive dependency hierarchy looks like this:
node_modules/
  foo/ (1.0.0)
  bar/ (2.0.0)
    node_modules/
      foo/ (1.0.0)
There are two issues with this approach. The first is that sometimes packages can end up with cyclical dependencies. This would then result in an infinitely deep node_modules/ directory. The second issue is that many dependency trees will end up with duplicate packages, increasing disk space requirements.
To overcome those issues, the npm CLI will attempt to “dedupe” or “hoist” sub-dependencies higher up in the node_modules/ directory. When that happens, a call to require() in a deeply nested package will ascend the filesystem until it finds the package. Following with the previous example, the node_modules/ directory could instead look like this:
node_modules/
  foo/ (1.0.0)
  bar/ (2.0.0)
When the bar package goes looking for the foo package, it will fail to find a node_modules/ directory in it’s own package, but will find it one level higher.
The algorithm employed by the npm CLI to determine the dependency tree layout ends up being rather complex. For example, consider that each package will specify in some way or another the version range of the packages it depends on. npm can then choose a common version to satisfy multiple version ranges. Also consider that only a single version of a package can exist in a node_modules/ directory at a time, since the directory is named after the package. If the [email protected] package actually depended on [email protected], then the foo package could not have been deduped to the root node_modules/ directory. In that case the dependency tree would look more like this:
node_modules/
  foo/ (1.0.0)
  bar/ (2.0.0)
    node_modules/
      foo/ (2.0.0)
Over time, new packages are constantly being published to the npm registry. This means that newer versions of packages will be added that satisfy the version requirements of your application. This means that there is no guarantee that the dependency tree of an application will remain the same between subsequent npm install runs. Even though you can specify exact package versions in an application’s package.json file, sub-dependencies of those dependencies most likely aren’t using exact versions, leading to the seemingly non-deterministic dependency tree.
Sometimes, small bugs or behavioral changes can make their way into an application when the dependency tree changes. The package-lock.json file (and it’s forgotten sibling npm-shrinklock.json) was created to lock-in an entire representation of the dependency tree. As new package versions come and go, the dependency tree will stay the same with each subsequent npm install run. Then, when you’re ready to update or add a new a package, you can do so using the appropriate npm install <package> command. This will result in a change to both package.json and package-lock.json, which can be checked in as a single version control commit.
To view a more complex example of this package “deduplication” process, switch back to the terminal where you made the leftish-padder package. Recall that you previously installed [email protected]. Now, run the command ls node_modules. This will give you a list of all the packages that have been hoisted to the top level node_modules/ directory. Even though you only installed the express package, you should actually see dozens of packages listed. On my machine I see a list of 49 packages, and here are the first dozen of them, though you may see different results:
accepts              array-flatten  body-parser  bytes
content-disposition  content-type   cookie       cookie-signature
debug                depd           destroy      ee-first
This gives the “physical” layout of packages on disk. To view the “logical” layout of the dependency tree, run the command npm ls. This will list the dependency tree. Here is a truncated version of the output that I see on my machine:
[email protected]
└─┬ [email protected]
  ├─┬ [email protected]
  │ └─ ...TRUNCATED...
  ├─┬ [email protected]
  │ ├── [email protected]
  │ ├── [email protected] deduped
  ├ ... TRUNCATED ...
  ├── [email protected]
In this case the only top level dependency is [email protected], which makes sense, since it’s the only package defined in the root package.json file. The express package depends on many packages, including body-parser. And body-parser depends on many packages, including content-type. Notice that this last package has the string “deduped” next to it. This means that the npm CLI has hoisted the package up higher in the dependency tree. The final line shows that the content-type package is a direct child of express.
Be sure to never require() a package that isn’t listed as a direct dependency of your project. If any module within the leftish-padder package were to attempt to use a hoisted package, like require('content-type'), the require would technically work. However, there’s no guarantee that the call will work in the future once the dependency tree shifts again.
Tip
Be careful when creating singleton instances within an npm package. Consider a package that creates a singleton database connection when it is first instantiated. Depending on how this package has been deduped, it may result in multiple database connections being created in one application. Also be wary of the instanceof operator when classes are defined within a package. An instance of [email protected]#MyClass will not pass an instanceof check with an instance of [email protected]#MyClass.
Internal npm Registry
The public npmjs.com registry is the go-to source for npm packages. By default, the npm CLI utility is configured to download packages from, and publish packages to, this registry. That said, many organizations will find that they may need to run an internal npm registry. Just like any popular SaaS tool, there will always be reasons to host an internal version instead of relying on a public version. Here are some of the reasons why an organization may choose to run an internal npm registry:
-
The npmjs.com registry, like any SaaS tool, will occasionally suffer from an outage. This may prevent applications from building and deploying.
-
An organization may want to host private packages but doesn’t want to pay the npmjs.com fees.
-
An organization may want statistics on which packages are being installed by their disparate projects.
-
An organization may want to blacklist packages with known vulnerabilities.
-
An organization may consume too much bandwidth and either get throttled or blacklisted by npm4.
There are many different tools available for hosting an internal npm registry. A registry, much like many of the other tools you’ve used in this book, is a service that runs somewhere, listening on a port, and is probably associated with a hostname. The npm CLI can be configured to interact with this private registry. These registries usually come with a proxy feature. Instead of just hosting an organization’s private packages, some can download and cache packages available on the public registry. This way an application with both public and private packages is able to get every package it needs by only communicating with the internal registry.
Installing Verdaccio
In this section you’ll work with the Verdaccio service. It’s an open source npm registry written in Node.js. It can be run by installing a global package obtained from npm, though you’ll work with it inside of a Docker container.
Run the following command to get a copy of the Verdaccio npm registry running locally:
$docker run -it --rm--name verdaccio-p 4873:4873verdaccio/verdaccio:4.5
Once you’ve executed that command wait for the Docker image layers to be downloaded and for the image to run. Then, once your terminal settles down, open the following URL in your web browser to view the Verdaccio web interface:
http://localhost:4873/
At this point there shouldn’t be any packages listed since you haven’t used it yet.
Configuring npm to use Verdaccio
The menu in the upper right corner of the Verdaccio web interface has a button labeled “LOGIN”. But, in order to use it, you’ll first need to create an account. Switch back to a terminal and run the following commands:
$npmsetregistry http://localhost:4873$npm adduser --registry http://localhost:4873
The first command configures the npm CLI to make use of your local Verdaccio registry when using future commands. The second command creates a new user with the registry. In the second command, the --registry flag isn’t needed, but it shows how individual npm commands can be overridden to use a specific registry URL.
When prompted, enter a username that you normally use, a password, and your email address. Once that’s done, and you’ve authenticated with the npm CLI, switch back to the Verdaccio webpage and proceed to login to the interface.
The web interface still isn’t that interesting. For that to happen you need to first publish a package. That leftish-padder package that you’ve been working on is a decent candidate.
Publishing to Verdaccio
Switch back to a terminal, and navigate to the directory where you created the sample package used in previous sections. Once you’re in that directory, run the following npm publish command to publish your package to your private npm registry:
$cdleftish-padder$npm publish --registry http://localhost:4873
Similar output should appear from when you previously ran the publish command with the --dry-run flag. This time you should see the following message printed after the package summary, conveying a successful publish:
+ [email protected]
Now that you’ve published your first package, switch back to the Verdaccio web interface and refresh the page. You should now see a listing of packages, and in this case you should only see your leftish-padder package installed. From this screen, click the leftish-padder entry in the listing to be taken to the package details screen.
This screen has four tabs on it. The first tab is titled “README”, and contains content from the README.md document (though, in this case it’s empty, so the screen just displays the message “ERROR: No README data found!”). The next tab is titled “DEPENDENCIES”, click it to see a list of dependencies for the most recent version of the package. In this case, you should only see one entry for express@^4.17.1. Click the third tab, titled “VERSIONS”, to be taken to a list of versions for this package. On this screen you should see two entries. The first is named latest, and is a pointer to the most recent version. The second is 0.1.0, which is the only version that you’ve published so far.
Unfortunately, there’s a bug with the current version of the package. The index.js file is empty and the package does nothing! Switch back to the terminal and edit the index.js file for your leftish-padder package. Add the content from Example 6-13 to this file.
Example 6-13. leftish-padder/index.js
module.exports=(s,p,c=' ')=>String(s).padStart(p,c);
Now that you’ve fixed the bugs with the package you’re ready to publish a new version. The first thing you’ll need to do is increment the version of the package. Since you’re dealing with a bug-fix, only the patch version needs to change. Run the following commands to increment the version number and perform a publish:
$npm verson patch$npm publish --registry http://localhost:4873
Now, open the Verdaccio webpage again and refresh the “VERSIONS” tab once more. You should now see a new entry for version 0.1.1 of your package.
So far, Verdaccio has been functioning as a tool where you can upload private packages. Unfortunately, the name leftish-padder might be a bit too generic. As of this writing, no package exists with this name, but one might in the near future. If that were to happen, the npm CLI would get confused. If you perform an installation, what happens if a package name collision happens? Should you get the private or public package?
In order to avoid this issue you could provide a long string at the beginning of a package name, like widget-co-internal-*. But, this would be annoying to type, and theoretically someone else could still choose the same package name. Instead, you should namespace your packages using something called a scope. Scopes are the official npm mechanism for namespacing packages. Scope names can also be registered so that nobody else can come along and use the same scope.
Open up the package.json file for your package and edit the name field. In this case you can use a username to scope your package. My username is tlhunter and so my package name entry looks like this:
"name": "@tlhunter/leftish-padder",
Run the publish command that you’ve been using one more time. Once the publish is complete, switch back to your web browser and visit the homepage for your Verdaccio installation again and refresh the page. You should now see an additional entry for the scoped package.
By using a scope with the same name as your npm organization you can be sure that nobody else will publish a package with a competing name to the public npm repository. Organizations can then publish public packages to the public registry using their organization scope, and publish private packages to their internal registry using the same scope.
Finally, it’s time to confirm that you’re able to install the private package that you published. This can be done by creating a sample project, installing the scoped package, and creating a JavaScript file to require and run the package. Run the following commands to do just that, substituting <SCOPE> for the scope you chose:
$mkdir sample-app&&cdsample-app$npm init -y$npm install @<SCOPE>/leftish-padder$echo"console.log(require('@<SCOPE>/leftish-padder')(10, 4, 0));"> app.js$node app.js
You should see the string “0010” printed in your console.
And there you have it! You’re now the proud new owner of a private npm registry. Before using this in production you’ll need to read the Verdaccio Docker documentation to configure it to persist changes to disk, give it a permanent hostname, and enable security features like TLS.
Once you’re done experimenting with Verdaccio you probably no longer want to use it as the registry for your npm CLI. Run the following command to set things back to normal:
$ npm config delete registryYour npm CLI is now configured to use the public npmjs.com repository again.
1 Python, and most other languages, can be executed by a separate web server on a request/response basis (perhaps with Django), or persistently run itself in memory (à la Twisted).
2 “Flaky” is an engineering term meaning something sometimes breaks.
3 When I worked for Intrinsic we distributed our security product to customers in this manner.
4 This may sound far-fetched but it did happen to an employer of mine.