
Chapter 2. Protocols
There are various methods a process can use to communicate with other services. As an example of this, consider communication by reading and writing to the filesystem, or by using Inter-Process Communication (IPC). However, with these approaches it’s only possible for a process to communicate with other processes on the same machine.
Instead, processes are typically built that communicate directly with the network. This still allows for communication between processes on the same machine, but more importantly, it allows for processes to communicate across a network. Although there is a limited set of resources on any single machine, there are far more resources available when code is distributed across multiple machines.
Note
Jeff Bezos famously mandated in the early 2000s that services within Amazon need to expose APIs via network interfaces. This mandate is then credited as transforming Amazon from a simple bookstore to the cloud behemoth that is AWS. This same pattern is being used in tech companies everywhere, allowing teams to access company data and innovate at an unprecedented rate.
The word protocol refers to a standardized format for communicating between two parties. When there aren’t protocols involved it’s inevitable that messages won’t be interpreted correctly or won’t be understood at all. It’s always better to adhere to an industry standard than to create a protocol from scratch. It’s also good to choose a small number of protocols within a company—perhaps one or two—to reduce the amount of duplicated effort and documentation within the organization.
The Open Systems Interconnection model (OSI model) is a concept for describing the relationships between different layers of network protocols. Officially there are seven layers, though as you’ll see in this chapter, it’s often the case that more layers are needed to describe modern applications. Visualizing this model with Table 2-1 will help you understand some of the concepts in this chapter. This book will discuss L4, L7, and the alleged L8 layers.
| Layer | Name | Example |
|---|---|---|
8 |
User |
JSON, gRPC |
7 |
Application |
HTTP, WebSocket |
6 |
Presentation |
MIME, ASCII, TLS |
5 |
Session |
Sockets |
4 |
Transport |
TCP, UDP |
3 |
Network |
IP, ICMP |
2 |
Data Link |
MAC, LLC |
1 |
Physical |
Ethernet, IEEE 802.11 |
This chapter looks at different types of protocols often used for inter-service communication. The ubiquitous HTTP protocol is the first one looked at, as well as the REST pattern that sits atop it. Various permutations of this protocol will also be examined, such as securing it with TLS and enabling compression. The Remote Procedure Call (RPC) pattern will also be looked at by using an implementation called gRPC. Finally, Distributed Tracing is explored, which is a concept for visualizing and debugging hierarchies of dependent requests and responses.
The forms of communication you’ll look at in this chapter are examples of synchronous communication. With this approach, one service sends a request to another service and waits for the other service to reply. Alternatively, asynchronous communication refers to an approach where the response to a message isn’t waited for, such as pushing a message into a queue.
Request and Response with HTTP
At its core, HTTP (Layer 7) is a text-based protocol that sits atop TCP (Layer 4), the ubiquitous protocol chosen when delivery guarantees are required. The protocol is based on requests, generated by a client to initiate an HTTP conversation, as well as responses, which are returned from a server to the client. It was designed for browsers to consume content from websites. Over the years it has received many enhancements. It has built-in semantics for dealing with compression, caching, errors, and even retries. Although it wasn’t exactly designed for API usage, it’s certainly the most popular go-to protocol for communicating between networked services, and one of the most popular protocols for building other protocols on top of.
That last point will come up a few times in this chapter. HTTP is a protocol for transferring hypermedia, content such as images and HTML documents. This includes content discovered and navigated by a person, not necessarily application code. This “shortcoming” is considered throughout the next few sections.
There are many reasons why HTTP is the default protocol used for public-facing APIs. Most companies already have a website and so the HTTP-speaking infrastructure already exists. Browsers often need to consume these APIs and there is a small handful of protocols that browsers can use. Testing an API endpoint can sometimes be done by visiting a URL with a browser—a tool that every developer already has installed.
HTTP Payloads
HTTP, being a text-based protocol, allows communication using any platform or language that can communicate over TCP. This also allows me to embed the raw content of HTTP messages within the pages of this book. To generate a request you might write code that looks like Example 2-1 (again, feel free to use whatever library you want).
Example 2-1. Example Node.js request code
#!/usr/bin/env node// npm install node-fetch@2constfetch=require('node-fetch');(async()=>{constreq=awaitfetch('http://localhost:3002/data',{method:'POST',headers:{'Content-Type':'application/json','User-Agent':`nodejs/${process.version}`,'Accept':'application/json'},body:JSON.stringify({foo:'bar'})});constpayload=awaitreq.json();console.log(payload);})();
Writing HTTP requests manually can be a bit of a chore. Luckily, most libraries handle serializing and deserializing the tough parts—namely header parsing and the request/status line parsing. Example 2-2 has an example of the correlating HTTP request that was generated by the previous node application.
Example 2-2. Example HTTP request
POST/dataHTTP/1.1Content-Type:application/jsonUser-Agent:nodejs/v13.2.0Accept:application/jsonContent-Length:13Accept-Encoding:gzip,deflateConnection:closeHost:localhost:3002{"foo":"bar"}

The first line is the request line.

Header / value pairs, separated by colons.

Two new lines then the (optional) request body.
This is the raw version of an HTTP request. It’s much simpler than a typical request you’ll see in the browser, lacking items such as cookies and the myriad of default headers inserted by modern browsers.
Responses look fairly similar to requests. Example 2-3 is example of a response that could correlate to the previous request.
Example 2-3. Example HTTP response
HTTP/1.1403ForbiddenServer:nginx/1.16.0Date:Tue, 29 Oct 2019 15:29:31 GMTContent-Type:application/json; charset=utf-8Content-Length:33Connection:keep-aliveCache-Control:no-cacheVary:accept-encoding{"error":"must_be_authenticated"}
The first line is the response line.
Header / value pairs, separated by colons.
Two new lines then the response body (also optional).
HTTP Semantics
HTTP has several important semantics built in. It is these semantics that, given enough time, any hand-rolled protocol ultimately ends up rebuilding. Ultimately, the existence of these semantics, and their universal understanding, is why many other protocols end up being built on top of HTTP.
- HTTP Methods
-
This value is the first word in the request line. In Example 2-2 the method is POST. There are many HTTP methods but the other popular ones are GET, PATCH, and DELETE. These methods map to the basic CRUD operations (Create, Read, Update, Delete) which are generic concepts that can be applied to almost all stateful data stores. By having applications adhere to the intentions of the HTTP methods, it’s possible for an outside observer to infer what the intent of a particular request is.
- Idempotency
-
This is a fancy word meaning that an operation can be executed multiple times without risk of side effects. The HTTP methods GET, PATCH, DELETE are each considered idempotent operations. If the result of an operation using one of those methods is unknown, for example a network failure prevents the response from being received, then it is considered safe for a client to retry the same request again.
- Status codes
-
Another important concept is that of status codes, and in particular status code ranges. A status code is the three digit number present in the response line. In Example 2-3, the status code is 403. An overview of these status code ranges is available in Table 2-2.
| Range | Type | Examples |
|---|---|---|
100 - 199 |
Information |
101 Switching Protocols |
200 - 299 |
Success |
200 OK, 201 Created |
300 - 399 |
Redirect |
301 Moved Permanently |
400 - 499 |
Client Error |
401 Unauthorized, 404 Not Found |
500 - 599 |
Server Error |
500 Internal Server Error, 502 Bad Gateway |
Note
The text that follows a status code is called the Reason Phrase. Any popular Node.js HTTP framework will infer which text to use based on the numeric status code your application specifies. The value is unused by modern software, and HTTP/2, the successor to HTTP, doesn’t provide such a value.
- Client verse server errors
-
The status code provides some very useful information. For example, the status range 400 - 499 dictates that the client made a mistake, while the status range 500 - 599 blames the server. This informs the client that if an operation is attempted, and the server decides the client made a mistake, that the client shouldn’t attempt to send the request again. This can happen if the client were to violate the protocol in some manner. However, when a server error happens, the client should feel free to try again. This could be due to a temporary error with the server, such as it being overwhelmed with requests or losing a database connection.
[Link to Come] will have you implement custom logic for retrying HTTP requests based on these status codes.
- Response caching
-
HTTP also hints at how responses can be cached. Typically, the only response that will get cached, especially by intermediary services, are those associated with a GET request. If there’s an error code associated with a response then it shouldn’t be cached as well. HTTP goes even further and conveys how long a response should be cached. The Expires header tells the client a particular date and time by which to discard the cached value. This system isn’t entirely perfect, though. Additional semantics could be applied to caching. For example, if user 123 requests a document with information specific to their bank account, it can be difficult to know that the result value—which can be cached—shouldn’t also be supplied to user 456.
- Statelessness
-
HTTP is inherently a stateless protocol. This means that by sending one message, the meaning of a future message won’t change. It’s not like, say, a terminal session where you might list the files in the current directory with
ls, change directory withcd, and then issue the same exactlscommand but get different output. Instead, every request contains all the information it needs to set the desired state.
There are conventions for simulating state over HTTP. For example, by making use of a header (like the Cookie header) that contains a unique session identifier, state about the connection can be maintained in a backend database. Other than basic authentication information, it’s usually not appropriate to require clients provide such stateful session markers when using an API.
HTTP Compression
In order to reduce the amount of data sent over the network, it is possible to compress the HTTP response body. This is another built-in feature of HTTP. When a client supports compression, it can choose to supply the Accept-Encoding header. The server, upon seeing that header, can then choose to compress the response body using whichever compression algorithm was supplied in the request. The gzip compression algorithm is the ubiquitous form of HTTP compression, though other algorithms such as brotli may offer higher compression values.
Compression is a trade-off in network payload size and CPU usage. Typically, it’s usually in your best interest to support HTTP compression at some point between the Node.js server and whatever client is consuming the data, especially if this is traffic being consumed by a third party over the internet. However, Node.js is not the most efficient tool for performing compression. This is a CPU-heavy operation and should be handled outside of the Node.js process whenever possible. “Reverse proxies with HAProxy” looks at using a tool called a Reverse Proxy to automatically handle HTTP compression. “SLA and Load Testing” looks at some benchmarks to prove this claim.
At any rate, Example 2-4 provides an example of how to create such a server that performs gzip compression in-process. This example uses the built-in Node.js modules and doesn’t require an npm install. Any popular HTTP framework will have its own idiomatic approach for implementing compression, usually just a require and a function call away, but under the hood they’re all essentially doing the same thing.
Example 2-4. server-gzip.js
#!/usr/bin/env node// Adapted from https://nodejs.org/api/zlib.html// Warning: Not as efficient as using a Reverse Proxyconstzlib=require('zlib');consthttp=require('http');constfs=require('fs');http.createServer((request,response)=>{constraw=fs.createReadStream(__dirname+'/index.html');constacceptEncoding=request.headers['accept-encoding']||'';response.setHeader('Content-Type','text/plain');console.log(acceptEncoding);if(acceptEncoding.includes('gzip')){console.log('encoding with gzip');response.setHeader('Content-Encoding','gzip');raw.pipe(zlib.createGzip()).pipe(response);}else{console.log('no encoding');raw.pipe(response);}}).listen(process.env.PORT||1337);
Now, you’ll test this server. First create an index.html file to serve and then start the server:
$echo"<html><title>Hello World</title></html>">> index.html$node server-gzip.js
Next, run the following commands to view the output from the server:
# Request uncompressed content$curl http://localhost:1337/# Request compressed content and view binary representation$curl -H'Accept-Encoding: gzip'http://localhost:1337/|xxd# Request compressed content and decompress$curl -H'Accept-Encoding: gzip'http://localhost:1337/|gunzip
By running these curl commands, you’re simulating a client communicating with the service over the network. The service outputs whether or not it’s using compression to help explain what’s happening. In this particular example, the compressed version of the file is actually larger than the uncompressed version! You can see this happening by running the two commands in Example 2-5.
Example 2-5. Comparing compressed verse uncompressed requests
$curl http://localhost:1337/|wc -c$curl -H'Accept-Encoding: gzip'http://localhost:1337/|wc -c
In this case the uncompressed version of the document is 40 bytes, and the compressed version is 53 bytes.
With larger documents this won’t be an issue. To prove this, run the previous echo command three more times to increase the index.html file size. Then, run the same commands in Example 2-5 again. This time the uncompressed version is 160 bytes and the compressed version is 56 bytes. This is because gzip operates by removing redundancies in the response bodies, and the example contains the same text repeated four times. This redundancy removal is particularly useful if a response body contains redundant text, like a JSON document with repeating attribute names. Most gzip compressing tools can be configured to be bypassed if a document is smaller than a certain size.
HTTP compression only affects the body of the request. It does not affect the HTTP headers. In the world of service-to-service APIs with a finite set of intentional HTTP headers this isn’t that big of a deal. However, when it comes to web browsers, it isn’t uncommon to end up with HTTP requests containing several kilobytes of headers (just think of all those tracking cookies). It is because of reasons like this that HTTP/2 was invented, which uses a mechanism called HPACK for compressing headers.
HTTPS / TLS
Another form of encoding is encryption. Transport Layer Security (TLS) is the protocol used for encrypting HTTP traffic. It’s what puts the S (secure) in HTTPS. Unlike gzip compression, TLS does encapsulate the HTTP headers as well. Much like gzip, TLS is a CPU intensive operation and should also be performed by an external process such as a Reverse Proxy.
TLS works by using certificates. There are two types of certificates: one containing a public key, which can safely be given to anyone in the world, and the other a private key, which should remain a secret to others. These two keys are inherently paired. Anyone can take a message and encrypt it using the public key, but only someone with the private key can then decrypt the message. With HTTP, this means a server will provide its public key, and a client will encrypt requests using the public key. When the client first communicates with the server it also generates a large random number, essentially a password for the session, which is encrypted with the public key and sent to the server. This temporary password is used to encrypt the TLS session.
Generating certificates and enabling them with a server can take some effort to implement. Traditionally, it was even an expensive feature that had to be paid for. Nowadays there is a service called Let’s Encrypt that not only automates the process but also makes it free. A caveat of this service is that the tool requires a server to be publicly exposed to the internet to verify DNS ownership of the host/domain being protected. This makes it difficult to encrypt internal services, even though it is the clear winner for public services.
Now it’s time to do some hands-on work with TLS. The easiest way to get an HTTPS server running locally is to generate a self-signed certificate, have your server read that certificate, and have a client make a request to the server without performing certificate validation. To generate your own certificate run the command in Example 2-6. Feel free to use any values you like, but use localhost when prompted for a common name.
Example 2-6. Generating a self-signed certificate
$mkdir -p ./{recipe-api,shared}/tls$openssl req -nodes -new -x509-keyout recipe-api/tls/basic-private-key.key-out shared/tls/basic-certificate.cert
This command creates two files, namely basic-private-key.key (the private key) and basic-certificate.cert (the public key).
Next, copy the recipe-api/producer-http-basic.js service that you made in Example 1-5 to a new file name recipe-api/producer-https-basic.js to resemble Example 2-7. This is an HTTPS server built entirely with Node.js.
Example 2-7. recipe-api/producer-https-basic.js
#!/usr/bin/env node// npm install fastify@2// Warning: Not as efficient as using a Reverse Proxyconstfs=require('fs');constserver=require('fastify')({https:{key:fs.readFileSync(__dirname+'/tls/basic-private-key.key'),cert:fs.readFileSync(__dirname+'/../shared/tls/basic-certificate.cert'),}});constHOST=process.env.HOST||'127.0.0.1';constPORT=process.env.PORT||4000;server.get('/recipes/:id',async(req,reply)=>{constid=Number(req.params.id);if(id!==42){reply.statusCode=404;return{error:'not_found'};}return{producer_pid:process.pid,recipe:{id,name:"Chicken Tikka Masala",steps:"Throw it in a pot...",ingredients:[{id:1,name:"Chicken",quantity:"1 lb",},{id:2,name:"Sauce",quantity:"2 cups",}]}};});server.listen(PORT,HOST,()=>{console.log(`Producer running at https://${HOST}:${PORT}`);});
The web server is now configured to enable HTTPS and read the certificate files.
Once you’ve created the server file, run the server and then make a request to it. You can do this by running the following commands:
$node recipe-api/producer-https-basic.js$curl --insecure https://localhost:4000/recipes/42
That --insecure flag probably caught your attention. In fact, if you were to open the URL directly in a web browser, you would get a warning that there is a problem with the certificate. This is what happens when a certificate is self signed.
In fact, if you were to make a request to this service using a Node.js application, the request would also fail. The inner Node.js http and https modules accept an options object, and most higher-level HTTP libraries in npm accept these options in some manner. One such way to avoid these errors is to provide the rejectUnauthorized: false flag. Unfortunately, this isn’t all that more secure than using plain HTTP and should be avoided.
The reason all this matters is that it’s not necessarily safe to trust just any old certificate encountered on the internet. Instead, it’s important to know that a certificate is valid. This is usually done by having one certificate “sign” another certificate. This is a way of saying that one certificate is vouching for the other. As an example of this, the certificate for thomashunter.name has been signed for by another certificate called Let’s Encrypt Authority X3. That certificate has been signed by another one called IdenTrust DST Root CA X3. The three certificates form a chain of trust (see Figure 2-1 for a visualization of this). The highest point in the chain is called the root certificate. This certificate is trusted by much of the world, in fact, its public key is included in modern browsers and operating systems.
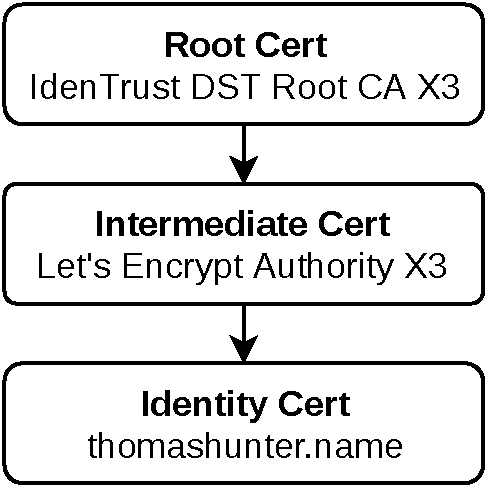
Figure 2-1. The certificate chain of trust
A better approach to working with self-signed certificates is to actually give the client a copy of the trusted self signed certificate, in this case the basic-certificate.cert file generated previously. This certificate can then be passed along by using the ca: certContent options flag. An example of this can be seen in Example 2-8.
Example 2-8. web-api/consumer-https-basic.js
#!/usr/bin/env node// npm install fastify@2 node-fetch@2// Warning: Not as efficient as using a Reverse Proxyconstserver=require('fastify')();constfetch=require('node-fetch');consthttps=require('https');constfs=require('fs');constHOST='127.0.0.1';constPORT=process.env.PORT||3000;constTARGET=process.env.TARGET||'localhost:4000';constoptions={agent:newhttps.Agent({ca:fs.readFileSync(__dirname+'/../shared/tls/basic-certificate.cert'),})};server.get('/',async()=>{constreq=awaitfetch(`https://${TARGET}/recipes/42`,options);constpayload=awaitreq.json();return{consumer_pid:process.pid,producer_data:payload};});server.listen(PORT,HOST,()=>{console.log(`Consumer running at http://${HOST}:${PORT}/`);});
The client is now trusting the exact public key used by the server.
Copy the basic-certificate.cert public key file to the shared/ directory so that it’s available in both the recipe-api/ and web-api/ projects, then run both of the servers again. Then make an HTTP request to the web-api service by running the following command:
$ curl http://localhost:3000/The web-api will then talk to the recipe_api using TLS.
Recall from Example 2-7 that each HTTPS server needs access to both the public and private key in order to receive requests. Also recall that a private key should never fall into the hands of an adversary. So, having a single pair of public and private keys for all services within a company is dangerous. If just one of the projects leaks its private key then all projects are affected!
One approach is to generate a new key for every single running service. Unfortunately, a copy of every server’s public key would need to be distributed to every client that might want to communicate with it, like in Example 2-8. This would be quite a maintenance nightmare! Instead, the approach used by non self-signed certificates can be emulated: Generate a single internal “Root“ certificate, keep the private key for that secure, but use it to sign each services set of keys.
Run the commands in Example 2-9 to do exactly this. These commands represent a condensed version of what you might do within an organization. The steps prefixed with CSR would be run on a very private machine, one that is just used for certificate generation purposes. The steps prefixed with APP would be performed on behalf of the new application.
Example 2-9. How to be your own Certificate Authority
# Happens once for the CA$opensslgenrsa-des3-outca-private-key.key2048$opensslreq-x509-new-nodes-keyca-private-key.key-sha256-days365-outshared/tls/ca-certificate.cert# Happens for each new certificate$opensslgenrsa-outrecipe-api/tls/producer-private-key.key2048$opensslreq-new-keyrecipe-api/tls/producer-private-key.key-outrecipe-api/tls/producer.csr$opensslx509-req-inrecipe-api/tls/producer.csr-CAshared/tls/ca-certificate.cert-CAkeyca-private-key.key-CAcreateserial-outshared/tls/producer-certificate.cert-days365-sha256
CSR: Generate a private key ca-private-key.key for the Certificate Authority. You’ll be prompted for a password.
CSR: Generate a root cert shared/tls/ca-certificate.cert (this will be provided to clients). You’ll get asked a lot of questions but they don’t matter for this example.
APP: Generate a private key producer-private-key.key for a particular service.

APP: Create a CSR producer.csr for that same service. Be sure to answer “localhost” for the Common Name question, but other questions don’t matter as much.

CSR: Generate a service certificate producer-certificate.cert signed by the CA.
Now, modify the code listing in Example 2-8 to load the ca-certificate.cert file. Also modify Example 2-7 to load the producer-private-key.key and producer-certificate.cert files. Restart both servers and run the following command again:
$ curl http://localhost:3000/You should get a successful response, even though web-api wasn’t aware of the recipe-api service’s exact certificate; it gains its trust from the root ca-certificate.cert certificate instead.
JSON over HTTP
Up to this point the body of HTTP requests and responses hasn’t really been examined. This is because the HTTP standard doesn’t dictate quite as much what goes in the body of an HTTP message. As I mentioned earlier, HTTP is a protocol that many other protocols end up being built on top of. This is where the mystical Layer 8 of the OSI Model diagram comes into play.
The most popular APIs written today are JSON over HTTP, a pattern often—usually mistakenly—referred to as REST (Representational State Transfer). The small JSON payloads you’ve been sending back and forth in the example applications are an example of JSON over HTTP.
There’s a lot left to be desired by simply communicating via JSON over HTTP. For example, how are errors represented? Certainly the HTTP error status codes should be leveraged, and general semantics should be followed, but what payload should actually be used for the body? What is the correct way to represent a particular internal object in JSON? What about meta information which doesn’t map cleanly to HTTP headers, such as pagination data? The problem with JSON over HTTP, as well as many APIs touting the REST label, is that the entirety of the contract between producer and consumer exists in documentation. A human must read the docs and manually write code to interact with these payloads.
Another issue is that every JSON over HTTP service is going to implement things differently. Short of having a Content-Type: application/json header, what goes on between that first and last curly brace could be anything. This usually requires that each new service consumed by a particular client will need new code written.
For a more concrete example, consider pagination. The loose concept of “JSON over HTTP” doesn’t have a built-in way to handle this. The Stripe API uses the query parameters ?limit=10&starting_after=20. Meta information is provided in the response body, such as the has_more boolean property that lets the client know that there is more data to paginate. The GitHub API, on the other hand, uses the query parameters ?per_page=10&page=3. Meta information about pagination is provided in the proprietary Link response header.
It’s these reasons that many different standards for representing request and response bodies in HTTP have been invented. The next two sections look at two popular Layer 8 protocols for this, namely “API Facade with GraphQL” and “RPC with gRPC”.
The Dangers of Serializing POJOs
JavaScript makes it dangerously easy to serialize an in-memory representation of a domain object. By simply calling JSON.stringify(obj)—which is what most http frameworks automatically do for you—any refactoring of your projects internal properties can leak out and result in API breaking changes.
A much better approach is to add a safety net to objects for manually controlling how they’ll be represented in JSON—a pattern called Marshalling. This can be achieved by representing serializable data as a class with a toJSON() method, instead of storing data as a POJO (Plain Ol’ JavaScript Object).
As an example of this, here are two ways to represent a User object within your codebase. The first one is a POJO and the second is a class that’s had a toJSON() method added:
constuser1={username:'pojo',:'[email protected]'};classUser{constructor(username,){this.username=username;this.=;}toJSON(){return{username:this.username,:this.,};}}constuser2=newUser('class','[email protected]');// ...res.send(user1);// POJOres.send(user2);// Class Instance
In both of these situations, when the response is sent, a consumer of the service will receive an JSON string representing an object with the same properties:
{"username":"pojo","email":"[email protected]"}{"username":"class","email":"[email protected]"}
However, perhaps at some point the application is modified to start tracking the user’s password as well. It might be done by adding a new password attribute to instances of the user object, perhaps by modifying the code where a user instance is created, setting the password at creation time. Or, perhaps some dark corner of the codebase is setting the password by calling user.password = value. Such a change can happen like this:
user1.password=user2.password='hunter2';// ...res.send(user1);res.send(user2);
When this happens the POJO is now leaking private information to consumers. Thankfully, the class with explicit marshaling logic is not leaking such details:
{"username":"pojo","email":"[email protected]","password":"hunter2"}{"username":"class","email":"[email protected]"}
Even if there are tests that check the HTTP response messages for the presence of values like username and email, they probably won’t fail when a new attribute like password has been added.
API Facade with GraphQL
GraphQL is a language built for querying APIs, designed by Facebook. It’s very useful for building facade services—one service that sits in front of multiple other services and data sources. It attempts to solve several issues present with traditional ad hoc implementations of JSON over HTTP APIs. GraphQL is particularly good at returning the minimal amount of data that the client wants. It’s also good at hydrating a response payload with data from multiple sources so that a client can get everything it needs by making a single request.
GraphQL doesn’t require that a particular protocol be used. Most implementations (and the implementation used in this section) do use GraphQL over HTTP, but it’s just as happy being consumed over another protocol such as TCP. An entire GraphQL query is described using a single string—much like with a SQL query—so when implementations are built on top of HTTP, usually they’ll make use of a single endpoint and clients will usually send requests via the POST method with the request body representing the query.
GraphQL responses are usually provided using JSON, but again, a different response type could be used as long as it’s able to represent hierarchies of data. These examples will use JSON as well.
Note
As of today, it’s more common to expose “JSON over HTTP” APIs to the public. GraphQL APIs are are more likely to be consumed by clients maintained by the same organization—such as internal usage. This is beginning to change, however, and more companies are beginning to expose public GraphQL APIs.
GraphQL Schema
A GraphQL schema is a string that describes all the interactions a particular GraphQL server is able to make. It also describes all the objects a server can represent, as well as the types of those objects (such as String and Int). There are essentially two classifications of these types; a type is either a primitive or it is a named object. Every named object will need an entry in the schema; no objects can be used that aren’t named and described. Create a new file name schema.gql and enter the contents of Example 2-10 into this file.
Example 2-10. shared/graphql-schema.gql
type Query {
  recipe(id: ID): Recipe
  pid: Int
}
type Recipe {
  id: ID!
  name: String!
  steps: String
  ingredients: [Ingredient]!
}
type Ingredient {
  id: ID!
  name: String!
  quantity: String
}
Top level query representation.
The
Recipetype.A
RecipehasIngredientchildren, in an array calledingredients.
The first entry, Query, represents the root of the query sent in by the consumer. In this case the consumer can essentially ask for two different sets of information. The pid entry returns an integer and is the value that’s been used in previous examples. The other entry, recipe, returns a Recipe type, which was defined in the schema document. This call accepts an argument when it is being queried. In this case the schema is stating that by calling the recipe method with an argument named id, an object following the Recipe schema will be returned. Table 2-3 contains a list of scalar types used by GraphQL.
| Name | Examples | JSON Equivalent |
|---|---|---|
|
10, 0, -1 |
Number |
|
1, -1.0 |
Number |
|
“Hello, friend! ” |
String |
|
true, false |
Boolean |
|
“42”, “975dbe93” |
String |
The Recipe object is then described in further detail in the next block. This block contains an id property which is an ID. By default the fields are nullable—if the client asks for the value and the server doesn’t provide the value then it will be coerced to null. The ! character states that the server must provide the field. Recipe also has name and steps properties that are strings (String). And finally, it has a property named ingredients, which contains an array of Ingredient entries. The next block describes the Ingredient object and contains its own properties. This schema resembles the response used so far in the example applications.
Queries and Responses
Next, you’ll look at what a query for interacting with this data might look like, as well as the response payloads. Queries in GraphQL have a very useful property in that the consumer gets to specify exactly what properties it is looking for. Another convenient feature is that there is never any surprise in the format of the response data; the nested query hierarchy ends up being in the same shape as the resulting data.
First consider a very basic example where only the pid value should be retrieved from the server. The query to do so looks like this:
{
  pid
}
An example response payload that matches the previous query would then resemble the following:
{"data":{"pid":9372}}
The outermost “envelope” object, the one that contains data, is there to help disambiguate meta information about the response from the response itself. Remember that GraphQL isn’t tied to HTTP, which provides concepts such as errors, so the response payloads much be able to differentiate a successful response from an error (if this query had an error there would be no data property in the root, but there would be an errors array).
Also notice that the recipe data isn’t displayed at all, even though it was defined in the root Query type in the GraphQL schema. Again, this is because queries specify exactly the fields that should be returned.
Up next is a more complicated query. This query will get a specific recipe based on its ID. It will also get information about the ingredients that belong to that recipe. The query would then look like this:
{
  recipe(id: 42) {
    name
    ingredients {
      name
      quantity
    }
  }
}
This query states that it wants an instance of the recipe having an id value of 42. It also wants the name of that recipe, but not the id or the steps properties. It also wants access to the ingredients, specifically their name and quantity values.
The response payload for this query would then look something like this:
{"data":{"recipe":{"name":"Chicken Tikka Masala","ingredients":[{"name":"Chicken","quantity":"1 lb"},{"name":"Sauce","quantity":"2 cups"}]}}}
Again notice how the nested request query follows the same shape as the nested JSON response. Assuming the developer who is writing the query is aware of the schema, then that developer can safely write any query and know if it will be valid or not, know the shape of the response, and even know the types of every property in the response.
In fact, the graphql npm module provides a web REPL specifically for writing and testing queries. The name of this interface is GraphiQL, a play on “GraphQL” and “Graphical”.
The graphql module is the official module for building GraphQL services in Node.js. It’s also the official reference implementation for GraphQL as a whole, as it’s not tied to a specific language or platform. The following code samples make use of the fastify-gql module. This module lets GraphQL work with Fastify in a convenient manner, but it is essentially a wrapper around the official graphql module.
GraphQL Producer
Now that you’ve seen some sample queries and their responses, you’re ready to write some code. First, create a new recipe-api service file based on the content in Example 2-11.
Example 2-11. recipe-api/producer-graphql.js
#!/usr/bin/env node// npm install fastify@2 fastify-gql@2constserver=require('fastify')();constgraphql=require('fastify-gql');constfs=require('fs');constschema=fs.readFileSync(__dirname+'/../shared/graphql-schema.gql').toString();constHOST=process.env.HOST||'127.0.0.1';constPORT=process.env.PORT||4000;constresolvers={Query:{pid:()=>process.pid,recipe:async(_obj,{id})=>{if(id!=42)thrownewError(`recipe${id}not found`);return{id,name:"Chicken Tikka Masala",steps:"Throw it in a pot...",}}},Recipe:{ingredients:async(obj)=>{return(obj.id!=42)?[]:[{id:1,name:"Chicken",quantity:"1 lb",},{id:2,name:"Sauce",quantity:"2 cups",}]}}};server.register(graphql,{schema,resolvers,graphiql:true}).listen(PORT,HOST,()=>{console.log(`Producer running at http://${HOST}:${PORT}/graphql`);});
The schema file is provided to the graphql module.
The
resolversobject tells graphql how to build responses.The
Queryentry represents the top level query.The
Reciperesolver is run when aRecipeis retrieved.Fastify uses
server.register()with the fastify-gql module, other frameworks will use their own conventions.
The GraphQL code gets registered with the Fastify server on the server.register line. This ends up creating a route that listens as /graphql for incoming requests. It is this endpoint that the consumer will later POST queries to. The following object that configures GraphQL provides it with the content of the shared/graphql-schemal.gql file, a reference to the resolvers object (which will be covered shortly), and a final bit of configuration called graphiql. This property, if true, enables the GraphiQL console mentioned earlier. With the service running, that console can be visited at http://localhost:4000/graphiql. Ideally, you’d never set that value to true for a service running in production—[Link to Come] covers that in more detail.
Now it’s time to consider the resolvers object. This object has properties at the root that correlate to the different types described in the GraphQL schema. The Query property describes the top level queries, whereas the Recipe describes the Recipe objects. Each property of those two objects are asynchronous methods (methods that are awaited somewhere else in the code). That means these methods can return a promise, they can be an async function, or they can simply return a simple value. There’s no databases involved in this example so each method simply runs synchronously and returns a simple value.
When these methods are called, GraphQL provides arguments about the context in which they’re being called. Consider the resolvers.Query.recipe method, for example. The first argument in this case is an empty object since it’s called at the root of the query. However, the second argument is an object representing the arguments being made to this function. In the schema file a recipe() is defined as accepting an argument named id which accepts an ID, and as returning a Recipe type. So, within this method, the id is provided as an argument. It’s also expected to return an object adhering to the Recipe shape.
In the schema, you’ve defined the Recipe as having id, name, steps, and ingredients properties. So, in the object you’re returning, each of the scalar values have been specified. However, the ingredients property hasn’t been defined. That will be picked up by resolvers.Recipe automatically when the GraphQL code runs.
GraphQL enforces that the JSON response from the request matches the incoming query shape. If the response object in the recipe() method were modified to have an additional property called serves, GraphQL would automatically strip out that unknown value before the response is sent to the client. Additionally, if the client didn’t request either of the known id or name values, they would also be stripped from the response.
Once the GraphQL code has run the resolvers and gotten the top-level recipe it expects from the recipe() method call, and assuming the client has requested the ingredients, it’s now ready to call the code to hydrate those ingredient values. This is performed by calling the resolvers.Recipe.ingredients method. In this case, the first argument now contains information about the parent object, in this case the top-level Recipe instance. The object provided contains all of the information that was returned from the recipe() method call, in this case the id, name, and steps values. The id is typically the most useful value. If this application was backed by a database then the id could be used to make a database query and get the related Ingredient entries. However, this simple example just uses hard coded values.
Note
Each of the methods described within the resolvers object can be called asynchronously. GraphQL is smart enough to call them all essentially in parallel, allowing your application to make multiple outbound asynchronous calls to get data from other sources. Once the slowest request is finished then the overall query can complete and a response be sent to the consumer.
GraphQL Consumer
Now that you’re familiar with building a producer that provides a GraphQL interface, it’s time to look at what it takes to build a consumer.
Building a consumer is a bit simpler. There are npm modules to help with the query generation, but interacting with a GraphQL service is simple enough that you can simply rebuild it using tools likely already familiar to you.
Example 2-12 creates a new web-api consumer. The most important part of this example is the query that will be sent. It’s also going to make use of query variables, which are a GraphQL equivalent to query parameters SQL. Variables are useful because, much like SQL, it’s dangerous to manually concatenate strings together to combine dynamic data, like user-supplied values, with static data, such as query code.
Example 2-12. web-api/consumer-graphql.js
#!/usr/bin/env node// npm install fastify@2 node-fetch@2constserver=require('fastify')();constfetch=require('node-fetch');constHOST='127.0.0.1';constPORT=process.env.PORT||3000;constTARGET=process.env.TARGET||'localhost:4000';constcomplex_query=`query kitchenSink ($id:ID) {recipe(id:$id) { id name ingredients { name quantity } } pid }`;server.get('/',async()=>{constreq=awaitfetch(`http://${TARGET}/graphql`,{method:'POST',headers:{'Content-Type':'application/json'},body:JSON.stringify({query:complex_query,variables:{id:"42"}}),});return{consumer_pid:process.pid,producer_data:awaitreq.json()};});server.listen(PORT,HOST,()=>{console.log(`Consumer running at http://${HOST}:${PORT}/`);});
Here’s a more complex query that accepts arguments.
The request body is JSON encapsulating the GraphQL query.
This example makes a POST request and sends a JSON payload to the server. This payload contains both the query as well as the variables. The query property is the GraphQL query string, and the variables property contains a mapping of variable names with their values.
The complex_query being sent is asking for almost every piece of data the server supports. It’s also using a more complex syntax for specifying which variables will be used in the query. In this case it names the query kitchenSink, which can be useful for debugging. The arguments for the query are defined after the name, in this case it’s declared that there’s a variable named $id that is an ID. That variable is then passed into the recipe() method. The variables property of the request body contains a single variable. In this section the variable doesn’t need to be prefixed with a $.
Once you’ve modified the two files, run both of the services and then run a command to make a request to the Consumer service by running the following commands:
$node recipe-api/producer-graphql.js$node web-api/consumer-graphql.js$curl http://localhost:3000
You’ll then receive a reply that looks like this:
{"consumer_pid":20827,"producer_data":{"data":{"recipe":{"id":"42","name":"Chicken Tikka Masala","ingredients":[{"name":"Chicken","quantity":"1 lb"},{"name":"Sauce","quantity":"2 cups"}]},"pid":20842}}}
GraphQL offers many more features than those listed in this section. For example, it includes a feature called mutations, which allows a client to modify documents. It also has a feature called subscription, which allows a client to subscribe to and receive a stream of messages.
RPC with gRPC
Tools like REST—and to an extent GraphQL—attempt to abstract away the underlying functionality provided by a producer and essentially exposes an API driven by data and CRUD operations. Despite all the complexity within the service the consumer is left with an interface with a lot of nouns and very few verbs.
For example, an API with a RESTful interface might allow a consumer to create an invoice. Such an operation might be performed by using the POST method in combination with a route named /invoice. But, how does the producer allow the consumer to send an email off to the user when the invoice is created? Should there be a separate endpoint for invoice emails? Should there be a property on an Invoice record called email that, when set to true during create time, triggers the email? There often isn’t a perfect way to represent application functionality using the verbs provided by HTTP. This is when it might make sense to reach for a new pattern.
RPC (Remote Procedure Call) is such a pattern. Unlike HTTP, which offers a very finite list of verbs, RPC is essentially free to support whatever verb the developer desires. If you think about the heart of the application, the aforementioned POST /invoice route ends up calling some code deeper within the application. There very well be a correlating method called create_invoice() within the code. With RPC, instead of going through the work to create a different interface, you can instead expose that method, almost in its raw form, to the network.
In general, RPC works by choosing which functions in the application to expose, and creating a mapping between these functions to some sort of network interface. Of course, it’s not as straightforward as simply exposing the functions to the network. Such methods need to be very rigorous about what type of data they accept and who they accept it from (just like an HTTP endpoint should).
One of the most popular standards for providing networked RPC endpoints between services is gRPC. gRPC is typically served over HTTP/2. Unlike GraphQL, which uses a single HTTP endpoint, gRPC uses the endpoint to determine what method to call.
Protocol Buffers
Unlike JSON over HTTP and GraphQL, gRPC typically doesn’t deliver messages over plain text. Instead, it transfers the data using Protocol Buffers (aka Protobufs), which is a binary format for representing serialized objects. Such a representation leads to smaller message payloads and increases network performance. Not only are the messages more compact, but it actually reduces the amount of redundant information sent with each message.
Protobufs have their own language for describing the messages that can be represented in a gRPC server. These files end in .proto and look pretty similar to a GraphQL schema. Example 2-13 has an example of how a similar operation can be defined for a gRPC service.
Example 2-13. shared/grpc-recipe.proto
syntax = "proto3";
package recipe;
service RecipeService {
  rpc GetRecipe(RecipeRequest) returns (Recipe) {}
  rpc GetMetaData(Empty) returns (Meta) {}
}
message Recipe {
  int32 id = 1;
  string name = 2;
  string steps = 3;
  repeated Ingredient ingredients = 4;
}
message Ingredient {
  int32 id = 1;
  string name = 2;
  string quantity = 3;
}
message RecipeRequest {
  int32 id = 1;
}
message Meta {
  int32 pid = 2;
}
message Empty {}
A definition for a service named
RecipeService.A message of type
Meta.A field named
idwhich can store a 32-bit integer.An array of
Recipemessages in a field namedingredients, the fourth entry for this message.
This recipe.proto file is shared by both clients and servers. This allows both ends to communicate with each other and be able to decode and encode the messages being sent. gRPC defines RPC methods, which can accept a message of a particular type and return a message of another type, as well as services, which are ways to group related method calls.
Notice the granularity of the message types. GraphQL, which was built with JSON and HTTP in mind, specifies numeric types using the value Int, simply an integer. gRPC, with lower level roots in C, more specifically describes an integer using its size, in this case an int32 (there usually isn’t a reason to limit an integers size if it’s going to be used in JSON). Table 2-4 has a more detailed list of common gRPC data types.
| Name | Examples | Node/JS Equivalent |
|---|---|---|
|
1.1 |
|
|
1.1 |
|
|
-2_147_483_648 |
|
|
9_223_372_036_854_775_808 |
|
|
true, false |
|
|
“Hello, friend! ” |
|
|
binary data |
|
The repeated keyword means that a field can contain multiple values. In those situations the values can be represented as an array of that values type.
Tip
There are some other number formats that can be represented in gRPC as well. This includes uint32 and uint64, sint32 and sint64, fixed32 and fixed64, and finally sfixed32 and sfixed64. Each has different restrictions on the range of the number represented, the accuracy, and how the number is represented in transit. The @grpc/proto-loader module can be configured to represent different values using a String in cases where a Number wouldn’t be sufficient.
You also might have noticed that the Recipe type is pretty similar in both GraphQL and gRPC, mostly having different syntax.
Another interesting part about these message types is the numeric value associated with each field. These values represent the order in which the field follows within the messages. The Ingredient message, for example, has id as the first property and quantity as the third property. It seems weird to list these numbers at first but the order is very important. Unlike JSON, which doesn’t technically have an order to properties, the order of properties in a Protocol Buffer message is very important for two reasons.
The first reason that field order is important is that the field names aren’t transmitted with the messages themselves. Since the schemas are shared between client and server, the names of the fields would be redundant. As a quick visualization of this, imagine how two integers transmitted both using JSON and again using binary might look. The two messages might look like the following:
{"id":123,"code":456}
01230456
If two numbers are always sent, and it’s common knowledge that the first is called id and the second called code, then representing the message like in the second row removes unnecessary redundancies (this is very similar to how CSV works, having column names in the first row and data in subsequent rows).
The second reason that field order matters is that messages represented using Protobufs, and gRPC itself, are designed to be backwards compatible. As an example, if v1 of the Protobufs Ingredient message contains an id, name, and a quantity field, and one day a new v2 is created with a fourth substitute field, then any nodes on the network still using v1 can safely ignore the additional fields and still communicate with the other nodes (this is beneficial in situations where a new version of the application is slowly released as the old version is phased out).
gRPC supports four styles of messaging, though these examples only look at the most basic style. Message requests and responses can either be streaming, or a single message. The basic style used in these examples involves a non-streaming request and response. However one can use server-side streaming RPC, where the server streams a response; client-side streaming RPC, where the client streams a request; or bidirectional streaming RPC, where the client and the server streams a request and a response. When working with a stream an instance of an Event Emitter is provided, but when working with singular messages, code will instead deal with callbacks.
gRPC Producer
Now that you’ve looked at some Protobuf message and service definitions, it’s time to actually implement a gRPC server using Node.js. Again, you’ll begin by creating a new recipe-api file. Create a file to resemble Example 2-14, and be sure to install the necessary dependencies. Dependencies beginning with an @ symbol represent scoped packages within the npm registry.
Example 2-14. recipe-api/producer-grpc.js
#!/usr/bin/env node// npm install [email protected] @grpc/[email protected]constgrpc=require('grpc');constloader=require('@grpc/proto-loader');constpkg_def=loader.loadSync(__dirname+'/../shared/grpc-recipe.proto');constrecipe=grpc.loadPackageDefinition(pkg_def).recipe;constHOST=process.env.HOST||'127.0.0.1';constPORT=process.env.PORT||4000;constserver=newgrpc.Server();server.addService(recipe.RecipeService.service,{getMetaData:(_call,cb)=>{cb(null,{pid:process.pid,});},getRecipe:(call,cb)=>{if(call.request.id!==42){returncb(newError(`unknown recipe${call.request.id}`));}cb(null,{id:42,name:"Chicken Tikka Masala",steps:"Throw it in a pot...",ingredients:[{id:1,name:"Chicken",quantity:"1 lb",},{id:2,name:"Sauce",quantity:"2 cups",}]});},});server.bind(`${HOST}:${PORT}`,grpc.ServerCredentials.createInsecure());server.start();console.log(`Producer running at http://${HOST}:${PORT}/`);
The Producer needs access to the
.protofile. In this case it’s loaded and processed when started, incurring a small startup cost.When a service it defined an object is provided with properties reflecting the methods defined in the
.protofile.This method correlates with the
GetMetaData(Empty)method in the.protodefinition.The
getRecipe()method makes use of an object passed in during the request. This object is provided ascall.request.gRPC can use TLS and authentication, but for this example it’s disabled.
This server listens for incoming HTTP/2 requests sent to localhost via port 4000. The HTTP routes associated with the two methods are based on the name of the service and the name of the methods. This means the method defined in <4> technically lives at the following URL:
http://localhost:4000/recipe.RecipeService/GetMetaData
The gRPC module abstracts the underlying HTTP/2 layer, so you typically don’t need to think of a gRPC service as being over HTTP/2, nor do you have to think about the paths.
gRPC Consumer
Now it’s time to implement the consumer. Example 2-15 is a reworked version of the web-api service. As of writing this book the official grpc npm module currently works by exposing methods that use callbacks. This code example uses util.promisify() so that you can call the methods using async functions.
Example 2-15. web-api/consumer-grpc.js
#!/usr/bin/env node// npm install [email protected] @grpc/[email protected] fastify@2constutil=require('util');constgrpc=require('grpc');constserver=require('fastify')();constloader=require('@grpc/proto-loader');constpkg_def=loader.loadSync(__dirname+'/../shared/grpc-recipe.proto');constrecipe=grpc.loadPackageDefinition(pkg_def).recipe;constHOST='127.0.0.1';constPORT=process.env.PORT||3000;constTARGET=process.env.TARGET||'localhost:4000';constclient=newrecipe.RecipeService(TARGET,grpc.credentials.createInsecure());constgetMetaData=util.promisify(client.getMetaData.bind(client));constgetRecipe=util.promisify(client.getRecipe.bind(client));server.get('/',async()=>{const[meta,recipe]=awaitPromise.all([getMetaData({}),getRecipe({id:42}),]);return{consumer_pid:process.pid,producer_data:meta,recipe};});server.listen(PORT,HOST,()=>{console.log(`Consumer running at http://${HOST}:${PORT}/`);});
Just like with the Producer service, this one loads the
.protodefinitions at startup.The gRPC client is aware that it is connecting to a
recipe.RecipeServiceservice.Also like the Producer, security has been disabled.
The
GetMetaData()call makes use of anEmptymessage, which contains no properties.The
GetRecipe()call, however, expects aRecipeRequestmessage. Here, an object adhering to the same shape is passed in.
This example sends two requests between the web-api and recipe-api services, whereas the previous GraphQL and JSON over HTTP examples made a single request. All the required information could have been retrieved in a single request, but I feel this example helps convey the heart of the RPC pattern where individual methods are called on a remote server.
Note that the grpc module was able to look at your .proto file and give you an object with methods on it correlating to methods in the service. In this case the client has a method called getMetaData(). This really brings in the feeling that RPC intends to convey, that code on one service is remotely calling methods on another service, as if the methods existed locally.
Now that you’ve got the two services defined, go ahead and run both of them and make a request by running the following commands:
$node recipe-api/producer-grpc.js$node web-api/consumer-grpc.js$curl http://localhost:3000/
The response to this request should resemble the following JSON payload:
{"consumer_pid":23786,"producer_data":{"pid":23766},"recipe":{"id":42,"name":"Chicken Tikka Masala","steps":"Throw it in a pot...","ingredients":[{"id":1,"name":"Chicken","quantity":"1 lb"},{"id":2,"name":"Sauce","quantity":"2 cups"}]}}
The Consumer service has combined the result of the two gRPC methods together, but they’re still visible in the resulting document. The recipe property correlates to the Recipe message definition in the .proto file. Notice how it contains a property called ingredients, which is an array of Recipe instances.