
13
Building a Chat Server
In the previous chapter, you created a RESTful API for your project. In this chapter, you will build a chat server for students using Django Channels. Students will be able to access a different chat room for each course they are enrolled on. To create the chat server, you will learn how to serve your Django project through Asynchronous Server Gateway Interface (ASGI), and you will implement asynchronous communication.
In this chapter, you will:
- Add Channels to your project
- Build a WebSocket consumer and appropriate routing
- Implement a WebSocket client
- Enable a channel layer with Redis
- Make your consumer fully asynchronous
Creating a chat application
You are going to implement a chat server to provide students with a chat room for each course. Students enrolled on a course will be able to access the course chat room and exchange messages in real time. You will use Channels to build this functionality. Channels is a Django application that extends Django to handle protocols that require long-running connections, such as WebSockets, chatbots, or MQTT (a lightweight publish/subscribe message transport commonly used in Internet of things projects).
Using Channels, you can easily implement real-time or asynchronous functionalities into your project in addition to your standard HTTP synchronous views. You will start by adding a new application to your project. The new application will contain the logic for the chat server.
Run the following command from the project educa directory to create the new application file structure:
django-admin startapp chat
Edit the settings.py file of the educa project and activate the chat application in your project by editing the INSTALLED_APPS setting, as follows:
INSTALLED_APPS = [
    # ...
    'chat',
]
The new chat application is now active in your project.
Implementing the chat room view
You will provide students with a different chat room for each course. You need to create a view for students to join the chat room of a given course. Only students who are enrolled on a course will be able to access the course chat room.
Edit the views.py file of the new chat application and add the following code to it:
from django.shortcuts import render, get_object_or_404
from django.http import HttpResponseForbidden
from django.contrib.auth.decorators import login_required
@login_required
def course_chat_room(request, course_id):
    try:
        # retrieve course with given id joined by the current user
        course = request.user.courses_joined.get(id=course_id)
    except:
        # user is not a student of the course or course does not exist
        return HttpResponseForbidden()
    return render(request, 'chat/room.html', {'course': course})
This is the course_chat_room view. In this view, you use the @login_required decorator to prevent any non-authenticated user from accessing the view. The view receives a required course_id parameter that is used to retrieve the course with the given id.
You access the courses that the user is enrolled on through the relationship courses_joined and you retrieve the course with the given id from that subset of courses. If the course with the given id does not exist or the user is not enrolled on it, you return an HttpResponseForbidden response, which translates to an HTTP response with status 403. If the course with the given id exists and the user is enrolled on it, you render the chat/room.html template, passing the course object to the template context.
You need to add a URL pattern for this view. Create a new file inside the chat application directory and name it urls.py. Add the following code to it:
from django.urls import path
from . import views
app_name = 'chat'
urlpatterns = [
    path('room/<int:course_id>/', views.course_chat_room,
         name='course_chat_room'),
]
This is the initial URL patterns file for the chat application. You define the course_chat_room URL pattern, including the course_id parameter with the int prefix, as you only expect an integer value here.
Include the new URL patterns of the chat application in the main URL patterns of the project. Edit the main urls.py file of the educa project and add the following line to it:
urlpatterns = [
    # ...
    path('chat/', include('chat.urls', namespace='chat')),
]
URL patterns for the chat application are added to the project under the chat/ path.
You need to create a template for the course_chat_room view. This template will contain an area to visualize the messages that are exchanged in the chat and a text input with a submit button to send text messages to the chat.
Create the following file structure within the chat application directory:
templates/
    chat/
        room.html
Edit the chat/room.html template and add the following code to it:
{% extends "base.html" %}
{% block title %}Chat room for "{{ course.title }}"{% endblock %}
{% block content %}
  <div id="chat">
  </div>
  <div id="chat-input">
    <input id="chat-message-input" type="text">
    <input id="chat-message-submit" type="submit" value="Send">
  </div>
{% endblock %}
{% block domready %}
{% endblock %}
This is the template for the course chat room. In this template, you extend the base.html template of your project and fill its content block. In the template, you define a <div> HTML element with the chat ID that you will use to display the chat messages sent by the user and by other students. You also define a second <div> element with a text input and a submit button that will allow the user to send messages. You include the domready block defined by the base.html template, which you are going to implement later using JavaScript, to establish a connection with a WebSocket and send or receive messages.
Run the development server and open http://127.0.0.1:8000/chat/room/1/ in your browser, replacing 1 with the id of an existing course in the database. Access the chat room with a logged-in user who is enrolled on the course. You will see the following screen:

Figure 13.1: The course chat room page
This is the course chat room screen that students will use to discuss topics within a course.
Deactivating the per-site cache
In Chapter 11, Rendering and Caching Content, you added a site-wide cache to your Django project. Now, you will need to follow a more granular approach for caching to prevent the chat room pages from being cached. You will deactivate the per-site cache to avoid site-wide caching and only use caching where needed.
Edit the settings.py file and comment out the UpdateCacheMiddleware and FetchFromCacheMiddleware classes of the MIDDLEWARE setting, as follows:
MIDDLEWARE = [
    'django.middleware.security.SecurityMiddleware',
    'django.contrib.sessions.middleware.SessionMiddleware',
    # 'django.middleware.cache.UpdateCacheMiddleware',
    'django.middleware.common.CommonMiddleware',
    # 'django.middleware.cache.FetchFromCacheMiddleware',
    # ...
]
You have deactivated the per-site cache in your project to avoid the new chat room view from being cached. Next, you will learn how to add Channels to your Django project to implement a real-time chat server.
Real-time Django with Channels
You are building a chat server to provide students with a chat room for each course. Students enrolled on a course will be able to access the course chat room and exchange messages. This functionality requires real-time communication between the server and the client. The client should be able to connect to the chat and send or receive data at any time. There are several ways you could implement this feature using AJAX polling or long polling in combination with storing the messages in your database or Redis. However, there is no efficient way to implement a chat server using a standard synchronous web application. You are going to build a chat server using asynchronous communication through ASGI.
Asynchronous applications using ASGI
Django is usually deployed using Web Server Gateway Interface (WSGI), which is the standard interface for Python applications to handle HTTP requests. However, to work with asynchronous applications, you need to use another interface called ASGI, which can handle WebSocket requests as well. ASGI is the emerging Python standard for asynchronous web servers and applications.
Django 3 comes with support for running asynchronous Python through ASGI, but it does not yet support asynchronous views or middleware. However, as mentioned, Channels extends Django to handle not only HTTP, but also protocols that require long-running connections, such as WebSockets and chatbots.
WebSockets provide full-duplex communication by establishing a persistent, open, bidirectional Transmission Control Protocol (TCP) connection between servers and clients. You are going to use WebSockets to implement your chat server.
You can find more information about deploying Django with ASGI at https://docs.djangoproject.com/en/3.0/howto/deployment/asgi/.
The request/response cycle using Channels
It's important to understand the differences in a request cycle between a standard synchronous request cycle and a Channels implementation. The following schema shows the request cycle of a synchronous Django setup:

Figure 13.2: The Django request/response cycle
When an HTTP request is sent by the browser to the web server, Django handles the request and passes the HttpRequest object to the corresponding view. The view processes the request and returns an HttpResponse object that is sent back to the browser as an HTTP response. There is no mechanism to maintain an open connection or send data to the browser without an associated HTTP request.
The following schema shows the request cycle of a Django project using Channels with WebSockets:

Figure 13.3: The Django Channels request/response cycle
Channels replaces Django's request/response cycle with messages that are sent across channels. HTTP requests are still routed to view functions using Django, but they get routed over channels. This allows for WebSockets message handling as well, where you have producers and consumers that exchange messages across a channel layer. Channels preserves Django's synchronous architecture, allowing you to choose between writing synchronous code and asynchronous code, or a combination of both.
Installing Channels
You are going to add Channels to your project and set up the required basic ASGI application routing for it to manage HTTP requests.
Install Channels in your virtual environment with the following command:
pip install channels==2.4.0
Edit the settings.py file of the educa project and add channels to the INSTALLED_APPS setting as follows:
INSTALLED_APPS = [
    # ...
    'channels',
]
The channels application is now activated in your project.
Channels expects you to define a single root application that will be executed for all requests. You can define the root application by adding the ASGI_APPLICATION setting to your project. This is similar to the ROOT_URLCONF setting that points to the base URL patterns of your project. You can place the root application anywhere in your project, but it is recommended to put it in a project-level file named routing.py.
Create a new file inside the educa project directory next to the settings.py file and name it routing.py.
Add the following code to it:
from channels.routing import ProtocolTypeRouter
application = ProtocolTypeRouter({
    # empty for now
})
Then, add the following line to the settings.py file of your project:
ASGI_APPLICATION = 'educa.routing.application'
In the previous code, you define the main ASGI application that will be executed when serving your Django project through ASGI. You use the ProtocolTypeRouter class provided by Channels as the main entry point of your routing system. ProtocolTypeRouter takes a dictionary that maps communication types like http or websocket to ASGI applications. You instantiate this class with an empty dictionary that later you will fill with a route for your chat application WebSocket consumer.
When Channels is added to the INSTALLED_APPS setting, it takes control over the runserver command, replacing the standard Django development server. Besides handling URL routing to Django views for synchronous requests, the Channels development server also manages routes to WebSocket consumers.
Start the development server using the following command:
python manage.py runserver
You will see output similar to the following:
Watching for file changes with StatReloader
Performing system checks...
System check identified no issues (0 silenced).
February 06, 2020 - 23:12:33
Django version 3.0, using settings 'educa.settings'
Starting ASGI/Channels version 2.4.0 development server at http://127.0.0.1:8000/
Quit the server with CONTROL-C.
Check that the output contains the line Starting ASGI/Channels version 2.4.0 development server. This line confirms that you are using the Channels development server, which is capable of managing synchronous and asynchronous requests, instead of the standard Django development server. HTTP requests continue to behave the same as before, but they get routed over channels.
Now that Channels is installed in your project, you can build the chat server for courses. In order to implement the chat server for your project, you will need to take the following steps:
- Set up a consumer: Consumers are individual pieces of code that can handle WebSockets in a very similar way to traditional HTTP views. You will build a consumer to read and write messages to a communication channel.
- Configure routing: Channels provides routing classes that allow you to combine and stack your consumers. You will configure URL routing for your chat consumer.
- Implement a WebSocket client: When the student accesses the chat room, you will connect to the WebSocket from the browser and send or receive messages using JavaScript.
- Enable a channel layer: Channel layers allow you to talk between different instances of an application. They're a useful part of making a distributed real-time application. You will set up a channel layer using Redis.
Writing a consumer
Consumers are the equivalent of Django views for asynchronous applications. As mentioned, they handle WebSockets in a very similar way to how traditional views handle HTTP requests. Consumers are ASGI applications that can handle messages, notifications, and other things. Unlike Django views, consumers are built for long-running communication. URLs are mapped to consumers through routing classes that allow you to combine and stack consumers.
Let's implement a basic consumer that is able to accept WebSocket connections and echoes every message it receives from the WebSocket back to it. This initial functionality will allow the student to send messages to the consumer and receive back the messages it sends.
Create a new file inside the chat application directory and name it consumers.py. Add the following code to it:
import json
from channels.generic.websocket import WebsocketConsumer
class ChatConsumer(WebsocketConsumer):
    def connect(self):
        # accept connection
        self.accept()
    def disconnect(self, close_code):
        pass
    # receive message from WebSocket
    def receive(self, text_data):
        text_data_json = json.loads(text_data)
        message = text_data_json['message']
        # send message to WebSocket
        self.send(text_data=json.dumps({'message': message}))
This is the ChatConsumer consumer. This class inherits from the Channels WebsocketConsumer class to implement a basic WebSocket consumer. In this consumer, you implement the following methods:
connnect(): Called when a new connection is received. You accept any connection withself.accept(). You can also reject a connection by callingself.close().disconnect(): Called when the socket closes. You usepassbecause you don't need to implement any action when a client closes the connection.receive(): Called whenever data is received. You expect text to be received astext_data(this could also bebinary_datafor binary data). You treat the text data received as JSON. Therefore, you usejson.loads()to load the received JSON data into a Python dictionary. You access themessagekey, which you expect to be present in the JSON structure received. To echo the message, you send the message back to the WebSocket withself.send(), transforming it in JSON format again throughjson.dumps().
The initial version of your ChatConsumer consumer accepts any WebSocket connection and echoes to the WebSocket client every message it receives. Note that the consumer does not broadcast messages to other clients yet. You will build this functionality by implementing a channel layer later.
Routing
You need to define a URL to route connections to the ChatConsumer consumer you have implemented. Channels provides routing classes that allow you to combine and stack consumers to dispatch based on what the connection is. You can think of them as the URL routing system of Django for asynchronous applications.
Create a new file inside the chat application directory and name it routing.py. Add the following code to it:
from django.urls import re_path
from . import consumers
websocket_urlpatterns = [
    re_path(r'ws/chat/room/(?P<course_id>d+)/$', consumers.ChatConsumer),
]
In this code, you map a URL pattern with the ChatConsumer class that you defined in the chat/consumers.py file. You use Django's re_path to define the path with regular expressions. The URL includes an integer parameter called course_id. This parameter will be available in the scope of the consumer and will allow you to identify the course chat room that the user is connecting to.
It is a good practice to prepend WebSocket URLs with /ws/ to differentiate them from URLs used for standard synchronous HTTP requests. This also simplifies the production setup when an HTTP server routes requests based on the path.
Edit the global routing.py file located next to the settings.py file so that it looks like this:
from channels.auth import AuthMiddlewareStack
from channels.routing import ProtocolTypeRouter, URLRouter
import chat.routing
application = ProtocolTypeRouter({
    'websocket': AuthMiddlewareStack(
        URLRouter(
            chat.routing.websocket_urlpatterns
        )
    ),
})
In this code, you use URLRouter to map websocket connections to the URL patterns defined in the websocket_urlpatterns list of the chat application routing file. The standard ProtocolTypeRouter router automatically maps HTTP requests to the standard Django views if no specific http mapping is provided. You also use AuthMiddlewareStack. The AuthMiddlewareStack class provided by Channels supports standard Django authentication, where the user details are stored in the session. You plan to access the user instance in the scope of the consumer to identify the user who sends a message.
Implementing the WebSocket client
So far, you have created the course_chat_room view and its corresponding template for students to access the course chat room. You have implemented a WebSocket consumer for the chat server and tied it with URL routing. Now, you need to build a WebSocket client to establish a connection with the WebSocket in the course chat room template and be able to send/receive messages.
You are going to implement the WebSocket client with JavaScript to open and maintain a connection in the browser. You will use jQuery for interaction with Document Object Model (DOM) elements, since you already loaded it in the base template of the project.
Edit the chat/room.html template of the chat application and modify the domready block, as follows:
{% block domready %}
  var url = 'ws://' + window.location.host +
            '/ws/chat/room/' + '{{ course.id }}/';
  var chatSocket = new WebSocket(url);
{% endblock %}
You define a URL with the WebSocket protocol, which looks like ws:// (or wss:// for secure WebSockets, just like https://). You build the URL using the current location of the browser, which you obtain from window.location.host. The rest of the URL is built with the path for the chat room URL pattern that you defined in the routing.py file of the chat application.
You write the whole URL instead of building it via its name because Channels does not provide a way to reverse URLs. You use the current course id to generate the URL for the current course and store the URL in a new variable named url.
You then open a WebSocket connection to the stored URL using new WebSocket(url). You assign the instantiated WebSocket client object to the new variable chatSocket.
You have created a WebSocket consumer, you have included routing for it, and you have implemented a basic WebSocket client. Let's try the initial version of your chat.
Start the development server using the following command:
python manage.py runserver
Open the URL http://127.0.0.1:8000/chat/room/1/ in your browser, replacing 1 with the id of an existing course in the database. Take a look at the console output. Besides the HTTP GET requests for the page and its static files, you should see two lines including WebSocket HANDSHAKING and WebSocket CONNECT, like the following output:
HTTP GET /chat/room/1/ 200 [0.02, 127.0.0.1:57141]
HTTP GET /static/css/base.css 200 [0.01, 127.0.0.1:57141]
WebSocket HANDSHAKING /ws/chat/room/1/ [127.0.0.1:57144]
WebSocket CONNECT /ws/chat/room/1/ [127.0.0.1:57144]
The Channels development server listens for incoming socket connections using a standard TCP socket. The handshake is the bridge from HTTP to WebSockets. In the handshake, details of the connection are negotiated and either party can close the connection before completion. Remember that you are using self.accept() to accept any connection in the connect() method of the ChatConsumer class implemented in the consumers.py file of the chat application. The connection is accepted and therefore you see the WebSocket CONNECT message in the console.
If you use the browser developer tools to track network connections, you can also see information for the WebSocket connection that has been established.
It should look like the following screenshot:

Figure 13.4: The browser developer tools showing that the WebSocket connection has been established
Now that you are able to connect to the WebSocket, it's time to interact with it. You will implement the methods to handle common events, such as receiving a message and closing the connection. Edit the chat/room.html template of the chat application and modify the domready block, as follows:
{% block domready %}
  var url = 'ws://' + window.location.host +
            '/ws/chat/room/' + '{{ course.id }}/';
  var chatSocket = new WebSocket(url);
  chatSocket.onmessage = function(e) {
    var data = JSON.parse(e.data);
    var message = data.message;
    var $chat = $('#chat');
    $chat.append('<div class="message">' + message + '</div>');
    $chat.scrollTop($chat[0].scrollHeight);
  };
  chatSocket.onclose = function(e) {
    console.error('Chat socket closed unexpectedly');
  };
{% endblock %}
In this code, you define the following events for the WebSocket client:
onmessage: Fired when data is received through the WebSocket. You parse the message, which you expect in JSON format, and access itsmessageattribute. You then append a new<div>element with the message to the HTML element with thechatID. This will add new messages to the chat log, while keeping all previous messages that have been added to the log. You scroll the chat log<div>to the bottom to ensure that the new message gets visibility. You achieve this by scrolling to the total scrollable height of the chat log, which can be obtained by accessing itssrollHeightattribute.onclose: Fired when the connection with the WebSocket is closed. You don't expect to close the connection and therefore you write the errorChat socket closed unexpectedlyto the console log if this happens.
You have implemented the action to display the message when a new message is received. You need to implement the functionality to send messages to the socket as well.
Edit the chat/room.html template of the chat application and add the following JavaScript code to the bottom of the domready block:
var $input = $('#chat-message-input');
var $submit = $('#chat-message-submit');
$submit.click(function() {
  var message = $input.val();
  if(message) {
    // send message in JSON format
    chatSocket.send(JSON.stringify({'message': message}));
    // clear input
    $input.val('');
    // return focus
    $input.focus();
  }
});
In this code, you define a function for the click event of the submit button, which you select with the ID chat-message-submit. When the button is clicked, you perform the following actions:
- You read the message entered by the user from the value of the text input element with the ID
chat-message-input - You check whether the message has any content with
if(message) - If the user has entered a message, you form JSON content such as
{'message': 'string entered by the user'}by usingJSON.stringify() - You send the JSON content through the WebSocket, calling the
send()method ofchatSocketclient - You clear the contents of the text input by setting its value to an empty string with
$input.val('') - You return the focus to the text input with
$input.focus()so that the user can write a new message straightaway
The user is now able to send messages using the text input and by clicking the submit button.
In order to improve the user experience, you will give focus to the text input as soon as the page loads so that the user can type directly in it. You will also capture keyboard key pressed events to identify the Enter/Return key and fire the click event on the submit button. The user will be able to either click the button or press the Enter/Return key to send a message.
Edit the chat/room.html template of the chat application and add the following JavaScript code to the bottom of the domready block:
$input.focus();
$input.keyup(function(e) {
  if (e.which === 13) {
    // submit with enter / return key
    $submit.click();
  }
});
In this code, you give the focus to the text input. You also define a function for the keyup() event of the input. For any key that the user presses, you check whether its key code is 13. This is the key code that corresponds to the Enter/Return key. You can use the resource https://keycode.info to identify the key code for any key. If the Enter/Return key is pressed, you fire the click event on the submit button to send the message to the WebSocket.
The complete domready block of the chat/room.html template should now look like this:
{% block domready %}
  var url = 'ws://' + window.location.host +
            '/ws/chat/room/' + '{{ course.id }}/';
  var chatSocket = new WebSocket(url);
  chatSocket.onmessage = function(e) {
    var data = JSON.parse(e.data);
    var message = data.message;
    var $chat = $('#chat');
    $chat.append('<div class="message">' + message + '</div>');
    $chat.scrollTop($chat[0].scrollHeight);
  };
  chatSocket.onclose = function(e) {
    console.error('Chat socket closed unexpectedly');
  };
  var $input = $('#chat-message-input');
  var $submit = $('#chat-message-submit');
  $submit.click(function() {
    var message = $input.val();
    if(message) {
      // send message in JSON format
      chatSocket.send(JSON.stringify({'message': message}));
      // clear input
      $input.val('');
      // return focus
      $input.focus();
    }
  });
  $input.focus();
  $input.keyup(function(e) {
    if (e.which === 13) {
      // submit with enter / return key
      $submit.click();
    }
  });
{% endblock %}
Open the URL http://127.0.0.1:8000/chat/room/1/ in your browser, replacing 1 with the id of an existing course in the database. With a logged-in user who is enrolled on the course, write some text in the input field and click the send button or press the Enter key. You will see that your message appears in the chat log:

Figure 13.5: The chat room page, including messages sent through the WebSocket
Great! The message has been sent through the WebSocket and the ChatConsumer consumer has received the message and has sent it back through the WebSocket. The chatSocket client has received a message event and the onmessage function has been fired, adding the message to the chat log.
You have implemented the functionality with a WebSocket consumer and a WebSocket client to establish client/server communication and be able to send or receive events. However, the chat server is not able to broadcast messages to other clients. If you open a second browser tab and enter a message, the message will not appear on the first tab. In order to build communication between consumers, you have to enable a channel layer.
Enabling a channel layer
Channel layers allow you to communicate between different instances of an application. A channel layer is the transport mechanism that allows multiple consumer instances to communicate with each other and with other parts of Django.
In your chat server, you plan to have multiple instances of the ChatConsumer consumer for the same course chat room. Each student who joins the chat room will instantiate the WebSocket client in their browser, and that will open a connection with an instance of the WebSocket consumer. You need a common channel layer to distribute messages between consumers.
Channels and groups
Channel layers provide two abstractions to manage communications: channels and groups:
- Channel: You can think of a channel as an inbox where messages can be sent to or as a task queue. Each channel has a name. Messages are sent to a channel by anyone who knows the channel name and then given to consumers listening on that channel.
- Group: Multiple channels can be grouped into a group. Each group has a name. A channel can be added or removed from a group by anyone who knows the group name. Using the group name, you can also send a message to all channels in the group.
You will work with channel groups to implement the chat server. By creating a channel group for each course chat room, the ChatConsumer instances will be able to communicate with each other.
Setting up a channel layer with Redis
Redis is the preferred option for a channel layer, though Channels has support for other types of channel layers. Redis works as the communication store for the channel layer. Remember that you already used Redis in Chapter 6, Tracking User Actions, and in Chapter 9, Extending Your Shop.
If you haven't installed Redis yet, you can find installation instructions in Chapter 6, Tracking User Actions.
In order to use Redis as a channel layer, you have to install the channels-redis package. Install channels-redis in your virtual environment with the following command:
pip install channels-redis==2.4.2
Edit the settings.py file of the educa project and add the following code to it:
CHANNEL_LAYERS = {
    'default': {
        'BACKEND': 'channels_redis.core.RedisChannelLayer',
        'CONFIG': {
            'hosts': [('127.0.0.1', 6379)],
        },
    },
}
The CHANNEL_LAYERS setting defines the configuration for the channel layers available to the project. You define a default channel layer using the RedisChannelLayer backend provided by channels-redis and specify the host 127.0.0.1 and the port 6379 on which Redis is running.
Let's try the channel layer. Initialize the Redis server using the following command from the shell in your Redis directory:
src/redis-server
Open the Django shell using the following command:
python manage.py shell
To verify that the channel layer can communicate with Redis, write the following code to send a message to a test channel named test_channel and receive it back:
>>> import channels.layers
>>> from asgiref.sync import async_to_sync
>>> channel_layer = channels.layers.get_channel_layer()
>>> async_to_sync(channel_layer.send)('test_channel', {'message': 'hello'})
>>> async_to_sync(channel_layer.receive)('test_channel')
You should get the following output:
{'message': 'hello'}
In the previous code, you send a message to a test channel through the channel layer, and then you retrieve it from the channel layer. The channel layer is communicating successfully with Redis.
Updating the consumer to broadcast messages
You will edit the ChatConsumer consumer to use the channel layer. You will use a channel group for each course chat room. Therefore, you will use the course id to build the group name. ChatConsumer instances will know the group name and will be able to communicate with each other.
Edit the consumers.py file of the chat application, import the async_to_sync() function, and modify the connect() method of the ChatConsumer class, as follows:
import json
from channels.generic.websocket import WebsocketConsumer
from asgiref.sync import async_to_sync
class ChatConsumer(WebsocketConsumer):
    def connect(self):
        self.id = self.scope['url_route']['kwargs']['course_id']
        self.room_group_name = 'chat_%s' % self.id
        # join room group
        async_to_sync(self.channel_layer.group_add)(
            self.room_group_name,
            self.channel_name
        )
        # accept connection
        self.accept()
    # ...
In this code, you import the async_to_sync() helper function to wrap calls to asynchronous channel layer methods. ChatConsumer is a synchronous WebsocketConsumer consumer, but it needs to call asynchronous methods of the channel layer.
In the new connect() method, you perform the following tasks:
- You retrieve the course
idfrom the scope to know the course that the chat room is associated with. You accessself.scope['url_route']['kwargs ']['course_id']to retrieve thecourse_idparameter from the URL. Every consumer has a scope with information about its connection, arguments passed by the URL, and the authenticated user, if any. - You build the group name with the
idof the course that the group corresponds to. Remember that you will have a channel group for each course chat room. You store the group name in theroom_group_nameattribute of the consumer. - You join the group by adding the current channel to the group. You obtain the channel name from the
channel_nameattribute of the consumer. You use thegroup_addmethod of the channel layer to add the channel to the group. You use theasync_to_sync()wrapper to use the channel layer asynchronous method. - You keep the
self.accept()call to accept the WebSocket connection.
When the ChatConsumer consumer receives a new WebSocket connection, it adds the channel to the group associated with the course in its scope. The consumer is now able to receive any messages sent to the group.
In the same consumers.py file, modify the disconnect() method of the ChatConsumer class, as follows:
 class ChatConsumer(WebsocketConsumer):
    # ...
    def disconnect(self, close_code):
        # leave room group
        async_to_sync(self.channel_layer.group_discard)(
            self.room_group_name,
            self.channel_name
        )
    # ...
When the connection is closed, you call the group_discard() method of the channel layer to leave the group. You use the async_to_sync() wrapper to use the channel layer asynchronous method.
In the same consumers.py file, modify the receive() method of the ChatConsumer class, as follows:
class ChatConsumer(WebsocketConsumer):
    # ...
    # receive message from WebSocket
    def receive(self, text_data):
        text_data_json = json.loads(text_data)
        message = text_data_json['message']
        # send message to room group
        async_to_sync(self.channel_layer.group_send)(
            self.room_group_name,
            {
                'type': 'chat_message',
                'message': message,
            }
        )
When you receive a message from the WebSocket connection, instead of sending the message to the associated channel, you now send the message to the group. You do this by calling the group_send() method of the channel layer. You use the async_to_sync() wrapper to use the channel layer asynchronous method. You pass the following information in the event sent to the group:
type: The event type. This is a special key that corresponds to the name of the method that should be invoked on consumers that receive the event. You can implement a method in the consumer named the same as the message type so that it gets executed every time a message with that specific type is received.message: The actual message you are sending.
In the same consumers.py file, add a new chat_message() method in the ChatConsumer class, as follows:
class ChatConsumer(WebsocketConsumer):
    # ...
    # receive message from room group
    def chat_message(self, event):
        # Send message to WebSocket
        self.send(text_data=json.dumps(event))
You name this method chat_message() to match the type key that is sent to the channel group when a message is received from the WebSocket. When a message with type chat_message is sent to the group, all consumers subscribed to the group will receive the message and will execute the chat_message() method. In the chat_message() method, you send the event message received to the WebSocket.
The complete consumers.py file should now look like this:
import json
from channels.generic.websocket import WebsocketConsumer
from asgiref.sync import async_to_sync
class ChatConsumer(WebsocketConsumer):
    def connect(self):
        self.id = self.scope['url_route']['kwargs']['course_id']
        self.room_group_name = 'chat_%s' % self.id
        # join room group
        async_to_sync(self.channel_layer.group_add)(
            self.room_group_name,
            self.channel_name
        )
        # accept connection
        self.accept()
    def disconnect(self, close_code):
        # leave room group
        async_to_sync(self.channel_layer.group_discard)(
            self.room_group_name,
            self.channel_name
        )
    # receive message from WebSocket
    def receive(self, text_data):
        text_data_json = json.loads(text_data)
        message = text_data_json['message']
        # send message to room group
        async_to_sync(self.channel_layer.group_send)(
            self.room_group_name,
            {
                'type': 'chat_message',
                'message': message,
            }
        )
    # receive message from room group
    def chat_message(self, event):
        # send message to WebSocket
        self.send(text_data=json.dumps(event))
You have implemented a channel layer in ChatConsumer, allowing consumers to broadcast messages and communicate with each other.
Run the development server with the following command:
python manage.py runserver
Open the URL http://127.0.0.1:8000/chat/room/1/ in your browser, replacing 1 with the id of an existing course in the database. Write a message and send it. Then, open a second browser window and access the same URL. Send a message from each browser window.
The result should look like this:
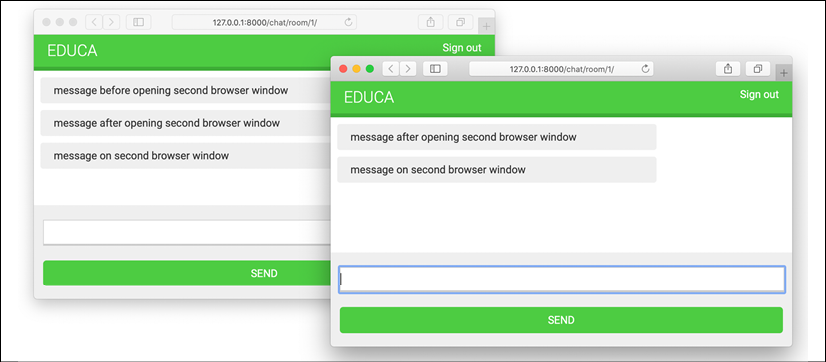
Figure 13.6: The chat room page with messages sent from different browser windows
You will see that the first message is only displayed in the first browser window. When you open a second browser window, messages sent in any of the browser windows are displayed in both of them. When you open a new browser window and access the chat room URL, a new WebSocket connection is established between the JavaScript WebSocket client in the browser and the WebSocket consumer in the server. Each channel gets added to the group associated with the course id passed through the URL to the consumer. Messages are sent to the group and received by all consumers.
Adding context to the messages
Now that messages can be exchanged between all users in a chat room, you probably want to display who sent which message and when it was sent. Let's add some context to the messages.
Edit the consumers.py file of the chat application and implement the following changes:
import json
from channels.generic.websocket import WebsocketConsumer
from asgiref.sync import async_to_sync
from django.utils import timezone
class ChatConsumer(WebsocketConsumer):
    def connect(self):
        self.user = self.scope['user']
        self.id = self.scope['url_route']['kwargs']['course_id']
        self.room_group_name = 'chat_%s' % self.id
        # join room group
        async_to_sync(self.channel_layer.group_add)(
            self.room_group_name,
            self.channel_name
        )
        # accept connection
        self.accept()
    def disconnect(self, close_code):
        # leave room group
        async_to_sync(self.channel_layer.group_discard)(
            self.room_group_name,
            self.channel_name
        )
    # receive message from WebSocket
    def receive(self, text_data):
        text_data_json = json.loads(text_data)
        message = text_data_json['message']
        now = timezone.now()
        # send message to room group
        async_to_sync(self.channel_layer.group_send)(
            self.room_group_name,
            {
                'type': 'chat_message',
                'message': message,
                'user': self.user.username,
                'datetime': now.isoformat(),
            }
        )
    # receive message from room group
    def chat_message(self, event):
        # send message to WebSocket
        self.send(text_data=json.dumps(event))
You now import the timezone module provided by Django. In the connect() method of the consumer, you retrieve the current user from the scope with self.scope['user'] and store them in a new user attribute of the consumer. When the consumer receives a message through the WebSocket, it gets the current time using timezone.now() and passes the current user and datetime in ISO 8601 format along with the message in the event sent to the channel group.
Edit the chat/room.html template of the chat application and find the following lines:
var data = JSON.parse(e.data);
var message = data.message;
var $chat = $('#chat');
$chat.append('<div class="message">' + message + '</div>');
Replace those lines with the following code:
var data = JSON.parse(e.data);
var message = data.message;
var dateOptions = {hour: 'numeric', minute: 'numeric', hour12: true};
var datetime = new Date(data['datetime']).toLocaleString('en', dateOptions);
var isMe = data.user === '{{ request.user }}';
var source = isMe ? 'me' : 'other';
var name = isMe ? 'Me' : data.user;
var $chat = $('#chat');
$chat.append('<div class="message ' + source + '">' +
             '<strong>' + name + '</strong> ' +
             '<span class="date">' + datetime + '</span><br>' +
             message +
             '</div>');
In this code, you implement these changes:
- You now convert the datetime received in the message to a JavaScript
Dateobject and format it with a specific locale. - You retrieve the user received in the message and make a comparison with two different variables as helpers to identify the user.
- The variable
sourcegets the valuemeif the user sending the message is the current user, orotherotherwise. You obtain the username using Django's template language with{{ request.user }}to check whether the message originated from the current user or another user. You then use thesourcevalue as aclassof the main<div>element to differentiate messages sent by the current user from messages sent by others. Different CSS styles are applied based on theclassattribute. - The variable
namegets the valueMeif the user sending the message is the current user or the name of the user sending the message otherwise. You use it to display the name of the user sending the message. - You use the username and the datetime in the message that you append to the chat log.
Open the URL http://127.0.0.1:8000/chat/room/1/ in your browser, replacing 1 with the id of an existing course in the database. With a logged-in user who is enrolled on the course, write a message and send it.
Then, open a second browser window in incognito mode to prevent the use of the same session. Log in with a different user, also enrolled on the same course, and send a message.
You will be able to exchange messages using the two different users and see the user and time, with a clear distinction between messages sent by the user and messages sent by others. The conversation between two users should look similar to the following one:

Figure 13.7: The chat room page with messages from two different user sessions
Modifying the consumer to be fully asynchronous
The ChatConsumer you have implemented inherits from the base WebsocketConsumer class, which is synchronous. Synchronous consumers are convenient for accessing Django models and calling regular synchronous I/O functions. However, asynchronous consumers present a higher performance, since they don't require additional threads when handling requests. Since you are using the asynchronous channel layer functions, you can easily rewrite the ChatConsumer class to be asynchronous.
Edit the consumers.py file of the chat application and implement the following changes:
import json
from channels.generic.websocket import AsyncWebsocketConsumer
from asgiref.sync import async_to_sync
from django.utils import timezone
class ChatConsumer(AsyncWebsocketConsumer):
    async def connect(self):
        self.user = self.scope['user']
        self.id = self.scope['url_route']['kwargs']['course_id']
        self.room_group_name = 'chat_%s' % self.id
        # join room group
        await self.channel_layer.group_add(
            self.room_group_name,
            self.channel_name
        )
        # accept connection
        await self.accept()
    async def disconnect(self, close_code):
        # leave room group
        await self.channel_layer.group_discard(
            self.room_group_name,
            self.channel_name
        )
    # receive message from WebSocket
    async def receive(self, text_data):
        text_data_json = json.loads(text_data)
        message = text_data_json['message']
        now = timezone.now()
        # send message to room group
        await self.channel_layer.group_send(
            self.room_group_name,
            {
                'type': 'chat_message',
                'message': message,
                'user': self.user.username,
                'datetime': now.isoformat(),
            }
        )
    # receive message from room group
    async def chat_message(self, event):
        # send message to WebSocket
        await self.send(text_data=json.dumps(event))
You have implemented the following changes:
- The
ChatConsumerconsumer now inherits from theAsyncWebsocketConsumerclass to implement asynchronous calls - You have changed the definition of all methods from
deftoasync def - You use
awaitto call asynchronous functions that perform I/O operations - You no longer use the
async_to_sync()helper function when calling methods on the channel layer
Open the URL http://127.0.0.1:8000/chat/room/1 with two different browser windows again and verify that the chat server still works. The chat server is now fully asynchronous!
Integrating the chat application with existing views
The chat server is now fully implemented and students enrolled on a course are able to communicate with each other. Let's add a link for students to join the chat room for each course.
Edit the students/course/detail.html template of the students application and add the following <h3> HTML element code at the bottom of the <div class="contents"> element:
<div class="contents">
  ...
  <h3>
    <a href="{% url "chat:course_chat_room" object.id %}">
      Course chat room
    </a>
  </h3>
</div>
Open the browser and access any course that the student is enrolled on to view the course contents. The sidebar will now contain a Course chat room link that points to the course chat room view. If you click on it, you will enter the chat room.

Figure 13.8: The course detail page, including a link to the course chat room
Summary
In this chapter, you learned how to create a chat server using Channels. You implemented a WebSocket consumer and client. You also enabled communication between consumers using a channel layer with Redis and modified the consumer to be fully asynchronous.
The next chapter will teach you how to build a production environment for your Django project using NGINX, uWSGI, and Daphne. You will also learn how to implement a custom middleware and create custom management commands.