DRAWING CIRCLES IN PERSPECTIVE
In this chapter, we will discuss the nature and drawing of circles in perspective, called ellipses. We will discuss practical techniques that are intended to aid the beginning drawing student in a fairly straightforward and accurate discussion and demonstration. Remember: Good drawing comes with a lot of practice, so once you understand what ellipses are—and how to draw them—practice whenever you are able. Nothing gives away an artist’s deficiencies more quickly than a drawing with poorly constructed ellipses; even to the untrained eye, lack of accuracy in drawn ellipses can usually be spotted, although the viewer may not quite understand what is wrong with the picture or how to fix the problem.

Ellipses: Foreshortened Circles

An ellipse is a circle in perspective. It sounds simple, yet many artists find it challenging to accurately draw them. Once you learn some simple rules and properties of ellipses, the mysteries will be revealed, and you can successfully and easily render them.
We see ellipses in objects all around us—rims of cups, bowls, and other cylindrical objects; wheels on cars, bicycles, and roller skates, etc. Observed straight on, these forms are circular, but it is much more common to see them at angles. Therefore, it is in the artist’s best interest to learn as much as possible about ellipses.
One of the most important elements that dictates how we see the shape of an ellipse is its relationship to eye level. Knowledge of eye level and its location is a key component in almost every drawing, but especially in regard to ellipses.
Attributes of Ellipses
All circles fit into a square. When drawing an ellipse, first visualize a circle within a square and then project it into perspective to observe the foreshortening that occurs. The circle is divided into equal quadrants by a horizontal axis and vertical axis. Notice what happens when the square and circle are projected into perspective space: The horizontal axis shortens in width, and the vertical axis shortens in height.

On this bottle, the horizontal axis is the major axis of the ellipse (red line). The vertical axis is the major axis of the bottle, but it is the minor axis of the ellipse (blue line). These axes are always at right angles to each other when a symmetrical object stands up straight on the ground plane. The major axis, or midline, of the bottle coincides with the ellipse’s minor axis and is perpendicular to the ellipse’s major axis. This is the rule when any symmetrical object’s base rests on the ground plane, such as the still-life objects in the image below.

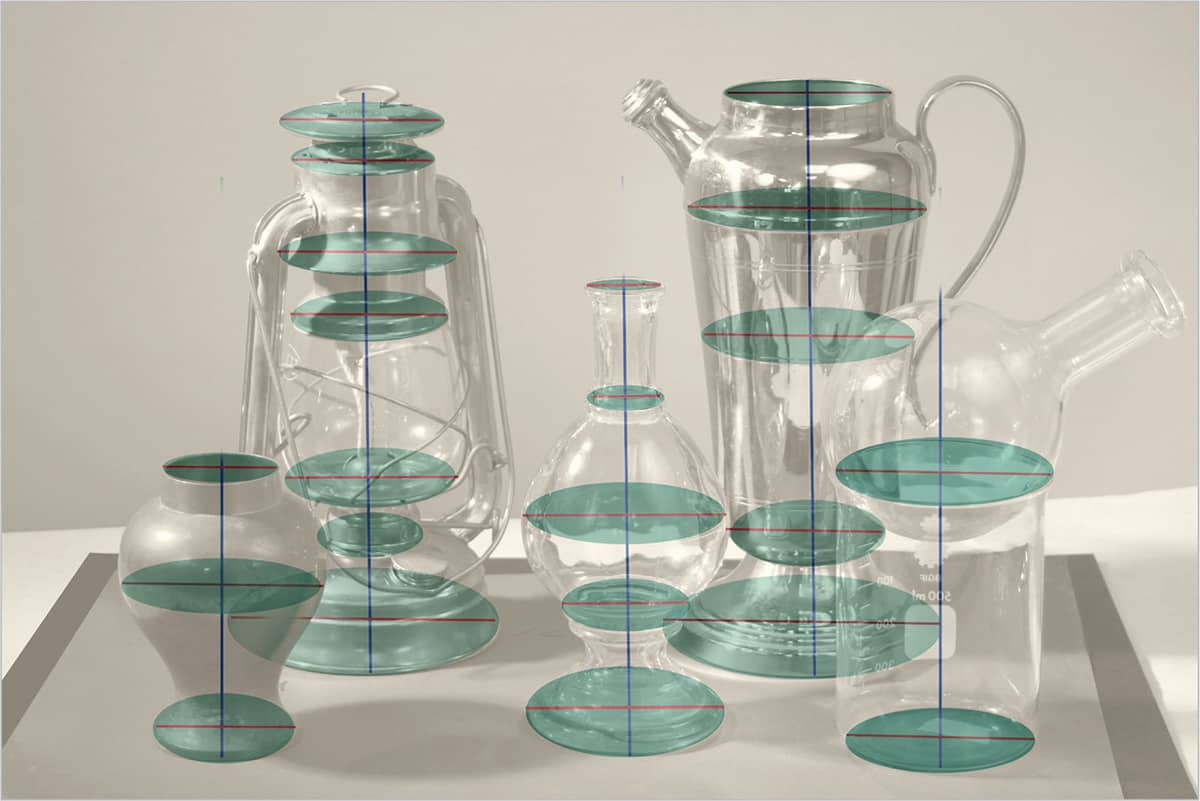
In this still life, notice the gradual change in length of the blue minor axes of the ellipses as they rise toward eye level. The relative width of the major axes (red) stays the same, however.
Size Ratio of Ellipses
Ellipses can be explained in degrees of angle to the viewer’s eye level, with 90˚ equal to a true circle and 0˚ when the ellipse is viewed at eye level. As an ellipse moves toward eye level, the length of the minor (vertical) axis is reduced. As an ellipse moves away from eye level, the length of the minor axis increases. Ellipses that are parallel to each other, or in similar locations horizontally, will have very similar size ratios (see image below).


THIS PHOTOGRAPH illustrates how ellipses relatively close to each other across a horizontal location are similar in their ratio of roundness. For instance, all of the ellipses at the objects’ bases (magenta) have similar ratios of roundness; let’s say 50˚. The middle, tan-colored ellipses are all around 30˚ to 35˚, and the very tops of the objects (purple) are about 10˚ to 15˚, as they are the closest to eye level.
Ellipses Not Parallel to the Ground Plane
As a circular object moves away from standing vertically on the ground plane, there are similarities and differences to the ellipses that we have already discussed.

Study this photograph of four pots resting horizontally on the ground. Notice that the pot farthest from the viewer has an ellipse for its rim that is almost a straight line; as the pots rotate around the ground plane toward the viewer, the ellipse of the rim rounds out more with each successive rotation toward the viewer.
Also note that the pots tend to shift away from eye level and farther down on the picture plane. The center midline axes of the pots also present more of a perspective angle to the viewer. These midline axes are directly related to the perspective angle of the side of each pot, bisecting its symmetry.

As the pots rotate toward the viewer from left to right, the ellipses become rounder, the blue midline (minor axis) becomes more of an acute angle to the picture plane, and the red major axis always stays at a right angle to the minor axis. The angle of the major axis of the pot (the minor axis of the ellipse) is dictated by the perspective construction angles of the sides of the pot.

Here is what the sketch of these pots would look like, with the major axis of the pot (also the minor axis of the ellipse) and the major axis of the ellipse sketched in lightly.
Drawing Ellipses in a Still Life
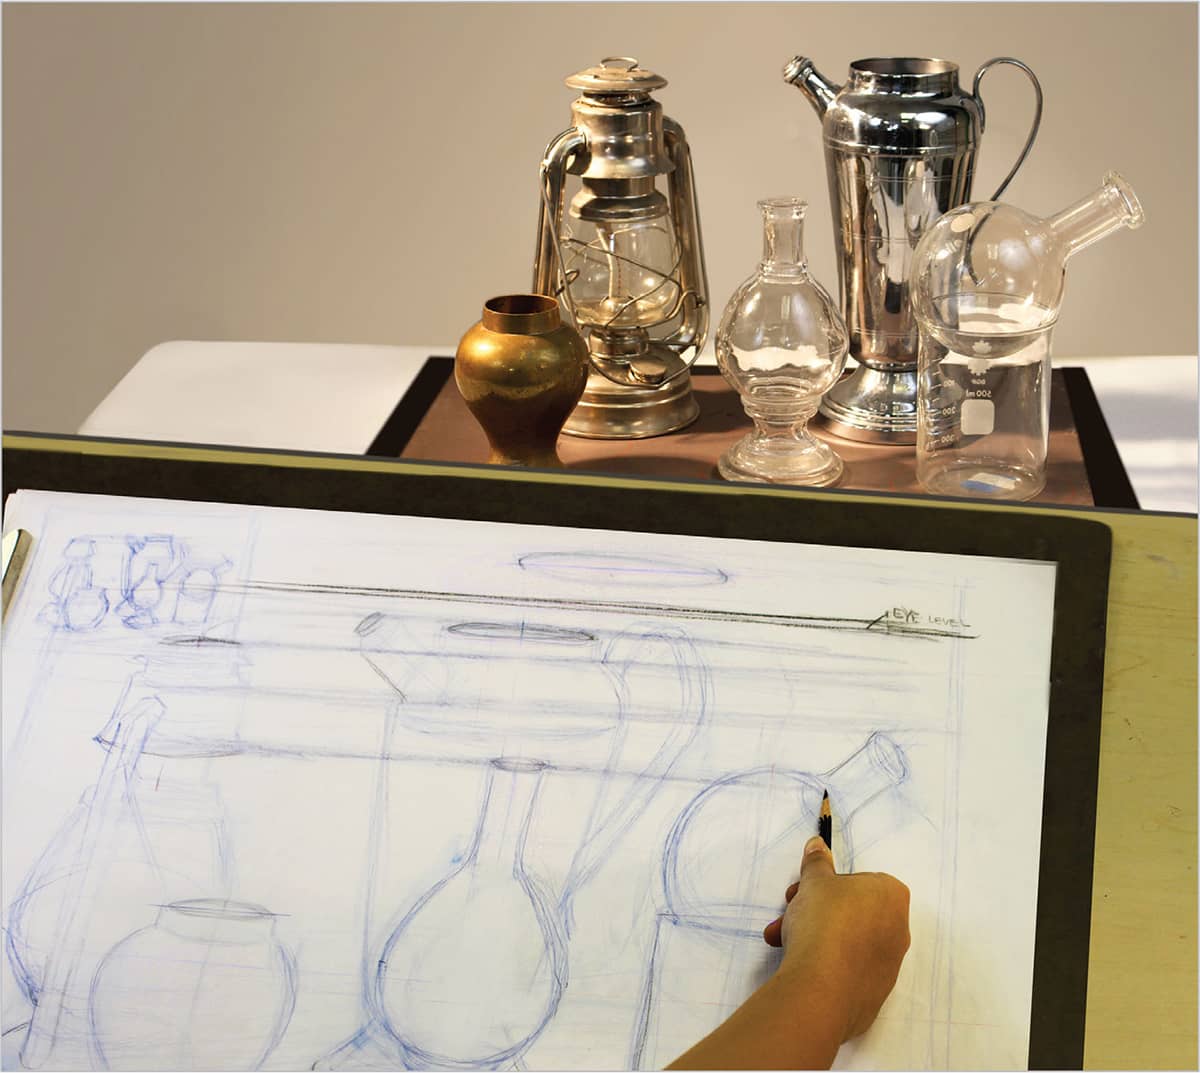
STEP 1 Make a quick thumbnail sketch in the corner to establish the objects. Then use a chopstick to see and apply visual relationships as you lightly sketch. To ensure height accuracy in each object, sketch light horizontal lines across the tops of objects and the ellipses of objects. This enables you to see which ellipses are on the same horizontal plane or on similar planes. You can then ensure that the ellipses are consistent within each plane.

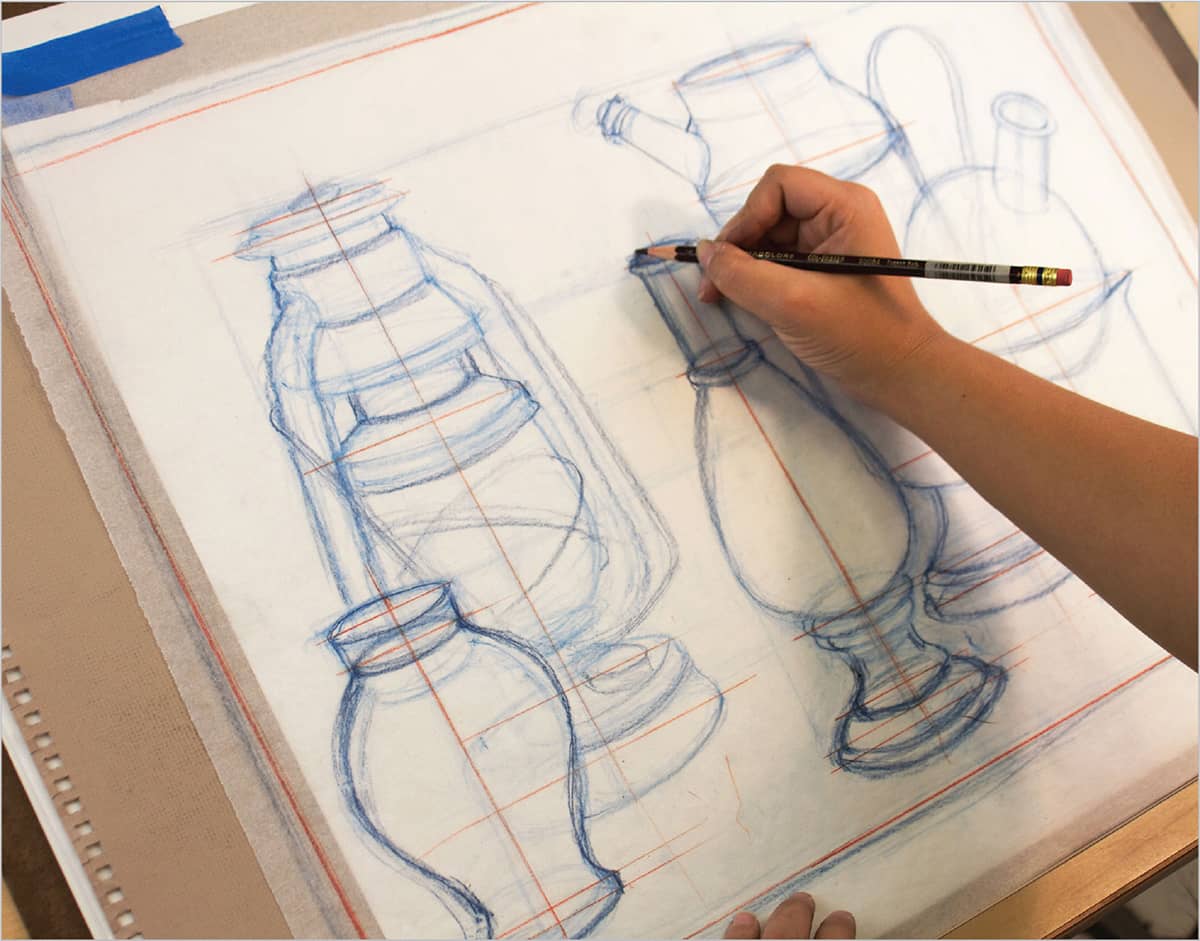
STEP 2 Draw the major axis of each object freehand, remembering that the midline axes of symmetrical objects are exactly vertical.

STEP 3 Check the integrity of the symmetry by using a chopstick to measure at several points along the length of each object. When all is accurate, strengthen the sketch with a contour line drawing over the light lines, using a darker graphite.
Transfer the Drawing
There are many ways to transfer a preliminary drawing to art paper for the final rendering. The method you choose depends on what type of paper is used, the value of the paper, and what type of final media will be used for rendering. Here is a technique for this type of project, which will be black-and-white colored pencil on dark gray toned art paper.

STEP 1 First tape a separate piece of white or tracing paper to the back of the drawing. This white sheet will enable you to see the line drawing when you apply dark pastel on the back of the tracing paper sketch after it is turned right-side up.

STEP 2 Use a dark coat of pastel, typically a combination of dark brown and black. Dark Conté crayons work equally well, as they have a waxy quality that makes for a nice, easy transfer. Liberally apply pastel to the back of the drawing and rub it in with your finger or a paper towel.
STEP 3 Turn the paper right-side up, with the sketch facing you, and tape it securely in place to the toned art paper. Then trace over your sketch. Use a different colored pencil for re-drawing/transferring so that you can clearly see what has already transferred.

STEP 4 With the initial sketch transferred to the toned drawing paper, you can develop the drawing to a full rendering. (Final tonal drawing by student Polly Hung.)
YOUR HOMEWORK
For your homework assignment, set up a simple still life (two or three objects), using glass and reflective-surface subjects. Create a line drawing using all the techniques for measuring and symmetry you’ve learned in this chapter. You’ll find it helpful to use objects of differing sizes and shapes.

STEP 1 Start by blocking in the overall sketch envelope around the still life, and create a gesture sketch, without a lot of refinement. Use a pencil or chopstick to check for accurate symmetry on each object. Draw the vertical midline (axis) for each object freehand.

STEP 2 Refine the midlines with a ruler or a triangle (use a red pencil for this), and further refine the contours and shape of each object.

STEP 3 Here is the finished contour line still life, with an indication of the ground plane.
EXERCISES FOR PRACTICE

The basic structure of the candlestick is mostly made up of ellipses and straight lines. If you like, you can start on a separate piece of paper to achieve the proportions you are happy with, and then trace onto the drawing paper.

Add the candle, wood grain, and window details using very light lines. An HB or 2B pencil with light pressure works best because the lines are easy to erase later if necessary. You can use a ruler to get the lines straight where needed.


