
1. Introducing Dreamweaver
Welcome to the world of Dreamweaver! The premiere Web design and development tool from Adobe may appear a little daunting at first, so this chapter shows you what’s what and what’s where. Once you understand what all the parts of its interface do, you’ll soon find that Dreamweaver is an invaluable application for creating and maintaining Web sites.
In this chapter, you’ll learn about the Dreamweaver Welcome screen and document window. Then you’ll see the plethora of toolbars and panels included with the software: the menu bar, the Document toolbar, the Style Rendering toolbar, the new Browser Navigation toolbar, and the Standard toolbar. The Status bar, Property Inspector, other panels, and the Insert panel are next, and then you’ll learn about the included workspace layouts, and how to set up your own custom workspace. Finally, there’s a summary of the new features in Dreamweaver CS5.
A Quick Tour of Dreamweaver
In this section, you’ll learn about the different windows, panels, pages, views, toolbars, and inspectors that make up the Dreamweaver experience. Whether you’re a novice to Web design, an experienced pro who’s new to Dreamweaver, or someone who primarily wants to know what’s new in Dreamweaver CS5, this will bring you up to speed.
The Welcome screen
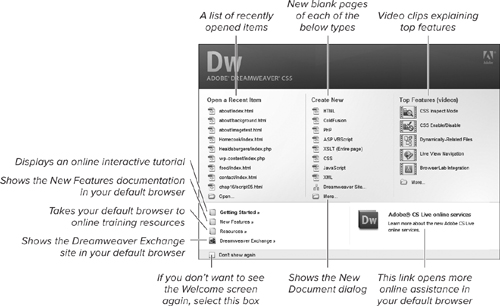
The first time you launch Dreamweaver, you’ll see the Welcome screen, as shown in ![]() . This page (which changes based on what you’ve recently done in Dreamweaver) is your starting point for creating and modifying pages and sites. If you close all your open Dreamweaver windows, the Welcome screen reappears.
. This page (which changes based on what you’ve recently done in Dreamweaver) is your starting point for creating and modifying pages and sites. If you close all your open Dreamweaver windows, the Welcome screen reappears.
![]() Dreamweaver’s Welcome screen will soon become familiar—but if you don’t want to see it, you can make it go away.
Dreamweaver’s Welcome screen will soon become familiar—but if you don’t want to see it, you can make it go away.
The Welcome screen consists of several sections:
• Open a Recent Item: This section contains a list of the nine most recently opened items in Dreamweaver. If you’ve opened fewer than nine, it shows just that number; if you’ve never used Dreamweaver, it appears with just a button showing an Open folder; clicking the button displays the Open dialog, just as if you had chosen File > Open.
• Create New: If you want to create a new page or site, this is the column for you. Choosing one of these options creates a new HTML, ColdFusion, PHP, ASP VBScript, XSLT, CSS, JavaScript, or XML file. You can also create a new Dreamweaver site. In addition, you can choose More, which will display the New Document dialog ![]() about which you’ll learn more later.
about which you’ll learn more later.
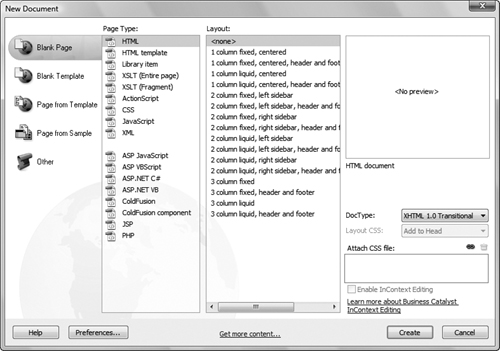
![]() The New Document dialog offers a multitude of choices.
The New Document dialog offers a multitude of choices.
• Top Features (videos): If you’re the type of person who likes video training, these clips open in your default browser and give you an overview of some of the new features in Dreamweaver CS5. This section may change from time to time as Adobe updates the video selection.
• Getting Started: Choosing this option gives you a quick tour of Dreamweaver’s functionality. You’ll see a short online tutorial on Adobe’s Web site.
• New Features: This opens the online new features documentation using your default browser.
• Resources: If, despite having this book, you still want further training, you can follow this link to find additional resources on Adobe’s site.
• More Help: This link, at the bottom-right corner of the window, takes you to Adobe’s Web site for more help resources.
• Dreamweaver Exchange: Dreamweaver is built with an extensible architecture—that is, it’s easy to add functionality to Dreamweaver that wasn’t included when it shipped. That’s done through a technology called extensions, which are bits of software that extend Dreamweaver’s capabilities.
You can get additional extensions through the Adobe Dreamweaver Exchange at www.adobe.com/exchange/, and then click on the Dreamweaver category. Some of them have an additional charge, and some are free, but it’s worth checking out what’s available when Dreamweaver alone doesn’t scratch your itch. See the bonus material “Customizing and Extending Dreamweaver” (www.dreamweaverbook.com) for more information.
• Don’t show again: Adobe knows that although some people love the Welcome screen, other people aren’t so fond of it. Throughout this book, you’ll see many examples of how you can personalize your copy of Dreamweaver so that it works just the way you want it to. Here, you can choose to never see the Welcome screen again.
If you reconsider, though, it’s easy to bring back the Welcome screen: in Dreamweaver, choose Edit (Windows)/Dreamweaver (Mac) > Preferences > General > Document Options, and select the Show Welcome Screen check box.
Editor setup (Windows only)
If you’ve just launched Dreamweaver for the first time and you’re using Windows, you’ll see a dialog before the Welcome screen ![]() . The Default Editor dialog lets you choose which file types you want to tell Windows to assign to Dreamweaver as the primary editor. In other words, when you double-click on a file with one of the listed extensions, Dreamweaver will launch to edit the file.
. The Default Editor dialog lets you choose which file types you want to tell Windows to assign to Dreamweaver as the primary editor. In other words, when you double-click on a file with one of the listed extensions, Dreamweaver will launch to edit the file.
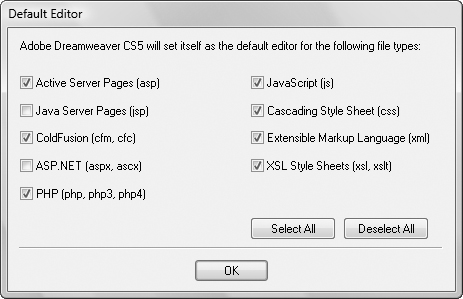
![]() Windows users will see the Default Editor dialog the first time they launch Dreamweaver.
Windows users will see the Default Editor dialog the first time they launch Dreamweaver.
Many of these file types are types that are used with the kinds of Web sites that we won’t be covering in this book, but unless you have a preference for a different editing program, there’s no harm in clicking the Select All button in the dialog. You should make sure that at least the JavaScript, Cascading Style Sheets, and Extensible Markup Language choices are selected. The Default Editor only appears the first time you run Dreamweaver.
The menu bar
The Dreamweaver menu bar looks about like what you’d expect to see on your platform. There is one big difference between the Windows menu bar ![]() and the Mac menu bar
and the Mac menu bar ![]() : the latter also contains a Dreamweaver menu. On it are the About Dreamweaver, Keyboard Shortcuts, and Preferences menu options. On Windows, the first can be found under Help, and the latter two under Edit. And of course, the Windows menu bar is part of the Dreamweaver window, whereas on the Mac the menu bar is always at the top of the screen.
: the latter also contains a Dreamweaver menu. On it are the About Dreamweaver, Keyboard Shortcuts, and Preferences menu options. On Windows, the first can be found under Help, and the latter two under Edit. And of course, the Windows menu bar is part of the Dreamweaver window, whereas on the Mac the menu bar is always at the top of the screen.
![]()
![]() The Dreamweaver menu bar on Windows.
The Dreamweaver menu bar on Windows.

![]() The Dreamweaver menu bar on a Mac, which includes an additional Dreamweaver menu and the Application Bar below.
The Dreamweaver menu bar on a Mac, which includes an additional Dreamweaver menu and the Application Bar below.
The other big difference is that on Windows, the Layout, Extend Dreamweaver, Site, and Workspace menus, and the Search online help field, which together are called the Application Bar, usually (if the window is maximized or wide enough) appear as part of the menu bar. On Mac, these appear in a separate toolbar below the menu bar.
Tip
On both platforms, you can turn the Application Bar off (and on Mac, recover some valuable vertical screen real estate) by choosing Window > Application Bar. Since the Application Bar contains items that you probably won’t use every day (and are also available via the regular menu bar), hiding it is usually a good idea.
Tip
On Windows, the right side of the menu bar includes a CS Live menu, which provides access to hosted Adobe services such as BrowserLab (which you can get to in other ways from Dreamweaver, as discussed in Chapter 3) and other services that are outside the scope of this book.
The document window
Now that you’ve opened a file, you see the document window and all its surrounding panels, inspectors, and so on ![]() . It may look busy and cluttered at first, but you’ll soon learn your way around.
. It may look busy and cluttered at first, but you’ll soon learn your way around.
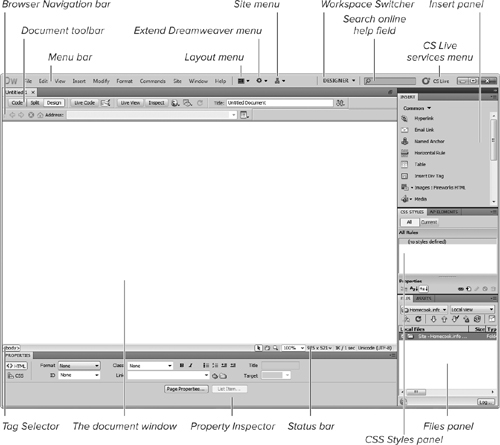
![]() This shows your basic vanilla Dreamweaver document window, but you can modify it to fit your work habits.
This shows your basic vanilla Dreamweaver document window, but you can modify it to fit your work habits.
The document window shown here is a blank white Web page, ready for you to add your design and content. If you want, you can just click inside the window and start typing away! The details of creating a Web page are covered in Chapter 3.
If you have multiple files open at once (a fairly common occurrence), you’ll see a row of tabs across the top of the document window ![]() . To go from one file to another, just click the name of the file you want to edit.
. To go from one file to another, just click the name of the file you want to edit.
![]()
![]() Switch from document to document by clicking the tab with the document name.
Switch from document to document by clicking the tab with the document name.
Don’t like tabs? Dreamweaver lets you get rid of them:
• Windows: When you open a document in Dreamweaver, click the Restore Down button ![]() in the top-right corner of the document window (not the one in the Dreamweaver window). Once one document has been moved into its own window, all the others automatically move, too. To go back to the original view, click the Maximize button (which has replaced the Restore Down button) in the top-right corner of any of the open document windows.
in the top-right corner of the document window (not the one in the Dreamweaver window). Once one document has been moved into its own window, all the others automatically move, too. To go back to the original view, click the Maximize button (which has replaced the Restore Down button) in the top-right corner of any of the open document windows.
![]()
![]() On Windows, the Restore Down button changes Dreamweaver from a tabbed view to a multiple document view.
On Windows, the Restore Down button changes Dreamweaver from a tabbed view to a multiple document view.
• Mac: Tabs are the normal interface in Windows, so Windows users have to manually lose the tabs any time they want to do without them. Mac users, though, only got tabs with Dreamweaver 8. For that reason, Dreamweaver allows Mac users to choose whether to get rid of tabs permanently (older Dreamweaver/Mac behavior), to force windows to always show tabs (Windows behavior), or to open documents in tabs, but only when two or more documents are open (new Dreamweaver/Mac behavior). These can be set by choosing Dreamweaver > Preferences > General > Document Options and selecting your preferred combination of “Open documents in tabs” and “Always show tabs.”
The Document toolbar
Below any document tabs you have open, you’ll find the Document toolbar (Windows: ![]() , Mac:
, Mac: ![]() ). The Document toolbar consists of three parts:
). The Document toolbar consists of three parts:
• View mode buttons: These let you choose between Design, Code, and Split views of your document. This area also includes the Live Code and Live View buttons, and the new CSS Inspect button. See “Using document views” for more on what each of these does and when you’d want to choose each. Live Code is discussed in Chapter 17, “Editing Code.”
• The page title: Every page needs a descriptive title, and here’s where you’ll change yours. The page title, and how it differs from the name of a page, will be covered in Chapter 3, “Building Your First Page.”
• Miscellaneous buttons: These contain everything from a “preview in browser” button, to a button to validate content, to a button to show additional visual aids inside Dreamweaver.
![]()
![]() The Document toolbar on Windows.
The Document toolbar on Windows.
![]()
![]() The Document toolbar on a Mac.
The Document toolbar on a Mac.
Using document views
The six document views allow you to choose which version of the document you want to see:
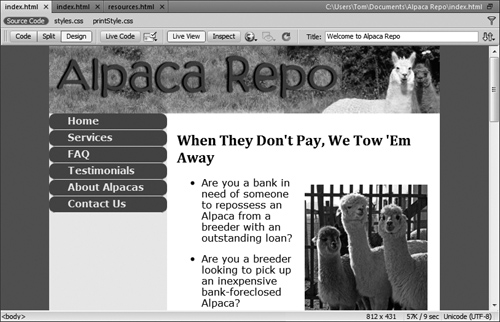
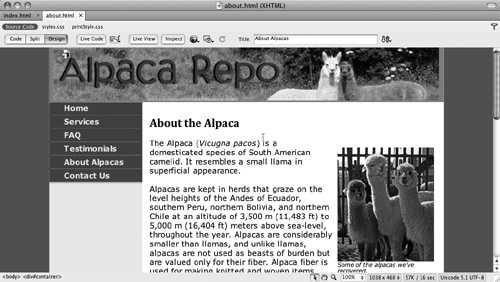
• Design: ![]() shows a simple Web page in the Design view. This mode, known as WYSIWYG (What You See Is What You Get), allows you to get an idea of how your page will appear when viewed in a browser. For the most part, almost everything you want to do in Dreamweaver can be done in the Design view, and this book will be largely about what you can do here (except for Chapter 15, “Working with Content Management Systems,” and Chapter 17, “Editing Code”).
shows a simple Web page in the Design view. This mode, known as WYSIWYG (What You See Is What You Get), allows you to get an idea of how your page will appear when viewed in a browser. For the most part, almost everything you want to do in Dreamweaver can be done in the Design view, and this book will be largely about what you can do here (except for Chapter 15, “Working with Content Management Systems,” and Chapter 17, “Editing Code”).
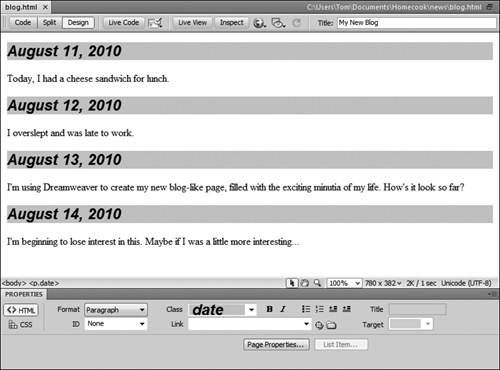
![]() A simple Web page displayed in the Design view.
A simple Web page displayed in the Design view.
• Code: ![]() shows the exact same page in the Code view. Here’s what the underlying markup and tags look like. Although Chapter 17 will cover the ins-and-outs of tags, many people work quite well with Dreamweaver without ever using the Code view. Note that in the Code view, you get a new toolbar (also covered in Chapter 17) at the left side of the document window, with specialized tools to work with code.
shows the exact same page in the Code view. Here’s what the underlying markup and tags look like. Although Chapter 17 will cover the ins-and-outs of tags, many people work quite well with Dreamweaver without ever using the Code view. Note that in the Code view, you get a new toolbar (also covered in Chapter 17) at the left side of the document window, with specialized tools to work with code.
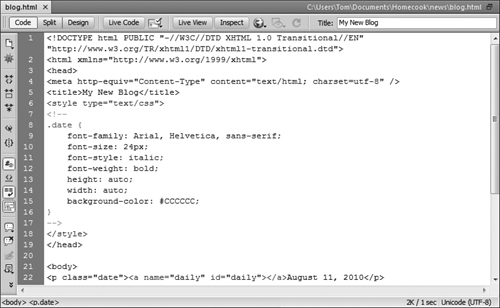
![]() The same Web page displayed in the Code view.
The same Web page displayed in the Code view.
• Split: ![]() shows the same page, again, in the Split view. If you can’t decide whether you want to look at Code or Design, Split lets you have the best of both, with code in one pane, and the WYSIWYG view in another. It’s a great way to start to learn about markup, and it’s also handy for control freaks (you know who you are) who want to tweak their tags to be just so, and simultaneously see how their design looks. You can resize the amount of space taken up by each of the two views by dragging the split bar between the two panes. With the View > Split Vertically and View > Design View on commands, you can also choose to have the split vertical or horizontal, and to have the Design view in the left or top panes rather than the default right or bottom panes.
shows the same page, again, in the Split view. If you can’t decide whether you want to look at Code or Design, Split lets you have the best of both, with code in one pane, and the WYSIWYG view in another. It’s a great way to start to learn about markup, and it’s also handy for control freaks (you know who you are) who want to tweak their tags to be just so, and simultaneously see how their design looks. You can resize the amount of space taken up by each of the two views by dragging the split bar between the two panes. With the View > Split Vertically and View > Design View on commands, you can also choose to have the split vertical or horizontal, and to have the Design view in the left or top panes rather than the default right or bottom panes.
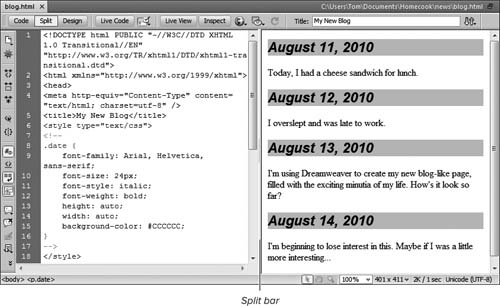
![]() And the same Web page displayed in the Split view.
And the same Web page displayed in the Split view.
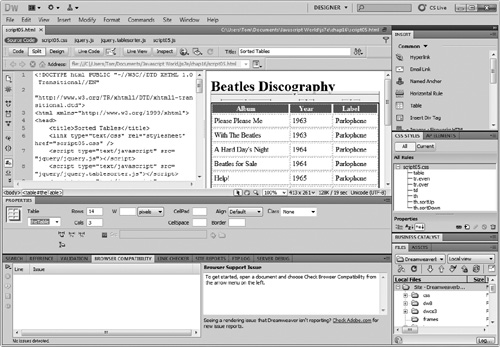
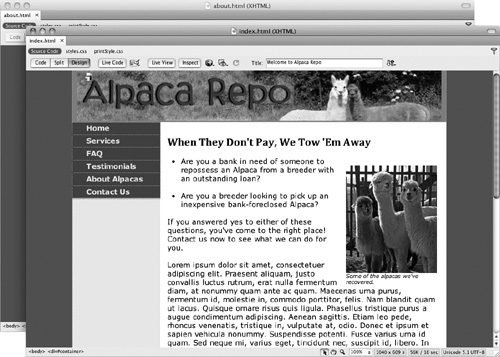
• Live View: This view is perfect for giving you a good idea of what pages powered by JavaScript or other code will look like in a browser. In versions prior to Dreamweaver CS4, you could only see the static version of a page in Dreamweaver; to see the dynamic view, you needed to view the page in a separate Web browser. With Live View, a browser engine (the cross-platform WebKit, the engine used by Apple’s Safari and Google’s Chrome browsers) is built into Dreamweaver, and clicking the Live View button displays the page using WebKit in the document window ![]() .
.
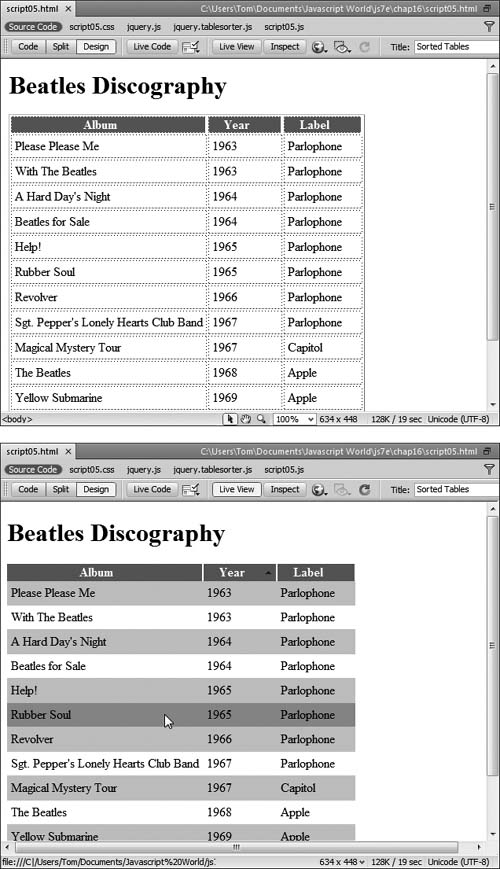
![]() Live View allows you to see how a page looks in Dreamweaver’s regular editing mode (top) and how it would look rendered in a browser (bottom). Note how in Live View the table shows CSS styling, as well as its Ajax-driven ability to sort the table by clicking its column headings.
Live View allows you to see how a page looks in Dreamweaver’s regular editing mode (top) and how it would look rendered in a browser (bottom). Note how in Live View the table shows CSS styling, as well as its Ajax-driven ability to sort the table by clicking its column headings.
• Live Code: This button splits the window into Live View in the Design pane and opens the Code pane. If your Web page uses JavaScript or Ajax for visual effects, the scripts will actually be rewriting the HTML under script control as the user interacts with the page. Live Code view allows you to see how the HTML changes as you interact with the page in the Design pane. You’ll learn more abut Live Code view in Chapter 17.
• Inspect: This button also enhances Live View. It allows you to turn on CSS Inspect mode, which outlines and highlights the CSS block styles in the Design pane as you move the cursor over the different blocks. There’s more about CSS Inspect mode in Chapter 9.
The Browser Navigation toolbar
The new Browser Navigation toolbar ![]() allows you to navigate from page to page when you are using Live View, in a natural way. It includes an address field and the usual Back, Forward, Refresh, and Home buttons. It also includes a button that allows you to access Live View Options.
allows you to navigate from page to page when you are using Live View, in a natural way. It includes an address field and the usual Back, Forward, Refresh, and Home buttons. It also includes a button that allows you to access Live View Options.
![]()
![]() The new Browser Navigation toolbar allows you to move between pages in your site, much as you would in a stand-alone Web browser.
The new Browser Navigation toolbar allows you to move between pages in your site, much as you would in a stand-alone Web browser.
The Related Files bar
Modern Web pages often have several supporting files that help make up the page. For example, what appears to the user as a single Web page may actually consist of an HTML file, a CSS file, and a JavaScript file. The Related Files feature adds a bar with the names of these supporting files under the documents tab ![]() . You’ll learn more about using the Related Files feature in Chapters 7 and 15.
. You’ll learn more about using the Related Files feature in Chapters 7 and 15.

![]() The Related Files bar makes it easy to switch to files that are attached to the current document, such as CSS or JavaScript files.
The Related Files bar makes it easy to switch to files that are attached to the current document, such as CSS or JavaScript files.
Other toolbars
If you right-click in a blank part of the Document toolbar, you’ll see that there are two other bars that aren’t enabled by default:
• Style Rendering bar: If you’ve set up your CSS style sheets so that your pages appear differently in, for example, a screen view versus a page designed for printing, this is what you’ll use to switch between the two style renderings ![]() . Most of the time, you’ll just want the default screen view. The Toggle button works a little differently: It toggles the page between a view that includes the rendered CSS styles and a view with CSS styles turned off.
. Most of the time, you’ll just want the default screen view. The Toggle button works a little differently: It toggles the page between a view that includes the rendered CSS styles and a view with CSS styles turned off.
![]()
![]() The Toggle button on the Style Rendering toolbar allows you to view the page with and without any attached CSS styles.
The Toggle button on the Style Rendering toolbar allows you to view the page with and without any attached CSS styles.
• Standard bar: While Adobe refers to this bar as “standard,” it’s actually used to make Dreamweaver feel more like a word processing application ![]() . Some examples of what it contains—New, Open, Save, Print, Cut, Copy, Paste—give you an idea of what’s here. As with the Style Rendering bar, the chances are that Adobe’s default for these toolbars (off) is what you’ll want to use.
. Some examples of what it contains—New, Open, Save, Print, Cut, Copy, Paste—give you an idea of what’s here. As with the Style Rendering bar, the chances are that Adobe’s default for these toolbars (off) is what you’ll want to use.
![]()
![]() The little-used Standard toolbar gives you access to functions such as Save, Copy, Paste, and Undo.
The little-used Standard toolbar gives you access to functions such as Save, Copy, Paste, and Undo.
You can turn off any of the four toolbars (Style Rendering, Document, Standard, or Browser Navigation) if you want the cleanest possible layout (for instance, if you’re working on a very small screen). To turn them back on, choose View > Toolbars, and select the ones you want to see again.
The Status bar
The Status bar is the bottommost part of the document window. It’s often also referred to as the tag selector, although that’s really the correct name for just the leftmost part. Click anywhere in a document, and the tag selector shows you the current tags based on the current location of the cursor. You can then click any of the tags in the tag selector ![]() to select everything contained within that tag. Clicking the
to select everything contained within that tag. Clicking the <body> tag always selects the entire contents of the page.

![]() The tag selector at the bottom of the document window makes it easy to select all the contents of a tag.
The tag selector at the bottom of the document window makes it easy to select all the contents of a tag.
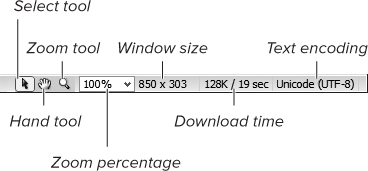
The rightmost side of the Status bar contains more controls ![]() . The Select, Hand, and Zoom tools let you (respectively) select objects on the page, scroll around the page, and zoom into the page. The next control shows the current zoom percentage of the page. After that is the window size currently being displayed
. The Select, Hand, and Zoom tools let you (respectively) select objects on the page, scroll around the page, and zoom into the page. The next control shows the current zoom percentage of the page. After that is the window size currently being displayed ![]() ; click this to get a pop-up menu of available window sizes (on Windows, this only works when the document window is not maximized). Next is an estimate of how long it would take a browser to download this page. If you don’t like the default values for these last two controls, you can change either or both by selecting Edit Sizes from the pop-up menu. We’ll cover this more extensively in Chapter 8. Finally, the status bar tells you the document text encoding for the page. The encoding tells the browser which character set should be used to display the fonts on the page.
; click this to get a pop-up menu of available window sizes (on Windows, this only works when the document window is not maximized). Next is an estimate of how long it would take a browser to download this page. If you don’t like the default values for these last two controls, you can change either or both by selecting Edit Sizes from the pop-up menu. We’ll cover this more extensively in Chapter 8. Finally, the status bar tells you the document text encoding for the page. The encoding tells the browser which character set should be used to display the fonts on the page.
![]() The controls on the right side of the Status bar.
The controls on the right side of the Status bar.
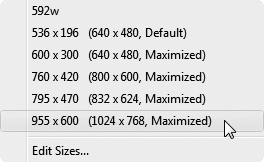
![]() Use this pop-up menu to choose the dimensions of your document window.
Use this pop-up menu to choose the dimensions of your document window.
The Property Inspector
At the bottom of the screen is the Property Inspector ![]() . Based on what is selected in the document window, different options appear in this inspector; that is, if you’ve selected some text, you’ll see text options, but if you’ve selected an image, image options appear. The Property Inspector can be used to view and modify the displayed options. The many uses of the Property Inspector will be covered throughout the rest of the book.
. Based on what is selected in the document window, different options appear in this inspector; that is, if you’ve selected some text, you’ll see text options, but if you’ve selected an image, image options appear. The Property Inspector can be used to view and modify the displayed options. The many uses of the Property Inspector will be covered throughout the rest of the book.
![]()
![]() The HTML tab of the Property Inspector.
The HTML tab of the Property Inspector.
In the lower-right corner of the inspector is an expand/collapse triangle. Depending on its current state, this either expands or collapses the inspector. This lets you choose whether you want to display the extra information shown in the bottom half.
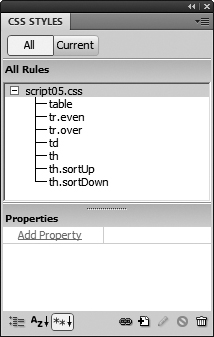
The Property Inspector has two tabs, HTML and CSS. Depending on which tab you’re on, Dreamweaver will apply properties of that type. For example, if you’re on the HTML tab, select some text in the document window, click the Italic button, and Dreamweaver will apply the style using the HTML <em> tag. If you’re on the CSS tab of the Property Inspector ![]() , select some text, click the Italic button, and Dreamweaver will walk you through creating a new CSS style rule for the selection.
, select some text, click the Italic button, and Dreamweaver will walk you through creating a new CSS style rule for the selection.
![]()
![]() The CSS tab of the Property Inspector.
The CSS tab of the Property Inspector.
The Panels
Along the right side of the Dreamweaver window are panels. In the default installation of Dreamweaver ![]() , the Insert, CSS Styles, AP Elements, Business Catalyst (a Web site hosting service from Adobe), Files, and Assets panels are visible and docked (in the default Designer workspace; more about workspaces later in this chapter). Also available, although not visible until you turn them on, are Databases, Bindings, Server Behaviors, Components, Snippets, Tag Inspector, Behaviors, History, Frames, Code Inspector, and Results. These can all be found under the Window menu.
, the Insert, CSS Styles, AP Elements, Business Catalyst (a Web site hosting service from Adobe), Files, and Assets panels are visible and docked (in the default Designer workspace; more about workspaces later in this chapter). Also available, although not visible until you turn them on, are Databases, Bindings, Server Behaviors, Components, Snippets, Tag Inspector, Behaviors, History, Frames, Code Inspector, and Results. These can all be found under the Window menu.
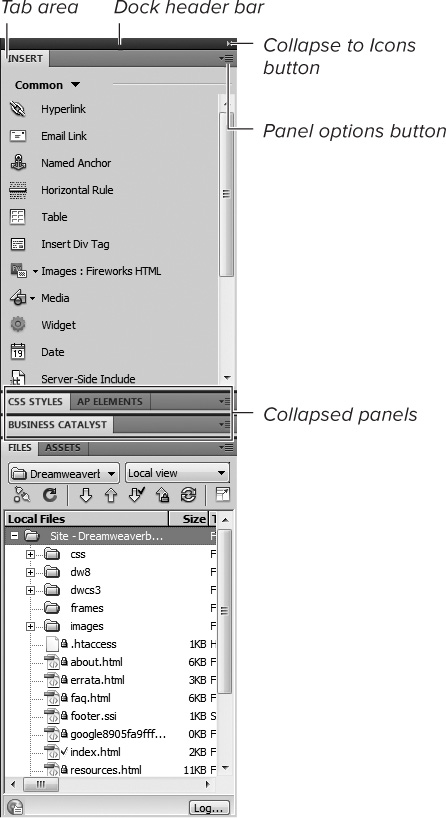
![]() A panel and its parts.
A panel and its parts.
The different panels appear by default in the dock area on the right side of the screen. You can move this area to the left side of the screen by dragging the dock header bar at the top of the stack of docked panels.
You can hide, show, move, resize, and rearrange panels to fit the way that you work. There are controls on each panel that help you do these things:
• Tab area: At the top of each panel, next to the tab with its name, is a dark gray area. This is the tab area. Click and drag this to move the panel to a new location. If you drag the panel out of the dock area, you undock the panel ![]() , and the dock header bar appears. To dock the panel again, use the tab area to drag the panel back into the dock area.
, and the dock header bar appears. To dock the panel again, use the tab area to drag the panel back into the dock area.
![]() An undocked panel has a dock header bar with a close box.
An undocked panel has a dock header bar with a close box.
Double-clicking the tab area will expand and collapse it to show either the whole panel or just the tab area. You can also resize a panel by clicking and dragging its left or bottom edge.
• Dock header bar: The bar across the top of an undocked panel is the dock header bar. Click and drag the dock header bar to move the panel to a new location. Clicking the close box (Windows) or close button (Mac) closes the panel group; it does not re-dock it. To re-dock, drag the panel back into the dock.
• Collapse to Icons button: You can reduce screen clutter by clicking the Collapse to Icons button at the upper-right corner of the dock, which shrinks the panels to icons ![]() . To use the iconic panel, click its icon, and the panel appears as a drawer next to the dock
. To use the iconic panel, click its icon, and the panel appears as a drawer next to the dock ![]() .
.
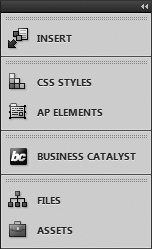
![]() If you need more screen space, you can shrink your panels to icons in the dock area.
If you need more screen space, you can shrink your panels to icons in the dock area.
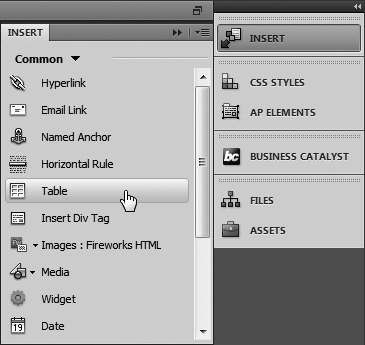
![]() Clicking a panel icon opens the panel in a drawer next to the dock area.
Clicking a panel icon opens the panel in a drawer next to the dock area.
• Panel options button: If you click the panel options button, a menu appears that gives you a variety of options ![]() based on which panel and tab you’re currently on. This example shows the options for the Insert panel. From here, you can hide the labels in the Insert panel, or show its icons in color. The ability to close tabs and move tabs from one panel to another allows you to set up Dreamweaver to work just the way you want it.
based on which panel and tab you’re currently on. This example shows the options for the Insert panel. From here, you can hide the labels in the Insert panel, or show its icons in color. The ability to close tabs and move tabs from one panel to another allows you to set up Dreamweaver to work just the way you want it.
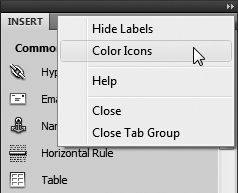
![]() Different panels have different menu options, but these are the most common.
Different panels have different menu options, but these are the most common.
Tip
Panels have an occasional tendency to go missing. If you have a situation where the Window menu says a panel is open but you can’t find it anywhere, choose Window > Arrange Panels to make all currently open panels visible again.
Tip
If you want to completely concentrate on working in your document window, you can hide the dock with all of the panels and the Property Inspector by pressing F4, or by choosing Window > Hide Panels. The panels and inspector shrink down to a thin gray strip on the right and bottom edges of your screen called the reveal strip. Click on a reveal strip to briefly show the dock or Property Inspector; it will shrink back down after a short delay when you move the cursor away. Press F4 or use the menu choice again to bring the hidden elements back for good.
The Insert panel
In the default Designer workspace, the top panel is the Insert panel ![]() . As you might have guessed, the Insert panel is used to insert content and objects into your Web page.
. As you might have guessed, the Insert panel is used to insert content and objects into your Web page.
![]() The Insert panel contains many of the tools you’ll use most often to insert objects on your Web pages.
The Insert panel contains many of the tools you’ll use most often to insert objects on your Web pages.
The Insert panel has eight different categories, which you can switch between with a pop-up menu. You get different tools in each category:
• Common: This set of objects contains most commonly used objects, such as links and images.
• Layout: This tab includes divs, tables, and frames: all objects that let you describe how you want to lay out your page.
• Forms: The Forms set includes form elements such as text fields, buttons, and check boxes.
• Data: If you’re someday going to work with external data such as databases, that’s when you’ll use the Data set.
• Spry: Spry is a JavaScript library for designers and developers that allows them to add rich page functionality using Ajax widgets, such as menus, form validation, and tabbed panels. The Spry tab allows you to insert Spry widgets onto your pages, with no coding required.
• InContext Editing: InContext Editing (ICE) is a hosted service that Adobe introduced with Creative Suite 4. It allows users to make relatively simple edits to their Web pages from a Web browser, with no other software required. In Dreamweaver, the Insert panel allows you to add certain areas to pages to make them available to ICE end users. We discuss ICE in more detail in “Working with Other Applications,” part of the bonus material on the companion Web site (www.dreamweaverbook.com).
• Text: The text tab doesn’t actually contain objects to insert on the page; instead, it lets you style text that’s already on the page.
• Favorites: This starts off empty, but you can modify it to contain just what you’d like it to have. To do this, choose the Favorites set, and then right-click. You’ll be presented with a dialog that allows you to add your most commonly used objects.
Tip
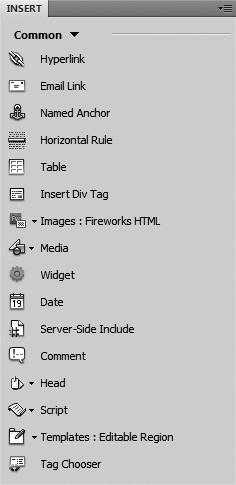
The Insert panel is just a different orientation of the Insert bar, which was the staple of all past versions of Dreamweaver. If you’re a long-time user and miss the Insert bar, just drag the Insert panel’s tab above the document window, and the panel will transform back into the familiar Insert bar ![]() . You lose a little vertical space for your document window, but you get back an old friend.
. You lose a little vertical space for your document window, but you get back an old friend.
![]()
![]() If you’re an old-school Dreamweaver user, you can turn the Insert panel back into the Insert bar.
If you’re an old-school Dreamweaver user, you can turn the Insert panel back into the Insert bar.
Tip
If you’re ever wondering what an icon on the Insert bar does, just move your cursor over it—a tool tip will appear with the icon’s name. If there’s a small black triangle to the right of an icon, that means this object contains related tools and objects. Click the object to view the pop-up menu of choices.
Setting Up Your Workspace
It’s not just a matter of deciding what you do want to see—setting up your workspace also means figuring out what you don’t want to see. Given the toolbars and all the possible panels and the Property Inspector, you can run out of room for the actual Web page you’re trying to work on ![]() . In Dreamweaver’s parlance, a workspace is an arrangement of panels, the dock, the document window, and the Property Inspector. Here’s how to set up a workspace that works for you.
. In Dreamweaver’s parlance, a workspace is an arrangement of panels, the dock, the document window, and the Property Inspector. Here’s how to set up a workspace that works for you.
![]() Not all the tools and panels are visible, but this is already an unusable workspace.
Not all the tools and panels are visible, but this is already an unusable workspace.
The included workspace layouts
Dreamweaver CS5 has preset workspaces that look and work the same on Windows and Mac, and are designed for different classes of users:
• App Developer
• App Developer Plus
• Classic
• Coder
• Coder Plus
• Designer (the default workspace)
• Designer Compact
• Dual Screen
These workspaces rearrange the document window, panels, and Property Inspector to work more efficiently for each type of user.
The Dual Screen layout isn’t associated with a kind of user; rather, it attempts to make the best of your hardware. If you’re lucky enough to have two (or more) monitors, the Dual Screen layout attempts to make the most of all of them. For example, the document window is expanded to cover the whole primary monitor, and the panels are moved onto the secondary monitor.
You switch between the different layouts with the Workspace Switcher in the Application Bar ![]() . Just choose from the pop-up menu to switch between workspaces.
. Just choose from the pop-up menu to switch between workspaces.
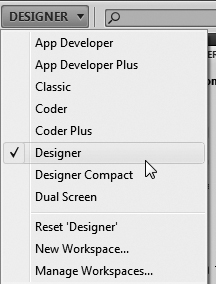
![]() The Workspace Switcher makes it easy to change between workspace layouts.
The Workspace Switcher makes it easy to change between workspace layouts.
Saving custom layouts
Chances are that the workspaces that come with Dreamweaver aren’t likely to be exactly what you want. No problem! You can save your own workspaces.
To save a custom workspace
1. Set up your layout just the way you want it. Show or hide panels, and drag them to where you want.
2. From the Workspace Switcher menu, choose New Workspace.
The New Workspace dialog appears ![]() .
.
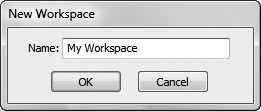
![]() Give your new custom workspace a name.
Give your new custom workspace a name.
3. Enter a name for your custom workspace, and then click OK.
Your new workspace appears at the top of the Workspace Switcher menu.
Tip
If at any point you’ve added, deleted, and moved around panels and documents to the point where everything’s all over the place, you can always go back to the original layout for any workspace by first choosing it from the Workspace Switcher menu, and then choosing Reset [workspace name] from the same menu.
To delete or rename a custom workspace
1. If you later decide that you don’t want a custom workspace any more, or want to give it another name, you can change it. From the Workspace Switcher menu, choose Manage Workspaces.
The Manage Workspaces dialog appears ![]() .
.
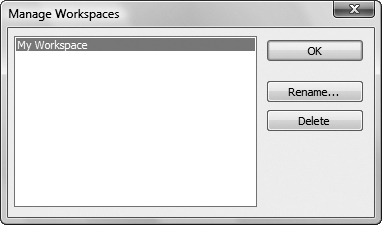
![]() The Manage Workspaces dialog lets you rename or delete your custom layouts.
The Manage Workspaces dialog lets you rename or delete your custom layouts.
2. Select the workspace you want to change, and then delete or rename your custom layout (but you can’t do this to any of the included layouts).
Managing windows
You may want your documents to open in tabs sometimes and in their own windows sometimes. It’s easy to go back and forth between these two options and to set your documents to appear just the way you want them. It’s a little different on each platform.
To manage windows (Windows)
• Starting with the default tabbed layout ![]() , choose Window > Cascade. Your document windows appear in a cascade—each slightly lower and to the right of the one behind it
, choose Window > Cascade. Your document windows appear in a cascade—each slightly lower and to the right of the one behind it ![]() .
.
![]() The default tabbed layout that you’ve seen before.
The default tabbed layout that you’ve seen before.
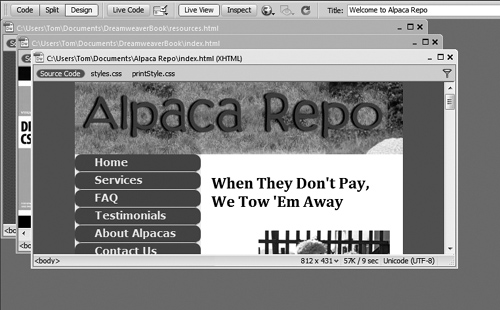
![]() Your three document windows, displayed in a cascade.
Your three document windows, displayed in a cascade.
or
• Starting with the default tabbed layout ![]() , choose Window > Tile Horizontally. Your document windows appear tiled horizontally with the available space split evenly between them
, choose Window > Tile Horizontally. Your document windows appear tiled horizontally with the available space split evenly between them ![]() .
.
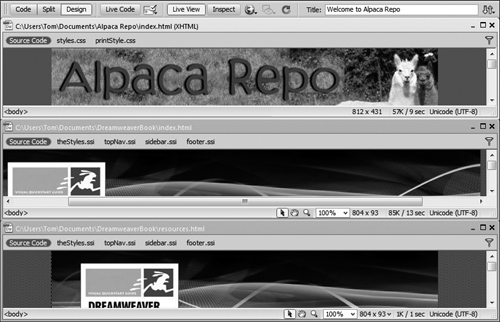
![]() Your three document windows, tiled horizontally.
Your three document windows, tiled horizontally.
or
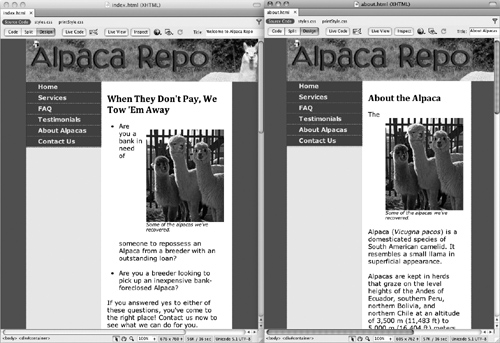
• Starting with the default tabbed layout ![]() , choose Window > Tile Vertically. Your document windows appear tiled vertically with the available space split evenly between them
, choose Window > Tile Vertically. Your document windows appear tiled vertically with the available space split evenly between them ![]() .
.
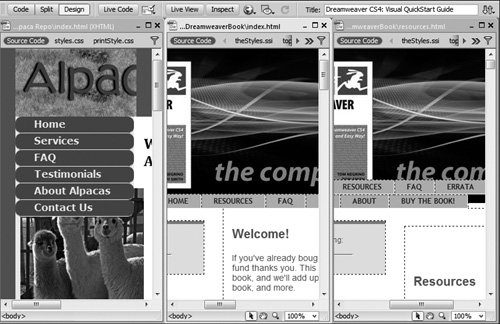
![]() Your three document windows, tiled vertically.
Your three document windows, tiled vertically.
Tip
To return to the tabbed window view, click the Maximize button in the top-right corner of any document. This puts all open windows back in their place.
Tip
There’s one good reason to have your documents opened in separate windows: it’s the only way a Windows user can use the pop-up menu of available window sizes (see figure ![]() in “The Status bar” section).
in “The Status bar” section).
Tip
Having trouble getting from document to document because one is behind another? All open documents are available for the choosing at the bottom of the Window menu.
To manage windows (Mac)
• Starting with the default tabbed layout ![]() , choose Window > Cascade. Your document windows appear in a cascade—each slightly lower and to the right of the one behind it
, choose Window > Cascade. Your document windows appear in a cascade—each slightly lower and to the right of the one behind it ![]() .
.
![]() The default tabbed layout on the Mac.
The default tabbed layout on the Mac.
![]() The two document windows in a cascade on the Mac.
The two document windows in a cascade on the Mac.
or
• Starting with the default tabbed layout ![]() , choose Window > Tile. Your document windows appear tiled vertically with the available space split evenly between them
, choose Window > Tile. Your document windows appear tiled vertically with the available space split evenly between them ![]() .
.
![]() The two document windows, tiled vertically on the Mac.
The two document windows, tiled vertically on the Mac.
Tip
To return to the tabbed window view, choose Window > Combine as Tabs. This puts all open windows back in their places. This command isn’t available in the Windows version, because the Maximize button in each window serves the same purpose.
Tip
Having trouble getting from document to document because one is behind another? The Window menu has a list of all open documents, as well as Next Document and Previous Document commands, so you can use it to choose the file you want.
Tip
Note that on Windows, you have a choice of horizontal or vertical window tiling, but on the Mac, the only tiling option is vertical.
What’s New in Dreamweaver CS5
If you’ve used Dreamweaver before, you’ll notice that although some things look similar, some things also look very different. A comprehensive description of all the new features in Dreamweaver CS5 would take up an entire chapter, so here are just a few of the highlights:
• Support for Content Management Systems: In recent years, more and more sites have been built upon the foundations of PHP-based platforms, such as WordPress, Joomla!, and Drupal. These content management systems (CMSs) are now well-supported within Dreamweaver. You can view dynamically generated pages on a CMS-based site using Live View; discover the related files used by the CMS and edit them in Dreamweaver; and filter down those files to find and work on the ones you need to make changes to your site ![]() . There’s lots more on this major new feature in Chapter 15, “Working with Content Management Systems.”
. There’s lots more on this major new feature in Chapter 15, “Working with Content Management Systems.”
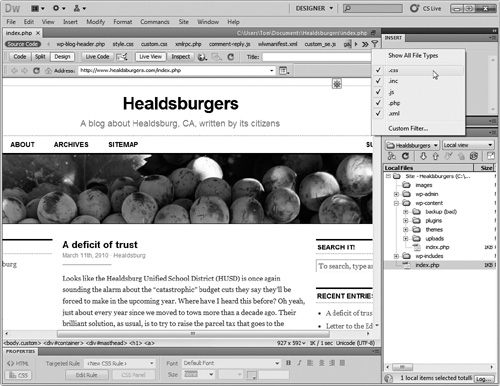
![]() Dreamweaver CS5 can now edit complex, dynamically driven sites, such as this WordPress site. To make it easier to find the files you want to work on, you can filter the related files by file type.
Dreamweaver CS5 can now edit complex, dynamically driven sites, such as this WordPress site. To make it easier to find the files you want to work on, you can filter the related files by file type.
• Live View Navigation: When you’re in Live View, you can use the Browser Navigation bar just like a browser, allowing you to move through your site as your site’s users would. This makes it lots easier to find and fix potential navigation problems without leaving Dreamweaver. Or you can enter a URL to inspect pages served from a live Web server. There’s more about this feature in Chapter 15.
• JavaScript elements: You know all those cool Ajax effects you see on Web pages these days? Now you can add many of them to your own sites in Dreamweaver, even if you know nothing about JavaScript. You can use Adobe’s Spry dynamic elements, or you can use elements from popular JavaScript frameworks such as jQuery. See Chapter 14 for more details. Of course, if you want to learn more about JavaScript, we suggest you pick up one of our other books, JavaScript & Ajax for the Web, Seventh Edition: Visual QuickStart Guide (Peachpit, 2009).
• Enhanced CSS starter layouts: Dreamweaver has always had layouts that you can use as jumping-off points for your own designs, but they’ve been improved in CS5 to use the latest CSS best practices and now boast new, easy-to-understand classes and structures. More about those starter layouts in Chapter 8.
• Coding enhancements: If you’re a coder, there are several new features for you. If you work with a Subversion version-control server, Dreamweaver CS5 expands support so you can move, copy, and delete files locally, and then synchronize changes with the remote depository. If you don’t like the changes, you can now revert them from within Dreamweaver. PHP custom class code hinting and Site-specific code hints make it easier to write new code in the Code view. You’ll learn more about these features in Chapter 17.
• Improved CSS tools: Two new features make it easier to write and work with CSS. CSS Disable/Enable lets you turn CSS properties off and on directly from the CSS Styles panel, allowing you to easily test the effect of the properties. CSS Inspection mode works with Live View to let you visually display the CSS box model properties. You can see an element’s padding, border, and margin without needing third party tools like Firebug.
• Adobe BrowserLab integration: Adobe’s online service, BrowserLab, allows you to see how your page will be rendered by many different browsers and versions under several different operating systems. Dreamweaver CS5 can now preview pages directly to BrowserLab.
Putting It All Together
1. Use Dreamweaver’s Welcome screen to become familiar with its options: create a new page (then add a little text), view training videos, take a quick tour of the application’s features, and browse the online resources.
2. Explore the menu bar.
3. Explore the Document toolbar and toggle between document views.
4. Check out the Property Inspector and its various options. Take a look at both the HTML and CSS tabs.
5. Practice hiding, showing, moving, resizing, and rearranging panels.
6. Use the Insert panel to insert content and objects into your Web page.
7. Set up a workspace by opening, closing, and arranging the panels you want in your workspace. Arrange the dock, the document window, and the Property Inspector to your liking, and then save it all as a custom layout.