
Chapter 28
Using Dreamweaver Templates
In This Chapter
- Working with templates
- Building your own templates
- Working with editable and locked regions
- Dreamweaver Technique: Converting a Page to a Template
- Setting up repeating regions
- Dreamweaver Technique: Applying Additional Editable Regions
- Inserting optional regions
- Creating nested templates
- Evaluating template expressions
- Modifying the default web page
- Managing InContext Editing
Let’s face it: Web design is a combination of glory and grunt work. Creating the initial design for a website can be fun and exciting, but when you have to implement your wonderful new design on 200 or more pages, the excitement fades as you try to figure out the quickest way to finish the work. Enter templates. Using templates properly can be a tremendous time-saver. Moreover, a template ensures that your website has a consistent look and feel, which, in turn, generally means that it’s easier for users to navigate.
In Dreamweaver, you can produce new documents from a standard design saved as a template, just as you do in a word processing program. Furthermore, you can alter a template and update all the files that were created from it earlier; this capability extends the power of the repeating element Libraries to overall page design. Templates also form the bridge to one of the key technologies shaping the web—Extensible Markup Language (XML).
Dreamweaver now also works with a different kind of template, one that allows your clients to edit their content right in the browser. Adobe InContext Editing is a service that makes it possible for web designers to offload the onerous task of updating site content to the clients while maintaining the overall design of the site.
Dreamweaver makes it easy to access all kinds of templates—everything from your own creations to the default blank page—whether you’re updating them yourself or providing them to your client for InContext Editing. This chapter demonstrates the mechanisms behind Dreamweaver templates and shows you a range of strategies for getting the most out of them.
Templates exist in many forms. Furniture makers use master patterns as templates to create the same basic design repeatedly, using new wood stains or upholstery to differentiate the final product. A stencil, in which the inside of a letter, word, or design is cut out, is a type of template as well. With computers, templates form the basic document into which specific details are added to create new, distinct documents.
Dreamweaver templates, in terms of functionality, are a combination of traditional templates and updatable Library elements. After a new page is created from a template, the document remains attached to the original template unless specifically separated or detached. The new document maintains a connection to previous pages in a site. If the original template is altered, all the documents created from it can be automatically updated. This relationship is also true of Dreamweaver’s repeating element Libraries. In fact, templates can include Library elements.
Cross-reference: Library items work hand in hand with templates. See Chapter 29 for a detailed discussion of Library items.
When a template is first created, the entire page is locked; locked sections of a template cannot be changed in a document derived from that template. A key process in defining a template is to designate certain areas as regions that can be changed in some way in a template-derived document. Dreamweaver supports four different regions in a template:
- Editable regions: The area, such as all the code, within an editable region may be altered. In a page where all the navigation code is locked, for instance, the content area can be designated as an editable region.
- Editable attributes: Within a locked tag, specific attributes can be made editable. For example, you can unlock the class attribute for the <body> tag while keeping all other attributes secure.
- Optional regions: Content within an optional region may or may not be displayed, depending on certain conditions set by the template designer.
- Repeating regions: Certain areas in an otherwise locked object (typically a table) can be repeated as many times as needed in a template-derived document. Repeating regions are great for controlling the overall look and feel of a table but allowing the number of detail rows to vary.
All the various region types require template markup within the document. You can also combine certain template regions—you could, for example, make some of the content within a repeating region editable and keep some of it locked.
Naturally, templates can be altered to mark additional editable areas or to relock editable areas. Moreover, you can detach a document created from a template at any time and edit anything in the document. You cannot, however, reattach the document to the template without losing (or seriously misplacing) inserted content. On the other hand, you can give a document based on one template a completely different look (without changing the content) by applying another template with identical regions.
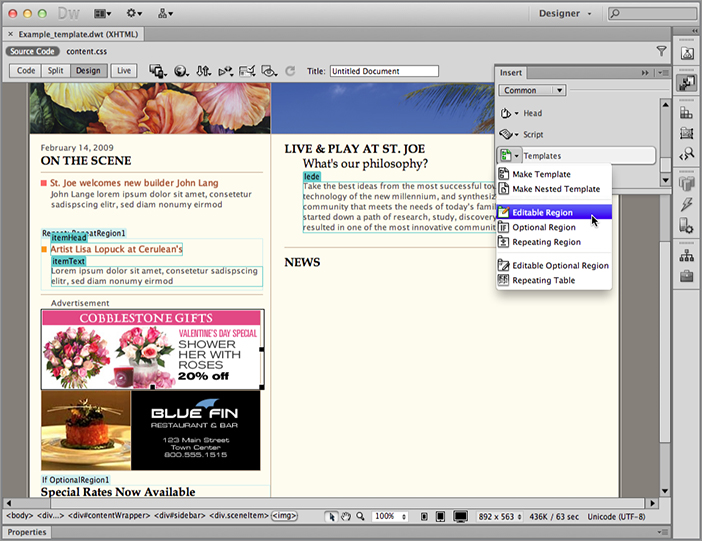
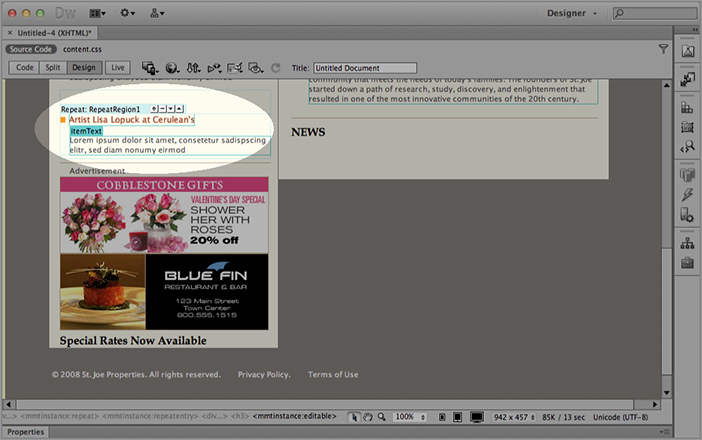
Let’s look at an example template. The layout, background, and navigation controls are identical on every page. One basic template page (shown in Figure 28-1) is created, and all the final pages are created from the template. Notice the highlighting surrounding certain areas in the template. In a template, the specified regions are highlighted, and the locked areas are not. A tab further identifies each region to make it easier to add the right content in the right area.
Figure 28-1: In a template, designated regions are clearly marked and distinguished from the rest of the page, which is locked and cannot be changed.
You can use any design you like for your own template. Perhaps the best path to take is to finalize a single page that has all the elements that you want to include in your template. Then, convert that document to a template and proceed to mark all the changeable areas—whether text or image—as a type of region. Before saving your file as a template, consider the following points when designing your basic page:
- Use placeholders where you can. Whether it’s dummy text or a temporary graphic, a placeholder gives shape to your page. Placeholders also make it easier to remember which elements to include. If you are using an image placeholder, set a temporary height and width through the Property inspector or by dragging the image placeholder’s sizing handles. Of course, you can also just insert a sample graphic.
- Finalize and incorporate as much content as possible in the template. If you find yourself repeatedly adding the same information or objects to a page, add them to your template. The more structured elements you can include, the faster your pages can be produced.
- Use sample objects on the template. Often, you have to enter the same basic object, such as a plugin for a digital movie, on every page with only the filename changing. Enter your repeating object (with as many preset parameters as possible) on your template page. Then, you have only to select a new filename for each page.
- Include your <meta> information. Search engines rely on <meta> tags to get the overview of a page and then scan the balance of the page to get the details. You can enter a Keyword or Description object from the HTML category of the Insert panel so that all the web pages in your site have the same basic information for cataloging.
- Set up an external style sheet. Since you’ll be working with multiple pages, it’s a good idea to work with an external style sheet from the beginning. Dreamweaver handles all the necessary path changes to make sure that the CSS file you link to in the template is linked properly in your child pages.
You can create a template from a web document with one command: File Save As Template. Dreamweaver stores all templates in a Templates folder created for each defined site with a special file extension (.dwt). After you’ve created your page and saved it as a template, notice that Dreamweaver inserts <<Template>> in the title bar to remind you of the page’s status. Now you’re ready to begin defining the template’s editable regions.
Note: You can also create a template from an entirely blank page if you like. To do so, open the Assets panel and select the Templates category. From the Templates category, click the New Template button. You can find more information about how to use the Assets panel of the Templates category later in this chapter. Another approach to achieve the same result is to choose File New to display the New Document dialog box, select the Blank Page category, and then choose HTML template from the Page Type category. Use this method when you want to build an XHTML-compliant template from scratch.
As noted earlier, when you convert an existing document into a template via the Save As Template command, the entire document is initially locked. If you attempt to create a document from a template at this stage, Dreamweaver alerts you that the template doesn’t have any editable regions, and you cannot change anything on the page. Editable regions are a key element in templates.
Marking existing content as editable
Editable regions can either surround existing content or stand alone without any content. As noted earlier, in both cases you must give the region a unique name. Dreamweaver uses the unique name to identify the editable region when entering new content, applying the template, and exporting or importing XML.
Note: As I noted previously, each editable region must have a unique name, but the name need only be different from any other editable region on the same page. The same name could be used for objects, JavaScript functions, or editable regions on a different template.
To mark an existing area as an editable region, follow these steps:
1. Select the text, object, or area on the page that you want to convert to an editable region.
Tip: The general rule with editable regions is that you need to select a complete tag pair, such as <table> ... </table>. This strategy has several implications. For instance, although you can mark an entire table, one or more contiguous rows, or a single cell as editable, you can’t mark multiple cells, separated rows, or a column. Attempting to do so marks a multiple row region. You have to select each cell individually (<td> ... </td>). In addition, you can select the content of an <div> tag to be editable and keep the tag itself locked (so that its class and/or ID cannot be altered). However, if you select the <div> tag to be editable, you can’t lock the content.
2. Choose Insert Template Objects Editable Region. You can also use the keyboard shortcut Ctrl+Alt+V (Command+Option+V), or right-click (Control+click) the selection and choose Templates New Editable Region from the context menu. Whichever method you choose, Dreamweaver displays the New Editable Region dialog box shown in Figure 28-2.
Now, editable template regions—as well as the other region types—are just a mouse click away.
Alternatively, you can choose, from the Common category of the Insert panel, the Templates group and click once on the Editable Region icon. You can also drag the icon over the selected text. Either action brings up the New Editable Region dialog box.
3. Enter a unique name for the selected area. Click OK if you’re finished, or click Cancel to abort the operation.
Figure 28-2: The descriptive name you enter for a new editable region must be unique.

Caution: Although you can use spaces in editable region names, some characters are not permitted. The illegal characters are the ampersand (&), double quote ("), single quote ('), and left and right angle brackets (< and >).
Dreamweaver outlines the selection with the color picked in Preferences on the Highlighting panel, shown if View Visual Aids Invisible Elements is enabled. The name for your newly designated region is displayed on a tab marking the area; the region is also listed in the Modify Templates submenu. If still selected, the region name has a checkmark next to it in the Templates submenu. You can jump to any other editable region by selecting its name from this dynamic list.
Inserting a new editable region
Sometimes it’s helpful to create a new editable region in which no content currently exists. In these situations, the editable region name doubles as a label identifying the type of content expected, such as CatalogPrice. Dreamweaver always highlights the entry in the template in a small tab above the region.
To insert a new editable region, follow these steps:
1. Place your cursor anywhere on the template page without selecting any item in particular.
2. Choose Insert Template Objects Editable Region. Alternatively, click the Editable Region icon on the Templates menu of the Insert panel.
3. Enter a unique name for the new region. Click OK when you’re finished, or click Cancel to abort the operation.
Dreamweaver inserts the new region name in the document, marks it with a named tab, and adds the name to the dynamic region list (which you can display by choosing Modify Templates).
Two editable regions, one for the web page’s title and one for other <head> content, are automatically created when you save a document as a template. The title is stored in a special editable region called doctitle, and the <head> content region is named head. To change the title (which initially takes the same title as the template), enter the new text in the Title field of the Document toolbar. You can also use the keyboard shortcut Ctrl+J (Command+J) to open the Page Properties dialog box. Finally, you can select View Head Content and click the Title icon—with the visible region outline—to enter the new text in the Property inspector.
The head editable region may not appear very useful during the template creation phase, but when you begin creating documents based on a template, it really shines. New <meta> tags, CSS style links and rules, and behavior-added JavaScript all take advantage of the head editable region.
Creating links in templates
A common problem that designers encounter with Dreamweaver templates centers on links. People often add links to their templates and discover that these links do not work when new pages are derived from the templates. The main cause of this error is linking to a non-existent page or element by hand—that is, typing in the link, rather than using the Select File dialog box to choose it. Designers tend to set the links according to their final site structures, without taking into account how templates are stored in Dreamweaver.
Recommended linking technique
There’s an easy way to make sure the links in your template pages are correct. For example, when creating a template, suppose you have links to three pages—products.htm, services.htm, and about.htm—all in the root of your site. Both products.htm and services.htm have been created, so you click the Folder icon in the Property inspector and select those files. Dreamweaver inserts those links as follows: ../products.htm and ../services.htm. The ../ indicates the directory above the current directory—which makes sense only when you remember that all templates are stored in a subfolder of the site root called Templates. These links are correctly resolved when a document is derived from this template to reflect the stored location of the new file.
Let’s assume that the third file, about.htm, has not yet been created, and so you enter that link by hand. The common mistake is entering the pathname as it should appear when it’s used: about.htm. However, because the page is saved in the Templates folder, Dreamweaver converts that link to /Templates/about.htm for any page derived from the template—and the link will fail. This type of error also applies to dependent files, such as graphics or other media.
The best solution is to always use the Folder or the Point-to-File icon to link to an existing file when building your templates. If the file does not exist, and if you don’t want to create a placeholder page for it, link to another existing file in the same folder and modify the link manually.
Handling special template workflows
There is one special circumstance in which you would not use the Folder or Point-to-File icon to do your linking for you. Let’s suppose your site design calls for each page to link to a CSS file in the same folder as the file itself; a technique like this is used when you want to vary pages by departments and each department has its own folder. In this circumstance, linking in the standard template manner wouldn’t work because you’re effectively linking to a number of files and not just one. To accomplish this goal, you’ll need to use a special syntax in your href attribute, like this:
<link href="@@('departmentStyles.css')@@" rel="stylesheet" type="text/css" />
As you see later in this chapter, the double @ signs and parentheses characters are generally used to designate template expressions. Here, they’re used to tell Dreamweaver not to alter the href value. These types of links will obviously need to be coded by hand.
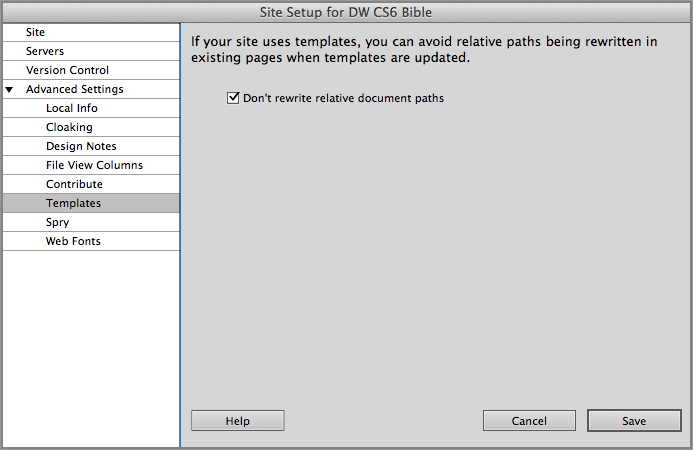
Another variation of the more typical template workflow is to store your dependent files—such as images, includes, and CSS style sheets—in the Templates folder. Dreamweaver novices often take this approach because it makes sense to them to group all their assets in subfolders immediately below the current page. Although this is generally a solid practice when creating sites, it’s not the way Templates are intended to work. However, Dreamweaver is flexible enough to be used this way, but only if you make a change to your Site Setup settings. In the Site Setup dialog box, switch to the Advanced Settings Templates category (see Figure 28-3) and clear the Template Updating checkbox. This action changes this option from its default state, Don’t Rewrite Document Relative Paths, to one that will rewrite such paths in the Templates folder. Failure to turn off the Template Updating option will result in broken links to any dependent files in your Templates folder for any child page.
Caution: Just to be absolutely clear: Although the Template Updating option makes it possible to store your dependent files in the Templates folder, it’s a bad idea and strongly discouraged. It is a far better practice to maintain such assets in a folder off the site root. Items in the Templates folder are generally not published to the web, and if your images or includes are stored there, they’re likely to be forgotten.
Figure 28-3: Leave the Don’t Rewrite Document Relative Paths option in its default checked state unless you are storing dependent files such as images or includes in your Templates folder (not recommended).
Locking an editable region
Inevitably, you’ll sometimes mark as editable a region that you’d prefer to keep locked. Similarly, you may discover that every page constructed to date has required inputting the same content, so it should be entered on the template and locked. In either event, converting an editable region to a locked one is a simple operation.
To lock an editable region, follow these steps:
1. Place your cursor in the editable region you want to lock.
2. Choose Modify Templates Remove Template Markup. The same menu selection is available from the context menu.
Caution: If you are removing a newly inserted editable region that contains only the region name—which happens when an empty editable region is added—the content is not removed and must be deleted by hand on the template. Otherwise, it appears as part of the document created from a template and won’t be accessible.
Adding Content to Template Documents
Constructing a template is only half the job—using it to create new pages is the other half. Because the basic layout is complete and you’re only dropping in new images and entering new text, creating pages based on templates takes just a fraction of the time needed to create regular web pages. Dreamweaver makes it easy to enter new content as well—you can even move from one template region to the next, much like filling out a form (which, of course, is exactly what you’re doing).
To create a new document based on a template, follow these steps:
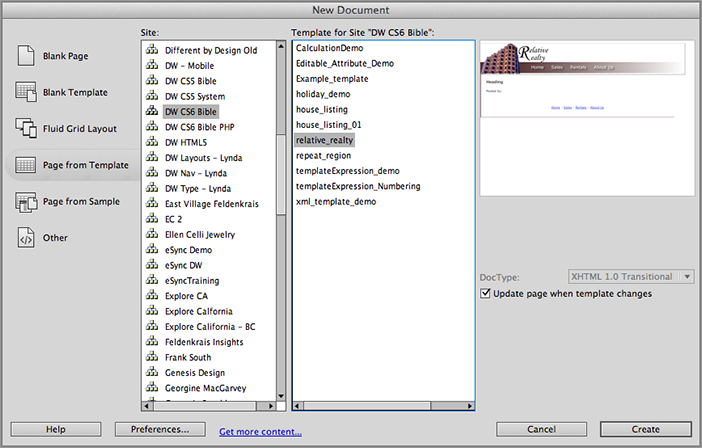
1. In the Template category of the Assets panel, select the desired template and choose the New From Template option from the panel’s context menu. Alternatively, choose File New. Then, from the New Document dialog box, select the Page From Template category and choose the site and desired template, as shown in Figure 28-4.
Figure 28-4: A list of all the templates by site is accessible by choosing Page From Template in the New Document dialog box.
2. If you want to maintain a connection between the template-derived document and the template, leave the Update Page When Template Changes option selected. To detach the template from the newly created document and make the entire page editable, deselect the option.
3. Click OK when you’re finished.
When your new page opens, the editable regions are again highlighted, as shown in Figure 28-5; furthermore, the cursor is only active when it is over an unlocked region. If you have the Code view open, you also see that the locked region is highlighted in a different color—by default, gray. Document highlighting makes it easy to differentiate the two types of regions.
Note: A document created from a template is known as an instance of that template.
Figure 28-5: In a document based on a template, the template regions are clearly marked.

Generally, it is easiest to select the editable region name or placeholder first and then enter the new content. Selecting the editable regions can be handled in several ways:
- Highlight the region name or placeholder with the mouse.
- Position your cursor inside any editable region and select the <mmtinstance:editable> tag in the Tag Selector.
- Choose Modify Templates and select the name of your editable region from the dynamic list.
Note: If all your editable regions are separate cells in a table, you can tab forward and Shift+Tab backward through the cells. With each press of the Tab key, all the content in the cell is selected, whether it is an editable region name or a placeholder.
Naturally, you should save your document to retain all the new content that’s been added.
Tip: Behaviors can be added without any additional coding or workarounds to links within editable regions. You cannot, however, add a behavior to text or an image in a locked region.

Converting a Page to a Template
In this Dreamweaver Technique, you convert an existing page to a template and apply editable regions to several page elements.
1. From the Techniques site, expand the 28_Template folder and open the template_start file.
2. Choose File Save as Template.
3. In the Save As Template dialog box, enter house_listing in the Save As field and click Save.
4. When the Update Links dialog box appears, click Yes.
5. Dreamweaver stores the new file in the Templates folder as house_listing.dwt. The next task is to begin adding editable regions to the template. Select the text “A Real Steal” by dragging across it with your mouse.
Because you want to make just the text inside the <h1> tag an editable region and not the entire element, it’s best not to use the Tag Selector in this case.
6. From the Insert panel’s Common category, choose Templates: Editable Region.
7. In the New Editable Region dialog box, enter Headline in the Name field.
8. If you have Visual Aids Invisible Elements enabled, you’ll see a border appear around the editable region, as well as a tab naming the area. Delete the selected original text and enter the placeholder text Short Headline.
9. Place your cursor in the first paragraph of text and choose the <p.firstParagraph> tag from the Tag Selector.
10. Repeat Steps 6 and 7 to create a new editable region; name the region Description.

11. Press Delete to remove the selected original text. Press Enter (Return) to create a new paragraph and enter this placeholder text: Enter lively description of property here. Use upbeat adjectives and short declarative sentences. Make sure the firstParagraph style is applied.
12. In the Property inspector, choose firstParagraph from the Style list.
13. Select the second paragraph in the Tag Selector and click Delete to remove it.
14. Save your page; Dreamweaver notes that the Headline editable region is within a block tag. Click OK to acknowledge that this is by design.
In the next Technique, you expand on this template.
Now that you understand the basics of template design and implementation, you can proceed to some of the more advanced features. Editable regions can encompass any portion of the page, from a single tag up to the entire <body>. But what if you want to make just a portion of a tag—an attribute—editable and keep the rest of the tag locked? I once worked on a site where the client wanted to tie the background color of a table’s header row to a graphic on the page. Every couple of weeks, I would get an e-mail asking for help to fix the page—broken while the client was trying to change the one attribute, bgcolor. It was a frustrating situation for both the client and me.
Dreamweaver gives you control over your editable areas right down to the attribute level. Not only can an attribute be made editable, but you can restrict its type and even provide default values. All the editable attributes on a page are displayed within a single dialog box, centralizing updates. Each of the various types of attributes—text, number, URL, color, boolean—has a specific interface for choosing a value. A color-type attribute, for example, uses a Dreamweaver-style color picker.
To make an attribute editable, follow these steps:
1. With the template open for editing, select the tag or object that contains the attribute you want to make editable.
Note: Your selection should be outside an editable region. If you try to change the attribute of a tag within an editable region, Dreamweaver reminds you that this tag is already fully editable.
2. Choose Modify Templates Make Attribute Editable to display the Editable Tag Attributes dialog box, as shown in Figure 28-6.
3. Select the desired attribute from the Attribute drop-down list.
Tip: For quicker editing, make sure your selected tag already contains the attribute you’d like to make editable. The Attribute drop-down list shows all the parameters within a selected tag, whether or not they have values.
Figure 28-6: With the Editable Tag Attributes dialog box, you can extend access to any attribute—even a custom one—of any tag in a locked area.

4. If the attribute you want is not available from the drop-down list, click Add and enter the attribute in the pop-up dialog box. After you’ve confirmed your entry in the pop-up dialog box by clicking OK, your attribute appears in the Attribute drop-down list. New entries are always uppercased in the list, but do not appear uppercased in the code if specified otherwise in the Tag Library Editor.
5. Select the Make Attribute Editable option. The Make Attribute Editable option may seem redundant in this dialog box, but it enables you to make a number of attributes editable in the same tag while leaving others locked.
6. Enter a unique name for the tag’s editable attribute in the Label field. The Label is used to identify this specific editable attribute and is displayed in the Template Properties dialog box when the attribute is modified. Pick a name that identifies both the tag and the attribute, like logoTableBgColor for the bgcolor attribute of a table containing the logo.
7. Select a Type from the drop-down list. Here are the five options:
- Select this type for attributes requiring a text-based value, such as the <img> tag’s alt attribute.
- URL: Choose this type when the attribute value points to a file or requires an Internet address, such as the href attribute of the <a> tag. Designating an attribute as a URL type enables Dreamweaver to update the link if the file is moved or renamed.
- Color: Use the Color type for those attributes specifying a color value, such as the <tr> tag’s bgcolor attribute. The major benefit of identifying color-related attributes as such is the color picker that is made available in the Template Properties dialog box.
- True/False: Select this type if the attribute is a boolean, meaning it accepts a value of true or false only—for example, the <object> tag’s hidden attribute.
- Number: Choose the Number type when an attribute requires a numeric value, such as the <img> tag’s height and width attribute.
Caution: If you need to enter a percentage, such as 50%, or another value that contains both numbers and other characters, select the Text type for your editable attribute. Although you might think the Number type is more logical, Dreamweaver generates errors when the template is saved with this type entered.
8. Enter the desired initial value for the attribute in the Default field. If the attribute is already present in the selected tag, the current value is displayed in the Default field. For new attributes, the Default field is initially blank.
9. Click OK when you’re finished.
Editable attributes are noted in the code by surrounding the values with double @ signs, like this:
<img src="@@(monthlyImageSrc)@@" width="100" height="50"
align="@@(monthlyImageAlign)@@">
In this example, the <img> tag has two editable attributes, src and align, which are set to variable values: @@(monthlyImageSrc)@@ and @@(monthlyImageAlign)@@, respectively.
Tip: You can apply the same editable attribute to different tags. For example, you might want different regions on the page to share the same class. Although you can repeat the Make Attribute Editable command for every variable, you might find it more efficient to simply copy and paste the variable value.
When you examine the template file, note two Adobe comments inserted in the <head> section:
<!-- TemplateParam name="monthlyImageSrc" type="URL" value=
"../images/admin.gif" -->
<!-- TemplateParam name="monthlyImageAlign" type="text" value="left" -->
These TemplateParam tags are used by Dreamweaver to identify the editable attributes and provide their types and default values.
Caution: The default values set in editable attributes are not rendered when viewing the template in the Design view, only in the template-derived document. This is a known bug in Dreamweaver.
After you’ve inserted your editable attributes in the template, Dreamweaver provides a straightforward user interface for editing them in template-derived documents. Whether you choose File New or select the template in the Assets panel to create your new document, you find a new command available under the Modify menu: Template Properties.
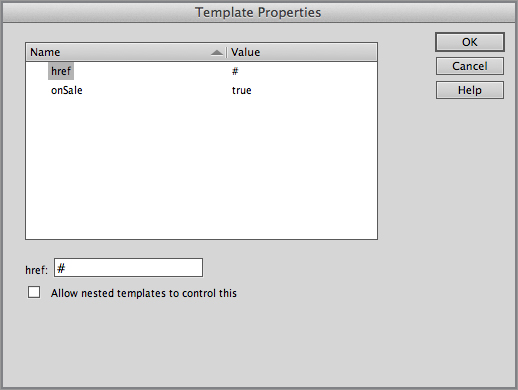
The Template Properties dialog box, shown in Figure 28-7, lists all the editable attributes found on a single page. Selecting each property brings up the editing options for that particular attribute type (text, number, color, URL, and true/false) and the current associated value. After modifying any or all of the template properties, Dreamweaver refreshes the page and displays the attributes with their new values.
Figure 28-7: How you specify the value for an editable attribute in the Template Properties dialog box depends on the type of attribute.
With each of the Template Properties types, you have the option to allow the nested template to control the attribute. Select this option if you intend to save the current document as a template—thus creating a nested template—and if you want documents based on that nested template to set the attribute value. You can also choose this option when editing a nested template. Nested templates are covered in depth later in this chapter.
To set the editable attributes on a template-based document, follow these steps:
1. Choose Modify Template Properties. The Template Properties dialog box is displayed.
2. Select the attribute to specify its value.
3. If you want to allow the attribute to be modified in a document based on a nested template, choose the Allow Nested Templates To Control This option. If the option is selected, the phrase pass through in parentheses replaces the attribute value editing options.
4. Enter the new value for the attribute. Depending on the type of attribute you select, you enter the value differently:
- For Text, Number, and URL type attributes, enter the new value in the text field next to the editable attribute name.
- For Color type attributes, select the color picker to sample the desired color from the color palette or any area on the screen. You can also enter the hexadecimal color value or color name directly in the associated text field.
- For True/False type attributes, select the Show Attribute Name option to set the value to true and deselect it to set the value to false.
5. To set the value of any other editable attribute on the page, choose the attribute from the list and repeat Steps 3 and 4.
6. Click OK when you’re finished.
Data-driven pages handle repeating regions elegantly. A single row of a table is bound to data, and the application server returns as many requested rows as are available. However, not all pages are data-driven—and not all areas of a page that repeat can be bound to a data source. Dreamweaver provides solutions for both the server-side—the Repeat Region server behavior—and the client-side—the template-based repeating region feature.
A repeating region, like an editable region, is applied to a template and may surround any tag-complete area (an area containing both a beginning tag and an ending tag) on a page. Typically, repeating regions wrap around the same types of areas as their server behavior cousins, such as table rows. However, unlike the Repeat Region server behavior, template-repeating regions are expanded and manipulated manually in a template-based document. Keep in mind one other important aspect of repeating regions: They aren’t automatically editable—you have to include an editable region within a repeating region to make it so. The capability to lock specific portions of repeating regions makes this an extremely powerful feature.
To insert a repeating region, follow these steps:
1. Select the portion of the page that you want to repeat. As noted earlier, a repeating region cannot overlap a tag pair. If you attempt to do this, Dreamweaver automatically extends the selection so that the entire tag is included.
2. Choose Insert Template Objects Repeating Region or, from the Templates group of the Insert panel, click the Repeating Region.
3. Enter a unique name in the New Repeating Region dialog box and click OK. Dreamweaver automatically provides a name, but as always, it’s best if you supply a meaningful name. Dreamweaver surrounds the repeating region with a blue border and tab with the keyword “Repeat” and the name of the region, as shown in Figure 28-8.
As mentioned earlier, repeating regions are not, by default, editable. To make a repeating region editable, select the content within the repeating region—not the repeating region itself—and then create an editable region by either clicking the Editable Region icon in the Templates menu of the Insert panel or choosing Insert Template Objects Editable Region. You must give the editable region a unique name as usual.
Figure 28-8: Repeating regions are marked in templates with an outline and named tab, just like editable and optional regions.
Caution: You may notice that the repeating and editable regions tabs overlap, making it difficult to see the repeating region name. I’ve found it handy to use fairly long names for the repeating region, such as dataRowRepeating, and relatively short names for the editable region, such as dataRow, to enable me to see portions of both tabs. Also, although all template regions use the same color established in Preferences, the highlight for a repeating region is significantly lighter than that for editable regions. This color variation makes it much easier to identify the different types of regions.
Modifying a repeating region
The power of repeating regions isn’t apparent until you open a template-based document containing one. With Invisible Elements enabled, you notice a series of buttons above each repeating region, as shown in Figure 28-9. With these controls, new entries—identical to the content contained within the repeating region—are added, deleted, or moved from one position to another. You can even copy and paste content within a repeating region.
Figure 28-9:Entries can be added and removed in a repeating region; they can also be reordered.

To modify a repeating region in a template-based document, follow these steps:
1. Make sure View Visual Aids Invisible Elements is enabled.
2. Locate the four buttons above the repeating region:
- To add a new entry, click the Add (+) button. New entries are inserted below the current cursor selection. New entries are selected after they are created.
- To delete an existing entry, position your cursor in the entry and click the Remove (–) button.
- To move an entry down, place your cursor in the entry and click the Down button.
- To move an entry up, place your cursor in the entry and click the Up button.
3. To copy and paste an entry, follow these steps:
a. Position your cursor in the entry.
b. Choose Edit Repeating Entries Copy Repeated Entry.
c. Choose Edit Paste or Edit Repeating Entries Paste Repeated Entry.
If you prefer to work with Invisible Elements off, Dreamweaver provides corresponding menu options under both the main and the context menus. In fact, the menu options are, in some ways, more powerful and can be immediate time-savers. Look in the main menu under Modify Templates Repeating Entries or, in the context menu under Templates, for these commands:
- New Entry Before Selection
- New Entry After Selection
- Move Entry Up
- Move Entry Down
Constructing a repeating table
Repeating regions are used so commonly in tables that Dreamweaver provides a tool to create both a table and a repeating region at the same time. The Repeating Table object opens the standard table dialog box with the added capability to define which rows are within a repeating region. When inserted, the repeating region is all set up—and even includes a separate editable region in each cell, as shown in Figure 28-10.
To insert a Repeating Table, follow these steps:
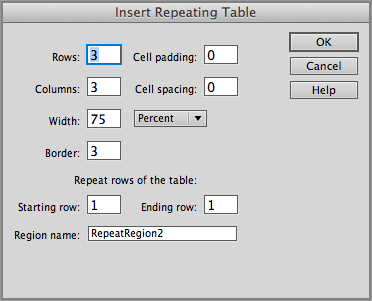
1. In your template open for editing, position your cursor where you’d like the table to appear and choose Insert Template Objects Repeating Table. Alternatively, you can drag the Repeating Table icon from the Templates menu of the Insert panel. The Insert Repeating Table dialog box, shown in Figure 28-11, is displayed.
2. Enter the values desired for the table attributes: Rows, Columns, Cell Padding, Cell Spacing, Width, and Border.
Cross-reference: If you’re not familiar with setting up a table, see Chapter 12.
Figure 28-10: The Repeating Table object also includes editable regions for every cell in the repeating region rows.

3. Determine which rows of the table are to be repeated by entering the number of the first row in the Starting Row field and the number of the last row in the Ending Row field. For example, if you want only the second row of the table to repeat, your values are Starting Row: 2 and Ending Row: 2. However, if you want three rows to repeat starting with row 2, the values are Starting Row: 2 and Ending Row: 5.
4. Enter a unique name for the repeating region in the Region Name field or leave the Dreamweaver-supplied default name.
5. Click OK when you’re finished.
Figure 28-11: With the Repeating Table feature, you can define multiple rows to repeat.
After the table is created, notice that every cell in the designated repeating region is editable. Dreamweaver automatically inserts separate editable regions and names them incrementally EditRegion1, EditRegion2, and so on. By defining each cell as editable, rather than the entire row, Dreamweaver gives you the option to retain the editability on a cell-by-cell basis. If the cell should not be editable, position your cursor anywhere in the cell and choose Modify Templates Remove Template Markup.
Applying Additional Editable Regions
In the previous Dreamweaver Technique, you began the process of converting an existing page into a template. This Technique takes the next step and includes editable regions within a table.
1. Open the file created in the previous Dreamweaver Technique from the Templates folder, house_listing.dwt.
2. You can apply editable regions to more than just text. Images are also good candidates, but first, it’s a good idea to create a generic image placeholder. Select the image of the house in the page and delete it.
3. From the Insert panel’s Common category, choose Images: Image Placeholder.
4. When the Image Placeholder dialog box opens, enter House in the Name field, 324 in Width, and 188 in Height; click OK when you’re done.
5. Select the image placeholder and, from the Property inspector’s Class list, choose imageRight.
6. With the image selected, choose Template: Editable Region.
7. In the New Editable Region dialog box, enter House Image in the Name field.
8. Tables are another page element that is easily made template-friendly. Select the value in the table cell next to the Bedrooms label and choose Templates: Editable Region.
9. In the New Editable Region dialog box, enter Bedrooms in the Name field and click OK.
10. Repeat Steps 8 and 9 to create editable regions for each of the values in the second column of the table; make your selections and name your editable regions like this:
|
Selection |
Editable Region Name |
|
½ |
Bathrooms |
|
1 acre |
Acres |
|
2500 sq. ft. |
Square Feet |
|
350,000 |
Price |

11. Save your page; click OK to acknowledge that some block content is within an editable region—if desired, you can select the Don’t Show Me This Message Again option to avoid this alert in the future.
Editable regions are a cornerstone of the template structure and, as you can see, have a great number of uses.
One of my clients quite regularly wanted to feature one of his products over the others, so we developed a special logo exactly for that purpose. Whenever a product was to be highlighted, I modified the page to include the special logo rather than the standard one. Typically, this took up to a half hour every time the change was made. Not only did I have to find the catalog page with the to-be-featured item and replace the logo—something else I had to hunt for—I also had to find the previously featured item page and revert the special logo placed there to the standard one. Not difficult work, but certainly tedious.
Dreamweaver’s Optional Region feature is intended to reduce, if not eliminate, such tiresome chores. Content placed on a template within an optional region is conditionally shown or not shown on the template-derived page. In the just-described situation, this feature enables me to put both logos in the same template, each in its own optional region. By default, the main logo is shown, but if I decide not to show it, the special logo is shown in its place. Optional regions are extremely powerful.
Optional regions work somewhat like a cross between repeating regions and editable attributes. Like repeating regions, optional regions can surround any portion of a page; also, they are not editable by default, although it’s possible to create an editable optional region. After an optional region has been placed on the template page—as with editable attributes—the Template Properties dialog box is used to set the condition that displays or hides the content on a template-derived page.
The conditions that control an optional region range from a basic true/false or boolean statement to more complex, evaluated expressions. Reflecting this, the New Optional Region dialog box contains two tabs, Basic and Advanced. Under the Basic tab, you simply enter the name for the optional region and indicate whether to display the region by default. The Advanced tab, shown in Figure 28-12, gives you the opportunity to set the condition dependent on another existing template parameter or enter a template expression.
Figure 28-12: Optional regions can be controlled by the state of another parameter directly or by the evaluation of a template expression.

Note: The Basic and Advanced tabs are mutually exclusive. The tab showing when OK is selected determines which template parameter is used.
Now, look at an example to see how both the Basic and the Advanced approaches work together. Take the situation, described at the beginning of this section, which requires the use of a special logo every so often. To accomplish this, I create one optional region using the Basic tab of the New Optional Region dialog box. In this region, I just enter a name, mainLogoRegion, and enable the Show By Default option. In this region, I place my standard logo. The Basic tab creates a template parameter with code like this in the <head>:
<!-- TemplateParam name="mainLogoRegion" type="boolean" value="true" -->
Next, I create a second optional region and select the Advanced tab of the New Optional Region dialog box. I want this region to be displayed only when the other region is not. To achieve this effect, I select the Enter Expression option and enter the following in the text area:
mainLogoRegion != true
With optional regions, the name is the same as the condition; so translated into English, this expression reads, “Show this region if mainLogoRegion is not shown.” As shown in Figure 28-13, Dreamweaver uses the condition as the name of the optional region, and this name is represented in the tab above the optional regions.
Figure 28-13: Complex expressions can be used to show or hide optional regions.

Dreamweaver template expressions support a subset of JavaScript operators, so I could have also written this expression like this:
!mainLogoRegion
In a different situation, you might want to tie a number of noncontiguous optional regions together so that if the main region shows, the others would as well. You achieve this by setting Use Parameter to the name of the main region. You’ll find a more detailed discussion of template expressions a little later in this chapter.
To insert an optional region, follow these steps:
1. Choose Insert Template Objects Optional Region or, from the Templates menu of the Insert panel, click the Optional Region icon.
2. If you want to create a template parameter, from the Basic tab, follow these steps:
a. Enter a unique name for the optional region in the Name field.
b. Choose the Show By Default option if you want to make the region initially viewable.
3. If you want to link this optional region to the state of another optional region, from the Advanced tab, follow these steps:
a. Select the Use Parameter option.
b. Choose an existing optional region from the drop-down list.
4. If you want to control the optional region display with a template parameter, from the Advanced tab, follow these steps:
a. Select the Enter Expression option.
b. Enter the desired expression in the text area.
Template parameters are explored in depth later in this chapter.
5. Click OK when you’re finished.
Combining editable and optional regions
Similar to repeating regions, optional regions by themselves are not editable. Many uses exist for optional regions with the designed content either displayed or not displayed. However, in certain situations, the optional content needs to be editable as well. For such situations, Dreamweaver provides the Editable Optional Region object.
The procedure for adding an editable optional region is exactly the same as for inserting an optional region—Dreamweaver automatically includes an editable region within the optional region. The new editable region is also automatically named.
Tip: You can change the name of the automatically added editable region by selecting the template region tab or its tag in the Tag Selector and then changing the name in the Property inspector.
To add an editable optional region, follow these steps:
1. Choose Insert Template Objects Editable Optional Region or, from the Templates menu of the Insert panel, click the Editable Optional Region icon.
2. Follow the procedure outlined for inserting an optional region.
3. Click OK when you’re finished.
Of course, if you want to add an editable region to an optional region containing locked content, you can always do so when editing the template.
Setting optional region properties
Although you set up an area of the page to be optionally displayed in the template, you actually choose the display option—whether to show or hide the region—in the document created from the template. As with editable attributes, the Template Properties dialog box handles control of the optional regions. Unlike editable attributes, optional regions only use true/false values to determine whether a selected region is either shown (true) or not shown (false).
Instead of the template parameter statement found in templates, Dreamweaver inserts instance parameters into the <head> section of the template-derived document, like this one:
<!-- InstanceParam name="mainLogoRegion" type="boolean" value="true" -->
To set the parameters of an optional region in a template-based document, follow these steps:
1. Choose Modify Template Properties. The Template Properties dialog box is displayed.
2. Select the optional region you want to affect.
3. If you want to allow the optional region to be modified in a document based on a nested template, choose the Allow Nested Templates To Control This option. If the option is selected, the phrase pass through in parentheses replaces the Show Attribute Name option and appears in the list.
Cross-reference: Learn about nested templates in a section later in this chapter appropriately named “Nesting Templates.”
4. Otherwise, select the Show Name option to set the value to true and deselect it to set the value to false.
5. To set the value of any other optional regions on the page, choose the entry from the list and repeat Steps 2 through 4.
6. Click OK when you’re finished.
Evaluating template expressions
So far in this chapter, you’ve seen a little of what template expressions can do. With optional regions, template expressions are either set explicitly or evaluated to true or false. Template expressions can also be used throughout the template to great effect. Here is a short list of what’s possible with template expressions:
- Alternate the background color of a row contained in a repeating region.
- Automatically number each row in a repeating region.
- List the total number of rows in a repeating region.
- Show an optional region if a certain number of rows are used, or another region if that number of rows is exceeded.
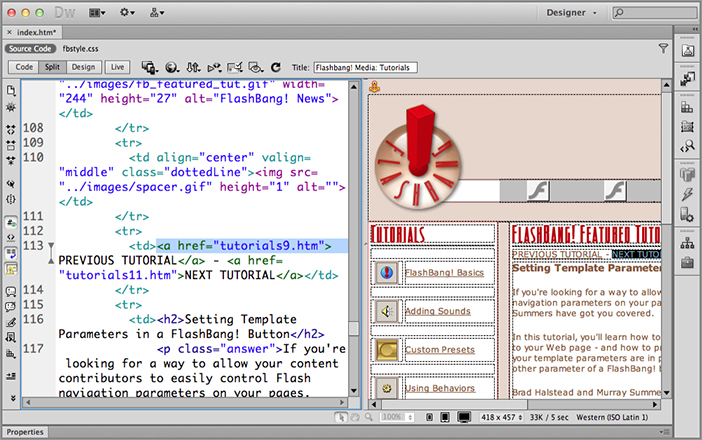
- Create sequential navigation links, allowing users to page to the next—or previous—document in a series.
- Compute values displayed in a table, displaying items such as basic cost, tax, shipping, and total.
- Display particular content depending on the position of the row—first, second, second-to-last, or last, for example—in the repeating region.
Two types of template expressions exist: template expression statements and inline template expressions. Template expression statements take the form of a specialized HTML comment, like this:
<!-- TemplateExpr expr="fileExt" -->
Template expression statements are coded by hand. Inline template expressions are surrounded by parentheses and double @ signs, like this:
@@(fileExt)@@
Inline template expressions can only be entered by hand, but they are very flexible. You can insert an inline template expression as an attribute into any of Dreamweaver’s text field interfaces, such as the Link field of the text Property inspector or the Bg (Background Color) field of the row Property inspector. Template expressions not entered as attributes appear as Invisible Elements with a double @ sign symbol, as shown in Figure 28-14. Template expression statements appear with a script icon.
Caution: Although you can enter an inline template expression in Code view without a problem, you cannot enter one on the page in Design view.
Figure 28-14: Template expressions can be entered as either statements or inline code.

Template expression language and object model
Template expressions are written in their own language, which uses a subset of JavaScript operators and its own object model. The syntax of template expressions closely resembles that of JavaScript, and both use a similar dot notation to refer to the properties of a specific object. Similar to JavaScript, Dreamweaver template expressions also have their own object model, although the object model for template expressions is much more limited in scope.
The elements supported by Dreamweaver template expressions are detailed in Table 28-1.
Table 28-1: Template Expression Features and Operators


The template expressions document model is made up of two primary objects: _document and _repeat. The document object contains all the template variables found on the page. For example, if you create an optional region with the name altImageRegion, you can refer to it in a document expression with the following statement:
<!-- TemplateBeginIf cond="_document.altImageRegion" -->
However, the _document prefix is implicit, and the same statement can be written like this:
<!-- TemplateBeginIf cond="altImageRegion" -->
As you may suspect, the _repeat object refers to a repeating region. The _repeat object has a number of very useful properties, as shown in Table 28-2.
Table 28-2: _repeat Object Properties
|
Property |
Description |
|
_index |
Returns the index number of the current entry. The _index property is zero-based, so for the first entry of a repeating region, _index equals zero. |
|
_numRows |
Returns the total number of entries in a repeating region. |
|
_isFirst |
Returns True if the current entry is the first entry of a repeating region, False otherwise. |
|
_isLast |
Returns True if the current entry is the last entry of a repeating region, False otherwise. |
|
_prevRecord |
Returns the _repeat object for the entry before the current entry. For example, if _index = 2, then _prevRecord._index = 1. If _prevRecord is used in the first entry, an error occurs. |
|
_nextRecord |
Returns the _repeat object for the entry after the current entry. For example, if _index = 2, then _nextRecord._index = 3. |
|
_parent |
Returns the _repeat object for a repeating region enclosing the current repeating region. For example, use _parent._numRows to find the total number of rows of the outer repeating region. |
The _repeat object is also implicit, and it is not necessary to reference it specifically in a template expression.
Multiple-if template expressions
Certain template expressions cannot be handled by referencing a single condition—“If A is true, show B” does not cover every possible circumstance. What if you wanted to test against multiple conditions and provide multiple results? Can Dreamweaver handle something like “If A is true, show B; but if C is true, show D—and if neither of them is true, show E”? With the help of multiple-if expressions, you bet it can.
With a multiple-if template expression, you can test for any number of conditions and act accordingly. Multiple-if expressions use two different template expressions: one to close the entire expression and another one for each separate case. Here is an example:
<!-- TemplateBeginMultipleIf -->
<!-- checks value of template parameter SKU and shows the desired image-->
<!-- TemplateBeginIfClause cond = "SKU == 101">
<img src = "/images/ring101.tif" width="125" height="125">
<!-- TemplateEndIfClause-->
<!-- TemplateBeginIfClause cond = "SKU == 102">
<img src = "/images/bracelet102.gif" width="125" height="125">
<!-- TemplateEndIfClause-->
<!-- TemplateBeginIfClause cond = "SKU == 103">
<img src = "/images/necklace103.gif" width="125" height="125">
<!-- TemplateEndIfClause-->
//default display if none of the other conditions are met
<!-- TemplateBeginIfClause cond = "SKU != 103">
<img src = "/images/spacer.gif" width="125" height="125">
<!-- TemplateEndIfClause-->
<!-- TemplateEndMultipleIf -->
In this code, if none of the conditions are met, a blank spacer image is displayed. As with other template expressions, multiple-if expressions must be coded by hand.
Template expression examples
Template expressions obviously have a great deal of power built in, but how do you put it to use? Let’s look at some specific examples to help you get a better understanding of template expressions in general, as well as to give you some useful tools.
Alternating row background colors
If you have a data-filled table of any significant size, alternating background colors for each row greatly increases the readability of the data. Template expressions provide a technique for specifying the two classes with different background colors—and automatically applying the right color whenever a new row is added in a repeating region. The key to this technique is the conditional operator.
The conditional operator has three parts: the condition and the two results. If the condition is evaluated as true, the first result is applied; if it is not, the second is applied. In this case, the condition that is examined involves the _index property, which returns the position of the current row. By combining the _index property with the bitwise AND operator, &, like this:
_index & 1
True is returned every other row, starting with the second row. The full template expression specifies the two classes as hexadecimal values; the second value specified (here, oddRow, a CSS class, which has a background-color property with a light yellow value) is returned in the first row, the first value (evenRow, another CSS class with a white background color) in the following row, and so on:
@@((_index & 1) ? 'evenRow' : 'oddRow')@@
This template expression is entered as the class attribute for the table row containing the data in a template’s repeating region. Note the use of the single quotes around the class values; quotes are needed in the conditional operator syntax, and single quotes are used here because Dreamweaver encloses the entire attribute value with double quotes.
Here’s the code for the entire table in the template document. The tag containing the alternating row background color is shown in bold:
<table width="100%" border="0" cellspacing="0" cellpadding="0">
<tr>
<th>Item</th>
<th>SKU</th>
<th>Price</th>
</tr>
<!-- TemplateBeginRepeat name="repeatRow" -->
<tr class="@@((_index & 1) ? 'evenRow': 'oddRow')@@">
<td><!-- TemplateBeginEditable name="itemEdit" -->itemEdit<!--
TemplateEndEditable --></td>
<td><!-- TemplateBeginEditable name="skuEdit" -->skuEdit<!--
TemplateEndEditable --></td>
<td><!-- TemplateBeginEditable name="priceEdit" -->priceEdit<!--
TemplateEndEditable -->
</td>
</tr>
<!-- TemplateEndRepeat -->
</table>
You won’t see any changes in the template itself—for the full effect, you have to open up a document based on the template and add a few rows. As you can see in Figure 28-15, whenever another entry is added to the repeating region in the template-based document, the alternating color is automatically applied.
Tip: As written, the code in this technique alternates color every row. To alternate the color every two rows, change the value in the condition from 1 to 2 so that the template expression reads:
@@((_index & 2) ? 'evenRow' : 'oddRow')@@
Figure 28-15: Using a conditional operator for the class attribute automatically generates alternating row colors in a repeating region.

Automatic row numbering
In a template with a repeating region, you often want the flexibility of adding as many rows as required and adding a reference number to each row. The _index property of the template object model provides an easy way to number rows automatically. The only trick to this technique is to remember that _index is a zero-based property and you add a 1 to have the correct row number displayed.
Here’s the template expression by itself:
@@(_index + 1)@@
This code should be entered directly in Code view within the repeating region. You can combine this with any other text, such as a following period or color or styles. Here’s an example, bolded, in a right-aligned table cell with several non-breaking spaces trailing to create a decimal-aligned look:
<td align="right">@@(_index + 1)@@ </td>
The right-align and non-breaking space combination keeps numbering in line no matter how entries are involved, as shown in Figure 28-16.
Figure 28-16: The _index property helps to automatically number rows in a repeating region.

Computing values in a table
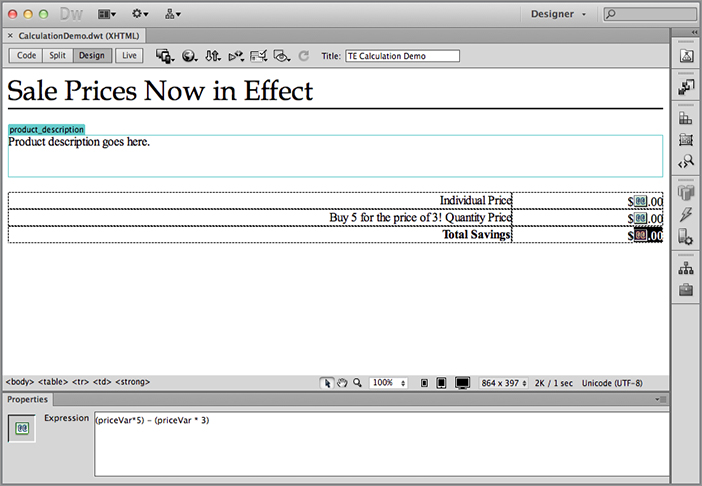
After a value has been entered for a template expression variable, it can be used in calculations and can also be used as a deciding factor in a multiple-if statement. For example, each page of a template shows a catalog item and all the relevant information. Included in that relevant information is the price—an element that may fluctuate far more than the description or picture of the item. Should the client want to offer a special discount for higher quantities, template expressions can automatically calculate the new price and the savings.
In this example, I’ve set up one template parameter, priceVar, and given it a default value of 100:
<!-- TemplateParam name="priceVar" type="number" value="100" -->
This code goes in the non-editable portion of the template’s <head>. The example application, shown in Figure 28-17, uses three different template expressions. The first, @@priceVar@@, displays the parameter set with the Template Properties dialog box.
The second shows the quantity price—which, here, is the base price times 3:
@@(priceVar * 3)@@
The third expression displays the savings a buyer could receive by buying in quantity. In this example formula, the price times 3 is subtracted from the price times 5:
@@((priceVar * 5) - (priceVar * 3))@@
Again, you can add whatever text or styles are necessary. Here, a dollar sign is placed in front of every expression that is followed by a decimal point and two zeros, as you can see in Listing 28-1.
Figure 28-17: Template expressions, set in Template Properties, can be used to calculate other values in a template-based document.
Listing 28-1: Template Expressions Computing Example
<table width="100%" border="0" cellspacing="0" cellpadding="0">
<tr>
<td width="77%" align="right">Individual Price</td>
<td width="23%" align="right">$@@(priceVar)@@.00</td>
</tr>
<tr>
<td align="right">Buy 5 for the price of 3! Quantity Price</td>
<td align="right">$@@(priceVar * 3)@@.00</td>
</tr>
<tr>
<td align="right"><strong>Total Savings</strong></td>
<td align="right"><strong>$@@((priceVar * 5)@@ – (priceVar * i
))@@.00</strong></td>
</tr>
</table>
Now the calculations on this template are ready to be used for any product in the catalog, at any price point, offering the same deal. All you need to do is create a page based on this template and change the template property priceVar.
Sequential navigation links
Although much of the web is based on the principle that you can link to any page from any other page, certain situations—such as help or instructional applications—require sequential navigation. Numerous help applications use some form of Previous and Next buttons, for example. If these files are named sequentially—such as docFile10, docFile11, docFile12, and so on—template expressions can be used to automatically code the links to the prior and subsequent pages.
You can rely on template expressions for the capability to handle string concatenation to create these auto-updating links. The first task is to set up a template parameter to be used as the number of the current file in the series. If, for example, you’re creating docFile5.htm from your template, the template parameter is set to 5. To accomplish this task, use Dreamweaver’s editable attribute facility to create the template parameter. This example assumes that you are editing a template with Previous and Next buttons already in place. Follow these steps:
1. Select the <a> tag surrounding the Previous button from the Tag Selector.
2. Choose Modify Templates Make Attribute Editable.
3. In the Editable Tag Attributes dialog box, click Add (+) and enter a dummy attribute name such as baseLink. Choose an attribute name that will be ignored by browsers rather than a real attribute.
4. Make sure that Make Attribute Editable is selected.
5. Choose Number as the Type of attribute from the drop-down list.
6. Enter a default number. This number is set for every file created, so the default value is merely a placeholder.
Now you can use the template parameter set up in a template expression. Follow these steps:
1. Click the Previous button or link on the template page.
2. In the Property inspector, enter code similar to the following in the Link field:
@@('docFile' + (baseLink - 1) + '.htm')@@
In this example, the sequential files are all within the same folder and named docFile1.htm, docFile2.htm, and so on. My template parameter, defined in the previous step, is called baseLink.
3. Click the Next button to perform a similar operation.
4. In the Link field, enter code like this:
@@('docFile' + (baseLink + 1) + '.htm')@@
Here, instead of subtracting a number from the base value, as you did for the Previous button link, you add one.
After the template is saved, create a file based on the template. Now you’re ready to specify the template parameter. Follow these steps:
1. Choose Modify Template Properties and select the editable attribute established in the template.
2. Enter the number value corresponding to the filename of the current sequentially named page. For example, if the file is named docFile5.htm, enter 5.
3. Click OK when you’re finished.
When you preview your page, notice that the Previous and Next buttons now link the proper pages in the sequence, as shown in Figure 28-18.
Figure 28-18: Although it looks like a standard link, this code was generated by Dreamweaver during the design-time construction of this template-based document.
Tip: You can also use optional regions to hide the Previous button when the template-based page is the first in the series and the Next button when a page is the last in the series. It’s all in the power of template expressions.
The simple template, with its combination of locked and editable regions, truly reflects the reality of many web pages where the overall structure is constant and the details of the content vary. Often, however, a single locked area is too rigid to really be useful in a complex site. Suppose for a moment you’re working on a site for a magazine publisher with multiple brands. The client wants a general look and feel for the entire site with separate navigation and content for each magazine. One way to achieve this effect is to use multiple templates—one set for each magazine, all incorporating the parent-company style. The problem here is that to effect changes on the highest level, all the templates need to be changed. Another way—a better way—is to use nested templates.
Nested templates allow template-based documents to have numerous tiers of locked regions. With nested templates, the magazine publisher in our example could make a change to just the master template, and the modifications would ripple through all the other magazine-specific templates and on down to their related pages. Best of all, there’s no real limit on nesting templates: Your template-based files can be as deeply nested as you need them to be.
Here’s an overview of how nested templates work:
- A new page based on the master template is created and saved as a template; this new document is the nested template.
- Within the editable areas originally set up in the master template, new editable areas are placed. All areas not designated as editable in the nested template are locked.
- A new document is created, based on the nested template. The only editable areas are those inserted in the nested template.
- When modifications are made to the nested template, the changes are reflected in the pages based on that template. When modifications are made to the master template, the changes are applied both to the nested template and to documents based on the nested template.
Dreamweaver employs a color-coding system to help you differentiate editable regions inserted in the master template from those added in the nested template. Although you can’t tell it in this black-and-white screenshot, the master template editable regions are shown in orange, whereas nested template editable regions are shown in blue (see Figure 28-19).
Figure 28-19: The master template editable region—the region in the center here—is highlighted with an orange outline. The nested template editable regions, the outside regions, are blue.

To create a nested template, follow these steps:
1. Create a master root-level template by choosing File Save As Template for an existing page or selecting New Template from the Template category of the Assets panel for new documents. The master template contains all the elements—navigation, logos, footers, and so on—common to all template-based pages in the site.
2. Insert editable regions wherever variable content is desired in the master template and save the template when you’re ready.
3. Create a new document based on the master template by following these steps:
a. Choose File New to open the New Document dialog box.
b. Select the Templates category.
c. Make sure the current site is selected in the Templates For list.
d. Select the desired master template from the Template list.
e. Click Create.
4. Save the newly created document as a template. By saving a template-derived document as a template, a nested template is created.
5. In the nested template, make any changes needed within the editable regions. These changes are locked in any document based on the nested template.
6. Add any desired template regions (editable, repeating, or optional) within the existing editable regions from the master template. When the first editable region is inserted in the nested template, the editable regions from the master template turn orange to differentiate them from the new regions.
7. After you’ve finished adding the desired template regions to the nested template, save the file.
Now, when creating documents based on the nested template, you are still able to modify content within an editable region—but only those editable regions added in the nested template.
Working with Templates in the Assets Panel
As a site grows, so does the number of templates it employs. Overall management of your templates is conducted through the Templates category of the Assets panel. You can open the Templates category by choosing Window Assets and clicking the Template icon on the left side of the Assets panel. The Templates category, shown in Figure 28-20, displays a list of the current site’s available templates in the lower pane and a preview of the selected template in the upper pane.
The Templates category has these five buttons along the bottom:
- Apply: Creates a document derived from the currently selected template if the current document is blank; if the current document is based on a template, this option changes the locked regions of the document to match the selected template.
- Refresh Site List: Displays the list of all templates currently in the site.
- New Template: Creates a new blank template.
- Edit: Loads the selected template for modification.
- Delete: Removes the selected template.
Figure 28-20: Use the Templates category of the Assets panel to preview, delete, open, create, or apply your current site’s templates.

The Assets panel’s context menu offers all these options and more, as explained in Table 28-3.
Table 28-3: Template Category Context Menu
|
Command |
Description |
|
Refresh Site List |
Displays the list of all templates currently in the site cache. |
|
Recreate Site List |
Reloads the template site list into the cache. |
|
New Template |
Starts a new blank template. |
|
New From Template |
Creates a new page from the selected template. |
|
Edit |
Opens the selected template for modifying. |
|
Apply |
Creates a document derived from the currently selected template if the current document is blank. If the current document is based on a template, this option changes the locked regions of the document to match the selected template. The same effects can also be achieved by dragging the template from the Assets panel to the current document. |
|
Rename |
Renames the selected template. |
|
Delete |
Removes the selected template. |
|
Update Current Page |
Applies any changes made in the template to the current page, if the current page is derived from a template. |
|
Update Site |
Applies any changes made in any templates to all template-based documents in the site. |
|
Copy to Site |
Copies the highlighted template, but none of the dependent files, to the selected site. |
|
Locate in Site |
Opens the Site panel and highlights the selected template. |
Creating a blank template
Not all templates are created from existing documents. Some web designers prefer to create their templates from scratch. To create a blank template, follow these steps:
1. Open the Templates category of the Assets panel by selecting its symbol.
2. From the Templates category, select New Template. A new, untitled template is created.
3. Enter a title for your new template and press Enter (Return).
4. While the new template is selected, click the Edit button. The blank template opens in a new Dreamweaver document window.
5. Insert your page elements.
6. Mark any elements or areas as editable regions using one of the methods previously described.
7. Save your template.
Opening and deleting templates
You can edit a template—to change the locked or editable regions—in several ways. To use the first method, choose File Open and, in the Open dialog box, change the Files Of Type to Template Files (*.dwt) on Windows systems, or select Template Files from the Enable drop-down list on Macintosh systems. Then, locate the Templates folder in your defined site to select the template to open.
The second method of opening a template for modification uses the Templates category of the Assets panel. Select a template to modify and click the Edit button. You can also double-click your template to open it for editing. Finally, if you’re working in the Site panel, open a template by selecting the Templates folder for your site and opening any of the files found there.
Tip: After you’ve made your modifications to the template, you don’t have to use the Save As Template command to store the file—you can use the regular File Save command or the keyboard shortcut Ctrl+S (Command+S). On the other hand, if you want to save your template under a new name, use the Save As command.
As with any set of files, there comes a time to clean house and remove files that are no longer in use. To remove a template, first open the Templates category of the Assets panel. Next, select the file you want to remove and click the Delete button.
Caution: Dreamweaver does not alert you if files exist that were created from the template that you’re about to delete. Deleting the template, in effect, “orphans” those documents, and they can no longer be updated via a template.
Applying templates
Dreamweaver makes it easy to try a variety of different looks for your document while maintaining the same content. After you’ve created a document from a template, you can apply any other template to it. The only requirement is that the two templates have editable regions with the same names. When might this feature come in handy? In one scenario, you might develop a number of possible website designs for a client and create templates for each approach, which are then applied to the identical content. Or, in an ongoing site, you could completely change the look of a catalog seasonally but retain all the content.
To apply a template to a document, follow these steps:
1. Open the Templates category of the Assets panel.
2. Make sure the web page to which you want to apply the style is the active document.
3. From the Templates category, select the template you want to use and click the Apply button.
Tip: You can also drag onto the current page the template you’d like to apply or choose Modify Templates Apply Template to Page from the menus.
4. If content exists without a matching editable region, Dreamweaver displays the Inconsistent Region Names dialog box. To keep the content, select the listed editable regions from the template being applied in which you want the content to appear and click OK.
The new template is applied to the document, and all the new locked areas replace all the old locked areas.
Mapping inconsistent template regions
When Dreamweaver applies a template to a page, it attempts to map the regions on the two pages to one another. If there is a one-to-one correspondence between the regions on the page and the regions on the template—for every editable region in the template, an editable region exists with the same name on the page—everything goes smoothly, and the template is applied without incident. If, however, the region names do not match—for example, the template’s main content area is called theContent, whereas the page’s main content area is called mainContent—Dreamweaver gives you the opportunity to place the content properly with the Inconsistent Region Names dialog box, shown in Figure 28-21.
The Inconsistent Region Names dialog box appears automatically when Dreamweaver finds regions that do not match in a template and the document to which the template is being applied. You can map the content in the document to any region in the template or discard the content. However, you cannot ignore the unmapped content; Dreamweaver does not proceed with the template application until all inconsistently named regions are addressed in some fashion.
Figure 28-21: The Inconsistent Region Names dialog box works with the full range of template regions, as well as template properties.

To handle inconsistently named regions, follow these steps:
1. When the Inconsistent Region Names dialog box appears, select the first unresolved region.
2. From the Move Content To New Region drop-down list, select the region you want to assign to the unmapped region.
3. If no region is suitable and you want to discard the content, choose Nowhere from the list.
4. To use the same choice for all regions displayed, choose the Use For All option.
5. To map another region, select its name from the list and repeat Steps 2 through 4.
6. Click OK when you’re finished.
You always find certain regions, such as doctitle and head, listed in the Move Content To New Region list. In general, you would not want to move any body-area content into these regions.
Tip: The region names must match precisely—including the case of the two names—or the Inconsistent Region Names dialog box appears.
Anytime you save a change to an existing template—whether or not any documents have been created from it—Dreamweaver asks if you’d like to update all the documents in the local site attached to the template. You can also update the current page or the entire site at any time, just as you can update Library elements. Updating documents based on a template can save you an enormous amount of time—especially when numerous changes are involved.
To update a single page, open the page and choose Modify Templates Update Current Page or select the same command from the context menu of the Assets panel. Either way, the update is instantly applied.
To update a series of pages or an entire site, follow these steps:
1. Choose Modify Templates Update Pages. The Update Pages dialog box, shown in Figure 28-22, appears.
Figure 28-22: Any changes made to a template can be applied automatically to the template’s associated files by using the Update Pages command.

2. To update all the documents using all the templates for an entire site, choose Entire Site from the Look In option; then select the name of the site from the accompanying drop-down list.
3. To update pages using a particular template, choose Files That Use from the Look In option and then select the name of the template.
4. To view a report of the progress of the update, make sure that the Show Log option is enabled.
5. Click Start to begin the update process.
The log window displays a list of the files examined and updated, the total number of files that could not be updated, and the elapsed time.
Mistakes are made, clients change their minds, bosses change directions—for whatever reason, you’ll find that you need to remove template markup from time to time. Luckily, Dreamweaver has made it as easy to delete the template indicators as it is to insert them. With a little know-how, you can remove template markup from an editable attribute for an entire site.
Deleting template markup individually
Quite often I find I need to convert an editable region in a template to a locked area. You can accomplish this change in one of two ways—you can delete the surrounding template tags in the code or you can use a Dreamweaver command, Remove Template Markup. Personally, I find the command approach to be much faster and more efficient. Individual template markup can only be removed from the template itself.
To remove any surrounding template code via the command, place your cursor within the template region and choose Modify Templates Remove Template Markup. Alternatively, right-click (Control+click) and choose Templates Remove Template Markup.
The Remove Template Markup command works only on the template markup immediately enclosing the cursor position. If, for example, you need to remove an editable optional region and convert the content to being locked, you issue the Remove Template Markup command twice: once to remove the editable region and again to remove the optional region.
Caution: Using the Remove Template Markup command to remove an optional region does not delete the corresponding TemplateParam statement in the <head> tag. If no other optional region uses the same TemplateParam statement, you must remove the code manually.
Removing template markup from an entire page
Template-derived documents don’t need to stay template-derived documents forever. All you need do is to detach the document from its template, and all template markup in the page is removed. To detach a document from the template, choose Modify Templates Detach from Template.
Note: If, for any reason, you need to remove all of the markup from a template itself, the fastest way is to create a document from that template and then issue the Detach From Template command.
Exporting a site without template markup
Not all sites are template-based. Dreamweaver gives you the power to strip all of the template markup from template-based documents in an entire site. This command is particularly useful when migrating previously template-based documents to a site that does not use templates. Just to hedge your bets, Dreamweaver optionally exports the data from your template-based documents into XML files so that, if necessary, the data can be applied to a new template.
The Export Without Markup command handles more than just the templates, however. An entire copy of your site is copied to a new folder, sans template markup. Even the Template folder itself, with all the site’s templates intact, is copied. Best of all, this is not necessarily a one time feature. If repeated, you have the option to extract only the modified files.
To export a site without template markup, follow these steps:
1. Choose Modify Templates Export Without Markup. The Export Site Without Template Markup dialog box, shown in Figure 28-23, appears.
Figure 28-23: The Export Without Markup command duplicates your entire site in another folder while simultaneously removing all markup from template-derived files.
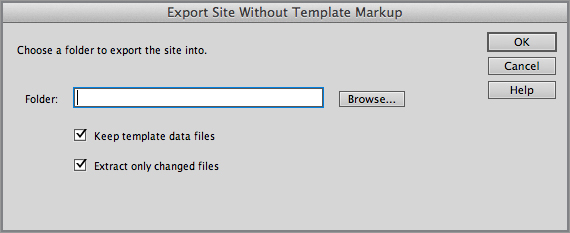
2. Enter the path to the folder to hold the exported site or click the Browse button to locate the folder. Because the entire site is exported, the folder you choose may not be contained in the current site.
3. If you want to maintain the data from the template-based documents, choose the Keep Template Data Files option.
Cross-reference: Dreamweaver stores the data in a standard XML file format. For more about Dreamweaver’s XML export features, see Chapter 32.
4. If you have previously exported the site with this command and want to update your export, choose the Extract Only Changed Files option.
5. Click OK when you’re finished.
After the operation is completed, you’ll probably want to define a new site to manage the exported files—Dreamweaver does not do this task for you automatically.
Each time you open a new document in Dreamweaver, a blank page is created. The code that makes up that blank page depends on which document type you choose—HTML, XML, ColdFusion, or ASP.NET, among others. The default documents on which the new pages are based are all stored in the Dreamweaver CS6ConfigurationDocumentTypesNewDocuments folder. A selected default page works in a similar fashion to the templates in that you can create new documents from it, but no editable or locked regions exist—everything in the page can always be altered. For example, the basic HTML document is a bare-bones structure with only a few properties specified—a document type and a character set:
<!DOCTYPE html PUBLIC "-//W3C//DTD XHTML 1.0 Transitional//EN" ~CA
"http://www.w3.org/TR/xhtml1/DTD/xhtml1-transitional.dtd">
<html xmlns="http://www.w3.org/1999/xhtml">
<head>
<meta http-equiv="Content-Type" content="text/html; charset=utf-8" />
<title>Untitled Document</title>
</head>
<body>
</body>
</html>
Naturally, you can change any of these elements—and add many, many more—after you’ve opened a page. But what if you want to have a <meta> tag with creator information in every page that comes out of your web design company? You can do it in Dreamweaver manually, but it’s a bother, and chances are good that you’ll forget. Luckily, Dreamweaver provides a more efficient solution.
In keeping with its overall design philosophy of extensibility, Dreamweaver enables you to modify the default file as you would any other file. Just choose File Open and select the appropriate file from the Dreamweaver CS6ConfigurationDocumentTypesNewDocuments folder. After you have made your changes, save the file as you would normally. Now, to test your modifications, choose File New and select your document type. Your modifications appear in the new document.
Editing Content in the Browser
One of the primary uses of Dreamweaver templates is updating client sites. With primary portions of the design—such as the logo and navigation—locked, targeted editable areas containing web page content can quickly be modified. However, to make any changes on pages derived from Dreamweaver, you’d typically need a desktop tool such as Adobe Contribute or Dreamweaver itself. Many site owners are more business-oriented than web-savvy and don’t have the skills or time to devote to mastering a software package. For them, the solution is Adobe InContext Editing.
InContext Editing is an in-browser editing service available in Business Catalyst sites, using web pages with special markup from Dreamweaver. These pages can be modified using any modern browser, starting from Internet Explorer 6, Firefox 3, and Safari 3.1. Clients can change or add text, images, or links. Specially designated sections, such as event listings, can be repeated and modified or reordered. Despite all this access, designers maintain a high degree of control. Not only can they establish which areas are editable and which are not, but they can also control the level of editability—from full stylistic freedom to plain-text editing only.
The workflow for creating, publishing, and editing InContext Editing pages goes like this:
1. The designer creates a page in Dreamweaver.
2. InContext Editing versions of editable and repeating regions are added to the page through Dreamweaver tools.
3. The designer publishes the page to a site that has been registered with the Adobe Business Catalyst service.
4. The client navigates to the InContext Editing–enabled page and presses a keyboard shortcut to log in.
5. Once logged in, the client makes any desired changes to the site, saves the page, and clicks Publish.
Next, you learn how to integrate InContext Editing controls into your web pages.
Setting up InContext Editing templates
Unlike Dreamweaver templates, you don’t have to save an InContext Editing–enabled page as a template to make it functional. All you need to do is to add one or more InContext Editing regions to the page and, when you publish the page to your site, put a number of InContext Editing–related files online. From a designer’s standpoint, it takes only a few minutes to make an existing page client-editable.
Dreamweaver includes an InContext Editing category in the Insert panel with two entries:
- Create Editable Region: Adds a <div> tag or tag attribute that allows the enclosed content to be modified through InContext Editing.
- Create Repeating Region: Adds code that allows an InContext Editing user to repeat a specific section of code and change it. Users can also reorder code blocks within the repeating region.
Although the objects are very straightforward to apply, they do permit the designers to exercise a fair amount of control. Each object is discussed in turn in the following sections.
Note: It’s important to realize that InContext Editing pages are not the same as Dreamweaver templates, discussed earlier in this chapter. You cannot, as a designer, create pages based on InContext Editing–enabled pages, and, therefore, you can’t update a master template to change derived pages. You (or the client) can, however, duplicate a page once it has been published and add new content through the InContext Editing toolbar in the browser.
Adding an editable region
An InContext Editing editable region can be applied to any portion of the page. Once it is applied, Dreamweaver adds a single attribute to the code, like this:
<div ice:editable="*">
The value of the ice:editable attribute is initially set to an asterisk, which indicates that all editing options are available. If you turn off all the options, so that the content can only be changed but not styled, the ice:editing value is empty. Selecting one or more options will cause the available options to be written into the code, like this:
<div ice:editable="bold,align_right,align_center,align_left">
To add an InContext Editing editable region to the page, follow these steps:
1. Place your cursor in the area you want to make editable.
2. From the Insert panel, choose the InContext Editing category.
3. Select Create Editable Region.
4. In the Create Editable Region dialog box (see Figure 28-24), choose to wrap the current selection with a <div> tag or transform the parent tag into an editable region by adding the InContext Editing attribute. Click OK.
Which option you choose depends on your design. Sometimes wrapping a new <div> tag around existing content causes elements to shift, and it is better to take the attribute route by transforming the parent tag.
5. Select the desired options in the Editable Region Property inspector.
Figure 28-24: If you have already selected the parent tag for your editable region, the option to Transform The Parent Tag Into An Editable Region is disabled.

Note: Unlike with standard Dreamweaver templates, you can’t add editable regions within <heading> or other tags. Therefore, if you don’t want clients to modify the format or style of the content, select Uncheck All in the InContext Editing Property inspector to disable all editing options.
InContext Editing gives you a wide variety of options to choose from, as shown in Figure 28-25. You can quickly eliminate all of them by choosing Uncheck All or bring them all back by clicking Check All. The available options are listed in Table 28-4.
Figure 28-25: By default, all options are enabled when you insert a new InContext Editing editable region.

Table 28-4: InContext Editing Property Inspector Options
|
Icon |
Name |
Description |
|
|
Bold |
Displays a bold button to add a <span> tag with the inline CSS property font-weight: bold. |
|
|
Italic |
Displays an italic button to add a <span> tag with the inline CSS property font-style: italic. |
|
|
Underline |
Displays an underline button to insert <u> tags. |
|
|
Alignment buttons |
Displays left, center, right, and justify buttons. |
|
|
Font Face |
Displays a drop-down list with a standard selection of web font families. |
|
|
Font Size |
Displays a drop-down list of seven font sizes, from 10 px to 48 px. |
|
|
Indent and Outdent buttons |
Displays buttons to move the text in by adding a <blockquote> tag or out by removing a <blockquote> tag. |
|
|
Numbered List and Bulleted List |
Displays buttons for converting paragraphs to an ordered or unordered list. |
|
|
Paragraph Styles |
Displays a drop-down list of HTML formats, including: paragraph and Heading 1 through Heading 6. |
|
|
Background Color |
Displays a color picker for adding a background color to a selection. |
|
|
Font Color |
Displays a color picker for adding a color to a selection. |
|
|
CSS Styles |
Displays a drop-down list of CSS classes, as chosen through the Manage Available CSS Classes object. |
|
|
Image/Media |
Displays controls for adding and managing images and other media. |
|
|
Link |
Displays controls for adding and managing links. |
You can also use the Class drop-down list included in the InContext Editing Property inspector to specify a CSS class for any InContext Editing–added <div> tag.
Like standard editable regions and Spry elements, an InContext Editing region is identified by a tab and blue border, as shown in Figure 28-26. Unlike editable regions, you don’t need to name them separately.
Figure 28-26:To invoke the InContext Editing Property inspector, click the blue tab surrounding the content.

Note: If you’d like to get a jump start on your pages—and incorporate InContext Editing—Dreamweaver has just the feature for you. When you create a new HTML page with one of Dreamweaver’s pre-built CSS layouts (available through the New dialog box), you’ll see an option to Enable InContext Editing. Click that checkbox and Dreamweaver will generate a CSS standards-compliant page where the main content area is already enclosed in an InContext Editing editable region. Customize the page however you like, save, and you are ready to post to the InContext Editing server.
To remove a selected InContext Editing editable region from your page, choose Remove Region from the Property inspector.
Tip: When you remove an InContext Editing editable region through the Property inspector, only the ice:editable region is removed. If code such as <div ice:editable="*"> is wrapped around the content, the <div> tag remains. To remove both tag and attribute, right-click the <div> tag in the Tag Selector and choose Remove Tag.
Repeating page sections
The InContext Editing repeating region works in exactly the same way as the Dreamweaver template repeating region. Add a repeating region to a section of the page that includes at least one editable region, and when the page is published, the user can add more instances of the section and change the content, reorder them, or delete them. Repeating regions are excellent for page sections such as blog posts, event listings, and news items.
To add an InContext Editing repeating region to the page, follow these steps:
1. Make sure that you have added InContext Editing editable regions to any section of the page you want to repeat.
2. Select the outermost section of the element you want to repeat in the Tag Selector or in Code view.
Typically, a <div> tag is used as a containing element for a repeating section. You can include as many editable and non-editable sections within the containing <div> tag as you like.
3. From the Insert panel’s InContext Editing category, choose Create Repeating Region.
Dreamweaver adds an attribute to the selected tag, ice:repeating="true", and also adds another attribute, ice:repeatinggroup="*", to the parent tag. This parent tag will contain all instances of the repeating region.
4. In the Repeating Regions Group Property inspector, deselect either of the default options: Reorder or Add/Remove, as shown in Figure 28-27.
Figure 28-27: Give your client the capability to grow the page content in a controlled fashion through InContext Editing repeating regions.

With the Reorder option enabled, controls that allow the client to move items up and down appear above the repeating region in the browser. This functionality is useful, for example, to place a new item before an existing item. When the Add/Remove option is checked, similar controls for inserting and deleting a repeating section are made available.
5. Save your page. Three new files are copied to your site: ice.conf.js, ice.js, and ide.html.
You can use the InContext Editing repeating region facility in combination with non-editable sections of the page as well. Imagine, for instance, that you have a number of news items that you do not want to allow the client to remove. If you create a dummy news item to which you apply the InContext Editing editable regions and then the repeating region, Dreamweaver will mark the entire news section—with both editable and non-editable items—as the Repeating Regions Group. When the client goes to edit this section in the browser, only the editable item can be deleted or reordered.
Much of a web designer’s responsibility is related to document production, and Dreamweaver offers a comprehensive template solution to reduce the workload. When planning your strategy for building an entire website, remember that templates provide these advantages:
- Templates can be created from any web page.
- Dreamweaver templates combine locked and editable regions. Editable regions must be defined individually.
- After you declare a template, you can create new documents from it.
- With Dreamweaver’s repeating regions, you can add or remove data from tables without altering the table structure.
- Show or hide content with each new template-derived document with Dreamweaver optional regions.
- Nested templates can be used to structurally organize locked and editable content.
- If a template is altered, pages built from that template can be automatically updated, but will need to be re-uploaded if already on the site.
- The default template that Dreamweaver uses can be modified so that every time you choose File New and select a file type, a new version of your customized template is created.
- Adobe offers a service, Business Catalyst InContext Editing, which makes it easy for clients to update their own web page content in any modern browser without affecting the overall design. Dreamweaver designers can set up editable regions and repeating regions.
In the next chapter, you learn how to streamline production and site maintenance by using repeating page elements from the Dreamweaver Library.