
Chapter 32
Integrating XML and XSLT
In This Chapter
- Exploring the basics of XML
- Exporting XML from templates
- Importing XML into Dreamweaver
- Building XML files
- Styling with XSL
- Incorporating XSLT fragments
- Creating client-side XSLT pages
- Dreamweaver Technique: Adding Data to an XSL Page
- Making XSLT server-side pages
XML, short for Extensible Markup Language, has quickly become a powerful force on the web and an important technology for web designers to master. XML enables designers to define the parts of any document—from web page to invoice—in terms of how those parts are used. When a document is defined by its structure, rather than its appearance, as it is with HTML, the same document can be read by a wide variety of systems and put to use far more efficiently.
Dreamweaver includes Roundtrip XML as a complement to its Roundtrip HTML core philosophy. Roundtrip HTML ensures that the defined tags of HTML remain just as you’ve written them. With XML, no fixed set of defined tags exists—XML tags can be written for an industry, a company, or just a website. Roundtrip XML permits web designers to export and import XML pages based on their own structures.
You can find XML all throughout Dreamweaver, just under the hood. The Design Notes feature is based on XML, as is the completely customizable menu system. The Third-party Tags file is pure XML and can describe any kind of tag. In fact, you can use XML to describe most anything, even HTML. This chapter explores the basics of XML, as well as the implementation of Roundtrip XML in Dreamweaver. You’ll also find techniques for presenting XML data in a web page using Extensible Stylesheet Transformation (XSLT) technology; this exciting feature of Dreamweaver allows the easy display of such XML data as RSS feeds from blogs and other web services.
XML is to structure what Cascading Style Sheets (CSS) are to format. Whereas Cascading Style Sheets control the look of a particular document on the web, XML makes the document’s intent paramount. Because there are almost as many ways to describe the parts of a document as there are types of documents, a set language—such as HTML—could never provide enough specification to be truly useful. With XML, you create your own custom tags to describe the page, which makes XML a truly extensible language.
XML became a W3C Recommendation in February 1998, after a relatively brief two-year study. The speed with which the recommendation was approved speaks to the need for the technology. XML has been described as a more accessible version of SGML (Standard Generalized Markup Language), the widely used text-processing standard. In fact, the XML Working Group that drafted the W3C Recommendation started out as the SGML Working Group.
What can XML do that HTML can’t? Suppose you have a shipping order that you want to distribute. With HTML, each part of the document—such as the billing address, the shipping address, or the order details—is enclosed in tags that describe its appearance, like this:
<h2 align="center"><strong>Invoice</strong></h2>
<p align="left">Ship to:</p>
<p>J. Lowery<br>
101 101st Avenue, Ste. 101<br>
New York, NY 10000</p>
With XML, each section of the page is given its own set of tags, according to its meaning, as follows:
<documentType>Invoice</documentType>
<noTax/>
<ship-toHeader>Ship to:</ship-toHeader>
<customer>J. Lowery<br></customer>
<ship-toAddress>101 101st Avenue, Ste. 101<br>
New York, NY 10000</ship-toAddress>
Like HTML, XML is a combination of content and markup tags. Markup tags can be used in pairs, such as <customer> ... </customer>, or they can be singular. A single tag is called an empty tag because no content is included. Single tags in XML must include an ending slash—as in <noTax/>, for example—and are used to mark where something occurs. Here, <noTax/> indicates that no sales tax is to be applied to this invoice.
Also, like HTML, XML tags can include attributes and values. As with HTML, XML attributes further describe the tag, much like an adjective describes a noun. For example, another way to write the <ship-toHeader> tag is as follows:
<header type="Ship To">
With a more generalized tag such as this one, you can easily change values, as in <header type="Bill To">, rather than include another new tag.
In all, XML recognizes six kinds of markup:
- Elements: Elements are more commonly known as tags and, as in HTML, are delimited by a set of angle brackets <>. As noted previously, elements can also have attributes set to particular values.
Caution: Although surrounding values with quotes is optional in HTML—as in color=white—quotes are mandatory in XML.
- Entity references: Certain characters in XML, such as the delimiting angle brackets, are reserved in order to permit markup to be recognized. These characters are represented by entities in XML. As in HTML, character entities begin with an ampersand and end with a semicolon. For example, <Content> is XML code to represent <Content>.
- Comments: XML comments are identical to HTML comments; they both begin with <!-- and end with -->.
- Processing instructions: XML processing instructions are similar to server-side includes in that the XML processor (like the server) passes them on to the application (like the browser).
- Marked sections: XML can pass blocks of code or other data without parsing the markup and content. These blocks of character data are marked with <![CDATA[ at the beginning and ]]> at the end:
<![CDATA[If age < 19 and age > 6, then the kids are in ;
school]]>
Communication between XML and HTML is greatly eased because large blocks of data can be passed in this fashion.
- Document type declarations: Because every XML document is capable of containing its own set of custom tags, a method for defining these tags must exist. Although a discussion of the formats of such document type declarations is beyond the scope of this book, it’s helpful to know that such declarations can be made for elements, attributes, character entities, and notations. Notations refer to external binary data, such as GIFs, that are passed through the XML parser to the application.
XML documents may begin with an XML declaration that specifies the version of XML being used. The XML declaration for a document compliant with the 1.0 specification looks like this:
<?xml version="1.0" encoding="utf-8"?>
A much more detailed document type declaration (DTD), in which each tag and attribute is described in SGML, is also possible. XML documents that include these types of DTDs are labeled valid XML documents. Other documents that respect the rules of XML regarding nesting of tags and other matters, but don’t include DTDs for the elements, are known as well-formed XML. Dreamweaver exports well-formed XML documents but can import either well-formed or valid XML.
How do you make an XML page? You can choose File New and select XML from the Blank Page Page Type category, or you can convert an existing template-based document into XML format with one command. Currently, Dreamweaver creates its XML pages based on a template’s editable regions. With this approach, the true content of a page—what distinguishes it from all other pages of the same type—can be separated and applied independently of the original web page. In other words, after the XML information is gathered from a web page, it can be imported into any other application to be displayed, read, spoken, translated, or acted upon.
Cross-reference: To get a better idea of how to use XML, you need to understand Dreamweaver templates, which are discussed in Chapter 28.
Dreamweaver templates are composed of locked and editable regions. The locked regions are repeated for each page created from the template, whereas the content in the editable regions is added per page. The connection between XML and templates is similar to the relationship between a database form and its data. In a database, each field has a unique name, such as LastName, FirstName, and so on. When you create a database form to present the data, the placeholders for the data use the same field names. Then, when data from one record flows into the form, the information from the field goes into the areas with the corresponding field names. Likewise, each editable region has a unique name—in essence, a field name. The content within the editable region is the field’s data. When the template data is exported as an XML file, the name of the editable region is converted to an XML tag that surrounds its data.
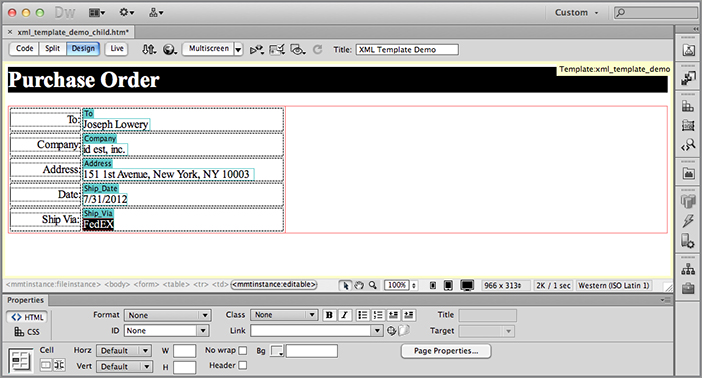
For example, Figure 32-1 shows a Dreamweaver template for a purchase order. On the left are the headings (To, Company, Address, and so on) for the information in a locked area, whereas the specific shipping data (on the right) resides in a series of editable regions, each with its own name.
When exported as XML by Dreamweaver, the resulting XML file looks like the following:
<?xml version="1.0" encoding="utf-8"?>
<po template="/Templates/po.dwt" codeOutsideHTMLIsLocked="false">
<ShipDate><![CDATA[10 Oct 2002]]></ShipDate>
<doctitle><![CDATA[
<title>Purchase Order</title>
]]></doctitle>
<head></head>
<Address><![CDATA[1234 AnyStreet<br>
Anytown, USA]]></Address>
<ShipVia><![CDATA[UPS]]></ShipVia>
<Company><![CDATA[John@apos;s Does]]></Company>
<To><![CDATA[John Doe]]></To>
</po>
Note several important items about the XML file. First, notice the use of self-evident labels for each of the tags, such as <Company> and<ShipVia>; such names make it easy to understand an XML file. Even the one tag not based on a user-defined name, <doctitle>, is straightforward. Second, all the data included in the XML tags is marked as a CDATA area; this ensures that the information is conveyed intact, just as it was entered. Finally, if you look at the <Address> tag data, you see that even HTML tags (here, a <br> tag) are included in the CDATA blocks. This practice enables you to carry over basic formatting from one page to the next. You can avoid this by designating just the inner content—without any of the formatting tags—as an editable region.
Dreamweaver can create one of two different types of XML tags during its export operation. The first is referred to as Dreamweaver Standard XML and uses an <item> tag with a name attribute set to the editable region’s name. For example, if the editable region is named ShipVia, the Dreamweaver Standard tag is
<item name="ShipVia">Content</item>
Figure 32-1: Dreamweaver creates XML pages based on templates and editable regions. This template is now ready to be exported as an XML file.
The Dreamweaver Standard XML file has one other distinguishing characteristic. The XML file is saved with a reference to the defining Dreamweaver template, like this:
<templateItems template="/Templates/PO.dwt">
When you are importing a Dreamweaver Standard XML file, if the specified template cannot be found, a dialog box appears asking that you select another template.
The other option is to use what Dreamweaver refers to as Editable Region Name tags. This method uses the editable region names themselves as tags. In the case of the editable region name ShipVia, the tag pair under this method is <ShipVia> ... </ShipVia>.
To create an XML file from within Dreamweaver, follow these steps:
1. Open a Dreamweaver document based on a template that has at least one editable region.
2. Choose File Export Export Template Data As XML. The Export Template Data As XML dialog box opens, as shown in Figure 32-2.
3. Choose the format for the XML tags by selecting one of the Notation options:
- Use Standard Dreamweaver XML Tags: Select this option to produce <item> tags with name attributes set to the names of the editable regions.
- Use Editable Region Names As XML Tags: Select this option to produce XML tags that use the editable region names directly.
Selecting either option displays sample tags in the Sample area of the dialog box.
4. Click OK when you’re finished. An Export Template Data As XML Save File dialog box appears.
5. Enter the path and name of the XML file you want to save in the File Name text box. Click Save when you’re finished.
Figure 32-2: You can convert the editable content of any template-based page to an XML document by using the Export Template Data As XML dialog box.

As part of Roundtrip XML, Dreamweaver includes an Import XML command. Like the Export XML command, Import XML works with Dreamweaver templates. The content information in the XML document fills out the editable regions in the template, much as data fills out a form in a database.
With this import capability, you can independently create and store content in an XML file and then, if you want to publish the page to the web, simply import it into the Dreamweaver template.
To be imported, XML files must follow one of the two structures used when exporting a template to XML: Standard Dreamweaver XML or Editable Region Names used as XML tags. Although it’s a matter of personal preference, I find the Editable Region Names format to be easier to read and, in general, simpler to work with.
Note: When you’re importing XML files, make sure that the XML files that you’re importing have the necessary template declarations in order for Dreamweaver to find the appropriate template to format the incoming data.
How do you create a file from the XML? Naturally, you could open a template for your XML document and fill in the data by hand—but that, in a sense, defeats the purpose of automating your workflow via XML. A more efficient scenario is to use a database to accept and store content; the database entry form is easily accessible over a network or over the Internet. A report, generated by the database application, blends the content data and the XML structure, resulting in an XML file to be imported into Dreamweaver.
To import an XML file into a Dreamweaver template, follow these steps:
1. If desired, open a file based on a Dreamweaver template; otherwise, create a new blank page (you must have at least one file open before the next step).
2. Choose File Import XML into Template. The Import XML dialog box opens.
Caution: Any existing information in the Dreamweaver document in the editable regions is replaced by the information in the corresponding tags of the XML document.
3. Select an XML file from the Import XML dialog box.
4. Select Open when you’re finished.
The XML file is imported into Dreamweaver, and the editable region placeholder names are replaced with the data in the XML document.
Whereas HTML code has some degree of built-in styling—browsers render content enclosed with <p> tags much differently from what’s within an <img> tag—XML has none: It’s all just data. The Extensible Stylesheet Language (XSL) specification developed by the W3C is intended to give designers the power to shape XML data. In fact, XSL has the potential to go beyond styling to actual transformation; functions within XSL can, for example, sort the XML data it is passed.
Dreamweaver embraces XSL in a major way. Dreamweaver has the power to create XSL documents to fit a variety of situations, including both server-side and client-side options. This facility opens a whole new world of possibilities for Dreamweaver users. For example, designers can include information from RSS (Really Simple Syndication) feeds right in their web pages—styled to fit into the look and feel of their site—through a very straightforward process. For intranet developers, XML reports, like those generated by Dreamweaver’s own Reports system, can be presented in a suitable fashion.
XSL is actually a family of W3C specifications. In addition to the XSL standard, a separate specification covers XSLT, short for XSL Transformations. Many of the Dreamweaver XSL features involve XSLT functions that convert XML to HTML and CSS. Another key component under the XSL umbrella is the XML Path Language, or XPath. XPath is an expression language that allows the XML data to be selectively presented; XPath powers Dreamweaver features like the XSL Repeat Region.
Dreamweaver creates two different types of XSL content: a full XSLT page that displays HTML and transformed XML data together, and an XSLT fragment that contains only the transformed XML data. An XSLT fragment is embedded in a standard web page much like a server-side include; a feed from the Yahoo! Weather RSS service (http://weather.yahooapis.com/forecastrss?w=2459115&u=f), which will give you New York weather in Fahrenheit embedded in the home page of a ski resort, is a good example of how an XSLT fragment would be used. XSLT fragments are used far more frequently on the web in general, whereas XSLT pages are more often seen in intranet applications.
Including XSLT fragments
The comparison of an XSLT fragment to a server-side include (SSI) is a good one, for a number of reasons:
- Neither type of file can be viewed independently on the web because they both lack necessary HTML tags, including <html>, <head>, and <body>.
- Both require an application server for display in a browser. Dreamweaver supports ASP, ColdFusion, and PHP server models for XSLT fragments.
- You can edit either an XSLT fragment or SSI in Dreamweaver with equal ease.
- Each XSLT fragment and SSI appears to be a single entity when selected in the embedded page at design time.
Unlike SSIs, XSLT fragments have a page type all their own and can be created directly from the New Document dialog box. To create an XSLT fragment, follow these steps:
1. Choose File New.
2. From the New Document dialog box’s first category, select the Blank Page category and the XSLT (Fragment) entry, and then click Create. Dreamweaver asks which data source you’d like to use for your new XSLT fragment, as shown in Figure 32-3.
Figure 32-3: Read the latest for any RSS feed by using the remote XML data option.
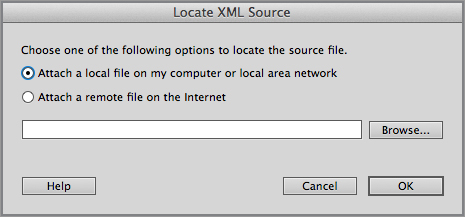
3. In the Locate XML Source dialog box, select the Attach A Local File On My Computer Or Local Area Network option if you want to incorporate data from a static XML file available on your system; use the Browse button to open the Select File dialog box or enter the path to the file by hand in the provided field.
4. If you’re displaying XML data from a file on the web, choose the Attach A Remote File On The Internet option and enter the full Internet address in the available field.
5. Click OK when you’re done.
6. Save the newly created document with an .xsl filename extension—that is, rssfeed.xsl.
Binding XSL data to the page
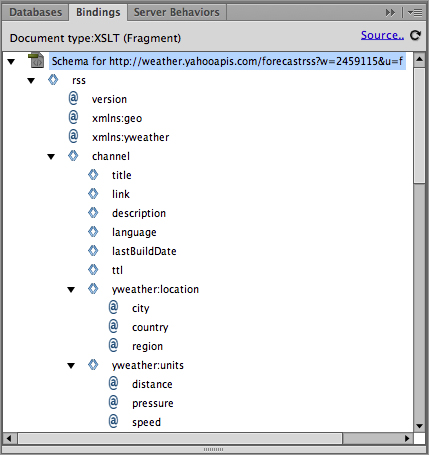
Once the fragment page is created, you’re ready to create the HTML structure to hold and bind the data. You can use any standard HTML objects, such as tables and <p> or <br/> tags, to hold your data. The data itself is displayed in the Bindings panel, as shown in Figure 32-4.
Figure 32-4: Once your file is connected to an external XML source like an RSS feed, the Bindings panel displays the available data structure.
Dreamweaver provides the following visual indicators when displaying XML data:
|
|
Child elements that occur once within a parent are identified with a double-angle bracket. |
|
|
Child elements that occur one or more times are identified with a double-angle bracket followed by a plus sign. |
|
|
Optional child elements are identified with a double-angle bracket followed by a question mark. |
|
|
Attributes of a parent are identified with an at (@) sign. |
Bind data to a page by dragging an element from the Bindings panel and dropping it in the desired place or by positioning your cursor on the page and double-clicking the selected data element in the Bindings panel.
Tip: In addition to displaying XML data as text, you can also use it in a link. Select the text, data, or image you want to use as a link and then, from the Property inspector’s Link field, click the Browse For File icon. When the Select File dialog box opens, select Data Sources; the XML data tree appears just like in the Bindings panel. Choose the data field you want to use as the href value, typically labeled link or rss:link, and then click OK twice to close the open dialog boxes. The XML data appears in the Link field wrapped in braces, like this: {rss:link}.
The basic code inserted by Dreamweaver for XSL data looks like this:
<xsl:value-of select="rdf:RDF/rss:channel/rss:title"/>
where the value of the select attribute is the XPath description of where the data is located in the XML file. Forward slashes represent parent nodes, much like folders in a URL.
Repeating XSL data
A common use of XSLT fragments is to incorporate results from an RSS feed onto the page. Generally, you would include a few heading elements, such as the main feed title and author, followed by a series of titles, short descriptions, and links, each concerning a particular item in the RSS feed. The layout for such a fragment often involves a table to contain the repeating data, as shown in Figure 32-5.
To display repeated data, an XSLT Repeat Region object is used. Similar to a Repeat Region server behavior, the XSLT Repeat Region object wraps the necessary code around a selection, typically one or more rows of a table. Just as you would identify which recordset to use with a Repeat Region server behavior, the XSLT Repeat Region object requires that you identify which element in the XML schema repeats. You’ll remember that Dreamweaver identifies such items in the Bindings panel with a double-angle bracket and plus sign combination.
Figure 32-5: Use basic HTML tools such as headings, paragraph tags, and links to structure the data in an XSLT fragment.

The XSL code for repeating elements is <xsl:for-each> and, when applied to a table row, looks like this example:
<xsl:for-each select="rdf:RDF/rss:item">
<tr>
<td>...</td>
</tr>
</xsl:for-each>
The select attribute in the <xsl:for-each> tag refers to the repeating element in the XML data. Dreamweaver inserts this code after you’ve identified the repeating item in the XPath Expression Builder (Repeat Region) dialog box.
To set an XSLT fragment area to repeat in Dreamweaver, follow these steps:
1. Select the HTML and XSL data you want to repeat. It’s best to select the containing tag pair around the XSL data, such as <tr> or <p>.
2. From the Insert panel’s XSLT category, choose Repeat Region.
Alternatively, you can select Insert XSLT Objects Repeat Region; either approach opens the XPath Expression Builder (Repeat Region) dialog box.
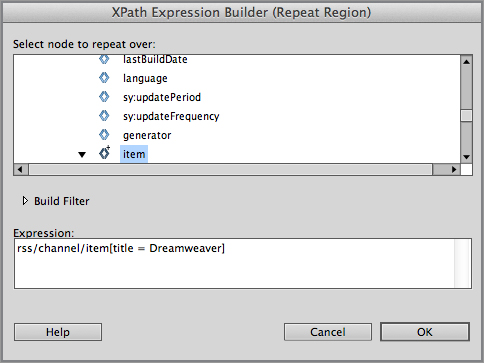
3. In the XPath Expression Builder (Repeat Region) dialog box, select the element you want to repeat (see Figure 32-6).
Repeatable elements are identified with the double-angle brackets and plus sign, +. Be sure to choose the parent repeating element of any item you want to display.
4. Click OK when you’re done.
In Design view with Invisible Elements enabled, Dreamweaver displays a border around the repeated area with the label xsl:for-each.
Figure 32-6: Choose the parent repeating element with the plus sign (disclosure triangle on the Macintosh).

Filtering XSL data
While the XPath Expression Builder (Repeat Region) dialog box makes setting up a repeat region a simple point-and-click operation, it also permits you to establish filters for the data. You could, for example, use this feature to limit the items from the Adobe XML News Aggregator (http://feeds.adobe.com/) to those concerned with Dreamweaver. Filters can be applied at the same time as the XSLT Repeat Region or afterward.
To apply a filter to an existing XSLT Repeat Region, follow these steps:
1. Select any of the XML data within the repeat region.
2. From the Tag Selector, choose <xsl:for-each>.
3. In the Property inspector, click the lightning bolt next to the Select field.
4. When the XPath Expression Builder (Repeat Region) dialog box reopens, select Build Filter. The dialog box expands to display the filter controls.
5. Click Add (+) to start a new filter criteria. The initial filter criteria is set up to use the previously selected repeating data element in the Filter By column; your focus will be on choosing values for the Where, Operator, and Value columns.
6. Select the data element you want to filter by from the Where list. For example, if you wanted to filter by the subject field of the Adobe XML News Aggregator feed, you’d choose dc:subject.
7. Choose the operation you want to use in your filter from the Operator list. For string comparisons, you would select the equal sign (=) or !=. Other operators include <, <=, >, >=, and <>.
8. Enter the desired filter keyword or other value in the Value column (see Figure 32-7).
If you’re using a text value in your filter criteria, surround the word or phrase with single quotation marks. Dreamweaver automatically converts these to their character entity equivalents—'—so that the code will validate properly.
9. To add additional conditions, select either and or or from the And/Or column and repeat Steps 5–8.
10. Click OK when you’re done.
Test your XSLT fragment by previewing it in the browser, and Dreamweaver will create the necessary code to display the page.
Figure 32-7: You can display just what you want from an RSS feed with an XSLT filter.
Showing XSL data conditionally
Other tools for shaping your XML data through XSL are the conditional XSLT objects in Dreamweaver. Both the XSLT Conditional Region and Multiple Conditional Region objects are used to display XML data or even standard HTML if your custom conditions are met. Unlike the filtering mechanism of the XSLT Repeat Region object, the conditional objects work with data that has already been made available to the page. You could, for example, display the optional description element from an RSS feed along with the Description label, but only if the description value exists.
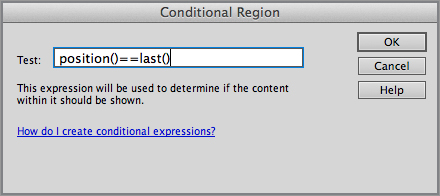
The XSLT Conditional Region, when applied by itself, tests for a single condition and renders the enclosed content if the condition is met, very much like an If-Then clause in programming. In fact, the code uses the <xsl:if> tag. For example, if you wanted to display text indicating the final item from an RSS feed, you’d use code like this:
<xsl:if test="position()=last()">
<p>Last item:</p>
</xsl:if>
The test attribute checks to see if the position() function—which refers to the current item—is the same as the one the last() function returns and, if so, displays the text. To apply the XSLT Conditional Region object, follow these steps:
1. Select the text, image, page object, or code you want to make conditional in either Design or Code view.
2. From the Insert panel’s XSLT category, choose Conditional Region.
3. When the Conditional Region dialog box opens, enter the condition to evaluate in the Test field (see Figure 32-8).
4. Click OK.
Figure 32-8: Display or hide anything in an XSL fragment through the XSLT Conditional Region object.
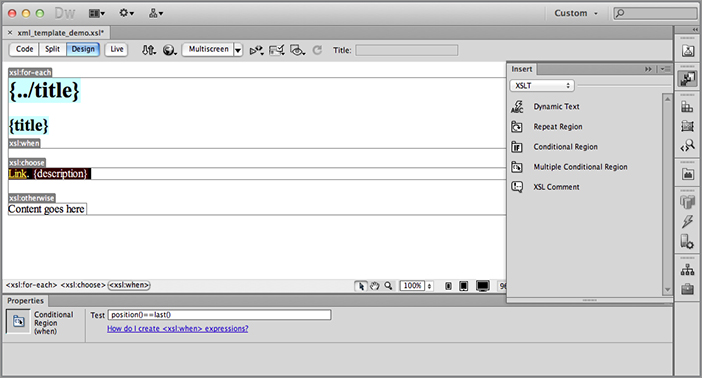
Although the XSLT Conditional Region object displays or doesn’t display some code based on a single condition, the Multiple Conditional Region is much more flexible. Although the Multiple Conditional Region object initially tests a single condition, it provides alternative output leading to an either/or code output. For example, say you want to test for the final item and note it as such when it appears, but you also want to display other text—that is, Next item:—until it appears. In this situation, your XSL code would look like this:
<xsl:choose>
<xsl:when test="position()=last()">
<p>Last item:</p>
</xsl:when>
<xsl:otherwise>
<p>Next item:</p>
</xsl:otherwise>
</xsl:choose>
You can add additional condition testing by including more <xsl:when> tags prior to the <xsl:otherwise> tag. In Dreamweaver, this is accomplished by applying the XSLT Conditional Region object prior to the <xsl:otherwise> tag. By using the two conditional objects in conjunction with one another, you can test for as many conditions as you’d like and retain a default result.
To create multiple XSLT conditional regions, follow these steps:
1. Select the text, image, page object, or code you want to render if the first condition is true.
2. From the Insert panel’s XSLT category, choose Multiple Conditional Region.
3. When the Multiple Conditional Region dialog box opens, enter the condition to evaluate in the Test field; click OK when you’re done.
Dreamweaver displays three different tabs: The <xsl:choose> area surrounds the <xsl:when>—which holds your previously selected content—and the <xsl:otherwise> area, which displays the placeholder text Content goes here, as shown in Figure 32-9.
Figure 32-9:Dreamweaver displays the content for both outcomes in a Multiple Conditional Region.
If you just want to insert a single condition with a default result, you can stop here.
4. To add additional conditions and results, place your cursor in the placeholder content in the <xsl:otherwise> area and choose the <xsl:otherwise> tag in the Tag Selector.
5. Press the left-arrow key to move the cursor in front of the <xsl:otherwise> tag.
6. From the Insert panel’s XSLT category, choose Conditional Region.
7. When the Conditional Region dialog box opens, enter the next condition you want to evaluate in the Test field; click OK when you’re ready. Dreamweaver adds an <xsl:when> tag with placeholder content.
8. Repeat Steps 4–7 to add more conditional regions.
After you’ve created all the conditions desired, replace the placeholder text with the actual page elements or code you want rendered if the condition is true.
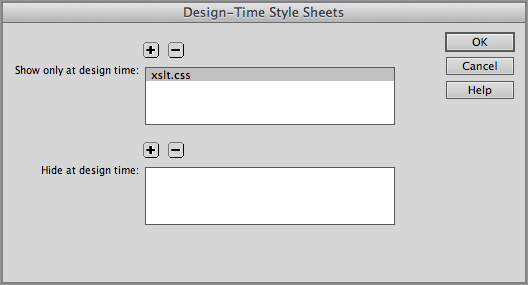
Styling XSLT fragments
Although you can use CSS to style your XSLT fragments, you shouldn’t link to an external style sheet or embed styles within the fragment page. If you do, the CSS links and embedded styles will appear in the body of your document, along with the XSLT fragment. What’s the solution? Design-time style sheets.
Cross-reference: To refresh your memory on how to implement a design-time style sheet, visit Chapter 6.
Typically, the page intended as the receptacle for the XSLT fragment is built prior to the fragment itself, along with the CSS style sheet. To view your XSLT fragment with the desired styles, attach the same style used by the host page as a design-time style sheet. Once the design-time style sheet is in place, you can assign CSS styles to the XML data and surrounding structures, as shown in Figure 32-10.
Figure 32-10: Style XSLT fragments through Dreamweaver’s design-time style sheet feature.
Adding XSLT fragments to web pages
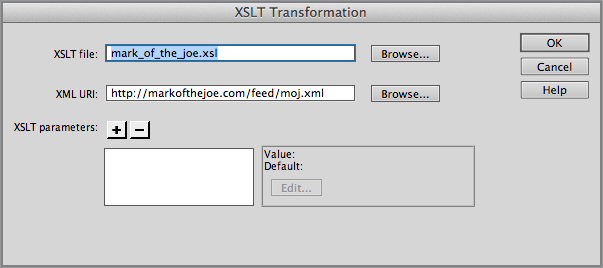
Once your XSLT fragment has been completed, it’s very straightforward to include it in your server model page. The actual code insertion is handled by a server behavior, XSL Transformation. To include an XSLT fragment, follow these steps:
1. Place your cursor where you’d like the XSLT fragment to appear.
2. From the Server Behaviors panel, click Add (+) and select XSL Transformation from the list.
3. In the XSL Transformation dialog box, click Browse next to the XSLT File field.
4. When the Select File dialog box appears, locate the .xsl file that contains your fragment and click OK. Dreamweaver automatically populates the XML URI field with the address of the XML data, as shown in Figure 32-11.
5. If you need to add any parameters to affect the XSLT fragment, click Add (+) in the XSLT Parameters area and enter the name and value of the parameter.
6. Click OK when you’re done.
Figure 32-11: The XSLT Transformation server behavior is used to select the XSLT fragment for inserting.
Dreamweaver displays the XSLT fragment in the page; when selected, it appears as a solid, uneditable block. Unlike with server-side includes, a custom Property inspector is not available for inserted XSLT fragments. You can preview the page in the browser to see the data within the document.
The XSLT Parameters option found in the XSL Transformation dialog boxes allows you to set up parameters to pass to the XSLT fragment. You could, for example, create an XSLT parameter named ItemLimit with a value of 5 if you wanted to restrict the number of XML items shown to five or fewer. To ensure that the XSLT fragment works properly with this parameter, you’d need to set a filter criteria, as described in the “Filtering XSL Data” section, where the position() function is less than or equal to the variable $ItemLimit.
Building full XSLT pages
As noted earlier, Dreamweaver gives you the option to create either an XSLT fragment or an XSLT page. Although XSLT fragments are more typically used, the full XSLT page has advantages, including the capability to transform XML data on the client-side without an application server such as ASP, ColdFusion, or PHP.
Much of the information covered in the previous XSL fragment discussion applies to full XSLT pages. XML data appears in the Bindings panel and is bound to the page in the same manner. All the objects in the Insert panel’s XSLT category—including the Repeat Region and Conditional Region objects—can and should be used when crafting the XML data in an XSLT page.
Client-side pages
Dreamweaver’s client-side XSL feature set is quite remarkable. With it, you can post XML data to be transformed by an XSLT page and viewed in a modern browser, without the use of server-side code. There are, however, a number of limitations:
- Only full XSLT pages, and not XSLT fragments, can be used.
- The XML file must be stored locally; you can’t link to a remote XML feed.
- Both the XML and the XSLT page must be published to the same folder on the web server.
- Only a limited number of browsers can be used to view the completed page.
It’s important to understand how XSLT pages interact with XML files to present the completed HTML page for the browser. Although XSL stands for Extensible Stylesheet Language, it’s not an exact parallel to Cascading Style Sheets. The primary difference is that an XSLT page contains HTML and XSLT code, unlike an external CSS file, which does not incorporate any HTML. Another key point is that both the XML and the XSL files refer to one another, whereas with HTML and CSS, the only connection is the link or import code in the HTML page. The final concept to grasp is that you’re actually displaying the XML file, although it is transformed by the XSLT page. All links from other pages to show the data must be to the XML file.
Here’s a general overview of the workflow for applying an XSLT page to an XML file:
1. Create an XSLT page.
2. Attach the XML data to the XSLT page.
3. Bind the XML data to the XSLT page.
4. From the XML page, link to the XSLT page.
5. Publish both files to the web.
6. View the XML page.
Creating XSLT pages
Dreamweaver provides two paths to approach the initial step, creating an XSLT page. You can build a page from scratch by choosing File New Document and then selecting the Basic page category and choosing XSLT (Entire page). Or, if you have an existing HTML page you want to use to incorporate XML data, you can convert your HTML page into XSLT format.
To convert an HTML page to an XSLT page, follow these steps:
1. Open the page you want to convert in Dreamweaver.
2. Choose File Convert XSLT 1.0.
Dreamweaver automatically saves the converted file under its original name with a new .xsl extension. For example, rss_feed.html becomes rss_feed.xsl.
Caution: Neither templates nor template-derived pages can be converted to an XSLT document. You’ll need to detach the template-derived page from the template before converting.
Attaching XML data to an XSLT page
Attaching XML data to an XSLT page is just as straightforward as converting the page:
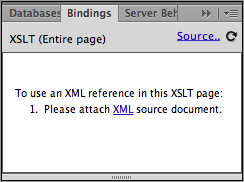
1. From the Bindings panel, click the XML link in the displayed step: Please Attach XML Source Document (see Figure 32-12).
2. When the Locate XML Source dialog box opens, make sure that the Attach A Local File On My Computer Or Local Area Network option is selected.
3. Click Browse to open the Select File dialog box and locate the XML file; click OK when you’ve found it.
4. Click OK in the Locate XML Source dialog box to confirm your choice.
Dreamweaver parses the XML file and displays the structure in the Bindings panel.
Figure 32-12: Attach an XML file to an XSLT page through the Bindings panel.
Binding the XML data
Binding the data in an XSLT page is handled in exactly the same way as with an XSLT fragment. Data is dragged from the Bindings panel onto the page or double-clicked to be inserted at the cursor position. Likewise, repeat and conditional regions are applied in the same manner as described in the previous sections, “Repeating XSL Data,” “Filtering XSL Data,” and “Showing XSL Data Conditionally.”
Unlike with XSLT fragments, it’s not necessary to use design-time style sheets because the XSL page contains the HTML, as well as the link to the CSS external style sheets. Style can be applied to XML data just like any other page element.
Linking from an XML file
All of the work so far has been centered on the XSLT page. Now it’s time to shift focus to the XML document. The first action is to link the XSLT page from the XML file. Recall that the browser actually loads the XML file, which in turn calls the XSLT page to transform the data into HTML.
Tip: Client-side XSL transformations work with local XML files only. To use the data from an RSS feed, you’ll need to save the data page from your browser and publish it to your own web server.
To link an XSLT style sheet to an XML page, follow these steps:
1. Open the XML file attached in the XSLT document.
2. Choose Commands Attach an XSLT Stylesheet.
3. When the Attach an XSLT Stylesheet dialog box opens (see Figure 32-13), click Browse to locate the XSLT file you’ve been working with.
Figure 32-13: Link your XML file to the appropriate XSLT style sheet.
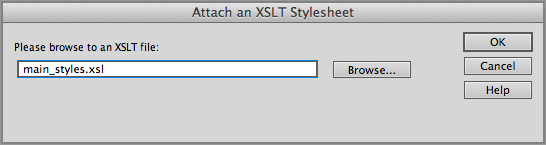
Caution: Remember that both the XML and the XSLT files must be in the same folder. If the XSLT file is in a separate folder, all the dependent files (including images, CSS, and includes) will not be found.
Publishing and viewing XML and XSLT files
XML files can be published to the server like any other document in Dreamweaver. Best of all, Dreamweaver is smart enough to automatically publish your XSLT files—and any files referenced in that document—if you opt to put dependent files.
It’s vital to remember that you must view the XML file in your browser and not the XSLT document. Given that the XSLT page has all the visual elements, this approach might feel a bit unnatural, but it’s the way it works.
Only modern browsers are capable of viewing an XML file and processing the XSLT correctly on the client-side. Among capable browsers are:
- Internet Explorer 6 and higher
- Firefox 3 and higher
- Opera 9 and higher
- Safari 3 and higher
- Chrome 1.0 and higher

Adding Data to an XSL Page
In this Technique, you convert an existing HTML page to XSLT format and then integrate data from an XML file into it.
1. From the Techniques site, expand the 32_XML folder and open the xml_start.htm file.
2. Choose File Convert XSLT 1.0.
Dreamweaver converts the file and saves it as xml_start.xsl.
3. From the Bindings panel, select the Source link.
4. When the Locate XML Source dialog box appears, click Browse.
5. In the Locate Source XML for XSL Template dialog box, locate the properties.xml file in the 32_XML folder and click OK; click OK again to confirm your choice in the Locate Source XML dialog box.>
The Bindings panel is populated with the XML data schema.
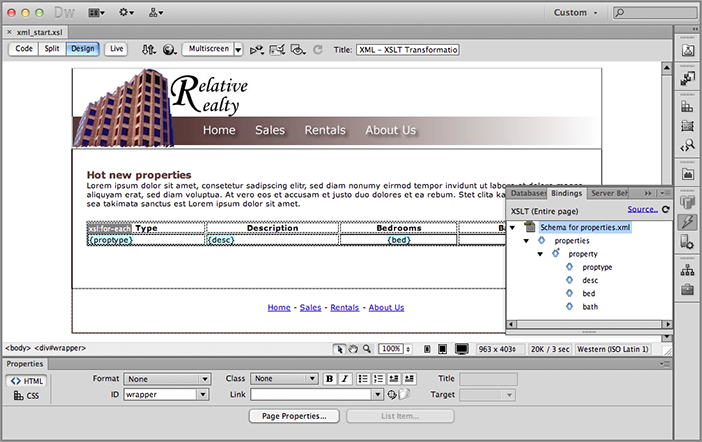
6. From the Bindings panel, drag proptype to the cell under the Type label, desc under Description, bed under Bedrooms, and bath under Bathrooms.
The next step is to apply a repeat region so that all the XML data will be displayed.
7. Select the proptype XML data placed on the page.
8. From the Tag Selector, choose the <tr> tag.
9. Choose Insert XSLT Objects Repeat Region.
10. When the XPath Expression Builder (Repeat Region) dialog box opens, choose Property and click OK.
11. Save your page.
The final step is to make the connection from the XML file to the XSLT page.
12. From the Files panel, open the properties.xml file in the 32_XML folder.
13. Choose Commands Attach an XSLT Stylesheet.
14. When the dialog box opens, click Browse and locate xml_start.xsl; click OK when you’re ready.
15. Save your XML page.
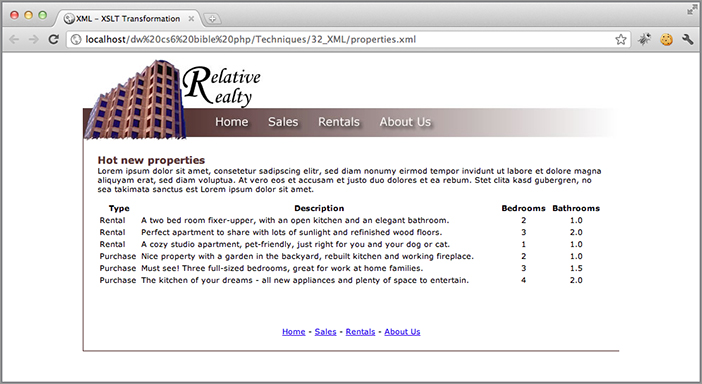
Preview the page in your primary browser by pressing F12 (Option+F12). If you’re using a recent browser version, you’ll see the XML data embedded in the page.
Server-side pages
Although most designers and developers working with application servers will prefer to work with XSLT fragments, they do have the option to use full XSLT pages. One advantage to taking the full-page approach is that it allows for complete separation between the server-side code and the presentation code; organizations that deploy strictly divided web teams may find this useful.
Server-side XSL transformations suffer almost none of the drawbacks seen with client-side transformation:
- Both full XSLT pages and XSLT fragments can be used.
- The XML file can be stored locally or remotely.
- Because the transformation occurs on the server-side, any browser can be used to view the transformed page.
The only similar restriction for both client-side and server-side transformations is that if a local XML file is used for the data, both must be contained in the same folder.
In Dreamweaver, server-side XSL transformations have been developed for most of the supported server models: ASP, ASP.NET, ColdFusion, and PHP. Only JSP is not supported.
The workflow for creating a server-side XSLT transformation is similar to that of a client-side transformation, with a number of key differences:
1. Create an XSLT page.
2. Attach the XML data to the XSLT page.
3. Bind the XML data to the XSLT page.
4. Remove all HTML from your dynamic page.
5. From the dynamic page, link to the XSLT page.
6. Publish both files to the web.
7. View the dynamic page.
The primary differences pertain, as you might expect, to the server-oriented nature of the page. As noted in the fourth step, you’ll need to remove all HTML from your application page. This is a necessary action because the full XSLT page already contains the HTML framework—<html>, <head>, and <body> tags—and to leave it in the application page would cause errors.
Another difference is the manner in which the XSLT page is connected to the data. Rather than link to the XSLT page from the XML file, you apply a Dreamweaver server behavior in the dynamic page to create a connection to the XSLT file and its related XML data.
To link to the full XSLT page from the dynamic page, follow these steps:
1. With the dynamic page open, choose Window Server Behaviors.
2. In the Server Behaviors panel, click Add (+) and select XSL Transformation from the list.
You may find the XSL Transformation box familiar; the same functionality is used when you create an XSLT fragment.
3. In the XSL Transformation dialog box, select the Attach A Local File On My Computer Or Local Area Network option if you want to incorporate data from a static XML file available on your system; use the Browse button to open the Select File dialog box or enter the path to the file by hand in the provided field.
4. If you’re displaying XML data from a file on the web, click the Attach A Remote File On The Internet option and enter the full Internet address in the available field.
5. Click OK when you’re done.
Before viewing it on your web server, you’ll need to publish your dynamic and XSLT pages to your web server. Unlike with the client-side transformation, Dreamweaver will not automatically include the XSLT file as a dependent file. When the files have been posted, view the dynamic page to see the page with the XML data and XSLT transformations.
XML is a vital future technology that is knocking on the door of virtually every web designer. As the development tools become more common, the Roundtrip XML capability within Dreamweaver makes interfacing with this new method of communication straightforward and effortless. When you work with XML, keep the following points in mind:
- XML (Extensible Markup Language) enables content to be separated from the style of a web page, creating information that can be more easily used in various situations with different kinds of media.
- Tags in XML reflect the nature of the content, rather than its appearance.
- Dreamweaver includes a Roundtrip XML facility that makes it possible to export and import XML files through Dreamweaver templates.
- Use tag libraries to create custom XML tags and take advantage of Dreamweaver’s Code Hints and Code Completion.
- XML data can be presented on the Internet with all the style of a standard web page through the use of Extensible Style Sheet Transformation (XSLT). Dreamweaver includes functionality for creating either client-side or server-side XSLT pages.
In the next chapter, you learn about customizing Dreamweaver, including how to use tag libraries.