
Steps to Create Virtual Partitions
In this section we'll cover the steps to create Virtual Partitions. These are steps I performed while working with vPars with some of the very first installations. This list should serve as a framework for working with vPars. You may chose not to perform some of the steps and to add others. It is only a framework for getting vPars working on your system.
In our upcoming examples to create our Virtual Partitions, we'll execute the steps shown in Figure 16-4.
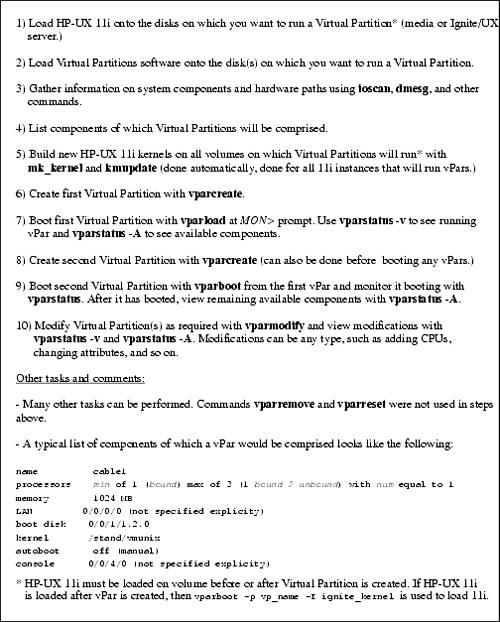
1) Load HP-UX 11i
HP-UX 11i must be loaded on the volumes that will be used to host all vPars. The method you use to install 11i, whether media, Ignite-UX, or some other technique, are all acceptable provided that HP-UX 11i is present on all of the disks. HP-UX 11i must be present on the first disk before you begin the vPar creation. You can create vPars on other disks before HP-UX 11i is loaded on them and then use vparboot -p vp_name -I ignite_kernel to boot and load HP-UX 11i on the other disks. In this chapter I first load HP-UX 11i on all disks before creating vPars. Chapter 1 covers loading HP-UX 11i and vPars software. In our upcoming example the first Virtual Partition will be created on the internal disk on an rp5400 (formerly know as L-Class) system. The second Virtual Partition will be created on an external disk. After loading HP-UX 11i on one of the root volumes, I issued uname, which resulted in the following output:
The hostname of cvhdcon3 and HP-UX revision 11.11, which is the latest HP-UX 11i available at the time of this writing, are shown.
An interesting nuance to working with vPars is the naming of hosts and vPars. In a nutshell, you supply hostnames when installing 11i and Virtual Partition names when creating vPars. It reduces confusion if both the hostname and vPar name are the same for an instance of HP-UX 11i. In some cases, however, organizations require hostnames to conform to conventions that result in names that are difficult to remember. In this case some system administrators pick easy-to-remember vPar names. In the upcoming example we used different names for the vPars and hostnames.
Our upcoming examples have hostnames of cvhdcon3 and cvhdcon4. The respective vPar names used are cable1 and cable2.
2) Load the Virtual Partitions Application Software
The Virtual Partitions software must also be loaded on the volumes that will be used to host all vPars. At the time of this writing there are base and full versions of the software. The restrictions of the base software are a maximum of two vPars and a maximum of one CPU in one of the vPars. After loading the vPars software on one of the root volumes, I ran swlist, which resulted in the following output:
# swlist
# Initializing...
# Contacting target "cvhdcon3"...
#
# Target:  cvhdcon3:/
#

#
# Bundle(s):
#

  BUNDLE11i             B.11.11.0102.2 Required Patch Bundle for HP-UX 11i, Febr
uary 2001
  CDE-English           B.11.11        English CDE Environment
  FDDI-00               B.11.11.01     PCI FDDI;Supptd HW=A3739A/A3739B;SW=J3626
AA
  FibrChanl-00          B.11.11.06     PCI/HSC FibreChannel;Supptd HW=A6684A,A66
85A,A5158A
  GigEther-00           B.11.11.14     PCI/HSC GigEther;Supptd HW=A4926A/A4929A/
A4924A/A4925A;SW=J1642AA
  HPUX11i-OE-MC         B.11.11.0106   HP-UX Mission Critical Operating Environm
ent Component
  HPUXBase64            B.11.11        HP-UX 64-bit Base OS
  HPUXBaseAux           B.11.11.0106   HP-UX Base OS Auxiliary
  HWEnable11i           B.11.11.0106.8 Hardware Enablement Patches for HP-UX 11i
, June 2001
  OnlineDiag            B.11.11.03.08  HPUX 11.11 Support Tools Bundle, Jun 2001

  RAID-00               B.11.11.01     PCI RAID; Supptd HW=A5856A
  VPARSBASE             A.01.00.03     HP-UX Virtual Partitions
#
The HP-UX Virtual Partitions software is the last entry shown in this listing.
3) Gather the System Component and Hardware Paths
You get to know your hardware at an intimate level when working with vPars. You not only need to know the components of which your system is comprised, you also need to know the paths of much of the hardware. Some system components, such as System Bus Adapters and the memory controller, are shared among vPars, so you don't specify those components as part of individual Virtual Partitions. Most other components in your system, such as processors, I/O cards, disks, and others, are fixed to specific vPars.
In order to see the components of which our example system is comprised,we'll run ioscan -f and dmesg in the following listing:
# ioscan -f
Class       I  H/W Path       Driver    S/W State   H/W Type     Description
=============================================================================
root        0                 root      CLAIMED     BUS_NEXUS
ioa         0  0              sba       CLAIMED     BUS_NEXUS    System Bus
                                                                 Adapter (803)
ba          0  0/0            lba       CLAIMED     BUS_NEXUS    Local PCI Bus
                                                                 Adapter (782)
lan         0  0/0/0/0        btlan     CLAIMED     INTERFACE    HP PCI 10/100
                                                                 Base-TX Core
ext_bus     0  0/0/1/0        c720      CLAIMED     INTERFACE    SCSI C896
                                                    Ultra Wide Single-Ended
target      0  0/0/1/0.1      tgt       CLAIMED     DEVICE
disk        0  0/0/1/0.1.0    sdisk     CLAIMED     DEVICE       HP DVD-ROM 304
target      1  0/0/1/0.3      tgt       CLAIMED     DEVICE
tape        0  0/0/1/0.3.0    stape     CLAIMED     DEVICE       HP      C1537A
target      2  0/0/1/0.7      tgt       CLAIMED     DEVICE
ctl         0  0/0/1/0.7.0    sctl      CLAIMED     DEVICE       Initiator
ext_bus     1  0/0/1/1        c720      CLAIMED     INTERFACE    SCSI C896
                                                    Ultra Wide Single-Ended
target      3  0/0/1/1.0      tgt       CLAIMED     DEVICE
disk        1  0/0/1/1.0.0    sdisk     CLAIMED     DEVICE       SEAGATE ST17340 4LC
target      4  0/0/1/1.2      tgt       CLAIMED     DEVICE
disk        2  0/0/1/1.2.0    sdisk     CLAIMED     DEVICE       SEAGATE ST17340 4LC
target      5  0/0/1/1.7      tgt       CLAIMED     DEVICE
ctl         1  0/0/1/1.7.0    sctl      CLAIMED     DEVICE       Initiator
ext_bus     2  0/0/2/0        c720      CLAIMED     INTERFACE    SCSI C87x
                                                    Ultra Wide Single-Ended
target      6  0/0/2/0.0      tgt       CLAIMED     DEVICE
disk        3  0/0/2/0.0.0    sdisk     CLAIMED     DEVICE       SEAGATE ST17340 4LC
target      7  0/0/2/0.2      tgt       CLAIMED     DEVICE
disk        4  0/0/2/0.2.0    sdisk     CLAIMED     DEVICE       SEAGATE ST17340 4lc
target      8  0/0/2/0.7      tgt       CLAIMED     DEVICE
ctl         2  0/0/2/0.7.0    sctl      CLAIMED     DEVICE       Initiator
ext_bus     3  0/0/2/1        c720      CLAIMED     INTERFACE    SCSI C87x
                                                    Ultra Wide Single-Ended
target      9  0/0/2/1.7      tgt       CLAIMED     DEVICE
ctl         3  0/0/2/1.7.0    sctl      CLAIMED     DEVICE       Initiator
tty         0  0/0/4/0        asio0     CLAIMED     INTERFACE    PCI Serial
tty         1  0/0/5/0        asio0     CLAIMED     INTERFACE    PCI Serial
ba          1  0/1            lba       CLAIMED     BUS_NEXUS    Local PCI Bus
                                                                 Adapter (782)
ba          2  0/2            lba       CLAIMED     BUS_NEXUS    Local PCI Bus
                                                                 Adapter (782)
ba          3  0/3            lba       CLAIMED     BUS_NEXUS    Local PCI Bus
                                                                 Adapter (782)
ba          4  0/4            lba       CLAIMED     BUS_NEXUS    Local PCI Bus
                                                                 Adapter (782)
ba          5  0/5            lba       CLAIMED     BUS_NEXUS    Local PCI Bus
                                                                 Adapter (782)
ba          6  0/8            lba       CLAIMED     BUS_NEXUS    Local PCI Bus
                                                                 Adapter (782)
fc          0  0/8/0/0        td        CLAIMED     INTERFACE    HP Tachyon TL/TS
                                               Fibre Channel Mass Storage Adapter
fcp         0  0/8/0/0.8      fcp       CLAIMED     INTERFACE    FCP Protocol
                                                                 Adapter
ext_bus     4  0/8/0/0.8.0.5.0        fcparray  CLAIMED     INTERFACE    FCP
                                                            Array Interface
target     10  0/8/0/0.8.0.5.0.0      tgt       CLAIMED     DEVICE
disk        5  0/8/0/0.8.0.5.0.0.0    sdisk     CLAIMED     DEVICE  HP A5277A
disk        6  0/8/0/0.8.0.5.0.0.1    sdisk     CLAIMED     DEVICE  HP A5277A
disk        7  0/8/0/0.8.0.5.0.0.2    sdisk     CLAIMED     DEVICE  HP A5277A
disk        8  0/8/0/0.8.0.5.0.0.3    sdisk     CLAIMED     DEVICE  HP A5277A
target     11  0/8/0/0.8.0.5.0.1      tgt       CLAIMED     DEVICE
disk        9  0/8/0/0.8.0.5.0.1.0    sdisk     CLAIMED     DEVICE  HP A5277A
target     12  0/8/0/0.8.0.5.0.2      tgt       CLAIMED     DEVICE
disk       10  0/8/0/0.8.0.5.0.2.0    sdisk     CLAIMED     DEVICE  HP A5277A
target     13  0/8/0/0.8.0.5.0.3      tgt       CLAIMED     DEVICE
disk       11  0/8/0/0.8.0.5.0.3.0    sdisk     CLAIMED     DEVICE  HP A5277A
ext_bus     5  0/8/0/0.8.0.255.0      fcpdev    CLAIMED     INTERFACE    FCP
                                                            Device Interface
target     14  0/8/0/0.8.0.255.0.5    tgt       CLAIMED     DEVICE
ctl         4  0/8/0/0.8.0.255.0.5.0  sctl      CLAIMED     DEVICE  HP A5277A
ba          7  0/9                    lba       CLAIMED     BUS_NEXUS Local PCI
                                                            Bus Adapter (782)
fc          1  0/9/0/0                 td       CLAIMED     INTERFACE HP Tachyon
                                       TL/TS Fibre Channel Mass Storage Adapter
fcp         1  0/9/0/0.8               fcp      CLAIMED     INTERFACE FCP Protocol
                                                            Adapter
ext_bus     6  0/9/0/0.8.0.4.0        fcparray  CLAIMED     INTERFACE FCP Array
                                                            Interface
target     15  0/9/0/0.8.0.4.0.0      tgt       CLAIMED     DEVICE
disk       12  0/9/0/0.8.0.4.0.0.0    sdisk     CLAIMED     DEVICE HP A5277A
disk       13  0/9/0/0.8.0.4.0.0.1    sdisk     CLAIMED     DEVICE HP A5277A
disk       14  0/9/0/0.8.0.4.0.0.2    sdisk     CLAIMED     DEVICE HP A5277A
disk       15  0/9/0/0.8.0.4.0.0.3    sdisk     CLAIMED     DEVICE HP A5277A
target     16  0/9/0/0.8.0.4.0.1      tgt       CLAIMED     DEVICE
disk       16  0/9/0/0.8.0.4.0.1.0    sdisk     CLAIMED     DEVICE HP A5277A
target     17  0/9/0/0.8.0.4.0.2      tgt       CLAIMED     DEVICE
disk       17  0/9/0/0.8.0.4.0.2.0    sdisk     CLAIMED     DEVICE HP A5277A
target     18  0/9/0/0.8.0.4.0.3      tgt       CLAIMED     DEVICE
disk       18  0/9/0/0.8.0.4.0.3.0    sdisk     CLAIMED     DEVICE HP A5277A
ext_bus     7  0/9/0/0.8.0.255.0      fcpdev    CLAIMED     INTERFACE FCP
                                                            Device Interface
target     19  0/9/0/0.8.0.255.0.4    tgt       CLAIMED     DEVICE
ctl         5  0/9/0/0.8.0.255.0.4.0  sctl      CLAIMED     DEVICE HP A5277A
ba          8  0/10                   lba       CLAIMED     BUS_NEXUS Local PCI
                                                            Bus Adapter (782)
lan         1  0/10/0/0               btlan     CLAIMED     INTERFACE HP A5230A/
                                                B5509BA PCI 10/100Base-TX Addon
ba          9  0/12                   lba       CLAIMED     BUS_NEXUS Local PCI
                                                            Bus Adapter (782)
lan         2  0/12/0/0               btlan     CLAIMED     INTERFACE    HP A5230A/
                                                B5509BA PCI 10/100Base-TX Addon
pbc         0  32             pbc       CLAIMED     BUS_NEXUS    Bus Converter
processor   0  33             processor CLAIMED     PROCESSOR    Processor
pbc         1  36             pbc       CLAIMED     BUS_NEXUS    Bus Converter
processor   1  37             processor CLAIMED     PROCESSOR    Processor
pbc         2  96             pbc       CLAIMED     BUS_NEXUS    Bus Converter
processor   2  97             processor CLAIMED     PROCESSOR    Processor
pbc         3  100            pbc       CLAIMED     BUS_NEXUS    Bus Converter
processor   3  101            processor CLAIMED     PROCESSOR    Processor
memory      0  192            memory    CLAIMED     MEMORY       Memory
#
# dmesg

Jul 31 20:03
gate64: sysvec_vaddr = 0xc0002000 for 2 pages
NOTICE: nfs3_link(): File system was registered at index 3.
NOTICE: autofs_link(): File system was registered at index 6.
NOTICE: cachefs_link(): File system was registered at index 7.
0 sba
0/0 lba
0/0/0/0 btlan
0/0/1/0 c720
0/0/1/0.1 tgt
0/0/1/0.1.0 sdisk
0/0/1/0.3 tgt
0/0/1/0.3.0 stape
0/0/1/0.7 tgt
0/0/1/0.7.0 sctl
0/0/1/1 c720
0/0/1/1.0 tgt
0/0/1/1.0.0 sdisk
0/0/1/1.2 tgt
0/0/1/1.2.0 sdisk
0/0/1/1.7 tgt
0/0/1/1.7.0 sctl
0/0/2/0 c720
0/0/2/0.0 tgt
0/0/2/0.0.0 sdisk
0/0/2/0.2 tgt
0/0/2/0.2.0 sdisk
0/0/2/0.7 tgt
0/0/2/0.7.0 sctl
0/0/2/1 c720
0/0/2/1.7 tgt
0/0/2/1.7.0 sctl
0/0/4/0 asio0
0/0/5/0 asio0
0/1 lba
0/2 lba
0/3 lba
0/4 lba
0/5 lba
0/8 lba
0/8/0/0 td
td: claimed Tachyon TL/TS Fibre Channel Mass Storage card at 0/8/0/0
0/8/0/0.8 fcp
0/8/0/0.8.0.5.0 fcparray
0/8/0/0.8.0.5.0.0 tgt
0/8/0/0.8.0.5.0.0.0 sdisk
0/8/0/0.8.0.5.0.0.1 sdisk
0/8/0/0.8.0.5.0.0.2 sdisk
0/8/0/0.8.0.5.0.0.3 sdisk
0/8/0/0.8.0.5.0.1 tgt
0/8/0/0.8.0.5.0.1.0 sdisk
0/8/0/0.8.0.5.0.2 tgt
0/8/0/0.8.0.5.0.2.0 sdisk
0/8/0/0.8.0.5.0.3 tgt
0/8/0/0.8.0.5.0.3.0 sdisk
0/8/0/0.8.0.255.0 fcpdev
0/8/0/0.8.0.255.0.5 tgt
0/8/0/0.8.0.255.0.5.0 sctl
0/9 lba
0/9/0/0 td
td: claimed Tachyon TL/TS Fibre Channel Mass Storage card at 0/9/0/0
0/9/0/0.8 fcp
0/9/0/0.8.0.4.0 fcparray
0/9/0/0.8.0.4.0.0 tgt
0/9/0/0.8.0.4.0.0.0 sdisk
0/9/0/0.8.0.4.0.0.1 sdisk
0/9/0/0.8.0.4.0.0.2 sdisk
0/9/0/0.8.0.4.0.0.3 sdisk
0/9/0/0.8.0.4.0.1 tgt
0/9/0/0.8.0.4.0.1.0 sdisk
0/9/0/0.8.0.4.0.2 tgt
0/9/0/0.8.0.4.0.2.0 sdisk
0/9/0/0.8.0.4.0.3 tgt
0/9/0/0.8.0.4.0.3.0 sdisk
0/9/0/0.8.0.255.0 fcpdev
0/9/0/0.8.0.255.0.4 tgt
0/9/0/0.8.0.255.0.4.0 sctl
0/10 lba
0/10/0/0 btlan
0/12 lba
0/12/0/0 btlan
32 pbc
33 processor
36 pbc
37 processor
96 pbc
97 processor
100 pbc
101 processor
192 memory
btlan: Initializing 10/100BASE-TX card at 0/0/0/0....

    System Console is on the Built-In Serial Interface
btlan: Initializing 10/100BASE-TX card at 0/10/0/0....
btlan: Initializing 10/100BASE-TX card at 0/12/0/0....
Entering cifs_init...
Initialization finished successfully... slot is 9
Logical volume 64, 0x3 configured as ROOT
Logical volume 64, 0x2 configured as SWAP
Logical volume 64, 0x2 configured as DUMP
    Swap device table:  (start & size given in 512-byte blocks)
        entry 0 - major is 64, minor is 0x2; start = 0, size = 8388608
    Dump device table:  (start & size given in 1-Kbyte blocks)
        entry 0000000000000000 - major is 31, minor is 0x12000; start = 117600,
size = 4194304
Starting the STREAMS daemons-phase 1
Create STCP device files
Starting the STREAMS daemons-phase 2
        $Revision: vmunix:    vw: -proj    selectors: CUPI80_BL2000_1108 -c 'Vw
for CUPI80_BL2000_1108 build' -- cupi80_bl2000_1108 'CUPI80_BL2000_1108'  Wed
Nov  8 19:24:56 PST 2000 $
Memory Information:
  physical page size = 4096 bytes, logical page size = 4096 bytes
  Physical: 4194304 Kbytes, lockable: 3231756 Kbytes, available: 3711728 Kbytes

#
The output of ioscan -f and dmesg provide a lot of useful information about our system. We'll use the components and paths in ioscan output and the memory information in dmesg to create a list of components for the respective vPars in the upcoming step. We now know, for instance, that the paths of two of the LAN cards are at 0/0/0/0 and 0/10/0/0. We know the paths of all four processors of 33, 37, 97, and 101. The console is located at 0/0/4/0. From the dmesg output we know that we have a total of four GBytes of RAM that can be spread among the vPars.
From these two outputs we have the information we need to create the Virtual Partitions in the next step.
4) List the Components of the Virtual Partitions
From the ioscan and dmesg messages we can select the components of our first Virtual Partition. The following is a list of components we'll include in this partition:
First vPar cable1
name         cable1
processors   min of one (bound) max of three (two unbound)
             with num (bound + umnbound) equal to one
memory       1024 MB
LBA Core I/O 0/0 (all components on 0/0 are implied)
LAN          0/0/0/0 (not specified explicitly, on 0/0)
boot disk    0/0/1/1.2.0
kernel       /stand/vmunix (this is default)
autoboot     off (manual)
console      0/0/4/0 (not specified explicitly, on 0/0)
You may want to set autoboot to auto during installation and set to manual after installation. This makes booting easier during installation.
Some of the components require some explanation concerning the way in which they are implemented with vPars. The following is a more detailed discussion of some of these components, including CPU, memory, and LAN, bootdisk, setboot, kernel, and console.
The CPUs used in both this partition (cable1) and the one we will define shortly (cable2) are specified with min, max, and num. We will have min bound CPUs that have I/O interrupts assigned to them and are therefore ideal for I/O-intensive applications. The additional CPUs assigned to the vPars are unbound, and do not process I/O interrupts. Therefore, unbound CPUs are ideal for processor-intensive applications as opposed to I/O-intensive applications. Unbound CPUs can be freely moved from one vPar to another while vPars are running, so having min bound CPUs gives us the freedom to move around the unbound CPUs. Bound CPUs can also be added to and deleted from Virtual Partitions only when the partition is down.
On machines that employ Non-Uniform Memory Access (NUMA) you would use hardware paths (path) to specify CPUs. This is to ensure that you minimize the distance between CPUs and memory. On systems such as the rp7400 (formerly know as N-Class) and rp5400 (formerly know as L-Class) that do not employ NUMA, min is recommended to define bound CPUs.

vparcreate -p cable1 -a cpu:::1:3 -a cpu::1

vparmodify -p cable2 -m cpu::1 <-- reduces cable2 from 3 to 1
vparmodify -p cable1 -m cpu::3 <-- increases cable1 from 1 to 3
We first removed the two unbound CPUs from cable2 and then added them to cable1. If the two unbound CPUs were not assigned to a vPar, we would not have to remove them from cable2 prior to adding them to cable1.
There are many ways to work with CPUs, so by characterizing your applications and understanding the options for using bound and unbound CPUs, you can use the processor mix that best meets your needs.
We have identified one GByte of memory for cable1. Memory can be specified by range or size.
To add one GByte of memory to cable1 using size, we would use the following vparcreate command:
vparcreate -p cable1 -a mem::1024
 | This vparcreate command specifies only the memory for use in cable1. The full vparcreate command for creating cable1 will be shown in an upcoming section. |
The memory is specified in MBytes (1024 MBytes = 1 GByte) in multiples of 64 MBytes. At the time of this writing, the Virtual Partition Monitor consumes roughly 128 MBytes of RAM, so this will not be available to allocate to a Virtual Partition. Modifying memory allocation requires that the Virtual Partition be down, at the time of this writing.
On machines that employ Non-Uniform Memory Access (NUMA) you would use the range. Range is a subset of size. On systems such as the rp7400 (formerly know as N-Class) and rp5400 (formerly know as L-Class) that do not employ NUMA, the size is recommended to define memory. The syntax for specifying memory by range is as follows:
None of the examples in this book were prepared using NUMA systems so you won't see any examples using the range syntax; all examples use the size syntax.
The LAN interface used for this first Virtual Partition is on Local Bus Adaptper (LBA) zero. This means that any other components on LBA zero would have to be in this Virtual Partition as well. At the time of this writing, components on an LBA can't be shared between vPars.
Note that we have decided not to use the hostname as our Virtual Partition name. As mentioned earlier, it is desirable to use the same name for the hostname and vPar. Because our hostnames are a little hard to remember the system administrator decided to use simple vPar names. When we loaded HP-UX 11i on the system we selected the hostnames (you can also run set_parms after loading 11i to set the system name and other parameters) of cvhdcon3 and cvhdcon4. We then chose the simple vPar names of cable1 and cable2, respectively.
The ioscan issued earlier in this chapter showed many disk devices. The boot device for our first Virtual Partition is the internal disk with the hardware path 0/0/1/1.2.0.
At the time of this writing, components that are at or below the Local Bus Adapter (LBA) level are devoted to a single Virtual Partition. This means that although the output of our earlier ioscan command shows four internal disks, all four of these disks must be in the same Virtual Partition because they are on the same LBA.

In our example we have autoboot set to off for our Virtual Partition. The setboot command on a non-vPars system reads from and writes to stable storage. On a vPars system the setboot command interacts with the Virtual Partition database. In our upcoming example we'll set the autoboot to off when we create cable1 with vparcreate. Running setboot on a vPars system has the effects shown in Table 16-2:
| vPars setboot Option | Description |
|---|---|
| -a | Changes the alternate boot path of the Virtual Partition.
To set the alternate boot path:
# setboot -a 0/8/0/0.8.0.5.0.0.0
|
| -b | Sets the autoboot attribute of the Virtual Partition.
To set Autoboot on:
# setboot -b on
|
| -p | Changes the primary boot path of the Virtual Partition.
To set the primary boot path:
# setboot -p 0/0/1/1.2.0
|
| -s | Has no effect. |
| no options | Displays information about boot attributes. |
The setboot command is one of the aspects of working with vPars that is different from a non-vPars system.
Chapter 5 of the vPars book contains detailed information on the way in which the console operates in a vPas enviornment. In our first partition we have specified LBA 0/0 as a component of vPar cable1. Since the physical console at 0/0/4/0 is on the Core I/O card at 0/0, it is an implied component of cable1 and we do not have to specify the physical console in this partition. The other Virtual Partitions on this system will use the virtual console functionality of vPars whereby issuing Ctrl-A cycles between virtual console displays.
The Virtual Partition database that contains all vPar-related information is /stand/vpdb. This is managed, and synchronized for you, so you don't need to pay too much attention to it if you don't want to. You can, however; create an alternate database if you wish. You may want to do this in order to create a completely different Virtual Partition configuration for your system without affecting your currently running database.

Second vPar cable2
We'll list the same categories of components for cable2 as we did for cable1 in the following list:
							name          cable2
processors    min of one (bound) max of three (two unbound)
              with num (bound + umnbound) equal to one
memory        1024 MB
LAN           0/10/0/0
boot disk     0/8/0/0.8.0.5.0.0.0
kernel        /stand/vmunix (this is the default)
autoboot      off (manual)
console       virtual console to be created
We now have a list of components for two vPars. The result is that our rp5400 (formerly know as L-Class) system has been divided into two vPars that look like Figure 16-5:
Figure 16-5. rp5400 (formerly know as L-Class) with Two vPars (unused components not shown)

Figure 16-5 reflects what our system will look like when we perform the upcoming steps to create our two vPars. Note that two unbound processors, shown as 2,3 in Figure 16-5, can be assigned to cable1 and cable2 as required.
5) Virtual Partition Kernel-Related Work
Each Virtual Partition has its own instance of HP-UX 11i, which has its own HP-UX kernel. It is likely that you'll customize these kernels in a variety of ways to suit the applications you have running in the respective vPars. When you install the vPars software, it automatically reconfigures the kernel to include the vPar drivers and make the kernel relocatable. You do not have to perform the kernel-related steps in this section because they are performed for you when vPars software is loaded. It is still informative; however, to see the steps that were manually performed in this section to get better insight conconcerning the way that vPars operate. In this step we'll investigate the files that have been updated by the vPars application and build the new kernel. Keep in mind that the new kernel needs to be built on every volume that has HP-UX 11i on it and will run a vPar.
Because memory is shared among multiple vPars, the kernel must be relocatable in memory. At the time of this writing, there are patches that allow the kernel to be built as a relocatable kernel. We won't perform any checks related to patches.
The file /sbin/vecheck is a vPar file that is required on the system. The following listing is a portion of /usr/conf/gen/config.sys that checks to see if /sbin/vecheck has been loaded on the system:
# Determine whether the linker supports kernel relocation.  If it does,
# link the kernel using the relocation options.
LOADOPTS_ADDL=`
        if [ -f /sbin/vecheck ]; then
                ${WHAT} ${LD} |
                ${AWK} '$$0 ~ /92453-07 linker/ {
                        split($$7, vers, ".");
                        if ( vers[1] == "B" &&
                        ( vers[2] == 11 && vers[3] >= 25 ) || vers[2] > 11 )
                                print "${LOADOPTS_RELOC}";
                        else print "${LOADOPTS_STATIC}"; }';
        else
                echo "${LOADOPTS_STATIC}";
        fi;
     `
The following is a long listing of /sbin/vecheck which was loaded with the vPar software:
# ll /sbin/vecheck
-r-xr-xr-x   1 bin        bin          20533 Mar  5 19:01 /sbin/vecheck
#
Next let's take a look at /stand/system to see the vpar driver that has been added to the file:
# cat /stand/system
***************************************
* Source: /ux/core/kern/filesets.info/CORE-KRN/generic
* @(#)B.11.11_LR
*
***************************************
* Additional drivers required in every machine-type to
* create a complete
* system file during cold install.  This list is every driver that the
* master.d/ files do not force on the system or is not identifiable by
* ioscan.
* Other CPU-type specific files can exist for their special cases.
* see create_sysfile (1m).
***************************************
*
* Drivers/Subsystems
sba
lba
c720
sctl
sdisk
asio0
cdfs
cxperf
olar_psm
olar_psm_if
dev_olar
diag0
diag1
diag2
dmem
dev_config
iomem
nfs_core
nfs_client
nfs_server
btlan
maclan
dlpi
token_arp
inet
uipc
tun
telm
tels
netdiag1
nms
hpstreams
clone
strlog
sad
echo
sc
timod
tirdwr
pipedev
pipemod
ffs
ldterm
ptem
pts
ptm
pckt
td
fddi4
gelan
GSCtoPCI
iop_drv
bs_osm
vxfs
vxportal
lvm
lv
nfsm
rpcmod
autofsc
cachefsc
cifs
prm
vpar                              <--- vpar driver added here
STRMSGSZ                65535
nstrpty                 60
dump lvol
maxswapchunks           2048
#
The vpar driver is a master driver described in /usr/conf/master.d, as shown below:
# pwd
/usr/conf/master.d
# cat vpar
$CDIO
vpar       0
$$$

$DRIVER_INSTALL
vcn             -1              209
vcs             -1              -1
vpar_driver     -1              -1
$$$

$DRIVER_DEPENDENCY
vcn            vpar
vcs            vpar
vpar           vcs vcn vpar_driver
vpar_driver    vpar
$$$

$DRIVER_LIBRARY
*
* The driver/library table.  This table defines which libraries a given
* driver depends on.  If the driver is included in the dfile, then the
* libraries that driver depends on will be included on the ld(1) command
* line.  Only optional libraries *need* to be specified in this table,
* (but required ones can be included, as well).
*
* Driver handle    <libraries>
*
* subsystems first
vcn            libvpar-pdk.a
vcs            libvpar-pdk.a
vpar           libvpar-pdk.a
vpar_driver    libvpar-pdk.a
$$$

$LIBRARY
*
* The library table.  Each element in the library table describes
* one unique library.  The flag member is a boolean value, it is
* initialized to 1 if the library should *always* be included on
* the ld(1) command line, or 0 if the library is optional (i.e. it
* is only included when one or more drivers require it).  The order
* of the library table determines the order of the libraries on the
* ld(1) command line, (i.e. defines an implicit load order).  New
* libraries must be added to this table.
* Note: libhp-ux.a must be the last entry, do not place
* anything after it.
*
* Library   <required>
*
libvpar-pdk.a     0
$$$
#
You can see in that this file there are multiple drivers present. The vcn and vcs drivers are used to support the console in a vPars environment. Since you'll probably only have one physical console for multiple partitions, you need a way to share the physical device. The use of these drivers is described in Chapter 4 in the vPars book, in which kernel configuration is covered. For now it is sufficient to know that these drivers exist as part of the vPars installation and must be built into the kernel.
Now that the kernel has what it needs to be built relocatable and the drivers are present for vPars, we can run mk_kernel to build the new kernel and kmupdate to move the new kernel-related files into place. This is done automatically for you, but the following commands show how you would perform this process:
# mk_kernel
Generating module: krm...
Compiling /stand/build/conf.c...
Loading the kernel...
Generating kernel symbol table...
# kmupdate

  Kernel update request is scheduled.

  Default kernel /stand/vmunix will be updated by
  newly built kernel /stand/build/vmunix_test
  at next system shutdown or startup time.

#
Keep in mind that this procedure needs to be performed for all HP-UX 11i operating systems that will run a Virtual Partition.
6) Create the First Virtual Partition
 | The vparcreate command is used to create a vPar. The summary of this command is shown in Table 16-1 and its man page appears in Appendix B. The general form of the command is as follows: |
vparcreate -p vp_name [-B boot_attr] [-D db_file] [-S static_attr]
[-b kernel_path] [-o boot_opts] [-a rsrc] [-a...]
When creating this vPar, I placed the vparcreate command in a file so that I could modify it for the second vPar and execute it. The vparcreate command is shown below:
# cat /tmp/cable1
vparcreate -p cable1 -B manual -b /stand/vmunix -a cpu::1
-a cpu:::1:3 -a mem::1024 -a io:0/0 -a io:0/0/1/1.2.0:boot
#
After changing the permissions on this file and running it, the vPar cable1 was successfully created. Next, we'll boot the vPar we just created.
7) Boot the First Virtual Partition
Now that the first vPar has been created and the kernel automatically rebuilt to support vPars, we can boot the first vPar which we named cable1.
We'll both boot off the first vPar and check its status. We need to load the Virtual Partition Monitor (vpmon) at the ISL> prompt. vpmon is a ramdisk kernel, similar to vmunix, that needs to be loaded at the time of boot. From the ISL> prompt we are going to run vpmon to get the MON> prompt. From the MON> prompt we boot our Virtual Partition with vparload, as shown in the following example:
ISL> hpux
							/stand/vpmon

Boot
: disk(0/0/1/1.2.0.0.0.0.0;0)/stand/vpmon
421888 + 142056 + 4247112 start 0x23000
cable1: WARNING: No boot device specified

Welcome to VPMON (type '?' for a list of commands)

MON> vparload -p cable1

[MON] Console client set to cable1

[MON] cable1 loaded

              .
							.
							.
You may see messages different from those shown in the example after the vparload command was issued. In any event, the system progressed through the remainder of the boot process and booted the one Virtual Partition cable1 that we created. We now have a subset of the system components dedicated to this Virtual Partition.
The vparload command has the following three forms:
form1: vparload -all

form2: vparload -auto

form3: vparload -p vp_name [-b kernelpath] [-o boot_options]
[-B hardware_path]
We issued the third form shown above.
Now that the partition has booted, let's first obtain the status of the one Virtual Partition we created, called cable1, that we have running:
#
							vparstatus -p cable1 -v


[Virtual Partition Details]
Name:         cable1
State:        Up
Attributes:   Dynamic,Manual
Kernel Path:  /stand/vmunix
Boot Opts:

[CPU Details]
Min/Max:  1/3
Bound by User [Path]:
Bound by Monitor [Path]:  33
Unbound [Path]:

[IO Details]
   0.0
   0.0.1.1.2.0  BOOT

[Memory Details]
Specified [Base  /Range]:
          (bytes) (MB)
Total Memory (MB):  1024
#


We can now run vparstatus -A to view the available components of our system. Since we created a first partition with only one CPU, we should see three CPUs and many other system components available, as shown in the following listing:
# vparstatus -A

[Unbound CPUs (path)]:  37
                        97
                        101
[Available CPUs]:  3

[Available I/O devices (path)]:  0.1
                                 0.2
                                 0.3
                                 0.4
                                 0.5
                                 0.8
                                 0.9
                                 0.10
                                 0.12
                                 32
                                 36
                                 96
                                 100

[Unbound memory (Base  /Range)]:  0x0/128
                (bytes) (MB)      0xc000000/1856
                                  0x180000000/1088
[Available memory (MB)]:  3072
#
This output shows many components available for our second partition. Based on our earlier planning exercise, we know the components that we wish to include in the second vPar, and this vparstatus -A command confirms that they are indeed available.
For cable2 we want one CPU initially, and there are three available. We want the I/O cards for boot and LAN at 0/8 and 0/10 respectively We want one GByte of memory and there are now roughly three GBytes available. We have all of the components we need to proceed to our next step of creating cable2.
8) Create the Second Virtual Partition

Here are the components we earlier listed for our second vPar:
name         cable2
processors   min of one (bound) max of three (two unbound)
             with num (bound + umnbound) equal to one
memory       1024 MB
LAN          0/10
LBA          0/8
boot disk    0/8/0/0.8.0.5.0.0.0
kernel       /stand/vmunix (this is the default)
autoboot     off (manual)
console      virtual console to be created

We can now proceed to create the second partition with the command shown in the following file:
# cat /tmp/cable2
vparcreate -p cable2 -B manual -b /stand/vmunix -a cpu::1
-a cpu:::1:3 -a mem::1024 -a io:0/8
-a io:0/8/0/0.8.0.5.0.0.0:boot -a io:0/10
#
It is important to obtain the path of the boot device exactly as it appears in the search at boot time. When you issue the vparcreate you use the path as it appears in the search; however, when you issue vparstatus -v you may see a path with additional 0s added to the boot device.
 | After executing this file, we can determine if the second vPar has been created and the components of which it is comprised by running vparstatus: |
# vparstatus -v

[Virtual Partition Details]
Name:         cable1
State:        Up
Attributes:   Dynamic,Manual
Kernel Path:  /stand/vmunix
Boot Opts:

[CPU Details]
Min/Max:  1/3
Bound by User [Path]:
Bound by Monitor [Path]:  33
Unbound [Path]:

[IO Details]
   0.0
   0.0.1.1.2.0  BOOT

[Memory Details]
Specified [Base  /Range]:
          (bytes) (MB)
Total Memory (MB):  1024

[Virtual Partition Details]
Name:         cable2
State:        Down
Attributes:   Dynamic,Manual
Kernel Path:  /stand/vmunix
Boot Opts:


[CPU Details]
Min/Max:  1/3
Bound by User [Path]:
Bound by Monitor [Path]:  37
Unbound [Path]:

[IO Details]
   0.8
   0.8.0.0.8.0.5.0.0.0, BOOT
   0.10

[Memory Details]
Specified [Base  /Range]:
          (bytes) (MB)
Total Memory (MB):  1024
#

With the second vPar created, we can proceed to the next step and boot it.
9) Boot the Second Virtual Partition

# vparboot -p cable2
vparboot: Booting cable2.  Please wait...

# vparstatus
[Virtual Partition]
                                                                          Boot
Virtual Partition Name         State Attributes Kernel Path               Opts
============================== ===== ========== ========================= =====
cable1                         Up    Dyn,Manl   /stand/vmunix
cable2                         Load  Dyn,Manl   /stand/vmunix

[Virtual Partition Resource Summary]
                                           CPU    Num        Memory (MB)
                                  CPU     Bound/   IO   # Ranges/
Virtual Partition Name          Min/Max  Unbound  devs  Total MB    Total MB
==============================  ================  ====  ====================
cable1                            1/  3    1   0     4    0/  0         1024
cable2                            1/  3    1   0     4    0/  0         1024

# vparstatus
[Virtual Partition]
                                                                          Boot
Virtual Partition Name         State Attributes Kernel Path               Opts
============================== ===== ========== ========================= =====
cable1                         Up    Dyn,Manl   /stand/vmunix
cable2                         Boot  Dyn,Manl   /stand/vmunix

[Virtual Partition Resource Summary]
                                           CPU    Num        Memory (MB)
                                  CPU     Bound/   IO   # Ranges/
Virtual Partition Name          Min/Max  Unbound  devs  Total MB    Total MB
==============================  ================  ====  ====================
cable1                            1/  3    1   0     4    0/  0         1024
cable2                            1/  3    1   0     4    0/  0         1024

# vparstatus
[Virtual Partition]
                                                                          Boot
Virtual Partition Name         State Attributes Kernel Path               Opts
============================== ===== ========== ========================= =====
cable1                         Up    Dyn,Manl   /stand/vmunix
cable2                         Up    Dyn,Manl   /stand/vmunix

[Virtual Partition Resource Summary]
                                           CPU    Num        Memory (MB)
                                  CPU     Bound/   IO   # Ranges/
Virtual Partition Name          Min/Max  Unbound  devs  Total MB    Total MB
==============================  ================  ====  ====================
cable1                            1/  3    1   0     4    0/  0         1024
cable2                            1/  3    1   0     4    0/  0         1024

#
This progression of states of cable2 reflects the time it takes to boot the operating system from the second volume on which this vPar is run.
In addition to load, boot, and up, there are other states in which you may find a Virtual Partition as well. Table 16-3 summarizes the states of Virtual Partitions at the time of this writing:
| vPars State | Description |
|---|---|
| load | The kernel image of a Virtual Partition is being loaded into memory. This is done by the Virtual Partition monitor. |
| boot | The Virtual Partition is in the process of booting. The kernel image has been successfully loaded by the Virtual Partition monitor. |
| up | The Virtual Partition has been successfully booted and is running. |
| shut | The Virtual Partition is in the process of shutting down. |
| down | The Virtual Partition is not running and is down. |
| crash | The Virtual Partition has experienced a panic and is crashing. |
| hung | The Virtual Partition is not responding and is hung. |
With more than one vPar running, you would use the built-in vPars drivers to toggle the console between any number of Virtual Partitions using Ctrl-A. Figure 16-6 shows using the console to view cable1 with a hostname of cvhdcon3. Issuing Ctrl-A connects to vPar cable2 with a hostname of cvhdcon4. When you issue Ctrl-A to switch to the next vPar in the console you are supplied with the name of the vPar to which you have connected in brackets, such as [cable1].

In addition to using the console to switch between vPars, you can also use the LAN cards configured into the respective vPars to open a TELNET or other type of session to the vPars. This is the same technique that you would use to connect to any system over the network and is one of the primary reasons you always want to have a LAN card configured as part of every vPar.
We did not cover the configuration of the two LAN cards, one in each vPar, in this chapter. The LAN configuration would have to be completed for both vPars in order to use the networking cards for such operations as a TELNET session. Chapter 13 of the vPars book covers many networking topics, including the /etc/hosts file; /etc/rc.config.d/netconf file, which must be configured on each vPar; and many others.
10) Modify the Virtual Partition
It is likely that you'll want to modify your Virtual Partitions in a variety of ways. You may want to add or remove a CPU, for instance. Let's take a look at an example of adding a CPU to a Virtual Partition.

# vparstatus -p cable1 -v

[Virtual Partition Details]
Name:         cable1
State:        Up
Attributes:   Dynamic,Manual
Kernel Path:  /stand/vmunix
Boot Opts:

[CPU Details]
Min/Max:  1/3
Bound by User [Path]:
Bound by Monitor [Path]:  33     <-- one
							bound CPU @ 33
Unbound [Path]:

[IO Details]
   0.0
   0.0.1.1.2.0  BOOT

[Memory Details]
Specified [Base  /Range]:
          (bytes) (MB)
Total Memory (MB):  1024
#


# vparstatus -p cable2 -v


[Virtual Partition Details]
Name:         cable2
State:        Up
Attributes:   Dynamic,Manual
Kernel Path:  /stand/vmunix
Boot Opts:

[CPU Details]
Min/Max:  1/3
Bound by User [Path]:
Bound by Monitor [Path]:  37    <-- one CPU in use at 37
Unbound [Path]:

[IO Details]
   0.8.0.0.8.0.5.0.0.0  BOOT
   0.10.0.0

[Memory Details]
Specified [Base  /Range]:
          (bytes) (MB)
Total Memory (MB):  1024
#

# vparstatus -A

[Unbound CPUs (path)]:  97
                        101
[Available CPUs]:  2

[Available I/O devices (path)]:  0.1
                                 0.2
                                 0.3
                                 0.4
                                 0.5
                                 0.9
                                 0.12
                                 32
                                 36
                                 96
                                 100

[Unbound memory (Base  /Range)]:  0x0/64
                (bytes) (MB)      0xc000000/1856
                                  0x180000000/128
[Available memory (MB)]:  2048
#

 | We can now run vparstatus -p cable1 -v to confirm that the CPU has been added, shown in the following listing: |
# vparstatus -p cable1 -v


[Virtual Partition Details]
Name:         cable1
State:        Up
Attributes:   Dynamic,Manual
Kernel Path:  /stand/vmunix
Boot Opts:

[CPU Details]
Min/Max:  1/3
Bound by User [Path]:
Bound by Monitor [Path]:  33         <-- original CPU @ 33
Unbound [Path]:  97                  <-- unbound CPU @ 97

[IO Details]
   0.0
   0.0.1.1.2.0  BOOT

[Memory Details]
Specified [Base  /Range]:
          (bytes) (MB)
Total Memory (MB):  1024
#
The vparstatus output shows that the CPU at hardware path 97 has indeed been added to cable1 with the vparmodify command as unbound.
In addition, we can run GlancePlus or top to confirm that there are two CPUs in use on cable2. The following is a top output run on cable2:
# top

System: cvhdcon3                                      Thu Oct  4 15:30:42 2001
Load averages: 0.19, 0.51, 0.62
124 processes: 110 sleeping, 14 running
Cpu states:
CPU   LOAD   USER   NICE    SYS   IDLE  BLOCK  SWAIT   INTR   SSYS
 0    0.37   0.0%   0.2%   0.0%  99.8%   0.0%   0.0%   0.0%   0.0%
 1    0.02   0.0%   0.0%   0.8%  99.2%   0.0%   0.0%   0.0%   0.0%
---   ----  -----  -----  -----  -----  -----  -----  -----  -----
avg   0.19   0.0%   0.2%   0.4%  99.4%   0.0%   0.0%   0.0%   0.0%

Memory: 93636K (57816K) real, 322124K (239536K) virtual, 746284K free  Page# 1/4

CPU TTY        PID USERNAME PRI NI   SIZE    RES STATE    TIME %WCPU  %CPU COMMAND
 0   ?          36 root     152 20     0K   832K run      0:00  0.33  0.33 vxfsd
 1   ?        1342 root     158 10    80K   212K sleep    0:10  0.28  0.28 cclogd
 0   ?        1149 root     152 20  4644K  7260K run      0:06  0.21  0.21 prm3d
 1   ?         922 root     154 24   540K   808K sleep    0:00  0.15  0.15 hpterm
 0 pty/ttyp1  3114 root     186 24   596K   528K run      0:00  0.17  0.15 top
 1   ?        1146 root     -16 20  7788K  7240K run      0:03  0.14  0.13 midaemon
 1   ?           3 root     128 20     0K    32K sleep    0:04  0.11  0.11 statdaemon
 0   ?        2018 root     154 20  3908K  1908K sleep    0:00  0.05  0.04 alarmgen
 1   ?        1272 root     152 20   856K   960K run      0:00  0.04  0.04 opcmona
 1   ?        1372 root     152 20  1076K  2356K run      0:00  0.04  0.04 samd
 0   ?           0 root     128 20     0K     0K sleep    0:11  0.02  0.02 swapper
 1   ?           1 root     168 20   448K   204K sleep    0:00  0.02  0.02 init
 0   ?           2 root     128 20     0K    32K sleep    0:00  0.02  0.02 vhand
 0   ?           4 root     128 20     0K    32K sleep    0:00  0.02  0.02 unhashdaemo
 1   ?          20 root     147 20     0K    32K sleep    0:00  0.02  0.02 lvmkd
 0   ?          22 root     147 20     0K    32K sleep    0:00  0.02  0.02 lvmkd
 1   ?          24 root     147 20     0K    32K sleep    0:00  0.02  0.02 lvmkd
 0   ?         339 root     154 20   152K   204K sleep    0:00  0.02  0.02 syncer
 0   ?         342 root     168 20    76K   192K sleep    0:00  0.02  0.02 vphbd
 0   ?         345 root     168 20   156K   216K sleep    0:00  0.02  0.02 vpard
 0   ?         410 root     154 20    80K   224K sleep    0:00  0.02  0.02 syslogd
 0   ?         446 root     127 20   156K   424K sleep    0:00  0.02  0.02 netfmt
 0   ?         552 root     154 20   740K   816K sleep    0:00  0.02  0.02 rpc.statd
 0   ?         558 root     154 20  1004K  1032K sleep    0:00  0.02  0.02 rpc.lockd
 0   ?         586 root     154 20   180K   316K sleep    0:00  0.02  0.02 inetd
 0   ?         855 root     154 20  1064K   472K sleep    0:00  0.02  0.02 sendmail:
 0   ?         863 root     154 20   772K   712K sleep    0:00  0.02  0.02 snmpdm
 0   ?         896 root     154 20   620K   552K sleep    0:00  0.02  0.02 mib2agt
 0   ?         914 root     154 20  1332K   444K sleep    0:00  0.02  0.02 cmsnmpd
 1   ?         951 root     154 20  4044K  1840K sleep    0:00  0.02  0.02 rpcd
 1 pty/ttyp1   952 root     158 24   512K   180K sleep    0:00  0.02  0.02 sh
 0   ?         974 root     168 20   152K   304K sleep    0:04  0.02  0.02 scrdaemon
 0   ?         996 root     154 20   200K   336K sleep    0:00  0.02  0.02 pwgrd
 0   ?        1039 root     154 10   308K   428K sleep    0:00  0.02  0.02 diagmond
 0   ?        1093 root     154 20  1224K   816K sleep    0:00  0.02  0.02 ttd
 1   ?        1135 root     154 20  2588K  1624K sleep    0:00  0.02  0.02 perflbd
 0   ?        1156 root     154 20  2952K  1572K sleep    0:00  0.02  0.02 swagentd
 0   ?        1167 root     154 20   224K   252K sleep    0:00  0.02  0.02 emsagent
 0   ?        1168 root     127 20  2380K  2204K sleep    0:00  0.02  0.02 scopeux
This output shows two CPUs, labeled 0 and 1, in cable1. The System name of cvhdcon3 is shown at the output because the hostname for cable1 is cvhdcon3.


# vparstatus -p cable1 -v

# vparstatus -p cable1 -v

[Virtual Partition Details]
Name:         cable1
State:        Up
Attributes:   Dynamic,Manual
Kernel Path:  /stand/vmunix
Boot Opts:

[CPU Details]
Min/Max:  1/3
Bound by User [Path]:
Bound by Monitor [Path]:  33         <--
							bound CPU @ 33
Unbound [Path]:  97                  <--
							unbound CPU @ 97

[IO Details]
   0.0
   0.0.0.0
   0.0.1.1.2.0  BOOT
   0.0.4.0  CONSOLE

[Memory Details]
Specified [Base  /Range]:
          (bytes) (MB)
Total Memory (MB):  1024
# vparmodify -p cable1 -d cpu::1
# vparstatus -p cable1 -v

[Virtual Partition Details]
Name:         cable1
State:        Up
Attributes:   Dynamic,Manual
Kernel Path:  /stand/vmunix
Boot Opts:

[CPU Details]
Min/Max:  1/3
Bound by User [Path]:
Bound by Monitor [Path]:  33         <-- original CPU @ 33
Unbound [Path]:                      <-- no unbound CPUs

[IO Details]
   0.0
   0.0.0.0
   0.0.1.1.2.0  BOOT
   0.0.4.0  CONSOLE

[Memory Details]
Specified [Base  /Range]:
          (bytes) (MB)
Total Memory (MB):  1024
#
We could perform many other modifications to the vPars with the two unbound CPUs that are available, such as adding two CPUs to one of the vPars or one CPU to each vPar.
