
Chapter Objectives
Continue introducing necessary cluster infrastructure services
Detail configuration options for remote access, Kerberos, SSH, PDSH, DHCP, and system logging (
klogandsyslog)
The previous chapter introduced a number of important infrastructure services provided by Linux. In this chapter we continue the coverage with more infrastructure services, including remote access services, local file system configuration, logging, console management, and authentication.
As part of your cluster's design process, you had to make choices about the infrastructure services that are necessary. Let's continue implementing the cluster infrastructure by giving configuration considerations and procedures for some of the more common services. Bootstrapping the cluster to prepare for installation of compute slices, administrative tools, monitoring tools, and other higher level software layers involves activating the required infrastructure services first.
Examples of required infrastructure services (along with some configuration and design options) that are covered in the upcoming sections are
Authentication services (allowing administration staff to log in and work together)
Remote access services (to allow network administration)
Stable storage (for administrative software, scripts, and installation of packages)
Local and remote administrative file systems (sharing data necessary for the installation process)
Boot-time configuration (preparing for automatic system installation)
Logging and console management (for testing and error detection)
Licensing (for any licensed software in the cluster)
It is essential to understand the relationships, or dependencies, between the individual services to pick the proper installation order. If the work of installing and configuring the services is to be shared between multiple administrators, physical access to the systems for multiple people at once becomes an important consideration. The number of administrative and infrastructure nodes in a cluster is small in relationship to the compute slices, but the few support the many in this case.
The default Linux authentication and privilege scheme, like that of most UNIX and UNIX-like operating systems, is based on two numerical values, the UID and GID. With the default scheme, users authenticate themselves to the system with a combination of their user name and a password, and they are given system identifiers that are represented by the associated UID and GID values.
These values are then checked when users attempt to access resources to determine whether they are authorized to access a particular resource. Ensuring that the authorizations granted to specific users on the system are correct is a major task for a UNIX administrator.
Things have evolved to the point where users and processes may actually possess multiple UIDs and GIDs as well as specific “capabilities.” Finding information on Linux capabilities requires persistence. They do not appear to be fully implemented and they are not very well documented in many of the kernel releases. Later versions of the Linux kernel are extending the authorization features to capabilities, access control lists (ACLs), and other facilities.
The UNIX user and group information is traditionally kept in the /etc/passwd and /etc/group files, which are “world readable.” The open access to these files led to scripts and applications directly parsing the information in them (primarily to translate the numerical UID and GID values to their equivalent ASCII representations—in other words, translating the GID 0 to its human-readable name root)—changing that approach promised to break existing software, so the situation remains on today's system. This use of the files, by the way, is equivalent to a directory service: looking up information given a key like the user name or a UID.
With the advent of programs like crack, which can use “brute-force” techniques to determine passwords, the visibility of the encrypted password field in the files becomes a real liability (because it is only the equivalent of a 56-bit encryption key) in public environments. crack and similar programs use dictionaries of words and common user password choices (like the user name backward), encrypt them in all possible combinations, and check them against the values in a user's password field. If a match is found between the password field and the “cracked” password value, the user's account may be easily compromised.
Again, the Linux approach to this situation is similar to that of other UNIX-like systems: use larger password fields and optionally place “sensitive” information in files that have “tighter” security associated with them (they are only readable by root). These files on Linux are /etc/shadow and /etc/gshadow, and there are routines to convert to and from the formats with and without shadow files—for example, pwconv, grpconv, pwunconv, and grpunconv. Linux can use MD5 password encryption, with up to a total of 30 usable bytes, not including delimiters—a 210-bit key. (This could more accurately be described as a passphrase, rather than a password.)
The distribution of Linux MD5 password fields via NIS or other services may cause compatibility issues with versions of UNIX that use the older password encryption scheme and expect at most 8 bytes in the password field. Interoperability with existing authentication systems is a strong consideration when picking your cluster's authentication mechanism. The MD5 and shadow functionality are separate options. They, along with the authentication mechanism, can be configured from the authconfig tool.
TIP
If interoperability is not an issue and you choose to use the “traditional” /etc/passwd and /etc/group files as the authentication database, enable either MD5 passwords, the shadow files, or both for additional security. You should also consider password aging and password strength checking to augment security.
The actual authentication process on Linux is implemented with pluggable authentication modules (PAM), a system based on stackable, dynamically loaded modules which may be configured into a multi-layered authentication process. A brief survey of the /etc/pam.d directory will show PAM-enabled applications, and examining the /lib/security directory (where the PAM libraries are kept), shows quite a number of PAM libraries, handling a number of authentication sources (Kerberos, lightweight directory access protocol [LDAP], SMB, rhosts) in addition to the libraries that implement the “standard” Unix authentication. Configuration information for PAM is kept in the file /etc/pam.conf. (I do not have space to delve into the intricacies of security in general, or PAM in particular. See Garfinkel and Spafford [1994] for a good treatise on UNIX security.)
The authentication scheme you choose for your cluster will determine which infrastructure issues you face. In some cases, the standard UNIX authentication mechanism is sufficient; in others, you may be required to interface to existing Kerberos, Microsoft Windows authentication mechanisms (SMB or Active Directory), or other services. Whatever the choice, you must be able to authenticate users and control their access to resources.
The standard Red Hat Linux installation procedure creates the root user account and gives it access to a dedicated home directory in /root. The default permissions on that directory, shown in the output from an ls -ld /root command, are
drwxr-x--- 26 root root 4096 Mar 2 22:49 /root
These permissions prevent anyone except the root user and members of the root group from accessing (including viewing) the directory's contents. The minute that someone who is not either the root user or in the root group needs to access files in that directory, the “world” permissions on the directory need to be “opened up.”
This action points out one of the major weaknesses of the directory access scheme used by UNIX. Changing the access permissions to make files accessible to users other than the owner and the group makes the contents of the directory visible to any user on the system. Of course, this situation needs to be avoided, particularly for sensitive information that might be kept in root's home directory.
Linux attempts to make management of directory access permissions easier, using the following approach.
Each user has his own unique UID and matching GID (for example, user
robl, UID 500, grouprobl, GID 500) created in thepasswdandgroupfiles.Default home directory permissions are initially set to
700(rwx------indicating read, write, and execute for the directory's owner only) on that directory.
Let's say we have several users configured in a similar manner. What would be needed for them to share information in a central project directory?
Permissions on the files created in a shared directory like this require special attention. The UNIX heritage has left us with two inheritance schemes for group ownership of files. In the first scheme (from SYSV UNIX), the group ownership of a file comes from the GID of the process creating the file. But what about the BSD situation, when a user or process may be a member of more than one group at the same time? (Just try typing id to see to which groups you belong. There are more than you think.) In this case, the files group comes from the directory in which the file is created.
The default behavior on Linux is to create a file with the group inherited from the process or user that creates it, irrespective of the directory group permissions. To get the “inherit from the directory” behavior, we must set the set group ID (or SGID) bit on the directory. This is done with the command chmod g+s <directory>.
With the SGID bit set, files created in the directory will retain the UID of the creating user or process, but will inherit the group ownership from the directory. Judicious use of the user mask can make the files available to the original user and the group that owns the directory. One additional trick is to set the “sticky” bit on a directory (chmod o+t <directory>) to enable restricted deletion behavior: Only root or the file's owner may unlink or rename it. An example configuration is shown in Figure 11-1.
TIP
Use group ownership to manage the access to shared directories and files. It is far easier to add and remove users from a group to control access to shared resources, than to change ownership and permissions on individual files or directories with every change to a project team.
When protecting the contents of a shared directory, rather than opening the permissions up “to the world,” it is far easier to use assign project members to the directory's group owner. The directory's owner permissions then designate full rights for an individual who manages the data in the directory, while the group rights on the directory apply to all of the users of the data. Setting the SGID permission on the directory, in conjunction with the proper umask value, will properly handle the owner and group permissions on shared files in the directory. In this way, instead of changing permissions on the directory when users are added to or deleted from the project—or fighting with the “world visible” problem—access is managed by adding or removing users from the definition of the group that owns the directory.
If you are using the /etc/passwd and /etc/group information as the sole authentication mechanism for your cluster, you can use NIS to distribute this information to client systems that must use it to authenticate users and their processes. If you want to use NIS to distribute /etc/passwd and /etc/group information, you should refer to Chapter 10 for information on configuring NIS servers and clients.
A number of software environments, including the DCE and the Andrew file system (AFS) use Kerberos as the central authentication mechanism. The current version of the software is Kerberos 5, and you should be aware that there are at least three major implementations of the daemons, including the versions from the Massachusetts Institute of Technology (MIT) and for Microsoft Windows. (See Garman [2003] for a complete treatise on the Kerberos protocol, implementations, and system administration.)
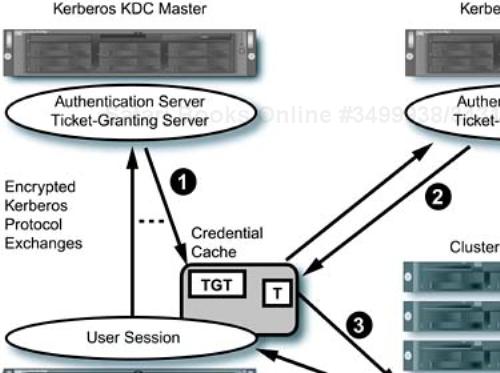
To support Kerberos inside the cluster you will need to set up at least one key distribution center (KDC) and the client software on the other systems. The KDC provides for redundancy, and it is a very good idea to have a replicated KDC available to your cluster systems. The Kerberos KDC comprises the principal database the authentication server, and the ticket-granting server. Slave KDC servers have a copy of the database, and are capable of authentication and ticket operations, but cannot make changes to the database information.
Once your system's Kerberos client authenticates you, you are granted a “ticket-granting ticket” (TGT) that maintains a record of your authentication and may be used to obtain other tickets for access to Kerberos-enabled services in the environment. A domain of Kerberos administration is referred to as a realm. Your cluster may be its own Kerberos realm or it may be required to take part in an existing realm, in which case you will need to interoperate with the existing KDCs. An example of a “Kerberized” interaction is shown in Figure 11-2.
The Kerberos service is very secure (provided it is properly installed and configured), in that all communications in the network are encrypted and therefore are not subject to prying eyes looking at network traffic with packet sniffers. (It is also important to control physical access to KDCs to prevent tampering.) The protocols involved for authentication, ticket granting, and service access are designed to prevent issues like “man-in-the-middle” attacks and other tricks that sneaky hackers might try to eavesdrop on conversations or to hijack system resources.
The fact that your initial ticket (or TGT) expires after a preset interval (configurable, but usually eight hours to a full day) helps ensure that by the time someone could use brute-force decryption techniques to determine your conversation's contents, the information would do them no good.
Kerberos requires each entity, or communication point, in a conversation to be authenticated. These entities are called principals, and may be a service, a host (system), a user, or a special entity within the Kerberos system itself. The requirement that all parties be authenticated means that each principal that can participate in a conversation needs to be authenticated, with an identity and an encryption key.
A brief introduction to the terminology used to describe entities in Kerberos is in order at this point. There are three types of principals and two formats for a principal “name” or just “a principal” in Kerberos 5 (the format differs slightly from previous versions). The first format is used for both users and host principals:
user[/instance]@REALM
In the case of a host principal, the user portion of the principal is the string “host.” Examples of two user principals and a host principal respectively are:
rob/[email protected]
kadmin/[email protected]
host/[email protected]
For services, the principal format is
service/fully-qualified-domain-name@REALM
Now that you can recognize principals, you will see them used in the output examples in the next section. We will be doing minimal work with principals in this section, because we have limited space. You may need to locate a Kerberos expert if your installation is complex.
The Red Hat distribution includes the Kerberos version 5 server software in the ES versions, and the server is also a standard part of the Fedora distribution. The configuration files for the KDC are /etc/krb5.conf and /var/kerberos/krb5kdc/kdc.conf. Let's call our local Kerberos realm CLUSTER.LOCAL, which is the upper-case form of our DNS domain.
The systems in a Kerberos realm must have their times synchronized within a five-minute window. When running Kerberos in your cluster, it is a very good idea to use a time synchronization service, such as NTP, to keep the system clocks within the required tolerance. This is a very good example of a dependency between two infrastructure services.
We can use the skeleton /etc/krb5.conf file on the first KDC machine (assuming that we will do at least two), filling in the appropriate system names, domain names, and Kerberos realm:
[logging]
 default = FILE:/var/log/krb5libs.log
 kdc = FILE:/var/log/krb5kdc.log
 admin_server = FILE:/var/log/kadmind.log

[libdefaults]
 ticket_lifetime = 24000
 default_realm =  CLUSTER.LOCAL
 dns_lookup_realm = true
 dns_lookup_kdc = true

[realms]
 CLUSTER.LOCAL = {
  kdc = ns2.cluster.local:88
  admin_server = ns2.cluster.local:749
  default_domain = cluster.local
 }

[domain_realm]
 .cluster.local. =  CLUSTER.LOCAL
 cluster.local = CLUSTER.LOCAL

[kdc]
 profile = /var/kerberos/krb5kdc/kdc.conf
[appdefaults]
 pam = {
   debug = false
   ticket_lifetime = 36000
   renew_lifetime = 36000
   forwardable = true
   krb4_convert = false
 }
Next, modify the /var/kerberos/krb5kdc/kdc.conf file, again using our system, domain, and realm names:
[kdcdefaults]
 acl_file = /var/kerberos/krb5kdc/kadm5.acl
 dict_file = /usr/share/dict/words
 admin_keytab = /var/kerberos/krb5kdc/kadm5.keytab
 v4_mode = nopreauth

[realms]
 CLUSTER.LOCAL = {
  master_key_type = des-cbc-crc
  supported_enctypes = des3-cbc-sha1:normal des3-cbc-sha1:norealm des3-cbc-sha1:onlyrealm
 des-cbc-crc:v4 des-cbc-
crc:afs3 des-cbc-crc:normal des-cbc-
crc:norealm des-cbc-crc:onlyrealm des-cbc-
md4:v4 des-cbc-md4:afs3 des-cbc-
md4:normal des-cbc-md4:norealm
des-cbc-md4:onlyrealm des-cbc-md5:v4 des-cbc-md5:afs3 des-cbc-md5:normal des-cbc-md5
:norealm des-cbc-md5:onlyrealm
des-cbc-sha1:v4 des-cbc-sha1:afs3 des-
cbc-sha1:normal des-cbc-sha1:norealm des-cbc-sha1:onlyrealm
 }
des-cbc-crc:v4 des-cbc-
crc:afs3 des-cbc-crc:normal des-cbc-
crc:norealm des-cbc-crc:onlyrealm des-cbc-
md4:v4 des-cbc-md4:afs3 des-cbc-
md4:normal des-cbc-md4:norealm
des-cbc-md4:onlyrealm des-cbc-md5:v4 des-cbc-md5:afs3 des-cbc-md5:normal des-cbc-md5
:norealm des-cbc-md5:onlyrealm
des-cbc-sha1:v4 des-cbc-sha1:afs3 des-
cbc-sha1:normal des-cbc-sha1:norealm des-cbc-sha1:onlyrealm
}
Once the configuration files are modified, we need to create the initial Kerberos database files and enter the master database key. These are located in /var/kerberos/krb5kdc. The /etc/init.d/krb5kdc start-up script explicitly looks for a file named principal that gets created in that directory as part of the database initialization, and exits silently if the file does not exist:
# kdb5_util create -s
Initializing database '/var/kerberos/krb5kdc/principal' for
realm 'CLUSTER.LOCAL',
master key name 'K/[email protected]'
You will be prompted for the database Master Password.It is
important that you NOT FORGET this password.
Enter KDC database master key:
Re-enter KDC database master key to verify:
We are now ready to start the service and make sure it gets restarted at system boot time:
# chkconfig krb5kdc on
# service krb5kdc start
If there are errors, you can look in the /var/log/krb5kdc.log file for diagnostic messages. The local administration tool, kadmin.local is designed to operate only on a KDC server and will not allow remote connections. Once the KDC is operating, we can use the local administrative tool to authenticate to it and add a user as an administrative principal to the database:
# kadmin.local
Authenticating as principal root/[email protected] with
password.
kadmin.local:  listprincs
K/[email protected]
kadmin/[email protected]
kadmin/[email protected]
kadmin/[email protected]
krbtgt/[email protected]
kadmin.local:  addprinc rob/admin
WARNING: no policy specified for rob/[email protected];
defaulting to no policy
Enter password for principal "rob/[email protected]":
Re-enter password for principal "rob/[email protected]":
Principal "rob/[email protected]" created.
kadmin.local:  quit
Now we want to start the Kerberos administrative daemon, which is the service that handles remote administration requests and allows users to change their passwords. We need to modify the /var/kerberos/krb5kdc/kadm5.acl file to allow our administrative user to perform administrative operations. The ACL options are complex, so for this simple example we will edit the file to contain
This allows any principle name that matches the instance and realm /[email protected] to perform all operations. In real life, this is probably neither safe nor smart.
Next we need to create the /var/kerberos/krb5kdc/kadm5.keytab file. This file contains principal information for the two principals specified in the ktadd command, which appends the information to the specified file, along with new, random passwords generated during the process:
# kadmin.local
kadmin.local: ktadd -k /var/kerberos/krb5kdc/kadm5.keytab
kadmin/admin kadmin/changepw

kadmin.local# quit
The key tab information is used to authenticate remote connections to the kadmin server, which we can now start:
# chkconfig kadmin on
# service kadmin start
When the daemon (which is named kadmind) starts, you should see a long list of messages detailing the administrative principals it is using. If everything went as expected, you should be able to use the kadmin command, either locally or remotely:
# kadmin
kadmin:  listprincs
K/[email protected]
kadmin/[email protected]
kadmin/[email protected]
kadmin/[email protected]
krbtgt/[email protected]
rob/[email protected]
kadmin:  quit
The kadmin command authenticates the user with the KDC and encrypts the traffic between it and the kadmind process, which makes remote administration safe.
Now that you have a functional KDC, you should be able to authenticate yourself and get a TGT with the kinit command. If you see an error message like
kinit(v5): Client not found in Kerberos database while
getting initial credentials
It means that Kerberos cannot find a principal in its database that matches your UNIX user name. Notice that I used my administrative principal in this request. I got the error message when I tried a kinit without specifying the principal on the command line, and the principal name defaulted to rob. We have not added any other principals at this point. I leave this as an exercise for you.
$ kinit rob/admin
Password for rob/[email protected]:
$ klist
Ticket cache: FILE:/tmp/krb5cc_1000
Default principal: rob/[email protected]
Valid starting     Expires            Service principal
03/03/04 22:25:20  03/04/04 08:25:20
           krbtgt/[email protected]
Kerberos 4 ticket cache: /tmp/tkt1000
klist: You have no tickets cached
One final note on the tickets you obtain: They are stored in the credentials cache in the /tmp directory and stay around until destroyed with the kdestroy command (or until they expire). You need to put the kdestroy command in your shell's logout script to ensure that they are not left hanging around after you log out.
If you want to replicate the Kerberos database to a slave KDC server, you need to initialize two KDCs following the procedure outlined in the previous section: One will become the master and one will become the slave KDC. This next section shows the steps for creating the slave KDC. We are almost finished with the Kerberos server configuration!
In this example, we have two KDC servers, ns1.cluster.local and ns2.cluster.local. The ns2.cluster.local system will be the slave KDC and ns1.cluster.local will be the master KDC.
To begin, we need to create host principals on the master and the slave KDC systems. The principal is added to the key tabs for the KDC machines for use in the replication process, once it is created. This example is for the master:
# kadmin Authenticating as principal rob/[email protected] with password. Enter password: kadmin: addprinc -randkey host/ns2.cluster.local WARNING: no policy specified for host/[email protected]; defaulting to no policy Principal "host/[email protected]" created. kadmin: ktadd host/ns2.cluster.local Entry for principal host/ns2.cluster.local with kvno 3, encryption type Triple DES cbc
After repeating the operation on the slave, we will create a /var/kerberos/krb5kdc/kpropd.acl file on the slave KDC system, that contains the host principals that we just created:
host/[email protected]
host/[email protected]
Only the master KDC is required in the file, but if we ever have to flip roles (because the master is lost for some reason), we will be prepared. The Red Hat distributions provide the kpropd service, which needs to be started on the slave KDC:
# chkconfig kprop on
# service kprop start
Note that if the /var/kerberos/krb5kdc/kprop.acl file exists, the start-up scripts will silently refuse to start the kadmin service. Apparently this should be running on only the master KDC. Once the kpropd daemon is running on the slave, we can dump the master's database to a file and send it to the slave, using the default file names
# kdb5_util dump /var/kerberos/krb5kdc/slave_datatrans
# kprop -f /var/kerberos/krb5kdc/slave_datatrans
     ns1.cluster.local
Database propagation to ns1.cluster.local: SUCCEEDED
The database is extracted from the master KDC server with the kdb5_util command and is copied across a secure, encrypted channel to the slave KDC, where the database is loaded into the slave, again using the kdb5_util command. We have one last operation to perform before we can rest on our Kerberos laurels: We need to enable the slave KDC to read the database, which is encrypted by the master password we entered oh so long ago.
# kdb5_util stash
Enter KDC database master key:
#
This command simply stores the master database password in a local file that is used by the slave KDC to “open” the database for use. You should enter the master password you used when you created the master database. The last remaining task, which I leave to you, dear reader, is to create a cron job that transfers the database from the master KDC to the slave KDC at regular intervals.
Kerberos allows users to authenticate themselves once, receive a TGT, and then use that TGT to access “Kerberized” services. In addition to the manual authentication process, Linux provides a PAM module that can perform the user's authentication as part of the normal system login. See the documentation in man pam_krb5 for information on setting up the PAM service for Kerberos. The integration of the two services simplifies ticket management issues for the user, obtaining the TGT and releasing tickets in the credential cache on logout, among other features.
Once a user is authenticated and granted a TGT, Kerberized clients for services are available, including telnet, ftp, rlogin, rsh, and rcp, which are all located in the /usr/kerberos/bin directory. There are also other clients and services, like SSH, that are Kerberos aware. Kerberos is one way to solve the “clear text password” security issues within a networked environment.
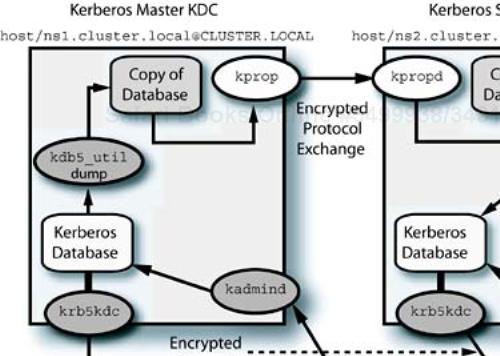
The Red Hat distributions, and Fedora, provide an MIT-based version of Kerberos 5. The configuration steps in this section are based on that version of the software. A diagram of the interactions and files involved in master and slave KDCs is shown in Figure 11-3. Administrative information for the server portion of Kerberos is available in Hypertext Markup Language (HTML) format in the /usr/share/doc/krb5-server-<version> directory. Documentation for the Kerberos “workstation” package, which contains the Kerberized servers (klogind, krb5-telnetd, kshd, and so forth) is located in /usr/share/doc/krb5-workstation-<version>. (I discuss configuration of these services in the next section, primarily because they are required for remote access to the administrative servers that we are discussing.)
You will find Kerberos to be very good about logging the actions being taken in the /var/log/krb5kdc.log and /var/log/kadmind.log files. With the addition of auditing capabilities to the Kerberos features, we can complete the three basic “A” components in a secure environment: authentication, authorization, and auditing. If your environment warrants it, using Kerberos provides a level of security that is difficult to get without it.
For a system administrator, remote access to systems in the network is an important part of the day-to-day administration activities, as well as the initial installation operations. For users, access to the cluster will be primarily through some form of secure connection to the master nodes (if it is a computational cluster) or through an application front end (if the system is a parallel Web or database server).
In the case of direct remote access for the user or administrator, some form of authentication is required to prove identity and to control the level of permission. Within the cluster, as well, access to the resources needs to be tightly controlled to prevent issues with system stability and to cut down on the potential for users to “go around” the job-scheduling mechanisms. (They find enough ways to do this, even if there are no “gaping” holes in the access.) Although the level of required security can narrow the available choices for remote access to a system, there are two major groups of remote access services that can meet our needs.
Both of the service groups, the BSD remote shell (the BSD offering is really a set of separate services) and SSH (several commands with the same transport), can interact with the Kerberos service, which we discussed in the previous section. This gives us a lot of flexibility regarding which choice we make.
The BSD services are turned off by default, because the non-Kerberized versions transmit passwords and data “in the open,” with an unencrypted transport. SSH (really “Open SSH”) is enabled and is seen as the default Linux remote access method because of its security and flexibility.
Most UNIX administrators and a lot of UNIX users are aware of the network services introduced to UNIX by the BSD4.2 distribution: rsh, rlogin, rcp, telnet, and ftp. We have all configured ${HOME}/.rhosts files and /etc/hosts.equiv files to allow easy access to remote systems. Ah, those were simpler days. As easy and convenient as these services are for users and system administrators, they all rely implicitly on the integrity of the systems involved and the network between them.
Except in very special circumstances, this level of trust is a dangerous thing in today's networks, especially if you are connected directly to the Internet. If you are used to using the previously mentioned clients and their equivalent servers—in.rlogind, in.rexecd, in.rshd, in.telnetd (even with the benefit of the TCP wrapper files /etc/hosts.allow and /etc/hosts.deny)—you should think strongly about “moving on.” Likewise, you should consign the .rhosts file and /etc/hosts.equiv to the dust bin, unless you want to invite network intrusions and all the other problems that come with unencrypted communications and passwords in “clear text” on the network. You should know that one of the applications included with every Linux distribution, or freely available, is a software packet sniffer that is capable of trapping user passwords in clear text.
You should not use the BSD remote access services in your cluster. Period. If you going to give in to user pressure to enable these services in their raw, nonsecure form, then at least consider this a transition period and set a date by which you will start using the more secure replacements. Fortunately, Kerberized versions of these services exist, so the transition need not be nightmarish in proportion (rewriting administrative scripts, retraining users, and so on).
TIP
The BSD remote access services are nonsecure and should not be used. The SSH services are a better replacement for the BSD remote access tools, but should not have the fall-back to BSD operation enabled. Using a secure service with a fall-back to an nonsecure one is a terrible idea from a security standpoint.
If you have the luxury of breaking with the past and are willing to set up Kerberos, you will want to examine the secure Kerberized “replacement” services. The best option is to take a look at SSH, which is covered in an upcoming section. I do not discuss the older, nonsecure services any further.
As previously mentioned, there are client replacement versions of the BSD/Advanced Research Projects Agency (ARPA) remote services that use Kerberos authentication, and most are located in the /usr/kerberos/bin directory. The server portion of these services must be explicitly enabled on the system being accessed by the client, and are located in the /usr/kerberos/sbin directory. The BSD/ARPA services and their Kerberized equivalents are listed in Table 11-1.
Table 11-1. Kerberized Equivalents for BSD Remote Services
Service Description | “Standard” Service | Kerberized Server |
|---|---|---|
Remote login, BSD style |
|
|
Remote login, Kerberos authentication |
| |
Remote terminal session |
|
|
Remote shell |
|
|
File transfer |
|
|
One of the disadvantages of using the Kerberized versions of the BSD services is that, if the Kerberos authentication fails, the service will drop back to the old-style login behavior, with unencrypted passwords. Additionally, to get the secure behavior, the user must explicitly request encryption. The use of ticket forwarding and other features requires the user to be aware of the operation of Kerberos and to be familiar with its terminology. This may be useful in a transitional mode, but it still leaves room for insecure communications if users don't properly invoke the service client.
For example, instead of simply issuing a telnet <target system> command, the user would specify telnet -a -x -f <target system>. The options to the Kerberized telnet tell the client to log in on the remote system as the current principal (-a), to encrypt all conversations (-x), and to forward all “forwardable” Kerberos tickets (-f) to the remote system. Users may tend to fall back to old habits, without the options, which will result in nonsecure behavior.
The server portion of the services are started by the xinetd process in response to an incoming client request. The xinetd process configuration is /etc/xinetd.conf is essentially a skeleton with a few global definitions and a directive that includes all files located in the /etc/xinetd.d directory. (This is an interesting administration paradigm that you will find in several places on the system. It allows a package requiring an xinetd service to install itself, drop the configuration file in the /etc/xinetd.d directory, and cause xinetd to reload its configuration. No grep, sed, or awk is required, and the possibility of disturbing other services is minimized. Removal of a package is the reverse set of operations.) These files need to be modified to enable the appropriate servers for the Kerberos versions of the BSD/ARPA clients.
For instance, to enable the eklogin server on a client system, you need to modify the /etc/xinetd.d/eklogin file:
# default: off
# description: The encrypting kerberized rlogin server accepts
# rlogin sessions authenticated and encrypted with Kerberos 5.
service eklogin
{
        flags   = REUSE
        socket_type    = stream
        wait    = no
        user    = root
        server  = /usr/kerberos/sbin/klogind
        server_args    = -e -5
        disable  = no
}
A brief note on the contents of the xinetd configuration files may save some confusion. Sometimes the default value for line in the reads, disable = yes, as in this example. Other times, the line may specify, enable = no, which is an inverted specification for the same result. You need to watch closely for the difference, particularly in scripts.
After modifying the service files, you must cause the xinetd daemon to reread its configuration files:
# service xinetd reload
Perform similar configuration changes and the system will now handle incoming requests from the Kerberized clients for the services you enable. For debugging purposes, and to verify that the service is talking to the Kerberos KDC, you can look at the /var/log/krb5kdc.log file for the tickets that are issued to the clients:
Mar 04 22:38:40 ns2 krb5kdc[757](info): AS_REQ (3 etypes {16 3 1}) 192.168.0.152(88):
 ISSUE: authtime 1078468720, etypes {rep=16 tkt=16 ses=16}, host/ns2.cluster.local@CLUSTER
.LOCAL
for host/[email protected]
You should be able to see the KDC issue a ticket for the client as it tries to access the service. Even if the ticket is properly issued, the access could fail, as shown in the following encrypted telnet request:
# telnet -x ns1 Trying 192.168.0.151... Connected to ns1.cluster.local (192.168.0.151). Escape character is '^]'. Waiting for encryption to be negotiated... [ ... output deleted ...] [ Kerberos V5 refuses authentication because telnetd: krb5_rd_req failed: Decrypt
What is happening? To find out, we need to enable debug output on the server side of the connection for the service we are using. This can be done by modifying the xinetd configuration file, in this case for krb5-telnet, adding the server_args option to pass the debug flags:
# default: off
# description: The kerberized telnet server accepts normal
# telnet sessions, but can also use Kerberos 5 authentication.
service telnet
{
        flags   = REUSE
        socket_type  = stream
        wait   = no
        user   = root
        server  = /usr/kerberos/sbin/telnetd
        server_args = -D report
        log_on_failure += USERID
        disable  = no
}
This will dump lots of information on the client's side of the conversation. We can watch the negotiation process occur, see what the supported encryption types are for both the client and server, and look for something going amiss. With the server-side debug option installed and activated, we see
# telnet -x ns1 Trying 192.168.0.151... Connected to ns1.cluster.local (192.168.0.151). Escape character is '^]'. Waiting for encryption to be negotiated... td: send do AUTHENTICATION [... output deleted ...] td: send suboption AUTHENTICATION SEND KERBEROS_V5 CLIENT|MUTUAL|ENCRYPTKERBEROS_V5
The error message, it turns out, is confusing the issue. What is really happening is a mismatch in the encryption capabilities that can be handled between the service daemon and the host principal. Kerberos will always try to use the strongest encryption available to it, and some clients can't handle the stronger type of encryption, especially if they are compiled to be used outside the United States (a clue to this can be found in man -k cfb64, which returns the man page for DES_CRYPT).
We need to regenerate the key tab entry for the host principal involved:
# kadmin Authenticating as principal root/[email protected] with password. Enter password: kadmin: ktrem host/ns1.cluster.local Entry for principal host/ns1.cluster.local with kvno 3 removed from keytab WRFILE:/etc
This example shows the commands necessary to create a key tab entry with just the lowest common denominator between the host and the service, which is date encryption standard (DES) encryption. Now we can try connecting again:
# telnet -x ns1
Trying 192.168.0.101...
Connected to ns1.cluster.local (192.168.0.151).
Escape character is '^]'.
Waiting for encryption to be negotiated...
[ Kerberos V5 accepts you as "[email protected]" ]
done.
Last login: Fri Mar  5 14:43:17 from ns2
#
We are finally able to connect, using telnet with an encrypted communication path and a new ticket generated for us from the Kerberos KDC's ticket-granting service (TGS):
Mar 05 14:43:37 ns2 krb5kdc[5716](info): TGS_REQ (1 etypes  {1}) 192.168.0.110(88): ISSUE
: authtime 1078526609, etypes  {rep=16 tkt=16 ses=1}, [email protected] for  host/ns1
[email protected]
The Kerberos login facilities allow a user to create a ${HOME}/.k5login file, which contains the names of principals that are allowed to access the account. The file must be owned by the account owner and contains the familiar principal[/instance]@realm format, one per line. An example .k5login file is
Any authenticated Kerberos principal listed in the .k5login file is allowed access to the account. This finishes our introduction to configuring and using Kerberos. Now, onward to SSH.
Although SSH sounds as if it should be a general-purpose scripting language, like the Korn shell (ksh) or the Bourne shell (sh), or even the Borne-again shell (bash), it is not a shell in the sense of a “command shell” that is the local user interface to the operating system's kernel or user applications. Instead, SSH is a transport, or protocol, that defines a method of secure, network-based communication using encryption and mutual authentication. Adding to the confusion, there are various versions and implementations of the SSH protocol.
The implementation of SSH that is included with Linux, and that I will discuss, is really OpenSSH from the OpenBSD project (see http://www.openssh.com for more details). This particular SSH implements both the SSH version 1 and version 2 (SSH1 and SSH2) protocols with a client–server architecture. For our purposes, I will refer to the OpenSSH implementation when I use the term SSH, along with the SSH2 protocol, which is now used as the default transport.
Red Hat Linux, and derivatives, include the SSH client and server software as part of the Linux distribution. In general, SSH is well integrated into the Linux environment, and the default configuration is usable once the operating system is installed. This is good, because it means that with minimal work we have a mechanism to log in to remote systems securely and to transfer files via a secure channel.
Just when you thought that things could not get better, they can. SSH is also capable of forwarding TCP/IP network traffic through secure “tunnels.” This process is also called port forwarding, because a numerical TCP/IP port on one machine may be securely connected to an entirely different port on another machine via secure communications through an SSH tunnel. As complicated as this may sound, it really isn't.
The flexibility of SSH allows secure communications in any number of situations that do not require modification of client or server software, as needed with Kerberos. The administration of SSH is also somewhat less involved than that of Kerberos. The transition from using BSD remote access (for example, rsh) may be as easy as setting up SSH and substituting the ssh command for rsh in existing scripts.
The SSH transport also is optionally used by quite a few Linux installation, monitoring, and system administration tools, which optionally use encrypted transport and authentication to guarantee secure communications between their components. If SSH sounds like a good thing, it is—without a doubt. It is for good reason that SSH is enabled by default, and the BSD-style services are disabled by default. (For more complete coverage of SSH features and its administration than I can cover here, see Barrat and Silverman [2001].)
Like Kerberos, SSH uses mutual authentication to verify that the participants in a communications channel are who they claim to be. Public key encryption is heavily used by SSH for user authentication and data transport. Unfortunately, we don't have space or time to delve heavily into encryption in general, or public key encryption (as used in SSH) in particular. I will simplify the details without losing too much information in the process. (Aside from the SSH-specific introduction in Barnett and Silverman [2001], you should also read The Code Book: The Science of Secrecy from Ancient Egypt to Quantum Cryptography [Singh 2000].)
One way to understand what public key encryption is, and how SSH uses it, is to examine the contents of the /etc/ssh directory. There you will see the following files containing the string “key” in their names:
ssh_host_dsa_key
ssh_host_dsa_key.pub
ssh_host_key
ssh_host_key.pub
ssh_host_rsa_key
ssh_host_rsa_key.pub
These are the keys that are used by the /usr/sbin/sshd process to identify the local host. They are generated when the system boots for the first time, and by default are created to be unique to the host on which they reside. The ssh_host and ssh_host.pub files are the private and public keys, respectively, that belong to the host “key pair” that is used by the SSH1 protocol. The other files belong to host key pairs that are used by the SSH2 protocol.
The two files that compose the key pair are generated by the /usr/bin/ssh-keygen command using a particular algorithm (either Rivest, Shamir, Adelman [RSA] or Digital Signature Algorithm [DSA]). The public key may be shared or published openly, but the private key should never be shared. The private key files are only accessible by root, whereas the public key files are readable by everyone.
The magic about public key systems is that data encrypted with the public key from a key pair may be decrypted with the private key. It is not practical to create the private key from the public key. The private key becomes the “proof of identity,” or the credential associated with a particular “agent” involved in the authentication process. Among other things, the agent may be a user, an application, or a host.
SSH uses a fairly complex protocol to authenticate an agent, establish an encrypted channel, and exchange data. The protocol ensures that both ends of the conversation are authenticated and that they can exchange the encryption keys necessary to pass data in both directions. This protocol, and the exact way that the public keys are used for authentication, are beyond the scope of this discussion.
In addition to generating keys with the RSA and DSA algorithms, the ssh-keygen program can output the “fingerprint” of a key, which is useful in comparing the contents of two key files:
# ssh-keygen -l  -f ssh_host_rsa_key.pub
1024 dc:b6:4d:e4:92:84:20:0e:a0:8f:f6:53:0f:0e:7d:35
ssh_host_rsa_key.pub
Key files may also be protected by a pass phrase, when they are generated, to keep them from being used if the file is stolen. The ssh-keygen command will allow a user with the proper pass phrase to change the pass phrase protecting the key file. An example of generating a 1,024-bit RSA key pair is
# ssh-keygen  -b 1024 -t rsa -f /tmp/foo
Generating public/private rsa key pair.
Enter passphrase (empty for no passphrase):
Enter same passphrase again:
Your identification has been saved in /tmp/foo.
Your public key has been saved in /tmp/foo.pub.
The key fingerprint is:
33:c0:68:00:fe:60:dc:12:db:70:99:0b:16:eb:6a:07 root@nec2
Notice from this example that it is possible to specify an empty pass phrase for the key file. It is more secure to specify a pass phrase (10 to 30 characters). However, to use the key files, you must specify the pass phrase. For this reason, host keys are created with no pass phrase.
Configuration files for SSH are located, along with other important information, in the /etc/ssh directory. The server portion of the software is /usr/sbin/sshd, and the local client programs ssh, ssh-add, ssh-keygen, ssh-keyscan, and ssh-agent are located in the /usr/bin directory.
Although it is not usually necessary to alter the server or client configurations radically from the default, there are some local preferences that might need to be enabled, as in this server configuration file example:
#X11Forwarding no
X11Forwarding yes
#X11DisplayOffset 10
#X11UseLocalhost yes
#PrintMotd yes
#PrintLastLog yes
#KeepAlive yes
#UseLogin no
#UsePrivilegeSeparation yes
#Compression yes
#MaxStartups 10
# no default banner path
#Banner /some/path
#VerifyReverseMapping no
# override default of no subsystems
Subsystem       sftp    /usr/libexec/openssh/sftp-server
In this configuration example, the server allows X Windows forwarding, and the sftp subsystem is enabled for use by clients.
The client SSH configuration is kept in /etc/ssh/ssh_config, and the server configuration is located in the /etc/ssh/sshd_config file. Both files are populated with comments that represent the default values for the full set of the software's configuration options:
# Host *
#   ForwardAgent no
#   ForwardX11 no
#   RhostsAuthentication no
#   RhostsRSAAuthentication no
#   RSAAuthentication yes
#   PasswordAuthentication yes
#   BatchMode no
#   CheckHostIP yes
#   StrictHostKeyChecking ask
#   IdentityFile ~/.ssh/identity
#   IdentityFile ~/.ssh/id_rsa
#   IdentityFile ~/.ssh/id_dsa
#   Port 22
#   Protocol 2,1
#   Cipher 3des
#   Ciphers aes128-cbc,3des-cbc,blowfish-cbc,cast128-
       cbc,arcfour,aes192-cbc,aes256-cbc
#   EscapeChar ~
        ForwardX11 yes
This example, from the client configuration file, /etc/ssh/ssh_config, shows X Windows forwarding enabled for the associated client. Note the default values for the port, user identity files (key pairs), and protocols. The ${HOME}/.ssh/identity file is used by SSH1 only.
Each user needs to have an RSA and DSA key pair to use for authentication purposes. These files are created in the ${HOME}/.ssh directory, which also contains other user-specific SSH configuration information. The following command creates the RSA keys:
# ssh-keygen -b 1024 -t rsa -f id_rsa
Generating public/private rsa key pair.
Enter passphrase (empty for no passphrase):
Enter same passphrase again:
Your identification has been saved in id_rsa.
Your public key has been saved in id_rsa.pub.
The key fingerprint is:
c1:a3:3e:07:e5:80:83:31:38:36:af:ff:09:c6:82:31 root@ns2
Next we create the DSA keys:
# ssh-keygen -b 1024 -t dsa -f id_dsa
Generating public/private dsa key pair.
Enter passphrase (empty for no passphrase):
Enter same passphrase again:
Your identification has been saved in id_dsa.
Your public key has been saved in id_dsa.pub.
The key fingerprint is:
b4:07:05:51:96:23:59:a2:92:fa:06:1c:c0:a2:99:d9 root@nec2
The number of bits in the key is specified in these examples for illustration purposes only. The default number of bits—1,024—is the recommended length for the keys.
In environments where the user's home directory is shared, and potentially open to access by other users, the SSH identity files in the ${HOME}/.ssh directory should be protected by a pass phrase to prevent unauthorized use if they are copied. Typing the pass phrase every time the key is required, however, can lead to strong objections from users. If too much effort is required with regard to supplying pass phrases, the users will simply stop using them, thus compromising security.
To solve this issue, SSH provides a “helper” program, ssh-agent, that allows the user to specify the identity key's pass phrase once, when the key is loaded into the agent with ssh-add. The agent is started as the parent of all processes in the user's session, and it creates well-known environment variables (SSH_AUTH_SOCK and SSH_AGENT_PID) that specify information about how to contact the agent. All SSH-aware programs will use the communication path defined (temporary sockets in /tmp) to contact the agent. This is shown in Figure 11-4.
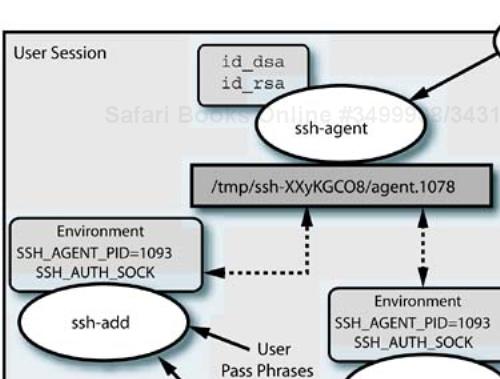
The agent may execute a subcommand, in which case the environment variables are exported to the child process, or it may be run with command-line options to generate csh or sh (Bourne shell) formatted definitions for the environment variables. (In this case, the command is run with the shell's eval command, which causes the output of the ssh-agent program to be interpreted as shell commands. For example, use 'eval ssh-agent -s' for Bourne shell environments.) In this mode, the agent will terminate when the subprocess exits. When ssh-add is executed, it will load the SSH1 identity and SSH2 id_dsa and id_rsa private key files by default. The X Windows display manager, xdm, is set up to run the ssh-agent program as part of a GNU Network Object Management Environment (GNOME) or K Desktop Environment (KDE) session, or if X Windows is started with startx.
If the identity key files are protected by pass phrases, the user is prompted for the pass phrase, with either a text or X Windows-based prompt. The private identity keys are never made directly available; instead, the agent performs operations requiring them and sends the results over the communication channel. This preserves the integrity of the private keys.
Once the identity keys are created, we may connect to any remote hosts that might be available with SSH servers:
# ssh ns1
The authenticity of host 'ns1 (192.168.0.151)' can't be established.
RSA key fingerprint is dc:b6:4d:e4:92:84:20:0e:a0:8f:f6:53:0f:0e:7d:35.
Are you sure you want to continue connecting (yes/no)? yes
Warning: Permanently added 'ns1,192.168.0.151' (RSA) to the list of known hosts.
Last login: Fri Mar  5 09:28:27 2004 from ns2.cluster.local
#
The process of logging in to the remote system via SSH has created a new file in our ${HOME}/.ssh directory: the known_hosts file. Every unique host that we visit causes an entry to be placed in this file.
The known_hosts file contains information for the hosts that we have visited with the SSH client. These entries are very long and aren't shown here, but you should examine the file, just to see what they look like. Each entry contains the host name, the IP address, the type of key (ssh_rsa), and the RSA public key value itself.
The full set of hosts that are known to a given system is contained in all the user's known_hosts files, and in a global /etc/ssh/known_hosts file that is used system wide. Populating the global file with commonly accessed hosts will eliminate the need for the user files to maintain separate information, and will help eliminate messages like we saw when first connecting in the previous example.
In an environment like a cluster, with a fixed number of systems and a regular network configuration, an identical /etc/ssh/known_hosts file, containing the RSA public host keys from every system, might be installed on every system. However, to avoid invalidating user and system known_hosts key values, the host key sets themselves must be preserved across new system installations. (This can happen when spare nodes are swapped into the cluster as a result of a hardware failure. Also, to “reimage” a node with some of the installation tools may involve the tool running the key generation sequence as part of a standard postinstall script. This, of course, will result in different host keys for the system.) Collecting the host keys from the cluster's hosts and replacing them in /etc/ssh after a system is reinstalled can avoid messages warning of altered host keys as a possible result of man-in-the-middle attacks.
The error messages that are output when a host key does not match the expected value are intended as a security feature. This behavior is controlled by the configuration option StrictHostKeyChecking, which may be set to values of yes to output error messages and fail the connection on a mismatch, no to ignore mismatches and automatically update the database, or ask to prompt the user for the appropriate action. The ask setting is the default, but the correct setting for your cluster depends on your security requirements.
Now that we have some idea of the role that keys play in the SSH authentication scheme, we can take advantage of another useful feature that allows users to log in to an account on another machine without reauthenticating. This ability is useful for system administrators using the root account on machines in the cluster, or for parallel tools (like PDSH, discussed in the next section) that use SSH as a transport to execute commands on multiple systems.
This feature involves the use of the ${HOME}/.ssh/authorized_keys2 file, which may contain the RSA public identity keys for multiple users. (Although the documentation does not mention it, the authorized_keys2 file appears to be available for use only with the SSH2 protocol version, whereas the authorized_keys file was the original name used by SSH1.) The SSH server on the remote system will allow connections to the local account by users whose identity key matches an entry in the account's authorized_keys2 file. A user whose identity is already authenticated with a particular key will not have to reauthenticate to access the remote system.
Setting up this access for the root account (or others) involves the following steps:
Generating the identity keys for the user account on each system
Adding the public RSA identity key for each system's user account into the an
authorized_keys2fileDistributing the
authorized_keys2file containing all user keys to the${HOME}/.sshdirectory on each systemAuthenticating as the user in question and connecting to the remote systems
A simple example, involving the root accounts on two systems, follows:
login: root
password:
[root@ns1 root]# cd .ssh
[root@ns1 .ssh]# ssh-keygen -t dsa id_dsa

[ ... output deleted ...]

[root@ns1 .ssh]# ssh-keygen -t rsa -f id_rsa

[ ... output deleted ...]

[root@ns1 .ssh] scp id_rsa.pub root@ns2:/root/.ssh/rsapub_ns1
root@ns2's password:
rsapub_ns1 100% |**************************|   219       00:00
[root@ns1 .ssh] ssh ns1
root@ns2's password:
[root@ns2 root] cd .ssh
[root@ns2 .ssh]# ssh-keygen -t dsa id_dsa

[ ... output deleted ...]

[root@ns2 .ssh]# ssh-keygen -t rsa -f id_rsa

[ ... output deleted ...]

[root@ns2 .ssh]# cat id_rsa.pub rsapub_ns1 > authorized_keys2
[root@ns2 .ssh]# chmod g-rwx,o-rwx authorized_keys2
[root@ns2 .ssh]# exit
[root@ns1 .ssh]# scp root@ns2:/root/.ssh/authorized_keys2 .
authorized_keys2 100% |**************************|   438 00:00
[root@ns1 .ssh]# chmod g-rwx,o-rwx authorized_keys2
In this example we use the SSH secure copy (scp) command to move files back and forth via SSH. Notice that once the remote authorized_keys2 file was created, it was no longer necessary to authenticate ourselves as root to the remote system.
By logging in to an account that has SSH identity keys available, a user has authenticated himself to the local system and gained access to the SSH credentials (keys) for that account, contained in the ${HOME}/.ssh directory. With the user's RSA public identity key installed in the remote system's authorized_keys2 file, the user's identity is proved to the remote SSH server when the local private key successfully decrypts the challenges produced by the remote SSH server using the user's public key. If the process works properly, then no reauthentication is required.
Although the ability to save authentication operations and the associated password entry can save an immense amount of work and make automation of administration tasks easier, there are risks involved. If the root account is compromised on one system, then the “keys to the kingdom” are readily available. You should carefully evaluate the security risks associated with using this feature.
There are a number of SSH server configuration options, in /etc/ssh/sshd_config, that allow you to allow access selectively to the system that runs the server. You can control the hosts, users, and groups (primary groups only) that are allowed to connect to the server from remote clients. Example configurations for the /etc/ssh/sshd_config file on an administrative node are provided as follows:
AllowHosts       *@cluster.local
DenyHosts        *@10.0.2.* *@10.0.3.*
AllowUsers       root
AllowGroups      *
DenyGroupsusers
If any line denies access to a host, user, or group, then that line takes precedence over an Allow* configuration line. So even though the AllowGroups configuration line specifies a wildcard that matches all groups, the DenyGroups specification disables any user whose primary group is users. (It is unfortunate that the checking is limited to primary groups [the group specified in the /etc/passwd file], which limits the use of the group as an access control entity.) Another example is the AllowHosts configuration, which enables access for any system within the cluster.local domain, followed by the DenyHosts specification, which limits the host access to only a single network (the management network).
The SSH server allows the lists of strings to contain up to 256 members for the Allow* and Deny* lists. See the documentation for the SSH server for further information about configuring these options.
Finally, there are ways to execute customized commands and change SSH behavior in a user's session or globally. Those options include
A per-user SSH client configuration file in
${HOME}/.ssh/configA systemwide SSH client configuration file in
/etc/ssh/ssh_configA per-user SSH client-executed file,
${HOME}/.ssh/rc, which is executed just before the user's shell is startedA systemwide SSH client-executed file,
/etc/ssh/sshrc, which is executed just before the user's shell is started, but not if${HOME}/.ssh/rcexistsA per-user environment variable definition,
${HOME}/.ssh/environmentThe per-user
${HOME}/.shostsfile and/etc/ssh/hosts.equiv, which allow behavior similar to the BSDrhostsauthentication, but do not use therlogin/rshauthentication
With all this user-level behavioral modification for SSH, the system administrator needs an upper hand. If the /etc/nologin file exists, then only the root user is allowed access to the system. A cluster-wide nologin script can sometimes be a very useful thing. I discuss the implementation of such a thing, along with parallel command execution, in an upcoming section.
SSH transport does not define file transport behavior, but there are two useful utilities that use the transport to do secure file copy and file transport operations: scp and sftp respectively.
The scp and sftp commands both use a subsystem that is defined in the /etc/ssh/sshd_config file: sftp-server. The definition for this service is
Subsystem sftp /usr/libexec/openssh/sftp-server
Although sftp subsystem is a special case, it does use a general-purpose facility provided by the SSH server for creating subsystems, which allows the execution of a remote command. The command line
ssh -s <subsystem> ns1.cluster.local
executes the named subsystem on behalf of the user.
The scp command behaves in a fashion similar to the BSD rcp command, but uses the SSH transport to perform secure copies. The command will prompt the user for password information if it is required as part of the authentication process. The scp command, along with ssh and sftp, allows an option (-i) that specifies an alternate identification file (key) to be used for the operation.
We used scp in a previous example to move a public key file between systems. Please refer to this example for the command format. The sftp command operates in a manner similar to the familiar ftp utility. The major difference between these utilities lies in the ability to specify the remote user and system as part of the target file parameter, as in root@ns2:/tmp/myfile.
With the SSH transport successfully installed and operating, it is possible to forward a TCP/IP port on one system to another port, either locally or on another system. The uses for this tend to be complex, so I touch only briefly touch on the capability here. SSH port forwarding, or tunneling, tends to be more of an issue for master nodes that must connect the cluster to the outside world, servicing users that want potentially unsecure services, such as X-Windows, available outside the cluster.
The forwarding operations take place outside the applications that are doing the communicating, so the applications themselves do not need to be modified. The system administrator may design and produce an environment that uses secure SSH transport without the implicit knowledge of the applications using it. This makes SSH a better choice than some other mechanisms like Kerberos, which require applications to “participate” in the infrastructure by explicitly calling library routines (requiring recompilation).
First, for X-Windows forwarding, the option must be enabled on the server, and the Linux version disables it by default. In this case, the server will create a proxy connection to the user's local X Windows server. This is conditional on the DISPLAY variable being set in the local user's environment. Using this feature of SSH makes the communication between the X-Windows client on the remote host and the local X-Windows server secure, which is not normally the case. See Figure 11-5 for an example X-Windows forwarding configuration.
X-Windows forwarding is a special case of port forwarding, providing special support for the X-Windows system architecture and features like X authentication. The more general case of port forwarding with SSH allows you to create a secure connection from a local port to another port, either local or remote. It is also possible to create a secure connection from a remote port to a local port using another option.
The SSH command format for local port forwarding, when the client TCP port to be forwarded is on the local machine, is
ssh -L<Listen>:<host>:<port> <system>
Thus, if we wanted to connect the local port 2105 to the sendmail port (TCP port 25) on the local host, we could use
# ssh -L2501:localhost:25 localhost
Last login: Sun Mar  7 14:02:57 2004 from localhost
# netstat -an | grep 2501
tcp    0   0    127.0.0.1:2501   0.0.0.0:*            LISTEN
# ps -ef | grep L2501

root     16152 15946  0 14:02 pts/1    00:00:00 ssh
-L2501:localhost:25 localhost

# exit
Connection to localhost closed.
#
As the netstat output from the previous command example shows, the SSH client is listening on the specified local port and will forward traffic to the SSH daemon on the specified target port—in this case, on the local system.
The connection will persist until the SSH client is terminated, which you can do with the kill command or, as shown in the example, by exiting the interactive session. The SSH client provides a -f option that instructs it to fork into the background, but this is intended for executing a remote command that has no output. If we try to use the option without a command, we get the following error message:
# ssh -f -L2501:localhost:25 localhost
Cannot fork into background without a command to execute.
#
This is annoying. To get around this behavior, we have to specify a command to satisfy SSH, but we want the command to do nothing for the duration of the connection. This is an example:
# ssh -f -L2501:localhost:25 localhost sleep 100000
# ps -ef | grep 2501 | grep -v grep
root     16377     1  0 14:56 ?        00:00:00 ssh
       -f -L2501:localhost:25 localhost
# kill 16377
Killed by signal 15.
The nature of the interactive forwarding operation is such that we have to deal with “backgrounding” the SSH client in our sessions if we want to use forwarding as a user. If we attempt to log out of our session with active port forwarding, SSH will wait for the forwarded connections to terminate before exiting. The port forwarding configurations may be specified in the SSH configuration files if they are of a permanent, systemwide nature, so that they are reestablished and available for all users at system boot time.
SSH also allows forwarding ports “off system” to a remote target. This is still called local forwarding, because it is a local port that is forwarded for a local client. Any local program that connects to the “listen” port will have its traffic transparently and securely forwarded to the destination port on a remote system. As before, we need to deal with the backgrounding issue:
# ssh -f -L2501:localhost:25 ns1.cluster.local sleep 100000
# netstat -an | grep 2501
tcp      0       0   127.0.0.1:2501    0.0.0.0:* LISTEN
# ps -ef | grep 2501 | grep -v grep
root     16425     1  0 15:13 ?        00:00:00 ssh
      -f -R2501:localhost:25 ns1.cluster.local
#
It is also possible to forward a remote port to a port on the local system using the -R option instead of the -L option. This is called remote port forwarding, and it creates a connection between a listen port on the remote system and the specified port on the local system:
# ssh -f -R25:ns2.cluster.local:2501 ns1.cluster.loal
       sleep 100000
[root@ns2 root]# ssh ns1
Last login: Sun Mar  7 15:23:19 2004 from ns2.cluster.local
[root@ns1 root]# netstat -an | grep 25
tcp    0     0      127.0.0.1:25    0.0.0.0:* LISTEN
#
Configuration of SSH with regard to forwarding is quite complex, and I do not cover any more details here. See the man pages for ssh, sshd, ssh_config, and sshd_config for more details, including the creation of “gateway” systems.
The main point of the discussion about SSH is that it provides a secure transport that you can use for remote access, remote command execution, and generalized remote services. This functionality is available inside the cluster, but may also be provided for external connections to the cluster's master nodes. Any number of previously unsecure services may be provided in a secure manner, with only one open port on the master nodes: the SSH port, 22.
The transition from BSD remote access services is made easier by similar functionality in SSH that is disabled by default. Once users are used to working with SSH, there is no need for the potentially insecure access services. The SSH transport forms a secure backbone for implementing both user and system-level access, and configuration options allow the system administrator great latitude in controlling the availability and behavior of the environment.
For use in your cluster, SSH is probably the best choice for remote access, because of its integration into the Linux distributions. The “out-of-the-box” configuration with Red Hat and derivatives is quite usable. You can add to SSH's usefulness for system administration by
Populating
/etc/ssh/known_hostsfiles inside the clusterSetting the appropriate value for the server's
StrictHostKeyCheckingoption in your cluster's environmentCollecting and restoring system host keys when systems are reinstalled
Creating and distributing the
rootaccount's.ssh/authorized_usersfile
You will find that SSH is already assumed, or supported as an option, in a number of open-source system administration and monitoring tools that are available.
A cluster may comprise several to several thousand systems. Performing the same operation manually on each system in a cluster can take a lot of time, and even automation or scripting of remote tasks can also suffer scaling issues. Unless you have worked in a cluster environment before, this problem might not even occur to you.
Consider, as an example, an automated process of getting the date from 100 systems in a cluster with a shell script. The script performs a remote login, gets the date information, then logs out and proceeds to the next system. Each get operation takes approximately three seconds (one second for login, one second for the date command, and one second to log out). If you believe my numbers, it will take a total of 300 seconds (five minutes) to get the date information from 100 systems—if no errors occur.
By the time a cluster reaches 500 or more systems, it will take 25 minutes for even the simplest operations to complete, and much longer for commands that require more time. Obviously, there needs to be a cluster-specific solution for this kind of system administration operation. We have a parallel environment, what about a parallel command tool that can execute a single command on multiple systems at the same time?
The PDSH is just such a solution. I automatically include it in my cluster environments. If someone hasn't seen it before, they immediately take a liking to it once they see its capabilities.
The PDSH software was written by Jim Garlick at Lawrence Livermore National Laboratory, and the home page for PDSH software has a brief description of its capabilities (http://www.llnl.gov/linux/pdsh). You may download PDSH from a public FTP site (ftp://ftp.llnl.gov/pub/linux/pdsh). Because PDSH is a relatively simple application, let's take the time to install the source RPM file and take a brief look at compiling RPM packaged software for the Red Hat environment.
PDSH is available from the FTP site in three forms: a compressed “tar ball”[1] (pdsh-1.7-6.tgz), a binary RPM package (pdsh-1.7-6.i386.rpm), and a source RPM-package (pdsh-1.7-6.src.rpm). One of the big contributions Red Hat has made to the Linux world is the Red Hat package manager or RPM software. This allows installation of binary packages, but also can easily configure, compile, and install source packages.
To install the PDSH source package, pdsh-1.7-6.src.rpm, all we need to do is execute the following command:
# rpm -ivh pdsh-1.7-6.src.rpm
The i option to rpm indicates an install operation, the v option indicates verbose output, and the h option causes the command to output a progress bar composed of “hash” marks or “#” as it performs the installation.
Installing the PDSH source RPM package as outlined here will place the package contents under the directory /usr/src/redhat. The /usr/src directory also contains the Linux kernel source tree, if it is installed. A diagram of the directory structure is shown in Figure 11-6. The directory structure shown is for the Fedora distribution, which has a kernel with a “native POSIX threads library,” and thus the .ntpl suffix on the kernel source directory version.
The installation of the source RPM package places the pdsh.spec specification file under the /usr/src/redhat/SPECS directory and the pdsh-1.7-6.tgz file under the /usr/src/redhat/SOURCES directory. Up until a recent release, the source package building capability was part of the rpm command, but now it is located in a separate rpmbuild command. To extract the source files from the archive pdsh-1.7-6.tgz to /usr/src/redhat/BUILD, execute the rpmbuild command with the prep option:
# rpmbuild -v -bp /usr/src/redhat/SPECS/pdsh.spec
This will create the source files from the tar archive.
If you examine the pdsh.spec file, you will see that it contains information about how to configure, build, install, and manage the PDSH software package using the standard environment provided by the package manager. The file contains sections that define the actions taken in each step (in the %prep, %build, %install portions of the file) along with other information used by the package manager. To execute the prep and build steps (but not install), you can use
# rpmbuild -v -bc /usr/src/redhat/SPECS/pdsh.spec
Finally, you can do the whole process, prep, compile, and install in one rpmbuild command line:
# rpmbuild -v -bi /usr/src/redhat/SPECS/pdsh.spec
The fact that a binary package is available for PDSH removes the need for you to compile the source package yourself, unless you want to make changes to the software's configuration.
The source packages do not show up in the RPM package database for the system on which they are installed. If you were to install both the pdsh-1.7-6.i386.rpm file and the pdsh-1.7-6.src.rpm file, executing
# rpm -qa | grep pdsh
pdsh-1.7-6
produces output that shows the installed binary package is the only one visible in the RPM package database. The files installed by the binary package are
# rpm -q --filesbypkg pdsh
pdsh                      /usr/bin/dshbak
pdsh                      /usr/bin/pdcp
pdsh                      /usr/bin/pdsh
pdsh                      /usr/man/man1/dshbak.1.gz
pdsh                      /usr/man/man1/pdcp.1.gz
pdsh                      /usr/man/man1/pdsh.1.gz
pdsh                      /usr/share/doc/pdsh-1.7
pdsh                      /usr/share/doc/pdsh-1.7/ChangeLog
pdsh                      /usr/share/doc/pdsh-1.7/DISCLAIMER
pdsh                      /usr/share/doc/pdsh-1.7/README
pdsh                      /usr/share/doc/pdsh-1.7/README.KRB4
It is possible to get the rpmbuild command to build a binary version of the RPM package, build both source and binary RPMs, and build only the source RPM version of the package with the following commands:
# rpmbuild -bb /usr/src/redhat/SPECS/pdsh.spec
# rpmbuild -ba /usr/src/redhat/SPECS/pdsh.spec
# rpmbuild -bs /usr/src/redhat/SPECS/pdsh.spec
The source RPM, if created, is placed under /usr/src/redhat/SRPMS and the binary RPM is placed under /usr/src/redhat/RPMS/<arch>, where <arch> is, by default, the processor architecture of the machine doing the compiling.
To save effort, you can install the source RPM; perform the prep, build, and install steps; create the binary RPM packages; and remove all the BUILD, SOURCE, and SPEC files with a single command:
# rpmbuild --rebuild pdsh-1.7-6.src.rpm
The RPM facility makes it fairly easy, although not necessarily trivial, to get software packages installed that are not part of the standard Red Hat Linux distribution and are not compiled for the hardware architecture that you are using. Be aware, however, that not all packages are available in RPM format. Most packages have dependencies that must also be installed, and not all packages are as simple to handle or as readily configured as PDSH.
It turns out that we have to make some modifications to the “stock” PDSH package to get it to use SSH as the default remote shell. The default remote shell type is RSH, which means we have to enable the associated security risks. To use SSH, the necessary steps are
Don't worry. This will be easy, and it is a great introduction to working with source RPM files. Locate the section in the specification file that matches
%build
%if %chaos
./configure --prefix=/usr --with-readline --with-elan
%else
./configure --prefix=/usr --with-readline
       --with-machines=/usr/local/etc/machines
%endif
make
We want to change the line between %else and %endif to read
./configure --prefix=/usr --with-ssh=/usr/bin/ssh
       --with-machines=/usr/local/etc/machines
Note that this is a single line—make the change with your favorite editor and save the file. The change is essentially replacing the --with-readline with --with-ssh=/usr/bin/ssh. Next, we want to build the binary RPM file, using
# rpmbuild -bb /usr/src/redhat/SPECS/pdsh.spec
This will produce the new binary RPM file in /usr/src/redhat/RPMS/i386, with the original package's name.
Next, install the new binary RPM on the systems in your cluster that you wish to run PDSH. You might want to change the package name to differentiate it from the original pdsh-1.7-6.i386.rpm file. You can tell which remote shell is the built-in default, with
# pdsh -w foo -q | grep RCMD
RCMD_SSH
If the answer from this command comes back RCMD_BSD, then the changes did not “take” and PDSH is still using the BSD RSH remote shell mechanism, which is the original behavior. Make sure you installed the correct binary RPM file. I cover the options and use of PDSH in the next section. This example specifies a dummy system (foo) and tells PDSH to print current settings and exit without performing any actions.
The pdsh command will create multiple threads in its process, each of which will attempt to connect to a remote system specified in the command's options. The number of system connections at any one time is called fan out, and is specified by the -f option to the shell. It defaults to 32. Output from each system is prefixed with the system's host name:
# pdsh -w cs[01-02] date
cs02: Tue Mar  2 17:45:04 PST 2004
cs01: Tue Mar  2 17:44:42 PST 2004
This output can, in turn, be piped to the dshbak command, which will sort the output from the client systems into blocks of adjacent output, removing the system tag from the front:
# pdsh -w nec[01-02] date | dshbak
----------------
cs02
----------------
 Tue Mar  2 17:45:23 PST 2004
----------------
cs01
----------------
Tue Mar  2 17:45:01 PST 2004
PDSH supports the specification of a set of systems, using ranges for the numerical suffixes. We discussed host naming conventions in Chapter 10. Choosing a consistent host name scheme can make it easier to use commands like pdsh, which rely on consistency in the host name format. It is worth the initial design effort to save system administration effort on an on going basis. A diagram of PDSH is shown in Figure 11-7.
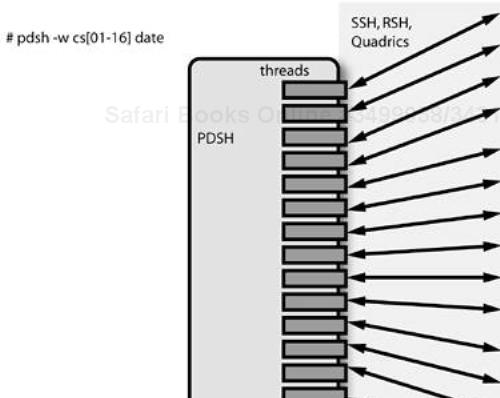
In the previous example, we specified a host range with the -w option—specifically, -w cs[01-02], which expands to the host names cs01 and cs02. Other range examples are -w cs[0-9] and -w cs[001-143,145,176]. It is also possible to specify more complex ranges, such as cs[01-05,09-20], and to exclude systems from the range with the -x option, as in -w cs[01-20] -x [06-09], which produces the equivalent to the range -w cs[01-05,10-20].
There are a number of ways to specify a default set of machines, so that you can issue the pdsh command with an associated remote command without specifying system name ranges with the -w option. The facilities are
Specifying the
-aoptions, and the list of systems in/usr/local/etc/machineswill be used; the-xoption may be used in conjunction with the list from themachinesfileSetting the environment variable
WCOLLto point to a file containing a list of systems; the-xoption may be used in conjunction with the list from the associated file
I usually set up shell command aliases that point to predefined files containing classes of cluster nodes: administrative nodes, compute slices, name servers, file servers, and so forth. In this way I can choose a base class of systems on which to execute a command, exclude any special cases with -x, and fire away. (The ability to make major mistakes in parallel is an exhilarating experience. This is a comment on my typing and error-checking ability, not on PDSH.)
PDSH can also run in interactive mode, prompting for a sequence of commands that are executed on the remote systems:
# pdsh -w cs[01-02]
pdsh> date
cs02: Tue Mar  2 19:27:01 PST 2004
cs01: Tue Mar  2 19:26:37 PST 2004
pdsh> cat /etc/issue
cs02: Red Hat Linux release 8.0 (Psyche)
cs02: Kernel
 on an m
cs02:
cs01: Fedora Core release 1 (Yarrow)
cs01: Kernel
 on an m
cs01:
pdsh>exit
This interactive mode proves useful for extended sessions on multiple systems.
PDSH is a very useful tool in any environment in which you want to execute identical commands on multiple systems at once. With a little adjustment to use SSH as the default shell (making note of the disclaimers in the PDSH documentation about SSH prompting for passwords and creating other output), PDSH can allow root to access any node in the cluster without explicit authentication. I think the extra work needed to use SSH is worth it.
The PDSH package includes the pdsh command, the dshbak output formatting tool, and a parallel version of the copy command, called pdcp, that uses the same mechanism as PDSH. If you are using a Quadrics QsNet interconnect with the Quadrics resource management software (RMS) package, PDSH will also interface to and use the QsNet interconnect, and will get system (resource) information from the RMS package. See the PDSH installation instructions and documentation for details on how to set up this feature.
DHCP can automatically assign IP addresses to hosts at boot time based on broadcast requests from the DHCP client on those systems. In addition to dynamically assigning IP addresses, which can drive system administrators and network monitoring applications crazy, DHCP can statically assign IP addresses and distribute networkwide configuration information to the clients it services. The service is based on UDP datagrams, using UDP port 68 by default.
When properly configured, DHCP is an essential single-point administration tool for a cluster environment. In addition to the benefits we have already mentioned, the DHCP server can handle the boot-time installation requests from client system's boot ROMs supporting pre-execution environment (PXE) and Internet Bootstrap Protocol (BOOTP) standardized requests. The DHCP server initially responds to a client's broadcast request for information, and manages initial boot information requests and the assigned IP address “lease” given to the client thereafter.
The Red Hat DHCP server-side implementation is the daemon /usr/sbin/dhcpd, and the client-side is implemented by /sbin/dhclient. The configuration files are /etc/dhcpd.conf and /etc/dhclient.conf respectively. The DHCP server, once a configuration file is created, may be enabled and started in the traditional manner:
# chkconfig dhcpd on
# service dhcpd start
Once started, you can check for error messages from the daemon in the /var/log/messages file.
DHCP client information is kept under /var/lib/dhcp, particularly the dhclient-<device>.leases file, which contains useful information about the client's current lease for a given Ethernet interface (in this case, the file is /var/lib/dhcp/dhclient-eth0.leases):
lease {
  interface "eth0";
  fixed-address 192.168.0.103;
  filename "pxelinux.0";
  option subnet-mask 255.255.255.0;
  option routers 192.168.0.1;
  option dhcp-lease-time 86400;
  option dhcp-message-type 5;
  option domain-name-servers 192.168.0.151,192.168.0.152;
  option dhcp-server-identifier 192.168.0.151;
  option nis-domain "local.cluster";
  option nis-servers 192.168.0.151,192.168.0.152;
  option ntp-servers 192.168.0.151,192.168.0.152;
  option broadcast-address 192.168.0.255;
  option host-name "cs01";
  option domain-name "cluster.local";
  renew 0 2004/3/7 17:13:47;
  rebind 1 2004/3/8 05:02:33;
  expire 1 2004/3/8 08:02:33; }
Although looking at a client's information assumes that there is a functional server to distribute it, we put the cart before the horse here to see just what kind of information DHCP can distribute to clients.
Notice the information contained in the listing of the client's lease file, along with the information about the lease times: IP address, host name, subnet mask, default gateway (router), NIS domain, NIS servers, NTP servers, and DNS servers. Additionally, a file is specified (pxelinux.0) that will be supplied to this system if it makes a PXE boot request to the DHCP server. I cover more about system installation using this feature in an upcoming chapter, but suffice it to say that this file will be loaded and executed by the local system in response to a PXE request.
To enable the use of DHCP on a given interface, the interface's network initialization file, /etc/sysconfig/network-scripts/ifcfg-eth0 in this case, eth0 needs to contain a BOOTPROTO=dhcp definition:
# Accton|SMC2-1211TX
DEVICE=eth0
BOOTPROTO=dhcp
HWADDR=00:10:B5:7C:70:42
ONBOOT=yes
TYPE=Ethernet
This tells the network start-up script that the DHCP client, dhclient, should be invoked as part of the network initialization.
The DHCP client will receive information from the DHCP server, and will automatically generate system configuration file information from it. The dhclient process executes the /sbin/dhclient-script file, which can generate configuration files like /etc/resolv.conf, /etc/yp.conf, and /etc/ntp.conf. In addition to generating system configuration files from the DHCP server's reply, the script can run the domainname and hostname commands, and install default network routes.
The DHCP client may need configuration information provided so that it can properly deal with multiple network interfaces. For example, a system may wish to have the DHCP information from one interface take precedence over information from other interfaces. Certain system parameters, like the host name, can only have one value. Controlling which parameters are accepted from the DHCP server by the DHCP client is allowed. If you are having issues resolving the DHCP information on a client system, see the man page for dhclient and dhclient.conf.
The dhclient-script itself is called from dhclient with an environment containing variables that may be used by the script in the configuration of the network services, including the reason the script was called, the interface name, and the IP address assigned to the client. The behavior of the dhclient-script may be extended by rewriting the script or creating the files /etc/dhclient-enter-hooks and /etc/dhclient-exit-hooks, which are executed before and after the DHCP configuration is performed respectively. See man dhclient-script for details. Figure 11-8 depicts the major components of the DHCP subsystem on the server and the client.
The Linux dhclient has some limited support for dynamic DNS updates, which are necessary to maintain host name-to-IP address mappings if you allow IP addresses to be dynamically assigned. In general, you should probably avoid using dynamic IP addresses in your cluster, but this is no reason to forego DHCP itself. See the man page for dhclient.conf for more information on configuring dynamic DNS.
Now that we have examined the client-side information distributed by DHCP (and even more is possible), we need to discuss configuring the DHCP server and making the information available to the clients. This is done in the next section.
Configuration of the DHCP server may be quite involved, but it doesn't have to be. A single server may listen to multiple subnets, clients may be gathered into groups that share configuration information, and global parameters may be specified for each subnet and group of clients. This minimizes the amount of typing necessary to get a functional configuration file.
Once the basic functionality is tested, the remaining systems in the cluster may be added to the appropriate portions of the configuration file. A skeleton example of the /etc/dhcpd.conf file is
authoritative;
ddns-update-style               none;
default-lease-time              2592000;
use-host-decl-names  =          true;
boot-unknown-clients =          true;


shared-network cluster {

       subnet 10.1.0.0 netmask 255.255.248.0 {

           option domain-name-servers  10.1.0.151,10.1.0.152;
           option domain-name          "cluster.local";
           option nis-domain           "local.cluster";
           option subnet-mask          255.255.248.0;
           option nis-servers          10.1.0.151,10.1.0.152;
           option ntp-servers          10.1.0.151,10.1.0.152;
           option routers              10.1.0.254;
           option broadcast-address    10.1.7.255;

           group physical-hosts {

             host ns1 {
                        option host-name "ns1";
                        hardware ethernet 00:06:25:04:FF:4C;
                        fixed-address 10.1.0.151;
             }
             host ns2 {
                        option host-name "ns2";
                        hardware ethernet 00:06:25:04:DE:4E;
                        fixed-address 10.1.0.152;
             }
           }

           group PXE-clients {

             allow booting;
             allow bootp;
             filename "pxelinux.0"; # Relative to /tftpboot!

             host cs01 {
                        option host-name "cs01";
                        hardware ethernet 00:20:78:11:3C:F1;
                        fixed-address 10.1.0.101;
             }
             host cs02 {
                        option host-name "cs02";
                        hardware ethernet 00:01:02:03:EB:9B;
                        fixed-address 10.1.0.102;
             }
           }

       }

       subnet 10.2.0.0 netmask 255.255.248.0 {
           option routers              10.2.0.254;
           option subnet-mask          255.255.248.0;
           option broadcast-address    10.2.7.255;

             host dn01 {
                        option host-name "dn01";
                        hardware ethernet 00:20:78:23:32:FF;
                        fixed-address 10.2.0.101;
             }
             host dn02 {
                        option host-name "dn02";
                        hardware ethernet 00:20:78:23:31:FC;
                        fixed-address 10.2.0.102;
             }

       }

       subnet 10.3.0.0 netmask 255.255.248.0 {
           option routers              10.3.0.254;
           option subnet-mask          255.255.248.0;
           option broadcast-address    10.3.7.255;
       }


}
This configuration file is a slight modification from the configuration file that I use in my home network. The global definitions for the entire DHCP server are outside this “block.” The authoritative definition in the global parameters allows the DHCP server to send negative acknowledgments (NAKs) to clients—something that your local IT department would frown upon if this server were on a corporate network. (Make sure that there is no “leakage” from your cluster's networks into the external networks. If there is, someone will eventually come knocking at your cubicle. You also want to make sure there is no leakage into your cluster for DHCP, especially from Microsoft DHCP servers, which have the nasty habit of answering all requests on the subnet, regardless of whether they “own” the client. If I had a nickel for every time this has happened …) The global parameters also allow booting unknown clients (without a MAC address entry in the configuration file) and force the use of the declared host names (use-host-decl-names).
There are three subnets, all sharing the same physical, switched Ethernet network. Hosts may belong to any of the networks by configuring their Ethernet interface or interfaces with a “primary” network, and then adding any necessary network aliases. The infrastructure services, like DNS, NIS, NTP, and boot installation, are all provided on the 10.1.0.0 management network. It turns out, by the way, that the current dhclient does not handle aliased network interfaces properly. I am still investigating this.
The enclosing shared-network definition is required to allow the DHCP server to deal with having only one physical interface, but being able to access three subnets (a “shared” interface). Inside the shared-network block are three subnet blocks, each with their own parameter definitions. The first subnet block has two client group definitions. The first group is a set of hosts that is not expected to be doing remote network-based installations—they are the infrastructure servers. The second group, PXE-clients, is configured to return the file /tftpboot/pxelinux.0 to the client's PXE boot requests.
The client definitions contain declarations of the host name, hardware (MAC) address, and IP address associated with each system. Because the initial DHCP requests are based on broadcasts, it is the client's MAC address that identifies the specific interface that is making the request. This means that all MAC addresses for all interfaces must be collected and entered into the configuration file before you can expect DHCP to assign IP addresses and host names properly in a “fixed” configuration like this.
Although the DHCP service is important to the cluster's operation, it is not critical as long as the address allocation scheme is not dynamic. Even if a server fails, clients will hang on to their previous lease information, and because this is static, failure to renew a lease will not result in bad configuration data. It may be desirable to distribute the DHCP service between two or more servers if a cluster gets large enough.
The DHCP servers may be put into “partner” mode to provide fail-over between a primary and a secondary server, but configuration of that functionality is beyond the scope of this discussion. See the man page for dhcpd.conf for more information on configuring fail-over between two DHCP servers.
DHCP can make our system administration life a lot easier by automatically specifying the “personality” for systems in the cluster. When we begin to discuss installation of compute slices, we will need a way to clone systems, yet ensure that the unique information that makes them separate network entities can be easily managed. DHCP will help with this task.
In any single-system environment, the use of activity and error logging is essential to managing the system effectively. The word managing, in this case, means both debugging problems and monitoring system activities for patterns that may need attention or corrective action. In a cluster environment, the amount of log information that gets generated is proportional to both the default log levels and the number of systems in the cluster.
Now, anyone who has managed more than two systems knows it is just not practical to go running back and forth between systems, manually comparing log files and error messages. If you agree that the model of a cluster operation involves creating a single, integrated system solution, then you must realize that a reasonable goal is managing all the log information from the cluster's individual systems in a cohesive, central manner. This discussion covers ways of using the software packages that are supplied “out of the box” with Linux distributions. “Add-on” tools from the open-source community for system management are discussed in a later chapter.
The Red Hat distributions and derivatives supply the standard Linux system logging daemon, syslogd, and two useful tools—logrotate and logwatch—to help with log file management. There are a number of other more specific tools, such as Web-server log analyzers, that are available from the open-source community. Integrating the syslog facility on multiple systems in a cluster, and using the standard log management tools, is the goal for the current discussion.
The architects of the BSD version of the UNIX operating system realized that there was a need for a standardized and central system facility that allowed the operating system, subsystems, applications, and users to generate and log informative messages. At the same time, they realized that any central system logging facility needed to be flexible enough to handle different message priorities and permanent log file destinations for the messages. The Linux system logging daemon, syslogd, is compatible with the behavior of the familiar UNIX subsystem.
One useful change made to the logging architecture under Linux is the addition of a separate daemon, klogd, to handle logging of messages generated by the kernel. These messages are a special case, because they require special processing to deal with converting numerical addresses from the kernel to symbolic output readable by humans. The combined logging daemons are collectively called the sysklogd system. Indeed, the manual page for syslogd and sysklogd are synonymous, whereas the newer klogd has a separate entry.
The output files from both of these daemons are essential in debugging software issues with the kernel and subsystems of Linux. The flexibility of the system is such that the level of information available may be adjusted up or down depending on the operating needs of the system manager. Under default operation, the klogd output is disabled. Let's examine the basic operation of the system and put it to use in our cluster.
The behavior of the syslogd daemon is controlled by its configuration file, /etc/syslog.conf. This file contains “rule” specifications with the general format <selector> <action>, with the two fields being separated by one or more whitespace characters. The <selector> field is further defined as two tokens separated by a “.” character: <subsystem>.<priority>.
Currently allowed literal values for the <subsystem> token are auth, authpriv, cron, daemon, kern, lpr, mail, mark, news, syslog, user, uucp, and the values local0 through local7. Possible literal values for the <priority> token are debug, info, notice, warning, err, crit, alert, and emerg. The subsystem tag specifies the subsystem that produced the message, and the priority specifies the importance level of the message.
The default behavior of the syslogd daemon is to log all messages for a given rule and associated priority or higher, and the others are ignored. In addition to simple rule format, multiple selector fields for a given action may be separated by a “;” character, and multiple facility values for a single priority are separated by a “,” character.
The <action> token may be either a file (full pathname, starting with a “/” character), a named pipe (a path to the fifo file, with “|” as the first character), a terminal device (such as /dev/console), a comma-separated list of users who will receive the message if they are logged in, every user that is logged in (specified with an “*” character), or a remote machine (“@” character followed by the name of the remote host with remote logging enabled). At this point, an example will serve us well. The default /etc/syslog.conf file included with the Fedora distribution contains the following definitions:
# Log all kernel messages to the console.
# Logging much else clutters up the screen.
#kern.*        /dev/console

# Log anything (except mail) of level info or higher.
# Don't log private authentication messages!
*.info;mail.none;authpriv.none;cron.none /var/log/messages

# The authpriv file has restricted access.
authpriv.*      /var/log/secure

# Log all the mail messages in one place.
mail.*         /var/log/maillog

# Log cron stuff
cron.*         /var/log/cron

# Everybody gets emergency messages
*.emerg        *
# Save news errors of level crit and higher in a special file.
uucp,news.crit      /var/log/spooler

# Save boot messages also to boot.log
local7.*       /var/log/boot.log
Several notes about the rules specified in this default configuration file will help clarify the use of selectors, priorities, and actions.
The logging of kernel messages to the console is disabled (contained in a comment line), but would normally go to the system console.
Everything at
infolevel or higher is logged to/var/log/messages, except formail,authpriv, andcronmessages, which are excluded by usingnonefor the priority level in the selector's priority value.The information from
authpriv,cron, andmailis separated into three separate log files via three separate rules that specify the log file target as the action.Any
emergmessages are sent to all users that are currently logged in to the system.Critical messages generated by the
uucpandnewssubsystems are directed to the/var/log/spoolerfile.Messages from the system boot process are directed to
/var/log/boot.logby the start-up scripts, which use theinitlogcommand and a default logging level oflocal7, as specified in the/etc/initlog.conffile.
The last note is interesting. The start-up scripts in /etc/init.d use a common definition of shell functions that is sourced from /etc/init.d/functions. This file defines success and failure functions that the init scripts can use to log start-up messages via the initlog command, which defaults to the local7 facility and a notice priority. This is a great example of Linux system architects using the syslog facility in a creative way enabled by its designers.
Although the initlog command is primarily intended for use by the system start-up scripts, there is another facility that we can use to our advantage: the /sbin/logger command. This command provides a -i option to add the PID to the log message, the -p option to specify a numerical or subsystem.level value, and a -t option to allow specifying a tag that is placed in the message. Let's see what an example command does:
# logger -i -p local0.info -t TAG-YOURE-IT 'Test message!'
# tail -1 /var/log/messages
Mar  8 21:29:20 ns2 TAG-YOURE-IT[19958]: Test message.
We can certainly use this facility in the custom scripts that we create if we ever need to generate a permanent record of the script's actions.
Now that we have a brief understanding of how the sysklogd system works, we can put it to use tracking the system activities in our cluster. Before continuing on to the configuration of remote logging with syslogd, we need to attend to one detail that we have neglected: the kernel logging daemon, klogd.
The kernel produces error messages in the /proc/kmsg file, which is an interface to the kernel message buffer. It is the job of the klogd process to detect and read any messages, properly format them by translating numerical addresses to symbolic values using the appropriate /boot/System.map-<version> file, and finally directing the output to either a file, the system console, or syslogd.
Kernel error messages, or recoverable failures called oops, are most likely to occur when new functionality is added to the kernel, either by patches or by software from sources other than the Linux current operating system distribution version. You might need to add new driver modules, enable an experimental kernel feature, or patch a portion of the kernel to meet user-specific needs. All of these activities disturb the status quo and add the potential for kernel error messages. In this situation, it is a good idea to be able to capture any messages and debug information generated by the kernel software failures. (This is especially true if you are working with an ISV or a software developer who will want feedback on their software.)
Configuring and enabling klogd will enable you to log the messages generated by the kernel and choose exactly how much information is generated, along with where it ends up, either on the local system console, in a log file, or both. If one of the targets is a serial console, and you have serial port switches, such as those made by Cyclades, that are capable of logging serial console output to central files via NFS, then it may not be necessary to direct the output to a log file on the local system as well. But then kernel crashes, panics, and oops behave in mysterious ways.
To enable klogd, you must modify the contents of the /etc/sysconfig/syslog file, which contains two variable definitions that set the daemon start-up options for the ksyslogd subsystem—one for syslogd and one for klogd:
# Options to syslogd
# -m 0 disables 'MARK' messages.
# -r enables logging from remote machines
# -x disables DNS lookups on messages received with -r
# See syslogd(8) for more details
SYSLOGD_OPTIONS="-m 0"
# Options to klogd
# -2 prints all kernel oops messages twice; once for klogd
# to decode, and once for processing with 'ksymoops'
# -x disables all klogd processing of oops messages entirely
# See klogd(8) for more details
KLOGD_OPTIONS="-x"
As you can see from the variable definition for KLOGD_OPTIONS, the processing of kernel oops messages is disabled by default. If you alter the definitions of the variables, you must execute
# service syslog restart
to get the new options passed to the daemon. This action will stop and restart both the syslogd process and the klogd process.
As mentioned previously, to enable sending logging information to a remote system, you may replace the “action” portion of the rule in /etc/syslog.conf with a token of the form @<system>—for example, @ns1 to send the messages associated with a particular rule to ns1. The remote logging feature uses UDP port 514 (see the definition in /etc/services).
But sending the messages out into the ether is only half of the required action. After all, this is a client–server software architecture. You must configure the remote syslogd to listen for and accept network messages. This is easy to do, by adding the -r option to the definition for the SYSLOGD_OPTIONS variable in the /etc/sysconfig/syslog file (as listed earlier). Once the changes are made, restart the syslogd daemon (and by default its klogd daemon brother) with
# service syslog restart
A diagram of the ksyslogd subsystem and its components is shown in Figure 11-9.
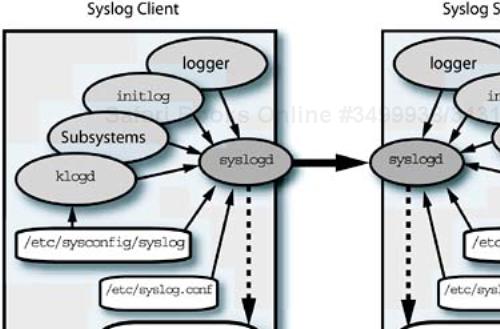
There are a number of design choices you must make with regard to providing remote logging services for the cluster's logging client systems.
What logging information is important to me?
How much disk space do I need on the logging servers?
Do I need to enable kernel messages?
How many remote logging servers are necessary?
How is the log data divided between the servers?
What is the mixture between remote and local message logging?
Once you have decided which messages to log remotely, you can craft the client's /etc/syslog.conf file to send the appropriate messages based on subsystem and priority. An example client configuration might be
# Log kernel messages to the remote server, 'klogd -c 4'
# will also display messages above this level to the console.
kern.err       @ns1.cluster.local
# Log anything (except mail) of level info or higher locally.
# Don't log private authentication messages!
*.info;mail.none;authpriv.none;cron.none /var/log/messages
# The authpriv file has restricted access.
authpriv.*      @ns2.cluster.loal
# Log all the mail messages in one place.
mail.*         /var/log/maillog
# Log cron stuff
cron.*         /var/log/cron
# Everybody gets emergency messages
*.emerg       @ns2.cluster.local
# Save news errors of level crit and higher in a special file.
uucp,news.crit      /var/log/spooler
# Save boot messages also to boot.log
local7.*       @ns1.cluster.local
This configuration file sends client kernel errors to ns1.cluster.local and local authorization messages (this would be a perfect place to apply an SSH tunnel to make sure that all information is encrypted in transit), and boot messages to the remote syslog server ns2.cluster.local. Configuring the KLOGD_OPTIONS variable in /etc/sysconfig/syslog with the option value -c 4 sends kernel error messages (and higher) to the console, where they may be logged by a serial port console switch. The logging priority “name” maps to the numerical values extracted from /usr/include/sys/syslog.h (lower values are higher priority):
#define LOG_EMERG    0           /* system is unusable */
#define LOG_ALERT    1           /* immediate action */
#define LOG_CRIT     2           /* critical conditions */
#define LOG_ERR      3           /* error conditions */
#define LOG_WARNING  4           /* warning conditions */
#define LOG_NOTICE   5           /* normal but significant */
#define LOG_INFO     6           /* informational */
#define LOG_DEBUG    7           /* debug-level messages *
As you can see from the example, it is relatively easy to set up remote logging on a large number of clients and collect gigabytes of log information on the logging servers. The design decision was made to separate the kernel messages from the other logging output by sending them to a separate remote syslog server. This may not be necessary on a production cluster that is running qualified applications on fully supported operating system releases.
Once you begin collecting log information from remote systems, the storage requirements on the logging servers will increase, often dramatically. (This is when having a separate /var partition for the Linux system can pay off. If, for some reason, there is a runaway client that is logging large amounts of messages, the associated log file will grow to fill the partition. With a separate /var partition, the full file system may not stop other essential system activities.) The amount of log information you need to keep will depend on the stability and security posture of the environment in which you work. A useful tool for managing log file revisions is /usr/sbin/logrotate, which automates the rotation, compression, and removal of log file information once it is collected.
The /etc/logrotate.conf file contains the configuration information for logrotate, and in the same manner as the xinetd facility, has an include statement for a directory that contains individual configuration files for separate log information.
# see "man logrotate" for details
# rotate log files weekly
weekly
# keep 4 weeks worth of backlogs
rotate 4
# create new (empty) log files after rotating old ones
create
# uncomment this if you want your log files compressed
#compress
# RPM packages drop log rotation information into this
# directory
include /etc/logrotate.d
# no packages own wtmp -- we'll rotate them here
/var/log/wtmp {
    monthly
    create 0664 root utmp
    rotate 1
}
# system-specific logs may be also be configured here.
The configuration information in /etc/logrotate.d is added by individual packages that require log management. This is the real location to examine for examples of log management configuration files. The configuration information for syslogd log files is contained in /etc/logrotate.d/syslog:
/var/log/messages /var/log/secure /var/log/maillog
/var/log/spooler /var/log/boot.log /var/log/cron
{
    sharedscripts
    postrotate
     /bin/kill -HUP `cat /var/run/syslogd.pid 2> /dev/null`
                   2> /dev/null || true
    endscript
}
The default configuration file for the named daemon, /etc/logrotate.d/named is
/var/log/named.log {
    missingok
    create 0644 named named
    postrotate
        /bin/kill -HUP `cat /var/run/named/named.pid 2>
                    /dev/null` 2> /dev/null || true
    endscript
}
These two configuration files illustrate some of the features of logrotate: the ability to execute scripts before and after the log is “rotated,” control over how the log file gets created, and the ability to handle multiple files (or wild cards) in a single configuration. Normally, the prerotate and postrotate command scripts are executed for each file specified or for those that match the wild card for the configuration. The sharedscript definition indicates that the two scripts, if present, should only be executed once for the entire set of files associated with the configuration.
In both these examples, the postrotate script executes a command that causes the daemon to close open files and restart. For modern daemons, this will cause open files, like the log, to be closed, the daemon configuration to be reread, and the log file to be recreated. Some older daemons may not behave in such a civilized manner, and so there are a number of configuration options that can help deal with custom situations. (In this case, the procedure might be to stop the daemon completely, rename the log file to the new name, then restart the daemon. It may be necessary to create the default log file for the daemon before restarting it.) See the man page for logrotate for more details.
In the default files, the rotation takes place on a weekly basis, as specified in the main configuration file, /etc/logrotate.conf, which governs the behavior of the tool once it is run by some external scheduler (see information on cron that follows). In a busy cluster, this can result in huge log files for logs associated with frequently performed activities, like DNS lookups or user authentication information. You may need to consider dropping back to a daily rotation.
The activities of logrotate are scheduled by the cron subsystem,[2] out of the /etc/cron.daily directory, which is specified along with hourly, weekly, and monthly directories in the /etc/crontab file. The /etc/cron.daily/logrotate file merely calls the logrotate command with its configuration file on the command line. The logrotate command keeps its state information (when files were last rotated) in the /var/lib/logrotate.status file, which contains entries similar to
logrotate state -- version 2
"/var/log/messages" 2004-3-7
"/var/log/secure" 2004-3-7
"/var/log/boot.log" 2004-3-7
"/var/log/cron" 2004-3-7
A diagram of the “logrotate” facility and associated components is shown in Figure 11-10.
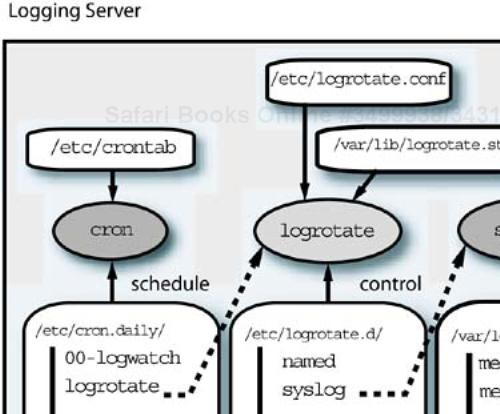
The /usr/sbin/logwatch tool allows general-purpose reporting generated by scanning log information. It is highly configurable and is able to scan the currently active log files, as well as the compressed archives. The configuration information for logwatch is located in the /etc/log.d directory, and the configuration file, /etc/log.d/logwatch.conf, is a link to the file in the /etc/log.d/conf directory. The default configuration information for the reporting is
LogDir = /var/log
MailTo = root
Print = No
#Save = /tmp/logwatch
Range = yesterday
Detail = Low
Service = All
The default configuration settings will search log files in the specified directory, generate and mail the report to root, will not print the report to stdout, will not save the report output, will search only the prior day's information, and will produce a low-resolution report for all defined services. The entire system is implemented in Perl, and may be extended to meet your specific needs.
The logwatch utility seems to work with varying degrees of success on different versions of the Red Hat and Fedora distributions. An example of using logwatch follows:
# logwatch --service sshd --range all --archives --print

 ################### LogWatch 4.3.2 (02/18/03) ###############
       Processing Initiated: Wed Mar 10 00:33:38 2004
       Date Range Processed: all
     Detail Level of Output: 0
          Logfiles for Host: ns1
##############################################################
--------------------- SSHD Begin ------------------------
SSHD Started: 1 Time(s)
Users logging in through sshd:
   root logged in from hpxw4100.lucke.home (192.168.0.111) using password: 1 Time(s)
**Unmatched Entries**
RSA1 key generation succeeded
RSA key generation succeeded
DSA key generation succeeded
---------------------- SSHD End -------------------------
###################### LogWatch End #########################
Several other open-source log-watching and analysis tools are available. One such tool is wots (http://www.vcpc.univie.ac.at/~tc/tools/) and another is swatch (http://swatch.sourceforge.net).
Without looking too hard, you might notice that configuration information is not provided for managing either the Kerberos kadmind or krb5kdc log files, and /var/log/kadmind.log and /var/log/krb5kdc.log respectively. This is an important point to remember: logrotate configuration files may not be specified for all subsystems that you enable as part of your cluster. Let's pick on our old friend Kerberos and craft a logging configuration for the two daemons as a final exercise.
First, we need to research the logging and control behavior of the associated Kerberos daemons. Second, we need to adjust the behavior of the system logging facility to meet our needs for this information. Third, we need to create the /etc/logrotate.d/krb5kdc and /etc/logrotate.d/kadmind configuration files with our favorite text editor (one of the 436 different editors available on Linux).
On investigation, we notice that the default logging behavior of the Kerberos daemons is specified in /etc/krb5.conf:
[logging]
 default = FILE:/var/log/krb5libs.log
 kdc = FILE:/var/log/krb5kdc.log
 admin_server = FILE:/var/log/kadmind.log
The fact that the syslog facility is not being used may or may not represent a security decision, because we don't see any warnings in the Kerberos documentation, let's decide to go ahead with the changes. The man page for krb5.conf shows that the subsystem does allow for configuration of SYSLOG as a target for logging instead of FILE.
Now we need to determine what syslogd subsystem and priority we want to use for logging, and whether we want to separate the information into one or more log files that are distinct from /var/log/messages. The man page for krb5.conf tells us that if we use syslogd and do not specify a subsystem and priority, the defaults are auth and err respectively. Let's make the choice to use the “Local0” subsystem, so that we can separate the Kerberos information into a separate file.
Before we completely commit the systems to these changes, we need to ensure that the Local0 service is not in use for something already (like the Local7 subsystem is used for Linux boot messages). Once we have verified the safety of using Local0, we may proceed. The information in the Kerberos configuration file is changed to
[logging]
 default = SYSLOG:INFO:LOCAL0
 kdc = SYSLOG:INFO:LOCAL0
 admin_server = SYSLOG:INFO:LOCAL0
The next step is to add the following information to the /etc/syslog.conf file on the KDCs:
# Kerberos specific logging to remote server
Local0.* @logserver.cluster.local
Don't forget to restart the syslog service on the KDCs to activate the changes:
# service syslog restart
This will now route the client's Local0 messages to the remote log server. On the logging server, we need to direct the Kerberos messages into a log file by adding a configuration rule to the /etc/syslog.conf file:
# Kerberos messages get their own local log file
Local0.* /var/log/Kerberos
Again, don't forget to restart the syslog service on the log server:
# service syslog restart
Now we need to set up the logrotate subsystem on the log server to handle the new file. Because we are adding a file to the syslogd suite, we can just modify the /etc/logrotate.d/syslog file to add the new log file to the standard processing:
/var/log/messages /var/log/secure /var/log/maillog
/var/log/spooler /var/log/boot.log /var/log/cron
/var/log/Kerberos {
    sharedscripts
    postrotate
        /bin/kill -HUP `cat /var/run/syslogd.pid 2>
                /dev/null` 2> /dev/null || true
    endscript
}
We can also test the path between the remote client and the logging server before we restart the Kerberos daemons:
# logger -i -t KERBEROS_TEST -p local0.err 'Message from KDC1'
If the message comes through on the remote log server, we can restart the Kerberos daemons to start using the new logging target:
# service krb5kdc restart
# service kadmin restart
This is a simple walk-through for adding remote logging streams into your cluster's central logging scheme. You should carefully design the additions to the logging facilities before committing the changes. Design twice and implement once.
Utilizing the default Linux logging tools involves specifying options to the individual subsystems that implement a specific logging strategy for your cluster. The facilities provided by syslogd and klogd allow either local or remote logging of messages from subsystems or custom scripts. In this way you can capture whatever informational messages you might require to manage or debug your cluster.
Once the log information is captured to log files, Linux provides the ability to manage the log files by compressing them and maintaining a predetermined number of on-line versions. The logrotate facility allows daily, weekly, or monthly rotation of individual log files, with or without compression, so you can adjust the management frequency to meet the specific needs of your cluster. Further archival actions are left as an exercise for the system administrator.
The amount of information accumulated in the log files is too much to analyze manually. The logwatch tool may be used to scan the information and summarize it. Customizing the scanning behavior allows you to pick and choose the messages to include in the summary information.
A logging strategy should include the configuration of the basic tools to implement the system administration policies for log information. The design information for your cluster should include information about the configuration of the standard log management subsystems and additional log management software.
This chapter has been an infrastructure marathon. We covered user and group permissions, remote access with SSH, parallel commands with PDSH, installing and building source RPM packages, Kerberos authentication, configuring DHCP, system logging strategies, and system log file management. This is a wide range of possible services and configuration examples, but we have still only scratched the surface of what Linux has to offer.
There are still as many infrastructure design possibilities as there are system architects to create them. This is one of the beauties of Linux—that there is always more than one way to solve a problem. The more familiar you are with the offerings, and the more you are able to expand your knowledge base, the more creative the solutions that are open to you.
The infrastructure services discussed in this chapter and the previous one are the basis for the higher level services that I cover in the chapters to come.
[1] A reference to the tape archiver (tar) and a sticky little blob of files. The .tgz suffix indicates a tar archive compressed with GNU zip.
[2] One note on the default cron configuration is needed. The default is to mail the output of cron jobs to the user specified in the MailTo clause in /etc/crontab. This, of course, depends on having sendmail activated to handle the mail, which will silently stack up waiting for delivery otherwise. This dependency on local mail operation, and by association the sendmail daemon, is a problem with a lot of UNIX and Linux subsystems.