
Final Cut Express offers many, many ways to manipulate your raw media—a wild world of complex effects. Someday soon (we all hope), computer processing will speed up enough to dispense with the need to render in Final Cut Express. We enjoy more real time and less rendering in each successive version of Final Cut Express, but the program is not completely renderless yet. Until it is, you’ll need to render some clips with effects before you can play back your final result.
This chapter outlines the workings of RT Extreme, FCE’s software-only effects previewing feature. Real-time systems use the power of your Mac’s CPU to process added effects on the fly, allowing you to play them back without rendering them first. For editors (and their clients) who work extensively with effects, these systems can dramatically improve efficiency and creativity.
Rendering is the process of combining your raw clip media with filters, transitions, and other adjustments to produce a new file. This new file, called the render file, can be played back in real time.
This is a chapter with more protocol than most. Understanding rendering protocols can be a big factor in making your post-production work efficient while producing high-quality results. This chapter lays out the rules governing video and audio render files along with some strategies for minimizing render time.
Real-time effects take advantage of the G4/5’s graphics handling power to compute and display previews of many effects in real time. RT Extreme (RTE), Final Cut Express’s software-based effects previewing feature, doesn’t require any additional hardware.
RTE effects are computed on the fly and play back in the FCE program windows.
RTE’s real-time effects previewing may not require extra hardware, but a qualifying G4 and 512 MB of RAM are the minimum system requirements for any RTE functionality. Check the Technical Specifications page of Apple’s Final Cut Express web site at www.apple.com/finalcutpro/specs.html for a list detailing which real-time effects are supported on which G4/5 systems.
If your Mac supports real-time effects, FCE will identify your G4/5 model and display the RTE effects it supports in boldface type, both on the Browser’s Effects tab (Figure 18.1) and on the Effects menu (Figure 18.2).
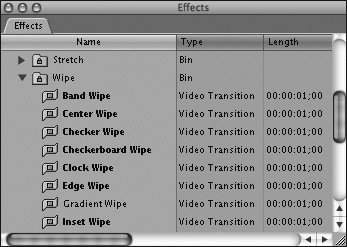
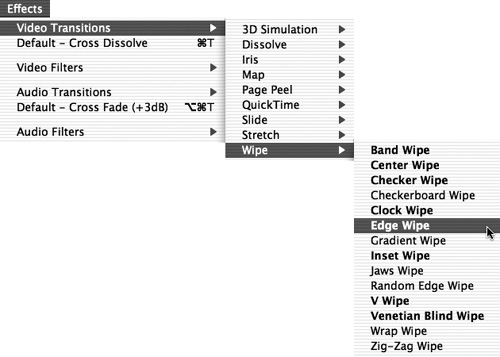
Figure 18.2. Real-time effects also appear in boldface in the Effects menu. (Select Unlimited RT from the Timeline’s RT pop-up menu, and you’ll enable additional real-time effects.)
The Timeline’s render status bars are color coded to let you know which sections of your sequence will play back in real time, and which sections still require rendering before you can play them. (See “Rendering indicators” later in this chapter.)
Like most cutting-edge technologies, RTE effects come with a list of caveats and trade-offs attached, so let’s get those out of the way up front.
RTE’s real-time magic works only on DV and HDV format footage.
RTE effects are computed on the fly and play back only in the Canvas and the Viewer and in full-screen Digital Cinema mode. You have to disable your DV FireWire to enable RTE’s real-time previewing, so you won’t be able to see anything on your external TV monitor while you’re enjoying your real-time previews. However, you can purchase and install an extra Radeon video display card in your G4 tower and then route the RTE previews to an external TV monitor via S-video. If you’re using a qualifying PowerBook G4, you can use the PowerBook’s S-video output to feed your external monitor.
Remember that RTE previews are optimized for real-time processing, not resolution. They work great for judging timing and composition, but for critical judgment of color and detail, be sure to render at least a few test frames and view them on your external NTSC or PAL monitor at final output resolution.
For the official word on FCE’s real-time capabilities, see Chapter 33 of Apple’s Final Cut Express Help PDF.
To enable real-time effects:
Do one of the following:
Choose View > Video Out > Canvas Playback (Figure 18.3).
Choose View > Video Out > Digital Cinema Desktop Preview - Main (Figure 18.4).
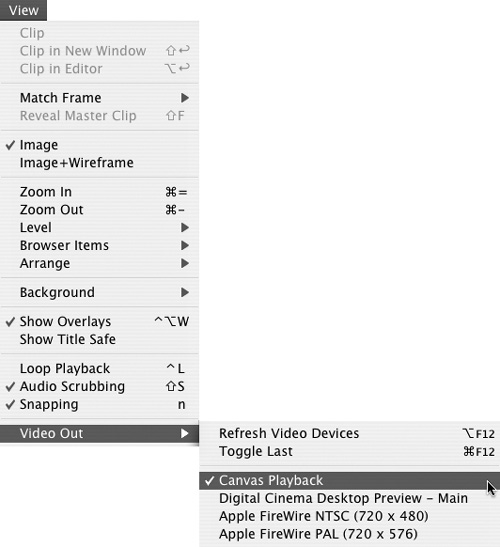
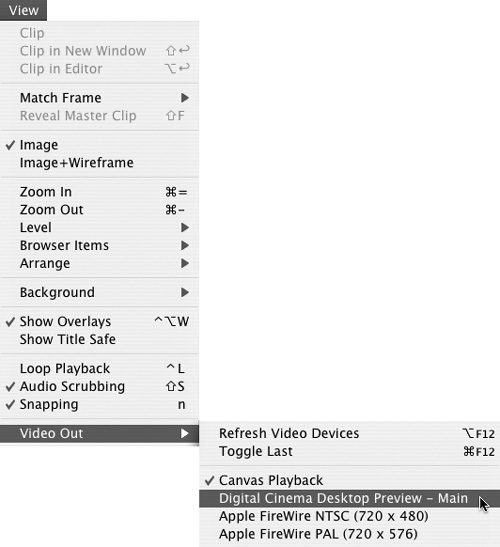
Your external video output is disabled and real-time previewing is enabled.
Final Cut Express’s real-time architecture offers flexibility far beyond the simple enabling or disabling of individual effects. Finding the right balance between image quality and system performance for each specific working situation involves some tweaking, but you have a couple of important tools to assist you.
You use the settings on the RT pop-up menu to adjust the balance between image quality and playback performance.
Real-time playback quality settings can be adjusted in either of two locations: the Timeline’s RT pop-up menu (Figure 18.5) and the Playback Control tab of the System Settings window. The RT pop-up menu is the more convenient route.
Figure 18.5. Mix and match settings in the Timeline’s RT pop-up menu to adjust the balance between playback quality and real-time performance.
For details on Playback Control tab settings, see Chapter 3, “Presets and Preferences.”
Use the settings on the Render Control tab of the Sequence Settings window to balance the image quality and rendering speed of rendered material in your current sequence. For more information, see “Changing the Settings of an Existing Sequence” in Chapter 4. For details on Render Control tab settings in your Sequence preset, see Chapter 3, “Presets and Preferences.”
FCE has made dramatic improvements in real-time effects performance, but when you finally run out of processing power, you must render.
This section outlines FCE’s playback and rendering quality settings and rendering protocols and explains how to navigate the Sequence menu’s vast forest of Render commands.
For more information, see Chapter 34 of Apple’s Final Cut Express Help PDF.
Here are some general guidelines to help you understand Final Cut Express’s rendering protocols.
What needs to be rendered
In general, you must render any transitions, effects, and composited layers that exceed the real-time capacity of your FCE system.
Also, before your sequence can be exported or printed to video, you have to render any source media with frame rate, frame size, or video or audio compression settings that differ from those settings in your sequence.
Audio tracks with transitions or filters, as well as multiple audio tracks over your real-time playback limit, have to be rendered before playback.
Clips whose speed has been changed must also be rendered before playback.
What doesn’t need to be rendered
Final Cut Express sequences that include real-time-supported transitions, effects, and composited layers can be played back in real time without rendering, as long as the sequence size and frame rate match those of the original source material.
Multiple audio tracks can be played back in real time without rendering. (See Table 18.1, “Final Cut Express Audio Track Costs,” later in this chapter for more information.)
Table 18.1. Final Cut Express Audio Track Costs
ITEM | TYPE | TRACK COST |
|---|---|---|
Each mono track | Track | 1 |
Each mono track with transitions applied | Transition | 2 |
Pair of stereo tracks | Track | 2 |
Sub-sequence containing track | Track | 4 (one stereo) |
Each track referencing a sub-sequence | Track | Number of audio tracks in sub-sequence |
Compressor/limiter | Filter | 6 |
Expander/gate | Filter | 6 |
Vocal de-esser | Filter | 6 |
Vocal de-popper | Filter | 6 |
Reverb/echo | Filter | 6 |
All other filters | Filter | 3 |
Rendering order
Video frames in sequences are rendered in the following order:
Effects applied within individual tracks are processed first. Speed changes, filters, motion, motion blur, opacity, and transitions are processed next, in that order.
After processing of all the individual tracks is complete, the processed tracks are composited, starting with the top layer of video (the highest-numbered track), which is composited onto the track below it.
It is possible to change the order of rendering by using nested sequences. For more information, see “Working with Multiple Sequences” in Chapter 4.
As you build your sequence, you’ll encounter the following indicators:
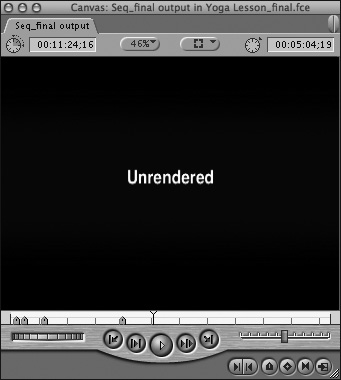
When you try to play video material that requires rendering in the Viewer or the Canvas, a blue background with the word “Unrendered” appears (Figure 18.6), indicating that the video can’t play in real time.
When you try to play audio material that requires rendering in the Viewer or the Canvas, you’ll hear a steady beeping sound, indicating that the audio can’t play in real time.
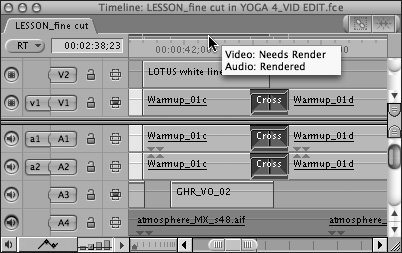
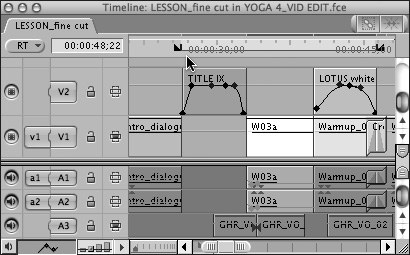
In the Timeline, the rendering indicator above the ruler (Figure 18.7) consists of two thin bars. These bars indicate which sections of the sequence currently require rendering to play back smoothly. The upper bar indicates the render status of video tracks; the lower bar shows the audio track status.
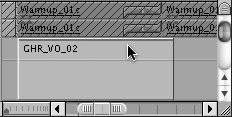
A sequence audio clip requiring sample-rate conversion displays a render status indicator overlay right on the clip in the Timeline (Figure 18.8).
Non-real-time FCE systems use the following status codes in the rendering indicators:
Red (Needs Render): The material needs to be rendered.
Gray: No rendering is required.
Blue-gray: The material has already been rendered.
Real-time effects previewing adds six (!) more color codes to the render status indicator:
Dark green (Full): The material can be played back and output at full quality in real time. No rendering is required.
Green (Preview): No rendering is required for real-time playback in the Canvas or the Viewer. For playback on an external device, green indicates a lower-quality output of scaling and motion effects.
Yellow (Proxy): Real-time playback is an approximation of the final effect. To get the true final effect, you still need to render the material. You’ll see the final effect when playback is stopped or during scrubbing.
Dark yellow: The material has been rendered at a quality lower than that currently specified on your sequence’s Render Control tab. FCE preserves these render files even if you modify the sequence’s render quality settings later.
Orange (Unlimited): Indicates effects enabled by selecting Unlimited RT in the Timeline’s RT pop-up menu. These effects exceed your computer’s “official” real-time playback capabilities and may drop frames during playback, but you can get a rough idea of how a complex effect is shaping up.
Final Cut Express’s rendering commands are all about choices. At the top level of the Sequence menu, you’ll find three Render commands:
Render Selection processes only the material you select in the Timeline.
Render All creates render files for the entire sequence.
Use Render Only to process a single type of unrendered material. Render Only can process either the portion of the sequence you select or the entire sequence if you don’t mark a selection.
Each Render command has a submenu that offers a second tier of choices.
In all three submenus, you can choose to render just video, just audio, or both.
Both the Render Selection and Render All submenus allow you to pick and choose which types of render-eligible sections you want to process in this rendering operation. Check any or all of the render types before you kick off a render (Figure 18.9). The render options stay checked until you change them, so once you’ve set up a render specification, you can render with a simple keyboard command.
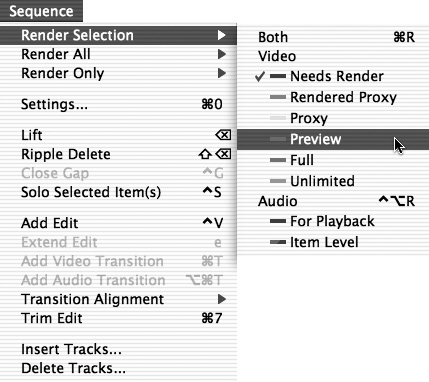
Figure 18.9. Choose Sequence > Render Selection (or Sequence > Render All) and then specify which render types you want to include in this rendering operation by selecting those items from the submenu. Making a selection toggles the checked status on or off; you’ll have to select multiple times if you want to include or exclude multiple render types.
Tip
HDV users take note: Powering off any FireWire devices that are connected to your computer while an HDV render is underway could trash your render in progress and cause FCE HD to freeze up or quit unexpectedly. Don’t touch that off switch until your render is safely completed.
To render a section of a sequence:
Do one of the following:
In the Timeline, select a portion of a clip or one or more clips or transitions.
In the Timeline or the Canvas, set the sequence In and Out points to mark the area that you want to render (Figure 18.10).
Choose Sequence > Render Selection and then select which types of render-eligible material you want to include in this rendering operation by selecting those items from the submenu. Selected types are checked; making a selection toggles the checked status on or off.
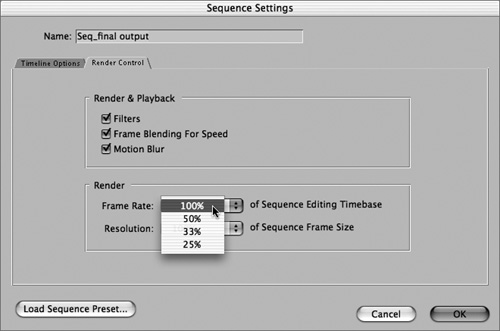
Press Command-0 (zero) to open the sequence’s Sequence Settings window. Verify (or adjust) the settings on the Render Control tab to specify the image quality of this render operation (Figure 18.11); then click OK.
Do one of the following:
Choose Sequence > Render Selection; or press Command-R to render both video and audio in the selected area.
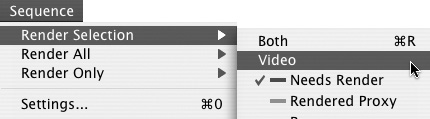
Choose Sequence > Render Selection > Video (Figure 18.12) to render just video in the selected area.
Choose Sequence > Render Selection > Audio; or press Control-Option-R to render just the audio in the selected area.
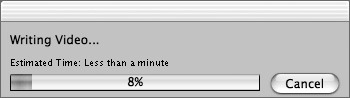
A progress bar displays the percentage of completed processing while the selected area is being rendered (Figure 18.13).
Click Cancel if you want to stop rendering. Final Cut Express saves all the rendered frames it has processed, even if you cancel rendering.
To render an entire sequence or multiple sequences:
Do one of the following:
Open the sequence you want to render in the Timeline.
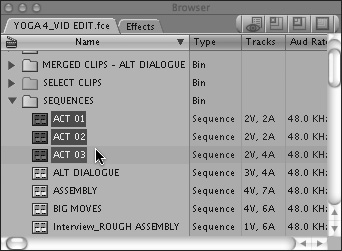
In the Browser, select the icon of the sequence you want to render (Figure 18.14). You can select multiple sequences in multiple projects.
Choose Sequence > Render All and then select which types of render-eligible material you want to include in this rendering operation by selecting those items from the submenu. Selected types are checked; making a selection toggles the checked status on or off.
Choose Sequence > Render All.
A progress bar displays the percentage of completed processing while the sequence is being rendered. Click Cancel if you want to stop rendering. Final Cut Express saves all the rendered frames it has processed, even if you cancel rendering.
To render a single type of render-eligible material:
Select a portion of the sequence, or to render the entire sequence, leave the entire sequence unselected.
Choose Sequence > Render Only and select a type of render-eligible material to render from the submenu. Video render options are listed at the top of the submenu; the three options at the bottom are audio only.
To disable rendering:
Although real-time video playback in Final Cut Express is usually limited to a single, cuts-only track, FCE can mix and play back up to eight tracks of audio in real time, so audio rendering is not always necessary.
The number of tracks you specify in the Real-Time Audio Mixing preference (located on the General tab of the User Preferences window) determines how many tracks Final Cut Express attempts to play back before it asks for audio rendering.
There’s an additional factor that determines whether you have maxed out your real-time audio playback capabilities: All audio tracks are not created equal. When you apply filters or transitions to an audio track, Final Cut Express must allocate processing power to calculate those effects on the fly in order to play back the result in real time—which brings us to track costs. (See the sidebar “FCE Protocol: Track Costs” and Table 18.1.)
Render files are valuable media elements, stored as actual media files on your hard disk like your original captured media files. Final Cut Express names render files according to its own internal naming protocols. You won’t be able to identify individual render files by their filenames, so planning your render file management strategy is a critical part of your post-production work. This will become clear the next time you invest considerable time in a single complex rendering process.
You can specify up to 12 disks for storing captured video, captured audio, or render files. As you create render files, Final Cut Express stores them on the disk with the most available space. If you don’t specify disk locations, Final Cut Express saves video and audio render files in separate folders (called Render Files and Audio Render Files), which are located, along with your Capture Scratch folder, in the Final Cut Express Documents folder (Figure 18.15). Render files are media files and should be stored on the same media drives as your captured media.

Figure 18.15. Render files are stored in the Final Cut Express Documents folder, along with your Capture Scratch folder.
Specify storage locations for your render files on the Scratch Disks tab in the System Settings window. For more information, see Chapter 3, “Presets and Preferences.”
When you are working on multiple projects, each with multiple sequences, render files can build up quickly.
Freeing up disk space by dumping old render files is an attractive proposition, but use caution if you are deleting render files for your current projects. Final Cut Express uses render file names that are useful to the program but unintelligible to you.
Final Cut Express will automatically delete any render file in your project that has been directly superceded by a replacement render file, but it doesn’t throw out leftover render files or render files in old versions of projects. To delete render files, you’ll have to sort through your project’s render folder, manually weeding out obsolete files and moving them to the Trash (Figure 18.16).
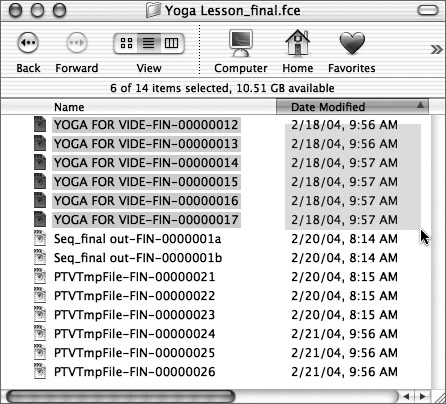
Figure 18.16. Select obsolete render files in a project’s Render folder and move them to the Trash. The Date sort function in the Finder can help you find older render files.
For more information, see “Deleting Media” in Chapter 4.
To take full advantage of the media manipulation techniques that are possible with Final Cut Express, you will need to render to produce your finished results; you’ll also need to render to review your sequence and evaluate any effects you’ve created. The rendering strategies in this section fall into three basic categories:
Tips for avoiding unnecessary rendering
Techniques for speeding up rendering times
Schemes for preserving render files
Final Cut Express allows you to add source material whose frame rate and compression settings do not match your sequence settings. However, if the frame rate, frame size, or video or audio compression settings in your source media are different from the settings in your sequence, those frames need to be rendered before the sequence can be exported or printed to video.
If a particular group of source clips looks normal when you open it from the Browser window (Figure 18.17) but requires rendering or changes size or shape when you add it to a sequence and view it in the Canvas window (Figure 18.18), you probably have a settings mismatch between your source clips and your sequence settings.
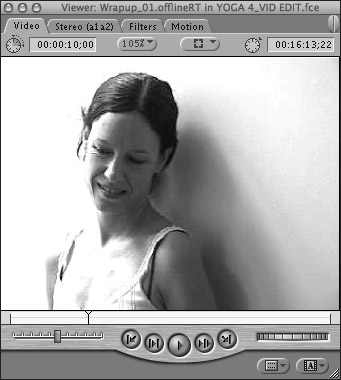
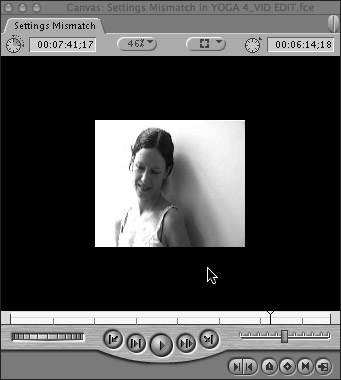
Figure 18.18. The same clip as it appears in the Canvas. The mismatched sequence settings override the clip settings, causing the clip to appear distorted and to play back poorly.
Important: To avoid rendering when creating a sequence with cuts only, make sure that the sequence’s editing timebase, frame size, and compression settings are the same as the frame rate, frame size, and compression settings of your source media.
How do you compare source clip and sequence settings? Open the clip’s Item Properties window and note the clip’s video rate, frame rate, frame size, and compression settings (Figure 18.19). Then open the Item Properties window for the sequence (Figure 18.20). Note the sequence’s video rate (called the Vid Rate), Frame Size, and Compressor settings; these should match the clip’s video rate (called the Vid Rate), Frame Size, and Compressor settings (Figure 18.21). For information on specifying sequence settings, see Chapter 3, “Presets and Preferences.”
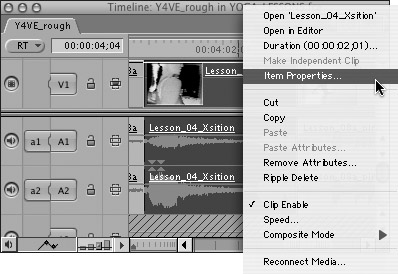
Figure 18.19. To view a clip’s format settings, Control-click the clip in the Browser or the Timeline and then choose Item Properties from the shortcut menu.
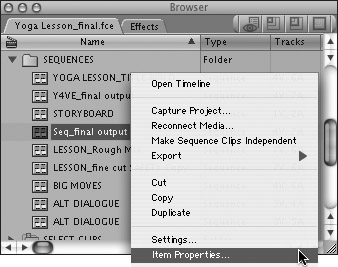
Figure 18.20. To view a sequence’s format settings, Control-click the sequence in the Browser and then choose Item Properties from the shortcut menu.
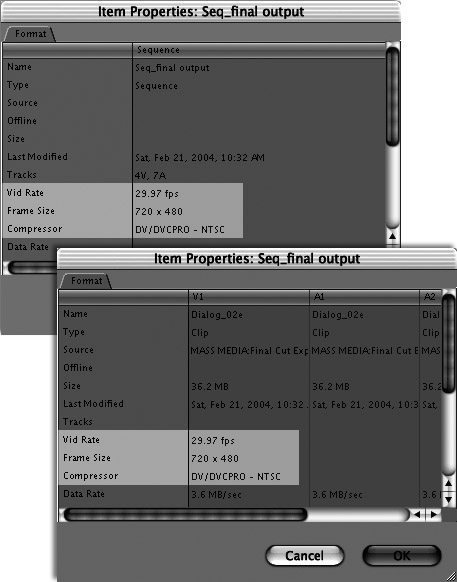
Figure 18.21. The clip’s Item Properties window compared with the sequence’s Item Properties window. Compare the Vid Rate, Frame Size, and Compressor settings in the two windows. Highlighted settings must match for the sequence to play in real time.
There are two ways to delay rendering your sequence until you have completed your desired adjustments: you can enable the Play Base Layer Only option in the RT pop-up menu, or you can press the Caps Lock key to temporarily disable rendering.
The Play Base Layer Only option allows playback with minimal rendering. With Play Base Layer Only enabled, Final Cut Express will play the lowest opaque track in the sequence and all audio tracks rather than displaying the “Unrendered” message in areas that still require rendering. Cuts will be substituted for unrendered transitions. Motion will not be applied to clips or sequences when played back in the Viewer.
Following are a few strategies that can help you minimize your rendering time. Using a lower-resolution draft quality saves disk space as well as time, because lower-resolution render files are smaller.
Using draft mode
Use a low-resolution render quality to perfect element positioning, motion paths, scaling, and other basic design decisions. After you are satisfied with the timing and movement of your effects sequence, start including your most calculation-intensive effects. Render short test sections first and then review them to evaluate your final image quality. If you are set up to use an external NTSC or PAL monitor, check your output on the monitor to see that your render quality is sufficient.
If you are building a highly complex effects sequence, you may want to render your elements in stages. For example, you might perfect just the motion paths and interactions of your composited layers and then render just that portion of your sequence in high quality by exporting and re-importing your rendered elements. The export process creates a new piece of source media, and you can continue to sculpt your sequence using the new composited clip as a fully rendered base track. Exporting to preserve a render file is described later in this chapter.
Batch rendering
Use the batch render feature to render all your projects while you’re busy elsewhere.
You may spend days creating a polished effects or title sequence in Final Cut Express and wait hours for your final product to render. How can you protect your time investment?
Following are a few strategies to help you hold onto your render files.
Salvaging renders with Undo
Final Cut Express allows multiple undos. If you just want to try a new idea on material you’ve already rendered, when you’re done, you can undo (Command-Z) your experiment until you have reverted to your previously rendered file. Careful use of the Undo function can give you freedom to experiment without risking rendered sequence material.
FCE protocol dictates that when you invalidate a render file by changing a sequence, the invalid render file becomes unrecoverable either when you next save the project or when you are past the point where you can use Undo to make the render file valid again, whichever is later.
Exporting to preserve render files
Exporting creates a physical copy of your rendered file on your hard disk. Exporting is the safest way to preserve rendered material. Once you have exported render files, you can re-import and use them just as you would raw captured media. For your render file to be exported without re-rendering, the export settings must match the render file’s settings.
Using nested sequences to preserve render files
You can select a group of sequence clips or a portion of a Final Cut Express sequence and, by cutting and pasting it into a separate sequence (which you then edit back into your master sequence), convert that selection into a self-contained sub-sequence. As a sub-sequence inside a parent sequence, nested sequences are treated the same as other clips in a sequence. But unlike clips, nested sequences are actually pointers, or references, to the original sequence, not copies.
A nested sequence can help preserve your render files, because even though it can be edited into another sequence in pieces just like a clip, the render files associated with the nested sequence are preserved within the nested sequence. Even if you make a change in the parent sequence that requires the nested sequence to be re-rendered, when you open the nested sequence, your original render files created within the nested sequence will still be available.
However, like everything else associated with rendering, you need to be aware of particular protocols governing the preservation of render files when a sequence is nested as a sub-sequence in another, parent sequence.
To learn how to create nested sequences, see Chapter 4, “Projects, Sequences, and Clips.”
Tips
Before rendering a sequence that you intend to nest in a parent sequence, make sure that the nested sequence has the same render settings (frame rate, frame size, and compression settings) as the parent sequence to avoid having to render the nested sequence again.
Final Cut Express cannot reliably track down all nested sub-sequence material that requires rendering when you perform a Render All process. If you have built multiple levels of nested, unrendered sub-sequences into your project, this tip’s for you: Try rendering at least one element in each nested sequence to help FCE track down the nested rendering required. Double-check your rendered sequences before you invite your client in for a screening.