Final Cut Express’s designers have carefully organized the tools you use to configure settings and preferences. The goal of this organization is to make it much easier for editors using the most common hardware and video formats to configure FCE—and much more difficult for users to unintentionally modify individual settings within a preset configuration.
This chapter explains Easy Setups—FCE’s streamlined configuration feature—and then walks you through your preference options in the User Preferences and System Settings windows.
FCE’s preset principle is balanced by a highly customizable interface. At the end of this chapter you’ll learn about options for reconfiguring Final Cut Express’s interface to complement your personal working preferences.
FCE preference settings are accessed from three menu choices: Easy Setup, User Preferences, and System Settings (Figure 3.1).
Figure 3.1. Access preference settings from three Final Cut Express menu choices: Easy Setup, User Preferences, and System Settings.
Easy Setup: Capture, device control, and sequence settings are all organized into preset configurations, and these Audio/Video presets are grouped into master presets called Easy Setups. For more information, see the next section, “Using Easy Setups.”
User Preferences and System Settings: Unlike your Easy Setup preset, which is largely dictated by your hardware and video formats, a preference is a setting that specifies how you want to work with your media in Final Cut Express. FCE preferences are divided between two windows: User Preferences and System Settings. The settings in these windows affect all your Final Cut Express projects.
An Easy Setup is a single preset configuration of multiple Final Cut Express settings: a Device Control preset, a Capture preset, a Sequence preset, and video and audio playback settings. The beauty of a preset is that you can configure all your settings correctly with a single selection.
You selected an Easy Setup as part of the initial setup process. Your selected Easy Setup becomes your default setup, so all projects and sequences use these settings until you change them.
Once you have an Easy Setup that works for your Final Cut Express system, you shouldn’t need to change it unless you change your video hardware or video format. If you do use your FCE system with a variety of different cameras or with footage shot in a different DV format, Easy Setups make it simple to switch configurations quickly and accurately.
In this section, you’ll learn how to choose the correct Easy Setup and how to switch to a different Easy Setup.
The Easy Setups window displays the currently selected presets for each setting—Sequence, Capture, and Device Control, plus Audio and Video Playback—that makes up your current Easy Setup, plus a brief description of when you should use the currently selected setup.
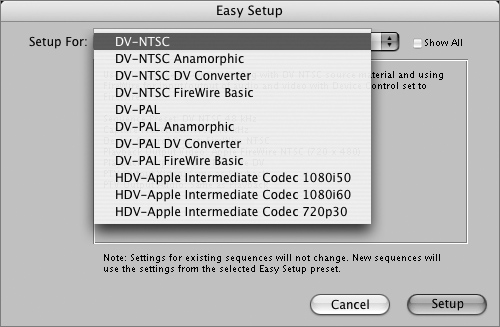
FCE’s default DV-NTSC (or DV-PAL) setup will be fine for most FCE users, but if you check Show All and then click the Easy Setups pop-up menu, you’ll see a long list of other setups to choose from (Figure 3.2).
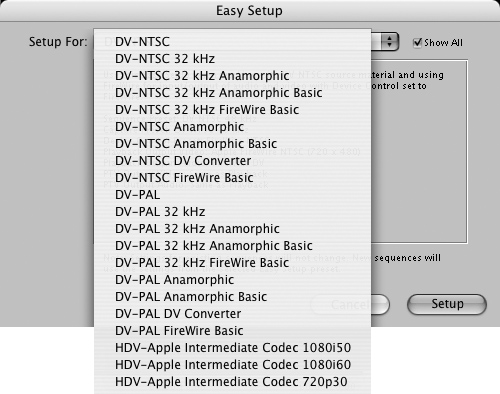
Figure 3.2. The Easy Setup window. Check Show All, and you’ll find a long list of Easy Setups to choose from. Choose the one that matches the format of the video you want to capture.
When should you switch to another Easy Setup? The basis for selecting a preset is always matching:
You want your Capture preset to match the recorded format of the DV tape you’re capturing. If the tape was recorded with 16-bit, 48-kHz audio, then the default DV-NTSC setup is fine. If you’re capturing DV with 12-bit, 32-kHz audio, you’ll need to switch to an Easy Setup with the same settings. If you’re capturing DV that was shot in anamorphic (wide-screen) format, switch to a setup set that includes anamorphic settings.
Your Sequence preset must match the format of your Capture preset. All Easy setups in FCE take care of this for you.
Your Device Control setting must match the requirements of the video hardware you’re controlling. Final Cut Express is pretty good at automatically selecting the correct device control setting, but if you’re having trouble controlling your video device from inside FCE, check the Final Cut Express Qualified Devices page at
www.apple.com/finalcutexpress/qualification.html. Your equipment may require a different device protocol or an additional helper script.Your Video Playback settings must match the video format (DV or PAL) of the device you’re outputting video to.
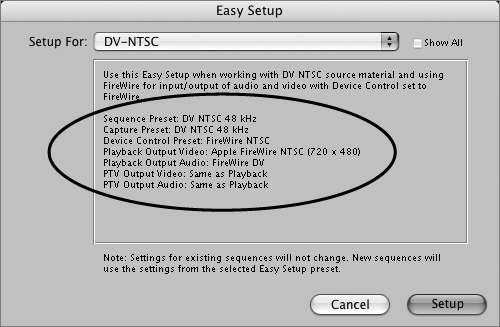
DV-NTSC, FCE’s default setup, is designed to complement the recommended settings on most DV decks and camcorders. (The default settings are the same for the two video standards that FCE supports: NTSC and PAL.)
Here are the settings for DV-NTSC:
Sequence preset: DV NTSC 48 kHz
Capture preset: DV NTSC 48 kHz Capture
Device control preset: FireWire NTSC
External video for playback and print to video: Apple FireWire NTSC (720 x 480)
When an Easy Setup offers an alternative to any of these default presets, the alternative is listed in the Easy Setup’s name. Figure 3.3 dissects one example.
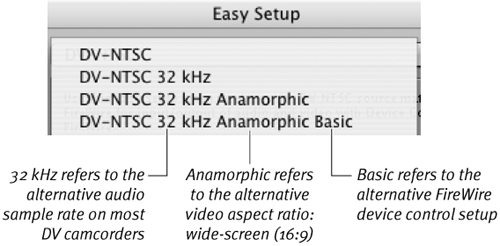
Figure 3.3. An Easy Setup’s name indicates which alternatives to the default preset are included. If a default preset is used, it’s omitted from the name.
Tip
Unfortunately, many consumer DV camcorders come from the factory set to record audio at the lower-quality 12-bit, 32-kHz setting. FCE assumes you’ll be savvy enough to switch your camera settings to 16-bit, 48 kHz—the recommended higher-quality audio setting. Check any source tapes you’re capturing and be aware that if your camera is set at 32 kHz, choosing the default Easy Setup will result in a settings mismatch.
To switch to a different Easy Setup:
Choose Final Cut Express > Easy Setup.
Do one of the following:
Check Show All to see the complete list of available Easy Setups.
Leave Show All unchecked to see a restricted list of Easy Setups.
From the Setup For pop-up menu, select an Easy Setup (Figure 3.4).
A summary of your selected Easy Setup appears below the pop-up menu (Figure 3.5).
Click Setup.
The new Easy Setup affects only new projects and sequences and doesn’t change settings for existing projects and sequences.
The settings in the User Preferences and System Settings windows affect all of your Final Cut Express projects. The User Preferences window contains four tabs: General, Editing, Timeline Options, and Render Control. The System Settings window offers another four tabs’ worth of preference settings: Scratch Disks, Memory & Cache, Playback Control, and External Editors. System Settings window preference options are covered in the second half of this section.
To set General preferences:
Choose Final Cut Express HD > User Preferences.
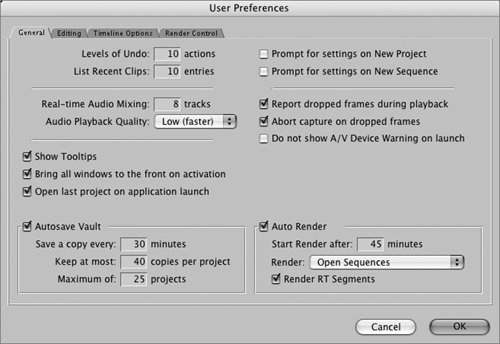
The General tab will appear as the front tab in the User Preferences window (Figure 3.6).
You can specify settings for the following:
Levels of Undo: Specify the number of actions that can be undone. Specifying a large number of undos can make significant demands on your available RAM, however.
List Recent Clips: Set the number of recently accessed clips available on the Viewer’s Recent Clips pop-up menu.
Real-Time Audio Mixing: Specify the number of audio tracks that Final Cut Express mixes in real time. The default setting is eight tracks. The maximum number of tracks you will be able to mix depends on multiple factors. Reduce the number of tracks if you experience audio playback problems, such as video stuttering or audio pops or dropouts.
Audio Playback Quality: Choose the quality of sample-rate conversion when you import audio files with sample rates that differ from your sequence’s rate. At the lowest playback quality, Final Cut Express can reserve more processing power for real-time mixing operations. If you choose the highest playback quality, your sample-rate-converted audio will sound better, but you won’t be able to stack up as many simultaneous audio tracks before FCE needs to mixdown (render) your audio. Higher quality settings will take more processing time, so the default is Low. In general, choose Low when editing. FCE automatically defaults to the highest audio quality during all rendering, audio mixdown, and printing to video, so you won’t need to switch the setting here when you’re ready to output your program.
Show ToolTips: Check this box to toggle the display of tooltip labels on buttons and tools.
Bring All Windows to the Front on Activation: Check this box to specify that whenever FCE is in the background, clicking any single FCE window to activate the application will bring all open FCE windows to the front of the Desktop.
Open Last Project on Application Launch: Check this box if you want FCE to automatically reopen your last saved project when you launch the application. Uncheck the box if you want FCE to create a new empty project on application launch.
Autosave Vault: Check this box if you want FCE to save backup copies of all your open projects automatically at regular intervals. Enter a number to specify a time interval in minutes. For more information, see “Using the Autosave Vault” in Chapter 4.
Save a Copy Every n Minutes: Enter a number of minutes to specify a time interval between backup operations.
Keep at Most n Copies per Project: Enter a value to specify how many autosaved backup copies of each project file you want Final Cut Express to store.
Maximum of n Projects: Enter a value to specify the maximum number of projects you want to back up in the Autosave Vault. If the number of open projects exceeds the number specified here, Final Cut Express will override the maximum you set and autosave all open projects.
Prompt for Settings on New Project: Check this box if you want the option to modify project properties each time you create a new project.
Prompt for Settings on New Sequence: Check this box if you want to see a list of sequence presets each time you create a new sequence.
Report Dropped Frames During Playback: Check this box if you want Final Cut Express to display a warning dialog box whenever frames are dropped during playback.
Abort Capture on Dropped Frames: Check this box to automatically stop the capture process if dropped frames are detected during a capture.
Do Not Show A/V Device Warning on Launch: Check this box if you want Final Cut Express to ignore any missing external video devices when you launch the application and disable the display of the External A/V warning dialog box.
Auto Render: Check the box to enable the triggering of automatic rendering when FCE is idle for a specified period.
Start Render After n Minutes: Enter a number of minutes to specify how long FCE should be idle before automatic rendering is triggered.
Which Sequences: Select Open Sequences to render all sequences currently open in the Timeline, select Current Only to render just the active sequence on the front tab of the Timeline, or select Open Except Current to render all open sequences except the active sequence on the front tab of the Timeline.
Render RT Segments: Check the box to include those sections of your sequence that use real-time effects in the auto-render operation.
Tip
Displaying video on the computer monitor while printing to video or editing to tape taxes the computer’s processing power and can cause performance problems. If you notice dropped frames in your output when performing these operations, check out the tips for optimizing performance in Chapter 2, “Installing and Setting Up,” before giving up and disabling Desktop video playback. You may want to increase the size of your thumbnail caches if you are working with a large number of clips and want to display thumbnails, or if you are using the Browser’s Icon view. If you often scrub through thumbnails in Icon view, you can optimize the performance of this feature by increasing the size of the thumbnail RAM cache on the Memory & Cache tab of the System Settings window.
Preference settings on this tab are all directly related to editing and trimming operations. Many of these preferences can be modified without opening the User Preferences window; for example, the Trim preferences can be toggled without leaving the Trim Edit window by using keyboard shortcut equivalents.
To set Editing preferences:
Choose Final Cut Express HD > User Preferences.
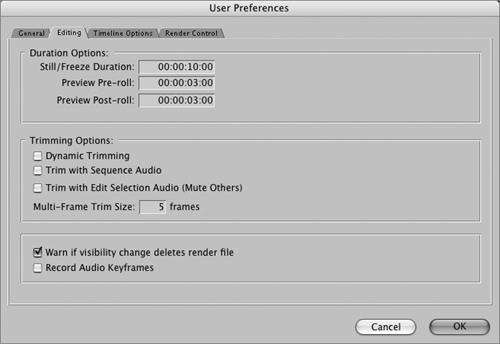
Click the Editing tab. On the tab (Figure 3.7), you can specify settings for the following:
Still/Freeze Duration: Enter a duration (in seconds) to specify a default duration between In and Out points for imported still images, generators, and Adobe Photoshop files. Feel free to change this setting to increase your efficiency—for example, when you’re producing a series of freeze-frames of a uniform length. The same Still/Freeze duration also applies to any freeze-frames you create from clips opened in the Canvas or Viewer.
Preview Pre-roll: Enter a number of seconds to specify how much media to play before the edit point when you click the Play Around Current button or the Play Around Edit-Loop button.
Preview Post-roll: Enter a number of seconds to specify how much media to play after the edit point when you click the Play Around Current button or the Play Around Edit-Loop button.
Dynamic Trimming: Check the box to enable Dynamic Trim mode in the Trim Edit window. You can also enable this mode in the Trim Edit window.
Trim with Sequence Audio: Check the box to monitor all audio tracks at the playhead position while trimming an edit in the Trim Edit window. Uncheck this option to limit audio monitoring in the Trim Edit window to the selected clip’s audio.
Trim with Edit Selection Audio (Mute Others): Check the box to monitor only the audio tracks included in the edit selected for trimming in the Trim Edit window.
Tip
The two Trim Edit preferences settings listed above apply only when you are using the JKL keys to play back or trim—they have no effect if you’re using the spacebar or Transport control buttons. See Chapter 11, “Fine Cut: Trimming Edits” for more information.
Multi-Frame Trim Size: Set the multi-frame trim size by specifying the number of frames (up to 99) in this field. The specified number appears in the multi-frame trim buttons in the Trim Edit window.
Warn if visibility change deletes render file: Check this box if you want Final Cut Express to display a warning dialog box whenever making tracks invisible would cause render files to be deleted.
Record Audio Keyframes: Check the box to enable the real-time recording of audio keyframes in the Viewer’s Audio tab as you use the sliders to make level or pan adjustments on the fly. See Chapter 12, “Audio Tools and Techniques” for more information.
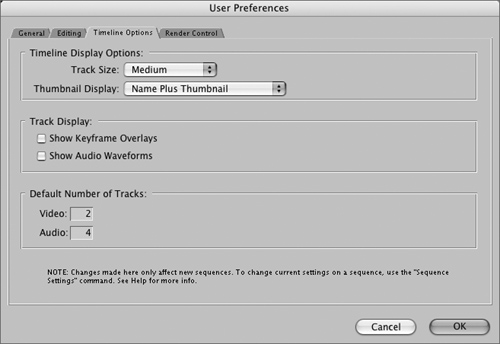
The Timeline display options you specify on the Timeline Options tab in the User Preferences window will become the default display settings for subsequent new projects and sequences. If you want to modify the Timeline display options for an existing sequence, you will need to make the change in the Sequence Settings window for that sequence. See “Changing the Settings of an Existing Sequence” in Chapter 4.
To customize your default Timeline display settings:
Choose Final Cut Express > User Preferences.
Click the Timeline Options tab. On the Timeline Options tab (Figure 3.8), you can modify the default settings for any of the following:
Track Size: Choose a setting to specify a default track size.
Thumbnail Display: Select one of three thumbnail display options:
Name: Choose Name to display just the name of the clip.
Name Plus Thumbnail: Choose this option to display the first frame of every clip as a thumbnail image, along with the name of the clip.
Filmstrip: Choose Filmstrip to display as many thumbnail images as possible for the current zoom level of the Timeline.
Track Display: Check the boxes next to the Timeline features you want to display by default in new sequences.
Show Keyframe Overlays: Display opacity keyframe overlays on video clips and audio level keyframe overlays on audio clips in the Timeline.
Show Audio Waveforms: Display audio waveforms on audio clips in the Timeline.
Default Number of Tracks: Specify the number of video and audio tracks to be included in a new sequence.
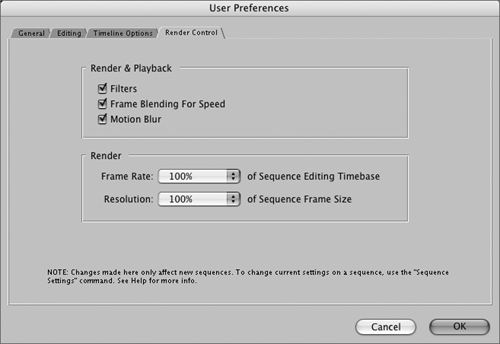
Render Control tab settings affect the image quality of rendered material in your sequence. You can selectively disable noncritical aspects of render processing that improve image quality but slow your work. Low-resolution/limited-frame-rate rendering is much faster than a high-resolution render process; your Render Control tab settings allow you to control the balance between the quality of the render file and the speed of the rendering process. These Render Control tab settings apply during all FCE operations, including real-time playback, rendering, video output, and QuickTime output, so be sure to specify full-quality rendering before your final output.
The settings you define in this window become the default render quality settings for subsequent new projects and sequences. If you want to modify Render Control settings for an existing sequence, you will need to make the change in the Sequence Settings window for that sequence. See “Changing the Settings of an Existing Sequence” in Chapter 4.
To customize your default Render Control settings:
Choose Final Cut Express > User Preferences.
Click the Render Control tab. On the tab (Figure 3.9), modify the default settings for any of the following; then click OK:
Render & Playback options:
Filters: Check this box to include filters when rendering. Filters will be applied only to clips you have specified. Excluding filters from a render quality setting is another way to speed up rendering.
Frame Blending for Speed: Check this box to enable any motion-smoothing effects you have previously applied to speed-modified clips.
Motion Blur: Check this box to include motion blur when rendering. Motion blur will be applied only to clips you have specified. Excluding motion blur from a render quality setting will speed up rendering.
Render options:
Frame Rate: Set the frame rate for the render quality to 25%, 33% 50%, or 100% of the sequence editing timebase.
Resolution: Select an option from this pop-up menu to set the resolution (frame size) for the render quality to 25%, 33% 50%, or 100% of the resolution set for the sequence.
A scratch disk is a folder on a hard disk where Final Cut Express stores your captured media source files and render files. The default scratch disk location is the same hard disk where your Final Cut Express application is installed. You can specify multiple scratch disk locations, either to improve performance by capturing audio and video on separate drives (not recommended for DV) or to provide the necessary storage capacity for your project media.
You should assign your scratch disks to your fastest disk drives. For best performance, avoid using the system hard disk as a scratch disk.
When a disk or folder is added to the scratch disk list, Final Cut Express automatically creates a folder on that disk called Final Cut Express Documents. That folder contains subfolders (one for each type of media file your project will generate) named Capture Scratch, Audio Capture Scratch, Render Files, Audio Render Files, Thumbnail Cache Files, and Waveform Cache Files (Figure 3.10). If you are capturing DV, your captured media files will be stored in a folder bearing your project’s name inside the Capture Scratch folder.
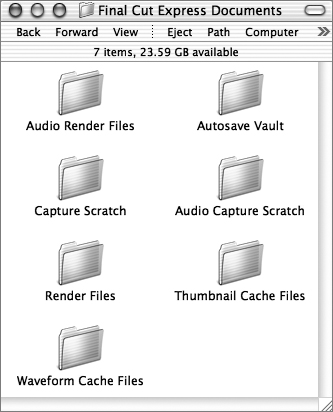
Figure 3.10. The Final Cut Express Documents folder contains a subfolder for each type of media file that your project will generate.
Tip
Final Cut Express requires that each hard disk have a distinct name that does not contain the entire name of another media drive. For example, the program will not reliably distinguish between two drives named Media and Media 1, but Media 1 and Media 2 are acceptable names. Bear this in mind when you are assigning names to hard drives you are using with Final Cut Express.
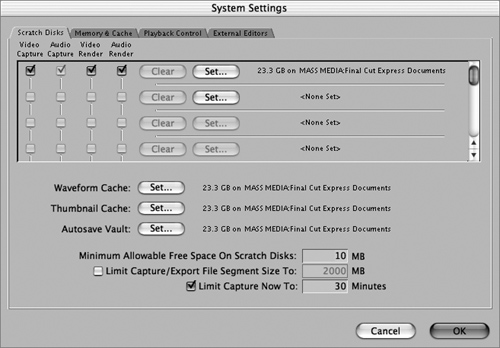
To specify Scratch Disk preferences:
Choose Final Cut Express > System Settings.
The Scratch Disks tab appears as the front tab of the System Settings window (Figure 3.11).
You can specify settings for the following:
Video Capture, Audio Capture, Video Render, and Audio Render: Check these boxes to specify the types of files to be stored on each disk. Specify more than one disk for increased storage space. When the current disk runs out of space, Final Cut Express automatically switches to the next specified disk for storing capture files or to the disk with the most space available for storing render files.
Clear: Click to remove a disk from the list of available disks.
Set: Click to choose a disk or a folder on a hard disk. You can specify up to 12 disks.
Waveform Cache: Click the Set button to specify a folder or disk to store waveform cache files (graphical representations of audio signals). The default location is the Final Cut Express Documents folder on your scratch disk.
Thumbnail Cache: Click the Set button to specify a folder or disk to store thumbnail cache files. The default location is the Final Cut Express Documents folder on your scratch disk. You specify the size of this cache on the Memory & Cache tab.
Autosave Vault: Click the Set button to specify a folder or disk to store FCE’s automatic backup copies of your project files. The default location is the Final Cut Express Documents folder on your scratch disk. For more information on the Autosave Vault, see Chapter 4, “Projects, Sequences, and Clips.”
Minimum Allowable Free Space on Scratch Disks: Enter a limit value. When disk space falls below this minimum, a disk will no longer be used as a scratch disk, and files will be stored on the next disk in the list.
Limit Capture/Export File Segment Size To: Enter a limit value. The default value is 2 GB. Final Cut Express allows the capture and export of single files larger than 2 GB, but if you plan to move your files to another system that has a file size limitation, or if you share media files over a network, you should enable this option. Files that are larger than your specified limit will be spanned (written as separate, but linked, files).
Limit Capture Now To: Enter a limit value. The default limit is 30 minutes.
Tip
FCE automatically calculates a safer, saner default value for Minimum Allowable Free Space (MAFS) on Scratch Disks. Previous versions of FCE used 10 MB as the default minimum—too low for comfort.
Each time FCE generates a new preference file, it checks the capacity of the first scratch disk selected in the Scratch Disks tab, and automatically sets a default value for MAFS that is based on a percentage of the disk’s capacity. FCE allows 5% if the scratch disk is a boot drive, and 1% for a non-boot hard drive. You can always set a higher MAFS. If you’re interested in preserving the performance and reliability of your captured source media, you should set a higher minimum. Many users set aside 10 percent of each drive’s capacity as “headroom”—and sleep better for it.
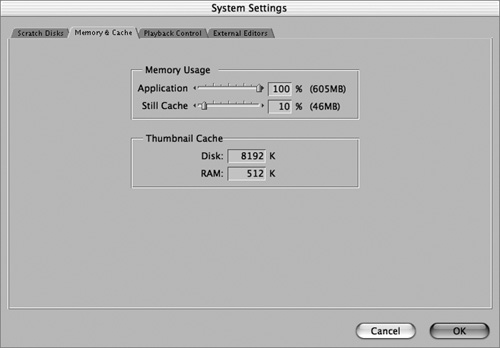
Settings on the Memory & Cache tab determine how much of your computer’s available RAM can be used by Final Cut Express, and how that assigned RAM will be apportioned.
Final Cut Express makes extensive use of your computer’s RAM to support real-time playback and preview. You don’t have to set hard memory allocations for applications running in OS X, but it is advisable to set an upper limit on the amount of RAM that FCE can use. If you like to keep multiple applications open while you edit, setting aside some RAM will minimize OS X’s use of virtual memory to accommodate the processor load, which helps maintain FCE’s performance.
Choose Final Cut Express > System Settings.
Click the Memory & Cache tab. On the tab (Figure 3.12), modify the default settings for any of the following; then click OK:
Memory Usage: Assign an upper limit to FCE’s RAM usage and allocate a percentage of that total for use by the still cache.
Application: Use the slider or enter a maximum percentage of total available RAM to make available to Final Cut Express. The total number of megabytes assigned to FCE appears to the right of the percentage slider.
Still Cache: Use the slider or enter a percentage value to allocate a portion of the RAM allotted to FCE for use by the still cache. The recommended minimum is 25 MB, but you should increase this value if your projects include large amounts of graphics. The total number of megabytes appears to the right of the percentage slider.
Thumbnail Cache: If you use Large Icon as your Browser view, or if you’re working on a large project containing many clips and want to display thumbnails in the Browser or Timeline, you should increase the amount of RAM available for displaying thumbnails to improve FCE’s performance and the image quality of your thumbnails.
Disk: Specify the amount of disk space to allocate for storing thumbnails.
RAM: Specify the amount of memory to allocate for storing thumbnails.
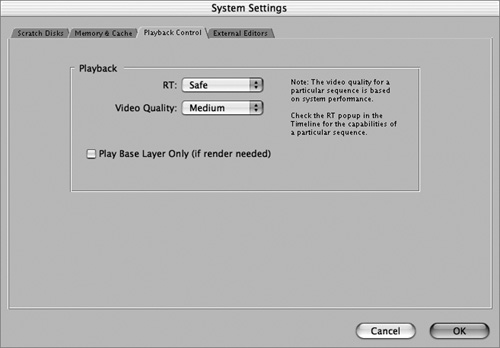
FCE lets you change the settings that determine the image quality of real-time playback. The options help you strike a balance between the number of effects you can see in real time versus the visual quality of the playback. An overview of these settings follows; for more information, see Chapter 18, “Real Time and Rendering.”
Tip
As you shift from basic assembly to multilayer effects and finishing work, your playback quality needs may change frequently. You can modify these Playback Control settings directly in the Timeline’s RT pop-up menu and save yourself a trip to the System Settings window.
To specify Playback Control settings:
Choose Final Cut Express > System Settings.
Click the Playback Control tab. On the Playback Control tab (Figure 3.13), modify the default settings for any of the following and then click OK:
RT: Choose a default image-quality level for the playback of real-time effects.
Safe: Final Cut Express limits real-time effects processing to a level that can be sustained without dropping frames during playback.
Unlimited: Final Cut Express allows real-time effects processing to exceed the level that your computer can handle without dropping frames during playback. Unlimited playback is useful when quick previewing is more important than image quality or playback integrity.
Video Quality: This option is available for DV and other codecs that support playback at multiple quality levels. Choose one of three image-quality levels:
High: Full-frame, full-resolution playback, which preserves video interlacing.
Medium: High-quality, quarter-frame-resolution playback of noninterlaced video.
Low: Low-quality, quarter-frame- resolution playback of noninterlaced video.
Play Base Layer Only (If Render Needed): Check this box to play only the base tracks (V1 and all audio tracks up to the real-time audio mixing track limit you set in General preferences) and cuts. Cuts will be substituted for unrendered or non-real-time transitions. Motion will not be applied to clips or sequences when played back in the Viewer. Play Base Layer Only is optimized to allow playback with minimal rendering. Unrendered sections will display the red render status indicator.
When you’re coaxing a stack of graphic elements you’ve created in a layered Photoshop file into a seamless match with your video elements, you can find yourself making many, many trips back and forth between FCE and Photoshop. The External Editors preferences are designed to speed the process of modifying a media file you’ve created in another application and then imported into FCE.
In this preferences window, you can specify which application will become the default editing application for each of three different media types: still image, video, and audio.
To specify External Editors preferences:
Choose Final Cut Express > System Settings.
Click the External Editors tab.
Using the Clear and Set buttons, specify an external editing application for the file types listed (Figure 3.14):
Clear: Click the Clear button next to a file type to reset the External Editor for that file type to the default application used by your Mac’s Finder.
Set: Click the Set button, navigate to the folder location of the editing application you want to specify, and then click Open.
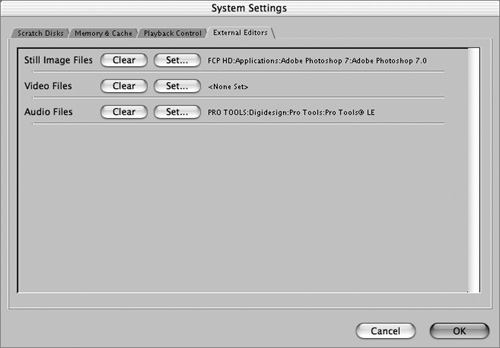
The pathname and the application name appear next to the file type on the External Editors tab.
Final Cut Express offers an array of customizable options:
You can create and save custom full-screen layouts.
You can turn any command used in Final Cut Express into a custom button, building custom button bars that can be saved and reloaded or transported to another FCE system.
You can create and save custom filters, transitions, and even motion effects as Favorites.
In this section, you’ll learn how to create custom screen layouts and button bars. Learn about working with Favorites in Chapter 14, “Compositing and Effects Overview.”
The power of the Final Cut Express interface lies in its flexibility. You perform a wide range of tasks in FCE: database management, editing, effects design, titling, and many others. Here are a couple of sample screen layouts that can help you make the most of your screen real estate. Final Cut Express saves every detail of your workspace status each time you quit the program, so the next time you relaunch Final Cut Express, each program window will contain the same project, sequence, clip, and frame—just as you left it.
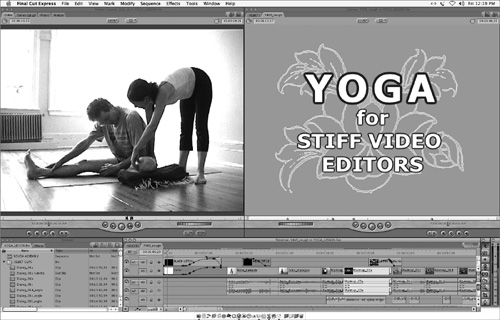
Figure 3.15 is an example of a screen layout with a wide view of the Timeline.
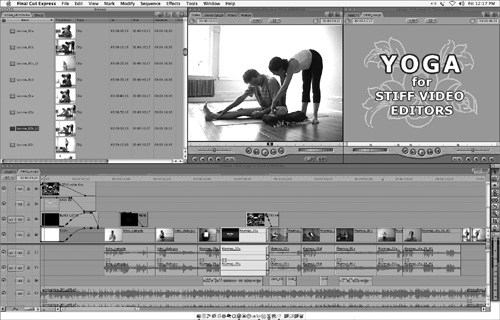
Figure 3.15. Use a screen layout with a wide Timeline to get the big picture of your sequence layout.
Figure 3.16 is an example of a video-editing layout with large picture-viewing monitors.
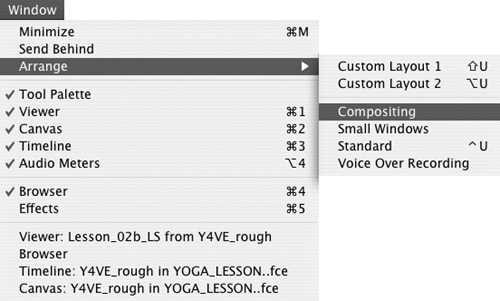
To select a preset screen layout:
Choose Window > Arrange (Figure 3.17). then select a screen layout from the four presets and two custom layouts available.
To customize a screen layout:
Arrange the four main windows in the layout and sizes you want.
Hold down the Option key and choose one of the two custom layouts from the Arrange submenu of the Window menu (Figure 3.18).

Figure 3.18. Holding down the Option key while selecting a custom layout from the Arrange submenu of the Window menu saves the current screen layout as a custom preset.
The next time you open Final Cut Express, you can choose the layout you created from the Arrange submenu of the Window menu.
Use FCE’s button bar (Figure 3.19) to personalize your workspace by adding custom shortcut buttons to the button bars located at the top of the Viewer, Canvas, Browser, Timeline, and Voice Over tool windows. There’s a button available for virtually every FCE command.
Figure 3.19. You can arrange shortcut buttons in the button bar found at the top of major program windows. You can group and color-code buttons and save and load custom button bar sets.
FCE lets you save multiple button bar toolsets, so you can easily switch to a button bar that complements your current editing task. You can:
Rearrange the button order.
Add spacers to organize your buttons into groups.
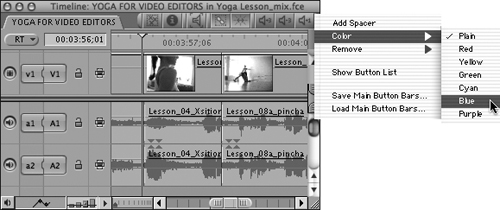
Change the color of a button.
Copy or move a button from one window to another.
Save custom button bars.
For all the details on managing custom buttons, see Chapter 5 of Apple’s Final Cut Express Help PDF.
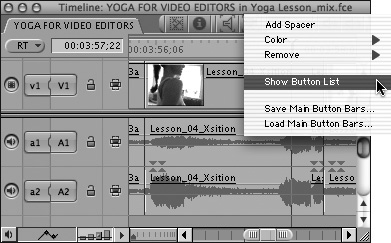
To create a custom shortcut button:
Control-click the button bar area at the top of the window; then choose Show Button List from the shortcut menu (Figure 3.20).
The Button List window appears, displaying a complete list of commands.
To find the command you want to make into a shortcut button, do one of the following:
Click the expansion triangle next to the name of the command’s group to reveal the command in the list.
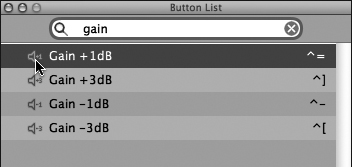
Enter the command’s name or a keyword in the Search field. Commands matching the search term are displayed automatically (Figure 3.21).
Click the Search field to view the command list alphabetically.
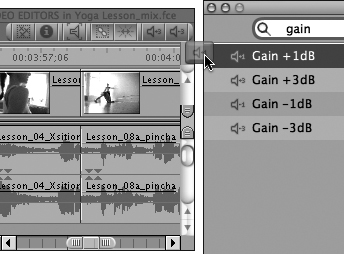
Drag the command from the list to the button bar location where you want the button to appear (Figure 3.22).
The button appears in the location you’ve selected (Figure 3.23).
Close the Button List window.
To delete a button:
Do one of the following:
Control-click the shortcut button and then choose Remove > Button from the shortcut menu.
Drag the button off the bar and release the mouse button.
The button disappears in a puff of animated smoke (Figure 3.24).