
This chapter walks you through the process of assembling the necessary hardware, hooking everything up, and installing Final Cut Express. Topics include Final Cut Express system requirements as well as hardware selection and configuration for both a basic setup and a more full-featured system.
The chapter ends with suggestions for optimizing performance, including recommendations for running Final Cut Express on a minimal “base-case” system and tips for troubleshooting Final Cut Express.
The perfect time to get the latest news on Final Cut Express and your hardware options is before you commit to a particular system. Apple’s official Final Cut Express web site has a Resources page, and there’s also a bustling community of resources for Final Cut Pro. FCP web sites, FCP user group meetings, and reputable vendors are my favorite sources. See Appendix A for a list of some useful sites.
Final Cut Express has the same basic system requirements as its big brother Final Cut Pro, but because fast CPUs and built-in FireWire ports have spread throughout the Macintosh product line, FCE wannabes can keep pace on just about any recent Mac. If you’re unsure whether your Power Mac makes the grade, go to the AppleSpec page at Apple’s web site and look up its complete specifications at http://www.info.apple.com/support/applespec.html.
Apple is continuously testing and qualifying third-party software and third-party external devices for compatibility with Final Cut Express. To review the latest list of Apple-approved video hardware and software, go to the Final Cut Express web site at http://www.apple.com/finalcutexpress/qualification.html.
Tip
If you want to make use of FCE’s real-time effects, you’ll need more RAM and a speedier CPU. See the sidebar “Real-Time System Requirements.”
Mac OS X 10.3.7 or later
QuickTime 6.5.2 or later
Minimum hardware requirements:
Power Mac G4 with a 500-MHz processor and an AGP graphics card
384 MB of RAM (though more is always welcome)
DVD drive (required for installation)
40-GB A/V (audio/video-rated) drive
True color (24-bit) display
FCE application disk space requirements:
1 GB for the FCE application installation
5 GB for Soundtrack media
9 GB for LiveType media
DV hardware requirements:
FireWire-equipped camcorder or DV deck for video capture
FireWire cable plus any additional cables you may need for connecting your camcorder or deck to an external TV monitor and speakers
You’ll need a few additional items to transform your Macintosh into a video production studio. This section describes two possible setups. The basic system is the bare minimum required; the recommended setup is, well, highly recommended for anyone with more than a passing interest in making movies.
A basic hardware configuration (Figure 2.1) includes a DV camcorder or deck, a computer, and a high-resolution computer monitor. The beauty of the basic system is its simplicity: a DV camcorder connected to your Macintosh with a FireWire cable—that’s all there is to it.

Here’s a rundown of the function of each piece of the system.
DV camcorder or deck: The DV camera or deck feeds digital video and audio into the computer via FireWire and records DV output from Final Cut Express. During video capture, you must monitor audio through your camera or deck’s audio outputs; computer speakers are muted.
Computer: Final Cut Express, installed on the Mac, captures and then stores digital video from the DV camera or deck on an A/V hard drive. Qualified Macs are equipped with FireWire; no additional video digitizing card is needed. You use your computer’s speakers to monitor your audio. You edit your DV footage with Final Cut Express and then send it back out to tape through FireWire to your DV camcorder or deck.
High-resolution computer monitor: You view the results of your work on the computer’s monitor.
A recommended setup (Figure 2.2) adds a dedicated hard drive to store your media and enhances your monitoring capabilities with the addition of an NTSC or PAL video monitor and external speakers.
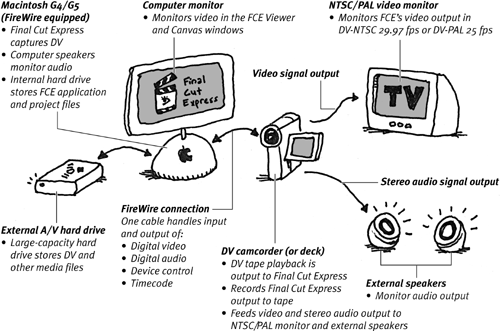
Dedicated hard drive: Adding a dedicated drive for your media improves the performance as well as the storage capacity of your system. For more information, see “Storage Strategy for Final Cut Express” later in this chapter.
NTSC monitor: Most DV camcorders feature a built-in LCD display that you can use as an external video monitor, but if you’re producing video to be viewed on television, you should preview your video output on an NTSC monitor as you edit. A real studio monitor is best, but even a consumer TV will give a much more accurate idea of how your program looks and sounds. Connect the NTSC or PAL monitor to your video deck or camcorder using the component, S-video, or composite output jacks.
External speakers: Monitoring audio output from your video camcorder or deck with external speakers provides higher-quality audio output.
Tip
If you plan to use an external NTSC or PAL monitor as you edit, connect your external speakers to monitor the audio output of your camcorder or deck, so that the audio from the external speakers will be synchronized with the video displayed on the video monitor. You need to do this because audio from your computer’s built-in audio outputs will be slightly out of sync with the NTSC or PAL monitor.
Connecting a DV camcorder or deck to your computer couldn’t be simpler. All you need is a single FireWire cable, which transmits device control data, timecode, video, and audio between the DV device and your Mac.
To connect a DV device to your computer with FireWire:
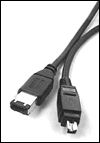
Start with a 6-pin to 4-pin FireWire cable (Figure 2.3). Plug the 6-pin connector into the 6-pin Apple FireWire port (Figure 2.4) and the 4-pin connector into your video device’s DV port. (FireWire ports on external devices are sometimes labeled IEEE 1394, DV IN/OUT, or iLink.) Both connectors snap into place when properly engaged.
Turn on the DV camcorder or deck.
Switch the DV device to VCR mode (sometimes labeled VTR).

Tips
If your DV device is Apple FireWire compatible, connect it to the computer and turn it on before installing Final Cut Express to allow the installation program to automatically receive setup information from your DV camcorder or deck.
Whenever you want to use a DV deck or camcorder with Final Cut Express, connect and turn on the device before opening the application so FCE can detect the device.
If you want to use a camcorder as your playback/record deck, you must switch it to VCR mode. In VCR mode, the camcorder uses the video and audio connectors or FireWire for input and output. Because a camcorder in Camera mode has switched its inputs to receive information from the CCD sensor and microphone, Final Cut Express cannot record to the camcorder while it is in Camera mode.
For more information on controlling your deck or camcorder during video capture, see Chapter 5, “Capturing Video.”
For more information on controlling your deck or camcorder as you output to tape, see Chapter 19, “Creating Final Output.”
Final Cut Express is designed to use the audio and video outputs of your DV deck or camcorder to feed an external NTSC or PAL monitor. Because the monitor receives output from Final Cut Express through your device’s outputs, you must have your device on and the FireWire connection to your computer established, or you won’t be able to view output on your monitor while you work in Final Cut Express.
To connect an external NTSC or PAL monitor:
Position your video monitor at a comfortable viewing distance from your location in front of the computer.
Do one of the following:
Connect the audio and video outputs of your video deck or camcorder to the audio and video inputs of your NTSC or PAL monitor.
If you are using additional external speakers, or if your video monitor has no speakers, connect only the video output from your video device to the video input of your monitor. Use your video device’s audio outputs to feed your external speakers.
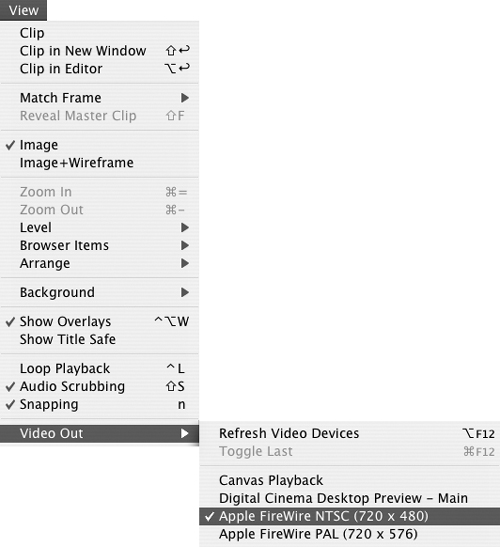
After you install Final Cut Express, you can check or modify your viewing settings by choosing View > Video Out (Figure 2.5).
Tip
For more details on FCE’s video output settings, see the next section, “FCE Protocol: Controlling External Video Output.”
It’s a good idea to set up and connect your additional hardware before you install Final Cut Express, because the type of DV deck or camcorder you use with Final Cut Express determines how the software is configured during installation. If you have not yet installed and configured the additional hardware you will be using with your computer, read “Hardware Selection and Connection” earlier in this chapter. If your system is already configured with capture hardware and a camcorder or deck, proceed with the installation instructions in this section.
If you don’t have your hardware yet, it’s okay to install Final Cut Express.
It’s also important to install your software in the recommended order.
Here’s a recommended installation configuration for a Final Cut Express system with two hard drives available.
You should leave your fastest drive completely free for media files only. Media files include captured audio and video, as well as rendered media files and any computer-generated graphics or motion graphics.
Keep your Final Cut Express project files on the same drive as the application.
You should also back up your project files to removable media with such frequency that your behavior seems obsessive to a casual observer. Go ahead—let ’em laugh.
To install Final Cut Express:
Be sure any external video hardware is connected and turned on before you start the installation procedure, so that Final Cut Express can automatically detect your video capture equipment.
Insert the Final Cut Express disc into your DVD drive (Figure 2.6). then follow the onscreen installation instructions.
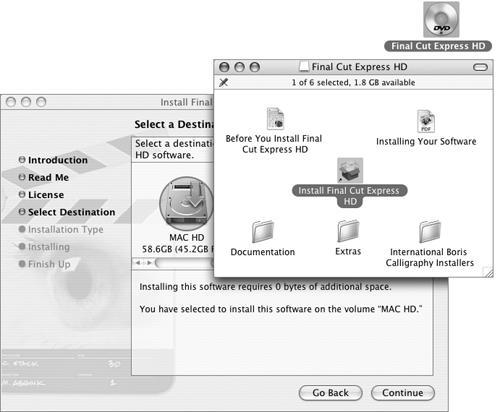
After reading the obligatory licensing agreement and read-me file, choose an installation location from the Install Final Cut Express dialog box. Normally, you should choose the Applications folder on the startup disk; installing FCE in this folder gives all users of your computer access to the program (Figure 2.7).
Figure 2.7. If you install FCE in the Applications folder, any user of the computer can use the software.
However, if you want exclusive use of Final Cut Express, install the program in a private application folder you create inside your Home directory (Figure 2.8).

Tips
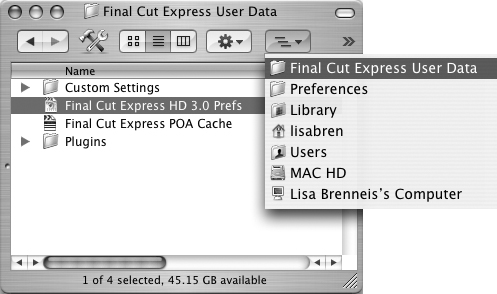
For each user, Final Cut Express creates a separate Final Cut Express User Data folder and generates a separate Custom Settings folder and Final Cut Express Prefs file (Figure 2.9).
One big benefit of personal FCE Preference files is that your individual Scratch Disk preferences stay put, even when you’re sharing your FCE system with the masses. As long as you remember to log in to your own identity before you start work, your preferences will load from your User Data folder when you launch FCE.
Final Cut Express relies on QuickTime for its functionality, which is installed automatically under Mac OS X 10.2 and later. However, it’s a good idea to check Apple’s web site for the latest information on QuickTime updates and Final Cut Express version compatibility before you install FCE.
You don’t need to upgrade to QuickTime Pro to use Final Cut Express.
Be sure any external video hardware is connected and turned on before you launch Final Cut Express for the first time, so that FCE can detect your DV camcorder and streamline the initial setup process. With the standard hardware setup, your initial setup selections should correctly configure all your Final Cut Express audio and video settings automatically.
To register and choose your initial setup:
Open the Final Cut Express application and enter your registration information and serial number.
In the Choose Setup dialog box, choose an Easy Setup from the Setup For pop-up menu (Figure 2.10). Choose the setup that matches your system’s video format and hardware. FCE constructs a short list of Easy Setups based on your hardware format; check Show All to display a complete list of setups available (Figure 2.11).
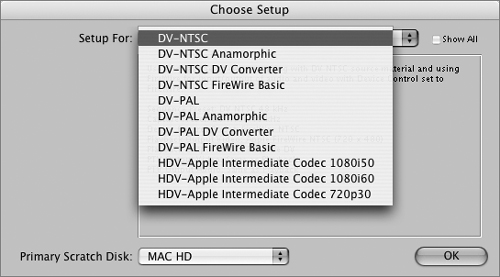
Figure 2.10. In the Choose Setup dialog box, pick the Easy Setup that matches your system’s video format and hardware.
For more information, see “How to choose an Easy Setup” in Chapter 3.
A brief description and summary of your selected Easy Setup appears below the pop-up menu (Figure 2.12).
From the Primary Scratch Disk pop-up menu, choose the disk you want to use to store your captured video, audio, render, and cache files (Figure 2.13).

Figure 2.13. From the Primary Scratch Disk pop-up menu, choose the disk you want to use to store your captured media.
It is recommended that you save captured media files on a different disk than the disk where Final Cut Express is installed. For more information, see “Setting Scratch Disk Preferences” in Chapter 3.
Click OK.
If you didn’t connect a DV camcorder or deck during launch, Final Cut Express displays the External Video dialog box notifying you that it can’t find an external device. Click Continue to dismiss it. If the dialog box appears and you did connect a device, see “Troubleshooting” later in this chapter.
Final Cut Express is now configured to use a standard set of preferences and preset controls based on information you supplied. You may want to review the default preference settings before you dive into a project. For details on modifying preferences, read “Specifying User Preferences and System Settings” in Chapter 3.


Trying to eke out the best possible performance from Final Cut Express? Here’s a rundown of settings and maintenance tips that can help FCE perform more efficiently.
Turn off file sharing.
Avoid running processor-intensive operations in other open applications while you’re working in Final Cut Express (especially when capturing video).
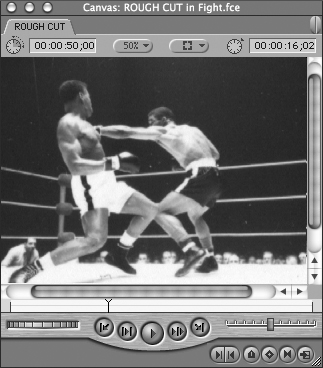
Make sure the entire image area is visible in windows playing video. If you see scroll bars on the edge of the Viewer or the Canvas (Figure 2.14), you’re zoomed in too far for optimum performance.
Don’t place program windows so that they split across dual monitors.
Store project files on your startup disk, and store media and rendered files on a separate hard disk.
Maintain 10 percent free space on each disk drive. If you fill your disk to the last megabyte, your performance will take a dive—and that’s the best-case scenario.
Defragment disk drives regularly, especially those you use for capturing. You can use a defragmentation utility; or make a complete backup of your data, erase the disk, and restore your data.
When a project is finished and archived, delete all files from the disk you used to create the project and then defragment the drive. This helps prepare the disk for the next project.
Final Cut Express performs poorly if you try to work with remote media files over a network connection. Copy files from the network to a local disk before importing them.
It’s a good idea to run Disk First Aid, a component of Apple’s Disk Utility application, once or twice a month to check your drive’s data directory.
You probably won’t encounter any of these problems. But if you run into snags after installing Final Cut Express and configuring your hardware, the following tips may help.
Many of the tips presented here involve checking and adjusting preferences. But before you start changing individual preferences, try this: choose Final Cut Express > Easy Setup and make sure you’re still using the correct Easy Setup for your video format and hardware.
Also, make sure you’re running the latest version of Final Cut Express by checking Apple’s web site.
You’ll find a complete guide to setting preferences and presets in Chapter 3, “Presets and Preferences.”
You can’t establish a device control connection with your camcorder or deck.
Make sure the FireWire cable connecting your computer and DV camcorder is connected properly.
Verify that the camcorder is set to VCR mode.
If your device has a Local/Remote switch, be sure it’s set to Remote.
Turn the device off and back on and then restart Final Cut Express.
You can’t control certain functions of your camcorder or deck.
Make sure the FireWire cable connecting your computer and DV camcorder is connected properly.
If you are using a device with FireWire, try switching the device control protocol from Apple FireWire to FireWire Basic.
If your device has a Local/Remote switch, make sure it’s switched to Remote.
You see a “Missing scratch disk” warning.
Make sure your scratch disks are powered up and mounted properly. You should see your disks on the Finder Desktop.
Make sure your designated Capture Scratch folder is in its proper location.
If you are sharing Final Cut Express with other users on a multiuser system, make sure you are logged in as the current user—FCE creates a separate set of preference settings for each user.
You don’t hear audio on your computer’s speakers when playing video from your camcorder or deck.
Make sure your audio cables are connected properly.
When you enable your external video output to monitor video externally (by choosing Apple FireWire from the View menu), your audio and video are routed to your external monitor or video device, and your computer’s speakers do not receive any audio. Make sure your external monitor and speakers are on and that the volume is turned up. To disable external video output, choose View > Video Out and select Canvas Playback or Digital Cinema Desktop Preview.
Video is not visible on an external NTSC or PAL monitor.
Make sure your cables are connected properly and that your monitor is on.
Verify that the camcorder is set to VCR mode.
Confirm that external video output is enabled by choosing View > Video Out > Refresh Video Devices to re-scan all your input/output busses. Then choose View > Video Out and make sure the Apple FireWire option is checked.
Make sure the Capture window is closed.
You notice dropped frames on your NTSC or PAL monitor during DV playback from the Timeline.
Like the common cold, dropped frames are frequently a symptom of an overworked system. Refer to Appendix A, “Solutions to Common Problems and Customer Support,” in Apple’s Final Cut Express Help PDF for a comprehensive list of possible causes of dropped frames. Here are a few easy things to try first:
In the Canvas, choose Fit to Window from the View pop-up menu to ensure that the image area displays the entire frame.
Reduce the Canvas or Viewer view size to 50 percent.
Disable Show as Square Pixels in the Zoom pop-up menu.
Set Audio Quality Playback to Low Quality and reduce the number of Real-Time Audio Mixing tracks specified on the General tab in the User Preferences window.
Turn off AppleTalk and file sharing.
Make sure your media drives are fast enough to feed media files to FCE and that the drives have not become so fragmented that their performance is impaired.