3. Operators and Control Structures
In the preceding chapter you learned about the basic data types in C++, as well as the fundamentals of working with variables. For the most part, the examples there just assigned values to different variables and then printed those variables within some context. In order to do more with your programs, you need to use operators and control structures.
You’ve already seen a couple of operators, including the assignment (=), concatenation for strings (+), and arithmetic operators. In this chapter you’ll do some more arithmetic, learn about the comparison and logical operators, and master the increment and decrement operators.
The other main focus in this chapter is control structures: language constructs that dictate when, or how many times, specific code is executed. The most important control structure is the if conditional, along with its siblings if-else and if-else if. Two other conditionals are covered: the switch and the ternary. The chapter concludes with coverage of two loops: while and for. Once you’ve completed this chapter, you’ll possess all of the rudimentary skills for programming in C++.
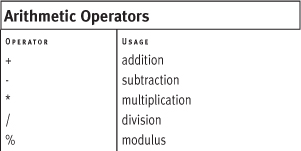
Arithmetic Operators
A couple of examples in Chapter 2, “Simple Variables and Data Types,” performed some arithmetic, particularly addition and multiplication. Arithmetic in C++ works exactly as you learned (hopefully) in school. The standard operators are listed in Table 3.1.
Table 3.1. Aside from the modulus operator, which returns the remainder from a division, the arithmetic operators are quite obvious.
The one bugaboo when it comes to arithmetic in C++ is that the types of numbers being used—integers or real numbers—impact the end result. Using these operators, take a look at the following results:
int a = 3;
int b = 2;
int c;
c = a + b; // 5
c = a - b; // 1
c = b - a; // -1
c = a * b; // 6
c = a / b; // 1, not 1.5!
c = a % b; // 1
When you divide one integer by another integer, the result will always be an integer, meaning that any remainder (the fraction) is dropped, as in the preceding example. For this reason, you’ll pretty much always want to use real numbers for division. If one of the two numbers involved in a division is a float, a float will automatically be the result:
float a = 3.0;
float b = 2.0;
float c;
c = a / b; // 1.5
Conversely, the modulus operator (%) can only be used on integers. You cannot return the remainder of a division when one of the two numbers is a real number.
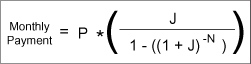
Since you’ve already done some simple arithmetic, this next example will be more complex. This program will calculate the monthly payment for a conventional mortgage, compounded monthly (using the United States’ formula). Formally written, the formula is the craziness seen in Figure 3.1. If you don’t comprehend the formula itself, don’t sweat it, just make sure you understand what each individual step is doing in the following application.
Figure 3.1. This formula is used in the United States to calculate the monthly payment for a compound interest loan. The monthly payment is the loan amount (P) multiplied by the monthly interest rate (J) divided by 1 minus the monthly interest rate (J) to the minus N power, where N is the number of months of the loan.
In this program, you’ll see how to properly use different data types and how to perform an elaborate calculation in smaller, more manageable steps. This program also requires the pow() function, which returns the value of a number to a certain power. This function is defined within the cmath library, so see the sidebar for more information about that.
To perform arithmetic
- Create a new, blank text document in your text editor or IDE (Script 3.1).
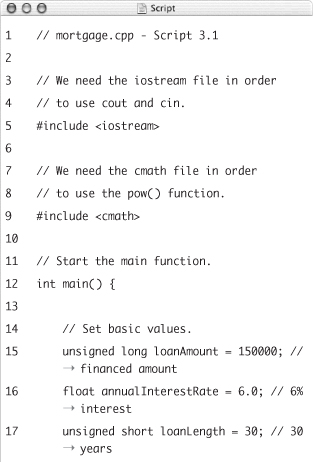
// mortgage.cpp - Script 3.1
Script 3.1. In this program, the monthly payment is calculated for a loan with compound interest (specifically, a mortgage). A complex calculation (see Figure 3.1) is broken down into smaller, clearer steps.
- Include the
iostreamandcmathheader files.#include <iostream>
#include <cmath>As it says in the sidebar, the
cmathfile is necessary to use thepow()function in this program. - Start defining the
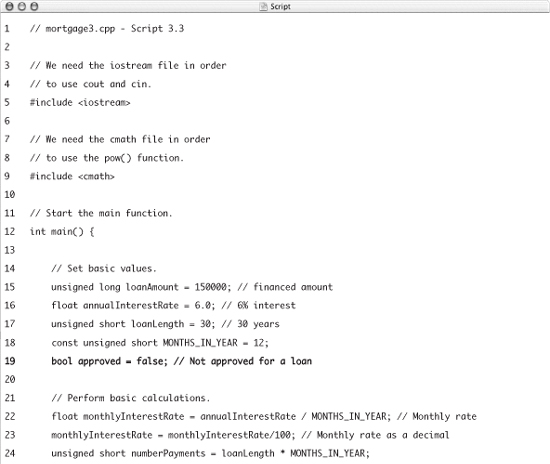
main()function and declare the required variables.int main() {
unsigned long loanAmount = 150000;
float annualInterestRate = 6.0;
unsigned short loanLength = 30;
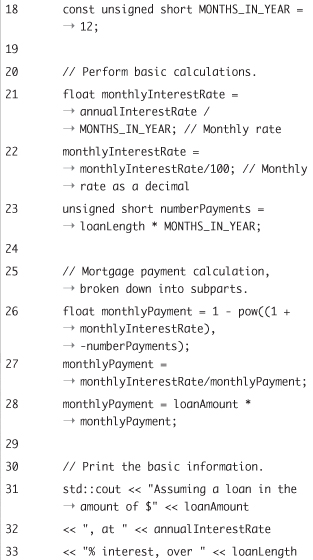
const unsigned short MONTHS_IN_YEAR = 12;In order to calculate a mortgage payment, you need to know the loan amount, the interest rate, and the length of the loan (30 years, 15 years, 100 years). The first three variables store these values. The loan amount is unsigned, as it will always be positive, and a long integer, allowing for that massive loan (especially for those living around San Francisco). The length of the loan is an unsigned short integer, as it will also always be positive but is limited in its value (most banks won’t give loans larger than 65,000 years!). The interest rate is declared as a float, because it will normally be a real number. Finally, a constant is defined to represent the number of months in a year, lest you forget why the number
12is being used in later calculations. - Perform the basic calculations.
float monthlyInterestRate = annualInterestRate / MONTHS_IN_YEAR;
monthlyInterestRate = monthlyInterestRate/100;
unsigned short numberPayments = loanLength * MONTHS_IN_YEAR;The formula (Figure 3.1) requires that the interest rate be in a decimal format (so
.06instead of just6) and on a monthly basis (.005instead of.06). To find this number, the annual interest rate is divided by the number of months in a year and then by100.To determine the total number of payments, the number of years of the loan is multiplied by the number of months in a year.
- Start calculating the monthly payment.
float monthlyPayment = 1 - pow((1 + monthlyInterestRate), -numberPayments);
Referring back to the formula in Figure 3.1, this equation represents the denominator (1 minus 1 plus J to the minus N power). The
pow()function is called, with1 + monthlyInterestRateas the number and-numberPaymentsas the exponent. This returned value is then subtracted from 1. - Complete the calculations.
monthlyPayment = monthlyInterestRate/ monthlyPayment;
monthlyPayment = loanAmount * monthlyPayment;The final two steps are to divide the monthly interest rate by the already-determined denominator and then to multiply this by the amount of the loan. Rather than continuing to create new variables, the existing
monthlyPaymentvariable is assigned the value of a calculation involving itself, which is perfectly acceptable (and common). - Begin printing the information.
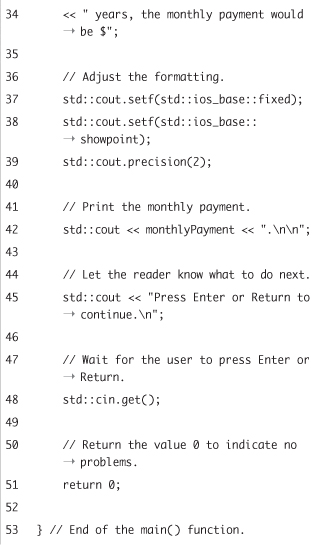
std::cout << "Assuming a loan in the amount of $" << loanAmount
<< ", at " << annualInterestRate
<< "% interest, over " << loanLength
<< " years, the monthly payment would be $";For starters, all of the basic information—the loan amount, the annual interest rate, and the length of the loan (in years)—is printed.
- Adjust the formatting and print the monthly payment.
std::cout.setf(std::ios_base::fixed);
std::cout.setf(std::ios_base::showpoint);
std::cout.precision(2);
std::cout << monthlyPayment << ". ";In the preceding chapter you also learned how to format how floating-point numbers are printed. These first three lines will ensure that all real numbers are printed with exactly two decimal points.
- Pause the execution of the application until the user presses Enter or Return.
std::cout << "Press Enter or Return to continue. ";
std::cin.get(); - Add the
returnline and close themain()function.return 0;
} - Save the file as
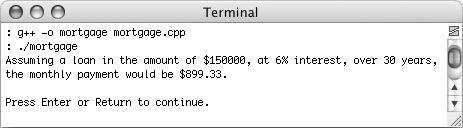
mortgage.cpp. - Compile and run the application (Figure 3.2).
Figure 3.2. Using a somewhat complex formula, this program calculates the monthly payment for a loan.
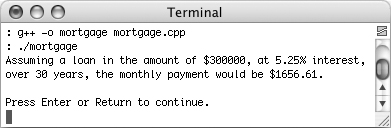
- If desired, change the values of the
loanAmount,annualInterestRate, andloanLengthvariables, save the file, and then recompile and rerun the application (Figure 3.3).Figure 3.3. Change any of the initial values to recalculate the monthly payment (compare with Figure 3.2).
 Tips
Tips
• Do not confuse the addition and subtraction operators with those used to indicate the sign of a number. Spacing makes all the difference:
int a = +3;
// Positive 3int b = -2;
// Negative 2int c = a + b;
// 1
• The real number types store an approximation of values (for example, 2.0 might actually be stored as 1.9999999). For this reason, arithmetic using floats can be tricky, and you should never check to see if two floats have the same value.
• Each of the arithmetic operators can be combined with the assignment operator (=) to perform calculations and assign a value in one step. For example:
int a = 10;a += 2;
// 12, same as a = a + 2;a -= 3;
// 9, same as a = a -3;a *= 2;
// 18, same as a = a * 2;a /= 6;
// 3, same as a = a / 6;a %= 2;
// 1, same as a = a % 2;
This means that in the mortgage application, you could simplify the final calculation as:
monthlyPayment *= loanAmount;
if Conditionals
The first of the control structures to be covered in this chapter is the basic if conditional. Conditionals are a branching type of control structure, meaning that whether or not blocks of code are executed depends upon the truth of a condition (Figure 3.4). Its syntax is straightforward:
if (condition) {
// Do whatever.
}
Figure 3.4. With a simple if conditional, if a condition is true, certain statements will be executed. If the condition is false, those statements will not be run.

The condition is placed within parentheses, followed by—within curly braces—the statement or statements to be executed. If the condition is true, the statements will be executed. If it is false, the statements will not be run.
But, you may ask, what is true and false? Without getting into a deep philosophical discussion, in C++, the following are true:
• true
• A bool variable with a value of true
• Any nonzero number
• Any numeric variable with a nonzero value
Therefore, the following are false:
• false
• A bool variable with a value of false
• 0
• 0.0
As you’ll see in the rest of this chapter, true and false can also be determined using other operators (like comparing one number to another) and compound structures. In the meantime, the mortgage application will be slightly modified to quickly demonstrate an if conditional.
To use an if conditional
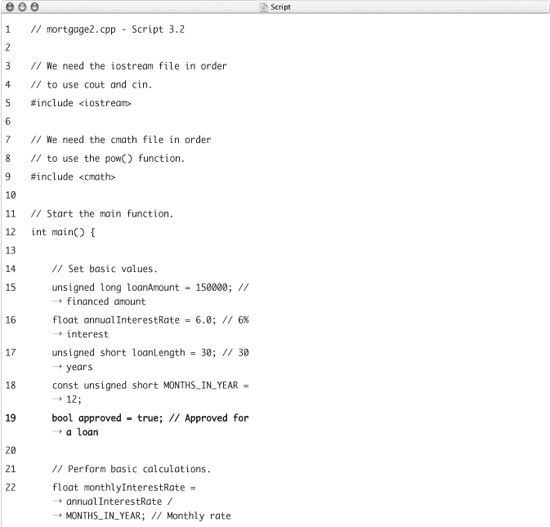
- Open
mortgage.cpp(Script 3.1) in your text editor or IDE. - Declare and initialize a variable of type
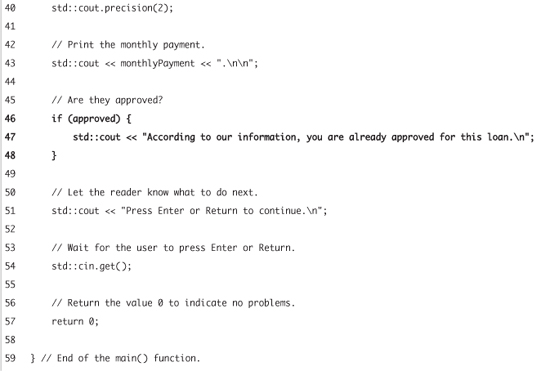
bool(Script 3.2).bool approved = true;
The boolean variable
approvedcan have a value of either true or false. It’ll be used in this example to indicate whether or not the user is approved for a loan. This variable type was quickly introduced at the end of the preceding chapter, in case you missed it. - After printing out the results of the calculations, print a message if the user is approved.
if (approved) {
std::cout << "According to our information, you are already approved for this loan. ";
}This conditional says that if the value of
approvedis true, then thecoutline should be executed. Ifapprovedis false, thecoutline will be skipped.Script 3.2. An
ifconditional is added to the program so that a message is printed only if theapprovedvariable is true.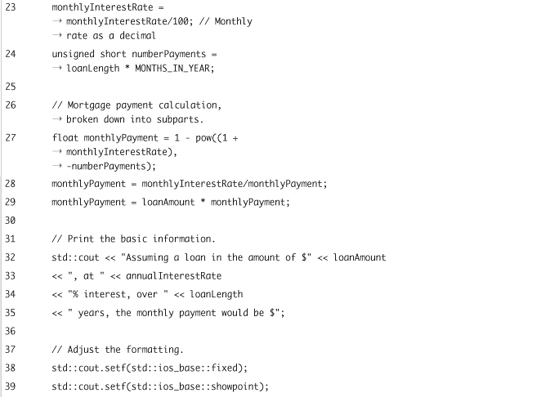
- Save the file as
mortgage2.cpp, compile, and run (Figure 3.5).Figure 3.5. The added statement (compare with Figure 3.3) is printed only if the
approvedvariable has a value of true.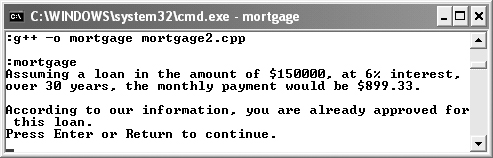
- Change the value of approved to false, save the file, recompile, and rerun the application (Figure 3.6).
Figure 3.6. If
approvedis false, then the condition is false, and no extra message will be printed (compare with Figure 3.5).
Tips
• Any number or type of statements can be executed as the result of the conditional. If your conditional uses only one statement, you can get away without using the curly braces. For example:
if (true) std::cout << "This is so true.";
• Creating single-statement conditionals without curly braces, while perfectly legal, can make your code harder to follow and possibly lead to errors if you make future changes to that conditional. That being said, you may like the terseness of this format or encounter it in other people’s work. In this book, you’ll see almost every conditional use the curly braces.
Using else and else if
There can, and often will, be much more to your conditionals than a simple if clause. Conditionals can be made more responsive by adding else if and/or else clauses. An else if clause allows you to test another condition:
if (condition) {
// Do this.
} else if (another condition) {
// Do that.
}
You can have as many else if clauses in a conditional as you need:
if (condition 1) {
// Do this.
} else if (condition 2) {
// Do this instead.
} else if (condition 3) {
// Do this then.
}
An else clause behaves differently than else if in that it does not allow you to specify a condition under which it applies. Instead, an else clause is invoked if no other clause is true.
if (condition) {
// Do this.
} else {
// Do this instead.
}
In other words, the else acts as the default response (Figure 3.7). You can, and often will, combine else and else if clauses together, so long as the else is the final part of the conditional (because it’s the default case).
Figure 3.7. By adding an else clause to a conditional, you guarantee that some statements are executed under any condition.

To hammer the point home, an else clause will be added to the if conditional in the mortgage application.
To use an else clause
- Open
mortgage2.cpp(Script 3.2) in your text editor or IDE. - Add an
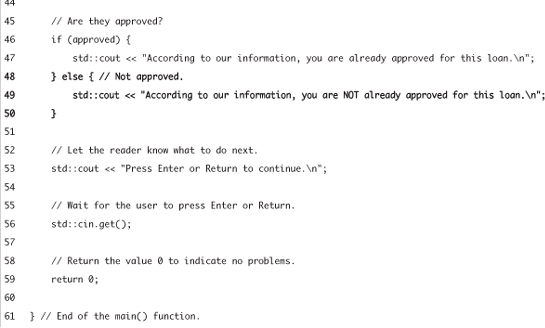
elseclause to theifconditional so that it reads like so (Script 3.3).if (approved) {
std::cout << "According to our information, you are already approved for this loan. ";
} else {
std::cout << "According to our information, you are NOT already approved for this loan. ";
}The conditional has been completed so that an appropriate message is printed whether
approvedis true or false.Script 3.3. The complete
if-elseconditional will print different messages depending upon the true or false value of theapprovedvariable.
- Make sure that
approvedhas a value of false.bool approved = false;
To see the effect of adding this
elseclause, theifcondition must be false, which means thatapprovedmust have a value of false. - Save the file as
mortgage3.cpp, compile, and run (Figure 3.8).Figure 3.8. The
elseconditional added to the program (see Script 3.3) makes the NOT approved line print ifapprovedis false. Compare this result with Figure 3.6, which did not use theelseclause.
Tips
• Although it’s not required, indenting statements four spaces from their associated if, else, or else if clauses makes it easier to see which statements are associated with which clauses.
• Like a simple if statement, the if-else and if-else if don’t require curly braces if each has only one resulting statement. Again, it’s good practice to always use the curly braces, though.
• You’ll see many different styles for how programmers lay out and indent their control structures. Another popular format is:
if (condition)
{
// Do this
}
It doesn’t matter what style you use; the most important thing is that you are consistent.
The Ternary Operator
C++ has an alternative syntax for the if-else conditional, referred to as the ternary (or trinary) operator. The name stems from the fact that there are three parts to using the operator. The syntax looks a little strange, but the ternary operator is just a simplified if-else. The structure is:
(condition) ? returnThisIfTrue : returnThisIfFalse;
The operator will return one of two values. If the established condition is true, then the first value after the question mark is returned. If the condition is false, then the value after the colon is returned. The returned value can be assigned to a variable, printed, and so forth.
For example, the following will return a value indicating whether a number is odd (it uses the modulus operator to see if there’s a remainder when the number is divided by 2):
int testNumber = 20;
char oddNumber;
oddNumber = ( (testNumber % 2) == 0) ? 'N' : 'Y';
So if the remainder of dividing testNumber by 2 is equal to 0, then N is returned and assigned to oddNumber. Otherwise, Y is returned. Rewritten as a conditional, this would be
int testNumber = 20;
char oddNumber;
if ( (testNumber % 2) == 0) {
oddNumber = 'N';
} else {
oddNumber = 'Y';
}
Another use of the ternary operator will be demonstrated in this, the next revision of the mortgage application.
To use the ternary operator
- Open
mortgage3.cpp(Script 3.3) in your text editor or IDE. - Delete the
if-elseconditional (Script 3.4).Since the ternary operator will be used, the
if-elseconditional can be deleted and thestd::coutlines will be restructured. - After all of the calculations, begin printing the statement of approval.
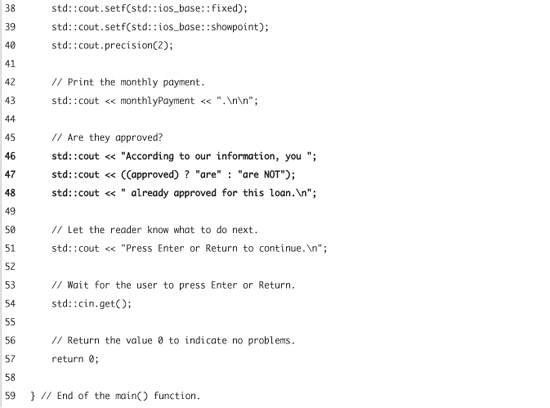
std::cout << "According to our information, you ";
To achieve the same end result (the approved-specific message), we only need to change the message to say are approved or are NOT approved. The initial part of the message is the same in both cases and can be printed first.
Script 3.4. The same functionality accomplished by the
if-elseconditional in Script 3.3 can be replicated using the ternary operator.
- Create the conditional using the ternary operator.
std::cout << ((approved) ? "are" : "are NOT");
The ternary here checks the value of
approved. If that value is true, then simply are is returned. If that value is false, then are NOT is returned. In either case, the returned value is sent immediately tocout, which sends the text to the console. - Complete the message.
std::cout << " already approved for this loan. ";
- Save the file as
mortgage4.cpp, compile, and run (Figure 3.9).Figure 3.9. The functionality of the mortgage application is the same whether it uses an
if-else(Figure 3.8) conditional or the ternary operator.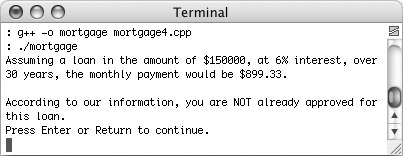
- Change the value of
approved, save the file, recompile, and rerun the application.

Tip
• If you’re getting a little tired of having to recompile the program after each variable change, we feel your pain. In Chapter 4, “Input, Output, and Files,” you’ll learn how to base calculations and other procedures upon keyed input or file data.
Logical and Comparison Operators
Using a simple variable (as in the previous examples) as a condition won’t take you very far in your programming. In order to make more complex, real-world if statements, you’ll want to utilize the various comparison and logical operators (Table 3.2).
Table 3.2. The logical and comparison operators allow you to compare values and create more complex conditions.
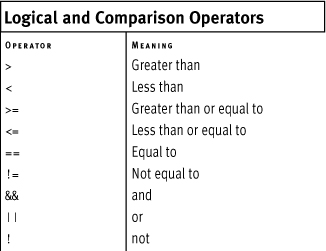
The comparison operators are used with mathematical values, for example, to tell if one value is greater than, equal to, or less than another. Using these, the true/false status of a conditional can be based on more elaborate formulas:
if (age >= 18) {
std::cout << "You can vote (in the U.S.).";
}
The logical operators are used, often in conjunction with parentheses, to create compound conditions, such as a range:
if ( (age > 12) && (age < 20) ) {
std::cout << "You are a teenager.";
}
Special attention should be given to the equality operator (==). One of the most common mistakes programmers make—even the most seasoned ones—is to inadvertently use the assignment operator (=) in a conditional:
if (myVar = 190) {...
The real intent of the conditional is to check if the value of myVar is equal to 190 (written as myVar == 190), which may or may not be true. The preceding miswritten conditional instead attempts to assign the value 190 to myVar.
Let’s rewrite the mortgage application (for the last time, promise!) so that different messages are printed according to the calculated monthly payment.
To use comparison operators
- Open
mortgage4.cpp(Script 3.4) in your text editor or IDE. - Define a few values as constants (Script 3.5).
const unsigned short LOW_MAX = 500;
const unsigned short MODERATE_MAX = 1500;
const unsigned short PRICEY_MAX = 3000;
const unsigned short EXPENSIVE_MAX = 10000;Script 3.5. By using a long
if-else if-elseconditional and the comparison operators (specifically less than), different messages are printed depending on the calculated monthly payment.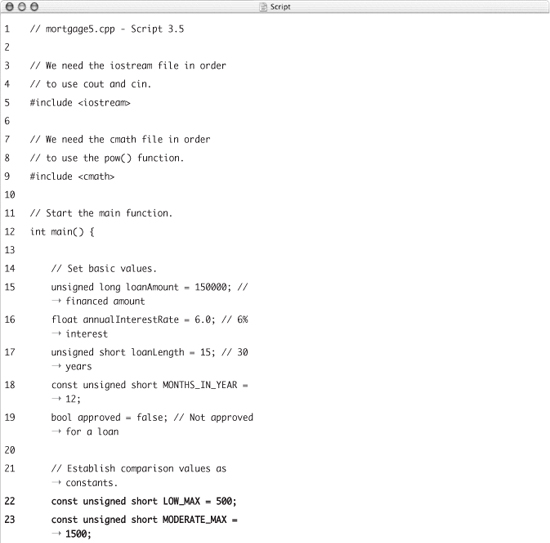
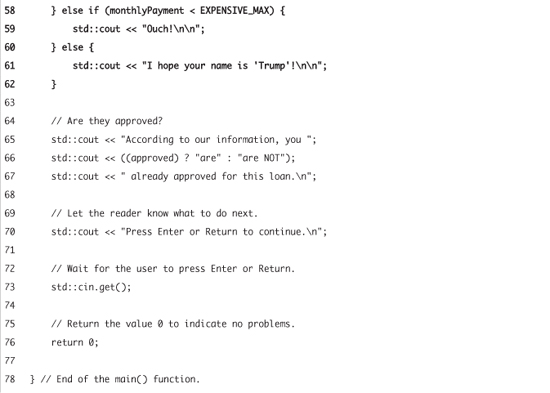
The application will compare the calculated monthly payment against set amounts to say whether the payment amount is cheap, reasonable, expensive, etc. You could use hard-coded numbers in the conditionals (which will be added to the application in Step 3), but it wouldn’t be obvious where those values were coming from (they’d be so-called magic numbers). It will be more clear what’s happening if the values are established as descriptive constants, which is what’s being done here. Feel free to change the values to correspond to your own budget and real estate market.
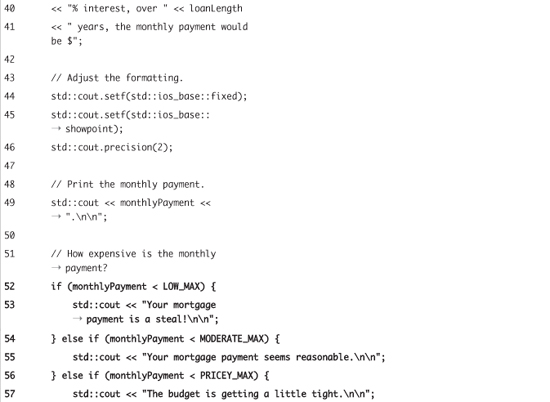
- After the monthly payment has been calculated and printed, add a conditional that makes different comments about the payment amount.
if (monthlyPayment < LOW_MAX) {
std::cout << "Your mortgage payment is a steal! ";
} else if (monthlyPayment < MODERATE_MAX) {
std::cout << "Your mortgage payment seems reasonable. ";
} else if (monthlyPayment < PRICEY_MAX) {
std::cout << "The budget is getting a little tight. ";
} else if (monthlyPayment < EXPENSIVE_MAX) {
std::cout << "Ouch! ";
} else {
std::cout << "I hope your name is 'Trump'! ";
}This long conditional first checks if the monthly payment is less than
LOW_MAX, defined as500(presumably dollars) in Step 2. If so, then the firstcoutstatement is executed. If not, the second condition is checked and the logic continues. If none of the conditionals are true, that implies thatmonthlyPaymentis greater than or equal to10,000, so a default message is printed. - Save the file as
mortgage5.cpp, compile, and run (Figure 3.10).Figure 3.10. A price-specific message is printed corresponding to the value of the monthly payment.
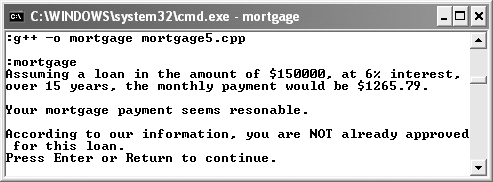
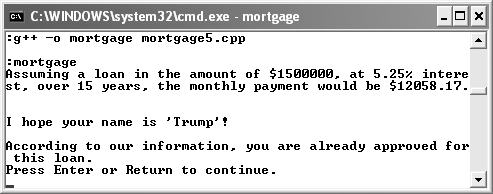
- Change the values of the different variables, save the file, recompile, and rerun the application (Figure 3.11).
Figure 3.11. Monthly payments within different ranges result in different messages being printed (compare with Figure 3.10).
Tips
• C++ also has several reserved keywords that mean the same as the corresponding logical operators. Specifically, and is the same as &&, not is the same as !, or is the same as ||, and not_eq is the same as !=.
• You should never compare the equality of floats. Due to the way computers represent this data type, two seemingly equal values may be off by the slightest fraction. Similarly, the integer 2 and the float 2.0 may not equate!
• Some programmers recommend reversing the values in a conditional when one literal value is used. For example:
if (24 == hours) {...
The benefit of this is that if you inadvertently use only one equals sign, an error message will be reported upon compilation (as you cannot assign the value of a variable to a number).
• In C++, but not C, you can check if two strings are the same using the equality operator (==):
std::string name = "Andi";
if (name == "Claudia") { // False
Switch Conditionals
Along with the ternary operator, the switch is a sometimes useful variation on an if conditional. This conditional takes an integer variable as its condition and checks its value against several possibilities:
switch (year) {
case 2006:
// Do something.
break;
case 2007:
// Do something else.
break;
default:
// Do this.
break;
}
The break statement is critical to the functionality of the conditional. Upon hitting a break, the application will leave the switch. If you omit a break, then every subsequent statement—even those that fall under other cases—will be executed.
The default case is an optional one but, if included, is normally placed last. If none of the other cases are matched, the default case will be applied (it behaves like an else clause in this regard).
To repeat, though, the important fact about a switch is that it can only match an integer (which does include the char type, since that’s a small integer) against several possible values. This next example, which determines a person’s astrological sign, shows a switch in action. It also demonstrates another use of the ternary operator.
To use a switch conditional
- Create a new, blank text document in your text editor or IDE (Script 3.6).
// horoscope.cpp - Script 3.6
Script 3.6. A
switchconditional, along with twelve uses of the ternary operator, determines a person’s astrological sign given their birth month and day.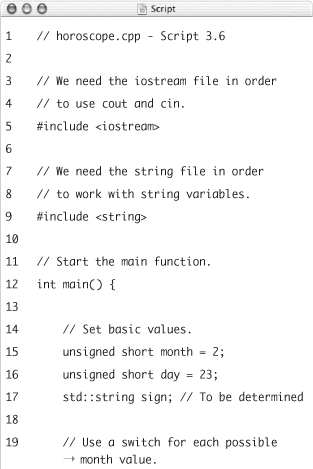
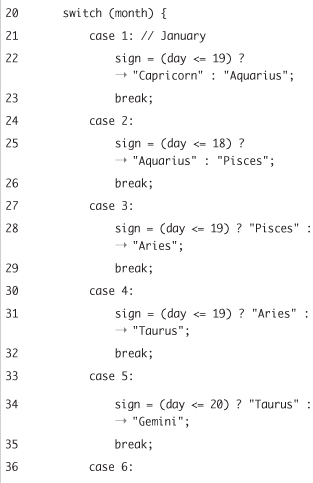
- Include the
iostreamandstringheader files and begin themain()function.#include <iostream>
#include <string>
int main() {As this program will use one variable of type
string, thestringfile should be included. - Declare the required variables.
unsigned short month = 2;
unsigned short day = 23;
std::string sign;This program requires three variables. The first two are small, unsigned integers, representing the day and month for a person’s birthday. The third variable is a string, which will be assigned the person’s astrological sign. Refer back to Chapter 2 for the details of declaring string variables.
- Begin the
switch.switch (month) {
Again, a
switchtakes just an integer as its condition. Here, the condition is the variablemonth, whose value will be compared against twelve cases (one for each month). - Define the first case.
case 1:
sign = (day <= 19) ? "Capricorn" : "Aquarius";
break;The first case applies if
monthhas a value of1, which means the person’s date of birth is in January. Because there are two possible signs within each month, a conditional needs to be used on the day to see which sign applies. The tersest way to accomplish this is to use the ternary operator. If a person’s birthday is on or before January 19th, they are a Capricorn; on the 20th or later, they are an Aquarius. Therefore, the ternary operator will return either of those two strings depending upon the truth of the condition. Whichever string is returned will be assigned to thesignvariable. - Define the remaining cases.
case 2:
sign = (day <= 18) ? "Aquarius" : "Pisces";
break;
case 3:
sign = (day <= 19) ? "Pisces" : "Aries";
break;
case 4:
sign = (day <= 19) ? "Aries" : "Taurus";
break;
case 5:
sign = (day <= 20) ? "Taurus" : "Gemini";
break;
case 6:
sign = (day <= 21) ? "Gemini" : "Cancer";
break;
case 7:
sign = (day <= 22) ? "Cancer" : "Leo";
break;
case 8:
sign = (day <= 22) ? "Leo" : "Virgo";
break;
case 9:
sign = (day <= 22) ? "Virgo" : "Libra";
break;
case 10:
sign = (day <= 22) ? "Libra" : "Scorpio";
break;
case 11:
sign = (day <= 21) ? "Scorpio" : "Sagittarius";
break;
case 12:
sign = (day <= 21) ? "Sagittarius" : "Capricorn";
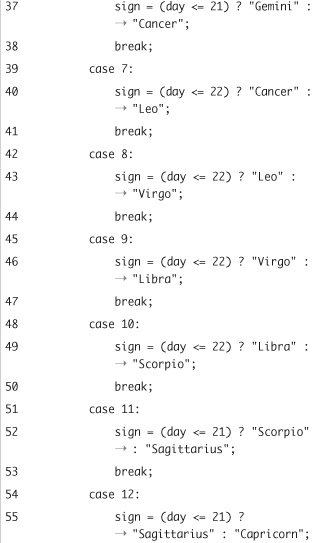
break;The remaining eleven cases are variations on the first one, changing the date and signs accordingly.
- Complete the
switch.}
This curly brace completes the
switchconditional. Nodefaultcase is used here, as the values1through12should cover all the bases. You could add adefaultcase to handle invalid month values, though. - Print out the information.
std::cout << "If your birthday is " << month
<< "/" << day << ", then your sign is: "
<< sign << ". "; - Pause the execution of the application until the user presses Enter or Return.
std::cout << "Press Enter or Return to continue. ";
std::cin.get(); - Add the
returnline and close themain()function.return 0;
} - Save the file as
horoscope.cpp. - Compile and run the application (Figure 3.12).
Figure 3.12. This program determines a person’s astrological sign given their birth date and month.

- If desired, change the values of the
monthanddayvariables, save the file, and then recompile and rerun the application (Figure 3.13).Figure 3.13. Change the
monthanddayvalues to find a different sign.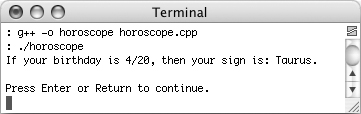
Tips
• The main downside to using switch is that it can be used only with integer and char data types. This greatly restricts when you can use it, but if a switch is a possibility, it’s often a faster, more obvious method (as opposed to a long if conditional).
• Another control structure exists in C++ that we do not discuss in this book: goto. It’s not really necessary in C++ or C (in fact, many programmers suggest it should never be needed).
• It is acceptable to have multiple cases in a switch that use the same statements. The syntax for that would be
switch (gender) {
case 'M':
case 'm':
// Do whatever.
break;
case 'F':
case 'f':
// Do this.
break;
}
Increment and Decrement Operators
Related to arithmetic are two special operators, referred to as increment and decrement. The former increases the value of a number by 1, whereas the latter decreases the value of a number by 1. To do either, use the name of a variable followed by two plus signs or two minus signs together.
int myVar = 10;
myVar++; // 11
myVar++; // 12
myVar--; // 11
Just so it’s clear, understand that the increment operator is simply a shorthand version of
myVar = myVar + 1;
or
myVar += 1;
These operators come in both the postfix (shown here) and prefix versions, differing in precedence (see the sidebar “Understanding Precedence” earlier in the chapter for a discussion of precedence). If you use the postfix version, the value is returned and then incremented (or decremented). If you use the prefix version, however, the value is incremented (or decremented) and then returned. As a simple example, this next program will demonstrate the difference.
To use the increment and decrement operators
- Create a new, blank text document in your text editor or IDE (Script 3.7).
// increment.cpp - Script 3.7
#include <iostream>
int main() {Script 3.7. The difference between using the postfix or the prefix increment or decrement operator is demonstrated by this program.
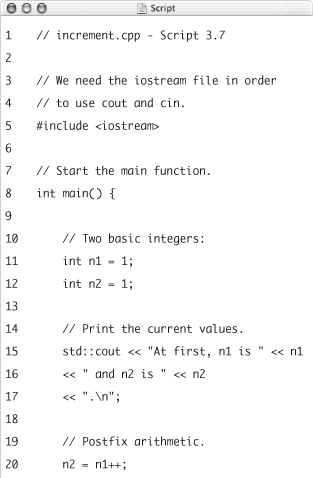
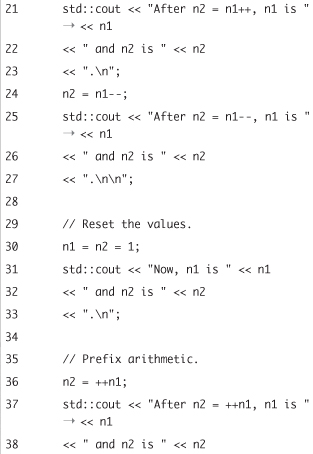
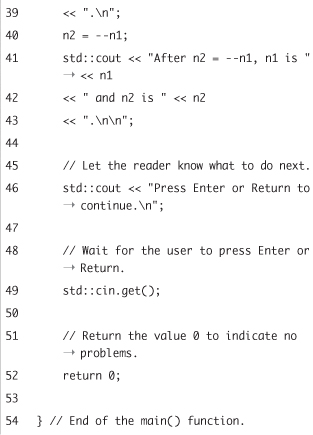
- Declare and initialize two integers, and then print their current values.
int n1 = 1;
int n2 = 1;
std::cout << "At first, n1 is " << n1
<< " and n2 is " << n2
<< ". ";To show the differences between the prefix and postfix versions of the operators, dummy variables are used, initially set to
1each. Their values at the start are then printed. - Use the postfix version of the incremental operator on
n1while assigning the returned value ton2.n2 = n1++;
std::cout << "After n2 = n1++, n1 is " << n1
<< " and n2 is " << n2
<< ". ";The first line here is the important one, because two things are actually happening. One is that
n2is being assigned a value. The other event is that then1variable is incremented (its value is increased by one). Because of operator precedence, the assignment will occur first, and thenn1’s value will be increased. So, as you’ll see when you run the application,n1now has a value of2butn2has a value of1(n1’s original value).The
coutstatement is used to confirm this result. - Repeat Step 3 using the decrement operator.
n2 = n1--;
std::cout << "After n2 = n1--, n1 is " << n1
<< " and n2 is " << n2
<< ". ";Again, precedence dictates that the assignment occurs first, so
n2will have a value of2(n1’s original value) andn1will end up with a value of1. - Reset the values of both integers and print their values.
n1 = n2 = 1;
std::cout << "Now, n1 is " << n1
<< " and n2 is " << n2
<< ". ";Before going through the same routines using the prefix versions of the operators, the values should be reset and printed for confirmation.
- Repeat Steps 3 and 4 using the prefix version of both operators.
n2 = ++n1;
std::cout << "After n2 = ++n1, n1 is " << n1
<< " and n2 is " << n2
<< ". ";
n2 = --n1;
std::cout << "After n2 = --n1, n1 is " << n1
<< " and n2 is " << n2
<< ". ";These lines use the prefix version of the operators. As you’ll see when you run the application, the prefix operators have higher precedence than the assignment operator, so incrementation or decrementation occurs first, and then the assignment is made. To be specific, after the first line, both
n1andn2will have a value of2. - Pause the execution of the application until the user presses Enter or Return.
std::cout << "Press Enter or Return to continue. ";
std::cin.get(); - Add the
returnline and close themain()function.return 0;
} - Save the file as
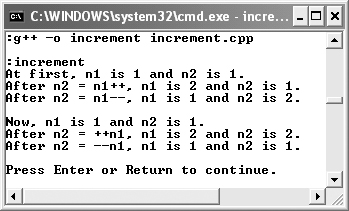
increment.cpp. - Compile and run the application (Figure 3.14).
Figure 3.14. To most clearly understand how the increment and decrement operators work, this application runs through some uses and confirms the results.
Tips
• C++ gets its name from the notion that it’s one notch better than C.
• The increment and decrement operators are most frequently used within loops, as you’ll see toward the end of this chapter.
While Loop
Conditionals are one broad type of control structure, and loops are the other. The C++ language supports two loop formats: while (and its sibling do...while) and for. Each loop type accomplishes the same thing—repeatedly executing some code a certain number of times—but in slightly different ways.
The while loop is like an if conditional in that it checks a condition and then executes some statements if that condition is true:
while (condition) {
// Do whatever.
}
Once the loop has successfully executed its statements, it will then recheck the condition. If the condition is still true, the process will be repeated. If the condition is false, the execution of the loop is over and the program will continue running (Figure 3.15).
Figure 3.15. As long as the established condition is true, a while loop will continue to execute blocks of code.
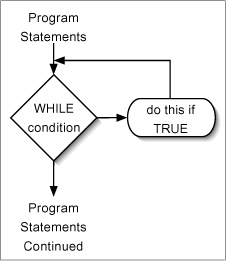
A common enough mistake programmers make is to create a loop whose condition will never be false. This creates an infinite loop, resulting in an application that will just run and run. Therefore, you should ensure that something occurs within the loop so that the condition will eventually be false.
This next example will use a while loop to help calculate the factorial of a number. In simplest terms, the factorial (represented in math by the exclamation mark: n!) is the sum of the multiplication of every number between 1 and the number. So,
5! = 1 * 2 * 3 * 4 * 5; // 120
3! = 1 * 2 * 3; // 6
To use a while loop
- Create a new, blank text document in your text editor or IDE (Script 3.8).
// factorial.cpp - Script 3.8
#include <iostream>
int main() {Script 3.8. A
whileloop is used to calculate the factorial of a number. As long as the numbermultiplier(which starts off as1) is less than or equal tonum(the number whose factorial is being calculated), the code in thewhileloop body will be executed.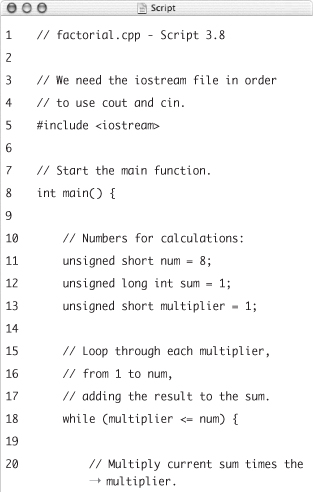

- Define the necessary variables.
unsigned short num = 8;
unsigned long int sum = 1;
unsigned short multiplier = 1;Three variables are required, all of them integers. The first is the number whose factorial is being determined,
num. Because a factorial can quickly become a huge number, you should limit the value ofnumto around13or less.The other two integers are used in the calculation. The
sumvariable will store the factorial total. Due to the way the calculations are made, its value is initially set to1. Themultipliervariable also starts with a value of1, as a factorial is defined as the sum of the multiplication of all numbers from1tonum. - Start defining the
whileloop.while (multiplier <= num) {
This condition is true as long as the value of
multiplieris less than or equal tonum. If so, the loop’s statements will be executed. Oncemultiplierbecomes greater thannum, this condition will no longer be true and the program will continue on. - Complete the
whileloop.sum *= multiplier;
++multiplier;
}The loop contains two statements, which will be executed upon each iteration. The first statement is the actual factorial calculation. It says that the value of
sumshould be set tosum * multiplier. You could also write this assum = sum * multiplier;
to be more explicit. The first time the loop is executed, both variables will be
1, sosumwill end up with a value of1(which is 1 times 1). On the next iteration,sumwill be1andmultiplier 2, makingsum 2(1 times 2). Thensumwill be2andmultiplier 3, makingsum 6(2 times 3). This continues on until themultiplierexceeds the value ofnum.The second line is necessary to avoid an infinite loop. The
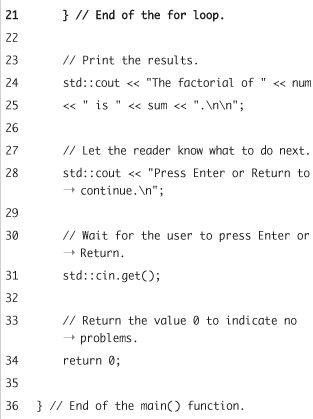
multipliervariable is incremented within thewhileloop so that the loop’s condition does eventually become false. - Print the results.
std::cout << "The factorial of " << num
<< " is " << sum << ". "; - Complete the application.
std::cout << "Press Enter or Return to continue. ";
std::cin.get();
return 0;
} - Save the file as
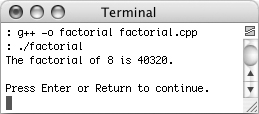
factorial.cpp, compile, and then run the application (Figure 3.16).Figure 3.16. Running the program shows that the factorial of 8 is 40,320.
- Change the value of
num, keeping it less than13, then save the file, and recompile and rerun the application (Figure 3.17).Figure 3.17. Did you know that the factorial of 10 is 3,628,800? Well, now you do. More important, you now know how to use a
whileloop in C++.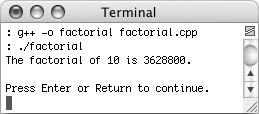
Tips
• As suggested twice already, you should restrict your factorial calculation to a number less than 13 (or thereabouts). The problem is that a factorial of larger numbers will likely exceed the range of even an unsigned long integer, resulting in overflow. While the world won’t come to an end and your computer won’t crash, the calculated result will not be accurate. See the sidebar on overflow and underflow to learn more.
• A related kind of loop is the do...while. Unlike the while loop, which could possibly never have a true condition, this loop is always executed at least one time. Its structure looks like:
do {
// Do this.
} while (condition);
For Loop
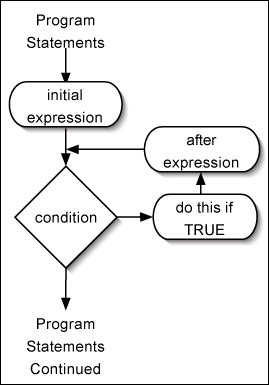
The final control structure we discuss in this chapter (and in the book) is the for loop. Much like while, it will perform an operation for a certain number of iterations. The syntax, though, is vastly different:
for (initial expression; condition; concluding expression) {
// Do whatever.
}
The first time the application encounters the loop, the initial expression will be executed. Then the conditional will be checked. If the condition is true, the statements (marked by Do whatever.) are executed. Then, the concluding expression is run. Finally, the condition is checked again and the process is repeated (except that the initial expression is run only the first time; see Figure 3.18). With the for loop, the concluding expression is usually responsible for ensuring that the condition becomes false at some point.
Figure 3.18. The for loop serves the same purposes as a while loop, but how it works is quite different.
To use a for loop
- Open
factorial.cpp(Script 3.8) in your text editor or IDE, if it isn’t already. - Remove the declaration of the
multipliervariable (Script 3.9).Because the loop itself has a different structure, the variables required by the application will be slightly different. Specifically,
multiplierwill be replaced by another variable within the loop. - Remove the entire
whileloop.Script 3.9. Here, the factorial application has been rewritten using a
forloop instead of awhileloop. Compare with Script 3.8.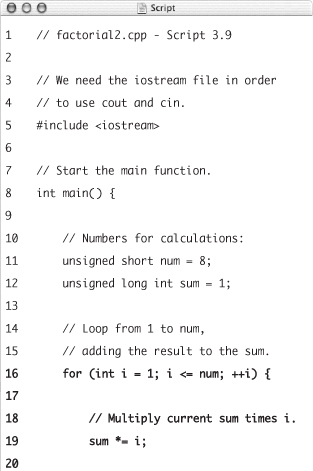
- Begin defining the
forloop.for (int i = 1; i <= num; ++i) {
The for loop begins with the initial expression, which will be executed only once. The expression itself is the declaration of a variable called
iwhose value is initially set as1. Next, the conditional is defined: isiless than or equal tonum? As long as this condition is true, the loop’s body will be executed. The final section of theforloop says what should happen after the loop’s statements have run. After each iteration, theivariable’s value should be incremented. This is the equivalent of incrementingmultiplierin the previous version of the program. - Complete the
forloop.sum *= i;
}Since
iis incremented after the loop’s execution (as part of the loop’s definition), the body of the loop can be just this one line of code. Again, this is the equivalent ofsum = sum * i;
or
sum *= multiplier;
in the previous version of the program.
- Save the file as
factorial2.cpp, compile, and run the application (Figure 3.19).Figure 3.19. A number’s factorial is now calculated using a
forloop instead of awhileloop, but the end result is still accurate.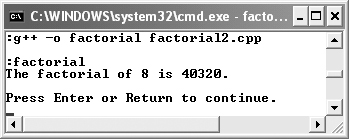
Tips
• Although the for loop often uses only three separate expressions, it’s not limited in that way. The first and last parts of the for syntax (the initial and concluding expressions) can have multiple expressions, separated by commas:
for (int i = 1, int j = 2; (i+j) <= myVar; ++i, ++j) {...
• Conversely, each of the three for loop sections is optional. The code
for (;;) {...
is perfectly valid, although it does create an infinite loop.
• The for loop is often used with arrays to do something with each of the array’s elements. This will be demonstrated in Chapter 6, “Complex Data Types.”
• When nesting for loops, it’s quite common to use a variable called i for the first, outermost loop; j for the inner one; k for one inside of that; and so forth.
• In this last example, something special happened in that the i variable was declared as part of the loop’s structure. Because i is defined there, the variable exists only within the loop itself. Conversely, sum and num exist before, within, and after the loop. You’ll learn more about this concept—called variable scope—in Chapter 5, “Defining Your Own Functions.”