
Chapter Four. Organizing, Comparing, and Sorting
Like megapixel, white balance, and CCD, the term workflow entered the photography lexicon with the advent of the digital camera. Though film photographers certainly have a work-flow, the photography industry of old never really defined it as such. There was “shooting” work, and there was “darkroom” work, but the concept of some sort of “production pipeline” is more of a digital photography convention.
Even if you don’t think you have—or need—some kind of fancy codified workflow, you will at least need to concern yourself with selecting the images from your shoot that you want to edit, preserving the best quality throughout those edits, outputting your images as needed, and archiving your files for safekeeping.
While Apple pitches Aperture as a workflow management tool, Aperture doesn’t lock you in to a particular workflow philosophy, so you can use the program in the way that makes the most sense to you. In this chapter, we’ll look at the organization and sorting tools that Aperture provides, which you’ll use throughout your post-production process.
Defining A Workflow
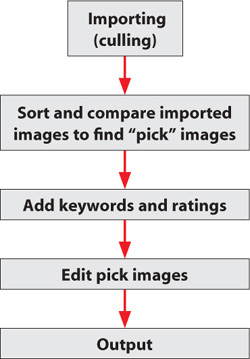
Editing can be time consuming, so you don’t want to waste effort adjusting and correcting images that you won’t ultimately use. So after importing, your next step is to sort through the imported images to find the “pick” images that you want to pass through the rest of your workflow. Some picks are very easy to spot. For others, especially images that are part of a burst sequence, you’ll probably need to compare several images side by side to determine which one you like the best. While sorting and comparing, you will also apply keywords and ratings to make performing searches and outputting your images later easier.
Once you’ve selected your pick images, you’re ready to start editing them. After editing, you’ll be ready to output your finished images in whatever formats and media your project requires.
Finally, with your images output, you’ll back up and archive the whole lot for safekeeping (Figure 4.1).
Figure 4.1. In a basic workflow, you’ll import your images, sort and compare them to find the pick images that you want to edit, add keywords and ratings, edit your images, and output your results.
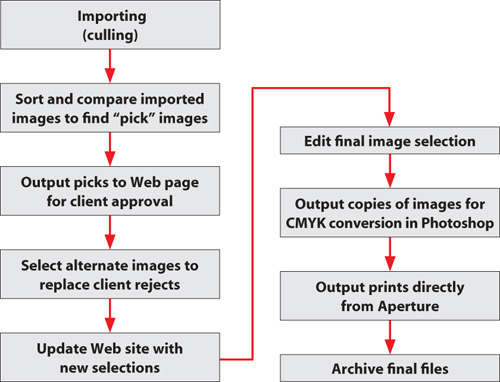
In practice, your workflow may not be so linear. For example, let’s say your final output goal is a set of prints to be delivered to a client. After importing and sorting, you arrive at a set of pick images, but before you begin editing them, you want to output them to a Web page, for client approval. The client rejects half of the images, so you select some alternates and post an updated page. The client signs off on the selection, and so you begin editing the images.
After editing, you post a new Web page, so the client can approve your final images. At this point, the client informs you that, in addition to prints, the client wants a set of high-res CMYK TIFF files, which will be used to create some posters. Now you need to create additional versions of your images for CMYK conversion. The CMYK images will need some additional correction, and both sets of images will need to be sharpened using settings appropriate to their respective sizes.
When all of that is finished, you’ll be ready to archive your final files (Figure 4.2).
Figure 4.2. A real-world workflow is usually more complex than the simple “import, edit, output” ideal. In a complex job, you’ll often create multiple outputs throughout your workflow. Aperture is ideally suited to flexible, changing workflows.
As you can see, workflow doesn’t always follow an “import, process, output” procedure. In the preceding example, you would have to go through several output stages at various points in the workflow. Each of those output processes would result in the creation of more files and versions, which would need to be tracked and managed. And, because different output options can change the appearance of your images—converting to CMYK, for example, can mute your colors—you’ll often have to add a secondary editing stage as you prepare for final output.
Aperture’s nonmodal, nondestructive approach to workflow and editing makes it simple to create and adjust to complex workflows like the one just described. However, though Aperture makes it possible to improvise your way through your post-production work, changing your workflow on the fly as your needs change, it’s still worth giving a little thought to a few simple questions when you first begin importing your images:
• What types of output will you ultimately need to create? Electronic files? Prints? Online delivery? All of the above?
• Will you need to create secondary output, and at what stages of the workflow will this need to happen?
• Do your different output types have particular editing needs and requirements—extra color adjustment after CMYK conversion, for example, or different sizes of output, which will each require custom sharpening settings?
You don’t have to devise any type of complex plan once you’ve answered these questions. It’s simply a good idea to acknowledge them and keep one eye on these concerns as you work.
Working with Keywords and Metadata
As you’ll see later in this chapter, Aperture provides a powerful organizational feature in the form of albums. With albums, you can easily group the images from a shoot into different categories. For example, you might create separate albums for the indoor and outdoor images from a location. Albums are great for grouping images by broad categories. But suppose that, in addition to grouping indoor and outdoor shots, you want to be able to select images that have only male or female models. Do you create separate albums for these, and then separate albums for “female models indoors” and “female models outdoors” and so on?
Keywords and metadata are descriptive words and phrases that can be applied to any image. Because you can apply many different keywords and metadata tags to an image, you can perform very complex searches. In the previous example, you could tag your images with indoor and outdoor keywords as well as male and female keywords. Or you could use albums to divide your images by model gender and then use keywords to search for indoor or outdoor images within each album.
Keywords and metadata have an additional organizational advantage over albums in that they allow for the possibility of future searches that you haven’t thought of yet.
Technically, keywords are metadata. The keywords you enter in Aperture are stored in the version file that you’re working on, along with all of the other non-EXIF metadata (EXIF metadata is stored in the header of the original image file). When we refer to metadata, we’re referring to all of these different categories of metadata.
Defining Keywords
Aperture provides several ways to apply keywords to an image. To add keywords to the current primary select, you can enter the keywords in the Keywords field of the Metadata inspector (Figure 4.3).
Figure 4.3. To add a keyword to the current primary select, enter it in the Keywords field of the Metadata inspector. You can enter keywords for the current selection using the Keyword fields on the control bar and in the Metadata inspector.

If you want to add a keyword to all of the currently selected files, you can enter it in the Add Keyword field on the control bar (Figure 4.4).
Figure 4.4. If you enter a keyword in the Add Keyword field on the control bar, it will be added to all of the currently selected images.
![]()
However, keywording goes much faster if you perform your keywording chores using the keyword buttons on the toolbar and the Keywords HUD. With a little thought, you’ll probably find that you can define most or all of your keywords at once.
The Keywords HUD provides a simple interface for defining keywords (Figure 4.5). You open it by pressing Shift-H or by choosing Window > Show Keywords HUD.
Figure 4.5. The Keywords HUD provides a simple interface for defining keywords, as well as for applying them to batches of images.
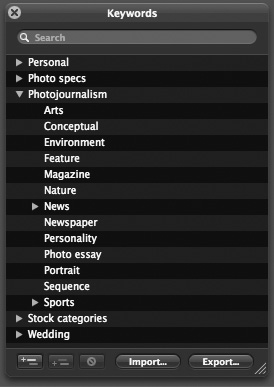
When you first open the Keywords HUD, you’ll find it prestocked with a number of keywords: Weddings, Stock Categories, Photojournalism, and so on. If you click the reveal arrow next to any of these keywords, you’ll find additional keywords related to each subject. Some of those keywords may have subkeywords of their own.
To help you keep your keywords organized, the Keywords HUD lets you create hierarchical keywords. If you group your keywords into hierarchical families, you’ll have a much easier time finding a particular keyword in the Keywords HUD, particularly as your list of keywords grows.
Aperture includes lots of predefined keywords that you may never use. You can easily delete these keywords by selecting them in the Keywords HUD and then pressing the Delete key on your keyboard. When you delete a keyword, any child keywords are also deleted.
Creating Keywords
The Keywords HUD provides two simple buttons for creating keywords (Figure 4.6).
Figure 4.6. You can create and delete keywords using the buttons at the bottom of the Keywords HUD.
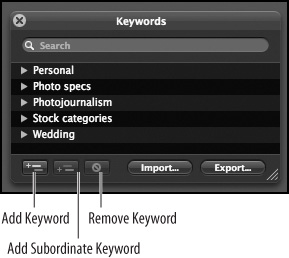
Add Keyword creates a keyword at the same level as the currently selected keyword. If no keywords are selected, it creates a keyword at the root level.
Add Subordinate Keyword adds a child keyword beneath the currently selected keyword. (This button is available only when a keyword is selected.) Subordinate keywords provide a way for you to keep the Keywords HUD organized. If you group your keywords hierarchically, you’ll have a much easier time finding and navigating the Keywords HUD.
Remove Keyword deletes the currently selected keyword.
Adding Keywords to an Image
Aperture provides several ways to apply keywords to an image, and you can freely switch from one to another. Depending on how you have your interface configured, you may find some methods easier than others.
You can assign keywords at any time during your workflow, and you may find that you tweak and change keyword assignments throughout your post-production process. However, you should at least make an initial keyword pass early in your workflow as this will make some later editing operations easier.
Adding Keywords Using the Keywords HUD
In addition to letting you define keywords, the Keywords HUD lets you add keywords to any image using simple dragging and dropping.
1. Select one or more keywords (you can select multiple keywords by Shift- or Command-clicking keywords in the Keywords HUD, just as you can use Shift-and Command-clicking to select multiple images).
2. Drag the selected keywords from the Keywords HUD onto the image that you want to add them to. You can drop keywords onto thumbnails or images displayed in the Viewer pane.
You can add keywords to images that are not selected. Later in this section, you’ll learn more about the use of selections when keywording.
You can quickly find a particular keyword in the Keywords HUD by typing its name in the Search box at the top of the Keywords HUD. As you type, Aperture will display all images that have keywords that match your search.
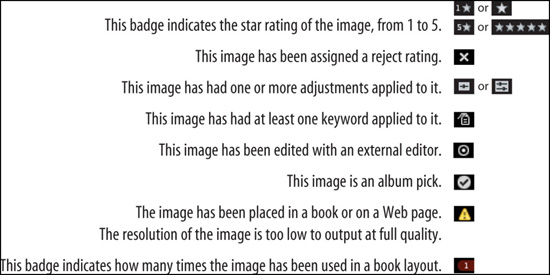
If your current view options include the display of badges, after you add a keyword (using any technique) Aperture will superimpose a small badge over the image in both the Browser and Viewer panes (Figure 4.7), so you can quickly see which images have been keyworded. Later in this chapter, you’ll see how to turn off this display.
Figure 4.7. Images that have keywords applied to them will display a small badge.
Adding Keywords Using the Metadata Inspector
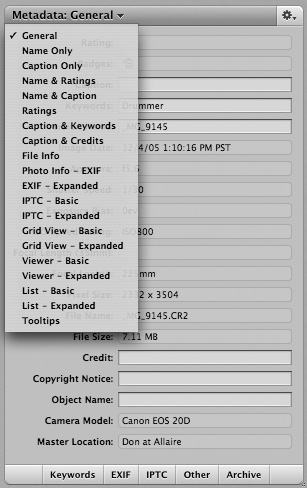
In any layout, you can press I to open the Inspector pane. The Metadata panel in the lower part of the Inspector pane allows you to view all of the metadata of the current primary select. To view the keywords attached to the current image, open the pop-up menu at the top of the Metadata inspector and select General or Caption and Keywords (Figure 4.8). Other sets also allow you to see the keywords metadata; it doesn’t matter which you use to view your keywords.
Figure 4.8. From the top of the Metadata inspector, you can select the meta-data set that you want to view.
Using the Metadata inspector, you can also add keywords to the current primary select by typing keywords directly in the Keywords field in the Inspector pane. You can even type keywords that are not currently defined in the Keywords HUD. Note, however, that if you enter an undefined keyword in the Metadata inspector, that keyword will not be added to the Keywords HUD. Editing keywords in the Inspector pane is really useful only for making simple changes to keywords or for applying keywords that are specific to that individual image.
Adding Keywords Using Control Bar Buttons
The Aperture control bar (the bar full of controls at the bottom of the Aperture window) provides simple buttons for assigning keywords (Figure 4.9). Though there will be times when you’ll use each of Aperture’s keyword controls, you’ll probably find the control bar buttons to be the speediest mechanism for assigning keywords.
Figure 4.9. The Aperture control bar includes, among other things, buttons that let you easily assign keywords.
![]()
By default, the control bar is not visible in all layouts. You can toggle it on and off by pressing Shift-D.
The number of keyword buttons displayed on the control bar depends on the size of your monitor. However, the control bar will expand to fill as much horizontal space as you can provide, so you can see more buttons if you close the Inspector pane and choose a layout that doesn’t have a Projects view, such as the Ratings and Keywords layout.
To add a keyword to the currently selected image using the control bar, click the appropriate button. Note that the first eight buttons are numbered with keyboard shortcuts, which allow you to apply those buttons’ keywords with a single keystroke.
By default, Aperture shows a predefined set of keyword buttons. You can change from one button set to another using the pop-up menu on the right side of the control bar.
Creating a Keyword Button Set
If you have created custom keywords and want to be able to assign them using control bar buttons, then you need to define a new button set.
Follow these steps to create a custom button set:
1. Open the control bar pop-up menu and select Edit Buttons to open the button set editor (Figure 4.10).
Figure 4.10. The button set editor lets you define new keyword buttons for the control bar.
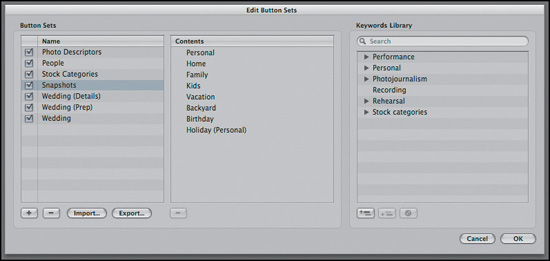
The button set editor is divided into several panels: one that contains a list of the current button sets, a second that displays the contents of the currently selected button set, and a third that displays all currently defined keywords.
When you select a button set in the Button Sets panel, the Contents panel will display all of the buttons that have been defined for that set. As with keywords, Aperture comes with several button sets predefined. Feel free to delete or deactivate the categories that you don’t expect to use.
2. To delete a button set, select it and then click the - button below the Button Sets panel.
3. To deactivate a button set so that it won’t appear in the Button Sets pop-up menu, uncheck the box to the left of the button set’s name.
4. To create a new, empty button set, click the + button below the Button Sets panel and enter a new name. The Contents panel will appear empty because you have not yet added any buttons to your new set.
The Keywords Library panel includes the exact same display and controls as the Keywords HUD. With it, you can add and delete keywords and use the Search box to find a particular keyword.
5. To add keywords to the currently selected button set, drag the keywords from the Keywords Library panel into the Contents panel.
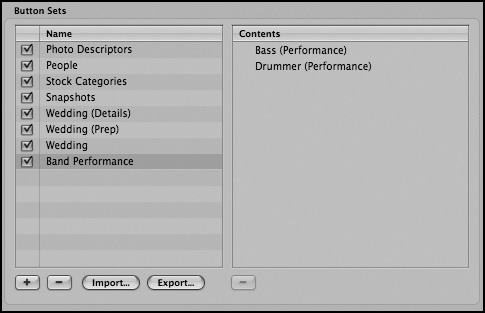
Note that if you drag a subordinate keyword, its parent will be listed in parentheses (Figure 4.11). However, these parenthetical additions will not be displayed on the buttons themselves, so if you have two subordinate keywords with the same name, you may want to edit the names to make them more easily identifiable when they’re displayed alone on the buttons in the control bar.
Figure 4.11. Subordinate keywords are displayed with their parent keyword in parentheses.
6. When you’re done creating your button set, click OK to save the set and dismiss the Edit Button Sets dialog box.
Note that Aperture does not automatically display any of the new button sets. To see your new buttons, you must select them from the Button Set pop-up menu on the control bar.
You can add as many buttons as you want to a button set. However, as you add buttons, Aperture will need to display them at smaller and smaller sizes to fit them on the control bar. In addition, only the first eight buttons receive keyboards shortcuts (the keys 1 through 8). If you want to be able to drive your keywording efforts entirely from the keyboard, then you should confine your button sets to eight buttons.
As you’ll see in a moment, Aperture provides keyboard shortcuts for changing from one button set to another. To facilitate completely keyboard-driven keywording, you should create several button sets of eight buttons each rather than one giant button set with lots of buttons. If you confine your keywords to the first eight buttons in a set, then you can add them to an image by selecting the image and pressing 1 through 8.
Switching Between Button Sets
You can switch to the next or previous button set using the . (period) and , (comma) keys. If you keep related button sets next to each other in the button set list, then you can easily switch between sets and apply the bulk of your keywords without ever touching the mouse.
If you have unchecked any button sets in the Edit Button Sets dialog box, then the Button Set pop-up menu on the control bar may become confused if you change button sets using the . and , keys. If you find yourself facing this issue, try deleting the unwanted button sets rather than unchecking them.
With a little thought, you can strategically place your buttons so that commonly used keywords have a keyboard equivalent, and keywords that you use only rarely are applied using the mouse. In our example, we relegated the broad categories of Performance and Rehearsal to mouse-driven buttons because we can very quickly select the relevant images and apply these two keywords; then we can step through our images individually to apply other relevant keywords using the keyboard.
Adding Keywords to Multiple Images
By default, when you have multiple images selected, if you click a keyword button on the button bar, all of the selected images will receive the keyword. Similarly, if you drag a keyword from the Keywords HUD to any of the selected images, all of them will receive the keyword.
However, there may be times when you have multiple images selected so that you can view them side by side, but you want to assign a keyword only to the primary select. Aperture facilitates this operation through the Toggle Primary Only button on the toolbar (Figure 4.12).
Figure 4.12. The Toggle Primary Select button lets you control whether keywords are applied to every image in a selection or just to the primary select.
![]()
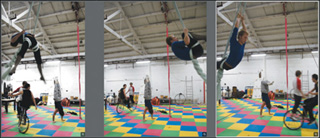
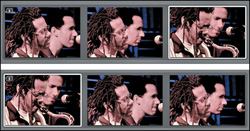
When Toggle Primary Only is activated, keyword buttons apply only to the primary select. You can tell when Toggle Primary Only is active because the thin white selection lines disappear from the secondary selects in the Viewer pane (Figure 4.13). Note that the Browser display does not change.
Figure 4.13. When Toggle Primary Select is on, only the primary select shows a selection border.
With Toggle Primary Only activated, dragging and dropping from the Keywords HUD will affect only the image that you drop onto, whether it’s the primary select or one of the secondary selections. As before, you can also drop onto any thumbnail.
Editing metadata in the Metadata inspector always affects only the primary select.
Editing other metadata
Just as you can edit keywords using the Metadata pane, you can edit many other metadata items.
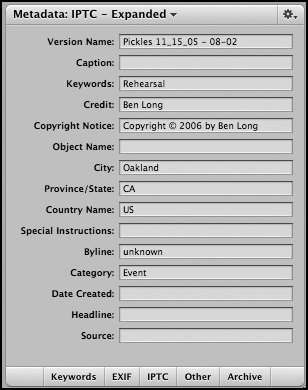
From the pop-up menu at the top of the Metadata inspector, select the IPTC – Expanded metadata set. This selection displays all of the standard IPTC metadata fields (Figure 4.14). You can freely edit any of these tags by entering data directly in the fields of the Metadata inspector.
Figure 4.14. The IPTC - Expanded metadata set in the Metadata inspector lets you view all of the standard IPTC fields.
You cannot edit EXIF metadata using Aperture (or most other programs). There’s really no need to edit EXIF metadata except the time stamp, and as you saw in Chapter 3, Aperture lets you store an adjusted time stamp with each version that you create.
Lifting and stamping metadata
Often, the easiest way to apply a complex set of keywords and metadata to an image is to copy the data from an image that you’ve already edited. Aperture’s Lift and Stamp tools let you copy certain types of metadata from one image and paste it onto another image.
1. Select the Lift tool by clicking its icon in the toolbar or by pressing O.
2. Click an image that has the metadata and keywords that you want to copy.
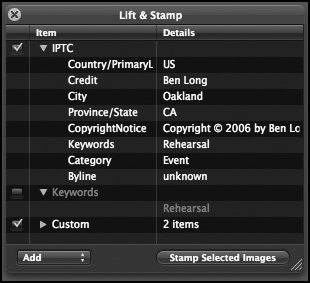
After you click, Aperture will display the Lift and Stamp HUD, which lets you select the metadata tags that you want to copy (Figure 4.15). For example, if you want to copy only the IPTC metadata and keywords but not the keywords, you can uncheck Keywords and any other items that may be listed.
Figure 4.15. The Lift & Stamp HUD lets you select exactly which metadata you want to copy from one image to another. In this case, we’re taking the IPTC tags and some custom metadata, but not the keywords.
After lifting, the Lift tool will automatically turn into the Stamp tool.
3. With the Stamp tool, click another image to apply the lifted metadata to that image.
At the bottom of the Lift and Stamp HUD is a pop-up menu that, by default, says Add. In Add mode, Aperture will stamp only the metadata tags that don’t already exist in the target image. If you change the menu to Replace, then the Stamp tool will replace all of the metadata in the target image.
If you performed any time or date adjustments when you imported the images, these adjustments will be listed as custom metadata tags.
Stamping Multiple Images
There are two ways to lift from one image and stamp onto a range of other images:
• After lifting, click the Stamp tool on the first image in the range of images that you want to stamp. That image will be stamped. Then Shift-click the last image in the range of images that you want to stamp. The last image and all of the images between it and the first image you clicked will be stamped.
• First select all of the target images that you want to stamp onto. Then use the Lift tool to click the thumbnail of the image that you want to copy from. When the Lift and Stamp HUD appears, click the Stamp Selected Images button to apply the lifted data to all of the selected images.
You can switch to the Select tool (the arrow cursor) at any time by pressing A. This shortcut is handy when you want to drop the current lift without stamping something.
Copying and Pasting Metadata
You can also copy and paste metadata from one image to another.
1. Select the image that you want to copy from.
2. Press Command-Shift-C to copy the metadata, or choose Metadata > Lift.
Unlike with the Lift and Stamp tools, Aperture won’t show you the Lift and Stamp HUD. In fact, you’ll get no feedback that any data was actually copied.
3. Select the images that you want to apply the copied metadata to. You can select as many images as you want, and Aperture will apply the metadata to all of them.
4. Press Command-Shift-V or choose Metadata > Paste to apply the copied metadata to the selected images.
When you copy and paste metadata in this way, only the fields that have data are copied. For example, if you copy metadata from an image that has only a version name and then paste that metadata onto an image that already has a version name and a caption, only the version name will be pasted. The original caption will remain the same.
As you may already have noticed, the keyboard shortcuts for copying and pasting metadata are simple variations on the standard Command-C, Command-V shortcuts for copying and pasting.
Building Metadata Template Images
You’ll probably find that you routinely want to apply the same metadata to new batches of images. Although Aperture lacks a built-in metadata template facility, if you tag some documents using metadata that you routinely use, then you can easily lift and stamp these tags onto new images that you import into Aperture.
With just a little bit of effort, you can create a library of useful metadata sources.
1. In your image editor of choice, create a 200 × 200-pixel RGB document.
2. Using a large, easy-to-read typeface, fill the document with text that describes a group of metadata (Figure 4.16).
Figure 4.16. Using an image editor, you can create custom images that serve as metadata templates.

3. Save the document using a descriptive name. To conserve space, save the file as a JPEG image.
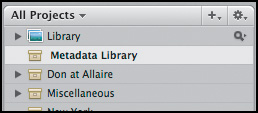
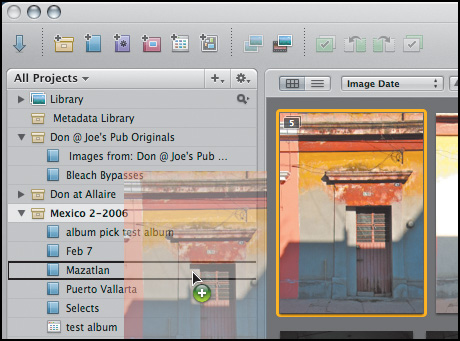
4. In Aperture, create a new project called “Metadata Library.” Note the space at the beginning of the name. This will ensure that the Metadata Library project always sits at the top of your project list (Figure 4.17).
Figure 4.17. You can keep your metadata templates in a special metadata project so that they’re always readily available for lifting and stamping.
5. Import the document you just created into your Metadata Library project.
6. Select the imported image and configure the metadata as needed.
You can now use the Lift and Stamp tools to copy this set of metadata to any other images.
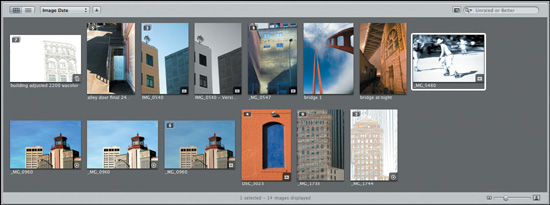
Repeat the procedure to create additional metadata template documents. Because the image contains the name of the metadata template, you’ll be able to select the appropriate template simply by looking at the thumbnails in the Metadata Library project (Figure 4.18).
Figure 4.18. You can easily spot the correct metadata template in your metadata library by looking at its thumbnail.

To further organize your metadata library, color-code the backgrounds of the metadata template documents you create.
Changing Metadata with Batch Change
You can also change metadata using the Batch Change command. Select the images you want to change and then choose Metadata > Batch Change or press Command-Shift-B. In the Batch Change dialog box, you can adjust the time zone of the selected images, as well as the version name or any other metadata field (Figure 4.19). (This is the same interface that you saw earlier in the Import dialog box; you can learn more about how it works in Chapter 3.)
Figure 4.19. The Batch Change dialog box lets you change the metadata tags, as well as the time offset and version name, of all currently selected images.
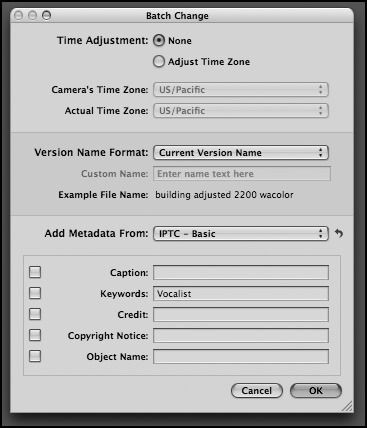
Be aware, though, that metadata tags that you define in the Batch Change dialog box are not added to your existing metadata fields; metadata tags that you define here replace any existing metadata tags on the selected images.
Controlling the Metadata Display
One of the most useful things you can do with metadata is simply view it. Aperture provides many ways to see the metadata attached to your images.
Viewing Image Tooltips
When you hover the mouse over an image thumbnail or an image in the Viewer pane and press T, Aperture displays a tooltip panel containing a selection of metadata for that image (Figure 4.20). You can also choose View > Image Tooltips to see this same display.
Figure 4.20. If you hover the mouse over any image or image thumbnail and press T, Aperture will display a floating HUD of metadata. Press T again to dismiss this display.
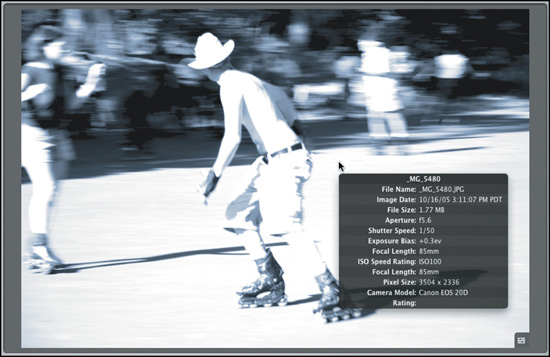
Once you’ve activated Image Tooltips, you can move the mouse over any other image or thumbnail to see its metadata tooltip.
Image Tooltips is a toggle; press T again to deactivate its display.
Viewing Metadata Overlays
In both the Browser and Viewer panes, Aperture can overlay metadata, allowing you to see the original file name, version name, rating, exposure setting, keywords, and any other metadata that you care to display.
1. Choose View > Metadata Overlays > Grid View, or press U.
Aperture toggles the metadata overlays superimposed on the image thumbnails in the Browser pane (Figure 4.21).
Figure 4.21. When you activate metadata overlays for the Browser pane, Aperture will superimpose metadata information such as the filename and badges.
2. Switch to a layout that provides a Viewer pane, such as Standard Layout (Command-Option-S).
3. Select an image to view in the Viewer pane and give that image a three-star rating by pressing Command-Option 3.
You’ll learn more about ratings in the next section.
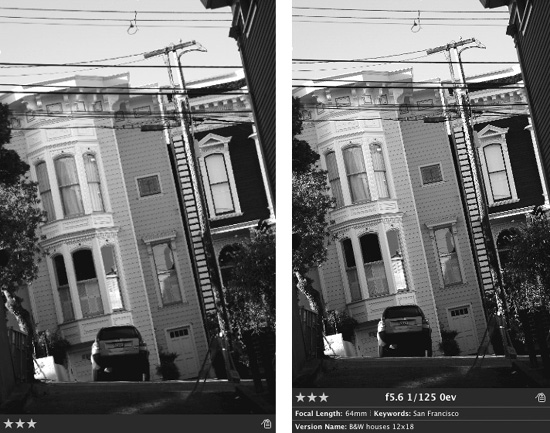
4. Choose View > Metadata Overlays > Viewer, or press Y, to toggle the display of metadata information in the Viewer pane (Figure 4.22).
Figure 4.22. Aperture can also display metadata overlays in the Viewer pane. Here, the current rating is superimposed over the image.

A three-star rating will appear in the lower-left corner of the image. This is the only metadata that is currently configured to appear in the Viewer metadata overlay.
Using these two keyboard shortcuts—U for the Browser overlays and Y for the Viewer overlays—you can easily turn metadata overlays on and off as you need them.
Changing the Metadata Overlay Display
Being able to see metadata superimposed on your image or thumbnail can be a great time-saver, particularly when you’re sorting and comparing your images. However, these displays are useful only if they show the information that you need. You can select the metadata you want shown in the metadata overlays by using the View Options dialog box.
1. Choose View > View Options or press Command-J.
The View Options dialog box (Figure 4.23) presents three panels for configuring your metadata overlay display. The first lets you configure the Viewer overlays, the second lets you specify the overlays for grid view and list view, and the third lets you control what is displayed in the Image Tooltips overlays.
Figure 4.23. Using the View Options dialog box, you can specify what metadata gets displayed when you activate metadata overlays in the Browser or Viewer pane. View Options also lets you configure the data that is displayed in the Image Tooltips pane.
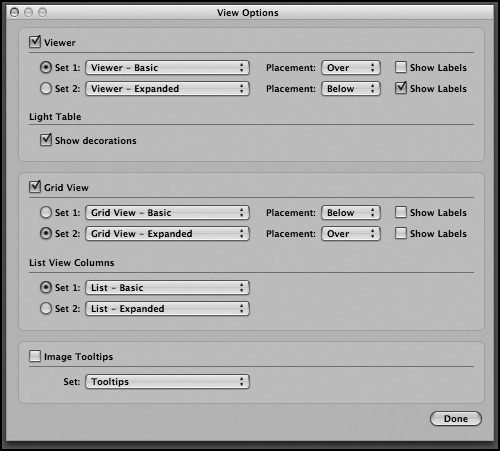
For both the Viewer and Browser overlays, you can use the Placement pop-up menu to specify whether you want metadata superimposed on your images or listed below.
If you select the Show Labels option, then each metadata field will be labeled.
By default, the Viewer Set 1 overlay is configured to show the Viewer – Basic meta-data set. The Viewer Set 2 overlay defaults to showing the Viewer – Expanded metadata set, but with the metadata displayed below the image and the metadata labels turned on.
2. Click Done to dismiss the dialog box; then make sure that the Viewer metadata overlay is active by choosing View > Metadata Overlays and making sure that Viewer is checked.
With an image selected, you should see a very basic metadata overlay—probably just a rating.
3. Press Shift-Y to change from metadata overlay Set 1 to Set 2.
The image should shrink a little bit, and beneath it you should see, in addition to the rating, a detailed display of exposure information (Figure 4.24).
Figure 4.24. You can switch between two metadata sets by pressing Shift-Y, giving you easy access to a tremendous amount of metadata.
4. Press Shift-Y again, and Aperture will switch back to Set 1.
With a little planning, you can define two sets of metadata that include all of the information that you’ll ever want to view. At any time, you can switch between the two sets by pressing Shift-Y, or you can completely turn off the viewer metadata overlay by pressing Y.
You can perform the same type of configuration for the Browser pane by selecting different view sets in the Grid View pane of the View Options dialog box. You can toggle between these two sets by pressing Shift-U.
You can also customize the Image Tooltips view by selecting a different metadata set in the Image Tooltips pop-up menu of the View Options dialog box.
Defining a Metadata Set
Aperture takes a nice approach to metadata management. In the Metadata inspector, you can define sets of metadata tags and then select these sets from any of Aperture’s metadata viewing facilities. With this global approach, you don’t have to reconfigure the same meta-data selections in different parts of the program.
We’re going to create a simple metadata set right now to fix one small shortcoming in Aperture’s stock Browser view. By default, the metadata overlays for Aperture’s Browser pane display the version name of each image. Sometimes, though, you may want to see the original filename instead of the version name, especially once you start saving the same image in multiple formats.
None of Aperture’s standard metadata sets include a “filename with extension” option, so we’ll create a new set that provides this feature.
1. Open the Metadata inspector.
2. Open the action menu in the upper-right corner of the Metadata inspector and choose New Set.
3. Name the new set Filename with Extension.
The new name will appear at the top of the Metadata inspector to indicate that this set is currently active. The inspector itself will be empty, since the set currently contains no tags.
The Other metadata category is displayed (Figure 4.25).
Figure 4.25. At the bottom of the Metadata inspector pane, you can select various categories of metadata tags to add to the current set.
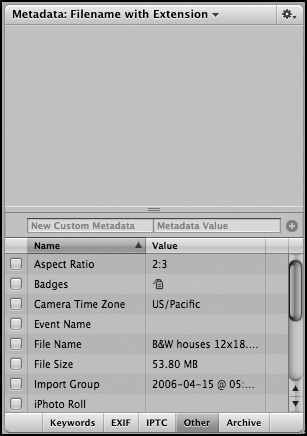
5. Select the check box next to File Name.
The File Name tag is added to the current set.
6. If you don’t have an image selected, select one now. Its name should appear in the File Name field in the Metadata inspector.
Note that the Browser view is still not showing filenames. This is because the Browser View preference is not configured to display this set. We’ll get to that in a moment.
7. You can select any other information that you want to display. If the tag you want does not appear in the Other category, then click one of the other buttons—Keywords, EXIF, and so on—to display those tags. When you’re finished, click the selected category button again to close the keyword display.
8. Open the View Options dialog box by pressing Command-J.
9. In the Grid View Set 1 pop-up menu, select Filename with Extension. Configure the rest of the options as you like and then click Done.
10. If necessary, activate the Grid View metadata overlay by pressing U.
You should see the full filename with the extension displayed for each image (Figure 4.26).
Figure 4.26. After you define the new set and select it in the View Options dialog box, the Browser pane displays filenames beneath each thumbnail.
If you like, you can also use this set for the Viewer display. Note that you can edit existing sets by selecting the set you want to edit and then choosing Edit Current Set from the action menu in the upper-right corner of the Metadata inspector. You may want to edit the set that you’re using for your tooltip display to also include the full filename.
Figure 4.27. Aperture displays several different types of badges, which help you monitor the status of your images.
Using Sort Groups
If you select the Add Gaps Between Sort Groups preference in the Aperture Preferences dialog box, gaps will be placed between collections of thumbnails with similar metadata.
When this option is turned on, Aperture adds space between groups based on the type of sorting you have selected.
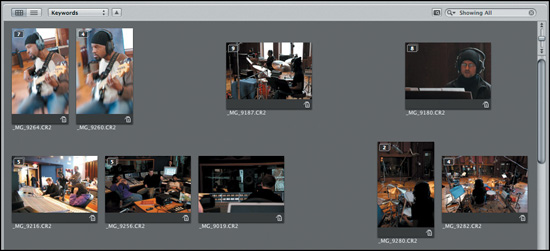
For example, in Figure 4.28, the Browser pane is being sorted by keyword (as indicated by the pop-up menu at the top of the Browser pane), so Aperture automatically added space between groups of images that have the same keywords.
Figure 4.28. When Add Gaps Between Sort Groups is selected, Aperture automatically separates images into groups based on the current search criteria.
Working With Stacks
Very few photographers shoot only a single frame of a particular subject or moment. Whether it’s to experiment with different exposures or compositions or to try to capture a fleeting moment in an ever-changing scenario, most photographers tend to cover their subjects with large batches of images.
Of course, while shooting multiple images is a great way to improve your odds of getting a usable shot, it’s also a great way to complicate your post-production workflow. In addition to having more images to transfer and manage, you have to take the time to select the best image from each batch.
Just as film photographers sort related slides or prints into piles for comparison, Aperture lets you sort your images into virtual stacks. At the simplest level, stacks provide an organizational structure for keeping groups of related images together. But Aperture improves on this simple grouping idea with a sophisticated comparison mechanism that eases the process of selecting the best image from a stack. And, as you’ll see later in this chapter, stacks can have a profound impact on the rest of your workflow.
You got a brief introduction to stacks in Chapter 3, because Aperture provides simple stacking tools within its Import dialog box. These same tools are available in the main Aperture application.
Stacking is an incredibly powerful, unique Aperture feature, so it’s worth spending some time learning the following concepts.
Stack Basics
You can easily create a stack by selecting multiple images, either consecutive or not, and then choosing Stacks > Stack or pressing Command-K.
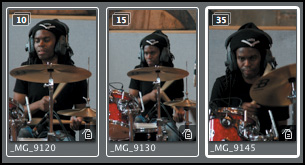
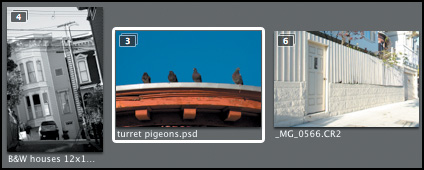
Stacks are displayed like a normal series of thumbnails, but enclosed in a gray border. The first image in the stack includes a small number to indicate the number of images contained in the stack (Figure 4.29). If you click the image, the stack will “close,” and only the first image of the stack will be visible (Figure 4.30).
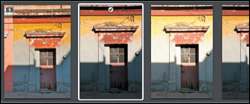
Figure 4.29. After stacking, these three images are enclosed in a gray box with a badge on the first image indicating the number of images in the stack.
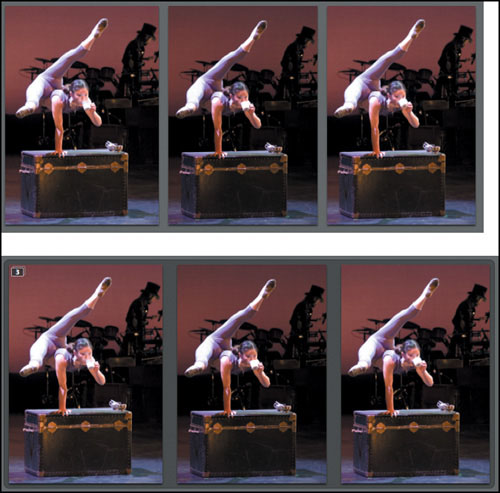
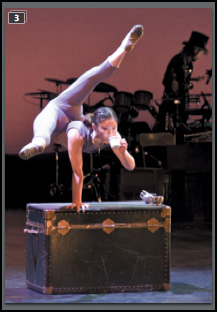
Figure 4.30. A closed stack displays the first image of the stack along with the stack number badge.
You can quickly open all of the stacks in the project you’re currently viewing by pressing Option-’ (apostrophe) or by choosing Stacks > Open All Stacks. You can close all stacks by pressing Option-; (semicolon) or by choosing Stacks > Close All Stacks.
When stacked, your images behave just as they normally would. You can select and deselect them, edit them, add keywords and metadata, and so on. The stack structure itself doesn’t impede any of your normal operations.
Creating a Stack
To create a stack, select the images that you want stacked together and then choose Stacks > Stack or press Command-K. The images will be combined into a stack. They will appear in the stack in the same order in which you selected them.
Adding to a Stack
There are two ways to add images to an existing stack:
• In the Browser pane, drag images and drop them onto an existing stack. A vertical green bar will appear to indicate where the image will be placed in the stack (Figure 4.31).
Figure 4.31. You can drag and drop an image onto an existing stack. A green bar shows where the image will be inserted.

• Select the images that you want to add to the stack; then select any image in the destination stack. Press Command-K or choose Stacks > Stack. The selected images will be added to the end of the selected stack.
You can combine any two stacks by selecting any number of images from each and then executing the Stack command.
Removing Images from a Stack
There are three ways to remove an image from a stack:
• If you decide that you want to remove an image from a stack, simply select it and drag it to a new location in the Browser pane. A vertical green bar will indicate the image’s new location.
• Select the image and choose Stacks > Extract Item. If you’re working in full-screen mode and can’t see the Browser pane or menu bar, you can extract the item by pressing Command-Shift-K.
• You can break a stack into smaller stacks by selecting an image in the stack and then choosing Stacks > Split Stack or pressing Option-K. The stack will be split in two at the point just before the image you selected.
Moving Images within a Stack
There are many ways to move images within a stack. The most basic way is to simply drag them about within the stack (Figure 4.32).
Figure 4.32. One way to rearrange the images in a stack is to drag them to a new location within the stack.
Moving a stack
Just as you can rearrange images in the Browser pane to put them in a custom order, you can rearrange stacks. However, be aware that a stack must be closed before you can drag it to a new location. If you click an image in an open stack and start dragging, you’ll drag the selected image out of the stack rather than moving the entire stack.
Unstacking
You can completely break apart a stack and restore all of its images to regular, unstacked images by selecting any image within a stack and choosing Stacks > Unstack.
You can unstack all of the images in a project by choosing Edit > Select all or pressing Command-A and then executing the Unstack command.
Auto-stacking
As its name suggests, Aperture’s Auto-Stack command can automatically create stacks for you. Auto-Stack works by assuming that images shot within a particular span of time probably belong in the same stack.
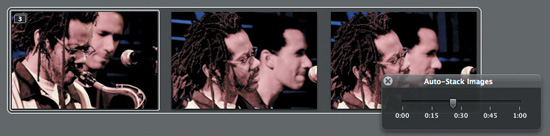
To auto-stack all of the images in a project, choose Stacks > Auto-Stack. Aperture will present the Auto-Stack Images HUD, a simple slider that works just like the Auto-Stack slider in the Import dialog box.
As you move the slider to the right, the images in your project will automatically group together into stacks (Figure 4.33). If, for example, you set the slider to :10, then all images shot within 10 seconds of each other will automatically be collected into separate stacks.
Figure 4.33. As you drag the slider in the Auto-Stack Images HUD, your images will automatically clump together into stacks.
You can continue to use all of the normal stacking operations—moving images in and out of stacks, splitting stacks, and so on—while the Auto-Stack Images HUD is open.
When the auto-stacking feature encounters a series of images that it thinks have been bracketed, it will automatically group them into a stack and set the neutral image—the one shot at the camera’s recommended metering—as the pick of the stack. The alternate exposures will be included in the order they were shot.
Picking and Comparing
While you can place the images in a stack in any order, the first image—the leftmost image—is considered the pick of the stack. It is the image that is displayed when the stack is closed, and it has special relevance for many Aperture commands.
So far in this chapter we’ve been taking things in a particular order—adding keywords, now stacking—but in a real-world workflow, you’ll often be performing these operations simultaneously. You’ll probably also be rating your images at the same time, a topic we’ll cover after stacking. Because of Aperture’s nonmodal design, you can easily mix all of these different tasks. So just because we’re choosing to look at them separately, don’t think that your workflow has to proceed in this order.
Selecting a New Pick
The leftmost image in a stack is always the pick, but you can easily assign a new pick by selecting another image in the stack and then pressing Command- or choosing Stacks > Pick.
1. Switch to Standard layout by pressing Command-Option-S.
You can use any layout for making a pick, but for the sake of this exercise, we want both a Browser and a Viewer pane.
2. In the Browser pane, open a stack and select an image in that stack other than the pick.
3. Press Command- to set the selected image as the new pick (Figure 4.34).
Figure 4.34. Here, the last image in this stack is selected; pressing Command- will promote the image so that it becomes the pick.
The selected image will move to the leftmost, first position in the stack. The image that was in the first position will shift to second place, and all other images will be shuffled down. Because Aperture shuffles the old pick down as you try different picks, your images will automatically fall into order from best to worst.
It doesn’t matter whether you select your new pick image in the Browser or Viewer pane. The Pick command will make whatever is the primary select the new pick.
Using Stack View
Aperture’s ability to simultaneously display multiple images side by side makes comparing and picking much easier than in a program where you must open separate documents for each image. To make comparisons even easier, though, Apple has added some features specifically for performing comparisons.
On the left side of the control bar is a pop-up menu called Viewer Mode (Figure 4.35). The options in the Viewer Mode menu let you change the way that Aperture displays selected images.
Figure 4.35. The Viewer Mode menu on the control bar lets you change the way that Aperture displays selected images in the Viewer pane.
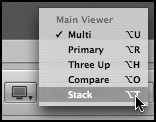
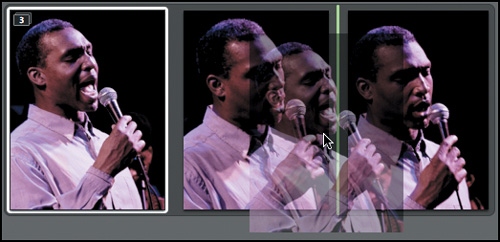
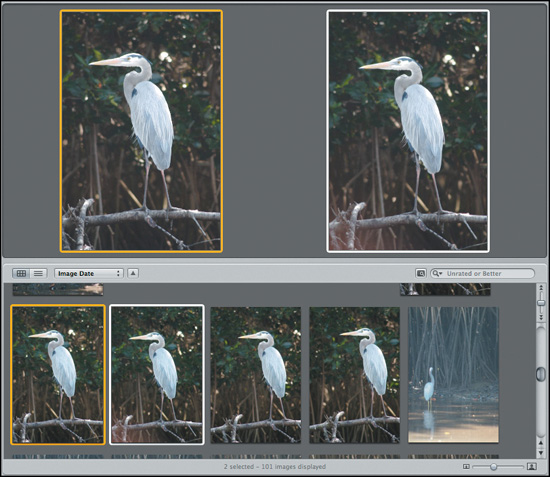
When you select Stack, Aperture displays the pick of the current stack on the left side of the Viewer pane. The second image in the stack is placed on the right side of the Viewer pane (Figure 4.36).
Figure 4.36. In Stack mode, you can easily compare all of the images in a stack against the current pick, replacing the pick with better candidates along the way.
As you press the Left and Right Arrow keys to change the current selection, that image is shown on the right, allowing you to easily compare the pick image to all of the other images in the stack. When you find a new image that you like better, press Command- or choose Stacks > Pick to make that new image the pick.
Using Stack view, you can very quickly compare all of the images in a stack to find the best pick. Here are some other points to keep in mind while comparing:
• You can use the Promote and Demote commands to move the currently selected image up and down the stack. Choose Stacks > Promote or Stacks > Demote, or press Command-[ to promote the image or Command-] to demote the image.
• If you can’t decide between the pick and the current select because they’re both good enough to be picks, then press Command-Shift-K to extract the current selection from the stack (you can also extract by choosing Stacks > Extract). Now you’ll have easy access to both images.
• You don’t have to have a Viewer pane visible to use Stack view. If only the Browser pane is visible, you can still use Stack view; you just won’t have a large preview of the images.
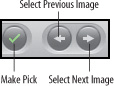
• If you prefer using the mouse for organizing your stacks, you can use the stack buttons on the control bar (Figure 4.37).
Figure 4.37. Using the buttons on the control bar, you can perform all of your stack comparison operations using only the mouse.
Using Stacks
Stacks are interesting entities because in one way they act as containers and in another way they act as images. Once you’ve stacked your images, you can close the stacks and forget about all of your alternate images. They’re there if you need them, and you can always reorder or fiddle with them, but for the most part you can focus the rest of your workflow on your stack picks: the images at the front of your stacks.
To understand the full value of stacks, let’s take a quick look at how to use stacks with some other parts of Aperture.
Adding a Stack to an Album
As you saw in Chapter 2, albums are organizational structures that allow you to create groups of images without duplicating any of the media in your library.
You can add a stack to an album by dragging it into the album, just as you would any other image (Figure 4.38). Aperture adds the entire stack to the album, not just the stack pick.
Figure 4.38. To add a stack to an album, just drag it to the album as you would a regular image.
Now try this:
1. Open a stack and select an image in the stack that is not the pick.
2. Drag that image to an existing album.
3. Open the album and examine it.
You should see the stack that included the image that you added, but the stack pick will be the image shown at the front of the stack, not the image you dragged.
If an image that’s in a stack is not the pick and you want to add that image to an album, you can always extract it from the album and then add the individual image. However, there’s a much better way that doesn’t require you to break your stack groupings.
Defining an Album Pick
When you put any image from a stack into an album, Aperture places the entire stack in the album, but always defaults to displaying the stack’s pick image. If you want to display a different image from the stack, then you will need to specify a different image in that stack as the album pick for that album. Defining an album pick is simple.
1. Place the stack that contains your desired image in the album of your choice.
2. Open the stack and select the image that you want to appear at the front of the stack in that album.
3. Choose Stacks > Set Album Pick or press Command-Shift-.
A check mark badge will appear on the image (Figure 4.39).
Figure 4.39. This stack was placed in an album, but we want the second image to appear at the front of the stack instead of the pick. To accomplish this, we set the second image as the album pick. It will now appear at the front of the stack in that album.
When you close the stack, the album pick image will be displayed at the front of the stack. The stack pick remains the same—if you return to the library, you’ll still see your original pick at the front of the stack—but for this one album, the album pick that you defined appears at the front of the stack.
You can define separate album picks from the same stack for any number of albums, Smart Albums, Web journals, books, or Web galleries.
Stop Thinking about your Images like Documents
Stacks are a deceptively simple concept. The full implication of the effect of stacks on your workflow may not be immediately obvious, and this is partly because they represent a very different way of working with your computer.
Consider the following pre-Aperture workflow scenario:
You’ve been asked by a local promoter to cover an arts festival. He’s hoping for photos that can be used as promotional materials and posters for next year’s festival, so you spend several days shooting people and artists and performances at a variety of locations.
When you’re finished, you copy the images to your computer and use your favorite image cataloger to sort them and find a selection of your best two dozen shots. You edit these and build them into a slideshow using your favorite presentation program.
The client comes to your studio and views your slides. He’s very pleased with your work and likes everything except for a couple of pictures of some dancers. He asks if you have any alternatives. You immediately remember some other shots that you now believe he’d like better.
You quit your presentation program and go to your folder of arts festival images. These images all have incomprehensible, camera-generated names, of course, so you have to open the images in a file browser and find the right ones. Once you’ve found the names, you import those images into your slide-show presentation and start your presentation again. Of course, these images haven’t been edited, so you have to ask your client to imagine them looking as good as the ones they’re replacing.
In this scenario, the amount of time needed to perform all of this document management and searching will vary depending on how many files you have to wade through and how fast your computer is. In addition, depending on the software you’re using for image browsing and slideshow creation, you may need to save your images in different formats as you move them around.
Now consider the same scenario using Aperture:
After shooting the arts festival, you import your images into Aperture. You use the auto-stacking feature to automatically group the pictures into stacks of related images. Then you work your way through your project, rating your images and making your picks. Finally, you move your select images into an album and perform some quick color and tone adjustments.
You invite the client over and show him the album as a slideshow. When he gets to the dancer images that he doesn’t like, though, and asks for alternatives, you remain in Aperture. Because your images are stacked, you can very easily find alternatives. You simply open the stack that contains the image that the client doesn’t like and look inside. Because the stack contains all of the additional related images, you can quickly present a range of alternatives. When the client identifies the image he likes better, you make that image the pick of the stack.
You give it a quick crop and then use the Lift and Stamp tools to copy the color and tone adjustments from the former pick to the new one.
Now when you run the slideshow, the new image appears in place of the old one. What’s more, it already has reasonable color and tone corrections, so the client gets a very good impression of what the final image will look like.
The thing to realize about stacking is that it not only lets you keep your images organized within Aperture; it also obviates the need for most of the document management that you normally have to perform in the Finder. In fact, with Aperture you can stop thinking about individual documents at all. With your images stacked, you only need worry about the pick images that you choose to work with. However, if you ever happen to need another image, you can simply open the relevant stack to find it. With stacks, all related images travel with your pick at all times.
Comparing Images
Sometimes you will want to compare images that aren’t stacked, or to compare images from different stacks. Although you can always manually select multiple images for your comparisons, Aperture also provides a special Compare view that offers some additional functionality.
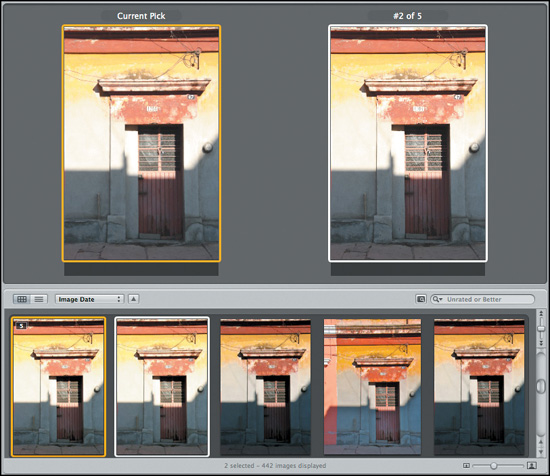
You must be in a layout that has a Viewer pane to use Compare view. To enter Compare view, select an image and press the Return key. The selected image will appear in the left half of the Viewer pane and will be bordered by a yellow selection rectangle (Figure 4.40). The next image in your project will appear to the right.
Figure 4.40. Compare mode is a lot like Stack mode, but it lets you compare images that aren’t currently stacked.
Navigating Compare view is simple:
• Pressing the arrow keys changes the image displayed on the right.
• If you decide that you like the right image better and want to begin comparing against it, press Return. The image will move to the left side of the Viewer pane and will become the new compare source.
• You can also change the compare source by holding down the Option key while you use the arrow keys.
If you’re in a stack, you can use the Promote and Demote commands to move the right image up and down the stack. Note, though, that unlike Stack mode, Compare mode doesn’t restrict you to comparing only images within a single stack.
Rating Images
When you stack images, you automatically get a simple, default sort of rating in the form of the pick. With a stack, you know that the first image is the best image in the stack. But Aperture’s rating capabilities go far beyond simple stack picks.
Aperture allows you to assign a rating of one to five stars to any image. In addition, you can assign a Reject rating or no rating at all. Image ratings are searchable, so you can quickly filter out only the best, five-star images in a project, album, or any other Aperture construct, including the entire library.
There are several ways to apply a rating to the current selection of images:
• Select a rating from the Metadata menu (Figure 4.41).
Figure 4.41. You can assign a rating to an image by selecting the rating from the Metadata menu.
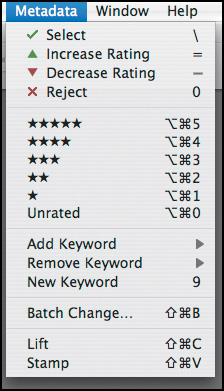
• Use a rating keyboard shortcut. Command-Option 1 through 5 will apply a rating of 1 to 5, while Command-Option-0 will delete an existing rating. You can assign a Reject rating by pressing X.
• You can increase or decrease an existing rating by one star by pressing + or - or by choosing Metadata > Increase Rating or Metadata > Decrease Rating. If the current selection has no rating, increasing will add one.
• If you prefer rating with the mouse, you can use the rating buttons on the control bar, to the left of the keyword buttons.
• To quickly add a rating of five stars, press the key.
No matter which control you use, every selected image will receive the rating (or change of rating).
Note, too, that lifting and stamping (or the keyboard equivalents) copies ratings along with all of the other image metadata.
Strategies For Controlling Aperture
Aperture’s interface can be easily driven using the mouse or the keyboard, or some combination of the two. You’ll usually perform your rating, sorting, and comparison tasks at the same time, so the controls for these features have been configured to make it easy to perform these tasks together.
Rating, Sorting, and Comparing Using the Mouse
If you’re a mouse-oriented Mac user, then you’ll be glad to know that you can perform all of the operations described in this chapter using the Aperture control bar.
Using the Next and Previous buttons on the control bar, you can step through all of your images and then rate them using the rating buttons and add keywords using the keyword buttons (assuming that you have defined the keyword buttons appropriately). Then you can use the Select button to apply a five-star rating to the currently selected image.
Don’t forget to use the Toggle Primary Only button to alternate between adjustments to all selected images and adjustments to only the primary select.
Because all of these buttons are grouped together on the control bar, you can easily perform all of your sorting, rating, and comparison with very little mouse movement.
Rating, Sorting, and Comparing Using the Keyboard
If you prefer to drive your Mac using the keyboard, then you’ll be pleased to find that Aperture is very keyboard friendly. When performing your sorting, rating, and keywording, you can use a simple set of keyboard controls to quickly navigate your images and apply the appropriate ratings and keywords.
Using the arrow keys, you can easily navigate from one image to another. In full-screen mode or the Viewer pane, the Left and Right Arrow keys will always take you to the previous and next images, respectively. In the Browser pane, you can use all four arrow keys—Up, Down, Left, Right—to navigate your images.
To apply ratings, you can use the following keyboard shortcuts:
• Press Command-Option 1 to 5 to assign a rating of one to five stars.
• Press to add five stars to the current image.
• Press - to decrease the existing rating by one star.
• Press = to increase the existing rating by one star.
• Press 0 to assign no rating.
To assign keywords, configure the keyword buttons so that the keywords you want to use are on the first eight buttons. Then use the following keyboard shortcuts:
• Press 1 to 8 to assign the corresponding keyword.
• Press . (period) to switch to the next button set.
• Press , (comma) to switch to the previous button set.
To compare images, press Return to set the currently selected image as the compare source. Then use the arrow keys to bring up additional comparison images. When you’re done comparing, press Command-Shift-A to deselect all images.
Using Modifier Keys
Whether you’re using the keyboard or the control bar, the following modifier keys will change the behavior of your selection and rating commands:
Shift: If you hold down the Shift key while either clicking the Next and Previous buttons or pressing the arrow keys, the selection will be extended to the next or previous image.
Command: If you hold down the Command key while navigating left or right, the selection will slide to the left or right.
Command-Option: Holding down both Command and Option while using the Next and Previous buttons or arrow keys will move to the previous or next image within the current selection. You won’t be able to navigate beyond the images that are currently selected.
Like the navigation buttons, the ratings buttons are altered by simple modifier keys:
Control: Holding down Control increases the rating and automatically selects the next or previous image.
Shift: Holding down Shift while increasing or decreasing a rating will first erase any existing rating.
Control-Shift: Pressing Control-Shift clears the previous rating, applies the new one, and then navigates to the next or previous image.
Finding and Filtering Using The Query Hud
At the top of the Browser pane in any of Aperture’s layouts, you’ll find a small magnifying glass next to a text field. This is the control for activating Aperture’s Query HUD (Figure 4.42).
Figure 4.42. The Query HUD lets you search the currently selected project or album or even your entire library.

The Query HUD lets you perform searches and filterings of your current view (project, album, book, light table, and so on). With the Query HUD, you can easily find only your five-star images or only the five-star images tagged with a particular keyword. What’s more, because the Query HUD can filter images based on their EXIF metadata, you can even find only the five-star images tagged with a particular keyword that were shot at a specific ISO rating.
A list of search criteria appears in the main part of the HUD. You can activate or deactivate any of these criteria by selecting the box next to it.
The Match pop-up menu at the top of the HUD lets you specify whether you want the Query HUD to match any one of the specified criteria or all of the specified criteria (Figure 4.43). By default, the Query HUD is configured to match all.
Figure 4.43. This Query HUD is configured to find only three-star images with Bass keywords attached.
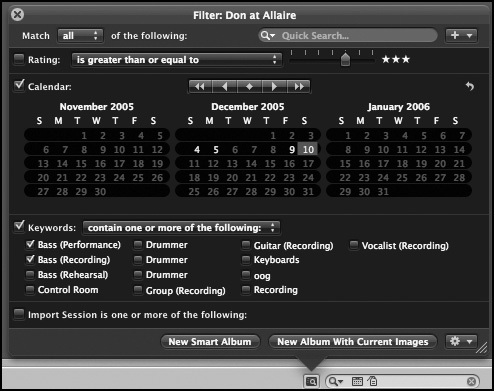
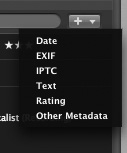
The + menu at the upper right of the Query HUD lets you add criteria to your search (Figure 4.44). Configuring each type of criteria is easy.
Figure 4.44. The action menu in the Query HUD lets you add search criteria.
• Rating simply searches for images with a particular star rating. You can change the Rating pop-up menu to specify whether you want to find images with a rating that is less than, equal to, or greater than the rating that you specify using the Rating slider. The Rating slider lets you search for any rating, including Reject and Unrated.
• The Calendar criteria let you search for images shot on a particular date. Aperture highlights days on the calendar on which photos in the current selection were taken. This keeps you from performing searches that won’t turn up any images.
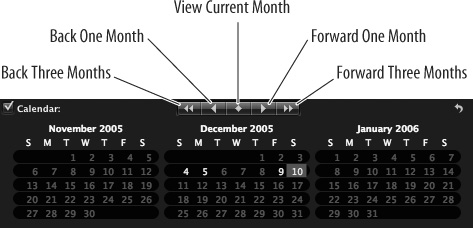
The double-arrow buttons at the top of the Calendar panel move forward or backward three months at a time, while the single arrows move in one-month increments. The diamond button takes you to the current month (Figure 4.45).
Figure 4.45. You can use the arrows at the top of the Calendar panel to navigate forward and backward. The calendar will highlight only dates for which there are images that match.
• Keywords lets you search for images by keyword. All of the keywords found in the currently viewed images are presented in the Query HUD, and you can simply select the ones you want to search for. With the Keywords pop-up menu, you can specify whether you want to find any or all of the selected keywords.
• Import Session enables you to find all of the images that were imported in a particular batch. Every time you import a batch of images, Aperture tags them all as part of the same session.
• Date lets you search for images with a specified date. Unlike with Calendar, you can enter any date and specify whether you want to find images before or after that date or exclude images with that date.
• EXIF lets you search for a particular EXIF tag.
• IPTC lets you search for IPTC data that you may have entered.
• The Text field lets you enter any text that you want. All metadata fields are then searched for this text. If you can’t remember whether you entered a particular tag in the Version Name or Comment field, this is the way to find it.
You can also perform a text search by entering text in the text field at the top of the Browser pane. You don’t have to open the Query HUD. To search for multiple text items, separate them with commas.
• Other Metadata lets you specify a metadata field that may not have been covered by one of the other criteria.
As you specify criteria, Aperture performs its search, and the results will appear in real time in the Browser pane.
Working with your Search Results
After you’ve performed a search, you can click the New Smart Album button to automatically create a Smart Album from the selected criteria, or you can click New Album with Current Images to create an album with the found images. The pop-up menu lets you select other Aperture constructs that you can send the images to: books, Web galleries, and so on. You’ll learn about all of these features in Chapter 8.
You can also, of course, close the Query HUD and work with your found images just as you normally would. The Query HUD text field at the top of the Browser pane indicates that you’re currently looking at filtered output and displays a series of small icons to give you an idea of what the current query is. At any time, you can click the small X in the Query HUD text field to cancel the query and return to a complete view of your images.
As you already saw in Chapter 2, you can also filter your entire library by clicking the small magnifying glass next to the Library entry at the top of the Projects pane. This action brings up a special Query HUD that will search all of the entries in your library.
Finding Shutter Speed
Although the Query HUD will let you search for specific EXIF information in your images, there are a few caveats to keep in mind if you want to search for particular shutter speeds.
To search for shutter speed, begin by selecting EXIF from the + menu in the Query HUD. This will add an EXIF search field to the HUD. Set the EXIF pop-up menu to Shutter Speed (Figure 4.46).
Figure 4.46. To search for images shot with a particular shutter speed, begin by adding an EXIF search field to the Query HUD and then configure the search for Shutter Speed.
![]()
Photographers traditionally refer to shutter speeds as fractions: 1/60, 1/100, 1/1000, and so on. Aperture uses this same notation when it displays the shutter speed in an image’s metadata. However, in the original image file, shutter speed is probably stored as a decimal value, so a shutter speed of 1/3 of a second may actually be stored as 0.4.
When you view the metadata for an image, Aperture automatically converts decimal values to fractions. The Query HUD, though, simply searches the contents of the metadata field as-is; no conversions are made. So if you enter 1/3 in the query HUD, Aperture will simply truncate everything from the / on, and you’ll end up performing a search for 1.
Therefore, when searching for shutter speeds, you must enter the decimal equivalent of the shutter speed that you want to find. Aperture’s query HUD uses eight decimal places of precision, so rather than entering 0.01 to search for 1/60 of a second, try 0.01666666.
When performing greater-than and less-than searches, Aperture simply looks for decimal values that are greater than or less than the value you specify.
Finding the aperture
You can also use the Query HUD to search for images shot with a particular aperture. First use the + menu in the Query HUD to add an EXIF search field to the Query HUD; then set the pop-up menu to Aperture.
Though apertures are usually notated as f/ plus the aperture value, you need to enter only the aperture value itself in the Query field. So if you want to search for images shot at f/4, just enter 4 in the Query HUD.
When performing a greater-than or less-than search, be aware that Aperture searches for numeric values that are greater or less than the number you specify. It doesn’t search for larger or smaller aperture sizes. So if you want to find images with an aperture size larger than f/16, you actually need to use the less-than option (since larger apertures have smaller numeric values).
Finding duplicates
Having duplicate images in your library uses up disk space and can create version-control headaches. Although you sometimes may intentionally create multiple copies of an image, it’s also very easy to import multiple copies of an image accidentally, especially when you’re first making the move to Aperture and importing images from multiple locations.
Aperture does not include a feature especially for finding duplicates, but you can use the Query HUD to search for duplicate images in your library.
To search your entire library for duplicates, do the following:
1. Click the Smart Settings icon next to Library in the Projects pane and configure it as shown in Figure 4.47.
Figure 4.47. To find duplicate images in your library, first configure the Smart Settings HUD to find all of the images in your library.
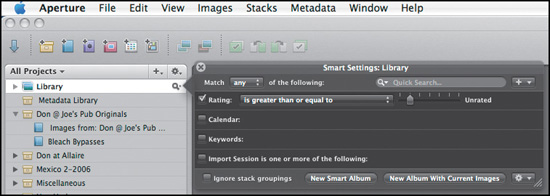
This configuration will filter out all images with a rating greater than Unrated, which should find all of the images in the library.
2. Close the Smart Settings HUD.
3. Change to Project Management layout by pressing Command-Option-M.
4. Switch to list view by clicking the List view button at the top of the Browser pane (Figure 4.48).
Figure 4.48. Click the List view button at the top of the Browser pane to view your library as a list.
![]()
Your library will now be shown as a list.
5. From the sort order pop-up menu, choose File Name.
The list will be sorted by filename, and any duplicates should show up right next to each other.
6. Scroll to the right until you reach the Master Location column.
This column shows the name of the project that contains the master file for image.
You can rearrange the columns in list view by dragging them to new locations.
7. Drag the Master Location column to the left until it is closer to the filename.
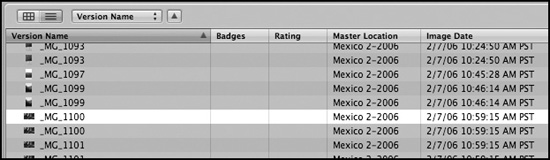
Now you can see file names and their locations without scrolling (Figure 4.49). You can simply look for duplicate names and then immediately see which project both images are located in.
Figure 4.49. In List view, you can see that there are two identical copies of _MG_1100 in the Mexico 2-2006 project. Finding duplicates in list view is a little easier than finding them in grid view because you can sort by name to get all copies of an image together.
8. To delete one of the duplicates, select it and press Command-Delete.
You can perform this same procedure on a project-by-project basis by using the Query HUD to search for all of the images in a specific project rather than searching the entire library.
Working with Smart Albums
Like a regular album, a Smart Album contains references to images in your library. Unlike for a regular album, you don’t add images by dragging them into a Smart Album. Instead, you use Smart Albums’ own associated Query HUD. Using this HUD, you define criteria to determine what images should be in the album. Aperture then automatically populates your Smart Album with all images that match that criteria. The advantage of a Smart Album is that its contents are automatically updated as your library changes.
For example, if you create a Smart Album for five-star images shot this year that include the keyword Travel, then any additional five-star travel images that you define in your library this year will automatically be added to that Smart Album.
To create a Smart Album, follow these steps:
1. Select the project to which you want to add the Smart Album.
2. Choose File > New Smart > Album or press Command-Shift-L. Alternately, you can click the New Smart Album button on the toolbar.
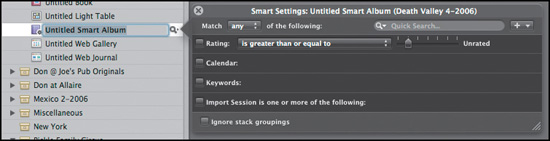
Aperture adds a Smart Album to your Project, and the album’s Smart Settings HUD appears (Figure 4.50).
Figure 4.50. The Smart Settings HUD for a Smart Album works just like the Query HUD. The results of these settings are automatically added to the attached Smart Album.
3. Configure these settings just as you would in the Query HUD.
The results of the query are automatically added to the album.
Note that if the Smart Album finds an image that matches its search criteria and that image is in a stack, then the entire stack will be placed in the Smart Album. If you want the Smart Album to include only the individual images that match its criteria, select the Ignore Stack Groupings check box in the Smart Settings HUD. Your image will remain stacked, but the Smart Album will show only the one image that matches.
At any time, you can alter the criteria for a Smart Album by clicking the small magnifying glass to the right of the Smart Album’s name in the Projects panel.
Wrapping Up
Organizing a large project full of images can be a lot of work. As explained earlier, you won’t necessarily perform the tasks presented in this chapter in a particular order. In most cases, you’ll probably find that you begin by organizing your images into stacks. While working on that, you’ll probably add a few ratings (tagging picks as five-star images, for example).
Once your images are stacked, you can begin to think about adding ratings and keywords. While thorough keywording and rating will help your future organizational efforts, your immediate goal is to find the images that you think are worthy of editing and final output.
Depending on whether you intend to use Smart Albums or regular albums, you may need more or fewer keywords. You’ll learn about the difference between these two types of albums in Chapter 8.