
Chapter Three. Importing
Before you can do any work in Aperture, you have to get your pictures out of your camera and onto your Mac’s hard drive. There are many ways to do this and you don’t have to have Aperture simply to copy images from a camera. However, since Aperture is designed to facilitate your entire digital workflow, it includes a full-featured importer that can transfer images from a media card or directly from your camera.
When you import into Aperture—from a card reader, a camera, or a folder that’s already on your Mac—Aperture copies the imported images into its own library. You can then freely delete the images from their original location, because Aperture has its own copies inside its library.
But Aperture’s Import facility lets you do much more than simply copy images into the Aperture library. With the tools built in to the Aperture import facility, importing can mark the beginning of your sorting and organization process.
You can configure Aperture to automatically launch any time you plug a camera or card reader into your Mac. Select Aperture > Preferences and change the When a Camera Is Connected, Open pop-up menu to Aperture. (From this same menu, you can also configure your Mac to open a different application, or to do nothing at all, freeing you to manage the copying process yourself from the Finder.) Note that even if you have this menu set to open nothing, if Aperture is running when you connect a camera or media reader, then its Import dialog box will still automatically open.
Your Mac’s image importing options can also be configured outside of Aperture. Your Applications folder should contain a program called Image Capture. With a media card mounted on your desktop, launch Image Capture and select Image Capture > Preferences to specify the application that you want launched when a camera or media card reader is connected.
In Chapter 2, we examined Aperture’s master/version scheme for storing and manipulating images. To recap: When you import, Aperture copies your image into its internal library. This file is considered by Aperture to be a master file, and it is never altered or manipulated. Instead, when you edit an image, that edit is added to a list of edits that are applied to the original master data, on the fly, whenever the image is displayed or output. That list of edits is called a version.
When you first import an image into Aperture, the program automatically creates a version for that image. Because you have not yet applied any edits, that version of the image looks exactly like your original untouched master file (Figure 3.1).
Figure 3.1. The thumbnails and images that you see in Aperture’s Viewer and Browser are actually a combination of two files: the original raw data and the list of edits and changes that gets applied to that data any time the image is written to the screen or output.

In Chapter 5, you’ll see how to create additional versions of an image.
Importing from a Camera or Media Card
Depending on how you configure Aperture (as just discussed), the Import dialog box may appear automatically when you attach a camera or media card reader to your Mac. If you have not configured Aperture to automatically launch when a camera is connected, you can invoke the Import dialog box manually. This procedure is also handy when you want to import images that are already on your drive.
The Import dialog box is divided into three main areas: the thumbnail view, in the middle of the dialog box, where you can select and arrange images for import; the Info pane (at the right), where you can adjust the time stamp of your images, rename images, and add metadata; and, if you’re importing images already on your drive, a file browser (at the left) for selecting the folder that you want to import from (Figure 3.2).
Figure 3.2. Aperture’s Import dialog box lets you select the images you want to import, along with a destination project or album to import them into. In addition, you can apply metadata and other adjustments while importing.

The arrow on the left side of the Import pane indicates which project your images will be imported into. You can change the import destination by simply clicking a different project name. Note that you can import directly into an existing album, Web gallery, light table, or book. Aperture will import the images into the project and automatically add them to the indicated item.
The Import dialog box is not modal—you can still access Aperture’s menu bar and the buttons in the main Aperture window. So if you need to create a new project while the Import dialog box is open, you can simply click the New Project button or choose File > New Project.
Selecting images for import
By default, the Import dialog box will import all of the images from the currently selected source. However, by clicking the displayed thumbnails, you can choose specific images for import. All of the usual selection rules apply when selecting images (Shift-click to select contiguous images, Command-click to add noncontiguous images to the current selection).
If you deselect the images that are technically or artistically flawed, you won’t waste time importing them, and you’ll have fewer images to sort and compare later. Because Aperture lets you select only the images that you want to import, importing becomes the first sorting and organizing step in your workflow.
Using the controls at the bottom of the Import dialog box, you can change the size of the thumbnails shown; re-sort the images by date, file name, or size; or switch to a list view of the images.
Adjusting the time stamp of imported images
All digital cameras have internal clocks, and they use these clocks to time stamp every image that they shoot. Though you may not remember doing it, at some point when you first got your camera, you probably set the date and time.
Unless you have a camera equipped with GPS (Global Positioning System), your camera doesn’t know when you’ve changed time zones. So if you fly to the other side of the world and take some pictures, they’ll all be stamped with whatever time it is back home.
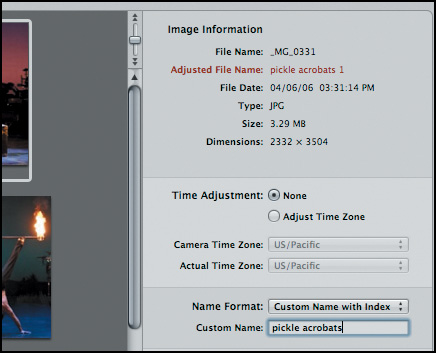
Aperture lets you adjust the time stamp of an image. To adjust imported images, click the Adjust Time Zone button. Configure the Camera Time Zone pop-up menu so that it matches the time zone that your camera is set to; then change the Actual Time Zone popup menu to the time zone in which you were shooting (Figure 3.3). Upon import, your images will show the correct actual time.
Figure 3.3. Images that were shot in New York were imported, but the camera was set for California time. Using the Adjust Time Zone button, you can tell Aperture to adjust the time stamp on the images to reflect the correct East Coast time.

True to its “never alter the master image” philosophy, Aperture doesn’t actually change the time stamp of the original image. Instead, it stores the offset that you specify in the version information that’s stored alongside the file.
If you forget to adjust the time on Import, you can adjust it afterward by selecting the images whose time you want to adjust and then choosing Metadata > Batch Change. You’ll learn more about the Batch Change dialog box in Chapter 4.
Renaming images during import
Camera-generated names are fairly meaningless, and though you can always search for images by digging through thumbnails, having well-named files can facilitate easier searching and sorting later. By default, Aperture uses the original camera names when it imports images. You can rename images during import by selecting a new naming option from the Name Format pop-up menu.
Of course, Aperture preserves the original names when it imports your images. The new names you define are given to the initial versions that Aperture creates and are stored in the Version Name field of each image’s metadata. So when we speak of renaming in Aperture, what we’re really talking about is defining a new version name.
The Name Format pop-up menu provides renaming options that allow you to include sequential numbers, version names, date and time stamps, and counters.
At the top of the Info pane, Aperture shows you the new file name for the selected image, allowing you to double-check that you’ve selected the correct name format (Figure 3.4).
Figure 3.4. At the top of the Info pane in the Import dialog box, Aperture shows an example of your selected renaming scheme.
Defining custom naming presets
You can define your own naming schemes by selecting Edit from the Name Format popup menu.
To define a new name, click the + button beneath the Name list and enter a new preset name. In the Format field, you can enter text to use in your new file names, and you can use the Include check boxes to insert various image parameters.
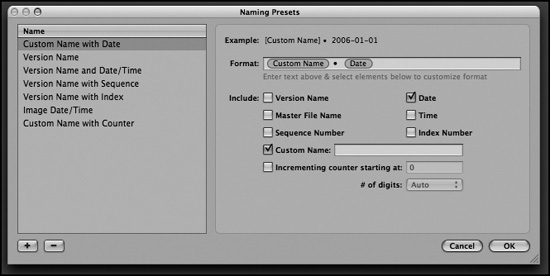
In addition to specifying the predefined parameters, you can enter text in the Format field. For example, the definition shown in Figure 3.5 will rename the file with a custom name along with the date, separated by a • (dot character).
Figure 3.5. You can define new naming schemes using the Custom Names Preset editor. This preset will rename files using text entered by the user, a bullet, and then the date that the image was created.
Adding metadata
Chapter 2 introduced the concept of metadata—additional data that’s included in an image file. Metadata is used for storing the date and time an image was shot, any keywords or ownership information that you might want to apply, and much more.
Aperture supports many types of metadata, and you can assign many of these metadata tags during import. At first, entering metadata may seem like a tedious hassle, but good meta-data tagging is well worth the time and effort. When your images have accurate metadata, many Aperture operations become much simpler, including searching, sorting, and Web gallery construction. As your library grows, good organization and easy searching become even more important, so good metadata tagging becomes especially valuable.
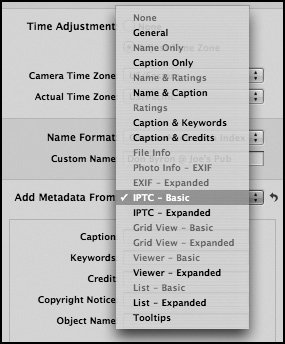
Metadata tags are divided into categories in Aperture, to make it easier to find the particular metadata field that you’re looking for. In the Import dialog box, the Add Metadata From pop-up menu lets you select the metadata category that you want to view, and as you’ll see later, you can customize the existing categories as well as define your own (Figure 3.6). This is the same menu that appears in the Metadata panel of the Info pane.
Figure 3.6. The Add Metadata From pop-up menu lets you select the category of metadata that you want to edit.
Some of the metadata categories on the Add Metadata From pop-up menu are used to configure the display of metadata in different Aperture views and layouts and so are dimmed when you’re in the Import dialog box. You’ll also find that many metadata tags are repeated from category to category. You don’t have to pick just one category—categories are for organization only, and you can make as many entries in as many categories as you like.
Metadata that is entered in the Import dialog box is automatically applied to all of the images that are imported. You can’t selectively apply metadata while importing.
To edit metadata, find the tag that you want to edit and enter new text in its field. Aperture auto-completes any tags that you’ve previously entered, allowing you to type just a few characters to quickly enter common tags. At the very least, you’ll probably want to fill in the Credit and Copyright Notice fields for all of the images that you import (Figure 3.7). (And if you’re wondering, you can type a © symbol by pressing Option-G.)
Figure 3.7. When importing, it’s a good idea to at least tag your images with your credit and copyright information. Adding keywords will make it easier to perform certain types of searches and sorts later.

You don’t have to enter metadata only during import. Aperture provides the same metadata interface in the main program, so if you forget a particular tag or later change your mind about a metadata entry, you can easily alter it after import. However, it’s sometimes easier to make metadata—and thus organizational—decisions during import rather than later facing the daunting task of tagging a huge project full of images.
If you’re importing scanned images, they won’t have EXIF metadata of any kind (your scanner doesn’t know when an image was shot) so you’ll need to enter as much data as you need by hand. Obviously, which fields are important to you is a personal decision.
Stacking
In any type of photography, but particularly in event or journalistic photography, you often shoot bursts of images. Perhaps you’re trying to get just the right facial expression, or you’re trying to capture the precise moment that a football quarterback releases the ball. Since most digital cameras provide the ability to shoot image bursts (at anywhere from three to eight frames per second), it’s easy to cover a specific moment with lots of shots.
If you’re a landscape or nature photographer who regularly brackets your shots, then you might use your camera’s burst feature in conjunction with its auto-bracketing capability to automatically capture bursts of bracketed images.
In either case, your shoots will often yield groups of related images that were shot at around the same time. You will usually want to pick just one of these images as your final “keeper.”
To help in your organizational chores, Aperture lets you group images into special collections called stacks. Stacks are very simple in concept, and this simplicity belies the depth of their usefulness. (We’ll be spending a lot of time with stacks in later chapters.) Stacks are especially useful for managing bursts of shots, thanks to Aperture’s ability to automatically create stacks out of images that were shot within a certain time interval.
At the bottom of the Import dialog box you’ll find a small slider with time markings beneath it (Figure 3.8). This is the Auto Stacking slider. You can use the auto-stacking feature to group your images into stacks, based on the amount of time that elapsed between shots. As you move the slider to the right, images shot within a certain time interval will clump together. For example, if you move the slider to :15, then any images shot within 15 seconds of each other will be stacked together.
Figure 3.8. The Auto Stacking slider at the bottom of the Import dialog box lets you automatically group your images into stacks, based on the time interval between shots.
![]()
1. Find the Auto Stacking slider at the bottom of the Import dialog box and slide it to the right until it sits about halfway between the first two notches (at about 8 seconds).
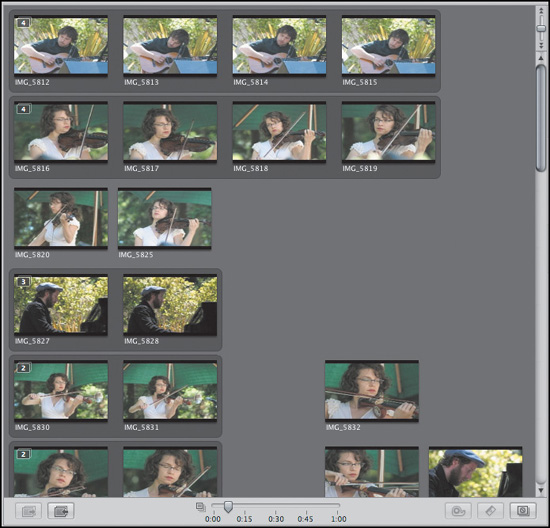
As you move the slider, the images in the Import dialog box should coalesce into stacks of related images (Figure 3.9).
Figure 3.9. As you slide the Auto Stacking slider to the right, your images automatically clump together into stacks. Here, Aperture is set to automatically stack any images shot within approximately 8 seconds of each other.
2. Try moving the slider more to the right and then back to the left to see how the stacks change.
The stacking feature is like a sieve that filters time. The images that the Auto Stacking slider groups together may not necessarily be related, but images shot within a close time interval usually are, so the auto-stacking feature usually creates a good initial stack. In Chapter 4, you’ll see how to edit your stacks to add or remove images.
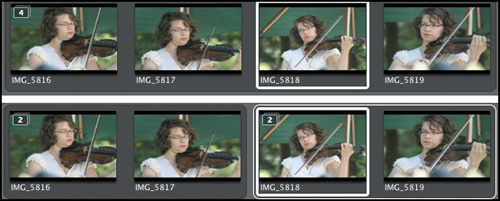
Stacks can be open or closed. When a stack is open, you can see all of the images that it contains. By default, the Auto Stacking slider creates open stacks.
The first image in any stack is considered the “pick” of the stack—the select image that you want to use from that batch. The number in the corner of the pick image shows the number of images in the stack. You can click the number to open and close the stack (Figure 3.10).
Figure 3.10. Stacks in Aperture can be closed (top), showing only the pick image, or open (bottom) to reveal all of the images contained within.

While Aperture’s auto-stacking facility does a great job of automatically grouping bursts of images, in a fast-paced shoot, you may quickly shoot small bursts of unrelated images in a very short span of time. When you use auto-stacking, these unrelated images may end up grouped together. The Import dialog box provides three tools for separating and merging stacks (Figure 3.11).
Figure 3.11. You can use the Join Stacks and Split Stack buttons to merge and divide stacks; use the Unstack All Stacks button to eliminate all stacks.
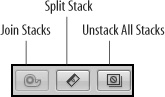
Split Stack: Use the Split Stack button to divide one big stack into separate smaller stacks. Simply select an image at the point where you want the stack split and then click the Split Stack button or press Option-K. Aperture splits at a point before the selected image (Figure 3.12).
Figure 3.12. The upper image shows the original stack, with an image selected. After the Split Stack command is executed, there are two stacks. The split occurs just before the selected image.
Join Stacks: If you have two stacks that you want to combine, select the images in both stacks (just as you would normally select a group of images) and then click the Join Stacks button or press Command-K.
Unstack All Stacks: Finally, if you change your mind and decide that you don’t want any images stacked, click the Unstack All Stacks button.
As with metadata, you don’t have to perform your stacking operations during import. Aperture provides the same stacking controls—and more—within the main application.
You’ll learn much more about stacks and how to use and edit them in Chapter 4.
Performing the import operation
Once you’ve selected your desired images and defined the metadata and stacking information that you want, you can click the Import button at the lower right of the Import dialog box to start the import operation.
The Import dialog box will go away and a small progress indicator will appear next to the project into which you’re importing (Figure 3.13). The speed of the import process will vary depending on the speed of your computer, the speed of your camera or media card reader, and the read-write speed of the media card itself. However, you don’t have to wait for the import process to finish before continuing to use Aperture. While importing, you can freely work on other projects or even start working on images that have been successfully imported from the current import job. Aperture shows the thumbnail for an image as soon as it copies the image into its library. Depending on the processing power of your computer, though, performing other operations while importing may or may not be speedy enough for productive work.
Figure 3.13. When importing images, Aperture displays a small progress indicator next to the destination project. Because importing happens in the background, you can continue working in the program while your images are imported.

Some cameras save separate, tiny thumbnail files alongside their full-res images, and sometimes Aperture imports these when you import directly from a camera, so you see two thumbnails for those images. You can usually solve this problem by copying the images to your hard drive first and importing from there.
Canceling an import session
You can cancel an import session after it has begun—maybe you’ve changed your mind about what to import, or perhaps you need full processing power to edit another image—using Aperture’s Show Task List window.
1. While the images are still importing, select Window > Show Task List (Figure 3.14).
Figure 3.14. You can use the Task List window to cancel any currently running import operations.
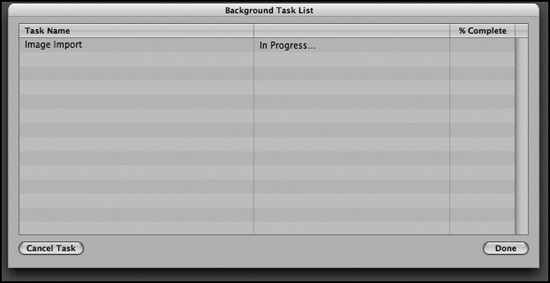
2. In the Task List window, there should be an entry called Image Import. Select this entry by clicking it.
3. Click the Cancel Task button. The import process will be canceled. Aperture will ask you whether you want to eject the card, erase and eject the card, or simply stop the process. After answering, click Done to dismiss the Background Task List dialog box.
If your camera provides a voice annotations feature, note that Aperture will not import these annotations to your Mac. To ensure that you don’t lose your annotations, you’ll need to import them separately using the Finder.
Importing Image Files
If you want to import images that have already been copied to a hard drive or stored on a CD-ROM or DVD, you can invoke the Import dialog box by choosing File > Import > Images or by pressing Command-I.
When importing in this way, you will be presented with an Import dialog box that looks just like the one described in the preceding section, but with the addition of a file browser at the top of the window. Use this browser to select the folder you want to import (Figure 3.15).
Figure 3.15. When you invoke the Import dialog box manually, Aperture adds a pane at the top that lets you browse your local drives to find the folder that you want to import.

Once you have selected a folder, the Import dialog box will show thumbnails of all of the images contained within. All of the other import controls work the same as when you are importing from a camera or media card.
Importing folders as projects
If the images you want to import have already been sorted into folders and subfolders, you can preserve that structure by choosing File > Import > Folders into a Project. Aperture will ask you to choose a folder and will then automatically create a new project with the same name as the folder you select, and it will import all images within that folder into the new project. If your chosen folder contains any subfolders, Aperture will create albums within your project and arrange the contents to match the subfolder’s existing structure and content.
Note that if you have a project selected in the Projects pane when you select File > Import > Folders into a Project, then Aperture will create a new folder within that selected project and import the images into that location. As before, Aperture will create albums for any subfolders.
Drag-and-drop importing
Because Aperture also supports drag-and-drop importing, you don’t have to use the Import dialog box at all. Simply drag and drop an image from the Finder into a project in Aperture’s Projects pane. Note that you cannot drag and drop into the Browser or Viewer pane.
Note that you can often drag and drop images from other applications. For example, you can drag and drop thumbnails of images from Adobe Bridge or iView Media Pro directly into an Aperture project. Aperture will copy the original file just as if you were adding it from the Finder. You can also drag and drop images from iPhoto directly into Aperture.
Importing raw files
Aperture provides very good support for raw files, and you’ll learn how to work with raw files in Chapter 6. (That chapter also discusses why you might want to use raw format.) Before you can edit any raw files, though, you have to import them, and there are a few things to know about Aperture’s raw import capability.
• Raw files appear just like any other files in the Import dialog box. Aperture automatically builds thumbnails for raw images, just as it does for other formats.
• You can import raw files only from cameras explicitly supported by Aperture. Apple maintains a list of supported raw formats at this Web address: www.apple.com/aperture/raw/.
Aperture also supports Adobe’s DNG format, an open raw specification that Adobe has developed to try to provide a solution to the confusion arising from the glut of raw formats.
You can convert your raw files to DNG format using Adobe’s free DNG Converter application, available at www.adobe.com/dng. The Adobe DNG Converter can convert a tremendous number of raw formats into DNG format. This would seem to make it something of a universal translator for raw files that you want to import into Aperture, since Aperture supports DNG format. However, Aperture’s DNG support is limited to only DNG files that were created from the raw formats that Aperture already supports.
If this seems counterintuitive to the idea of a “universal” raw format, we’re in complete agreement. At the time of this writing, there is a healthy debate waging as to who is to blame for this problem: Apple or Adobe.
Many users choose to convert their images to DNG as a form of long-term insurance. Since DNG is an open standard, there’s a good chance that it will be around for a long time—something that can’t necessarily be said about a format controlled by a company.
If you do decide to convert your images to DNG format and find that Aperture isn’t reading your newly made DNG files, then try changing some of the DNG Converter preferences.
1. In the DNG Converter, click the Change Preferences button in the main window (Figure 3.16).
Figure 3.16. If you want to use DNG files with Aperture, you’ll need to change a few of the default preferences in the Adobe DNG Converter.

2. Set the Image Conversion Method to Convert to Linear Image.
3. Make sure the Embed Original Raw File box is checked.
4. Click OK.
You’re now ready to start processing.
Setting the Image Conversion Method to Linear Image tells the raw converter to do some of the necessary color conversions itself rather than simply storing the original raw data. In a way, this “bakes” a certain level of color quality into the file and slightly limits the amount of editing you can perform in Aperture.
By selecting Embed Original Raw File, you tell the converter to save an exact copy of the original raw file within the DNG file itself. You can later extract this file if Aperture adds support for your camera and then import that original raw file into Aperture. This provides a safeguard to protect the data lost by your linear conversion.
If you find that Aperture is ignoring some Photoshop files when you import a folder full of images, go to Photoshop’s Preferences dialog box and make sure that the File Handling preference is set to Enable Large Document Format. Also, set Maximize PSD and PSB File Compatibility to Always.
Aperture doesn’t support CMYK images. If you import any Photoshop or TIFF files saved in a CMYK color space, they will appear very strange in Aperture. You should convert them to RGB before importing them.
Importing an iPhoto Library
If you’re upgrading to Aperture from iPhoto, you can easily import your existing iPhoto library directly into Aperture. Choose File > Import > iPhoto library and in the resulting dialog box navigate to Home > Pictures > iPhoto Library.
When you import an iPhoto library, Aperture creates a new folder in the Projects pane called iPhoto Library. Inside this, it creates a subfolder called Rolls, and within this folder, it creates a separate project for every roll that is defined in iPhoto. If you have created any albums in iPhoto, then Aperture creates its own albums within the iPhoto Library folder and adds the appropriate images automatically.
The iPhoto library is always imported into the root level of your Aperture library. You cannot import an iPhoto library into an existing project.
Aperture does not create any kind of link between the imported iPhoto library and your original. If you make any changes within iPhoto, those changes will not be updated in the imported library within Aperture. Also note that you can import as many iPhoto libraries as you like. Aperture will simply create a new folder for each one.
For best results, quit iPhoto before starting your iPhoto library import process in Aperture. This will ensure that you don’t make any changes to the contents of the iPhoto library while Aperture is importing it.
After importing your iPhoto library, you can rearrange your images to place your pictures in the right projects and folders.
An Alternate iPhoto Import Technique
Figure 3.17. When exporting images from iPhoto for import into Aperture, be certain to set the export options to save original, full-sized images.

Working with The Aperture Library
As you’ve already learned, when you import images into Aperture, they are copied into the program’s internal library. The Aperture library itself is nothing more than a special type of Mac OS X folder called a package. By default, the Aperture library is kept in the Home > Pictures folder and is called simply Aperture Library. As you’ll see later in this chapter, you can change the location of Aperture’s library using the Preferences dialog box.
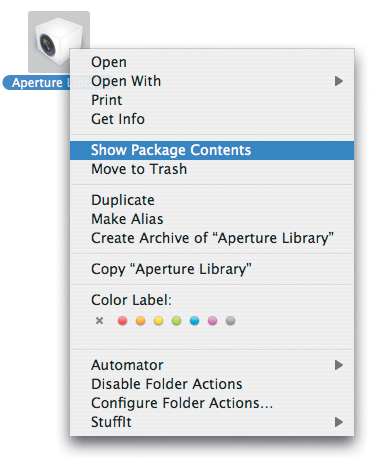
In the Finder, you can open and examine the Aperture library by Control-clicking it (or right-clicking if you have a multi-button mouse) and then selecting Show Package Contents (Figure 3.18). The library will open just like any other folder.
Figure 3.18. In the Finder, if you right-click the Aperture library, you can use the Show Package Contents command to open the library, just as for any folder.
It’s important to understand that Aperture does not do anything to your original image files when it copies them into the Aperture library. You can easily open the Aperture library and move or copy any of your original images to any other location using nothing more than the Finder.
In general, you don’t want to spend too much time directly manipulating the Aperture library. If you accidentally delete a file or rearrange things, Aperture itself could get confused, and though your original images would not be harmed, any edits or organization that you’ve performed could be lost.
Nevertheless, direct manipulation of the library can be useful for solving certain problems, and simply knowing how to retrieve your original images in the event of a crash or other weird Mac anomaly can give you some peace of mind.
Library architecture
The Aperture Library package uses a very simple, straightforward architecture that makes finding a specific image very easy (Figure 3.19).
Figure 3.19. The Aperture library contains a separate package for each project you create. Inside that package you’ll find a separate folder for all of your import sessions, and within each import folder you’ll find a separate folder for every image. Image folders contain the original raw master file as well as separate files for each version.

The root level of Aperture Library contains two folders, Built-in Smart Albums and Aperture.aplib, which contain preference files and other documents that Aperture needs in order to run.
More important, the root level of Aperture Library contains a separate package for every project that you have defined inside Aperture. Each package is named with the project name and the .approject extension. If you’ve created albums or folders at the root level of your library, you’ll see those as well.
You can open any project package within the library using the same command that you used to open the Aperture library itself. Inside, you’ll find a root folder that contains documents titled Album.implicitAlbum, AP.Minis, AP.Thumbnails, AP.Tinies, and Info.apfolder. You don’t need to worry about any of these documents, and you shouldn’t try to open or explore them. They are storage areas for the various sizes of thumbnails that Aperture creates, along with other settings and essential parameters.
If you have created any albums in your project, then you will see a separate document for each album. These will have a .apalbum extension. Although these documents have the same icon as the project packages, they are not actually projects that can be opened.
Inside the project package, you will find a separate folder for each import session for that project. Aperture separates your images by import session, just as iPhoto separates your images into roll: one for each time you import. Aperture names each folder with the date and time that it was imported. (Note that the times may look strange because aperture uses forward slashes instead of colons to separate hours, minutes, and seconds. This convention is necessary because in the Macintosh Finder, colons are reserved for path separators.)
If you open one of these folders, you’ll find a separate folder for every image that was imported during that session. The name of each of these folders will match the original file name that was given to the image. Inside each image folder, you will find a copy of the original file from your camera, with the original name and extension (Figure 3.20).
Figure 3.20. Each image that you import is kept in its own folder inside the Aperture library, alongside version files and other related data.
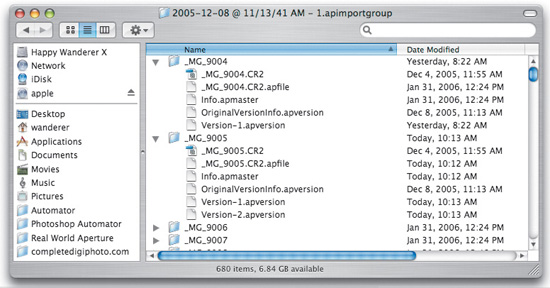
You’ll also probably find three utility files:
<imagename>.apfile, which contains metadata about the folder you’re looking at—size, modification date, checksum data, and so on.
Info.apmaster, which contains metadata about the master file itself—name, format, and so on.
OriginalVersionInfo.apversion, which is the version file for the first version of the image—the one that gets created upon import. The metadata in here is what gets copied when you create a new version from the original master image.
You’ll also find a separate file for each version of the image you have created. These files are the lists of edits and metadata we’ve been discussing throughout this chapter. The version files are called Version-1.apversion, Version-2.apversion, and so on. They can be interesting to look at if you’re curious about what Aperture stores when you create a new version. You can open any version file using TextEdit or any other program that can read text files.
Inside each version document, you’ll find standard XML code (Figure 3.21). Though you can edit these files to change the metadata associated with the image, it’s better to make these sorts of changes within Aperture, simply to prevent the types of syntax errors that can occur when working with XML files.
Figure 3.21. If you open a version file in a text editor, such as TextEdit, you’ll find a standard XML file. This is where all of the edits and metadata for the image are stored.

In addition to satisfying simple curiosity, knowing how to dig into your Aperture library can be handy in the event of certain troubles. For example, if you find Aperture crashing when you click a particular image, you can remove the troublesome file by deleting the relevant folder in the Aperture library.
Extracting your original images from the Aperture library
You can easily export your original master images from within Aperture, as you’ll see in Chapter 7. However, if for some reason you don’t have access to Aperture—maybe your copy won’t launch for some reason, or someone has sent you a copy of an Aperture library but you don’t have Aperture installed—you can easily extract image files using Spotlight.
1. Open your Aperture library, as explained earlier, by right-clicking the Aperture library file and selecting Show Package Contents from the pop-up menu.
2. Choose File > Find or press Command-F to invoke Spotlight.
3. Make certain that Folder “Aperture Library” is selected.
4. In the File Type pop-up menu, instead of Any, choose Images.
Spotlight will automatically find all of the images within Aperture Library (Figure 3.22). “Images” includes all of the file types that Aperture supports, so Spotlight will find raw files as well as JPEG files, TIFF files, Photoshop documents, and more.
Figure 3.22. By performing a Spotlight search inside Aperture Library, you can easily find all of the image files in your library.

5. When the search is completed, press Command-A to select all of the found images.
6. Drag the images to another folder or drive.
By using Spotlight, you don’t have to manually dig into each separate subfolder within your library. Note that, unlike with regular folders, if you move images to another folder on the same drive as Aperture Library, the images will be copied rather than moved.
Changing the location of the library
By default, Aperture stores its library in the Pictures folder of your Home directory. Unless you’ve been tinkering with Aperture’s preferences, your Pictures folder will be located on your boot drive, along with your operating system, all your applications, and lots of other data. Because your Aperture library can grow very quickly, you may prefer to place it on another drive—one with more storage space.
Changing the location of your library is very simple:
1. Quit Aperture.
2. Copy Aperture Library to the new location.
3. Launch Aperture.
Everything will look the same, but you’re not quite finished yet.
4. Choose Aperture > Preferences.
In the Library Location field, you’ll see that Aperture is still looking for your library in its old location (Figure 3.23).
Figure 3.23. You can use Aperture’s Preferences dialog box to define a new location for your Aperture library.

5. In the Preferences dialog box, click the Set button beneath the Library Location field and navigate to the directory that you copied your old library into.
This will point Aperture to the correct library location.
6. Restart Aperture.
Your new library will be in use.
7. Once you’ve seen that the new library has been properly moved and configured, delete the original library that you were using before.
Note that if you’re moving your library to an external drive, you need to be certain that the drive is powered on and mounted before you launch Aperture. If Aperture can’t find the volume that your library is on, it will return to its default library configuration and create a new, empty library in your Home > Pictures folder. You’ll need to reset the Library Location preference and restart Aperture to repoint Aperture to the correct library.
Avoid putting your Aperture library on a drive encrypted with Apple’s FileVault feature. FileVault can greatly impede Aperture’s performance.
Creating multiple libraries
As you saw in the preceding section, you can easily create multiple libraries in different locations. Using multiple libraries, you can divide your entire image collection across multiple drives. If your library is too big to fit on a single drive, multiple libraries can serve as a workaround. For example, you could put all of your landscape images on one drive with its own library, all of your portfolio images on another with its own library, and so on.
To switch from one library to another, you’ll need to bring the appropriate drive online, change the Library Location preference, and then restart Aperture.
The downside to this scheme is that you can’t perform searches across these multiple libraries, nor can you output a collection of images culled from each.
If you find yourself hurting for space—and you have to have a lot of images before this becomes a problem—the best solution is to simply buy a bigger drive. However, if you’re using a laptop, this may not be an option as laptop hard drives come in comparatively small capacities. However, it is possible to create a single library that spans multiple drives.
Spanning a single library across multiple drives
If you have multiple hard drives attached to your Mac, you can span your Aperture library across all of them to create a single library with much more space. Because there’s no internal command for configuring your library in this way, you’ll need to use a separate, free application called Aperture Library Spanner, which you can download from www.completedigitalphotography.com/spanner. This small application will perform the necessary steps to get your library stretched across two drives.
Apple does not officially sanction the process of spanning your library in this way. However, I’ve never experienced any trouble with this technique. But to be safe, be certain to back up your images diligently.
Here’s how to use Aperture Library Spanner:
1. Make sure that the both the drive that contains your Aperture library and the drive that you want to span it to are powered up and mounted on your desktop.
2. Launch Aperture Library Spanner (Figure 3.24). If your library is not currently in the Home > Pictures folder, then click the Change button next to the Current Library Location field, navigate to the directory that contains your library, and click Choose.
Figure 3.24. You can use the free Aperture Library Spanner to span your Aperture library across multiple drives.

3. Click the Change button next to the Span to This Directory field. Navigate to the location that you want to span your library to. (This location should be on your second drive.) Click Choose.
4. Click the Span Folders button.
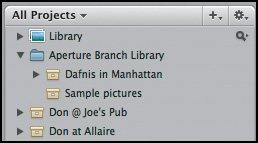
Aperture Library Spanner will quit Aperture (if it’s running) and create a folder called Aperture Branch Library at the location that you specified in the Span to This Directory field. Finally, it will define a link between Aperture Library and this new folder.
5. Launch Aperture.
You should now see a folder called Aperture Branch Library just below the main Aperture library in the Projects pane. Any projects that you place in this folder will be stored on the secondary drive (Figure 3.25).
Figure 3.25. After spanning, a new Aperture Branch Library folder will appear in your Aperture Projects pane.
You can move existing projects into this folder just as you would to any folder created in Aperture. However, Aperture will need some time to copy the project from the primary drive to the drive containing the Aperture Branch Library folder. It won’t provide a progress indicator for this process, but you can check up on it using the Show Task List Window, or you can simply wait until your images appear.
Note that you can make this folder the destination for importing, just as you would any other folder. Simply select it as the destination for your imports. If this folder is selected when you choose to make a new project, then that project will be created in the Aperture Branch Library folder.
Bear in mind that for spanning to work properly, all of the drives that house your library will need to be on whenever you launch Aperture. If you’re using a desktop machine with multiple internal drives, this won’t be a problem, as your drives will always be present.
To create new projects directly on your external volume, make sure the Aperture Branch Library folder is selected before you create a new project.
Handling a missing drive
If your library spans multiple drives and you launch Aperture when the additional drives aren’t mounted on the Desktop (obviously, this is possible only when your additional drives are removable), your Aperture Branch Library folder will appear dimmed. If you restart Aperture with the additional drives mounted, the Aperture Branch Library folder will still be inaccessible. The only way to get it back is to rebuild the Aperture database as described earlier in this chapter.
After rebuilding, your image thumbnails may be rendered in gray. Sometimes clicking a thumbnail will regenerate it, but a more reliable way to restore the thumbnails is to stack any images that are missing thumbnails. You can then unstack the images after the thumbnails are back.
In general, it’s best to use spanning only with internal drives, simply to avoid the trouble of offline volumes.
Restoring to a single-drive library
If you want to return to working with a library on a single drive, you first need to move any images off the secondary drive. In Aperture, move any projects in the Aperture Branch Library folder back to your internal drive. If you don’t have enough space on your internal drive, then you can export your images and projects to another drive using the export commands described in Chapter 8.
With the extra folder cleared out, select it in the Projects pane and choose File > Delete Project or press Command-Delete to delete it.
Wrapping Up
There aren’t many image editing programs that require an entire chapter just to discuss importing because few (if any) image editing programs offer the organizational power that Aperture provides within its import facility.
While Aperture aims to address all of your image processing workflow concerns, one of its great strengths is that its flexible interface doesn’t lock you in to any particular work-flow. Importing is just one example of this. You don’t have to perform any keywording or stacking or metadata tagging during import—all of these features are available to you later. However, if it makes more sense to you to perform these tasks while importing, then Aperture provides that flexibility.