
Chapter Two. Aperture Philosophy and Interface
The idea of a philosophy chapter in a computer book may seem a little pretentious or contrived, but if you want to use Aperture to its fullest potential, then you need to understand—or at least acknowledge—some of the fundamental philosophical ideas that underlie its design.
To get the most out of Aperture, you’ll need to give up some habits and practices that you’ve learned from other programs—and not just other graphics programs. The payoff for your philosophical journey will be a photo editing and post-production workflow that is much simpler and more flexible than what you’re probably used to now.
Aperture was designed specifically to serve the needs of photographers. Most popular graphics programs were designed to process image documents stored on your computer. Those two goals are not necessarily the same. Whereas most graphics programs provide general-purpose image editing tools, Aperture’s designers understand that photographers have additional needs besides image adjustments and corrections. What’s more, the Aperture engineers recognize that photographers don’t just think in terms of individual images, but often visualize larger narratives and collections of images. Finally, they understand that photographers don’t want to have to perform particular edits and corrections in a specific order just because the image editor needs them performed that way. Different images can suggest different workflows, and so Aperture allows you to perform any type of edit at any time.
These features together mean that your relationship with Aperture may not be quite like your relationship with other applications.
Thinking Different
When Apple released the original Macintosh in 1984, the company touted it as “the computer for the rest of us.” Unlike the other operating systems of the time, the Mac OS didn’t make users remember arcane commands to use it. Nor did users have to remember to do particular things at particular times—install device drivers, configure obtuse hardware settings; the Mac simply did all those things.
Many experienced computer users didn’t understand this philosophy of human-computer interaction. Because users were letting the computer do things for them, they had less control over what and how things got done. The irony, of course, is that the computer was ostensibly intended to be a labor-saving device. Nevertheless, most computer users felt that giving up control to their operating system was disempowering.
Fast-forward roughly 20 years to Apple’s release of Mac OS X. In addition to its numerous technical advantages over the original Macintosh operating system, Mac OS X differed from its predecessors in that it imposed a predefined file structure on the Macintosh Finder. With Mac OS X, you could no longer stick your files just anywhere.
Many experienced Mac users bristled at the idea that they were supposed to stay away from the root directory of their hard drive. The didn’t like the notion that they were supposed to keep their files confined to their “home” directory, and that even there Apple was pushing the idea that they should divide their files into “documents,” “pictures,” “music,” “movies,” and “applications.” After all, they were the crowd who “thinks different” (or even “differently”).
Several years out, these people don’t really complain anymore. After a few months of using the new system, they realized that giving up some control and letting the computer take care of some work was actually empowering.
To fully embrace Aperture’s functionality, you will have to take a similar step.
Your image editing appliance
The software tool that is most important to most Mac-based photographers today is not Adobe Photoshop. Nor is it iView Media Pro or Extensis Portfolio or Corel Painter. It’s the Finder. Most photographers perform their image management and workflow organization using the Finder. They group their images into folders and then group their folders on their hard drive. When it comes time to organize and sort images, they either pour their images into an image cataloging program or use an image browsing program to look at the contents of a particular folder. When they’ve found the image they want to edit, they launch it from the Finder into their image editing program, where they edit it and resave it.
Finally, when they’ve performed their editing and printing chores and are ready to back up or archive their images, they copy their images to another drive or burn them to a CD or DVD.
Obviously, this practice works, as there’s no shortage of digital photos in the world. But the Finder is a general-purpose document management tool and application launcher. Ask yourself: Do you sort and organize your tax records using the same techniques that you use to organize printed photos? Or music CDs? Or books? Probably not. Making direct parallels between the analog and digital world is sometimes a shaky rhetorical ploy, but from this example it seems safe to argue that you usually use specialized tools to manage and execute different types of projects in different media.
Aperture is a specialized tool for digital photography. It turns your Macintosh into a digital photography appliance. For the most part, it replaces the Finder for the duration of your photo sorting and editing work. It also replaces most of your existing image editor, as well as any image cataloging software you might be using and any backup tools. In other words: it will replace most of your current digital photography workflow tools.
This is the factor that most users have a difficult time with when making the switch to Aperture. They try to treat Aperture like any other image editing program. They think that they can still manage their images and workflow using the Finder and then take those images into Aperture when they need any of the functions that Aperture provides. But because of the way that Aperture is designed, taking this approach will only make your workflow more complicated.
To return, then, to the pretentious promise of our chapter title: the philosophical lesson you must learn to use Aperture is the lesson of giving up control. To get the most out of Aperture, you must let it manage your documents; you must let it take care of your individual files. You must stop thinking of the Finder as a useful photography tool and instead see that Aperture provides the tools you need to take your images from input, through editing, to output.
Commit right now to learning how a completely Aperture-based photography workflow functions. Don’t try to out-think it; don’t try to augment it with other programs. Try to see that your current document management habits don’t apply here, and that you need to learn some Aperture-specific ones. Later, if you decide that Aperture is not for you because you like to do things differently or need more control, then there’s no harm done.
The Aperture Library
Before you can do anything with a digital photo, you must get it off your camera’s media card and onto your Mac’s hard drive. In a traditional workflow, you use the Finder or an image cataloging or editing tool to copy the images from your camera’s media card into a folder on your drive.
Aperture includes a built-in import function, but when you import images into Aperture, they don’t go into just any folder on your hard drive. Instead, they go into the Aperture library, a special type of folder that’s kept on your drive.
By default, the Aperture library is kept in the Pictures folder inside your Home folder (Figure 2.1).
Figure 2.1. By default, the Aperture library is kept in your Pictures folder. Though the library looks like a document, it’s actually a special type of folder called a package.
![]()
Let’s be honest here: the idea of putting all of your images into some kind of special container is, to put it diplomatically, disconcerting. After all, you might want to use those images in another program, or give a copy of them to someone, or back them up. Or you might one day stop using Aperture and want to get all of your images back for use somewhere else.
Those are exactly the types of concerns that one expects to hear from a Finder chauvinist. But you are becoming an Aperture user. And as an Aperture user, you know—or are going to know—that all of those tasks just described can be performed from within Aperture itself with no more work than it takes to perform them from the Finder. In fact, many of those tasks require less work in Aperture than they do in the Finder.
Still, that question of your images being locked up in a special data structure is a legitimate one. After all, what happens if that data structure gets corrupted? Or if Apple stops supporting Aperture? Or if you decide you want to change to a non-Aperture workflow?
The answer to all of these questions is the same: The Aperture library is not a special data structure. It’s a regular Finder folder that’s sort of wearing a disguise.
In Mac OS X, to facilitate software installation (and software development), Apple created a special Finder object called a package. A package is simply a folder that looks like a document. Packages give developers a way to hide configuration and preference files that their applications require, but that users don’t need to see. In Mac OS X, a folder can be designated a package and given an icon. Many OS X applications, including Safari and Mail, are packages, as is the Aperture library.
As a quick experiment, try this:
1. In the Finder, go to your Applications folder by pressing Command-Shift-A.
2. Scroll through the folder until you find the icon for Safari.
3. Command-click the Safari icon or, if you’re using a multi-button mouse, right-click the Safari icon (Figure 2.2).
Figure 2.2. You can open any package in the Finder by control-clicking it and then selecting Show Package Contents.
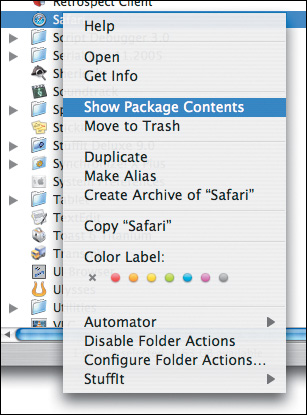
4. Select Show Package Contents from the pop-up menu that appears.
You should see a window open that contains a Contents folder. Safari is a package, just like many of the applications in your Applications folder, and you have just opened that package. As you can see, it’s nothing more than a folder that contains, in this case, another folder. Open the Contents folder and you’ll find more documents and folders. You can copy or move any of these documents, but that’s really not a good idea, as Safari will probably stop working.
In the next chapter you’ll see how to open your Aperture library and look inside. For now, though, simply realize that Aperture is not doing anything that you don’t normally do when you import your images. It is simply storing your pictures in a folder on your drive. That folder happens to be called a package, and it requires a special command to open, but inside, your images are kept just like any other images in any other folder. You’re free to copy or move them out at any time.
So if anyone ever tells you that they don’t use Aperture because they don’t want their images tied up in a proprietary database, you can smirk knowingly and mock their ignorance. After all, part of the fun of being a Macintosh user is the smug self-righteousness that is ours by right, because we use a superior computer.
Masters and versions
Much of Aperture’s flexibility and power derives from its employment of a nondestructive editing system. When you open an image in an image editing or painting program—whether it’s a 20-year-old copy of MacPaint 1.0 or the latest version of Photoshop—the image data is read into the computer’s memory. The color of each pixel in the image is represented by a number, and when you edit any of the pixels in the image, their color values—and corresponding underlying numbers—are altered. When you save the image, the new numbers are written back to the original file. This type of editing is called destructive editing because the original pixel values are destroyed when you make editing changes (Figure 2.3). (Hopefully, you first saved a copy of your original file, so that you can return to the original image if you need to.)
Figure 2.3. In a destructive editing process, when you make an edit (such as the brightening edit show here), the pixels in your image are changed. When you output to a screen, printer, or file, those new, changed pixels are sent to the relevant device.

In a nondestructive editing process, your original image data is read into memory, but when you make an edit, the original pixel values are not altered. Instead, each edit is added to a list of all of the edits that you have specified for that image. Any time the computer needs to display or output the image, the list of edits is applied to the original data. These edits are applied on the fly, whether you’re displaying the images onscreen, printing to a printer, or saving to a file (Figure 2.4). Because your original pixel data is never altered, you can remove or alter any edit at any time and in any order.
Figure 2.4. In a nondestructive editing process, any edit is simply added to a list of edits to be applied to the original image data. When you output to a screen, printer, or file, those edits are applied in real time as the image data is moved to the relevant device.

Some programs provide both destructive and nondestructive editing. Photoshop’s Brush tool, for example, performs destructive changes to your image—it alters the original pixels; however, Photoshop’s adjustment layers are completely nondestructive—their effects are applied in real time.
Aperture, by contrast, provides only nondestructive editing tools. When you import an image into Aperture—whether from a media card or from another folder on your hard drive—that image is copied into the Aperture library. This image is considered by Aperture to be a master image, and it is never altered in any way. A master image is the original image data that you can return to at any time.
When you import an image, Aperture immediately creates a version of your image alongside the master (Figure 2.5). A version is simply a list of the edits that you want applied to an image. Initially, the version contains no edits. As you begin to make edits, though, they are added to the version. What you see on your screen when you click a particular version is the original master data with that version’s edits applied to it.
Figure 2.5. Any time you add an image to the Aperture library, the original file is copied into the library and stored as a master file. A small text file is immediately created alongside it, which will contain a list of all edits that you want to make to the image.

At any time, you can create a new version. The new version can be based on an existing version, or it can be an entirely new version, containing no edits. The great thing about versions is that they’re very, very tiny files. A version is actually just an XML file, usually only 24 to 30 kilobytes in size. Because your original data is never duplicated, if you create five new versions, you’ll consume roughly only 100 kilobytes of additional disk space.
In a destructive editing system, the decision to create a new version is a serious one. You must decide whether you can afford the disk space and then commit to the time of saving and managing a new version. In Aperture, creating a new version uses no significant amount of storage space and so is very speedy. Managing all of your versions is very easy thanks to Aperture’s tools.
The other advantage of nondestructive editing is that you can take the list of edits that are currently being applied to one image and apply them to other images. So if you have a burst of images that were shot at the same time with the same exposure and they’re all too dark, you can edit the first image to a better exposure and then easily copy those edits to all of the other images in the burst.
Viewing the library
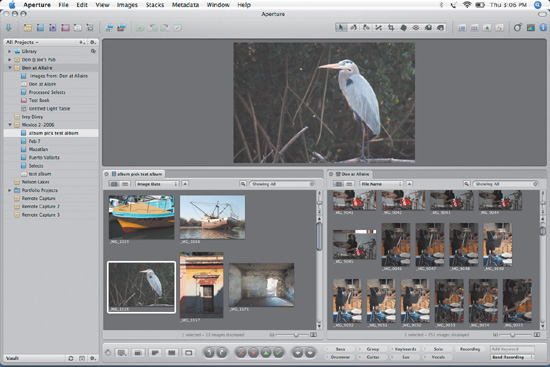
Aperture’s interface consists of a single window divided into separate panes (Figure 2.6).
Figure 2.6. Aperture’s interface is contained in a single, resizable window that is divided into resizable panes.

On the left side of the window is the Projects pane, which displays the entire contents of the Aperture library. The Projects pane lets you select which element of your library you want to view. You’ll use the Projects pane to keep your library organized; create, delete, and manage projects; move images from one project to another; and create other Aperture elements.
The Projects pane contains lots of different types of elements; you’ll learn about them throughout the rest of this book. When you click an element in the Projects pane, its contents appear in the Browser pane as a series of thumbnails. When you click an image in the Browser pane, it appears in a larger size in the Viewer pane.
Most image editing programs are document based. You open an individual image, edit it, save it, and close it, and then you open another image. In Aperture, you simply click an image in the Browser pane to view it—you don’t ever have to issue an Open command. When you click a different image in the Browser pane, any changes you’ve made to the first image are automatically saved, and the next image is loaded, so you don’t ever have to issue a Save command either. If you’ve spent any time working with iPhoto or iTunes, then you should already be used to this approach.
Aperture Interface Basics
Aperture’s interface makes a great first impression on most people. It’s pretty, it looks very professional, and it presents your images in very attractive ways. It also helps you make short work of very complex edits.
In this section, we’re going to explore the fundamental interface issues that you’ll need to understand to work along with the rest of this book. If you’ve been using Aperture already, then you’re probably already familiar with most of the material in this section.
The Aperture interface makes extensive use of tooltips. If you’re not sure what a particular button or control does, simply hover your mouse over that control to see a pop-up label. Tooltips provide a quick and easy way to find out what everything in the main window does.
The Browser pane
When you click any element (except the library) in the Projects pane, the contents of that item appear in the Browser pane. The Browser pane displays thumbnails of all of the items that you’ve placed in the selected element (Figure 2.7).
Figure 2.7. The Browser pane lets you select which image or images you want to view in the Viewer pane.

You can change the size of the thumbnails by using the slider at the lower right of the Browser pane. At the upper right, you’ll find a search box, which allows you to filter the view to display only images that match specific criteria.
As with all of Aperture’s panes, you can resize the Browser pane by dragging one of its borders. Because Aperture’s entire interface is contained in a single window, changing the size of one pane affects the size of all of the other panes.
You can resize Aperture’s entire interface window just as you would any other window, by dragging the lower-right corner.
At the upper left of the Browser pane are two buttons that let you change the Browser pane from grid view, which displays a grid of thumbnails, to list view, which displays a list of image names. You’ll probably stick with Grid view most of the time, but we’ll discuss list view further in Chapter 4 (Figure 2.8).
Figure 2.8. You can use the Grid View (left) and List View (right) buttons to change the way content is displayed in the Browser pane.
![]()
Some configuration options in some Aperture dialog boxes refer to “Grid View.” These references mean the grid view mode of the Browser pane.
You’ll use the Browser pane for browsing an entire batch of images to find ones you want to edit, as well as for organizing and arranging your images.
In addition to using the scroll bars, you can navigate the Browser pane using the J, K, and L keys. Pressing J scrolls upward; pressing L scrolls down. Repeatedly pressing the keys increases the speed of the scrolling. Pressing K stops the scrolling immediately.
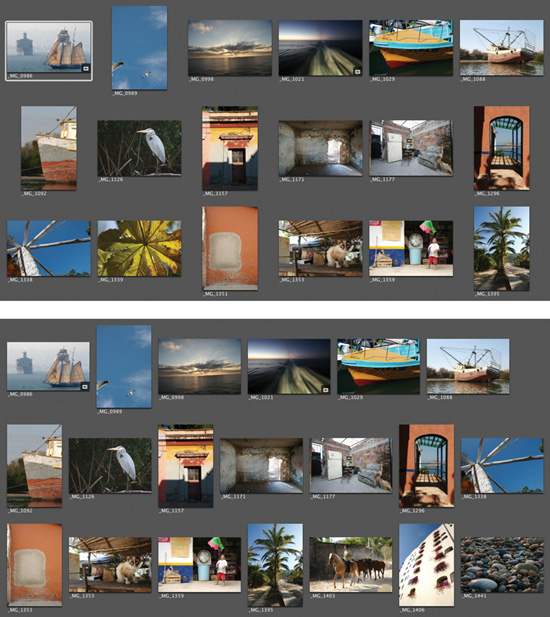
Normally, Aperture displays thumbnails in the Browser pane in a strict grid. Whether the images use portrait or landscape orientation, they will take up the same space in the grid. If you want to make the most of your screen real estate, choose Aperture > Preferences and select Proportional Spacing for Images in Grid View. With this option selected, thumbnails will be more intelligently spaced to make better use of screen space (Figure 2.9).
Figure 2.9. When you change Aperture from a regular to a proportional grid, your thumbnail display will employ a much more efficient use of screen space.
The Viewer pane
The Viewer pane displays the image or images that are currently selected in the Browser pane. The Viewer pane offers no special controls, but you can resize it just like any other pane, by dragging its borders.
If you press Option-W or choose Window > Swap Workspace, the Browser and Viewer panes swap positions. To rotate the Browser and Viewer pane positions, press Shift-W or choose Window > Rotate Workspace.
Because it’s possible to size the Browser pane to fill the entire Aperture window, your Viewer pane may not be visible. See “Window Layouts” later in this chapter for more on how to make the Viewer pane visible.
When you import an image into Aperture, Aperture builds thumbnails of that image at different sizes. These thumbnails are what you see in the Browser pane and, at times, in the Viewer pane. When you first click an image in the Viewer pane, Aperture displays its cached thumbnail of the image while it loads the full data.
The thumbnails that Aperture creates have a little bit of sharpening applied to them. Consequently, thumbnails sometimes look a little different than the actual image.
The toolbar
The toolbar spans the top of the Aperture window. It contains simple buttons for creating new items such as Web galleries, books, and folders, as well as buttons for performing edits and changing the layout of the main window (Figure 2.10).
Figure 2.10. The toolbar spans the top of the window and provides simple buttons for creating library elements, performing edits, and changing the layout of the Aperture window.
![]()
You can customize the toolbar by selecting View > Customize Toolbar. This command invokes a dialog box that lets you add any of Aperture’s main commands to the toolbar. You’re probably better off leaving the toolbar in its default configuration until you learn more about the program’s other commands.
The Inspector pane
The Inspector pane is on the right side of the Aperture window. If it’s not currently visible, press I, or click the Show Inspectors button on the right side of the toolbar. The Inspector pane is divided into two panels: Adjustments and Metadata.
The Adjustments panel
The Adjustments panel provides access to all of Aperture’s image editing controls. In Aperture, to edit an image, you first add a specific type of adjustment to the current version. The controls for each adjustment appear in the Adjustments panel of the Inspector pane, where you can adjust them to achieve the desired edit (Figure 2.11). We’ll discuss all the different types of adjustments in the next chapter.
Figure 2.11. The Adjustments panel is where you add and configure the adjustments that you want to make to the currently selected image.
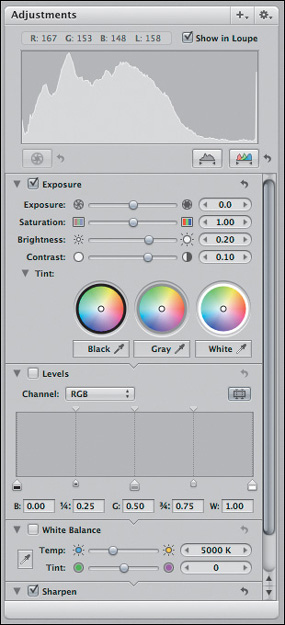
At the top of the Adjustments panel sits the histogram and RGB readout tools, both essential image editing tools that you may already be familiar with. You’ll learn how to use these tools in Chapter 5.
The Metadata panel
At the bottom of the Inspector pane is the Metadata panel, which lets you view all of the metadata attached to the currently selected image (Figure 2.12).
Figure 2.12. The Metadata panel lets you view and edit the metadata of the currently selected image.

When you take a picture, your digital camera records millions of bytes of image data, but it also stores some other important data such as the date and time the picture was taken, the f/stop and shutter speed used, and the ISO setting. This data conforms to the Exchangeable Interchange Format (EXIF) specification, a standard that most camera and software vendors now support.
EXIF metadata sits in the header of your image file, before any of the actual image data, and is just one type of metadata that Aperture supports. For example, Aperture also supports IPTC metadata, a standard set of metadata fields used by journalists and publishers to store such information as the photographer’s name, the location of the shot, and keywords that describe the image. In Aperture, this additional metadata is stored in the version file that you’re currently editing.
Using the Metadata panel, you can view the metadata of the image that is currently selected in the Browser pane. Because Aperture supports so many different metadata fields, if the program listed them all it would be very difficult to find the one piece of data you were looking for. So Aperture lets you define metadata sets: a collection of specific metadata fields that are displayed in the Metadata panel.
At the top of the Metadata panel is a pop-up menu that lets you select the metadata set that you want to view (Figure 2.13).
Figure 2.13. The Metadata menu lets you select the set of metadata that you want to view in the Metadata panel.

If you select General, then you’ll see a mix of EXIF and IPTC metadata tags that probably provide most of the information that you need for everyday work. Many metadata sets overlap—that is, the same metadata fields are displayed in different combinations in different sets.
Some metadata sets may seem to be of dubious value—Grid View Basic, for example, which contains only two fields. In addition to displaying metadata in the Metadata panel of the Inspector pane, Aperture can display metadata in other places: superimposed over the image thumbnails of the Browser pane, superimposed over the current image in the Viewer pane, underneath images in a Web gallery, and more. You define what is displayed in each of these locations by creating a version set, so not all of the sets shown in the menu are meant to be useful in the Metadata panel.
You’ll learn more about version sets and how to define them and what to use them for in Chapter 4.
The control bar
Beneath the Browser pane you’ll find the control bar (Figure 2.14). If it’s not currently visible, press Shift-D.
Figure 2.14. The control bar provides controls for configuring the Viewer pane, rotating images, applying ratings, and adding keywords.
![]()
On the left side are view controls for changing the mode of the Viewer pane. Next to those you’ll find rotation buttons, then special buttons for adding star ratings and for navigating, and finally buttons and controls for adding keywords. You’ll learn about all of these in Chapter 4. You can toggle the control bar on and off by pressing Shift-D.
The toolbar is the bar full of controls at the top of the window; the control bar is the bar full of controls at the bottom of the window.
Window layouts
Different parts of your workflow may require access to different types of controls and information. To help you, Aperture provides four preconfigured pane layouts that you can easily switch among by clicking the layout buttons on the right side of the toolbar (Figure 2.15). These layouts provide special pane configurations optimized for particular tasks (Figure 2.16).
Figure 2.15. The layout buttons let you easily arrange the Aperture panes into the configurations shown in Figure 2.16. These layouts make it easier to perform specific tasks.
![]()
Figure 2.16. Aperture provides four predefined window layouts.

You can resize the entire interface window just as you would any other Mac window: by dragging the lower-right corner.
Deleting items from the library
You can delete any item from the Aperture library by selecting it from the Library pane and then pressing Command-Delete. Deletion can be a little tricky in Aperture, though, because of its master/version system. We’ll cover deletion in more detail in Chapter 5.
Favorites
As your library grows and you create more and more projects, scrolling through the entire list to find the project you’re looking for can become a hassle. To allow easier management of large libraries, Aperture lets you create a set of “favorite” projects. To define a project as a favorite, select it and then choose Add to Favorites from the action menu at the upper right of the Projects pane (the menu with the small gear on it) (Figure 2.17).
Figure 2.17. From the action menu at the top of the Projects pane, you can manage your Favorites list. Favorites help you work more easily with a large list of projects.

To view only projects designated as favorites, open the All Projects menu at the top of the Projects pane and select Show Favorites (Figure 2.18). Only those projects designated as favorites will be listed, and the All Projects menu will change to Favorite Projects.
Figure 2.18. The pop-up menu at the top of the Projects pane lets you easily switch to a Favorites-only display.

You can return to viewing your entire library by selecting Show All from the Favorite Projects menu.
To remove an item from your favorites collection, select it in the Projects pane and choose Remove from Favorites from the action menu.
Heads-up displays
Aperture has a few more controls that it shows using heads-up displays, or HUDs. For example, if you click the small magnifying glass at the top of the Browser pane, you’ll see the Query HUD, which lets you filter the current collection of images by keyword, metadata, date, and more (Figure 2.19). (The HUD itself is labeled “Filter HUD,” but Apple refers to it as the Query HUD in its documentation, so we’ll follow that convention here. You’ll learn more about the Query HUD in Chapter 4.)
Figure 2.19. Many of Aperture’s functions are accessed through heads-up displays, or HUDs, which can be toggled on and off at any time.

HUDs are simple floating palettes that you can easily move about the screen. In addition to the Query HUD, Aperture provides Adjustments and Keywords HUDs, as well as HUDs for some editing functions such as cropping. Except for the Query HUD, all of the commands provided in heads-up displays are also available in the Inspector panels, toolbar, or control bar. The advantage of a HUD is that you can easily toggle it on and off—usually with a single keystroke—to maximize your screen real estate.
If you want to see a bigger image in the Viewer pane, you can close the Inspector pane, by pressing I, and then open the Adjustments HUD, by pressing H. The Adjustments HUD provides all of the same controls as the Adjustment inspector, but in a standard, movable HUD that can be opened and closed as you need.
Selecting Images
Aperture provides some innovative features for comparing, sorting, and organizing images. All of these features require you to first select the images you want to work with. An understanding of how to make and change selections is essential for smooth Aperture workflow and for performing batch edits and adjustments.
Selecting a project to view
Before you can select any images to work with, you must select the project that you want to view. When you click the name of a project in the Projects pane, Aperture displays all of the image thumbnails for that project in the Browser pane. If a Viewer pane is visible, then Aperture displays the currently selected image, which is usually the first one in the collection.
If your project contains any other objects—albums, folders, Web galleries, light tables, and so on—then clicking one of these displays only the contents of that item.
Viewing multiple projects
If you want to view multiple projects simultaneously, or an item such as a Web gallery from one project side by side with a book from another project, just select the first project in the Projects pane and then Command-click additional projects. Each new project will be added to the Browser pane as a separate tab.
To remove a project from view, click the small X on the tab’s title bar.
To view two projects side by side, select the first project in the Projects pane and then Option-click a second project. The second project will appear in its own pane, alongside the first project (Figure 2.20).
Figure 2.20. With a simple Option-click, you can split Aperture’s Browser pane into multiple panes to view different projects side by side.
Select an image in either project to display the image in the Viewer pane; however, you can’t select images from both projects simultaneously.
Selecting images
Once you’ve selected a project to work on, you’re ready to select some images. Selecting images serves two purposes in Aperture:
• It specifies the images that you want to edit.
• It specifies the images that you want to view. Remember that Aperture lets you view and compare images side by side.
You select images by simply clicking thumbnails in the Browser pane of any layout. To select a single image, click it in the Browser pane. To select a different image, click it.
For the most part, Aperture follows all of the standard Macintosh selection rules. To select a range of contiguous images, do the following:
1. In the Browser pane, click the first image that you want to select.
2. Hold down the Shift key and click the last image that you want to select.
Aperture will select the first and last images as well as all of the images in between (Figure 2.21).
Figure 2.21. You can hold down the Shift key when clicking to select contiguous groups of images.

To make a noncontiguous selection—an image here, an image there—use the Command key instead of the Shift key.
1. In the Browser pane, click the first image that you want to select.
2. Hold down the Command key and click any images that you want to add to the selection.
You can also Command-click a selected image to remove it from the current selection.
You can also combine both techniques to make complex selections of images. Here’s an example:
1. Click an image to select it.
2. Shift-click an image in another row.
All of the images between the two clicked images are selected.
3. Command-click some additional images.
They will be added to your selection (Figure 2.22).
Figure 2.22. This selection was created by clicking the first image to select it and then Shift-clicking the third image to add it and everything in between to the selection. Then the sixth image was Command-clicked to add it to the selection.

At any time, you can deselect all images by clicking in any gray space in the Browser pane.
If a Viewer pane is visible, then Aperture will display your selected images side by side. Deselect all images and then try the following:
1. Switch to Standard layout by pressing Command-Option-S.
The Viewer pane will be empty because you don’t have any images selected.
2. Select six images in the Browser pane.
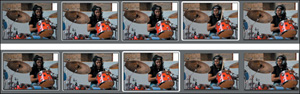
The Viewer pane will display all six images (Figure 2.23).
Figure 2.23. Images that you select in the Browser pane are displayed side by side in the Viewer pane.

3. Command-click an additional image to add it to the selection.
The image will be added to the images shown in the Viewer pane.
4. Command-click one of the selected images to deselect it.
The image will be removed from the Viewer pane.
Depending on the size of your screen, Aperture should be able to display a large number of images side by side. This ability to lay images next to each other makes Aperture an excellent tool for reviewing, comparing, and picking images at the end of a long day of shooting.
Switch back to Project Management layout (Command-Option-M) and notice that the same images are selected. Aperture maintains the current selection until you alter or deselect it.
These are the basic selection processes that you will use repeatedly within Aperture.
Note that you can deselect images by Command-clicking them in either the Browser or Viewer pane. Aperture doesn’t care whether you deselect using thumbnails or full-res images.
Making selections using the keyboard
In addition to performing selection tasks using the mouse, you can make selections using the keyboard.
To deselect the current selection, you can press Command-Shift-A. To select everything, press Command-A (just as you do in other programs).
You can easily select multiple images by using the arrow keys.
1. Select a single image using the mouse.
2. Hold down the Shift key and press the Right Arrow key.
The next image will be added to the selection.
You can continue to make a contiguous selection using Shift and the arrow keys. You can use the Up Arrow and Down Arrow keys to make selections in the previous and next rows, respectively.
3. Press Command–Left Arrow to shift the entire selection to the left. Press Command–Right Arrow to shift the selection to the right (Figure 2.24).
Figure 2.24. Pressing Command-Left Arrow shifted the selection of three images (top row) to the left (bottom row). You can shift in either direction using the Command key in conjunction with the arrow keys.
The primary select
As explained earlier, you select images in Aperture for two reasons: to view a series of images side by side and to perform edits on an image (or images). To serve these two different purposes, Aperture distinguishes between a regular selected image—that is, an image that is simply selected for viewing—and the primary select—the image that will be altered if you perform an editing operation.
To see this distinction, switch to Standard layout (press Command-Option-S) and select three images. Notice that while all three selected images in the Browser pane have a white border around them, one of the images has a thicker border. This thickly bordered image is the primary select (Figure 2.25).
Figure 2.25. In both the Viewer and Browser panes, the primary select is surrounded by a thick white outline while the rest of the selected items are surrounded by thin outlines.

Now look in the Inspector pane (if it is not already open, press I to open it). The Adjustments inspector shows a histogram for the current primary select, and the Metadata inspector shows the metadata tags for the primary select. So even though three images are selected, the parameters of only the primary select are shown.
When multiple images are selected, pressing the arrow keys moves the primary select from image to image within the group of selected pictures. To ensure that your edits affect the images you want, it’s important to pay attention to the primary select. Some types of edits and changes can be applied to the primary select only, while others can be applied to every image in the current selection. In later chapters, you’ll learn how to control this functionality.
Sorting images in the Browser pane
By default, the Browser pane displays thumbnails sorted by date, but you can easily change the way that the images are sorted by selecting a different criterion from the sort menu at the top of the Browser pane (Figure 2.26). When you pick a new sort criteria, Aperture immediately reorders the thumbnails you are viewing.
Figure 2.26. The Sort pop-up menu lets you select a new criterion for sorting the thumbnails in the Browser pane.

You can manually rearrange the thumbnails in a project by simply dragging them into a different order. Click an image and drag it to a new position. Aperture will display a green line to indicate where the image will be positioned when you release the mouse.
Once you’ve rearranged some thumbnails, the Sort pop-up menu will change to Custom to indicate that you are now viewing a custom sort. Once you’ve defined a custom sort, you can freely switch between it and other sorting criteria through the Sort menu. Aperture remembers your custom arrangement, allowing you to switch back to it later if you want.
In Aperture 1.0.1, moving thumbnails can sometimes result in quirky behavior. Sometimes images won’t land in the correct location, or they will always drop into the first position in the Browser pane. If your thumbnail dragging becomes strange, try choosing a different criterion in the Sort menu and then again choosing Custom. This process will usually clear up the problem.
Viewer modes
So far, you’ve been using the Viewer in its default, normal mode so that when you select an image, it appears in the Viewer pane. As you’ve seen, you can select multiple images, and they will appear side by side in the Viewer pane.
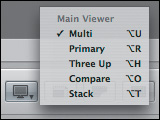
You can change the Viewer pane, though, so that it behaves a little differently when you select an image. You can do so by using the Viewer Mode pop-up menu on the left side of the control bar (Figure 2.27).
Figure 2.27. The Viewer Mode menu on the left side of the control bar lets you control the Viewer pane’s display of the current selection.
If you aren’t currently viewing a layout that shows the control bar, you can either switch to one or activate the control bar manually, by choosing Window > Show Control bar or by pressing Shift-D.
By choosing different options on the Viewer Mode menu, you can alter the display of the current selection of images.
Multi is the default mode. In Multi mode, clicking an image selects it and displays it in the Viewer pane, if this pane is visible. You can change to Multi mode by pressing Option-U.
Primary mode displays only the primary select of the current selection. It allows you to select multiple images for keywording or rating, but view only the primary select (making it easier to edit that image).
Three-Up mode, which can be accessed from the View Mode menu or by pressing Option-H, automatically displays the currently selected image alongside the images that appear immediately before it and after it. As you change the current selection, the before and after images update automatically.
Three-Up mode can provide a quick way of getting a view of a series of images. If you regularly shoot bracketed bursts of three images—something many cameras can do automatically—then this feature is particularly useful.
Stack and Compare modes are more sophisticated modes for comparing images, and they will be discussed in detail in Chapter 4.
Though they may seem a little random, the keyboard shortcuts for the various viewer modes are actually easy to remember. They’re simply the Option key plus the second letter of the name of the mode.
If you have multiple monitors attached, Aperture will display a separate set of options for the additional monitors. Consult the Aperture Getting Started manual for details.
Using The Loupe
Just as a film photographer uses a loupe—a small magnifier—to examine slides on a light table, you can use Aperture’s virtual loupe to magnify your images.
You can activate the Aperture loupe by clicking the Loupe icon on the toolbar, but keyboard control is much easier. You can toggle the loupe on and off at any time by pressing the ~ (tilde) key. The loupe will appear and will follow your mouse around, magnifying the area at the mouse’s position (Figure 2.28). If you move too close to the edge of the screen, the loupe will automatically reorient itself to fit on your monitor.
Figure 2.28. Drag Aperture’s loupe over any image or thumbnail to see a 100 percent magnification.

Note that you can even use the loupe on thumbnails. Position the loupe over any thumb-nail in the Browser pane, and the loupe will magnify it just as if it were an image in the Viewer pane. This feature can be particularly handy for quickly checking a series of images to find the one with the best focus.
When you activate the loupe, it appears at the current mouse position. So if you want to examine a particular part of an image, simply position the mouse on that location and then press the ~ key. The ~ key is a toggle, so you can dismiss the loupe at any time by pressing it again.
You can change the size of the loupe, and thus the size of the magnified area, by pressing Command-+ or Command- - or by selecting View > Increase Diameter or View > Decrease Diameter (Figure 2.29). If you want the loupe to magnify to more than 100 percent, press Command-Shift-+. To turn the magnification back down, press Command-Shift- -.
Figure 2.29. You can change the size of the loupe by pressing Command- + or Command- -, and the magnification power of the loupe by pressing Command-Shift- + and Command-Shift- -.

Zooming
At any time, you can press Z to zoom the Viewer pane to 100 percent. Whether you have a single image or multiple images selected, all images displayed in the Viewer pane will be enlarged. Alternately, you can choose View > Zoom to Actual Size. While zoomed in, you can pan the image by dragging the control in the small navigation pane on the right side of the image (Figure 2.30). You can also hold down the spacebar to activate the grabber hand and then drag with the mouse to pan.
Figure 2.30. When zoomed in, you can pan by dragging the control in the small navigation pane that appears on the right side of your image, or you can hold down the spacebar and drag.

Pressing Z again returns the image to normal size.
If you have multiple images selected, you can press the spacebar and drag to pan any one of the selected images, or hold down Shift and press the spacebar while dragging to pan all images simultaneously.
Note that even when images are zoomed, you can deselect them by Command-clicking them in the Viewer pane.
Working In Full-Screen Mode
So far, we’ve been looking at images within Aperture’s main window. For more serious editing and comparing, though, Aperture provides an excellent full-screen mode.
You can toggle in and out of full-screen mode at any time by pressing F or by choosing View > Full Screen. Aperture’s interface, along with the menu bar and the rest of your Mac desktop, will fade away, leaving you in an uncluttered environment that lets you focus on your image without any distractions. Full-screen mode also allows you to see a larger view of your image, since Aperture doesn’t need to use valuable screen space for interface elements (Figure 2.31).
Figure 2.31. Full-screen mode provides you with an uncluttered view of your image, to facilitate distraction-free editing. The toolbar at the top of the screen and filmstrip at the bottom provide access to basic editing and navigation controls.

If you have multiple images selected when you turn on full-screen mode, Aperture will display all of them, just as it does in its regular interface.
In full-screen mode, Aperture provides a toolbar that appears when you move the mouse to the top of the screen. This toolbar provides access to many of the same controls as the toolbar and control bar in Aperture’s regular interface. We’ll explore these tools in more detail later.
A filmstrip HUD provides a tiny, single-row browser that allows you to select images. All of the normal selection rules apply to the filmstrip (as well as to the full-size view). You can change the size of the filmstrip HUD using the Thumbnail Size slider at the lower right, and you can reposition the filmstrip by clicking one of its edges and dragging.
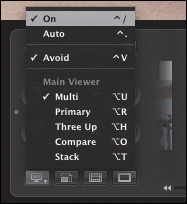
At the lower left of the filmstrip HUD is the Viewer Mode pop-up menu (Figure 2.32). With it, you can define the behavior of the filmstrip. When On is selected, the filmstrip’s default behavior is active; if you instead select Auto, the filmstrip will disappear until you move your mouse to the bottom of the screen (just as with the Mac OS X Dock).
Figure 2.32. In full-screen mode, you can use the Viewer Mode menu to control the behavior of the filmstrip.
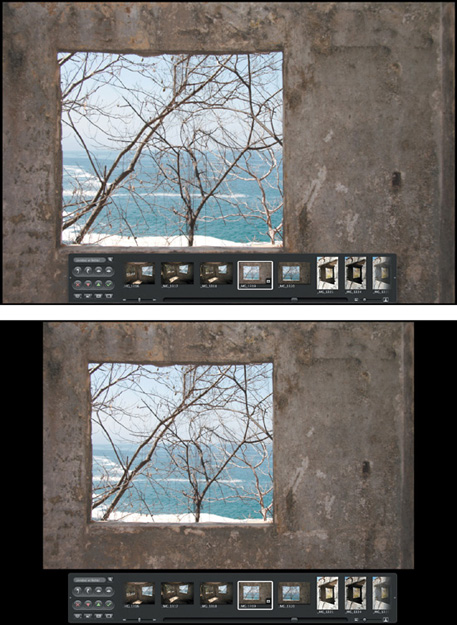
By selecting Avoid in the Viewer Mode menu, you can specify whether the filmstrip lays over your image or is tiled on the screen with the image (Figure 2.33). If you want the largest image possible, set the filmstrip to Auto mode and turn off Avoid. With this configuration, the filmstrip will appear only when you move the mouse to the bottom of the screen.
Figure 2.33. If you set the filmstrip to Avoid, then it will be tiled onscreen with your image. When Avoid is turned off, then the filmstrip overlays your image, providing you with a bigger view.
The rest of the filmstrip’s controls mirror buttons found in Aperture’s regular interface, which you’ll learn about throughout the rest of the book.
Obviously, in full-screen mode, you can no longer see the Inspector pane and its various adjustment and keyword controls. However, through HUDs, you can gain access to all of the same controls as in normal editing mode. You can toggle the Adjustments HUD by pressing H, and the Keywords HUD by pressing Shift-H (Figure 2.34).
Figure 2.34. When working in full-screen mode, you can gain access to all of the normal editing and keyword controls by using HUDs, such as the Adjustments HUD, shown here.

In full-screen mode, the loupe and the Zoom command function just like they do in normal editing mode. Press ` to toggle the loupe on and off, and press Z to toggle between 100% and Fit to Window.
Working with Albums
In Chapter 4, you’ll learn the details of all of Aperture’s organizational tools. However, you can quickly get started organizing your projects by dividing related images into albums.
As you learned earlier, when you place an image into an album (or a Web gallery, Web journal, book, or light table), Aperture simply creates a pointer inside the album that references the original image. Consequently, you can have many albums in a project—some containing the same images as others—without having to duplicate any actual image data.
You can use albums to divide the contents of a project by subject or to separate the best images in a project.
Creating an album
There are several ways to create an album. However, before creating an album, you must select the project that you want to add the album to. Once you’ve chosen your destination project, you can use any of these techniques.
1. Select the images you want to add to the album.
2. Choose File > New > Album, or press Command-Option-L, or click the New Album button on the toolbar.
Aperture will create a new album in your project and automatically add the selected images. The album’s name will be highlighted for editing, allowing you to immediately rename it.
Alternately, you can execute the New Album command and then add images to the album later, using the procedure described next.
Adding images to an album
To add images to an existing album, select them in the Browser or Viewer pane and drag them onto the desired album in the Projects pane (Figure 2.35).
Figure 2.35. To add images to an album, drag them from the Browser pane to the appropriate album in the Projects pane.
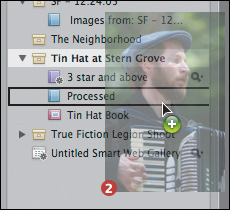
A + icon will appear next to your cursor to indicate that the dragged images will be added to the album that you have dragged to. When you release the mouse, the images will be added to the album.
You can also import images directly into a project from the Import dialog box. Just define the album as your destination when importing. Obviously, you have to create the album before opening the Import dialog box. Imported images are imported into the project that contains that album and then are automatically added to the album.
Viewing an album
When you click a project in the Projects pane, Aperture displays all of the images contained in that project. To view the contents of an album, click the album in the Projects pane. Aperture will display only the contents of that album.
Copying an image from one album to another
To copy an image from one album to another, select the image in the source album and drag it to the destination just as you would when adding an image to the album. You don’t need to hold down any modifier keys to make a copy.
In Chapter 4, you’ll learn some additional ways to add images to albums, and you’ll learn how to create a Smart Album, which can automatically populate itself with images that match search criteria.
Printing A List Of Keyboard Shortcuts
Apple has designed Aperture so that it can be run from the keyboard. In fact, if you’re mouse averse, you’ll probably find that you can do almost everything you need to do without ever taking your hands from the keys. However, learning all of those keyboard shortcuts can be difficult. This book tries to cover them in detail, but you can also use Aperture’s keyboard shortcut chart, which is provided as a PDF file. The PDF is hidden inside the Aperture application, but you can get to it using ordinary Finder controls.
1. Find your Aperture application. By default, it should be in your Applications folder.
2. Control-click the Aperture application and choose Show Package Contents from the pop-up menu. (On a two-button mouse, you can right-click to invoke the menu.)
A regular Finder window called Aperture should open. Inside there should be a single folder called Contents.
3. Open the Contents folder and then open the Resources folder that’s inside that.
Inside that folder, you should find a document called keys.pdf.
4. Copy the keys.pdf document to your desktop by holding down the Option key while you drag the document.
Now you can open the document in your favorite PDF viewer to read or print it.
It’s interesting to note the items that appear in red. These are items that were either cut before the final release or slated for future updates. Brushes? Very interesting...
Wrapping Up
What you’ve seen in this chapter are the basic controls you’ll use to drive all of your operations in Aperture. With even just a little practice, you should find yourself easily navigating between projects, selecting and deselecting images to view groups of images side by side, zooming and panning and using the loupe to examine your images up close, and toggling in and out of full-screen mode when you want a better view.
When learning Aperture’s interface, pay attention to the fact that it is not modal. In other words, just about every command and feature is available at any time. So when you’re viewing multiple images, you can still zoom or use the loupe; when you’re viewing in full-screen mode, you can still select images and perform all of the usual editing tasks—and so on. This lack of modality enables an extremely fluid image processing workflow, as you’ll see throughout the rest of this book.