
Chapter Six. Editing Raw Files
By default, your digital camera probably outputs JPEG files. JPEG (short for Joint Photographic Experts Group, the organization that created the JPEG specification) is a fairly amazing technology that makes it possible to greatly reduce the file size of an image with little discernable loss in quality.
JPEG files are ideal for digital cameras, where storage space can be limited and a smaller file size can mean a speedier camera. But JPEG files require your camera to do a lot of extra work. To create a JPEG file, your camera has to perform a substantial amount of image processing, some of which is the same type of processing that you do in your image editor.
When your camera creates a JPEG file, it makes some decisions about color processing, sharpening, noise reduction, saturation, and tone. While a good camera will make very good choices when applying these effects, they may not be the ideal choices for every image. More important, though, is the fact that if the camera has already manipulated your image data to achieve certain effects, you may have less latitude when you apply your own adjustments.
As you saw in the last chapter, it is possible to push an edit too far and end up with a final image that has tone breaks and other artifacts. With a JPEG image, your camera has already performed a fair amount of processing, which means that you’ll encounter artifacts much sooner when editing.
What’s more, while your camera may capture 10 to 12 bits of color data per pixel, JPEG files support only 8 bits of data. This means that your camera must throw away a lot of the color information that it captures when it converts to JPEG. You may not always see the effects of this lost data, but you’ll probably feel them when you’re editing. You’ll have far less latitude for making adjustments.
Fortunately, these days many cameras—from simple point-and-shoot to high-end SLR—include the capability to shoot raw images. Aperture provides thorough raw support, and this chapter explores all of its raw capabilities. In addition to learning some new tools, you’ll take a look at the raw-specific features of some of the editing adjustments that you’ve already used.
What Happens When You Shoot Raw
The image sensor in your digital camera is covered with a grid of tiny cells, one for each pixel that the sensor generates. Each cell, called a photosite, is covered with a small piece of light-sensitive metal. When light strikes the photosite, the metal releases a number of electrons that is directly proportional to the amount of light that struck the site. By measuring the voltage at each site, the sensor determines how much light struck that particular pixel. In this way, the sensor builds up a grid of grayscale pixels.
Your camera, of course, outputs a full-color image. So where does the color information come from?
Each pixel on your camera’s sensor has a colored filter over it, usually a red, green, or blue filter (some cameras use different colors, but the theory is the same no matter what colors are used; Figure 6.1). So each pixel on the sensor is able to register one primary color. To turn this mosaic of primary-color pixels into a full-color image, a process called demosaicing is employed.
Figure 6.1. The image sensor in your camera is covered with a grid of photosites, each of which is covered with a separate red, green, or blue filter.

Demosaicing is an interpolation process that calculates the color of any one pixel by examining all of the surrounding pixels. For example, say you’re trying to determine the color of a pixel that has a green filter over it and a current value of 255 (the maximum value a pixel can have). You examine the surrounding pixels and discover that the red pixels to the left and right also have values of 255, as do the blue pixels above and below and the green pixels at the corners. From this analysis, it’s pretty safe to say that the pixel in question is white, because an equal mix of full red, green, and blue is white (Figure 6.2).
Figure 6.2. Though each photosite is covered with a filter of a single color, your image sensor can interpolate the true color of each pixel by examining all surrounding pixels.

Of course, there is a possibility that your pixel is supposed to be pure green—that your subject matter included a single tiny spot of green amidst a field of white. However, the pixels on an image sensor are very, very small, so it’s unlikely that you would ever have a single pixel of one isolated color.
Just to be safe, though, a special low-pass filter is placed between your camera’s lens and its sensor. This filter blurs your image ever so slightly, so that any individual color pixels will smear their neighbors, preventing incorrect interpolation of a single pixel or single row of pixels.
The example that we’ve been discussing is very simple. Obviously, trying to interpolate every subtle shade of color is a complex process, and demosaicing accuracy is one of the factors that can make one digital camera yield better images than another. Thus, demosaicing algorithms are carefully guarded trade secrets.
When you shoot in JPEG mode, one of the first things your camera does with its captured image data is demosaic it to generate a full-color image. When you shoot in raw format, however, no demosaicing is performed by the camera. Instead, the raw data that your image sensor captures is written directly to your camera’s storage card. Demosaicing is then performed in your raw conversion software, such as Aperture.
While most decent cameras these days do a very good job of demosaicing, the fact is it’s a very complex, computationally intensive task. Cameras don’t have a lot of time to spend on this type of computation, because they need to be ready to shoot another image as quickly as possible. Because of this, some in-camera demosaicing algorithms take a few shortcuts that can sometimes affect image quality.
Since your Mac doesn’t have to rush through things, it can perform some slightly more sophisticated demosaicing algorithms. This is one of the reasons that raw images can yield better quality than JPEG images.
What’s more, raw images can be processed and stored as 16-bit images, allowing you to preserve all of the color data that your camera originally captured. (Of course, they can also be converted to JPEG files if you ultimately need those.)
Some cameras can output TIFF files. Because TIFF is an uncompressed format, these images are free of the compression artifacts you can find in JPEG files. However, TIFF files are already demosaiced, so they contain three full channels of data. A raw file has only a single channel of luminance information. Consequently, raw files are usually much smaller than TIFF files.
Some cameras perform a lossless compression on their raw files before writing them to the card to save space.
Nonlinear Data and Gamma Correction
Figure 6.3. A linear image looks very flat. You won’t see a lot of variation in the highlights or shadows.
Figure 6.4. The image in Figure 6.3 after a gamma curve has been applied.

How Aperture Converts a Raw Image
Aperture can tell if a file is a raw file by reading the format information stored in the image’s EXIF header. From this data, Aperture can also determine the make and model of the camera that was used to shoot the image. If Aperture finds that the file was created using an unsupported camera, it won’t convert it. The image will be displayed in the Import dialog box as a gray square (Figure 6.5).
Figure 6.5. An images that is stored in an unsupported raw format appears as a gray box in Aperture’s Import dialog box.

The raw conversion features of Aperture are built on top of the raw conversion capability that’s included in Mac OS X itself. Consequently, Aperture supports all the same cameras that are supported by the Finder, Preview, and iPhoto. For a complete list of supported cameras, see www.apple.com/aperture.
When processing a raw image, the first thing Aperture does is demosaic the file. Though this processing yields a legible image, the results are far from finished, and a number of additional processing steps are required.
Aperture includes a profile of every supported raw-capable camera. Created by Apple’s engineers, these profiles contain, among other things, colorimetric information about the color filters that cover the photosites of the camera’s image sensor: Aperture may know that a particular pixel has a red filter, but what exactly does “red” mean? The colorimetric data stored in each camera profile contains detailed descriptions of the color characteristics of the sensor’s color filters.
After demosaicing, Aperture uses the camera’s colorimetric data to adjust the color of the image. Unlike the color adjustments that you performed in the last chapter, this type of adjustment does not involve the remapping of tones in the image. Instead, the underlying definitions of the primary colors themselves are changed. Thus, this is a “free” edit that doesn’t use up any of your editing latitude.
The resulting data is mapped into a color space. A color space is a mathematical model that describes the range and extent of the colors that your image can contain. You may know that a pixel is “100 percent red,” but exactly what “red” that 100 percent is, is defined by the color space that the image is in.
As you probably know, white balance is the process of calibrating your camera for the particular light source in which you’re shooting. After its colorimetric adjustment and color space conversion, Aperture white balances your image. As with the colorimetric conversion, this is also a “free” change.
The camera profiles that Apple creates also contain a gamma correction curve. This curve is applied to your image to make the linear image data appear like that of the nonlinear images that we’re used to seeing.
With all of these adjustments made, your image is ready for display.
If you are shooting in JPEG mode, these same adjustments are made inside your camera. However, they are then followed up by saturation, tone, and contrast adjustments (according to settings that are usually defined in the camera’s menu) and then sharpening and possibly some noise reduction. Finally, the image is JPEG compressed and stored. All of these operations are destructive; they use up some of your editing latitude.
Choosing An Aperture Raw Converter
Aperture 1.1 actually contains two raw converters. There’s the original 1.0 converter, which suffered from some occasional image quality problems, and the 1.1 converter, which addresses the 1.0 problems and includes some additional editing controls.
Rather than simply replacing the old converter with the new, Apple includes both converters in Aperture and allows you to freely switch from one to the other. For new images, you’ll want to use the 1.1 converter, but if you have old images that you’ve already edited to your satisfaction, there’s no reason not to keep them in the 1.0 format. Apple’s inclusion of both converters means that early adopters don’t have to re-edit legacy images.
When you select a raw image in the Browser pane, Aperture automatically displays a small pop-up menu at the top of the Adjustments panel (Figure 6.6). From this menu, you can select the converter that you want to use, and you can freely switch back and forth. After you select a new converter, Aperture will immediately reprocess your image and display the new conversion.
Figure 6.6. The raw converter pop-up menu lets you choose whether you want your raw images converted using the version 1.0 converter or the 1.1 converter.

If you select File > Migrate Images, you can specify global raw conversion rules that automatically convert your images to the 1.1 raw converter (Figure 6.7).
Figure 6.7. The Migrate Images dialog box lets you specify which raw converter Aperture should use by default.

Fine-Tuning a Raw Image
When you select the 1.1 converter, Aperture adds a Raw Fine Tuning brick to the Adjustments panel (Figure 6.8). This adjustment gives you a little additional manual control over the conversion of the current image.
Figure 6.8. When you choose to use the 1.1 converter, Aperture provides a set of Raw Fine Tuning adjustments.

Within Raw Fine Tuning, you’ll find the following parameters.
Boost: When Aperture applies its gamma correction curve, some of your image’s tones are pushed deeper into the shadows, while others are pushed more into the highlights. Some users feel that Apple’s gamma curves are a little too aggressive and that they result in images that are little too contrasty, with colors that are oversaturated. With the Boost slider, you can control how strongly the gamma correction curve is applied to your image.
By default, the Boost slider is set to 1.0, meaning that the gamma correction curve is being applied at full strength. If you move the Boost slider all the way to the left, there will be no gamma correction curve applied at all, and you’ll be viewing a linear image. The values in between let you apply more or less gamma correction.
If your images are slightly too contrasty, try moving the Boost slider to a lower value before performing other edits.
Sharpening: Raw Fine Tuning provides a set of sharpening controls that work very much like the normal Aperture sharpening adjustment. The Intensity slider lets you specify how much sharpening to apply, while the Edges slider lets you independently sharpen edges. Sharpening here is a subtle control meant to reduce the softness introduced by your camera’s low-pass filter. You’ll probably later want to add a normal Sharpen adjustment as well.
Chroma Blur: Digital cameras produce two kinds of noise: luminance noise, which appears as speckly white patterns, and chrominance noise, which appears as colored splotches. The Chroma Blur slider looks for areas that have a sudden color change and blurs them to reduce chrominance noise. Obviously, this effect has an impact on the sharpness of your image. You’ll usually want to use Chroma Blur and Sharpening in tandem to find a good balance of noise reduction and preservation of detail.
Auto Noise Compensation: This parameter reduces luminance noise in your image. When analyzing noise, the Auto Noise Compensation algorithm takes several parameters into account, including the type of camera you’re using and the ISO setting you were shooting with.
By default, these settings are initially configured with settings that Apple has deemed best for the type of camera that you’re using. The Raw Fine Tuning adjustment identifies the type of camera that was used to take the image and loads settings from a prebuilt profile.
If you find that a different configuration of noise reduction and sharpening parameters works better, then you can save your new settings in a profile by choosing Save as Camera Default from the Settings pop-up menu in the Raw Fine Tuning brick (Figure 6.9). Now any image you edit that was shot with that type of camera will receive these fine-tuning settings. In this way, you can easily define a custom raw conversion profile for your camera. You can switch back to the default conversion parameters at any time by choosing Apple from the Settings pop-up menu.
Figure 6.9. After defining raw tuning settings, you can save those parameters as the defaults for your camera.

Some raw converters embed their conversion parameters directly in the raw file. Files that have been modified in this way may not work with Aperture. Either switch to a pristine copy of the raw file or process it in the other converter and then import the results into Aperture.
Adjusting White Balance
In Chapter 5, you saw how you can use the White Balance adjustment—the Temperature and Tint sliders—to alter the color in your image. This adjustment also works on raw files, but Aperture performs its adjustments in a very different way when working with raw data.
On nonraw images—JPEG, Photoshop, TIFF, and other files—the Temperature and Tint sliders make changes by redistributing the tones in your image. As you saw in the last chapter, this kind of redistribution can result in data loss that produces visible artifacts.
With a raw file, the Temperature and Tint sliders don’t redistribute any tones. Instead, they change the settings for the white balance adjustment that is applied during the raw conversion. Remember: Aperture is performing its raw conversion on the fly, so you’re free to change your raw conversion parameters (such as white balance) at any time.
Aperture reads the white balance setting that your camera stores in the image’s EXIF information at the time of shooting. If the camera was set for an incorrect white balance, or if its automatic white balance mechanism chose a bad white balance, then your image’s initial white balance may be off. This is a fairly harmless problem, as you can easily correct the bad white balance with no loss of image quality.
If your raw image needs any color adjustment, it’s best to try to perform as much of this adjustment as you can using the White Balance controls, as these adjustments don’t diminish your editing latitude.
When working on a raw file, you’ll find that the Temperature and Tint sliders yield slightly different results than they do when used on a nonraw file. You’ll sometimes find that you can push and pull your colors to a greater degree (Figure 6.10).
Figure 6.10. Both of these images have had the same white balance adjustment. As you can see, the image on the left, which was a raw file, yields a slightly different result than the image on the right, which was a TIFF file.

Using Auto Exposure
Located directly beneath the histogram is a small Auto Exposure button that can automatically set the Exposure slider. This button works only when you’re adjusting a raw image.
Auto Exposure analyzes your image and calculates an exposure setting that will distribute the tones more evenly across the histogram (Figure 6.11). Auto Exposure is smart enough to know that if your original image is very bright or very dark, then it should not simply shove all the tones into the middle of the histogram. Instead, it will perform an adjustment that’s enough to stop egregious clipping, but without going too far.
Figure 6.11. The Auto Exposure button, located directly beneath the histogram, will try to calculate an exposure setting for a raw image. The image on the right has had Auto Exposure applied.

Applying Auto Exposure is often a good way to start your Exposure adjustment. Let Auto Exposure provide a ballpark exposure setting and then tweak the setting by hand afterward.
Performing Highlight Recovery
In the last chapter, you saw how to use the Exposure slider to change the exposure of your image, making it brighter or darker. When you work with a raw file, though, the Exposure slider has an additional function: it can be used to recover overexposed highlights, restoring detail to areas that have blown out to complete white. Aperture accomplishes this seemingly magical operation by exploiting two properties of your image.
First, an overexposed image is not necessarily overexposed in all three color channels. Sometimes, only a single red, green, or blue channel will be overexposed. If your image has at least one channel that is not overexposed, then it can use the information in that channel to rebuild the channels that are clipped.
Second, most cameras shoot a little more range than is actually visible in the resulting image. This extra range is used for utility functions such as white balance. If your image has some of this extra overhead, Aperture can reach into that data to rebuild clipped highlights.
Exploring overexposure
As you learned in the last chapter, overexposure appears in an image histogram as a white spike on the right side. By default, the Aperture histogram is a graph of the luminance information in your image—a composite of all three color channels. If any one channel is clipped, then the luminance histogram will show a white spike.
Using the action menu in the upper-right corner of the Adjustments panel (Figure 6.12), you can change the Aperture histogram to show separate, overlapping histogram displays for each individual color channel. With this three-channel display, it’s possible to see whether all three or only a few channels are clipping. In Figure 6.13, you can see that the blue channel is just barely clipped, while the red and green channels are more strongly overexposed. Since much of the blue channel is intact, this image is a good candidate for highlight recovery.
Figure 6.12. From the Adjustments action menu, you can change the histogram display to show histograms for specific channels in your image.
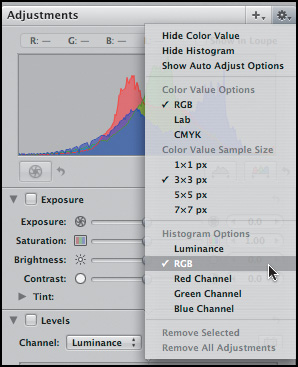
Figure 6.13. Although this image has clipping in all three channels, it has very little clipping in the blue channel. We should be able to recover a fair amount of highlight detail.

Recovering highlights
Highlights get clipped because they are overexposed. To use Aperture’s highlight recovery feature, simply move the Exposure slider to reduce the exposure for your image.
As you move the slider to the left, you should see detail start to reappear in your image. You’ll also see the spike on the right side of image shrink as the data that was clipped gets pulled back into the histogram (Figure 6.14).
Figure 6.14. With the exposure setting lowered, the highlights have been largely rebuilt. Notice the improved detail in the clouds.

In Figure 6.14, we were able to recover most of the detail in the clouds—detail that was previously overexposed to pure white. Note that there’s one area in the middle cloud that is still solid white. This is the area where all three channels were clipped, so there’s no way to rebuild the lost data. The areas where detail has reappeared are areas where only the red and green channels were clipping.
Of course, as you reduce the exposure to recover highlights, the rest of your image will get darker. Your goal with most images is to find the point at which you’ve recovered as much highlight detail as possible without darkening your image too much. The histogram will be your guide in determining when you’ve restored all of the highlight detail that can be recovered. When the right edge of the histogram is no longer spiking, it’s time to stop. (If your goal is an image that is darker, of course, by all means keep reducing the exposure.)
Though the White Point slider in the Levels adjustment brick performs the same function as the Exposure slider—it changes the white point in your image—the Levels adjustment does not provide any highlight recovery features. You can recover highlights only using the Exposure slider.
When to adjust exposure and when to adjust brightness
As you’ve seen, the Exposure and Brightness sliders perform similar functions: they allow you to change the brightness of your image. Though they achieve this in different ways—the Exposure slider changes the white point, and the Brightness slider changes the midpoint—in many cases, you can use either control to achieve the brightness change that you’re looking for.
When you’re editing a raw file with overexposed highlights, though, these two controls serve very specific functions. Your editing workflow on an overexposed raw file will usually proceed as follows:
• You’ll use the Exposure slider to recover any overexposed highlights. This will result in an overall darkening in your image, as you saw in Figure 6.14.
• Because you can’t then brighten your image with the Exposure slider without reclipping your highlights, you’ll use the Brightness slider to restore proper exposure to your image’s midtones.
• Next, you’ll use the Levels adjustment if your shadow tones need any adjustment. (If you’re using Levels to correct your shadows, you can also use it to brighten the midtones, instead of using the Brightness slider.)
• Finally, you’ll perform any other edits and adjustments that you need (Figure 6.15).
Figure 6.15. To finish this image, we added both Levels and Highlights and Shadows adjustments, being very careful not to reclip the highlights.

Note that other adjustments, such as Saturation, can brighten your image enough that your highlights reclip. Be sure to keep a close eye on the histogram when making further adjustments.
Exposing For Raw
When shooting in raw mode, it’s worth considering a change in your exposure strategy.
Most digital photographers are used to underexposing to protect their highlights. Sure, underexposing can lead to shadow tones that are completely black, but an underexposed shadow is much less visible than an overexposed highlight. What’s more, because Aperture can rebuild highlights that have been slightly overexposed, you have a bit of a safety net when shooting in raw mode.
However, because of the linear nature of digital image sensors, if you take a different approach to your exposures, you’ll produce images that contain much more robust data, which can withstand more edits. You’ll also find that you can produce images that are less prone to noise.
Linear data revisited
As discussed earlier, the image sensor in your digital camera has a linear response to light. When the brightness in your scene doubles, the camera registers twice as much light.
Camera sensors begin recording an image by measuring the brightest values in your scene. This brightest stop takes up fully half of the dynamic range of your sensor. Thus, if your sensor is capable of capturing 4,096 levels of light, 2,048 of those levels will be consumed in the recording of just the brightest stop in your scene.
The next brightest stop will use half of those remaining 2,048 levels. The next brightest will use half of what’s left over from that, and so on for about 8 to 10 stops worth of light (Figure 6.16).
Figure 6.16. Most of the data that your camera captures goes to recording the brightest half of the image. Half of the remaining data goes to recording the next stop, and so on. This means that your camera records substantially more information for the bright areas of your image than for the dark areas.

Thus, when you get to the darkest tones in your scene, your camera will be representing them with only a few shades—in some cases, very few shades. Consequently, if you expose to preserve as much highlight detail as possible, then you’ll be capturing far more levels than if you expose for shadows.
But, you may be thinking, what if the scene I’m envisioning in my final output is a dark scene? That’s fine—you should still expose to capture as many of the bright tones as you can, because you’ll get far more information, and you can always push those tones down into the shadow areas to create a darker image. What’s more, you’ll end up with shadow areas that are much less noisy than if you try to expose to capture shadow tones. Because your camera captures so few tones in the shadow range, the signal-to-noise ratio in those tones is very bad. By capturing high-quality highlights and then darkening them, you can achieve much less noisy shadow areas.
So when shooting, you want the data in your histogram biased more toward the right edge than toward the left to guarantee that you’re capturing as much data as possible in the area where your camera records the most information.
If you’re worried about overexposure, remember: you have a little bit of a safety net in the form of Aperture’s highlight recovery features. To play it safe while you learn this technique, though, bracket your shots and shoot at least one exposure using your normal strategy.
Wrapping Up
A lot of people are intimidated by raw shooting because they’re afraid it’s complicated and technical. As you’ve seen here, in Aperture the process of editing raw or JPEG files is the same. The only difference is that when you’re editing a raw file, you have a few more controls at your disposal and a lot more editing latitude.