
Chapter Eight. Output
In the old days of analog photography, this chapter would have been called “Printing,” but nowadays, whether you initially shoot film or digital, once your images are in your computer, you probably create several different kinds of output. In fact, prints may be an increasingly rare form of output for many photographers.
Aperture provides a large array of output options, from electronic to print, and in this chapter, we’ll look at all of them.
Defining Presets
Because Aperture never alters your master files, the original pixel dimensions of your images are always preserved. This means that you’re always working on full-resolution files. If you need to output an image at a different size or resolution, that resizing is performed at the time of output. Aperture relies on presets—predefined parameter settings—for specifying output options such as file format, file size, and resolution.
Aperture comes preconfigured with most of the presets that you’ll need. For example, when exporting a file, you can choose from presets that let you save in JPEG, TIFF, or Photoshop format, at a variety of sizes. You’ll also find presets designed for specific tasks, such as e-mailing images.
Aperture provides five categories of presets: Image Export, Web Export, Slide Show, File Naming, and Printing. You can select or define presets in any export dialog box—the Export Versions or Print dialog box, for example—or you can choose Aperture > Presets and select the category you want to edit.
Building a preset for any category is simple. You create a new preset by clicking the + button below the Preset list (Figure 8.1) and then configure the parameters that you want for that preset. In most cases, you should find the parameters self-explanatory. If not, consult the Aperture User Manual by choosing Help > Aperture User Manual.
Figure 8.1. Aperture presets editing interfaces all follow the same basic design. Presets are listed on the left side, with + and - buttons for adding and deleting presets below the list, and editable parameters are on the right side of the dialog box.

Image Export and Web Export allow you to superimpose a watermark over your images (Figure 8.2). Select the position for the watermark from the Position menu; then adjust the Opacity slider to specify how distinctly the watermark is superimposed over your image. Finally, click the Choose Image button to select an image from your hard drive to use as a watermark. You cannot select images from within your Aperture library (go figure), so if the watermark image you want to use is currently in Aperture, you’ll have to export a version of it first (see the next section for details on exporting).
Figure 8.2. Both Image Export and Web Export presets let you define a watermark that will be superimposed over your images at the time of export.
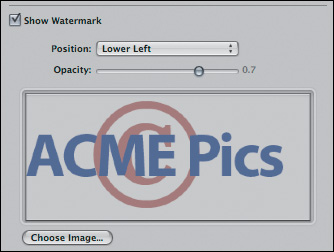
Though the watermark feature can decrease the opacity of your watermark image, if you want any areas to be fully transparent, you’ll have to build that transparency into the watermark file. The easiest way to do this is to place the watermark image on a floating layer in Photoshop.
Naming files
In Chapter 3, you saw how Aperture’s Import dialog box lets you specify naming conventions for imported images, and you saw how you can define a file name that is composed of different file properties: version name, sequential number, and so on. The File Name presets dialog box presents a very similar interface, allowing you to easily create file name presets for your exporting chores (Figure 8.3).
Figure 8.3. You can define file name presets to build custom file names that you can use when you export and save your images.

The options in the File Name Presets dialog box are straightforward, but it’s worth remembering that there is a difference between the original file name and the version name. The file name is the original name of the master image; the version name is whatever you have decided to name each version of that image that you create. Version names provide you with a simple mechanism for giving your final file names descriptive titles, but without losing track of your original name—you always have the original file name stored in Aperture.
If you have created a lot of custom presets, you may want to consider backing them up. Presets are stored in your Home > Library > Application Support > Aperture folder.
Exporting Images
In the preceding chapter, you learned how to use Photoshop’s round-trip feature, which lets you easily move images into another editor and back. If you need to create files to give to other people, though, or to use in another application such as a video editor or 3D modeler, you’ll need to use Aperture’s export functions.
When you export an image, you have two options: you can export the original master file for that image, or you can export the current version.
Exporting a master
When you choose to export the master of the selected image, the original file that was imported into Aperture is exported. Remember that Aperture never alters a master image so this file will be an exact copy of whatever you imported. If you originally imported a JPEG file, then the exported master will be that same JPEG file. If you imported a raw file, then the original, unprocessed raw document will be exported. If you imported a Photoshop file, even one with multiple layers and effects, then that original file will be exported.
If you want to work with your original document in another application, or if you want to give a copy of the original document to someone else, you should export it as a master.
If you haven’t made any adjustments to your original image, then exporting a master is a viable option for delivering a copy of the image to someone else. However, note that if you’ve applied any metadata to your image, that data won’t be included with the exported master. For that, you’ll need to export a version (discussed later in this chapter).
To export a master, follow these steps:
1. Select the images that you want to export.
2. Choose File > Export Master.
3. Select a destination to save the file.
4. Click Export Masters Here.
Aperture exports the original master file.
Exporting a version
If you’ve edited an image and want to export the results, then you’ll need to use the Export Version command. Similarly, if you haven’t made any adjustments but have added metadata to your image, then you’ll need to use Export Version to produce an image that includes your metadata.
If you need to export an image at a particular size, don’t worry; you’ll can specify an output size when you save the file. Because Aperture is a nondestructive editor, there’s no need to keep separate versions for different image sizes.
To export a version, follow these steps:
1. Select the images that you want to export.
2. Choose File > Export version.
3. In the resulting dialog box, navigate to the location in which you want to save.
4. From the Export Preset menu (Figure 8.4), choose a format and file size.
Figure 8.4. You can select your final size and output format at the time of export by selecting the appropriate export preset.
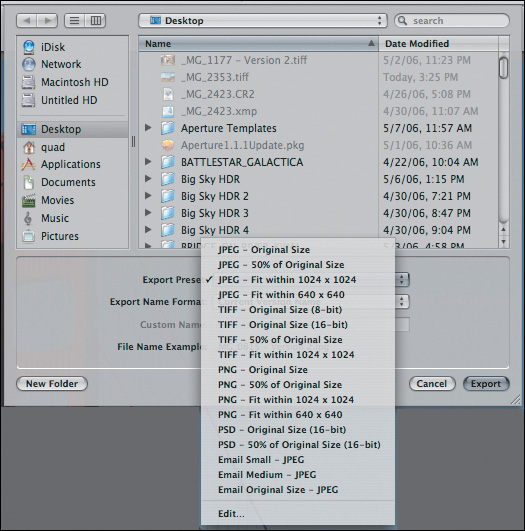
The preset menu contains all of the most common file sizes and format configurations. We’ll explore how to create new sets in the next section.
5. Choose a naming convention from the Export Name Format menu.
These are the same types of name formats that you saw in the Import dialog box.
6. Click Export.
Aperture saves your images.
Creating E-Mail And Web Output
You can easily e-mail any selection of images by choosing File > Email. Aperture will create a scaled copy of each image and attach it to a message in your e-mail program of choice.
In the Preferences dialog box, you can specify your e-mail program as well as the preset used for the resizing (Figure 8.5). By default, Aperture uses the Email Medium — JPEG preset, which scales your image to fit inside a 1,024 × 1,024 box and uses a JPEG quality setting of 8. If you prefer a different size or file format, you can either select a different preset or build one of your own.
Figure 8.5. In the Preferences dialog box, you can specify the e-mail program and export preset that you want to use for exporting images to an e-mail program.

Creating a Web gallery
Aperture can create HTML galleries of your images. If you have a .Mac account, Aperture will automatically upload the resulting gallery to your iDisk for serving. If you don’t have a .Mac account, Aperture can output a folder full of HTML and JPEG files, which you can upload to your own server.
A Web gallery in Aperture consists of an index page, which provides thumbnails of all of your included images, and navigation. If you click a thumbnail, you’ll be taken to a detail page that displays a larger image. Detail pages let you navigate through the gallery and also return to the index page (Figure 8.6).
Figure 8.6. An Aperture-generated Web gallery consists of index pages (left), which contain image thumbnails, and detail pages (right), which contain larger versions.

Here’s how to create a Web gallery:
1. Select the images you want to include in the gallery.
2. Choose File > New > Web Gallery, or click the New Web Gallery from Selection button on the toolbar.
Aperture creates a new Web gallery within your project.
A Web gallery is just like an album in that it includes references to your original images. However, when you click a Web gallery in the Projects pane, the Viewer pane displays a special Web gallery editing interface (Figure 8.7).
Figure 8.7. When you click a Web gallery in the Projects pane, the Viewer pane displays Aperture’s Web gallery editor.
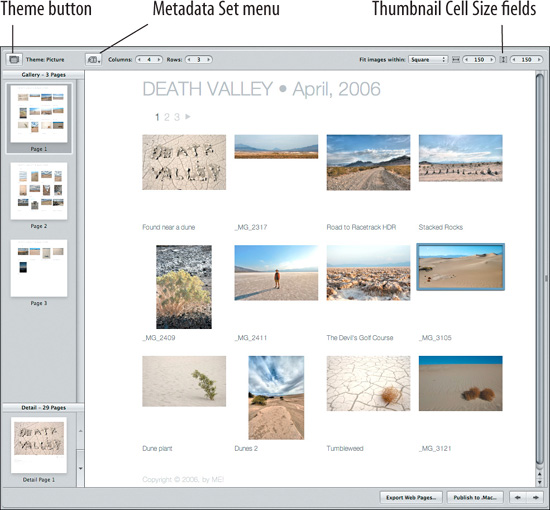
Aperture will generate as many index pages as are required to hold all of the images that you add to the gallery. You can change the number of images that each index page holds by using the Columns and Rows selectors at the top of the Viewer pane. You can view individual detail pages by using the Detail navigator below the index pages.
Customizing a Web gallery
Aperture contains several Web gallery themes that you can view by clicking the Theme button at the top of the window.
In the Choose Web Themes pane (Figure 8.8), select the theme that you want to use. You can switch themes at any time.
Figure 8.8. You can select from several predesigned themes for your Web gallery by clicking the Themes button.

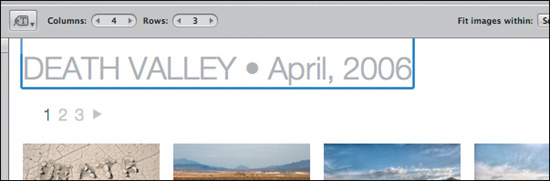
Each theme has an editable site title, which you can change by double-clicking it and then entering new text (Figure 8.9). Some themes also have an editable subtitle or an additional block of text.
Figure 8.9. You can edit many of the text fields on a Web gallery Web page by double-clicking the field to make it editable.
Most themes also have one customizable piece of metadata. You can specify what you want that metadata to be by choosing a metadata set from the Metadata Set pop-up menu at the top of the window.
Detail pages also have a selectable piece of metadata. Click a detail page to view it and then use the Metadata Set pop-up menu to choose the metadata set you want displayed.
The Fit Images Within pop-up menu lets you specify whether your thumbnails should be constrained to fit within a square or rectangle or displayed at the width specified in the Thumbnail Cell Size fields.
You control the order of the images in your Web gallery using the Browser pane. The order that appears in the Browser is the order that will be used when the images are placed in the gallery.
To add more images to the gallery, drag them from your project into the Web gallery. To delete an image, select it and press the Delete key. Your original images will not be deleted, of course, because the Web gallery holds only references.
Creating a Smart Web Gallery
A Smart Web Gallery works just like a Smart Album (see Chapter 4). Using the Smart Settings HUD attached to the Smart Web Gallery, you can define criteria for the images that you want included in that gallery. All images in the project that have matching criteria will be added to the gallery. All other design and customization features are the same as for normal Web galleries.
When you create any new object in an Aperture project—Web galleries, Web journals, albums, books—Aperture automatically selects the name of the object so that you can immediately give it a more meaningful name. You can re-edit the name at any time by double-clicking it in the Projects pane.
Creating a Web journal
A Web journal is a variation of the Web gallery that allows you to add text. Instead of index pages, a Web journal has journal pages, which can contain any number of image thumb-nails and multiple text blocks. When you click a thumbnail, Aperture takes you to the detail page for that image. Web journal detail pages work just like Web gallery detail pages (Figure 8.10). You can create as many journal pages as you want, and each can tell its own story and have its own collection of images.
Figure 8.10. Web journals consist of journal pages (left), which can contain any amount of images and text. When you click an image on a journal page, you’ll be taken to a larger, detail page for that image (right).

You create a Web journal by selecting images and then choosing File > New > Web journal.
Customizing a Web journal
Web journals provide all of the same customization features as Web galleries. You can pick a theme for your Web journal using the Theme button, change the selectable metadata using the Metadata Set pop-up menu, and choose the number of columns that you want to display.
Web journal detail pages have no customization options.
Building a journal page
When you create a Web journal, your fist page initially contains no images. You add an image by dragging it from the Browser pane to the journal page. Aperture will display a green bar to indicate where the image will go (Figure 8.11).
Figure 8.11. Drag your first image onto a journal page. Aperture displays a green bar to indicate where the image will be placed.

Some themes provide pages with empty boxes that you can drag images into (Figure 8.12). If a page includes a shaded box with a + in the middle, you can drag an image into this frame. The image serves as a header graphic that you can include on each of your journal pages. At any time, you can double-click the image to invoke the Image Scale HUD, which you can then use to zoom and crop the image.
Figure 8.12. If the journal page for your selected theme includes an image box, you can drag an image into the box and then scale it to your liking.

You can continue to add images next to your initial image, but a single row cannot contain more images than you have defined using the Column pop-up menu at the top of the window.
Clicking the Add Text button at the top of the window adds an editable block of text to the page. You can add as many text blocks as you want, and you can insert images between text blocks to build up your page.
Adding journal pages
You can add pages by clicking on the + button at the bottom of the Journal panel. Some themes provide a choice of page styles, which you can access from the Page Template menu at the bottom of the Journal panel (Figure 8.13).
Figure 8.13. Using the Page Template menu, you can choose the style you want for the current page.

Aperture can also automatically build journal pages for you, based on the metadata in your image. Using the action menu at the bottom of the Journal panel, you can tell Aperture to build a separate page for each day (it will determine days by looking at the date metadata in your images), ranking, keyword, and more.
Customizing Aperture’s templates
Although Aperture doesn’t provide a built-in facility for customizing templates, if you have some experience with HTML and CSS, then you can do a little hacking on Aperture’s existing templates to alter them or create entirely new templates.
Aperture’s templates are stored in the Aperture application package. The templates themselves are just HTML, CSS, and JPEG files, and you can easily edit them using any text or HTML editor. With a little editing, you can easily change the existing color scheme or even create new layouts (Figure 8.14).
Figure 8.14. With a little hacking of Aperture’s Web theme files, you can customize your Web galleries.

For more information on customizing Aperture’s Web templates, see www.completedigitalphotography.com/?p=427.
Creating Slideshows
You can display a full-screen slideshow of the images in any Aperture object—project, album, Web gallery, Web journal, and so on—by using the Slideshow command. Choose File > Slideshow or press Shift-S to begin.
Sometimes Aperture doesn’t update the File menu properly. If you find that Slideshow is dimmed in the File menu, you can probably still access it by pressing Shift-S.
Aperture will present a small dialog box asking you which slideshow preset you want to use. Select one and click Start. Your screen should fade to black, and then your slides will begin.
You can pause the slideshow by pressing the spacebar. A second press of the spacebar will restart the show.
Configuring slideshow presets
You can use the Slideshow Presets dialog box to customize your slideshow display and add music and effects. To open the dialog box, choose Aperture > Presets > Slideshow.
As with all of Aperture’s presets editors, you click the + button below the Presets list (Figure 8.15) to create a new slideshow preset.
Figure 8.15. By creating slideshow presets, you can create custom slideshow specifications.

For each preset, you can configure the following parameters:
• Timing: From the Timing menu, you can choose to display each image for a fixed amount of time, advance slides manually, or fit your slide display to a piece of music. If you choose Fit to Music, Aperture automatically calculates how long each slide should be displayed to fit all of the slides within the duration of the chosen song.
• Duration: If you select a fixed timing, you can use the Duration slider to select the display time.
• Loop Slideshow: If you want the slideshow to loop, check this box. After the slide-show starts, you can stop it by pressing Esc.
• Quality: Your slideshow can display Aperture’s cached proxy images, which load very quickly, or full-size images. If you’re using a small monitor, the proxy images may deliver all of the quality you need. If you’re using a larger monitor, however, you should opt for full-size images. With full-size, full-res display, you won’t be able to advance through your slides as quickly, since Aperture will need some time to cache each image before it appears.
If you’re using manual advancement and full-res image quality, Aperture will display a proxy image if you choose to advance before the next slide as been cached. As soon as the full-res image is loaded, the proxy will be replaced.
• Play Slideshow on Main Display Only: If you’re running a dual-monitor system and you want the slideshow to run only on your primary display, select Play Slideshow on Main Display Only.
• Rows and Columns: Aperture can display multiple images in a grid on your screen and then swap out each image as the show advances. (Check out the included 4-Up presets to see how a slideshow set up this way looks.) The Rows and Columns sliders let you choose the number of images that you want on the screen at one time.
• Padding: You can adjust the space between the different images by dragging the Padding slider.
• Fade Time: Aperture automatically adds dissolves between slideshow images. You can adjust the duration of the dissolve using the Fade Time slider. Setting Fade Time to 0 eliminates the dissolve.
• Crossfade: Select Crossfade to cause one image to dissolve over another. If the box is unchecked, Aperture will fade out the A image to the background color and then fade in the B image.
• Background: You can select the background color that is displayed behind your images.
• Play Music During Slideshow: Select Play Music During Slideshow to view the contents of your iTunes library. From here, you can select a playlist or song to play during the show.
Creating Light Tables
If you’re a film photographer who’s used to scattering slides on a light table and freely rearranging them and experimenting with different sequences, then you’ll find Aperture’s light table very familiar. A light table is a large virtual pasteboard—you can drag images onto it and then freely resize and arrange them (Figure 8.16). Images can overlap and can be any size, and you can grab them and move them around at any time.
Figure 8.16. A light table lets you freely position, scale, and layer your images, providing a hands-on approach to looking at your pictures.

Light tables are ideal for photographers who like to pick images by trying to find a story or narrative in a sequence of shots. Similarly, if you’re working with a client on images for a magazine or brochure layout, you can rough out layouts on a light table to see how your images fit together.
As with Web galleries, albums, and books, you create a light table by selecting the images you want to add to the light table and then choosing New > Light Table or clicking the New Light Table From Selection button.
You can add more images by dragging them to the Light Table entry in the Projects pane. When you select the light table in the Projects pane, the Viewer pane shows the light table at the top and the Browser pane below it. To add images to the light table, drag them from the Browser pane onto the light table. You can freely move the images around by dragging them. To resize an image, click it to select it and then drag its resize handles.
The light table viewer provides some simple organizational tools:
Put Back: If you want to remove an image from the light table, select the image and then click the Put Back button. The image will disappear from the light table but remain in the Browser.
Uncover: If you lose track of an image because you’ve accidentally stacked another image on top of it, select the image in the Browser pane and then click the Uncover button. The obscuring images will slide away, allowing you to see your selected image. Click the image, and it will move to the top layer.
Navigator: As you add images to the light table, it will expand to hold them all. If the light table becomes larger than your monitor display, you can easily get lost. Click the Navigator button to zoom out to view the entire light table. Click an image to zoom back in to that image’s position in the light table.
Zoom slider: You can zoom in and out of the light table by dragging the Zoom slider.
Scale to Fit All Items: Click Scale to Fit All Items to have Aperture automatically adjust the Zoom slider so that all images fit on the light table.
Printing a light table
You can print your light table by choosing File > Print Light Table. The entire contents of your light table will be scaled to fit the current paper size selected in the Print dialog box. We’ll discuss the Print dialog box in detail at the end of this chapter.
If you want to print just part of a light table, select the images that you want to print and then choose File > Print Images. Those images will be scaled to fit the page, but their layout will be preserved.
Creating Books
Aperture provides a built-in book-making facility that provides layout tools for designing professional-looking picture books. After building your book in Aperture, you can upload it to Apple’s book-printing service, where it will be printed and bound and then shipped to you via regular mail.
While the print quality is not as good as what you get from a high-quality desktop photo printer (or as good as the quality delivered by the Order Prints option, which we’ll look at later), it’s still very good, and the overall look of the books is polished and professional. The Aperture book-making facility is ideal for making courtesy books for clients, delivering mock-ups of a layout or book design, or creating gifts.
Creating a book
An Aperture book is just like an album or Web gallery in that it simply contains pointers to images in your project.
To create a book, follow these steps:
1. Select the images that you want to include in the book and then choose File > New > Book or click the New Book button on the toolbar.
2. In the dialog box that appears, pick a book size and theme (Figure 8.17).
Figure 8.17. When you create a new book, Aperture first asks you to choose a theme for the book. The theme will determine page layouts, color scheme, and type options.

Currently, Aperture provides two book sizes: Mini, which creates 2.6 × 3.5-inch books, offered in packs of three only; and Standard, which creates 8.5 × 11-inch books, offered in hardcover and softcover versions. You can choose the desired size from the Book Size pop-up menu. Aperture provides six predefined themes, and each theme provides different layout options. You can change the book’s theme later if your initial choice does not provide the look that you want.
3. Click Choose Theme, and Aperture will add a book to your project and place your selected images in it.
You can add more images at any time by dragging them into the Book entry in the Projects pane.
Creating a book layout
As with Web galleries, when you select a book in the Projects pane, Aperture displays its book editing interface (Figure 8.18).
Figure 8.18. When you select a book in the Projects pane, Aperture displays its book editor in the Viewer pane.
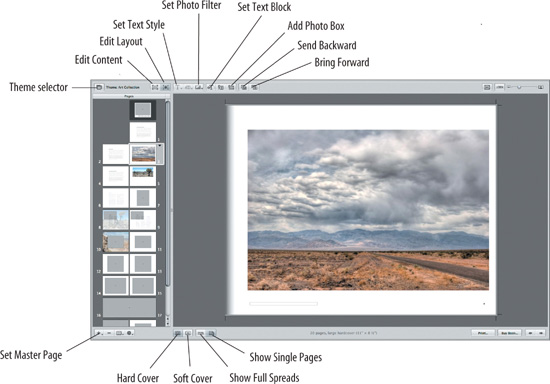
By default, all books begin with 20 pages, each of which holds placeholder text blocks and empty image boxes. You can add or delete pages (additional pages cost more, but if you have fewer than 20 pages, you’ll still pay the same base price) as well as change the layout and contents of the pages.
Navigating your book is simple: in the Pages panel, just click the page that you want to view. By default, Aperture displays two-page spreads. If you’re working with a small screen, you may want to switch to single-page view by clicking the Show Single Pages button below the page display.
Choosing a new master page design
Aperture provides a choice of page layouts, called master pages, and you can select new layouts on a page-by-page basis. Each book theme provides a different set of layouts appropriate to that theme’s design.
To change a page’s master page, follow these steps:
1. In the Pages panel, select the page you want to alter.
2. Select a new master page design from the Set Master Page menu located below the Pages panel.
Your page will immediately change layout. If you are switching from a page design that includes text blocks to one that doesn’t include text blocks, then you will lose any text that you’ve added to the page.
Editing text
You can edit the text in any text box by double-clicking it. To change the style of the text, select a new style from the Set Text Style menu (Figure 8.19). The options in this menu will vary depending on the theme you have selected. A text block can have only one style applied to it, and you cannot change the style of individual words within a text block.
Figure 8.19. In a book layout, you have several choices for the style of your text blocks.

Adding images
You can add an image to any photo box—the large shaded boxes with the + signs in the middle—by dragging an image from the Browser pane into the box (Figure 8.20). The image will be scaled to fit the box. After you’ve added an image to a book, Aperture adds a small number badge to its thumbnail in the Browser pane, to indicate the number of times that the image has been used in the book.
Figure 8.20. You can place images in any photo box by dragging them from the Browser pane.

Zooming and cropping an image: You can zoom into and pan around an image in a photo box by double-clicking the image to invoke the Image Scale HUD. Drag the slider to the right to zoom in on the image. Click in the gray area surrounding the book layout to dismiss the HUD. If you’ve zoomed in on an image, you can pan around it by clicking and dragging the image.
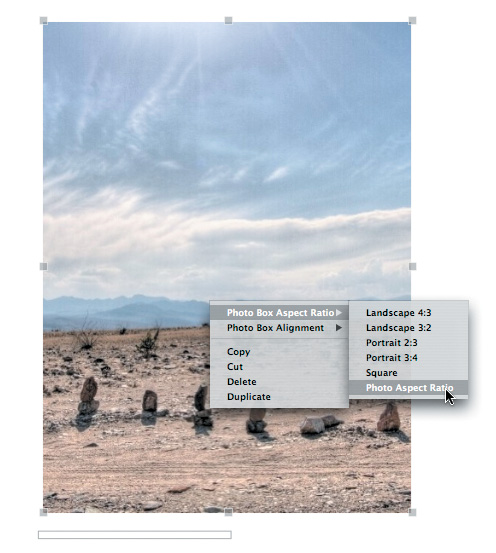
Changing the aspect ratio of a photo box: If your image does not have the same aspect ratio as the photo box that you’ve placed it in, it will be cropped. You can automatically resize the photo box to match your image by clicking the Edit Layout button and then Control-clicking (or right-clicking, if you have a two-button mouse) the image. From the pop-up menu, choose Photo Box Aspect Ratio > Photo Aspect Ratio (Figure 8.21). The box will be resized to match your image.
Figure 8.21. By Control-clicking an image, you can ask Aperture to automatically change the aspect ratio of a photo box to match the aspect ratio of the image that’s been placed inside it.
Changing the size of a photo box: In Edit Layout mode, you can resize a photo box, even one that already contains an image, by dragging the control handles along the edges of the box. Hold down the Shift key while dragging to maintain the aspect ratio.
Rotating an image: You can rotate an image within its photo box by double-clicking the image to make it editable and then using the rotation tools to rotate it in 90-degree increments. You cannot arbitrarily rotate a photo box.
Adding a photo filter
Aperture provides some built-in filter effects that can be applied to any image in a book layout. You can use these filters to perform black-and-white conversions and sepia conversions and apply a wash to an image to make it appear lightly screened (Figure 8.22).
Figure 8.22. Using the Set Photo Filter menu, we applied a Light Wash filter to this image to screen it back, making the text box on top of it more readable.

Filter effects that you apply in a book layout are visible only in the book; they do not appear on the images in your library.
To apply a photo filter, select the image that you want to filter and then choose the filter you want to apply from the Set Photo Filter menu.
Autofilling book pages
Aperture can automatically build pages for you using your remaining unused images. Select the page on which you want to begin autofilling and then choose Autofill Unplaced Images from the action menu below the Pages panel. Aperture will fill the remaining photo boxes in your book with your unused images.
If you want to limit the images that Aperture uses, select the images that you want to use and then choose Autofill Selected Images from the action menu.
Customizing book pages
You can freely edit Aperture’s book layouts, to tweak them to meet the needs of your particular project. Aperture’s book editing facilities are powerful enough that you can completely rebuild pages to your own design.
Changing the layout of text blocks
You can change the size of a text block or move the block on the page by clicking the Edit Layout button. Handles will appear on the text block, and you can use these to stretch and drag the block. As you drag, alignment guides appear to help you align blocks.
In Edit Layout mode, you can also add text blocks by clicking the Add Text Box button or choosing Add > Text Box from the action menu below the Pages panel.
When you’re done editing, switch back to Book Layout mode by clicking the Edit Content button.
Changing the number of columns in a text bock: You can give a text box a columnar layout by choosing Text Block Columns from the action menu below the Pages panel.
Changing text box alignment: You can change the alignment of text within a block by choosing Text Box Alignment from the action menu below the Pages panel.
Adding a photo box
You can add as many photo boxes as you like to a page. To add a new one, select the page to which you want to add the box. Click the Edit Layout button and then click Add Photo Box to add a new box. You can then resize and position the box.
You can create overlapping text and photo boxes simply by layering the boxes on top of each other. You can change the stacking order of the currently selected item by using the Send Backward and Bring Forward buttons.
Adding a metadata box
If you want to automatically display the metadata for a particular image, you can add a metadata box. Click the Add Metadata Box button and then position and size the box.
You must configure the text box to display the appropriate metadata:
1. Click the page to which you want to add the metadata box.
2. Select the metadata box and the picture that you want it associated with.
3. With both items selected, Control-click (or right-click if you have a two-button mouse) the metadata box and then choose Link Metadata Box from the pop-up menu.
This command tells Aperture to display the metadata from the linked image.
4. Click the Set Metadata Format button and then select the metadata set that you want displayed in the selected metadata box.
Changing the page background
In addition to adding images to photo boxes, you can drag images directly onto the page background. The image will fill the entire page, and all other elements on the page will sit on top of it. You can still zoom and pan the image, but you can’t change its aspect ratio.
To add an image to a page background, drag it from the Browser pane to the white part of the page (or the black part, if you’re using a theme with black pages). The page will be highlighted in gray to indicate that the image will be added to the page background.
The ability to add images to the page backgrounds gives you lots of additional design and layout possibilities, because you can design page elements—or even entire pages—save them as images, and then import those images into Aperture and place them on a book page.
For example, by default Aperture’s themes have a white or black background. You can change the background color of a page using the following technique:
1. In your image editor, create a document that is 8.5 × 11 inches with a resolution of 300 ppi.
2. Fill the document with your desired page color.
3. Save the colored document as a TIFF file and then import it into the Aperture project that contains your book.
4. Add the document to your book.
5. Drag the file into the page background of the page that you want to color.
You can now create text or photo boxes on top of this page.
Using this technique, you can perform some additional layout functions that Aperture doesn’t currently provide:
Use additional typefaces: Aperture doesn’t let you use any typefaces besides those included in the Set Text Style menu. However, you can use your image editor to create a background image that has the text that you want, styled and positioned to your liking, and then import that image into Aperture and place your images over it. Obviously, you will not be able to edit the text in Aperture. You can also use this technique to add graphic elements such as border lines.
Create complex image layouts: While Aperture lets you design pages with multiple, overlapping text and image boxes, it doesn’t let you arbitrarily rotate images or perform other more sophisticated layout tricks. However, you can lay out your page in your image editor, position your images as you like there, and save the entire layout as an image that you can then import and place on a page background (Figure 8.23).
Figure 8.23. If you need to create more complex layouts than what Aperture’s built-in tools are capable of, consider designing a page in an external application and then applying it to a page background in your Apple book.

Saving custom pages
If you’ve customized the layout of a page and want to be able to easily apply that layout to other pages in your book, you can save the custom layout by choosing Save Page > As New Document Master from the action menu below the Pages panel.
The new page layout will appear in the Master Page menu. Note that images added to page backgrounds are not saved in the master page definition.
Outputting your book
When you’re ready to output your book, you have two options:
• Click the Buy Book button to order an Apple-printed book. After you complete the book order form, Aperture will prepare your book file and then upload it to the book ordering server.
• Click the Print button to print the book yourself on your own printer. Aperture comes with book-printing presets; we’ll cover printing in detail in the next section. Note that, from the Print dialog box, you can also save your book as a PDF document. You can then submit this file to other book-printing services.
Printing
You can print your images directly from within Aperture using its full-featured printing functions. In addition to producing individual prints at any size supported by your printer, Aperture can print contact sheets and custom layouts.
As with Web layouts, you don’t have to resize your images before you print them. Aperture takes care of the appropriate resizing at print time.
Using onscreen proofing
Aperture provides a built-in onscreen proofing facility that can help your monitor deliver a more accurate view of what your final printed colors will look like. Color management is a complex topic worthy of its own book. In this section, we’ll be covering the basics of onscreen proofing.
Running a color-accurate system is also expensive. To get accurate onscreen proofs, you’ll need a high-quality (read pricey) monitor as well as special profiling hardware. If you’re using a standard Apple display with the default monitor profile, don’t expect your onscreen proofs to perfectly match your printed pages.
Whether you choose to use onscreen proofing or not, over time you’ll probably learn to better predict how the image on your screen will appear on paper. As you become more experienced with the traits of your particular printer, it will become easier for you to look at an image onscreen and say, “Oh, that will shift to red,” or “Those shadows will turn out too dark.”
Installing printer profiles
For onscreen proofing to work, you must have ICC profiles installed for your printer. Most high-quality photo printers ship with ICC profiles that are installed along with the printer driver. Some vendors provide profiles as a separate installation, while others provide improved profiles as a separate download. Check your printer vendor’s Web site for more information.
If you’re not sure whether you have profiles installed for your printer, you can use the Color Sync Utility to see a list of your currently installed profiles. You’ll find the ColorSync Utility in your Applications > Utilities folder.
Selecting a profile
You must select a profile before you can activate onscreen proofing. Choose View > Printing Profile and then select the profile for the printer and paper that you want to print on. Because different papers have different characteristics, you must be sure to pick the correct profile for your chosen paper type.
Toggling onscreen proofing
After you select a profile, onscreen proofing will automatically be activated, and your image display will be adjusted. The original colors in your document are not altered; the display is simply adjusted to better reflect your printed results.
You can turn onscreen proofing on and off by choosing View > Onscreen Proofing or pressing Option-Shift-P.
Once you activate onscreen proofing, it remains active until you turn it off. Even if you restart Aperture, it will still be on. So if you see strange posterization in your image, particularly in the shadows, check to see if onscreen proofing is turned on.
Using the Print dialog box
When you are ready to print, select the images that you want to print and then choose File > Print or press Command-P. Aperture will present its Print dialog box.
For the most part, the Aperture Print dialog box (Figure 8.24) is very intuitive. A preview of the layout of the current page is shown on the right side, layout and configuration controls are provided in the middle, and preset controls are shown on the left.
Figure 8.24. From Aperture’s Print dialog box, you can define printer settings as well as page layout options.
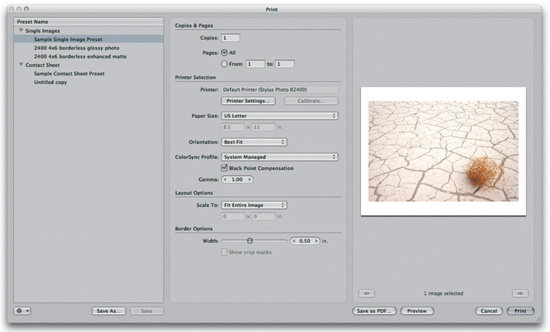
Aperture provides two printing modes: Single Images and Contact Sheet. You can define different presets for each of these modes, and Aperture includes several default presets in the Preset Name panel on the left side of the Print dialog box.
Aperture defaults to selecting the last preset that was used. If you’ve never printed before, then Sample Single Image Preset will be chosen. If you want to print a single image per page, then select a Single Images preset. If you want to print multiple images on a page, then select a Contact Sheet preset.
Configuring the print controls
In the Copies and Pages section, you can specify the number of pages and the pages you want printed. You can use the arrow keys below the image preview to see what will be printed on each page.
Printer Selection takes the place of the Page Setup dialog box that you usually use in a Mac application. Click the Printer Settings button to invoke the standard dialog box. From here, you can select the printer that you want to print to. You’ll also want to configure some options for your specific printer driver:
• Select a paper type. Most printer drivers allow you to select the type of paper that you’re printing to.
• Deactivate color management. Many printers include built-in color management software that tries to correct the color in your image. When printing from Aperture, you want Aperture to have full control of your image’s color, so deactivate any built-in color management options in the printer driver.
When you’ve finished configuring the Printer Settings dialog box, click Done to return to the Aperture Print dialog box.
Once you’ve selected a printer, the Paper Size pop-up menu will include all of the paper sizes provided by your current printer selection. Select your target paper size, and the preview image will update.
From the Orientation pop-up menu, you can choose Portrait or Landscape orientation, or choose Best Fit to have Aperture automatically fit your image so that it fills as much of the page as possible.
If you were using Aperture’s onscreen proofing feature, then you’ll want to set the ColorSync Profile pop-up menu in the Print dialog box to the same profile that you selected as your proofing profile.
If you select Black Point Compensation, Aperture tries to adjust your image so that its blacks match the black point specified in your current printer profile. This option should provide better detail in the shadow areas, but it may make your images less contrasty, as your blacks may lighten. Experiment with this setting to learn more about how it affects the output from your particular device.
In the Gamma field, you can set your output gamma to match the gamma setting on your monitor. If you’re not sure what gamma your monitor profile uses, leave Gamma set to its default of 1.0.
Scale To lets you tell Aperture to scale your image to a specific size (4 × 6 inches, 5 × 7 inches, 8 × 10 inches, or a custom size) or to automatically fit it to the current page size. If you select Fit Entire Image, then the entire image will be placed on the page at the maximum size that will fit within the current page size. If you choose Fill Entire Page, then the image will fill the whole page. If the image and the page have different aspect ratios, then the image will be cropped.
Aperture can automatically put a border around your image. The Border slider lets you control the width of the border. Border width is subtracted from the initial page size calculation that Aperture derives. So if you select Fit Entire Image in the Scale To Options, Aperture will figure out the largest size that will fit on the page and then reduce the image to make room for the border width that you specify.
When you select a Scale To size that is smaller than the page size, the Show Crop Marks check box will become active, giving you the option of including crop marks on your final page.
Printing multiple images on one page
If you want to print multiple images on a single page, you’ll need to use a Contact Sheet preset. The Sample Contact Sheet preset is designed to let you print small thumbnails of images on one page, in the form of a traditional contact sheet.
When you choose the Sample Contact Sheet preset with multiple images selected, your images will be arranged in a four-column grid and will take up as many pages as required to print every image.
If you want to quickly print a contact sheet of all of the images in any type of Aperture object—project, album, book, and so on—deselect all images and choose Print. Aperture will automatically create a contact sheet containing all of the images in that object.
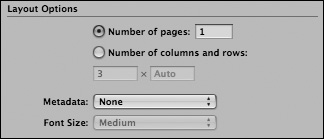
When you use a Contact Sheet preset, you’ll have three additional layout options (Figure 8.25): You can select Number of Columns and Rows and then specify the exact number of images that you want in your grid. From the Metadata pop-up menu, you can select a metadata set to include below each image. From the Font Size menu, you can specify the size used for the metadata display.
Figure 8.25. When you use a Contact Sheet preset, Aperture adds three more options to the Print dialog box.
You can also use Contact Sheet presets for printing multiple images on a page at larger sizes. For example, if you select two images before printing, you can create a Contact Sheet layout that prints them both on one page at as large a size as possible.
Here’s how to create a Contact Sheet layout:
1. Choose New Contact Sheet Preset from the action menu below the Preset Name panel. Give the new preset a name.
2. Set Orientation to Best Fit.
3. Set Number of Pages to 1.
4. Configure the rest of the options as appropriate for your printer.
In a Contact Sheet layout, you can specify either a number of pages or a number of columns and rows. When you specify a specific number of pages, Aperture sizes your images so that they all fit at maximum size across the number of pages you specify (Figure 8.26).
Figure 8.26. You can print multiple images on a single page using a Contact Sheet preset.

By contrast, if you specify a number of columns and rows, then Aperture will create a grid of thumbnails. So by setting Number of Pages to 1, you tell Aperture to fit both of your selected images on one page. If you select more images and then use this same preset, they will all be fit onto one page.
Saving a preset
You can create presets in two ways: by using the New Preset command in the action menu below the Preset Name panel, or by configuring the Print dialog box and then clicking the Save As button below the Preset Name panel. Aperture will prompt you for a preset name and then save the preset.
Settings that you specify in the Printer Settings dialog box—paper type and color management, for example—are not saved in presets. Presets provide you with a shortcut for paper size and layout options, but you still need to manually specify printer-specific settings. However, Aperture remembers your last printer settings until you quit the application.
Printing strategies
No matter how careful and meticulous you’ve been with your image edits, your images will probably need additional edits for printing. Your printer has a very different color gamut and dynamic range than your monitor does, and different papers respond very differently to the same image.
Fortunately, with Aperture’s versioning system, you can easily make additional versions of your image and add custom adjustments for each paper type. And with the clever use of some keywords and smart albums, you can organize and maintain a collection of versions for different printers.
First, when you want to print an image on a particular type of paper, create a new version of your final edited image and give it a keyword that corresponds to that paper—“Enhanced Matte Paper,” for example. To the new version, add any adjustments that you may need to get the image to print well on your chosen paper type. You may have to print test prints to get your image adjusted properly.
If you want to also print the image on a different type of paper, create another version, give it a keyword that corresponds to the new paper type, and adjust the image accordingly.
All of these new versions can be kept in the same stack as your final edit, making them simple to keep track of.
Now, in your project, create a Smart Album and name it after your first paper type. Configure the Smart Album to match all images that include your paper type keyword. Select the Ignore Stack Groupings check box so that the album culls only individual images. Your Smart Album will now contain only the image versions that are appropriate to a specific type of paper. As you tag more images with that paper type keyword, they will automatically be added to your Smart Album.
You can create different Smart Albums for each paper type.
In your Smart Album, if you make a new version of one of the images, that new version will automatically be added to the same stack that the original image was pulled from.
Ordering Prints
Aperture provides a built-in print ordering system that automatically uploads your images to a Kodak print service. This service prints your images using a chemical printing process, just like a regular film lab does.
To order prints, select the images that you want to print and then choose File > Order Prints. You may have to configure your account. Then select your options and order your prints.
Your images will be uploaded to the photo service computer, and you will receive your prints by regular mail. The length of time required for print delivery depends on your location.
Wrapping Up
As you’ve seen, Aperture makes short work of any type of output, whether print or digital. The most significant point to keep in mind when outputting from Aperture is that you can easily crank out different kinds of output at any time during your post-production workflow. You don’t need to save files at different sizes or take any huge detours.
The next chapter covers the last tasks you need to perform in a typical workflow and shows you how everything you’ve learned fits together.