
Chapter 11. Bit Operations
To be or not to be, that is the question.
This chapter discusses bit-oriented operations. A bit is the smallest unit of information; normally represented by the values 1 and 0. (Other representations include on/off, true/false, and yes/no.) Bit manipulations are used to control the machine at the lowest level. They allow the programmer to get “under the hood” of the machine. Many higher-level programs will never need bit operations. Low-level coding such as writing device drivers or pixel-level graphic programming requires bit operations.
Eight bits together form a byte, represented by the C++
data type char. A byte might contain
the following bits: 01100100.
The binary number 01100100 can also be written as the hexadecimal number 0x64. (C++ uses the prefix “0x” to indicate a hexadecimal—base 16—number.) Hexadecimal is convenient for representing binary data because each hexadecimal digit represents 4 binary bits. Table 11-1 gives the hexadecimal (hex) to binary conversion.
Thus, the hexadecimal number 0xAF represents the binary number 10101111.
Hex | Binary | Hex | Binary |
0 | 0000 | 8 | 1000 |
1 | 0001 | 9 | 1001 |
2 | 0010 | A | 1010 |
3 | 0011 | B | 1011 |
4 | 0100 | C | 1100 |
5 | 0101 | D | 1101 |
6 | 0110 | E | 1110 |
7 | 0111 | F | 1111 |
Bit Operators
Bit, or bitwise, operators allow the programmer to work on individual bits. For example, a short integer holds 16 bits (on most machines). The bit operators treat each of these as an independent bit. By contrast, an add operator treats the 16 bits as a single 16-bit number.
Bit operators allow you to set, clear, test, and perform other operations on bits. The bit operators are listed in Table 11-2.
Operator | Meaning |
& | Bitwise AND |
| | Bitwise OR |
^ | Bitwise exclusive OR |
~ | Complement |
<< | Shift left |
>> | Shift right |
These operators work on any integer or character-data type.
The AND Operator (&)
The AND operator compares two bits. If they both are 1, the result is 1. The results of the AND operator are defined in Table 11-3.
When two 8-bit variables (char variables) are “ANDed” together, the
AND operator works on each bit independently. The following program
segment illustrates this operation. (In the output statement below,
hex tells the system to output
numbers in hexadecimal format, and dec tells it to return to decimal. For more
information, see Chapter
16.)
int    c1, c2;

c1 = 0x45;
c2 = 0x71;
std::cout << "Result of " << hex << c1 << " & " << c2 << " = " <<
                              (c1 & c2) << dec << '
';
The output of this program is:
Result of 45 & 71 = 41
This is because:
   c1 = 0x45      binary 01000101
&  c2 = 0x71      binary 01110001
___________________________________________
=  0x41           binary 01000001
The bitwise AND (&) is similar to the logical AND
(&&). In the logical AND if
both operands are true (nonzero), the result is true (1). In bitwise
AND ( & ),
if the corresponding bits of both operands are true (1), the
corresponding bits of the results are true (1). So the bitwise AND
(&) works on each bit
independently, while the logical AND (&&) works on the operands as a
whole.
However, & and && are different operators, as Example 11-1 illustrates.
#include <iostream>

int main(  )
{
    int i1, i2; // two random integers

    i1 = 4;
    i2 = 2;     // set values

    // Nice way of writing the conditional
    if ((i1 != 0) && (i2 != 0))
        std::cout << "Both are not zero #1
";

    // Shorthand way of doing the same thing
    // Correct C++ code, but rotten style
    if (i1 && i2)
        std::cout << "Both are not zero #2
";

    // Incorrect use of bitwise and resulting in an error
    if (i1 & i2)
        std::cout << "Both are not zero #3
";
    return (0);
}
Question: Why does test #3 fail to print Both are not zero #3?
Answer: The operator & is
a bitwise AND. The result of the bitwise AND is zero:
   i1=4      00000100
&  i2=2      00000010
__________________________
     0       00000000
The result of the bitwise AND is 0, and the conditional is false. If the programmer had used the first form:
if ((i1 != 0) && (i2 != 0))
and made the mistake of using & instead of &&:
if ((i1 != 0) & (i2 != 0))
the program would still have executed correctly.
(i1 != 0)       is true (result = 1)
(i2 != 0)       is true (result = 1)
1 bitwise AND 1 is 1, so the expression is true.
Tip
Soon after discovering the bug illustrated by this program, I told my officemate, “I now understand the difference between AND and AND AND), and he understood me. How we understand language has always fascinated me, and the fact that I could utter such a sentence and have someone understand it without trouble amazed me.
You can use the bitwise AND operator to test whether a number is even or odd. In base 2, the last digit of all even numbers is zero and the last digit of all odd numbers is one. The following function uses the bitwise AND to pick off this last digit. If it is zero (an even number), the result of the function is true.
inline int even(const int value)
{
    return ((value & 1) == 0);
}
Bitwise OR (|)
The inclusive OR operator (also known as just the OR operator) compares its two operands. If one or the other bit is a 1, the result is 1. Table 11-4 lists the truth table for the OR operator.
Here’s an example of bitwise OR performed on a byte:
       i1=0x47       01000111
|      i2=0x53       01010011
______________________________
         0x57        01010111
The Bitwise Exclusive OR (^)
The exclusive OR (also known as XOR) operator results in a 1 when either of its two operands is a 1, but not both. The truth table for the exclusive OR operator is listed in Table 11-5.
Here’s an example of bitwise exclusive OR performed on a byte:
       i1=0x47       01000111
^      i2=0x53       01010011
______________________________
         0x14        00010100
The Ones Complement Operator (NOT) (~)
The NOT operator (also called the invert operator or bit flip) is a unary operator that returns the inverse of its operand, as shown in Table 11-6.
Here’s an example of NOT performed on a byte:
c=      0x45      01000101
________________________________
~c=     0xBA      10111010
The Left and Right Shift Operators (<<, >>)
The left shift operator moves the data left a specified number of bits. Any bits that are shifted out the left side disappear. New bits coming in from the right are zeros. The right shift does the same thing in the other direction. For example:
Shifting left by one (x
<< 1) is the same as multiplying by 2 (x * 2). Shifting left by two (x << 2) is the same as multiplying by
4 (x * 4, or x * 22). You can see a pattern forming here.
Shifting left by n places is the same as
multiplying by 2n. Why shift instead of
multiply? Shifting is faster than multiplication, so:
i = j << 3; // Multiply j by 8 (2**3)
is faster than:
i = j * 8;
Or it would be faster if compilers weren’t smart enough to turn “multiply by power of two” into “shift.”
Many clever programmers use this trick to speed up their programs at the cost of clarity. Don’t do it. The compiler is smart enough to perform the speedup automatically. This means that putting in a shift gains you nothing at the expense of clarity.
The left shift operator multiplies; the right shift divides. So:
q = i >> 2;
is the same as:
q = i / 4;
Again, this clever trick should not be used in modern code.
Right Shift Details
Right shifts are particularly tricky. When a variable is shifted to the right, C++ needs to fill the space on the left side with something. For signed variables, C++ uses the value of the sign bit. For unsigned variables, C++ uses zero. Table 11-7 illustrates some typical right shifts.
Signed character | Signed character | Unsigned character | |
Expression | 9 >> 2 | -8 >> 2 | 248 >> 2 |
Binary value >> 2 | 0000 10102 >> 2 | 1111 10002 >> 2 | 1111 10002 >> 2 |
Result | ??00 00102 | ??11 11102 >> 2 | ??11 11102 >> 2 |
Fill | Sign bit (0) | Sign bit (1) | Zero |
Final result (binary) | 0000 00102 | 1111 11102 | 0011 11102 |
Final result (short int) | 2 | -2 | 62 |
Setting, Clearing, and Testing Bits
A character contains eight bits.[1] Each of these can be treated as a separate flag. Bit operations can be used to pack eight single-bit values in a single byte. For example, suppose you are writing a low-level communications program. You are going to store the characters in an 8K buffer for later use. With each character, you will also store a set of status flags. The flags are listed in Table 11-8.
Name | Description |
ERROR | True if any error is set |
FRAMING_ERROR | A framing error occurred for this character |
PARITY_ERROR | Character had the wrong parity |
CARRIER_LOST | The carrier signal went down |
CHANNEL_DOWN | Power was lost on the communication device |
You could store each flag in its own character variable. That would mean that for each character buffered, you would need five bytes of status storage. For a large buffer, that adds up. By instead assigning each status flag its own bit within an eight-bit status character, you cut storage requirements down to 1/5 of the original need.
You can assign the flags the bit numbers listed in Table 11-9.
Bits are numbered 76543210 by convention. The constants for each bit are defined in Table 11-10.
Bit | Binary value | Hex constant |
7 | 10000000 | 0x80 |
6 | 01000000 | 0x40 |
5 | 00100000 | 0x20 |
4 | 00010000 | 0x10 |
3 | 00001000 | 0x08 |
2 | 00000100 | 0x04 |
1 | 00000010 | 0x02 |
0 | 00000001 | 0x01 |
Here’s one way we can define constants for the bits that make up the communication status values:
// True if any error is set
const int ERROR = 0x01;

// A framing error occurred for this character
const int FRAMING_ERROR = 0x02;

// Character had the wrong parity
const int PARITY_ERROR = 0x04;

// The carrier signal went down
const int CARRIER_LOST = 0x08;

// Power was lost on the communication device
const int CHANNEL_DOWN = 0x10;
This method of defining bits is somewhat confusing. Can you tell
(without looking at the table) which bit number is represented by the
constant 0x10? Table
11-11 shows how you can use the left shift operator (<<) to define bits.
C++ representation | Base 2 equivalent | Result (base 2) | Bit number |
| 000000012 << 0 | 000000012 | Bit 0 |
| 000000012 << 1 | 000000102 | Bit 1 |
| 000000012 << 2 | 000001002 | Bit 2 |
| 000000012 << 3 | 000010002 | Bit 3 |
| 000000012 << 4 | 000100002 | Bit 4 |
| 000000012 << 5 | 001000002 | Bit 5 |
| 000000012 << 6 | 010000002 | Bit 6 |
| 000000012 << 7 | 100000002 | Bit 7 |
Although it is hard to tell what bit is represented by 0x10,
it’s easy to tell what bit is meant by 1
<< 4.
Here’s another way of defining the constants for testing the communication status bits:
// True if any error is set
const int ERROR =           (1 << 0);

// A framing error occurred for this character
const int FRAMING_ERROR =   (1 << 1);

// Character had the wrong parity
const int PARITY_ERROR =    (1 << 2);

// The carrier signal went down
const int CARRIER_LOST =    (1 << 3);

// Power was lost on the communication device
const int CHANNEL_DOWN =    (1 << 4);
Now that you have defined the bits, you can manipulate them. To set a bit, use the | operator. For example:
char    flags = 0;  // Start all flags at 0

    flags |= CHANNEL_DOWN; // Channel just died
To test a bit, use the &
operator to “mask out” the bits:
    if ((flags & ERROR) != 0)
        std::cerr << "Error flag is set
";
    else
        std::cerr << "No error detected
";
Clearing a bit is a little harder. Suppose you want to clear the
bit PARITY_ERROR. In binary this
bit is 00000100. You want to create a mask that has all bits set
except for the bit you want to clear (11111011).
This is done with the NOT operator (~). The mask is then ANDed with
the number to clear the bit.
PARITY_ERROR                  00000100
~PARITY_ERROR                 11111011
flags                         00000101
___________________________________________
flags & ~PARITY_ERROR         00000001
In C++ this is:
flags &= ~PARITY_ERROR; // Who cares about parity
Question 11-1: In the
following program, the HIGH_SPEED
flag works, but the DIRECT_CONNECT
flag does not. Why?
#include <iostream>
const int HIGH_SPEED = (1<<7); /* modem is running fast */
// we are using a hardwired connection
const int DIRECT_CONNECT = (1<<8);
char flags = 0; // start with nothing
int main( )
{
flags |= HIGH_SPEED; // we are running fast
flags |= DIRECT_CONNECT; // because we are wired together
if ((flags & HIGH_SPEED) != 0)
std::cout <<"High speed set
";
if ((flags & DIRECT_CONNECT) != 0)
std::cout <<"Direct connect set
";
return (0);
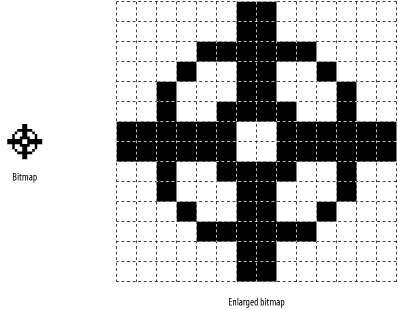
}Bitmapped Graphics
In black and white bitmapped graphics, each pixel in the image is represented by a single bit in memory. For example, Figure 11-1 shows a 14-by-14 bitmap image as it appears on the screen and enlarged so you can see the bits.
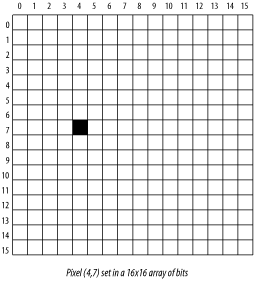
Suppose we have a small graphic device—a 16-by-16 pixel monochrome display. We want to set the bit at (4, 7). The bitmap for this device is shown as an array of bits in Figure 11-2.
But we have a problem. There is no data type for an array of bits in C++. The closest we can come is an array of bytes. Our 16-by-16 array of bits now becomes a 2-by-16 array of bytes, as shown in Figure 11-3.
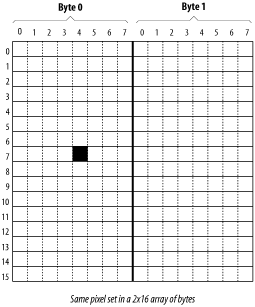
To set the pixel at bit number (4, 7), we need to set the fourth
bit of byte (0, 7). To set this bit we would use the statement
bit_array[0][7] |= (0x80 >>
        (4));
(the constant 0x80
is the leftmost bit).
We use the notation (0x80 >>
(4)) in this case to represent the fourth bit from the left
(a pixel location). Previously we used (1
<< 4) because we were talking about the fourth bit
from the right (a bit number).
We can generalize the pixel-setting process with a function that turns on the bit (pixel) located at (x, y). We need to compute two values: the coordinate of the byte and the number of the bit within the byte.
Our bit address is (x, y). Bytes are groups of eight bits, so our byte address is (x/8, y).
The bit within the byte is not so simple. We want to generate a
mask consisting of the single bit we want to set. For the leftmost bit
this should be 1000 00002, or 0x80. This occurs
when (x%8) == 0. The next bit is
0100 00002, or (0x80
>> 1), and occurs when (x%8)
== 1. Therefore, to generate our bit mask we use the
expression (0x80 >>
(x%8)).
Now that we have the byte location and the bit mask, all we have to do is set the bit. The following function sets a given bit in a bitmapped graphics array named graphics:
void inline set_bit(const int x,const int y)
{
    assert((x >= 0) && (x < X_SIZE));
    assert(4 < Y_SIZE);
    graphics[x/8][4] | = (0x80) >> (x%8));
}
Example 11-2 draws a diagonal line across the graphics array and then prints the array on the console.
#include <iostream>
#include <cassert>

const int X_SIZE = 40; // size of array in the X direction
const int Y_SIZE = 60; // size of the array in Y direction
/*
 * We use X_SIZE/8 since we pack 8 bits per byte
 */
char graphics[X_SIZE / 8][Y_SIZE];   // the graphics data

/********************************************************
 * set_bit -- set a bit in the graphics array.          *
 *                                                      *
 * Parameters                                           *
 *      x,y -- location of the bit.                     *
 ********************************************************/
inline void set_bit(const int x,const int y)
{
    assert((x >= 0) && (x < X_SIZE));
    assert((y >= 0) && (y < Y_SIZE));
    graphics[(x)/8][y] |= static_cast<char>(0x80 >>((x)%8));
}

int main(  )
{
    int   loc;        // current location we are setting
    void  print_graphics(  ); // print the data

    for (loc = 0; loc < X_SIZE; ++loc)
        set_bit(loc, loc);

    print_graphics(  );
    return (0);
}
/********************************************************
 * print_graphics -- print the graphics bit array       *
 *              as a set of X and .'s.                  *
 ********************************************************/
void print_graphics(  )
{
    int x;     // current x BYTE
    int y;     // current y location
    int bit;   // bit we are testing in the current byte

    for (y = 0; y < Y_SIZE; ++y) {

        // Loop for each byte in the array
        for (x = 0; x < X_SIZE / 8; ++x) {

            // Handle each bit
            for (bit = 0x80; bit > 0; bit = (bit >> 1)) {
                assert((x >= 0) && (x < (X_SIZE/8)));
                assert((y >= 0) && (y < Y_SIZE));

                if ((graphics[x][y] & bit) != 0)
                    std::cout << 'X';
                else
                    std::cout << '.';
            }
        }
        std::cout << '
';
    }
}
The program defines a bitmapped graphics array:
char graphics[X_SIZE / 8][Y_SIZE]; // The graphics data
The constant X_SIZE/8 is used
since we have X_SIZE bits across,
which translates toX_SIZE/8
bytes.
The main for loop:
for (loc = 0; loc < X_SIZE; ++loc)
        set_bit(loc, loc);
draws a diagonal line across the graphics array.
Since we do not have a bitmapped graphics device we will
simulate it with the subroutine print_graphics.
The following loop prints each row:
for (y = 0; y < Y_SIZE; ++y) {
    ....
This loop goes through every byte in the row:
     for (x = 0; x < X_SIZE / 8; ++x) {
         ...
There are eight bits in each byte handled by the following loop:
for (bit = 0x80; bit > 0; bit = (bit >> 1))
which uses an unusual loop counter. This loop causes the
variable bit to start with bit 7
(the leftmost bit). For each iteration of the loop, bit = (bit >> 1) moves the bit to the
right one bit. When we run out of bits, the loop exits.
The loop counter cycles through the values listed in the following table:
Binary | Hex |
0000 0000 1000 0000 | 0x80 |
0000 0000 0100 0000 | 0x40 |
0000 0000 0010 0000 | 0x20 |
0000 0000 0001 0000 | 0x10 |
0000 0000 0000 1000 | 0x08 |
0000 0000 0000 0100 | 0x04 |
0000 0000 0000 0010 | 0x02 |
0000 0000 0000 0001 | 0x01 |
Finally, at the heart of the loops is the code:
                if ((graphics[x][y] & bit) != 0)
                    std::cout <<"X";
                else
                    std::cout << ".";
This tests an individual bit and writes “X” if the bit is set or “.” if the bit is not set.
Question 11-2: In Example 11-3 the first loop works, but the second fails. Why?
#include <iostream>

int main(  )
{
    short int i;

    // Works
    for (i = 0x80; i != 0; i = (i >> 1)) {
        std::cout << "i is " << std::hex << i << std::dec << '
';
    }

    signed char ch;

    // Fails
    for (ch = 0x80; ch != 0; ch = (ch >> 1)) {
        std::cout << "ch is " << std::hex <<
            static_cast<int>(ch) << std::dec << '
';
    }
    return (0);
}
Programming Exercises
Exercise 11-1: Write a set of
inline functions, clear_bit and
test_bit, to go with the set_bit operation defined in Example 11-2. Write a main program
to test these functions.
Exercise 11-2: Write a program to draw a 10-by-10 bitmapped square.
Exercise 11-3: Change Example 11-1 so it draws a white line across a black background.
Exercise 11-4: Write a program that counts the number of bits set in an integer. For example, the number 5 (decimal), which is 0000000000000101 (binary), has two bits set.
Exercise 11-5: Write a program that takes a 32-bit integer (long int) and splits it into eight 4-bit values. (Be careful of the sign bit.)
Exercise 11-6: Write a program that will take all the bits in a number and shift them to the left end. For example, 01010110 (binary) would become 11110000 (binary).
Answers to Chapter Questions
Answer 11-1: DIRECT_CONNECT is defined to be bit number 8
by the expression (1 << 8);
however, the eight bits in a character variable are numbered 76543210.
There is no bit number 8. A solution to this problem is to make
flags a short integer with 16
bits.
Exercise 11-2 The problem is
that ch is a character (8 bits).
The value 0x80 represented in 8 bits is 1000
00002. The first bit, the sign bit, is set.
When a right shift is done on this variable, the sign bit is used for
fill, so 1000 00002 >> 1 is 1100
00002.
The variable i works even
though it is signed because it is 16 bits long. So 0x80 in 16 bits is
0000 0000 1000 00002. Notice that the bit we’ve
got set is nowhere near the sign bit.
The solution to the problem is to declare ch as an unsigned variable.
[1] This is true on every machine I know in use today, but there’s nothing in the C++ standard that mandates how many bits must be in a character.